Burda Download-Pattern
Skirt Easy Fashion 9177- Instructions
Sizes 34, 36, 38, 40, 42, 44
Skirt Length about 21 ” (55 cm)
Upper waistband = Waistline
You Will Need:
Tafetta, 51” (130 cm) wide:
Sizes 34, 36: 49” (1.25 m)
Sizes 38, 40, 42, 44: 59” (1.5 m)
8” (0.2 m) iron-on interfacing for fabric
1 Seam Zipper, 8 ” (22 cm)long
Special zipper foot for sewing machine
Thread
Fabric recommendation:
Heavy Weight Fabrics
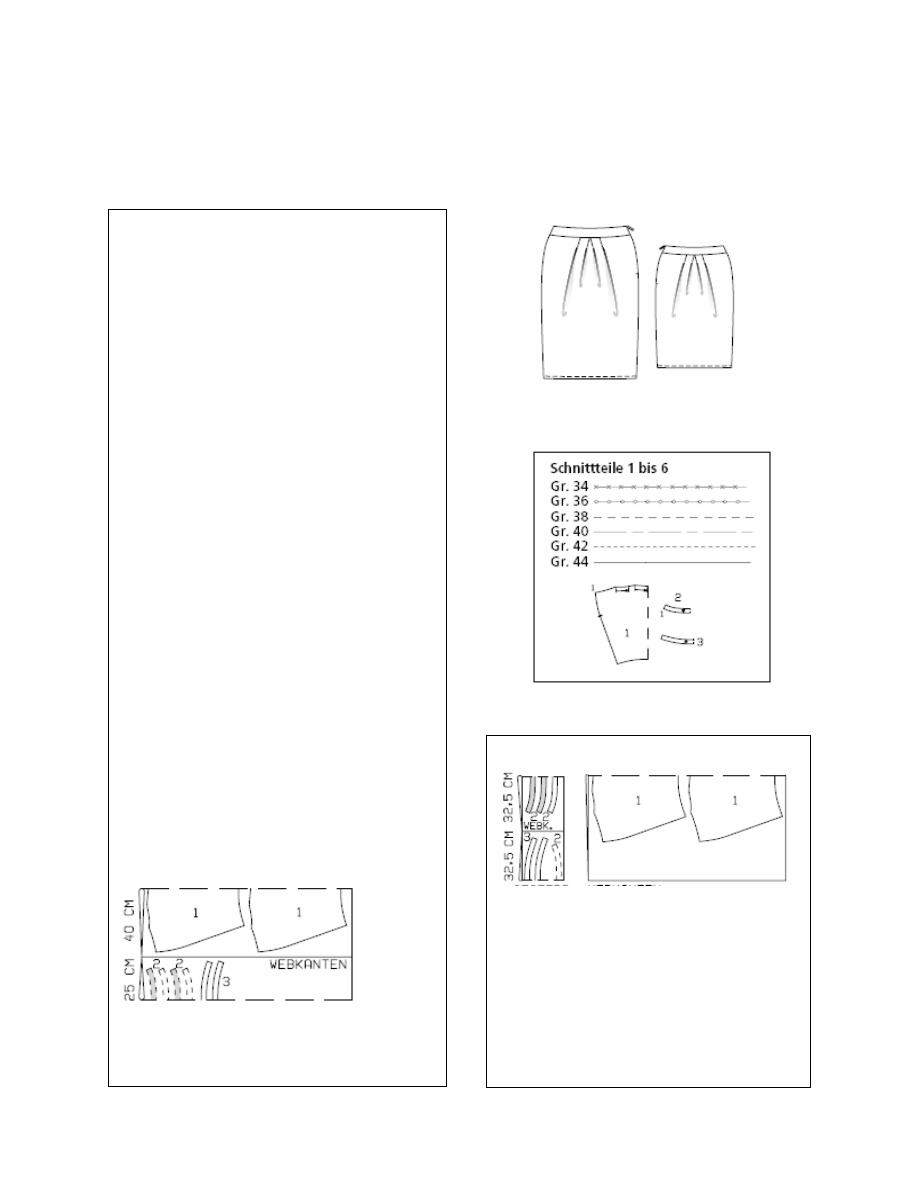
Cutting the Print Outs:
The pattern pieces are printed onto 8 sheets
of paper, each with a thin frame. Wait until all sheets
have printed. Arrange the pattern sheets according to the
layout provided. Cut each sheet at the upper and right
edge along the thin frame lines. Start with the lower left
sheet and glue the sheets together neatly at the thin frame
line.
Choose your size according to the Burda size chart:
Dresses, blouses, jackets and coats according to
your bust size. Pants and skirts according to your hip size.
If necessary, change the paper pattern so that it reflects
the number of inches that your measurements differ
from the measurement chart.
Cut the pattern pieces for the design you wish to sew
according to your size.
Tip: You can make cutting easier,
if you additionally trace pattern pieces 1 and 3 once each
and pattern piece 2 three times each.
Pattern Layout
Tafetta, 130cm wide
Sizes 34 and 36
Fold
Fold
Sizes 38 to 44
Fold Selvage
Fold Selvage
Fold fabric according to pattern layout, right side is
facing inside.
Cutting
The cutting layouts below show how to arrange the
pattern pieces on the fabric. Make sure that the grain of
the fabric runs parallel with the selvage of the fabric.
Important:
The pattern pieces include seam allowances of 1.5 cm.
Skirt Fabric
1 Front Skirt Piece at Fold
1x
2 Back Skirt Piece at Fold
1x
2 Front Waistband at Fold
2x
2 Back Waistband at Fold
2x
3 Front Seam Facing at Fold
1x
3 Back Skirt Facing at Fold
1x
Interfacing
All parts that are depicted as grey areas in the pattern layout,
should be cut from lining with the same grain as the fabric parts.
Iron the interfacing onto the wrong side of the outer waistband
pieces and the outer flap pieces.
Transferring Pattern Markings onto the Fabric
Transfer the lines and markings of the pattern, except the grain,
onto the wrong side with the fabric with a tracing wheel and
Burda tracing paper (see instructions that come with tracing
paper).
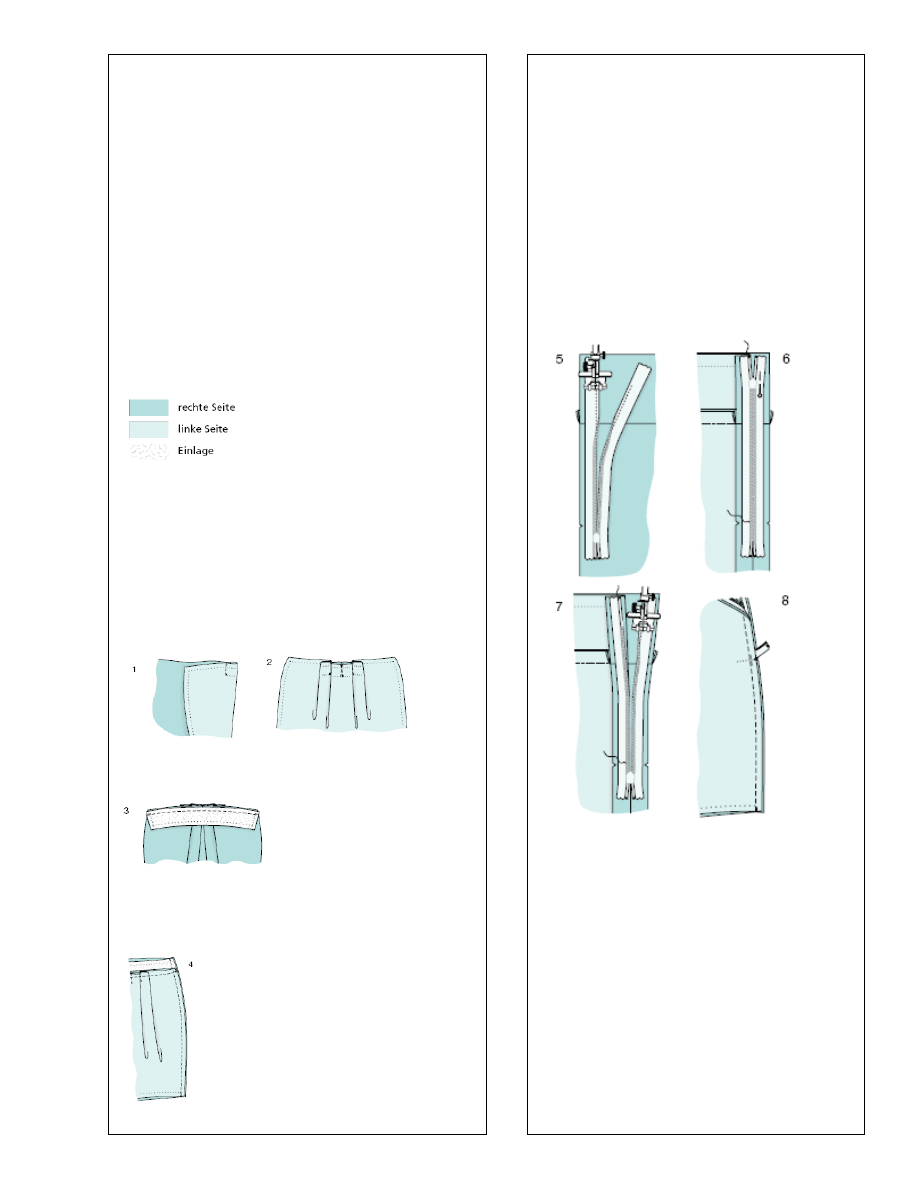
Sewing
When pinning and stitching the seams, the right sides of the
fabric are facing. Seam allowance is 5/8” (1.5 cm )wide. Secure
the seam beginning and end with reverse stitches
1.) Pleats
Lay and stitch the pleats one by one, starting at a pleat at the side.
Fold the skirt so that the fold lines of the first pleat meet, right
sides facing. Pin the pleat lines onto each other from the top
ending at the arrow line. Stitch. Secure seam beginning and end
(1). Then lay The other pleats in the same manner and stitch.
Press the fold towards the side seams (2). Pin the pleats to the
upper edges of the skirt.
2.) Stitching the Outer Waistband
Pin the reinforced waistbands right sides facing onto the upper
skirt edge. Stitch (3).Trim seam allowances and press the
waistband flat.
3.) Right Side Seam
Place skirt pieces onto top of each other right sides facing, pin
the right side seam. Stitch. (4) Fold apart and iron seam
allowances.
4.) Seam zipper, Left Side Seam
Match left side seams and mark the end of the slit where
the zipper will be inserted as depicted in the pattern with
a notch. Open the zipper and press the zipper coil flat
with your thumbnail so that the part of the seam between
the band and the coil is visible.
Place the open zipper facing up onto the right side of the
fabric at the back slit edge. The distance of the zipper
band’s edge to the seam allowance edge should be 1/8”
(5mm) (= seam allowances width minus 1 cm zipper band
width). Pin the upper zipper end to the seam allowance
edge. The bottom end of the zipper should overlap the
marked slit ending.
Place the sewing foot of your sewing machine onto the
zipper so that the zipper coil is in the dent next to the
needle (5).
Stitch the zipper starting at the top until you get to
the slit marking. Close the zipper. Place the second
zipper band facing up onto the front slit edge and pin at
the top (6). Open the zipper again. Place the sewing foot
onto the upper end of the zipper, so that the coil lies in the
dent left of the needle. Stitch the zipper starting at the top
until you reach the slit marking, then close the zipper.
Below the zipper place the skirt pieces onto each other
right sides facing. Pin the let side seam from bottom until
you reach the slit marking, placing the loose bottom end
of the zipper toward the seam allowance. Stitch seam
(8),
Using the zipperfooot, sew as close as possible next to or
below the last stitches of the zipper seams. Fold apart and
iron the seam allowances, sew to the lower skirt edge.

5.) Doubling the Waistband (Turning it Over)
Stitch a side seam at the remaining waistband pieces. Fold
apart and iron seam allwances. Pin the waistband piece
without interfacing right sides facing onto the upper edge of
the waistband piece with interfacing, seams meet. Fold the side
edges of the waistband piece without interfacing to the outside
at about 5mm from the slit edge. Fold the slit seam allowances
of the waistband piece with interfacing to the outside, pin (9).
Stich along the upper waistband edge, trim seam allowances
back to 4mm width. Turn the waistband piece without
interfacing and slit seam allowances over to the inside. Iron
edge, fold in and pin the waistband piece without interfacing
above the waistband’s base seam, sew onto the zipper bands
(10). Stitch neatly around the waistband.
6.) Turning Over the Lower Skirt Edge
Place seam facing onto each other right sides facing, stitch side
seams. Fold apart and iron seam allowances. Match upper
seam edges, pin the facing right sides facing onto the lower
skirt edge. Side seams meet. Stitch (11).Trim the seam
allowances back to 4mm and fold apart, iron. Pin the facing
over to the inside, iron the edge. Stitch neatly allowing 7 mm.
Sew the inner edge of the facing loosely to the skirt by hand
(12).
Wyszukiwarka
Podobne podstrony:
Laurelle Jeans Skirt instructions
Michelle Skirt Instructions
Vanessa Skirt instructions
Sidonie aline skirt instructions
alma skirt instructions
6012 Skirt Kasia Instructions
high waisted skirt pattern instructions
132 Skirt drafting and sewing instructions original
wykład 6 instrukcje i informacje zwrotne
Instrumenty rynku kapitałowego VIII
05 Instrukcje warunkoweid 5533 ppt
Instrukcja Konwojowa
2 Instrumenty marketingu mix
Promocja jako instrument marketingowy 1
więcej podobnych podstron