
Player Operation User’s Manual
Version 2.1.0.1

Table of Contents
Color Setting ..................................................................................10
Function Setting.............................................................................11
Playback File from Forensic DVR .........................................................15

Welcome
Thank you for using our player!
This user’s manual is designed to be a reference tool for the installation and operation of
your system!

1 General Introduction
This player is a tool to play video file. It supports snapshot and can save a section of the
video to a file.
It has the following features:
z Support various function: Play/Pause/Stop/Slow play/Fast play/Repeatedly
play/Snapshot/Frame by frame play/Record and etc.
z You can drag the process bar to adjust play position.
z Support fast forward and fast backward.
z Support various languages.
z Support the file from forensic DVR.

2 Environment
Player has the following hardware requirement:
z Memory: Min 512M.
z HDD: Min 4G.
z OS: Microsoft windows XP\2000\2003\Me.
3 Installation
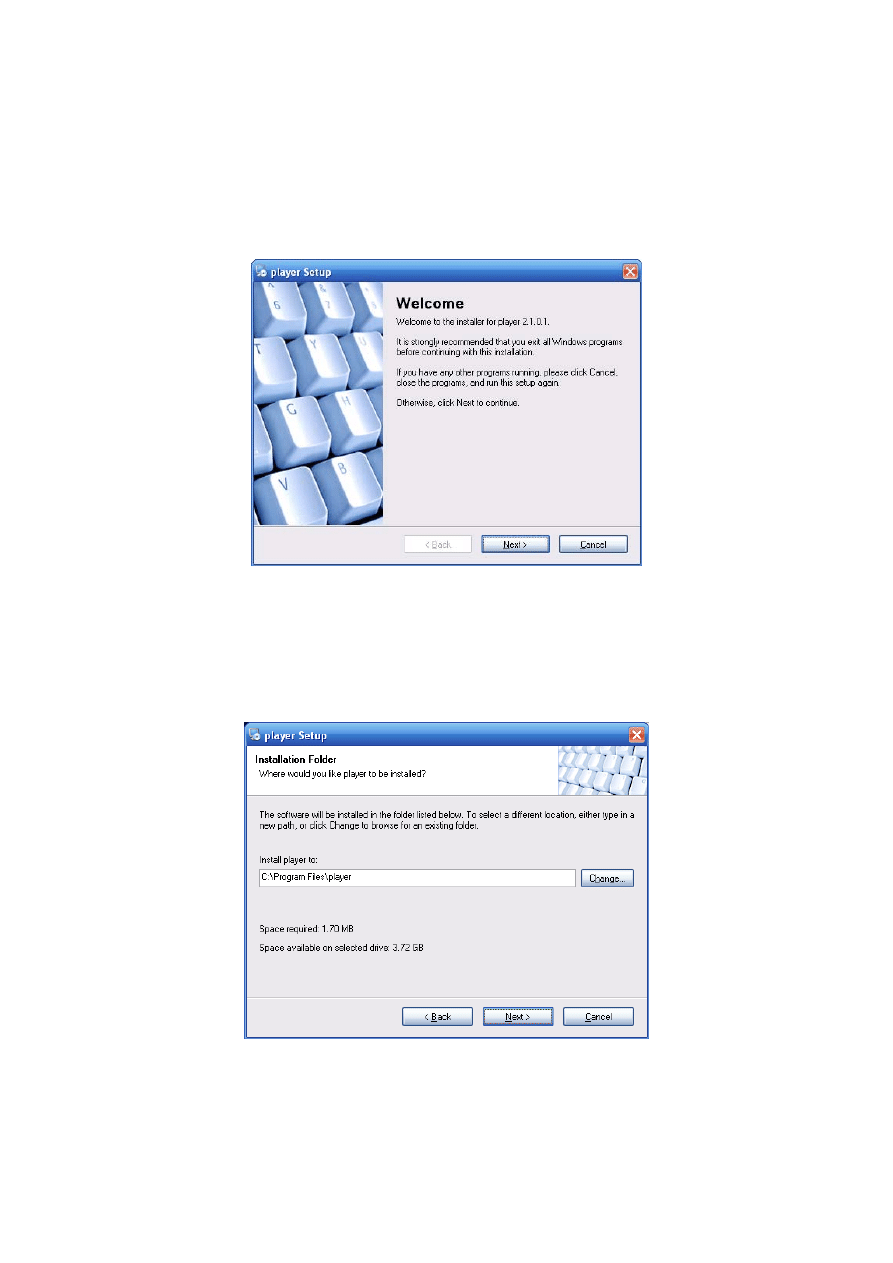
Please follow the steps listed below to complete installation.
Click General_Player_Eng_V2.1.0.1.R.091203.exe file, system begins installation. See
Please click next button to continue.
Figure 3-1
Now you can see an interface is shown as in Figure 3-2.
You can click browser to modify installation directory. Default path is C:\Program
Files\Player.
Please click next button to continue.
Figure 3-2
You can see the following interface. See Figure 3-3.
Please click next button to continue.
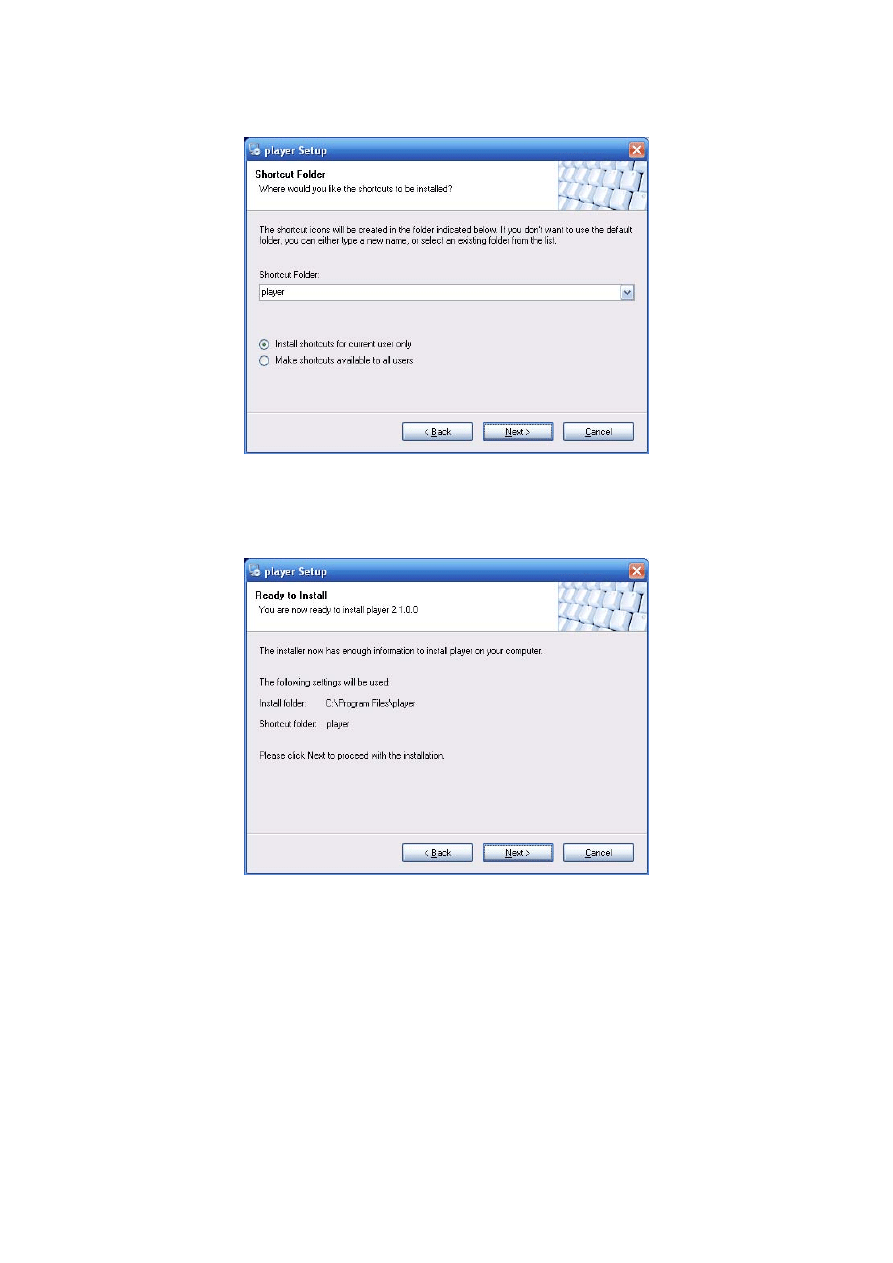
Figure 3-3
The interface is shown as in Figure 3-4.
Please read the installation information and then click next button to continue.
Figure 3-4
Please wait while system is in installation process. See Figure 3-5.
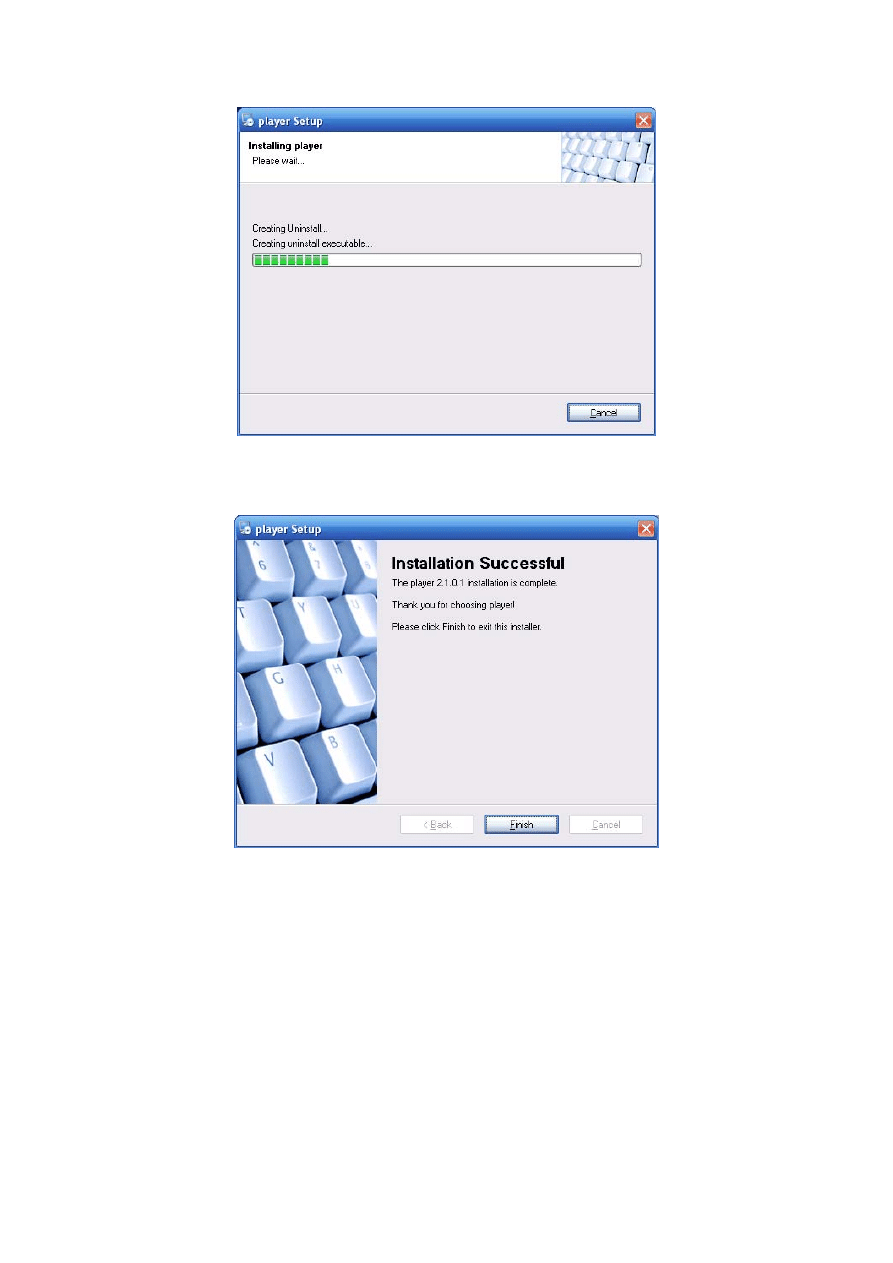
Figure 3-5
After installation, the interface is shown as below. See Figure 3-6.
Figure 3-6
Please click finish button to complete the installation.
Note:
Program automatically creates shortcut menu in the Start and desktop.
4 Operation
4.1 Main Interface
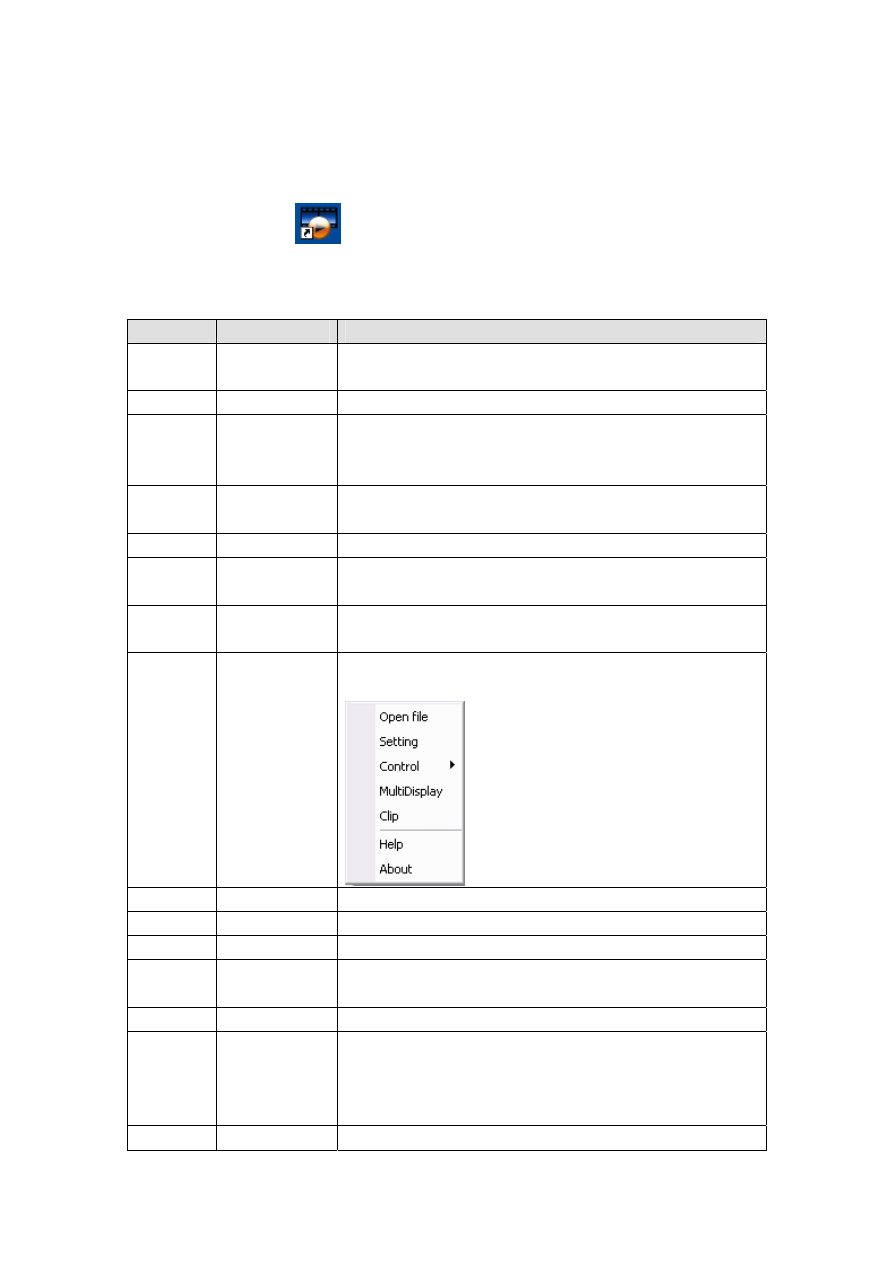
You can click the icon
in the installation path or the desk to open the player
interface.
In player interface, there are following items. See Figure 4-1.
SN
Name
Function
1 Play
process
bar
Here you can view current play process. You can left click
your mouse and then drag it to control play process.
2
Play time
Display current play time and file total time.
3
AVI convert
You can use this function to convert .dav,.mp4,.264 file
to .avi format. Supports convert multiple files at the same
time.
4
Full screen
You can click it to switch between full screen and standard
screen.
5
Play sequence There are two modes for you to select: shuttle and repeat.
6
Language
You can click here to switch between various languages.
Right now system only supports English interface.
7 Software
version
Here you can view current player version information.
8
Menu
The setup menu including
Open file/setting/control/multiple play/clip/help/about.
9
Minimize
You can click to minimize player interface.
10
Close
You can click it to close player interface.
11
Open
You can click it to select corresponding file to play.
12
Play/Pause
Click it once, you can pause current play. Click it again
system resume play.
13
Stop
Click it to stop current play.
14
Record
When you play the file, you can click it to record current
video. You can click stop button to complete record. The
recorded file is saved in your specified directory
(Menu-Setting-recorded path).
15
Previous file
Click it, you can view previous video file.
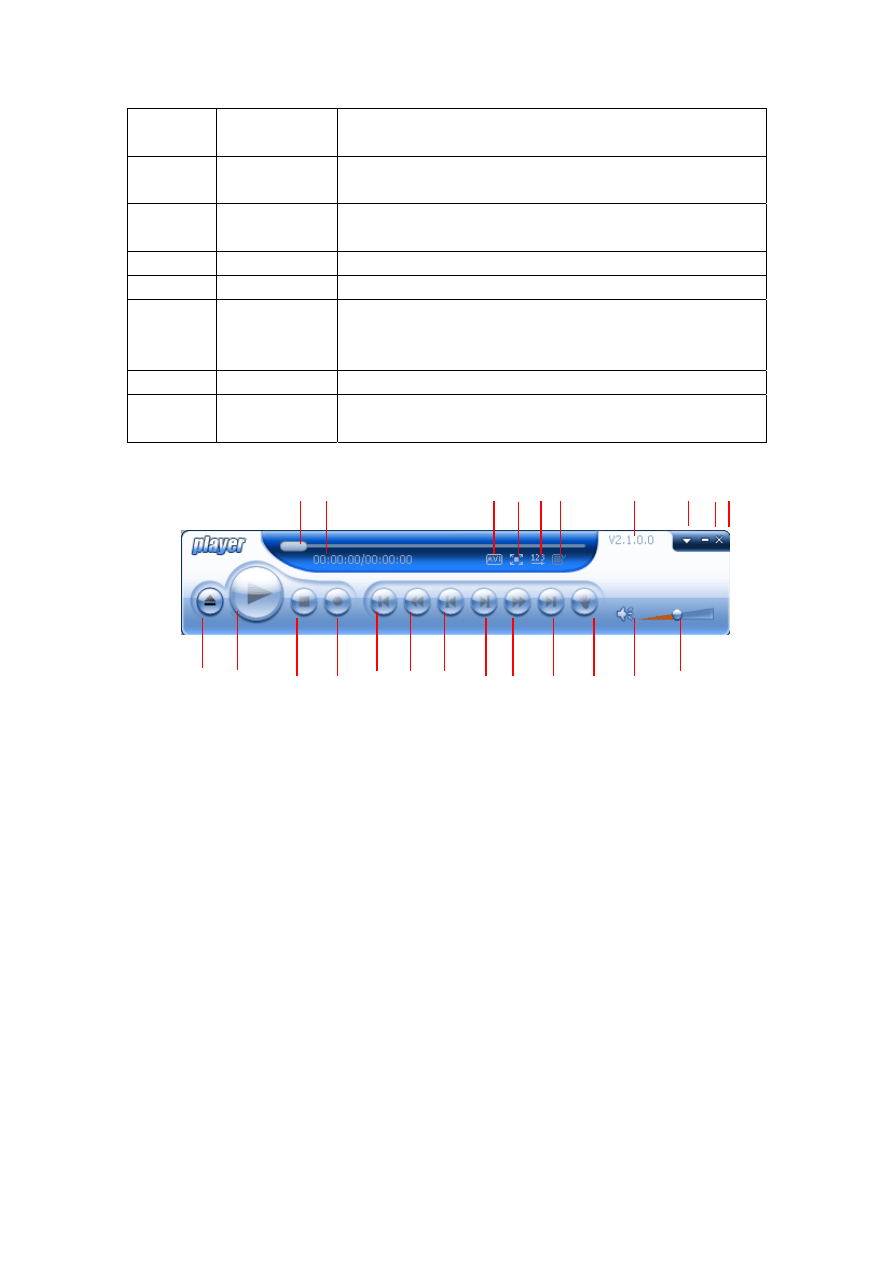
16 Fast
backward.
It includes:1/2x,1/4x,1/8x,1/16x
17 Backward
play
frame by frame
You can click it to realize frame by frame play. Click it once
system backward plays one frame.
18
Play frame by
frame
You can click it to realize frame by frame play. Click it once
system plays one next frame.
19
Fast forward
It includes:2x,4x,6x,8x.
20
Next
Click it you can view the next video file.
21
Snapshot
When you play the video file, you can click it to save current
video to the installation path as an image file.
(Menu-Setting-recorded picture path).
22
Volume.
Here you can enable or disable sound.
23 Volume
slide
bar
You can click it to adjust volume.
1
2
3 4
5
6
7 8 9
10
11 12 13 14 15
16 17 18 19 20 21 22
23
Figure 4-1
4.2 Setting
4.2.1 Color
Setting
During the play process, click the Menu button (Button 8 in Figure 4-1) and then click
setting item. The interface is shown as in Figure 4-2. Here you can drag the slide bar to
adjust video bright, contrast, saturation and hue.

Figure 4-2
4.2.2 Function
Setting
Select set button In Figure 4-2, the function setting interface is shown as in Figure 4-3.
Here you can set associated file, set open option and select the path to save the snapshot
image and recorded file.
Figure 4-3
4.3 Play File
Click open button (Button 11 in Figure 4-1), you can see an interface is shown as in Figure
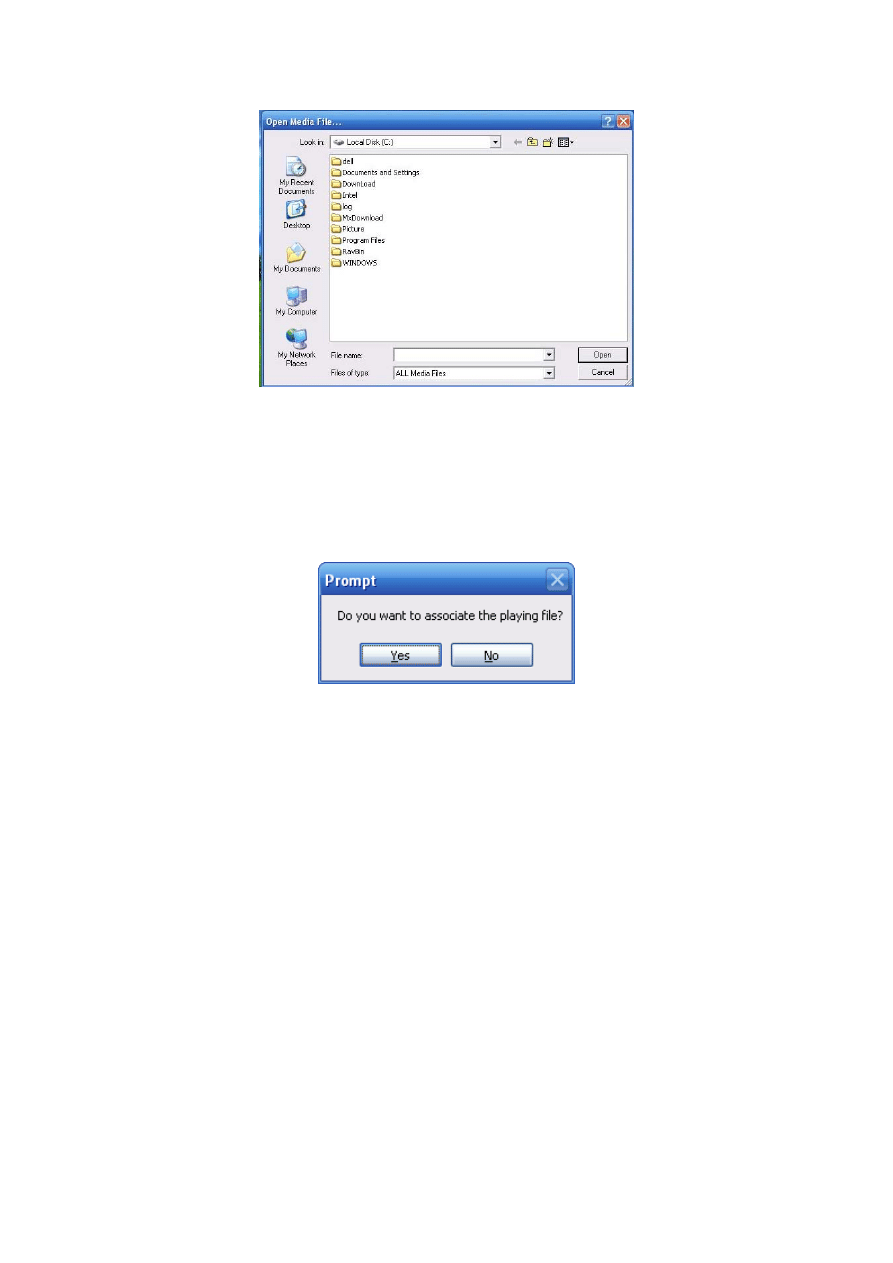
Figure 4-4
Please select the file and then click open button to begin play.
Or you can just select the file and then drag it to the player to play.
Important
If it is your first time to use player. Double click player icon, you can see the following
interface. See Figure 4-5.
Figure 4-5
If you click yes, you can double click to open all the files with extension name .dav. mp4,
mpeg.
4.4 AVI Convert
Click AVI convert button (Button 3 in Figure 4-1), you can click browser to select the file(s)
to be converted. The interface is shown as below. See Figure 4-6.
Click convert button you can begin the operation.
Important
You can select multiple files at the same time.
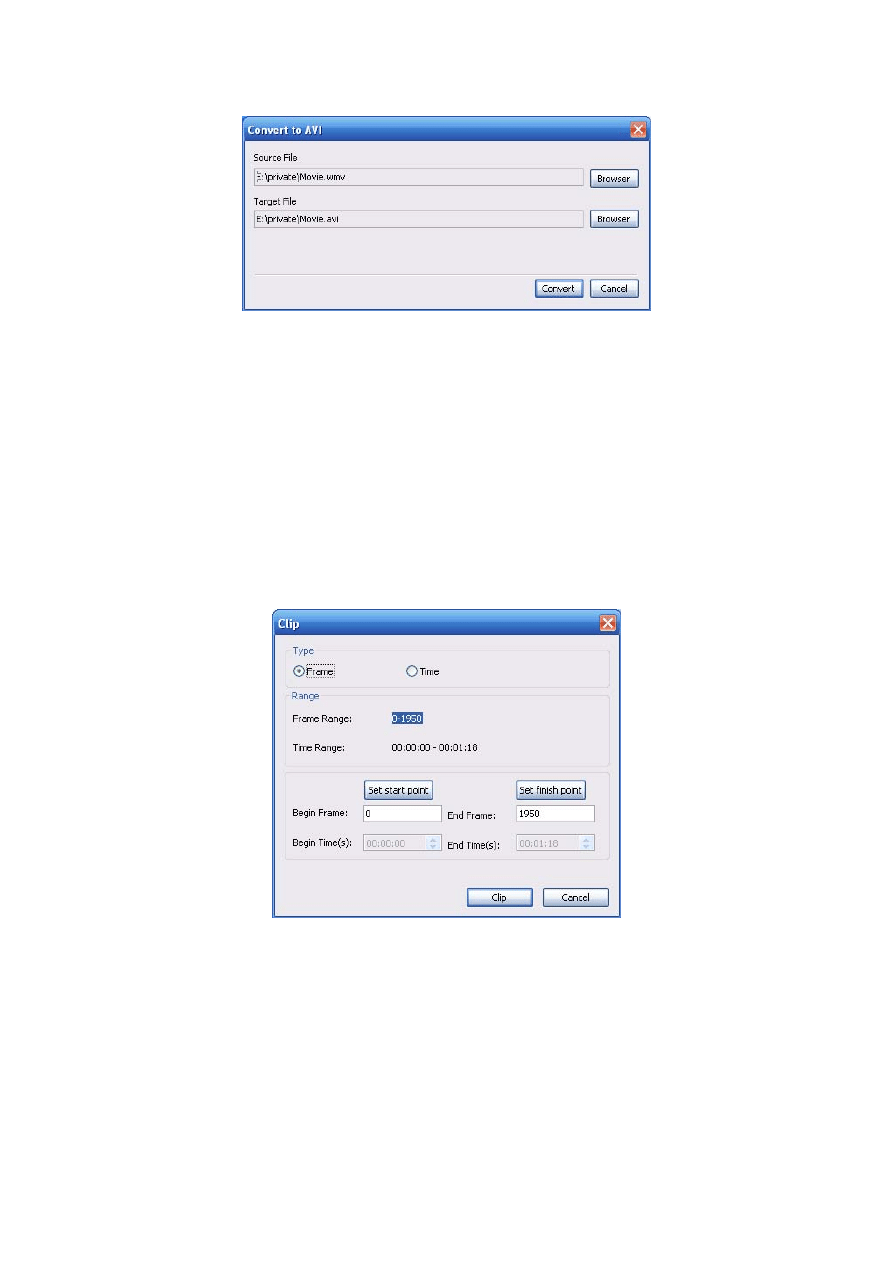
Figure 4-6
4.5 Clip
During the play process, click Menu button (Button 8 in Figure 4-1) and then select clip
item. Or you can right click the play window and then select the clip item (Figure 4-9). The
interface is shown as below.
Here you can set to clip according to frame (Figure 4-7) or the time (Figure 4-8).
You can input begin time and end time or you can drag the play slide bar to set the start
time and end time to set.
Click clip button, system pops up a dialogue box for you to input saved file name. Then
system begins clipping.
Figure 4-7
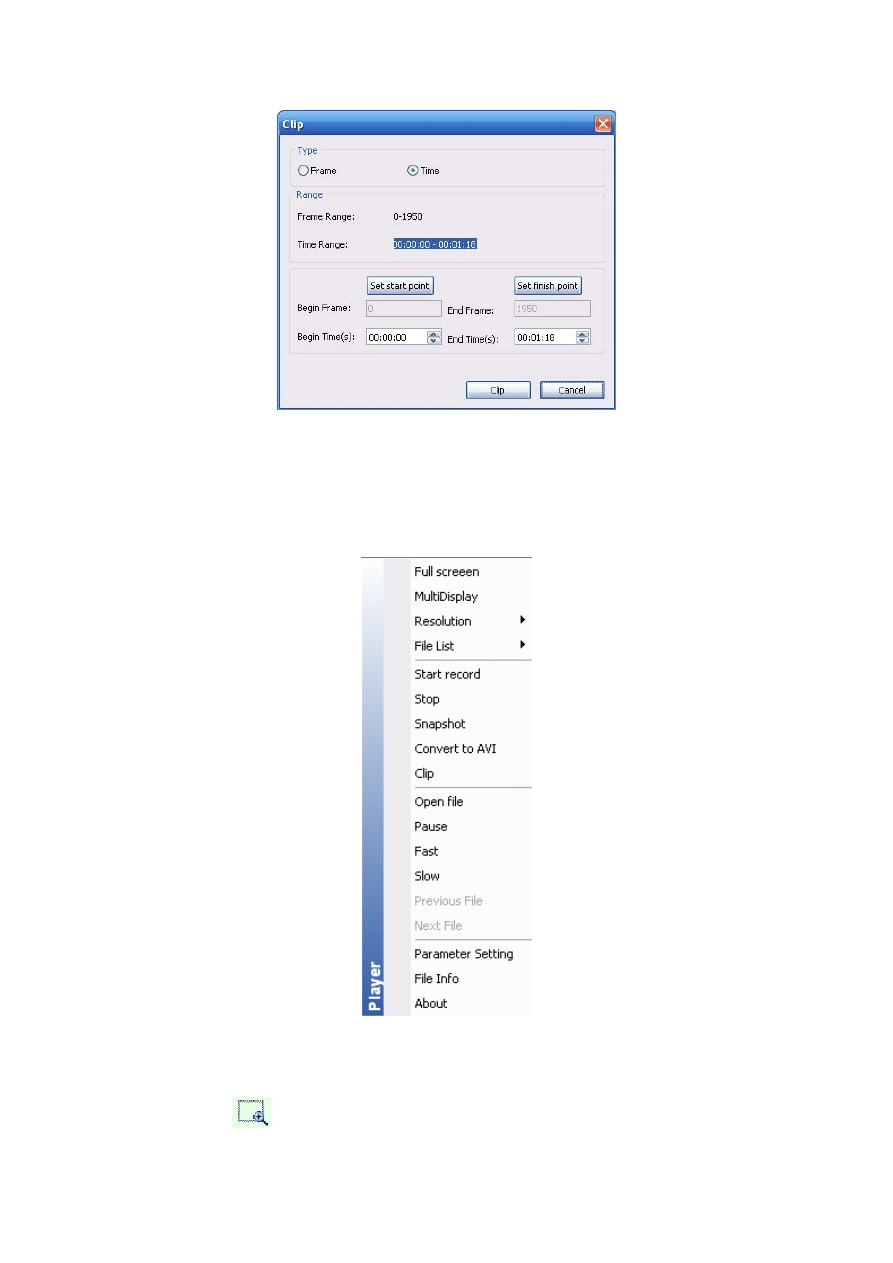
Figure 4-8
4.6 Multiple Display
During the play process, right click the play window, system pops up the following
interface. See Figure 4-9.
Figure 4-9
Select MultDisplay item, you can see the current play becomes paused and your mouse
icon becomes
.
Please drag the mouse in the screen to select a zone you want to play in detail. Then
double click the specified zone, you can see system pops up a new window to play the
zone. There are two play windows at the same time.
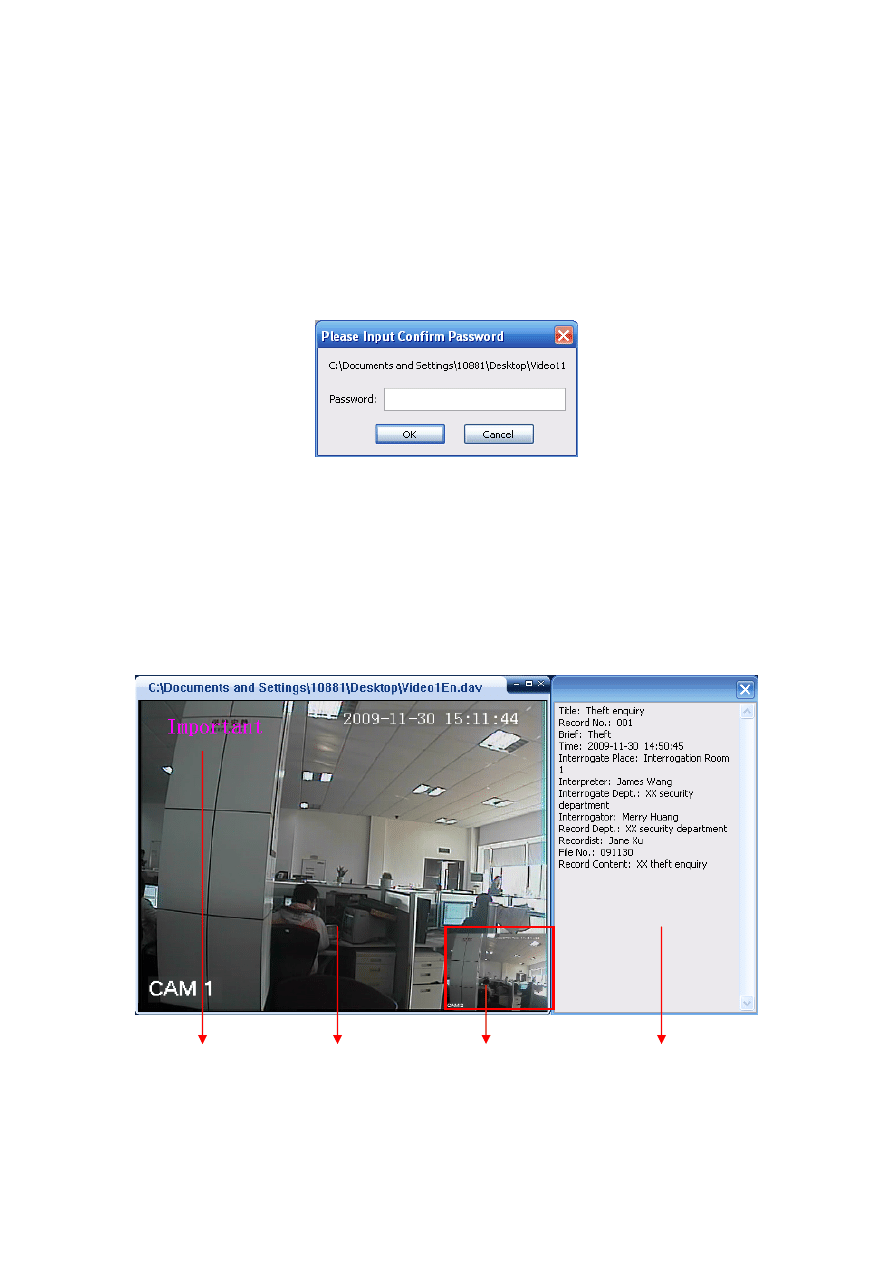
4.7 Playback File from Forensic DVR
When you play a file from the forensic DVR, system pops up the following dialogue box.
For security reasons, you need to input the proper password to playback the interrogation
file.
Figure 4-10
The playback interface is shown as below. See Figure 4-11.
You can view the corresponding information and view the detail interrogation content.
When there are data from two channels. There are two windows to playback at the same
time. Click the window, these two windows can switch.
You can view the heading content on the right side.
If the file contains the overlay information, the information can display for five seconds and
then disappear.
Overlay information Big window Small window File head information
Figure 4-11
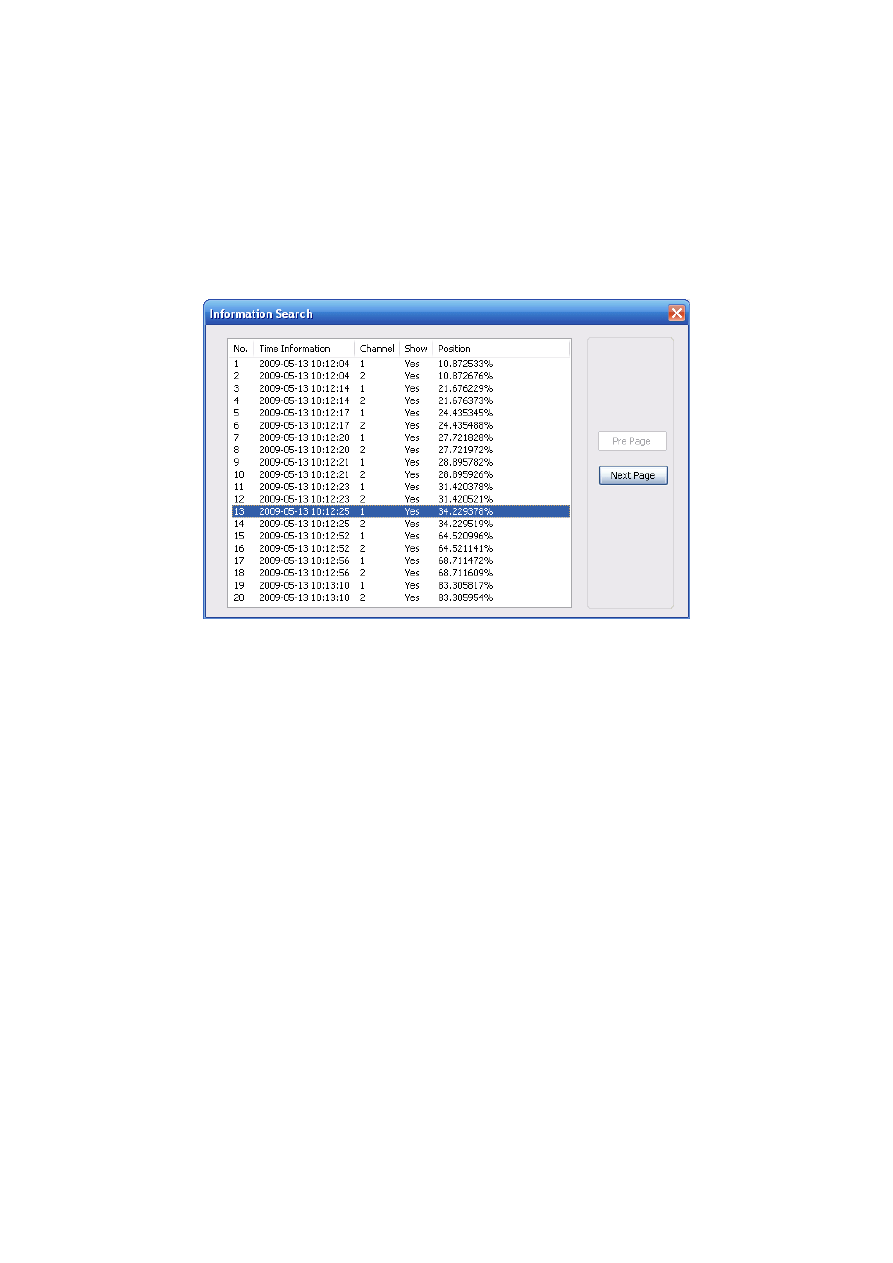
Right click mouse, you can see the shortcut menu has extra two options: information
search and elisor information (You can refer to Figure 4-9).
When the heading window is closed, you can click elisor information to view again.
Click information search button, the interface is shown as below. See Figure 4-12.
Here you can view the mark information list during the interrogation. You can conveniently
know the title overlay time and channel.
Click one item; the player can go to the corresponding time and then play. The selected
video will be displayed in the larger window by default.
Figure 4-12
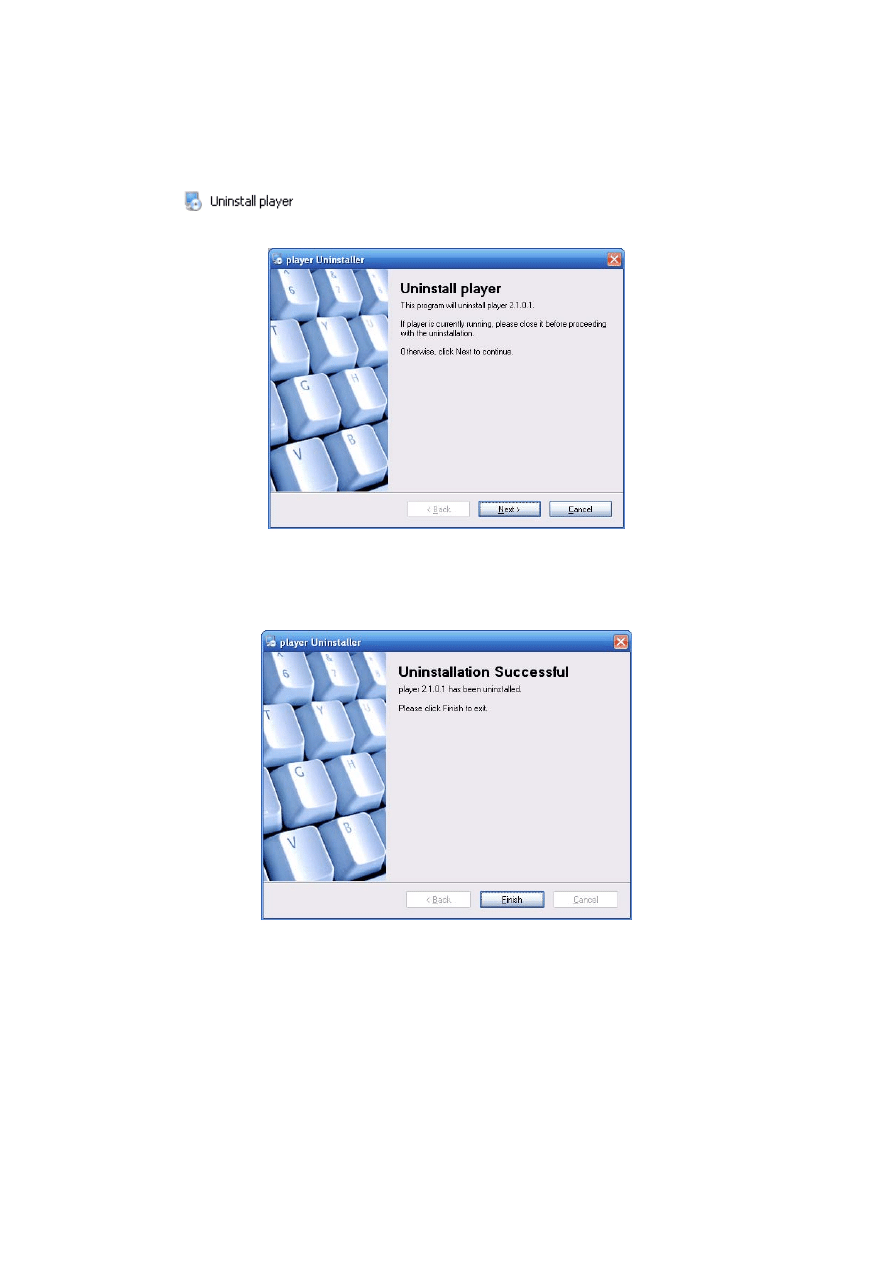
5 Un-installation
From the installation path, or from the Start->All program, you can find the un-installation
button
. Double click it you can see the following dialogue box. See
Figure 5-1
Click next button, you can see system begins un-installation.
After un-installation, you can see an interface is shown as below. See Figure 5-2.
Figure 5-2
Click finish button, you can complete the un-installation.
Note
• This manual is for reference only. Slight difference may be found in the user
interface.
• All the designs and software here are subject to change without prior
written notice.

• Please visit our website or contact your local service engineer for more
information.
Document Outline
Wyszukiwarka
Podobne podstrony:
Player Operating Manual
cas test platform user manual
CARPROG Opel ECU programmer user manual
elm327 interface viecar obd2 bluetooth scanner user manual
autel power scan ps100 user manual
Chartplanner user manual
INPA User manual
all100 user manual
CARPROG user manual
FX2N 485 BD User's Manual JY992 Nieznany
mb sbc tool user manual
07 Altistart48 user manual
iphone user manual pdf
PRDM 0010 Upgrade user manual UPG 0001
TK105 GPS Tracker User Manual
ATDSK1118 User Manual
FX2N 232 IF User's Manual JY992D66701
Protek 3502C USER MANUAL
więcej podobnych podstron