HYPNOW SARL au capital de 13 000 € - RCS AIX 489 750 943 00016 – TVAIC : FR 49 489 750 943 – code APE 2899B
Siège social : Villa Mornaghia – Avenue Montfleuri – 13090 Aix en Provence – France
Fax +33 (0)811 480 213 - www.hypnow.fr –
hypnow@hypnow.fr
Heat Exchanger :
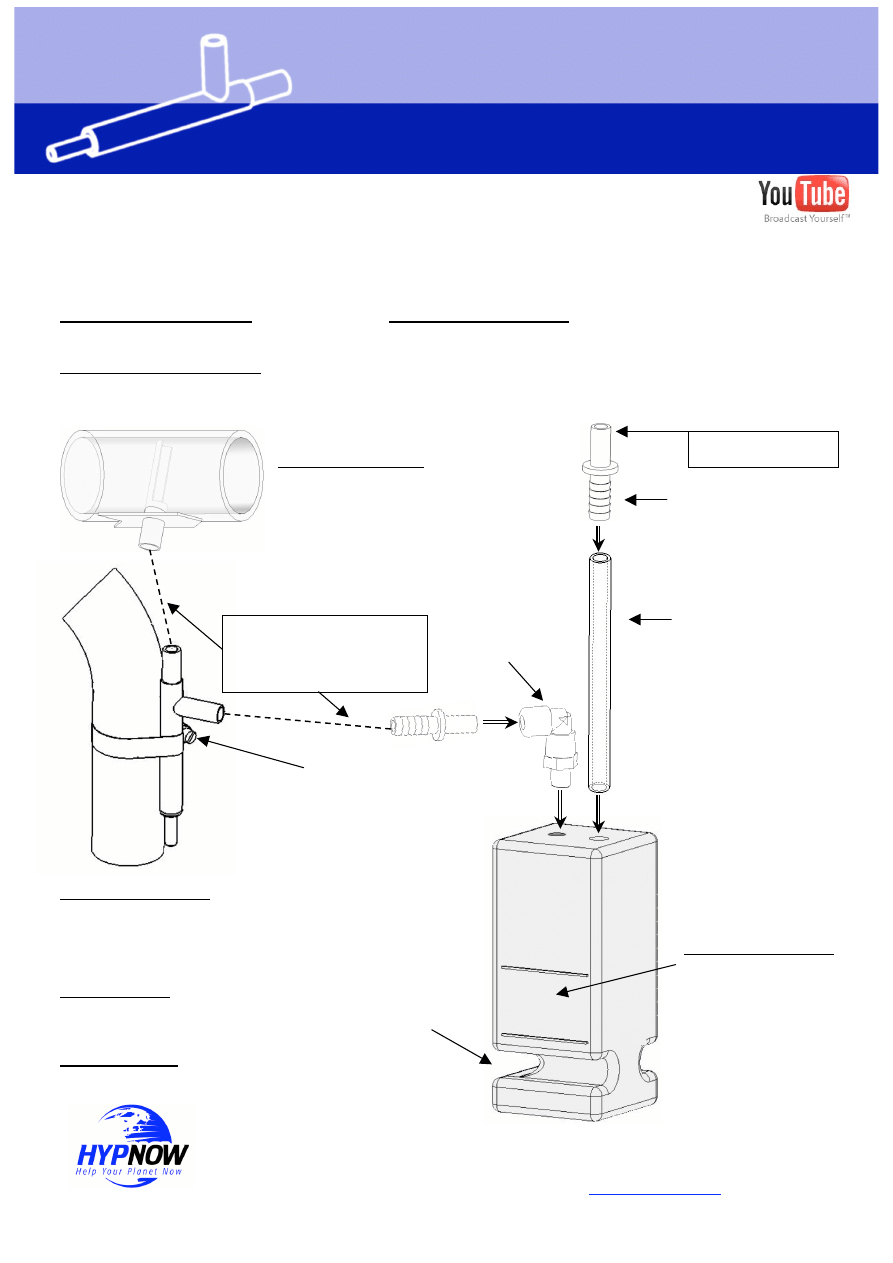
Bend engine coolant hose through this groove or mount the
Bubbler behind the radiator. Water temperature in Bubbler
should be between 20 and 50°C (70 and 120° F).
INSTALLATION MANUAL - VERSION BASIC
(version 5)
Demos on
Attention : the Retrokit Nano is not meant for on-road vehicles. Although fuel savers are allowed on vehicles, the increase
in power output is notable. In case o f installation on a vehicle, approval by any applicable government agency is strongly
advised, as is written approval by the insurance company providing coverage for such a vehicle. Respect the laws of
the country in which the Retrokit Nano is used.
FUEL SAVER
RETROKIT "NANO"
Precautions before installation:
Burn risk from skin contact with hot exhaust pipe: complete installation with engine cold.
Risk of cuts from sharp metal edges: use gloves, safety glasses, and any other safety equipment required
to protect installer during installation.
Tools needed for installation :
2 drill bitts - 6 and 12 mm, drill, Phillips
screwdriver, 10 mm wrench, knife.
Installing the Diffuser :
Drill one 12mm hole in the rubber air intake
pipe, between the air filter and the engine (or
before the turbo), push in the Diffuser and
orient the arrow in the direction of the air
flow (toward the engine). Clamp the Diffuser
with 2 plastic ties.
ATTENTION : remove the air intake pipe
before drilling and clean it well before
remounting.
Monunting the reactor :
Place the reactor along the exhaust pipe and fix it with a clamp (not
supplied, ask your dealer). The temperature of the exhaust pipe
should be between 200°C and 250°C maxi. If necessary, use a plate
between the reactor and the pipe (th. 0,5mm, steel, aluminium or
copper).
* Quality of water :
Use non-calcytic, slightly acidic (pH < 6.5) clean water.
Rain water works well.
Precautions before startup :
Tighten all clamps, and the Bubbler attachment, check the orientation of the
Diffuser. Prevent pinching or kinking of silicone tubes.
Setting the water level :
Adjust the water leve
between mini and maxi to
see an appropriate
"bubbling" that suits the
nomal rpm of the engine.
Silicone Tube (supplied)
cut and slid in Bubbler,
length 19 cm. Held in
place by barb fitting
(supplied)
Silicone Tube (supplied) for
connections :
- reactor / diffuser
- bubbler / reactor (max dist 1m)
Bubbler Air Intake.
Install air filter for dusty
conditions.
Ask
your
distributor for advice.
Elbow fitting on
Bubbler
Reactor
NANO
E
xh
a
u
st
p
ip
e
Diffuser
Translucent
bubbler
Mini
Maxi
Clamp (non supplied)
Fill water* here
WITH ENGINE OFF
Wyszukiwarka
Podobne podstrony:
Notice NANO PRO GB V3
PL AmethystT191 L3 C A4 V5 2
Plaquette NANO PRO GB V3
3 ABAP 4 6 Basic Functions
Amadeus Basic Podręcznik szkoleniowy
Basic Shed
BASIC MALTESE GRAMMAR AND DIC (G Falzon)
Notice V1
Kolos Nano id 242184 Nieznany
500 GB Free Transferu
basic model
Basic Radiation Physics
podciag a4
BASIC MILITARY REQUIREMENTS 24
2013.09.17 FORMATKA RYSUNKOWA A4
A4, Akademia Morska -materiały mechaniczne, szkoła, Mega Szkoła, PODSTAWY KON, Program do obliczeń P
tab imip a4, AiR WIP, IV semestr, PRZTS Przetwórstwo tworzyw sztucznych, projekt
Basic Codes HTML
K 4 Pręt p1 A4
więcej podobnych podstron