856-124262-001-A
N8151-32B
ඤ௬ DVD-RAM ౾
Built-In DVD-RAM Unit
䝴䞊䝄䞊䝈䜺䜲 䝗
User's Guide
x
〇ရ䜢 䛤 ⏝䛻䛺䜛 ๓䛻ᚲ䛪ᮏ᭩䜢 䛚ㄞ䜏䛟 䛰䛥 䛔䚹
ᮏ᭩䛿⇍ㄞ䛾ୖ䚸 ษ䛻ಖ⟶䛧 䛶䛟 䛰䛥 䛔䚹
x
Make sure you read this manual before using the product. After
reading this manual carefully, store it in a safe place.

ၟᶆ䛻䛴䛔䛶
Trademarks
ᮏ᭩䛻グ㍕䛥 䜜䛶䛔䜛♫ྡ䛚䜘䜃ၟရྡ䛿ྛ♫䛾ၟᶆ䜎䛯䛿Ⓩ㘓ၟᶆ䛷䛩䚹
Windows XP
䛿 Microsoft® Windows® XP Professional operating system 䛾␎⛠䛷䛩䚹
Windows 2000
䛿 Microsoft® Windows® 2000 Professional operating system 䛚䜘䜃 Microsoft®
Windows® 2000 Server, Microsoft® Windows® 2000 Advanced Server
䛾␎⛠䛷䛩䚹
The company and product names contained in this manual are trademarks or registered
trademarks of the respective companies.
Windows XP is an abbreviation for Microsoft
®
Windows
®
XP Professional operating system.
Windows 2000 is an abbreviation for Microsoft
®
Windows
®
2000 Professional operating
system, Microsoft
®
Windows
®
2000 Server, or Microsoft
®
Windows
®
2000 Advanced Server.
䝺 䞊䝄䞊Ᏻᇶ‽䛻䛴䛔䛶
Laser Safety Statements
ᮏ〇ရ䛿䚸 䝺 䞊䝄䞊䛻㛵䛩䜛 Ᏻᇶ‽(IEC 60825-1, EN60825-1)䜽 䝷 䝇䠍 䛻㐺ྜ䛧 䛶䛔䜎
䛩䚹
This product is classified as a CLASS 1 LASER PRODUCT and conforms to IEC 60825-1
and EN60825-1.
䛤 ὀព
䠄 1䠅 ᮏ᭩䛾ෆᐜ䛾୍㒊䜎 䛯䛿㒊䜢 ↓᩿㌿㍕䛩䜛 䛣 䛸 䛿⚗Ṇ䛥 䜜䛶䛔䜎 䛩䚹
䠄 2䠅 ᮏ᭩䛾ෆᐜ䛻㛵䛧 䛶䛿ᑗ᮶ண࿌䛺䛧 䛻ኚ᭦䛩䜛 䛣 䛸 䛜䛒䜚 䜎 䛩䚹
䠄 3䠅 ᘢ♫䛾チྍ䛺䛟 」〇䞉 ᨵኚ䛺䛹 䜢 ⾜䛖 䛣 䛸 䛿䛷䛝 䜎 䛫䜣䚹
䠄 4䠅 ᮏ᭩䛿ෆᐜ䛻䛴䛔䛶䜢 ᮇ䛧 䛶సᡂ䛔䛯䛧 䜎 䛧 䛯䛜䚸 ୍䛤 ᑂ䛺Ⅼ䜔ㄗ䜚 䚸 グ
㍕䜒 䜜䛺䛹 䛚Ẽ䛵䛝 䛾䛣 䛸 䛜䛒䜚 䜎 䛧 䛯䜙 䚸 䛚㈙䛔ồ䜑䛾㈍ᗑ䛻䛤㐃⤡䛟 䛰䛥 䛔䚹
䠄 5䠅 㐠⏝䛧 䛯⤖ᯝ䛾ᙳ㡪䛻䛴䛔䛶䛿䠄 4䠅 㡯䛻䛛䛛䜟䜙 䛪㈐௵䜢 ㈇䛔䛛䛽䜎 䛩䛾䛷䛤ᢎ
䛟 䛰䛥 䛔䚹
䠄 6䠅 ᮏ〇ရ䜢 ➨୕⪅䜈ㆡΏ䞉 ༷䛩䜛 㝿䛿ᚲ䛪ᮏ᭩䜒 ῧ䛘䛶䛟 䛰䛥 䛔䚹
䠄 7䠅 ⴠ䞉 ᮏ䛿䛚ྲྀ䜚 ᭰䛘䛔䛯䛧 䜎 䛩䚹
Remarks:
(1) Reproduction of this document or portions thereof without prior approval is prohibited.
(2) The information contained in this document is subject to change at any time, without
prior notice.
(3) Reprinting or changing of this document without prior approval of NEC is prohibited.
(4) All efforts have been made to ensure that the contents of this manual are correct;
however, should any doubts arise, or errors or missed entries be detected, NEC would
greatly appreciate it if our dealers are informed about it.
(5) Please note that in no event shall NEC be liable for any damages whatever arising out
of the use of this device, regardless of item (4) above.
(6) When you transfer or sell the product, be sure to include this manual.
(7) If you find any missing pages or pages out of order in this manual, please contact your
dealer for a replacement.
i
հષ͈̮ಕփ!
ȡຈ̴̤උ͙̩̺̯̞ȡ
Safety Indications
a Read Carefully a
䛤 ⏝๓䛻䛣 䛾䛂 Ᏻୖ䛾䛤ὀព䛃 䜢 䜘 䛟 ㄞ䜣䛷䛤 ⌮ゎ䛧 䚸 ᮏ〇ရ䜢 䜘 䜚 Ᏻ䛻䛤ά⏝䛟
䛰䛥 䛔䚹 䛣 䛣 䛻♧䛧 䛯ὀព㡯䛿ᮏ〇ရ䜢 Ᏻ䛻䛚䛔䛔䛯䛰䛝 䚸 䛚ᐈᵝ䜈䛾༴ᐖ䜔㈈⏘
䜈䛾ᦆᐖ䜢 ᮍ↛䛻㜵Ṇ䛩䜛 䜒 䛾䛷䛩䚹 䜎 䛯䚸 ὀព㡯䛷䛿䚸 ༴㝤䛾⛬ᗘ䜢 ⾲䛩ゝⴥ䛸 䛧 䛶䚸
䛂 ㆙࿌䛃 䛸 䛂 ὀព䛃 䛸 䛔䛖 ⏝ㄒ䜢 ⏝䛧 䛶䛔䜎 䛩䚹 䛭䜜䛮䜜䛾⏝ㄒ䛿ḟ䛾䜘 䛖 䛺ព䜢 ᣢ
䛴䜒 䛾䛸 䛧 䛶ᐃ⩏䛥 䜜䛶䛔䜎 䛩䚹
Before using the product, read and understand the "Safety Indications" carefully to use the
product safely. The notes to be described below are required to enable you to use the
product safely and avoid personal injury and damage to properties that may arise. Term
"WARNING" or "CAUTION" is used to indicate a degree of danger. These terms are defined
as follows:
ே䛜Ṛஸ䛩䜛 䚸 䜎 䛯䛿㔜യ䜢 ㈇䛖 䛚䛭䜜䛜䛒䜛 䛣 䛸 䜢 ♧䛧 䜎 䛩䚹
WARNING
Failure to heed this sign could result in serious injury or death.
ⅆയ䜔䛡䛜䛾䛚䛭䜜䚸 䛚䜘 䜃≀ⓗᦆᐖ䛾Ⓨ⏕䛾䛚䛭䜜䛜䛒䜛 䛣 䛸 䜢 ♧䛧 䜎 䛩䚹
CAUTION
Failure to heed this sign could result in personal burn or injury and/or
damage to properties.
䜎 䛯䚸 ὀព㡯䛾ㄝ᫂䛾୰䛷䛿䚸 ⤮⾲♧䜢 ⏝䛧 䛶ὀព䛾ෆᐜ䜢 ⾲䛧 䛶䛔䜎 䛩䚹 ⤮⾲♧䛾
ព䛿ḟ䛾䛸 䛚䜚 䛷䛩䚹
Precautions against hazards are presented with the following symbols. The individual
symbols are defined as follows:
ศゎ⚗Ṇ
Prohibition of disassembly
ឤ㟁ὀព
Precaution against electric shock
Ⓨⅆὀព
Precaution against firing
䝺 䞊䝄䞊ගὀព
Precaution against laser beam
≉ᐃ䛧 䛺䛔୍⯡ⓗ䛺⚗Ṇ㡯
General prohibited matter
≉ᐃ䛧 䛺䛔୍⯡ⓗ䛺ὀព䞉 ㆙࿌
General notice or warning
䝁 䞊䝗 䜢 ᢤ䛔䛶!!
Disconnect the power cord!
㧗 ὀព
Hot surface
ii
ḟ䛻ᮏ〇ရ䜢 Ᏻ䛻ྲྀ䜚 ᢅ䛖 䛯䜑䛻Ᏺ䛳 䛶䛔䛯䛰䛝 䛯䛔ὀព㡯䜢 ♧䛧 䜎 䛩䚹 䛚ᐈᵝ䜈䛾
༴ᐖ䜔㈈⏘䜈䛾ᦆᐖ䜢 ᮍ↛䛻㜵Ṇ䛩䜛 䛯䜑䛻䜒 ᚲ䛪Ᏺ䛳 䛶䛟 䛰䛥 䛔䚹 䜎 䛯䚸 䛣 䜜䜙 䛾ὀព
㡯䛿ᮏᩥ୰䛷䜒 ᚲせ䛻ᛂ䛨 䛶グ㍕䛥 䜜䛶䛔䜎 䛩䚹
The following provides several precautions to enable you to use the product safely. Be sure
to obey them to prevent personal injury and damage to property that may arise. These
precautions will appear in the body text if necessary.
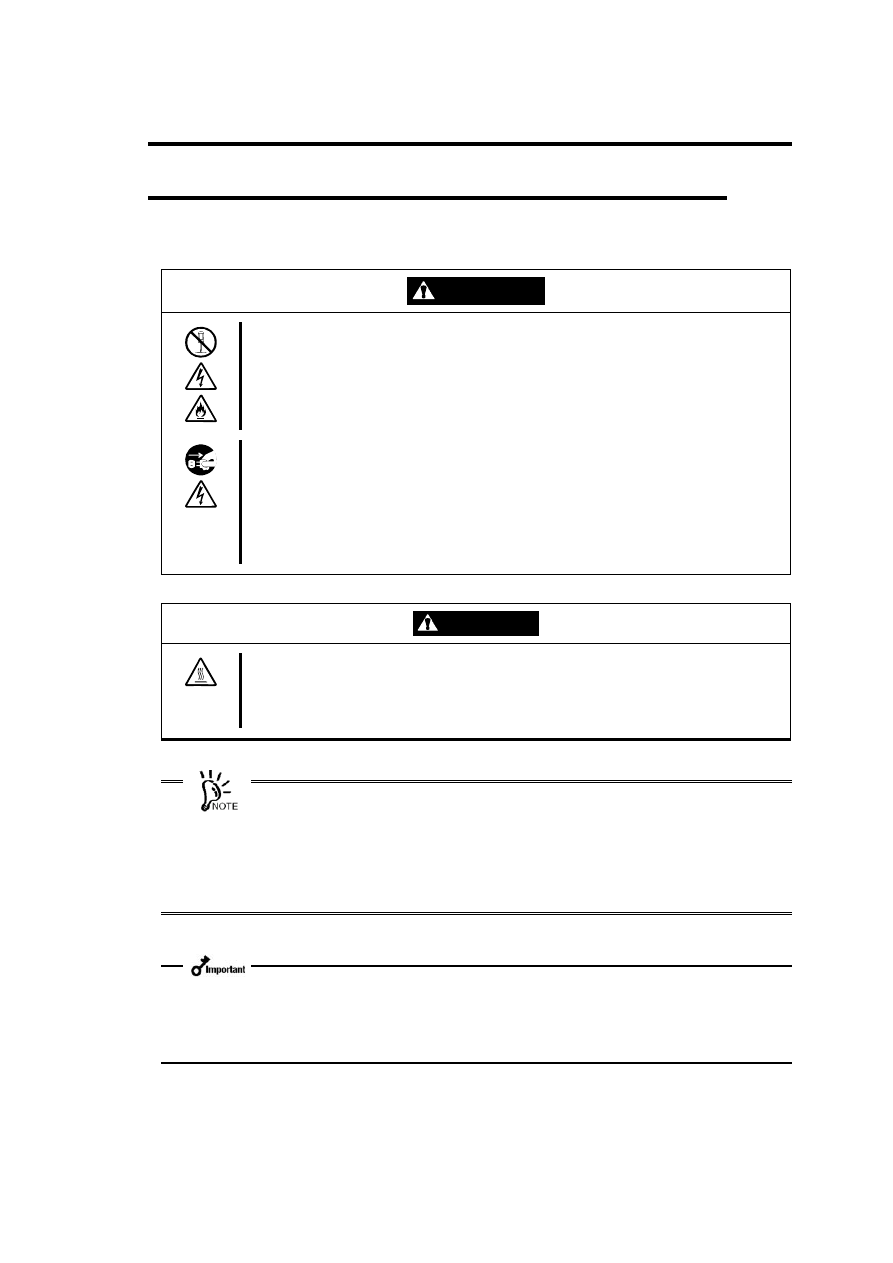
WARNING
ே䛻㛵䜟䜛 ᴗົ䜔㧗ᗘ䛺ಙ㢗ᛶ䜢 ᚲせ䛸 䛩䜛 ᴗົ䛻䛿⏝䛧 䛺䛔
Do not use the product in life-critical applications or applications requiring
high reliability.
ᮏ〇ရ䛿䚸 ་⒪ᶵჾ䚸 ཎᏊຊタഛ䜔ᶵჾ䚸 ⯟✵Ᏹᐂᶵჾ䚸 ㍺㏦タഛ䜔ᶵჾ䚸 ㏻⟶
ไタഛ䜔ᶵჾ䛺䛹 䚸 ே䛻㛵䜟䜛 タഛ䜔ᶵჾ䚸 䛚䜘 䜃㧗ᗘ䛺ಙ㢗ᛶ䜢 ᚲせ䛸 䛩䜛 タ
ഛ䜔ᶵჾ䛺䛹 䜈䛾⤌䜏㎸䜏䜔䛣 䜜䜙 䛾ᶵჾ䛾ไᚚ䛺䛹 䜢 ┠ⓗ䛸 䛧 䛯⏝䛿ពᅗ䛥 䜜
䛶䛚䜚 䜎 䛫䜣䚹 䛣 䜜䜙 タഛ䜔ᶵჾ䚸 ไᚚ䝅䝇䝔 䝮䛺䛹 䛻ᮏ〇ရ䜢 ⏝䛧 䛯⤖ᯝ䚸 ே
㌟ᨾ䚸 ㈈⏘ᦆᐖ䛺䛹 䛜⏕䛨 䛶䜒 ᘢ♫䛿䛔䛛䛺䜛 ㈐௵䜒 ㈇䛔䛛䛽䜎 䛩䚹
The product is not intended for integration with or control of facilities or equipment
that may affect human life or that require a high degree of reliability, such as medical
equipment, nuclear power facilities or instruments, aerospace instruments,
transportation facilities or instruments, and traffic control facilities or instruments.
NEC does not assume any liability for accidents resulting in injury or death, or for any
damages to property that may occur as a result of using the product in such facilities,
equipment, or control systems.
ศゎ䞉 ಟ⌮䞉 ᨵ㐀䛿䛧 䛺䛔
Do not disassemble, repair, or alter the Built-in DVD-RAM drive.
ಟ⌮ᢏ⾡⪅௨እ䛾ே䛿䚸 ᮏ᭩䛚䜘 䜃ᮏయ⨨䛻ῧ䛾ㄝ᫂᭩䛻グ㍕䛥 䜜䛶䛔䛺䛔ศ
ゎ䞉 ಟ⌮䞉 ᨵ㐀䜢 ⤯ᑐ䛻⾜䜟䛺䛔䛷䛟 䛰䛥 䛔䚹 ឤ㟁䛧 䛯䜚 䚸 Ⓨⅆ䛧 䛯䜚 䚸 ␗ᖖືస
䛧 䛶䛡䛜䜢 䛩䜛 䛣 䛸 䛜䛒䜚 䜎 䛩䚹
Never attempt to disassemble, repair, or alter the Built-in DVD-RAM drive on any
occasion other than described in this User's Guide or the manual of the computer in
which the product is installed if you are not a maintenance engineer. Failure to follow
this instruction may cause an electric shock or a fire as well as malfunctions of the
product.
↮䜔␗⮯䚸 ␗㡢䛜䛧 䛯䜚 䚸 ◚ᦆ䛧 䛯䜎 䜎 䜟䛺䛔
Do not use the product if any smoke, odor, or noise is present or it is damaged.
୍䚸 ↮䚸 ␗⮯䚸 ␗㡢䛺䛹 䛜⏕䛨 䛯ሙྜ䛿䚸 䛯䛰䛱 䛻ᮏయ⨨䛾㟁※䜢 OFF䛻䛧 䛶
㟁※䝁 䞊䝗 䜢 䝁 䞁 䝉䞁 䝖 䛛䜙 ᢤ䛔䛶䛟 䛰䛥 䛔䚹 䛭䛾ᚋ䚸 ㈍ᗑ䛻䛤 㐃⤡䛟 䛰䛥 䛔䚹
䛭䛾䜎 䜎 ⏝䛩䜛 䛸 ⅆ⅏䛾ཎᅉ䛸 䛺䜚 䜎 䛩䚹 䜎 䛯䚸 ⴠ䛸 䛧 䛯䜚 䚸 ◚ᦆ䛧 䛶䛔䛯䜚 䛧
䛯ሙྜ䛿䚸 䛭䛾䜎 䜎 ⏝䛫䛪䚸 ㈍ᗑ䜔ಖᏲ䝃䞊䝡 䝇♫䛻㐃⤡䛧 䛶Ⅼ᳨䜢 ౫㢗䛧
䛶䛟 䛰䛥 䛔䚹
If smoke, odor, or noise is present, immediately turn off the power of the computer
and disconnect the power cord from the outlet, then contact your service
representative. Using the product in such conditions may cause a fire. In addition, if
the product is dropped or damaged, contact your service representative to ask the
service of the product instead of using it without modification.
iii
WARNING
ᮏయ⨨䛾㟁※䝁 䞊䝗 䜢 ᥋⥆䛧 䛯䜎 䜎 ྲྀ䜚 䛡䞉 ྲྀ䜚 እ䛧 䜢 䛧 䛺䛔
Do not install or uninstall the product while the power cord of the computer is
connected to the AC inlet.
ᮏ〇ရ䛾ྲྀ䜚 䛡䞉 ྲྀ䜚 እ䛧 䜢 ⾜䛖 ๓䛻ᮏయ⨨䛾㟁※䜢 OFF䛻䛧 䛶䚸 ᮏయ⨨䛾
㟁※䝁 䞊䝗 䜢 䝁 䞁 䝉䞁 䝖 䛛䜙 ᢤ䛔䛶䛟 䛰䛥 䛔䚹 㟁※䜢 OFF䛻䛧 䛶䜒 䚸 㟁※䝁 䞊䝗 䜢
ᕪ䛧 ㎸䜣䛰䜎 䜎 䛰䛸 㟁Ẽ䛜ᮏయ⨨ෆ㒊䛻ὶ䜜䛶䛔䜎 䛩䚹 䛣 䛾䜎 䜎 ྲྀ䜚 䛡䜛 䛸 ෆ
㒊䛾㒊ရ䛻ゐ䜜䛶䚸 ឤ㟁䛩䜛 䛚䛭䜜䛜䛒䜚 䜎 䛩䚹
Turn off the power of the computer and unplug the power cord from the AC inlet
before installing/uninstalling the product to/from the computer. If the power is turned
off but the power cord remains inserted to the AC inlet, certain current flows in the
computer. Having your body touch parts in the product in such condition may cause
an electric shock.
㔪㔠䜔㔠ᒓ∦䜢 ᕪ䛧 ㎸䜎 䛺䛔
Keep needles or metal objects away from the product.
䝕䜱 䝇䜽 ᤄධཱྀ䛛䜙 㔠ᒓ∦䜔㔪㔠䛺䛹 䛾␗≀䜢 ᕪ䛧 ㎸䜎 䛺䛔䛷䛟 䛰䛥 䛔䚹 ឤ㟁䛾༴
㝤䛜䛒䜚 䜎 䛩䚹
Do not insert needles or metal objects into the product from the disk insertion port.
Failure to follow this warning may cause an electric shock.
ᮏ〇ရ䛾ෆ㒊䜢 䛾䛮䛛䛺䛔
Do not look into the product.
ᮏ〇ရ䛿䝺 䞊䝄䞊䜢 ⏝䛧 䛶䛔䜎 䛩䚹 㟁※䛜ON䛻䛺䛳 䛶䛔䜛 䛸 䛝 䛻ෆ㒊䜢 䛾䛮䛔䛯
䜚 䚸 㙾䛺䛹 䜢 ᕪ䛧 ㎸䜣䛰䜚 䛧 䛺䛔䛷䛟 䛰䛥 䛔䚹 ୍䚸 䝺 䞊䝄䞊ග䛜┠䛻ධ䜛 䛸 ኻ᫂
䛩䜛 䛚䛭䜜䛜䛒䜚 䜎 䛩䠄 䝺 䞊䝄䞊ග䛿┠䛻ぢ䛘䜎 䛫䜣䠅 䚹
The product uses laser light. Do not look into the product or insert a mirror into it
while the power is ON. If the laser enters into your eyes, you may be blinded. (The
laser beam is invisible.)

iv
CAUTION
㧗 ὀព
Hot surface
ᮏయ⨨䛾㟁※䜢 OFF䛻䛧 䛯┤ᚋ䛿䚸 ෆⶶᆺ䛾䝝䞊䝗 䝕䜱 䝇䜽 䛺䛹 䜢 䛿䛨 䜑⨨ෆ
䛾㒊ရ䛜㧗 䛻䛺䛳 䛶䛔䜎 䛩䚹 ༑ศ䛻෭䜑䛯䛣 䛸 䜢 ☜ㄆ䛧 䛶䛛䜙 ྲྀ䜚 䛡䠋ྲྀ䜚
እ䛧 䜢 ⾜䛳 䛶䛟 䛰䛥 䛔䚹
Immediately after the computer is powered off, its internal components such as hard
disk drives are very hot. Leave the computer until its internal components fully cool
down before installing/removing any component.
ᮏ〇ရෆ䛻Ỉ䜔␗≀䜢 ධ䜜䛺 䛔
Keep water or foreign matter away from the product.
ᮏ〇ရෆ䛻Ỉ䛺䛹 䛾ᾮయ䚸 䝢 䞁 䜔䜽 䝸 䝑 䝥 䛺䛹 䛾␗≀䜢 ධ䜜䛺䛔䛷䛟 䛰䛥 䛔䚹 ⅆ⅏
䜔ឤ㟁䚸 ᨾ㞀䛾ཎᅉ䛸 䛺䜚 䜎 䛩䚹 䜒 䛧 ධ䛳 䛶䛧 䜎 䛳 䛯䛸 䛝 䛿䚸 䛩䛠 ᮏయ⨨䛾㟁※
䜢 OFF䛻䛧 䛶䚸 㟁※䝁 䞊䝗 䜢 䝁 䞁 䝉䞁 䝖 䛛䜙 ᢤ䛔䛶䛟 䛰䛥 䛔䚹 ศゎ䛧 䛺䛔䛷㈍ᗑ
䜎 䛯䛿ಖᏲ䝃䞊䝡 䝇♫䛻䛤 㐃⤡䛟 䛰䛥 䛔䚹
Do not let any kind of liquid (water etc.) or foreign matter (e.g. pins or paper clips)
enter into the product. Failure to follow this caution may cause an electric shock, a
fire, or a failure of the product. When such things accidentally enter into the product,
immediately turn off the power of the computer and disconnect the power cord from
the AC inlet. Do not disassemble the product. Contact your service representative.
ᣦᐃ௨እ䛾䜿䞊䝤 䝹䛿䜟䛺 䛔
Use the authorized cables only.
ᘢ♫䛜ᣦᐃ䛩䜛 䜿䞊䝤 䝹௨እ䛾䜿䞊䝤 䝹䜢 䜟䛺䛔䛷䛟 䛰䛥 䛔䚹 ᣦᐃ௨እ䛾䜿䞊䝤
䝹䜢 ⏝䛧 䛯䜚 ㄗ᥋⥆䛧 䛯ሙྜ䚸 䝅䝵 䞊䝖 䛻䜘 䜚 ⅆ⅏䜢 ㉳䛣 䛩䛣 䛸 䛜䛒䜚 䜎 䛩䚹
Use only the cables authorized by your service representative. Use of an
unauthorized cable or connection by unauthorized cabling may cause a fire.
ᦆയ䛧 䛯䜿䞊䝤 䝹䜢 䜟䛺䛔
Do not use any damaged cable.
䜿䞊䝤 䝹䜢 ᥋⥆䛩䜛 ๓䛻䚸 䜿䞊䝤 䝹䝁 䝛䜽 䝍 䛜◚ᦆ䛧 䛶䛔䛯䜚 䚸 䝁 䝛䜽 䝍 䝢 䞁 䛜᭤
䛜䛳 䛶䛔䛯䜚 䚸 ở䜜䛶䛔䛺䛔䛛☜ㄆ䛧 䛶䛟 䛰䛥 䛔䚹 䝁 䝛䜽 䝍 䛜◚ᦆ䛧 䛯䜚 䚸 䝢 䞁 䛾
ở䜜䛯䜿䞊䝤 䝹䜢 ⏝䛧 䛯ሙྜ䚸 䝅䝵 䞊䝖 䛻䜘 䜚 ⅆ⅏䜢 ㉳䛣 䛩䛣 䛸 䛜䛒䜚 䜎 䛩䚹
Before the connection of a cable, make sure that the connectors of the cable are not
damaged and no connector pins are bent and dirt. Using a cable with a damaged
connector or some bent or dirt pins may cause a fire due to a short circuit.
䜿䞊䝤 䝹㒊ศ䜢 ᣢ䛳 䛶ᘬ䛝 ᢤ䛛䛺䛔
Do not hold a cable to pull out it.
䜿䞊䝤 䝹䜔㟁※䜿䞊䝤 䝹䜢 ᢤ䛟 䛸 䛝 䛿䚸 䝁 䝛䜽 䝍 㒊ศ䜢 ᣢ䛳 䛶䜎 䛳 䛩䛠 䛻ᘬ䛝 ᢤ䛔
䛶䛟 䛰䛥 䛔䚹 䜿䞊䝤 䝹㒊ศ䜢 ᣢ䛳 䛶ᘬ䛳 ᙇ䛳 䛯䜚 䚸 䝁 䝛䜽 䝍 㒊ศ䛻↓⌮䛺ຊ䜢 ຍ䛘
䛯䜚 䛩䜛 䛸 䜿䞊䝤 䝹䛜◚ᦆ䛧 䚸 ⅆ⅏䜔ឤ㟁䛾ཎᅉ䛸 䛺䜚 䜎 䛩䚹
Hold the connector of a cable to pull out the cable straight. Holding a cable itself to
pull out it or adding an excess force to the connector at one end of a connector may
cause the cable to be damaged. This may then cause a fire or an electric shock.
v
CAUTION
୰㏵༙➃䛻ᕪ䛧 ㎸䜎 䛺䛔
Insert a cable into the mating connector as far as it goes.
䜿䞊䝤 䝹䜔㟁※䜿䞊䝤 䝹䛿᰿ᮏ䜎 䛷䛧 䛳 䛛䜚 䛸 ᕪ䛧 ㎸䜣䛷䛟 䛰䛥 䛔䚹 ୰㏵༙➃䛺ᕪ
䛧 ㎸䜏䛿䚸 ᥋ゐⰋ䛾Ⓨ⇕䛻䜘 䜛 ⅆ⅏䛾ཎᅉ䛸 䛺䜛 䛣 䛸 䛜䛒䜚 䜎 䛩䚹
䜎 䛯ᕪ䛧 ㎸䜏㒊䛻䜋䛣 䜚 䛜䛯䜎 䜚 䚸 Ỉ䛺䛹 䛜䛴䛟 䛸 䚸 Ⓨ⇕䛧 䚸 ⅆ⅏䛾ཎᅉ䛸 䛺䜛
䛚䛭䜜䛜䛒䜚 䜎 䛩䚹
Insert a cable or power cable into the mating connector as far as it goes. Heat
generation resulting from a halfway inserted cable may cause a fire due to imperfect
contact. Heat will also be generated if condensation is formed on dusty blades of the
halfway inserted cable. This may increase the possibility of a fire.
ᮏ〇ရ䛾䛭䜀䛷ᦠᖏ㟁ヰ䜔PHS䚸 䝫䜿䝑 䝖 䝧䝹䜢 ⏝䛧 䛺䛔
Do not use a cellular phone or a pager near the product.
ᮏ〇ရ䛾㏆䛟 䛷䛿ᦠᖏ㟁ヰ䜔PHS䚸 䝫䜿䝑 䝖 䝧䝹䜢 ⏝䛧 䛺䛔䛷䛟 䛰䛥 䛔䚹 㟁Ἴ䛻
䜘 䜛 ㄗືస䛾ཎᅉ䛸 䛺䜚 䜎 䛩䚹
Turn off the power of the cellular phone or a pager near the product. Otherwise,
malfunction may be caused by radio wave.
䝖 䝺 䞊䜢 ᘬ䛝 ฟ䛧 䛯䜎 䜎 ᨺ⨨䛧 䛺䛔
Do not leave the tray ejected.
ᘬ䛝 ฟ䛧 䛯䝖 䝺 䞊䛾㛫䛛䜙 䜋䛣 䜚 䛜ධ䜚 ㄗసື䜢 ㉳䛣 䛩䛚䛭䜜䛜䛒䜚 䜎 䛩䚹 䜎 䛯䚸
䝖 䝺 䞊䛻䜆䛴䛛䜚 䛡䛜䜢 䛩䜛 䛚䛭䜜䛜䛒䜚 䜎 䛩䚹
Leaving the tray ejected may cause dust to enter into the product through the ejected
tray. This may then cause malfunction. In addition, people may hit on the tray to be
injured.
㞾䛜䛺 䛳 䛯䜙 ゐ䜙 䛺䛔
Do not touch the unit when it thunders.
㞾䛜Ⓨ⏕䛧 䛭䛖 䛺䛸 䛝 䛿ᮏయ⨨䛾㟁※䝁 䞊䝗 䜢 䝁 䞁 䝉䞁 䝖 䛛䜙 ᢤ䛔䛶䛟 䛰䛥 䛔䚹
䜎 䛯㟁※䝁 䞊䝗 䜢 ᢤ䛟 ๓䛻㞾䛜㬆䜚 䛰䛧 䛯䜙 䚸 䜿䞊䝤 䝹㢮䜒 ྵ䜑䛶⨨䛻䛿ゐ䜜䛺
䛔䛷䛟 䛰䛥 䛔䚹 ⅆ⅏䜔ឤ㟁䛾ཎᅉ䛸 䛺䜚 䜎 䛩䚹
If it is likely to start thundering, pull out the power cord of the computer from the AC
outlet. If it starts thundering before pulling out the power cord from the AC outlet, do
not touch any parts of the unit including cables. Failure to follow this caution may
cause an electric shock or a fire.
䝨䝑 䝖 䜢 ㏆䛵䛡䛺䛔
Keep away pets.
ᮏ〇ရ䛻䝨䝑 䝖 䛺䛹 䛾⏕䛝 ≀䜢 ㏆䛵䛡䛺䛔䛷䛟 䛰䛥 䛔䚹 ἥ≀䜔యẟ䛜ᮏ〇ရෆ㒊
䛻ධ䛳 䛶ⅆ⅏䜔ឤ㟁䛾ཎᅉ䛸 䛺䜚 䜎 䛩䚹
Keep away creatures such as pets from the product. Insertion of their hair or
excrements into the product may cause a fire or an electric shock.
vi
࠙࣬ρασ̞̾̀ͅ
Warning Label
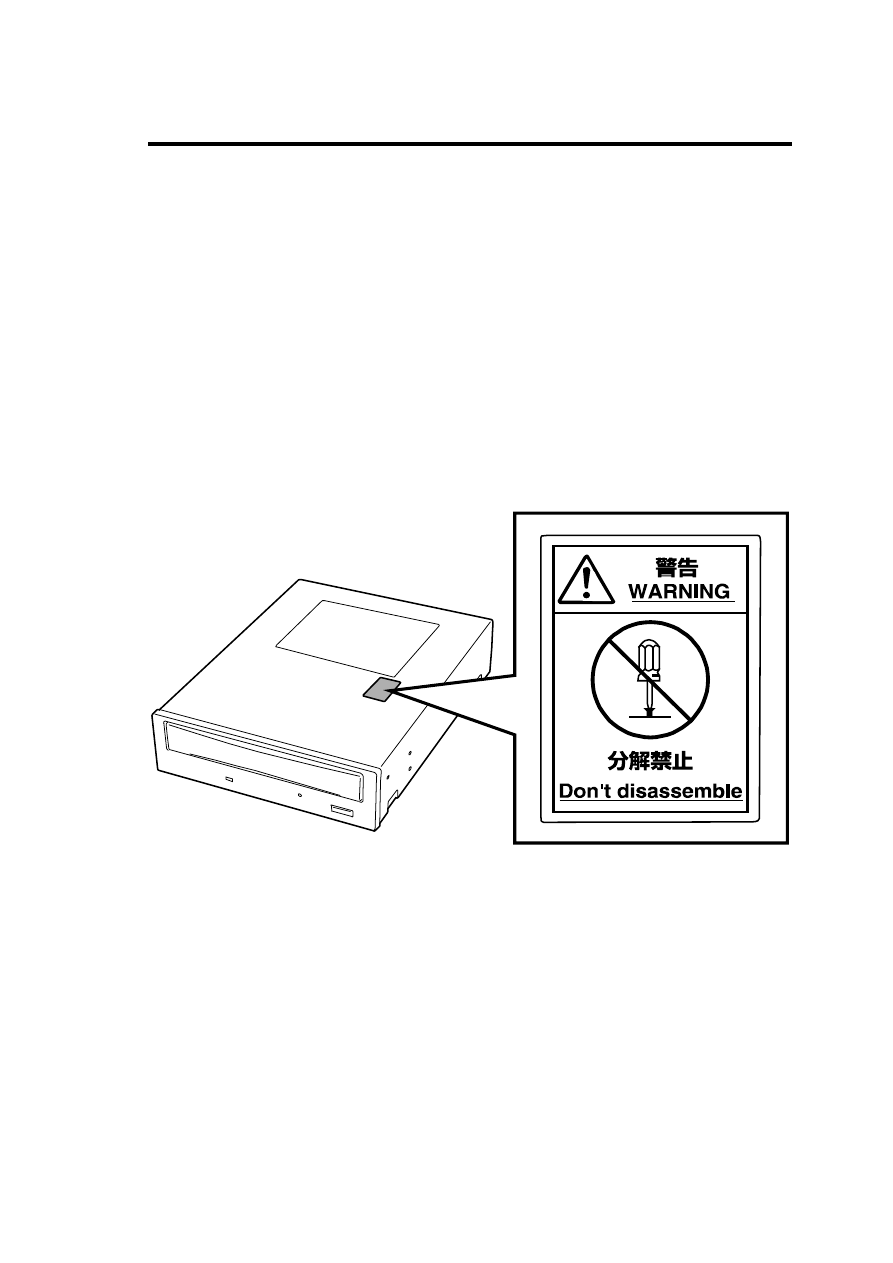
ᮏ〇ရෆ䛾༴㝤ᛶ䜢 ⛎䜑䜛 㒊ရ䜔䛭䛾࿘㎶䛻䛿㆙࿌䝷 䝧䝹䛜㈞䜚 䛡䜙 䜜䛶䛔䜎 䛩䚹 䛣 䜜
䛿ᮏ〇ရ䜢 ᧯స䛩䜛 㝿䚸 ⪃䛘䜙 䜜䜛 ༴㝤ᛶ䜢 ᖖ䛻䛚ᐈᵝ䛻ព㆑䛧 䛶䛔䛯䛰䛟 䛯䜑䛾䜒 䛾䛷
䛩䠄 䝷 䝧䝹䜢 䛿䛜䛧 䛯䜚 䚸 ở䛧 䛯䜚 䛧 䛺䛔䛷䛟 䛰䛥 䛔䠅䚹 䜒 䛧 䛣 䛾䝷 䝧䝹䛜㈞䜚 䛡䜙 䜜䛶
䛔䛺䛔䚸 䛿䛜䜜䛛䛛䛳 䛶䛔䜛 䚸 ở䜜䛶䛔䜛 䛺䛹 䛧 䛶ุㄞ䛷䛝 䛺䛔䛸 䛝 䛿㈍ᗑ䛻䛤㐃⤡䛟
䛰䛥 䛔䚹 ᮏ〇ရ䛻㈞䜚 䛡䜙 䜜䛶䛔䜛 䝷 䝧䝹䛻䛿௨ୗ䛾㆙࿌ᩥ䛜⾲グ䛥 䜜䛶䛔䜎 䛩䚹
A warning label is put on a part having hidden potential of danger within the product or the
area around such part. It is intended to make you always conscious of possible danger
when you operate the product. (Do not peel off any warning label. Also, do not make it dirty.)
If a warning label is not put on, peeling off, or unreadable due to dirty, contact your service
representative. The label put on the product describes the following warning text.

1
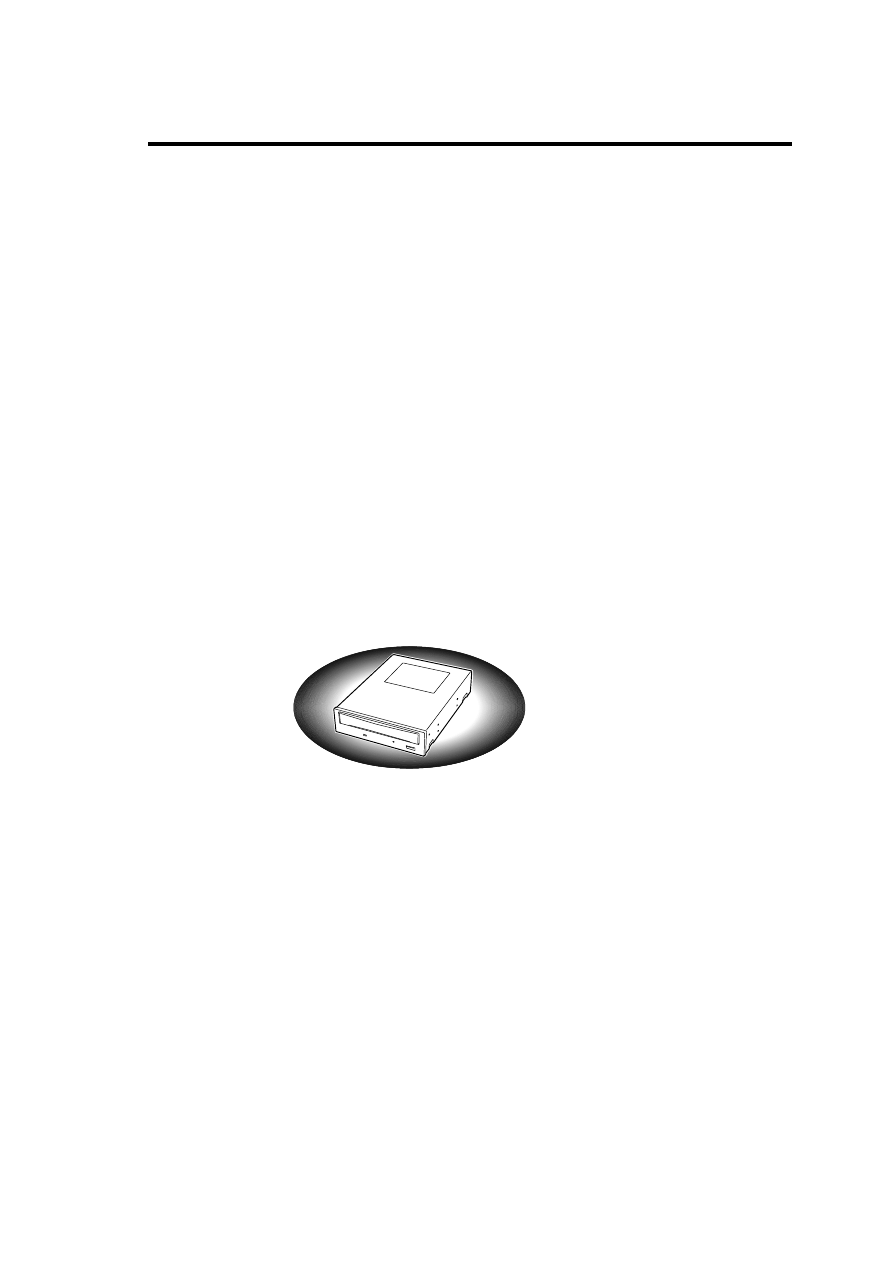
̢̧̦͘
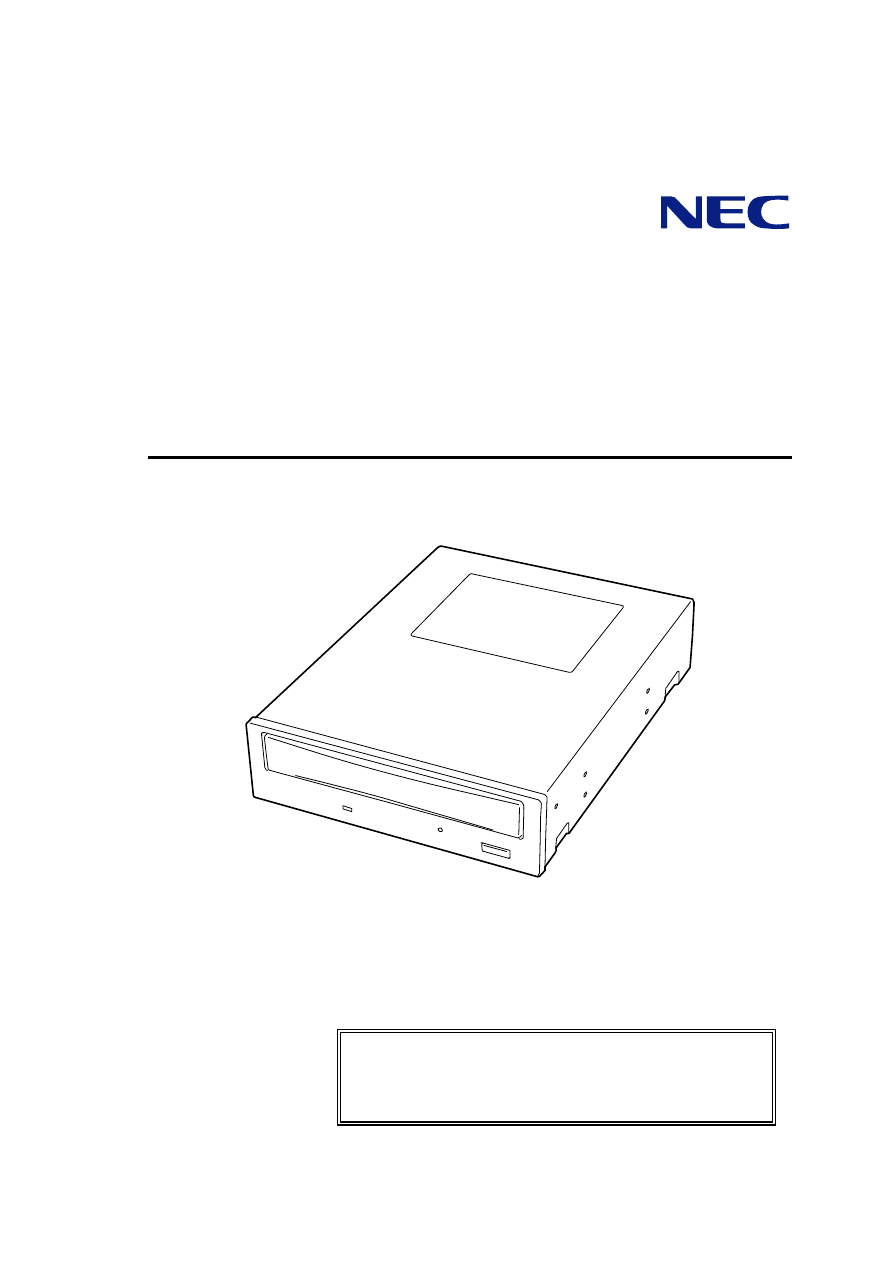
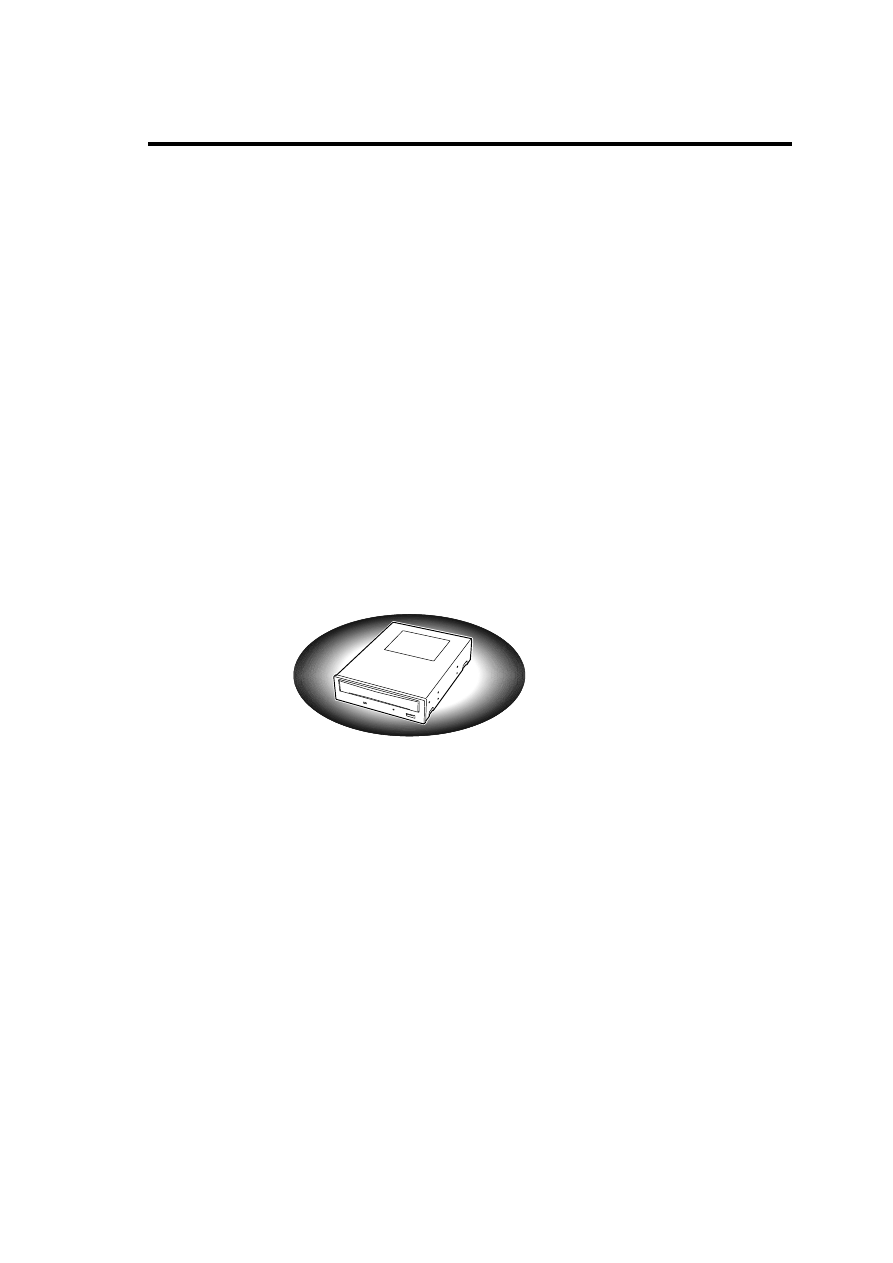
ᮏ᭩䛿䚸 N8151-32B ෆⶶ DVD-RAM ⨨䠄 ௨ୗ䛂 ᮏ〇ရ䛃 䛸 䜃䜎 䛩䠅 䜢 ṇ䛧 䛟 䚸 Ᏻ䛻
タ⨨䞉 ⏝䛩䜛 䛯䜑䛾ᡭᘬ䛝 䛷䛩䚹 ᮏ〇ရ䜢 ྲྀ䜚 ᢅ䛖 ๓䛻䛚ㄞ䜏䛟 䛰䛥 䛔䚹 䜎 䛯䚸 ᮏ〇ရ
䜢 ⏝䛩䜛 ୖ䛷䜟䛛䜙 䛺䛔䛣 䛸 䚸 ලྜ䛜㉳䛝 䛯䛸 䛝 䛻䜒 䛬䜂䛤 ⏝䛟 䛰䛥 䛔䚹
ᮏ〇ရ䜢 ྲྀ䜚 ᢅ䛖 ๓䛻䚸 ᮏ᭩䛾ㄝ᫂䜢 䜘 䛟 䛚ㄞ䜏䛻䛺䜚 䚸 ṇ䛧 䛟 ྲྀ䜚 ᢅ䛳 䛶䛟 䛰䛥 䛔䚹 ᮏ
᭩䛿䚸 ῧ䛾䛄 ಖド᭩䛅 䛸 ୍⥴䛻ษ䛻ಖ⟶䛧 䛶䛟 䛰䛥 䛔䚹
ᮏ〇ရ䜢 ྲྀ䜚 䛡䜛 ⨨䛾ྲྀ䜚 ᢅ䛔䛻䛴䛔䛶䛾ㄝ᫂䛿䚸 ᮏయ⨨䛻ῧ䛾ㄝ᫂᭩䜢 ཧ↷䛧
䛶䛟 䛰䛥 䛔䚹
ᮏ〇ရ䜢 ྲྀ䜚 ᢅ䛖 ๓䛻 i 䝨䞊䝆䛾䛂 Ᏻୖ䛾䛤ὀព䛃䚸 vi 䝨䞊䝆 䛾䛂 ㆙࿌䝷 䝧䝹䛻䛴䛔䛶䛃䚸
4
䝨䞊䝆䛻♧䛩䛂 ⏝ୖ䛾䛤ὀព䛃 䜢 ᚲ䛪䛚ㄞ䜏䛟 䛰䛥 䛔䚹
ᮏ᭩䛿 4 䛴䛾❶䛸 㘓䠄 A䡚E䠅 䛛䜙 ᵓᡂ䛥 䜜䛶䛔䜎 䛩䚹 ᮏ〇ရ䜢 ㉎ධ䛥 䜜䛶䛛䜙 ึ䜑䛶ྲྀ
䜚 ᢅ䛖 ሙྜ䛿➨ 1 ❶䛛䜙 㡰䛻ㄞ䜣䛷䛟 䛰䛥 䛔䚹 ᮏ〇ရ䛾ྲྀ䜚 ᢅ䛔᪉ἲ䜢 ▱䜚 䛯䛔ሙྜ䛿䚸
➨ 2 ❶䛛䜙 ㄞ䜣䛷䛟 䛰䛥 䛔䚹 䜎 䛯䚸 ᮏ〇ရ䛻␗ᖖ䛜㉳䛝 䛯ሙྜ䛿➨ 4 ❶䜢 ཧ↷䛧 䛶䛟 䛰䛥
䛔䚹
ḟ䛻䛭䜜䛮䜜䛾❶䛷ㄝ᫂䛧 䛶䛔䜛 ෆᐜ䛻䛴䛔䛶⡆༢䛻ㄝ᫂䛧 䜎 䛩䚹
➨ 1 ❶ 䛿䛨 䜑䛶䛚䛔䛻䛺䜛 䛸 䛝
ᮏ〇ရ䛾≉㛗䜔ྛ㒊䛾ྡ⛠䛸 ᶵ⬟䚸 ᮏయ⨨䜈䛾ྲྀ䜚 䛡᪉ἲ䜢 㡰䜢 ㏣䛳 䛶ㄝ᫂䛧 䜎
䛩䚹
➨ 2 ❶ ᪥ᖖ䛾⏝᪉ἲ
DVD-RAM/CD-ROM
䠄 ௨ୗ䝕䜱 䝇䜽 䛸 䜃䜎 䛩䚹䠅 䝕䜱 䝇䜽 䜢 ᮏ〇ရ䛻䝉䝑 䝖 䛩䜛 ᪉ἲ
䛚䜘 䜃ྲྀ䜚 ฟ䛧 ᪉䜔䝕䞊䝍 䛾ྲྀ䜚 ᢅ䛔䛻䛴䛔䛶ㄝ᫂䛧 䜎 䛩䚹
➨ 3 ❶ 䜽 䝸 䞊䝙䞁 䜾䞉 ᮏ〇ရ䛾㍺㏦
ᮏ〇ရ䛚䜘 䜃䝕䜱 䝇䜽 䛾䜽 䝸 䞊䝙䞁 䜾᪉ἲ䛻䛴䛔䛶ㄝ᫂䛧 䜎 䛩䚹 䜎 䛯䚸 ᮏ〇ရ䜢 ㍺㏦
䛩䜛 䛸 䛝 䛾ᡭ㡰䛻䛴䛔䛶䜒 ㄝ᫂䛧 䜎 䛩䚹
➨ 4 ❶ 䛂 ᨾ㞀䛛䛺䠛䛃 䛸 ᛮ䛳 䛯䛸 䛝 䛿
ᮏ〇ရ䛜ᛮ䛖 䜘 䛖 䛻ື䛛䛺䛔䛸 䛝 䛿ᮏ〇ရ䛾ᨾ㞀䜢 䛖 ๓䛻䜎 䛪䛣 䛣 䛷♧䛩䝏䝱 䞊䝖
䜢 ཧ↷䛧 䛶䛟 䛰䛥 䛔䚹
㘓 A ᵝ
ᮏ〇ရ䛾ᵝ䜢 グ㍕䛧 䛶䛔䜎 䛩䚹
㘓 B 䝕䜱 䝇䜽 䛻䛴䛔䛶
䝕䜱 䝇䜽 䛾ྲྀ䜚 ᢅ䛔᪉ἲ䛻䛴䛔䛶ㄝ᫂䛧 䜎 䛩䚹
㘓 C ูရ
ᘢ♫䛷⏝ព䛧 䛶䛔䜛 ูရ䜢 ⤂䛧 䛶䛔䜎 䛩䚹
㘓 D ᥎ዡရ
ᮏ〇ရ䛷䛾⏝䛻㐺䛧 䛯᥎ዡရ䜢 ♧䛧 䜎 䛩䚹
㘓 E EXPRESSBUILDER 䛾⏝䛻䛴䛔䛶
Express5800
䝅䝸 䞊䝈䛻ῧ䛾䛂 EXPRESSBUILDER䛃 CD-ROM 䜢 ⏝䛩䜛 㝿䛾ὀព
㡯䛻䛴䛔䛶ㄝ᫂䛧 䛶䛔䜎 䛩䚹

2
࿒ ষ
Ᏻୖ䛾䛤 ὀព
䡚ᚲ䛪䛚ㄞ䜏䛟 䛰䛥 䛔䡚
Safety Indications
a
Read Carefully
a
..............................................................................i
㆙࿌䝷 䝧䝹䛻䛴䛔䛶
Warning Label ............................................................................................................................... vi
䜎 䛘䛜䛝 ........................................................................................................................................... 1
┠ ḟ .............................................................................................................................................. 2
⏝ୖ䛾䛤 ὀព ................................................................................................................................ 4
䛚ᡭධ䜜䛻䛴䛔䛶 ............................................................................................................................ 5
ᮏ〇ရ䞉 ᾘ⪖ရ䛾ᗫᲠ䛻䛴䛔䛶 ....................................................................................................... 5
➨䠍 ❶ ึ䜑䛶䛚䛔䛻䛺䜛 䛸 䛝 䡚⟽䜢 㛤䛡䛶䛛䜙 䛚䛔䛻䛺䜜䜛 䜎 䛷䡚 ......................6
ᮏ〇ရ䛾≉㛗.................................................................................................................................... 6
⟽䛾୰㌟........................................................................................................................................... 7
ྛ㒊䛾ྡ⛠䛸 ᶵ⬟ ............................................................................................................................ 8
ྲྀ䜚 䛡......................................................................................................................................... 10
䝕䝞䜲 䝇タᐃ䝢 䞁 䛾☜ㄆ ........................................................................................................... 11
䝷 䝑 䝏䞁 䜾䝺 䞊䝹䛾ྲྀ䜚 䛡 .................................................................................................... 12
5.25
䜲 䞁 䝏䝕䝞䜲 䝇䝧䜲 䜈䛾ྲྀ䜚 䛡 ..................................................................................... 13
䜲 䞁 䝍 䝣 䜵 䞊䝇䜿䞊䝤 䝹䛾᥋⥆................................................................................................. 17
㟁※䜿䞊䝤 䝹䛾᥋⥆ .................................................................................................................. 19
⮬ᕫデ᩿䛾ᐇ⾜.......................................................................................................................... 19
BIOS
䛾䝏䜵 䝑 䜽 ....................................................................................................................... 20
䝕䝞䜲 䝇䝗 䝷 䜲 䝞䛾䜲 䞁 䝇䝖 䞊䝹 ............................................................................................. 20
➨䠎 ❶ ᪥ᖖ䛾⏝᪉ἲ........................................................................................................21
㟁※䛾 ON/OFF.............................................................................................................................. 21
䜲 䝆䜵 䜽 䝖 䝪䝍 䞁 䛸 䝡 䝆䞊䜲 䞁 䝆䜿䞊䝍 ....................................................................................... 22
䝕䜱 䝇 䜽 䛾䝉䝑 䝖 .......................................................................................................................... 23
䝕䜱 䝇 䜽 䛾䜲 䝆䜵 䜽 䝖 ................................................................................................................... 25
䝕䜱 䝇 䜽 䛾ᡭື䜲 䝆䜵 䜽 䝖 ............................................................................................................ 26
䝕䞊䝍 䛾᭩䛝 ㎸䜏䞉 ㄞ䜏ྲྀ䜚 ........................................................................................................ 27
ྲྀ䜚 ᢅ䛔ୖ䛾ὀព䡚ษ䛺䝕䞊䝍 䜢 Ᏺ䜛 䛯䜑䛻䡚 ........................................................................ 27
䝕䞊䝍 䛾䝞䝑 䜽 䜰䝑 䝥 ............................................................................................................... 28
䝕䜱 䝇 䜽 䛾䝷 䜲 䝖 䝥 䝻 䝔 䜽 䝖 .................................................................................................... 28
᪥ᖖ䛾ಖᏲ䠄 䜽 䝸 䞊䝙䞁 䜾䠅 .................................................................................................... 29
➨䠏 ❶ 䜽 䝸 䞊䝙䞁 䜾䞉 ᮏ〇ရ䛾㍺㏦ ..................................................................................30
ᮏ〇ရ䛾䜽 䝸 䞊䝙䞁 䜾 ................................................................................................................... 30
ᮏయ䛾䜽 䝸 䞊䝙䞁 䜾 .................................................................................................................. 30
䝺 䞁 䝈䛾䜽 䝸 䞊䝙䞁 䜾 ............................................................................................................... 31
䝕䜱 䝇 䜽 䛾䜽 䝸 䞊䝙䞁 䜾 ........................................................................................................... 32
ᮏ〇ရ䛾⛣ື䞉 ㍺㏦䛻䛴䛔䛶 ........................................................................................................ 32
➨䠐 ❶䛂 ᨾ㞀䛛䛺䠛䛃 䛸 ᛮ䛳 䛯䛸 䛝 䛿 ................................................................................34

3
㘓䠝 ᵝ..........................................................................................................................36
㘓䠞 DVD-RAM 䝕䜱 䝇䜽 䛻䛴䛔䛶 ..................................................................................37
DVD-RAM
䝕䜱 䝇䜽 䛾ྲྀ䜚 ᢅ䛔ୖ䛾ὀព....................................................................................... 38
㘓䠟 ูရ ......................................................................................................................39
㘓䠠 ᥎ዡရ ......................................................................................................................40
㘓䠡 EXPRESSBUILDER 䛾⏝䛻䛴䛔䛶 ......................................................................41

4
ঀဥષ͈̮ಕփ
ᮏ〇ရ䜢 ṇ䛧 䛟 ⏝䛩䜛 䛯䜑䛻ḟ䛾ὀព䜢 Ᏺ䛳 䛶䛟 䛰䛥 䛔䚹 䛣 䜜䜙 䛾ὀព䜢 ↓ど䛧 䛶䚸 ᮏ
〇ရ䜢 ⏝䛧 䛯ሙྜ䚸 ᮏ〇ရ䜎 䛯䛿㈨⏘䠄 䝕䞊䝍 䜔䛭䛾䛾⨨䠅 䛜◚ቯ䛧 䛯䜚 䚸 ᮏ〇ရ
䛜ㄗືస䛧 䛯䜚 䛩䜛 䛣 䛸 䛜䛒䜚 䜎 䛩䚹
䝕䝞䜲 䝇 䝗 䝷 䜲 䝞䛾䜲 䞁 䝇䝖 䞊䝹䛻䛴䛔䛶
ᮏయ⨨䛻䜲 䞁 䝇䝖 䞊䝹䛥 䜜䛶䛔䜛 䜸䝨䝺 䞊䝔 䜱 䞁 䜾䝅䝇䝔 䝮䛻䜘 䛳 䛶䛿䚸 䝕䝞䜲 䝇䝗 䝷
䜲 䝞䛾䜲 䞁 䝇䝖 䞊䝹䛜ᚲせ䛺ሙྜ䛜䛒䜚 䜎 䛩䚹
ᮏ〇ရ䛻ῧ䛾䛂 ෆⶶ DVD-RAM ⨨䝋 䝣 䝖 䜴䜵 䜰䝴䞊䝄䞊䝈䜺䜲 䝗 䛃 䛸 䛂 䝕䝞䜲 䝇䝗 䝷
䜲 䝞䝕䜱 䝇䜽 䛃 䜢 䛳 䛶ᮏయ⨨䛻䝗 䝷 䜲 䝞䜢 䜲 䞁 䝇䝖 䞊䝹䛧 䛶䛟 䛰䛥 䛔䚹
䜲 䞁 䝇䝖 䞊䝹䛻ᚲせ䛺᮲௳䜔䜲 䞁 䝇䝖 䞊䝹᪉ἲ䛻䛴䛔䛶䛿䚸 ῧ䛾䛂 ෆⶶ DVD-RAM ⨨
䝋 䝣 䝖 䜴䜵 䜰䝴䞊䝄䞊䝈䜺䜲 䝗 䛃 䜢 ཧ↷䛧 䛶䛟 䛰䛥 䛔䚹
᪥ᖖ䛾⏝䛻䛴䛔䛶
ᮏ〇ရ䛜ືస䛧 䛶䛔䜛 㛫䛿㟁※䜢 OFF 䛻䛧 䛺䛔䛷䛟 䛰䛥 䛔䚹 ᮏ〇ရ䛾ᨾ㞀䛾ཎᅉ
䛸 䛺䛳 䛯䜚 䚸 ᭩䛝 ㎸䜣䛰䝕䞊䝍 䜢 ኻ䛳 䛯䜚 䛩䜛 䛣 䛸 䛜䛒䜚 䜎 䛩䚹
䝕䜱 䝇䜽 䛾ᤄධ/ྲྀ䜚 ฟ䛧 䛿䚸 ᮏ〇ရ䛜䝕䜱 䝇䜽 䛾ᤄධ/ྲྀ䜚 ฟ䛧 䜢 ⾜䛘䜛 ≧ែ䛻
䛺䛳 䛶䛔䜛 䛣 䛸 䜢 ☜ㄆ䛧 䛶䛛䜙 ⾜䛳 䛶䛟 䛰䛥 䛔䚹 ↓⌮䜔䜚 䝕䜱 䝇䜽 䜢 ᤄධ䛧 䛯䜚 䚸
ྲྀ䜚 ฟ䛧 䛯䜚 䛩䜛 䛸 䚸 ᮏ〇ရ䛚䜘 䜃䝕䜱 䝇䜽 䛜◚ᦆ䛩䜛 䛣 䛸 䛜䛒䜚 䜎 䛩䚹
䝕䜱 䝇䜽 䛿䝅䝇䝔 䝮䛾㉳ືᚋ䛻ᤄධ䛧 䛶䛟 䛰䛥 䛔䚹 䜎 䛯䚸 ྲྀ䜚 ฟ䛧 䛿䝅䝇䝔 䝮䜢
⤊䛩䜛 ๓䛻⾜䛳 䛶䛟 䛰䛥 䛔䚹 䝕䜱 䝇䜽 䜢 ᤄධ䛧 䛯䜎 䜎 䚸 䝅䝇䝔 䝮䜢 ㉳ື䛧 䛯䜚 䚸
⤊䛧 䛯䜚 䛩䜛 䛸 䝕䞊䝍 䛜ቯ䜜䜛 䛚䛭䜜䛜䛒䜚 䜎 䛩䚹
䝕䜱 䝇䜽 ௨እ䛾䜒 䛾䜢 ᮏ〇ရ䛻ᤄධ䛧 䛺䛔䛷䛟 䛰䛥 䛔䚹 ᮏ〇ရ䛾ᨾ㞀䛾ཎᅉ䛸 䛺
䜚 䜎 䛩䚹 ≉䛻䝕䜱 䝇䜽 䜢 䜿䞊䝇䛛䜙 ྲྀ䜚 ฟ䛩䛸 䛝 䛻䚸 䝕䜱 䝇䜽 䛾ྲྀᢅㄝ᫂᭩䜔䝷
䝧䝹䛺䛹 䛜䛟 䛳 䛴䛔䛶䛔䜛 䛣 䛸 䛜䛒䜚 䜎 䛩䛾䛷ὀព䛧 䛶䛟 䛰䛥 䛔䚹
ᮏ〇ရ䜢 ⛣ື䛩䜛 ๓䛻䝕䜱 䝇䜽 䜢 ྲྀ䜚 ฟ䛧 䚸 䝖 䝺 䞊䜢 㛢䛨 䛶䛟 䛰䛥 䛔䚹 䝕䜱 䝇䜽
䜢 ධ䜜䛯䜎 䜎 ᮏ〇ရ䜢 ⛣ື䛩䜛 䛸 䝕䜱 䝇䜽 䜔ᮏ〇ရ䜢 ᦆയ䛩䜛 䛚䛭䜜䛜䛒䜚 䜎 䛩䚹
ᮏ〇ရ䜢 ⦪ྥ䛝 䛻タ⨨䛧 䛯ሙྜ䛿 8cmCD 䜢 ⏝䛷䛝 䜎 䛫䜣䚹 8cmCD 䜢 ⏝䛩䜛
ሙྜ䛿䚸 ᶓྥ䛝 䛻タ⨨䛷䛝 䜛 䝕䝞䜲 䝇䝧䜲 䛻ྲྀ䜚 䛡䛶䛟 䛰䛥 䛔䚹
CD
つ᱁䛻‽ᣐ䛧 䛺䛔䛂 䝁 䝢 䞊䜺䞊䝗 䛝 CD䛃 䛺䛹 䛾䝕䜱 䝇䜽 䛻䛴䛝 䜎 䛧 䛶䛿䚸
CD
⏕ᶵჾ䛻䛚䛡䜛 ⏕䛾ಖド䛿䛔䛯䛧 䛛䛽䜎 䛩䚹

5
̤ව̞ͦ̾̀ͅ
䝺 䞁 䝈䛾䛚ᡭධ䜜䛻䛴䛔䛶
㛗㛫⏝䛩䜛 䛸 䚸 ᮏ〇ရ䛾䝺 䞁 䝈䛻䜋䛣 䜚 䛺䛹 䛜╔䛧 䛶䚸 ṇᖖ䛻ㄞ䜏᭩䛝 䛷
䛝 䛺䛟 䛺䜛 䛚䛭䜜䛜䛒䜚 䜎 䛩䚹
⏝⎔ቃ䜔⏝ᅇᩘ䛻䜘 䛳 䛶␗䛺䜚 䜎 䛩䛜䚸 ῧ䛾䝺 䞁 䝈䜽 䝸 䞊䝘䞊䜢 ⏝䛔䛶䚸
2
䞄 ᭶䛻୍ᗘ䛚ᡭධ䜜䛩䜛 䛣 䛸 䜢 ᥎ዡ䛧 䜎 䛩䚹 䜽 䝸 䞊䝙䞁 䜾䛾ヲ⣽䛻䛴䛔䛶䛿 3
❶䜢 ཧ↷䛧 䛶䛟 䛰䛥 䛔䚹
ᮏయ䛾䛚ᡭධ䜜䛻䛴䛔䛶
ᮏయ⨨䛾㟁※䜢 OFF 䛻䛧 䛶䛟 䛰䛥 䛔䚹
䜘 䛤 䜜䛿䜔䜟䜙 䛛䛔䛔䛯ᕸ䛷㍍䛟 䜅䛝 ྲྀ䛳 䛶䛟 䛰䛥 䛔䚹
䜘 䛤 䜜䛜䜂䛹 䛔䛸 䛝 䛿䚸 䛖 䛩䜑䛯ྎᡤ⏝Ὑ䠄 ୰ᛶ䠅 䛻ᕸ䜢 䜂䛯䛧 䚸 䜘 䛟 䛧 䜌䛳
䛶䛛䜙 䜅䛔䛶䛟 䛰䛥 䛔䚹
Ꮫ䛮䛖 䛝 䜣䜢 䛤 ⏝䛾㝿䛿䚸 䛭䛾ὀព᭩䛻ᚑ䛳 䛶䛟 䛰䛥 䛔䚹
䝧䞁 䝆䞁 䜔䝅䞁 䝘䞊䛺䛹 䛾⁐䜢 䜟䛺䛔䛷䛟 䛰䛥 䛔䚹
ུୋȆક͈ܤ̞̾̀ͅ
ᮏ〇ရ䛾ᗫᲠ䜎 䛯䛿⏝䛷䛝 䛺䛟 䛺䛳 䛯䝕䜱 䝇䜽 䛾ᗫᲠ䛻䛴䛔䛶䛿ྛ⮬య䛾ᗫ
Რ᪉ἲ䛻ᚑ䛳 䛶䛟 䛰䛥 䛔䚹
DVD-RAM
䝕䜱 䝇䜽 䛻ಖᏑ䛥 䜜䛶䛔䜛 䝕䞊䝍 䛿䚸 ➨୕⪅䛻䜘 䛳 䛶ඖ䜔⏕䚸
⏝䛥 䜜䛺䛔䜘 䛖 䛚ᐈᵝ䛾㈐௵䛻䛚䛔䛶☜ᐇ䛻ฎศ䛧 䛶䛛䜙 ᗫᲠ䛧 䛶䛟 䛰䛥 䛔䚹
ಶே䛾䝥 䝷 䜲 䝞䝅䞊䜔ᴗ䛾ᶵᐦሗ䜢 ಖㆤ䛩䜛 䛯䜑䛻༑ศ䛺㓄៖䛜ᚲせ䛷䛩䚹
6
లˍડ ̤͛̀ঀ̧̞̈́ͥ͂ͅ
ȡภͬٳ̫̥̤̀ͣঀ̞̈́ͦͥ́͘ͅȡ
ᮏ〇ရ䜢 ึ䜑䛶䛚䛔䛻䛺䜛 ሙྜ䛿䚸 䛣 䛾❶䛛䜙 䛚ㄞ䜏䛟 䛰䛥 䛔䚹
䛣 䛣 䛷䛿䚸 ᮏ〇ရ䛾≉㛗䜔Ვໟ⟽䜢 㛤䛡䛶䛛䜙 ᮏ〇ရ䜢 ⏝䛷䛝 䜛 䜘 䛖 䛻䛺䜛 䜎 䛷䛾సᴗ
䜢 㡰䜢 ㏣䛳 䛶ㄝ᫂䛧 䜎 䛩䚹
ᮏ〇ရ䛚䜘 䜃⏝䛩䜛 䝋 䝣 䝖 䜴䜵 䜰䛻䛴䛔䛶᫂䛺Ⅼ䛜䛒䜚 䜎 䛧 䛯䜙 䚸 䛚㈙䛔ୖ䛢䛾㈍
ᗑ䜈䛤 ┦ㄯ䛟 䛰䛥 䛔䚹
ུୋ͈අಿ
ᮏ〇ရ䛿䚸 䝃䞊䝞ᶵჾ䛺䛹 䛾䝣 䜯 䜲 䝹䝅䝇䝔 䝮⏝䛻㛤Ⓨ䛥 䜜䛯ෆⶶᆺグ᠈⨨䛷䚸 䝻 䞊䜶
䞁 䝗 䛛䜙 䝝䜲 䜶䞁 䝗 䜎 䛷䛾䝁 䞁 䝢 䝳 䞊䝍 䝅䝇䝔 䝮䛷⏝䛩䜛 䛯䜑䛻タィ䛥 䜜䛯䚸 ᐜ㔞䛾
㧗ᛶ⬟ DVD-RAM ⨨䛷䛩䚹
ከᵝ䛺 䝯 䝕䜱 䜰 䜢 ᭩䛝 ㎸䜏䞉 ㄞ䜏ྲྀ䜚 ྍ⬟
<
᭩䛝 ㎸䜏䞉 ㄞ䜏ྲྀ䜚 >
ᐜ㔞
DVD-RAM
∦㠃䛷 4.7GB/୧㠃䛷 9.4GB
䠄 DVD-RAM䠅
<
ㄞ䜏ྲྀ䜚 >
DVD-ROM
ከᶵ⬟
CD-ROM
䝎䜲 䝺 䜽 䝖 䜸䞊䝞䞊䝷 䜲 䝖
CD-R
2MB
䛾䝕䞊䝍 䝞䝑 䝣 䜯
CD-RW
䝕䞊䝍 䛾ㄞ䜏ྲྀ䜚 䞉 ᭩䛝 ㎸䜏
ᶆ‽つ᱁䜢 䝃䝫䞊䝖
ᴗ⏺ᶆ‽䛾 ATA 䜲 䞁 䝍 䝣 䜵 䞊䝇䜢 䝃䝫䞊䝖
㧗㏿䝕䞊䝍 ㌿㏦
DVD-RAM
䝣 䜷 䞊䝷 䝮䛾⤫୍つ᱁䠄 Ver.2.0䠅 䛻‽
ᣐ
᭱ 4155KB/⛊䠄 DVD-RAM Ver.2.0䠅
㧗ရ㉁
ಙ㢗ᛶ䛾㧗䛔䝸 䞊䝗 䞉 䝷 䜲 䝖 䝦䝑 䝗 䜢 ᥇⏝
᭱᪂䛾㌿㏦䝰䞊䝗 䜢 䝃䝫䞊䝖
㧗㡢㉁䛷⏕
Ultra DMA
䝰䞊䝗 2/䝰䞊䝗 4 䛻ᑐᛂ
㧗⪏ሻᇕᵓ㐀
䝬䝹䝏䝽䞊䝗 DMA 䝰䞊䝗 2䚸 PIO ㌿㏦䝰䞊䝗
䛻䜒 ᑐᛂ
7
ภ͈ಎ
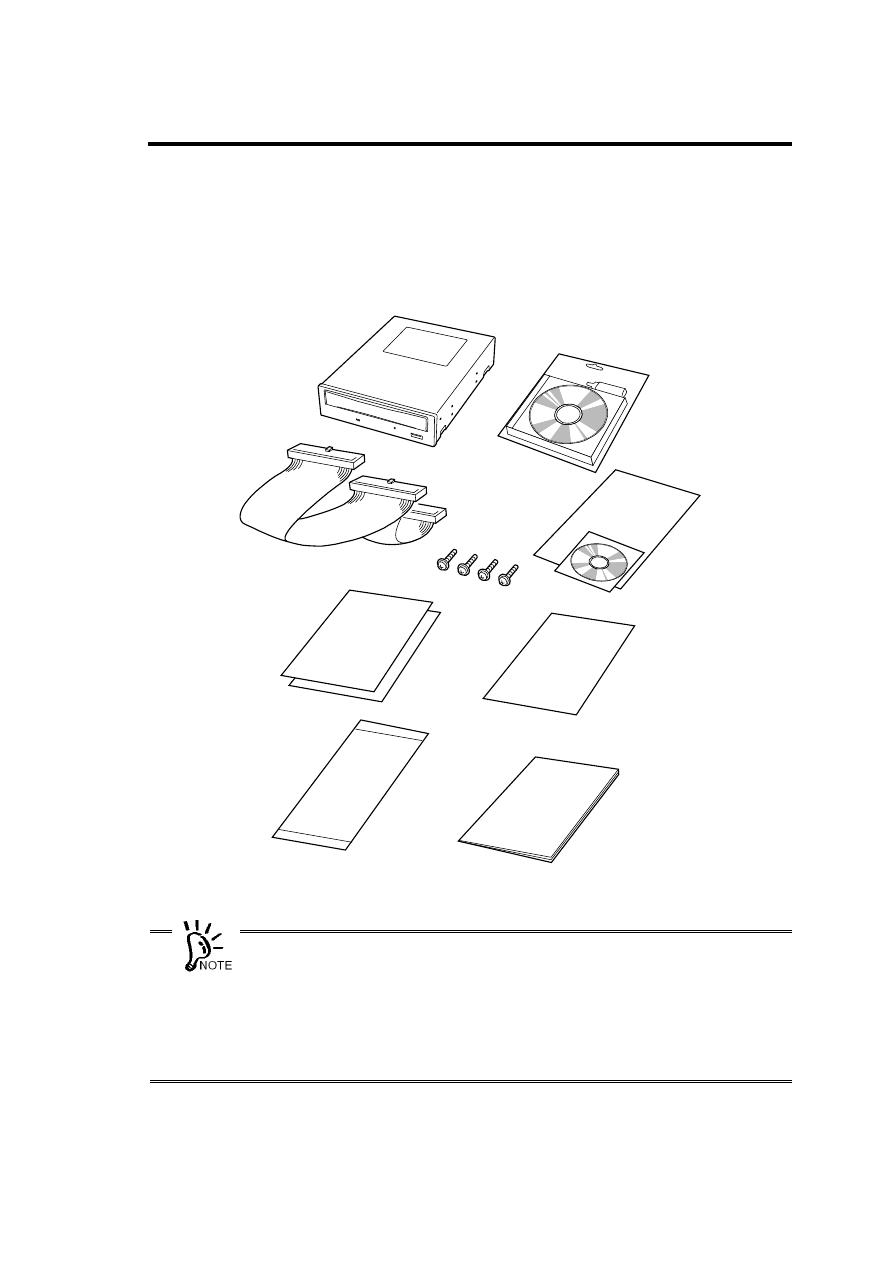
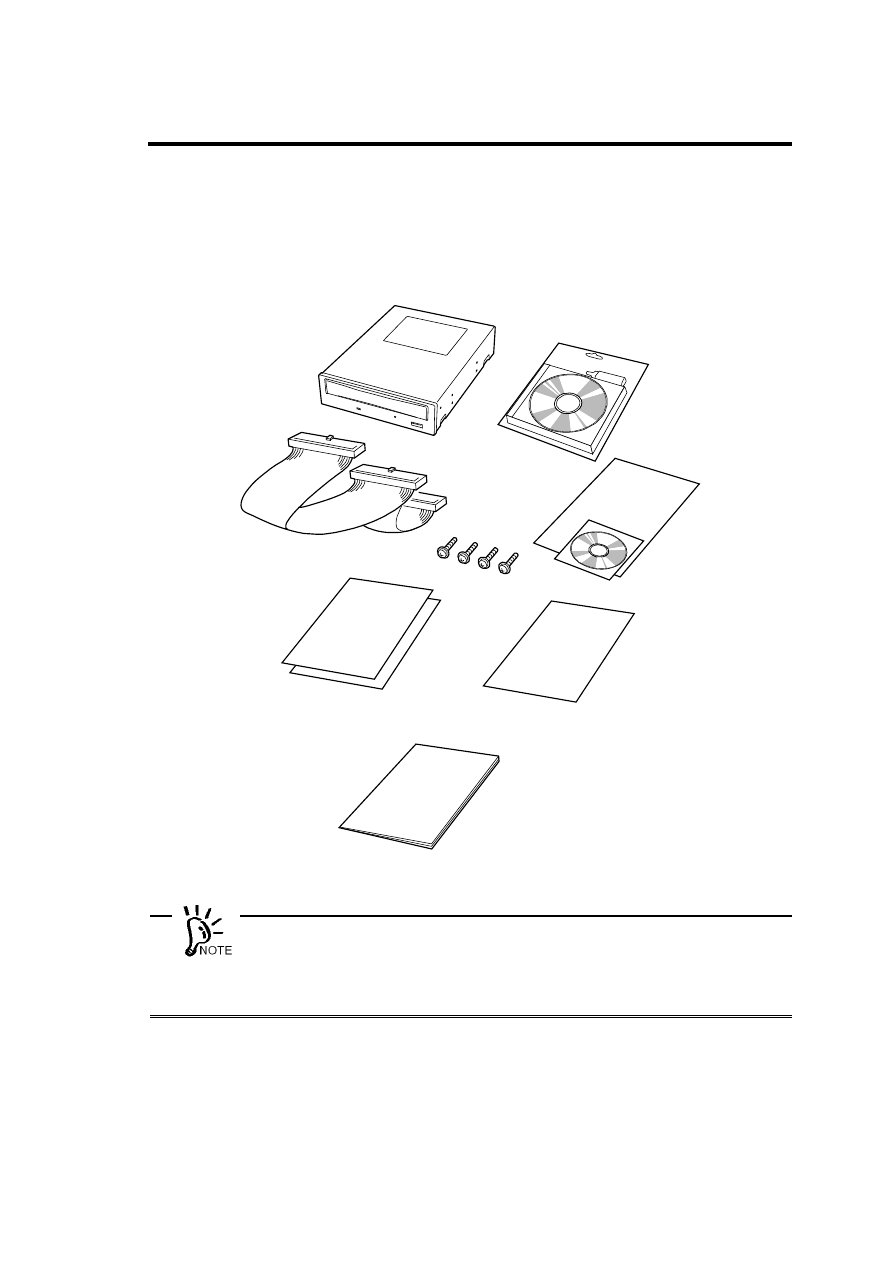
Ვໟ⟽䜢 㛤䛡䛶ḟ䛾䜒 䛾䛜䛩䜉䛶䛭䜝 䛳 䛶䛔䜛 䛣 䛸 䜢 ☜ㄆ䛧 䚸 䛭䜜䛮䜜䛾Ⅼ᳨䜢 ⾜䛳 䛶䛟
䛰䛥 䛔䚹 ୍㊊䜚 䛺䛔䜒 䛾䜔ᦆയ䛧 䛶䛔䜛 䜒 䛾䛜䛒䜛 ሙྜ䛻䛿䚸 ㈍ᗑ䛻㐃⤡䛧 䛶䛟 䛰䛥
䛔䚹
* M3
䝛䝆䚸 䝛䝆㒊㛗䛥 : 6mm
x
ᮏ〇ရ䜢 ㆡΏ䛩䜛 ሙྜ䛻䛿䚸 ᮏ᭩䜢 ే䛫䛶ㆡΏ䛧 䛶䛟 䛰䛥 䛔䚹
x
⟽䛸 ⦆⾪ᮦ䛿ᮏ〇ရ䛾⛣ື䜔ಖ⟶䛻⏝䛧 䜎 䛩䛾䛷ษ䛻ಖ⟶䛧 䛶䛚䛔䛶䛟 䛰
䛥 䛔䚹
x
ᮏ〇ရ䛻䛿䚸䝕䞊䝍 ⏝䝕䜱 䝇䜽 䛿ྵ䜎 䜜䛶䛔䜎 䛫䜣䚹㈍ᗑ䛷ู㏵㉎ධ䛧 䛶䛟 䛰䛥 䛔䚹
x
䛄 ಖド᭩䛅 䛿䚸 ㈍ᗑ䛷ᡤᐃ㡯䜢 グධ䛧 䛶䛚Ώ䛧 䛧 䜎 䛩䚹 グ㍕ෆᐜ䜢 ☜ㄆ䛾ୖ䚸
ษ䛻ಖ⟶䛧 䛶䛟 䛰䛥 䛔䚹 ಖドᮇ㛫୰䛻ᨾ㞀䛧 䛯ሙྜ䛿䚸䛄 ಖド᭩䛅 䛾グ㍕ෆᐜ䛻ᇶ䛵
䛝 ↓ᩱಟ⌮䛔䛯䛧 䜎 䛩䚹
ෆⶶ DVD-RAM ⨨
䝺 䞁 䝈䜽 䝸
䝘
IDE
䜿
䝤 䝹
䝕䝞䜲 䝇 䝗 䝷 䜲 䝞
䝉䝑 䝖
䝛䝆*䠄 4 ᮏ䠅
ὀព㡯
䠄 2 ᯛ䠅
⏝≧ἣ☜ㄆ
䝏䜵 䝑 䜽 䝅
䝖
ಖド᭩
䝴
䝄 䝈䜺䜲 䝗
䠄 ᮏ᭩䠅
8
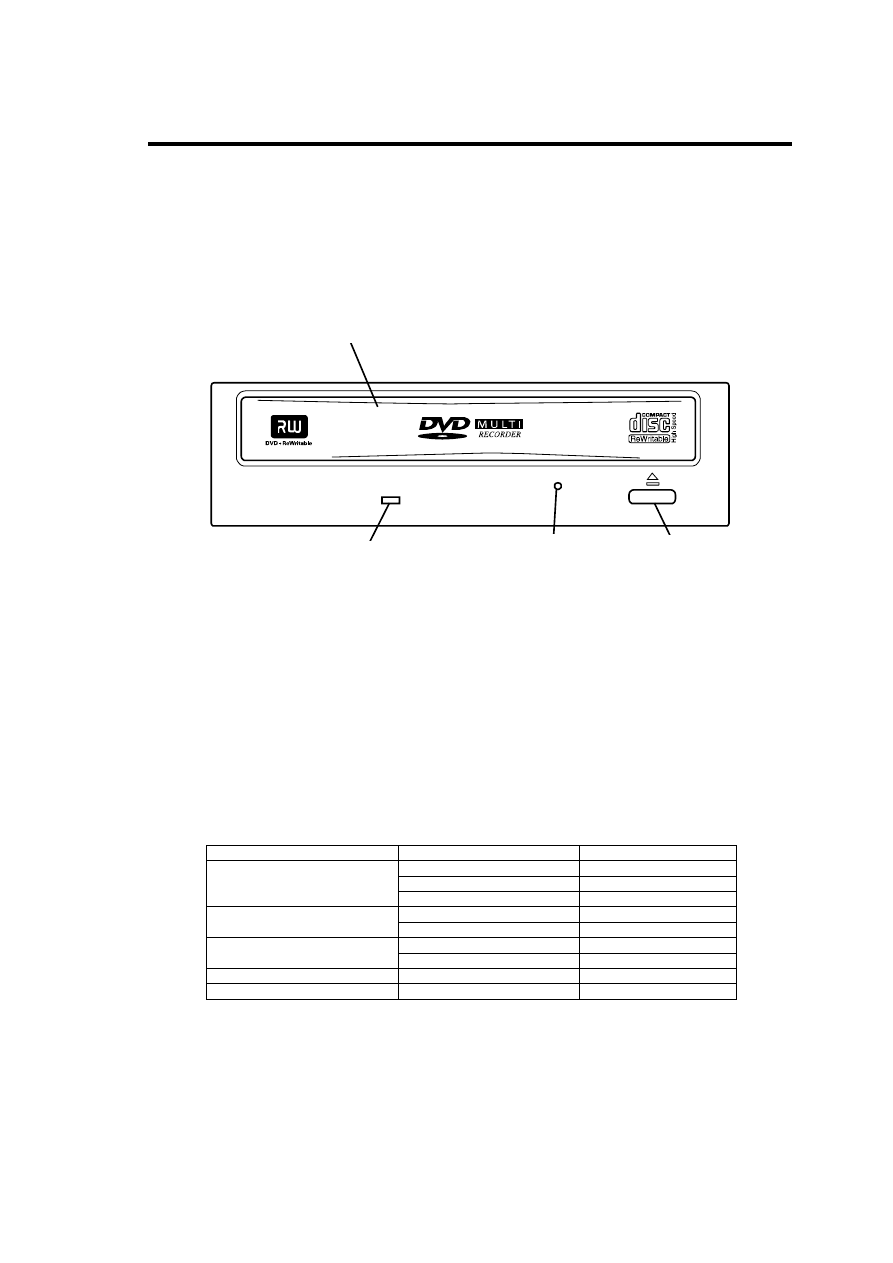
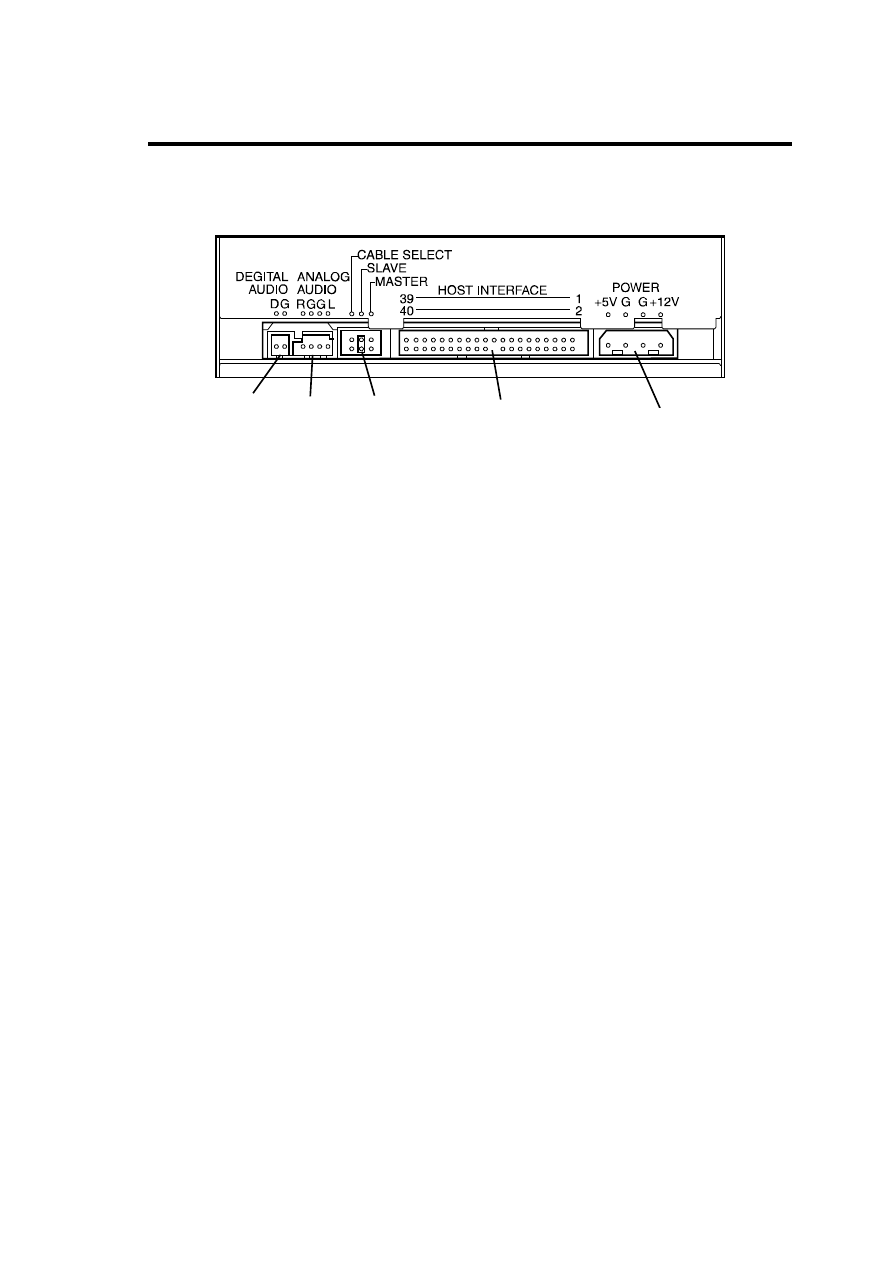
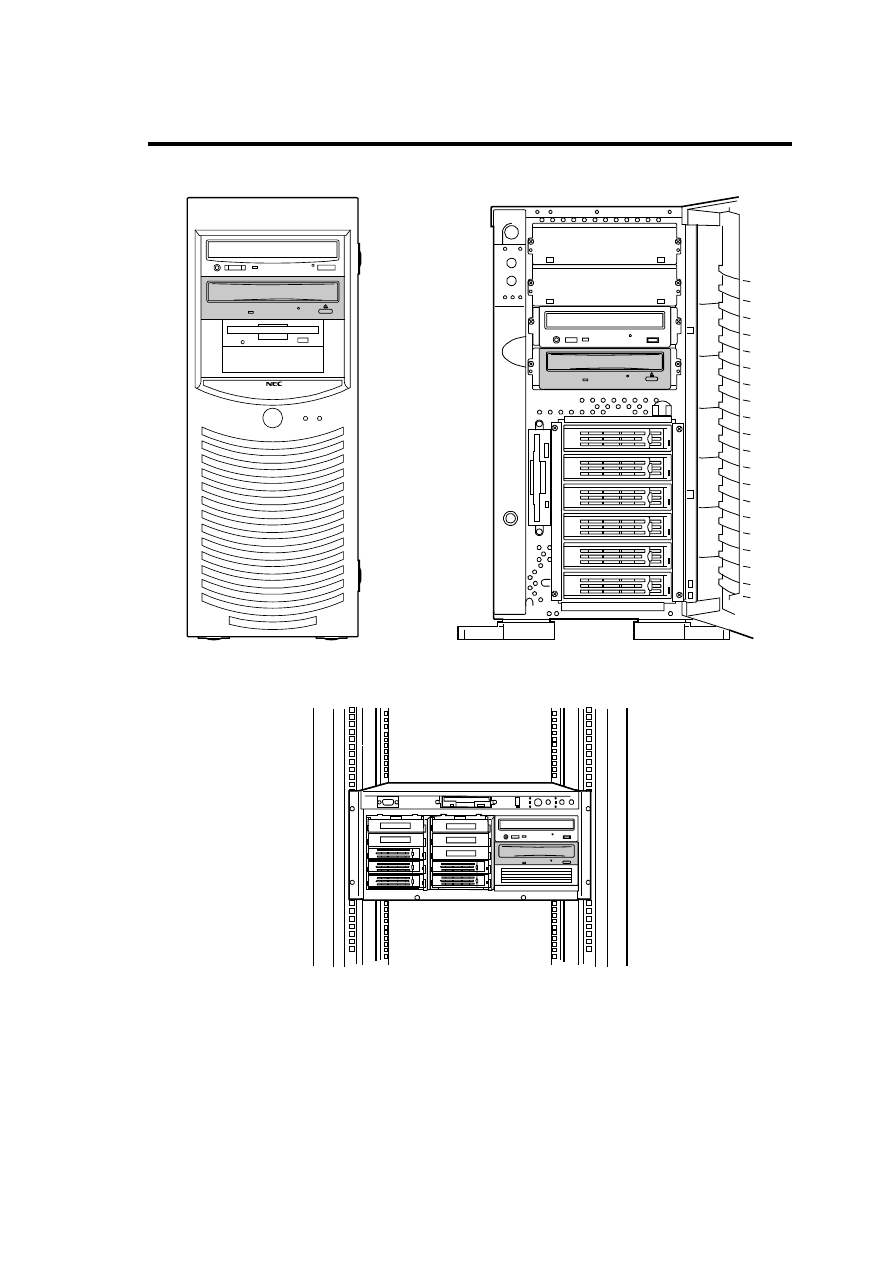
ڎ໐͈ྴઠ͂ܥෝ
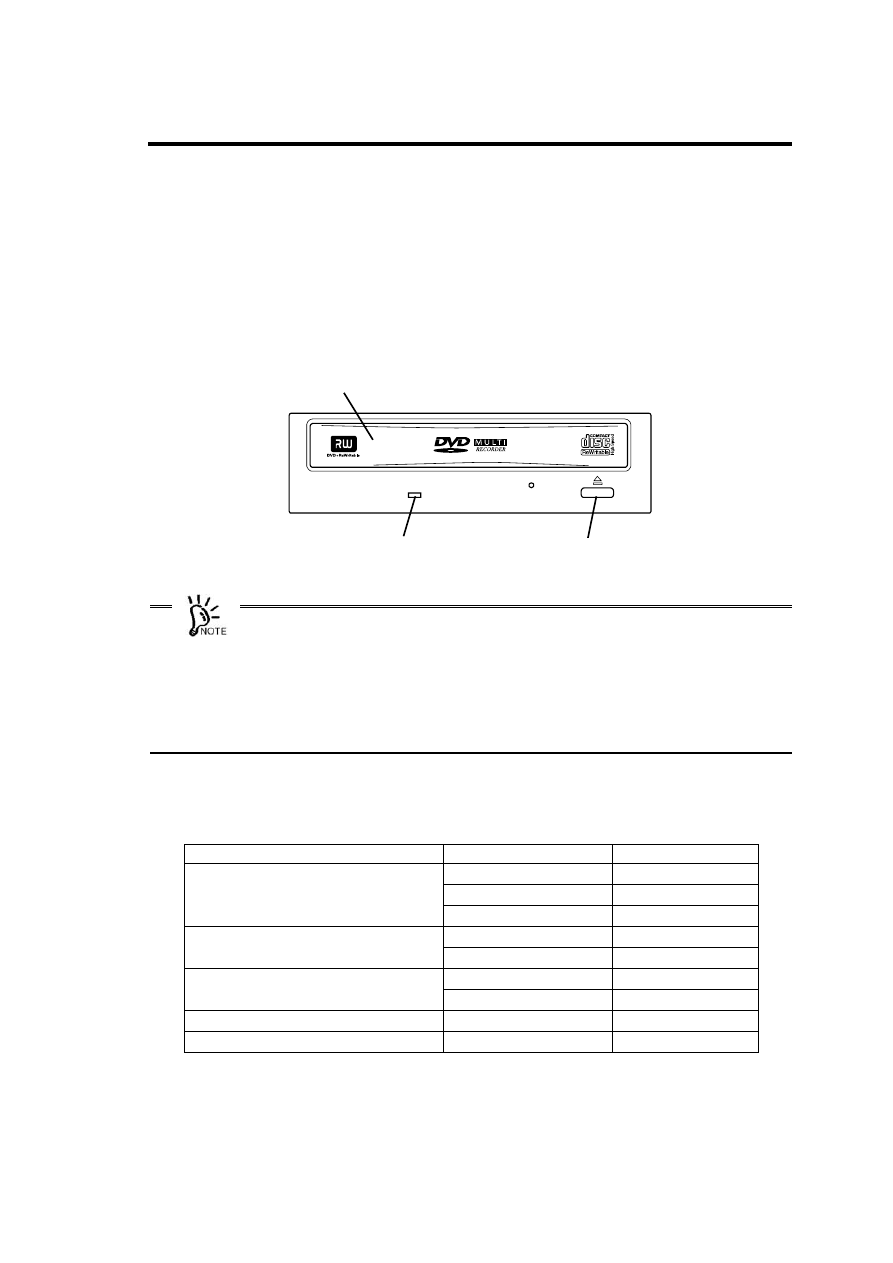
ᮏ〇ရ䛾タ⨨䜔ྲྀ䜚 ᢅ䛔䛾㝿䛻⏝䛩䜛 㒊ရ䛾ྡ๓䛸 䛭䛾⨨䜢 ♧䛧 䜎 䛩䚹
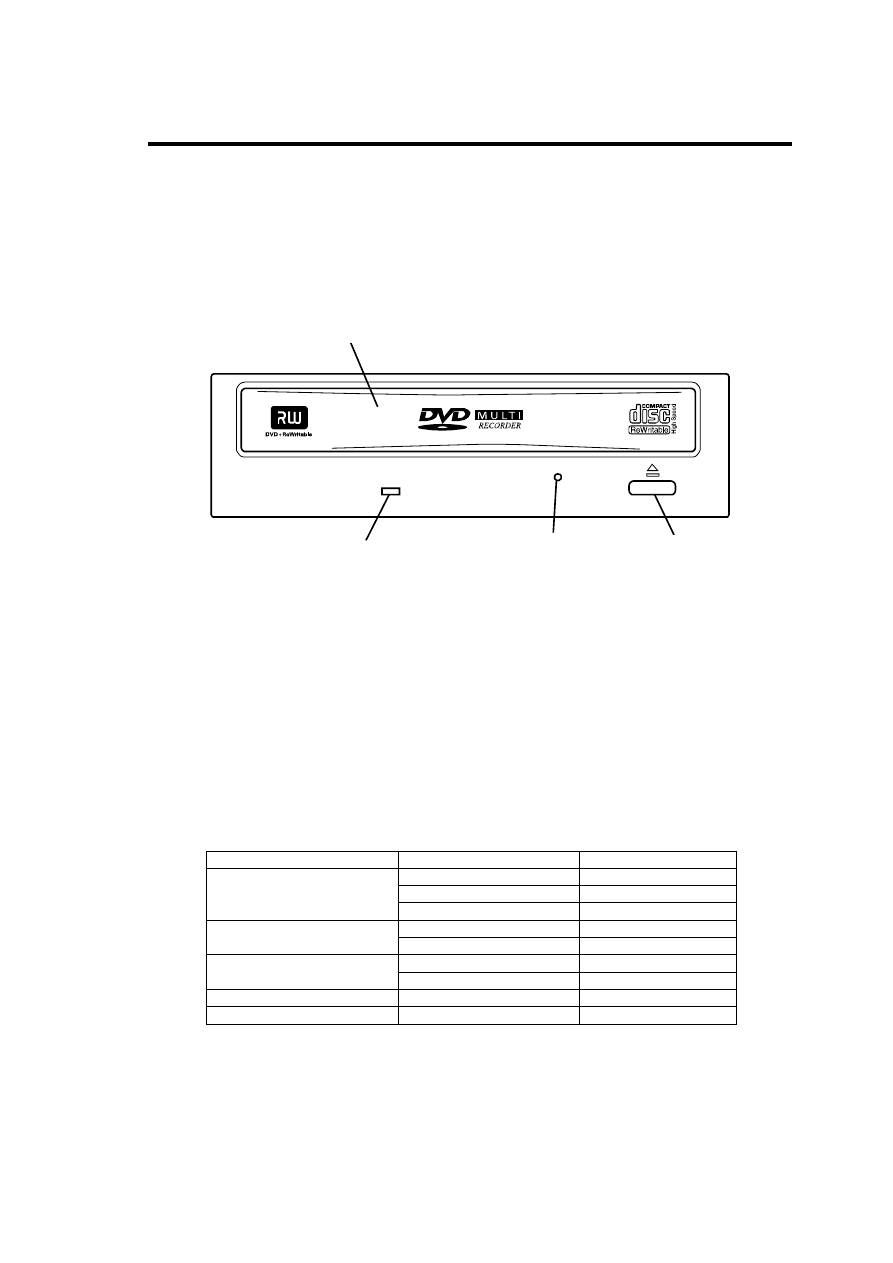
=๓㠃?
1
䝖 䝺 䞊
䝕䜱 䝇䜽 䜢 ⨨䛟 ሙᡤ䚹
㟁※䛜ධ䛳 䛶䛔䜛 ≧ែ䛷䜲 䝆䜵 䜽 䝖 䝪䝍 䞁 䜢 ᢲ䛩䛛䚸䜎 䛯䛿䝖 䝺 䞊䜢 ᢲ䛧 ㎸䜐䛸 ືస䛩䜛䠄 㟁
※䛜ධ䛳 䛶䛔䛺䛔䛸 䛝 䛿䚸 ືస䛧 䜎 䛫䜣䠅䚹
2
䜲 䝆䜵 䜽 䝖 䝪䝍 䞁
䝕䜱 䝇䜽 䜢 䝉䝑 䝖 䛩䜛 䛸 䛝 䜔ྲྀ䜚 ฟ䛩䛸 䛝 䛻ᢲ䛩䝪䝍 䞁䠄 㟁※䛜 OFF 䛾䛸 䛝 䛚䜘 䜃䝥 䝻 䜾䝷
䝮䛷⚗Ṇ䛥 䜜䛶䛔䜛 䛸 䛝 䛿ືస䛧 䜎 䛫䜣䠅䚹
3
ᙉไ䜲 䝆䜵 䜽 䝖 䝩䞊䝹
䝢 䞁 䠄 䜎 䛳 䛩䛠 䛻ఙ䜀䛧 䛯䜽 䝸 䝑 䝥 䛺䛹 䠅 䜢 ᢲ䛧 ㎸䜐䛸 䚸 ᡭື䛷䝖 䝺 䞊䜢 䜲 䝆䜵 䜽 䝖 䛷䛝 䜛
䠄 䜲 䝆䜵 䜽 䝖 䝪䝍 䞁 䜔䝋 䝣 䝖 䜴䜵 䜰䛛䜙 䜲 䝆䜵 䜽 䝖 䛷䛝 䛺䛔䛸 䛝 䛻䛳 䛶䛟 䛰䛥 䛔䠅䚹
4
䝡 䝆䞊䜲 䞁 䝆 䜿䞊䝍
㟁※䛜ධ䛳 䛶䛔䜛 䛸 䚸 䜲 䞁 䝆䜿䞊䝍 䛿ḟ䛾䜘 䛖 䛻Ⅼⅉ䛩䜛 䚹
ᤄධ䝯 䝕䜱 䜰
ືస≧ែ
⾲♧
᭩䛝 ㎸䜏୰
䜾䝸
䞁 Ⅼ⁛
ㄞ䜏ྲྀ䜚 ୰
䜾䝸
䞁 Ⅼⅉ
DVD-RAM
䝕䜱 䝇 䜽
ᚅᶵ୰
ᾘⅉ
ㄞ䜏ྲྀ䜚 ୰
䜾䝸
䞁 Ⅼⅉ
CD-ROM
䛺䛹 䛾䝕䜱 䝇 䜽
ᚅᶵ୰
ᾘⅉ
ㄞ䜏ྲྀ䜚 ୰
䜾䝸
䞁 Ⅼⅉ
CD/DA
䛺 䛹 䛾䝕䜱 䝇䜽
ᚅᶵ୰
ᾘⅉ
䝕䜱 䝇䜽 ᮍᤄධ
ᾘⅉ
䝕䜱 䝇䜽 ᤄධ/ฟ
䜾䝸
䞁 Ⅼ⁛
1
4
3
2
9
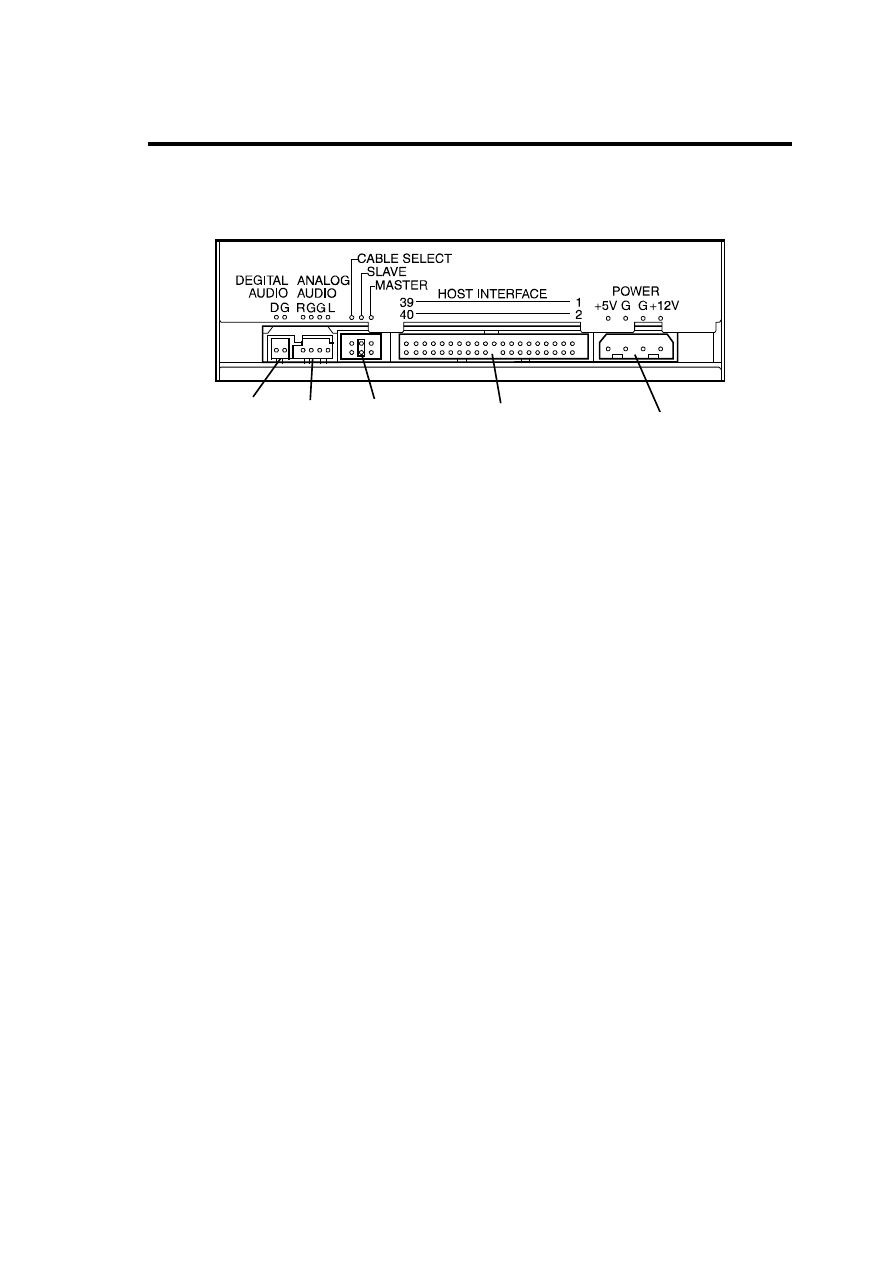
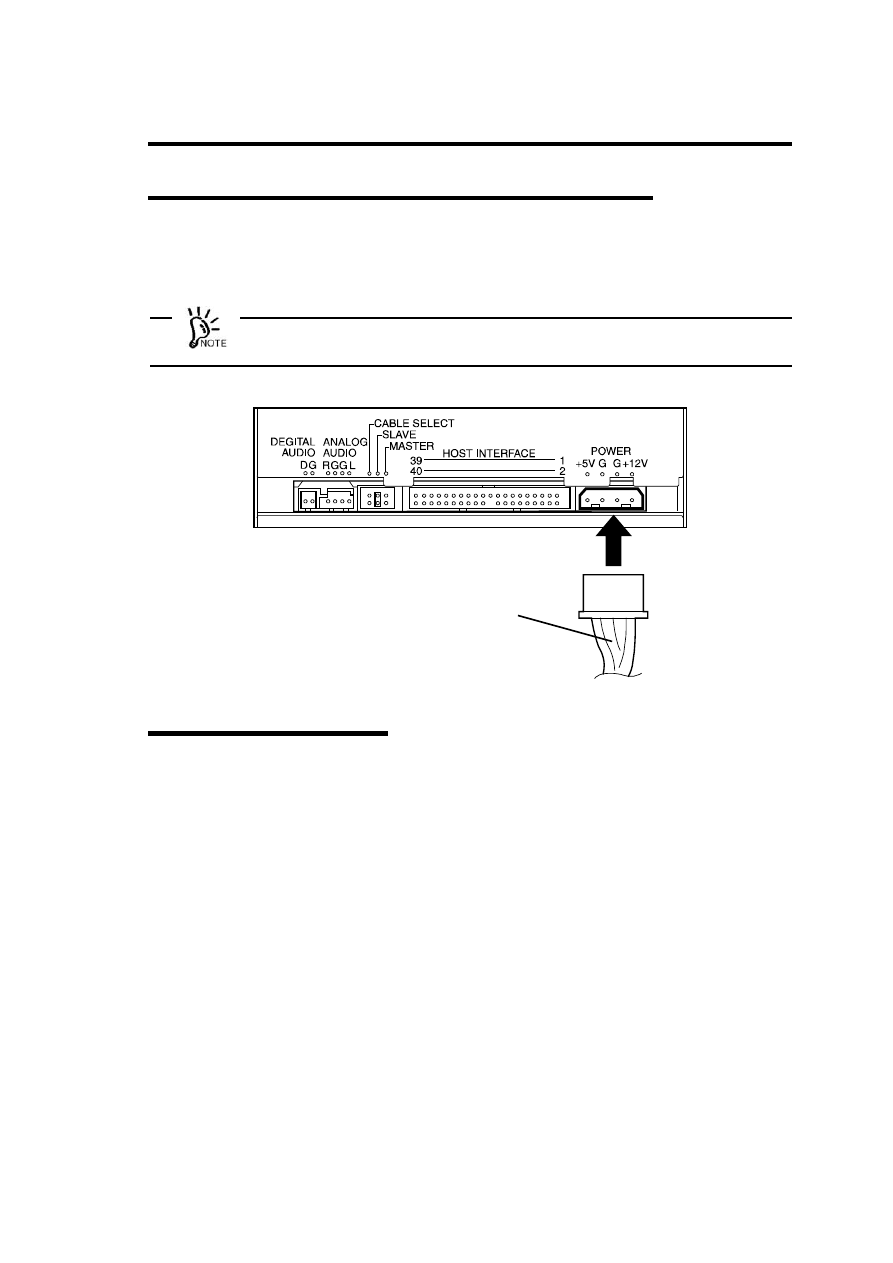
=⫼㠃?
1
㟁※䝁 䝛䜽 䝍
㟁※䜿䞊䝤 䝹䜢 ᥋⥆䛩䜛 䝁 䝛䜽 䝍 䚹
2
IDE
䜲 䞁 䝍 䝣 䜵 䞊䝇䝁 䝛䜽 䝍
IDE
䝞䝇䛻᥋⥆䛩䜛 䝁 䝛䜽 䝍 䚹 ῧ䛾䜿䞊䝤 䝹䜢 䛳 䛶᥋⥆䛩䜛 䚹
3
䝕䝞䜲 䝇タᐃ䝢 䞁
ෆ㒊タᐃ䜢 䛩䜛 䝢 䞁 䚹
4
䜸䞊䝕䜱 䜸䝁 䝛䜽 䝍
䜸䞊䝕䜱 䜸䜿䞊䝤 䝹䜢 ᥋⥆䛩䜛 䝁 䝛䜽 䝍 䚹
5
ᮍ⏝䝁 䝛䜽 䝍
ఱ䜒 ᥋⥆䛧 䛺䛔䛷䛟 䛰䛥 䛔䚹
5
4
3
2
1
10
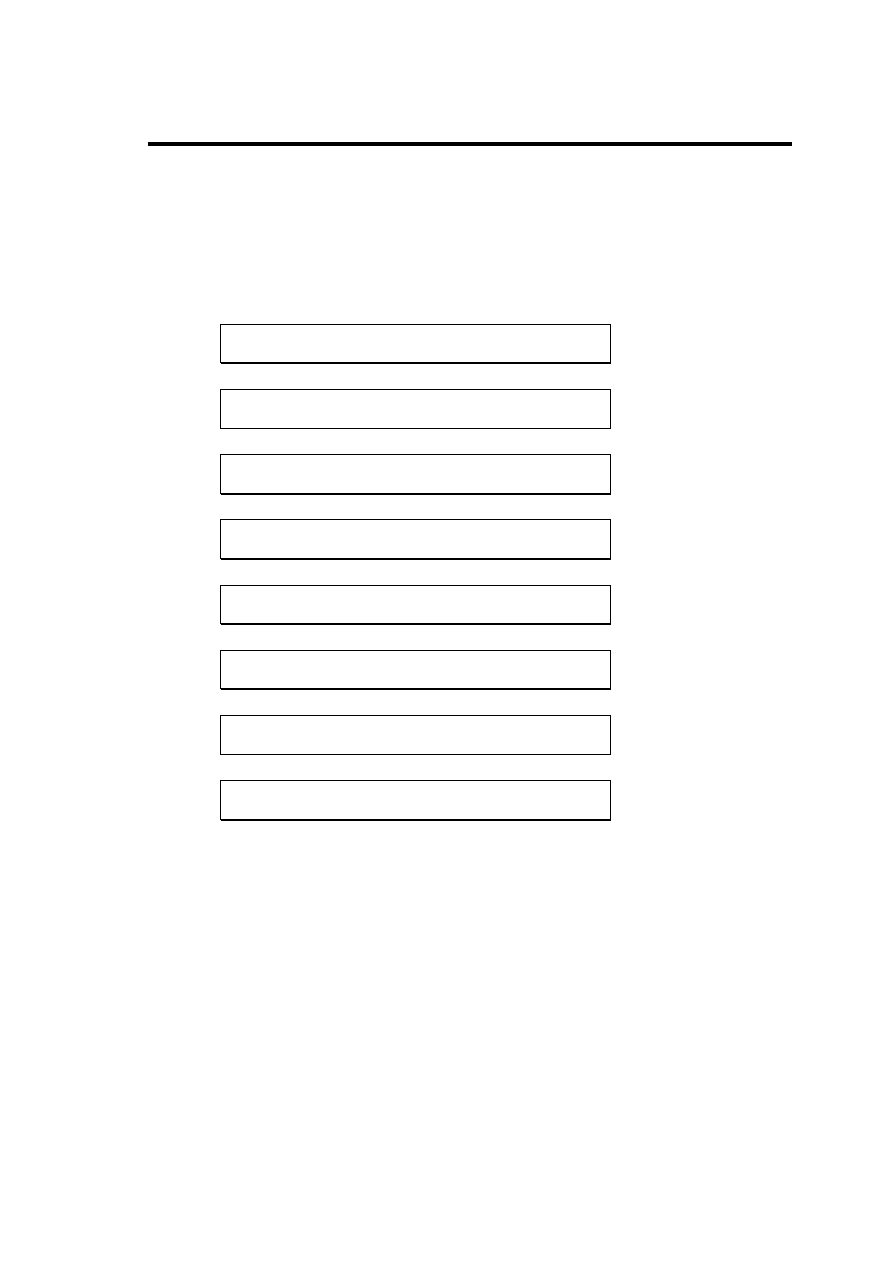
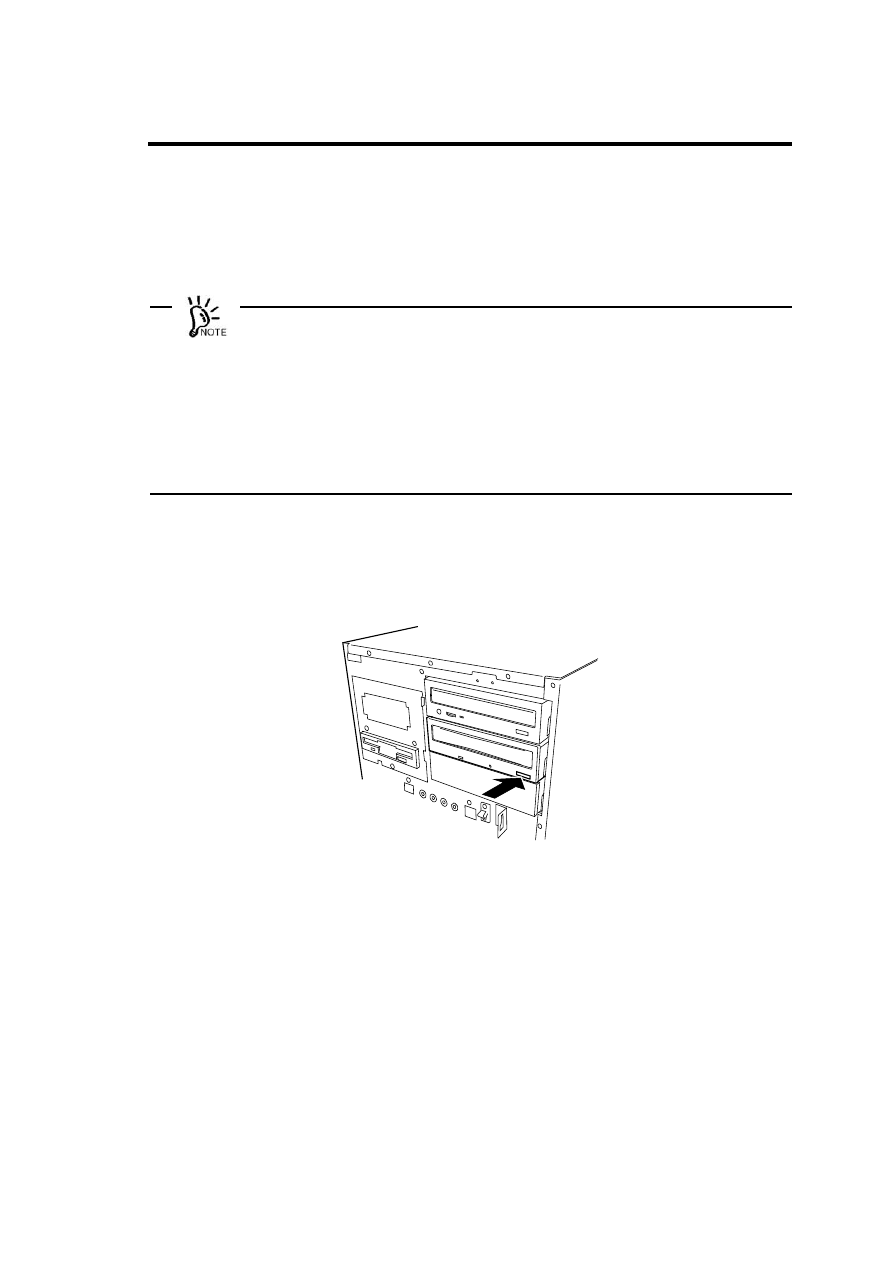
৾ͤັ̫
ᮏ〇ရ䛿䚸 ᮏయ⨨䛾 5.25 䜲 䞁 䝏䝕䝞䜲 䝇䝧䜲 䛻ྲྀ䜚 䛡䜛 䛣 䛸 䛜䛷䛝 䜎 䛩䚹 䝉䝑 䝖 䜰䝑
䝥 䛾㡰ᗎ䛿ḟ䛾䛸 䛚䜚 䛷䛩䚹
䝇䝔 䝑 䝥 1 䝕䝞䜲 䝇タᐃ䝢 䞁 䛾☜ㄆ
Ð
䝇䝔 䝑 䝥 2 䝷 䝑 䝏䞁 䜾䝺 䞊䝹䛾ྲྀ䜚 䛡
Ð
䝇䝔 䝑 䝥 3 5.25 䜲 䞁 䝏䝕䝞䜲 䝇䝧䜲 䜈䛾ྲྀ䜚 䛡
Ð
䝇䝔 䝑 䝥 4 䜲 䞁 䝍 䝣 䜵 䞊䝇䜿䞊䝤 䝹䛾᥋⥆
Ð
䝇䝔 䝑 䝥 5 㟁※䜿䞊䝤 䝹䛾᥋⥆
Ð
䝇䝔 䝑 䝥 6 ⮬ᕫデ᩿䛾ᐇ⾜
Ð
䝇䝔 䝑 䝥 7 BIOS 䛾䝏䜵 䝑 䜽
Ð
䝇䝔 䝑 䝥 8 䝕䝞䜲 䝇䝗 䝷 䜲 䝞䛾䜲 䞁 䝇䝖 䞊䝹
11
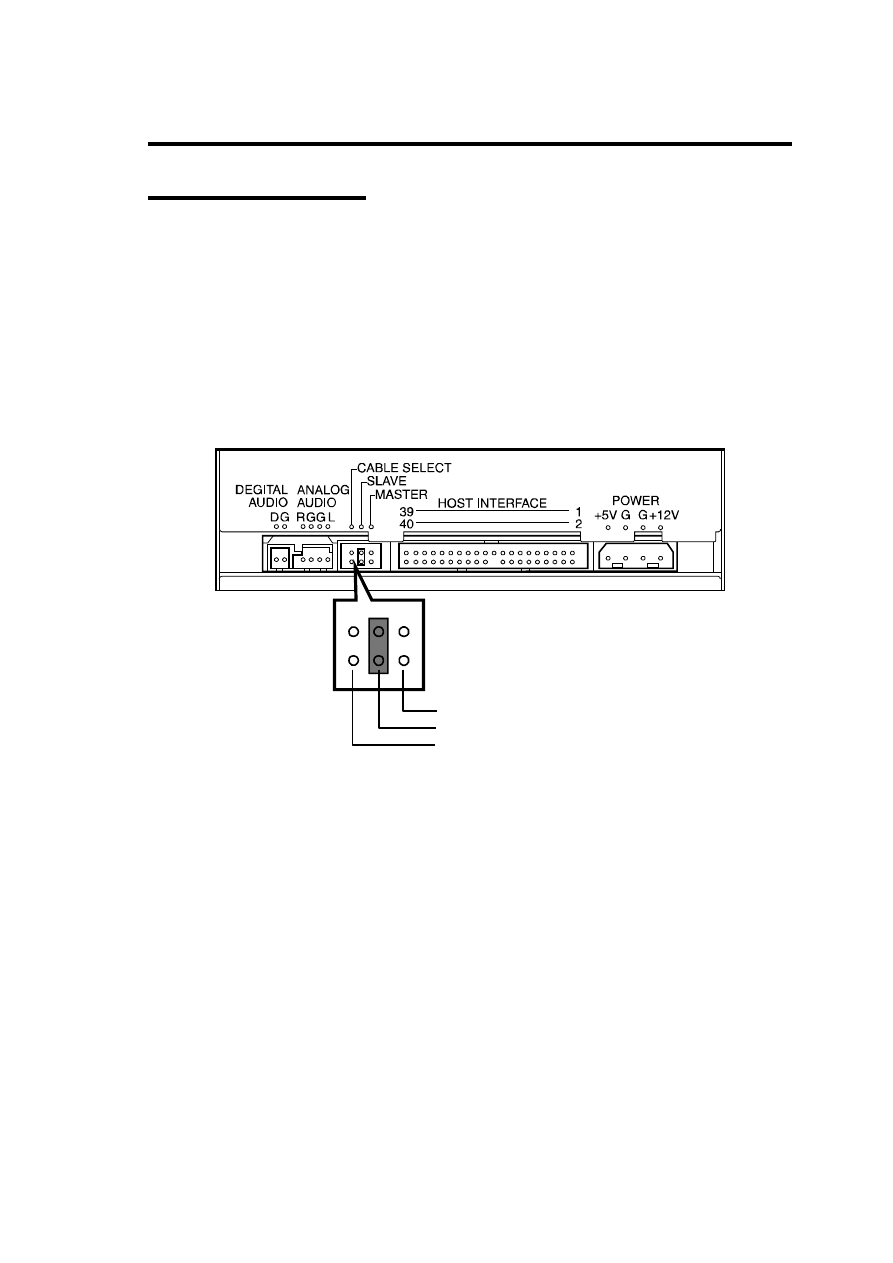
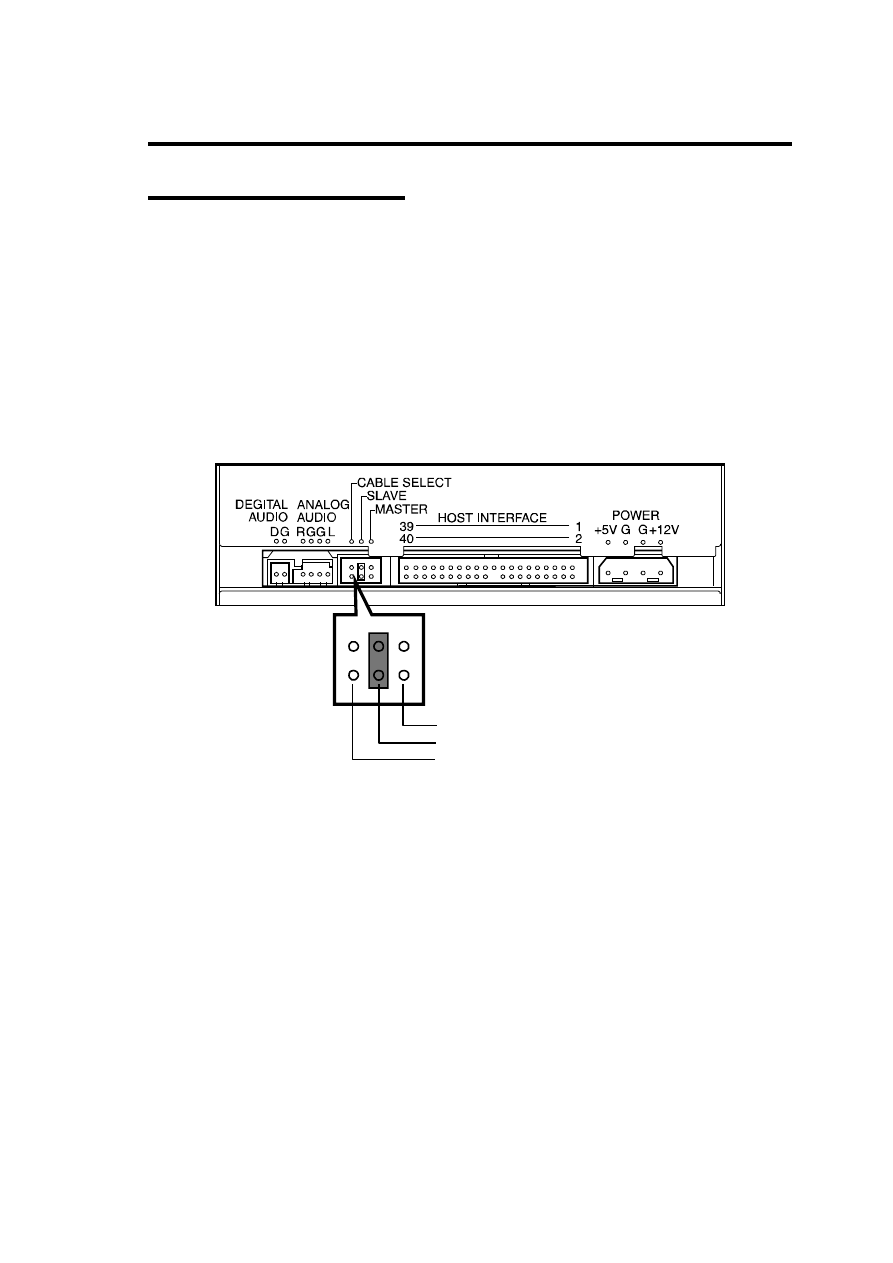
ΟΨͼΑ୭άϋ͈ږ
ᮏ〇ရ䜢 5.25 䜲 䞁 䝏䝕䝞䜲 䝇䝧䜲 䛻ྲྀ䜚 䛡䜛 ๓䛻䚸 ᮏ〇ရ䛾タᐃ䜢 ☜ㄆ䛧 䜎 䛩䚹
ᮏ〇ရ䜢 ྵ䜐 IDE 䝕䝞䜲 䝇䛿䚸 ID 䛾タᐃ䛜ᚲせ䛷䛩䚹 ྠ䛨 IDE 䝞䝇ୖ䛻᥋⥆䛥 䜜䜛 䝕䝞䜲
䝇䛿䚸 䛭䜜䛮䜜␗䛺䜛 ID 䜢 タᐃ䛧 䛶䛚䛛䛺䛔䛸 ṇ䛧 䛟 ືస䛧 䜎 䛫䜣䚹
ID
䛻䛿䚸䛂 MASTER䛃䚸䛂 SLAVE䛃䚸䛂 CABLE SELECT䛃 䛾 3 䛴䛜䛒䜚 䜎䛩䛜䚸 ᮏ〇ရ䛿ᶆ‽
ഛ䛾 CD-ROM/RW 䝗 䝷 䜲 䝤 䛺䛹 䠄 MASTER䠅 䛸 ྠ୍䝞䝇ୖ䛻᥋⥆䛩䜛 䛯䜑䚸䛂 SLAVE䛃
䛷⏝䛧 䛶䛟 䛰䛥 䛔䚹
ID
䛿䚸 ᮏ〇ရ⫼㠃䛻䛒䜛 䝕䝞䜲 䝇タᐃ䝢 䞁 䛾䝢 䞁 1䡚3 䜢 䛳 䛶タᐃ䛷䛝 䜎 䛩䠄 ᮏ〇ရ䛿
ᕤሙฟⲴ SLAVE 䛻タᐃ䛥 䜜䛶䛔䜎 䛩䠅䚹
MASTER
䠄 䝢 䞁 1䠅
SLAVE
䠄 䝢 䞁 2䠅
CABLE SELECT
䠄 䝢 䞁 3䠅
タᐃ䛩䜛 ID 䛾䝢 䞁 䛻䝕䝞䜲 䝇タᐃ䝢 䞁 䜢 ྲྀ䜚 䛡䜛
12
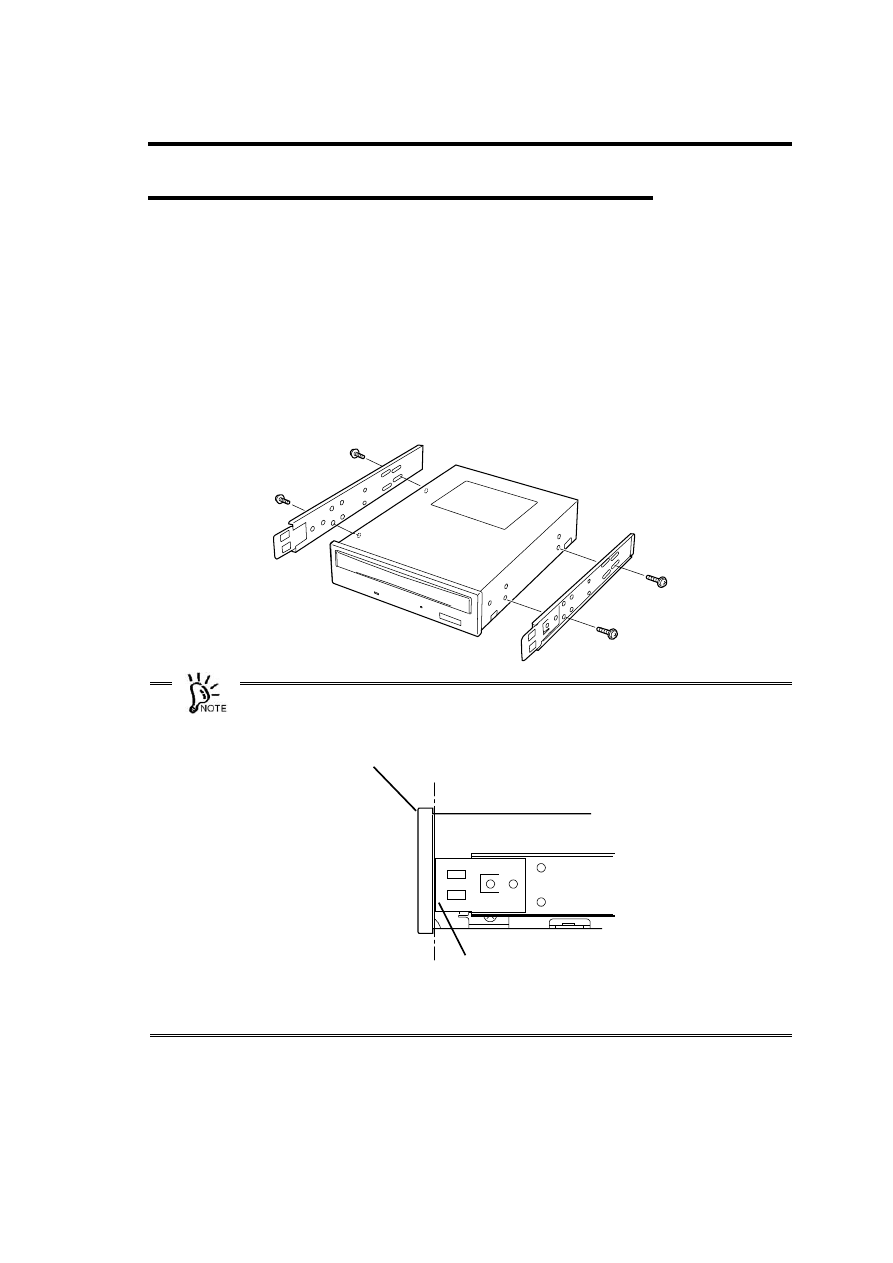
ρΛΙϋΈτȜσ͈৾ͤັ̫
ᚲせ䛻ᛂ䛨 䛶䝷 䝑 䝏䞁 䜾䝺 䞊䝹䜢 ྲྀ䜚 䛡䛶䚸 5.25 䜲 䞁 䝏䝕䝞䜲 䝇䝧䜲 䛻ྲྀ䜚 䛡䜛 ‽ഛ
䜢 䛧 䜎 䛩䚹
䝷 䝑 䝏䞁 䜾䝺 䞊䝹䛿䚸 ᮏయ⨨䛾 5.25 䜲 䞁 䝏䝕䝞䜲 䝇䝧䜲 䛻䛒䛳 䛯䜒 䛾䜢 ྲྀ䜚 䛡䜎 䛩䚹
ᮏయ⨨䛻䜘 䛳 䛶䛿䝷 䝑 䝏䞁 䜾䝺 䞊䝹䜢 ⏝䛫䛪䚸 ┤᥋ᮏయ⨨䛾 5.25 䜲 䞁 䝏䝕䝞䜲 䝇䝧
䜲 䛾䝣 䝺 䞊䝮䛻ᮏ〇ရ䜢 ᅛᐃ䛩䜛 ሙྜ䜒 䛒䜚 䜎 䛩䚹 䛣 䛾ሙྜ䛿䝷 䝑 䝏䞁 䜾䝺 䞊䝹䜢 ྲྀ䜚
䛡䜛 ᚲせ䛿䛒䜚 䜎 䛫䜣䚹
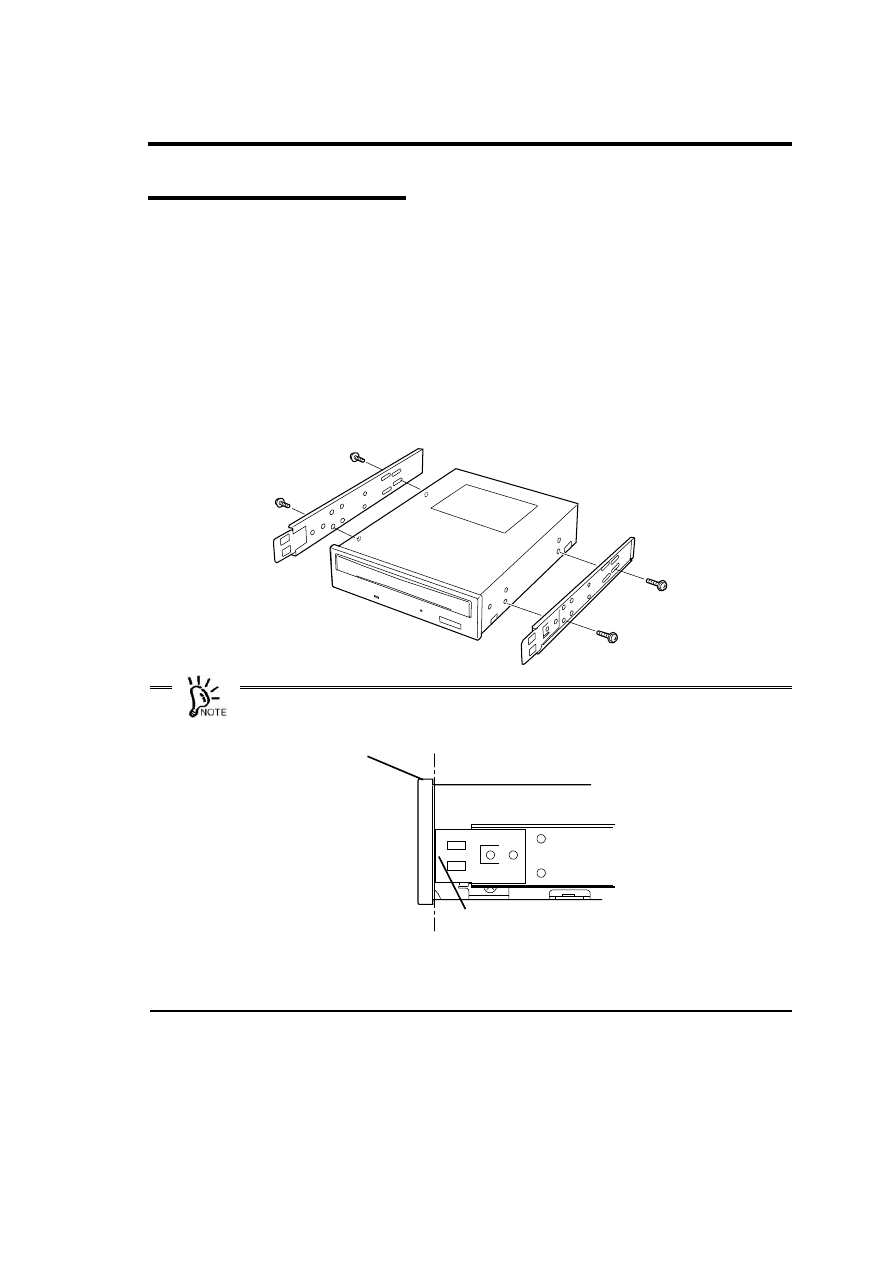
ᮏ〇ရ䜢 䛨 䜗 䛖 䜆䛷ᖹ䜙 䛺ሙᡤ䛻⨨䛔䛶䚸 䝷 䝑 䝏䞁 䜾䝺 䞊䝹䜢 ᮏ〇ရ䛻ῧ䛾䝛䝆䜢 䛳
䛶ᮏ〇ရ䛾ᕥྑ䛻ྲྀ䜚 䛡䜎 䛩䚹
x
ྲྀ䜚 䛡䝺 䞊䝹䛾ඛ➃䛜ୗᅗ䛾⨨䛻䛺䜛 䜘 䛖 䛻ᅛᐃ䛧 䛶䛟 䛰䛥 䛔䚹
x
䝛䝆䛿ᮏ〇ရ䛻ῧ䛾䝛䝆䠄 4 ᮏ䠅 䜢 ⏝䛧 䛶䛟 䛰䛥 䛔䚹 ῧ䛾䝛䝆䛿 M3 䝛䝆䚸 䝛
䝆㒊㛗䛥 䛜 6mm 䛷䛩䚹
ᮏ〇ရ๓㠃䛾
䝣 䝻 䞁 䝖 䝟䝛䝹
䛣 䛾㠃䛷 ⨨䜢 ྜ䜟䛫䜛
䝷 䝑 䝏䞁 䜾䝺
䝹䛾ඛ➃
13
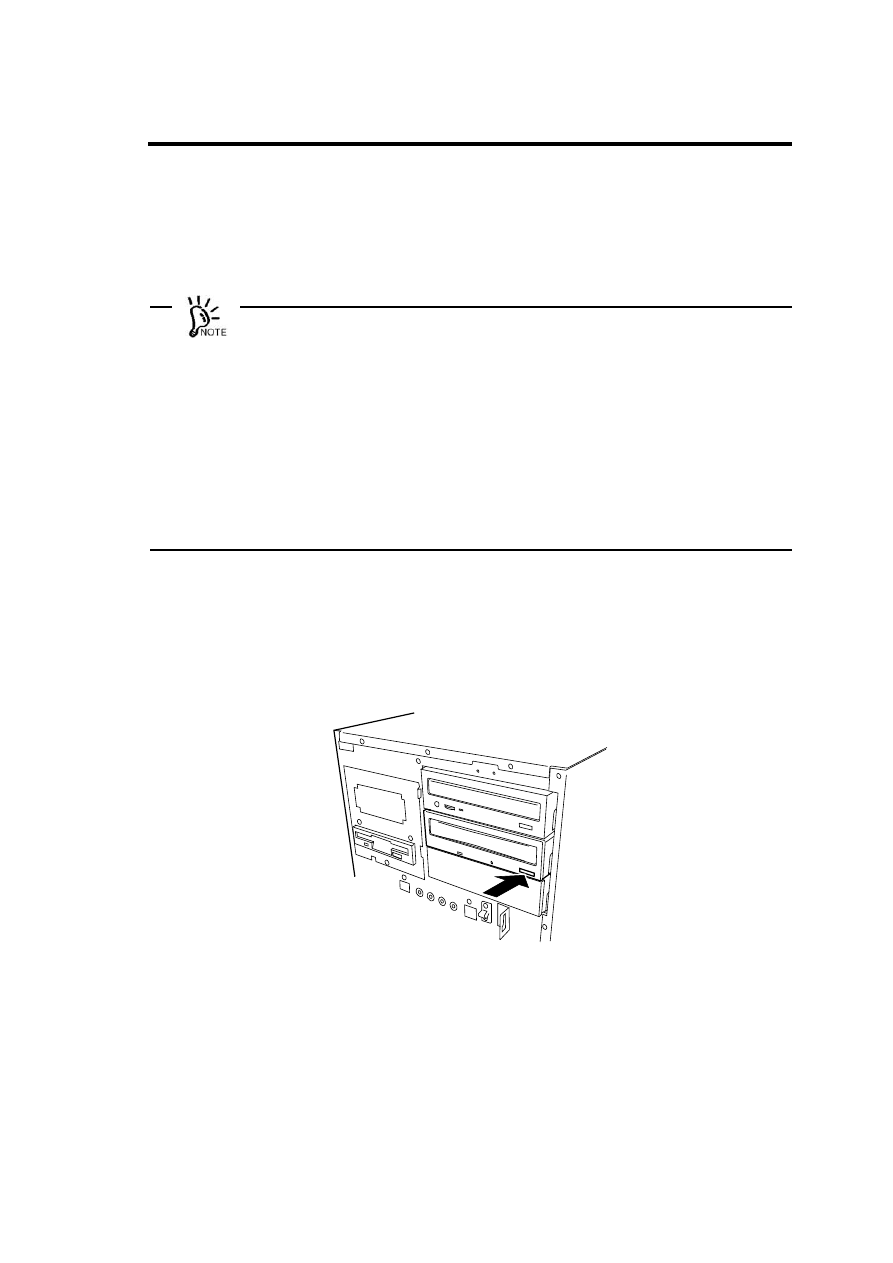
6/36 ͼϋΙΟΨͼΑαͼ͈͒৾ͤັ̫
ᮏయ⨨䛻ྲྀ䜚 䛡䜎 䛩䚹
ศゎ䞉 ಟ⌮䞉 ᨵ㐀䛿䛧 䛺䛔
ಟ⌮ᢏ⾡⪅௨እ䛾ே䛿䚸 ᮏ᭩䛚䜘 䜃ᮏయ⨨䛻ῧ䛾ㄝ᫂᭩䛻グ㍕䛥 䜜䛶䛔䛺䛔ศ
ゎ䞉 ಟ⌮䞉 ᨵ㐀䜢 ⤯ᑐ䛻⾜䜟䛺䛔䛷䛟 䛰䛥 䛔䚹 ឤ㟁䛧 䛯䜚 䚸 Ⓨⅆ䛧 䛯䜚 䚸 ␗ᖖືస
䛧 䛶䛡䛜䜢 䛩䜛 䛣 䛸 䛜䛒䜚 䜎 䛩䚹
ᮏయ⨨䛾㟁※䝁 䞊䝗 䜢 ᥋⥆䛧 䛯䜎 䜎 ྲྀ䜚 䛡䞉 ྲྀ䜚 እ䛧 䜢 䛧 䛺䛔
ᮏ〇ရ䛾ྲྀ䜚 䛡䞉 ྲྀ䜚 እ䛧 䜢 ⾜䛖 ๓䛻ᮏయ⨨䛾㟁※䜢 OFF䛻䛧 䛶䚸 ᮏయ⨨䛾
㟁※䝁 䞊䝗 䜢 䝁 䞁 䝉䞁 䝖 䛛䜙 ᢤ䛔䛶䛟 䛰䛥 䛔䚹 㟁※䜢 OFF䛻䛧 䛶䜒 䚸 㟁※䝁 䞊䝗 䜢
ᕪ䛧 ㎸䜣䛰䜎 䜎 䛰䛸 㟁Ẽ䛜ᮏయ⨨ෆ㒊䛻ὶ䜜䛶䛔䜎 䛩䚹 䛣 䛾䜎 䜎 ྲྀ䜚 䛡䜛 䛸 ෆ
㒊䛾㒊ရ䛻ゐ䜜䛶䚸 ឤ㟁䛩䜛 䛚䛭䜜䛜䛒䜚 䜎 䛩䚹
CAUTION
㧗 ὀព
ᮏయ⨨䛾㟁※䜢 OFF䛻䛧 䛯┤ᚋ䛿䚸 ෆⶶᆺ䛾䝝䞊䝗 䝕䜱 䝇䜽 䛺䛹 䜢 䛿䛨 䜑⨨ෆ
䛾㒊ရ䛜㧗 䛻䛺䛳 䛶䛔䜎 䛩䚹 ༑ศ䛻෭䜑䛯䛣 䛸 䜢 ☜ㄆ䛧 䛶䛛䜙 ྲྀ䜚 䛡䠋ྲྀ䜚
እ䛧 䜢 ⾜䛳 䛶䛟 䛰䛥 䛔䚹
x
ᮏ〇ရ䛿ᶆ‽ᐇ䛾 CD-ROM/RW 䝗 䝷 䜲 䝤 䛸 ྠ୍䝞䝇ୖ䛻᥋⥆䛧 䛶䛟 䛰䛥 䛔䚹 ᮏ
〇ရ䛻ῧ䛾 IDE 䜲 䞁 䝍 䝣 䜵 䞊䝇䜿䞊䝤 䝹䛿 MASTER/SLAVE 㛫䛾⥺㛗䛜▷䛔䛯
䜑䚸 CD-ROM/RW 䝗 䝷 䜲 䝤 䛺䛹 䛸 㞄᥋䛧 䛯䝕䝞䜲 䝇䝧䜲 䛻ྲྀ䜚 䛡䛶䛟 䛰䛥 䛔䚹
x
ᮏయ⨨䛻䜘 䛳 䛶䛿䚸 ᮏ〇ရ䜢 ⦪ྥ䛝 䛻䛧 䛶ྲྀ䜚 䛡䜛 䛣 䛸 䛜䛷䛝 䜛 ሙྜ䜒 䛒䜚 䜎
䛩䛜䚸 ⦪ྥ䛝 䛻ྲྀ䜚 䛡䛯ሙྜ䛿 8cmCD 䜢 ⏝䛷䛝 䜎 䛫䜣䚹 8cm 䛾 CD 䜢 ⏝䛩
䜛 䛸 䛝 䛿ᶓྥ䛝 䛻ྲྀ䜚 䛡䛶䛟 䛰䛥 䛔䚹
ᮏ〇ရ䛿ᶆ‽ഛ䛾 CD-ROM/RW 䝗 䝷 䜲 䝤 䛺䛹 䛸 㞄᥋䛧 䛶䝕䝞䜲 䝇䝧䜲 䛻ྲྀ䜚 䛡
䛶䛟 䛰䛥 䛔䚹 䜎 䛯䚸 䝬䝄䞊䝪䞊䝗 ୖ䛾䝁 䝛䜽 䝍 䚸 ᮏ〇ရ䚸 CD-ROM/RW 䛾㡰䛷䜲 䞁
䝍 䝣 䜵 䞊䝇䜿䞊䝤 䝹䜢 ᥋⥆䛩䜛 䜘 䛖 䚸 䛩䛷䛻ྲྀ䜚 䛡䜙 䜜䛶䛔䜛 CD-ROM/RW 䝗 䝷
䜲 䝤 䛺䛹 䛾ᦚ㍕䝇䝻 䝑 䝖 䜢 ኚ᭦䛩䜛 ᚲせ䛜䛒䜛 ሙྜ䛜䛒䜚 䜎 䛩䠄 ḟ䝨䞊䝆䛾ᅗ䜢 ཧ
↷䠅䚹

14
15
ᮏ〇ရ䛻䝷 䝑 䝏䞁 䜾䝺 䞊䝹䜢 ྲྀ䜚 䛡䛯ሙྜ
1.
ᮏయ⨨䛾㟁※䜢 OFF 䛻䛧 䛶䚸 㟁※䝁 䞊䝗 䜢 䝁 䞁 䝉䞁 䝖 䛛䜙 ᢤ䛟 䚹
2.
ᮏయ⨨䛾䜹 䝞䞊㢮䜢 ྲྀ䜚 እ䛩䠄 ヲ䛧 䛟 䛿ᮏయ⨨䛻ῧ䛾ㄝ᫂᭩䜢 ཧ↷䛧 䛶䛟
䛰䛥 䛔䠅䚹
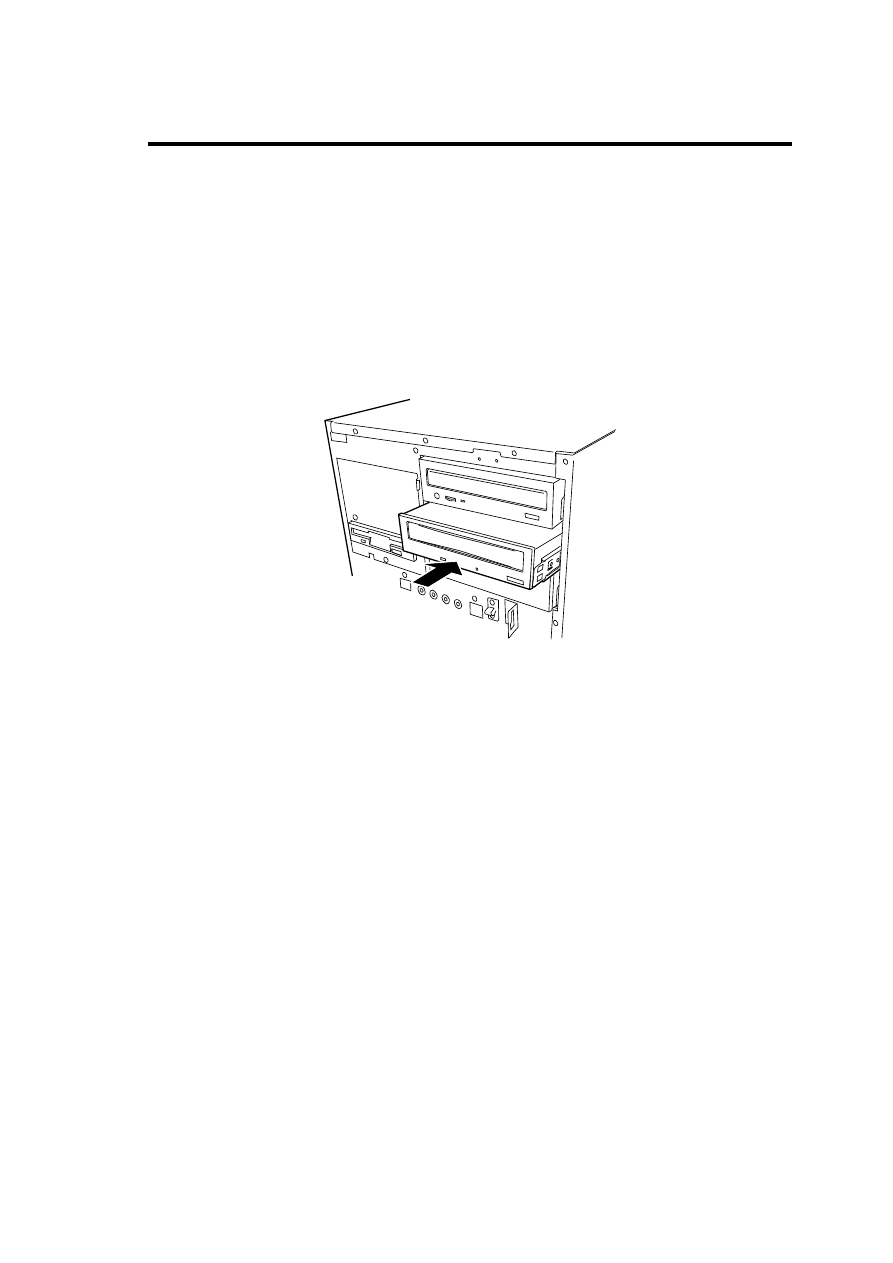
3.
ᮏ〇ရ䜢 5.25 䜲 䞁 䝏䝕䝞䜲 䝇䝧䜲 䛻ྲྀ䜚 䛡䜛 䚹
䛂 䜹 䝏䝑 䛃 䛸 㡢䛜䛧 䛶䝻 䝑 䜽 䛥 䜜䜛 䜎 䛷䜖䛳 䛟 䜚 䛸 䛶䛔䛽䛔䛻ᤄධ䛧 䛶䛟 䛰䛥 䛔䚹
16
ᮏ〇ရ䛻䝷 䝑 䝏䞁 䜾䝺 䞊䝹䜢 ྲྀ䜚 䛡䛪䚸 ┤᥋
6/36 䜲 䞁 䝏䝕䝞䜲 䝇䝧䜲 䛻ᅛᐃ䛩
䜛 ሙྜ
1.
ᮏయ⨨䛾㟁※䜢 OFF 䛻䛧 䛶䚸 㟁※䝁 䞊䝗 䜢 䝁 䞁 䝉䞁 䝖 䛛䜙 ᢤ䛟 䚹
2.
ᮏయ⨨䛾䜹 䝞䞊㢮䜢 ྲྀ䜚 እ䛩䠄 ヲ䛧 䛟 䛿ᮏయ⨨䛻ῧ䛾ㄝ᫂᭩䜢 ཧ↷䛧 䛶䛟
䛰䛥 䛔䠅䚹
3.
ᮏ〇ရ䜢 5.25 䜲 䞁 䝏䝕䝞䜲 䝇䝧䜲 䛻ᕪ䛧 ㎸䜐䚹
4.
ῧ䛾䝛䝆 4 ᮏ䠄 M3 䝛䝆䚸 䝛䝆㒊㛗䛥 䛜 6mm䠅 䛷ᮏ〇ရ䜢 5.25 䜲 䞁 䝏䝕䝞䜲 䝇
䝧䜲 䛻ᅛᐃ䛩䜛 䚹
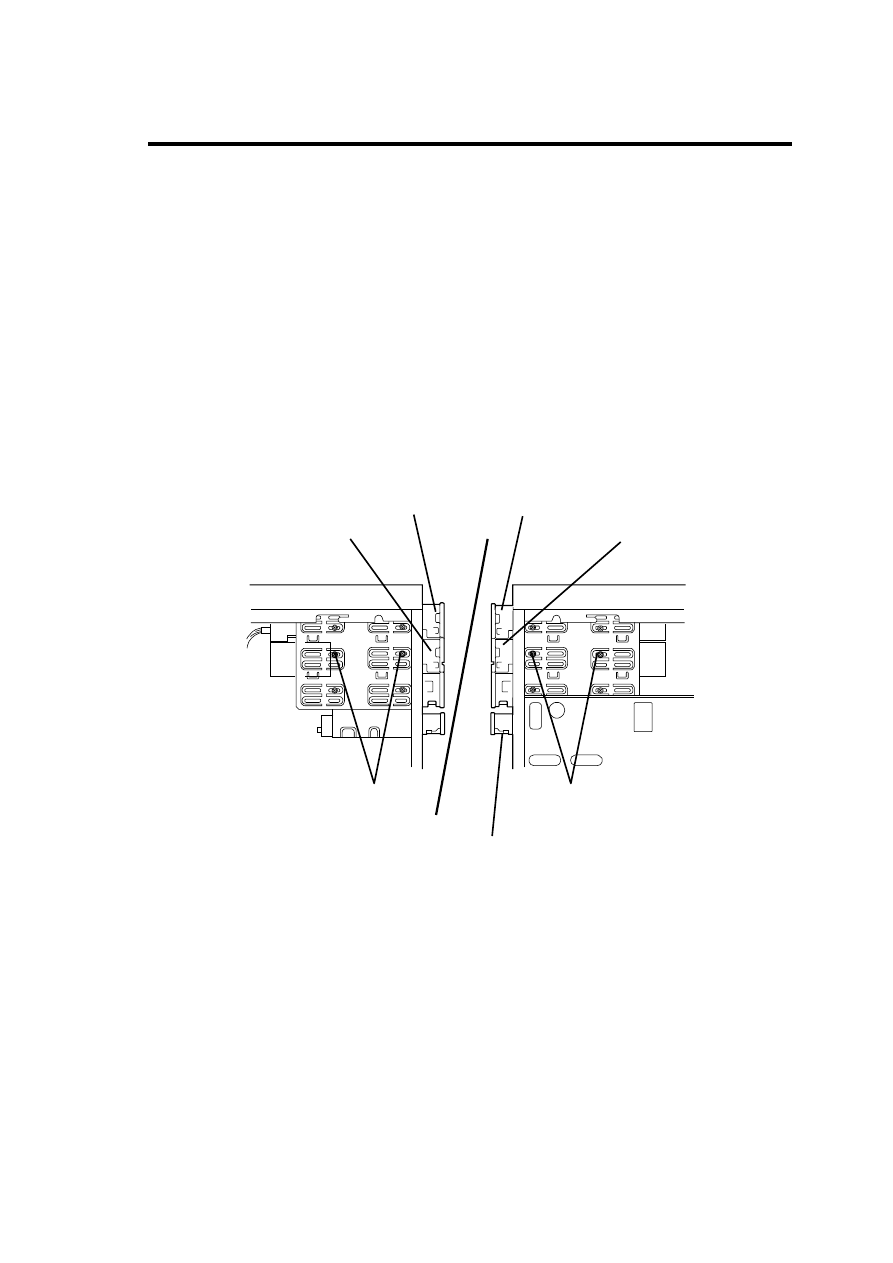
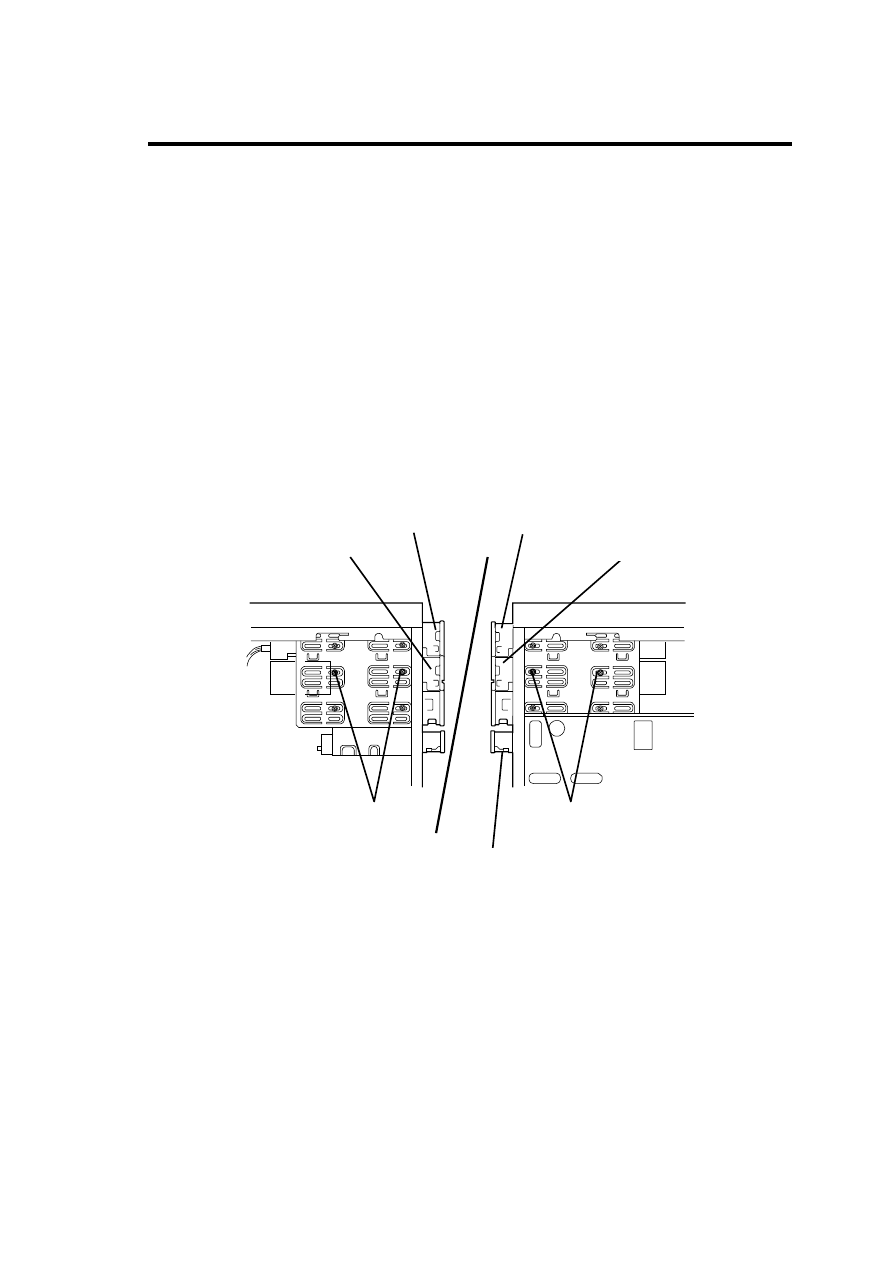
ᕥྑ䛾ഃ㠃䛛䜙 ྛ 2 ᮏ䛾䝛䝆䛷ᮏ〇ရ䜢 ᅛᐃ䛧 䜎 䛩䚹
ᕥഃ㠃
ྑഃ㠃
CD-ROM
䝗 䝷 䜲 䝤 䛺䛹
䠄 ᮏయᶆ‽ഛ䠅
CD-ROM
䝗 䝷 䜲 䝤 䛺䛹
䠄 ᮏయᶆ‽ഛ䠅
ᮏ〇ရ
ᮏ〇ရ
䝛䝆䠄 2 ᮏ䠅
䝛䝆䠄 2 ᮏ䠅
䛾⨨䛾๓㠃䛸 Ỉᖹ䛻䛺䜛 䜘 䛖 䛻⨨䜢 ྜ䜟䛫䜛
17
ͼϋΗέͿȜΑΉȜήσ͈୪
ᮏయ⨨ෆ㒊䜎 䛯䛿ᮏ〇ရ䛻ῧ䛾 IDE 䜲 䞁 䝍 䝣 䜵 䞊䝇䜿䞊䝤 䝹䜢 ⏝䛧 䛶䝬䝄䞊䝪䞊䝗
䛸 ᮏ〇ရ䚸 CD-ROM/RW 䝗 䝷 䜲 䝤 䛺䛹 䜢 ᥋⥆䛧 䜎 䛩䚹
ᦆയ䛧 䛯䜿䞊䝤 䝹䜢 䜟䛺䛔
䜿䞊䝤 䝹䜢 ᥋⥆䛩䜛 ๓䛻䚸 䜿䞊䝤 䝹䝁 䝛䜽 䝍 䛜◚ᦆ䛧 䛶䛔䛯䜚 䚸 䝁 䝛䜽 䝍 䝢 䞁 䛜᭤
䛜䛳 䛶䛔䛯䜚 䚸 ở䜜䛶䛔䛺䛔䛛☜ㄆ䛧 䛶䛟 䛰䛥 䛔䚹 䝁 䝛䜽 䝍 䛜◚ᦆ䛧 䛯䜚 䚸 䝢 䞁 䛾
ở䜜䛯䜿䞊䝤 䝹䜢 ⏝䛧 䛯ሙྜ䚸 䝅䝵 䞊䝖 䛻䜘 䜚 ⅆ⅏䜢 ㉳䛣 䛩䛣 䛸 䛜䛒䜚 䜎 䛩䚹
ᮏయ⨨ෆ㒊䛾 IDE 䜲 䞁 䝍 䝣 䜵 䞊䝇䜿䞊䝤 䝹䛜 ⫤䛾ሙྜ䛻䛿䛭䛱 䜙 䜢 䛳 䛶᥋⥆
䛧 䛶䛟 䛰䛥 䛔䚹 䛺䛚䚸 ᥋⥆䛩䜛 㡰ᗎ䛻ὀព䛧 䛶䛟 䛰䛥 䛔䚹
ᮏయ⨨ෆ㒊䜎 䛯䛿ᮏ〇ရ䛻ῧ䛾 IDE 䜲 䞁 䝍 䝣 䜵 䞊䝇䜿䞊䝤 䝹䜢 ᮏ〇ရ䛚䜘 䜃ᶆ‽䛷ᦚ
㍕䛥 䜜䛶䛔䜛 CD -ROM/RW 䝗 䝷 䜲 䝤 䛺䛹 䛻᥋⥆䛧 䚸 䝬䝄䞊䝪䞊䝗 ୖ䛾 IDE 䝁 䝛䜽 䝍 䛻᥋
⥆䛧 䜎 䛩䚹 䜎 䛯䚸 せ䛸 䛺䛳 䛯䜿䞊䝤 䝹䛿ษ䛻ಖ⟶䛧 䛶䛚䛔䛶䛟 䛰䛥 䛔䚹
䜲 䞁 䝍 䝣 䜵 䞊䝇䜿䞊䝤 䝹䛿䝬䝄䞊䝪䞊䝗 ୖ䛾䝁 䝛䜽 䝍 䚸 ᮏ〇ရ䚸 CD-ROM/RW 䝗 䝷 䜲 䝤 䛺
䛹 䛾㡰䛻᥋⥆䛧 䛶䛟 䛰䛥 䛔䚹
ᮏ〇ရῧ䛾 IDE 䜲 䞁 䝍 䝣 䜵 䞊䝇䜿䞊䝤 䝹䛿䚸 MASTER/SLAVE 㛫䛾⥺㛗䛜▷䛔䛯䜑䚸
ᶆ‽ഛ䛾 CD-ROM/RW 䝗 䝷 䜲 䝤 䛺䛹 䛸 㞄᥋䛧 䛶ᐇ䛩䜛 ᚲせ䛜䛒䜚 䜎 䛩䚹
䝬䝄 䝪
䝗
CD ROM/RW
䝗 䝷 䜲 䝤 䛺䛹
ᮏ〇ရ
ῧ䛾䜿
䝤 䝹
IDE
䝁 䝛䜽 䝍
m MASTER
m SLAVE

18
ᮏయ⨨䛻䜸䞊䝕䜱 䜸䜿䞊䝤 䝹䛜䛒䜛 ሙྜ䛿䚸 ᮏ〇ရ䛾⫼㠃䛻䛒䜛 䜸䞊䝕䜱 䜸䝁 䝛䜽 䝍 䛻
᥋⥆䛧 䛶䛟 䛰䛥 䛔䚹
䝬䝄 䝪
䝗 ୖ䛾
䜸
䝕䜱 䜸䝁 䝛䜽 䝍 䜈
CD-ROM/RW
䝗 䝷 䜲 䝤 䛺䛹 䛾䝁 䝛䜽 䝍
䛚䜘 䜃䝬 䝄 䝪
䝗 ୖ䛾 IDE 䝁 䝛䜽 䝍 䜈
19
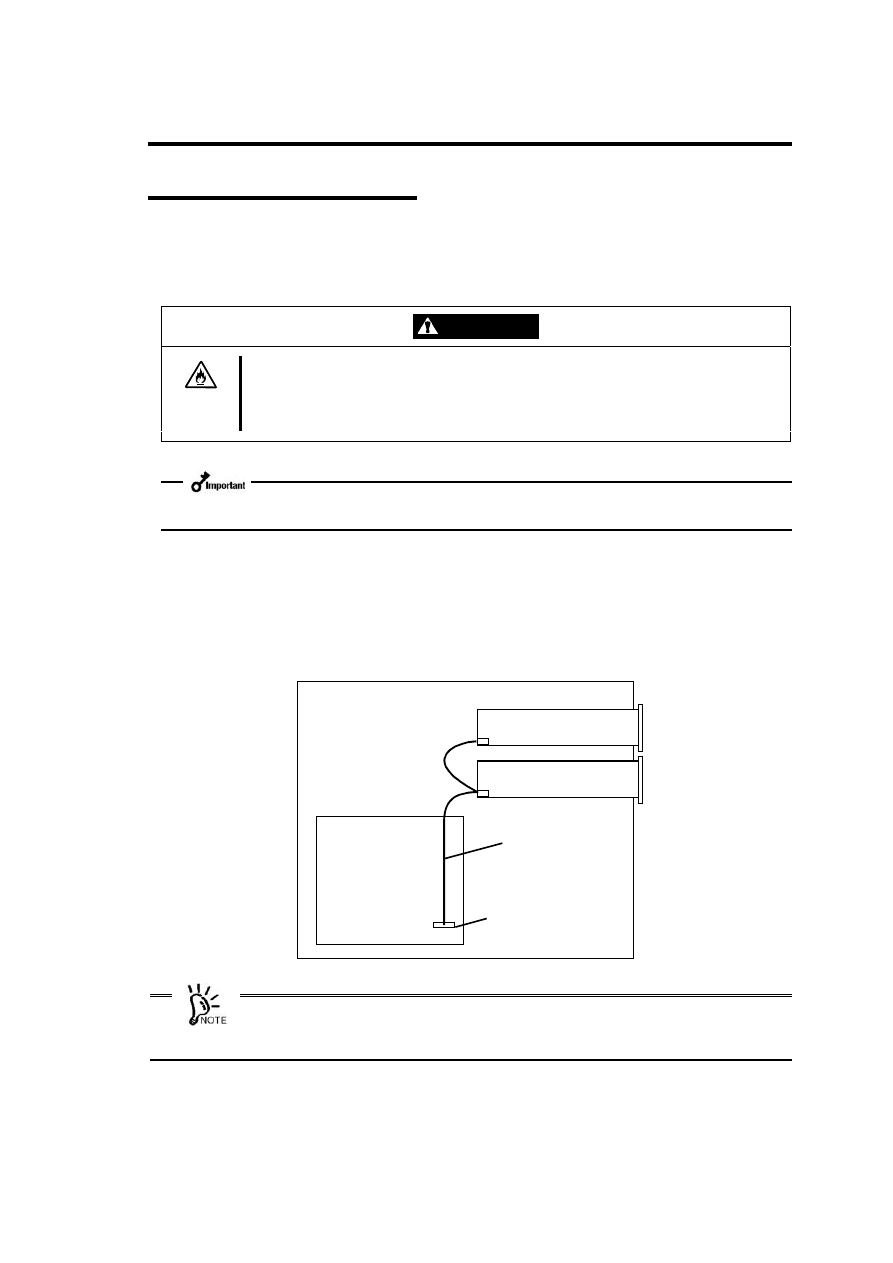
ഩ࡙ΉȜήσ͈୪
ᮏయ⨨䛾㟁※䝴䝙䝑 䝖 䛛䜙 ฟ䛶䛔䜛 DC 㟁※䜿䞊䝤 䝹䛾୰䛛䜙 ᮍ⏝䛾䜿䞊䝤 䝹䜢 ᮏ〇
ရ䛾⫼㠃䛻䛒䜛 㟁※䝁 䝛䜽 䝍 䛻ᕪ䛧 ㎸䜏䜎 䛩䚹
ᮏ〇ရ䛻᥋⥆䛷䛝 䜛 DC 㟁※䜿䞊䝤 䝹䛻䛴䛔䛶䛿䚸ᮏయ⨨䛾ㄝ᫂᭩䜢 ཧ↷䛧 䛶䛟 䛰䛥
䛔䚹
ুࡨ౯͈࣐
ᮏయ⨨䛾㟁※䜢 ON 䛻䛩䜛 䛸 䚸 ᮏ〇ရ䛿⮬ᕫデ᩿䜢 ⮬ືⓗ䛻ᐇ⾜䛧 䜎 䛩䚹
⮬ᕫデ᩿䛾⤖ᯝ䛿ᮏ〇ရ๓㠃䛾䝡 䝆䞊䜲 䞁 䝆䜿䞊䝍 䛷⾲䛧 䜎 䛩䚹 ᐇ⾜⤖ᯝ䜢 ☜ㄆ䛧 䛶䛟 䛰
䛥 䛔䚹
⮬ᕫデ᩿䛾⤖ᯝ䚸 ၥ㢟䛜䛺䛡䜜䜀䝡 䝆䞊䜲 䞁 䝆䜿䞊䝍 䛜ᾘⅉ䛧 䜎 䛩䚹
䜲 䞁 䝆䜿䞊䝍 䛜ᾘⅉ䛧 䛺䛛䛳 䛯䜚 䚸䛂 ᨾ㞀䛛䛺䠛䛃 䛸 ᛮ䛳 䛯䜚 䛧 䛯䛸 䛝 䛿䚸 ➨ 4 ❶䜢 ཧ↷䛧
䛶㞀ᐖ䛾ཎᅉ䜢 ☜ㄆ䛧 䛶䛟 䛰䛥 䛔䚹
DC
㟁※䜿
䝤 䝹
20
CJPT ͈ΙͿΛ·
ᮏయ⨨䛾 BIOS 䝴䞊䝔 䜱 䝸 䝔 䜱 䛷ᮏ〇ရ䛚䜘 䜃᥋⥆䜢 ኚ䛘䛯 CD-ROM/RW 䝗 䝷 䜲 䝤 䛺䛹
䛜ṇ䛧 䛟 ྲྀ䜚 䛡䜙 䜜䛶䛔䜛 䛣 䛸 䜢 ☜ㄆ䛧 䜎 䛩䠄 ⏝䛧 䛶䛔䜛 ᮏయ⨨䛻䜘 䛳 䛶䛿䚸 BIOS
䝴䞊䝔 䜱 䝸 䝔 䜱 䛷䛾⾲♧䛜䛷䛝 䛺䛔ሙྜ䛜䛒䜚 䜎 䛩䚹 䛭䛾ሙྜ䛿䚸 OS ୖ䛛䜙 ☜ㄆ䛧 䛶䛟 䛰
䛥 䛔䠅䚹 BIOS 䝴䞊䝔 䜱 䝸 䝔 䜱 䛾㉳ື᪉ἲ䚸 䛺䜙 䜃䛻᧯స᪉ἲ䛻䛴䛔䛶䛿䚸 ᮏయ⨨䛻ῧ
䛾ㄝ᫂᭩䜢 ཧ↷䛧 䛶䛟 䛰䛥 䛔䚹
BIOS
䝴䞊䝔 䜱 䝸 䝔 䜱 䜢 ㉳ື䛩䜛 䛸 ḟ䛾䜘 䛖 䛺⏬㠃䛜⾲♧䛥 䜜䜎 䛩䚹⏬㠃䛾䠷 Main䠹䝯 䝙䝳 䞊
䛾୰䛺䛹 䛻ᮏయ⨨䛻᥋⥆䛧 䛯䝕䝞䜲 䝇䛾䝍 䜲 䝥 䛺䛹 䛜⾲♧䛥 䜜䛶䛔䜎 䛩䚹
⾲♧䛾୰䛻ᮏ〇ရ䠄 ᮏ〇ရ䜢 ᥋⥆䛧 䛯 IDE 䝞䝇䛚䜘 䜃ᮏ〇ရ䛻䜚 ᙜ䛶䛯 ID 䛾ḍ䛻
䛂 CD-ROM䛃 䛸 ⾲♧䛥 䜜䜎 䛩䠅 䛚䜘 䜃 CD-ROM/RW 䝗 䝷 䜲 䝤 䛺䛹 䛜䛺䛔ሙྜ䛿䚸 ḟ䛾䛣 䛸
䛜⪃䛘䜙 䜜䜎 䛩䚹
䜲 䞁 䝍 䝣 䜵 䞊䝇䜿䞊䝤 䝹䛚䜘 䜃㟁※䜿䞊䝤 䝹䛜ṇ䛧 䛟 ᥋⥆䛥 䜜䛶䛔䛺䛔䚹
→ 䜿䞊䝤 䝹䜢 ṇ䛧 䛟 ᥋⥆䛧 䛶䛟 䛰䛥 䛔䚹
䝕䝞䜲 䝇䛾 ID タᐃ䛜ṇ䛧 䛟 䛺䛔䚹
→ ID 䛿䚸 㔜」䛧 䛺䛔䜘 䛖 タᐃ䛧 䛶䛟 䛰䛥 䛔䚹
<
⾲♧>
ΟΨͼΑΡρͼΨ͈ͼϋΑΠȜσ
ᮏయ⨨䛻䜲 䞁 䝇䝖 䞊䝹䛥 䜜䛶䛔䜛 䜸䝨䝺 䞊䝔 䜱 䞁 䜾䝅䝇䝔 䝮䛻䜘 䛳 䛶䛿䚸 䝕䝞䜲 䝇䝗 䝷
䜲 䝞䛾䜲 䞁 䝇䝖 䞊䝹䛜ᚲせ䛺ሙྜ䛜䛒䜚 䜎 䛩䚹
ᮏ〇ရ䛻ῧ䛾䛂 ෆⶶ DVD-RAM ⨨䝋 䝣 䝖 䜴䜵 䜰䝴䞊䝄䞊䝈䜺䜲 䝗 䛃 䛸 䛂 䝕䝞䜲 䝇䝗 䝷
䜲 䝞䝕䜱 䝇䜽 䛃 䜢 䛳 䛶ᮏయ⨨䛻䝗 䝷 䜲 䝞䜢 䜲 䞁 䝇䝖 䞊䝹䛧 䛶䛟 䛰䛥 䛔䚹
䜲 䞁 䝇䝖 䞊䝹䛻ᚲせ䛺᮲௳䜔䜲 䞁 䝇䝖 䞊䝹᪉ἲ䛻䛴䛔䛶䛿䚸 ῧ䛾䛂 ෆⶶ DVD-RAM ⨨
䝋 䝣 䝖 䜴䜵 䜰䝴䞊䝄䞊䝈䜺䜲 䝗 䛃 䜢 ཧ↷䛧 䛶䛟 䛰䛥 䛔䚹
21
లˎડ!ુ͈ঀဥ༹༷
䛣 䛣 䛷䛿䚸 ᮏ〇ရ䜢 ᪥ᖖ䛚䛔䛻䛺䜛 䛸 䛝 䛾ྲྀ䜚 ᢅ䛔᪉ἲ䛻䛴䛔䛶ㄝ᫂䛧 䜎 䛩䚹 䝕䜱 䝇䜽
䛻㛵䛩䜛 ㄝ᫂䜔ྲྀ䜚 ᢅ䛔䛻㛵䛩䜛 ὀព㡯䛻䛴䛔䛶䛿㘓 B 䜢 䛤ぴ䛟 䛰䛥 䛔䚹
ഩ࡙͈ PO0PGG
ᮏ〇ရ䜈䛾㟁※䛿䚸 ᮏయ⨨ෆⶶ䛾㟁※䝴䝙䝑 䝖 䛛䜙 ౪⤥䛥 䜜䛶䛔䜎 䛩䚹 ᮏయ⨨䛾㟁※
䜢 ON 䛻䛩䜜䜀䚸 ⮬ືⓗ䛻ᮏ〇ရ䛾㟁※䜒 ON 䛻䛺䜚 䜎䛩䚹 䜎 䛯䚸 ᮏయ⨨䛾㟁※䜢 OFF
䛻䛩䜜䜀䚸 ᮏ〇ရ䛾㟁※䜒 OFF 䛻䛺䜚 䜎 䛩䚹
㟁※䛾 ON/OFF 䛾≧ែ䛻䛴䛔䛶䛿䚸 ᮏయ⨨䛾 POWER 䝷 䞁 䝥 䛷☜ㄆ䛧 䛶䛟 䛰䛥 䛔䚹
x
ᮏయ⨨䛾㟁※䛾 ON/OFF 䜢 ᚲせ௨ୖ䛻⧞䜚 ㏉䛥 䛺䛔䛷䛟 䛰䛥 䛔䚹 ᮏ〇ရ䛚䜘 䜃ᮏ
య⨨䜔᥋⥆䛧 䛶䛔䜛 䛾ᶵჾ䛾ㄗືస䜔ᨾ㞀䛾ཎᅉ䛸 䛺䜚 䜎 䛩䚹
x
ᮏ〇ရ๓㠃䛻䛒䜛 䜲 䝆䜵 䜽 䝖 䝪䝍 䞁 䜢 ᢲ䛧 䛯䜎 䜎 䚸ᮏయ⨨䛾㟁※䜢 ON 䛻䛧 䛺䛔䛷
䛟 䛰䛥 䛔䚹 ᮏ〇ရ䛾ෆ㒊タᐃ䛜ኚ᭦䛥 䜜䚸 ᮏ〇ရ䛚䜘 䜃ᮏయ⨨䜔᥋⥆䛧 䛶䛔䜛 䛾
ᶵჾ䛾ㄗືస䜔ᨾ㞀䛾ཎᅉ䛸 䛺䜚 䜎 䛩䚹
x
ᮏ〇ရ๓㠃䛻䛒䜛 䝡 䝆䞊䜲 䞁 䝆䜿䞊䝍 䛜Ⅼⅉ䛧 䛶䛔䜛 㛫䛿㟁※䜢 OFF 䛻䛧 䛺䛔䛷䛟
䛰䛥 䛔䚹 䝕䜱 䝇䜽 ୖ䛾䝕䞊䝍 䛾୍㒊䜎 䛯䛿䛩䜉䛶䛜ኻ䜟䜜䜛 䛣 䛸 䛜䛒䜚 䜎 䛩䚹
22
ͼΐͿ·ΠδΗῧΫΐȜͼϋΐΉȜΗ
ᮏ〇ရ๓㠃䛾䝣 䝻 䞁 䝖 䝟䝛䝹䛻䛿䚸 䝖 䝺 䞊䛾㛤㛢䜢 ⾜䛖 䛯䜑䛾䜲 䝆䜵 䜽 䝖 䝪䝍 䞁 䛸 ືస≧
ែ䜢 ⾲♧䛩䜛 䝡 䝆䞊䜲 䞁 䝆䜿䞊䝍 䛜䛒䜚 䜎 䛩䚹
䜲 䝆䜵 䜽 䝖 䝪䝍 䞁 䛿ᮏ〇ရ䛻䝉䝑 䝖 䛧 䛯䝕䜱 䝇䜽 䜢 䜲 䝆䜵 䜽 䝖 䠄 ฟ䠅 䛩䜛 䛸 䛝 䛻ᢲ䛧 䜎
䛩䚹 䛯䛰䛧 䚸 䝋 䝣 䝖 䜴䜵 䜰䛻䜘 䛳 䛶䜲 䝆䜵 䜽 䝖 䜢 ⚗Ṇ䛥 䜜䛶䛔䜛 䛸 䛝 䛿䚸 䛣 䛾䝪䝍 䞁 䜢 ᢲ
䛧 䛶䜒 䝕䜱 䝇䜽 䛿䜲 䝆䜵 䜽 䝖 䛥 䜜䜎 䛫䜣䚹
x
䛚䛔䛻䛺䜛 ⎔ቃ䠄 ᮏయ⨨䜔䜸䝨䝺 䞊䝔 䜱 䞁 䜾䝅䝇䝔 䝮䚸䝕䝞䜲 䝇䝗 䝷 䜲 䝞䚸䝣 䜷 䞊
䝬䝑 䝖 䝋 䝣 䝖 䛺䛹 䠅 䛻䜘 䛳 䛶䛿䚸 䝕䜱 䝇䜽 䜢 ṇ䛧 䛟 䜲 䝆䜵 䜽 䝖 䛥 䛫䜛 䛯䜑䛻Ỵ䜑䜙 䜜
䛯ᡭ㡰䜢 ⾜䛖 ᚲせ䛜䛒䜛 ሙྜ䛜䛒䜚 䜎 䛩䚹 䜎 䛯䚸 䜲 䝆䜵 䜽 䝖 䝪䝍 䞁 䜢 ᢲ䛥 䛺䛟 䛶䜒 ᮏ
య⨨䛾⏬㠃ୖ䛛䜙 䜲 䝆䜵 䜽 䝖 䛩䜛 䛣 䛸 䛜䛷䛝 䜛 ሙྜ䜒 䛒䜚 䜎 䛩䚹
x
䝡 䝆䞊䜲 䞁 䝆䜿䞊䝍 䛜Ⅼⅉ䛧 䛶䛔䜛 㛫䛿䜲 䝆䜵 䜽 䝖 䝪䝍 䞁 䜢 ᢲ䛥 䛺䛔䛷䛟 䛰䛥 䛔䚹䝡
䝆䞊䜲 䞁 䝆䜿䞊䝍 䛜Ⅼⅉ䛧 䛶䛔䜛 㛫䛿䚸 䜲 䝆䜵 䜽 䝖 䝪䝍 䞁 䜢 ᢲ䛧 䛶䜒 䚸 䝡 䝆䞊䜲 䞁 䝆
䜿䞊䝍 䛜ᾘⅉ䛩䜛 䜎 䛷䜲 䝆䜵 䜽 䝖 䛥 䜜䜎 䛫䜣䚹
䝡 䝆䞊䜲 䞁 䝆䜿䞊䝍 䛿䚸䝉䝑 䝖 䛧 䛯䝕䜱 䝇䜽 ෆ䛾䝕䞊䝍 䛾䝅䞊䜽 ୰䜔䝣 䜷 䞊䝬䝑 䝖 ୰䚸䝕䞊
䝍 䛾䝸 䞊䝗 ୰䠋䝷 䜲 䝖 ୰䛻⥳Ⰽ䛻Ⅼⅉ䛧 䜎 䛩䚹
ᤄධ䝯 䝕䜱 䜰
ືస≧ែ
⾲♧
᭩䛝 ㎸䜏୰
䜾䝸 䞊䞁 Ⅼ⁛
ㄞ䜏ྲྀ䜚 ୰
䜾䝸 䞊䞁 Ⅼⅉ
DVD-RAM
䝕䜱 䝇䜽
ᚅᶵ୰
ᾘⅉ
ㄞ䜏ྲྀ䜚 ୰
䜾䝸 䞊䞁 Ⅼⅉ
CD-ROM
䛺䛹 䛾䝕䜱 䝇䜽
ᚅᶵ୰
ᾘⅉ
ㄞ䜏ྲྀ䜚 ୰
䜾䝸 䞊䞁 Ⅼⅉ
CD/DA
䛺䛹 䛾䝕䜱 䝇䜽
ᚅᶵ୰
ᾘⅉ
䝕䜱 䝇䜽 ᮍᤄධ
—
ᾘⅉ
䝕䜱 䝇䜽 ᤄධ/ฟ
—
䜾䝸 䞊䞁 Ⅼ⁛
䝖 䝺
䝡 䝆
䜲 䞁 䝆䜿
䝍
䜲 䝆䜵 䜽 䝖 䝪䝍 䞁
23
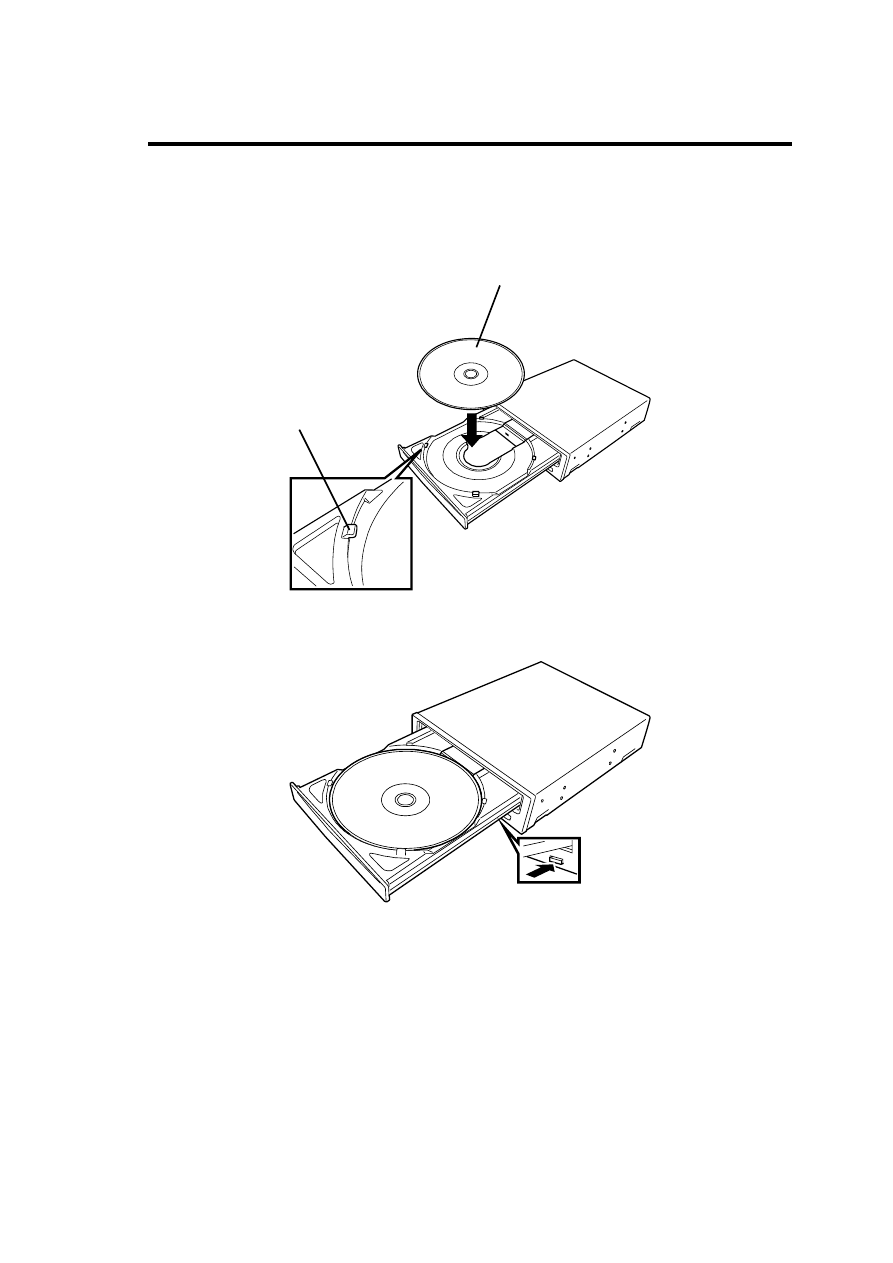
ΟͻΑ·͈ΓΛΠ
ḟ䛾ᡭ㡰䛻ᚑ䛳 䛶䝕䜱 䝇䜽 䜢 ᮏ〇ရ䛻䝉䝑 䝖 䛧 䜎 䛩䚹 䝕䜱 䝇䜽 䛻㛵䛩䜛 ㄝ᫂䜔ྲྀ䜚 ᢅ䛔䛻
㛵䛩䜛 ὀព㡯䛻䛴䛔䛶䛿㘓 B 䜢 䛤ぴ䛟 䛰䛥 䛔䚹
x
䝕䜱 䝇䜽 䛿䛶䛔䛽䛔䛻ྲྀ䜚 ᢅ䛳 䛶䛟 䛰䛥 䛔䚹 ᭀ䛻ྲྀ䜚 ᢅ䛖 䛸 䚸 䝕䜱 䝇䜽 䛜◚ᦆ䛧 䛶
䝕䞊䝍 䛾୍㒊䜎 䛯䛿䛩䜉䛶䜢 ኻ䛖 䛣 䛸 䛜䛒䜚 䜎 䛩䚹
x
䛖 䜎 䛟 ᮏ〇ရ䛻䝉䝑 䝖 䛷䛝 䛺䛔䛸 䛝 䛿䚸 ↓⌮䛺ຊ䜢 ຍ䛘䛶䝉䝑 䝖 䛧 䜘 䛖 䛸 䛫䛪䛻䚸
䛔䛳 䛯䜣ᮏ〇ရ䛛䜙 䝕䜱 䝇䜽 䜢 ྲྀ䜚 ฟ䛧 䛶䚸䝉䝑 䝖 䛩䜛 ᪉ྥ䜔ྥ䛝 䜢 ☜ㄆ䛧 䛶䛟 䛰䛥
䛔䚹
x
ᮏ〇ရ䛷⏝䛷䛝 䛺䛔䝕䜱 䝇䜽 䜢 䝉䝑 䝖 䛧 䛺䛔䛷䛟 䛰䛥 䛔䚹ᮏ〇ရ䛾ᨾ㞀䛾ཎᅉ䛸 䛺
䜚 䜎 䛩䚹
x
ᮏయ⨨䛻䜘 䛳 䛶䛿䚸ᮏ〇ရ䜢 ⦪ྥ䛝 䛻䛧 䛶ྲྀ䜚 䛡䜛 䛣 䛸 䛜䛷䛝 䜛 ሙྜ䜒 䛒䜚 䜎 䛩
䛜䚸 ⦪ྥ䛝 䛻ྲྀ䜚 䛡䛯ሙྜ䛿 8cmCD 䜢 ⏝䛷䛝 䜎 䛫䜣䚹
1.
ᮏయ⨨䛾㟁※䛜 ON 䛻䛺䛳 䛶䛔䜛 䛣 䛸 䜢 ☜ㄆ䛩䜛 䚹
2.
䜲 䝆䜵 䜽 䝖 䝪䝍 䞁 䜢 ᢲ䛩䚹
䝖 䝺 䞊䛜ฟ䛶䛝 䜎 䛩䚹
24
3.
䝕䜱 䝇䜽 䜢 䝖 䝺 䞊䛻䛾䛫䜛 䚹
4.
䜲 䝆䜵 䜽 䝖 䝪䝍 䞁 䜢 ᢲ䛧 䛶䝖 䝺 䞊䜢 㛢䛨 䜛 䚹
䝕
䝍 㠃䜢 䝖 䝺
䛻ྥ䛡䚸 䝺
䝧䝹䛺
䛹 䛾༳ๅ㠃䜢 ୖ䛻ྥ䛡䜛
䝩䝹䝎
䛻ᘬ䛳 䛛䛡䜛
25
ΟͻΑ·͈ͼΐͿ·Π
ḟ䛾ᡭ㡰䛻ᚑ䛳 䛶䝕䜱 䝇䜽 䜢 ᮏ〇ရ䛛䜙 ྲྀ䜚 ฟ䛧 䜎 䛩䚹 䝕䜱 䝇䜽 䛻㛵䛩䜛 ㄝ᫂䜔ྲྀ䜚 ᢅ䛔
䛻㛵䛩䜛 ὀព㡯䛻䛴䛔䛶䛿㘓 B 䜢 䛤 ぴ䛟 䛰䛥 䛔䚹
x
䝕䜱 䝇䜽 䛿䛶䛔䛽䛔䛻ྲྀ䜚 ᢅ䛳 䛶䛟 䛰䛥 䛔䚹 ᭀ䛻ྲྀ䜚 ᢅ䛖 䛸 䚸 䝕䜱 䝇䜽 䛜◚ᦆ䛧 䛶
䝕䞊䝍 䛾୍㒊䜎 䛯䛿䛩䜉䛶䜢 ኻ䛖 䛣 䛸 䛜䛒䜚 䜎 䛩䚹
x
䛚䛔䛻䛺䜛 ⎔ቃ䠄 ᮏయ⨨䜔䜸䝨䝺 䞊䝔 䜱 䞁 䜾䝅䝇䝔 䝮䚸䝕䝞䜲 䝇䝗 䝷 䜲 䝞䚸䝣 䜷 䞊
䝬䝑 䝖 䝋 䝣 䝖 䛺䛹 䠅 䛻䜘 䛳 䛶䛿䚸 䝕䜱 䝇䜽 䜢 ṇ䛧 䛟 䜲 䝆䜵 䜽 䝖 䛥 䛫䜛 䛯䜑䛻Ỵ䜑䜙 䜜
䛯ᡭ㡰䜢 ⾜䛖 ᚲせ䛜䛒䜛 ሙྜ䛜䛒䜚 䜎 䛩䚹 䜎 䛯䚸 䜲 䝆䜵 䜽 䝖 䝪䝍 䞁 䜢 ᢲ䛥 䛺䛟 䛶䜒 ᮏ
య⨨䛾⏬㠃ୖ䛛䜙 䜲 䝆䜵 䜽 䝖 䛩䜛 䛣 䛸 䛜䛷䛝 䜛 ሙྜ䜒 䛒䜚 䜎 䛩䚹
x
䝕䜱 䝇䜽 䛿ᮏయ⨨䛾㟁※䜢 OFF 䛻䛩䜛 ๓䛻ᚲ䛪ྲྀ䜚 ฟ䛧 䛶䛟 䛰䛥 䛔䚹 䝕䜱 䝇䜽 䜢
䝉䝑 䝖 䛧 䛯䜎 䜎 ᮏయ⨨䛾㟁※䜢 OFF 䛻䛩䜛 䛸 䝕䜱 䝇䜽 䜎 䛯䛿ᮏ〇ရ䛜ᦆയ䛩䜛 䛚
䛭䜜䛜䛒䜚 䜎 䛩䚹
x
䝡 䝆䞊䜲 䞁 䝆䜿䞊䝍 䛜Ⅼⅉ䛧 䛶䛔䜛 㛫䛿䜲 䝆䜵 䜽 䝖 䝪䝍 䞁 䜢 ᢲ䛥 䛺䛔䛷䛟 䛰䛥 䛔䚹䝡
䝆䞊䜲 䞁 䝆䜿䞊䝍 䛜Ⅼⅉ䛧 䛶䛔䜛 㛫䛿䚸 䜲 䝆䜵 䜽 䝖 䝪䝍 䞁 䜢 ᢲ䛧 䛶䜒 䚸 䝡 䝆䞊䜲 䞁 䝆
䜿䞊䝍 䛜ᾘⅉ䛩䜛 䜎 䛷䜲 䝆䜵 䜽 䝖 䛥 䜜䜎 䛫䜣䚹
1.
ᮏయ⨨䛾㟁※䛜 ON 䛻䛺䛳 䛶䛔䜛 䛣 䛸 䜢 ☜ㄆ䛩䜛 䚹
2.
䝡 䝆䞊䜲 䞁 䝆䜿䞊䝍 䛜ᾘⅉ䛧 䛶䛔䜛 䛣 䛸 䜢 ☜ㄆ䛩䜛 䚹
3.
䜲 䝆䜵 䜽 䝖 䝪䝍 䞁 䜢 ᢲ䛩䚹
䝖 䝺 䞊䛜ฟ䛶䛝 䜎 䛩䚹
4.
䝕䜱 䝇䜽 䛾➃䜢 ᣢ䛳 䛶䚸 䜖䛳 䛟 䜚 䛸 䛶䛔䛽䛔䛻ᮏ〇ရ䛛䜙 䜎 䛳 䛩䛠 䛻ྲྀ䜚 ฟ䛩䚹
䝕䜱 䝇䜽 䛿ᑓ⏝䛾䜿䞊䝇䛻ධ䜜䛶䚸 ษ䛻ಖ⟶䛧 䛶䛟 䛰䛥 䛔䚹
5.
䜲 䝆䜵 䜽 䝖 䝪䝍 䞁 䜢 ᢲ䛧 䚸 䝖 䝺 䞊䜢 㛢䛨 䜛 䚹
26
ΟͻΑ·͈൲ͼΐͿ·Π
㏻ᖖ䛾᪉ἲ䛷䝕䜱 䝇䜽 䜢 䜲 䝆䜵 䜽 䝖 䛷䛝 䛺䛟 䛺䛳 䛯ሙྜ䛾䛯䜑䛻ᡭື䛷䜲 䝆䜵 䜽 䝖 䛩䜛 䛣
䛸 䛜䛷䛝 䜎 䛩䚹
䛚䛔䛻䛺䜛 ⎔ቃ䠄 ᮏయ⨨䜔䜸䝨䝺 䞊䝔 䜱 䞁 䜾䝅䝇䝔 䝮䚸䝕䝞䜲 䝇䝗 䝷 䜲 䝞䚸䝣 䜷 䞊䝬䝑
䝖 䝋 䝣 䝖 䛺䛹 䠅 䛻䜘 䛳 䛶䛿䚸 䜲 䝆䜵 䜽 䝖 䝪䝍 䞁 䜢 ᢲ䛧 䛶䜲 䝆䜵 䜽 䝖 䛥 䛫䜛 ᪉ἲ䛜䛷䛝 䛺䛔
ሙྜ䛜䛒䜚 䜎 䛩䚹 ᡭື䛷䜲 䝆䜵 䜽 䝖 䛩䜛 ๓䛻䛚䛔䛻䛺䛳 䛶䛔䜛 䜸䝨䝺 䞊䝔 䜱 䞁 䜾䝅䝇䝔
䝮䜔ᮏయ⨨䚸 䝕䝞䜲 䝇䝗 䝷 䜲 䝞䛺䛹 䛾ㄝ᫂᭩䜢 ཧ↷䛩䜛 䛣 䛸 䜢 䛚່䜑䛧 䜎 䛩䚹
ศゎ䞉 ಟ⌮䞉 ᨵ㐀䛿䛧 䛺䛔
ಟ⌮ᢏ⾡⪅௨እ䛾ே䛿䚸 ᮏ᭩䛚䜘 䜃ᮏయ⨨䛻ῧ䛾ㄝ᫂᭩䛻グ㍕䛥 䜜䛶䛔䛺䛔ศ
ゎ䞉 ಟ⌮䞉 ᨵ㐀䜢 ⤯ᑐ䛻⾜䜟䛺䛔䛷䛟 䛰䛥 䛔䚹 ឤ㟁䛧 䛯䜚 䚸 Ⓨⅆ䛧 䛯䜚 䚸 ␗ᖖືస
䛧 䛶䛡䛜䜢 䛩䜛 䛣 䛸 䛜䛒䜚 䜎 䛩䚹
x
䝕䜱 䝇䜽 䛜㏻ᖖ䛾᪉ἲ䛷䜲 䝆䜵 䜽 䝖 䛷䛝 䛺䛟 䛺䛳 䛯䛸 䛝 䛻䛾䜏䚸 䛣 䛣 䛷♧䛩᪉ἲ䜢
⾜䛳 䛶䛟 䛰䛥 䛔䚹 ṇᖖ䛻䜲 䝆䜵 䜽 䝖 䛷䛝 䜛 䛸 䛝 䛻ᡭື䛷䜲 䝆䜵 䜽 䝖 䛩䜛 䛸 ᨾ㞀䛾ཎ
ᅉ䛸 䛺䜚 䜎 䛩䚹
x
ᮏయ⨨䛾㟁※䛜 OFF 䛾≧ែ䛷ᡭື䜲 䝆䜵 䜽 䝖 䜢 ⾜䛳 䛶䛟 䛰䛥 䛔䚹 ᮏయ⨨䛾㟁
※䛜 ON 䛾≧ែ䛷ᡭື䜲 䝆䜵 䜽 䝖 䜢 ⾜䛖 䛸 䚸 䝕䜱 䝇䜽 ෆ䛾䝕䞊䝍 䛾ᾘኻ䜔ᮏ〇ရ䚸
䛚䜘 䜃ᮏయ⨨䛾ᨾ㞀䛾ཎᅉ䛸 䛺䜚 䜎 䛩䚹
x
ᢡ䜜䜔䛩䛔䜒 䛾䛿ᙉไ䜲 䝆䜵 䜽 䝖 䝩䞊䝹䛻ᢲ䛧 ㎸䜎 䛺䛔䛷䛟 䛰䛥 䛔䚹
x
䝕䜱 䝇䜽 䛾ฟ䛜䛷䛝 䛺䛛䛳 䛯ཎᅉ䛜ศ䛛䜙 䛺䛔ሙྜ䛿ಖᏲ䝃䞊䝡 䝇♫䛻䛤 㐃
⤡䛟 䛰䛥 䛔䚹 䛭䛾䜎 䜎 䛷䛤 ⏝䛻䛺䜛 䛸 䚸 䝕䜱 䝇䜽 䛜ᤄධ䛷䛝 䛺䛛䛳 䛯䜚 䚸 䜃ྲྀ
䜚 ฟ䛫䛺䛛䛳 䛯䜚 䚸 ᮏ〇ရ䛾ᨾ㞀䛾ཎᅉ䛸 䛺䜚 䜎 䛩䚹
27
1.
ᮏయ⨨䛾㟁※䜢 OFF 䛻䛧 䛶䚸 䛧 䜀䜙 䛟 ᚅ䛴䠄 ⣙ 30 ⛊䠅䚹
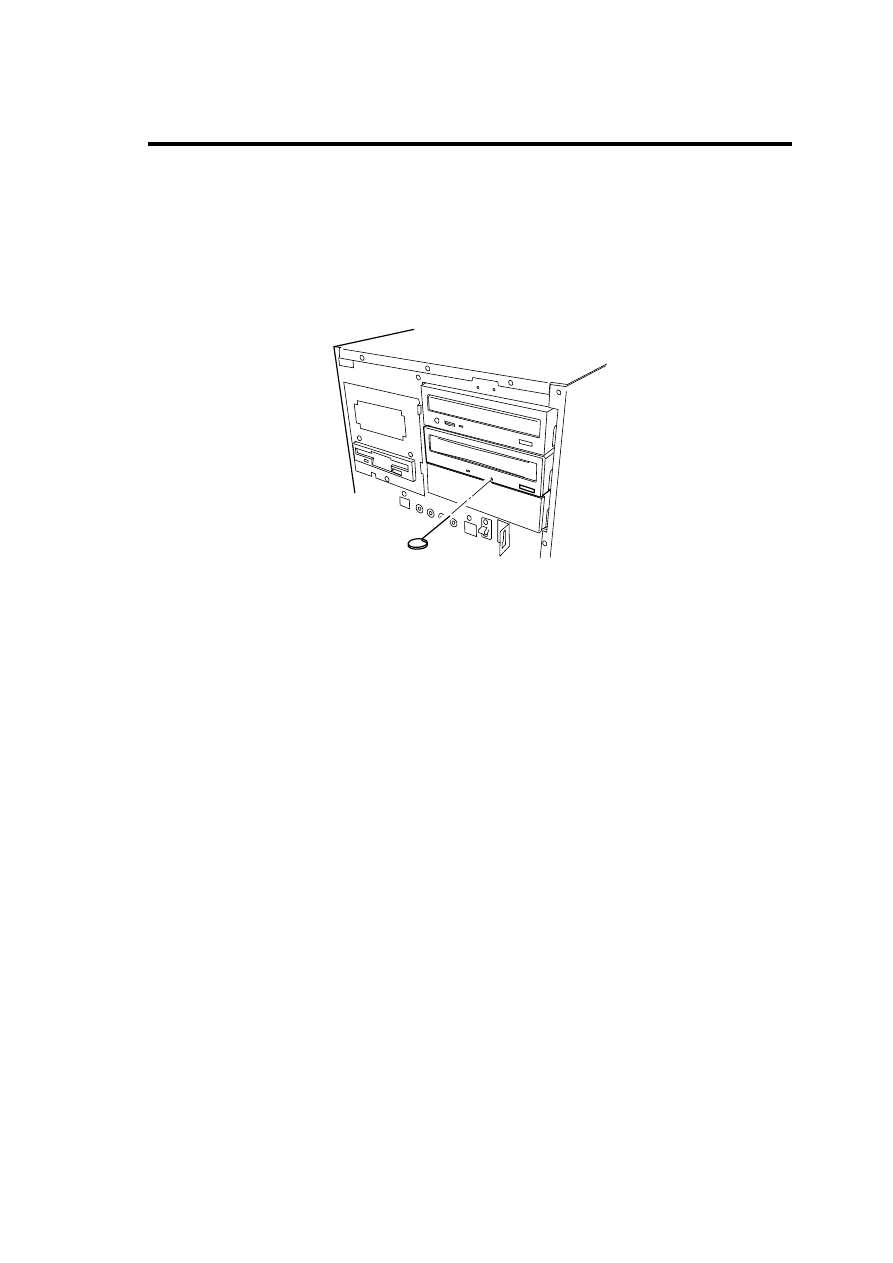
2.
ᮏ〇ရ๓㠃䛻䛒䜛 ᙉไ䜲 䝆䜵 䜽 䝖 䝩䞊䝹䛻㛗䛥 40mm ௨ୖ䚸 ኴ䛥 䚸 1mm䡚1.8mm
䛾䝢 䞁 䠄 䜎 䛳 䛩䛠 䛻ఙ䜀䛧 䛯䜽 䝸 䝑 䝥 䛺䛹 䠅 䜢 ᕪ䛧 ㎸䜏䚸 Ỉᖹ䛻䜖䛳 䛟 䜚 䛸 ᙉ䛟
ᢲ䛩䚹
䝖 䝺 䞊䛜ᢲ䛧 ฟ䛥 䜜䜎 䛩䚹
3.
䝖 䝺 䞊䛾ඛ➃䜢 ᣢ䛳 䛶䜖䛳 䛟 䜚 䛸 ᘬ䛝 ฟ䛩䚹
4.
䝕䜱 䝇䜽 䜢 ྲྀ䜚 ฟ䛩䚹
䝖 䝺 䞊䜢 㛢䛨 䜛 䛸 䛝 䛿䚸 䝕䜱 䝇䜽 䛾ฟ䛜䛷䛝 䛺䛛䛳 䛯ཎᅉ䜢 ☜ㄆ䛧 䛯ᚋ䚸 ␗ᖖ䛜䛺䛡䜜
䜀㟁※䜢 ON 䛻䛧 䛶䚸 䜲 䝆䜵 䜽 䝖 䝪䝍 䞁 䜢 䛳 䛶㛢䛨 䛶䛟 䛰䛥 䛔䚹 䛭䛾ᚋ䜒 ⥆䛔䛶䜲 䝆䜵
䜽 䝖 䛷䛝 䛺䛔ሙྜ䛿䚸 䛚㈙䛔ồ䜑䛾㈍ᗑ䜎 䛯䛿ಖᏲ䝃䞊䝡 䝇♫䛻㐃⤡䛧 䛶䛟 䛰䛥 䛔䚹
ΟȜΗ̧͈ࣺ͙Ȇඋ͙৾ͤ
DVD-RAM
䝕䜱 䝇䜽 䜈䛾᭩䛝 ㎸䜏䜔ᮏ〇ရ䛷⏝䛷䛝 䜛 䝕䜱 䝇䜽 䛾ㄞ䜏ྲྀ䜚 ᪉ἲ䛿䚸 ⏝
䛧 䛶䛔䜛 䜸䝨䝺 䞊䝔 䜱 䞁 䜾䝅䝇䝔 䝮䛚䜘 䜃䜰䝥 䝸 䜿䞊䝅䝵 䞁 䛾ㄝ᫂᭩䜢 ཧ↷䛧 䛶䛟 䛰䛥 䛔䚹
৾ͤե̞ષ͈ಕփȡఱ୨̈́ΟȜῌ̹ͬͥ͛ȡ
DVD-RAM
䝕䜱 䝇䜽 䜒 䛾グ㘓፹య䛸 ྠ䛨 䜘 䛖 䛻䝕䞊䝍 䛾ಖᛶ䛜 100%ಖド䛥 䜜䛶䛔䜛
䜒 䛾䛷䛿䛒䜚 䜎 䛫䜣䚹 DVD-RAM 䝕䜱 䝇䜽 䛻ಖᏑ䛧 䛯ษ䛺䝕䞊䝍 䜢 䝯 䝕䜱 䜰䛾Ḟ㝗䜔
䝝䞊䝗 䜴䜵 䜰ⓗ䛺ㄗືస䛺䛹 䛻䜘 䜛 ᾘኻ䜔◚ቯ䛺䛹 䛾ၥ㢟䜢 ᅇ㑊䛩䜛 䛯䜑䛻䜒 ḟ䛾䜘 䛖 䛺
᪉ἲ䛷䝕䞊䝍 䜢 ྲྀ䜚 ᢅ䛖 䛣 䛸 䜢 䛚່䜑䛧 䜎 䛩䚹

28
ΟȜΗ͈ΨΛ·ͺΛί
䛣 䛣 䛷䛿䚸 ୍䛾ሙྜ䛻ഛ䛘䛶䛾䝕䞊䝍 䛾䝞䝑 䜽 䜰䝑 䝥 ᪉ἲ䛻䛴䛔䛶ㄝ᫂䛧 䜎 䛩䚹
ṇ
3 ᯛ䛾 EWE.SBN 䝕䜱 䝇䜽 䛻䝞䝑 䜽 䜰䝑 䝥
㔜せ䛺䝕䞊䝍 䜎 䛯䛿䝥 䝻 䜾䝷 䝮䛺䛹 䜢 ಖᏑ䛩䜛 ሙྜ䛻䛿䚸 ṇ 2 ᯛ䛻䝞䝑 䜽 䜰䝑 䝥 䛩䜛 䛣
䛸 䜢 䛚່䜑䛧 䜎 䛩䚹
䛣 䛖 䛧 䛶䛚䛡䜀䚸 ୍᪉䛾 DVD-RAM 䝕䜱 䝇䜽 䛜䝂 䝭 䜎 䛯䛿ሻᇕ䛺䛹 䛻䜘 䛳 䛶䝸 䞊䝗 䜶䝷 䞊
䜢 ㉳䛣 䛧 䛶䜒 䚸 䜒 䛖 ୍᪉䛾 DVD-RAM 䝕䜱 䝇䜽 䛛䜙 ᪧ䛷䛝 䚸 ษ䛺䝕䞊䝍 䜔䝥 䝻 䜾䝷 䝮
䛾ᾘኻ䜢 㜵䛢䜎 䛩䚹
䝕䞊䝍 䛾
4 ୡ௦⟶⌮䛻䛴䛔䛶
䝕䜱 䝇䜽 ୖ䛾䝕䞊䝍 䜢 䝞䝑 䜽 䜰䝑 䝥 䛩䜛 ሙྜ䚸 䝞䝑 䜽 䜰䝑 䝥 䛥 䜜䛯䝕䞊䝍 䛾 3 ୡ௦⟶⌮䜢
䛚່䜑䛧 䜎 䛩䚹
䛣 䜜䛿 DVD-RAM 䝕䜱 䝇䜽 䜢 3 ᯛ䠄 A䚸 B䚸 C䠅 ⏝䛧 䛶䚸 1 ᪥┠䛿䝕䜱 䝇䜽 A 䛻䝕䞊䝍 䜢
䝞䝑 䜽 䜰䝑 䝥 䛧 䛯䛺䜙 䜀䚸2 ᪥┠䛻䛿䝕䜱 䝇䜽 B 䛻䝞䝑 䜽 䜰䝑 䝥 䛧 䚸3 ᪥┠䛻䛿䝕䜱 䝇䜽 C
䛻䝞䝑 䜽 䜰䝑 䝥 䛧 䚸 A→B→C 䛸 㡰␒䛻䝕䞊䝍 䜢 䝞䝑 䜽 䜰䝑 䝥 䛧 䛶䛔䛟 䜒 䛾䛷䛩䚹
䛣 䛖 䛧 䛶䛚䛡䜀䚸 䝕䜱 䝇䜽 C 䛜䝸 䞊䝗 䜶 䝷 䞊䜢 ㉳䛣 䛧 䛯䛸 䛧 䛶䜒 䝕䜱 䝇䜽 B 䛾䝕䞊䝍 䜢
⏝䛩䜜䜀䝕䞊䝍 䛿ᪧ䛷䛝 䜎 䛩䚹䜎 䛯䚸䝕䜱 䝇䜽 B 䛜䝸 䞊䝗 䜶䝷 䞊䜢 ㉳䛣 䛧 䛯䛸 䛧 䛶䜒 䝕䜱
䝇䜽 A 䛾䝕䞊䝍 䜢 ⏝䛩䜛 䛣 䛸 䛷ษ䛺䝕䞊䝍 䛿ᪧ䛷䛝 䜎 䛩䚹
ΟͻΑ·͈ρͼΠίυΞ·Π
㔜せ䛺䝣 䜯 䜲 䝹䛜ಖᏑ䛥 䜜䛶䛔䜛 DVD-RAM 䝕䜱 䝇䜽 䜢 䝉䝑 䝖 䛧 䛶䛔䜛 䛸 䛝 䛿䚸 䝷 䜲 䝖 䝥
䝻 䝔 䜽 䝖 䜢 䛧 䛶䛟 䛰䛥 䛔䚹⅏ᐖ䜔㟁䛻䜘 䜛 ✺↛䛾㟁※ OFF 䛺䛹 ୍䛾䛸 䛝 䛻䜒 䝕䜱 䝇䜽
䛾୰䛾䝣 䜯 䜲 䝹䛿ಖㆤ䛥 䜜䜎 䛩䚹 䜎 䛯䚸 ㄗ᧯స䛻䜘 䜛 䝕䞊䝍 䛾ᾘኻ䜢 㜵䛠 䛣 䛸 䛜䛷䛝 䜎 䛩䚹
䝷 䜲 䝖 䝥 䝻 䝔 䜽 䝖 ᪉ἲ䛻䛴䛔䛶䛿䚸 ῧ䛾ෆⶶ DVD-RAM ⨨䝋 䝣 䝖 䜴䜵 䜰䝴䞊䝄䞊䝈䜺
䜲 䝗 䜢 ཧ↷䛟 䛰䛥 䛔䚹

29
ુ͈༗Ȫ·ςȜΣϋΈȫ
䝺 䞁 䝈䛾䛚ᡭධ䜜䛻䛴䛔䛶
㛗㛫⏝䛩䜛 䛸 䚸 ᮏ〇ရ䛾䝺 䞁 䝈䛻䜋䛣 䜚 䛺䛹 䛜╔䛧 䛶䚸 ṇᖖ䛻ㄞ䜏᭩䛝 䛷䛝 䛺䛟 䛺
䜛 䛚䛭䜜䛜䛒䜚 䜎 䛩䚹
⏝⎔ቃ䜔⏝ᅇᩘ䛻䜘 䛳 䛶␗䛺䜚 䜎 䛩䛜䚸 ῧ䛾䝺 䞁 䝈䜽 䝸 䞊䝘䞊䜢 ⏝䛔䛶䚸 2 䞄 ᭶䛻
୍ᗘ䛚ᡭධ䜜䛩䜛 䛣 䛸 䜢 ᥎ዡ䛧 䜎 䛩䚹 䜽 䝸 䞊䝙䞁 䜾䛾ヲ⣽䛻䛴䛔䛶䛿䛣 䛾ḟ䛾❶䜢 ཧ↷䛧
䛶䛟 䛰䛥 䛔䚹
䝕䜱 䝇䜽 䛾䛚ᡭධ䜜䛻䛴䛔䛶
䝕䜱 䝇䜽 䜢 㛗㛫⏝䛧 䛶䛔䜛 䛸 䚸 ಖ⟶≧ែ䛻䜘 䜚 䝕䞊䝍 㠃䛻䜋䛣 䜚 䜔ở䜜䛜╔䛧 䛶
䝕䞊䝍 䜢 ṇ䛧 䛟 䝸 䞊䝗 /䝷 䜲 䝖 䝦䝑 䝗 䛷䛝 䛺䛟 䛺䜛 䛣 䛸 䛜䛒䜚 䜎 䛩䚹 䜽 䝸 䞊䝙䞁 䜾䛾ヲ⣽䛻
䛴䛔䛶䛿䛣 䛾ḟ䛾❶䜢 ཧ↷䛧 䛶䛟 䛰䛥 䛔䚹
30
లˏડ!·ςȜΣϋΈȆུୋ͈
ᮏ〇ရ䛚䜘 䜃䝕䜱 䝇䜽 䜢 Ᏻ䛻䚸 䛛䛴ṇᖖ䛻⏝䛩䜛 䛯䜑䚸 ᐃᮇⓗ䛻ᮏ〇ရ䛾䜽 䝸 䞊䝙䞁
䜾䜢 ⾜䛳 䛶䛟 䛰䛥 䛔䚹 䜎 䛯䚸 ᮏ〇ရ䜢 ㍺㏦䛩䜛 䛸 䛝 䛿ᚲ䛪䛣 䛣 䛷♧䛩ᡭ㡰䛻ᚑ䛳 䛶䛟 䛰䛥
䛔䚹䠄 䝕䜱 䝇䜽 䛾ྲྀ䜚 ᢅ䛔䛻䛴䛔䛶䛿㘓 B 䛷䜒 ㄝ᫂䛧 䛶䛔䜎 䛩䚹 䛤 ぴ䛟 䛰䛥 䛔䚹䠅
ུୋ͈·ςȜΣϋΈ
ศゎ䞉 ಟ⌮䞉 ᨵ㐀䛿䛧 䛺䛔
ಟ⌮ᢏ⾡⪅௨እ䛾ே䛿䚸 ᮏ᭩䛚䜘 䜃ᮏయ⨨䛻ῧ䛾ㄝ᫂᭩䛻グ㍕䛥 䜜䛶䛔䛺䛔ศ
ゎ䞉 ಟ⌮䞉 ᨵ㐀䜢 ⤯ᑐ䛻⾜䜟䛺䛔䛷䛟 䛰䛥 䛔䚹 ឤ㟁䛧 䛯䜚 䚸 Ⓨⅆ䛧 䛯䜚 䚸 ␗ᖖືస
䛧 䛶䛡䛜䜢 䛩䜛 䛣 䛸 䛜䛒䜚 䜎 䛩䚹
ུఘ͈·ςȜΣϋΈ
䝕䜱 䝇䜽 䛾ᤄධཱྀ䛺䛹 䛻䜋䛣 䜚 䛜⁀䜎 䜙 䛺䛔䜘 䛖 䚸 ᐃᮇⓗ䛻ᮏయ䛾䜎 䜟䜚 䜢 䜽 䝸 䞊䝙䞁 䜾
䛧 䛶䛟 䛰䛥 䛔䚹
x
ᮏయ⨨䛾㟁※䜢 OFF 䛻䛩䜛 䚹
x
䜘 䛤 䜜䛿䜔䜟䜙 䛛䛔䛔䛯ᕸ䛷㍍䛟 䜅䛝 ྲྀ䜛 䚹
x
䜘 䛤 䜜䛜䜂䛹 䛔䛸 䛝 䛿䚸 䛖 䛩䜑䛯ྎᡤ⏝Ὑ䠄 ୰ᛶ䠅 䛻ᕸ䜢 䜂䛯䛧 䚸 䜘 䛟 䛧 䜌䛳 䛶䛛
䜙 䜅䛟 䚹
x
Ꮫ䛮䛖 䛝 䜣䜢 ⏝䛩䜛 㝿䛿䚸 䛭䛾ὀព᭩䛻ᚑ䛳 䛶䛟 䛰䛥 䛔䚹
x
䝧䞁 䝆䞁 䜔䝅䞁 䝘䞊䛺䛹 䛾⁐䜢 䜟䛺䛔䚹

31
τϋΒ͈·ςȜΣϋΈ
ᮏ〇ရ䛾䝸 䞊䝗 /䝷 䜲 䝖 䝦䝑 䝗 䜢 Ύᤲ䛩䜛ሙྜ䛿䚸 ῧ䛾䝺 䞁䝈䜽 䝸 䞊䝘䞊䜢 䛤⏝䛟 䛰䛥 䛔䚹
䠄 ≉㛗䠅
䝺 䞁 䝈䜽 䝸 䞊䝘䞊ᾮ䜢 ⏝䛧 䛯‵ᘧ䝍 䜲 䝥 䛺䛾䛷䚸 ຠᯝⓗ䛻䝺 䞁 䝈䛾ở䜜䜢 ྲྀ䜚 㝖䛟 䛣 䛸
䛜䛷䛝 䜎 䛩䚹
䠄 䛔᪉䠅
1.
ᮏయ⨨䛾㟁※䜢 ON 䛻䛩䜛 䚹
2.
䝺 䞁 䝈䜽 䝸 䞊䝘䞊䛾ⓑⰍ䛾 5 䛴䛾ᕸ∦㒊ศ䛻䚸 ᒓ䛾䜽 䝸 䞊䝙䞁 䜾⁐ᾮჾ䛾䝤 䝷
䝅䜢 䛔䚸 䜽 䝸 䞊䝙䞁 䜾ᾮ䜢 1 ᅇᰁ䜏㎸䜎 䛫䜛 䚹
ከ㔞䛻ᰁ䜏㎸䜎 䛫䜎 䛩䛸 䚸 ᮏ〇ရෆ䛷㣕䜃ᩓ䜚 䚸 ᨾ㞀䛾ཎᅉ䛻䛺䜚 䜎 䛩
3.
䝺 䞁 䝈䜽 䝸 䞊䝘䞊䛾䝷 䝧䝹༳ๅ㠃䛻⾲♧䛥 䜜䛶䛔䜛 ▮༳䠄 ↑䠅 䜢 䚸 ᮏ〇ရ䛾ዟഃ
䛻ྥ䛡䛶䚸 䝕䜱 䝇䜽 䛸 ྠᵝ䛻䝖 䝺 䞊䜈䝉䝑 䝖 䛧 䚸 䝖 䝺 䞊䜢 㛢䛨 䜛 䚹
䝺 䞁 䝈䜽 䝸 䞊䝘䞊䛾㆑ู䛻䛿䚸 䝡 䝆䞊䜲 䞁 䝆䜿䞊䝍 䛜⣙ 15䡚30 ⛊Ⅼⅉ䛧 䜎䛩䚹
4.
䝡 䝆䞊䜲 䞁 䝆䜿䞊䝍 䛾Ⅼⅉ䛜ᾘ䛘䛯䜙 䚸 䜲 䝆䜵 䜽 䝖 䝪䝍 䞁 䜢 ᢲ䛧 䛶䚸 䝖 䝺 䞊䛛䜙
䝺 䞁 䝈䜽 䝸 䞊䝘䞊䜢 ྲྀ䜚 ฟ䛩䚹
ᶵ✀䛻䜘 䛳 䛶䛿䚸 ⮬ືⓗ䛻䝖 䝺 䞊䛜㛤䛝 䜎 䛩䛜䚸 ␗ᖖ䛷䛿䛒䜚 䜎 䛫䜣䚹
ྲྀ䜚 ฟ䛧 䛯䝺 䞁 䝈䜽 䝸 䞊䝘䞊䛿䚸 䝤 䝷 䝅㠃䜢 ୗ䛻䛧 䛶ᑓ⏝䛾ಖ⟶䜿䞊䝇䛻⣡䛧
䛶䛟 䛰䛥 䛔䚹
䠄 䛚▱䜙 䛫䠅
䜽 䝸 䞊䝙䞁 䜾䛾㢖ᗘ䛿䚸 ⏝⎔ቃ䜔⏝ᅇᩘ䛻䜘 䛳 䛶␗䛺䜚 䜎 䛩䛜䚸 䠎 䞄 ᭶䛻୍
ᗘ䛿䜽 䝸 䞊䝙䞁 䜾䜢 ⾜䛖 䛣 䛸 䜢 ᥎ዡ䛧 䜎 䛩䚹 䜎 䛯䚸 䛭䛾ሙྜ䛷䜒 ṇᖖ䛺䝕䞊䝍 䛾
ㄞ䜏᭩䛝 䛜䛷䛝 䛺䛔䛣 䛸 䛜䛒䜛 ሙྜ䛻䛿䚸 䜽 䝸 䞊䝙䞁 䜾䛾㛫㝸䜢 ▷䛟 (䠍 䞄 ᭶䠅 䛩
䜛 䛣 䛸 䜢 䛚່䜑䛧 䜎 䛩䚹
䝺 䞁 䝈䜽 䝸 䞊䝙䞁 䜾䛧 䛶䜒 䝕䞊䝍 䛾ㄞ䜏᭩䛝 䛻ၥ㢟䛜⏕䛨 䜛 ሙྜ䛿䚸 ୖグ䛂 䛔
᪉䛃 䛾ᡭ㡰䛷䜽 䝸 䞊䝙䞁 䜾ᾮ䜢 䜟䛪⧞䜚 ㏉䛧 䛶䛟 䛰䛥 䛔䚹 5䚸 6 ᅇ⧞䜚 ㏉䛧 䛶䜒
ゎᾘ䛥 䜜䛺䛔ሙྜ䛿䚸 䛾ཎᅉ䛜⪃䛘䜙 䜜䜎 䛩䚹 䛚㈙䛔ୖ䛢䛾㈍ᗑ䛻䛤┦ㄯ䛟
䛰䛥 䛔䚹
䠄 䛚㢪䛔䠅
ῧ䛾䝺 䞁 䝈䜽 䝸 䞊䝘䞊䛿䚸 ᮏ〇ရᑓ⏝䛷䛩䚹 䛾ᶵჾ䛻䛿⏝䛧 䛺䛔䛷䛟 䛰䛥
䛔䚹 ᨾ㞀䛾ཎᅉ䛻䛺䜚 䜎 䛩䚹
䝤 䝷 䝅䛜ᾘ⪖䛧 䛯ሙྜ䜔䝤 䝷 䝅䛾ở䜜䛜䜂䛹 䛟 䛺䛳 䛯ሙྜ䛿䚸 ᪂ရ䜢 䛚㈙䛔ồ䜑
䛟 䛰䛥 䛔䚹
ಖ⟶䛩䜛 㝿䛿䚸 ᒓ䛾ᑓ⏝䝥 䝷 䝇䝏䝑 䜽 䜿䞊䝇䛻⣡䛧 䚸 ┤ᑕ᪥ග䛾ᙜ䛯䜛 ሙᡤ
䜔㧗 䛻䛺䜛 ሙᡤ䛻⨨䛛䛺䛔䛷䛟 䛰䛥 䛔䚹
ᒓ䛾ᾮ௨እ䜢 䜽 䝸 䞊䝙䞁 䜾ᾮ䛻⏝䛧 䛺䛔䛷䛟 䛰䛥 䛔䚹
32
ΟͻΑ·͈·ςȜΣϋΈ
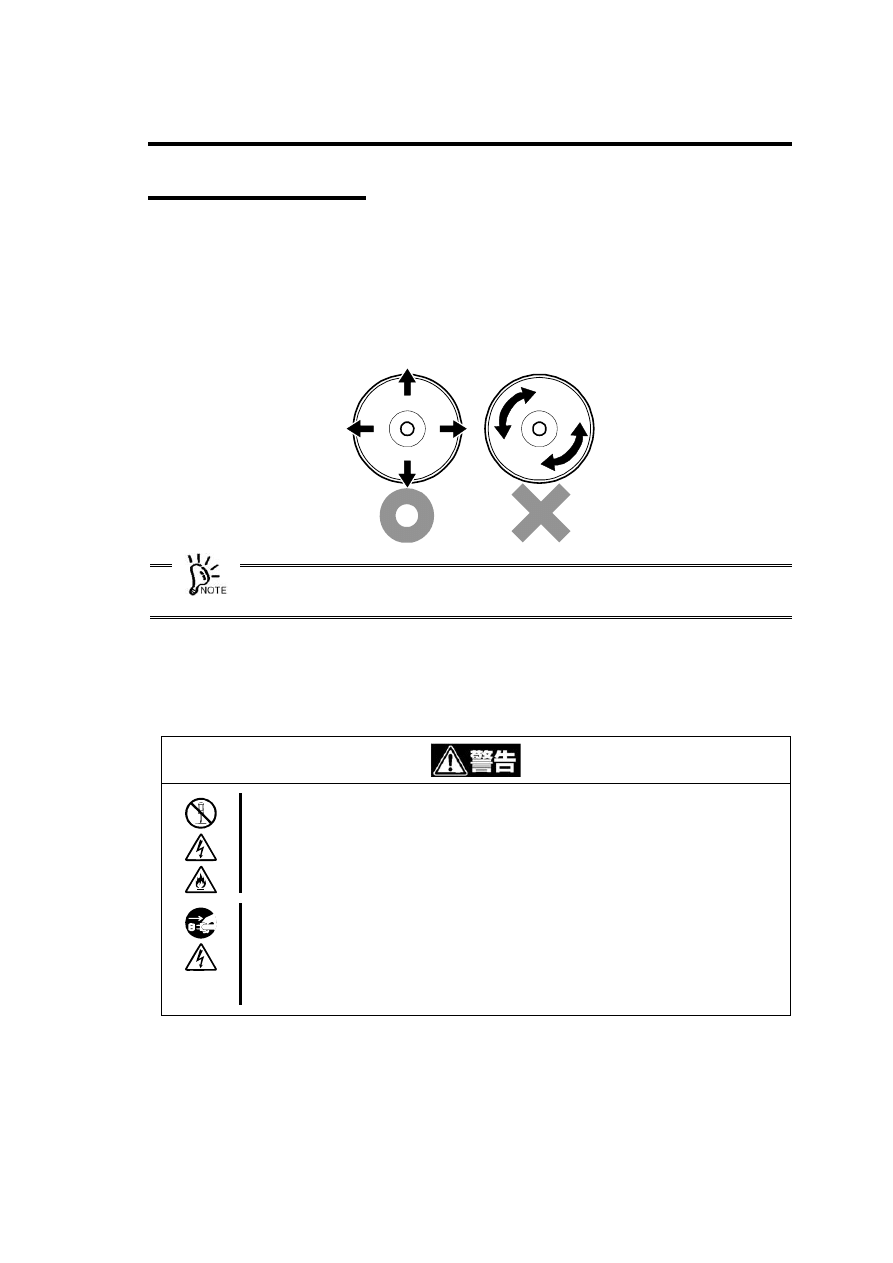
㛗ᮇ㛫䚸 ྠ䛨 䝕䜱 䝇䜽 䜢 ⏝䛩䜛 䛸 䚸 䝕䜱 䝇䜽 䛾䝕䞊䝍 㠃䛻䝂 䝭 䜔䝏䝸 䚸 ở䜜䛜╔䛧 䛶
䝕䞊䝍 䛾䝸 䞊䝗 /䝷 䜲 䝖 䛜ṇ䛧 䛟 䛷䛝 䛺䛟 䛺䜛 䛣 䛸 䛜䛒䜚 䜎 䛩䚹
╔䛧 䛯䜋䛣 䜚 䚸 ở䜜䛺䛹 䜢 㝖ཤ䛩䜛 㝿䛻䛿ᰂ䜙 䛛䛔䛔䛯ᕸ䛛ᕷ㈍䛾䜽 䝸 䞊䝘䞊䜢 ⏝
䛧 䝕䜱 䝇䜽 䛻യ䛜䛴䛛䛺䛔䜘 䛖 䛻㍍䛟 䜅䛝 ྲྀ䛳 䛶䛟 䛰䛥 䛔䚹 䛺䛚䚸 ⁐㢮䛿⤯ᑐ䛻⏝䛧
䛺䛔䛷䛟 䛰䛥 䛔䚹
䝕䜱 䝇䜽 Ύᤲ䜢 䛩䜛 ሙྜ䚸䝕䜱 䝇䜽 䛻യ䛜䛴䛛䛺䛔䜘 䛖 ὀព䛧 䛶䛟 䛰䛥 䛔䚹䝕䜱 䝇䜽 䛻
യ䛜䛴䛟 䛸 ษ䛺䝕䞊䝍 䜢 ㄞ䜏ྲྀ䜜䛺䛟 䛺䛳 䛯䜚 ◚ቯ䛥 䜜䛯䜚 䛧 䜎 䛩䚹
ུୋ͈֊൲Ȇ̞̾̀ͅ
ᮏ〇ရ䜢 ㍺㏦䛩䜛 䛸 䛝 䛿䚸 ᚲ䛪ḟ䛾ᡭ㡰䛻ᚑ䛳 䛶䛟 䛰䛥 䛔䚹
ศゎ䞉 ಟ⌮䞉 ᨵ㐀䛿䛧 䛺䛔
ಟ⌮ᢏ⾡⪅௨እ䛾ே䛿䚸 ᮏ᭩䛚䜘 䜃ᮏయ⨨䛻ῧ䛾ㄝ᫂᭩䛻グ㍕䛥 䜜䛶䛔䛺䛔ศ
ゎ䞉 ಟ⌮䞉 ᨵ㐀䜢 ⤯ᑐ䛻⾜䜟䛺䛔䛷䛟 䛰䛥 䛔䚹 ឤ㟁䛧 䛯䜚 䚸 Ⓨⅆ䛧 䛯䜚 䚸 ␗ᖖືస
䛧 䛶䛡䛜䜢 䛩䜛 䛣 䛸 䛜䛒䜚 䜎 䛩䚹
ᮏయ⨨䛾㟁※䝁 䞊䝗 䜢 ᥋⥆䛧 䛯䜎 䜎 ྲྀ䜚 䛡䞉 ྲྀ䜚 እ䛧 䜢 䛧 䛺䛔
ᮏ〇ရ䛾ྲྀ䜚 䛡䞉 ྲྀ䜚 እ䛧 䜢 ⾜䛖 ๓䛻ᮏయ⨨䛾㟁※䜢 OFF䛻䛧 䛶䚸 ᮏయ⨨䛾
㟁※䝁 䞊䝗 䜢 䝁 䞁 䝉䞁 䝖 䛛䜙 ᢤ䛔䛶䛟 䛰䛥 䛔䚹 㟁※䜢 OFF䛻䛧 䛶䜒 䚸 䝁 䞊䝗 䜢 ᕪ䛧
㎸䜣䛰䜎 䜎 䛰䛸 㟁Ẽ䛜ෆ㒊䛻ὶ䜜䛶䛔䜎 䛩䚹 䛣 䛾䜎 䜎 ྲྀ䜚 䛡䜛 䛸 ෆ㒊䛾㒊ရ䛻ゐ
䜜䛶䚸 ឤ㟁䛩䜛 䛚䛭䜜䛜䛒䜚 䜎 䛩䚹
33
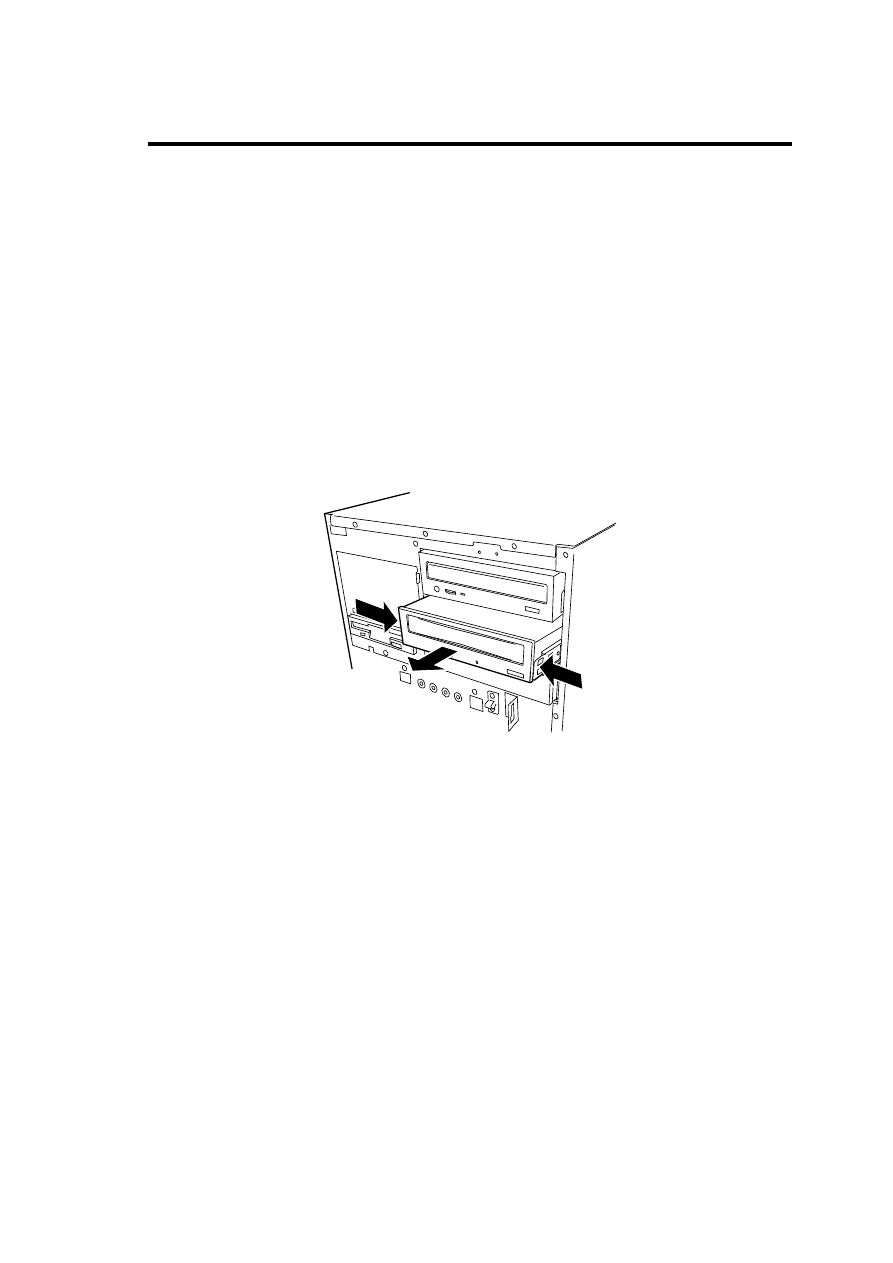
1.
ᮏ〇ရ䛛䜙 䝕䜱 䝇䜽 䜢 ྲྀ䜚 ฟ䛧 䚸 䝕䜱 䝇䜽 䜢 ῧ䛾䝥 䝷 䝇䝔 䜱 䝑 䜽 ಖㆤ䜿䞊䝇䛻
⣡䛧 䚸 ಖ⟶䛩䜛 䚹
䝕䜱 䝇䜽 䛻㐣ᗘ䛾ຊ䛜ຍ䜟䜙 䛺䛔䜘 䛖 ὀព䛧 䛶䛟 䛰䛥 䛔䚹
2.
ᮏయ⨨䛾㟁※䜢 OFF 䛻䛧 䛶䚸 䝅䝇䝔 䝮䜢 ⤊䛧 䛯ᚋ䚸 㟁※䝁 䞊䝗 䜢 䝁 䞁 䝉䞁 䝖
䛛䜙 ᢤ䛟 䚹
3.
ᮏయ⨨䛾䜹 䝞䞊㢮䜢 ྲྀ䜚 እ䛩䚹
4.
ᮏ〇ရ䛻᥋⥆䛧 䛶䛔䜛 DC 㟁※䜿䞊䝤 䝹䛚䜘 䜃䜲 䞁 䝍 䝣 䜵 䞊䝇䜿䞊䝤 䝹䜢 ྲྀ䜚 እ
䛩䚹
5.
ᮏ〇ရ䜢 ᮏయ⨨䛛䜙 ྲྀ䜚 እ䛩䚹
䝷 䝑 䝏䞁 䜾䝺 䞊䝹䜢 ྲྀ䜚 䛡䛶䛔䜛 ሙྜ䛿䚸 ୗᅗ䛾ᡭ㡰䛷ᮏయ⨨䛛䜙 ྲྀ䜚 ฟ䛧
䜎 䛩䚹
6.
䝷 䝑 䝏䞁 䜾䝺 䞊䝹䜢 ᮏ〇ရ䛻ྲྀ䜚 䛡䛶䛔䜛 ሙྜ䛿䚸 䝷 䝑 䝏䞁 䜾䝺 䞊䝹䜢 ྲྀ䜚 እ
䛩䚹
7.
ᮏ〇ရ䛜ධ䛳 䛶䛔䛯⟽䛻ᮏ〇ရ䜢 ධ䜜䛶䚸 ῧ䛾⦆⾪ᮦ䛷ᮏ〇ရ䜢 ᅛᐃ䛩䜛 䚹
34
లːડȶવ̥̈́ȉȷ͂এ̧̹͉̽͂
ᮏ〇ရ䛜ᛮ䛖 䜘 䛖 䛻ື䛛䛺䛟 䛺䜚 䚸䛂 ᨾ㞀䛛䛺䠛䛃 䛸 ᛮ䛳 䛯䛸 䛝 䛿䛣 䛾❶䛷♧䛩㞀ᐖฎ⌮
䝏䝱 䞊䝖 䜢 ཧ↷䛧 䛶㞀ᐖ䛾ཎᅉ䜢 ☜ㄆ䛧 䛶䛟 䛰䛥 䛔䚹
ศゎ䞉 ಟ⌮䞉 ᨵ㐀䛿䛧 䛺䛔
ಟ⌮ᢏ⾡⪅௨እ䛾ே䛿䚸 ᮏ᭩䛚䜘 䜃ᮏయ⨨䛻ῧ䛾ㄝ᫂᭩䛻グ㍕䛥 䜜䛶䛔䛺䛔ศ
ゎ䞉 ಟ⌮䞉 ᨵ㐀䜢 ⤯ᑐ䛻⾜䜟䛺䛔䛷䛟 䛰䛥 䛔䚹 ឤ㟁䛧 䛯䜚 䚸 Ⓨⅆ䛧 䛯䜚 䚸 ␗ᖖືస
䛧 䛶䛡䛜䜢 䛩䜛 䛣 䛸 䛜䛒䜚 䜎 䛩䚹
㞀ᐖฎ⌮䝏䝱 䞊䝖
ෆᐜ
ཎᅉ
ᑐฎ᪉ἲ
ᮏయ⨨䛾㟁※䛜
OFF
䛻䛺䛳 䛶䛔䜛
ᮏయ⨨䛾㟁※䜢 ON (POWER 䝷 䞁 䝥 Ⅼⅉ) 䛻䛧 䛶
䛟 䛰䛥 䛔䚹
DC
㟁※䜿䞊䝤 䝹䛜᥋
⥆䛥 䜜䛶䛔䛺䛔
ᮏ〇ရ䛻ᮏయ⨨䛾㟁※䝴䝙䝑 䝖 䛛䜙 ฟ䛶䛔䜛 㟁※
䜿䞊䝤 䝹䜢 ᥋⥆䛧 䛶䛟 䛰䛥 䛔䚹
䜲 䞁 䝍 䝣 䜵 䞊䝇䜿䞊
䝤 䝹䛜᥋⥆䛥 䜜䛶䛔
䛺䛔
ᮏ〇ရ䚸 䛚䜘 䜃ᶆ‽ഛ䛾 CD-ROM 䝗 䝷 䜲 䝤 䛺䛹 䜢
䝬䝄䞊䝪䞊䝗 ୖ䛾 IDE 䝁 䝛䜽 䝍 䛻᥋⥆䛧 䛶䛟 䛰䛥 䛔䚹
᥋⥆䛻⏝䛩䜛 䜿䞊䝤 䝹䛿ᮏ〇ရ䛻ῧ䛥 䜜䛶䛔䜛
䜲 䞁 䝍 䝣 䜵 䞊䝇䜿䞊䝤 䝹䜢 ⏝䛧 䛶䛟 䛰䛥 䛔䚹
ືస䛧 䛺䛔
䝕䝞䜲 䝇タᐃ䝢 䞁 䛾
タᐃ䜢 㛫㐪䛘䛶䛔䜛
ᮏ〇ရ䛻䛒䜛 䝕䝞䜲 䝇タᐃ䝢 䞁 䜢 ṇ䛧 䛟 タᐃ䛧 䛶䛟
䛰䛥 䛔䚹 ID 䜢 タᐃ䛩䜛 䝇䜲 䝑 䝏௨እ䛿ฟⲴ䛾タᐃ
䛻䛧 䛶䛟 䛰䛥 䛔䚹
䝕䜱 䝇䜽 䛜䝖 䝺 䞊䛾
୰䛻ṇ䛧 䛟 ධ䛳 䛶䛔
䛺䛔
䝕䜱 䝇䜽 䜢 ṇ䛧 䛟 ධ䜜䛶䛟 䛰䛥 䛔䚹
䝕䜱 䝇䜽 䛾ᤄධ᪉ྥ
䜢 㛫㐪䛳 䛶䛔䜛
䝕䜱 䝇䜽 䜢 ṇ䛧 䛔ྥ䛝 䛻䛧 䛶ᕪ䛧 ㎸䜣䛷䛟 䛰䛥 䛔䚹
䝕䜱 䝇䜽 䜢 䝉䝑 䝖
䛷䛝 䛺䛔
䛩䛷䛻ู䛾䝕䜱 䝇䜽
䛜䝉䝑 䝖 䛥 䜜䛶䛔䜛
䝉䝑 䝖 䛧 䛶䛔䜛 䝕䜱 䝇䜽 䜢 䜲 䝆䜵 䜽 䝖 䛧 䛶䛛䜙 䝉䝑
䝖 䛧 䛶䛟 䛰䛥 䛔䚹
ᮏయ⨨䛛䜙 䝕䜱
䝇䜽 (ᮏ〇ရ) 䜢 ㄆ
㆑䛷䛝 䛺䛔
䜲 䞁 䝍 䝣 䜵 䞊䝇䜿䞊
䝤 䝹䛜᥋⥆䛥 䜜䛶䛔
䛺䛔
ᮏ〇ရ䚸 䛚䜘 䜃ᶆ‽ഛ䛾 CD-ROM 䝗 䝷 䜲 䝤 䛺䛹 䜢
䝬䝄䞊䝪䞊䝗 ୖ䛾 IDE 䝁 䝛䜽 䝍 䛻᥋⥆䛧 䛶䛟 䛰䛥 䛔䚹
᥋⥆䛻⏝䛩䜛 䜿䞊䝤 䝹䛿ᮏ〇ရ䛻ῧ䛥 䜜䛶䛔䜛
䜲 䞁 䝍 䝣 䜵 䞊䝇䜿䞊䝤 䝹䜢 ⏝䛧 䛶䛟 䛰䛥 䛔䚹
䜲 䞁 䝍 䝣 䜵 䞊䝇䜿䞊
䝤 䝹䛜◚ᦆ䛧 䛶䛔䜛
䜲 䞁 䝍 䝣 䜵 䞊䝇䜿䞊䝤 䝹䜢 䛧 䛶䛟 䛰䛥 䛔䚹䜲 䞁 䝍
䝣 䜵 䞊䝇䜿䞊䝤 䝹䛿䚸ᮏ〇ရ䛻ῧ䛥 䜜䛶䛔䜛 䜲 䞁 䝍
䝣 䜵 䞊䝇䜿䞊䝤 䝹䜢 ⏝䛧 䛶䛟 䛰䛥 䛔䚹
䝕䝞䜲 䝇タᐃ䝢 䞁 䛾
タᐃ䜢 㛫㐪䛘䛶䛔䜛
ᮏ〇ရ䛻䛒䜛 䝕䝞䜲 䝇タᐃ䝢 䞁 䜢 ṇ䛧 䛟 タᐃ䛧 䛶䛟
䛰䛥 䛔䚹 ID 䜢 タᐃ䛩䜛 䝇䜲 䝑 䝏௨እ䛿ฟⲴ䛾タᐃ
䛻䛧 䛶䛟 䛰䛥 䛔䚹
35
ෆᐜ
ཎᅉ
ᑐฎ᪉ἲ
ᮏయ⨨䛛䜙 䝕䜱
䝇䜽 (ᮏ〇ရ) 䜢
ㄆ㆑䛷䛝 䛺䛔
䜲 䞁 䝇䝖 䞊䝹䛧 䛶䛔䜛 䝋 䝣
䝖 䜴䜵 䜰( 䝗 䝷 䜲 䝞) 䜢 㛫
㐪䛘䛶䛔䜛
ṇ䛧 䛔䝕䝞䜲 䝇䝗 䝷 䜲 䝞䜢 䜲 䞁 䝇䝖 䞊䝹䛧 䛶䛟 䛰
䛥 䛔䚹 䜎 䛯䚸 䜸䝨䝺 䞊䝔 䜱 䞁 䜾䝅䝇䝔 䝮䛸 ᮏయ
⨨䛻䜘 䛳 䛶䛿䚸 䝕䝞䜲 䝇䝗 䝷 䜲 䝞䛾䝻 䞊䝗 㡰䛻ไ
㝈䛜䛒䜛 ሙྜ䛜䛒䜚 䜎 䛩䚹 䛭䜜䛮䜜䛾ㄝ᫂᭩䜢 ཧ
↷䛧 䛶䛟 䛰䛥 䛔䚹
䝡 䝆䞊䜲 䞁 䝆䜿䞊䝍 䛜Ⅼⅉ
䛧 䛶䛔䜛
䝡 䝆䞊䜲 䞁 䝆䜿䞊䝍 䛜ᾘⅉ䛧 䛶䛛䜙 䜲 䝆䜵 䜽 䝖 䝪
䝍 䞁 䜢 ᢲ䛧 䛶䛟 䛰䛥 䛔䚹
䜲 䝆䜵 䜽 䝖 䝪䝍 䞁
䜢 ᢲ䛧 䛶䜒 䝖 䝺 䞊
䛜䜲 䝆䜵 䜽 䝖 䛥 䜜
䛺䛔
⏝䛧 䛶䛔䜛 ⎔ቃ(ᮏయ
⨨䜔䜸䝨䝺 䞊䝔 䜱 䞁 䜾䝅䝇
䝔 䝮䚸 䝕䝞䜲 䝇䝗 䝷 䜲 䝞䛺
䛹 ) 䛻䜘 䛳 䛶䜲 䝆䜵 䜽 䝖 䝪
䝍 䞁 䛾ᶵ⬟䛜ไ㝈䛥 䜜䛶䛔
䜛
⏝䛧 䛶䛔䜛 ⎔ቃ䛻䜘 䛳 䛶䛿䚸 䜲 䝆䜵 䜽 䝖 䝪䝍 䞁
䜢 ᢲ䛧 䛶䜒 䜲 䝆䜵 䜽 䝖 䛷䛝 䛺䛔ሙྜ䛜䛒䜚 䜎 䛩䚹
䛭䜜䛮䜜䛾ㄝ᫂᭩䜢 ཧ↷䛧 䛶ᡭ㡰䛻ᚑ䛳 䛯᪉ἲ䛷
䝕䜱 䝇䜽 䜢 䜲 䝆䜵 䜽 䝖 䛧 䛶䛟 䛰䛥 䛔䚹 (ᮏయ⨨ᮏ
య䛾䝖 䝷 䝤 䝹䛻䜘 䜚 䜲 䝆䜵 䜽 䝖 䛷䛝 䛺䛔ሙྜ䜒 ⪃
䛘䜙 䜜䜎 䛩䚹 䛣 䛾ሙྜ䛻䛿䚸 䛔䛳 䛯䜣ᮏయ⨨䛾
㟁※䜢 OFF 䛻䛧 䛶䚸ᡭື䜲 䝆䜵 䜽 䝖 䛷䝕䜱 䝇䜽 䜢
䜲 䝆䜵 䜽 䝖 䛧 䛶䛟 䛰䛥 䛔䚹 )
䛾ᮏయ⨨䜔䜸䝨䝺 䞊
䝔 䜱 䞁 䜾䝅䝇䝔 䝮䛷⏝䛧
䛶䛔䛯䝕䜱 䝇䜽 䜢 䝉䝑 䝖 䛧
䛶䛔䜛
ู䛾ᮏయ⨨䛷᭩䛝 ㎸䜣䛰䝕䜱 䝇䜽 䜔⏝䛧 䛶䛔
䜛 ⎔ቃ䛻ྜ䜟䛺䛔䝣 䜷 䞊䝬䝑 䝖 ᙧᘧ䛾䝕䜱 䝇䜽 䛾
䝕䞊䝍 䛿ㄞ䜏䛸 䜛 䛣 䛸 䛜䛷䛝 䜎 䛫䜣䚹 ᮏ〇ရ䚸 䛚
䜘 䜃ᮏయ⨨䛾ᵝ䜔⎔ቃ䛻䛒䛳 䛯䝕䜱 䝇䜽 䜢
⏝䛧 䛶䛟 䛰䛥 䛔䚹
ᛴ⃭䛺 ᗘኚ䜢 䛘䛯
ᛴ⃭䛺 ᗘኚ䛾䛯䜑䛻䝕䜱 䝇䜽 䜔ᮏ〇ရ䚸 ᮏయ
⨨䛜⤖㟢䛧 䛶䛔䜛 䛣 䛸 䛜⪃䛘䜙 䜜䜎 䛩䚹 ᛴ⃭䛺
ᗘኚ䛜ྜ䛳 䛯ሙྜ䛿䚸 1 㛫௨ୖᚅ䛳 䛶䛛䜙
⏝䛧 䛶䛟 䛰䛥 䛔䚹
䝕䞊䝍 䛾䝸 䞊䝗
(
ㄞ䜏ྲྀ䜚 ) 䛜䛷
䛝 䛺䛔
䝕䜱 䝇䜽 䛜ở䜜䛶䛔䜛
䝕䜱 䝇䜽 䜢 䜽 䝸 䞊䝙䞁 䜾䛧 䛶䛟 䛰䛥 䛔䚹
䝕䜱 䝇䜽 䛜䝷 䜲 䝖 䝥 䝻 䝔 䜽
䝖 䛥 䜜䛶䛔䜛
䝕䜱 䝇䜽 䛾䝷 䜲 䝖 䝥 䝻 䝔 䜽 䝖 䜢 ゎ㝖䛧 䛶䛟 䛰䛥
䛔䚹
䝕䞊䝍 䛾䝷 䜲 䝖
(
᭩䛝 ㎸䜏) 䛜䛷
䛝 䛺䛔
䝕䜱 䝇䜽 䛜䝣 䜷 䞊䝬䝑 䝖 䛥
䜜䛶䛔䛺䛔䚹 䜎 䛯䛿䚸 ᮏ〇
ရ䜔ᮏయ⨨䛾⎔ቃ䛻ྜ䛳
䛶䛔䛺䛔ᙧᘧ䛷䝣 䜷 䞊䝬䝑
䝖 䛥 䜜䛶䛔䜛
䝕䜱 䝇䜽 䜢 ᮏ〇ရ䜔ᮏయ⨨䛾⎔ቃ䛻ྜ䛳 䛯ᙧᘧ
䛷䝣 䜷 䞊䝬䝑 䝖 䛧 䛶䛟 䛰䛥 䛔䚹 (グ㘓䛧 䛶䛔䜛 䝕䞊
䝍 䛜ᚲせ䛺ሙྜ䛿䚸 ู䛾䝕䜱 䝇䜽 䜢 ⏝䛧 䛶䛟 䛰
䛥 䛔䚹 )
⏝䛧 䛶䛔䜛 ⎔ቃ ᗘ䛜ప
䛩䛞䜛
⏝⎔ቃ ᗘ䛜 5䉝௨ୗ䛾ሙྜ䛿䚸 䝸 䞊䝗 䛷䛝 䛶
䜒 䝷 䜲 䝖 䛷䛝 䛺䛔䛣 䛸 䛜䛒䜚 䜎 䛩䚹 ⏝⎔ቃ ᗘ
䜢 5䉝௨ୖ䛻䛧 䛶䛛䜙 ⏝䛧 䛶䛟 䛰䛥 䛔䚹
ᛴ⃭䛺 ᗘኚ䜢 䛘䛯
ᛴ⃭䛺 ᗘኚ䛾䛯䜑䛻䝕䜱 䝇䜽 䜔ᮏ〇ရ䚸 ᮏయ
⨨䛜⤖㟢䛧 䛶䛔䜛 䛣 䛸 䛜⪃䛘䜙 䜜䜎 䛩䚹 ᛴ⃭䛺
ᗘኚ䛜䛒䛳 䛯ሙྜ䛿䚸 1 㛫௨ୖᚅ䛳 䛶䛛䜙
⏝䛧 䛶䛟 䛰䛥 䛔䚹
䝕䜱 䝇䜽 䚸 䜎 䛯䛿ᮏ〇ရ䛾
䝸 䞊䝗 /䝷 䜲 䝖 䝦䝑 䝗 䛜ở䜜
䛶䛔䜛
䝸 䞊䝗 /䝷 䜲 䝖 䝦䝑 䝗 䛚䜘 䜃䝕䜱 䝇䜽 䜢 䜽 䝸 䞊䝙
䞁 䜾䛧 䛶䛟 䛰䛥 䛔䚹 䛭䜜䛷䜒 ᭩䛝 ㎸䜏䛜䛷䛝 䛺䛔
ሙྜ䛿䚸 ㈙䛔ồ䜑䛾㈍ᗑ䜎 䛯䛿ಖᏲ䝃䞊䝡 䝇
♫䛻㐃⤡䛧 䛶䛟 䛰䛥 䛔䚹
≀⌮䝣 䜷 䞊䝬䝑 䝖 䜢 䛧 䛶䛔
䜛
≀⌮䝣 䜷 䞊䝬䝑 䝖 䛿ㄽ⌮䝣 䜷 䞊䝬䝑 䝖 䛻ẚ䜉㛫
䛜䛛䛛䜚 䜎 䛩䚹 䛧 䜀䜙 䛟 䛚ᚅ䛱 䛟 䛰䛥 䛔䚹
䝣 䜷 䞊䝬䝑 䝖 䛻␗
ᖖ䛻㛫䛜䛛䛛䜛
䝕䜱 䝇䜽 䛜ở䜜䛶䛔䜛
䝕䜱 䝇䜽 䜢 䜽 䝸 䞊䝙䞁 䜾䛧 䛶䛟 䛰䛥 䛔䚹

36
ັ˝!ॽအ
UltraDMA
䝰䞊䝗 4
66.6MB/s
UltraDMA
䝰䞊䝗 2
33.3MB/s
䝬䝹䝏䝽䞊䝗 DMA 䝰䞊䝗 2
16.6MB/s
䝕䞊䝍 ㌿㏦㏿ᗘ
PIO
㌿㏦䝰䞊䝗 4
16.6MB/s
Random
䠄 ᖹᆒᅇ㌿ᚅ䛱 㛫ྵ䜐䠅
DVD-RAM
240ms
DVD-ROM
140ms
ᖹᆒ䜰 䜽 䝉䝇㛫
CD-ROM
130ms
䝞䝑 䝣 䜯 ᐜ㔞
2MB
እᙧᑍἲ
146mm
䠄 ᖜ䠅 㽢190mm䠄 ዟ⾜䛝 䠅 㽢41.3mm䠄 㧗䛥 䠅
㉁㔞
⣙ 0.95kg
㟁※䠄 ᐃ᱁䠅
DC +5V
1.0A
DC +12V
0.8A
ᾘ㈝㟁ຊ䠄 ᐃ᱁䠅
14.6W
⎔ቃ᮲௳
䠷 ືస䠹
࿘ᅖ ᗘ
5
䉝䡚45䉝䠄 ᗘኚ⋡: 10䉝䠋㛫䠅
┦ᑐ‵ᗘ
10%
䡚80%RH
᭱‵⌫ ᗘ
29
䉝䠄 ⤖㟢䛧 䛺䛔䛣 䛸 䠅
䠷 ㍺㏦䠹
࿘ᅖ ᗘ
䞊30䉝䡚60䉝
┦ᑐ‵ᗘ
5%
䡚90%RH
᭱‵⌫ ᗘ
29
䉝䠄 ⤖㟢䛧 䛺䛔䛣 䛸 䠅
䠷 ື䠹
ືస
1.96m/s2
௨ୗ
㍺㏦
9.8m/s2
௨ୗ
37
ັ˞!EWE.SBN ΟͻΑ·̞̾̀ͅ
ᮏ〇ရ䛷⏝䛷䛝 䜛 䝕䜱 䝇䜽 䛿䚸 ௨ୗ䛾䛸 䛚䜚 䛷䛩䚹
௨ୗ䛾䝯 䝕䜱 䜰䛻᭩䛝 ㎸䜏䠋ㄞ䜏ྲྀ䜚 䛜䛷䛝 䜎 䛩䚹
DVD-RAM
䠄 4.7GB/∦㠃䠅
DVD-RAM
䠄 9.4GB/୧㠃䠅
௨ୗ䛾䝯 䝕䜱 䜰䛾ㄞ䜏ྲྀ䜚 䛜䛷䛝 䜎 䛩䚹
DVD-RAM
䠄 5.2GB/୧㠃䠅
DVD-RAM
䠄 2.6GB/∦㠃䠅
DVD-ROM
CD-ROM
CD-R/RW
ᮏ〇ရ䛷⏝䛩䜛 DVD-RAM 䝕䜱 䝇䜽 䛿䚸 ᘢ♫䛜ᥦ౪䛩䜛 DVD-RAM 䝕䜱 䝇䜽 䜎 䛯䛿
᥎ዡရ䜢 ⏝䛩䜛 䛣 䛸 䜢 䛚່䜑䛧 䜎 䛩䚹 ヲ䛧 䛟 䛿㘓 C,㘓 D 䜢 䛤 ぴ䛟 䛰䛥 䛔䚹

38
EWE.SBN ΟͻΑ·͈৾ͤե̞ષ͈ಕփ
᭩䛝 ㎸䜏῭䜏䜎 䛯䛿᭩䛝 ㎸䜎 䜜䛶䛔䛺䛔 DVD-RAM 䝕䜱 䝇䜽 䜢 㛗ᣢ䛱 䛥 䛫䜛 䛯䜑䛻䚸 ḟ䛾
Ⅼ䛻ὀព䛧 䛶 DVD-RAM 䝕䜱 䝇䜽 䜢 ྲྀ䜚 ᢅ䛳 䛶䛟 䛰䛥 䛔䚹
DVD-RAM
䝕䜱 䝇䜽 䜢 ⴠ䛸 䛧 䛯䜚 䚸䛯䛯䛔䛯䜚 䛧 䛺䛔䛷䛟 䛰䛥 䛔䚹DVD-RAM 䝕䜱
䝇䜽 䛜◚ᦆ䛩䜛 䛚䛭䜜䛜䛒䜚 䜎 䛩䚹 䜎 䛯䚸 ◚ᦆ䛧 䛯 DVD-RAM 䝕䜱 䝇䜽 䜢 ᮏ〇ရ
䛻䝉䝑 䝖 䛩䜛 䛸 䚸 ᮏ〇ရ⮬㌟䜒 ᦆയ䛩䜛 䛚䛭䜜䛜䛒䜚 䜎 䛩䚹
DVD-RAM
䝕䜱 䝇䜽 䜢 䚸 ᮏయ⨨䛾䝰䝙䝍 䚸 䝰䞊䝍 䚸 䛚䜘 䜃䝡 䝕䜸䜎 䛯䛿 X ⥺䜢
⏝䛩䜛 ᶵჾ䛺䛹 䚸 㟁☢Ἴ䛻䜘 䜛 㟁Ἴ㞀ᐖ䛾Ⓨ⏕※䛾㏆䛟 䛻䛿⨨䛛䛺䛔䛷䛟 䛰䛥
䛔䚹 DVD-RAM 䝕䜱 䝇䜽 䛾䝕䞊䝍 䛜ᦆ䛺䜟䜜䜛 䛣 䛸 䛜䛒䜚 䜎 䛩䚹
DVD-RAM
䝕䜱 䝇䜽 䛿┤ᑕ᪥ග䜢 㑊䛡䚸 䝠 䞊䝍 䛭䛾䛾⇕※䛛䜙 㐲䛦 䛡䛶ಖ⟶䛧
䛶䛟 䛰䛥 䛔䚹
DVD-RAM
䝕䜱 䝇䜽 䛿䚸 ᐊෆ ᗘ䠉10䉝䡚50䉝䚸 ┦ᑐ‵ᗘ 3%䡚85%䛾䜋䛣 䜚 䛾
䛺䛔ሙᡤ䛷ಖ⟶䛧 䛶䛟 䛰䛥 䛔䚹 DVD-RAM 䝕䜱 䝇䜽 䜢 ⏝䛩䜛 䛸 䛝 䛿䚸 ᗘ໙㓄
10
䉝/㛫䠄 1 㛫䛻 10䉝௨ෆ䛾 ᗘኚ䠅 䛷ᐊ 䠄 ᗘ䛜 5䉝䡚35䉝䚸 ‵ᗘ䛜
15%
䡚85%䠅 䛻ᡠ䛧 䛶䛛䜙 ⏝䛧 䛶䛟 䛰䛥 䛔䚹
DVD-RAM
䝕䜱 䝇䜽 䛿䚸 ᖖ䛻ῧ䛾ಖㆤ䜿䞊䝇䛻⣡䛧 䚸 䝫䝸 ⿄䛻ධ䜜䛶ᐦᑒ䛧
䛶䛟 䛰䛥 䛔䚹
DVD-RAM
䝕䜱 䝇䜽 䛾䝕䞊䝍 㠃䜢 ᡭ䜔䜒 䛾䛷ゐ䜜䛺䛔䛷䛟 䛰䛥 䛔䚹
㣧㣗䜔ႚ↮䜢 䛧 䛺䛜䜙 䛾ྲྀ䜚 ᢅ䛔䛿㑊䛡䛶䛟 䛰䛥 䛔䚹
DVD-RAM
䝕䜱 䝇䜽 䛿䚸 ᑓ⏝䛾䝥 䝷 䝇䝏䝑 䜽 ಖㆤ䜿䞊䝇䛻ධ䜜䛶Ỉᖹ䜎 䛯䛿ᆶ┤
䛺≧ែ䛻䛧 䛶ಖ⟶䛧 䛶䛟 䛰䛥 䛔䚹
DVD-RAM
䝕䜱 䝇䜽 䛾ୖ䛻䜒 䛾䜢 ⨨䛛䛺䛔䛷䛟 䛰䛥 䛔䚹
ᮏ〇ရ䛻ᤄධ䛩䜛 䛸 䛝 䛿䚸 䛶䛔䛽䛔䛻ྲྀ䜚 ᢅ䛳 䛶䛟 䛰䛥 䛔䚹
39
ັ˟!༆ค
ᮏ〇ရ⏝䛻ḟ䛾ูရ䜢 ⏝ព䛧 䛶䛔䜎 䛩䚹 䛚㈙䛔ồ䜑䛾㝿䛿㈍ᗑ䛻ရྡ䛸 ᆺ␒䜢 䛚⏦䛧
䛡䛟 䛰䛥 䛔䚹
ᑦ䚸 EF-8172 䛿䜹 䞊䝖 䝸 䝑 䝆䛛䜙 ྲྀ䜚 ฟ䛧 ྍ䛾䛯䜑⏝䛷䛝 䜎 䛫䜣䚹
ရྡ
ᆺ␒
DVD-RAM
䝕䜱 䝇䜽 䜹 䞊䝖 䝸 䝑 䝆
4.7GB
EF-8171

40
ັˠ!ଔ
䠘DVD-RAM 䝕䜱 䝇䜽 䛻䛴䛔䛶䠚
DVD-RAM
䝕䜱 䝇䜽 䛿䚸 ᯇୗ㟁ჾ⏘ᴗ〇䜎 䛯䛿᪥❧䝬䜽 䝉䝹〇䜢 ᥎ዡ䛧 䜎 䛩䚹
䠘䜽 䝸 䞊䝙䞁 䜾䜻䝑 䝖 䛻䛴䛔䛶䠚
䜽 䝸 䞊䝙䞁 䜾䜻䝑 䝖 䛿䚸ᯇୗ㟁ჾ⏘ᴗ〇䝺 䞁 䝈䜽 䝸 䞊䝘䞊䠄 LF-K123LCJ1䠅䚸䝕䜱 䝇䜽 䜽 䝸 䞊
䝘䞊䠄 LF-K200DCJ1䠅 䜢 ᥎ዡ䛧 䜎 䛩䚹

41
ັˡ!FYQSFTTCVJMEFS ͈ঀဥ̞̾̀ͅ
Express5800
䝅䝸 䞊䝈䛻ᶆ‽䛷ῧ䛥 䜜䛶䛔䜛 䛂 EXPRESSBUILDER䛃 CD-ROM 䜢 ⏝
䛩䜛 㝿䛿䚸 ḟ䛾Ⅼ䛻䛴䛔䛶ὀព䛧 䛶䛟 䛰䛥 䛔䚹
ヲ䛧 䛟 䛿䚸 ᮏ〇ရ䛻ῧ䛥 䜜䛶䛔䜛 ู⣬䛾䛂 EXPRESSBUILDER 䛤 ⏝䛾ὀព䛃 䜢 ཧ↷
䛧 䛶䛟 䛰䛥 䛔䚹
EXPRESSBUILDER
䜢 ㉳ື䛷䛝 䛺䛔
→ 䛔䛳 䛯䜣ᮏ〇ရ䛻᥋⥆䛧 䛶䛔䜛 䜲 䞁 䝍 䝣 䜵 䞊䝇䜿䞊䝤 䝹䜢 ྲྀ䜚 እ䛧 䛶䛛䜙
㉳ື䛧 䛶䛟 䛰䛥 䛔䚹
䝅䞊䝮䝺 䝇䝉䝑 䝖 䜰䝑 䝥 ୰䛻䝃䞊䝡 䝇䝟䝑 䜽 CD-ROM 䛾䝉䝑 䝖 䜢 せồ䛥 䜜䛯
→ Express5800 䝅䝸 䞊䝈ᑓ⏝䛾䝉䝑 䝖 䜰䝑 䝥 䝒 䞊䝹䛂 䝅䞊䝮䝺 䝇䝉䝑 䝖 䜰䝑
䝥 䛃 䜢 ⏝䛩䜛 䛸 䚸 タᐃሗ䜢 䛒䜙 䛛䛨 䜑ධຊ䛧 䛶䛚䛟 䛣 䛸 䛷䚸 ⮬ື䛷
Windows 2000
䜔 Windows XP 䛾䜲 䞁 䝇䝖 䞊䝹䛛䜙 䝉䝑 䝖 䜰䝑 䝥 䜎 䛷䜢 ⾜
䛖 䛣 䛸 䛜䛷䛝 䜎 䛩䠄 䛣 䛾㛫䚸Express5800 䝅䝸 䞊䝈ᮏయ䛾䛭䜀䛷䝉䝑 䝖 䜰䝑
䝥 䛾≧ἣ䜢 ☜ㄆ䛩䜛 ᚲせ䛜䛒䜚 䜎 䛫䜣䠅䚹
䛯䛰䛧 䚸 䝃䞊䝡 䝇䝟䝑 䜽 䜢 㐺⏝䛩䜛 タᐃ䛻䛧 䛯䛸 䛝 䛻䛿䚸䛂 䛣 䛣 䛛䜙 ↓ே䜲
䞁 䝇䝖 䞊䝹䛻䛺䜚 䜎 䛩䚹䞉 䞉 䞉 䛃 䛸 䛔䛖 䝯 䝑 䝉䞊䝆䛜⾲♧䛥 䜜䛯䛸 䛝 䛻䝃䞊
䝡 䝇䝟䝑 䜽 CD-ROM 䜢 ᮏ〇ရ䛻䝉䝑 䝖 䛧 䛶䛟 䛰䛥 䛔䚹
䝃䞊䝡 䝇䝟䝑 䜽 CD-ROM 䜢 ᮏ〇ရ䛻䝉䝑 䝖 䛫䛪䛻↓ே䜲 䞁 䝇䝖 䞊䝹䜢 㛤
ጞ䛩䜛 䛸 䚸䜲 䞁 䝇䝖 䞊䝹䛾㏵୰䛷䝃䞊䝡 䝇䝟䝑 䜽 CD-ROM 䛾䝉䝑 䝖 䜢 せồ
䛥 䜜䜎 䛩䚹 䝃䞊䝡 䝇䝟䝑 䜽 CD-ROM 䜢 ᮏ〇ရ䛻䝉䝑 䝖 䛧 䛶䛟 䛰䛥 䛔䚹
䝬䝇䝍 䞊䝁 䞁 䝖 䝻 䞊䝹䝯 䝙䝳 䞊䛾䝉䝑 䝖 䜰䝑 䝥 䝥 䝻 䜾䝷 䝮䜢 ᧯స୰䛻
EXPRESSBUILDER
䛾䝉䝑 䝖 䜢 せồ䛥 䜜䛯
→ Windows 䛾 Autorun ᶵ⬟䛛䜙 ㉳ື䛩䜛 䛂 䝬䝇䝍 䞊䝁 䞁 䝖 䝻 䞊䝹䝯 䝙䝳 䞊䛃
ෆ䛾䝉䝑 䝖 䜰䝑 䝥 䝯 䝙䝳 䞊䛾୰䛻䛿䚸 CD-ROM 䝗 䝷 䜲 䝤䛻
EXPRESSBUILDER
䜢 䝉䝑 䝖 䛩䜛 䜘 䛖 せồ䛧 䛶䛟 䜛 䜒 䛾䛜䛒䜚 䜎 䛩䚹 ᮏ〇
ရ䛻䝉䝑 䝖 䛧 䛯 EXPRESSBUILDER 䜢 䛾 CD-ROM 䝗 䝷 䜲 䝤䛻䝉䝑 䝖 䛧
䛶䛛䜙 䝉䝑 䝖 䜰䝑 䝥 䜢 ⥆䛡䛶䛟 䛰䛥 䛔䚹」ᩘ䛾 CD-ROM 䝗 䝷 䜲 䝤䜢 ᦚ㍕䛧
䛶䛔䜛 ሙྜ䛿䚸 䝯 䝑 䝉䞊䝆䛻⾲♧䛥 䜜䜛 䝗 䝷 䜲 䝤 䝺 䝍 䞊䜢 ཧ↷䛧 䛶䚸 ヱᙜ
䛩䜛 CD-ROM 䝗 䝷 䜲 䝤 䛻䝉䝑 䝖 䛧 䛶䛟 䛰䛥 䛔䚹

42
Preface
This guide is intended to enable you to install and use the N8151-32B Built-in DVD-RAM
Unit (called the Built-in DVD-RAM drive hereafter) correctly and safely. Be sure to read this
guide before handling the Built-in DVD-RAM drive. Also refer to this guide when you want to
know how to use the Built-in DVD-RAM drive or some malfunction occurs.
Before handling the Built-in DVD-RAM drive, read this guide carefully to handle it correctly.
Store this guide securely as well as the Warranty coming with this guide.
For how to handle the computer in which the Built-in DVD-RAM drive is installed, refer to
the manual of the computer.
Be sure to read "Notes for Safety" on page i, "Warning Label" on page vi and "Notes on
Use" on page 46 before handling the Built-in DVD-RAM drive.
This guide is composed of four chapters and appendices A to E. When you first handle the
Built-in DVD-RAM drive, read this guide in the sequential order from Chapter 1. When you
want to know how to use the Built-in DVD-RAM drive, read Chapter 2 and following. See
Chapter 4 when an error occurs in the Built-in DVD-RAM drive.
The following describes the contents of each chapter or appendix simply.
Chapter 1 First Use of Built-in DVD-RAM Drive
Describes the features of the Built-in DVD-RAM drive, part names and functions, and
the installation of the Built-in DVD-RAM drive into a computer sequentially.
Chapter 2 Using Built-in DVD-RAM Drive
Describes how to insert or eject a DVD-RAM/CD-ROM disk (called the disk hereafter)
into or from the Built-in DVD-RAM drive and how to handle data.
Chapter 3 Cleaning and Carriage of Built-in DVD-RAM Drive
Describes the cleaning of the Built-in DVD-RAM drive and the disk and the procedure
of carrying the Built-in DVD-RAM drive.
Chapter 4 When Occurrence of Fault Is Suspected
If the Built-in DVD-RAM drive does not operate as you wish, see the chart shown in
this chapter instead of doubting whether the Built-in DVD-RAM drive is defected.
Appendix A Specifications
Describes the specifications of the Built-in DVD-RAM drive.
Appendix B Disks
Describes how to handle disks.
Appendix C Accessories
Introduces accessories provided by NEC.
Appendix D Recommended Devices
Introduces recommended devices suitably used for the Built-in DVD-RAM drive.
Appendix E Use of NEC EXPRESSBUILDER
Describes the notes on the use of the "NEC EXPRESSBUILDER" CD-ROM coming
with any NEC Express5800 series machine.

43
Contents
Preface........................................................................................................................................... 42
Contents......................................................................................................................................... 43
Notes on Use ................................................................................................................................. 45
Cleaning ......................................................................................................................................... 46
Disposal of the Built-in DVD-RAM Drive and Consumables........................................................... 46
Chapter 1 First Use of Built-in DVD-RAM Drive ~From Unpackaging to First Use~ .........47
Features ......................................................................................................................................... 47
Package Contents .......................................................................................................................... 48
Part Name and Function ................................................................................................................ 49
Installation ...................................................................................................................................... 51
Checking Device ID Jumper ...................................................................................................... 52
Installing Latching Rails on the Built-in DVD-RAM Drive ........................................................... 53
Installing the Built-in DVD-RAM Drive into 5.25-inch Device Bay .............................................. 54
Connecting Interface Cables...................................................................................................... 58
Connecting Power Cable to the Built-in DVD-RAM Drive .......................................................... 60
Executing Self-diagnosis............................................................................................................ 60
Checking by BIOS ..................................................................................................................... 61
Installing Device Driver .............................................................................................................. 61
Chapter 2 Using Built-in DVD-RAM Drive..........................................................................62
Power On/Off ................................................................................................................................. 62
Eject Button and Busy Indicator ..................................................................................................... 63
Loading Disk .................................................................................................................................. 64
Ejecting Disk .................................................................................................................................. 66
Ejecting Disk Manually ................................................................................................................... 67
Data Read/Write............................................................................................................................. 68
Notes on Data Handling ~Security of Important Data~................................................................... 68
Data Backup .............................................................................................................................. 69
Disk Write Protect ...................................................................................................................... 69
Routine Maintenance (Cleaning) ............................................................................................... 70
Chapter 3 Cleaning and Carriage of Built-in DVD-RAM Drive...........................................71
Cleaning of Built-in DVD-RAM Drive .............................................................................................. 71
Cleaning of Built-in DVD-RAM Drive.......................................................................................... 71
Cleaning of Lens........................................................................................................................ 72
Cleaning of Disk......................................................................................................................... 73
Carriage of Built-in DVD-RAM Drive .............................................................................................. 73
Chapter 4 When Occurrence of Fault Is Suspected ..........................................................75

44
Appendix A Specifications ..................................................................................................77
Appendix B Disks...............................................................................................................78
Notes on Handling of DVD-RAM Disk ............................................................................................ 79
Appendix C Accessories ....................................................................................................80
Appendix D Recommended Devices .................................................................................81
Appendix E Use of NEC EXPRESSBUILDER...................................................................82

45
Notes on Use
Follow the following notes to use the Built-in DVD-RAM drive correctly. Ignoring these notes
in use of the Built-in DVD-RAM drive may cause the Built-in DVD-RAM drive and/or some
properties (including data and other devices) to be defected or the Built-in DVD-RAM drive
to operate incorrectly.
Installation of Device Driver
Some operating systems installed in the computer require the device driver to be installed.
Install the device driver to the computer by using the "Device Driver Disk" coming with the
Built-in DVD-RAM drive.
For the conditions required for the installation and the installation procedure, refer to the
"Built-in DVD-RAM Driver Software User’s Guide" coming with the Built-in DVD-RAM drive.
Ordinary Use of Built-in DVD-RAM Drive
Do not turn off the power while the DVD-RAM drive is operating. Failure to follow it
may cause the Built-in DVD-RAM drive to be defected or the data written into the
disk to be lost.
Insert or eject a disk into or from the Built-in DVD-RAM drive after confirming that
the Built-in DVD-RAM drive allows the disk to be inserted or ejected. Inserting or
ejecting a disk forcibly may cause the Built-in DVD-RAM drive and/or the disk to be
damaged.
Insert a disk into the Built-in DVD-RAM drive after starting the system completely.
In addition, eject the disk from the Built-in DVD-RAM drive before exiting the
system. Starting or exiting the system with a disk remaining inserted may cause
some data in the disk to be broken.
Do not insert any medium other than a disk into the Built-in DVD-RAM drive.
Failure to follow it may cause the Built-in DVD-RAM drive to be defected. In
particular, note that, when a disk is taken off from its case, the manual sheet or
label of the disk may be put on the disk.
Before the Built-in DVD-RAM drive is carried, take off the inserted disk from the
Built-in DVD-RAM drive and close the tray. Carrying the Built-in DVD-RAM drive
with a disk remaining inserted may cause the Built-in DVD-RAM drive and/or the
disk to be defected.
Any 8-cm CD medium is not available for the Built-in DVD-RAM drive placed in the
longitudinal direction. To allow an 8-cm CD medium to be used, install the Built-in
DVD-RAM drive into a device bay which can be installed in the transverse
direction.
It cannot be secured that CD replay devices can replay disks such as "copy-
guarded CD" not conforming to the CD standard.

46
Cleaning
Cleaning of Lens
The lens on the Built-in DVD-RAM drive may be covered with dust and/or dirt while
the Built-in DVD-RAM drive is used for a long time. This may cause data read/write
to be done incorrectly.
While the cleaning frequency varies depending on the usage environment and
frequency of the Built-in DVD-RAM drive, it is recommended to clean the lens once
for two months by using the attached lens cleaner. See Chapter 3 for details of the
cleaning.
Cleaning of Built-in DVD-RAM Drive
Turn off the power of the computer.
Wipe out any dirt with soft and dry cloth lightly.
If heavy dirt is found, immerse cloth in diluted kitchen detergent (neutral), wring out
the cloth, and wipe the dirt with the cloth.
Follow the notes on chemical cloth if used.
Do not use solvents including benzin and thinner.
Disposal of the Built-in DVD-RAM Drive and Consumables
For the disposal of the Built-in DVD-RAM drive or disks become unavailable,
observe the waste disposal rules of your local government.
Make sure to completely erase the data stored in disk to be disposed on your own
responsibility so that the data will never be restored, replayed, and/or reused by a
third party. It is required to pay sufficient attention to protect personal privacy and
corporate secrets.
47
Chapter 1 First Use of Built-in DVD-RAM Drive
~ From Unpacking to First Use ~
First read this chapter when you first use the Built-in DVD-RAM drive.
This chapter describes the features of the Built-in DVD-RAM drive and the jobs from the
unpacking to the first use of the Built-in DVD-RAM drive sequentially.
Contact your service representative for the questions on the Built-in DVD-RAM drive and
the software used for the Built-in DVD-RAM drive.
Features
The Built-in DVD-RAM drive is a built-in storage drive developed for file systems in a server
or similar unit. The large capacity and high performance DVD-RAM drive is designed to be
used in a wide variety of computer systems ranging from low-end to high-end units.
Various media available for data read/write
<Data read/write>
Large capacity
DVD-RAM
4.7 GB for single-sided disk/ 9.4GB for
double-sided disk (DVD-RAM)
<Data read>
DVD-ROM
Versatility
CD-ROM
Direct overwrite
CD-R
2MB data buffer
CD-RW
Data read/write
Industry standard support
Supporting the industry-standard ATA interface
High-speed data transfer
Conforming to the unified standard of the DVD-
RAM forum (Ver. 2.0)
Up to 4155KB/sec (DVD-RAM Ver.2.0)
High quality
Using highly reliable read/write head
Supporting the latest transfer mode
Replaying high quality sound
Ultra DMA mode 2/mode 4 available
High anti-dust structure
Multi-word DMA mode 2 and PIO transfer mode
available also
48
Package Contents
Open the package and ensure that all the components and parts shown below are present.
Also, check that each item is undamaged. If a component or part is missing or damaged,
contact your service representative.
* M3 screw, screw length: 6 mm
x
When you transfer the Built-in DVD-RAM drive, be sure to include the User’s Guide.
x
Store the package and protectors securely because they are used in carriage or
storage of the Built-in DVD-RAM drive.
x
The Built-in DVD-RAM drive does not include data disks. Purchase them at your
service representative.
Built-in DVD-RAM Drive
Lens cleaner
IDE cable
Device drivers
Screws* (4)
Caution sheets
(2)
Usage status
check sheet
User’s Guide
(this guide)
49
Part Name and Function
The following describes the names of the parts used to install or handle the Built-in DVD-
RAM drive and their locations.
<Front View>
1
Tray
Place on which a disk is put
The tray is moved if you press the eject button or push the tray under the power-on status.
(The tray does not move under the power-off status.)
2
Eject button
Press this button to insert or eject a disk into or from the Built-in DVD-RAM drive. (The button
does not operate if the power of the Built-in DVD-RAM drive is OFF or the relevant program
prohibits it from operating.)
3
Manual emergency ejecting hole
Insert a pin (such as a clip extended straight) into this hole to eject the tray manually. (The
hole is provided to eject the tray manually when the eject button and the relevant software are
not available for the ejection.)
4
Busy indicator
The indicator operates as shown in the table below under the power-on status.
Inserted media
Operation status
Indication
Writing
Blinking green
Reading
Off
DVD-RAM disk
Stand-by
Off
Reading
Illuminating green
CD-ROM or similar disk
Stand-by
Off
Reading
Illuminating green
CD/DA or similar disk
Stand-by
Off
No disk insertion
Off
Disk inserting/ejecting
Blinking green
1
4
3
2
50
<Rear View>
1
Power connector
The power connector is connected with the power cable.
2
IDE interface connector
The IDE interface connector is used to connect the Built-in DVD-RAM drive to the IDE bus
with the attached cable.
3
Device ID jumper
These pins are used to provide the internal settings for the Built-in DVD-RAM drive.
4
Audio connectors
The audio connectors are connected with audio cables.
5
Unused connectors
Do not connect any cables to these connectors.
5
4
3
2
1

51
Installation
The Built-in DVD-RAM drive can be installed into the 5.25-inch device bay in a computer.
The procedure of installing the Built-in DVD-RAM drive into the computer is explained
below.
Step 1
Checking device ID jumper
Ð
Step 2
Installing latching rails on the Built-in DVD-RAM drive
Ð
Step 3
Installing the Built-in DVD-RAM drive into
5.25-inch device bay
Ð
Step 4
Connecting interface cable to the Built-in DVD-RAM drive
Ð
Step 5
Connecting power cable
Ð
Step 6
Executing self-diagnosis
Ð
Step 7
Checking by BIOS
Ð
Step 8
Installing device driver
52
Checking Device ID Jumper
Check the jumper settings of the Built-in DVD-RAM drive before installing the Built-in DVD-
RAM drive into a 5.25-inch device bay of the computer.
Any IDE device including the Built-in DVD-RAM drive requires a specific ID to be set.
Devices connected on the same IDE bus can operate properly only when each of the
devices has a unique ID different from others.
There are three IDs, or "MASTER," "SLAVE," and "CABLE SELECT." Set the ID of the
Built-in DVD-RAM drive to "SLAVE" because it is connected to the same bus as that of the
factory installed CD-ROM/RW drive (MASTER).
The ID can be set by using jumper pins 1 to 3 on the rear of the Built-in DVD-RAM drive.
(The Built-in DVD-RAM drive is defined as "SLAVE" at the shipment from the factory.)
MASTER (pin 1)
SLAVE (pin 2)
CABLE SELECT (pin 3)
Insert the jumper pin into the pin corresponding to the
selected ID.
53
Installing Latching Rails on the Built-in DVD-RAM Drive
Install the latching rails on the Built-in DVD-RAM drive to prepare the installation of the
Built-in DVD-RAM drive into the 5.25-inch device bay if necessary.
The latching rails should be suitable to the 5-25-inch device bay in the computer.
Depending on the type of the computer, the Built-in DVD-RAM drive may be fixed to the
frame on the 5.25-inch device bay in the computer. In this case, the latching rails may not
be installed on the Built-in DVD-RAM drive.
Put the Built-in DVD-RAM drive on a rugged and flat table. Then install the latching rails on
the right and left sides of the Built-in DVD-RAM drive by using the screws coming with the
Built-in DVD-RAM drive.
x
Fix each installed rail so that the tip of the rail is located at the position shown in the
figure below.
x
Use the screws (4) coming with the Built-in DVD-RAM drive, or M3 screws having
screw length of 6 mm.
Front panel on the front face of
the Built-in DVD-RAM drive
Tip of latching rail
Align the tip of each rail with this face.
54
Installing the Built-in DVD-RAM Drive into 5.25-inch Device Bay
Install the Built-in DVD-RAM drive into the computer.
WARNING
Do not disassemble, repair, or alter the Built-in DVD-RAM drive.
Never attempt to disassemble, repair, or alter the Built-in DVD-RAM drive on any
occasion other than described in this User's Guide or the manual of the computer in
which the Built-in DVD-RAM drive is installed if you are not a maintenance engineer.
Failure to follow this instruction may cause an electric shock or a fire as well as
malfunctions of the Built-in DVD-RAM drive.
Do not install or uninstall the Built-in DVD-RAM drive while the power cord of
the computer is connected to the AC inlet.
Turn off the power of the computer and unplug the power cord from the AC inlet
before installing/uninstalling the Built-in DVD-RAM drive to/from the computer. If the
power is turned off but the power cord remains inserted to the AC inlet, certain
current flows in the computer. Having your body touch parts in the Built-in DVD-RAM
drive in such condition may cause an electric shock.
CAUTION
Hot surface
Immediately after the computer is powered off, its internal components such as hard
disk drives are very hot. Leave the computer until its internal components fully cool
down before installing/removing any component.
x
Connect the Built-in DVD-RAM drive to the bus to which the factory installed CD-
ROM/RW drive is also connected. Connect the IDE interface cable coming with the
Built-in DVD-RAM drive to the device bay adjacent to the CD-ROM/RW drive
because the MASTER-to-SLAVE cable only has a rather short length.
x
Some computers can be equipped with the Built-in DVD-RAM drive vertically. In the
installation, the Built-in DVD-RAM drive cannot accept 8-cm CD. To use 8-cm CD,
install the Built-in DVD-RAM drive horizontally.
Install the Built-in DVD-RAM drive in the device bay to be adjacent to the factory
installed CD-ROM/RW drive. In addition, connect the interface cable to the proper
connector on the motherboard, the Built-in DVD-RAM drive, and the CD-ROM/RW
drive in the order. Then it may become necessary to change the installation slots of
some devices already installed (see the figure on the next page).
55

56
Installing latching rails on the Built-in DVD-RAM drive for installing it into
5.25-inch device bay
1.
Turn off the power of the computer and pull out the power cord from the AC inlet.
2.
Remove the proper covers on the computer. (Refer to the manual attached to the
computer for details.)
3.
Install the Built-in DVD-RAM drive into the 5.25-inch device bay.
Insert the Built-in DVD-RAM drive slowly and carefully until a click occurs to have it
locked.
57
Fixing the Built-in DVD-RAM drive in 5.25-inch device bay directly without
installation of latching rails on the Built-in DVD-RAM drive
1.
Turn off the power of the computer and pull out the power cord from the AC inlet.
2.
Remove the proper covers on the computer. (Refer to the manual attached to the
computer for details.)
3.
Insert the Built-in DVD-RAM drive into the 5.25-inch device bay.
4.
Fix the Built-in DVD-RAM drive to the 5.25-inch device bay with the four screws
coming with the Built-in DVD-RAM drive, or M3 screws having screw length of 6
mm.
Fix the Built-in DVD-RAM drive to the 5.25-inch device bay with two screws on
each of the left and right sides.
Left side
Right side
CD-ROM drive
(factory installed in the computer)
Built-in DVD-RAM Drive
Screws (2)
Screws (2)
Locate the Built-in DVD-RAM drive so that the front face
is aligned with those of other devices.
Built-in DVD-RAM Drive
CD-ROM drive
(factory installed in the computer)
58
Connecting Interface Cables
Connect the motherboard to the Built-in DVD-RAM drive and the CD-ROM/RW drive by
using the IDE interface cable within the computer or that coming with the Built-in DVD-RAM
drive.
CAUTION
Do not use any damaged cable.
Before the connection of a cable, make sure that the connectors of the cable are not
damaged and no connector pins are bent and dirt. Using a cable with a damaged
connector or some bent or dirt pins may cause a fire due to a short circuit.
Use the IDE interface cable included in the computer if the cable has a two-way
connector. Note the connection order.
Connect the IDE interface cable to the Built-in DVD-RAM drive, the factory installed CD-
ROM/RW drive, and the IDE connector on the motherboard. Save any cables becoming
unnecessary carefully.
Connect the interface cable coming from the mating connector on the motherboard to the
Built-in DVD-RAM drive and the CD-ROM/RW drive in the order.
The IDE interface cable coming with the Built-in DVD-RAM drive must be connected to
the adjacent CD-ROM/RW drive factory installed because the MASTER-to-SLAVE
cable only has a rather short length.
Motherboard
CD-ROM/RW drive
Built-in DVD-RAM drive
Attached cable
IDE connector
m MASTER
m SLAVE
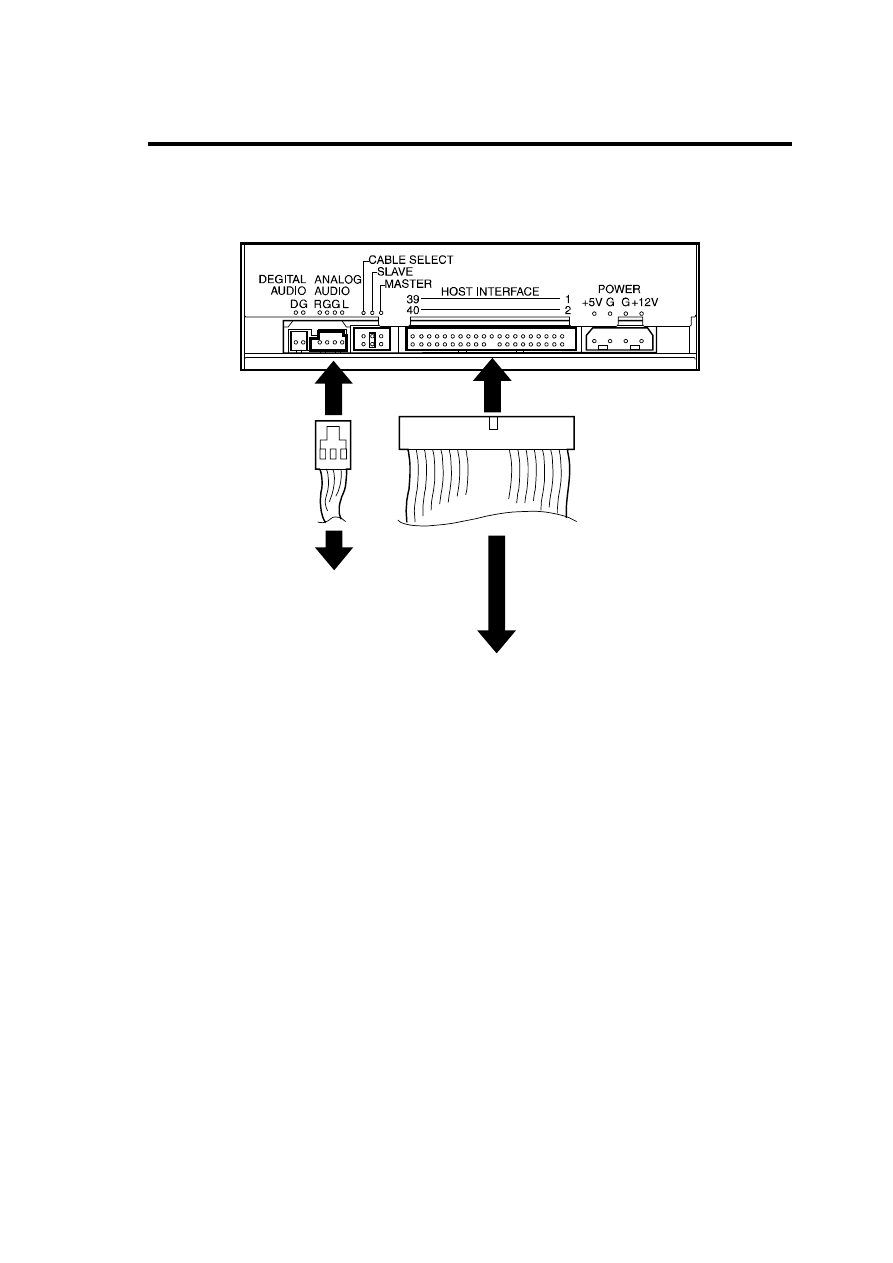
59
Connect the audio cable to the audio connector on the rear of the Built-in DVD-RAM drive if
the computer includes the cable.
To audio connector
on motherboard
To connector on CD-ROM/RW drive
and IDE connector on motherboard
60
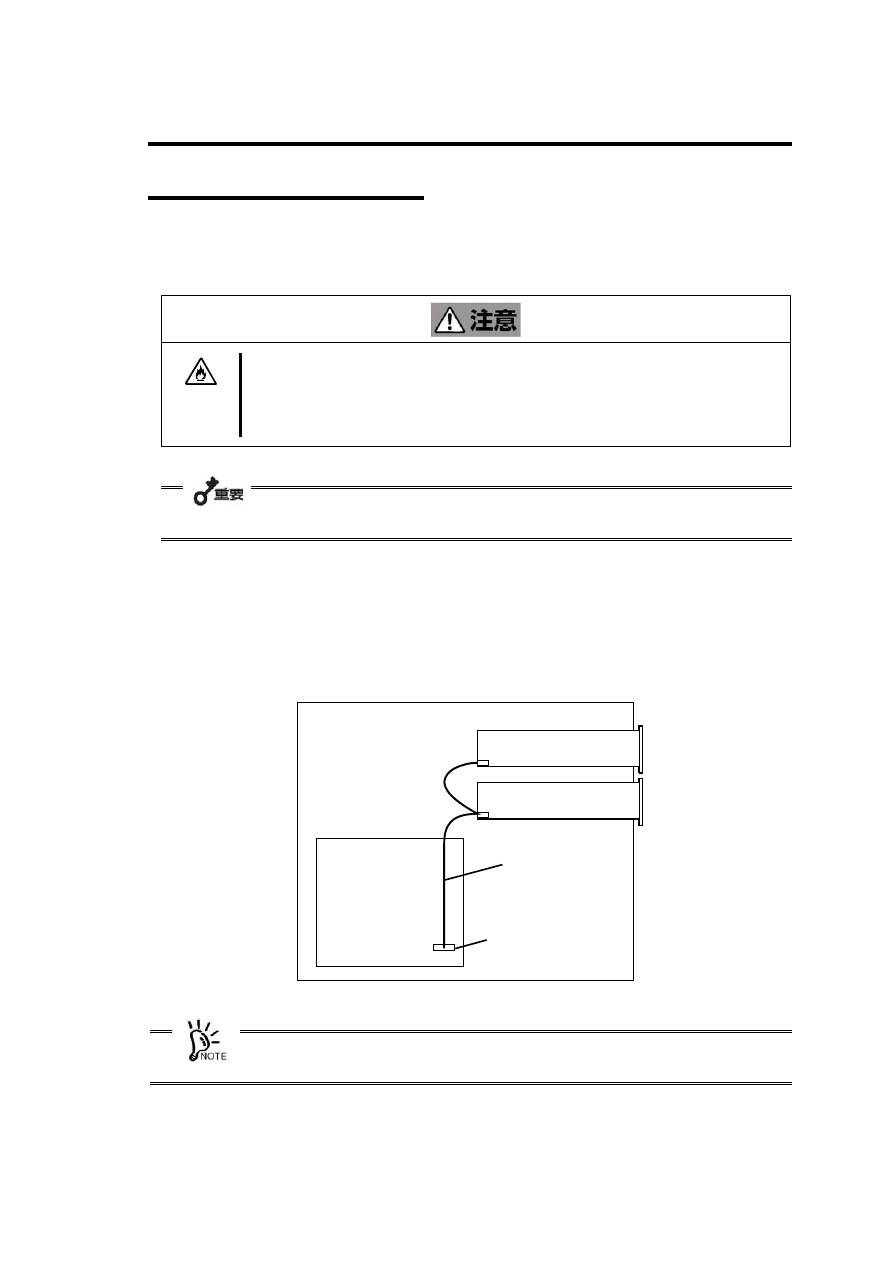
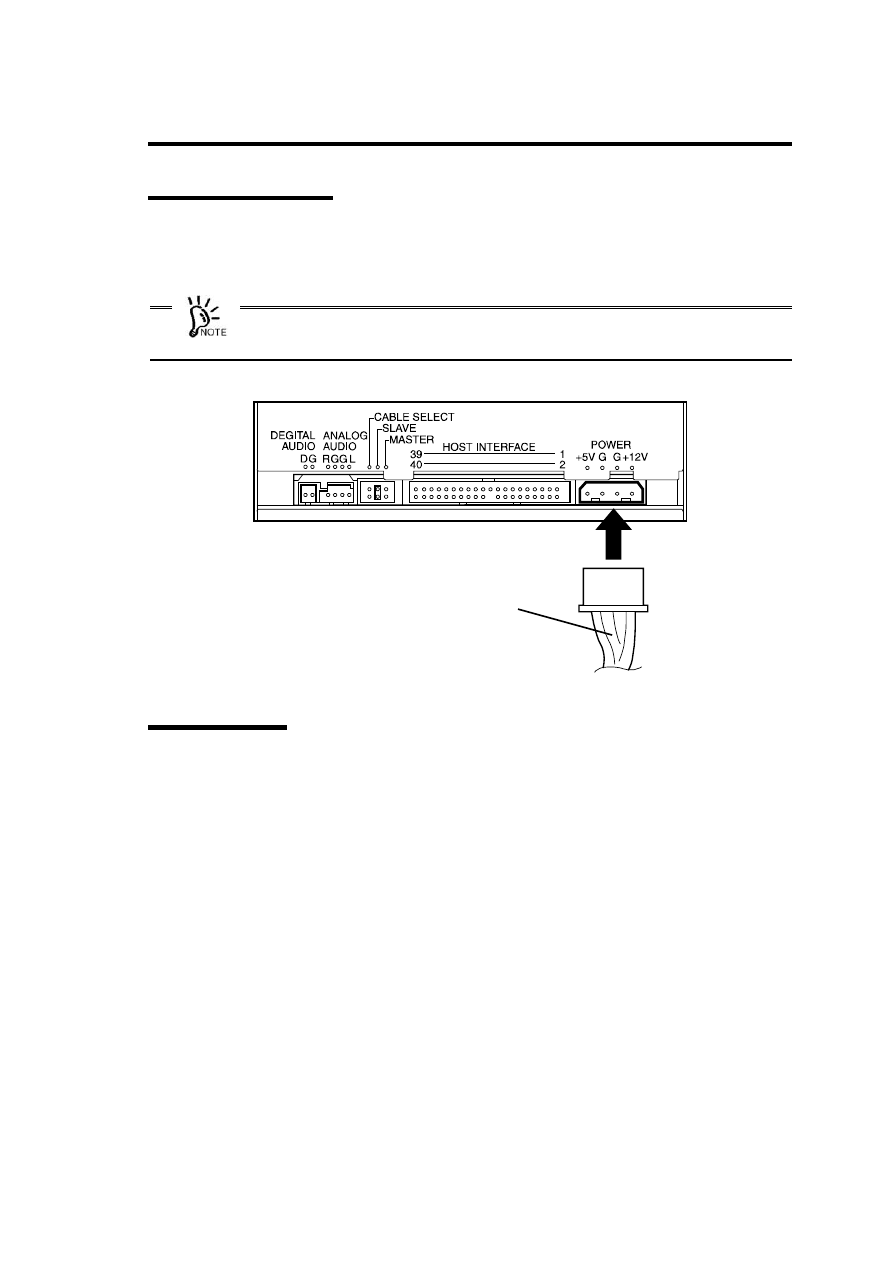
Connecting Power Cable to the Built-in DVD-RAM Drive
Select an unused cable from the DC power cables coming from the power unit in the
computer and insert the cable to the power connector on the rear of the Built-in DVD-RAM
drive.
For the DC power cable connectable to the Built-in DVD-RAM drive, refer to the manual
of the computer.
Executing Self-diagnosis
At the power-on of the computer, the Built-in DVD-RAM drive automatically starts the self-
diagnosis.
The result of the self-diagnosis is indicated by the busy indicator on the front face of the
Built-in DVD-RAM drive. Do not forget to check the result.
If the self-diagnosis does not found any problem, the busy indicator will go off.
If the indicator does not go off or you suspect the occurrence of an error, see Chapter 4 to
find the cause of the fault.
DC power cable

61
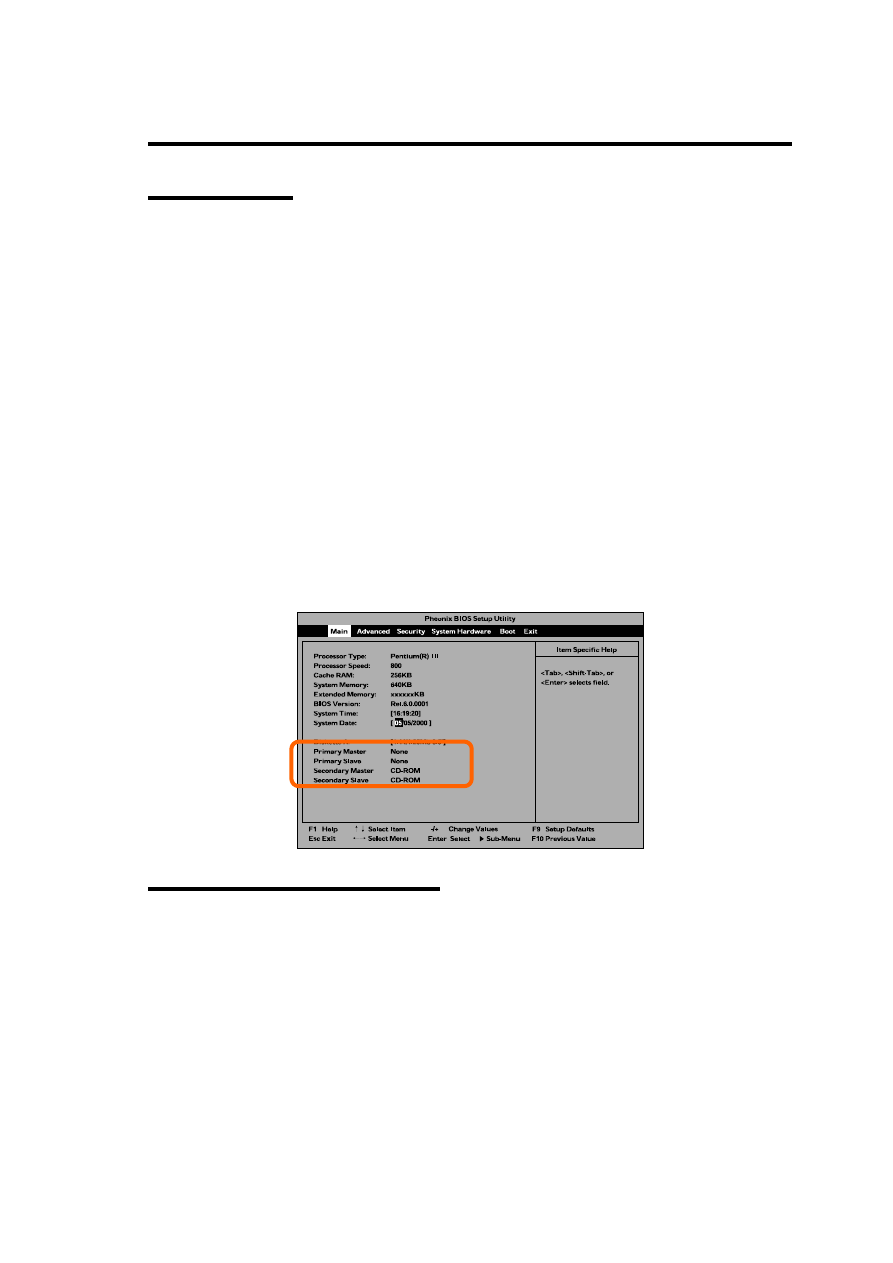
Checking by BIOS
Confirm that the Built-in DVD-RAM drive and the CD-ROM/RW drive subject to connection
change are installed properly by using the BIOS Utility in the computer. (Some computers
cannot use the BIOS Utility for the confirmation. If so, make the confirmation on OS.) Refer
to the manual of the computer for how to start and operate the BIOS Utility.
After the BIOS Utility is started, the screen shown below appears. The Main menu on the
screen includes the types of devices connected to the computer.
If the screen display does not include the Built-in DVD-RAM drive and the CD-ROM/RW
drive, either of the following problems is suspected. (For the Built-in DVD-RAM drive, the
screen display should indicate the IDE bus to which the Built-in DVD-RAM drive is
connected and "CD-ROM" in the ID field assigned to the Built-in DVD-RAM drive.)
The interface and/or power cables are connected incorrectly.
o Connect the cables correctly.
One or more device IDs are set incorrectly.
o Set any ID to be unique.
<Sample display>
Installing Device Driver
Some operating systems installed in the computer require the device driver to be installed.
Install the device driver to the computer by using the "Device Driver Disk" coming with the
Built-in DVD-RAM drive.
For the conditions required for the installation and the installation procedure, refer to the
"Built-in DVD-RAM Driver Software User’s Guide" coming with the Built-in DVD-RAM drive.

62
Chapter 2 Using Built-in DVD-RAM Drive
This chapter describes how to handle the Built-in DVD-RAM drive in its ordinary use. See
Appendix B for the description on disks and the notes on the handling the disks.
Power On/Off
The power of the Built-in DVD-RAM drive is supplied from the power unit built in the
computer. Turning on the power of the computer allows the power of the Built-in DVD-RAM
drive to be turned on automatically. In addition, turning off the power of the computer allows
the power of the Built-in DVD-RAM drive to be turned off automatically.
For the power on/off status, see the POWER lamp on the computer.
x
Do not repeat the power-on/off of the computer needlessly. Failure to follow it may
cause the Built-in DVD-RAM drive, the computer, and/or other connected devices to
malfunction or be defected.
x
Do not turn on the power of the computer with the eject button on the front of the
Built-in DVD-RAM drive remaining pressed. Failure to follow it may cause the internal
settings of the Built-in DVD-RAM drive to be changed and then the Built-in DVD-RAM
drive, the computer, and/or other connected devices to malfunction or be defected.
x
Do not turn off the power of the computer while the busy lamp on the front of the
Built-in DVD-RAM drive is illuminating. Failure to follow it may cause a part or all of
the data in the disk to be lost.
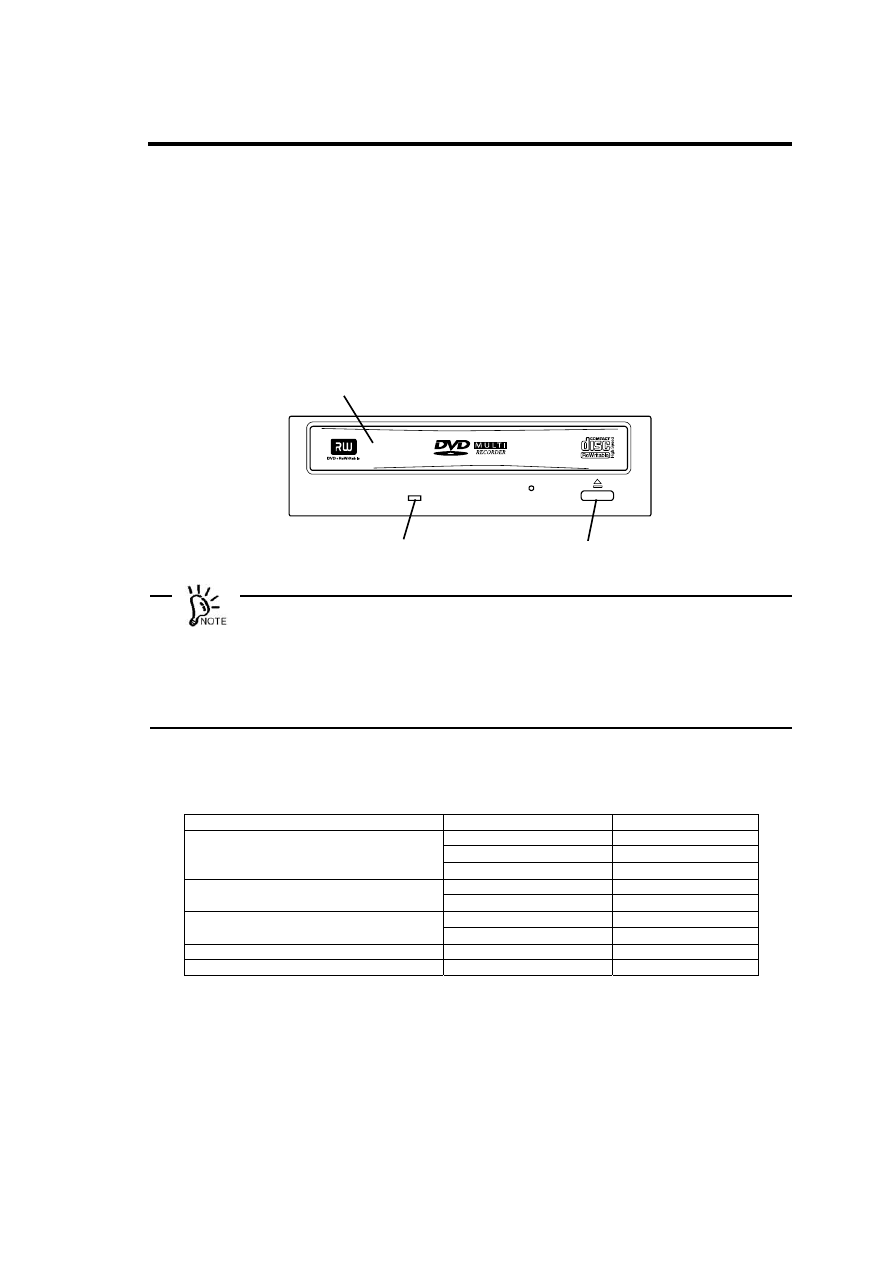
63
Eject Button and Busy Indicator
The front panel on the front of the Built-in DVD-RAM drive has an eject button used to open
or close the tray and a busy indicator indicating the operation status of the Built-in DVD-
RAM drive.
Press the eject button to eject the disk put on the Built-in DVD-RAM drive. If the relevant
software prohibits the disk from being ejected, pressing the switch cannot have the disk
ejected.
x
Depending on the usage environment (including the computer, operating system,
device driver, and formatting software), a predefined procedure may be required to
eject the disk from the Built-in DVD-RAM drive correctly or the disk may be ejected on
the computer screen without the depression of the eject button.
x
Do not push the eject button while the busy indicator is illuminating. If the eject button
is pressed while the busy indicator is illuminating, the disk will be ejected only after
the busy indicator goes off.
The busy indicator illuminates green during inserted disk formatting, data seeking in the
disk, or data read/write operation.
Inserted media
Operation status
Indication
Writing
Blinking green
Reading
Off
DVD-RAM disk
Stand-by
Off
Reading
Illuminating green
CD-ROM or similar disk
Stand-by
Off
Reading
Illuminating green
CD/DA or similar disk
Stand-by
Off
No disk insertion
Off
Disk inserting/ejecting
Blinking green
Tray
Busy indicator
Eject button
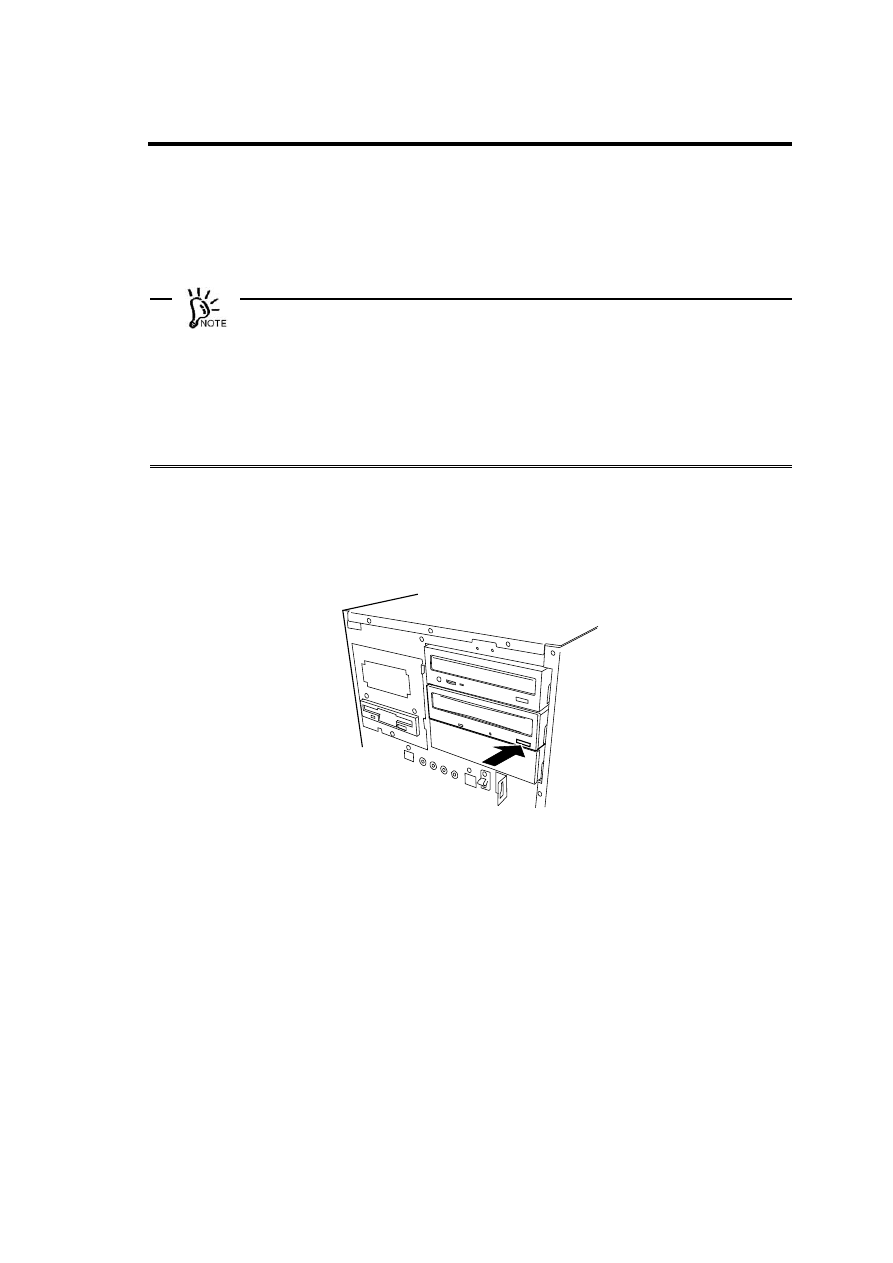
64
Loading Disk
Follow the procedure below to load a disk in the Built-in DVD-RAM drive. See Appendix B
for the description on the disk and the notes on handling the disk.
x
Handle the disk carefully. Handling the disk roughly may cause it to be broken and
then a part or all of the data saved in the disk to be lost.
x
If the disk cannot be loaded to the Built-in DVD-RAM drive suitably, do not add an
excess force to load it. Instead, remove it from the Built-in DVD-RAM drive and check
the direction and orientation in which the disk is placed.
x
Do not place any disk unavailable for the Built-in DVD-RAM drive. Failure to follow it
may cause the Built-in DVD-RAM drive to be defected.
x
Some computers can be equipped with the Built-in DVD-RAM drive vertically. In the
installation, the Built-in DVD-RAM drive cannot accept 8-cm CD.
1.
Make sure that the power of the computer is on.
2.
Press the eject button.
The tray is ejected.
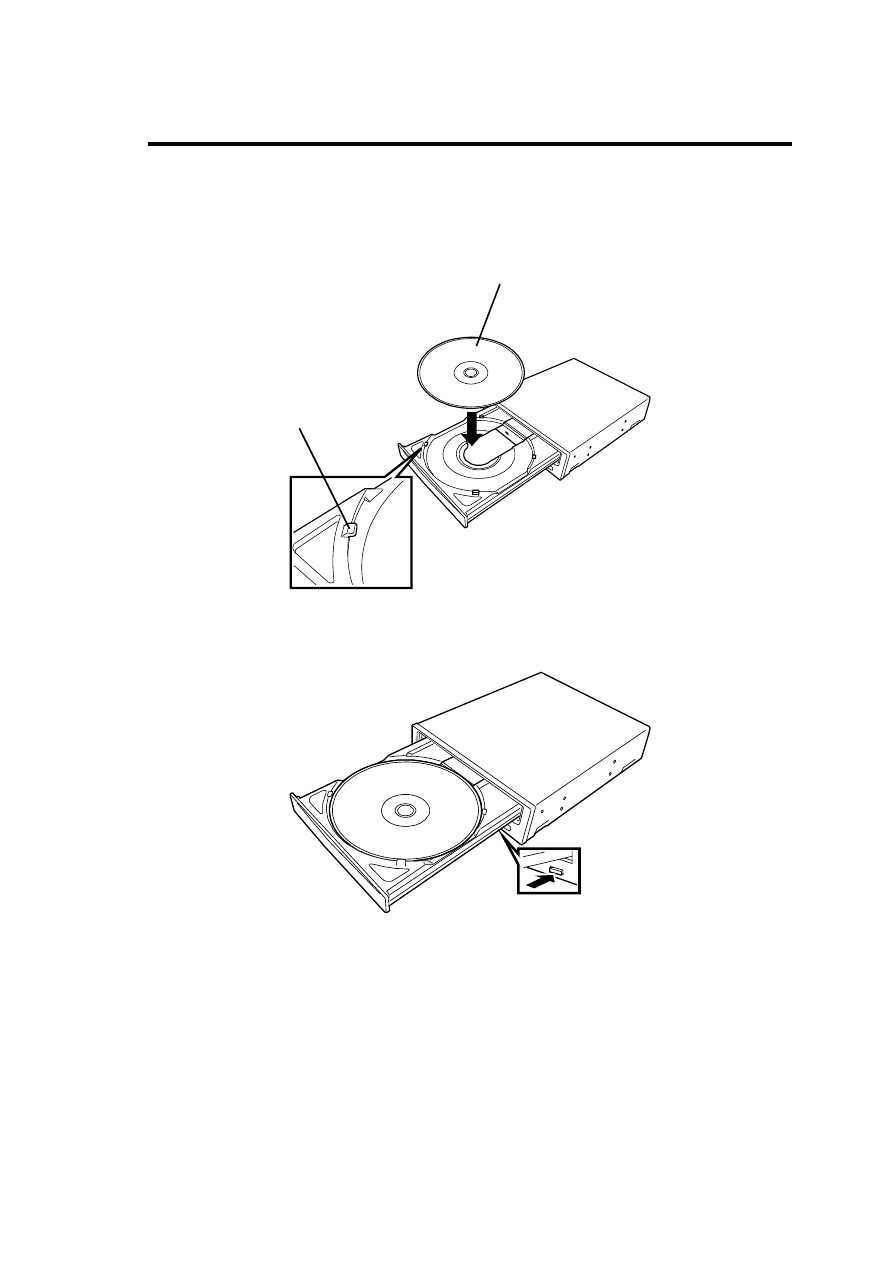
65
3.
Put a disk on the tray.
4.
Press the eject button to close the tray.
Have data side face on the tray and
label printing side face upward.
Hang disk on holder.
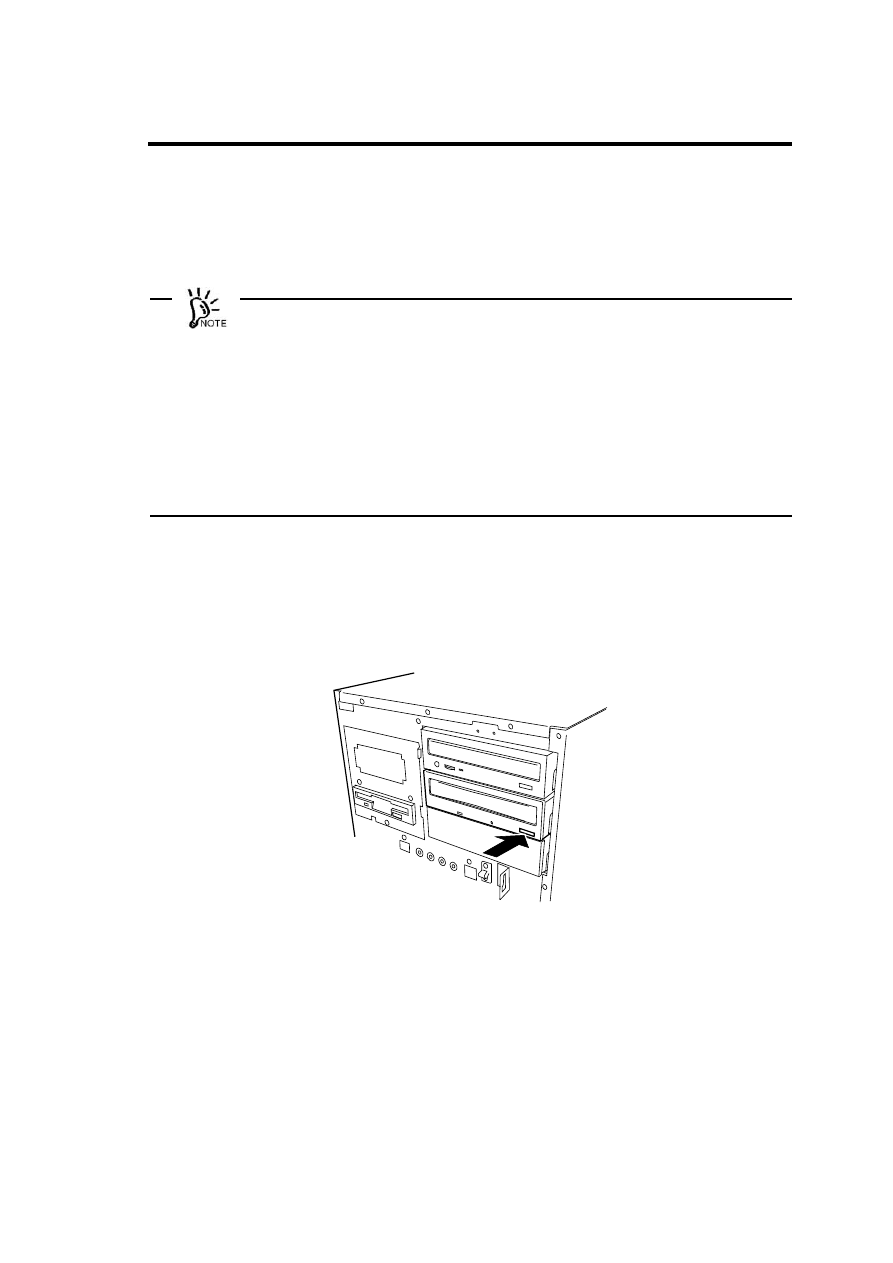
66
Ejecting Disk
Follow the procedure below to eject the disk from the Built-in DVD-RAM drive. See
Appendix B for the description on the disk and the notes on handling the disk.
x
Handle the disk carefully. Handling the disk roughly may cause it to be broken and
then a part or all of the data saved in the disk to be lost.
x
Depending on the usage environment (including the computer, operating system,
device driver, and formatting software), a predefined procedure may be required to
eject the disk from the Built-in DVD-RAM drive correctly or the disk may be ejected on
the computer screen without the depression of the eject button.
x
Be sure to take off the disk before the power of the computer is turned off. Turning off
the power of the computer with the disk remaining inserted may cause the disk and/or
Built-in DVD-RAM drive to be damaged.
x
Do not push the eject button while the busy indicator is illuminating. If the eject button
is pressed while the busy indicator is illuminating, the disk will be ejected only after
the busy indicator goes off.
1.
Make sure that the power of the computer is on.
2.
Make sure that the busy indicator is off.
3.
Press the eject button.
The tray is ejected.
4.
Hold the end of the disk and take off it straight from the Built-in DVD-RAM drive
slowly and carefully.
Put the disk into the exclusive case and save it carefully.
5.
Press the eject button to close the tray.

67
Ejecting Disk Manually
The disk can be ejected manually for the case where the normal procedure cannot be used
to eject the disk.
Depending on the environment in which the Built-in DVD-RAM drive is used (defined by the
computer, operating system, device driver, formatting software, and other devices),
pressing the eject button cannot have the disk ejected. It is recommended to refer to the
manuals of the operating system, computer, and/or device driver being used before the
manual ejection.
WARNING
Do not disassemble, repair, or alter the Built-in DVD-RAM drive.
Never attempt to disassemble, repair, or alter the Built-in DVD-RAM drive on any
occasion other than described in this User's Guide or the manual of the computer in
which the product is installed if you are not a maintenance engineer. Failure to follow
this instruction may cause an electric shock or a fire as well as malfunctions of the
product.
x
Try the method described in this section only when the normal method cannot eject
the disk. The manual disk ejection in the status where the normal method is
applicable may cause the Built-in DVD-RAM drive to be defected.
x
Eject the disk manually while the power of the computer is off. The manual disk
ejection in the status where the power of the computer is on may cause the data in
the disk to be lost and/or the Built-in DVD-RAM drive and the computer to be
defected.
x
Do not insert a frangible pin into the manual emergency ejecting hole.
x
Contact your service representative if the cause of unallowable disk ejection cannot
be found. Using the Built-in DVD-RAM drive without modification may cause a disk
not to be inserted or ejected or the Built-in DVD-RAM drive to be defected.
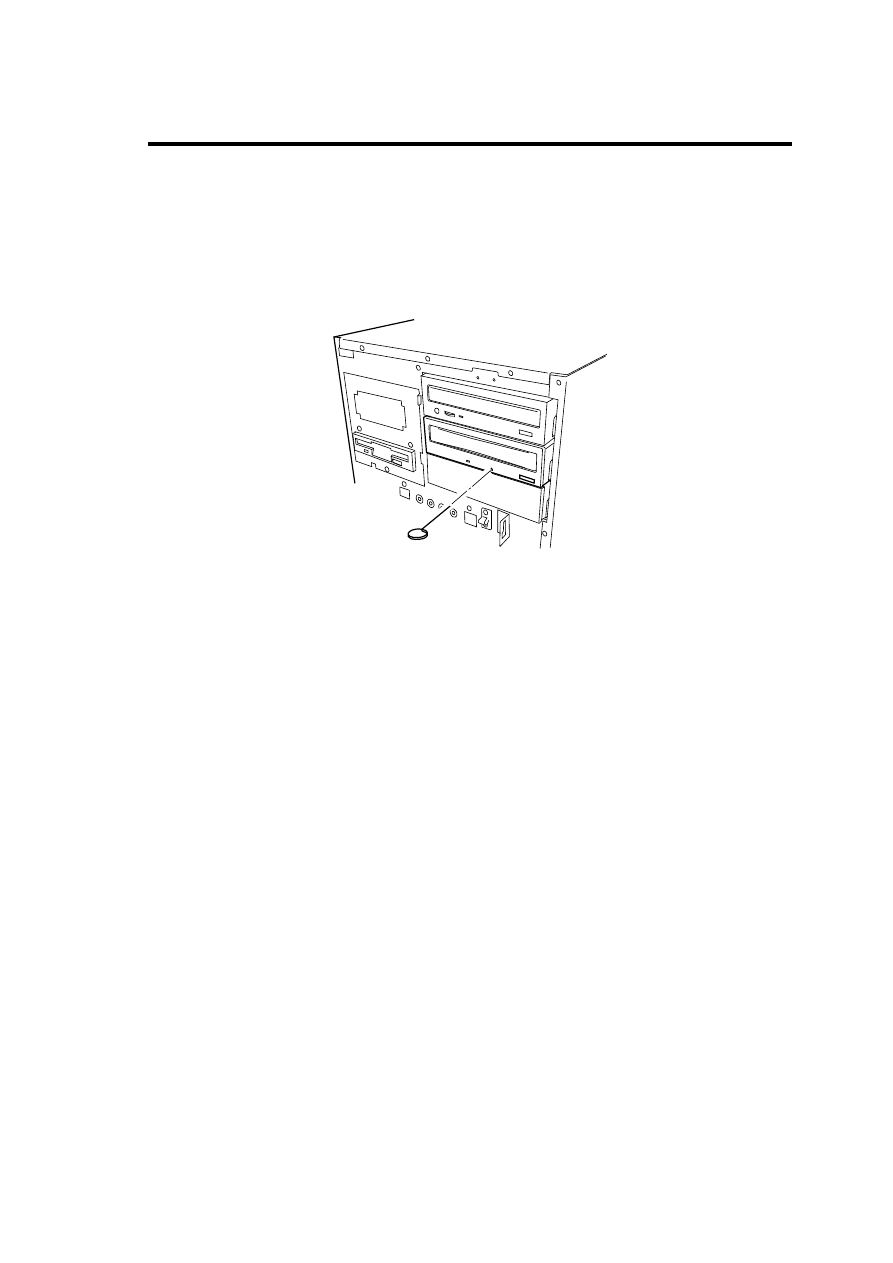
68
1.
Turn off the power of the computer and wait for a while (about 30 seconds).
2.
Insert a pin having length 40 mm or longer and thickness 1 - 1.8 mm (such as a
clip extended straight) into the manual emergency ejecting hole and push it on the
level slowly and intensely.
Then the tray is pushed out.
3.
Hold the tip of the tray to pull it out slowly.
4.
Take off the disk.
To close the tray, check the cause of unallowable disk ejection, turn on the power if no error
is found, and press the eject button. If the disk ejection is still disabled, contact your service
representative.
Data Read/Write
For how to write data into a DVD-RAM disk and how to read data from a disk available for
the Built-in DVD-RAM drive, refer to the manuals of the used operating system and the
relevant application.
Notes on Data Handling ~Security of Important Data~
As well as other recording media, the DVD-RAM disk does not fully secure data integrity. To
avoid problems such as loss or destruction of important data saved in a DVD-RAM disk due
to a defect of the disk or some hardware malfunction, it is recommended to handle such
data in the following ways.

69
Data Backup
This section describes the data backup procedure against an emergency.
Data backup in two DVD-RAM disks, or main and sub disks
For backup of important data or program, it is recommended to save the data or program in
two DVD-RAM disks, or the main and sub disks.
If a read error occurs due to dust covered on either of the DVD-RAM disks, the data can be
recovered from the other DVD-RAM disk to prevent the important data or program from
being lost.
Three-generation management of data
For the backup of the data on a disk, it is recommended to provide the three-generation
management for backup data.
Using three DVD-RAM disks, or A, B, and C disks, this method backs up the data in disk A
on the first day, the data in disk B on the second day and the data in disk C on the third day
and then the data in disks A, B, and C in the order.
If disk C causes a read error to occur, the correct data can be recovered by using the data in
disk B. If disk B causes a read error to occur, the correct data can be recovered by using the
data in disk A.
Disk Write Protect
If a DVD-RAM disk containing one or more important files is loaded in the Built-in DVD-RAM
drive, provide write protect for the disk. Then the files in the disk can be protected if sudden
power-off occurs due to a disaster or power interruption. In addition, the measures can
prevent the data from being lost by an incorrect operation.
For the write protect procedure, refer to the User’s Guide of the attached Built-in DVD-RAM
Driver Software.

70
Routine Maintenance (Cleaning)
Cleaning of lens
The lens on the Built-in DVD-RAM drive may be covered with dust and/or dirt while the
Built-in DVD-RAM drive is used for a long time. This may cause data read/write to be done
incorrectly.
While the cleaning frequency varies depending on the usage environment and frequency of
the Built-in DVD-RAM drive, it is recommended to clean the lens once for two months by
using the attached lens cleaner. See the next chapter for details of the cleaning.
Cleaning of disk
While a disk is used for a long time, the data side may be covered with dust and/or dirt. This
may cause data read/write to be done incorrectly. See the next chapter for details of the
cleaning.
71
Chapter 3 Cleaning and Carriage of Built-in
DVD-RAM Drive
To enable the Built-in DVD-RAM drive and disks to be used safely and normally, clean the
Built-in DVD-RAM drive routinely. In addition, always follow the procedure described below
to carry the Built-in DVD-RAM drive. (Appendix B describes the disk handling. Also see the
Appendix.)
Cleaning of Built-in DVD-RAM Drive
WARNING
Do not disassemble, repair, or alter the Built-in DVD-RAM drive.
Never attempt to disassemble, repair, or alter the Built-in DVD-RAM drive on any
occasion other than described in this User's Guide or the manual of the computer in
which the product is installed if you are not a maintenance engineer. Failure to follow
this instruction may cause an electric shock or a fire as well as malfunctions of the
product.
Cleaning of Built-in DVD-RAM Drive
Clean the surrounding area of the Built-in DVD-RAM drive routinely so that the disk
insertion port and other portions may not be covered with dust.
x
Turn off the power of the Built-in DVD-RAM drive.
x
Wipe out any dirt with soft and dry cloth lightly.
x
If heavy dirt is found, immerse cloth in diluted kitchen detergent (neutral), wring out
the cloth, and wipe the dirt with the cloth.
x
Follow the notes on chemical cloth if used.
x
Do not use solvents including benzin and thinner.

72
Cleaning of Lens
Use the lens cleaner coming with the Built-in DVD-RAM drive to clean the read/write head
in the Built-in DVD-RAM drive.
(Feature of lens cleaner)
The lens cleaner is made of lens cleaner solution and thus of the liquid type, which enables
the dirt on the lens to be removed effectively.
(Use of lens cleaner)
1.
Turn on the power of the Built-in DVD-RAM drive.
2.
Infiltrate the five white cloth pieces on the lens cleaner with cleaning solution once
by using the blush of the attached cleaning solution container.
If the cloth pieces are infiltrated with much solution, the solution may fly in the
Built-in DVD-RAM drive to cause the occurrence of a fault.
3.
Face the arrow () appearing on the label printing side of the lens cleaner to the
depth of the Built-in DVD-RAM drive, put the lens cleaner on the tray in the similar
way as a CD, and close the tray.
While the lens cleaner is identified, the indicator lamp illuminates for about 15 to
30 seconds.
4.
After the indicator lamp goes off, press the eject button to eject the lens cleaner
from the tray.
Depending on the Built-in DVD-RAM drive type, the tray is opened automatically.
This does not indicate the occurrence of an error.
Put the removed lens cleaner into the exclusive storage case with the brush side
facing downward.
(Remarks)
The cleaning frequency is desired to be once per 2 months while it varies
depending on the usage environment and frequency of the Built-in DVD-RAM
drive. If data read/write error occurs, it is recommended to clean the lens more
frequently (e.g., once per month).
When some problems occur in data read/write operations despite the lens
cleaning, repeat the procedure described in (Use of lens cleaner) above without
use of the cleaning solution. If the problems cannot be eliminated still, any other
cause may be suspected. Contact your service representative.
(Notes)
The attached lens cleaner should be exclusively used for the Built-in DVD-RAM
drive. Do not use the lens cleaner to any other drives. Failure to follow it may
cause the drives to be defected.
If the brush wastes or is polluted heavily, purchase a new brush.
For the storage, put the lens cleaner into the exclusive plastic case coming with
the Built-in DVD-RAM drive. Do not place the lens cleaner in an area subject to
direct sunshine or a high-temperature area.
Do not any cleaning solution other than the attached one.
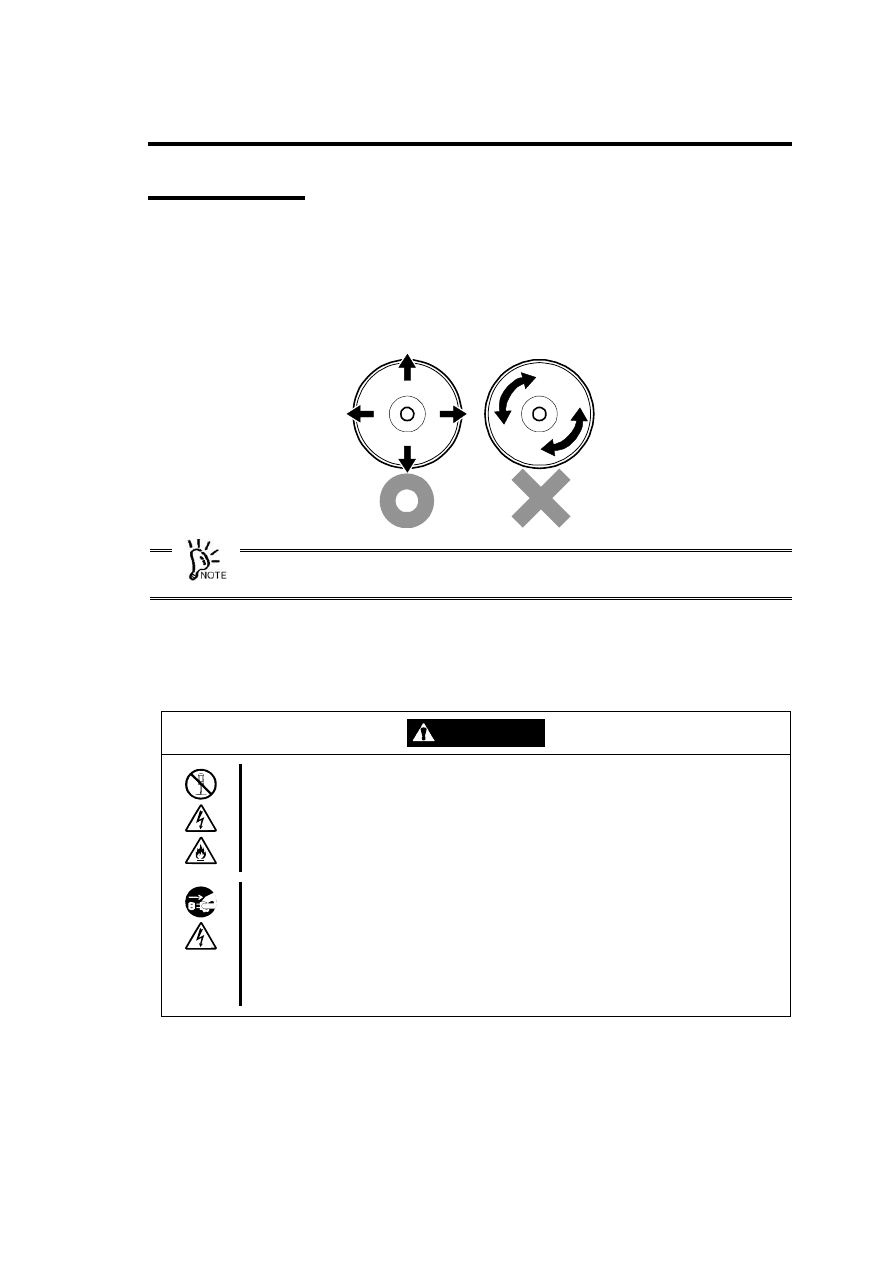
73
Cleaning of Disk
If a specific disk is used for a long time, the data side of the disk may be covered with dust
and/or dirt. This may cause data read/write to be done incorrectly.
To remove the dust and dirt covering the data side of the disk, wipe out them by using soft
and dry cloth or commercially available cleaner so that the disk may not be damaged. Do
not use any solvents.
Clean a disk so that it may not get hurt. If a disk gets hurt, the important data in the disk
may not be read or may be broken.
Carriage of Built-in DVD-RAM Drive
Follow the procedure below to carry the Built-in DVD-RAM drive.
WARNING
Do not disassemble, repair, or alter the Built-in DVD-RAM drive.
Never attempt to disassemble, repair, or alter the Built-in DVD-RAM drive on any
occasion other than described in this User's Guide or the manual of the computer in
which the product is installed if you are not a maintenance engineer. Failure to follow
this instruction may cause an electric shock or a fire as well as malfunctions of the
product.
Do not install or uninstall the product while the power cord of the computer is
connected to the AC inlet.
Turn off the power of the computer and unplug the power cord from the AC inlet
before installing/uninstalling the product to/from the computer. If the power is turned
off but the power cord remains inserted to the AC inlet, certain current flows in the
computer. Having your body touch parts in the product in such condition may cause
an electric shock.
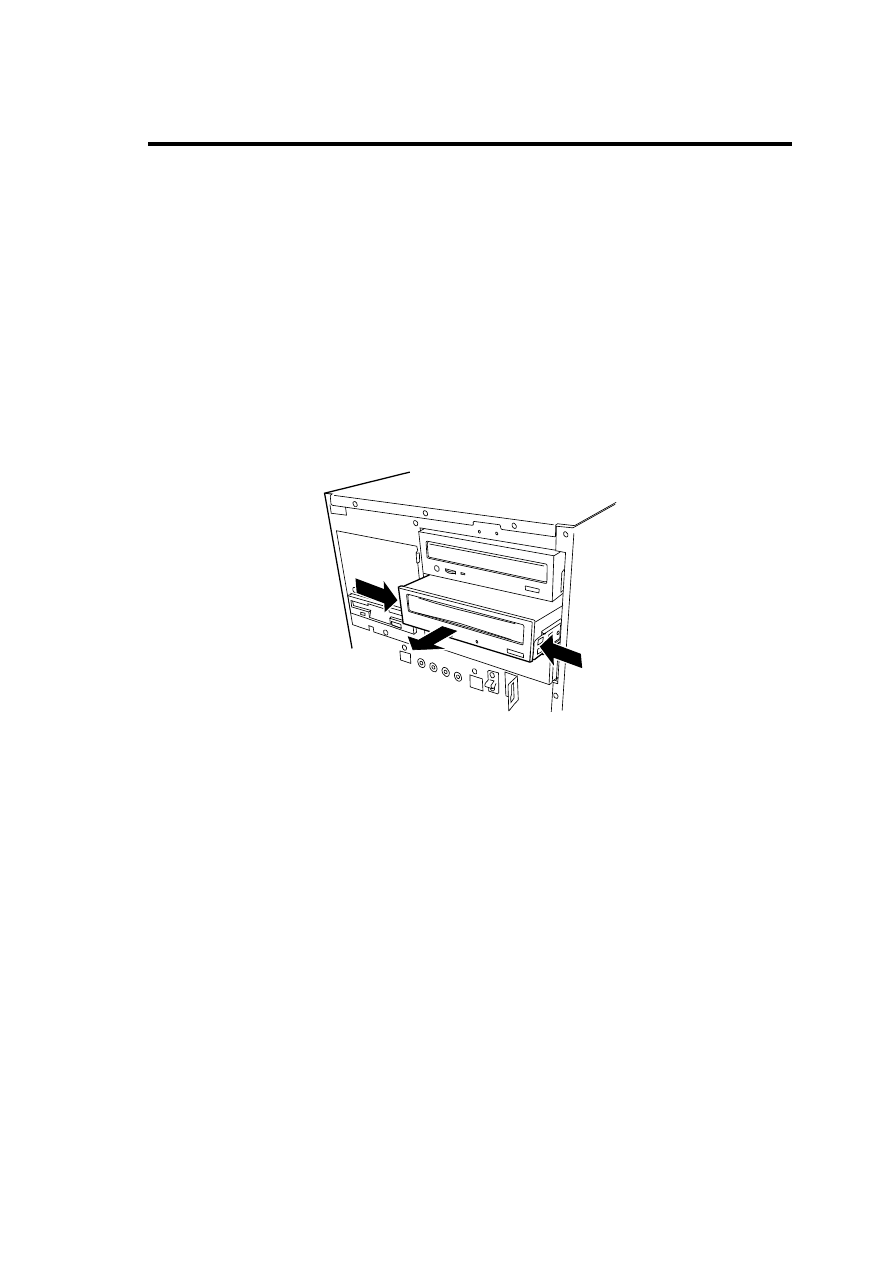
74
1.
Take off the disk from the Built-in DVD-RAM drive and put it into the attached
plastic protection case to save it.
Note that an excess force may not be added to the disk.
2.
Exit the system, turn off the power of the computer, and pull out the power cord
from the AC inlet.
3.
Remove the covers of the computer.
4.
Disconnect the DC power and interface cables connected to the Built-in DVD-RAM
drive.
5.
Remove the Built-in DVD-RAM drive from the computer.
If the latching rails are installed on the Built-in DVD-RAM drive, take off the Built-in
DVD-RAM drive from the computer by the procedure shown in the figure below.
6.
Remove the latching rails from the Built-in DVD-RAM drive if they are installed on
the Built-in DVD-RAM drive.
7.
Put the Built-in DVD-RAM drive into the package which contained the Built-in
DVD-RAM drive previously and fix the Built-in DVD-RAM drive with the attached
protectors.
75
Chapter 4 When Occurrence of Fault Is
Suspected
If the Built-in DVD-RAM drive operates improperly and the occurrence of a fault is
suspected, see the troubleshooting chart shown in this chapter to find the cause of the fault.
WARNING
Do not disassemble, repair, or alter the Built-in DVD-RAM drive.
Never attempt to disassemble, repair, or alter the Built-in DVD-RAM drive on any
occasion other than described in this User's Guide or the manual of the computer in
which the product is installed if you are not a maintenance engineer. Failure to follow this
instruction may cause an electric shock or a fire as well as malfunctions of the product.
Troubleshooting chart
Phenomenon
Cause
Action
The power of the computer is
set to off.
Turn on the power of the computer. (Then the
POWER lamp goes on.)
The DC power cable is not
connected to the Built-in
DVD-RAM drive.
Connect a power cable coming from the power unit in
the computer to the Built-in DVD-RAM drive.
The interface cable is not
connected.
Connect the Built-in DVD-RAM drive and the CD-
ROM drive to the IDE connector on the motherboard.
For the connection, use the interface cable coming
with the Built-in DVD-RAM drive.
The Built-in
DVD-RAM
drive does
not operate.
The device ID jumper is set
incorrectly.
Set the device ID jumper on the Built-in DVD-RAM
drive correctly. Leave the settings at the shipment for
the switches other than that used to configure the ID.
The disk is not put on the tray
correctly.
Put the disk on the tray correctly.
The disk is put on the tray in
improper inserting
orientation.
Insert the disk in the proper orientation.
Disk cannot
be set.
Another disk is already set to
the Built-in DVD-RAM drive.
Eject the disk being set and then set the proper disk.
The interface cable is not
connected to the Built-in
DVD-RAM drive.
Connect the Built-in DVD-RAM drive and the CD-
ROM drive to the IDE connector on the motherboard.
For the connection, use the interface cable coming
with the Built-in DVD-RAM drive.
The interface cable is
damaged.
Replace the interface cable. Use the interface cable
coming with the Built-in DVD-RAM drive.
The
computer
cannot
recognize
disk (the
Built-in
DVD-RAM
drive).
The device ID jumper is set
incorrectly.
Set the device ID jumper on the Built-in DVD-RAM
drive correctly. Leave the settings at the shipment for
the switches other than that used to configure the ID.
Incorrect software (driver) is
installed.
Install the correct device drivers. Depending on the
operating system and the computer, the order of
loading the device drivers may be restricted. Refer to
the manual of each device driver.
76
Phenomenon
Cause
Action
The busy indicator is
illuminating.
Press the eject button after the busy indicator goes
off.
Pressing the
eject button
does not
allow the
tray to be
ejected.
The function of the eject
button is restricted by the
usage environment (including
the computer, operating
system, and device driver)
Depending on the environment in which the Built-in
DVD-RAM drive is used, pressing the eject button
cannot have the disk ejected. Refer to the relevant
manual to eject the disk in the way following the
procedure. (The disk may not be ejected due to the
occurrence of an error in the computer. If so, turn off
the power of the computer and then eject the disk
according to the manual eject procedure.)
A disk having been used in
another computer or
operating system is set to the
Built-in DVD-RAM drive.
It is impossible to use a disk into which data is written
by another device or that of the format type unsuitable
to the environment in which the Built-in DVD-RAM
drive is used. Use any of the disks fit to the
specifications and environments of the Built-in DVD-
RAM drive and the computer.
The Built-in DVD-RAM drive
was subject to a rapid
temperature change.
The disk, the Built-in DVD-RAM drive, and/or the
computer may be condensed due to a rapid
temperature change. If a rapid temperature change
occurs, wait for an hour or longer before using the
system.
Data read is
disabled.
The disk is dirty.
Clean the disk.
The disk is write-protected.
Release the write protect of the disk.
Data write is
disabled.
The disk is not formatted yet
or formatted in a format
which does not meet the
environment for the Built-in
DVD-RAM drive or the
computer.
Format the disk in the form suitable to the
environments of the Built-in DVD-RAM drive and the
computer. (If the data saved in the disk is required,
use another disk.)
The usage environment
temperature is too low.
At the operating environmental temperature of 5°C or
less, the Built-in DVD-RAM drive may be able to read
data from the disk but unable to write data to the disk.
Use the Built-in DVD-RAM drive after increasing the
operating environmental temperature to 5°C or
higher.
The Built-in DVD-RAM drive
was subject to a rapid
temperature change.
The rapid temperature change may cause the disk,
the Built-in DVD-RAM drive, and/or the computer to
be condensed. If a sudden temperature change
occurs, wait for an hour or longer before using the
system.
The disk or the read/write
head of the Built-in DVD-
RAM drive is dirty.
Clean the read/write head and the disk. If the writing
operation is disabled still, contact you service
representative.
The disk is now formatted
physically.
It took longer time for physical formatting than for
logical formatting. Wait for a while.
Much time is
taken for
disk
formatting.
The disk is dirt.
Clean the disk.

77
Appendix A Specifications
UltraDMA mode 4
66.6 MB/s
UltraDMA mode 2
33.3 MB/s
Multi-word DMA mode 2
16.6 MB/s
Data transfer rate
PIO transfer mode 4
16.6 MB/s
Random (including average rotational delay)
DVD-RAM drive
240ms
DVD-ROM
140ms
Average access time
CD-ROM
130ms
Buffer capacity
2 MB
Outside dimension
146 (width) × 190 (depth) × 41.3 (height) mm
Weight
About 0.95 kg
Power supply (rating)
+5 VDC
1.0A
+12 VDC
0.8A
Power consumption (rating)
14.6W
Environmental requirement
䠷 Operating䠹
Ambient temperature
5 ºC – 45 ºC
(Temperature change rate: 10 ºC/h)
Relative humidity
10 % - 80 %RH
Highest dry bulb temperature
29 ºC (without condensation)
䠷 Carriage䠹
Ambient temperature
–30 ºC - 60 ºC
Relative humidity
5 % - 90 %RH
Highest dry bulb temperature
29 ºC (without condensation)
䠷 Vibration䠹
Operating
1.96 m/s
2
or less
Carriage
9.8 m/s
2
or less
78
Appendix B Disks
The Built-in DVD-RAM drive can accept the following disks.
The Built-in DVD-RAM drive can write or read data to or from the following media.
DVD-RAM (4.7 GB/single-sided)
DVD-RAM (9.4 GB/double-sided)
The Built-in DVD-RAM drive can read data from the following media.
DVD-RAM (5.2GB/double-sided)
DVD-RAM (2.6 GB/single-sided)
DVD-ROM
CD-ROM
CD-R/RW
It is recommended to use DVD-RAM disks provided by NEC or other recommended
disks for the Built-in DVD-RAM drive. See Appendices C and D for details.

79
Notes on Handling of DVD-RAM Disk
In order to lengthen the life of a written or non-written DVD-RAM disk as much as possible,
note the following when handling the disk.
Do not drop or hit a DVD-RAM disk. Failure to follow it may cause the disk to be
damaged. In addition, setting a broken DVD-RAM disk to the Built-in DVD-RAM
drive may also cause the Built-in DVD-RAM drive itself to be damaged.
Do not place DVD-RAM disks near sources of interference caused by radio wave
including a computer monitor, motor, video monitor, and apparatus using X ray.
Failure to follow it may cause the data saved in the DVD-RAM disks to be
damaged.
Store DVD-RAM disks in an area not exposed to direct sunshine and far from heat
sources such as a heater.
Store DVD-RAM disks in an area at the room temperature ranging from -10°C to
50°C and the relative humidity ranging from 3% to 85% without dust. To use the
DVD-RAM disks, return to the operating environment (room temperature: 5°C -
35°C, humidity: 15% - 85%) at the temperature gradient of 10°C/hour (temperature
change of 10°C or less for an hour).
Always put a DVD-RAM disk into the attached protect case. Then put the case into
a poly bag to seal it.
Do not have your hands or objects touch the data side of a DVD-RAM disk.
Do not handle a DVD-RAM disk during eating or smoking.
Put a DVD-RAM disk into the exclusive plastic protect case and place it
horizontally or vertically when it is stored.
Do not put any object on a DVD-RAM disk.
Insert a DVD-RAM disk into the Built-in DVD-RAM drive carefully.
80
Appendix C Accessories
The following accessory is provided for the Built-in DVD-RAM drive. To purchase the
accessory, inform your service representative of the product name and part number.
EF-8172 is unavailable because it cannot be taken off from the cartridge.
Product name
Part number
DVD-RAM disk Cartridge
4.7 GB
EF-8171

81
Appendix D Recommended Devices
Ask your service representative for the recommended DVD-RAM disks and cleaning kits.

82
Appendix E Use of NEC EXPRESSBUILDER
Note the following in use of the "NEC EXPRESSBUILDER" CD-ROM normally coming with
any NEC Express5800 series servers and workstations.
See the separate sheet "Notes on Use of NEC EXPRESSBUILDER" coming with the Built-
in DVD-RAM drive for details.
The NEC EXPRESSBUILDER cannot be started.
o Remove the interface cable connected to the Built-in DVD-RAM drive and
then start the NEC EXPRESSBUILDER.
Setting the Service Pack CD-ROM is requested during Express Setup.
o The use of "Express Setup," the setup tool exclusively used for NEC
Express5800 series machines, allows the operations from the installation of
Windows 2000 or Windows XP to the system setup to be done
automatically if the setup information is previously entered. (In the period,
you may not stay by the side of the NEC Express5800 series machine to
check the setup status.
However, if the setting includes the application of the Service Pack, insert
the Service Pack CD-ROM into the Built-in DVD-RAM drive when message
"Now unattended installation starts …" appears.
If you start the unattended installation without inserting the Service Pack
CD-ROM into the Built-in DVD-RAM drive, you will be requested to set the
Service Pack CD-ROM in the middle of the installation.
Setting the NEC EXPRESSBUILDER is requested during the operation of the
setup program in the Master Control menu.
o Some setup menus in the "Master Control Menu" started by the Windows
Autorun function require the NEC EXPRESSBUILDER to be inserted into
the CD-ROM drive. If this occurs, insert the NEC EXPRESSBUILDER
having been inserted into the Built-in DVD-RAM drive into the CD-ROM
drive and then continue the setup operation. If the computer is equipped
with more than one CD-ROM drive, see the drive letter appearing in the
message to insert the NEC EXPRESSBUILDER to the proper CD-ROM
drive.

N8151-32B
ෆⶶ DVD-RAM ⨨䝴
䝄 䝈䜺䜲 䝗
Built-in DVD-RAM Unit User’s Guide
2004
ᖺ 7 ᭶ ึ∧
July 2004, Ver. 1
᪥ᮏ㟁Ẽᰴᘧ♫
ᮾி㒔 ༊Ⱚ┠ 7 ␒ 1 ྕ
TEL(03)3454-1111
䠄 ௦⾲䠅
NEC Corporation
5-7-1, Shiba, Minato-ku, Tokyo, Japan
TEL (03)3454-1111 (main)
© NEC Corporation 2004
᪥ᮏ㟁Ẽᰴᘧ♫䛾チྍ䛺䛟 」〇䞉 ᨵኚ䛺 䛹 䜢 ⾜䛖 䛣 䛸
䛿䛷䛝 䜎 䛫䜣䚹
Reproduction of this document or portions thereof
without prior written approval of NEC is prohibited.

N8151-32B
ෆⶶ DVD-RAM ⨨䝴
䝄 䝈䜺䜲 䝗
N8151-32B Built-in DVD-RAM Unit User’s Guide
856-124262-001-A
ᮏ᭩䛿⏕⣬䜢 ⏝䛧 䛶䛔䜎 䛩䚹
This manual is printed on recycled paper.
Wyszukiwarka
Podobne podstrony:
Nec NDT 42 Owners Manual
Nec CDC TO3 Owners Manual
Nec VH 602 Owners Manual
Nec NDV 24 Owners Manual
Nec NDV 27 Owners Manual
Nec Audio EMCEE Owners Manual
Nec NDT 43 Owners Manual
Nec NDV 28 Owners Manual
Nec Versa LXI Owners Manual
Bmw 01 94 Business Mid Radio Owners Manual
Alpine MRD M300 Mono ampl Owners Manual
MPC The Kit Owners Manual
Oberheim Prommer Owners Manual
Alpine CDM 7874,7872,7871,CDE 7860 Owners Manual
Bmw 01 94 Business Mid Radio Owners Manual
Pioneer CS 53 Owners Manual
Kenwood CRS 155 Owners Manual
więcej podobnych podstron