REPROGRAM VCDS WITH
A.
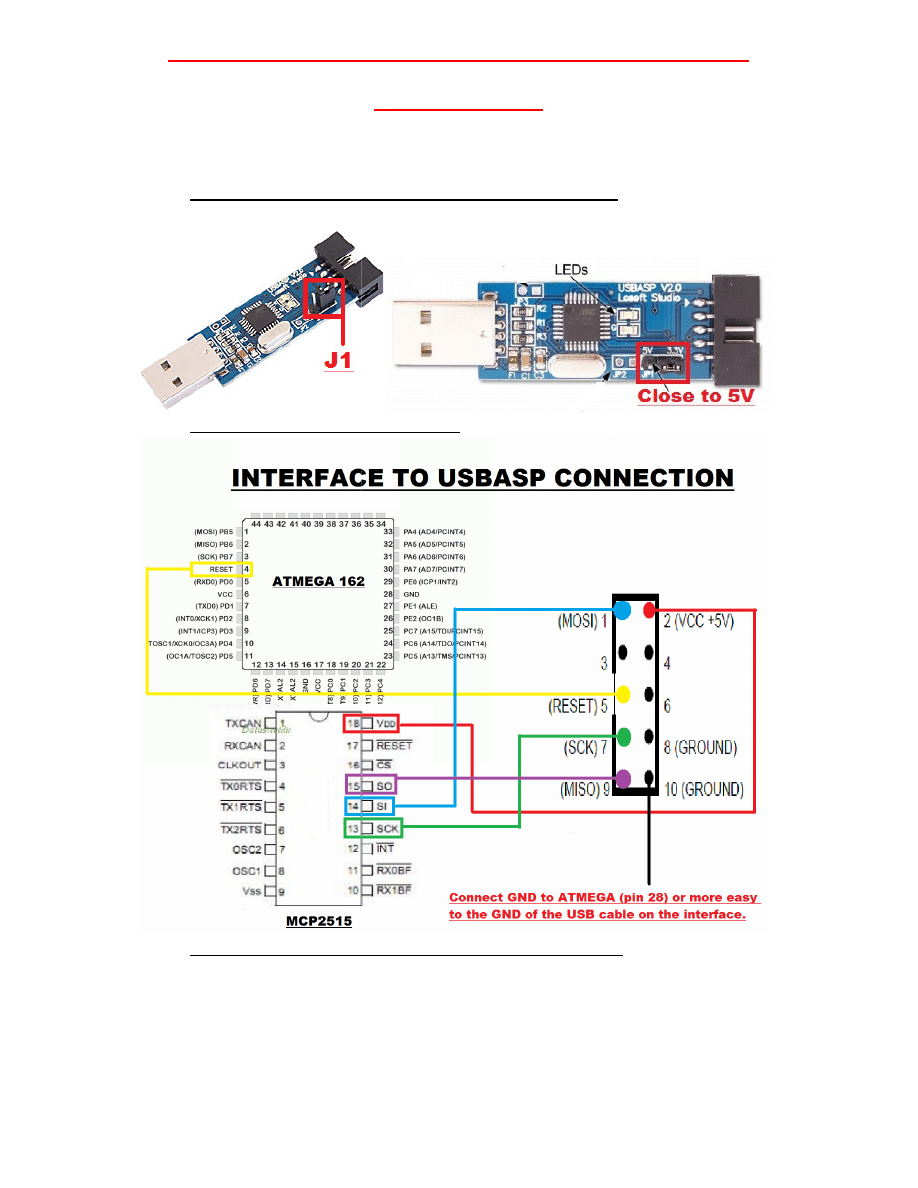
CONNECTION TO INTERFACE
1.
Close jumper J1 or JP1
2.
Wire connection to programmer:
3.
Connect programmer to
a)
If you have a good i
not then you did not wire it up ok, check connections.
b)
If you have an erased interface then you must check if connection is
ok or not. To do that open program PROGISP included in the pack and
push the
RD button
If you receive an error message then check wires,
OK.
REPROGRAM VCDS WITH USBASP PROGRAMMER
BY FANTOMEL
CONNECTION TO INTERFACE AND COMPUTER
JP1 on USBASP to establish 5V power.
Wire connection to programmer:
Connect programmer to USB and let it install drivers.
If you have a good interface, led will become green and you are
not then you did not wire it up ok, check connections.
If you have an erased interface then you must check if connection is
ok or not. To do that open program PROGISP included in the pack and
button
.
If you receive an error message then check wires, if not then
USBASP PROGRAMMER
, led will become green and you are OK, if
If you have an erased interface then you must check if connection is
ok or not. To do that open program PROGISP included in the pack and
then you are
B.
TESTING CONNECTION AND SEE IF ALL IS OK
1.
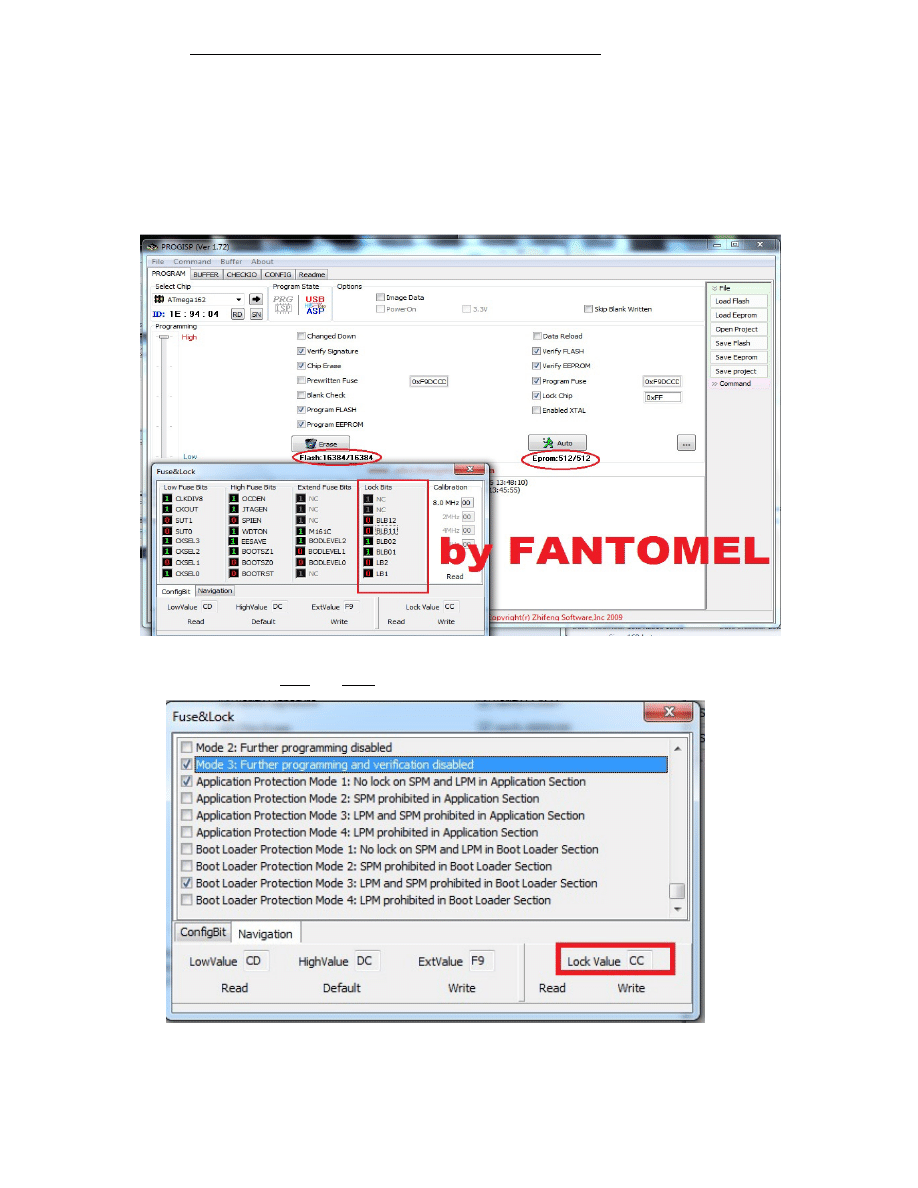
OPEN PROGISP 1.72 MODDED
2.
SELECT CHIP ATMEGA162
3.
LOAD FLASH - YOU WILL SEE IN PROGRAM BELLOW BUTTON ERASE THAT 0/16384 HAS
CHANGED IN Flash: 16384/16384
4.
LOAD EEPROM - YOU WILL SEE IN PROGRAM THAT BELLOW AUTO BUTTON VALUE HAS
CHANGED FROM 0/512 IN Eprom:512/512
5.
CLICK ON FIELD Lock Chip where you have value 0xCC and change bits as in picture
bellow(hw 44 model of fuses, for hw46 look on next page):
6.
PUSH BUTTON X on windows Fuse&Lock and you will see that value in main program has
changed from 0xFF into 0XCC
7.
CHECK that you have all fields as in picture checked: Verified Signature;Erase Chip; Program
Flash; Program EEPROM; Verify Flash; Verify EEPROM ; Program Fuse; Lock Chip.
DOUBLE CHECK THAT YOU HAVE PROGRAM FUSES:
0XF9DCCD FOR HW 44 OR
0XF9DACD FOR HW 46
AND LOCKCHIP 0XCC
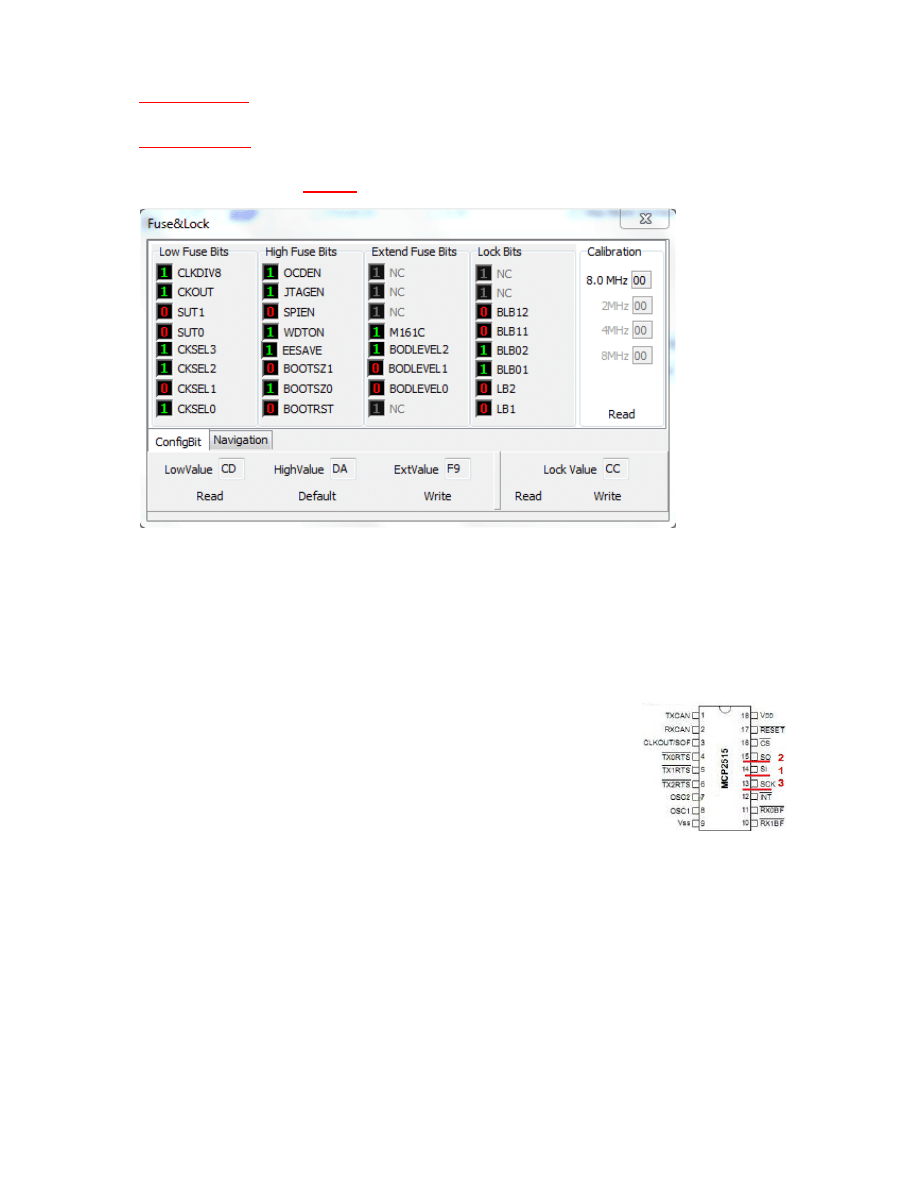
HW46
BE SURE YOU HAVE CONNECTED CORRECT WIRES TO
MISO,MOSI,SKC,RST,GND AND THAT YOU HAVE 12V ON
YOUR INTERFACE.
Pin 1(MOSI) on Atmega chip, or Pin 14 of the MCP2515
Pin 2(MISO) on Atmega chip, or Pin 15 or the MCP2515
Pin 3(SKC) on Atmega chip, or Pin 13 of the MCP2515
Pin 4(RST) on Atmega chip
8.
PUSH AUTO BUTTON AND YOUR INTERFACE WILL BE
REPROGRAMMED
Wyszukiwarka
Podobne podstrony:
ArcScan for ArcGIS Tutorial
Nebulosity Tutorial for Canon U Nieznany
Installing LAMP On Ubuntu For Newbies, HowtoForge Linux Howtos and Tutorials
Matlab Tutorial for Systems and Control Theory (MIT) (1999) WW
Bradley M Kuhn Picking Up Perl A Tutorial Book for New Perl Programmers
tutorial for flat herringbone
Silver s Dagger Tutorial for beginners
3 week diet plan for weight loss Tutorial PDF FREE DOWNLOAD
Non Programmer s Tutorial for Python 2 6
Figures for chapter 5
Figures for chapter 12
więcej podobnych podstron