Lab 8.3.13 Configure Cisco IOS Firewall CBAC
Objective
In this lab, the students will complete the following tasks:
• Configure a simple firewall including CBAC using the Security Device Manager (SDM).
• Understand how CBAC enables a router-based firewall.
• Configure a simple firewall including CBAC and RFC Filtering using the IOS CLI
• Test and verify CBAC operation
Scenario
In a secure network, it is important that internal network remain protected form the outside network.
Context-Based Access Control (CBAC) uses special format access control lists to protect internal
network segments. This provides much greater protection than a standard perimeter router. CBAC is
a component of the Cisco IOS Firewall feature set.
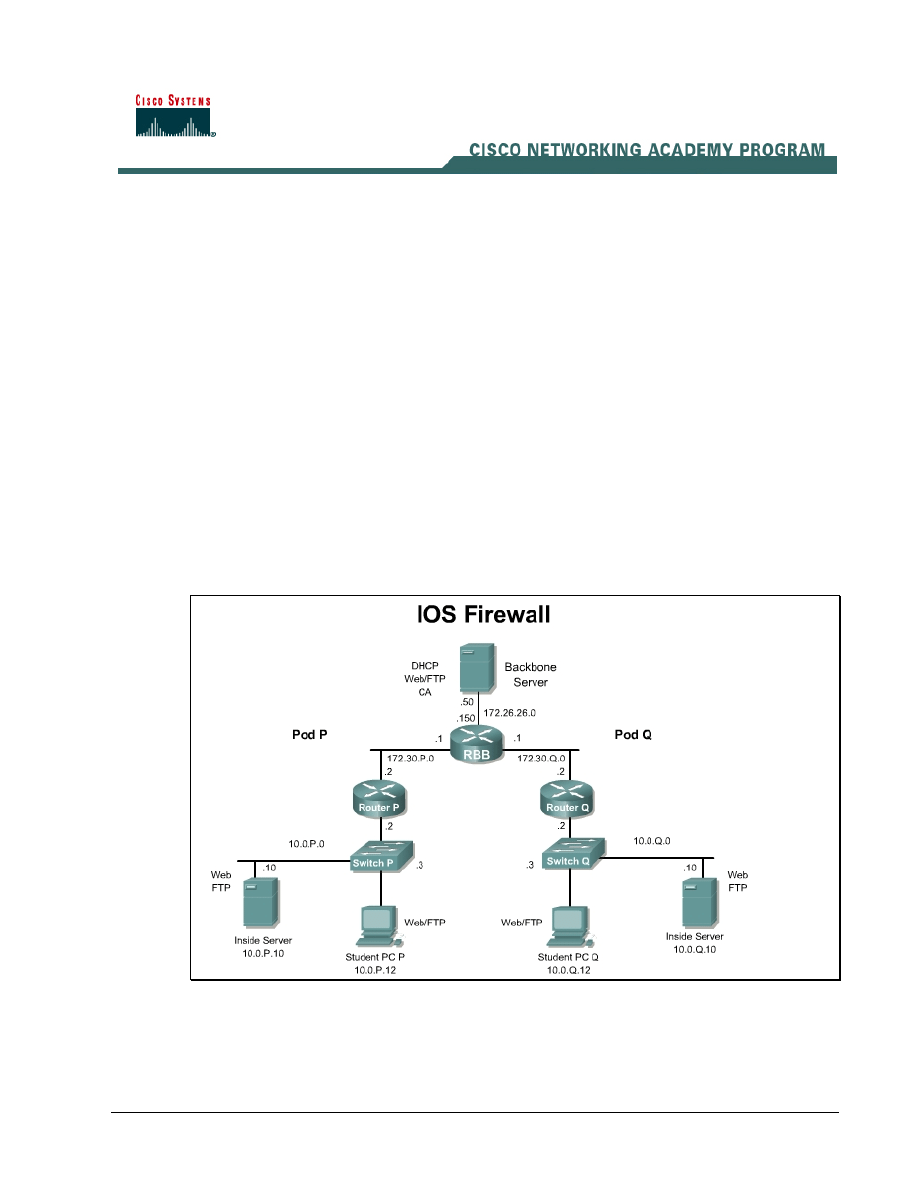
Topology
This figure illustrates the lab network environment.
1 - 12
Network Security 1 v2.0 – Lab 8.3.13
Copyright
© 2005, Cisco Systems, Inc.

Preparation
Begin with the standard lab topology and verify the starting configuration on the pod routers. Test the
connectivity between the pod routers. Access the perimeter router console port using the terminal
emulator on the student PC. If desired, save the router configuration to a text file for later analysis.
Refer back to the Student Lab Orientation if more help is needed.
Tools and resources
In order to complete the lab, the following is required:
• Standard IOS Firewall lab topology
• Console cable
• HyperTerminal
Additional materials
Further information about the objectives covered in this lab can be found at,
Command list
In this lab exercise, the following commands will be used. Refer to this list if assistance or help is
needed during the lab exercise.
Command
Description
logging on
Enable logging to the console
logging 10.0.P.12
Enable logging to the syslog server
ip inspect audit-trail
Enable the audit trail
show access-lists
Check ACLs
show ip inspect name
View the CBAC configuration and session information.
show ip inspect config
Displays the complete CBAC inspection configuration
show ip inspect interfaces
Displays interface configuration with respect to applied
inspection rules and access lists.
show ip inspect sessions
detail
Displays existing sessions that are currently being
tracked and inspected by CBAC. The optional detail
keyword causes additional details about these sessions
to be shown.
show ip inspect all
Displays all CBAC configurations and existing sessions
that are currently being tracked and inspected by
CBAC.
2 - 12
Network Security 1 v2.0 – Lab 8.3.13
Copyright
© 2005, Cisco Systems, Inc.

Part I: Configure CBAC using the Security Device Manager
Step 1 Using the SDM Firewall Wizard
Complete the following steps to configure a basic firewall using SDM:
a.
Establish an SDM connection to the router using the username sdm and password sdm.
b.
Click on the Configure button located in the main tool bar.
c.
Click the Firewall and ACL button in the Tasks panel.
d.
Click the Basic Firewall radio button and click the Launch the selected task button. The Basic
Firewall Configuration Wizard pop up appears. Click the Next button. The Basic Firewall
Interface Configuration page appears.
e.
Select the Outside (untrusted) interface using the pull down tool. Select FastEthernet0/1 or the
appropriate interface which is connected to the “outside”.
f.
Select the Inside (trusted) interface using the check boxes. Checkboxes allow users to select
more than one inside interface at a time. Check the FastEthernet0/0 box, leaving any others
blank. Select the Access Rule Log Option to enable logging of denied access rule entries.
Click Next
g.
A warning may appear indicating that SDM may not be available to launch on a given interface
(the outside interface, FA0/1) once the Firewall Wizard completes. Acknowledge the warning by
clicking OK. The Internet Firewall Configuration Summary appears.
h.
Click Finish. A popup to select which routing protocol traffic to allow will appear. Veirfy that
EIGRP is selected and click OK.
1. Complete the SDM generated configuration. Depending on what configurations may be
present, prompts and pop ups may vary. The SDM generated configuration is now delivered
to the running configuration of the router. Test the configuration delivery by clicking the View
item in the toolbar, and then selecting Running Config from the resulting pull-down menu.
Step 2 Verify the basic firewall configuration created by SDM
Complete the following steps to verify the CBAC configuration:
Click the Configuration button in the top menu, then the Firewall and ACL button in the Tasks
panel. Select the Edit Firewall Policy/ACL tab.
3 - 12
Network Security 1 v2.0 – Lab 8.3.13
Copyright
© 2005, Cisco Systems, Inc.
a. Notice the firewall icon, which is a brick wall, within the router icon. This indicated CBAC is
running on the router.
1. What is the Inspection Rule name?
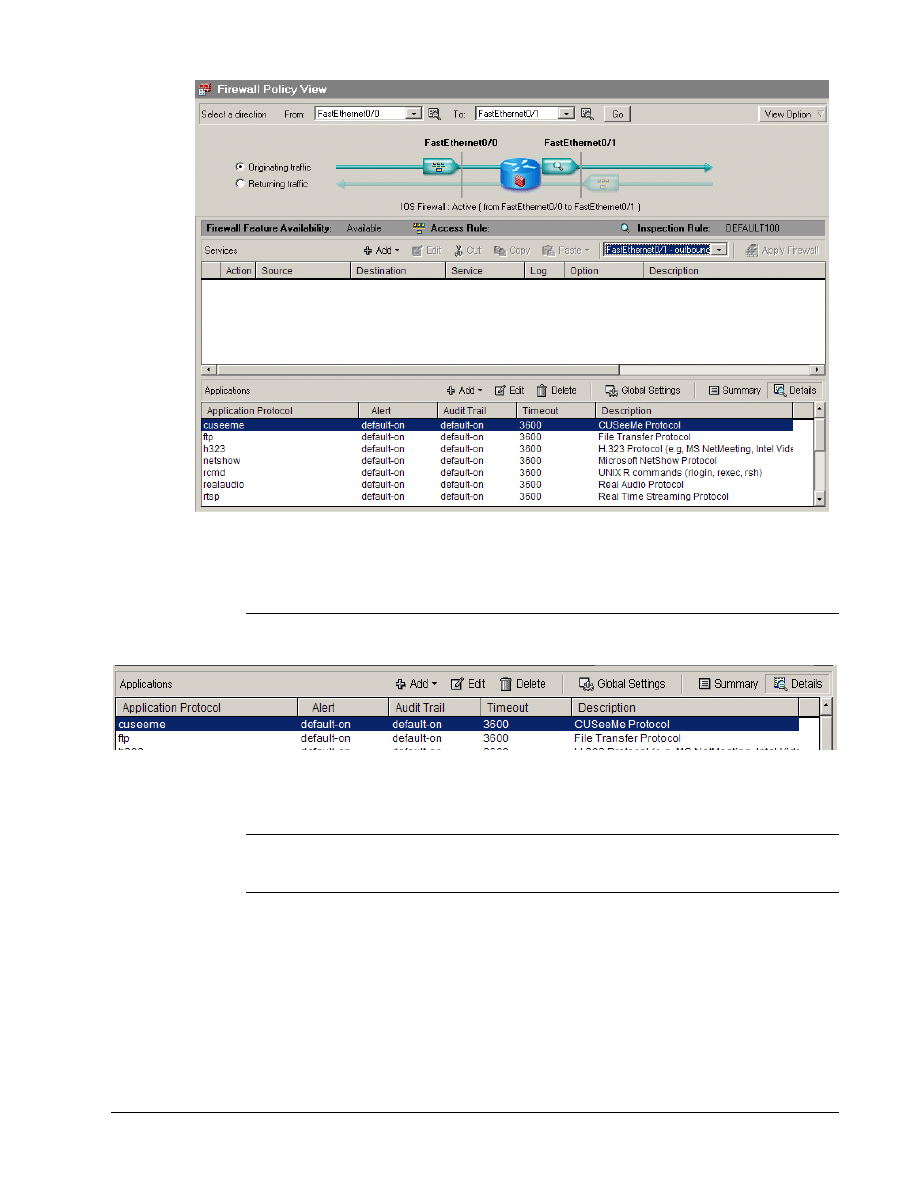
b. To see more information about the inspected protocols, click on the Details button in the
Applications box.
2. What applications are inspected?
3. Can new applications be added or deleted?
c. Verify the inbound ACLs on the inside interface.
4 - 12
Network Security 1 v2.0 – Lab 8.3.13
Copyright
© 2005, Cisco Systems, Inc.
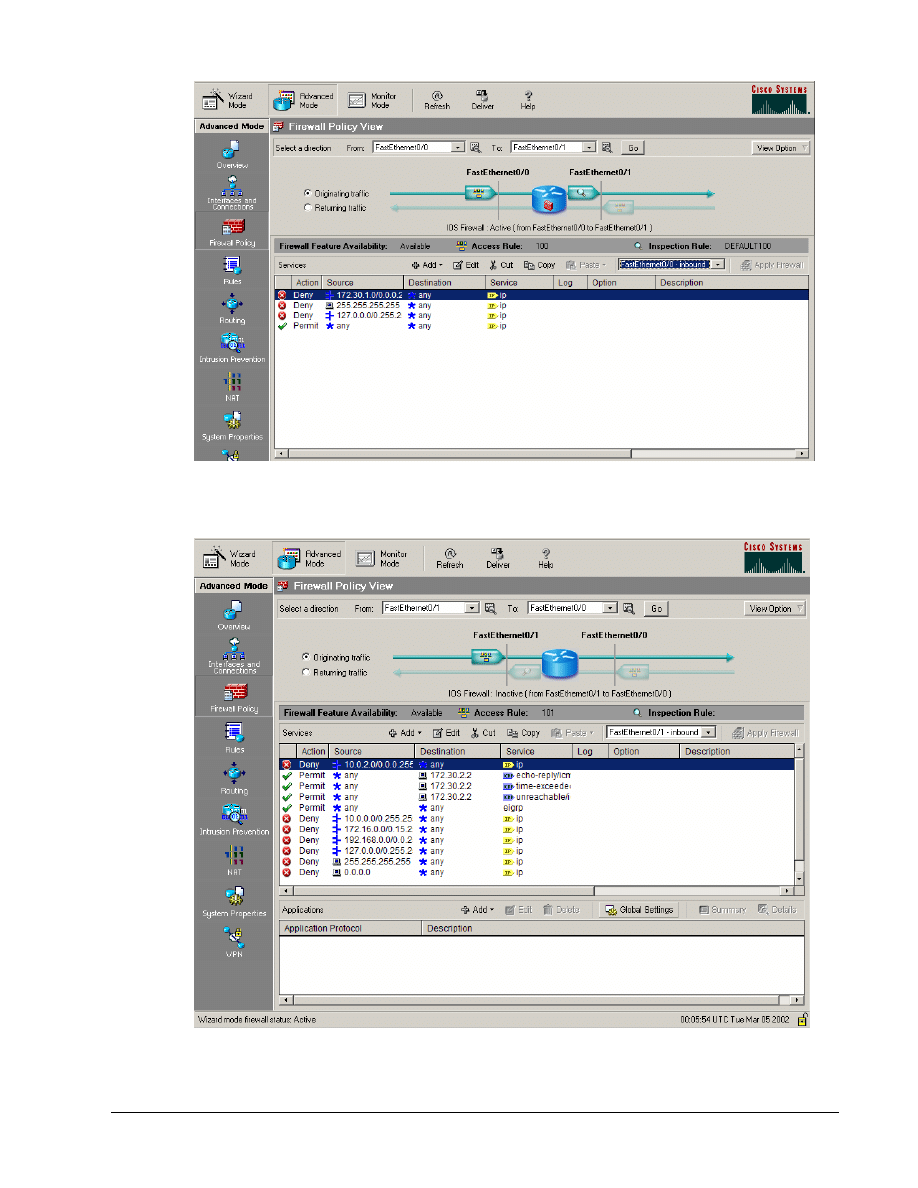
d. Click on the View Option button within the Edit Firewall Policy/ACL window. Select Swap
From and To Interface.
e. Notice that the firewall icon within the router is no longer present, and there is no Inspection
Rule listed.
5 - 12
Network Security 1 v2.0 – Lab 8.3.13
Copyright
© 2005, Cisco Systems, Inc.

f.
Click on the View Option button within the Edit Firewall Policy/ACL window. Select Swap
From and To Interfaces again to return the interfaces to the correct configuration.
g. Carefully look at the overall CBAC configuration. Note how the ACLs and Inspection policy
are applied to the router.
1. Which interface is the Inspection policy applied? Which direction? In or Out
_______________________________________________________________________
2. Will traffic from the loop back or broadcast address be denied or passed? Which RFCs
define these settings? What will happen to all other traffic?
_______________________________________________________________________
3. What security has been applied to the outside interface?
_______________________________________________________________________
Step 3 Configure Logging and Audit Trails
Complete the following steps to configure logging and auditing trails:
a. On the router, enable logging to the console and the Syslog server.
RouterP(config)# logging on
RouterP(config)# logging console
RouterP(config)# logging 10.0.P.12
(where P = pod number)
b. Enable the audit trail:
RouterP(config)# ip inspect audit-trail
RouterP(config)# end
c. Start the Kiwi Sylog software on the Student PC.
d. Observe the output created via the router console or within the Kiwi log window as traffic is
generated in the next step.
Step 4 Verify and test the basic firewall configuration created by SDM
Complete the following steps to verify and test the firewall configuration.
a. On the router, use the following commands to verify the CBAC configuration:
RouterP# show ip inspect name DEFAULT100
RouterP# show ip inspect config
RouterP# show ip inspect interfaces
RouterP# show ip inspect all
b. View the current inspection sessions.
RouterP#show ip inspect sessions
RouterP#
(There should not be any active sessions)
c. Ping RBB from the Student PC command prompt:
C:\> ping 172.26.26.150
Pinging 172.26.26.150 with 32 bytes of data:
Reply from 172.26.26.150: bytes=32 time=34ms TTL=125
6 - 12
Network Security 1 v2.0 – Lab 8.3.13
Copyright
© 2005, Cisco Systems, Inc.

Reply from 172.26.26.150: bytes=32 time=34ms TTL=125
Reply from 172.26.26.150: bytes=32 time=34ms TTL=125
Reply from 172.26.26.150: bytes=32 time=36ms TTL=125
d. On the router, use the following command to view the new dynamic ACL.
RouterP# show ip inspect sessions
Established Sessions
Session 8447EF40 (10.0.P.12:0)=>(0.0.0.0:0) icmp SIS_OPEN
e. Use the following command to view the session detail. This command must be used within
10 seconds of the ping to achieve the results shown below.
RouterP# show ip inspect sessions detail
Established Sessions
Session 833B7378 (10.0.1.12:8)=>(172.26.26.150:0) icmp SIS_OPEN
Created 00:00:02, Last heard 00:00:00
ECHO request
Bytes sent (initiator:responder) [96:96]
In SID 172.26.26.150[0:0]=>10.0.P.12[0:0] on ACL 101 (4
matches)
In SID 0.0.0.0[0:0]=>10.0.P.12[14:14] on ACL 101
In SID 0.0.0.0[0:0]=>10.0.P.12[3:3] on ACL 101
In SID 0.0.0.0[0:0]=>10.0.P.12[11:11] on ACL 101
f.
Wait 10 seconds and reissue the command.
RouterP# show ip inspect sessions detail
1. There should not be any active sessions. Why?
__________________________________________________________________________
g. From the Student PC, telnet to RBB.
C:\> telnet 172.26.26.150
h. Use the following command to view the new dynamic ACL.
RouterP# show ip inspect sessions
Session 84521F20 (10.0.P.12:4525)=>(172.26.26.150:23) tcp
SIS_OPEN
1. How can this session be identified as a telnet session?
_______________________________________________________________________
i.
Use the following commands to view the session detail.
RouterP# show ip inspect sessions detail
Established Sessions
Session 84521F20 (10.0.P.12:4597)=>(172.26.26.150:23) tcp
SIS_OPEN
Created 00:00:07, Last heard 00:00:05
Bytes sent (initiator:responder) [37:66]
In SID 172.26.26.150[23:23]=>10.0.P.12[4597:4597] on ACL 101
(9 matches)
7 - 12
Network Security 1 v2.0 – Lab 8.3.13
Copyright
© 2005, Cisco Systems, Inc.

j.
Close the telnet session.
k. From the Student PC, use the web browser to connect to RBB.
Enter http://172.26.26.150 in the URL field. Do not enter the password.
l.
Use the following command to view the new dynamic ACL.
RouterP# show ip inspect sessions
Session 844B5980 (10.0.P.12:4675)=>(172.26.26.150:80) tcp
SIS_OPEN
1. How can this session be identified as a web session?
__________________________________________________________________________
m. Use the following commands to view the session detail.
RouterP# show ip inspect sessions detail
Established Sessions
Session 844B5980 (10.0.P.12:4675)=>(172.26.26.150:80) tcp
SIS_OPEN
Created 00:01:51, Last heard 00:01:51
Bytes sent (initiator:responder) [358:338]
In SID 172.26.26.150[80:80]=>10.0.P.12[4675:4675] on ACL 101
(3 matches)
n. Return to web browser to enter the password to RBB
o. Observe the console or Kiwi Syslog window as the dynamic ACLs entries are removed.
00:40:06: %FW-6-SESS_AUDIT_TRAIL: Stop tcp session: initiator
(10.0.P.12:4675) sent 440 bytes -- responder (172.26.26.150:80) sent
823 bytes
1. How long does a typical TCP session remain open to a device?
_______________________________________________________________________
Part II: Configure CBAC using CLI
Step 1 Define and Apply Inspection Rules and ACLs using IOS CLI
Complete the following steps to define and apply inspection rules and Access Control Lists (ACLs):
a. Reload the startup configuration for this lab or remove the existing ACLs and CBAC
configuration applied by SDM.
b. Enter global configuration mode on the perimeter router.
c. On the router, define a CBAC rule to inspect all TCP and FTP traffic.
RouterP(config)# ip inspect name FWRULE tcp timeout 300
RouterP(config)# ip inspect name FWRULE ftp timeout 300
RouterP(config)# ip inspect name FWRULE icmp
d. Define the ACLs to allow outbound ICMP traffic and CBAC traffic (FTP and WWW). Block all
other inside-initiated traffic.
(RFC 2827 filtering)
RouterP(config)# access-list 100 deny ip 172.30.P.0 0.0.0.255 any
(where P = pod number)
(RFC 1918 filtering)
8 - 12
Network Security 1 v2.0 – Lab 8.3.13
Copyright
© 2005, Cisco Systems, Inc.

RouterP(config)# access-list 100 deny ip host 255.255.255.255 any
RouterP(config)# access-list 100 deny ip 127.0.0.0 0.255.255.255
any
RouterP(config)# access-list 100 permit ip any any
e. Define ACLs to allow inbound ICMP traffic and CBAC traffic (FTP and WWW) to the inside
web or FTP server. Block all other outside-initiated traffic.
(RFC 2827 filtering)
RouterP(config)# access-list 101 deny ip 10.0.P.0 0.0.0.255
any
(permit ping and routing updates)
RouterP(config)# access-list 101 permit icmp any host 172.30.P.2
echo-reply
RouterP(config)# access-list 101 permit icmp any host 172.30.P.2
time-exceeded
RouterP(config)# access-list 101 permit icmp any host 172.30.P.2
unreachable
RouterP(config)# access-list 101 permit eigrp any any
RouterP(config)# access-list 101 deny ip 10.0.0.0 0.255.255.255
any
(RFC 1918 filtering)
RouterP(config)# access-list 101 deny ip 172.16.0.0 0.15.255.255
any
RouterP(config)# access-list 101 deny ip 192.168.0.0 0.0.255.255
any
RouterP(config)# access-list 101 deny ip 127.0.0.0 0.255.255.255
any
RouterP(config)# access-list 101 deny ip host 255.255.255.255 any
RouterP(config)# access-list 101 deny ip host 0.0.0.0 any
RouterP(config)# access-list 101 deny ip any any log
!
(where P = pod number)
f.
Apply the inspection rule and ACL to the inside interface:
RouterP(config)# interface fa0/0
RouterP(config-if)# ip access-group 100 in
g. Apply the ACL to the outside interface:
RouterP(config-if)# interface fa0/1
RouterP(config-if)# ip inspect FWRULE out
RouterP(config-if)# ip access-group 101 in
RouterP(config-if)# exit
9 - 12
Network Security 1 v2.0 – Lab 8.3.13
Copyright
© 2005, Cisco Systems, Inc.

Step 2 Configure Logging and Audit Trails
Complete the following steps to configure logging and auditing trails:
a. Log into the perimeter router and access global configuration mode.
b. On the router, enable logging to the console and the Syslog server.
RouterP(config)# logging on
RouterP(config)# logging console
RouterP(config)# logging 10.0.P.12
(where P = pod number)
c. Enable the audit trail:
RouterP(config)# ip inspect audit-trail
RouterP(config)# end
RouterP#
d. Start the Kiwi Sylog software on the Student PC.
Step 3 Test and Verify CBAC
Complete the following steps to verify and test the firewall configuration.
a. On the router, use the following commands to verify the CBAC configuration:
RouterP# show ip inspect name FWRULE
RouterP# show ip inspect config
RouterP# show ip inspect interfaces
RouterP# show ip inspect all
b. View the current inspection sessions.
RouterP#show ip inspect sessions
RouterP#
(There should not be any active sessions)
c. Ping RBB from the Student PC command prompt:
C:\> ping 172.26.26.150
Pinging 172.26.26.150 with 32 bytes of data:
Reply from 172.26.26.150: bytes=32 time=34ms TTL=125
Reply from 172.26.26.150: bytes=32 time=34ms TTL=125
Reply from 172.26.26.150: bytes=32 time=34ms TTL=125
Reply from 172.26.26.150: bytes=32 time=36ms TTL=125
d. On the router, use the following command to view the new dynamic ACL.
RouterP# show ip inspect sessions
Established Sessions
Session 8447EF40 (10.0.P.12:0)=>(172.26.26.150:0) icmp SIS_OPEN
e. Use the following commands to view the session detail. This command must be used within
10 seconds of the ping to achieve the results shown below. Repeat the ping if needed.
RouterP# show ip inspect sessions detail
Established Sessions
10 - 12
Network Security 1 v2.0 – Lab 8.3.13
Copyright
© 2005, Cisco Systems, Inc.

Session 84521F20 (10.0.P.12:0)=>(0.0.0.0:0) icmp SIS_OPEN
Created 00:00:04, Last heard 00:00:01
Destinations: 1
Dest addr [172.26.26.150]
Bytes sent (initiator:responder) [128:128]
In SID 172.26.26.150[0:0]=>10.0.P.12[0:0] on ACL 101 (4
matches)
In SID 0.0.0.0[0:0]=>10.0.P.12[14:14] on ACL 101
In SID 0.0.0.0[0:0]=>10.0.P.12[3:3] on ACL 101
In SID 0.0.0.0[0:0]=>10.0.P.12[11:11] on ACL 101
f.
Wait 10 seconds and reissue the command.
RouterP# show ip inspect sessions
1. There should not be any active sessions. Why?
_______________________________________________________________________
g. From the Student PC, telnet to RBB.
C:\> telnet 172.26.26.150
h. Use the following command to view the new dynamic ACL.
RouterP# show ip inspect sessions
Session 84521F20 (10.0.P.12:4525)=>(172.26.26.150:23) tcp
SIS_OPEN
1. How can this session be identified as a telnet session?
_______________________________________________________________________
i.
Use the following commands to view the session detail.
RouterP# show ip inspect sessions detail
Established Sessions
Session 84521F20 (10.0.P.12:4597)=>(172.26.26.150:23) tcp
SIS_OPEN
Created 00:00:07, Last heard 00:00:05
Bytes sent (initiator:responder) [37:66]
In SID 172.26.26.150[23:23]=>10.0.P.12[4597:4597] on ACL 101
(9 matches)
j.
Close the telnet session.
k. From the Student PC, use the web browser to connect to RBB.
Enter http://172.26.26.150 in the URL field. Do not enter the password.
l.
Use the following command to view the new dynamic ACL.
RouterP# show ip inspect sessions
Session 844B5980 (10.0.P.12:4695)=>(172.26.26.150:80) tcp
SIS_OPEN
1. How can this session be identified as a web session?
_______________________________________________________________________
11 - 12
Network Security 1 v2.0 – Lab 8.3.13
Copyright
© 2005, Cisco Systems, Inc.

m. Use the following commands to view the session detail.
RouterP# show ip inspect sessions detail
Established Sessions
Session 844B5980 (10.0.P.12:4695)=>(172.26.26.150:80) tcp
SIS_OPEN
Created 00:01:51, Last heard 00:01:51
Bytes sent (initiator:responder) [358:338]
In SID 172.26.26.150[80:80]=>10.0.P.12[4675:4695] on ACL 101
(3 matches)
n. Return to web browser to enter the password to RBB
o. Observe the console or Kiwi Sylog window as the dynamic ACLs entries are removed.
00:40:06: %FW-6-SESS_AUDIT_TRAIL: Stop tcp session: initiator
(10.0.P.12:4695) sent 440 bytes -- responder (172.26.26.150:80)
sent 823 bytes
1. How long does a typical TCP session remain open to a device?
_______________________________________________________________________
12 - 12
Network Security 1 v2.0 – Lab 8.3.13
Copyright
© 2005, Cisco Systems, Inc.
Wyszukiwarka
Podobne podstrony:
NS2 lab 4 4 7 en Configure Cisco IOS IPSec using Pre Shared Keys
NS2 lab 4 4 7 en Configure Cisco IOS IPSec using Pre Shared Keys
NS2 lab 6 2 12b en Configure Cisco Easy VPN Server with NAT
Configuring Cisco IOS Firewall Intrusion
NS2 lab 6 2 12a en Configure Remote Access Using Cisco Easy VPN
Cisco IOS Firewall Intrusion Detection System(1)
NS1 lab 10 2 4 en Mitigate Layer 2 Attacks
lab 13, konfiguracja routerów cisco
NS1 lab 6 1 3 en Configure Local AAA on Cisco Router
lab 13, 9.2.1.10 Packet Tracer Configuring Standard ACLs Instructions
Cisco Press Configuring the PIX Firewall and VPN Clients Using PPTP, MPPE and IPSec
więcej podobnych podstron