
A Quick Start Guide to Monitor Profiling with Lprof
Overview
Author's note, the Lprof profilers were originally the creation of Marti Maria and
after some time of dormancy have been resurrected by some volunteers. Lprof is
now a separate project from littlecms, though it still depends on littlecms. Some
distros do have them in package form. Google is your friend. However, nothing else
on Linux is capable of the profile creation so easily as Lprof. They are worth
tracking down in rpm or other package form. One other thing to note for those who
used the earlier Lprof tools that the update Lprof application is now a single
executable.
Otherwise, visit
for the latest info and packages.
There is steady activity on refining these profilers to make them comparable to
commercial grade applications. There are no native Windows packages yet
available. For those users running on Windows and who do have an Adobe graphics
application installed, creation of a profile with Adobe Gamma is recommended for
creating a basic monitor profile.
There are five separate tools included in the package:
A monitor profiler
A scanner profiler
A measurement tool
A profile checker
Special utillities for with IT8 targets which are used for profiling
scanners
Here, we are going to focus on creation a monitor profile with the Monitor Profile
tool. Without some sort of reasonably accurate monitor profiler, you will find it
difficult to get consistent on screen color soft proofs with color management
enabled, nor obtain good results from the other tools. Before starting, you need to
find if possible, your monitor manual or a spec sheet from your vendor's website. In
addition, you might wish to locate the factory ICC profile, if available, which we
will use for comparison purposes later on.
Installation
Lprof is uses a new build system called scons, which based on python. It is simple
to untar and simply type python scons.py in the source directory. This will
build lprof and then python scons.py install as root will install the package.
I strongly recommend you read the detailed readme file before compiling.

Preparation
First steps:
You should have your monitor on for at least a half hour to
stabilize the temperature.
In addition, for optimum results, set your desktop to a neutral
gray background without any bitmap backgrounds or images. This
is one of those times, when all that beautiful eye candy is
definitely not helpful. The switch to a gray desktop, helps to
prevent your eyes from being being fooled by a lack of balance in
the colors. My desktop is usually a darkish blue, but for color
critical work - back to boring gray.
Configure, if possible, your monitor's color temperature to 6500k
through the on-screen controls. Your monitor manual should have
directions to set this for your individual monitor.
Explanation: This step, helps to get your monitor to display with a closer match to
the standards which are used in color measurement. Typically, most monitors are
set at the factory to 9300k to look brighter, however for accurate color
management it is too "cold" or bluish to depict colors in a balanced manner. After
changing your monitor temperature to 6500k, you might think it has a yellowish
cast, but walk away for a few minutes and return. Your eyes will adjust.
Next, set monitor contrast to nearly 100%. Then you want to use the brightness
controls to adjust the brightness, so you can see the following, so that each of the
shades of gray is distinct. The developers of Lprof highly recommend
setting gamma with the best precision. Further down is the screen for setting
Gamma within Lprof. It is nearly full screen and should be maximized to avoid
effects of having nearby colors on the screen.
Setting Profile Parameters
The first tab will bring up the panel. Check: "I want build a coarse monitor profile."
Then select: Enter Monitor Values.
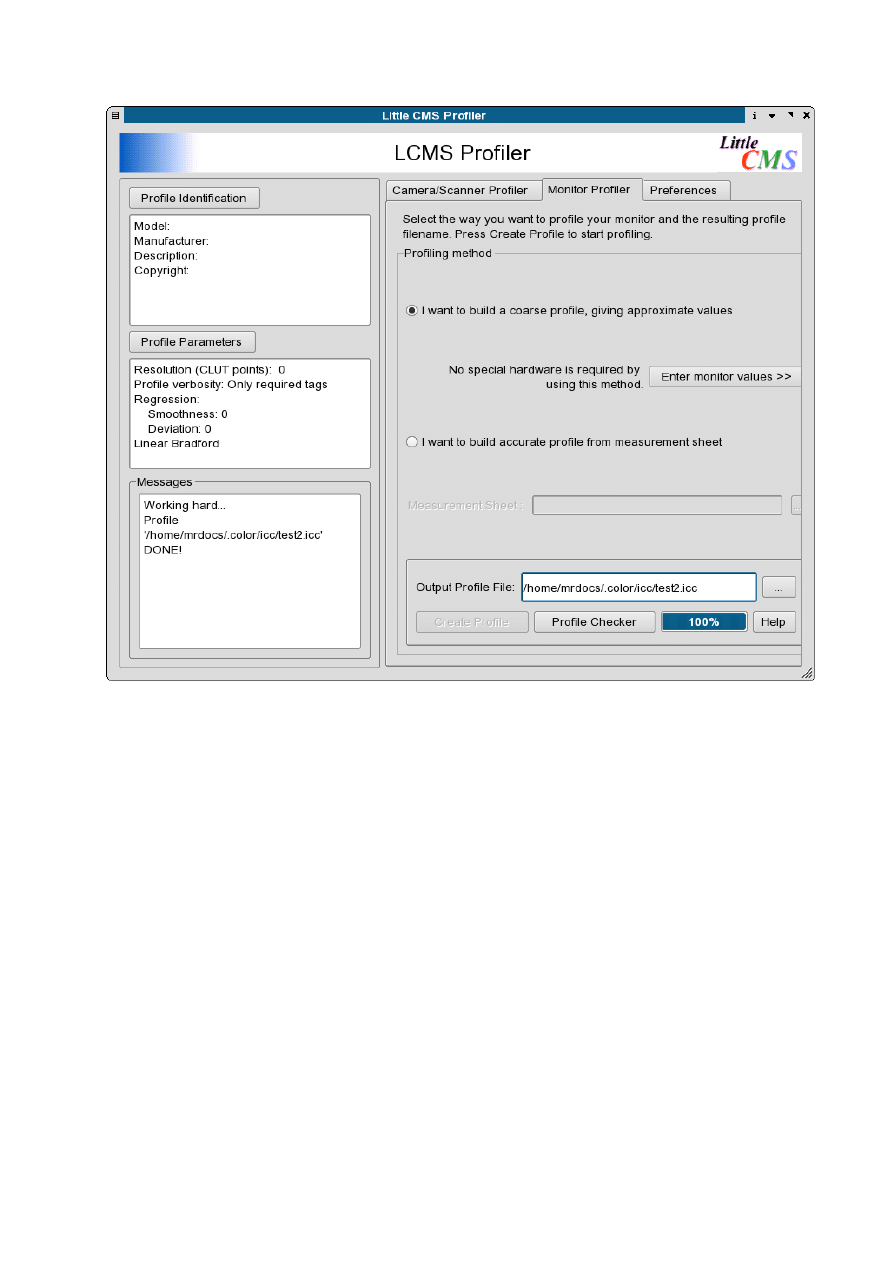
Then, select
Then, switch to the panel here and select: Set Gamma and Black Point
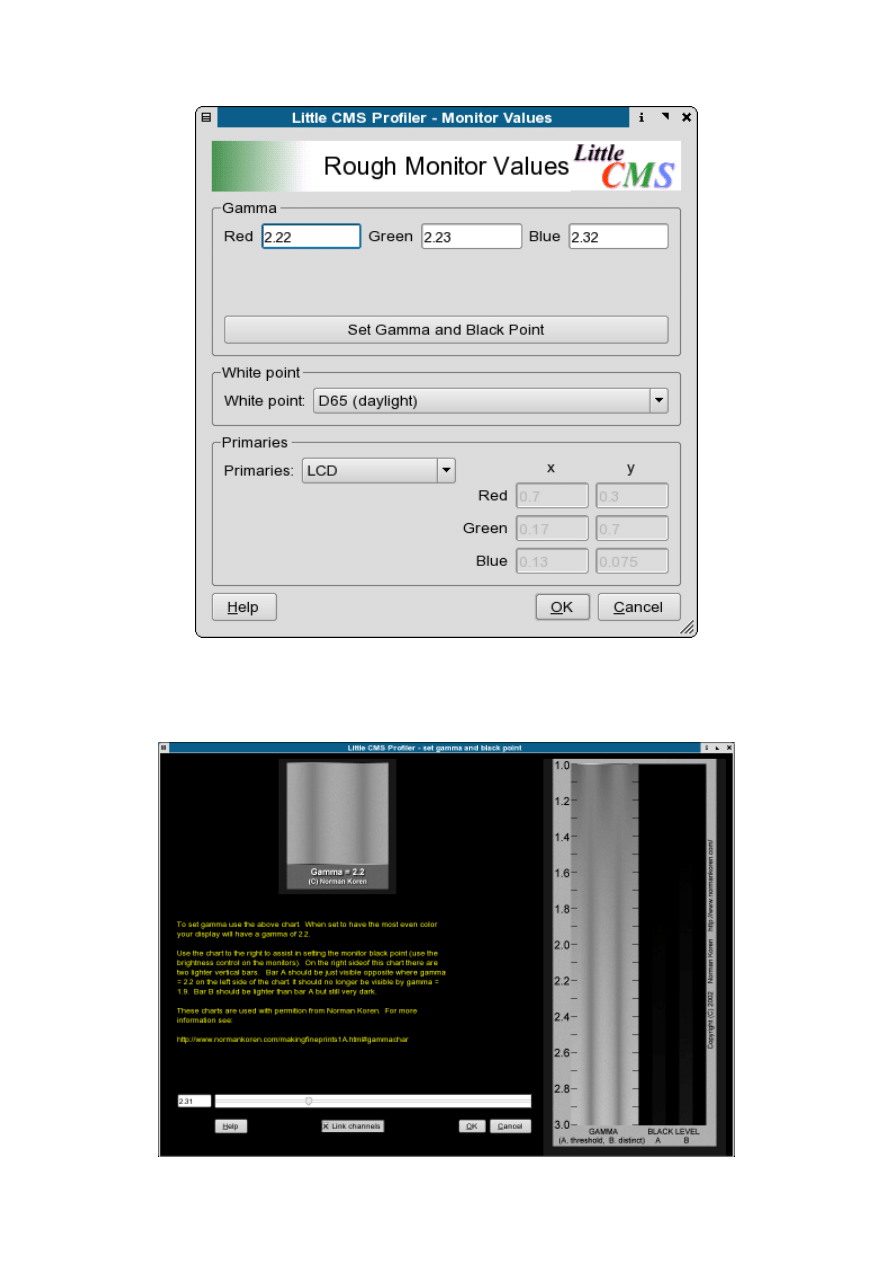
Setting Gamma
The panel below will take over almost all of your screen.
Now that we have switched the monitor temperature to 6500K, set the same in the
white point drop down list. Unless you know there is a specific reason to over ride
the default sRGB, leave this as is. You do not need to name the profile as indicated
just yet. Knowledgeable folks in India indicate 7500K is a more common setting for
that area.
Next adjust the slider to adjust the gamma so the two shades of gray blend
together with the closest color match possible. Most IBM compatible PC's have a
gamma setting between 2.1 and 2.4. Macs are generally 1.8. This the reason it is
common to find images on edited on a PC looking darker on a Mac. If you monitor is
older, it might have a slight color cast and you can try adjusting the individual
color channel settings. Don't overdo it. Slight subtle adjustments are better.
Next name the profile. On Linux or Unix, the recommended location is
$home/.color/icc
or /usr/share/color/icc for all users. Mac OSX users
can use the native ColorSync tool in the control panel to create a similar profile.
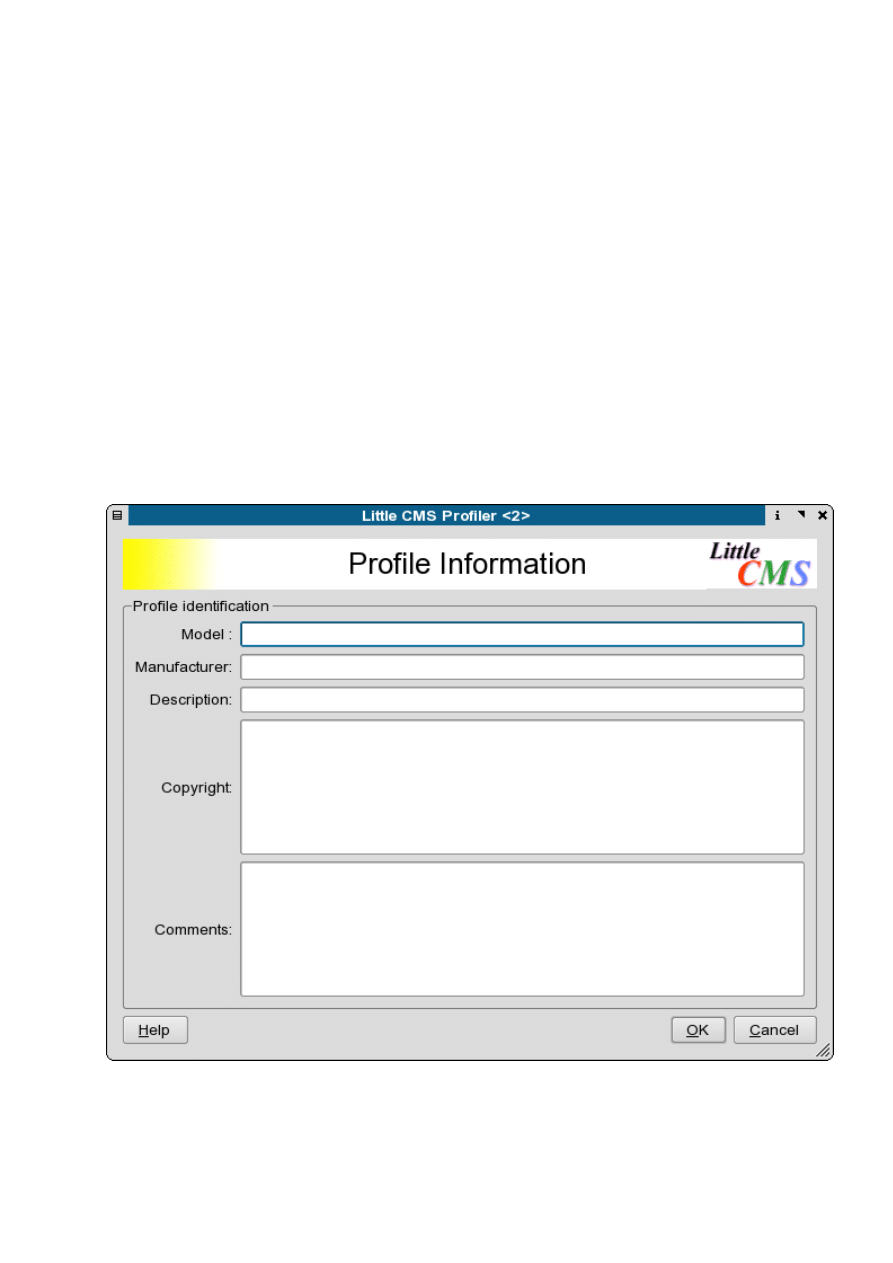
You can add addtional descriptive info in the Profile Identification panel below:
Using the monitor profile in Scribus

Next, go back to the main page, name your profile. You might want to name the
profile something like: $home/.color/icc/d650023.icm This gives you a quick
reference to what the profile means. In this case, d= daylight 6500=the monitor is
set to 6500k 23=gamma setting of 2.3. If you have colored walls or large windows,
you might want to create two monitor profiles: One for daylight and a second one,
when you have indoor lighting on during the night. The difference is subtle, but is
noticeable. for this preliminary profile, you can leave the Parameters and
Tweaking tab alone. The default is set to the icc default specs.
The last step is to Create Profile and the profiler will create the icm file. This
takes but a second or two. Now you can close the profiler for now.
Then, copy the profile to the Scribus profiles directory from a console to
$home/.color/icc : $ cp ./d650023.icm $home/.color/icc This is one the
default directories Scribus will search for profiles.
Now Scribus can use this profile for more accurately managing screen previews.
Start or restart Scribus and go File > Preferences > Color Management . Enable
color management and select the monitor profile as below:

By setting this monitor profile to be the default, you have enhanced the accuracy
of your screen previews. You can selectively enable the gamut checking in your
previews, but this is not quite perfected in littlecms. This is not a weakness in
littlecms nor Scribus, but a limitation of the current icc specs. When enabling this
consider the preview a warning - not definitive. The true test is what actually will
print.
You can also use this profile to enhance the previews in Cinepaint, GIMP, Krita or
other image editing programs which are color management savvy. Monitor colors
and brightness vary over time, so re-profiling at least once every couple of months
is a good idea. In professional settings, sometimes they are re-profiled every week.
Wyszukiwarka
Podobne podstrony:
Parallels Desktop Mac Quick Start Guide
Quick Start Guide
Smart Box NVR Series Quick Start Guide V1 0 0
Quick Start Guide
50064982 MD80210 quick start guide PL
PAP4055DUO V1 0 Quick Start Guide PL
AF104114261 en us quick start guide store and share documents
OUTLOOK 2016 QUICK START GUIDE
Quick Start Guide
quick start guide v2 1
Ultimate Comment Scraper Quick Start Guide
Parallels Desktop for Mac Quick Start Guide
Calibre Quick Start Guide John Schember
PAP4020DUO V1 0 Quick Start Guide PL
AF104114265 en us quick start guide lists
Quick Visual Guide To Basic Aikido Techniques
Nokia 5800 XpressMusic Quick Start Guide pl
Logitech M310 quick start guide
więcej podobnych podstron