
The Instructor
The Instructor
Mark Dvoretsky
The Chess Cafe
E-mail Newsletter
Each week, as a service to
thousands of our readers, we send
out an e-mail newsletter,
This
Week at The Chess Cafe
. To
receive this
free
weekly update,
type in your email address and
click Subscribe. That's all there is
to it! And, we do not make this list
available to anyone else.
E-
Mail:
Endgame Training:
Expert Use of the Rooks
I invite readers to solve the following rook endgames
(allow an hour to an hour and a half for all six positions).
Only the first few examples will be simple (although
even there, it will not be hard to go wrong); after that,
your task will become more and more difficult. Don’t be
unhappy if there are some positions you just can’t solve.
Serious consideration of these problems, followed by a
comparison of your ideas with the answers (which are, in
my opinion, both interesting and pretty) will undoubtedly
be to your benefit.
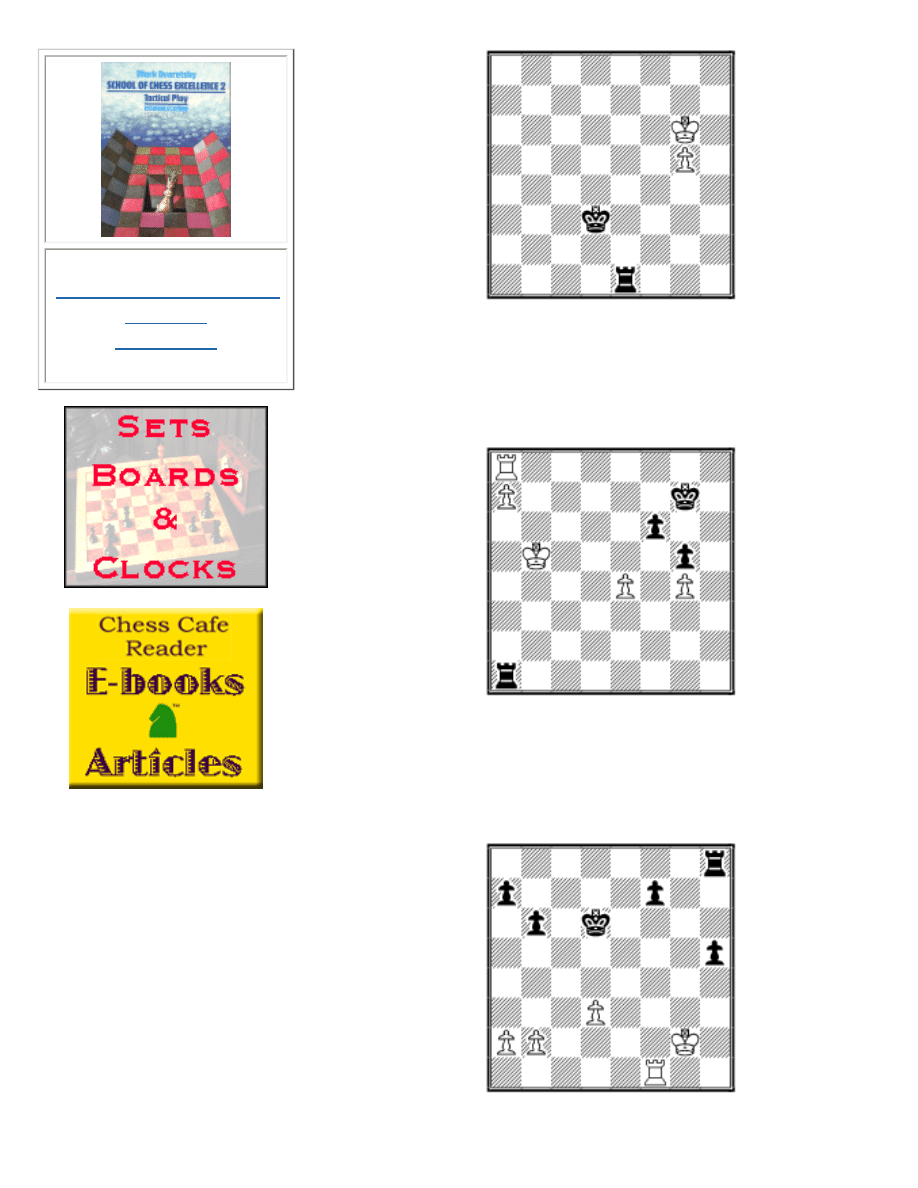
Diagram 1
White to move
How should White continue?
file:///C|/Cafe/Dvoretsky/dvoretsky.htm (1 of 8) [11/11/2002 10:59:33 PM]
Subscribe
The Instructor
Order
by Mark Dvoretsky
Diagram 2
Black to move
How should Black play?
Diagram 3
White to move
Can White win?
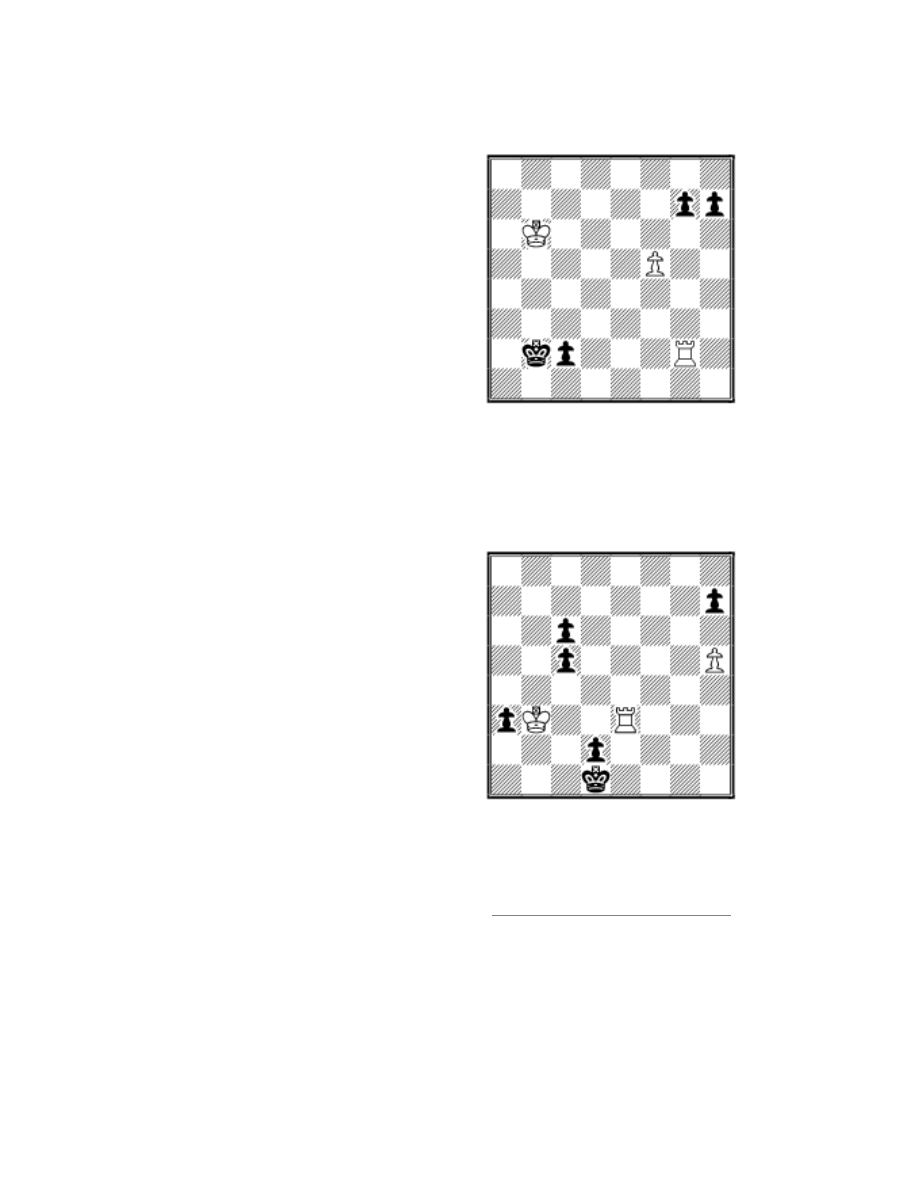
Diagram 4
file:///C|/Cafe/Dvoretsky/dvoretsky.htm (2 of 8) [11/11/2002 10:59:33 PM]
The Instructor
Black to move
How can Black exploit his advantage?
Diagram 5
White to move
How should White continue?
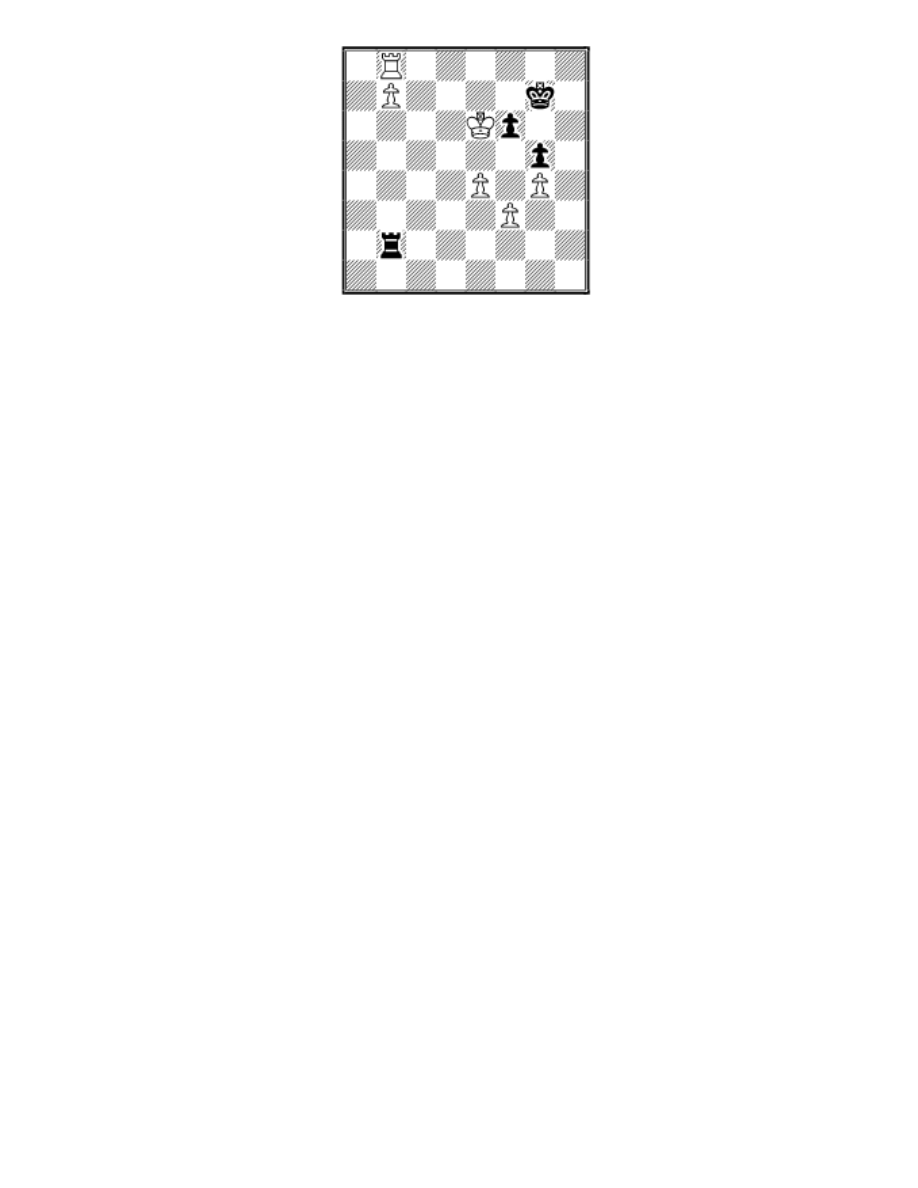
Diagram 6
White to move
How should White continue?
Solutions
1. G. Nadareishvili, 1961
1 Rg5!!
file:///C|/Cafe/Dvoretsky/dvoretsky.htm (3 of 8) [11/11/2002 10:59:33 PM]

The Instructor
Black is playing for stalemate. In order to gain time for the king to
approach, White must prevent the g-pawn from advancing two squares.
That is why 1 Kb6? g5!= is inaccurate.
1...Kh2 2 Kb6 h3 3 Kc5 Kh1 4 Kd4 h2 5 Ke3 g6 6 Rg3
g5 7 Kf2 g4 8 Ra3 g3+ 9 Kxg3 Kg1 10 Ra1#
2. Nunn - Smejkal, Lucerne Olympiad 1982
Black only draws with 111...Ke4? 112 Kf6(f7) Rf1+ 113
Ke6 Ra1 (113...Rg1 114 Kf6 Kd5 115 g6 Kd6 116 g7=)
114 g6 Ra6+ 115 Kf7 Kf5 116 g7 Ra7+ 117 Kf8 (117
Kg8! Kg6 118 Kh8=) 117...Kf6 118 g8N+.
111... Rf1!!
Now White’s king is unable to “shoulder-block” its Black colleague. For
this purpose, even a tempo is not too great a sacrifice!
112 Kh7 Ke4 113 g6 Kf5 114 g7 Rh1+ 115 Kg8 Kg6
116 Kf8 Rf1+ 117 Kg8 Ra1 118 Kh8 Rh1+ White
resigned.
3. Benko - Gereben, Budapest 1951
With accurate defense, the position is drawn.
1 Kb6 Rb1+ 2 Kc6 Rc1+ 3 Kd6 Rd1+!
In the game, Black erred with 3...Ra1?, and after 4 Rc8! (but not 4 Re8?
Ra6+! =) 4...Ra6+ 5 Rc6 Rxa7 6 Rc7+ Rxc7 7 Kxc7, White controlled
the distant opposition, which was then easily converted to the close
opposition: 7...Kh7 8 Kd7! Kg6 9 Ke6 Kg7 10 Ke7 Kg6 11 Kf8, and
Black resigned.
4 Ke6 Ra1 5 Rd8 (5 Re8 Ra6+! 6 Kf5 Rxa7 =) 5...Rxa7
6 Rd7+ Rxd7 7 Kxd7 Kh7!=. Black is saved only by the
distant opposition - and not by the close opposition:
7...Kf7? 8 Kd6 is zugzwang, and it is White who takes
the opposition.
file:///C|/Cafe/Dvoretsky/dvoretsky.htm (4 of 8) [11/11/2002 10:59:33 PM]
The Instructor
Let's take a look at an ending
recently played between two
women grandmasters.
Petz-Kosteniuk, Mainz
2000, 5th match game,
White to move.
Almost the same situation,
except White has an extra
pawn on f3. As a result, the pawn ending that arises after
77 Rd8! Rb6+ 78.Rd6 Rxb7 79 Rd7+ is an elementary win.
In the game there followed 77 Re8?? Rb6+! 78 Kf5 Rxb7 79 e5 fe 80
Rxe5 Rf7+ 81 Kxg5 Rxf3 82 Re7+ Kf8 83.Ra7 Rc3?? 83...Rg3! will
maintain the draw, but even simpler is 83...Kg8!, intending 84...Rf8.
With knight pawns (and no bishop or central pawns) a passive defense
with the Rook on the 8th rank draws.
84 Kh5?? After 84 Kg6! Rc6+ 85 Kh7 Rc5 86 Rg7 the g-pawn would
advance, leading to the Lucena position, which is won for White.
84...Kg8 85 Rd7 Rc6 Black sets up the Philidor position, which assures
the draw; as they say - "No comment."
4. Estrin - Berliner, Wch-corr. 1965
The Black rook stands behind the passed h-pawn; but since White’s king
has already arrived to blockade it, the pawn can only be employed as a
distracting force. Black must initiate active operations on the opposite
wing.
31...Ke6?! is useless after 32 Re1+ (Black cannot allow
the White rook to reach the 7th). And after 31...Rh7?! 32
Kh3, it’s not easy to make further progress.
31..Rc8! 32 Rxf7 Rc7! 33 Rf2
The pawn ending is lost: 33 Rxc7 Kxc7 34 Kg3 Kd6 35
Kh4 Kd5 36 Kxh5 Kd4, and wins. If 33 Rf8, then
33...Rc2+.
file:///C|/Cafe/Dvoretsky/dvoretsky.htm (5 of 8) [11/11/2002 10:59:33 PM]

The Instructor
33...Ke5!
Black is now winning: the king goes to d3, preparing
Rc2. Berliner gives the following analysis: 34 Kg3 Kd4
35 Kh4 Kxd3 36 Kxh5 Rc2:
A) 37 Rf7 Rc5+ 38 Kg4 Ra5 39 Rf3+! Kd2!! 40 a3 (40
b3 Ra3!) 40...Kc2 41 Rf2+ Kb3 42 Kf4 Rb5! 43 Ke4
Ka2! 44 Rf7 a6! 45 Ra7 Ra5 46 Rb7 b5, and wins;
B) 37 Rf3+ Kd2 38 b3!? (38 b4 Rc3! 39 Rf2+ Ke1 40
Rh2 Ra3 41 Kg5 Ra4 42 Rb2 Kd1 and wins; 38 Ra3 a5
39 Rb3 Rc5+ 40 Kg4 b5 41 Kf4 Kc2 42 Ke4 Kb1 43
Kd4 Rh5 44 Ra3 a4! 45 Kc3 Rh4! and wins) 38...Kc1 39
a4 Rb2! (intending 40...a5 and 41...Kc2) 40 a5 b5 41 a6
b4 42 Kg4 Kc2 43 Rf7 Rxb3 44 Rxa7 Ra3 45 Rb7 b3 46
a7 b2, and wins.
The game actually concluded: 34 a4?! (this move,
weakening the queenside pawns, actually makes Black’s
job easier) 34...Kd4 35 a5 Kxd3 36 Rf3+ Kc2 37 b4 b5!
38 a6 Rc4 39 Rf7 Rxb4 40 Rb7 Rg4+ 41 Kf3 b4 42
Rxa7 b3 White resigned.
5. J. Timman, 1988
The straightforward king march to the kingside pawns
comes too late:
1 Kc5? h5! 2 Kd4 (intending 3 Kd3) 2...Kb1 3 Rg1+ c1Q
4 Rxc1+ Kxc1 5 Ke3 (with the king on d5 or d6, White
could go after the g7-pawn; but from d4, the road is
much too long) 5...Kc2 6 Kf4 Kd3 7 Kg5 Ke4, and wins;
1 Kc6? h5! 2 Kd6 h4! 3 Ke6 h3 (Black has won a vital
tempo) 4 Rh2 Kb1 5 Rh1+ c1Q 6 Rxc1+ Kxc1 7 Kf7 h2
8 Kxg7 h1Q, and wins.
file:///C|/Cafe/Dvoretsky/dvoretsky.htm (6 of 8) [11/11/2002 10:59:33 PM]

The Instructor
1 Kc7!!
The “strategic double attack!” This move not only brings
the king closer to the g7-pawn (as may be seen in the
variant 1...Kb1 2 Rg1+ c1Q+ 3 Rxc1+ Kxc1 4 Kd7 h5 5
Ke7 h4 6 Kf7 h3 7 Kxg7 h2 8 f6 h1Q 9 f7 =), but at the
same time prepares a completely different idea.
1...h5! 2 Kb8!! Kb1 (the same reply comes after 2...h4)
3 Rxg7! c1Q 4 Rb7+ =.
6. J. Afek, 1970
On 1 Rh3? c4+! 2 Kxc4 a2, White’s in zugzwang. For
example: 3 h6 (or 3 Kb4 c5+ 4 Kc4 h6!) 3...c5! (both
sides have used up their extra pawn moves at the same
time) 4 Rg3 (4 Kd3 Kc1 wins) 4...Ke2 5 Rg2+ Kf1 and
wins (on the g-file, the rook is too close to the pawn -
only two files between them!)
So White must lose a move!
1 Rg3!! c4+!
1...a2? 2 Rg1+ Ke2 3 Kc2 would be a mistake - White
wins; and Black gets nothing out of 1...Kc1 2 Rc3+ Kb1
3 Rd3.
2 Kxc4 a2
2...Ke2 3 Rg2+ Ke3 4 Rg1 Kf2 5 Rh1=.
3 Rh3!! c5 (3...h6 4 Kb4! c5+ 5 Kc4 is zugzwang) 4 h6!
(and now it’s Black who’s in zugzwang) 4...Kc2 5 Rc3+
Kb2 5 Rb3+ Kc1 7 Rc3+ Kd1 8 Rh3! Ke2 9 Rh2+ Ke1
10 Rh1+ Ke2 11 Rh2+ Kd1 12 Rh3! =
Copyright 2002 Mark Dvoretsky. All rights reserved.
file:///C|/Cafe/Dvoretsky/dvoretsky.htm (7 of 8) [11/11/2002 10:59:33 PM]

The Instructor
Translated by Jim Marfia
This column is available in
Chess Cafe Reader
format. Click
for
more information.
[
] [
]
[
]
] [
Copyright 2002 CyberCafes, LLC. All Rights Reserved.
"The Chess Cafe®" is a registered trademark of Russell Enterprises, Inc.
file:///C|/Cafe/Dvoretsky/dvoretsky.htm (8 of 8) [11/11/2002 10:59:33 PM]
Document Outline
- Local Disk
Wyszukiwarka
Podobne podstrony:
Mark Dvoretsky The Instr5
Mark Dvoretsky The Inst16
Mark Dvoretsky The Inst30
Mark Dvoretsky The Inst14
Mark Dvoretsky The Inst11
Mark Dvoretsky The Instru
Mark Dvoretsky The Instr9
Mark Dvoretsky The Instr8
Mark Dvoretsky The Inst29
Mark Dvoretsky The Inst17
Mark Dvoretsky The Inst13
Mark Dvoretsky The Inst28
Mark Dvoretsky The Inst25
Mark Dvoretsky The Inst18
Mark Dvoretsky The Inst21
Mark Dvoretsky The Instr2
Mark Dvoretsky The Instr4
Mark Dvoretsky The Inst20
Mark Dvoretsky The Instr6
więcej podobnych podstron