Editor's Note: This article's code has been updated to work with the final release of the .Net framework.
In this article, we shall continue our work in building the online shopping cart application that we began in part
one (
http://www.csharptoday.com/content/articles/20011821.asp
). We have already discussed the basis
framework of the application; we built a category list, item showcase, shopping cart, and checkout system.
Now the time has come to increase the features of the shopping cart and have a complete system for online use.
We will build upon our development from part one and enrich the website with new features in the same way we
did before, first defining our basic requirements, setting up the necessary modifications, and finally converting it
to code.
These enhancements will demonstrate how easy it is to add new functionality to the framework described in the
previous article, by adding a customer rating control for the available items. We will also build an administration
console, which will enable us to manage the online store through the web. We will also discuss the security issues
on the web, and how to implement SSL in your server for encryption. Finally we will briefly discuss the various
payment services available on the web.
The application will be designed to work with an SQL Server database for storage. Application logic will be done
within the Web Form and presented to the user through the web browser. Core logic will reside in a separate C#
component using the code behind technique. It will also be .NET framework Beta 2 compliant.
It is assumed that you have basic knowledge of the C# language, web development knowledge, and database
design basics.
Remembering the shopping cart architecture
Programme
Search
C#Today
Living Book
Index
n
m
l
k
j
i
Full Text
n
m
l
k
j
Advanced
CATEGORIES
HOME
SITE MAP
SEARCH
REFERENCE
FORUM
FEEDBACK
ADVERTISE
SU
The C#Today Article
December 17, 2001
Previous article -
December 14, 2001
Next ar
Decemb
Building an Online Shopping Cart Using C# Part 2
by
Juan Martínez
CATEGORY: Application Development
ARTICLE TYPE:
Tutorial
Reader Comments
ABSTRACT
Article
Usefu
Innov
Inform
9 respo
In this article, Juan Martinez continues his work in building an online shopping cart application. In part
one, he discussed the basic framework of the application, now the time has come to increase the
features of the shopping cart and have a complete system for online use. These enhancements will
demonstrate how easy it is to add new functionality to the framework, by adding a customer rating
control for the available items. He will also build an administration console, which will enable us to
manage the online store through the web, and will discuss the security issues on the web, and how to
implement SSL in you server for encryption. Finally he will briefly discuss the various payment services
available on the web.
Article Discussion
Rate this article
Related Links
Index Entries
ARTICLE
페이지 1 / 17
C#Today - Your Just-In-Time Resource for C# Code and Techniques
2002-07-09
http://www.csharptoday.com/content/articles/20011217.asp?WROXE...

Before we start to put together our new components, we need to remember the architecture of our existing
shopping cart. We will review the shopping cart model and state where our modifications will be. We will also look
back at our existing database, which we will then modify to support the new features.
The shopping cart model
The shopping cart model is a simplified flow of information that happens in all online shopping cart
implementations, and is the basis for our online cart.
We then have four basic modules in our application:
z
Item Catalog - Here we display the options to our clients in an organized way.
z
Item Details - Here we show the client as much info as we can to show off our product.
z
Shopping Cart - Here we manage the user's selected items.
z
Checkout System - Here we save the items selected and the client's information to close the transaction.
We will build additional features inside the "item details" module by coding new user controls and simply include
them in the Web Form.
The administration console will control the information in the database. It will not have any influence on the
shopping cart model, as it will act as a back end.
The database model
Now we will take a look at our database schema.
페이지 2 / 17
C#Today - Your Just-In-Time Resource for C# Code and Techniques
2002-07-09
http://www.csharptoday.com/content/articles/20011217.asp?WROXE...
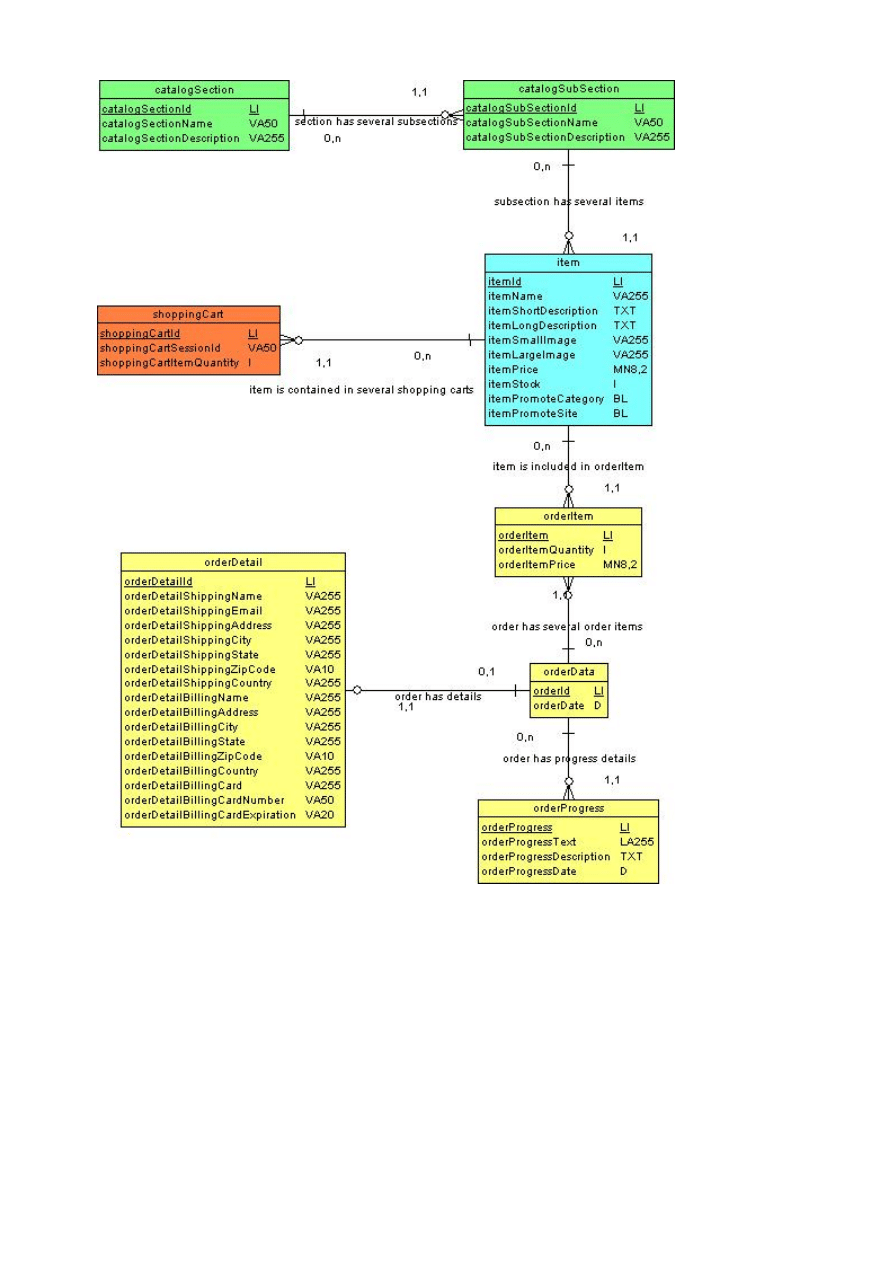
The tables are grouped as follows:
z
Green - The catalog part of our application.
z
Blue - Item details.
z
Orange - Shopping cart basket.
z
Yellow - The checkout system.
The new features of our application will have to interact with this existing database schema. The details will be
discussed afterwards.
The job ahead
Now that we have reviewed the work done previously, we need to define our new requirements, and then do the
appropriate changes to be able to support them.
페이지 3 / 17
C#Today - Your Just-In-Time Resource for C# Code and Techniques
2002-07-09
http://www.csharptoday.com/content/articles/20011217.asp?WROXE...

Defining our new requirements
As in every software development cycle, we need to define our requirements first, so that we can design software
capable of giving satisfaction to our customers.
Our online shopping cart application should add the following features:
z
Include a customer rating component.
z
An administration console to modify the existing information for the catalog section / subsection, items and have
a list of orders.
z
The administration console should allow registered users only through a login screen.
z
The console should also provide a way to manage these users.
z
The site should implement SSL encryption in the back end for security.
z
The shopping cart should also accept online transactions through the web.
The customer rating feature
This will be a new feature to integrate into the existing website. The goal of this part of the article is to show how
easy it is to develop new functionality into existing websites using the ASP. Net framework.
This new feature requires us to develop a new user control to implement the functionality. This will be
uc_item_rating.ascx, used to display the existing comments and add new ones.
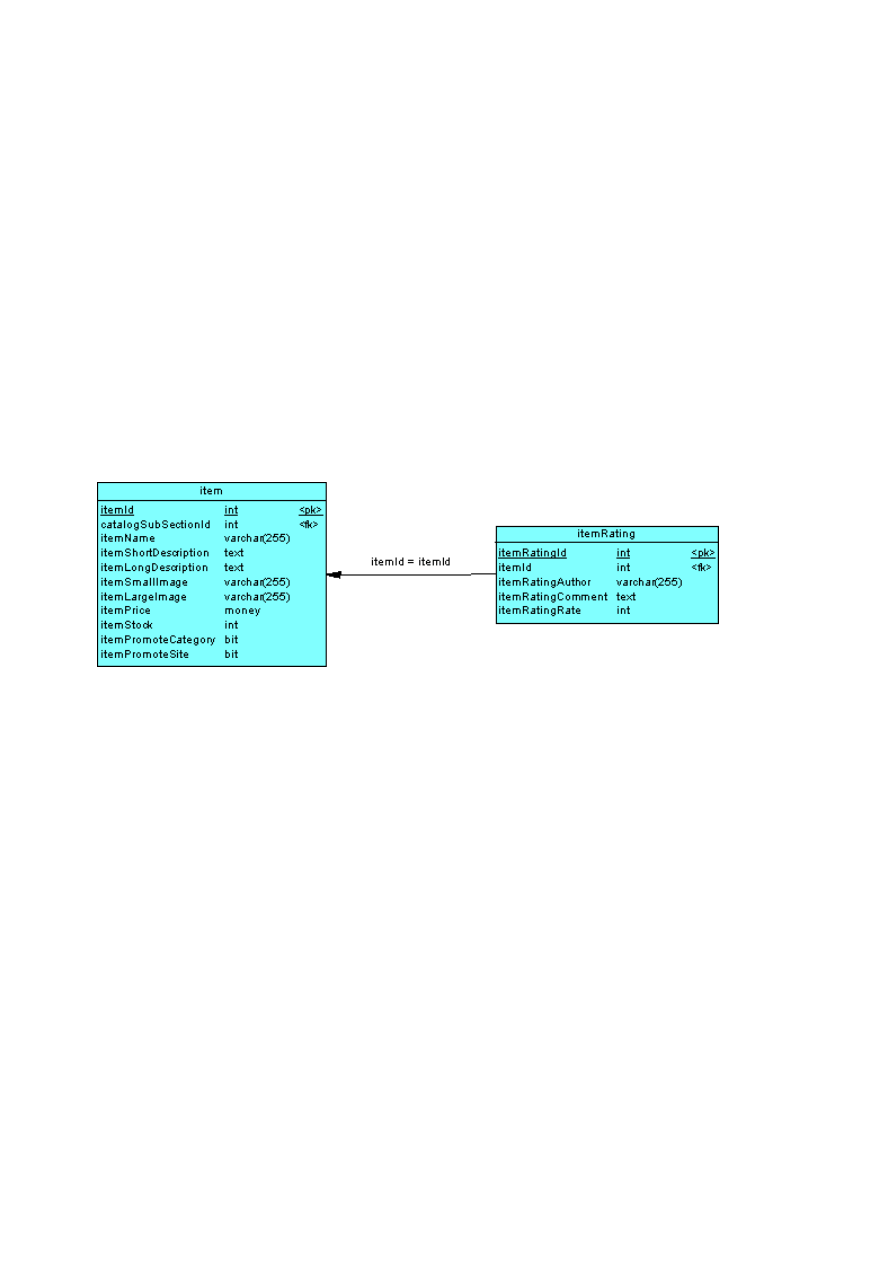
Database modifications
The database needs to be modified to accommodate the new feature. We just need to add a new table and a
relationship to the item table.
New controls
Our Web Application is made up of user controls. We do this to implement functionality in a modular fashion. It is
now time to extend our implementation. We will add a new user control to hold the new functionality. This control
will present the list of user reviews, and provide a form to add new comments. It will be added with the following
code:
Registered in the page:
<%@ Register TagPrefix="SC" TagName="ItemRating" Src="uc_item_rate.ascx" %>
And included in the page body:
<SC:ItemRating runat="server" />
Code behind classes
The code to achieve the desired behavior resides in the UcItemRating class. The following code populates the
rating list and calculates the average rating for the selected item:
int myItemId = 0;
if (Request.QueryString["itemId"] != null)
{
myItemId = Int32.Parse(Request.QueryString["itemId"]);
}
//Bind the rating list
string SQLQuery = "SELECT itemRatingAuthor, itemRatingComment, itemRatingRate FROM itemR
WHERE itemId = " + myItemId.ToString() + " ORDER BY itemRatingId ASC";
String connString = ConfigurationSettings.AppSettings["connString"];
SqlConnection myConnection = new SqlConnection(connString);
SqlDataAdapter myCommand = new SqlDataAdapter(SQLQuery, myConnection);
DataSet ds = new DataSet();
페이지 4 / 17
C#Today - Your Just-In-Time Resource for C# Code and Techniques
2002-07-09
http://www.csharptoday.com/content/articles/20011217.asp?WROXE...

myCommand.Fill(ds, "itemRating");
MyRatingList.DataSource = new DataView(ds.Tables[0]);
MyRatingList.DataBind();
//Calculate the average rating for the item
string strSelect = "SELECT itemRatingRate AS rate FROM itemRating";
myConnection = new SqlConnection(connString);
SqlCommand myCommand2 = new SqlCommand(strSelect, myConnection);
myConnection.Open();
SqlDataReader dr = myCommand2.ExecuteReader();
int total = 0;
double count = 0;
while (dr.Read())
{
total += dr.GetInt32(0);
count++;
}
double rate = 0;
rate = total / count;
myConnection.Close();
lblRating.Text = "Average Rating: " + rate.ToString();
The following code adds a new user rating to the list.
string author = "";
string comment = "";
int rate = 0;
author = txtAuthor.Text;
comment = txtComment.Text;
if (Radio1.Checked)
{
rate = 3;
}
else if (Radio2.Checked)
{
rate = 2;
}
else if (Radio3.Checked)
{
rate = 1;
}
int myItemId = 0;
if (Request.QueryString["itemId"] != null)
{
myItemId = Int32.Parse(Request.QueryString["itemId"]);
}
String connString = ConfigurationSettings.AppSettings["connString"];
//Retreive new Id from main order table
string strSelect = "SELECT COUNT(itemRatingId) AS myId FROM itemRating";
SqlConnection myConnection = new SqlConnection(connString);
SqlCommand myCommand = new SqlCommand(strSelect, myConnection);
myConnection.Open();
SqlDataReader dr = myCommand.ExecuteReader();
int newRateId = 0;
if (dr.Read())
{
newRateId = dr.GetInt32(0) + 1;
}
myConnection.Close();
//Add new order to the main order table
string strInsert = "INSERT INTO itemRating(itemRatingId, itemId,
페이지 5 / 17
C#Today - Your Just-In-Time Resource for C# Code and Techniques
2002-07-09
http://www.csharptoday.com/content/articles/20011217.asp?WROXE...
itemRatingAuthor, itemRatingComment, itemRatingRate) "
+ "VALUES (" + newRateId.ToString() + ", "
+ "" + myItemId.ToString() + ","
+ "'" + author + "',"
+ "'" + comment + "',"
+ "" + rate.ToString() + ")";
myConnection = new SqlConnection(connString);
myCommand = new SqlCommand(strInsert, myConnection);
myConnection.Open();
int queryResult = myCommand.ExecuteNonQuery();
myConnection.Close();
txtAuthor.Text = "";
txtComment.Text = "";
Radio1.Checked = false;
Radio2.Checked = true;
Radio3.Checked = false;
BindRatingList();
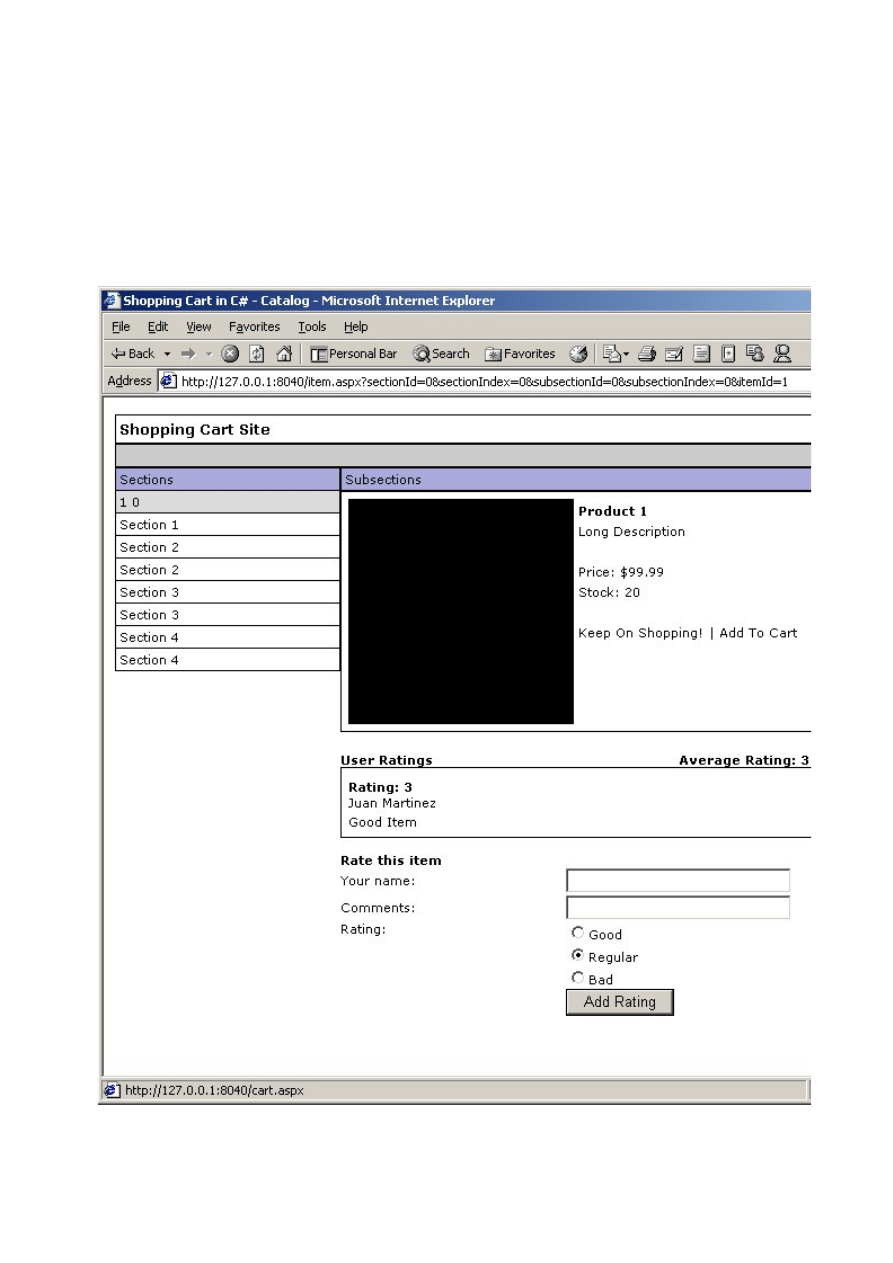
Final screens
Finally our item screen should look like this:
The administration console
The administration console consists of the pages needed to keep the site up to date. Administration pages should
be developed for each table in the database that is to be administered through the web. We will present the
development of such a page for the item table.
The user controls
We will develop several controls for this page. These controls contain specific functionality and are the building
blocks of our Web Form. The controls are the following:
z
uc_admin_menu.ascx
- Displays a list of categories.
z
uc_admin_item.ascx
- Displays the list of items for the selected category and provides a form to add new
items to that category. This will be used when we need to display the list of items and add new items.
z
uc_admin_item_edit.ascx
- Provides a form to modify the information for the selected item. This will be
used when we want to see the item's details and modify them.
The code behind classes
We have a couple of user controls that handle the information for the items in the store. The first displays the list
of subsections and the list of items in the selected subsection. It allows us to add a new item to the store. The
second user control displays a form with the selected item information that allows us to edit the information of the
item. It also enables us to delete the item.
The item list
This code populates our list of items. First we define our
DataList
in the user control. This piece of code lies in
the Web Form, and represents how the data will be displayed. It defines the look and feel of the list. Another part
페이지 6 / 17
C#Today - Your Just-In-Time Resource for C# Code and Techniques
2002-07-09
http://www.csharptoday.com/content/articles/20011217.asp?WROXE...

of our code is in charge of adding content to it.
<asp:DataList id="MyProductList" runat="server"
BorderColor="black"
BorderWidth="1"
GridLines="Both"
CellPadding="3"
Font-Name="Verdana"
Font-Size="8pt"
Width="600px"
HeaderStyle-BackColor="#aaaadd"
SelectedItemStyle-BackColor="Gainsboro"
RepeatDirection = "Horizontal"
RepeatColumns = "1"
DataKeyField="itemId"
>
<ItemTemplate>
<table>
<tr>
<td width=600 colspan=2><a href='admin_item_mod.aspx?subSectionId=<%# DataBinde
"catalogSubSectionId") %>&itemId=<%# DataBinder.Eval(Container.DataIte
%>'><span class="itemText">Edit / Delete</span></a></td>
</tr>
<tr>
<td width=300><span class="itemTitle">Item Id:</span></td>
<td width=300><span class="itemText"><%# DataBinder.Eval(Container.DataItem,
"itemId")
%></span></td>
</tr>
<tr>
<td width=300><span class="itemTitle">Item name:</span></td>
<td width=300><span class="itemText"><%# DataBinder.Eval(Container.DataItem,
"itemName")
%></span></td>
</tr>
<tr>
<td width=300><span class="itemTitle">Item short descripcion:</span></td>
<td width=300><span class="itemText"><%# DataBinder.Eval(Container.DataItem,
"itemShortDescription")
%></span></td>
</tr>
<tr>
<td width=300><span class="itemTitle">Item long descripcion:</span></td>
<td width=300><span class="itemText"><%# DataBinder.Eval(Container.DataItem,
"itemLongDescription")
%></span></td>
</tr>
<tr>
<td width=300><span class="itemTitle">Item small image:</span></td>
<td width=300><span class="itemText"><%# DataBinder.Eval(Container.DataItem,
"itemSmallImage")
%></span></td>
</tr>
<tr>
<td width=300><span class="itemTitle">Item large image:</span></td>
<td width=300><span class="itemText"><%# DataBinder.Eval(Container.DataItem,
"itemLargeImage")
%></span></td>
</tr>
<tr>
<td width=300><span class="itemTitle">Item price:</span></td>
<td width=300><span class="itemText"><%# DataBinder.Eval(Container.DataItem,
"itemPrice")
%></span></td>
</tr>
<tr>
<td width=300><span class="itemTitle">Item Stock:</span></td>
<td width=300><span class="itemText"><%# DataBinder.Eval(Container.DataItem,
"itemStock")
%></span></td>
</tr>
<tr>
<td width=300><span class="itemTitle">Promote in Category Home:</span></td>
<td width=300><span class="itemText"><%# DataBinder.Eval(Container.DataItem,
"itemPromoteCategory")
%></span></td>
</tr>
<tr>
<td width=300><span class="itemTitle">Promote in Site Home:</span></td>
<td width=300><span class="itemText"><%# DataBinder.Eval(Container.DataItem,
페이지 7 / 17
C#Today - Your Just-In-Time Resource for C# Code and Techniques
2002-07-09
http://www.csharptoday.com/content/articles/20011217.asp?WROXE...

"itemPromoteSite")
%></span></td>
</tr>
</table>
</ItemTemplate>
</asp:DataList>
Then we read from the database and bind the results to our
DataList
in the user control. This function executes
the statement against the database and binds the results to the list:
protected void BindProductList(string subSectionId)
{
string SQLQuery = "SELECT * FROM item WHERE catalogSubSectionId=" + subSectionId
+ " ORDER BY catalogSubSectionId, itemName";
String connString = ConfigurationSettings.AppSettings["connString"];
SqlConnection myConnection = new SqlConnection(connString);
SqlDataAdapter myCommand = new SqlDataAdapter(SQLQuery, myConnection);
DataSet ds = new DataSet();
myCommand.Fill(ds, "item");
MyProductList.DataSource = new DataView(ds.Tables[0]);
MyProductList.DataBind();
}
The add button
This code calls the function to add the new item to the store in the currently selected subsection.
<asp:button text="Add Item" OnClick="AddItem_Click" runat=server/>
This code reads the information from the form and saves it to the database. This functionality is fairly simple. We
check for the values in the Web Form and use it to build an
Insert
statement; we then execute it to save the
new record.
protected void AddItem_Click(object Source, EventArgs e)
{
if (Request.QueryString["subSectionId"] != null)
{
string itemName = txtItemName.Text;
string shortDesc = txtShort.Text;
string longDesc = txtLong.Text;
string smallImg = txtSmall.Text;
string largeImg = txtLarge.Text;
string price = txtPrice.Text;
string stock = txtStock.Text;
string myPromoteCategory = "";
string myPromoteSite = "";
if (promoteCategory.Checked)
{
myPromoteCategory = "1";
}
else
{
myPromoteCategory = "0";
}
if (promoteSite.Checked)
{
myPromoteSite = "1";
}
else
{
myPromoteSite = "0";
}
//Retreive new Id from main item table
String connString = ConfigurationSettings.AppSettings["connString"];
SqlConnection myConnection = new SqlConnection(connString);
페이지 8 / 17
C#Today - Your Just-In-Time Resource for C# Code and Techniques
2002-07-09
http://www.csharptoday.com/content/articles/20011217.asp?WROXE...

string strSelect = "SELECT MAX(itemId) AS myId FROM item";
SqlCommand myCommand = new SqlCommand(strSelect, myConnection);
myConnection.Open();
SqlDataReader dr = myCommand.ExecuteReader();
int newId = 0;
if (dr.Read())
{
newId = dr.GetInt32(0) + 1;
}
myConnection.Close();
//Add new item
string strInsert = "INSERT INTO item(itemId, catalogSubSectionId, itemName, itemSh
itemLongDescription, itemSmallImage, itemLargeImage, itemPrice, itemStock, ite
itemPromoteSite) "
+ "VALUES(" + newId + ", " + Request.QueryString["subSectionId"] + ", '"
+ itemName + "', '" + shortDesc + "', '" + longDesc + "', '" + smallIm
+ "', '" + largeImg + "', " + price + ", " + stock + ", "
+ myPromoteCategory + ", " + myPromoteSite + ")";
myConnection = new SqlConnection(connString);
myCommand = new SqlCommand(strInsert, myConnection);
myConnection.Open();
int queryResult = myCommand.ExecuteNonQuery();
myConnection.Close();
txtItemName.Text = "";
txtShort.Text = "";
txtLong.Text = "";
txtSmall.Text = "";
txtLarge.Text = "";
txtPrice.Text = "";
txtStock.Text = "";
promoteCategory.Checked = false;
promoteSite.Checked = false;
BindProductList(Request.QueryString["subSectionId"]);
}
}
The Edit button
This button calls the edit function and saves the new data for the item. This is similar to the add button, in that we
get the information from the Web Form and create the appropriate statement.
This displays the button in the Web Form:
<asp:button text="Edit Item" OnClick="EditItem_Click" runat=server/>
This stores the information to the database:
protected void EditItem_Click(object Source, EventArgs e)
{
if (Request.QueryString["subSectionId"] != null && Request.QueryString["itemId"] != nu
{
string itemName = txtItemName.Text;
string shortDesc = txtShort.Text;
string longDesc = txtLong.Text;
string smallImg = txtSmall.Text;
string largeImg = txtLarge.Text;
string price = txtPrice.Text;
string stock = txtStock.Text;
string myPromoteCategory = "";
string myPromoteSite = "";
if (promoteCategory.Checked)
{
myPromoteCategory = "1";
페이지 9 / 17
C#Today - Your Just-In-Time Resource for C# Code and Techniques
2002-07-09
http://www.csharptoday.com/content/articles/20011217.asp?WROXE...

}
else
{
myPromoteCategory = "0";
}
if (promoteSite.Checked)
{
myPromoteSite = "1";
}
else
{
myPromoteSite = "0";
}
String connString = ConfigurationSettings.AppSettings["connString"];
SqlConnection myConnection = new SqlConnection(connString);
string strUpdate = "UPDATE item "
+ "SET catalogSubSectionId=" + Request.QueryString["subSectionId"]
+ ", itemName='" + itemName + "', itemShortDescription='" + shortDesc
+ "', itemLongDescription='" + longDesc + "', itemSmallImage='"
+ smallImg + "', itemLargeImage='" + largeImg + "', itemPrice=" + pric
+ ", itemStock=" + stock + ", itemPromoteCategory=" + myPromoteCategor
+ ", itemPromoteSite=" + myPromoteSite + ""
+ "WHERE itemId=" + Request.QueryString["itemId"];
SqlCommand myCommand = new SqlCommand(strUpdate, myConnection);
myConnection.Open();
int queryResult = myCommand.ExecuteNonQuery();
myConnection.Close();
Response.Redirect("admin_item.aspx?subSectionId=" + Request.QueryString["subSectio
Response.End();
}
}
The Delete Button
Finally the delete button deletes the item from the database. We look for the selected
itemId
and use it to
construct our
Delete
statement.
This displays the button:
<asp:button text="Delete Item" OnClick="DeleteItem_Click" runat=server/>
And this code calls the
Delete
SQL statement:
protected void DeleteItem_Click(object Source, EventArgs e)
{
if (Request.QueryString["subSectionId"] != null &&
Request.QueryString["itemId"] != null)
{
String connString = ConfigurationSettings.AppSettings["connString"];
SqlConnection myConnection = new SqlConnection(connString);
string strDelete = "DELETE FROM item WHERE itemId=" +
Request.QueryString["itemId"];
SqlCommand myCommand = new SqlCommand(strDelete, myConnection);
myConnection.Open();
int queryResult = myCommand.ExecuteNonQuery();
myConnection.Close();
Response.Redirect ("admin_item.aspx?subSectionId=" +
Request.QueryString["subSectionId"]);
Response.End();
}
}
페이지 10 / 17
C#Today - Your Just-In-Time Resource for C# Code and Techniques
2002-07-09
http://www.csharptoday.com/content/articles/20011217.asp?WROXE...
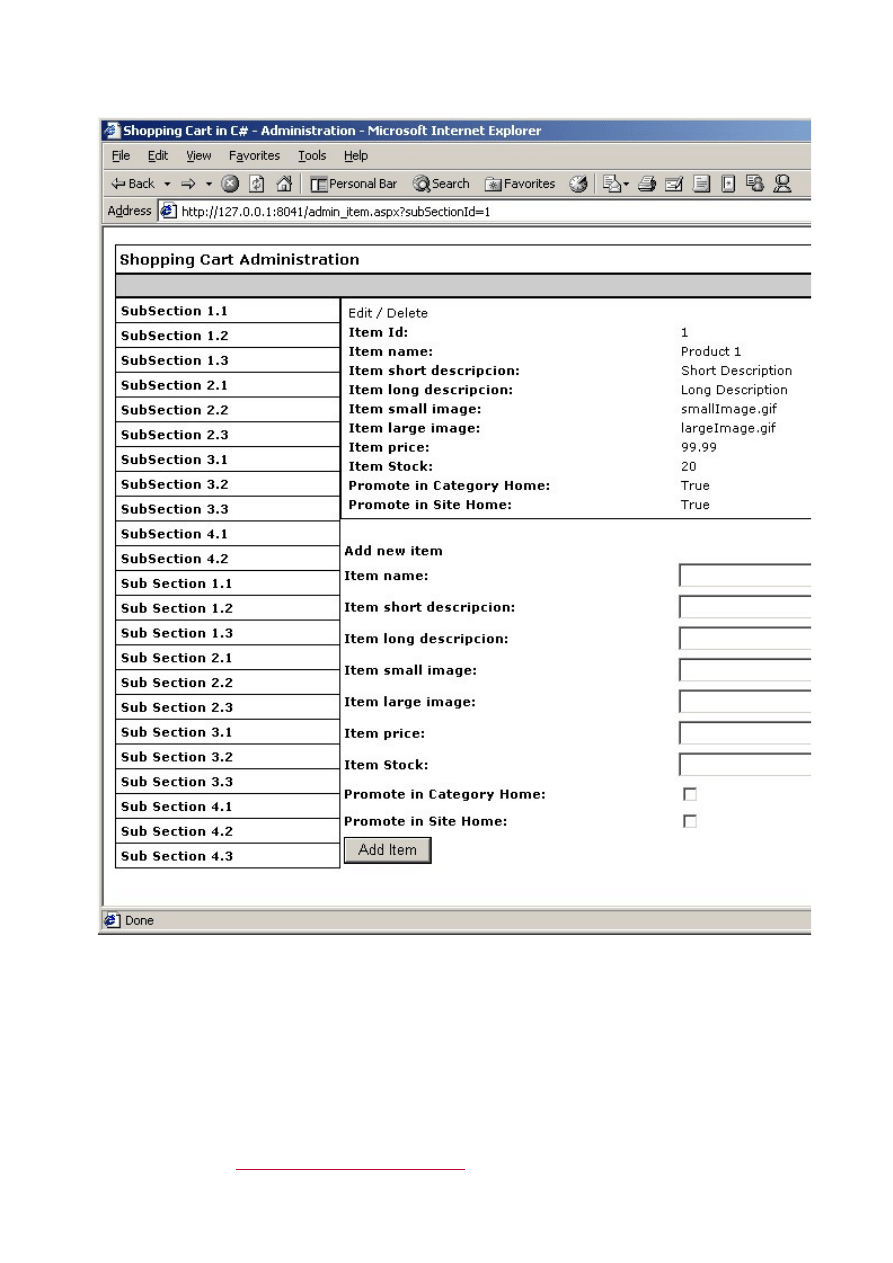
The final screens
This is how our administration page looks. We achieve this final screen by including our user controls into the Web
Form. This process is like bolting new equipment onto the site. This modular design enables us to reuse pieces of
code and makes the building process much more modular.
This screen (below) shows the Web Form making use of the
uc_admin_item.ascx
and the
uc_admin_item.ascx
user controls to display the list of menus and the list of items in the category, as well as
the add new form.
The item list and Add feature:
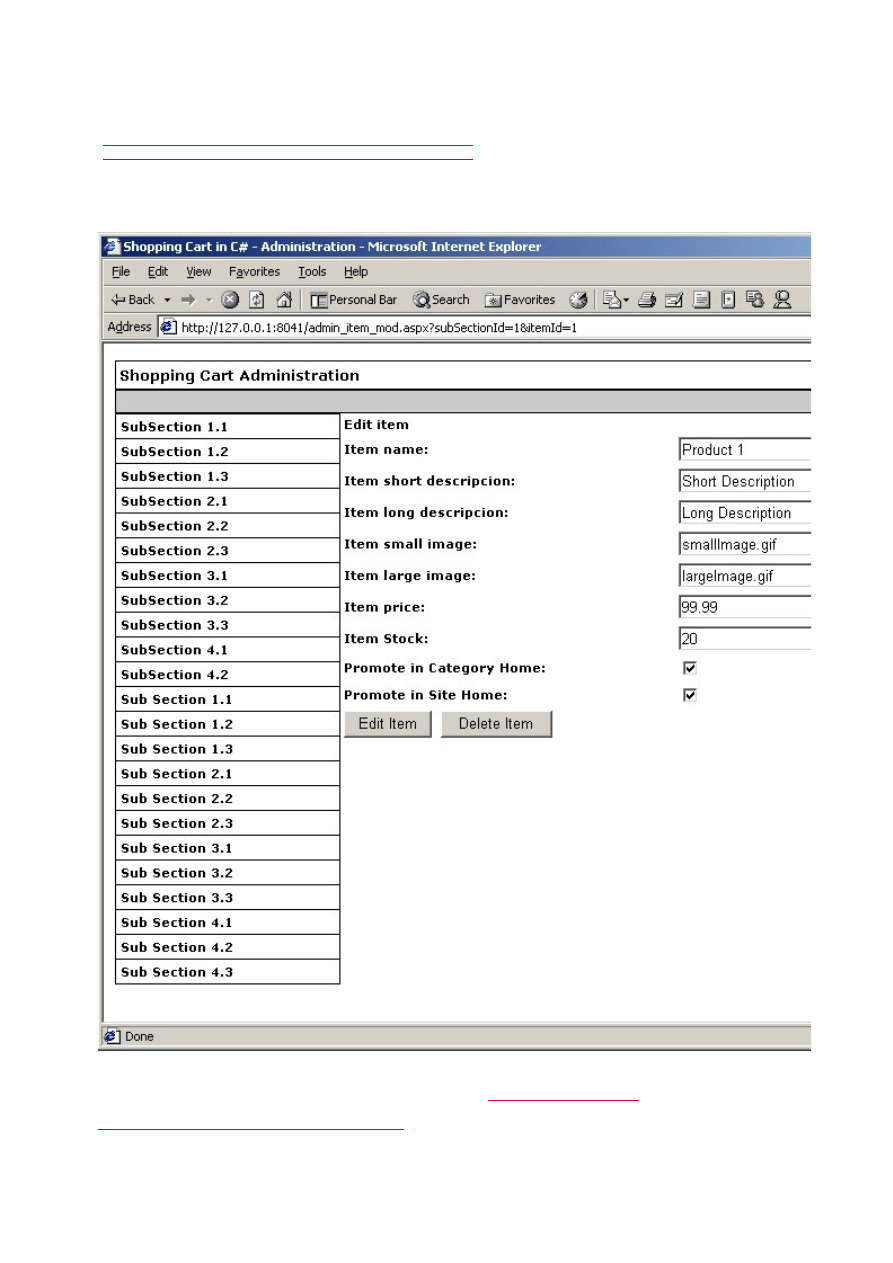
This Web Form utilizes the
uc_admin_item.ascx
and the
uc_admin_item_edit.ascx
user control to display
the menu and the edit form. Notice that this page represents different functionality, but we have reused the menu
control.
페이지 11 / 17
C#Today - Your Just-In-Time Resource for C# Code and Techniques
2002-07-09
http://www.csharptoday.com/content/articles/20011217.asp?WROXE...
The Edit / Delete page:
Setting up security for your server
A very important aspect that must be solved before you expect to ask for users' private information is securing
your server's connection to the Internet.
As information travels from the user's computer to your server through the Internet wires, it is exposed to
malicious users that could "sniff" into the data and retrieve some vital information like credit card numbers.
We need then to secure the information as it travels through the Internet. To achieve this, we use data
encryption. The way this works is that the information is encrypted with an encryption key installed on your
server. This ensures that data travels from the client to your server encrypted, so that if someone sniffs into your
information, it will be useless. Information travels through https which is the http protocol with encryption, so our
URL will look like this:
https://yourserver/yourwebform.aspx
. It is important to note that this is needed only while
페이지 12 / 17
C#Today - Your Just-In-Time Resource for C# Code and Techniques
2002-07-09
http://www.csharptoday.com/content/articles/20011217.asp?WROXE...
important information is transmitted between the client and the host.
For more information on encryption, please see Richard Conway's article on Cryptography - part 1
(
http://www.csharptoday.com/content/articles/20010823.asp
) and part 2
(
http://www.csharptoday.com/content/articles/20010830.asp
).
This diagram shows the effects of having an encrypted channel to transmit data. The sniffer is unable to retrieve
useful information from the wires between the server and your clients.
Now that we know how encryption works, we need to incorporate this encryption for our site. We get this
encryption key from a third party vendor, for example Verisign (
http://www.verisign.com
). Installation of the key
is very straightforward, and Verisign provides complete walkthroughs at
http://www.verisign.com/products/site/index.html
. Once the key is up and running in your server, you will only
need to redirect your Web Forms to use https where vital information is transmitted.
The basic steps to secure your server are:
페이지 13 / 17
C#Today - Your Just-In-Time Resource for C# Code and Techniques
2002-07-09
http://www.csharptoday.com/content/articles/20011217.asp?WROXE...

z
Create an encryption key for your server.
z
Request the activation of your encryption key from Verisign.
z
Install the key into your server and configure IIS to make use of it.
z
Route you important information through https by making your post/get forms go through
https://yourserver.com/test.aspx
, instead of just
http://yourserver.com/test.aspx
.
Details on the first three steps are available in the Verisign site at the URL provided above. This includes a detailed
step by step guide to installing a SSL key to your server.
Receiving payment from customers
So we have a nice online store, we have a secure connection to protect our customers, but we are still missing the
part that lead us to build an online store in the first place! We need to receive payment for the products we are
selling.
There are many ways to do this. In the early days, we would just receive the raw data for the order and process it
manually. This involved shipping and handling the product, and performing a charge to the credit card, usually
with a regular credit card merchant, by forcing a transaction with the number provided by the client.
With today's technology, we have more possibilities. We will discuss a couple of approaches that are available
from third parties on the Web. These services can be grouped as follows:
z
Services that receive information from you site for processing
z
Services that provide special APIs to handle the transactions within your system.
Services that receive information from your site for processing
These kinds of services provide you with access to a predefined infrastructure within their servers. This works in a
way in which you send a form with specific fields to their servers, and they take control of the whole transaction
for you.
Paypal (
http://www.paypal.com
) is a third party vendor that offers this service. It does so by hosting an account
with them, and posting information to the appropriate request handlers of theirs. There you will be presented with
a standard interface (for which you can alter the style) for handling the pay transaction. If the transaction went
out successfully, there will be a new item in your orders list for you to ship.
This is a very simple solution for the developer, since you are free of implementing the checkout system for your
application. This is done entirely on Paypal's servers, which manage the shipping calculation, credit card charge,
security and order administration. A tour of the service can be found at the following URL
(
http://www.paypal.com/cgi-bin/webscr?cmd=p/xcl/rec/sc-outside
) where details of the buying process are
presented.
Details and price for this kind of service vary from vendor to vendor but the concept is to free you from the
payment trouble, and concentrate in building a better site to attract more customers.
Here are the pros and cons for this approach:
Pros:
z
Easy to implement
z
Simple, easy to follow process
Cons:
z
Standard user interface
z
None or limited customization on the payment process
z
Usually share servers with others which leads to a limited number of transactions and performance limitations
Services that provide special APIs to handle the transactions within your system.
These kinds of services take a different approach to providing you with the tools to build your payment solution.
They do exactly that; provide you with the tools you need to develop your own solution.
페이지 14 / 17
C#Today - Your Just-In-Time Resource for C# Code and Techniques
2002-07-09
http://www.csharptoday.com/content/articles/20011217.asp?WROXE...

Cybercash (
http://www.cybercash.com
) is an example of one of these services providers. It gives you a set of
APIs and documentation, which you can use to develop your checkout system. This puts the responsibility on the
development team, but also gives them the possibility to create the solution that best fits the needs of the client.
For complete documentation on how to develop a solution with Cybercash, go to this URL
(
https://www.verisign.com/cgi-bin/go.cgi?a=b183338890612000
).
Here are the pros and cons for this approach:
Pros:
z
Complex API gives you the power to develop your own solution
z
Gives you direct interaction with the system which gives you much more details on the transaction.
z
Can have more control over the installed platform and can scale to larger sites
Cons:
z
You need to develop the whole checkout system which can be expensive and time consuming
z
Need for server capable of supporting the API and security.
Wrapping up
We have looked at the two basic approaches that are offered on the web for payment solutions. One sets you up
with a predefined solution, which you use out of the box. The other provides you with an API for you to create
your own solution.
Paypal is basically a packaged product that works out of the box and provides satisfaction to most of our needs in
a fast non-expensive way (although there are some small fees involved). On the other hand, services like
Cybercash, which provide complex APIs for development, gives us the freedom of developing a more customized
solution.
The Cybercash type of services provides the complete set of tools needed to create our application. This is best
suited for projects where complex order management is required and need to be developed specifically for the
occasion.
There are many more providers of this type of service out there. We can see that they can range from a simple
solution to more robust state of the art APIs, so the decision as to which service to choose lies within the
developer's specific needs. You need to balance the pros and cons of the vendor and evaluate which is better.
Installing the new version
Once we have finished the second part of our development, we need to deploy the changes. We have two choices
here, an upgrade or a new install.
The upgrade path will be needed if you intend to implement the changes on top of the code from part 1 of this
article. This will have to be a totally new installation of the site. Files are included for both paths in the
downloadable zip file.
Upgrade
The steps needed to do the upgrade are the following:
z
Run the
upgrade.sql
script to build the new item review table, and add an administrator user with the
username "admin" and the password "admin".
z
Copy the
uc_item_rating.ascx
user control to the root folder of your application to be with the rest of the
controls and Web Forms.
z
Copy the administration folder into your root folder so the files exist in
http://yourserver/yourapp/admin
.
New install
The steps needed to do a new install are as follows:
z
Create a new database in SQL Server
페이지 15 / 17
C#Today - Your Just-In-Time Resource for C# Code and Techniques
2002-07-09
http://www.csharptoday.com/content/articles/20011217.asp?WROXE...

z
Once we have created the database, we need to run the database creation script
newinstall.sql
, which will
create the database schema and populate it with some sample data.
z
Create a new site in your IIS administration program
z
Copy the
web.config
file to the
wwwroot
folde .
z
Copy the Web Forms and User controls to the
wwwroot
folder.
z
Copy the
codebehind.dll
into your
wwwroot/bin
directory (no registration required!).
How our online store rates
We should now have our online store up and running with enough features to be production worthy. We have
added functionality to the items module to display item reviews, and also a working content management system
to manage the information in our online store. We have also discussed some third party services to handle real-
time online transactions and Internet security.
Nevertheless, there is still much room for improvement.
One of the coolest features nowadays are customer management systems. These incorporate ideas presented
before like related items, user accounts, mailing lists and adds upon them. It is up to you to build the appropriate
custom features to fit your needs.
As for technology, we should also implement some best practices, like building upon components to achieve code
reuse, and also the use of stored procedures. All this left out for simplicity.
Conclusions
This concludes a two-part article that showed how to create an online shopping cart from scratch. We have
developed a catalog / section site to display our products. This was further enhanced with an item rating user
control in part two, and an administration console was also developed to manage the information of the online
store. We then discussed some security and payment issues and analyzed the resources needed to solve them.
Our application is now capable of handling real world use and will provide a valuable framework for further
development.
RATE THIS ARTICLE
Please rate this article (1-5). Was this article...
Useful?
No
n
m
l
k
j
n
m
l
k
j
n
m
l
k
j
n
m
l
k
j
n
m
l
k
j
Yes, Very
Innovative?
No
n
m
l
k
j
n
m
l
k
j
n
m
l
k
j
n
m
l
k
j
n
m
l
k
j
Yes, Very
Informative?
No
n
m
l
k
j
n
m
l
k
j
n
m
l
k
j
n
m
l
k
j
n
m
l
k
j
Yes, Very
Brief Reader Comments?
Your Name:
(Optional)
USEFUL LINKS
Related Tasks:
z
Download the support material
for this
z
Enter Technical Discussion
on this Artic
z
Technical Support on this article -
support@
z
See other articles in the Application Develo
z
See other
Tutorial
articles
z
Reader Comments
on this article
z
Go to Previous Article
z
Go to
Next Article
Related Sources
z
Cybercash:
http://www.cybercash.com
z
Paypal:
http://www.paypal.com
z
Verisign:
http://www.versign.com
Search the
C#Today Living Book
Index
n
m
l
k
j
i
Full Text
n
m
l
k
j
Advanced
Index Entries in this Article
z
administration console
z
architecture
z
C#
z
code behind technique
z
creating
z
cryptography
z
customer rating feature
z
Cybercash
z
database design
z
database table
z
database table, creating
z
encryption
z
enhanceme
z
INSERT sta
z
modifying
z
online stor
z
Paypal
z
receiving p
products from
z
security
z
shopping c
z
SSL
페이지 16 / 17
C#Today - Your Just-In-Time Resource for C# Code and Techniques
2002-07-09
http://www.csharptoday.com/content/articles/20011217.asp?WROXE...

z
database table, modifying
z
DataList control
z
DELETE statement
z
UPDATE st
z
user contro
z
VeriSign
z
web forms
HOME
|
SITE MAP
|
INDEX
|
SEARCH
|
REFERENCE
|
FEEDBACK
|
ADVERTIS
Ecommerce
Performance
Security
Site Design
XML
SO
Data Access/ADO.NET
Application
Development
Web Services
Graphics/Games
Mobile
Other Technologies
C#Today is brought to you by Wrox Press (
www.wrox.com
). Please see our
terms and conditions
and
privacy
C#Today is optimised for Microsoft
Internet Explorer 5
browsers.
Please report any website problems to
webmaster@csharptoday.com
. Copyright © 2002 Wrox Press. All Rights
페이지 17 / 17
C#Today - Your Just-In-Time Resource for C# Code and Techniques
2002-07-09
http://www.csharptoday.com/content/articles/20011217.asp?WROXE...
Wyszukiwarka
Podobne podstrony:
Building An Online Shopping Cart Using C Sharp And Asp Net Part 1
#0532 – Using an Online Email Program
Building an MVP Framework for NET Part 1
Building an MVP Framework for NET Part 2
Building an MVP Framework for NET Part 3
4 2 2 7 Lab Building an Ethernet Crossover?ble
Issues in Publishing an Online, Open Access CALL Journal
Building An Outdoor Playhouse
#0832 – Creating an Online Store
Using Two Part Counterpoint For Non Twelve Tone Music
Yank Kevin Building a Database Driven Web Site Using PHP and MySQL
Building An Olympic Body Through Bodyweight Conditioning Gymnastics Strength Training Article
lyo online shopping faq pl(1)
online shopping
Lucy Tobin Entrepreneur How to Start an Online Business Capstone (2012)(2)
Using Team Building Methods With an Ice Hockey Team
Analysis of soil fertility and its anomalies using an objective model
Untold Hacking Secret Getting geographical Information using an IP?dress
więcej podobnych podstron