62
Home Power #57 • February / March 1997
Homebrew
Food scientists have found that by reducing the
moisture content of food to between 10 and 20%,
bacteria, yeast, mold and enzymes are all prevented
from spoiling it. The flavor and most of the nutritional
value is preserved and concentrated. Vegetables, fruits,
meat, fish and herbs can all be dried and can be
preserved for several years in many cases. They only
have 1/3 to 1/6 the bulk of raw, canned or frozen foods
and only weigh about 1/6 that of the fresh food product.
They don’t require any special storage equipment and
are easy to transport.
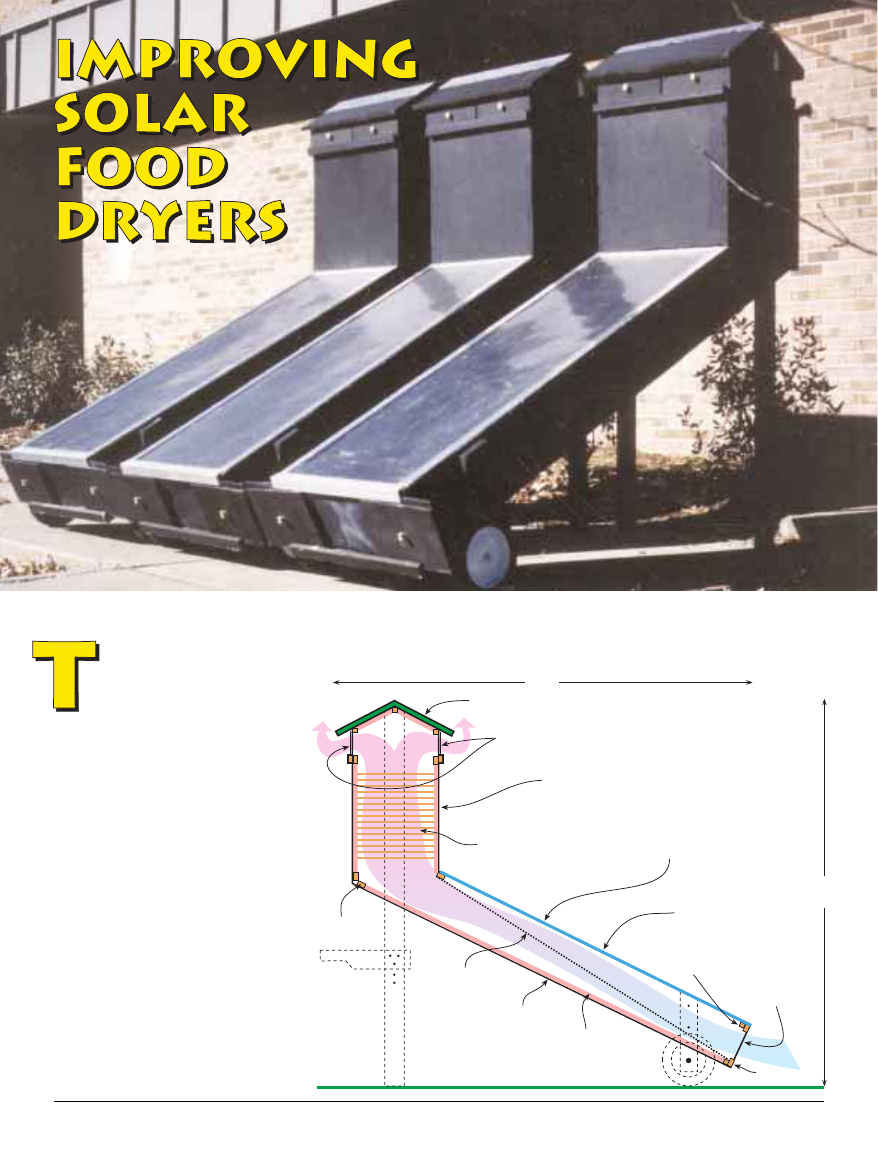
The solar dryer which will be described in this article is
easy to build with locally available tools and materials
(for the most part) for about $150 and operates simply
by natural convection. It can dry a full load of fruit or
vegetables (7–10 lbs) thinly sliced in two sunny to partly
sunny days in our humid Appalachian climate or a
smaller load in one good sunny day. Obviously the
amount of sunshine and humidity will affect
performance, with better performance on clear, sunny
and less humid days. However, some drying does take
place on partly cloudy days and food can be dried in
humid climates. The dryer was developed at
Appalachian State University in the Department of
Technology’s Appropriate Technology Program. Over
the last 12 years we have designed, built, and tested
quite a few dryers and this one has been our best. It
was originally developed for the Honduras Solar
Education Project, which Appalachian State
implemented several years ago. The prototype for that
project was constructed by Chuck Smith, a graduate
student in the Technology Department. Amy Martin,
another Appalachian student, constructed the modified
and improved version depicted in this article. Solar
dryers are a good way to introduce students to solar
thermal energy technology. They have the same basic
components as do all low temperature solar thermal
energy conversion systems. They can be easily
constructed at the school for small sums of money and
in a fairly short amount of time, and they work very well.
While conceptually a simple technology, solar drying is
more complex than one might imagine and much still
needs to be learned about it. Perfecting this technology
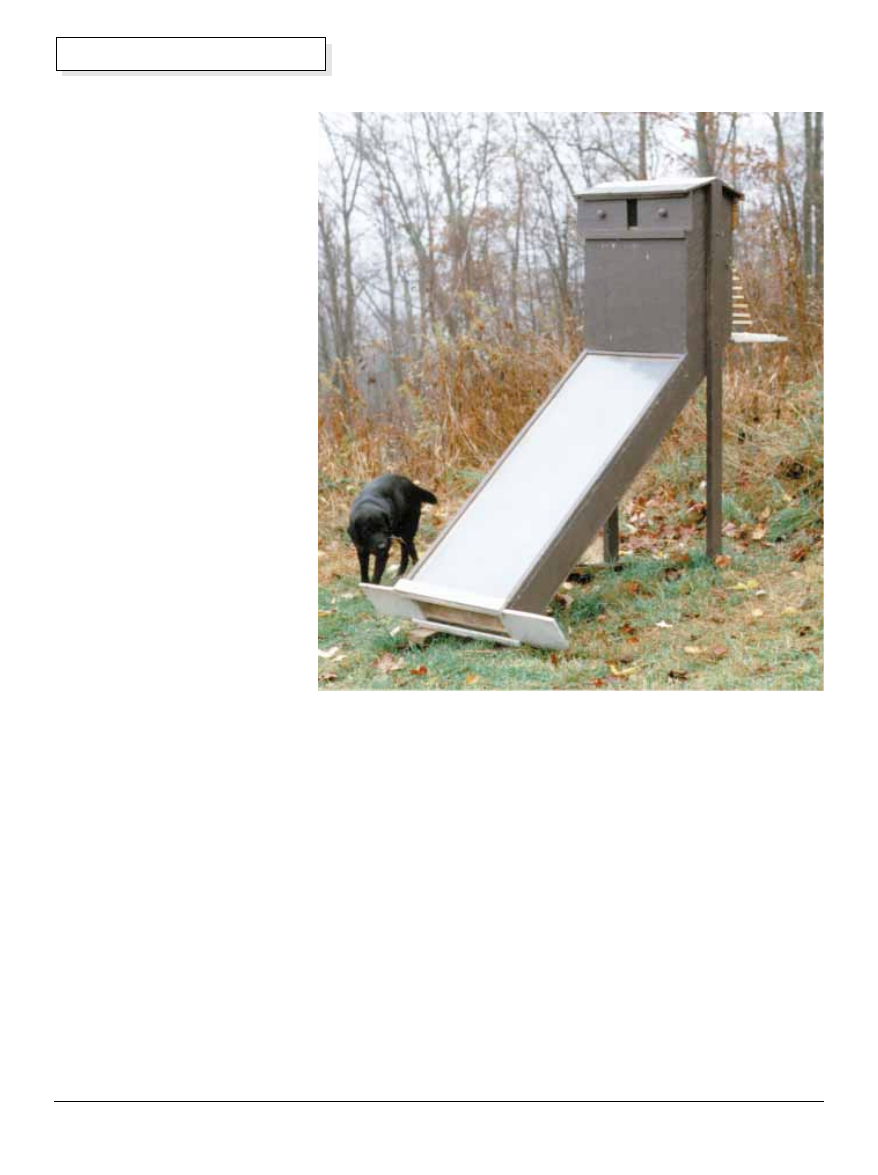
D
rying is our oldest
method of food
preservation. For
several thousand years
people have been
preserving dates, figs,
apricots, grapes, herbs,
potatoes, corn, milk, meat,
and fish by drying. Until
canning was developed at
the end of the 18th century,
drying was virtually the only
method of food
preservation. It is still the
most widely used method.
Drying is an excellent way
to preserve food and solar
food dryers are an
appropriate food
preservation technology for
a sustainable world.
The Design, Construction, and Use of an
Indirect, Through-Pass, Solar Food Dryer
Dennis Scanlin
©1997 Dennis Scanlin
63
Home Power #57 • February / March 1997
Homebrew
has been one of our goals and while we are not there
yet, over the years we have come up with some
designs that work pretty well. This article will describe
guidelines for designing, constructing and using a solar
food dryer.
Factors affecting food drying
There are three major factors affecting food drying:
temperature, humidity and air flow. They are interactive.
Increasing the vent area by opening vent covers will
decrease the temperature and increase the air flow,
without having a great effect on the relative humidity of
the entering air. In general more air flow is desired in
the early stages of drying to remove free water or water
around the cells and on the surface. Reducing the vent
area by partially closing the vent covers will increase
the temperature and decrease the relative humidity of
the entering air and the air flow. This
would be the preferred set up during
the later stages of drying when the
bound water needs to be driven out
of the cells and to the surface.
Temperature
There is quite a diversity of opinion
on the ideal drying temperatures.
Food begins cooking at 180˚F so
one would want to stay under this
temperature. All opinions surveyed
fall between 95° and 180˚F, with
110°–140˚F being most common.
Recommended temperatures vary
depending on the food bring dried.
Our experience thus far and the
research of quite a few others leads
to the conclusion that in general
higher temperatures (up to 180˚F)
increase the speed of drying. One
study found that it took
approximately 5 times as long to dry food at 104˚F as it
did at 176˚F. Higher temperatures (135°–180˚F) also
destroy bacteria, enzymes (158˚F), fungi, eggs and
larvae. Food will be pasteurized if it is exposed to 135˚F
for 1 hour or 176˚F for 10–15 min. Most bacteria will be
destroyed at 165˚F and all will be prevented from
growing between 140°–165°. Between 60° and 140˚F
bacteria can grow and many will survive, although
bacteria, yeasts and molds all require 13% or more
moisture content for growth which they won’t have in
most dried foods.
Some recommended drying temperatures are:
Fruits and Vegetables: (except beans and rice):
100°–130°F (Wolf, 1981); 113°–140° (NTIS, 1982);
temperatures over 65°C (149°F) can result in sugar
caramelization of many fruit products
Meat: 140°–150° F (Wolf, 1981)
Fish: no higher than 131°F (NTIS, 1982); 140°-150°
(Wolf, 1981)
Herbs: 95°–105°F (Wolf, 1981)
Livestock Feed: 75°C (167°F) maximum temperature.
(NTIS, 1982)
Rice, Grains, Seeds, Brewery Grains: 45°C (113°F)
maximum temperature. (NTIS, 1982)
Temperatures Obtainable in our Appalachian Dryer
Our Appalachian dryer, with a reflector added, has
reached temperatures over 200˚F on a sunny 75˚F day
with all the vents closed. Preliminary experiences with a
4' long reflector have demonstrated a 20˚F rise in the
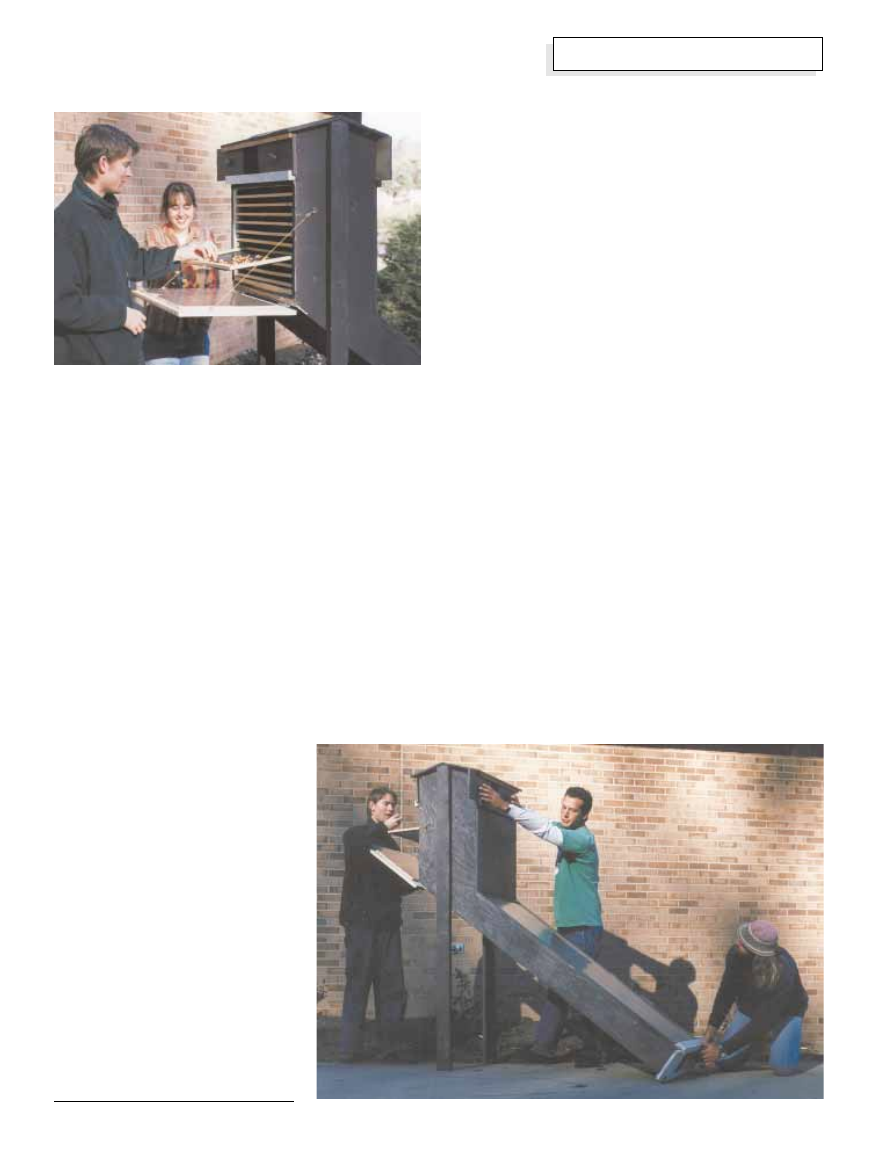
Above: Yum...the apples are almost ready.
Below: Adjusting the vents and testing (tasting?) the progress.
4:00 pm
2:30 pm
80
°
1:30 pm
Ambient
Bottom
Top
T
emperature in Degrees Fahrenheit
Time of Day for October 13, 1996
Chart 2
90
°
100
°
110
°
120
°
130
°
2:00 pm
3:00 pm
3:30 pm
64
Home Power #57 • February / March 1997
Homebrew
dryer temperature and a decrease in drying time. By
fully opening the vents the temperature can be brought
down to within 10° or 20° higher than the ambient
temperature. The dryer can operate for most of the day
between 120° and 155˚F by opening the exhaust vents
1–2" (10–20 sq. in.). These are the temperatures at the
bottom of the food drying area when the dryer has just
been filled with food and a reflector is being used. The
temperature drops significantly as it passes through the
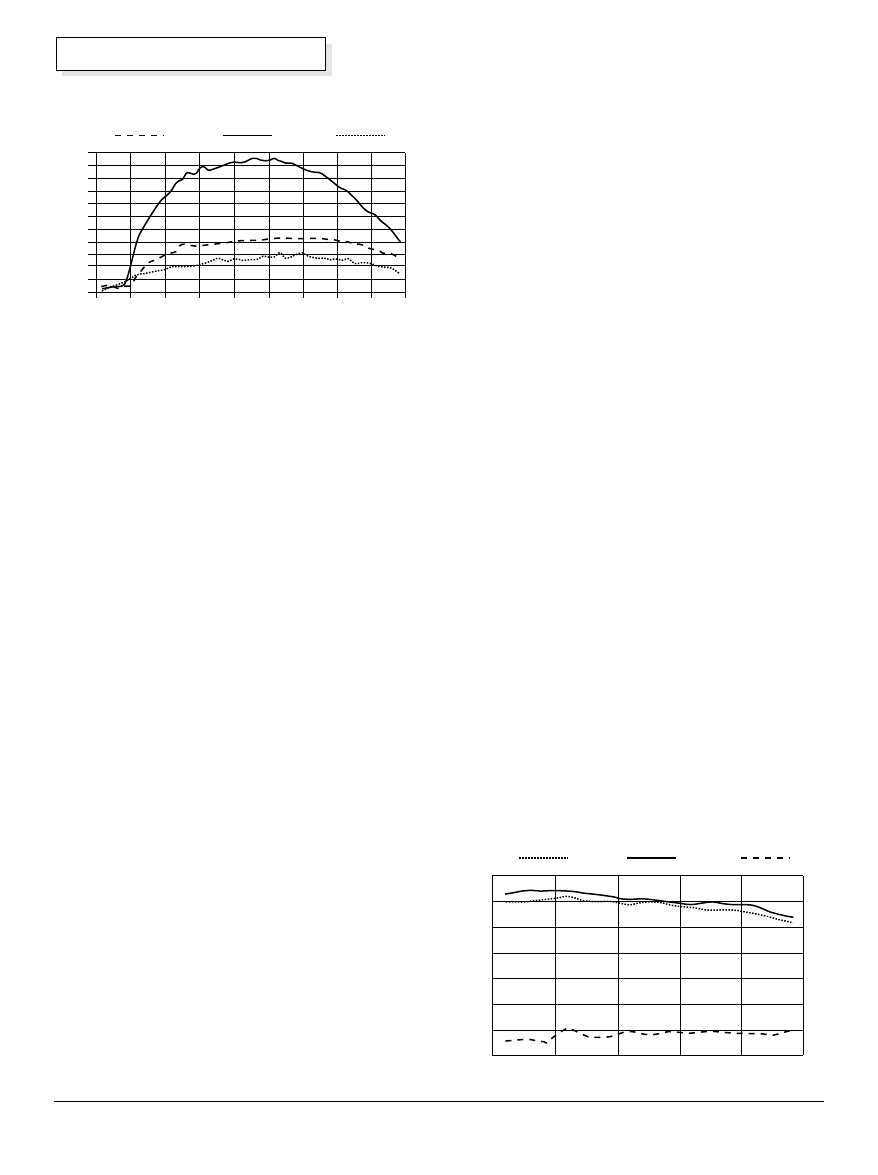
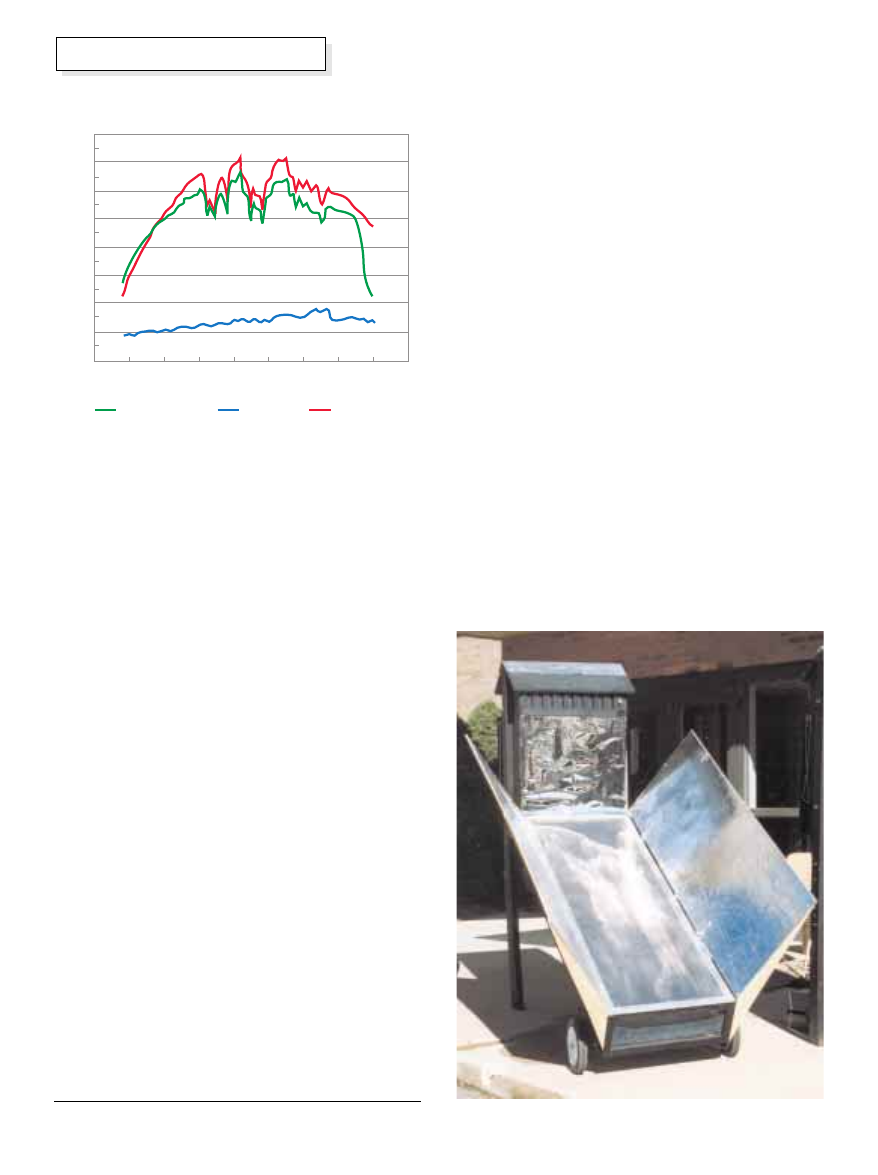
moist food. Chart 1 shows: the temperatures below the
bottom tray of food, the temperatures above the top tray
of food, and the ambient temperatures, right after a full
load of 25 sliced apples (about 8 lbs) had been placed
in the dryer. The dryer on this day had a reflector on it.
It was a clear sunny day with relative humidities
between 62 and 93%. By the end of the day, apples on
bottom 5 trays were dry, some apples on top 5 trays
were not. The temperatures were recorded with a Pace
Scientific Pocket Logger, model XR220, 1401
McLaughlin Drive, P.O. Box 10069, Charlotte, NC
28212, (704) 5683691
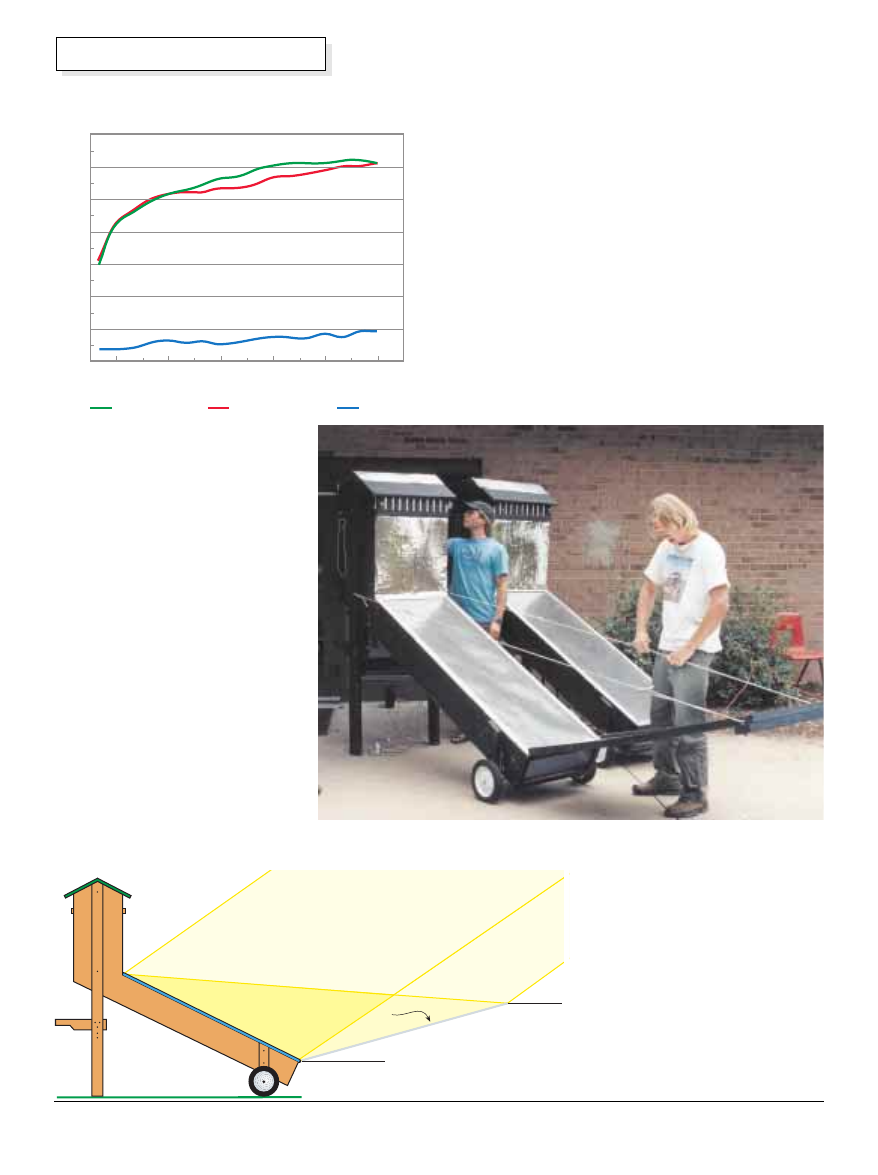
Chart 2 shows a dryer operating in the afternoon of its
second day of drying a load of food. One can see how
the temperatures increase in the top of the dryer, as the
food in the top of the dryer dries. This test was not
using a reflector. By the end of this day all apples slices
were bone dry, almost like crackers.
Possible temperature related problems
There are a couple of potential problems associated
with higher temperatures. One study reported slightly
higher vitamin C loss in fruits dried at 167˚F than at
131˚F. Greater vitamin loss has also been reported for
the direct style of food dryer which exposes the food
directly to the sun’s radiation (ASES, 1983). However,
there are many other factors that affect vitamin loss and
the losses are different for different foods and different
vitamins. I need to explore this topic more fully.
Case hardening is another potential problem associated
with drying at higher temperatures. If the temperature of
air is high and the relative humidity is low, there is the
possibility that surface moisture will be removed more
rapidly than interior moisture can migrate to the surface.
The surface can harden and retard the further loss of
moisture. Solar dryers start off at low temperatures and
high humidity and thus avoid this problem, I believe. At
least I have not observed it.
Air flow and velocity
The second of three factors affecting food drying is air
flow, which is the product of the air velocity and vent
area. The drying rate increases as the velocity and
quantity of hot air flowing over the food increases.
Natural convection air flow is proportional to vent area,
dryer height (from air intake to air exhaust), and
temperature. However air flow is also inversely
proportional to the temperature in a solar dryer. As the
air flow increases by opening an exhaust vent the dryer
temperature will decrease. Ideally one would want both
high temperatures and air flow. This can be difficult to
achieve in a solar dryer.
Air velocity in a natural convection collector is affected
by the distance between the air inlet and air exhaust,
the temperature inside the dryer and the vent area. The
greater the distance, temperature and vent area the
greater the velocity. It is often measured in feet per
minute (FPM) or meters per second. With constant
temperatures, 230 FPM air velocity drys twice as
rapidly as still air; at 460 FPM drying occurs three times
more rapidly than in still air (Desrosier, 1963). Axtell &
Bush (1991) suggest air velocities between 0.5 to 1.5
meters per second which is about 100 to 300 FPM.
Desrosier (1963) suggests even higher air velocities
between 300 to 1000 FPM.
The quantity of air, measured in cubic feet per minute
(CFM) or cubic meters per minute, is the product of
velocity and area of the exhaust vent. Morris (1981)
recommends 2–4 CFM per square foot of collector for
an efficient performing natural convection solar air
heater. If the air flows are too slow the collector will heat
50
°
100
°
150
°
9 am
12 pm
3 pm
6 pm
Ambient
Bottom
Top
T
emperature in Degrees Fahrenheit
Time of Day for October 15, 1996
Chart 1
65
Home Power #57 • February / March 1997
Homebrew
up and lose more heat to the air surrounding it. An
efficient solar thermal collector should not feel hot to the
touch. NTIS (1982) suggests 1/3 to 1/2 cubic meters
per minute (11.5 to 17.5 CFM) per cubic meter of dryer
volume as being a good flow rate for solar dryers.
Most designers of fossil fuel powered industrial food
drying systems recommend considerably higher flows.
Axtell & Bush (1991) of the Intermediate Technology
Development Group (ITDG) recommend between 0.3 to
0.5 cubic meters per second or about 600 and 1000
CFM. Desrosier (1963) recommends 250 CFM per SF
of drying surface. For the dryer described in this article
with 18 SF of drying surface that would equal a little
over 4,500 CFM.
Measured air velocities and flows
in the Appalachian dryer
Our solar dryers are only able to achieve air velocities
between 50 and 130 FPM with natural convection. Less
than most of the 100 to 1000 FPM range
recommended. Air velocities were measured in the
solar collector’s air flow channel with a Kurtz 490 series
mini-anemometer.
Our dryer also has less total air flow than is
recommended by most. During normal operation it
allows 25–60 CFM. A tremendous difference from the
600 to 4500 CFM recommended for industrial drying
systems. It has around 9 SF of glazing and should
allow, according to Morris, 18 to 36 CFM for efficient
collector performance. Our drying volume is about 3
cubic feet (0.08 cubic meters) and would according to
NTIS need between 1 to 1.5 CFM. Quite a bit less than
recommended by Morris for efficient collector
performance and also less than our dryer’s normal
operating performance.
Increasing air flows and air velocity seems to have
potential for increasing the performance of solar dryers.
Unfortunately as the air flow increases the temperature
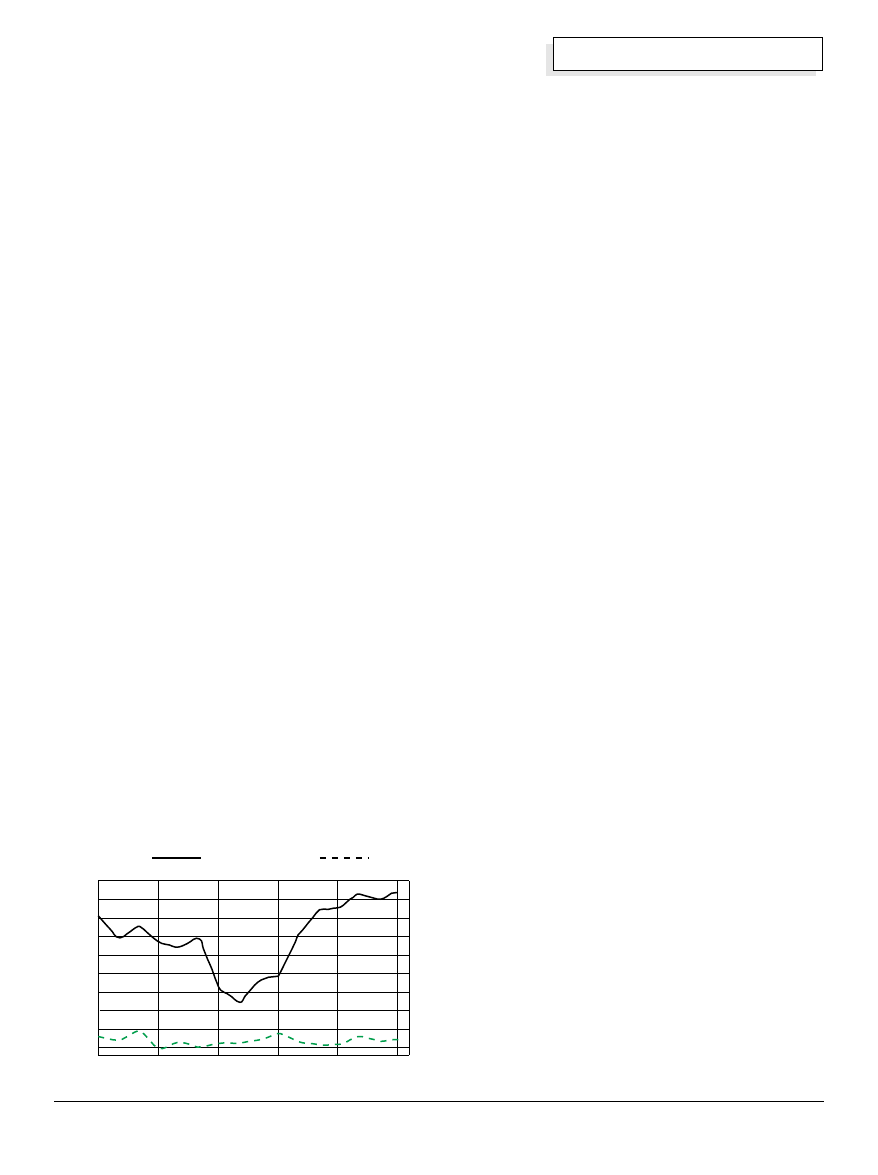
decreases in a solar dryer. Chart 3 depicts the
temperature decline when the vents are fully opened
from a 1 1/2" opening and then almost fully closed. We
have found temperature to be more significant than air
flow in affecting the speed or rate of drying and so we
usually reduce the air flows by partially closing the
exhaust vents to increase the temperature. By
increasing the power or performance of our solar
collector greater air flows will be possible while
maintaining high temperatures.
Relative Humidity
While not something one can do much about, the
relative humidity is the third factor affecting food drying.
The higher the humidity the longer the drying will take.
More air will be required and the temperatures will need
to be higher. Each 27˚F increase in temperature
doubles the moisture holding capacity of the air
(Desrosier,1963). In the Appalachian region where we
have tested our dryers we normally have a relative
humidity throughout the summer and early fall of 55 to
100%. This moist air can’t hold as much moisture as
less humid air could and as a result drying takes longer
than it might in a dryer climate. This humidity also
makes higher temperatures desirable for our climate.
How to get the correct temperature and air flow
The temperature obtainable in the dryer will be affected
by several things: area of south facing glazing,
insulation, air-tightness, area of vent opening, and
ambient temperature. The area of south facing glazing
is an important design decision. The dryer pictured has
9.2 SF of south facing glazing and approximately 3 CF
of drying volume or 3 SF of glazing for every 1 CF of
drying chamber. This is a good ratio. If one is interested
in drying speed, increasing the ratio of glazing SF per
cubic foot of dryer volume, adding more insulation
and/or adding a reflector to the dryer would be
desirable. This will allow one to increase the
temperatures, air velocities and total air flow; and
decrease the drying time. The temperature rise in the
dryer described can be as high as 125˚F above ambient
with a reflector and all vents closed. Normal
temperature rises without a reflector and with both
exhaust vents opened 1–3" (12–36 square inches)
would be 50 to 70˚F. As mentioned previously, our
preliminary testing indicates about a 20˚F increase in
temperature by adding a reflector. The maximum
temperature observed was 204˚F. The higher Delta T’s
and maximum temperatures will be reached with
exhaust vent opening area reduced.
Designing for good air flows involves quite a few
considerations. The air flow channel should be properly
sized. The depth of the channel should be 1/15 to
1/20th the length of the collector. Making the air flow
2:30 pm
1:00 pm
80
°
12:00 pm
Ambient
Bottom
T
emperature in Degrees Fahrenheit
Time of Day for October 6, 1996
Chart 3
90
°
100
°
110
°
120
°
130
°
12:30 pm
1:30 pm
2:00 pm
60
°
70
°
140
°
140
°
66
Home Power #57 • February / March 1997
Homebrew
path as aerodynamic as possible is also desirable;
especially for a natural convection collector. Although
turbulence created by fins on the back of an absorber
plate or corrugated metal has been shown to deliver as
much as 40% more heat in active systems (Morris,
1981). One should try to keep the intake and exhaust
vents spread as evenly as possible along the width of
the collector to allow easy air movement. The intake and
exhaust area and profile should ideally be the same or
larger than the air flow channel. Air flow rates can be
increased, while keeping temperatures up between
140˚F and 175˚F, by constructing a larger, more efficient,
better insulated collector and/or adding a reflector to the
collector. Increasing the size and/or performance of the
collector can also increase air velocity by increasing the
temperature inside the dryer. A larger, more efficient or
powerful collector will allow one to more fully open up
the vents thus increasing the CFM or volume of air
moving through the dryer, while still keeping the
temperatures high in the dryer. The dryer described here
has 2 exhaust vents with a total of about 1.6 square feet
of exhaust vent area. With the vents completely open
the maximum temperature attainable on a sunny 70˚F
day is only about 85˚F and so we normally decrease the
vent area and CFM of air flow to increase the
temperature and decrease the drying time. The area of
exhaust vent during normal operation for several dryers
we have designed and constructed is 10 square inches
or less. This enables the dryer to achieve temperatures
over 130˚F and still allow air flow. It is desirable to have
adjustable vent covers so one can adjust for different
foods and weather conditions. Ideally the temperature in
a food dryer should be controllable. The air velocity
could also be improved by adding a fan, possibly PV
powered as has been discussed in a previous HP
article, or tall chimneys. Adding chimneys to a dryer and
increasing the distance between the air inlet and
exhaust will increase the velocity and volume of air
moving through the dryer.
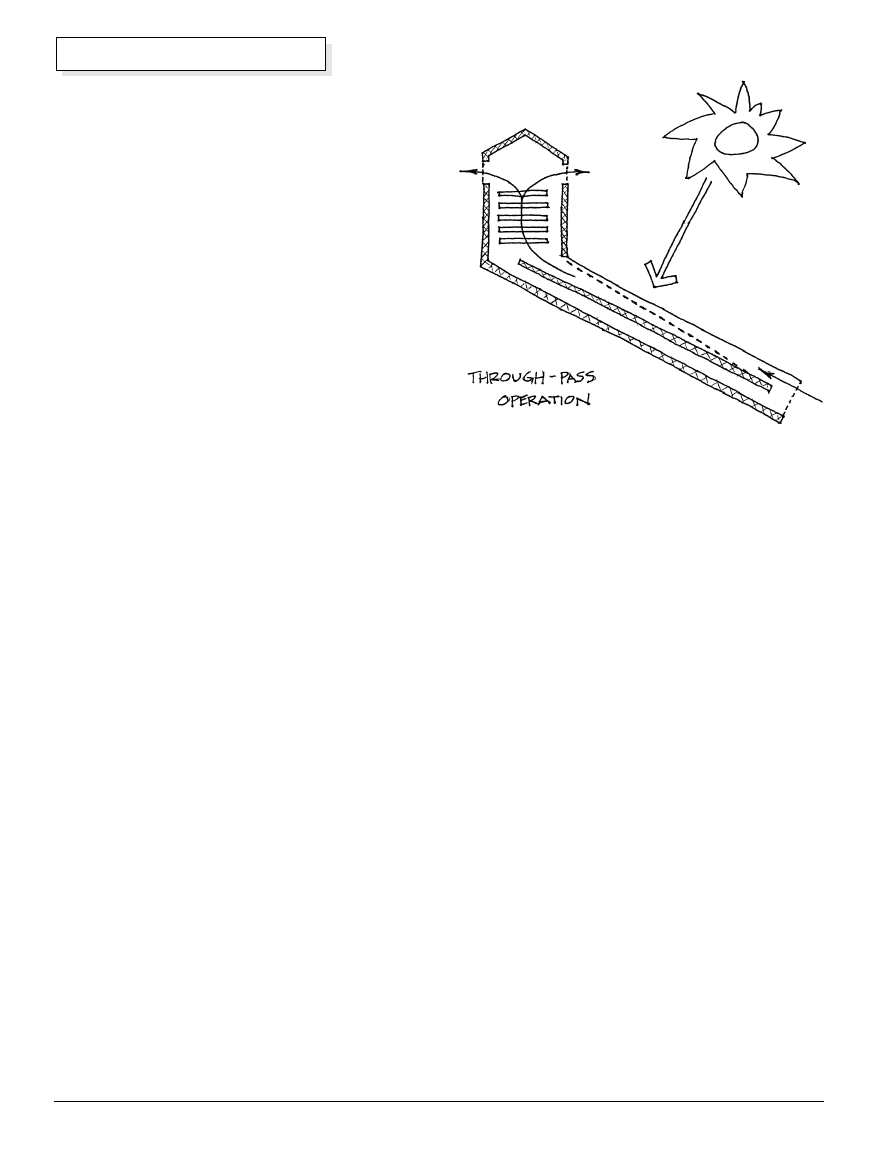
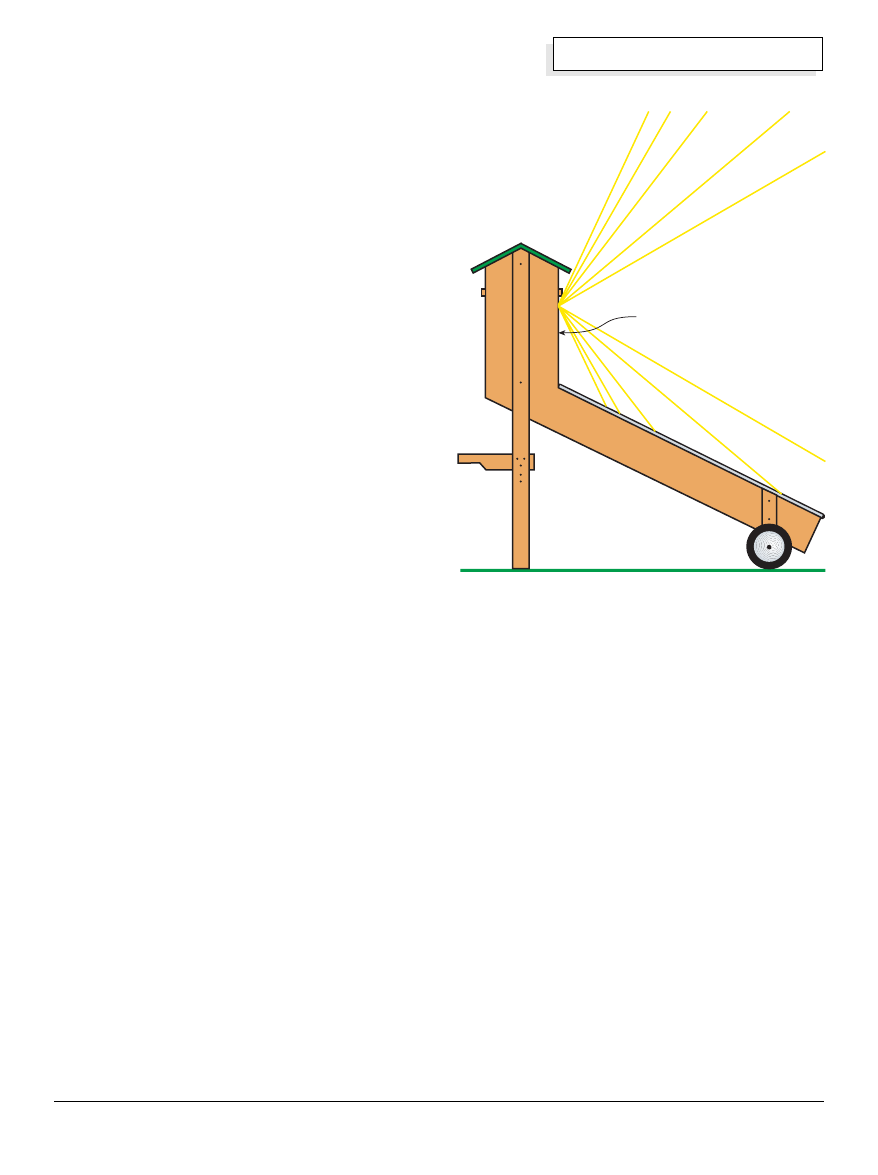
Collector design
The dryer uses a “Through Pass” collector configuration.
Solar energy passes through a glazing material and is
absorbed by 5 layers of black aluminum window
screening diagonally positioned in the air flow channel.
The air around the absorber, the black screen, is heated
and rises into the drying chamber. A slight vacuum or
negative pressure is created by the rising air which
draws in additional air through the inlet vent and the
aluminum mesh absorber. This air is heated and the
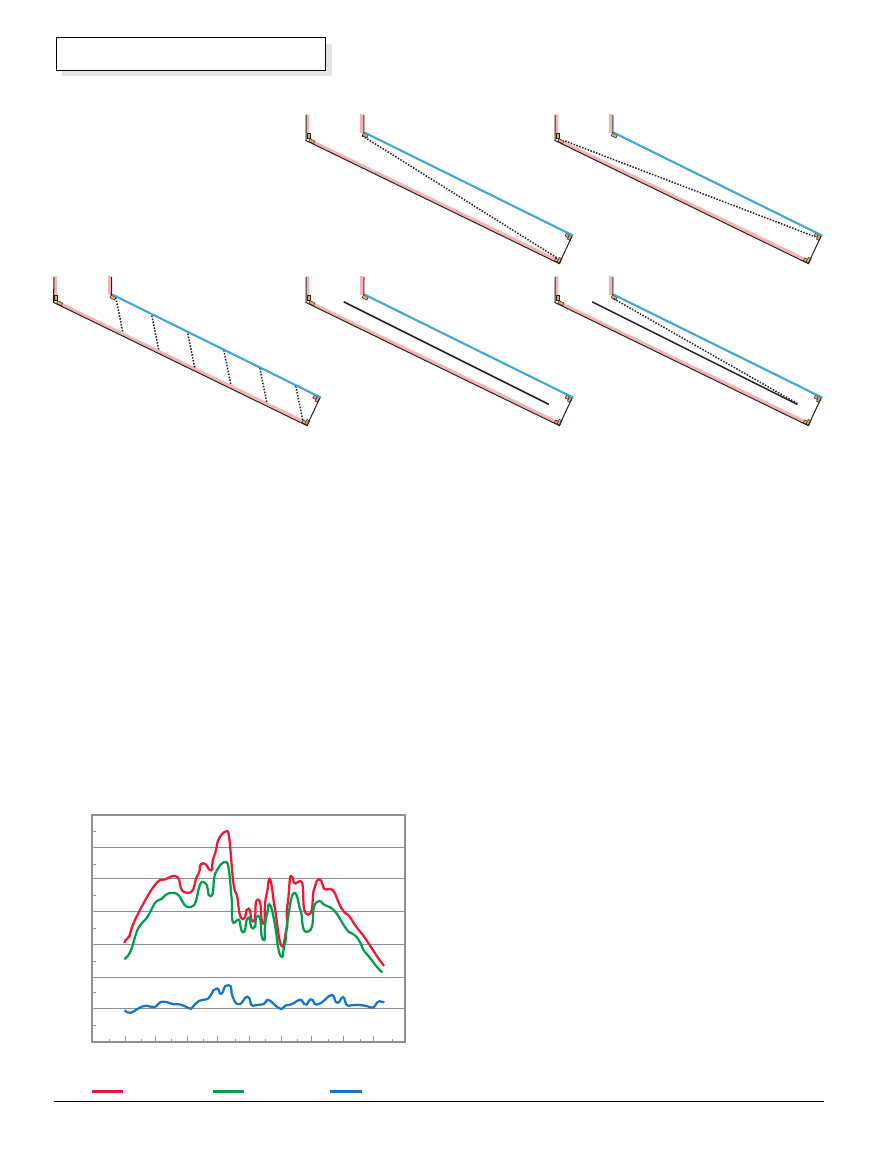
process continues (Illustration 1).
Through pass mesh type absorbers can outperform
plate type absorbers by quite a bit if properly designed
because the air must pass through the mesh resulting
in excellent heat transfer (Morris, 1981). At Appalachian
State we have compared the various absorber plate
configurations and have found the diagonally positioned
mesh type absorbers to produce the highest
temperatures inside a box connected to the collector.
Expanded wire lathe is recommended by some for the
mesh but needs to be painted and didn’t perform any
better in our tests than the window screening. Using
stock black or dark gray aluminum window screen
eliminates having to paint the absorber and is less
expensive and time consuming than other options. The
bottom of the air flow channel can be painted black or
some dark color to absorb any solar energy that gets
through the mesh or possibly painted a light or
reflective color to reflect sunlight back on to absorber
mesh. Morris (1981) recommends a dark color, when
we experimented with this we found similar
performance with both strategies.
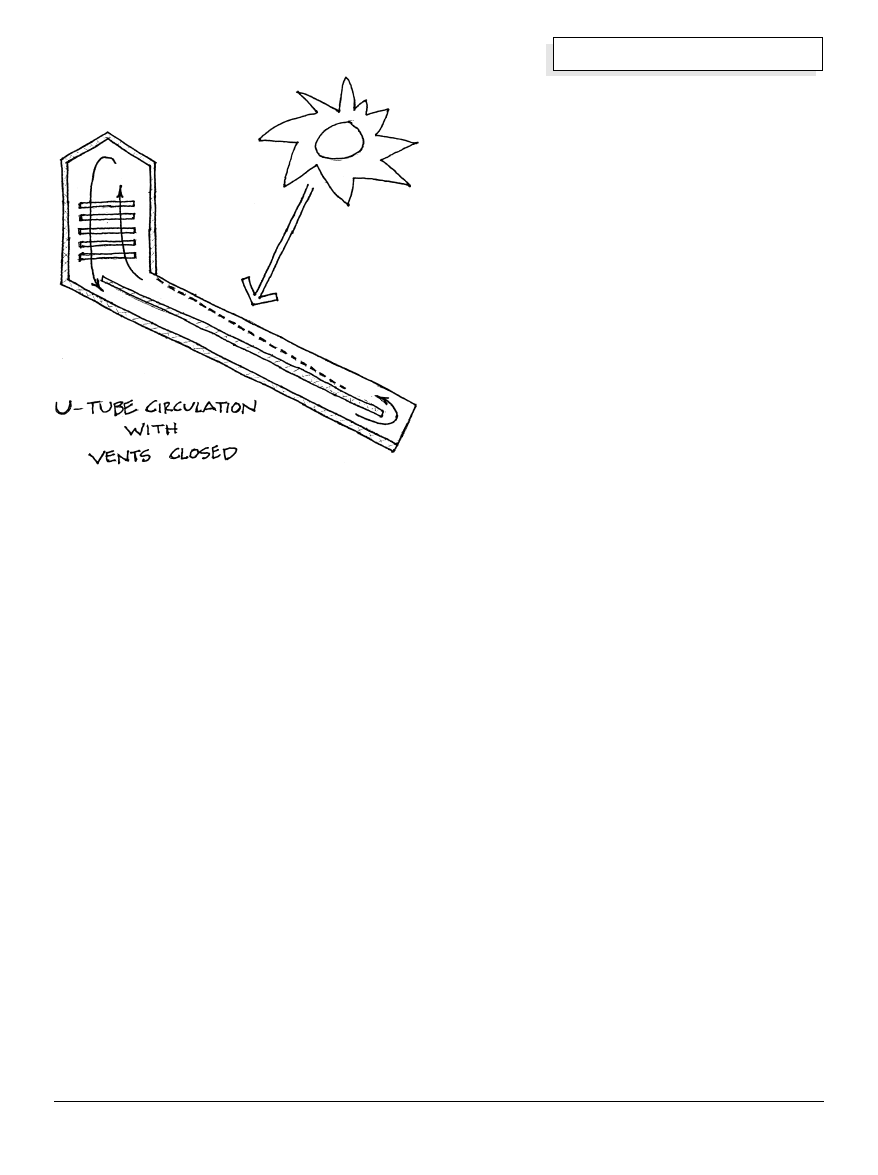
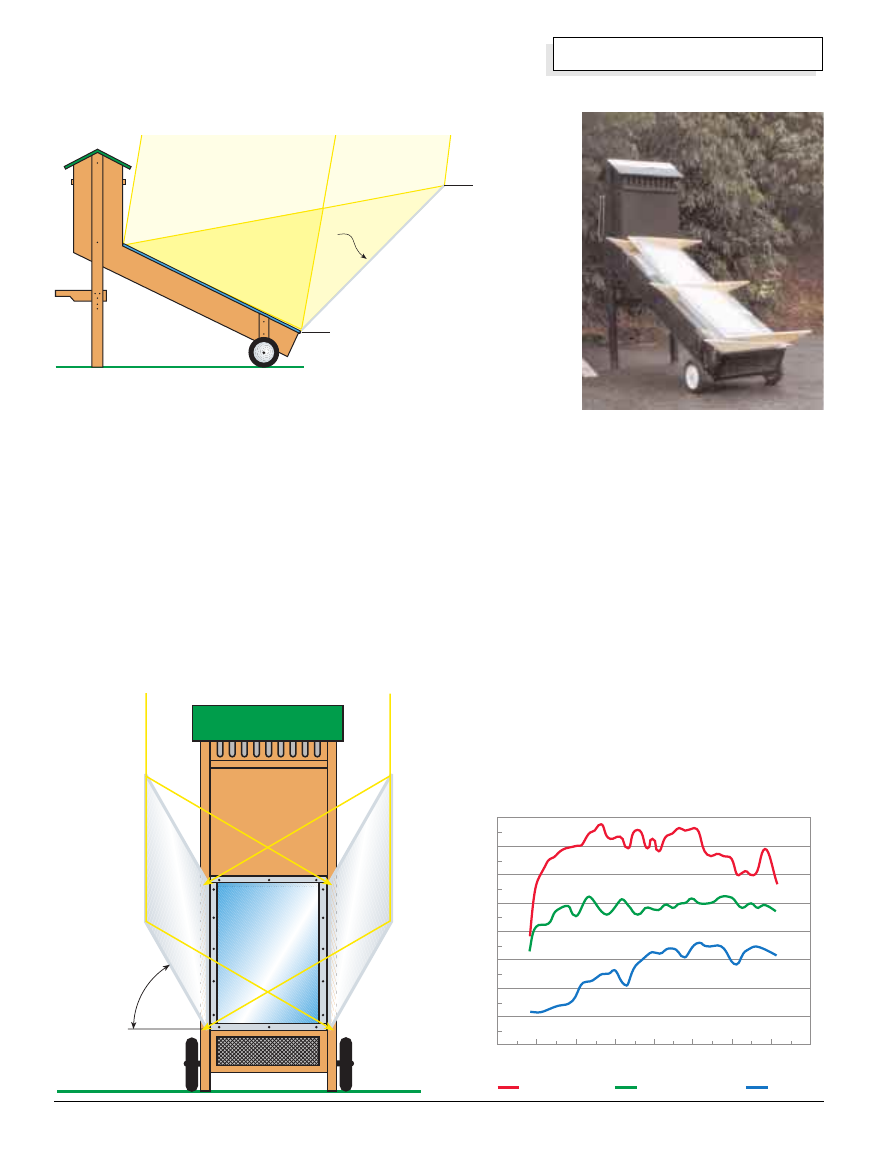
Another characteristic of our collector is it’s U-tube
design. In addition to the air flow channel right below
the glazing, there is a second air flow channel right
below the first one and separated by a 1/2" thick piece
of polyisocyanurate foam insulation board. This allows
air to circulate when the vents are closed to increase
the temperatures for pasteurization or to recycle air that
has not absorbed much moisture in the latter stages of
drying (Illustration 2).
When the vents are open most air will be drawn up in
the top air channel and the bottom channel helps to
reduce heat loss to the outside through the bottom of
the dryer. The measured air flow velocity in this bottom
channel was about 15 FPM with the two exhaust vents
Illustration 1
67
Home Power #57 • February / March 1997
Homebrew
open 1.5" each and went up to about 25 FPM when all
vents were closed. This seems to support the recycling
theory. I’m not sure this feature is necessary; but, it
doesn’t seem to hurt the performance and may be
helpful some times. We need to look at this some more.
One significant decision, in addition to size, which
needs to be made when designing an air heating solar
collector is what depth should the air flow channel be.
The air flow channel depth for a through pass collector
should be 1/20 the length of the collector (Morris,
1981). The collector pictured is 60" long and has a 3"
air deep air space (1/20 x 60") in both air flow channels.
Any kind of glazing will work for this design.
Appalachian’s dryer has two layers of glazing; the outer
is Sun-Lite HP, a fiberglass reinforced polyester (FRP),
often referred to as Kalwall. It is available from Solar
Components Corporation for about $2.00/SF (121
Valley Street, Manchester, NH,03103-6211, (603) 668-
8186). The inner glazing is Teflon manufactured by the
DuPont Company, (Barley Mill Plaza 30-2166, P.O. Box
80030, Wilmington, DE 19880-0030, (302) 892-7835).
There is a 3/4" air space between the two layers and
the glazings are caulked in place. The dryer should face
due south for best stationary performance. The altitude
angle of the glazing above horizontal should be the
compliment of the average noon altitude angle of the
sun at your latitude for the months you expect to be
using the dryer or your latitude minus 10˚, if you
primarily intend to use it during the later part of the
summer and early part of fall. For our latitude here in
Boone, NC of 36˚ that would be 26˚. The dryer pictured
has an angle of 36˚.
The sides and bottom of the collector and the sides,
door and top of the drying chamber are insulated with
1/2" Celotex Tuff-R polyisocyanurate foam insulation. It
normally is covered with an aluminum foil. I am going to
use 3/4" in the next one constructed. Making sure you
tightly construct the collector by making good tight
fitting joints, especially the door, and using caulks
and/or gasket material is also desirable. And finally
adding a reflector to the dryer and properly positioning it
(about 20˚ above horizontal in early October to 40˚ in
mid July at 36˚ N LAT) will improve the performance.
Materials Needed (approximate cost is $150, excluding
stainless steel shelf screen)
One 4' x 8' 3/4" CDX exterior plywood for sides, vent
covers and door
One 4' x 8' 1/4" exterior plywood for bottom, roof and
south wall of drying box
approx. 12 - 8' long 1x2 pine
Two 8' long PT 2x4 for dryer legs
Water resistant glue
Caulk or glazing tape
Eight 1/4" X 2 1/4" lag bolts and washers
24" wide by 30' long piece of black or dark gray
aluminum window screen (.65/FT)
Ten 21" x 14.5" Stainless steel screen for drying
shelves ($6.62/SF) adds another $150 to cost or could
use a vinyl or vinyl clad fiberglass screen for about
.35/SF
24" X 12 ft. 0.040 Sun Lite HP plastic glazing
($1.85/SF)
Two 3 1/4" strap hinges approx.
Fifty 1 1/2" galvanized deck screws
paint
Two 2" hook and eyes
One 4' x 8' 3/4" celotex foil faced polyisocyanurate
insulation board
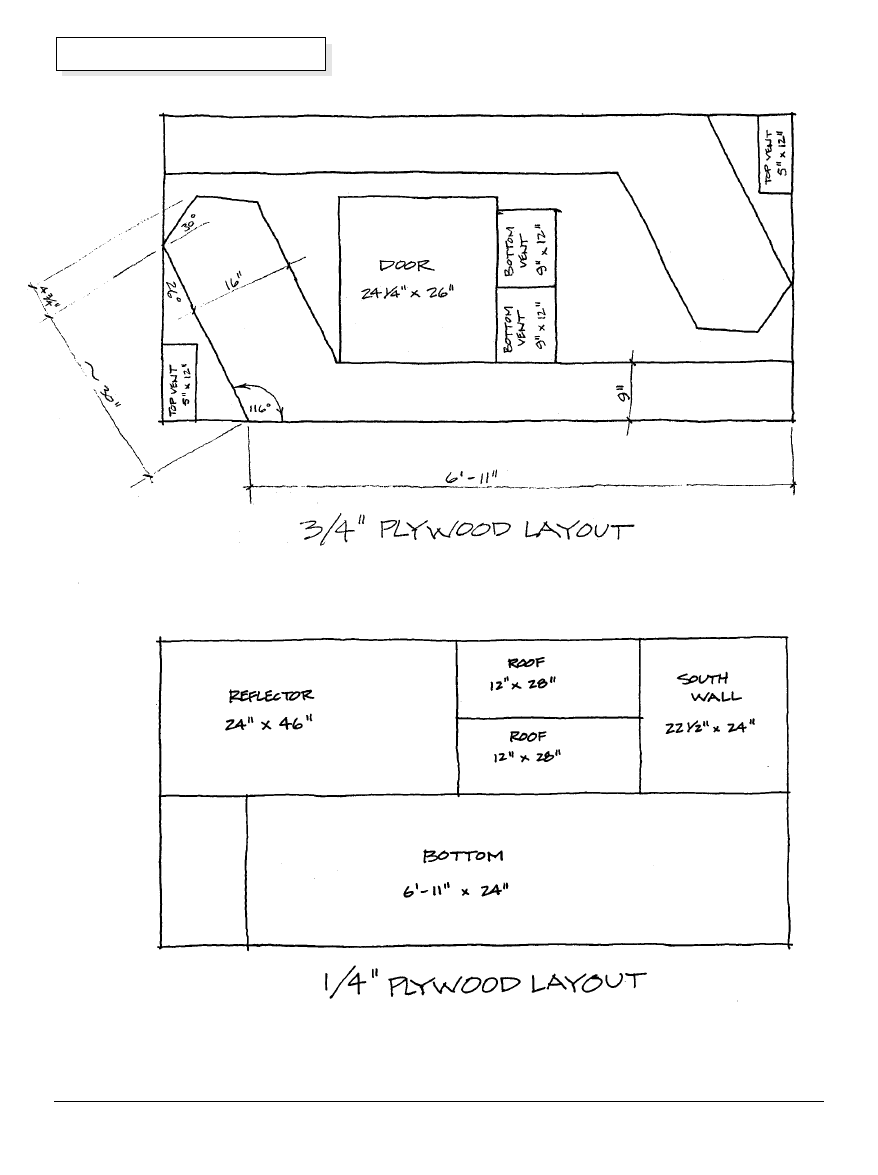
Dryer Construction and Details
The dryer is primarily constructed of 3/4" exterior
plywood, 1/4" exterior plywood, 3/4" celotex insulation
board, dark aluminum screening, glazing, some 3/4"
thick pine boards, and wood screws. The cutout
illustrations (Illustration 3 & 4) dimension the layout of
the important plywood and insulation pieces.
I tried to improve on the design depicted in this article
by slightly increasing the glazed area (from about 9 to
10 SF), the SF/CF ratio (from 3 to 3.5 SF/CF), the
thickness of insulation used ( 1/2" to 3/4") and lowering
the collector altitude angle (from 36˚ to 26˚) to improve
late summer and early fall performance. I am also going
to develop a larger and more permanent adjustable
reflector. Verify the measurements before blindly cutting
Illustration 2
68
Home Power #57 • February / March 1997
Homebrew
Illustration 3
Illustration 4
69
Home Power #57 • February / March 1997
Homebrew
everything out. I tried to be as accurate as I could;
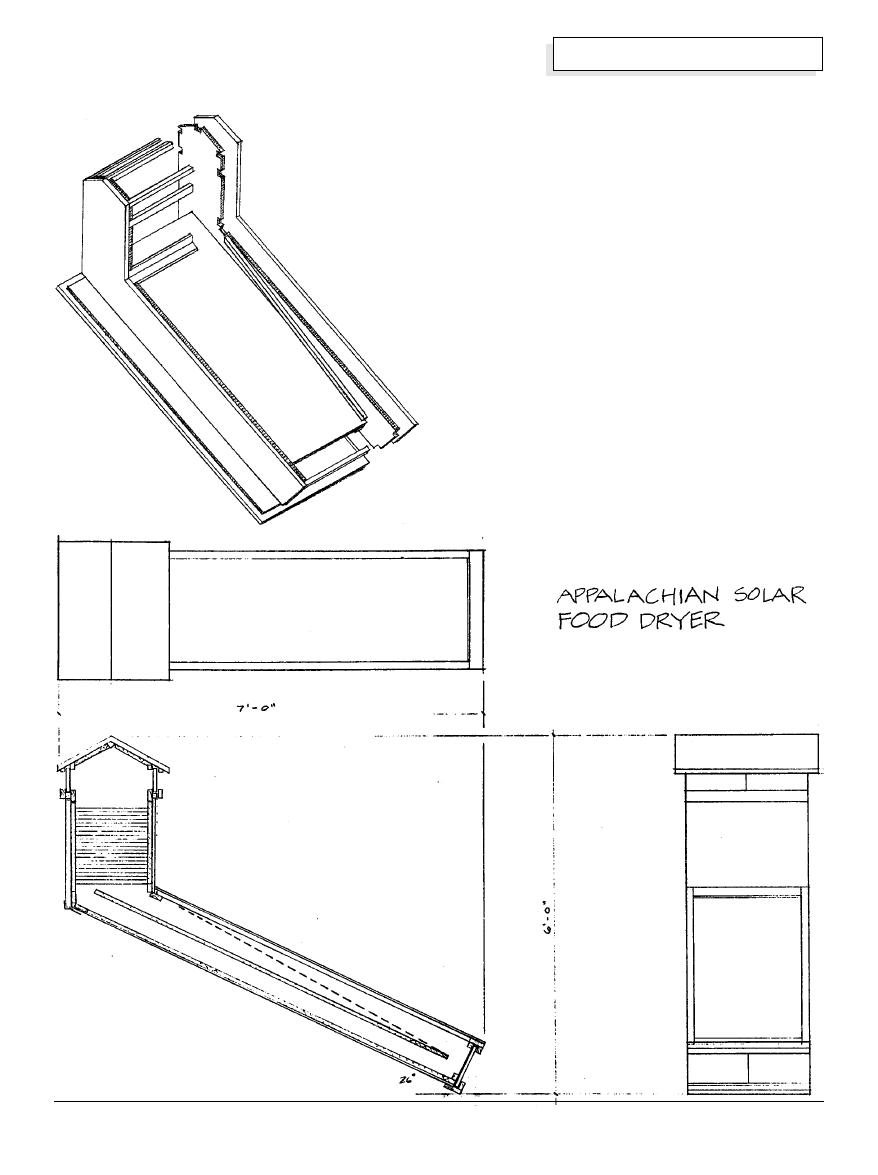
however, there may be some mistakes. The exploded
isometric drawing (Illustration 5) and the multiview
(Illustration 6) illustrate the basic construction.
Basically begin by laying out the dryer sides, the door
and the vent pieces on the 3/4" plywood. Cut these out
with a skill or jig saw. Cut the 1/4" plywood bottom out
with skill saw. Use the plywood side pieces to layout the
insulation board dryer side pieces and cut with a razor
knife. Glue the insulation to the plywood sides and then
connect the sides together by gluing and screwing or
nailing the plywood bottom on and screwing the 22 1/2"
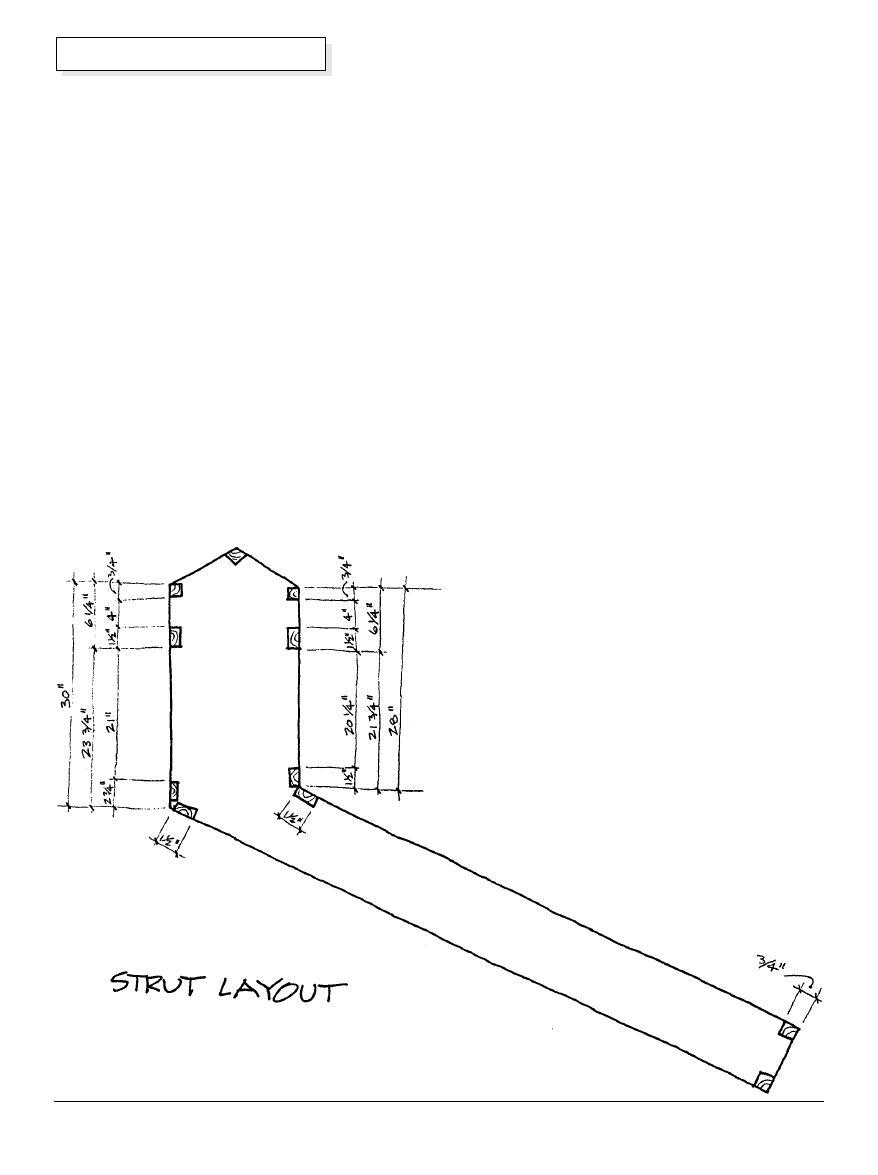
long wooden struts made from 1x2 stock in place.
Illustration 7 describes the location of the most critical
struts. Cut out insulation where the struts join the side
pieces. Once the basic form is constructed everything
else is applied as depicted in plans and photos.
Using the dryer
1) The initial phase of drying is more dependent on air
flow than temperature, so keep the bottom vents
completely open and the top about 1/2 open or more.
After 1 to 2 hours reduce the top exhaust vent opening
to 1"–3", leaving the bottom vents completely open, and
Illustration 5
Illustration 6
70
Home Power #57 • February / March 1997
Homebrew
let the temperature rise. Keep the dryer under 180˚ F.
Close all the vents at night to prevent rehydration of any
food left in dryer. On cloudy days keep the bottom vents
closed and the top vents almost closed to keep
temperatures as high as possible.
2) Keep everything as clean as possible; wash food
gently in cold water 3) Get fruit and/or vegetables in
dryer as quickly as possible after harvesting to preserve
vitamins
3) Remove blemished and woody areas of fruits and
vegetables
4) Consider blanching most vegetables, by exposing to
steam for a few minutes and then dipping in ice water,
to inactivate enzymes which can cause color, flavor and
nutritional deterioration. Blanching helps preserve
carotene, thiamine, and ascorbic acid. Blanching also
makes cell membranes more permeable, which
promotes more rapid drying and will kill potentially
harmful micro-organisms. The blanched dried product
will often have a softer texture when rehydrated.
Blanching apricots, peaches and pears imparts a
translucent appearance to the dehydrated product and
can also be used for fruits which will not have
detrimental color changes during drying: grapes, figs,
plums and prunes. Don’t blanch onion, garlic,
mushrooms, horseradish, herbs, or vegetables with
cabbage like flavors
5) Consider sulfuring fruits. Sulfuring helps preserve the
light color of apples and apricots and also helps
preserve ascorbic acid (C), and beta-carotene (A), and
helps control microbiological and insect activity. It also
protects delicate flavors and increases the shelf life of
dried foods. Sulfuring involves burning elemental sulfur
and exposing the fruit to the fumes for 1-5 hrs or
dipping the fruit for 30 seconds in a 5–7% potassium
metabisulfate solution. When fruit has been adequately
sulfured the surface will be lustrous. Pretreating
tomatoes with potassium metabisulfate prior to drying
has been reported to significantly improve the taste and
aroma of sauce made from the dried tomatoes. Sulfur
flowers are available at pharmacies or use pure sulfur
from garden centers. Use 1 tbls/lb of fruit. Thiamine is
destroyed by sulfuring.
6) Slice food thin (1/8") for most rapid drying and cut
uniformly.
7) Most vegetables should be dried until they feel
distinctly dry and brittle, around 10% MC.
8) If drying meat use lean meat, cut into very thin strips
and marinate before drying. Beef, turkey, chicken, and
salmon can all be dried.
9) If drying fish keep temperatures under 131˚F to avoid
cooking it and consider salting 1–2 days before drying.
Salting retards bacterial action and aids in the removal
of water by osmosis.
10) The safe maximum percentages of water to leave in
home dried produce are: no more than 10% for
vegetables and no more than 20% for fruits (Hertberg et
al., 1975). Fruit can be considered dry when it is
leathery, suede-like, or springy. No wetness should
Illustration 7

71
Home Power #57 • February / March 1997
Homebrew
come out of a cut piece when squeezed. A few pieces
squeezed together should fall apart and spring back
when pressure is released. Vegetables should be
brittle, or tough to brittle almost crisp like crackers or
potato chips.
11) Put screen over the intake and exhaust vents to
keep insects out.
Tips for Storing Dried Foods
1) Cool food to room temperature before packaging
2) Store dry fruits and vegetables in small, airtight,
moisture, insect and rodent proof containers in dark,
cool, dry and clean places. Glass jars, plastic bags, or
plastic containers that can be sealed tightly are good.
Store grains, roots, and legumes in places with good air
circulation (NTIS, 1982).
2) Dried meats and fish should be stored below 5°C
(41°F) to avoid rancidity (NTIS. 1982).
3) Most fruits and vegetables will keep for 6 months if
stored at 70°F and 3-4 times that long at 52°F (Wolf,
1981).
4) Meat and Fish can be stored dried for several
months in moisture proof, airtight containers. (Wolf,
1981)
5) If drying herbs store in uncapped jars for 24 hrs, if
moisture collects, herbs need additional drying
6) Refrigeration or freezing will extend life of dried food.
7) Carefully label the food.
Influence of dehydration on nutritional value of food
While all methods of food preservation result in a
degradation of the food quality and drying is no
exception, drying food does increase the concentrations
of proteins, fats and carbohydrates. Fresh peas are 7%
protein and 17% carbohydrates; dried peas 25% protein
and 65% carbohydrates. Fresh beef is 20% protein and
dried is 55%. There is; however, a loss of vitamins. The
extent of vitamin loss will be dependent upon the
caution exercised during the preparation of the food for
drying, the drying process selected, and storage of
dried food. In general indirect drying methods such as
the dryer described in this article retain more vitamins
than sun drying or direct drying and also better than
canning. Ascorbic acid, and carotene can be damaged
by oxidative processes. Thiamin is heat sensitive and
destroyed by sulfuring. The carotene content of
vegetables is decreased by as much as 80% if dried
without enzyme inactivation by blanching or sulfuring.
Thiamin will be reduced by 15% in blanched vegetables
and up to 75% in unblanched. In general more rapid
drying will retain more ascorbic acid than slow drying.
Usually dried meat has slightly fewer vitamins than
fresh. Fruits and vegetables are generally rich sources
of carbohydrates and drying, especially direct sun
drying, can deteriorate carbohydrates. The addition if
sulfur dioxide is a means of controlling this
deterioration.
Influence of drying on Micro-organisms
Living organisms require moisture; so by reducing the
moisture we are able to reduce the ability of molds,
bacteria, and yeasts from growing. Bacteria and yeasts
generally require moisture contents over 30%. Drying
food lower than 30% is no problem in a solar dryer.
Molds however can grow with as little as 12%. Molds
also require air, so as long as dried food is stored in an
airtight container molds should not be a problem. Also if
food was dried at over 140°F or if it was pasteurized
prior to and after drying all 4 of the problem causing
agents will be destroyed. Salt can be also used to
control microbial activity if drying fish or meat. It is also
important to start with clean food and utensils, and
store food away from dust, rodents, insects and
humidity.
Influence of drying on Enzyme activity
Enzymes are produced when plant tissues are
damaged. Their production can lead to discoloration,
loss of vitamins, and breakdown of tissues. Most
enzymes are inactivated at 158˚F. They also require
moisture to be active and their activity decreases with
decreasing moisture. But dried food still has some
moisture so food deterioration due to enzymes can still
be a problem. Browning of fruit for example and loss of
carbohydrate content. One minute of moist heat at 212
F will inactivate enzymes. This can be achieved by
blanching. Sulfuring also deactivates enzymes.
Surprisingly dry heat does not affect enzymes very
much. Short exposures to a dry 400°F has little effect.
Blanching times vary. In general 1–3 minutes for leafy
vegetables, 2–8 for peas, beans, and corn and 3–6 for
potatoes, carrots, and similar vegetables.
Access
Author: Dennis Scanlin, 3137 George’s Gap Road,
Vilas, NC 28692 • 704-297-5084
Internet Email: Scanlindm@conrad.appstate.edu
Sun-Lite HP glazing is available from Solar
Components Corporation, 121 Valley Street,
Manchester, NH 03103-6211 • 603-668-8186
Teflon glazing is manufactured by the DuPont, PO Box
80030, Wilmington, DE 19880-0030 • 302-892-7835
Reference List
American Solar Energy Society (1983). Progress in Passive
Solar Systems. Boulder, Colorado: American Solar Energy
Society, p. 682.
Propane
Refrigerator
DPR2260
$995.00
Plus Shipping
Dealer
Inquiries
Invited
MEMBER
Danby
®
“Good things come in small packages”
• 7.8 cu. ft. Capacity
Refrigerator.
• Reversible Door Hinges.
• Door Liner has large,
functional divisions,
plus a molded Egg Rack.
• Tall Upper Shelf
accommodates 1 & 2 gal Jugs.
• 3 Easy-glide Shelves
and a Large Crisper.
• Battery Powered Refrigerator
Light.
• Automatic Lighter
(piezo-electric)
• Automatic Safety Valve.
• European Style Door
with Recessed Handles.
• Refrigerator is AGA & CGA
Approved.
• No Electricity Needed.
(800) GO-SOLAR (467-6527) nrgoufit@cdsnet.net
136 S. Redwood Hwy, POB 1888, Cave Junction, OR 97523
Web Page: http://www.energyoutfitters.com
72
Home Power #57 • February / March 1997
Homebrew
Axtell, B.L. & Bush, A. (1991) Try dying it!: Case studies in the
dissemination of tray drying technology. London, UK:
Intermediate Technology Publications.
Desrosier, N.W. (1963). The technology of food
preservation.Westport, Conn.: Avi Publishing.
Hertzberg, R., Vaughan, B., & Greene, J. (1976). Putting Food
By. New York: Bantam.
International Labour Office (1986). Practical methods of food
preservation.
Martinez, P.S. (1985 ). Production characteristics of a solar
heated drying plant. Sunworld, 13(1,19), 19-21.
Morris, S. (1981). Retrofitting with Natural Convection
Collectors. In T. Wilson (Ed.), Home Remedies: A Guidebook
for Residential Retrofit (pp. 152 - 161). Philadelphia, PA: Mid-
Atlantic Solar Energy Association.
National Technical Information Service (NTIS). (1982).
Improved Food Drying and Storage; a training manual.(report
no. A360.33). Washington, DC: U.S. Peace Corps.
Winter, Steven & Associates, Inc. (1983). The Passive Solar
Construction Handbook. Emmaus, Pa: Rodale Press.
Wolf, R. (1981). Solar Food Dryer Preserves Food for Year-
Round Use; Using Solar Energy. Emmaus, PA: Rodale Press.
SNORKEL STOVE CO
camera ready b/w
3.5 wide
3.4 high
24
Home Power #69 • February / March 1999
his article
describes a series of
experiments
conducted over the last
year and a half with
three solar food dryers.
The food dryers were
constructed at
Appalachian State
University (ASU) using
plans published in
HP57. The goal of this
research program was
to improve the design
and to determine the
most effective ways to
use the dryer.
Dennis Scanlin,
Marcus Renner,
David Domermuth, &
Heath Moody
Above, Photo 1: Three identical solar food dryers for testing against a control.
1 1/2 x 3/4 inch
Pine
1/4 inch Plywood
Vent Covers
0.040 Sun-Lite HP Glazing
Screened Air Intake
3/4 inch Foil-Faced
Foam Insulation
Drying Shelves
1/4 inch Plywood
1 1/2 x 3/4 inch
Pine
3/4 x 3/4 inch
Pine
1/4 inch Plywood
1 1/2 x 1/8 inch
Aluminum Bar Trim
3/4 inch Plywood
Roof
3–6 Layers of Lath
or Screen
7 feet
6 feet
Figure 1: Cutaway View of the Appalachian Solar Food Dryer
©1999 Dennis Scanlin, Marcus Renner,
David Domermuth, and Heath Moody
25
Home Power #69 • February / March 1999
Solar Dehydration
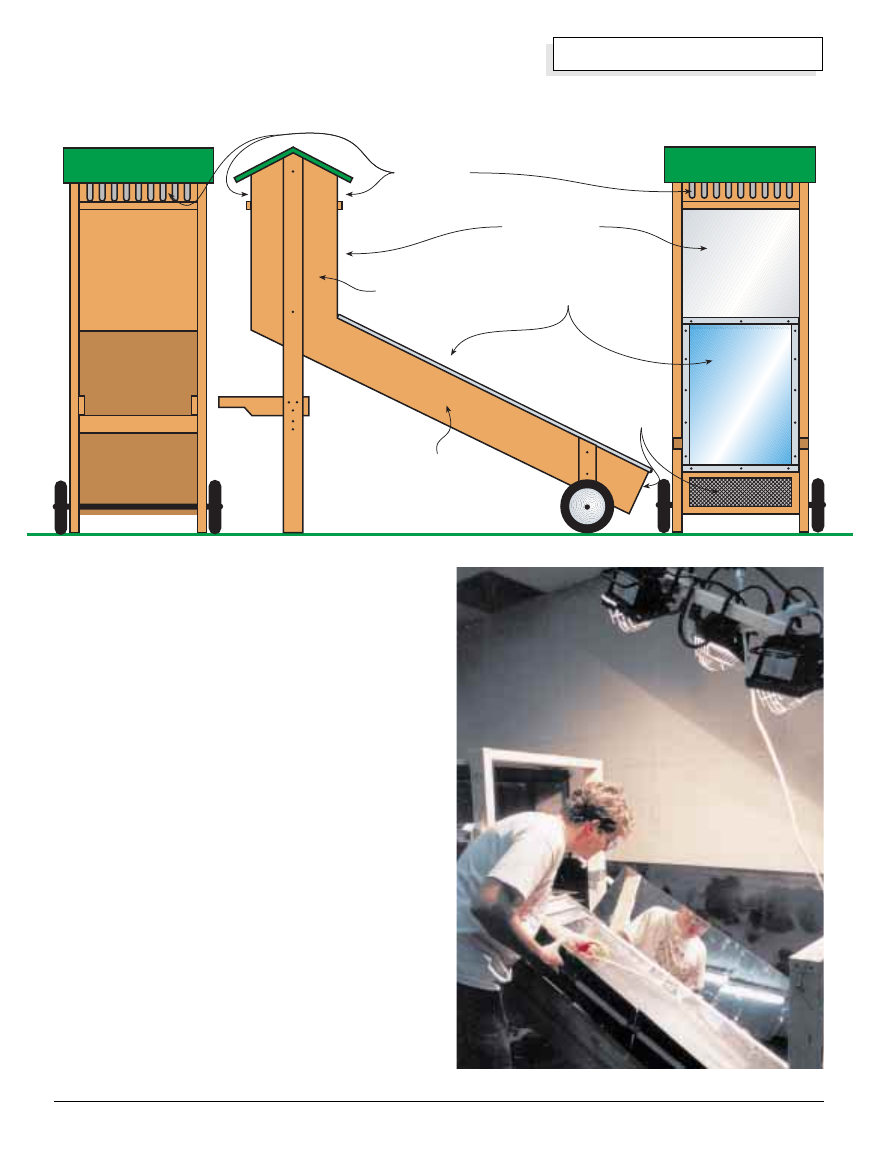
These solar food dryers are basically wooden boxes
with vents at the top and bottom. Food is placed on
screened frames which slide into the boxes. A properly
sized solar air heater with south-facing plastic glazing
and a black metal absorber is connected to the bottom
of the boxes. Air enters the bottom of the solar air
heater and is heated by the black metal absorber. The
warm air rises up past the food and out through the
vents at the top (see Figure 1). While operating, these
dryers produce temperatures of 130–180° F (54–82°
C), which is a desirable range for most food drying and
for pasteurization. With these dryers, it’s possible to dry
food in one day, even when it is partly cloudy, hazy, and
very humid. Inside, there are thirteen shelves that will
hold 35 to 40 medium sized apples or peaches cut into
thin slices.
The design changes we describe in this article have
improved the performance, durability, and portability of
the dryer, and reduced construction costs. This work
could also help in designing and constructing solar air
heaters used for other purposes, such as home heating
or lumber drying. Most of our experiments were
conducted with empty dryers using temperature as the
measure of performance, though some of our
experiments also involved the drying of peaches and
apples. We have dried almost 100 pounds (45 kg) of
fruit in these dryers during the past year. Graduate
students in the ASU Technology Department
constructed the dryers, and students taking a Solar
Access Door
to Drying Trays
Handles
Exhaust Vents
Collector Surface
(glazing)
Air Intake
Reflective Surface
(one test case)
Rear
Side
Front
Collector Chamber
Drying Chamber
Figure 2: Multiple Views of the Appalachian Solar Food Dryer
Above, Photo 2: Setting up the solar simulator.
26
Home Power #69 • February / March 1999
Solar Dehydration
Energy Technology course modified them for individual
experiments.
Methodology
We began by constructing three identical food dryers.
Having three dryers allowed us to test two hypotheses
at one time. For example, to examine three versus six
layers of absorber mesh and single versus double
glazing, Dryer One might have three layers of black
aluminum window screening as an absorber with single
glazing; Dryer Two, six layers of the same absorber
screen with single glazing; and Dryer Three, six layers
of the same absorber screen with two layers of glazing.
Once we set up an experiment, we collect data. This
lasts from several days to a couple of weeks until we
are confident that the data is reliable. Then we try
something different.
Using three food dryers also allows us to offer more
students hands-on experiences with solar air heaters.
Each semester, students take apart the dryers’ solar
collectors and rebuild them using different materials or
strategies. This classwork was supplemented with
experiments set up and completed by several graduate
students.
Equipment for Data Collection
We have two systems for measuring temperature. The
first system uses inexpensive indoor/outdoor digital
thermometers. One temperature sensor is placed inside
the dryer and the other one outside. Different locations
are used for the sensor inside the dryer. If food is being
dried, we normally place it under the bottom tray of food
and out of direct sunlight. This temperature data is
recorded on a data collection form every half hour or
whenever possible.
The other system uses a $600 data logger from Pace
Scientific to record temperature data. It is capable of
measuring temperature, relative humidity, AC current,
voltage, light, and pressure. The logger does not have a
display, but it’s possible to download the data to a
computer. The software that comes with the logger
allows us to see and graph the data. The data can also
be exported to a spreadsheet for statistical analysis.
We measure air flows with a Kurz 490 series mini-
anemometer. We weigh the food before placing it in the
dryer, sometimes during the test, and at the end of each
day. We use an Ohaus portable electronic scale,
purchased from Thomas Scientific for $111. We
measure humidity with a Micronta hygrometer
purchased from Radio Shack for about $20.
Solar Simulator
In addition to outdoor testing with the actual food
dryers, we use a solar simulator (see Photo 2) built by
David Domermuth, a faculty member in the Technology
Department at ASU. With the simulator, we can do
more rapid testing and replicate the tests performed on
the dryers, even on cloudy days. The simulator also lets
us control variables such as ambient temperature,
humidity, and wind effects. The unit can be altered
quickly because the glazing is not bolted on. The
simulator was constructed for $108. It was built in the
Time
Single Glazing
Ambient
Double Glazing
Degrees F
20
40
60
80
100
120
140
160
180
8:00
9:00
10:00 11:00
Noon 13:00 14:00 15:00 16:00 17:00
Graph 1: Single vs. Double Glazing
Below, Photo 3: This dryer has both a vertical wall
reflector and side reflectors.
27
Home Power #69 • February / March 1999
Solar Dehydration
same way as the food dryer, but without the food drying
box at the top.
The simulator uses three 500 watt halogen work lights
to simulate the sun. The inlet and outlet temperatures
are measured with digital thermometers. The
temperature probes are shaded to give a true reading
of the air temperature. We conducted the simulator
tests inside a university building with an indoor
temperature of 62–64° F (17–18° C). As we changed
variables, we noticed significant differences in outlet air
temperatures. The simulator did produce temperatures
comparable to those produced by the food dryers out in
the sun. However, we did not always achieve positive
correlations with our food dryers’ outdoor performance.
We may need to use different kinds of lights or alter our
procedures somewhat.
Experiments
We have done at least twenty different tests over the
last year and a half. All were done outside with the
actual food dryers and some were also repeated with
the solar simulator. The dryers were set up outside the
Technology Department’s building on the ASU campus
in Boone, North Carolina. We collected some additional
information at one of the authors’ homes. Every test
was repeated to make sure we were getting consistent
performance. We tried to run the tests on sunny to
mostly sunny days, but the weather did not always
cooperate. The dips in many of the charts were caused
by passing clouds.
Single vs. Double Glazing
The original design published in
HP57 used two layers
of glazing separated by a 3/4 inch (19 mm) air gap. We
used 24 inch (0.6 m) wide, 0.040 inch (1 mm) Sun-Lite
HP fiberglass-reinforced polyester plastic for the outer
layer. For the inner layer, we used either another piece
of Sun-Lite, or Teflon glazing from Dupont. Sun-Lite
glazing is available from the Solar Components
Corporation for about $2.40 per square foot ($25.83 per
m
2
). These two layers cost over $50, or about one-third
of the total dryer cost. We wanted to see if the second
layer helped the performance significantly and justified
the added expense.
We set up two dryers with six layers of steel lath
painted flat black. One had single glazing and the other
had two layers of glazing. The outer glazing was Sun-
Lite HP on both dryers. The dryer with double glazing
used Teflon as the inner glazing. The two dryers were
identical except for the number of glazing layers. The
tests were run on nine different days between February
17 and March 26, 1998. We opened the bottom vent
covers completely and the top vent covers to two
inches (51 mm). The ambient temperatures were cool
and no food was being dried.
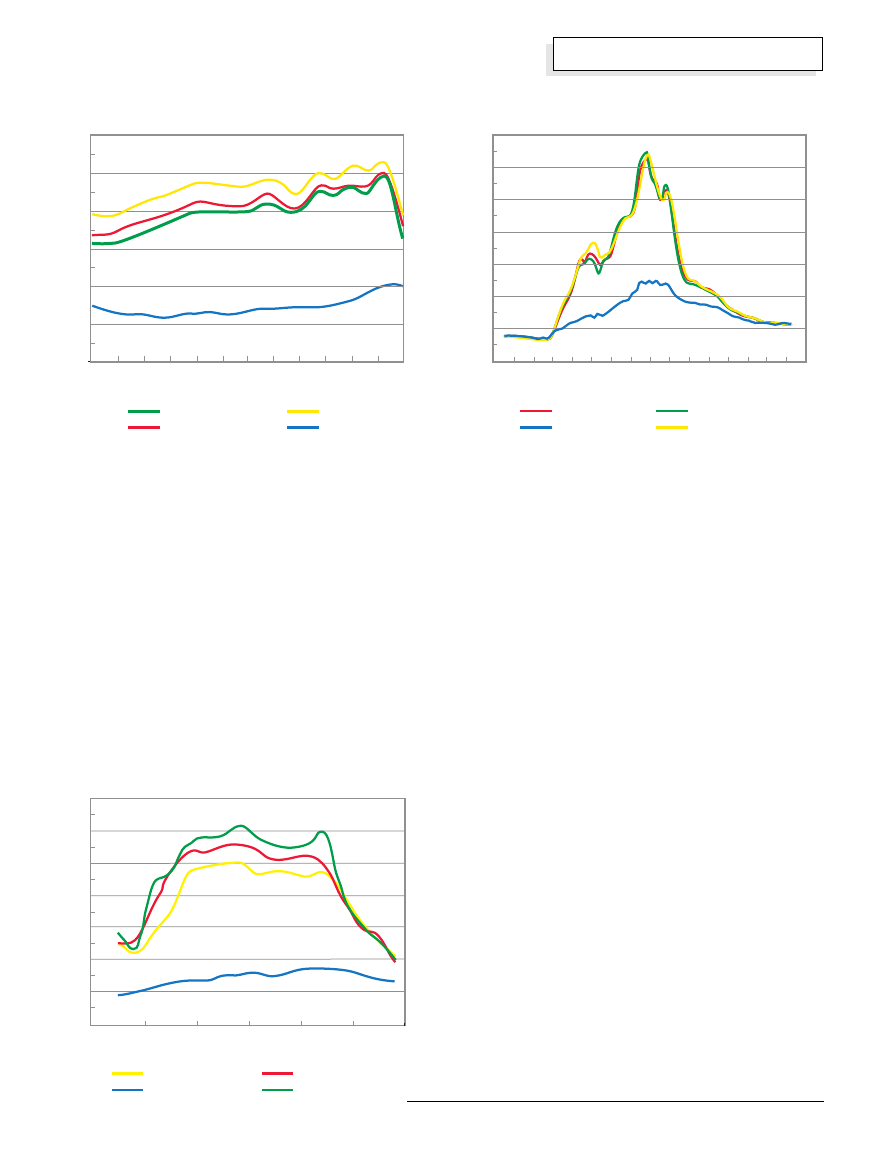
As Graph 1 shows, the double glazing did result in
higher dryer temperatures. This was on a sunny day
with clear blue skies and white puffy clouds, low
humidity (30%), and light winds. The temperatures
throughout most of the day were slightly higher with
double glazing. However, the single glazed dryer works
well and routinely reached temperatures of 130–180° F
(54–82° C). When this test was replicated with the solar
simulator, the double glazing also produced slightly
higher temperatures.
Our conclusion is that double glazing is not necessary
for effective drying. It does reduce some heat loss and
increases the dryer ’s temperature slightly, but it
increases the cost of the dryer significantly. Another
problem is that some condensation forms between the
two layers of glazing, despite attempts to reduce it by
caulking the glazing in place. The condensation
detracts from the dryer’s appearance and may cause
maintenance problems with the wood that separates
the two layers of glazing.
Reflectors
One possible way to improve the performance of these
dryers is to use reflectors. We tried several strategies:
making the vertical south wall of the dryer box a
reflective surface, hinging a single reflector at the
bottom of the dryer, and adding reflectors on each side
of the collector.
8:00 / 16:00
Noon
8:00 / 16:00
11:00 / 13:00
9:00 / 15:00
9:00 / 15:00
10:00 / 14:00
10:00 / 14:00
11:00 / 13:00
Noon
Reflective Surface
Figure 3: Sun Angles
and Reflection with a
Vertical Reflector
28
Home Power #69 • February / March 1999
Solar Dehydration
Vertical Wall Reflector
We realized that the vertical south
wall of the dryer box could be
painted a light color or coated with
aluminum foil, a mirror, or reflective
Mylar (see Photo 3). A vertical
south-facing wall reflector would
reflect some additional energy into
the dryer’s collector, protect the
wood from cracking, and prevent
deterioration from UV radiation.
Considering the fact that the angle
of reflection equals the angle of
incidence, we were able to model
the performance of this reflector,
using a protractor and a chart of sun
altitude angles (see Figure 3). If the
dryer is moved several times
throughout the day to track the sun’s
azimuth angle, then the reflector
concentrates some additional solar
energy onto the dryer’s collector
during most of the day.
Look at the temperatures recorded on Graph 2. A slight
increase in dryer temperature was recorded in the dryer
having the south-facing reflective wall. The reflected
light covers the collector most completely at mid-
morning and afternoon. As the sun gets higher, the light
is reflected onto a smaller area of the collector.
Single Reflector
A single reflector was hinged to the bottom of the
collector (see Photo 4). This reflector was supported
with a string and stick arrangement, similar to one used
by Solar Cookers International. With all reflector
systems, the dryer has to be moved several times
throughout the day if performance is to be maximized.
This allows it to track the azimuth angle of the sun. The
altitude angle of the reflector also needs to be adjusted
during the day from about 15° above horizontal in the
Reflective Surface
15
°
Reflector Angle
35
°
Sun Angle
8:30 / 4:30 Sun
Figure 4: Single Reflector at Low Sun Angle
40
60
80
100
120
140
160
180
9:30
10:00
10:30
11:00
11:30
Noon
Time
Degrees F
With Reflector
Without Reflector
Ambient
Graph 2: Vertical Wall Reflector vs. No Reflector
Above, Photo 4: Setting the front reflector angle.
morning and evening to 45° above
horizontal around noon (see Figures
4 and 5). The reflector added
10–20° F (2.4–4.8° C) to the
temperature of the dryer and
removed slightly more moisture from
the food than a dryer without a
reflector.
Side Mounted Reflectors
A third strategy was to add reflectors
to both sides of the collector. This
captures more solar energy than the
29
Home Power #69 • February / March 1999
Solar Dehydration
reflectors would shade the collector in the morning and
the other in the afternoon.
We concluded that the vertical wall reflector and the
single reflector mounted to the bottom of the collector
are the best ways to add reflectors, since tracking is not
crucial in these applications. However, these dryers
routinely attain temperatures of 130–180° F (54–82° C)
without reflectors, which is hot enough for food drying
and for pasteurization. Based on our work so far,
reflectors just don’t seem to be worth the trouble.
Absorbers
All low temperature solar thermal collectors need
something to absorb solar radiation and convert it to
heat. The ideal absorber is made of a conductive
material, such as copper or aluminum. It is usually thin,
without a lot of mass, and painted a dark color, usually
black. The original dryer design called for five layers of
Reflective Surface
45
°
Reflector Angle
80
°
Sun Angle
Noon Sun
Figure 5: Single Reflector at High Sun Angle
60
°
Reflector
Angle
Collector Surface
Reflector
Surface
Reflector
Surface
Figure 6: Ideal Angle for Side-Mounted Reflectors
20
40
60
80
100
120
140
160
180
8:00
9:00
10:00
11:00
Noon
13:00
14:00
15:00
16:00
Time
With Reflectors
Without Reflectors
Ambient
Degrees F
Graph 3: Vertical Wall & Side Reflectors
vs. No Reflector
Right, Photo 5:
Side reflectors
folded onto
glazing for
transportation.
other two strategies. We determined that the ideal
reflector angle would be 120° from the collector surface
(see Figure 6). This assumes that the dryer is pointing
toward the sun’s azimuth orientation.
We performed an experiment to compare a dryer with
two side reflectors and a vertical wall reflective surface
with a dryer having no reflectors (see Photo 3). Both
dryers were moved throughout the test period to track
the sun. The reflectors were mounted with hinges and
could be closed or removed when transporting the dryer
(see Photo 5). Graph 3 shows the significant increase
in temperatures attained by using these reflectors. The
problem with this design was that if the dryer could not
track the sun for one reason or another, one of the
30
Home Power #69 • February / March 1999
Solar Dehydration
black aluminum window screening, which had proven to
work well in other air heating collectors we had
constructed. Other designs call for metal lath, metal
plates such as black metal roofing, or aluminum or
copper flashing. We decided to try some different
materials and approaches to see if we could come up
with a better absorber.
Plate vs. Screen
First, we compared five layers of black aluminum
window screen placed diagonally in the air flow channel
to one piece of black corrugated steel roofing placed in
the middle of the channel (see Figure 7). We found that
the mesh produced temperatures about 7° F (3.9° C)
higher than the roofing in full sun. Other experiments
have shown that mesh type absorbers are superior to
plate type absorbers. These differences might be
reduced if we used a copper or aluminum plate instead
of the steel roofing.
Lath vs. Screen
Next, we compared three layers of pre-painted black
aluminum window screening to three layers of
galvanized steel lath painted flat black. We found that
the lath produced temperatures as much as 15° F (3.6°
C) higher than the screen in our outdoor solar food
dryer tests. We got the same results when we
compared six layers of screen to six layers of lath (see
Graph 4). While we found that the lath produced slightly
higher temperatures, it was harder to work with, needed
to be painted, and cost slightly more than the screen.
When these tests were replicated with the solar
simulator, we had slightly better results with the screen
than with the lath in both the three and six layer tests.
We were disappointed by the lack of positive correlation
between our outdoor tests with the actual food dryers
and our indoor tests with the solar simulator. But there
are many variables to control and quite a few people
involved in setting things up and collecting data, so our
control was not as tight as we would have liked. Despite
these problems, we are confident in concluding that
there is not a great deal of difference in performance
between lath and screen—both work effectively.
Layers of Absorber Mesh
We then compared three layers of lath to six layers of
lath, and three layers of screen to six layers of screen.
Obviously the more screen used, the greater the
expense. The literature on solar air heaters
recommends between five and seven layers. We
arbitrarily picked three and six layers. In our outdoor
tests, we found that six layers of screen produced
temperatures 5–10° F (1.2–2.4° C) higher than three
layers. Likewise, when we repeated these experiments
outdoors with lath, we found that six layers
outperformed both two and four layers (see Graph 5).
Steeply Angled Sections
U-Tube Through Pass
Reverse Diagonal Absorber
Normal Diagonal Absorber
Dual Pass
Figure 7: Collector/Absorber
Configurations
40
60
80
100
120
140
160
180
9:00
10:00 11:00 Noon 13:00 14:00 15:00 16:00 17:00 18:00 19:00
Time
Lath
Screen
Ambient
Degrees F
Graph 4: Lath vs. Screen Absorber
31
Home Power #69 • February / March 1999
Solar Dehydration
Tests performed in the solar simulator showed very little
difference between three and six layers. We used the
simulator to test one and two layers and no absorber.
With no absorber, the temperature decline was over 60°
F (33° C), dropping from 153 to 89° F (67 to 32° C) .
The temperatures for one, two, three, and six layers of
lath after one half-hour were 145, 155, 159, and 160° F
(63, 68, 70, and 71° C). Based on our work, we feel that
two or three layers of screen or lath are adequate for
effective performance, but adding a few more layers will
produce slightly higher temperatures.
Reflective Is Effective
When constructing a solar air heater, you must decide
what to do with the bottom of the air flow channel,
below the absorbing material. In the next part of our
research, we placed aluminum flashing in the bottom of
the air flow channels of two of the three dryers, on top
of the 3/4 inch (19 mm) foil-faced insulation (Celotex
Tuff-R, polyisocyanurate). The flashing in one of the
dryers was painted flat black. The third dryer was left
with just the reflective insulation board on the bottom of
the air flow channel. This test was done with both the
actual dryers and the solar simulator. In both cases, the
highest temperatures were attained with the reflective
foil-faced insulation. The differences were substantial,
with the reflective insulation showing readings as much
as 25° F (14° C) higher than the dryer with the black
aluminum flashing (see Graph 6).
Mesh Installation
The original design called for the mesh to be inserted
into the collector diagonally from the bottom of the air
flow channel to the top (see Figure 7). This seemed the
best from a construction point of view. In this test, three
configurations were compared: from bottom to top as
originally designed, from top to bottom, and a series of
more steeply angled pieces of mesh stretching from the
top to the bottom of the air flow channel. The
differences in temperatures attained were very small
(see Graph 7), and we concluded that there was not
much difference in performance.
U-Tube vs. Single Pass
Another characteristic of the original design is the U-
tube air flow channel. In addition to the air flow channel
right below the glazing, there is a second air flow
channel right below the first one, separated by a piece
of insulation board (see Figure 7). We compared a
dryer with this U-tube design to a dryer with just a
straight shot single channel and found no significance
difference in temperatures. We removed the insulation
board from our dryers and have completed all the
experiments detailed in this article without the U-tube
setup.
20
40
60
80
100
120
140
10:00
11:00
Noon
12:30
13:00
Time
2 Layers
4 Layers
6 Layers
Ambient
Degrees F
11:30
10:30
Graph 5: Two vs. Four vs. Six Layers of Absorber
20
40
60
80
100
120
140
160
5:00
7:00
9:00
11:00
13:00
15:00
17:00
19:00
21:00
Time
Bottom to Top
Top to Bottom
Ambient
Steeply Angled Sections
Degrees F
Graph 7: Absorber Installation Comparison
Black Flashing
Aluminum Flashing
Ambient
Foil-faced Tuff-R
Degrees F
20
40
60
80
100
120
140
160
11:45
12:15
12:45
13:15
13:45
14:15
14:45
Time
Graph 6: Collector Bottom Material Comparison
32
Home Power #69 • February / March 1999
Solar Dehydration
Active vs. Passive
We experimented with several small, PV-powered fans
to see if they would generate higher air flows and
possibly accelerate food dehydration. We tried three
different sizes: 0.08, 0.15, and 0.46 amps. We placed
the fans in the exhaust area of the dryer. Of the three,
the 0.15 amp fan seemed to work the best. It increased
the air flow from about 25 to 50 feet per minute (8 to 15
meters per minute), but decreased temperatures
significantly (see Graph 8). The larger fan did not fit in
the exhaust vent opening, and the smallest fan did not
significantly increase the air flow.
Even with the fans in use, the drying performance did
not improve. In every trial, the passive dryer either
matched or outperformed the active dryer. Each
morning during a five-day experiment, we placed
exactly the same weight of fruit in each dryer. We used
one to three pounds (0.4 to 1.4 kg) of apple or peach
slices. Each afternoon between 2:30 and 5 PM, we
removed and weighed the fruit. On all five days, the fruit
dried in the passive dryer weighed either the same or
less than the fruit dried in the active dryer.
Vent Opening
The dryers have vent covers at the top which can be
adjusted to regulate the air flow and temperature. The
smaller the opening, the higher the temperatures
attained. We wanted to know how much the vents
should be opened for maximum drying effectiveness.
We tried a variety of venting combinations while drying
fruit. For most of our experiments, we filled five to
seven of the thirteen shelves with 1/8 inch (3 mm) fruit
slices. We cut up, weighed, and placed an identical
quantity and quality of fruit in each of two dryers in the
morning. Sometime between 2 and 6 PM, we removed
the fruit from the dryers and weighed it again. We
compared openings of different measurements: a one
inch (25 mm) to a seven inch (178 mm), a 3/4 inch (19
mm) to a five inch (127 mm), a three inch (76 mm) to a
six inch (152 mm), a three inch (76 mm) to a nine inch
(229 mm), and a three inch (76 mm) to a five inch (127
mm). During these experiments, the bottom vents were
completely open.
We found that higher temperatures were attained with
smaller vent openings, but that drying effectiveness
was not always maximized. The best performance was
observed when the vents were opened between three
and six inches (76 and 152 mm), and temperatures
peaked at 135–180 °F (54–82° C) (see Graph 9). With
the one inch (25 mm) and smaller openings and the
seven inch (178 mm) and larger openings, less water
was removed from the fruit. There was no difference in
the water removed when we compared three inches to
five inches (76 mm to 127 mm) and three inches to six
inches (76 mm to 152 mm).
Based on this work, we would recommend opening the
leeward exhaust vent cover between three and six
inches (76 and 152 mm), or between ten and twenty
square inches (65 and 129 cm
2
) of total exhaust area.
The exact size of the opening depends on the weather
conditions. With the vents opened between three and
six inches (76 and 152 mm), we have been able to
remove as much as sixty ounces (1.75
l
) of water in a
single day from a full load of fruit and completely dry
about three and one-half pounds (1.5 kg) of apple slices
to 12–15% of the fruit’s wet weight.
Construction Improvements
As we experimented with the dryers, we came up with
some design improvements to simplify the construction,
reduce the cost, and increase the durability or
portability of the unit. To simplify the construction and
eliminate warping problems caused by wet weather, we
decided to eliminate the intake vent covers during our
40
60
80
100
120
140
160
180
9:00
11:00
13:00
15:00
17:00
19:00
21:00
Time
PV-Powered Fan
3 Inch Vent
Ambient
Degrees F
Graph 8: PV Exhaust Fan vs. Vent
40
60
80
100
120
140
160
180
200
7:00
9:00
11:00
13:00
15:00
17:00
19:00
21:00
Time
Degrees F
3 Inch Vent
6 Inch Vent
Ambient
Graph 9: Three Inch vs. Six Inch Exhaust Vent
33
Home Power #69 • February / March 1999
Solar Dehydration
experiments. The vent covers at the top, if closed at
night, would prevent or reduce reverse thermosiphoning
and rehydration of food left in the dryer.
The redesigned air intake now has aluminum screen
secured to the plywood side pieces with wooden trim.
We also redesigned the top exhaust vent cover to
eliminate the warping problem caused by leaving the
vent covers opened during wet weather. The new
exhaust vent cover works very well (see Photo 6). It
spreads the exhaust air across the dryer’s width rather
than concentrating it in the center. This should improve
convective flows and performance. However, the vent
cover makes it more difficult to calculate the exhaust
area, and as a result, we mainly used the old design for
our research this past year.
We added wheels and handles to the unit, as it is heavy
and difficult to move around. It’s now easier to
maneuver, although it is still difficult to transport in a
small pickup truck. We purchased ten-inch (254 mm)
lawnmower-style wheels for $6 each. The axle cost $2.
With the wheels on the small legs at the bottom of the
collector, one person can move the dryer.
The original design specified thin plywood for the roof of
the dryer. We replaced that with 3/4 inch (19 mm)
plywood and covered the peak of the roof with
aluminum flashing. We also used 1/2 inch (38 mm)
wide by 1/8 inch (3 mm) thick aluminum bar stock and
stainless steel screws to attach the glazing to the
dryer’s collector. Each collector used fourteen feet,
eight inches (4.5 m) of aluminum bar at a cost of $23.
The 1/4 inch (6 mm) plywood strips used in the original
design were adequate and less expensive, but would
have required more maintenance.
Conclusions and Recommendations
The dryer described in
HP57 has worked well in our
tests. It produces temperatures of 130–180° F (54–82°
C), and can dry up to 15 apples or peaches—about 3
1/2 pounds (1.6 kg) of 1/8 inch (3 mm) thick slices—in
one sunny to partly sunny day. The best performance in
our outdoor tests was attained with six layers of
expanded steel lath painted black, although aluminum
screen works almost as well and is easier to work with.
We also found that two or three layers of screen or lath
would produce temperatures almost as high as six
layers. The surface behind the absorber mesh should
be reflective, and for best performance the exhaust vent
covers should be opened three to six inches (76–152
mm). The cost of the dryer and the time to construct it
can be reduced by eliminating the U-tube air flow
channel divider, the second or inner layer of glazing,
and the intake vent covers, and by reducing the number
of layers of screen or lath to two or three.
We made the unit more portable by adding wheels and
handles, and improved the durability by fastening the
legs with nuts and bolts, using aluminum bar to hold the
glazing in place, and using 3/4 inch (19 mm) plywood
for the roof. We would also like to take the insulation
board out of a dryer to see if it significantly impacts the
performance. This would further decrease the cost of
the dryer. Soon, we hope to compare this design to
direct solar dryers, which a
Home Power reader has
recently suggested can outperform our design. Thus
far, we have avoided direct dryers because of concerns
about vitamin loss in foods exposed to direct solar
radiation.
We have tried to carefully explore all of the significant
variables affecting this dryer’s performance. We have
been able to increase drying effectiveness with higher
temperatures of approximately 30° F (16.6° C), while
decreasing the cost by about $30. We have
demonstrated the best vent opening for drying
effectiveness, and seen the impact that variables such
as double glazing, fans, reflectors, and absorber type
have on performance. We have also developed and
demonstrated a low cost solar simulator that can be
used to test solar thermal collectors indoors.
Access
Authors: Dennis Scanlin, Marcus Renner, David
Domermuth, and Heath Moody, Department of
Technology, Appalachian State University, Boone, NC
28608 • 704-262-3111 • scanlindm@appstate.edu
Above, Photo 6: The new vent design.
34
Home Power #69 • February / March 1999
Solar Dehydration
Solar Cookers International (SCI), 1919 21st Street,
Sacramento, CA 95814 • 916-455-4499
Fax: 916-455-4498 • sci@igc.org
Sun-Lite HP glazing was purchased from Solar
Components Corporation, 121 Valley Street,
Manchester, NH 03103-6211 • 603-668-8186
Fax: 603-668-1783 • solar2@ix.netcom.com
www.solar-components.com
Scales, anemometers, and other data collection
equipment were purchased from Thomas Scientific,
PO Box 99, Swedesboro, NJ 08085 • 800-345-2100
609-467-2000 • Fax: 800-345-5232
value@thomassci.com • www.thomassci.com
Data logger was purchased from Pace Scientific, Inc.,
6407 Idlewild Rd., Suite 2.214, Charlotte, NC 28212
704-568-3691 • Fax: 704-568-0278
sales@pace-sci.com • www.pace-sci.com
Creating Peace
of Mind!
P
eace of mind has become a
premium in today’s society. The Y2K
problem has created unrest, fear and
even panic in the minds of millions of
Americans. The global economy is
going berserk. But while the future is
definitely uncertain, one thing you can
count on is the fact that no matter
what happens, you will need food and
water! Emergency food storage is a
wise safeguard against all emergen-
cies from floods, earthquakes and
hurricanes to unemployment or illness.
Millennium III Foods offers nutritionally
balanced food plans for individuals,
families or communities at competitive
prices.
At Millennium III Foods, we don’t just
sell storage food…
WE CREATE PEACE OF MIND.
•
TWO WEEK SHIPPING
•
“One Year Supplies” are nutri-
tionally balanced to deliver over
1,900 calories per day
•
Real food that’s easy to use!
•
Awarded #1 Best Tasting
•
A La Carte ordering or purchase One
Year Units for one, two or four per-
sons. Great value, simple planning!
Call for prices and information
SALES 888•883•1603
FAX 406•388•2603
P.O. Box 10010
Bozeman, Montana 59719
WWW.M3MFOODS.COM
Fight Global Warming
P.O. Box 1101, Arcata, CA 95518-1101
Phone: 707-822-9095 • Fax: 707-822-6213 • www.sunfrost.com
Wyszukiwarka
Podobne podstrony:
Home Power Magazine Issue 072 Extract p34 Solar Hot Air Collectors
Home Power Magazine Issue 109 Extract pg22 Making Sense of Solar Electricity Costs
Home Power Magazine Issue 032 Extract p22 Whats An Inverter
Home Power Magazine Issue 021 Extract p78 Electric Fence Charger And Time Machine
Home Power Magazine Issue 063 Extract p42 Solar charge controller for Medium Power Applications
Home Power Magazine Issue 032 Extract p78 Me And My Panel
Home Power Magazine Issue 109 Extract p12 Off Grid Living In The City
Home Power Magazine Issue 095 Extract p22 Solar Electric Grid Tie
Home Power Magazine Issue 055 Extract p72 Surge Arresters For Lightning And EMP Protection
Home Power Magazine Issue 039 Extract p74 Exceltechs 1000 Watt Sine Wave Inverter
Home Power Magazine Issue 037 Extract p22 Solar Cooker Contest
Home Power Magazine 024 Extract p26 p30 All Solar Panels Ever Tested
Home Power Magazine Extract Low Voltage Battery Disconnect
Home Power Magazine Extract Installation Basics For Solar Domestic Water Heating Systems Part 2
Home Power Magazine Extract ThermoElectric Generators
Home Power Magazine Extract Installation Basics For Solar Domestic Water Heating Systems Part 1
Home Power Magazine Extract Inverter Safety
[ebook renewable energy] Home Power Magazine 'Correct Solar Panel Tilt Angle to Sun'
Home Power Magazine Betting the Farm Wind Electricity Pays Off
więcej podobnych podstron