
6
PICmicro® MCU
APPLICATION DESIGN
AND HARDWARE INTERFACING
A
fter reading the previous two chapters and “Introduction to Electronics” on the CD-
ROM, you must feel like there is nothing left to understand about designing PICmicro®
MCU applications. In these chapters on the CD-ROM I have provided background on how
microcontroller interfacing is carried out and some of the theories and pitfalls that you
should be aware of. This chapter covers some specifics about how the PICmicro® MCU
works when wired to different interfaces.
CONTENTS AT A GLANCE
Estimating Application Power
Requirements
Reset
Interfacing to External Devices
DIGITAL LOGIC
DIFFERENT LOGIC LEVELS WITH ECL
AND LEVEL SHIFTING
LEDs
Switch Bounce
Matrix Keypads
LCDs
Analog I/O
POTENTIOMETERS
PULSE-WIDTH MODULATION (PWM) I/O
AUDIO OUTPUT
Relays and Solenoids
DC and Stepper Motors
R/C Servo Control
Serial Interfaces
SYNCHRONOUS
ASYNCHRONOUS (NRZ) SERIAL
DALLAS SEMICONDUCTOR 1-WIRE
INTERFACE
253

I am not trying to say that the PICmicro® MCU is a difficult microcontroller to interface
to. Actually, it is one of the easiest eight-bit microcontrollers to develop interface applica-
tions for. In different versions, with built-in oscillators and reset circuits, interfaces can be
unbelievably easy to implement. Despite this, you should be aware of a few things that will
help you make your applications more efficient and keep you from having difficult to de-
bug problems.
Estimating Application
Power Requirements
Accurate power estimating for your applications is important because the expected power
consumption affects how much heat is produced by the circuit and what kind of power
supply is required by it. Although the PICmicro® MCU power can usually only be esti-
mated to an order of a magnitude, this is usually good enough to ensure that the circuit
won’t overheat, the power supply won’t burn out or the batteries will not be exhausted be-
fore the required execution time has passed.
For the PICmicro® MCU itself, the “intrinsic” current, what I call the current consumed
by the microcontroller with nothing connected to it, is available from Microchip in the data
sheets. For the PIC16F87x, rated at 4 MHz, Table 6-1 lists the IDD (the supply current or
intrinsic current), according to the oscillator type.
The current rating for the oscillator type selected in the configuration fuses should be
the basis for your estimate. Notice that as the clock frequency changes, the intrinsic cur-
rent consumption will go up at a rate of about one mA per MHz. For estimating purposes,
I recommend that you use the worst case for the oscillator selected.
Next, select the current requirements for the devices that connect directly to the PICmi-
cro® MCU. Depending on their operation, the current requirements can change drasti-
cally. For example, an LED that is off consumes just no current, and one that is on can
consume from five to 20 mA. Again, for these devices, the worst cases should be used with
the estimate.
Also, note that different devices will respond differently, depending on how they are
used. A very good example of this is a LCD display. Many modern LCDs have built-in
pull-ups to make interfacing easier for electronic devices that have open collector outputs
(such as the 8051). Typically, these devices current requirements will be quoted with the
254
PICmicro® MCU APPLICATION DESIGN AND HARDWARE INTERFACING
TABLE 6–1 PICmicro® MCU Oscillator Current Consumption Comparison
OSCILLATOR
IDD
FREQUENCY
LP
52.5
A
32 kHz
RC
5 mA
4 MHz
XT
5 mA
4 MHz
HS
13.5 mA
4 MHz

minimum value, rather than the maximum. To ensure you have an accurate estimate, you
will have to check the current drain with the LCD connected and operating with the
PICmicro® MCU.
Lastly, the power consumption of other devices connected to the circuit (but not the
PICmicro® MCU) will have to be determined through the device’s data sheets. Again, the
worst-case situation should be taken into account.
Once these three current values have been found, they can be summed together to get
the total application power and then multiplied by the voltage applied to get the power
consumed by the application. Once I have this value, I normally multiply it by a 25- to 50-
percent “derater” to ensure that I have the absolute worst case.
In the applications in this book where I have specified the current, I have continually
sought out the worst case and then derated the power to make it seem even worse. This is
to ensure that you will not have any problems with your application power supply. Power
can really make or break an application. Incorrectly specifying a supply can lead to prob-
lems with the application not powering up properly, failing intermittently, or not running
as long on batteries as expected.
Marginal power supply problems can be extremely difficult to find as well. By going
with a derated worst case for my application power requirements, I have eliminated one
possible point in the application from going bad.
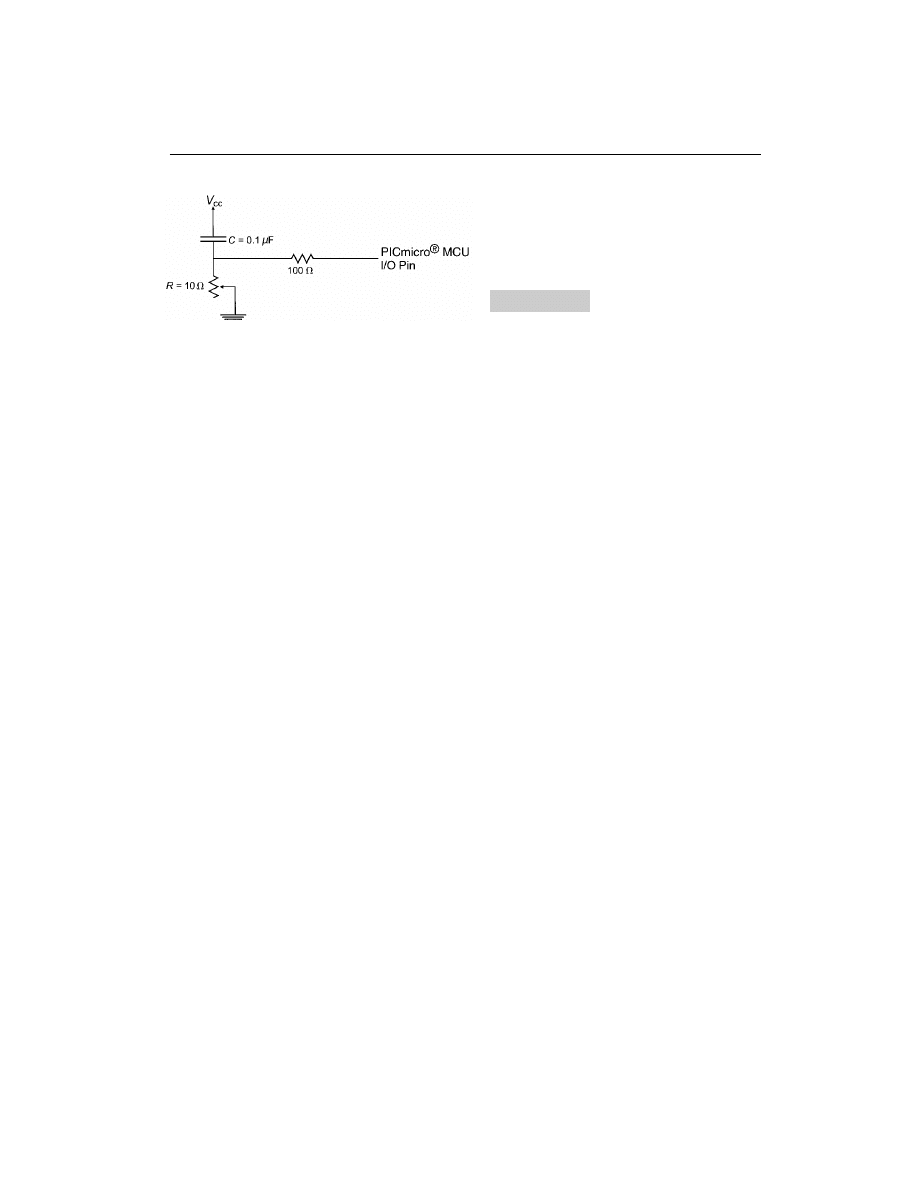
Reset
Reset in many new PICmicro® MCU part numbers can be simply implemented, elimi-
nating the need for a separate circuit or having a built-in brown-out reset sensor. Even
putting your own reset circuit into an application is simple; only a couple of rules must be
followed.
Adding external reset circuit to the PICmicro® MCU consists of a pull-up connected to
the _MCLR pin of the PICmicro® MCU. As shown in Fig. 6-1, a switch pulling _MCLR
to ground (to reset the device) can be implemented with a momentary on switch.
A resistor of 1 to 10 K is probably appropriate; the input is CMOS and does not draw
any current through the resistor. The resistor is primarily used as a current-limiting device
for the momentary-on switch.
In the configuration registers of the mid-range parts there is a bit known as PWRTE.
This bit will insert a 72-ms delay during PICmicro® MCU power up before the first in-
struction is fetched and executed. The purpose of this function is to allow the PICmicro®
RESET
255
Figure 6-1
MCU’s clock to stabilize before the application starts. In the low-end and high-end PICmi-
cro® MCU’s, this function is not always available.
PWRTE does not have to be enabled if a stable clock is being input to the PICmicro®
MCU, such as in the case where a “canned oscillator” is used as the PICmicro® MCU’s
clock source instead of a crystal, ceramic resonator, or RC network.
When the _MCLR pin is made active (pulled low), the oscillator stops until the pin is
brought back high. As well, the oscillator is also stopped during sleep mode to minimize
power consumption. The PWRTE 72 ms delay is required in these cases, as well to ensure
the clock is stable before the application’s code starts executing.
If the PICmicro® MCU is run at low voltage (less than 4.0 volts), do not enable the
built-in Brown-Out Reset (BOR), unless it is available with a low-voltage selector option.
Once power drops below 4.0 volts, then circuit will become active and will hold the
PICmicro® MCU reset—even though it is receiving a valid voltage for the application.
The low-voltage option usually means that the brown-out reset will reset the PICmicro®
MCU when the input voltage is below 4.0 volts or 1.8 volts.
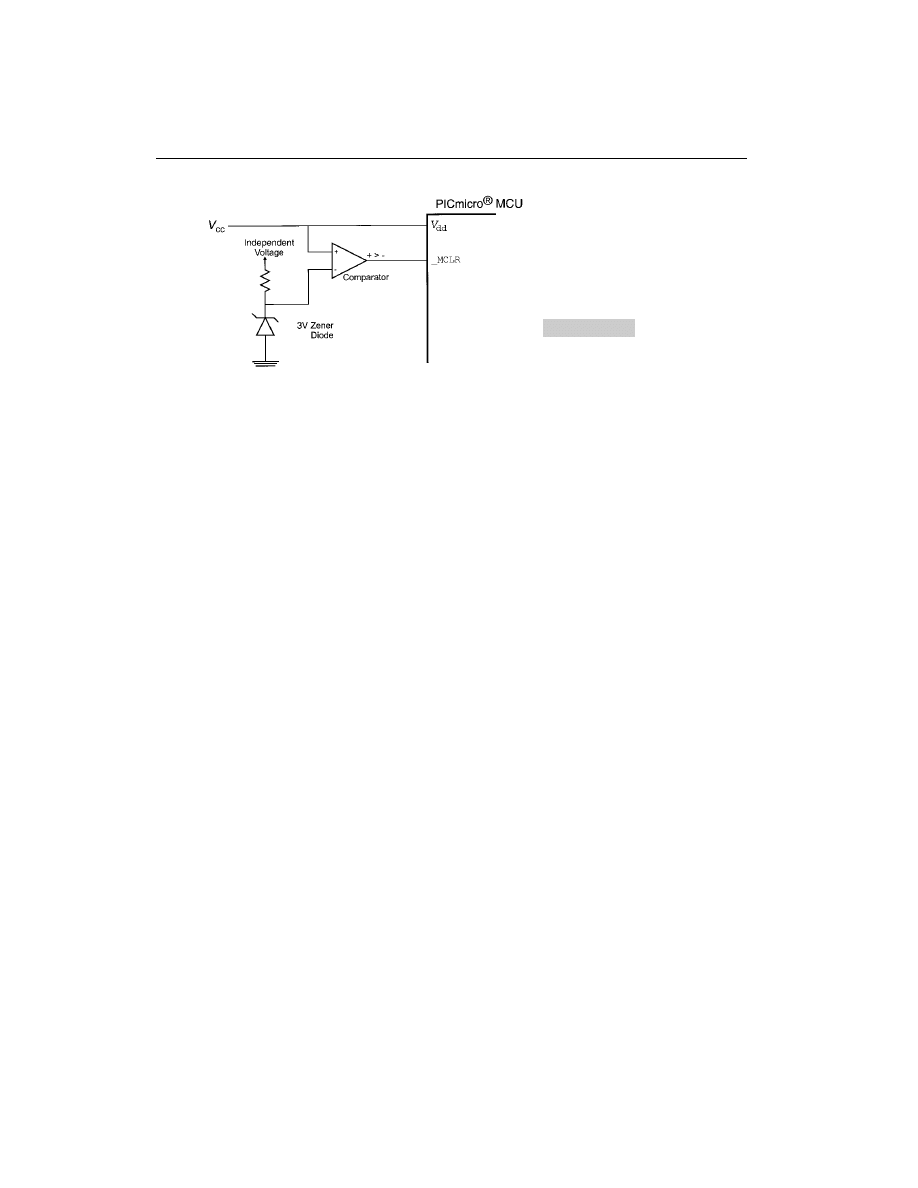
If you are going to use low voltage and want a brown-out detect function, this can be
added with a Zener diode and a comparator as is shown in Fig. 6-2.
In this circuit, voltage is reduced by the Zener diode voltage regulator to 3 volts. If V
cc
goes below three volts, this circuit will put the PICmicro® MCU into reset. The voltage-
divider values can be changed for different ratios and R can be quite high (100 K
) to
minimize current drain in a battery-driven application.
The PIC12C5xx and 16C505 PICmicro® MCU’s can provide an internal reset function,
which uses V
dd
as the _MCLR pin input. This frees the _MCLR pin for use as an input. The
freed _MCLR pins generally cannot be used as an output.
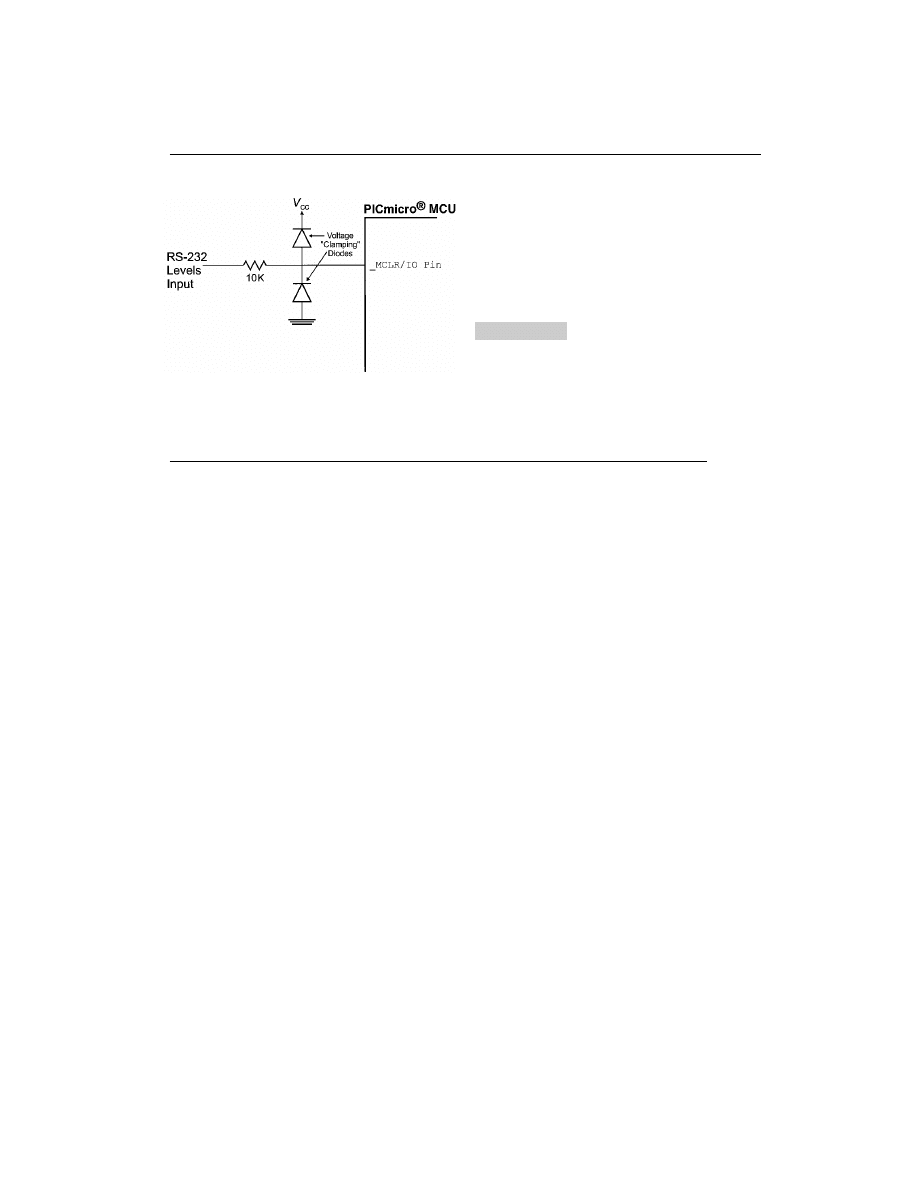
A common use for this pin is RS-232 input using a resistor as a current limiter and pro-
viding bit-banging software to read the incoming values. If you use the _MCLR/I/O pin in
this fashion, be sure that you “clamp” the pin shown in Fig. 6-3.
If the incoming negative voltage is not clamped within the PICmicro® MCU, the nega-
tive voltage could cause the PICmicro® MCU to be forced into reset mode. If the positive
voltage is not clamped, then the PICmicro® MCU could go into the programming mode.
The general-purpose pins are designed with clamping diodes built in and will not allow in-
puts to be driven outside V
dd
or ground. Not clamping the input pins can cause some con-
fusing problems when you first work with the PICmicro® MCU in this type of application.
The use of clamping diodes for RS-232 interfacing is shown in the “Serial LCD Interface” in
Chapter 16.
256
PICmicro® MCU APPLICATION DESIGN AND HARDWARE INTERFACING
PICmicro®
MCU reset with “brown out”
protection
Figure 6-2
Interfacing to External Devices
The previous chapters have provided a lot of information about the peripheral hardware
built into the PICmicro® MCU that will help making applications easier. Coupled with the
information contained in the appendices, you would have thought I had it all covered.
The following sections cover some of the hints and tips I’ve learned over the years for
interfacing PICmicro® MCUs to other devices. With this information, I have also in-
cluded source code for the different interface hardware. This code is available on the CD-
ROM as snippets that can be cut and pasted into your applications, as well as into macros
that can be added to the applications.
Much of this information and code is used later in the book when I go through the ex-
periments and projects. Some of the interfaces will seem very complex or difficult to cre-
ate, but I have tried to work through many of the difficulties and provide you with sample
circuits that are simple and cheap to implement.
DIGITAL LOGIC
It should not be surprising that the PICmicro® MCU can interface directly to TTL and
CMOS digital logic devices. The PICmicro® MCU’s parallel I/O pins provide digital out-
put levels that can be detected properly by both logic technologies and inputs that can de-
tect logic levels output from these logic families.
If you check the PICmicro® MCU data sheets, you will see that the output characteris-
tics are:
V
ol
(output low voltage)
0.6 V (max.)
V
oh
(output high voltage)
V
dd
0.7 V (min.)
This specification is given to allow for different V
dd
power inputs. For a V
dd
of 5 volts,
you can expect a “high” output of 4.3 volts or greater (normally, I see 4.7 volts when a
PICmicro® MCU pin is not under load). If the power voltage input (V
dd
) was reduced to 2 volts,
low output would still be 0.6 volts and high output becomes 1.3 volts (V
dd
– 0.7) or greater.
The PICmicro® MCU pins are specified to drive (source) up to 20 mA and sink (pull
the output to ground) 25 mA. These current capabilities easily allow the PICmicro® MCU
to drive LEDs. The total current sourced or sunk by the PICmicro® MCU should not ex-
ceed 150 mA (which is six I/O pins sinking the maximum current).
INTERFACING TO EXTERNAL DEVICES
257
Internal reset allow-
ing “_MCLR” pin to be used for RS-
232 input
Figure 6-3

The input “threshold” voltage, the point at which the input changes from an I to an O
and visa versa, is also dependent on the input power (V
dd
) voltage level. The threshold is
different for different devices and the data sheet should be consulted for precise values. In
general, for a number of different PICmicro® MCU part numbers, this value is specified
as being in the range:
0.25 V
dd
0.8 V V
threshold
0.48 V
dd
As a rule, you should use the higher value. For higher V
dd
s, this is approximately one
half V
dd
. At lower V
dd
voltages, (2 volts), the threshold becomes approximately two-thirds
of V
dd
.
For the most part, interfacing to conventional logic devices is very straightforward in
the PICmicro® MCU. The following sections feature some special interfacing cases and
how the PICmicro® MCU can be wired to other devices to take advantage of the PICmi-
cro® MCU’s electrical properties. Using these properties, applications can use standard
I/O pins to simulate different interface types and, in some cases, reduce the numbers of
pins required for an application.
Parallel bus devices
Although the PICmicro® MCU is very well suited for stand-
alone applications, many applications have to connect to external devices. There are built-
in PICmicro® MCU interfaces for Non-Return to Zero (NRZ) asynchronous I/O and
two-wire serial I/O, but sometimes the best interface is a simulated parallel I/O bus. A sim-
ulated parallel bus is useful for increasing the I/O capabilities of the PICmicro® MCU us-
ing standard I/O chips. These devices can be accessed fairly easily using an eight-bit I/O
port and a few extra control pins from the PICmicro® MCU.
I realize that the PIC17Cxx has the ability to drive a parallel bus, but I tend to shy away
from using these devices for this purpose because the PIC17Cxx I/O data bus is 16 bits
wide and can only access the full word of data at any one time. Most parallel buses require
an eight-bit bus and the PIC17Cxx devices tend to be more expensive than using the mid-
range parts. Looking at the extra costs of the PIC17Cxx devices, coupled with the com-
plexity of adding the address buffers, you’re probably better off using the mid-range
devices and simulating the bus as shown here.
When I create a parallel bus, I normally use PORTB for eight data bits and use other
PORT pins for the _RD and _WR lines. To avoid the extra costs and complexity of decode
circuitry, it is probably best to devote one I/O line to each device. Before writing from the
PICmicro® MCU to the device, TRISB is set to output mode and the value to be written is
output on PORTB. Next, the _CS and _WR lines are pulled low and remain active until the
device’s minimum access times are met. _RD is similar with TRISB being put in input
mode, the _CS and _RD pins are held active until the devices minimum read access time
is met, at which point the data is strobed into w, _CS, and _RD are driven high.
The circuit in Fig. 6-4 requires two parallel output bytes and one parallel input byte.
This could be implemented with a 40-pin PICmicro® MCU, using the I/O pins directly,
but it is much more cost effective to use an 18-pin PICmicro® MCU (such as the
PIC16F84) and a tristate output buffer and two eight bit registers. In Fig. 6-4, it is assumed
that data is clocked in or output with negative active signal pulses.
With this circuit, RA0 to RA2 would be set for output and initialized to 4 (high voltage)
driven out. To read the eight data bits on the tristate buffer, the following code could be used:
258
PICmicro® MCU APPLICATION DESIGN AND HARDWARE INTERFACING

bsf
STATUS, RPO
; Put PORTB into Input Mode
movlw
0x0FF
movwf
TRISB ∧ 0X080
bcf
STATUS, RPO
bcf
PORTA, 0
; Drop the “_RD” line
call
Dlay
; Delay until Data Output Valid
movf
PORT B, w
; Read Data from the Port
bsf
PORT A, 0
; “_RD”
1 (disable “_RD” Line)
Writing to one of the output registers is similar:
bsf
STATUS, RPO
clrf
TRIS B ∧ 0X080
; PORTB Output
bcf
STATUS, RPO
bcf
PORTA, 1
; Enable the “_WR1” Line
movwf
PORTB
; output the Data
call
Dlay
; Wait Data Receive Valid
bsf
PORTA, 1
; “_WR1”
1.
Combining input and output
Often when working on applications, you will find
some situations where peripheral devices will use more than one pin for I/O. Another case
would be when you are connecting two devices, one input and one output and would like
to combine them somehow so that you can reduce the number of PICmicro® MCU pins
required. Fewer PICmicro® MCU pins means that you can use cheaper PICmicro® MCUs
and avoid complex application wiring. This section presents two techniques for doing this
and the rules governing their use. This might at first appear problematic and asking for
problems with bus contention, but they really do work and can greatly simplify your ap-
plication.
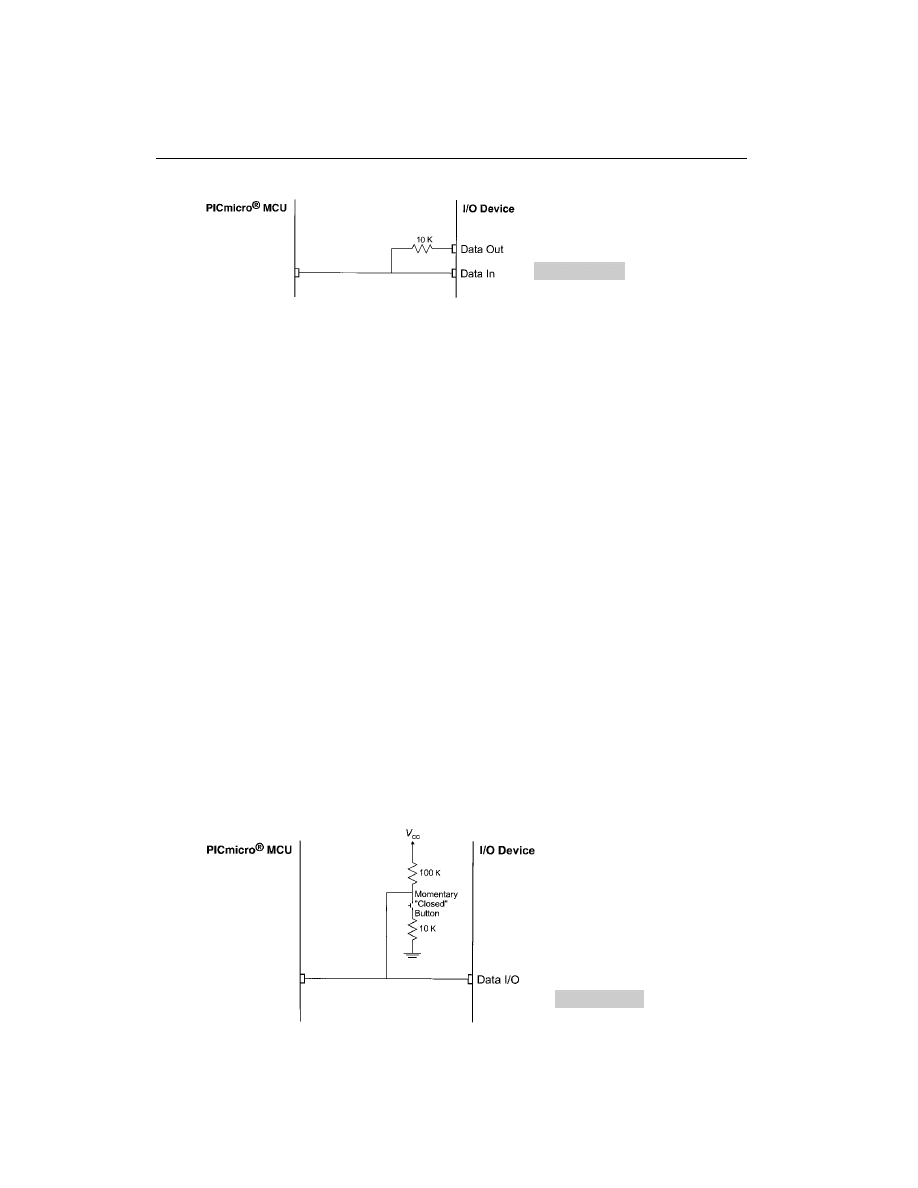
When interfacing the PICmicro® MCU to a driver and receiver (such as a memory with a
separate output and input), a resistor can be used to avoid bus contention at any of the pins
(Fig. 6-5).
In this situation, when the PICmicro® MCU’s I/O pin is driving out, it will be driving
the Data In pin register and regardless of the output of the Data Out pin. If the PICmicro®
MCU and Data Out pins are driving different logic levels, the resister will limit the current
flowing between the PICmicro® MCU and the memory Data Out pin. The value received
on the Data In pin will always be the PICmicro® MCU’s output due to the voltage drop
within the registor.
INTERFACING TO EXTERNAL DEVICES
259
Figure 6-4 PICmicro® MCU
simulated parallel 10 port
When the PICmicro® MCU is receiving data from the memory, its I/O pin will be put
in input mode and the Data Out pin will drive its value to not only the PICmicro® MCU’s
I/O pin, but the Data In pin as well. In this situation, the Data In pin should not be latching
any Data In. To avoid this, in most cases where this circuit combines input and output, the
two input and output pins are on the same device and the data mode is controlled by the
PICmicro® MCU to prevent invalid data from being input into the device. This is an im-
portant point because it defines how this trick should be used. The I/O pins that the PICmi-
cro® MCU are connected to must be mutually exclusive and can never be transmitting
data at the same time. A common use for this method of connection data in and data out
pins is used in SPI memories, which have separate data input and output pins.
The second trick is to have button input, along with an external device receiver. As is
shown in Fig. 6-6, a button can be put on the same “net” as an input device and the PICmi-
cro® MCU pin that drives it.
When the button is open or closed, the PICmicro® MCU can drive data to the input
device, the 100-K and 10-K resistors will limit the current flow between V
cc
and ground.
If the PICmicro® MCU is going to read the button high (switch open) or low (switch
closed) will be driven on the bus at low currents when the pin is in input mode. If the
button switch is open, then the 100-K resistor acts like a pull up and a 1 is returned.
When the button switch is closed, then there will be approximately 0.5 volt across the
10-K resistor, which will be read as a 0.
The button with the two resistors pulling up and down are like a low-current driver and
the voltage produced by them is easily “overpowered” by active drivers. Like the first
method, the external input device cannot receive data except when the PICmicro® MCU
is driving the circuit. A separate clock or enable should be used to ensure that input data is
received when the PICmicro® MCU is driving the line.
Two points about this method; this can be extrapolated to work with a switch matrix
keyboard. The circuit can become very complex, but it will work. Secondly, a
260
PICmicro® MCU APPLICATION DESIGN AND HARDWARE INTERFACING
Figure 6-5 PICmicro® MCU
simulated parallel 10 port
Figure 6-6 Combining
button in-put with digital I/O
resistor/capacitor network for debouncing the button cannot be used with this circuit be-
cause a resistor-capacitor network will “slow down” the response of the PICmicro® MCU
driving the data input pin and will cause problems with the correct value being accepted.
When a button is shared with an input device; such as is shown in Fig. 6-6, software but-
ton debouncing will have been done inside the PICmicro® MCU.
Simulated open collector/open drain I/O
Open collector/open drain outputs are
useful in several different interfacing situations. Along with providing a node in a dotted
AND bus, they are also useful to interface with I2C and other networks. I find that the sin-
gle open drain pin available in the different PICmicro® MCU devices to be insufficient for
many applications, which is why I find it useful to simulate an open drain driver with a
standard I/O pin.
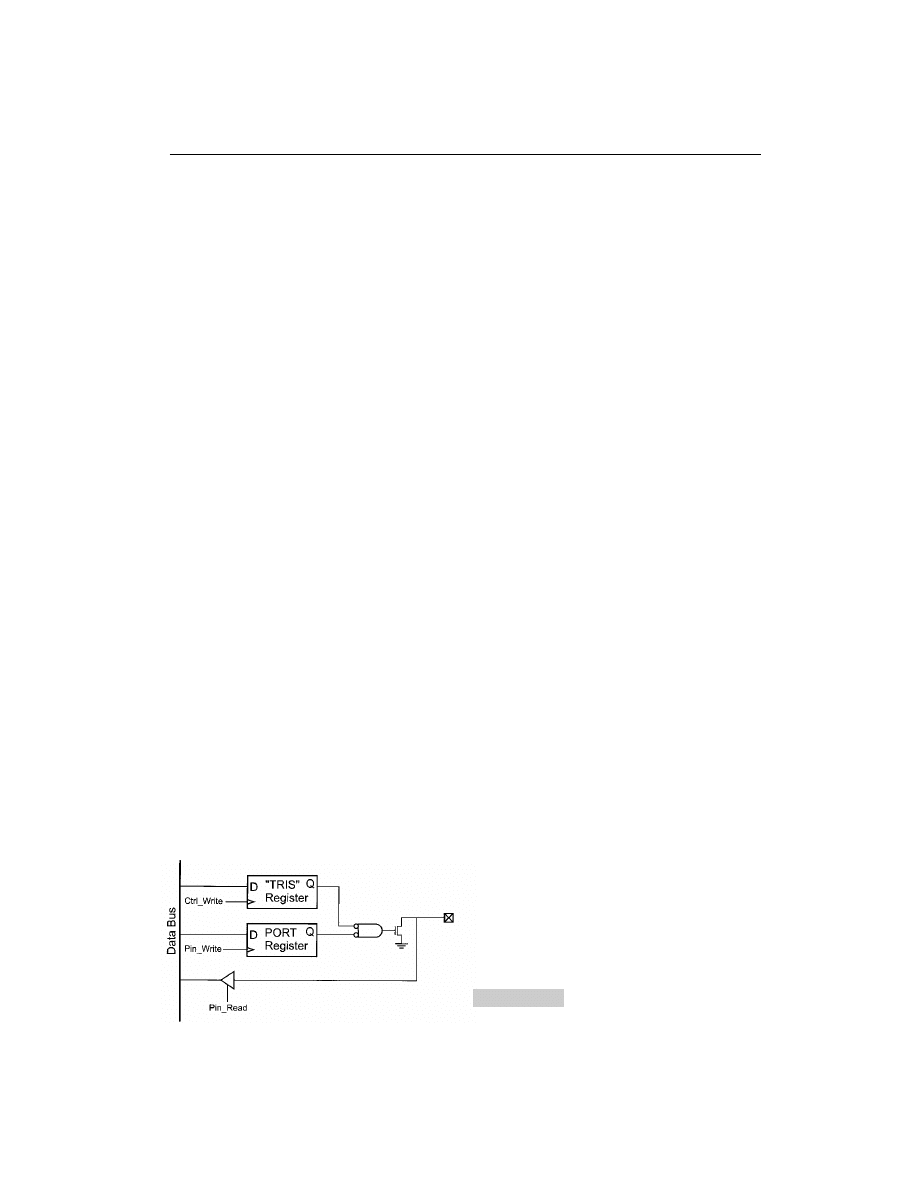
An open drain pin (shown in Fig. 6-7) consists of a N-channel MOSFET transistor with
its source connected to the I/O pin. Because there is no P-channel high driver in the pin cir-
cuit, when a 1 is being output the only transistor will be turned off and the pin is allowed
to float. Floating, in most applications, means having a pull up and multiple open-
collector/open-drain drivers on the net.
When the data out bit is low (and TRIS is enabled for output), the pin is pulled low. Oth-
erwise, it is not electrically connected to anything (“tristated”).
This action can be simulated by using the following code, which enables the I/O pin output
to be low if the carry flag is reset. If the carry flag is set, then the pin is put into input mode.
bcf
PORT#, pin
;
Make Sure PORTB Pin Bit is “0”
bsf
STATUS, RPO
btfss
STATUS, C
;
If Carry Set, Disable Open Collector
goto
$
4
;
Carry Reset, Enable Open Collector
nop
bsf
TRIS ∧ 0x080, pin
goto
$
3
bcf
TRIS ∧ 0x080, pin
goto
$
1
bcf
STATUS, RPO
This code, which is designed for mid-range PICmicro® MCUs, will either set the pin to
input (tristate) mode or pulled low on the sixth cycle after it has been invoked, I normally
put this code into a macro, with the port and pin specified as parameters.
It will seem like I went to some lengths to ensure that the timing was the same for mak-
ing the bit tristate (input mode) or pulled low to 0, as well as the state specified by the carry
flag. Regardless of the execution path, this code will take eight instruction cycles and the
INTERFACING TO EXTERNAL DEVICES
261
Figure 6-7 “Open Drain” no pin
configuration
I/O pin value will be changed at five cycles. I did this because this function is often used
with I2C or other network protocols and using the carry flag allows bits to be shifted
through this code easily.
In the sample open-drain simulation code, I reset the specified pin before potentially
changing its TRIS value. This is to prevent it from being the wrong value, based on reads
and writes of other I/O pins. This is the “inadvertent pin changes” that I’ve written about
elsewhere in the book.
DIFFERENT LOGIC LEVELS WITH ECL
AND LEVEL SHIFTING
Often, when working with PICmicro® MCUs and other microcontrollers, you will have to
interface devices of different logic families together. For standard positive voltage logic
families (i.e., TTL to CMOS), this is not a problem; the devices can be connected directly.
But, interfacing a negative voltage logic to a positive voltage logic family (i.e., ECL to
CMOS) can cause some problems.
Although chips usually are available to provide this interface function (for both input
and output), they typically only work in only one direction (which precludes bi-directional
busses—even if the logic family allows it) and the chips can add a significant cost to the
application.
The most typical method of providing level conversion is to match the switching thresh-
old voltage levels of the two logic families.
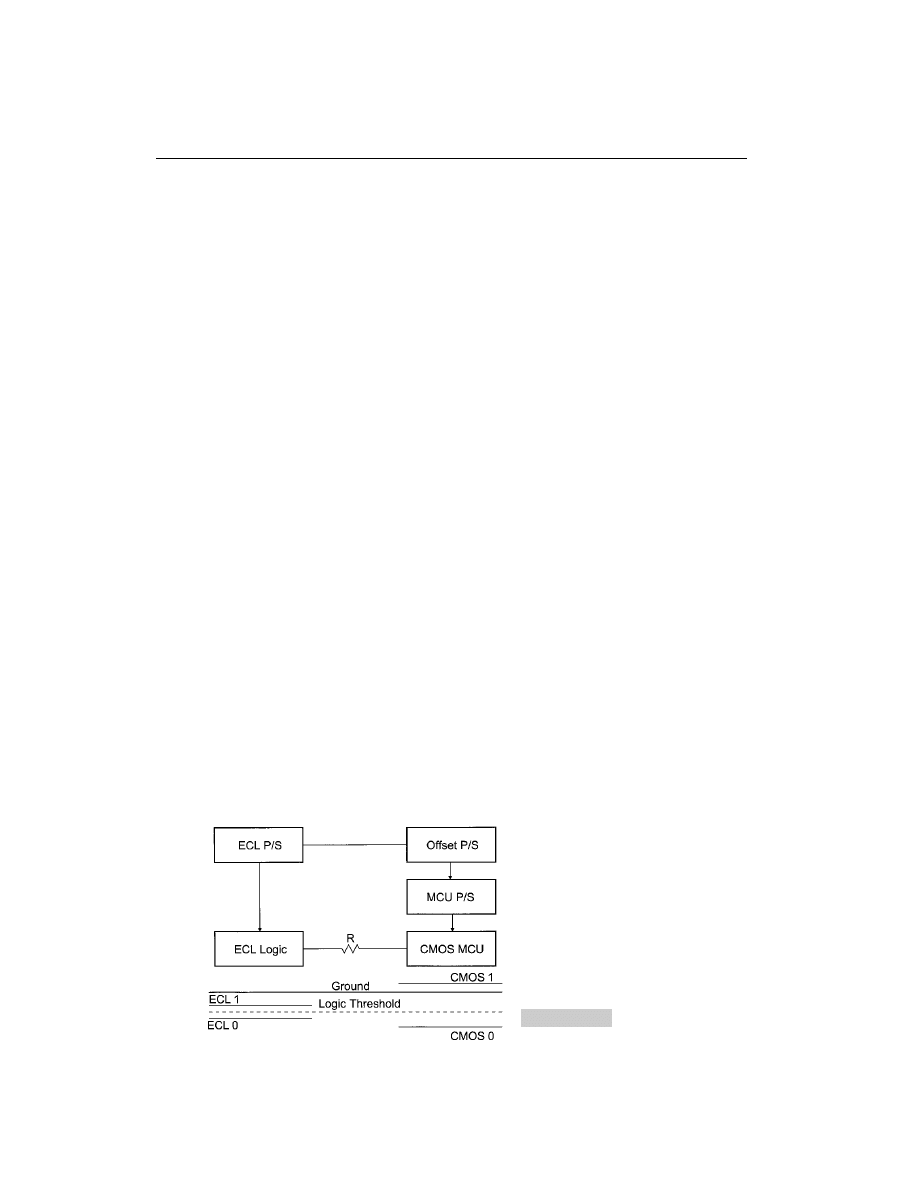
As shown in Fig. 6-8, the ground level for the COMS microcontroller has been shifted
below ground (the microcontroller’s “ground” is actually the CMOS 0 level). The purpose
of this is to place the point where the microcontroller’s input logic switches between a 0
and a 1 (known as the input logic threshold voltage) is the same as the ECL Logic. The re-
sistor (which is between 1 K and 10 K) is used to limit the current flow because of the dif-
ferent logic swings of the two different families.
Looking at the circuit block diagram, you’re probably thinking that the cost of shifting
the microcontroller power supply is much greater than just a few interface chips.
Actually, this isn’t a big concern because of the low power requirements of modern
CMOS microcontrollers. In Fig. 6-8, the microcontroller’s ground reference can be pro-
duced by placing a silicon diode (which has a 0.7 voltage drop across it) between it and the
ECL’s 2-volt power supply negative output. The 5-volt and 2-volt supplies’ positive out-
put have a common “threshold” voltage for this circuit and the registor limits the CMOS
262
PICmicro® MCU APPLICATION DESIGN AND HARDWARE INTERFACING
Figure 6-8 ECL to CMOS logic
level conversion
logic swing to the 1 volt ECL swing. This example might seem simplistic, but it would
provide the ability to connect a CMOS 0- to
5-volt microcontroller to ECL logic (and al-
low signals to be sent in either direction, between the PICmicro® MCU and the ECL
Logic) at a very low cost.
LEDs
The most common form of output from a microcontroller is the Light-Emitting Diode
(LED). As an output device, it is cheap and easy to wire to a microcontroller. Generally,
LEDs require anywhere from 5 mA of current to light (which is within the output
sink/source specification for most microcontrollers). But, what has to be remembered is,
LEDs are diodes, which means that current flows in one direction only. The typical circuit
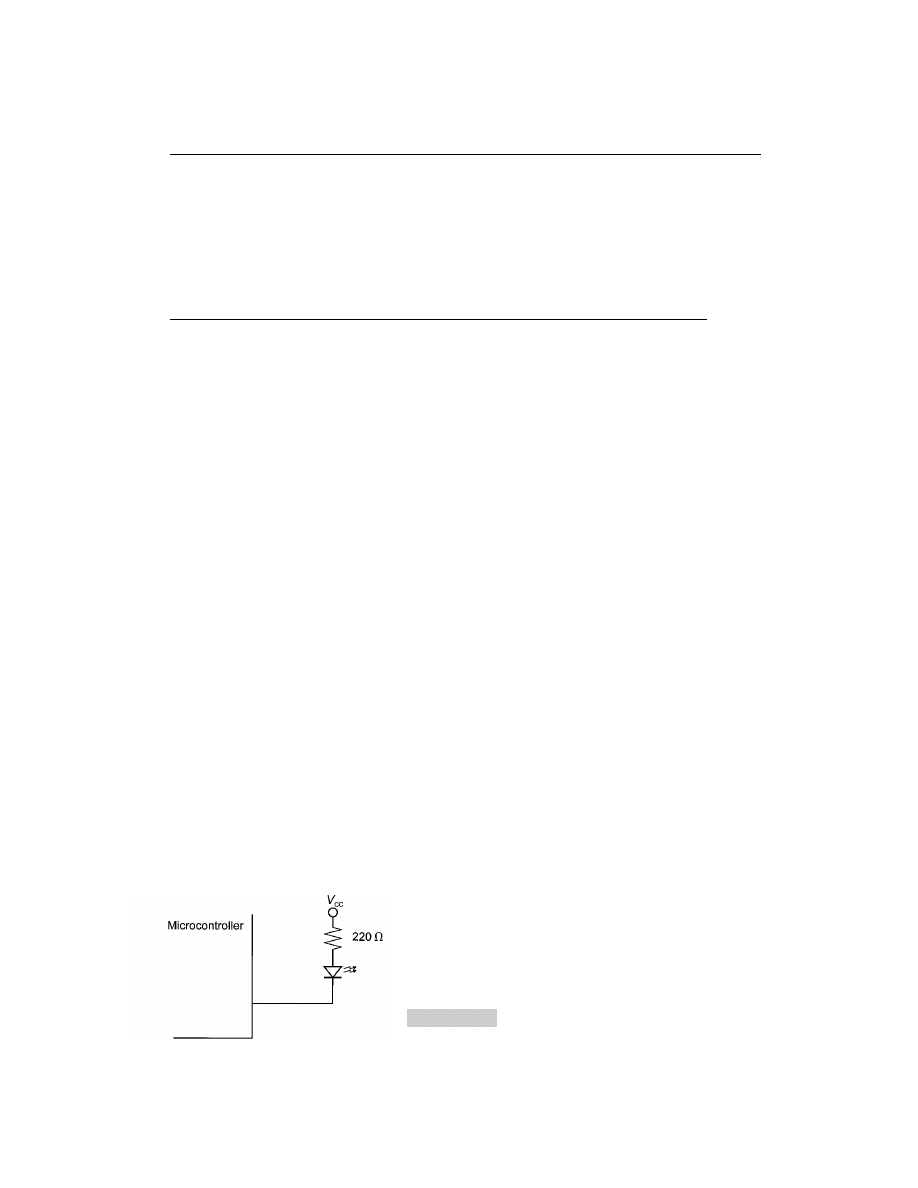
that I use to control an LED from a PICmicro® MCU I/O pin is shown in Fig. 6-9.
With this circuit, the LED will light when the microcontroller’s output pin is set to 0
(ground potential). When the pin is set to input or outputs a 1, the LED will be turned off.
The 220 Ohm resistor is used for current limiting and will prevent excessive current that
can damage the microcontroller, LED and the power supply. Elsewhere in the book, I have
shown how this resistor value is calculated. Some microcontrollers (such as the PICmi-
cro® MCU) already have current-limiting output pins, which lessens the need for the cur-
rent-limiting resistor. But, I prefer to always put in the resistor to guarantee that a short
(either to ground or V
cc
) cannot ever damage the microcontroller of the circuit it’s con-
nected to (including the power supply).
Probably the easiest way to output numeric (both decimal and hex) data is via seven-
segment LED displays. These displays were very popular in the 1970s (if you’re old
enough, your first digital watch probably had seven-segment LED displays), but have been
largely replaced by LCDs.
Seven-segment LED displays (Fig. 6-10) are still useful devices that can be added to a
circuit without a lot of software effort. By turning on specific LEDs (each of which light
up a segment in the display), the display can be used to output decimal numbers.
Each one of the LEDs in the display is given an identifier and a single pin of the LED is
brought out of the package. The other LED pins are connected together and wired to a
common pin. This common LED pin is used to identify the type of seven-segment display
(as either common cathode or common anode).
Wiring one display to a microcontroller is quite easy—it is typically wired as seven (or
eight, if the decimal point, DP, is used) LEDs wired to individual pins.
The most important piece of work you’ll do when setting up seven-segment LED dis-
plays is matching and documenting the microcontroller bits to the LEDs. Spending a few
moments at the start of a project will simplify wiring and debugging the display later.
LEDs
263
Figure 6-9 LED connection to a
microcontroller

The typical method of wiring multiple seven-segment LED displays together is to wire
them all in parallel and then control the current flow through the common pin. Because the
current is generally too high for a single microcontroller pin, a transistor is used to pass the
current to the common power signal. This transistor selects which display is active.
Figure 6-11 shows common-cathode seven-segment displays connected to a microcon-
troller.
In this circuit, the microcontroller will shift between the displays showing each digit in
a very short time slice. This is usually done in a timer interrupt handler. The basis for the
interrupt handler’s code is:
Int
- Save Context Registers
- Reset Timer and Interrupt
- LED_Display
0
;
Turn Off all the LEDs
- LED_Output
Display[ Cur ]
- Cur
(Cur 1) mod #Displays ; Point to Next Sequence Display
- LED_Display
1 Cur
;
Display LED for Current Display
- Restore Context Registers
- Return from Interrupt
This code will cycle through each of the digits (and displays), having current go through
the transistors for each one. To avoid flicker, I generally run the code so that each digit is
turned on/off at least 50 times per second. The more digits you have, the faster you have
264
PICmicro® MCU APPLICATION DESIGN AND HARDWARE INTERFACING
Figure 6-10
Organization of a 7 segment LED
display
Figure 6-11
Wiring four 7
segment LED displays
to cycle the interrupt handler (i.e., eight seven-segment displays must cycle at least 400
digits per second, which is eight times as fast as a single display).
You might feel that assigning a microcontroller bit to select each display LED to be
somewhat wasteful (at least I do). I have used high-current TTL demultiplexer (i.e.,
74S138) outputs as the cathode path to ground (instead of discrete transistors). When the
output is selected from the demultiplexer, it goes low, allowing current to flow through
the LEDs of that display (and turning it on). This actually simplifies the wiring of the fi-
nal application as well. The only issue is to ensure that the demultiplexer output can sink
the maximum of 140 mA of current that will come through the common cathode con-
nection.
Along with seven-segment displays, 14- and 16-segment LED displays are available,
which can be used to display alphanumeric characters (A to Z and 0 to 9). By following the
same rules as used when wiring up a seven-segment display, you shouldn’t have any prob-
lems wiring the display to a PICmicro® MCU. Chapter 16 shows how seven- and 16-seg-
ment LEDs can be used to display letters and numbers.
Switch Bounce
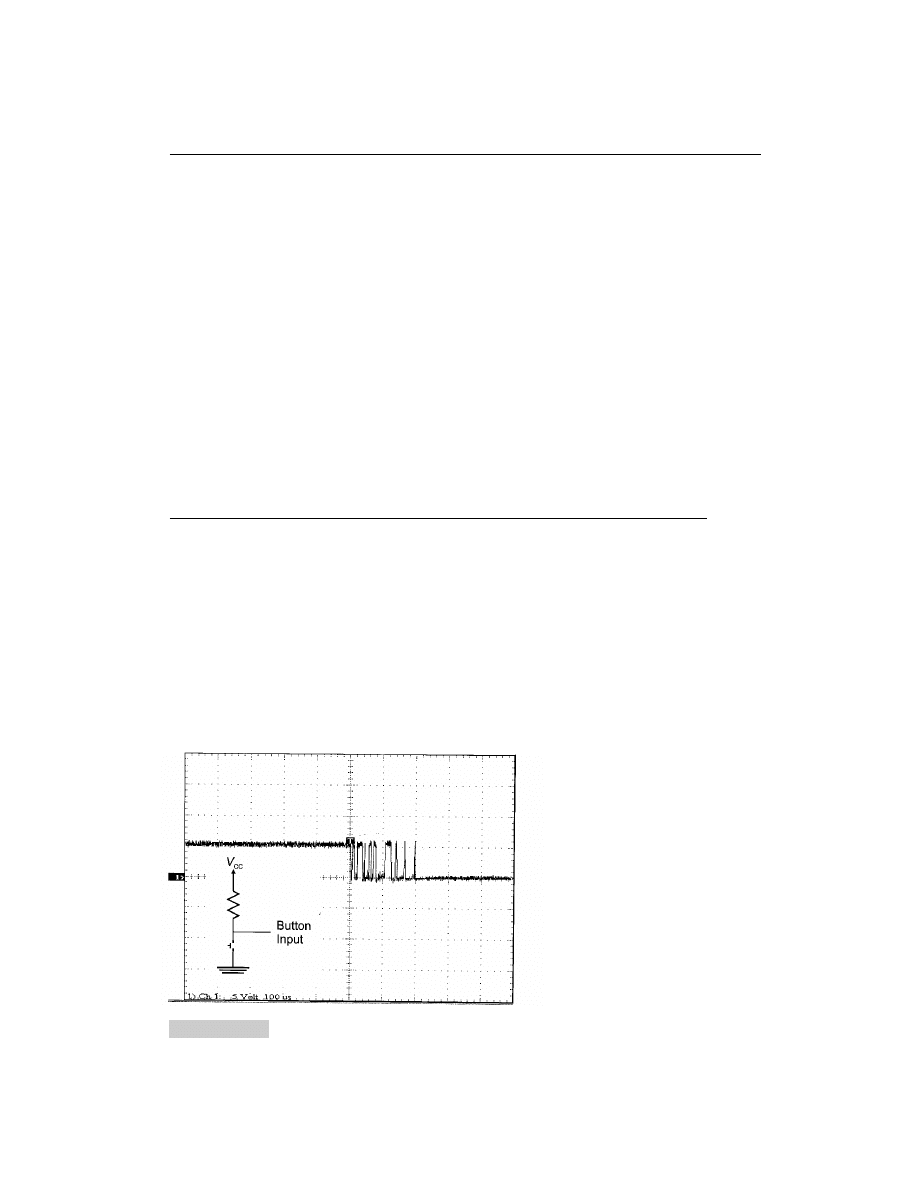
When a button is opened or closed, we perceive that it is a clean operation that really looks
like a step function. In reality, the contacts of a switch bounce when they make contact, re-
sulting in a jagged signal (Fig. 6-12).
When this signal is passed to a PICmicro® MCU, the microcontroller can recognize this
as multiple button presses, which will cause the application software to act as if multiple,
very fast button presses have occurred. To avoid this problem the “noisy” switch press is
“debounced” into an idealized “press,” or the step function (Fig. 6-13). Two common
methods are used to debounce button inputs.
The first is to poll the switch line at short intervals until the switch line stays at the same
level for an extended period of time. A button is normally considered to be debounced if it
SWITCH BOUNCE
265
Figure 6-12
Oscilloscope picture of a switch “bounce”

does not change state for 20 ms or longer. By polling the line every 5 ms, this debouncing
method can be conceptualized quite easily (Fig. 6-14).
The advantage of this method is that it can be done in an interrupt handler and the line
can be scanned periodically with a flag set if the line is high and another flag in the line is
low. For the “indeterminate” stage, neither bit would be set. This method of debouncing is
good for debouncing keyboard inputs.
The second method is to continually poll the line and wait for 20 ms to go by without
the line changing state. The algorithm that I use for this function is:
ButLoop:
while (Button
High);
// Poll Until Button is Pressed
for (Dlay
0; (Dlay 20msec) and (Button Low); Dlay);
if (Dlay !
20 msec)
// Repeat Process if 20 msecs have
goto ButLoop;
// Not gone by with Button Pressed
This code will wait for the button to be pressed and then poll it continuously until either
20 ms has passed or the switch has gone high again. If the switch goes high, the process is
repeated until it is held low for 20 ms.
This method is well suited to applications that don’t have interrupts, only have one but-
ton input, and have no need for processing while polling the button. As restrictive as it
sounds, many applications fit these criteria.
This method can also be used with interrupt inputs along with TMR0 in the PICmicro®
MCU, which eliminates these restrictions. The interrupt handler behaves like the follow-
ing pseudo-code when one of the port changes on interrupt bits is used for the button
input:
interrupt ButtonDebounce()
// Set Flags According to the
{
//
Debounced State of the Button
if (T0IF
1) {
// TMR0 Overflow, Button Debounced
T0IF
0; T0IE 0;
// Reset and Turn off TMR0 Interrupts
if (Button
High) {
Pressed
0; NotPressed 0; // Set the State of the Button
} else {
Pressed
1; NotPressed 0;
266
PICmicro® MCU APPLICATION DESIGN AND HARDWARE INTERFACING
Figure 6-14
Polling to eliminate
“bounce”
Figure 6-13
Idealized switch
operation
}
} else {
// Port Change Interrupt
NotPressed
1;
// Nothing True
RBIF
0;
// Reset the Interrupt
TMR0
20msecDlay;
// Reset Timer 0 for 20 ms
T0IF
0; T0IE 1;
// Enable the Timer Interrupt
}
} // End ButtonDebounce
This code waits for the input pin to change state and then resets the two flags that indi-
cate the button state and starts TRM0 to request an interrupt after 20 ms. After a port
change interrupt, notice that I reset the button state flags to indicate to the mainline that the
button is in a transition state and is not yet debounced. If TMR0 overflows, then the but-
ton is polled for its state and the appropriate button state flags are set and reset.
The mainline code should poll the Pressed and NotPressed flags when it is waiting for a
specific state. Chapter 15 shows this method of using TMR0 and how interrupts can be im-
plemented with or without interrupts.
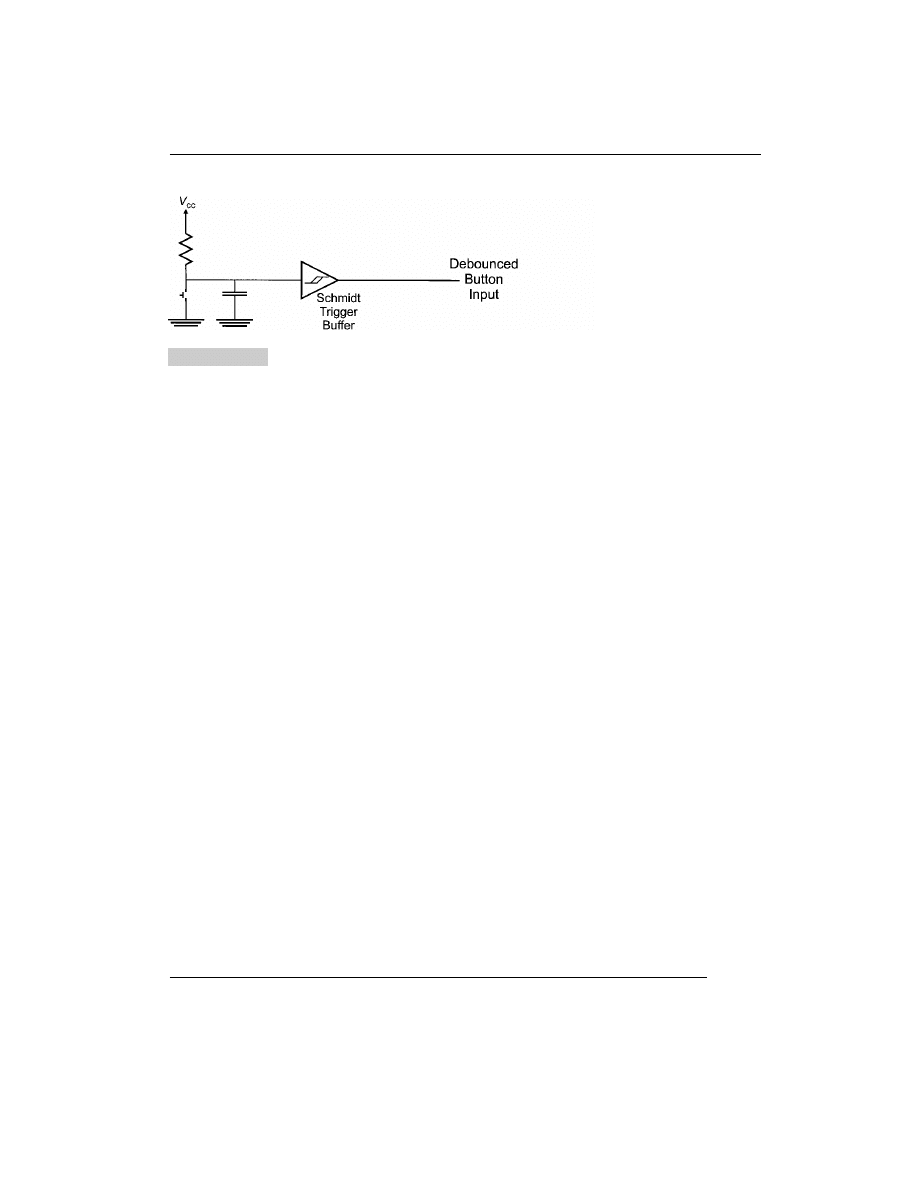
If you don’t want to use the software approaches, you can use a capacitor to filter the
bouncing signal and pass it into a Schmidt trigger input. Schmidt trigger inputs have dif-
ferent thresholds, depending on whether the signal is rising or falling. For rising edges, the
trigger point is higher than falling. Schmidt trigger inputs have the “hysteresis” symbol
put in the buffer (Fig. 6-15).
This method is fairly reliable, but requires an available Schmidt trigger gate in your circuit.
A Schmidt trigger input might be available in your PICmicro® MCU, but check the data
sheet to find out which states and peripheral hardware functions can take advantage of it.
Lastly, choose buttons with a positive “click” when they are pressed and released. These
have reduced bouncing, often have a “self cleaning” feature to reduce poor contacts, and
are a lot easier to work with than other switches that don’t have this feature. I have used a
number of switches over the years that don’t have this click and they can be a real problem
in circuits with intermittent connections and unexpected “bouncing” that occurs while the
button is pressed and held down.
Matrix Keypads
Switch matrix keyboards and keypads are really just an extension of the button concepts,
with many of the same concerns and issues to watch out for. The big advantage that the
matrix keyboards gives you is that they provide a large number of button inputs for a rel-
MATRIX KEYPADS
267
Figure 6-15
Debounced switch using a Schmidt Trigger
atively small number of PICmicro® MCU pins. The PICmicro® MCU is well designed
for simply implementing switch matrix keypads, which, like LCD displays that are ex-
plained in the next section, can add a lot to your application with a very small investment
in hardware and software.
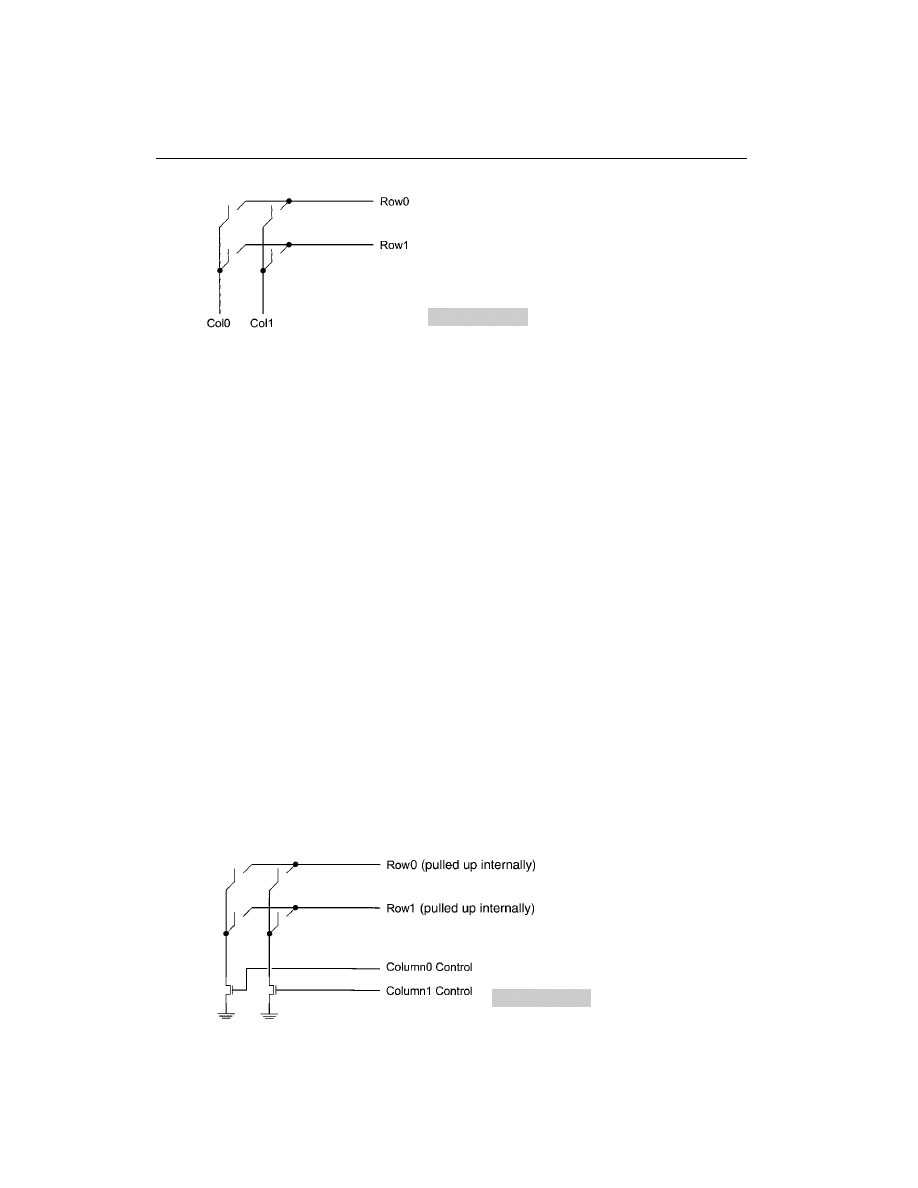
A switch matrix is simply a two-dimensional matrix of wires, with switches at each ver-
tex. The switch is used to interconnect rows and columns in the matrix (Fig. 6-16).
This diagram might not look like the simple button, but it will become more familiar when
I add switchable ground connections on the columns (Fig. 6-17).
In this case, by connecting one of the columns to ground, if a switch is closed, the pull
down on the row will connect the line to ground. When the row is polled by an I/O pin, a
0 or low voltage will be returned instead of a 1 (which is what will be returned if the switch
in the row that is connected to the ground is open).
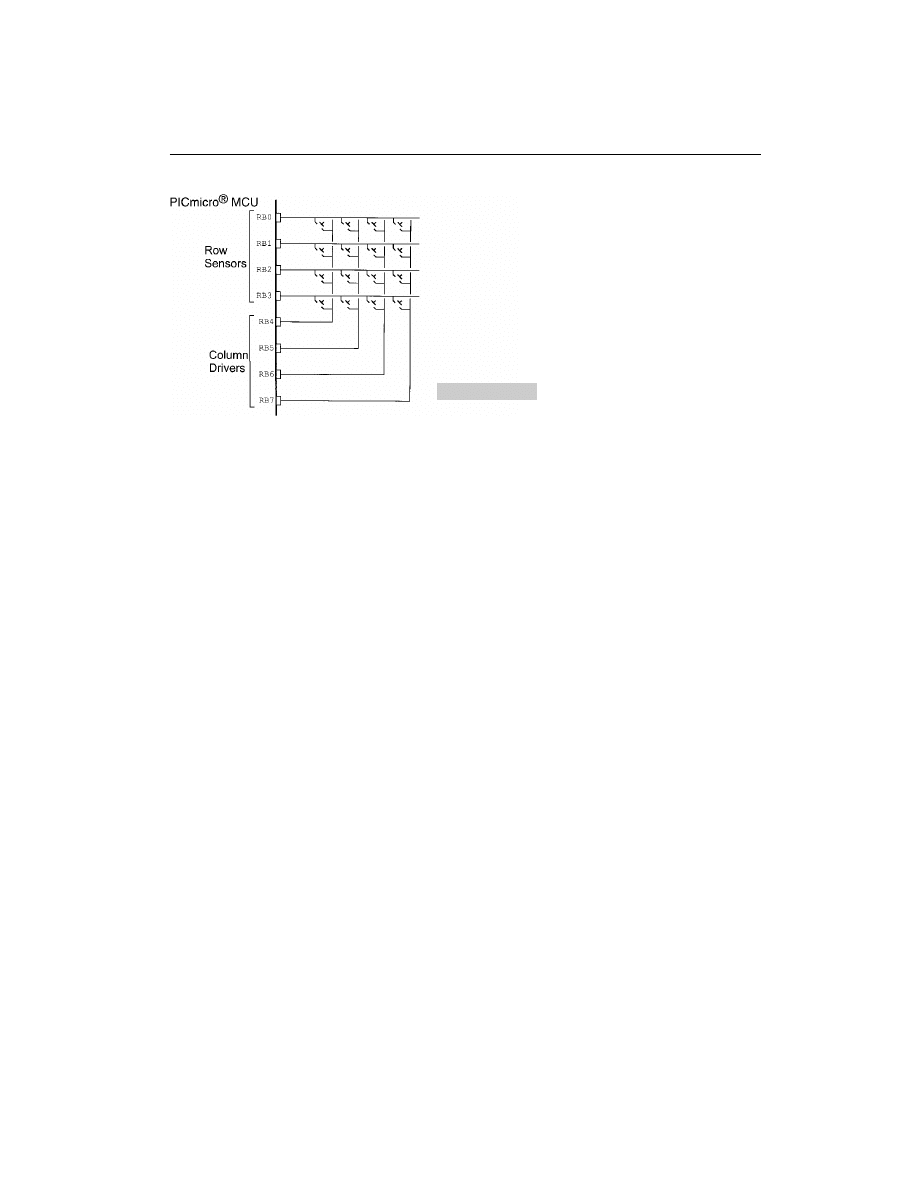
As stated, the PICmicro® MCU is well suited to implement switch matrix keyboards
with PORTB’s internal pull-ups and the ability of the I/O ports to simulate the open-drain
pull-downs of the columns (Fig. 6-18). Normally, the pins connected to the columns are
left in tristate (input) mode. When a column is being scanned, the column pin is output en-
abled driving a 0 and the four input bits are scanned to see if any are pulled low.
In this case, the keyboard can be scanned for any closed switches (buttons pressed) us-
ing the code:
int KeyScan()
// Scan the Keyboard and Return when a
{
//
key is pressed
int
i
0;
int
key
1;
while (key
1) {
for (i
0; (i 4) & ((PORTB & 0x00F) 0x0F0); i);
268
PICmicro® MCU APPLICATION DESIGN AND HARDWARE INTERFACING
Figure 6-16
2x2 switch matrix
Figure 6-17
Switch matrix with pull
down transistors
switch (PORTB & 0x00F) { // Find Key that is Pressed
case 0x00E:
// Row 0
key
i;
break;
case 0x00D:
// Row1
case 0x00C:
key
0x04 i;
break;
case 0x00B:
// Row2
case 0x00A:
case 0x009:
case 0x008:
key
0x08 i;
break;
else
// Row3
key
0x0C i;
break;
}//end switch
}// end while
return key;
} // End KeyScan
The KeyScan function will only return when a key has been pressed. This routine will
not allow keys to be debounced or for other code to execute while it is running.
These issues can be resolved by putting the key scan into an interrupt handler, which ex-
ecutes every 5 ms:
Interrupt KeyScan( )
// 5 msec Interval Keyboard Scan
{
int i
0;
int key
1
for (i
0; (i 4) & ((PORTB & 0x00F) 0x00F)); i);
if (PORTB & 0x00F) !
0x00F) {
// Key Pressed
switch (PORTB & 0x00F) {
// Find Key that is Pressed
case 0x00E:
// Row 0
key
i;
MATRIX KEYPADS
269
Figure 6-18
4x4 switch matrix connected
to PORTB

break;
case 0x00D:
// Row1
case 0x00C:
key
0x04 i;
break;
case 0x00B:
// Row2
case 0x00A:
case 0x009:
case 0x008:
key
0x08 i;
break;
else
// Row3
key
0x0C i;
break;
}//end switch
if (key
KeySave) {
keycount
keycount 1; // Increment Count
//
-- Put in Auto Repeat Code Here
if (keycount
4)
keyvalid
key;
// Debounced Key
} else
keycount
0;
// No match
Start Again
KeySave
key;
// Save Current key for next 5 msec
}
// Interval
}// End KeySave
This interrupt handler will set the keyvalid variable to the row/column combination of
the key button (which is known as a scan code) when the same value comes up four times
in a row. This for time scan is the debounce routine for the keypad. If the value doesn’t
change for four intervals (20 ms in total), the key is determined to be debounced.
There are two things to notice about this code. First, in both routines, I handle the row
with the highest priority. If multiple buttons are pressed, then the one with the highest bit
number will be the one that is returned to the user.
The second point is, this code can have an auto repeat function added to it very easily.
To do this, a secondary counter has to be first cleared and then incremented each time the
keycount variable is four or greater. To add an auto repeat key every second (200 inter-
vals), the following code is added in the interrupt handler at the comment.
if (keycount
4) {
keyrepeat
keyrepeat 1; // Decrement the Key Auto Repeat Value
if (keyrepeat
0) {
keyrepeat
200;
// Restart the 1 second Auto Repeat Count
keycount
3;
// Reset the counter
keyvalid
key;
// Return the key
}
} else
// Reset the Auto Repeat Counter
keyrepeat
1;
// End Outputting the Value with Auto
//
Repeat
The code and methodology for handling switch matrix keypad scans I’ve outlined here
probably seems pretty simple. I’m sure you’ll be surprised that, with a scanned keyboard,
it is most difficult to figure out the scan codes for specific keys and how to wire the key-
board. Chapter 15 demonstrates how this can be done.
270
PICmicro® MCU APPLICATION DESIGN AND HARDWARE INTERFACING

LCDs
LCDs can add a lot to your application in terms of providing a useful interface for the user,
debugging an application, or just giving it a professional look. The most common type of
LCD controller is the Hitachi 44780, which provides a relatively simple interface between
a processor and an LCD. Using this interface is often not attempted by new designers and
programmers because it is difficult to find good documentation on the interface, initializ-
ing the interface can be a problem, and the displays themselves are expensive.
I have worked with Hitachi 44780-based LCDs for a while now and I don’t believe any
of these perceptions. LCDs can be added quite easily to an application and use as few as
three digital output pins for control. As for cost, LCDs can be often pulled out of old de-
vices or found in surplus stores for less than a dollar.
The purpose of this section is to give a brief tutorial on how to interface with Hitachi
44780-based LCDs. I have tried to provide all of the data necessary for successfully
adding LCDs to your application. In the book, I use Hitachi 44780-based LCDs for a num-
ber of different projects.
The most common connector used for the 44780-based LCDs is 14 pins in a row, with
pin centers 0.100” apart. The pins are wired as in Table 6-2.
As you would probably guess from this description, the interface is a parallel bus, al-
lowing simple and fast reading/writing of data to and from the LCD.
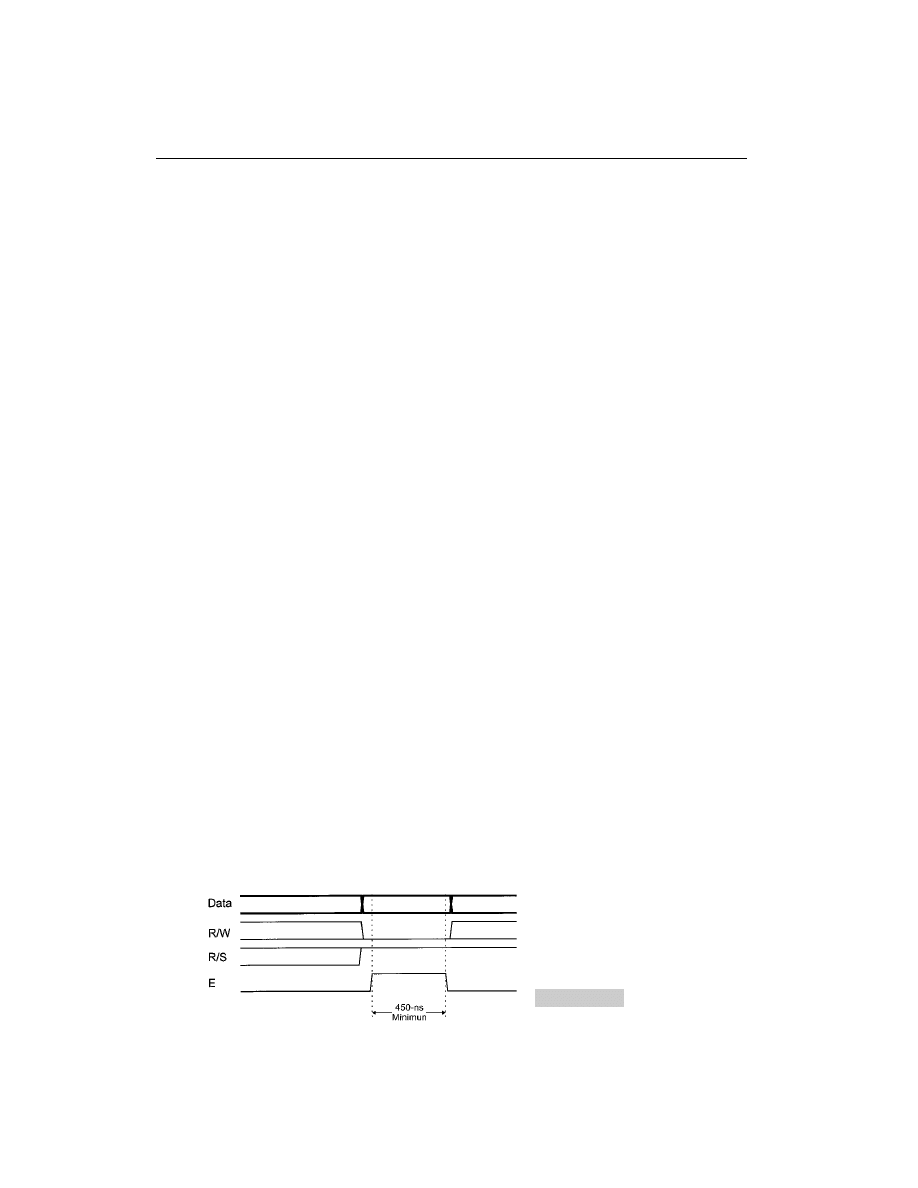
The waveform shown in Fig. 6-19 will write an ASCII byte out to the LCD’s screen.
The ASCII code to be displayed is eight bits long and is sent to the LCD either four or eight
bits at a time. If four-bit mode is used, two nybbles of data (sent high four bits and then low
four bits with an E clock pulse with each nybble) are sent to make up a full eight-bit trans-
fer. The E clock is used to initiate the data transfer within the LCD.
Sending parallel data as either four or eight bits are the two primary modes of operation.
Although there are secondary considerations and modes, deciding how to send the data to
the LCD is the most crucial decision to be made for an LCD interface application.
LCDs
271
TABLE 6–2
Hitachi 44780 Based LCD Pinout
PIN
DESCRIPTION
1
Ground
2
Vcc
3
Contrast Voltage
4
“R/S” - Instruction/Register Select
5
“R/W” - Read/Write LCD Registers
6
“E” - Clock
7-14
D0-D7 Data Pins
Eight-bit mode is best used when speed is required in an application and 10 I/O pins are
available. Four-bit mode requires six bits. To wire a microcontroller to an LCD in four-bit
mode, just the top four bits (DB4-7) are written to.
The R/S bit is used to select whether data or an instruction is being transferred between the
microcontroller and the LCD. If the bit is set, then the byte at the current LCD cursor position
can be read or written. When the bit is reset, either an instruction is being sent to the LCD or
the execution status of the last instruction is read back (whether or not it has completed).
The different instructions available for use with the 44780 are shown in Table 6-3.
The bit descriptions for the different commands are:
*Not used/ignored. This bit can be either 1 or 0
Set cursor move direction:
ID
Increment the cursor after each byte written to display if set
S
Shift display when byte written to display
Enable display/cursor
D
Turn display on(1)/off(0)
C
Turn cursor on(1)/off(0)
B
Cursor blink on(1)/off(0)
Move cursor/shift display
SC
Display shift on(1)/off(0)
RL
Direction of shift right(1)/left(0)
Set interface length
DL
Set data interface length 8(1)/4(0)
N
Number of display lines 1(0)/2(1)
F
Character font 5x10(1)/5x7(0)
Poll the busy flag
BF
This bit is set while the LCD is processing
Move cursor to CGRAM/display
A
Address
Read/write ASCII to the display
H
Data
Reading data back is best used in applications that require data to be moved back and forth
on the LCD (such as in applications that scroll data between lines). The busy flag can be
polled to determine when the last instruction that has been sent has completed processing.
For most applications, there really is no reason to read from the LCD. I usually tie R/W
to ground and just wait the maximum amount of time for each instruction (4.1 ms for clear-
ing the display or moving the cursor/display to the home position, 160
s for all other
commands). As well as making my application software simpler, it also frees up a micro-
controller pin for other uses. Different LCDs execute instructions at different rates and to
272
PICmicro® MCU APPLICATION DESIGN AND HARDWARE INTERFACING
Figure 6-19
LCD data write
waveform

TABLE 6–3
Hitachi 44780 Based LCD Commands
R/S
R/W
D7
D6
D5
D4
D3
D2
D1
D0
INSTRUCTION/DESCRIPTION
4
5
14
13
12
11
10
9
8
7
Pins
0
0
0
0
0
0
0
0
0
1
Clear Display
0
0
0
0
0
0
0
0
1
*
Return Cursor and
LCD to Home Position
0
0
0
0
0
0
0
1
ID
S
Set Cursor Move Direction
0
0
0
0
0
0
1
D
C
B
Enable Display/Cursor
0
0
0
0
0
1
SC
RL
*
*
Move Cursor/Shift Display
0
0
0
0
1
DL
N
F
*
*
Reset/Set Interface Length
0
0
0
1
A
A
A
A
A
A
Move Cursor to CGRAM
0
0
1
A
A
A
A
A
A
A
Move Cursor to Display
0
1
BF
*
*
*
*
*
*
*
Poll the “Busy Flag”
1
0
H
H
H
H
H
H
H
H
Write Hex Character to the
Display at the Current
Cursor Position
1
1
H
H
H
H
H
H
H
H
Read Hex Character at the
Current Cursor Positon on
the Display
avoid problems later on (such as if the LCD is changed to a slower unit), I recommend just
using the maximum delays listed here.
In terms of options, I have never seen a 5x10 pixel character LCD display. This means
that the F bit in the set interface instruction should always be reset (equal to 0).
Before you can send commands or data to the LCD module, the module must be initial-
ized. For eight-bit mode, this is done using the following series of operations:
1. Wait more than 15 ms after power is applied.
2. Write 0x030 to LCD and wait 5 ms for the instruction to complete.
3. Write 0x030 to LCD and wait 160 usecs for instruction to complete.
4. Write 0x030 AGAIN to LCD and wait 160 usecs or Poll the Busy Flag.
5. Set the Operating Characteristics of the LCD.
- Write “Set Interface Length”
- Write 0x010 to prevent shifting after character write.
- Write 0x001 to Clear the Display
- Write “Set Cursor Move Direction” Setting Cursor Behavior Bits
- Write “Enable Display/Cursor” & enable Display and Optional Cursor
In describing how the LCD should be initialized in four-bit mode, I specify writing to
the LCD in terms of nybbles. This is because initially, just single nybbles are sent (and not
two nybbles, which make up a byte and a full instruction). As mentioned, when a byte is
sent, the high nybble is sent before the low nybble and the E pin is toggled each time that
four bits are sent to the LCD.
To initialize in four-bit mode the following nybbles are first sent to the LCD:
LCDs
273

1. Wait more than 15 ms after power is applied.
2. Write 0x03 to LCD and wait 5 ms for the instruction to complete.
3. Write 0x03 to LCD and wait 160 usecs for instruction to complete.
4. Write 0x03 AGAIN to LCD and wait 160 usecs (or poll the Busy Flag).
5. Set the Operating Characteristics of the LCD.
- Write 0x02 to the LCD to Enable Four Bit Mode
All following instruction/data writes require two nybble writes:
- Write “Set Interface Length”
- Write 0x01/0x00 to prevent shifting of the display
- Write 0x00/0x01 to Clear the Display
- Write “Set Cursor Move Direction” Setting Cursor Behavior Bits
- Write “Enable Display/Cursor” & enable Display and Optional Cursor
Once the initialization is complete, the LCD can be written to with data or instructions
as required. Each character to display is written like the control bytes, except that the R/S
line is set. During initialization, by setting the S/C bit during the Move Cursor/Shift Dis-
play command, after each character is sent to the LCD, the cursor built into the LCD will
increment to the next position (either right or left). Normally, the S/C bit is set (equal to 1),
along with the R/L bit in the Move Cursor/Shift Display command for characters to be
written from left to right (as with a “TeleType” video display).
One area of confusion is how to move to different locations on the display and, as a fol-
low on, how to move to different lines on an LCD display. Table 6-4 shows how different
LCD displays that use a single 44780 can be set up with the addresses for specific charac-
ter locations. The LCDs listed are the most popular arrangements available and the layout
is given as number of columns by number of lines.
The ninth character is the position of the ninth character on the first line. Most LCD dis-
plays have a 44780 and support chip to control the operation of the LCD. The 44780 is re-
sponsible for the external interface and provides sufficient control lines for 16 characters
on the LCD. The support chip enhances the I/O of the 44780 to support up to 128 charac-
ters on an LCD in two lines of eight. From Table 6-4, it should be noted that the first two
entries (8x1, 16x1) only have the 44780 and not the support chip. This is why the ninth
character in the 16x1 does not appear at address 8 and shows up at the address that is com-
mon for a two-line LCD.
I’ve included the 40 character by 4 line (40x4) LCD because it is quite common. Nor-
mally, the LCD is wired as two 40x2 displays. The actual connector is normally 16 bits
wide with all the 14 connections of the 44780 in common, except for the E (strobe) pins.
The E strobes are used to address between the areas of the display used by the two devices.
The actual pinouts and character addresses for this type of display can vary between man-
ufacturers and display part numbers.
When using any kind of multiple 44780 LCD display, you should probably only display
one 44780’s cursor at a time to avoid confusing the user.
Cursors for the 44780 can be turned on as a simple underscore at any time using the En-
able Display /Cursor LCD instruction and setting the C bit. I don’t recommend using the
B (Block mode) bit because this causes a flashing full-character square to be displayed and
it is very annoying.
The LCD can be thought of as a TeleType display because in normal operation, after a
character has been sent to the LCD, the internal cursor is moved one character to the right.
The clear display and return cursor and LCD to home position instructions are used to re-
set the cursor’s position to the top right character on the display.
274
PICmicro® MCU APPLICATION DESIGN AND HARDWARE INTERFACING
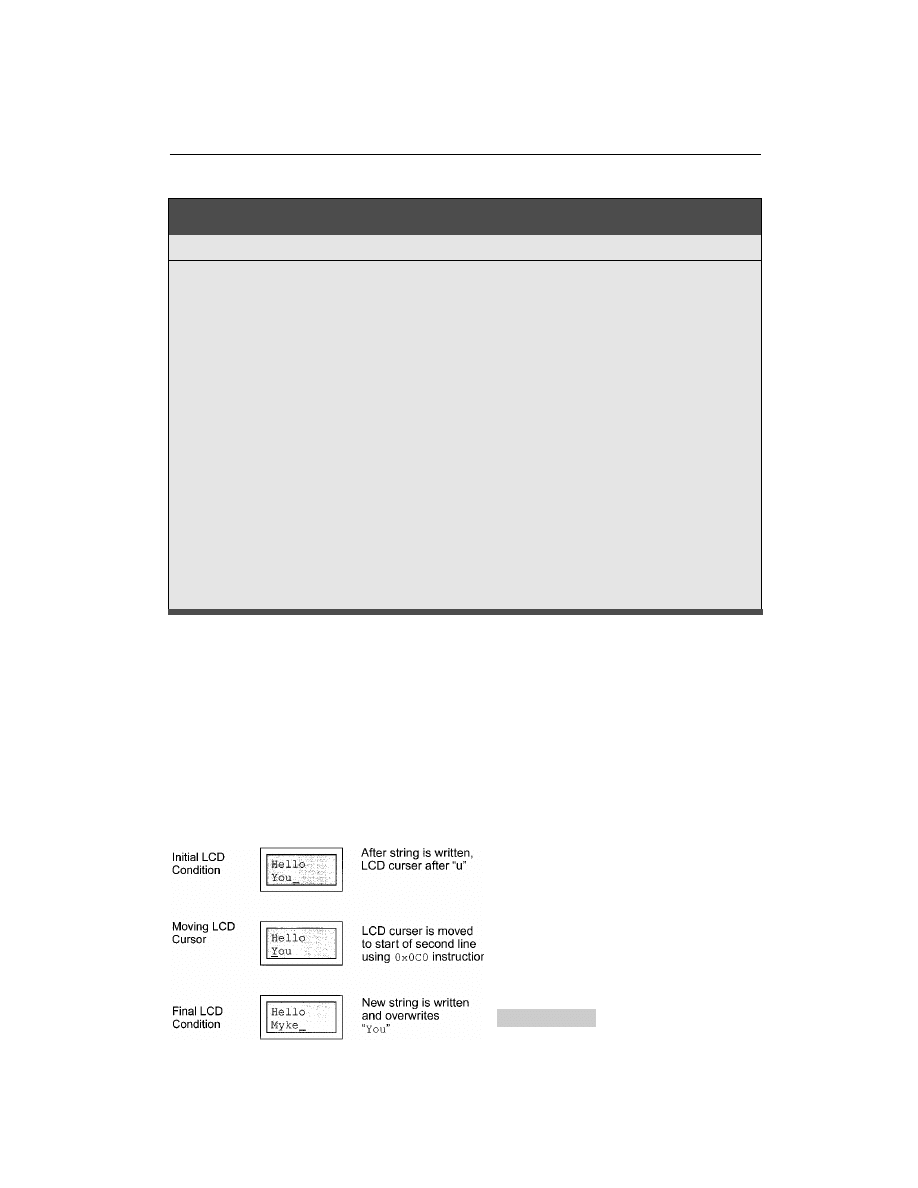
An example of moving the cursor is shown in Fig. 6-20.
To move the cursor, the move cursor to display instruction is used. For this instruction, bit
7 of the instruction byte is set with the remaining seven bits used as the address of the char-
acter on the LCD the cursor is to move to. These seven bits provide 128 addresses, which
matches the maximum number of LCD character addresses available. Table 6-4 should be
used to determine the address of a character offset on a particular line of an LCD display.
The character set available in the 44780 is basically ASCII. I say “basically” because
some characters do not follow the ASCII convention fully (probably the most significant
LCDs
275
TABLE 6–4
Hitachi 44780 Based LCD Types and Character Locations
LCD
TOP LEFT
NINTH
SECOND LINE
THIRD LINE
FOURTH LINE
COMMENTS
8x1
0
N/A
N/A
N/A
N/A
Note 1.
16x1
0
0x040
N/A
N/A
N/A
Note 1.
16x1
0
8
N/A
N/A
N/A
Note 3.
8x2
0
N/A
0x040
N/A
N/A
Note 1.
10x2
0
0x008
0x040
N/A
N/A
Note 2.
16x2
0
0x008
0x040
N/A
N/A
Note 2.
20x2
0
0x008
0x040
N/A
N/A
Note 2.
24x2
0
0x008
0x040
N/A
N/A
Note 2.
30x2
0
0x008
0x040
N/A
N/A
Note 2.
32x2
0
0x008
0x040
N/A
N/A
Note 2.
40x2
0
0x008
0x040
N/A
N/A
Note 2.
16x4
0
0x008
0x040
0x010
0x050
Note 2.
20x4
0
0x008
0x040
0x014
0x054
Note 2.
40x4
0
N/A
N/A
N/A
N/A
Note 4.
Note 1: Single 44780/No Support Chip.
Note 2: 44780 with Support Chip.
Note 3: 44780 with Support Chip. This is quite rare.
Note 4: Two 44780s with Support Chips. Addressing is device specific.
Figure 6-20
Moving an LCD
cursor
difference is 0x05B or is not available). The ASCII control characters (0x008 to 0x01F)
do not respond as control characters and might display “funny” (Japanese) characters. The
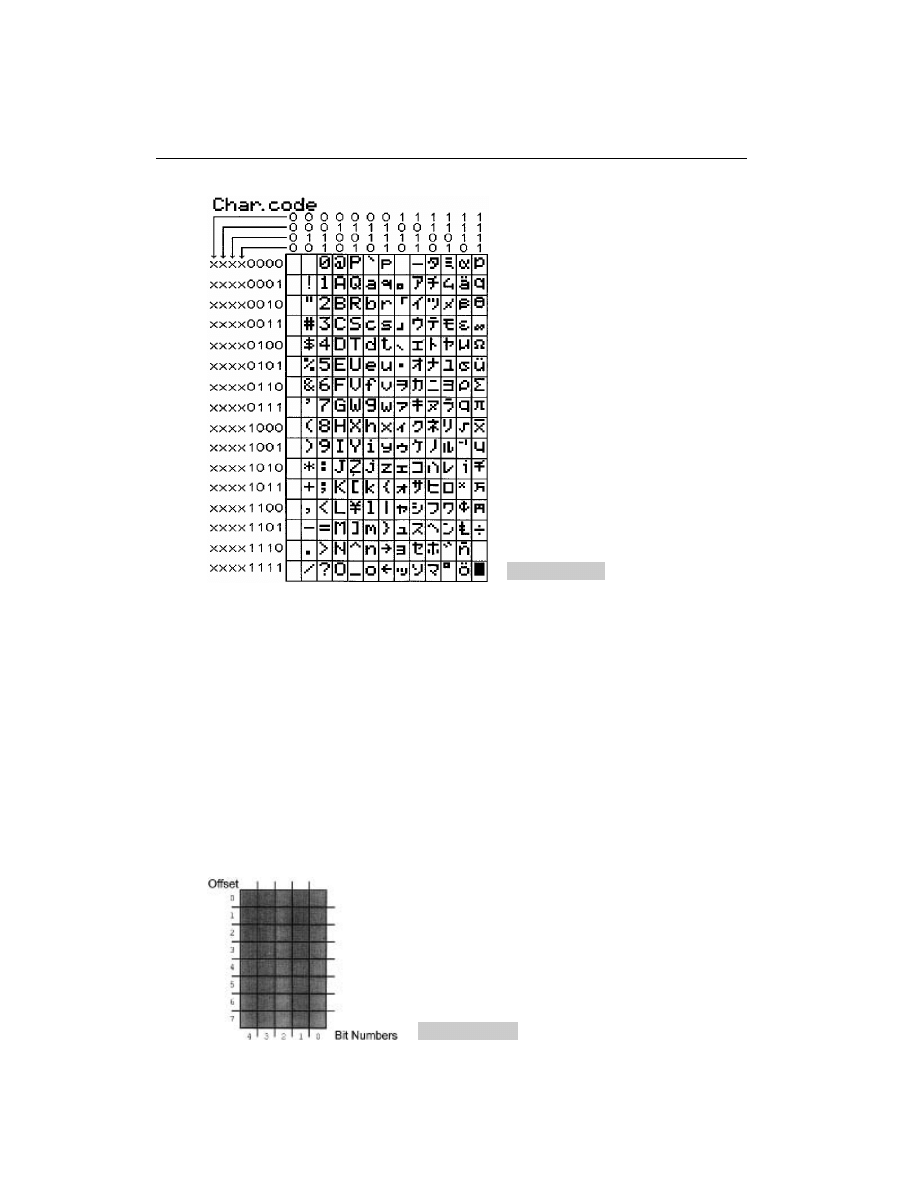
LCD character set is shown in Fig. 6-21.
Eight programmable characters are available and use codes 0x000 to 0x007. They are
programmed by pointing the LCD’s “cursor” to the character generator RAM (CGRAM)
area at eight times the character address. The next eight bytes written to the RAM are the
line information of the programmable character, starting from the top (Fig. 6-22).
I like to represent this as eight squares by five. Most displays were seven pixels by five for
each character, so the extra row may be confusing. Each LCD character is actually eight
pixels high, with the bottom row normally used for the underscore cursor. The bottom row
can be used for graphic characters, although if you are going to use a visible underscore cur-
sor and have it at the character, I recommend that you don’t use this line at all (i.e., set the
line to 0x000).
Using this box, you can draw in the pixels that define your special character and then
use the bits to determine what the actual data codes are. When I do this, I normally use a
276
PICmicro® MCU APPLICATION DESIGN AND HARDWARE INTERFACING
Figure 6-21
LCD character set
Figure 6-22
LCD character “box”
piece of graph paper and then write hex codes for each line, as shown in the lower right di-
agram of a “Smiley Face” (Fig. 6-23).
For some the “animate” applications, I use character rotation for the animations. This
means that, instead of changing the character each time the character moves, I simply dis-
play a different character. Doing this means that only two bytes (moving the cursor to the
character and the new character to display) have to be sent to the LCD. If animation were
accomplished by redefining the characters, then 10 characters would have to be sent to the
LCD (one to move into the CGRAM space, the eight defining characters and an instruc-
tion returning to display RAM). If multiple characters are going to be used or more than
eight pictures for the animation, then you will have to rewrite the character each time.
The user-defined character line information is saved in the LCD’s CGRAM area. This
64 bytes of memory is accessed using the move cursor into CGRAM instruction in a simi-
lar manner to that of moving the cursor to a specific address in the memory with one im-
portant difference.
This difference is that each character starts at eight times its character value. This means
that user-definable character 0 has its data starting at address 0 of the CGRAM, character
1 starts at address 8, character 2 starts at address 0x010 (16), etc. To get a specific line
within the user-definable character, its offset from the top (the top line has an offset of 0)
is added to the starting address. In most applications, characters are written to all at one
time with character 0 first. In this case, the instruction 0x040 is written to the LCD, fol-
lowed by all of the user-defined characters.
The last aspect of the LCD to discuss is how to specify a contrast voltage to the display.
I typically use a potentiometer wired as a voltage divider. This will provide an easily vari-
able voltage between ground and V
cc
, which will be used to specify the contrast (or dark-
ness) of the characters on the LCD screen. You might find that different LCDs work
differently with lower voltages providing darker characters in some and higher voltages do
the same thing in others.
There are a variety of different ways of wiring up an LCD. I noted that the 44780 could
interface with four or eight bits. To simplify the demands in microcontrollers, a shift reg-
ister is often used to reduce the number of I/O pins to three.
This can be further reduced by using the circuit shown in which the serial data is com-
bined with the contents of the shift register to produce the E strobe at the appropriate in-
LCDs
277
Figure 6-23
Example LCD custom character
Figure 6-24
LCD contrast voltage circuit
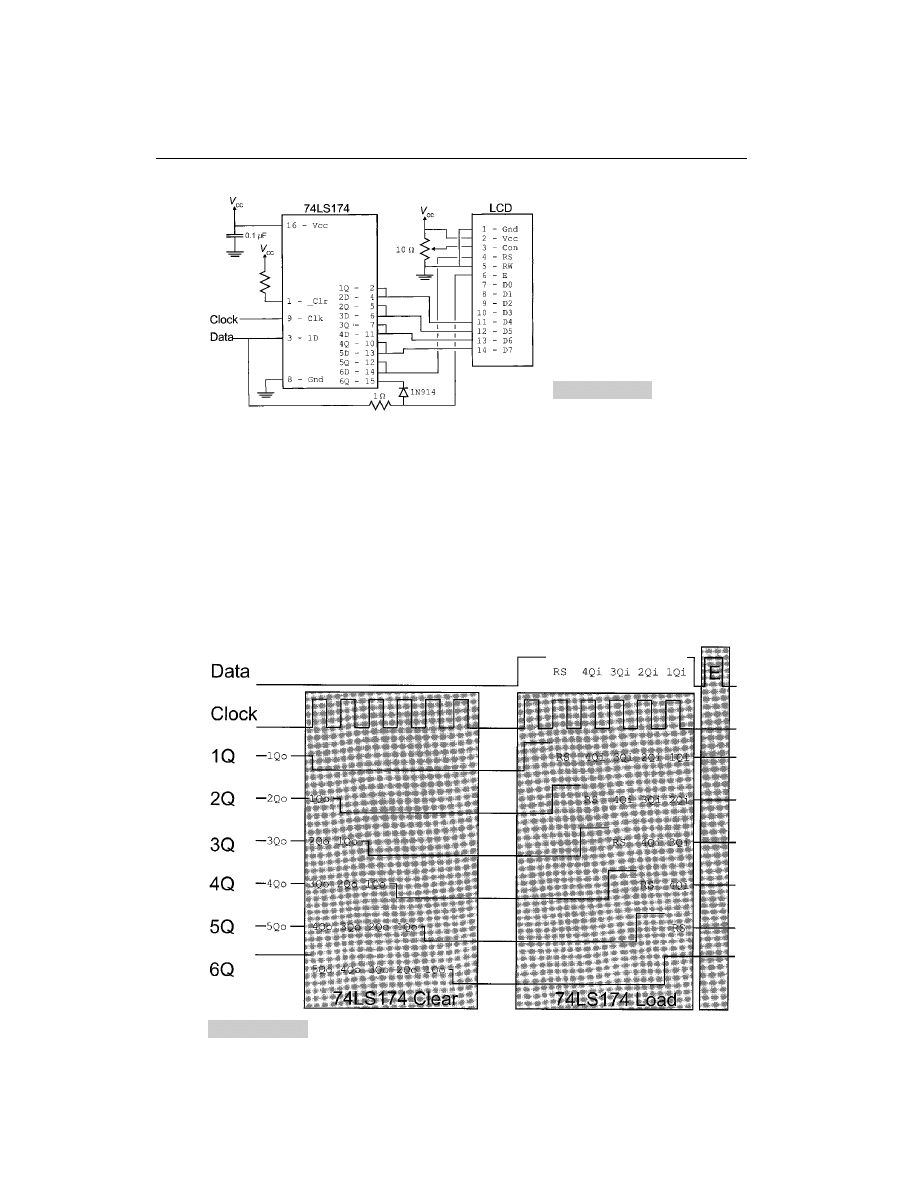
terval. This circuit ANDs (using the 1-K resistor and IN914 diode) the output of the sixth
D-flip-flop of the 74LS174 and the data bit from the device writing to the LCD to form the
E strobe. This method requires one less pin than the three-wire interface and a few more
instructions of code. The two-wire LCD interface circuit is shown in Fig. 6-25.
I normally use a 74LS174 wired as a shift register (as shown in the schematic diagram)
instead of a serial-in/parallel-out shift register. This circuit should work without any prob-
lems with a dedicated serial-in/parallel-out shift register chip, but the timing/clock polari-
ties might be different. When the 74LS174 is used, notice that the data is latched on the
rising (from logic low to high) edge of the clock signal. Figure 6-26 is a timing diagram
for the two-wire interface and it shows the 74LS174 being cleared, loaded, and then the E
strobe when the data is valid and 6Q and incoming data is high.
278
PICmicro® MCU APPLICATION DESIGN AND HARDWARE INTERFACING
Figure 6-25
2 wire LCD
interface
Figure 6-26
2 wire LCD write waveform

The right side of this diagram shows how the shift register is written to for this circuit to
work. Before data can be written to it, loading every latch with zeros clears the shift regis-
ter. Next, a 1 (to provide the E gate) is written followed by the R/S bit and the four data
bits. Once the latch is loaded in correctly, the data line is pulsed to strobe the E bit. The
biggest difference between the three-wire and two-wire interface is that the shift register
has to be cleared before it can be loaded and the two-wire operation requires more than six
times the number of clock cycles to load four bits into the LCD.
I’ve used this circuit with the PICmicro® MCU, Basic Stamp, 8051, and AVR, and it
really makes the wiring of an LCD to a microcontroller very simple. The biggest issue to
watch for is to ensure the E strobe’s timing is within specification (i.e., greater than
450 ns); the shift register loads can be interrupted without affecting the actual write. This cir-
cuit will not work with open-drain only outputs (something that catches up many people).
One note about the LCD’s E strobe is that in some documentation it is specified as high-
level active; in others, it is specified as falling-edge active. It seems to be falling-edge ac-
tive, which is why the two-wire LCD interface works even if the line ends up being high
at the end of data being shifted in. If the falling edge is used (like in the two-wire interface)
then ensure that before the E line is output on 0, there is at least a 450-ns delay with no
lines changing state.
Analog I/O
Before reading through the following sections, I suggest that you familiarize yourself with
Analog-to-Digital Converters (ADCs) and Digital-to-Analog Converters (DACs) in “In-
troduction to Electronics” on the CD-ROM. These sections will introduce you to the the-
ory of converting analog voltages and digital values between each other and the problems
that can arise with them.
The following sections introduce you to some of the practical aspects of working with
analog data with the PICmicro® MCU. This includes position sensing using potentiome-
ters. At first glance, you might think that an ADC-equipped microcontroller is required for
this operation, but there are a number of ways of doing this with strictly digital inputs. The
IBM PC carries out the same function (it doesn’t use an ADC either) for reading joystick
positions.
For analog output, I focus on the theory and operation behind Pulse-Width Modulated
(PWM) analog control signals. This method of control is very popular and is a relatively
simple way of providing analog control of a device. It can also be used to communicate
analog values between devices without needing any type of communication protocol. The
PICmicro® MCU has some built-in hardware that makes the implementation of pulse-
width-modulated input and output quite easy to work with.
I want to make it clear that audio input and output capabilities cannot be provided in the
PICmicro® MCU without significant front-end signal processing and filtering. Output
from the PICmicro® MCU can be simple “beeps” and “boops” without special hardware,
but anything more complex will require specialized hardware and software.
POTENTIOMETERS
One of the more useful human input devices is the dial. Rather than relying on some kind
of digital data, like a button or character string, the dial allows users a freer range of inputs,
ANALOG I/O
279
as well as positional feedback information in a mechanical device. For most people, reading
a potentiometer value requires setting the potentiometer as a voltage divider and reading the
voltage between the two extremes at the “wiper” (Fig. 6-27). A very elegant way of reading a
potentiometer’s position using the digital input of a PICmicro® MCU is shown in this section.
Notice that I consider the measurement to be of the potentiometer’s position and not its re-
sistance. This is an important semantic point; as far as using a potentiometer as an input de-
vice, I do not care about the actual resistance of its position, just what its position is. The
method of reading a potentiometer’s position using a digital I/O pin that I am going to show
you is very dependent on the parts used and will vary significantly between implementations.
The method of reading a potentiometer uses the characteristics of charged capacitor dis-
charging through a resistor. If the charge is constant in the capacitor, then the time to dis-
charge varies according to the exponential curve shown in Fig. 6-28.
The charge in a capacitor is proportional with its voltage. If a constant voltage (i.e., from a
PICmicro® MCU I/O pin) can be applied to a capacitor, then its charge will be constant. This
means that in the voltage discharge curve shown in Fig. 6-28, if the initial voltage is known
along with the capacitance and resistance, then the voltage at any point in time can be predicted.
The equation in Fig. 6-28:
V
(t)
V
Start
(1
e ** t/RC)
can be reworked to find R, if V, V
Start
, t, and C are known:
R
t/C * ln[(V
Start
V)/V
Start
]
Rather than calculate the value through, you can make the approximation of 2 ms for a re-
sistance of 10 k and a capacitance of 0.1
F with a PICmicro® MCU, which has a high-to-
low threshold of 1.5 volts. To measure the resistance in a PICmicro® MCU, I use the circuit
shown in Fig. 6-29.
For this circuit, the PICmicro® MCU’s I/O pin outputs a high, which charges the ca-
pacitor (which is limited by the potentiometer).
After the capacitor is charged, the pin is changed to input, the charge in the capacitor
draws through the resistor with a voltage determined by the V
(t)
formula. When the pin
first changes state, the voltage across the resistor will be greater than the threshold for
some period of time. When the voltage across the potentiometer falls below the voltage
threshold, the input pin value returned to the software will be zero. If the time required for
280
PICmicro® MCU APPLICATION DESIGN AND HARDWARE INTERFACING
Figure 6-27
Potentiometer input
to PICmicro® MCU ADC
Figure 6-28
Measure RC time
delay
voltage across the pin to change from reading of 1 to a 0 is recorded, it will be proportional
to the resistance between the potentiometer’s wiper and the capacitor.
The pseudo code for carrying out the potentiometer read is:
int ReadPot()
// Return the Potentiometer’s Position
{
int i;
pin
output; pin 1;
// Charge the Capacitor
for (i
0; i charge; i);
pin
input;
// Let the Capacitor Discharge
for ( i
0; pin 1; i);
return I ;
} // End ReadPot
The PICmicro® MCU assembly code for implementing this potentiometer read is not
much more complex than this pseudo code. Later, the book provides some examples of
how potentiometer reads are actually accomplished.
The 100-Ohm resistor between the PICmicro® MCU pin and the RC network is used to
prevent any short circuits to ground if the potentiometer is set so that no resistance is in the
circuit when the capacitor is changed.
This method of reading a potentiometer’s position is very reliable, but not very accurate,
nor is it particularly fast. When setting this up for the first time, in a specific circuit, you will
have to experiment to find the actual range that it will display. This is because of part vari-
ances (including the PICmicro® MCU) and the power supply characteristics. For this rea-
son, I do not recommend using the potentiometer/capacitor circuit in any products. Tuning
the values returned will be much more expensive than the costs of a PICmicro® MCU with
a built-in ADC.
PULSE-WIDTH MODULATION (PWM) I/O
The PICmicro® MCU, like most other digital devices, does not handle analog voltages
very well. This is especially true for situations where high-current voltages are involved.
The best way to handle analog voltages is by using a string of varying wide pulses to indi-
cate the actual voltage level. This string of pulses is known as a Pulse-Width-Modulated
(PWM) analog signal and it can be used to pass analog data from a digital device, control
DC devices, or even output an analog voltage.
This section covers PWM signals and how they can be used with the PICmicro® MCU.
In the discussion of TMR1 and TMR2, earlier in the book, I presented how PWM signals
are implemented and read using the CCP built-in hardware of the PICmicro® MCU. This
ANALOG I/O
281
Figure 6-29
PICmicro® MCU mea-
sure of RC time delay
section shows how PWM signals can be used for I/O in PICmicro® MCUs that do not have
the CCP module built in.
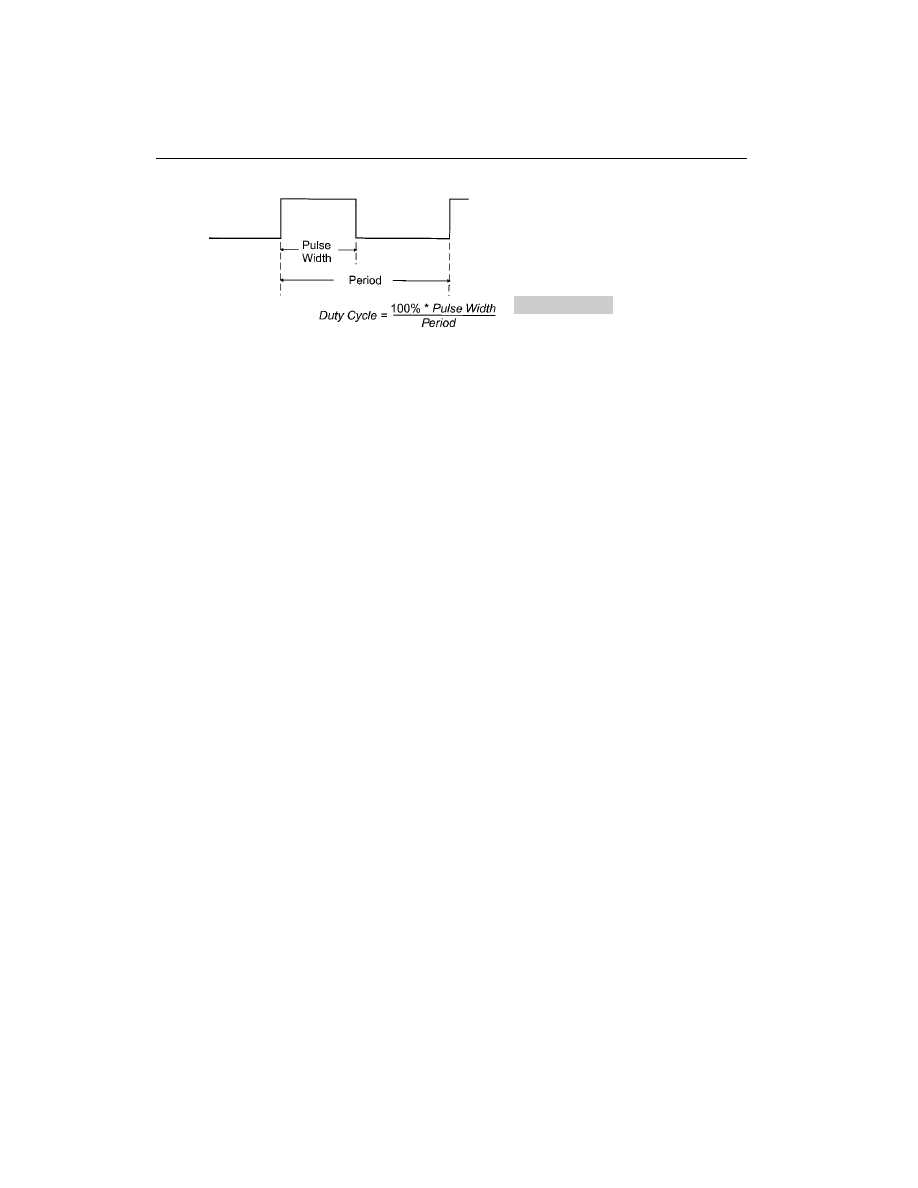
A PWM signal (Fig. 6-30) is a repeating signal that is on for a set period of time that is
proportional to the voltage that is being output. I call the on time the pulse width in Fig.
6-30. The duty cycle is the percentage of time that the on time is relative to the PWM sig-
nal’s period.
To output a PWM signal, the following code is used:
Period
PWMPeriod;
// Initialize the Output
On
PWMperiod - PWMoff;
// Parameters
while (1
1) {
PWM
ON;
// Start the Pulse
for (i
0; i On; i );
// Output ON for “On” Period of
//
Time
PWM
off;
// Turn off the Pulse
For ( ; i
PWMPeriod; i );
// Output off for the rest of the
//
PWM Period
} // end while
This code can be implemented remarkably simply in the PICmicro® MCU, but rather
than showing it, there is one aspect I want to change. This method is not recommended be-
cause it uses all the processor resources of the PICmicro® MCU and does not allow for
any other processing.
To avoid this problem, I would recommend using the TMR0 interrupt as:
Interrupt PWMOutput()
// When Timer Overflows, Toggle “On” and “Off”
{
//
and Reset Timer to the correct delay for
// the Value
if (PWM
ON) {
// If PWM is ON, Turn it off and Set Timer
PWM
off;
//
Value
TMR0
PWMPeriod
-
PWMOn;
} else {
// If PWM is off, Turn it ON and Set Timer
PWM
ON;
//
Value
TMR0
PWMOn;
} // end if
INTCON.T0IF
0;
// Reset Interrupts
} // End PWMOutput TMR0 Interrupt Handler
This code is quite easy to port to PICmicro® MCU assembly language. For example, if
the PWM period was 1 ms (executing in a 4-MHz PICmicro® MCU), a divide-by-four
prescaler value could be used with the timer and the interrupt-handler assembly-language
code would be:
282
PICmicro® MCU APPLICATION DESIGN AND HARDWARE INTERFACING
Figure 6-30
Pulse wave modu-
lated signal waveform

org 4
Int
; Interrupt Handler
movwf _w
; Save Context Registers
movf STATUS, w
; - Assume TMR0 is the only enabled Interrupt
movwf _status
btfsc PWM
; Is PWM O/P Currently High or Low?
goto PWM_ON
nop
; Low - Nop to Match Cycles with High
bsf PWM
; Output the Start of the Pulse
movlw 6
6
; Get the PWM On Period
subwf PWMOn, w
; Add to PWM to Get Correct Period for
; Interrupt Handler Delay and Missed cycles
; in maximum 1024 usec Cycles
goto PWM_Done
PWM_ON
; PWM is On - Turn it Off
bcf PWM
; Output the “Low” of the PWM Cycle
movf PWMOn, w
; Calculate the “Off” Period
sublw 6
6
; Subtract from the Period for the Interrupt
; Handler Delay and Missed cycles in maximum
; 1024 usec Cycles
goto PWM_Done
PWM_Done
; Have Finished Changing the PWM Value
sublw 0
; Get the Value to Load into the Timer
movwf TMR0
bcf INTCON, T0IF
; Reset the Interrupt Handler
movf _status, w
; Restore the Context Registers
movwf STATUS
swapf _w, f
swapf _w, w
retfie
In this code, TMR0 is loaded in such a way that the PWM’s period is always 1 ms (a
count of 250 “ticks” with the prescaler value of four). To get the value added and sub-
tracted from the total, I first took the difference between the number of ticks to get 1 ms
(250) and the full timer range (256). Next, I counted the total number of instruction cycles
of the interrupt handler (which is 23), divided it by four, and added the result to the 1-ms
difference. The operation probably seems confusing because I was able to optimize the
time for the PWM signal off:
Time Off
Period
-
ON
to:
movf ON, w
sublw 6
6
sublw 0
movwf TMR0
I realize that this doesn’t make any sense the first time you look at it, so I go through it
by showing how it works.
ANALOG I/O
283
Using the original equation, you should note that this calculates the number of cycles to
be delayed by TMR0, but the actual value to be loaded into TMR0 is calculated as:
TMR0 Delay Value
0x0100
-
(Time Off)
0x0100
-
(Period
ON)
0x0100
-
(256
250 Interrupt Execution- ON)
0x0100
-
(6
6 ON)
0x0100
-
(12
ON)
0x0100
-
12
ON
0x00F4 ON
Going back to the three instructions that load TMR0, you can show that they execute as:
movf ON, w
; w
ON
sublw 6
6
; w
6 6
-
w
;
12
-
ON
;
12 0x0FF ∧ ON 1
;
13 0x0FF ∧ ON
sublw 0
; w
0
-
w
;
0
-
(13
0x0FF ∧ ON)
;
0 0x0FF ∧ (13 0x0FF ∧ ON) 1
;
0x0FF ∧ 13 0x0FF ∧ 0x0FF ∧ ON 1
;
0x0FF ∧ 13 ON 1
;
0x0F4 ON
which is (surprisingly enough) the same result as what was found with the “TMR0 delay
value” equation. The formula in itself is not that impressive, except that it “dovetails” very
well with the PWM on half of the code. The process of coming up with this code probably be-
longs in another chapter on optimization, but to be honest with you, I came up with it using
nothing but trial and error along with the feeling that this kind of optimization was possible.
This is an example of what I mean when I say that you should look for opportunities
when processing data in the PICmicro® MCU. More often than not, you will come up with
something like these few instructions, which are very efficient, and integrate different
cases startlingly well.
Notice that, in this code, the PWM signal will never fully be on (a high DC voltage) or
fully off (a ground-level DC voltage). This is because when the routine enters the subrou-
tine handler, it changes the output, regardless of whether or not it is required for the length
of the interrupt handler. In actuality, if you time it out, you will see that the 23 instruction
cycles that the interrupt handler takes between changing the value works out to a 2.4-
percent loss of full on and full off. This should not be significant in most applications
and will serve as a “heartbeat” to let the receiver “know” the PICmicro® MCU is still
functioning—even though the output is stuck at an extreme.
In this example, I have expended quite a bit of energy to ensure that the period remains
the same, regardless of the on time. This was done to ensure that the changes in the duty cy-
cle remained proportional to the changes in the on period. This is important if the PWM out-
put is going to be passed through a low-pass filter (Fig. 6-31) to output an analog voltage.
284
PICmicro® MCU APPLICATION DESIGN AND HARDWARE INTERFACING
Figure 6-31
“Pulse width
modulated” analog voltage

In many applications where a PWM signal is communicating with another digital de-
vice, this effort to ensure that the period is constant and is not required. In these cases, a
timer is used to time the on period. This can be shown as the pseudo-code:
Int TimeOn()
// Time the Width of an incoming Pulse
{
int i
0;
while (PWMIP
off);
// Wait for the Pulse to Start
for ( ; PWMIP
ON; i );
// Time the Pulse Width
return i;
// Return the Pulse Width
} // end TimeOn
With the actual PICmicro® MCU assembly-language code being quite simple, but de-
pendent on the maximum pulse width value being timed, very long pulses will require
large counters or delays in between the PWM input (PWMIP in TimeOn) poll.
Passing analog data back and forth between digital devices in any format is not going to
be accurate because of the errors in digitizing the value and restoring it. This is especially
true for PWM signals, which can have very large errors because of the sender and receiver
not being properly synched and the receiver not starting to poll at the correct time interval.
In fact, the measured value could have an error of upwards of 10 percent from the actual
value. This loss of data accuracy means that the analog signals should not be used for data
transfers. But, as is shown in Chapters 15 and 16, PWM signals are an excellent way to
control analog devices, such as lights and motors.
When using a PWM to drive an analog device, it is important to be sure that the fre-
quency is faster than what a human can perceive. As noted in the “LED” section, this fre-
quency is 30 Hz or more. But for motors and other devices that might have an audible
“whine,” the PWM signal should have a frequency of 20 kHz or more to ensure that the
signal does not bother the user. In Chapter 16, I discuss this in more detail and demonstrate
how an audible 10 KHz “whine” can be produced.
The problem with the higher frequencies is that the granularity of the PWM signal de-
creases. This is because of the inability of the PICmicro® MCU (or what ever digital de-
vice is driving the PWM output) to change the output in relatively small time increments
from on to off, relative to the size of the PWM signal’s period. In the previous example
code, four instruction cycles (of 1
s each) are the lowest level of granularity for the PWM
signal that results in about 250 unique output values. If the PWM signal’s period was de-
creased to 100
s, from 1 ms, for a 10-kHz frequency, the same code would only have 25
or so unique output values that could be output. In this case, to retain the original code’s
granularity, the PICmicro® MCU would have to be sped up 10 times (not possible for
most applications) or another way of implementing the PWM will have to be found.
AUDIO OUTPUT
When I was originally blocking out this book, I wanted to include PICmicro® MCU audio
output and input. After some experimentation and a search on the Internet to see what
other people have done (or not done, as in the case of audio input to the PICmicro® MCU),
I have come to the conclusion that audio input is not appropriate for the PICmicro® MCU.
The PICmicro® MCU could have some kind of filtering input, but it simply does not have
ANALOG I/O
285
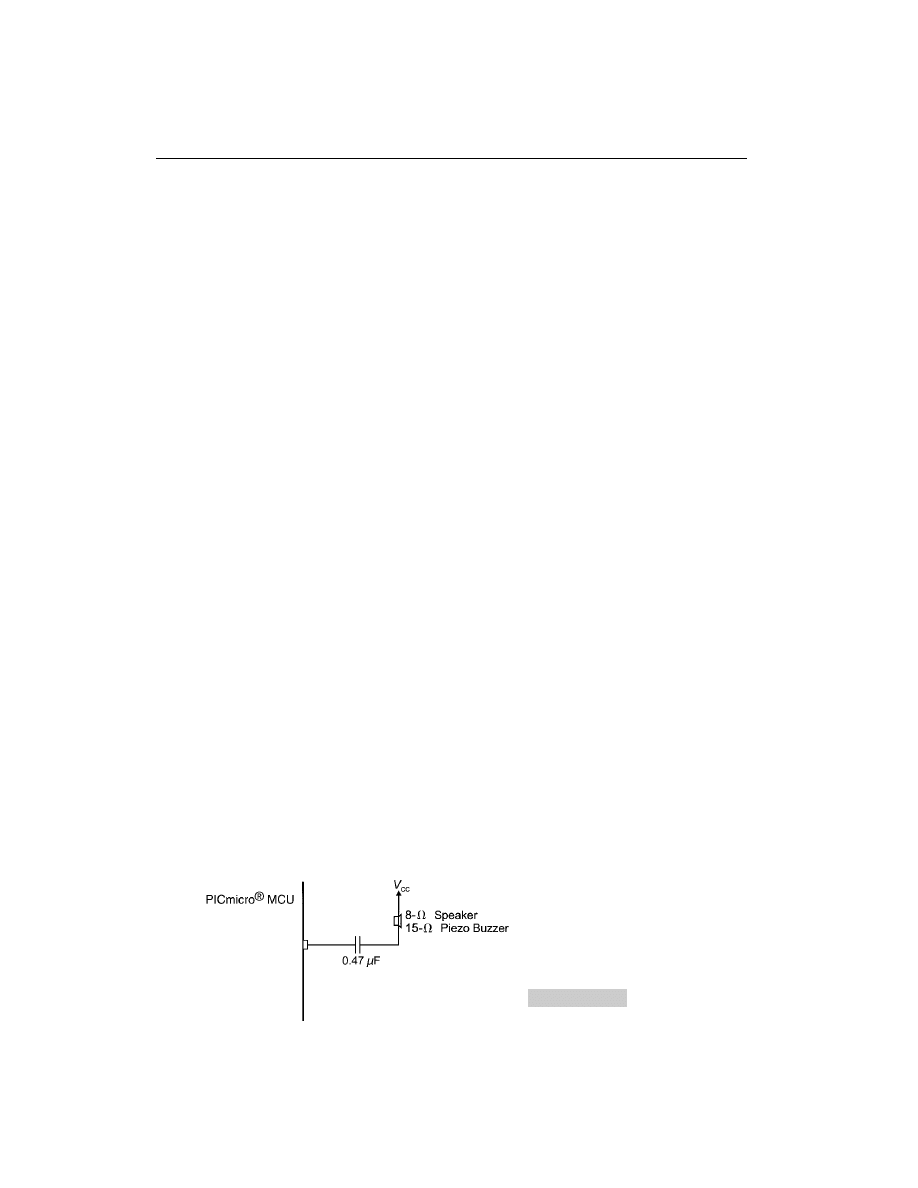
the processing capability to do more than respond to a specific frequency at a threshold
volume. For this reason, I would discourage you from passing audio input to the PICmi-
cro® MCU and just use the PICmicro® MCU to provide audio output using the techniques
outlined in this section.
When I discuss the PICmicro® MCU’s processing capabilities with regard to audio, I
tend to be quite disparaging. The reason for this is the lack of hardware multipliers in the
low-end and mid-range PICmicro® MCUs and the inability of all the devices to “natively”
handle greater than eight bits of in a floating-point format. The PICmicro® MCU proces-
sor has been optimized to respond to digital inputs and cannot implement the real-time
processing routines needed for complex analog I/O.
Despite this, you can implement some surprisingly sophisticated audio output that goes
beyond simple “beeps” and “boops” (Fig. 6-32).
The circuit in Fig. 6-32 passes DC waveforms through the capacitor (which filters out
the kickback spikes) to the speaker or piezo buzzer. When a tone is output, your ear will
hear a reasonably good tone, but if you were to look at the actual signal on an oscilloscope,
you would see the waveform shown in Fig. 6-33, both from the PICmicro® MCU’s I/O
pin and the piezo buzzer itself.
The PICmicro® MCU pin, capacitor, and speaker are actually a quite complex analog
circuit. Notice that the voltage output on the I/O pin is changed from a straight waveform.
This is because of the inductive effects of the piezo buffer. The important thing to note in
Fig. 6-33 is that the upward spikes appear at the correct period for the output signal.
Timing the output signal is generally accomplished by toggling an output pin at a set pe-
riod within the TMRO interrupt handler. To generate a 1-kHz signal shown in a PICmi-
cro® MCU running a 4 MHz, you can use the code (which does not use the prescaler) for
TMR0 and the PICmicro® MCU’s interrupt providing the speaker charges are in the back-
ground.
org 4
int
movwf _w
; Save Context Registers
bcf INTCON, TOIF
; Reset the Interrupt
movlw 256 - (250 - 4)
movwf TMRO
; Reset TMR0 for another 500 usecs
btfsc SPKR
; Toggle the Speaker
goto $
2
bsf SPKER
; Speaker Output High
goto $
2
bcf SPKER
; Speaker Output Low
swapf _w, f
; Restore Context Registers
swapf _w, w
retfie
286
PICmicro® MCU APPLICATION DESIGN AND HARDWARE INTERFACING
Figure 6-32
Circuit for driving
PICmicro
®
MCU audio
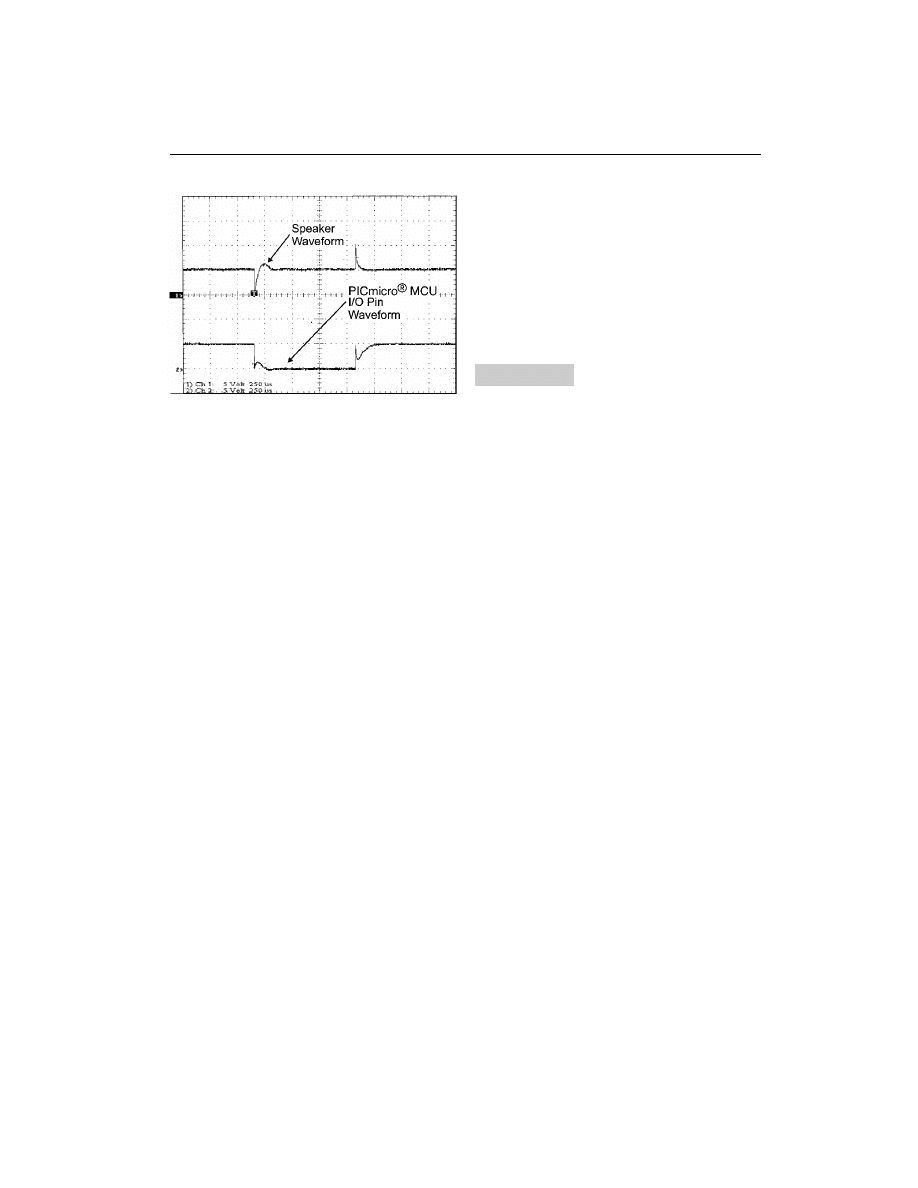
There are two points to notice about this interrupt handler. First, I don’t bother saving
the STATUS register’s contents because neither the zero, neither carry nor digit carry flags
are changed by any of the instructions used in the handler.
The second point to notice is the reload value of TMRO to generate a 1-kHz output in a
4-MHz PICmicro® MCU (an instruction clock period of 1
s), I have to delay 500 cycles
for the wave’s high and low. Because TMRO has a divide-by-two counts on its input, I
have to wait a total of 250 ticks. When I record TMRO, notice that I also take into account
the cycles taken to get to the reload (which is seven or eight), divide them by two and take
them away from the reload value.
For this handler, the reload value might be off by one cycle, depending on how the
mainline executes, for a worst-case error of 0.2% (2,000 ppm). This level of accuracy is
approximately the same as what you would get for a ceramic resonator; so, the actual
frequency should not be off an appreciable amount from the expected. This level of accu-
racy will not cause noticeable warbling (changes in the frequency) caused by the changing
interrupt latency as you run the application. The actual changes are very small and not de-
tectable by the human ear.
When developing applications that output audio signals, I try to keep the tone within the
range of 500 Hz to 2 kHz. This is well within the range of human hearing and is quite easy
to implement in a PICmicro® MCU. When you look at the Christmas tree project in Chap-
ter 16, you can see how this is done to create simple tunes on the PICmicro® MCU.
I wanted to finish off this section by describing how the PICmicro® MCU can cre-
ate more complex sounds, such as telephone TouchTone audio signals. The problem
with TouchTones is that they are a combination of two frequencies (that are listed in
the appendices). When they’re added together, you get a signal like the bottom one
shown in Fig. 6-34.
This signal is very hard to replicate with a digital circuit. If you want to create a com-
plex waveform like this, I recommend mixing two PICmicro® MCU-controlled frequency
outputs together or using a chip that is designed for the specific purpose that you have in
mind. The Parallax Basic Stamp II and PicBasic Pro do have instructions that allow you to
drive telephone TouchTones, but they require a filter circuit to work properly. I have found
that even with the filter, the phone system does not recognize the data being sent very re-
liably.
ANALOG I/O
287
Figure 6-33
PICmicro® MCU driving
a speaker output
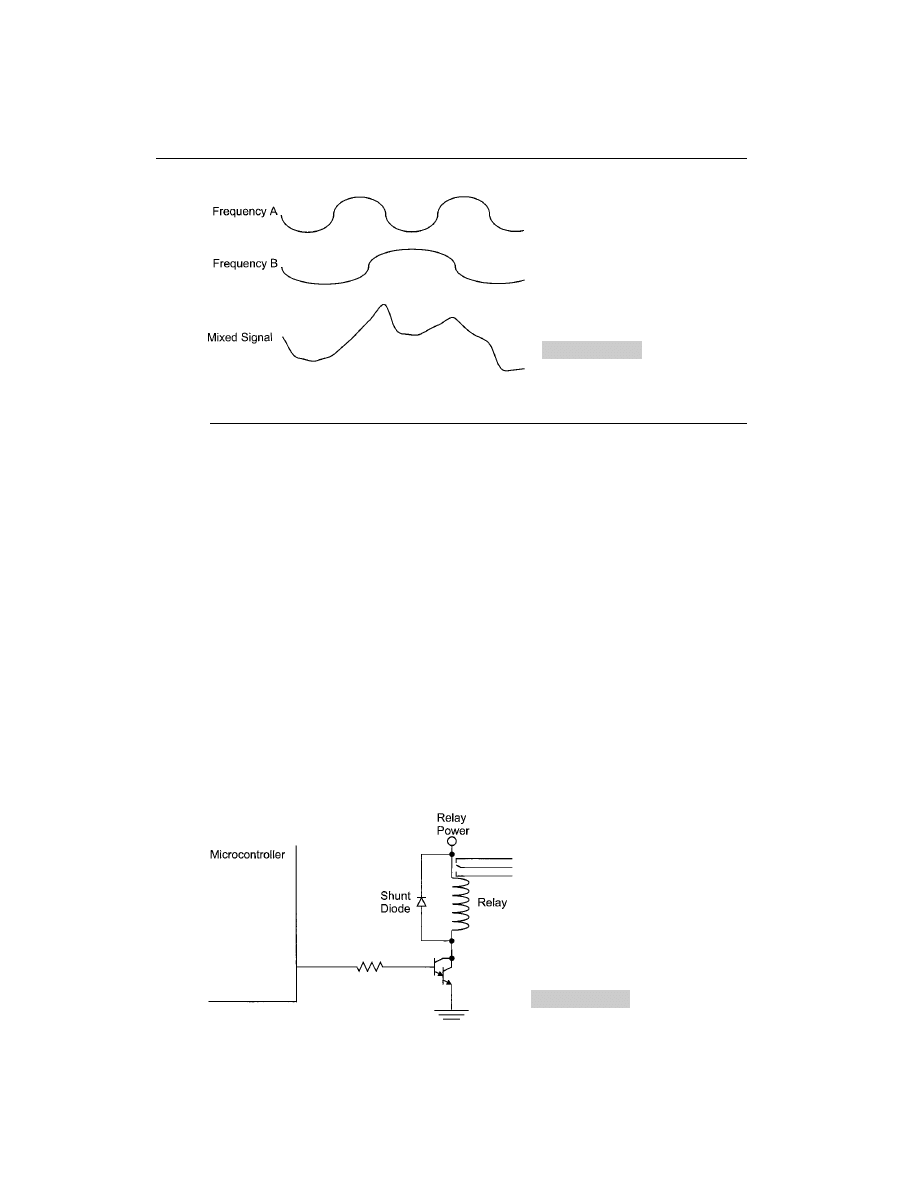
Relays and Solenoids
Some real-life devices that you might have to control by a microcontroller are electro-
magnetic, such as relays, solenoids, and motors. These devices cannot be driven di-
rectly by a microcontroller because of the current required and the noise generated by
them. This means that special interfaces must be used to control electromagnetic de-
vices.
The simplest method to control these devices is to just switch them on and off and by
supplying power to the coil in the device. The circuit shown in Fig. 6-35 is true for relays
(as shown), solenoids (which are coils that draw an iron bar into them when they are ener-
gized), or a DC motor (which will only turn in one direction).
In this circuit, the microcontroller turns on the Darlington transistor pair, causing
current to pass through the relay coils, closing the contacts. To open the relay, the out-
put is turned off (or a 0 is output). The shunt diode across the coil is used as a kick-back
suppressor. When the current is turned off, the magnetic flux in the coil will induce a
large back EMF (voltage), which must be absorbed by the circuit or a voltage spike will
occur, which can damage the relay power supply and even the microcontroller. This
diode must never be forgotten in a circuit that controls an electromagnetic device. The
kick-back voltage is usually on the order of several hundred volts for a few nanosec-
onds. This voltage causes the diode to breakdown and allows current to flow, attenuat-
ing the induced voltage which can damage the PICmicro® MCU and other electronic
devices in the application circuit.
288
PICmicro® MCU APPLICATION DESIGN AND HARDWARE INTERFACING
Figure 6-34
Mixed audio
output
Figure 6-35
Microcontroller
relay control
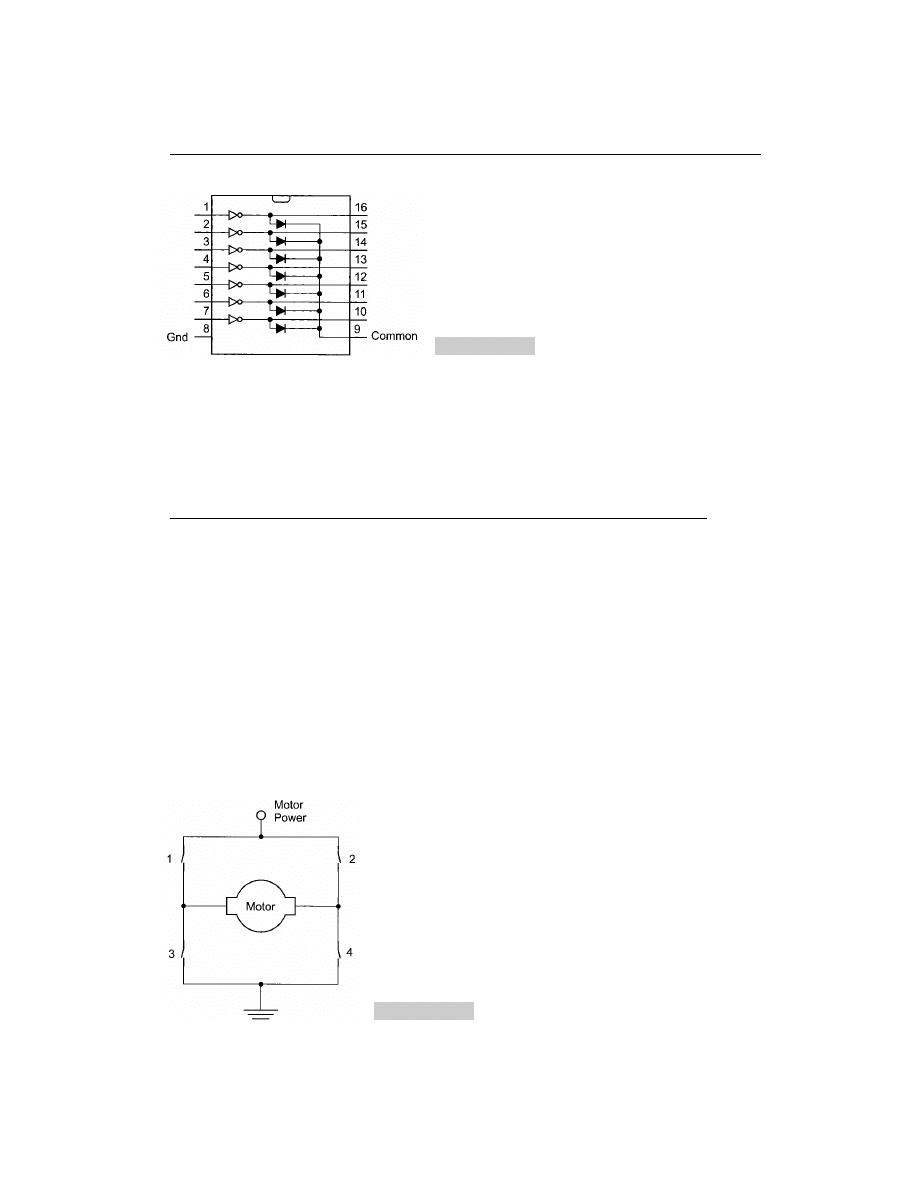
Rather than designing discrete circuits to carry out this function, I like to use integrated
chips for the task. One of the most useful devices is the ULN2003A (Fig. 6-36) or the
ULN2803 series of chips, which have Darlington transistor pairs and shunt diodes built in
for multiple drivers.
DC and Stepper Motors
Motors can be controlled by exactly the same hardware as shown in the previous section,
but as I noted, they will only run in one direction. A network of switches (transistors) can
be used to control turning a motor in either direction; this is known as an H-bridge (Fig.
6-37).
In this circuit, if all the switches are open, no current will flow and the motor won’t turn.
If switches 1 and 4 are closed, the motor will turn in one direction. If switches 2 and 3 are
closed, the motor will turn in the other direction. Both switches on one side of the bridge
should never be closed at the same time because this will cause the motor power supply
will burn out or a fuse will blow because a short circuit is directly between the motor
power and ground.
Controlling a motor’s speed is normally done by “pulsing” the control signals in the
form of a PWM signal, as shown previously in this chapter (Fig. 6-30). This will control
the average power delivered to the motors. The higher the ratio of the pulse width to the
period (the duty cycle), the more power delivered to the motor.
DC AND STEPPER MOTORS
289
Figure 6-36
ULN2003A driver array
Figure 6-37
“H” bridge motor driver
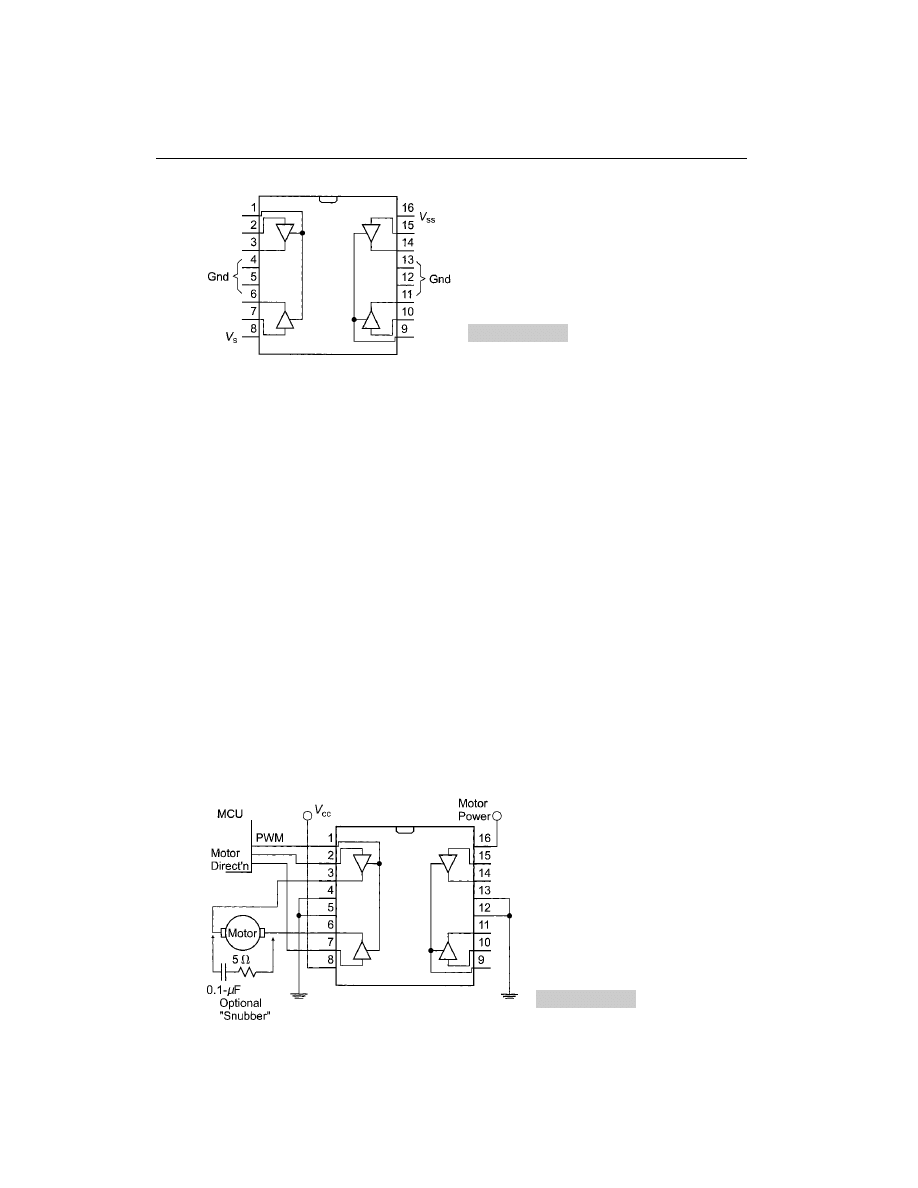
The frequency of the PWM signal should be greater than 20 kHz to prevent the PWM
from producing an audible signal in the motors as the field is turned on and off.
Like the ULN2003A simplified the wiring of a relay control, the 293D (Fig. 6-38) or
298 chips can be used to control a motor.
The 293D chip can control two motors (one on each side) connected to the buffer out-
puts (pins 3, 6, 11, and 14). Pins 2, 7, 10, and 15 are used to control the voltage level (the
switches in the H-bridge diagram) of the buffer outputs. Pins 1 and 9 are used to control
whether or not the buffers are enabled. The buffer controls can be PWM inputs, which
make control of the motor speed very easy to implement.
V
s
is
5 V used to power the logic in the chip and V
ss
is the power supplied to the mo-
tors (anywhere from 4.5 to 36 volts). A maximum of 500 mA can be supplied to the mo-
tors. Like the ULN2003A, the 293D contains integral shunt diodes. This means that to
attach a motor to the 293D, no external shunt diodes are required.
In this example circuit, you’ll notice that I’ve included an optional snubber resistor and ca-
pacitor. These two components, wired across the brush contacts of the motor, will help reduce
electromagnetic emissions and noise spikes from the motor. In the motor-control circuits that
I have built, I have never found them to be necessary. But if you find erratic operation from
the microcontroller when the motors are running, you might want to put in the 0.1-
F capac-
itor and 5 Ohm (2 watt) resistor snubber across the motor’s brushes (as shown in the circuit).
An issue with using the 293D and 298 motor controller chips and is that they are bipo-
lar devices with a 0.7-volt drop across each driver (1.4 to 1.5 volts for a dual driver circuit,
Fig. 6-39). This drop, with the significant amount of current required for a motor, results
290
PICmicro® MCU APPLICATION DESIGN AND HARDWARE INTERFACING
Figure 6-38
293D “H” bridge motor
driver
Figure 6-39
Wiring a motor
to the 293D
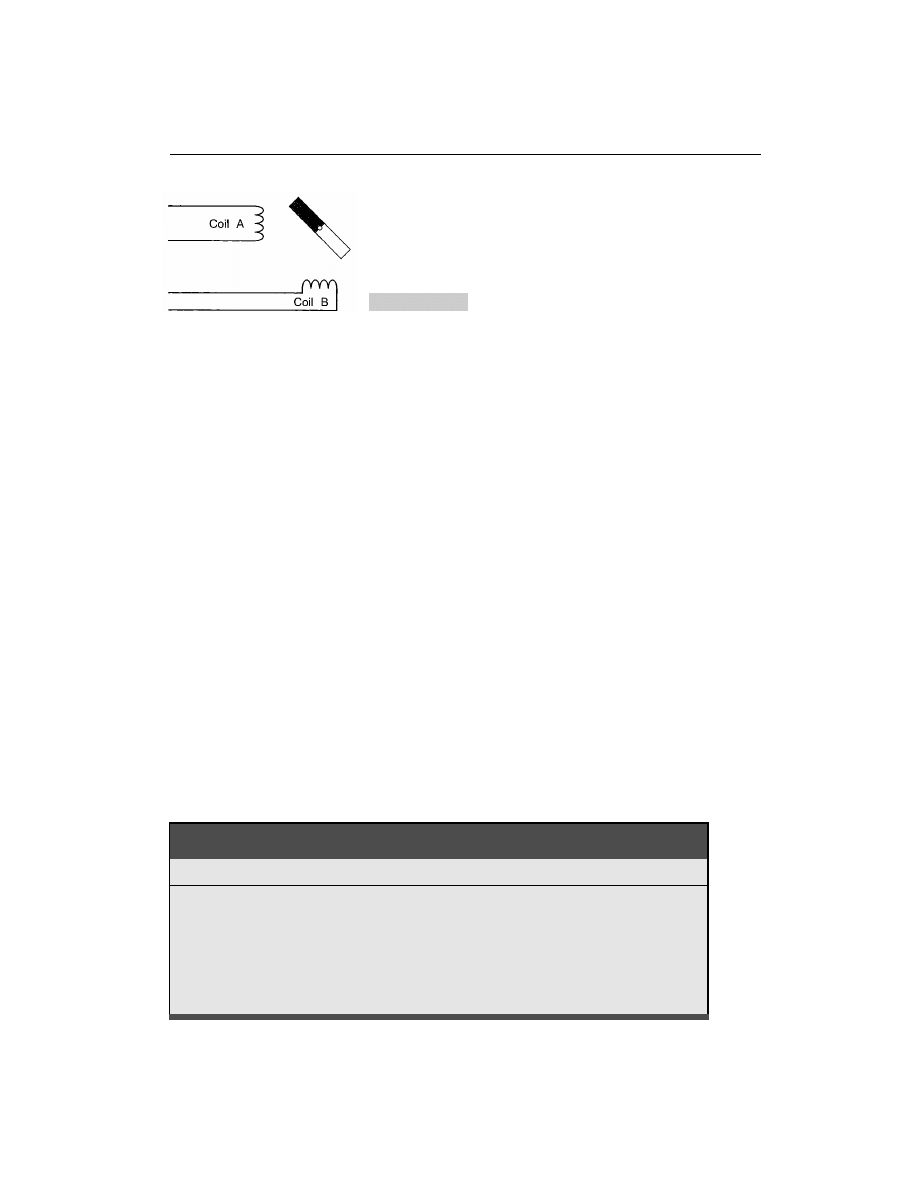
in a fairly significant amount of power dissipation within the driver. The 293D is limited
to 1 amp total output and the 298 is limited to 3 amps. For these circuits to work best, a
large heatsink is required.
To minimize the problem of heating and power loss, I have more recently been looking
at using power MOSFETS to control motors. Later, the book shows how to wire these
transistors in a circuit to control a motor.
Stepper motors are much simpler to develop control software for than a regular DC
motor. This is because the motor is turned one step at a time or can turn at a specific
rate (specified by the speed in which the steps are executed). In terms of the hardware
interface, stepper motors are a bit more complex to wire and require more current
(meaning that they are less efficient), but these are offset by the advantages in software
control.
A bipolar stepper motor consists of a permanent magnet on the motor’s shaft that has its
position specified by a pair of coils (Fig. 6-40).
To move the magnet and the shafts, the coils are energized in different patterns to attract
the magnet. For the motor shown in Fig. 6-40, the following sequence would be used to
turn the magnet (and the shaft) clockwise (Table 6-5).
In this sequence, coil A attracts the north pole of the magnet to put the magnet in an ini-
tial position. Then, coil B attracts the south pole, turning the magnet 90 degrees. This con-
tinues on to turn the motor 90 degrees for each step.
The output shaft of a stepper motor is often geared down so that each step causes a very
small angular deflection (a couple of degrees at most, rather than the 90 degrees in the pre-
vious example). This provides more torque output from the motor and greater positional
control of the output shaft.
A stepper motor can be controlled by something like a 293D (each side driving one
coil). But there are also stepper-motor controller chips, such as the UC1517.
DC AND STEPPER MOTORS
291
Figure 6-40
Stepper motor
TABLE 6–5
Commands to Move a Stepper Motor
STEP
ANGLE
COIL “A”
COIL “B”
1
0
S
2
90
N
3
180
N
4
270
S
5
360/0
S
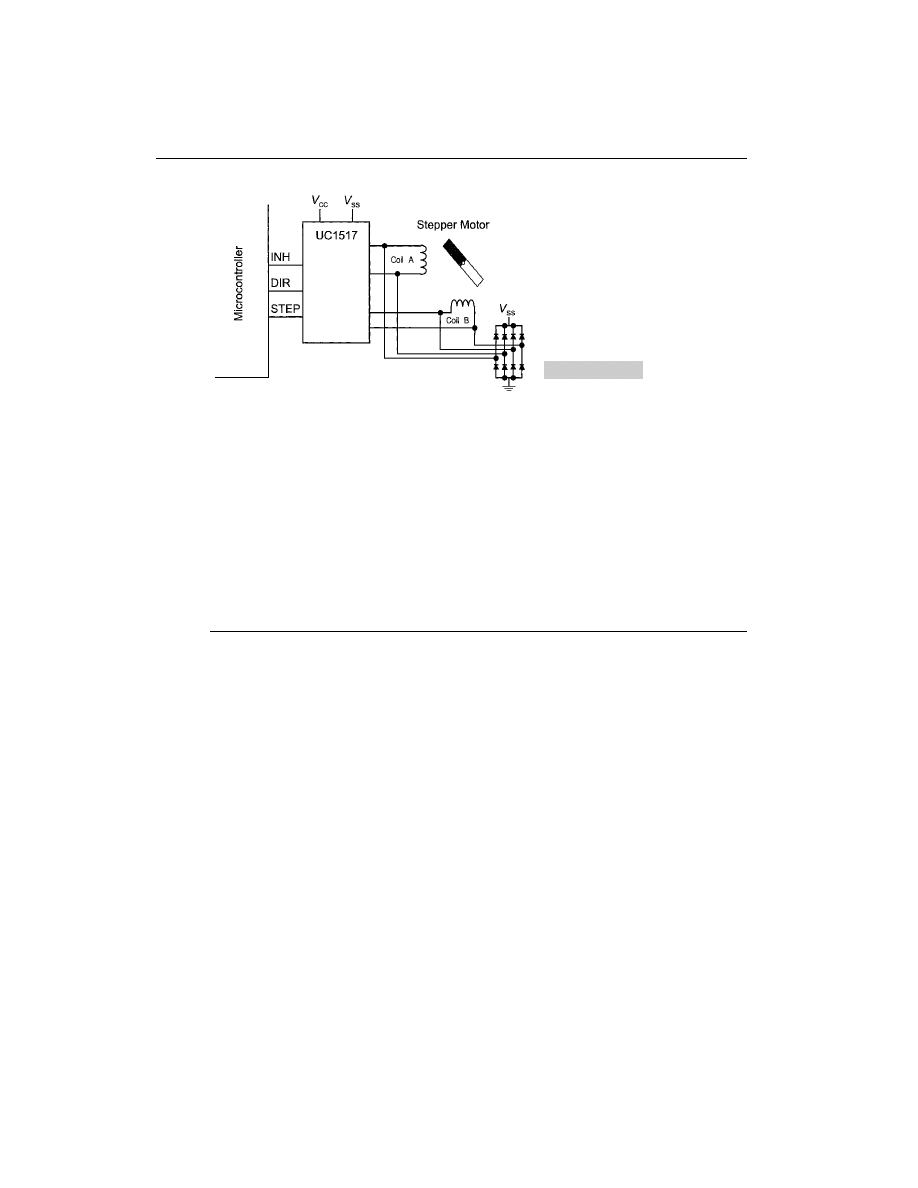
In this chip, a step pulse is sent from the microcontroller along with a specified direc-
tion. The INH pin will turn off the output drivers and allow the stepper shaft to be moved
manually. The UC1517 is capable of outputting bilevel coil levels (which improves effi-
ciency and reduces induced noise), as well as half stepping the motor (which involves en-
ergizing both coils to move the magnet/shaft by 45 degrees and not just 90 degrees). These
options are specific to the motor/controller used (a bipolar stepper motor can have four to
eight wires coming out of it). Before deciding on features to be used, a thorough under-
standing of the motor and its operation is required.
R/C Servo Control
Servos designed for use in radio-controlled airplanes, cars, and boats can be easily inter-
faced to a PICmicro® MCU. They are often used for robots and applications where sim-
ple mechanical movement is required. This might be surprising because a positional servo
is considered to be an analog device.
The output of an R/C servo is usually a wheel that can be rotated from 0 to 90 degrees.
(some servos can turn from 0 to 180 and others have very high torque outputs for special
applications). Typically, they only require
5 V, ground, and an input signal.
An R/C servo is an analog device, the input is a PWM signal at digital voltage levels.
This pulse is between 1.0 and 2.0 ms long and repeats every 20 ms (Fig. 6-42).
The length of the PWM pulse determines the position of the servo’s wheel. A 1.0-ms
pulse will cause the wheel to go to 0 degrees and a 2.0-ms pulse will cause the wheel to go
to 90 degrees.
With the PICmicro® MCU’s TMR2 capable of outputting a PWM signal, controlling a
servo could be considered very easy, although the TMR2 output will probably not give
you the positional accuracy that you will want.
To produce a PWM signal using a PICmicro® MCU, I normally use a timer interrupt
(set every 18 ms) that outputs a 1.0- to 2.0-ms PWM signal using pseudo-code:
Interrupt() {
// Interrupt Handler Code
int i
0;
BitOutput( Servo, 1);
// Output the Signal
292
PICmicro® MCU APPLICATION DESIGN AND HARDWARE INTERFACING
Figure 6-41
UC1517 control
of a stepper motor
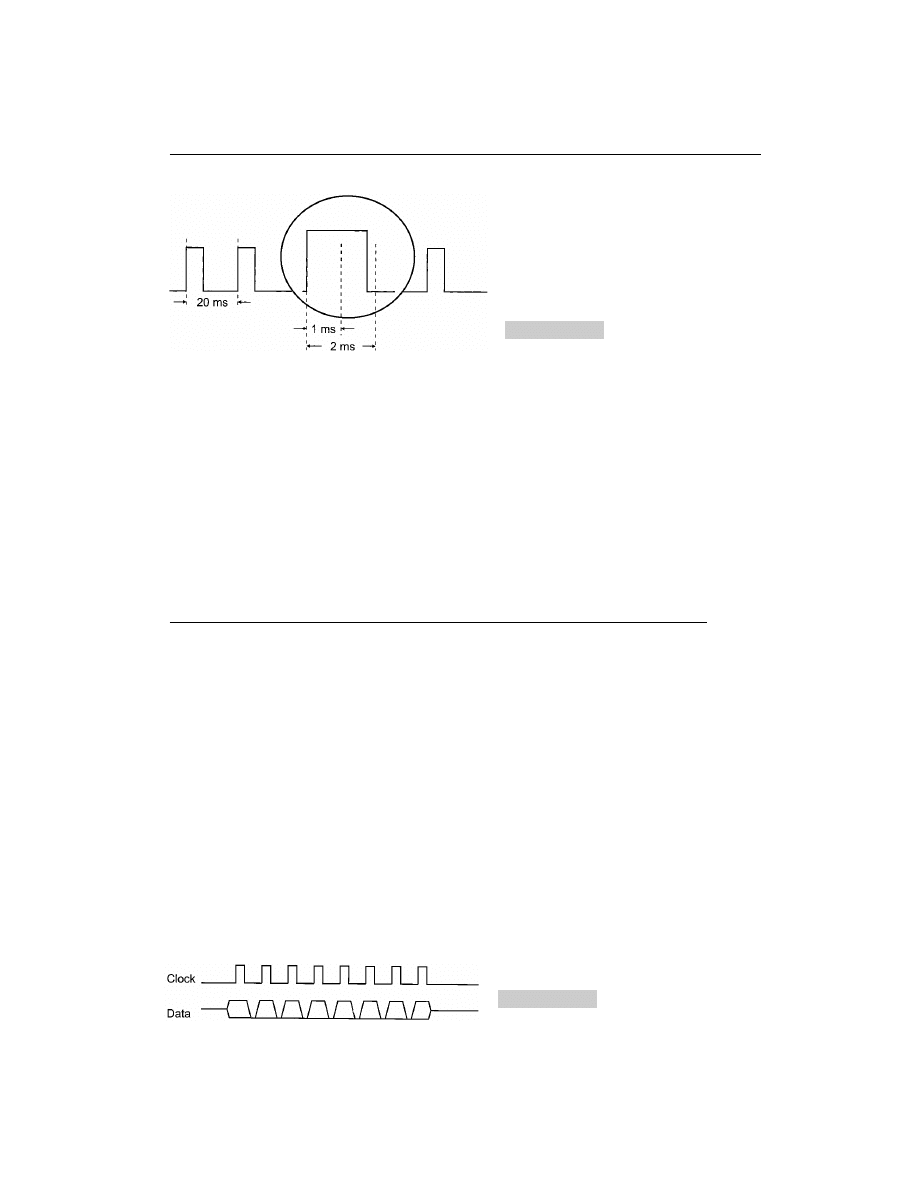
for (i
0; i (1 msec ServoDlay); i );
BitOutput( Servo, 2);
for (; i
2 msec; i );
// Delay full 2 msecs
} // End Interrupt Handler
This code can be easily expanded to control more than one servo (by adding more output
lines and ServoDlay variables). This method of controlling servos is also nice because the
ServoDlay variables can be updated without affecting the operation of the interrupt handler.
The interrupt handler takes two ms out of every 20. Thus, a 10-percent cycle overhead
provides the PWM function (and this doesn’t change even if more servo outputs are added
to the device).
Serial Interfaces
Most intersystem (or intercomputer) communications are done serially. Thus, a byte of
data is sent over a single wire, one bit at a time, with the timing coordinated between the
sender and the receiver. The obvious advantage of transmitting data serially is that fewer
connections are required.
A number of common serial communication protocols are used by microcontrollers. In
some devices, these protocols are built into the chip itself, to simplify the effort required
developing software for the application.
SYNCHRONOUS
For synchronous data communications in a microcontroller, a clock signal is sent along
with serial data (Fig. 6-43).
The clock signal strobes the data into the receiver and the transfer can occur on the ris-
ing or falling edge of the clock. A typical circuit, using discrete devices, could be like that
shown in Fig. 6-44.
This circuit converts serial data into eight digital outputs, which all are available at the
same time (When the O/P clock is strobed). For most applications, the second ‘374 (which
Serial Interfaces
293
Figure 6-42
Servo PWM
waveform
Figure 6-43
Synchronous
data waveform
provides the parallel data) is not required. This serial-to-parallel conversion can also be ac-
complished using serial-to-parallel chips, but I prefer using eight-bit registers because they
are generally easier to find than other TTL parts.
The two very common synchronous data protocols are Microwire and SPI. These meth-
ods of interfacing are used in a number of chips (such as the serial EEPROMs used in the
BASIC Stamps). Although the Microwire and SPI standards are quite similar, there are a
number of differences.
I consider these protocols to be methods of transferring synchronous serial data, rather
than microcontroller network protocols because each device is individually addressed
(even though the clock/data lines can be common between multiple devices). If the chip
select for the device is not asserted, the device ignores the clock and data lines. With these
protocols, only a single master can be on the bus. A possible connection of two devices is
shown in Fig. 6-45.
If a synchronous serial port is built into the microcontroller, the data transmit circuitry
might look like that shown in Fig. 6-46. This circuit will shift out eight bits of data. For
protocols, such as Microwire, where a start bit is initially sent, the start bit is sent using di-
rect reads and writes to the I/O pins. To receive data, a similar circuit would be used, but
data would be shifted into the shift register and then read by the microcontroller.
The Microwire protocol is capable of transferring data at up to 1 Mbps. Sixteen bits are
transferred at a time. To read 16 bits of data, the waveform looks like that shown in Fig. 6-47.
After selecting a chip and sending a start bit, the clock strobes out an eight-bit command
byte (labeled OP1, OP2, A5 to A0 in the previous diagram), followed by (optionally) a
294
PICmicro® MCU APPLICATION DESIGN AND HARDWARE INTERFACING
Figure 6-44
Synchronous
output circuit
Figure 6-45
Synchronous device bus
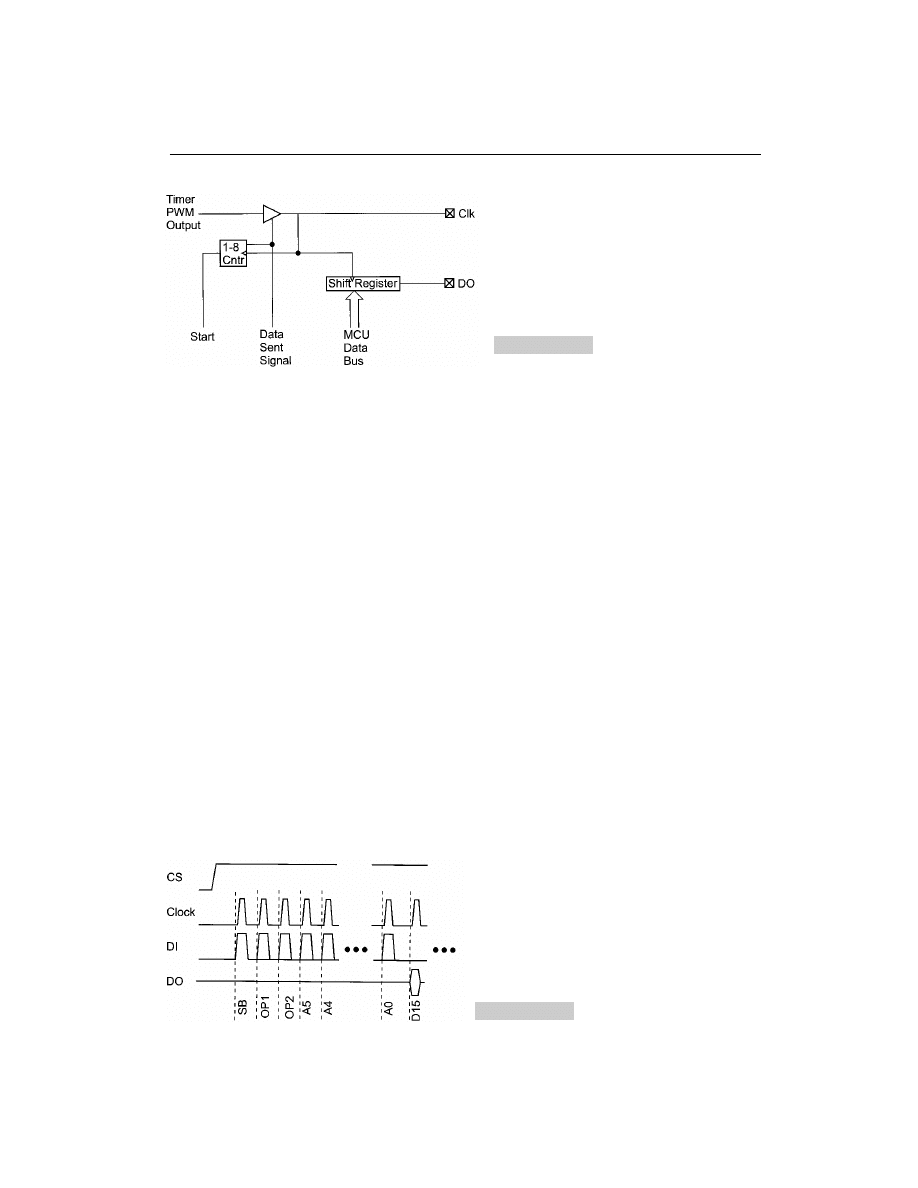
16-bit address word transmitted and then another 16-bit word, either written or read by the
microcontroller.
With a 1-Mbps maximum speed, the clock is both high and low for 500 ns. Transmitted
bits should be sent 100 ns before the rising edge of the clock. When reading a bit, it should
be checked 100 ns before the falling edge of the clock. Although these timings will work for
most devices, you should understand the requirements of the device being interfaced to.
The SPI protocol is similar to Microwire, but with a few differences.
1
SPI is capable of up to 3-Mbps data-transfer rate.
2
The SPI data word size is eight bits.
3
SPI has a hold that allows transmitter to suspend data transfer.
4
Data in SPI can be transferred as multiple bytes, known as blocks or pages.
Like Microwire, SPI first sends a byte instruction to the receiving device. After the byte
is sent, a 16-bit address is optionally sent, followed by eight bits of I/O. As noted, SPI does
allow for multiple byte transfers. An SPI data transfer is shown in Fig. 6-48.
The SPI clock is symmetrical (an equal low and high time). Output data should be avail-
able at least 30 ns before the clock line goes high and read 30 ns before the falling edge of
the clock.
When wiring a Microwire or SPI device, you can do a trick to simplify the microcon-
troller connection; combine the DI and DO lines into one pin. Figure 6-49 is identical to
what was shown earlier in this chapter when interfacing the PICmicro® MCU into a cir-
cuit where there is another driver.
In this method of connecting the two devices, when the data pin on the microcontroller
has completed sending the serial data, the output driver can be turned off and the micro-
controller can read the data coming from the device. The current-limiting resistor between
SERIAL INTERFACES
295
Figure 6-46
Synchronous
output
Figure 6-47
Microwire data read
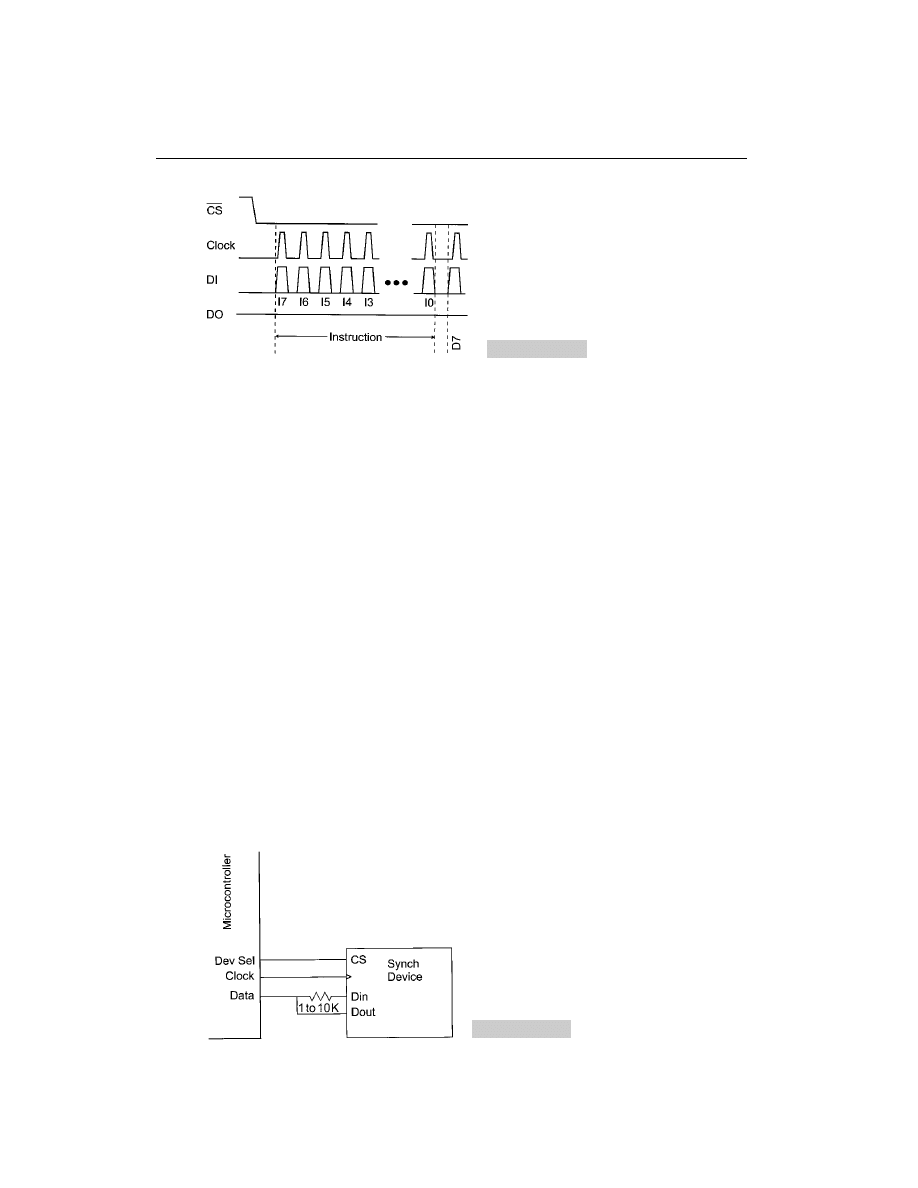
the data pin and DI/DO limits any current flows when both the microcontroller and device
are driving the line.
I2C
The most popular form of microcontroller network is I2C (Inter-Intercomputer
Communications). This standard was originally developed by Philips in the late ‘70s as a
method to provide an interface between microprocessors and peripheral devices without
wiring full address, data, and control busses between devices. I2C also allows sharing of
network resources between processors (which is known as multi-mastering).
The I2C bus consists of two lines, a clock line (SCL), which is used to strobe data (from
the SDA line) from or to the master that currently has control over the bus. Both of these
bus lines are pulled up (to allow multiple devices to drive them). An I2C-controlled stereo
system might be wired as in Fig. 6-50.
The two bus lines are used to indicate that a data transmission is about to begin, as well
as pass the data on the bus.
To begin a data transfer, a master puts a start condition on the bus. Normally, (when the
bus is in the idle state, both the clock and data lines are not being driven (and are pulled
high). To initiate a data transfer, the master requesting the bus pulls down the SDA bus
line, followed by the SCL bus line. During data transmission, this is an invalid condition
(because the data line is changing while the clock line is active/high).
Each bit is then transmitted to or from the slave (the device the message is being com-
municated with by the master) with the negative clock edge being used to latch in the data
(Fig. 6-51). To end data transmission, the reverse is executed, the clock line is allowed to
go high, which is followed by the data line.
Data is transmitted in a synchronous (clocked) fashion. The most-significant bit sent
first and, after eight bits are sent, the master allows the data line to float (it doesn’t drive it
low) while strobing the clock to allow the receiving device to pull the data line low as an
296
PICmicro® MCU APPLICATION DESIGN AND HARDWARE INTERFACING
Figure 6-49
Combining “DO” & “DI”
Figure 6-48
SPI data write
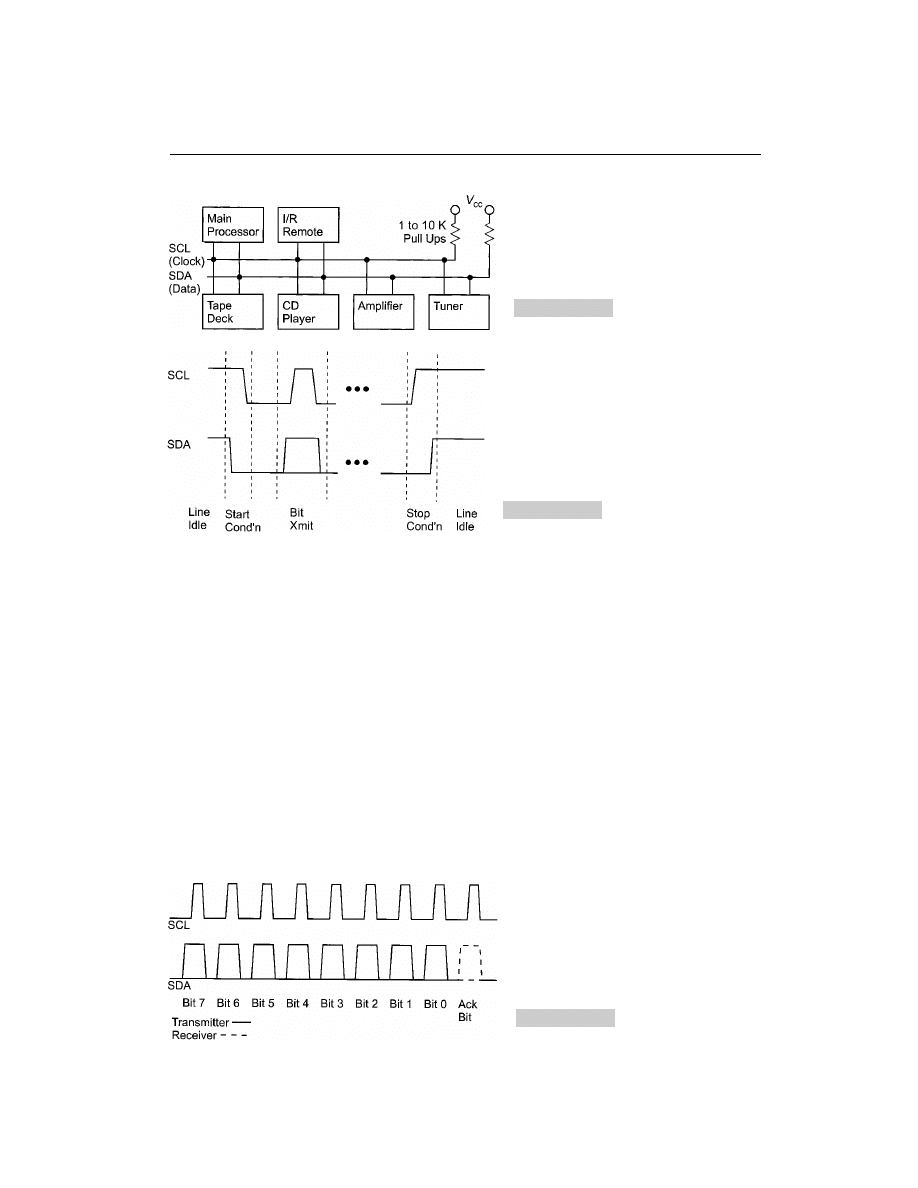
acknowledgment that the data was received. After the acknowledge bit, both the clock and
data lines are pulled low in preparation for the next byte to be transmitted or a stop/start
condition is put on the bus. Figure 6-52 shows the data waveform.
Sometimes, the acknowledge bit will be allowed to float high—even though the data
transfer has completed successfully. This is done to indicate that the data transfer has com-
pleted and the receiver (usually a slave device or a master, which is unable to initiate data
transfer) can prepare for the next data request.
The two maximum speeds for I2C (because the clock is produced by a master, there
really is no minimum speed) are standard mode and fast mode. Standard mode runs at
up to 100 kbps and fast mode can transfer data at up to 400 kbps. Figure 6-53 shows the
timing specifications for both the standard (Std., 100-kHz data rate) and fast (400-kHz
data rate).
A command is sent from the master to the receiver in the format shown in Fig. 6-54. The
receiver address is seven bits long and is the bus address of the receiver. There is a loose stan-
dard to use the most significant four bits are used to identify the type of device; the next three
bits are used to specify one-of-eight devices of this type (or further specify the device type).
As stated, this is a loose standard. Some devices require certain patterns for the second
three bits and others (such as some large serial EEPROMS) use these bits to specify an ad-
SERIAL INTERFACES
297
Figure 6-50
Example I2C
network wiring
Figure 6-51
I2C signals and
waveforms
Figure 6-52
I2C data
byte transmission

dress inside of the device. As well, there is a ten-bit address standard in which the first four
bits are all set and the next bit reset. The last two are the most-significant two bits of the
address, with the final eight bits being sent in a following byte. All this means is that it is
very important to map out the devices to be put on the bus and all of their addresses.The
first four bit patterns in Table 6-6 generally follow this convention for different devices.
This is really all there is to I2C communication, except for a few points. In some de-
298
PICmicro® MCU APPLICATION DESIGN AND HARDWARE INTERFACING
Figure 6-53
I2C signal
timing
Figure 6-54
I2C data
transmission
TABLE 6–6
Reserved I2C Device Type Bit Patterns
0000 - Reserved Address
0010 - Voice Synthesizer
0011 - PCM Audio Interface
0100 - Audible Tone Generation
0111 - LCD/LED Displays
1000 - Video Interface
1001 - A/D and D/A interfaces
1010 - Serial Memory
1100 - RF tuning/control
1101 - Clock/Calendar
1111 - Reserved/Ten Bit Address

vices, a start bit has to be resent to reset the receiving device for the next command (i.e., in
a serial EEPROM read, the first command sends the address to read from and the second
reads the data at that address).
Note that I2C is multi-mastering, which is to say that multiple microcontrollers can ini-
tiate data transfers on a single I2C bus. This obviously results in possible collisions (which
is when two devices attempt to drive the bus at the same time). Obviously, if one micro-
controller takes the bus (sends a start condition) before another one attempts to do so, there
is no problem. The problem arises when multiple devices initiate the start condition at the
same time.
Actually, arbitration in this case is really quite simple. During the data transmission,
hardware (or software) in both transmitters synchronize the clock pulses so that they match
each other exactly. During the address transmission, if a bit that is expected to be a 1 by a
master is actually a 0, then it drops off the bus because another master is on the bus. The
master that drops off will wait until the stop condition and then re-initiate the message. I re-
alize that this is hard to understand with just a written description. The “CAN” section
shows how this is done with an asynchronous bus, which is very analogous to this situation.
A bit-banging I2C interface can be implemented in software of the PICmicro® MCU quite
easily. But, because of software overhead, the fast mode probably cannot be imple-
mented—even the standard mode’s 100 kbps will be a stretch for most devices. I find that
implementing I2C in software to be best when the PICmicro® MCU is the single master
in a network. That way it doesn’t have to be synchronized to any other devices or accept
messages from any other devices that are masters and are running a hardware implemen-
tation of I2C that might be too fast for the software slave.
ASYNCHRONOUS (NRZ) SERIAL
Asynchronous long-distance communications came about as a result of the Baudot tele-
type. This device mechanically (and, later, electronically) sent a string of electrical signals
(now called bits) to a receiving printer.
This data packet format is still used today for the electrical asynchronous transmission
protocols described in the following sections. With the invention of the teletype, data
could be sent and retrieved automatically without having to an operator to be sitting by the
teletype all night, unless an urgent message was expected. Normally, the nightly messages
could be read in the morning.
Before going on, some people get unreasonably angry about the definition and usage of
the terms data rate and baud rate. Baud rate is the maximum number of possible data-bit
transitions per second. This includes the start, parity, and stop bits at the ends of the data
packet shown in Fig. 6-55, as well as the five data bits in the middle. I use the term packet
because we are including more than just data (some additional information is in there as
well), so character or byte (if there were eight bits of data) are not appropriate terms.
This means that for every five data bits transmitted, eight bits in total are transmitted
(thus, nearly 40% of the data-transmission bandwidth is lost in teletype asynchronous ser-
ial communications).
The data rate is the number of data bits that are transmitted per second. For this example,
if you were transmitting at 110 baud (which is a common teletype data speed), the actual data
rate is 68.75 bits per second (or, assuming five bits per character, 13.75 characters per second).
SERIAL INTERFACES
299
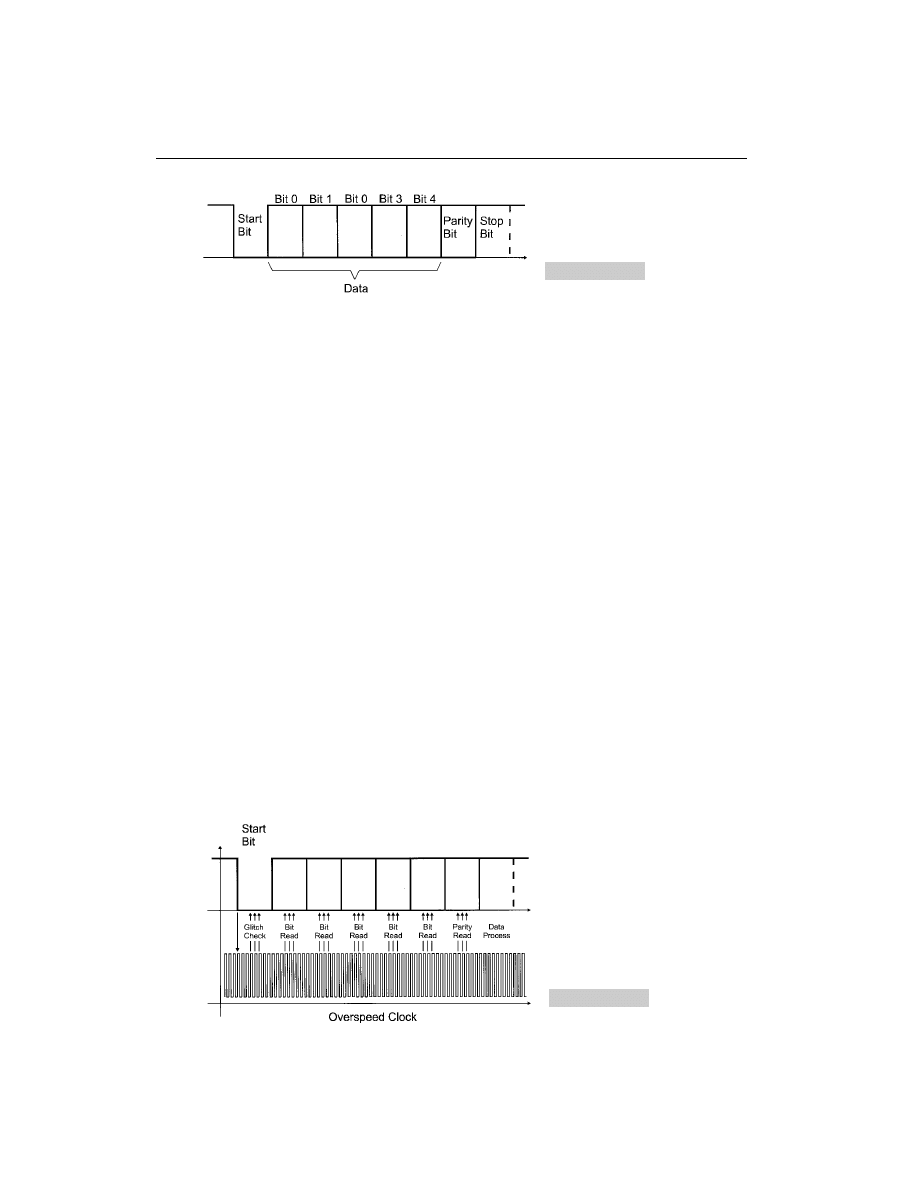
I use the term data rate to describe the baud rate. This means that when I say data rate,
I am specifying the number of bits of all types that can be transmitted in a given period of
time (usually one second). I realize that this is not absolutely correct, but it makes sense to
me to use it in this form and this book is consistent throughout (and I will not use the term
baud rate).
With only five data bits, the Baudot code could only transmit up to 32 distinct charac-
ters. To handle a complete character set, a specific five-digit code was used to notify the
receiving teletype that the next five-bit character would be an extended character. With the
alphabet and most common punctuation characters in the primary 32, this second data
packet wasn’t required very often.
The data packet diagram shows three control bits. The start bit is used to synchronize the
receiver to the incoming data. The PICmicro® MCU USART (Universal Synchronous/
Asynchronous Receiver/Transmitter) has an overspeed clock (running at 16 times the in-
coming bit speed), which samples the incoming data and verifies whether or not the data is
valid (Fig. 6-56).
When waiting for a character, the receiver hardware polls the line repeatedly at 1/16-bit
period intervals until a 0 (space) is detected. The receiver then waits half a cycle before
polling the line again to see if a glitch was detected and not a start bit. Notice that polling oc-
curs in the middle of each bit to avoid problems with bit transitions (if the transmitter’s clock
is slightly different from the receiver’s, the chance of misreading a bit will be minimized).
Once the start bit is validated, the receiver hardware polls the incoming data once every
bit period multiple times (again, to ensure that glitches are not read as incorrect data).
The stop bit was originally provided to give both the receiver and the transmitter some
time before the next packet is transferred (in early computers, the serial data stream was cre-
ated and processed by the computers and not by custom hardware, as in modern computers).
The parity bit is a crude method of error detection that was first brought in with teletypes.
The purpose of the parity bit is to indicate whether the data was received correctly. An odd
300
PICmicro® MCU APPLICATION DESIGN AND HARDWARE INTERFACING
Figure 6-55
Baudot asyn-
chronous serial data
Figure 6-56
Reading an
asynch data packet
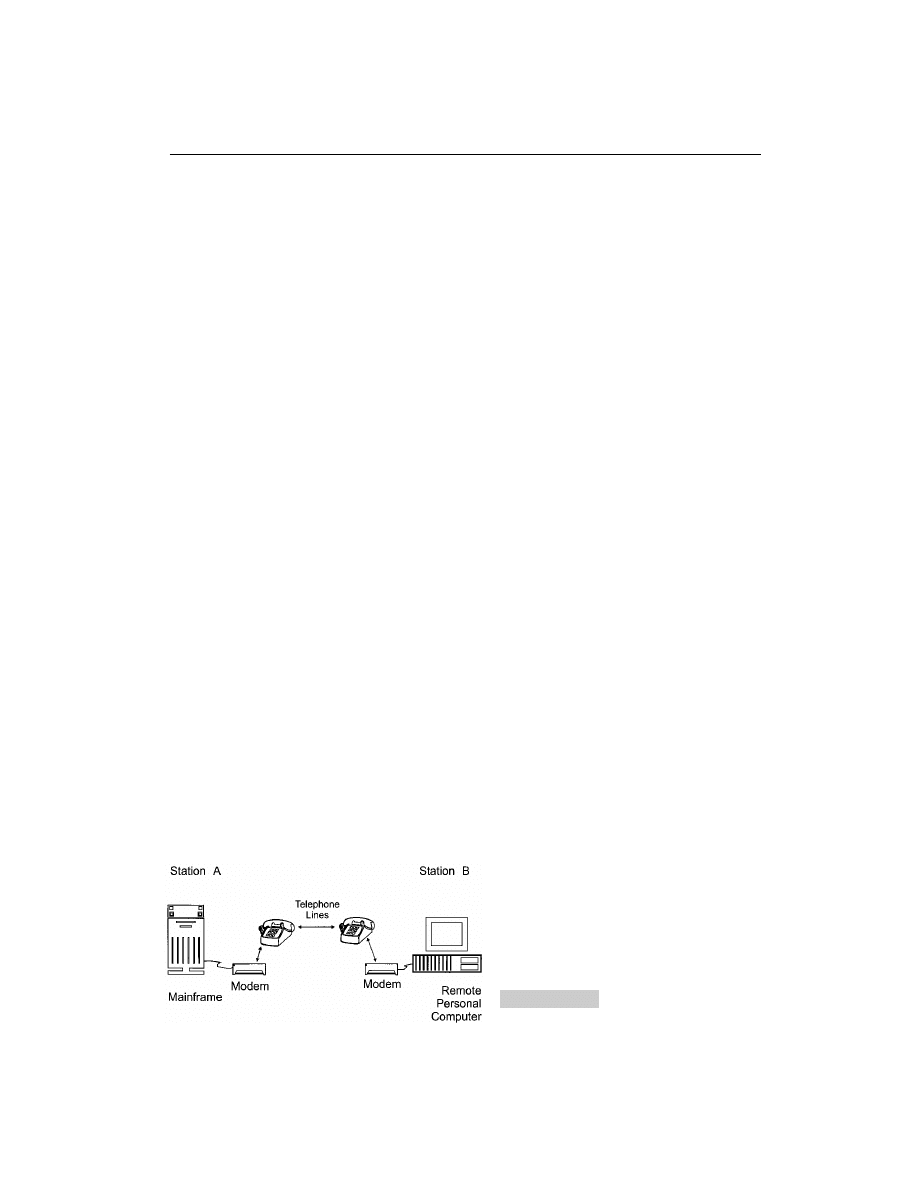
parity meant that if all the data bits and parity bits set to a mark were counted, then the re-
sult would be an odd number. Even parity is checking all the data and parity bits and seeing
if the number of mark bits is an odd number. Along with even and odd parity are mark,
space, and no parity. Mark parity means that the parity bit is always set to a 1, space parity
is always having a 0 for the parity bit, and no parity is eliminating the parity bit altogether.
The most common form of asynchronous serial data packet is 8-N-1, which means eight
data bits, no parity, and one stop bit. This reflects the capabilities of modern computers to
handle the maximum amount of data with the minimum amount of overhead and with a
very high degree of confidence that the data will be correct.
I stated that parity bits are a “crude” form of error detection. I said that because they can
only detect one bit error (e.g., if two bits are in error, the parity check will not detect the
problem). If you are working in a high-induced-noise environment, you might want to
consider using a data protocol that can detect (and, ideally, correct) multiple-bit errors.
RS-232
In the early days of computing (the 1950s), although data could be transmitted at
high speed, it couldn’t be read and processed and continuously. So, a set of handshaking lines
and protocols were developed for what became known as RS-232 serial communications.
With RS-232, the typical packet contains seven bits, (which is the number of bits that
each ASCII character contained). This simplified the transmission of man-readable text,
but made sending object code and data (which were arranged as bytes) more complex be-
cause each byte would have to be split up into two nybbles (which are four bits long). Fur-
ther complicating this is that the first 32 characters of the ASCII character set are defined
as “special” characters (e.g., carriage return, back space, etc.). This meant the data nybbles
would have to be converted or (shifted up) into valid characters (this is why, if you ever
see binary data transmitted from a modem or embedded in an e-mail message, data is ei-
ther sent as hex codes or the letters A to Q). With this protocol, to send a single byte of
data, two bytes (with the overhead bits resulting in 20 bits in total) would have to be sent.
As pointed out, modern asynchronous serial data transmission normally occur eight bits
at a time, which will avoid this problem and allow transmission of full bytes without
breaking them up or converting them.
The actual RS-232 communications model is shown in Fig. 6-57. In RS-232, different
equipment is wired according to the functions that they perform.
DTE (Data Terminal Equipment) and is meant to be the connector used for computers
(the PC uses this type of connection). DCE (Data Communications Equipment) was meant
for modems and terminals that transfer the data.
SERIAL INTERFACES
301
Figure 6-57
2 computer
communication via modem
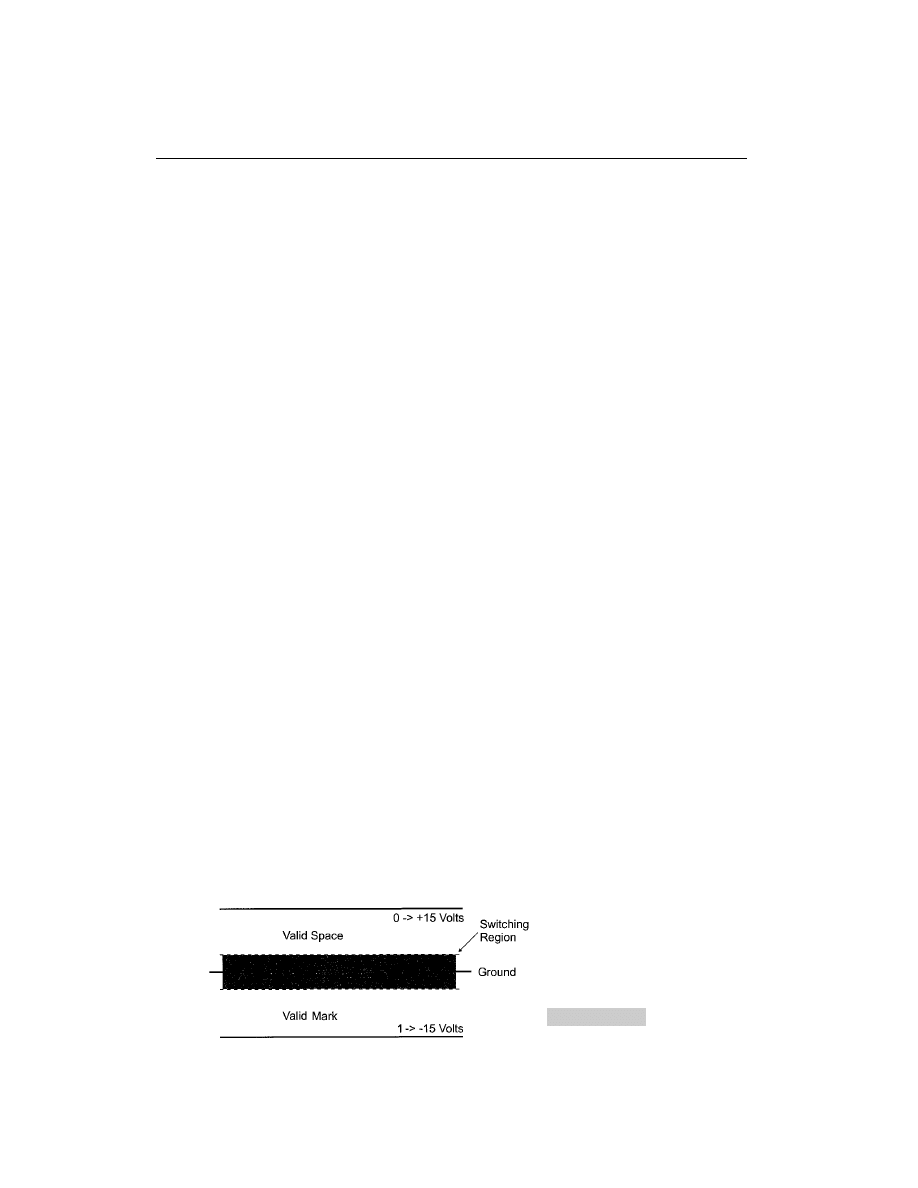
Understanding what the RS-232 model different equipment fits under is crucial to suc-
cessfully connecting two devices by RS-232. With a pretty good understanding of the se-
rial data, you can now look at the actual voltage signals.
As mentioned, when RS-232 was first developed into a standard, computers and the
electronics that drive them were still very primitive and unreliable. Because of that, we’ve
got a couple of legacies to deal with.
The first is the voltage levels of the data. A mark (1) is actually
12 Volts and a space
(0) is
12 V (Fig. 6-58).
From Fig. 6-58, you should see that the hardware interface is not simply a TTL or
CMOS-level buffer. Later, this section introduces you to some methods of generating and
detecting these interface voltages. Voltages in the switching region (
3 V) might not
be read as a 0 or 1, depending on the device. You should always be sure that the voltages
going into or out of a PICmicro® MCU RS-232 circuit are in the valid regions.
Of more concern are the handshaking signals. These six additional lines (which are at
the same logic levels as the transmit/receive lines and shown in Fig. 6-58) are used to in-
terface between devices and control the flow of information between computers.
The Request To Send (RTS) and Clear To Send (CTS) lines are used to control data flow
between the computer (DCE) and the modem (DTE device). When the PC is ready to send
data, it asserts (outputs a mark) on RTS. If the DTE device is capable of receiving data, it
will assert the CTS line. If the PC is unable to receiver data (i.e., the buffer is full or it is
processing what it already has), it will de-assert the RTS line to notify the DTE device that
it cannot receive any additional information.
The Data Transmitter Ready (DTR) and Data Set Ready (DSR) lines are used to estab-
lish communications. When the PC is ready to communicate with the DTE device, it as-
serts DTR. If the DTE device is available and ready to accept data, it will assert DSR to
notify the computer than the link is up and ready for data transmission. If a hardware error
is in the link, then the DTE device will de-assert the DSR line to notify the computer of the
problem. Modems, if the carrier between the receiver is lost, will de-assert the DSR line.
Two more handshaking lines are available in the RS-232 standard that you should be
aware of. Even so, chances are that you will never connect anything to them. The first is
the Data Carrier Detect (DCD), which is asserted when the modem has connected with
another device (i.e., the other device has “picked up the phone”). The Ring Indicator (RI)
is used to indicate to a PC whether or not the phone on the other end of the line is ringing
or if it is busy. This line is very rarely used in PICmicro® MCU applications.
A common ground connection exists between the DCE and DTE devices. This connec-
tion is crucial for the RS-232-level converters to determine the actual incoming voltages.
The ground pin should never be connected to a chassis or shield ground (to avoid large cur-
302
PICmicro® MCU APPLICATION DESIGN AND HARDWARE INTERFACING
Figure 6-58
RS-232 volt-
age levels
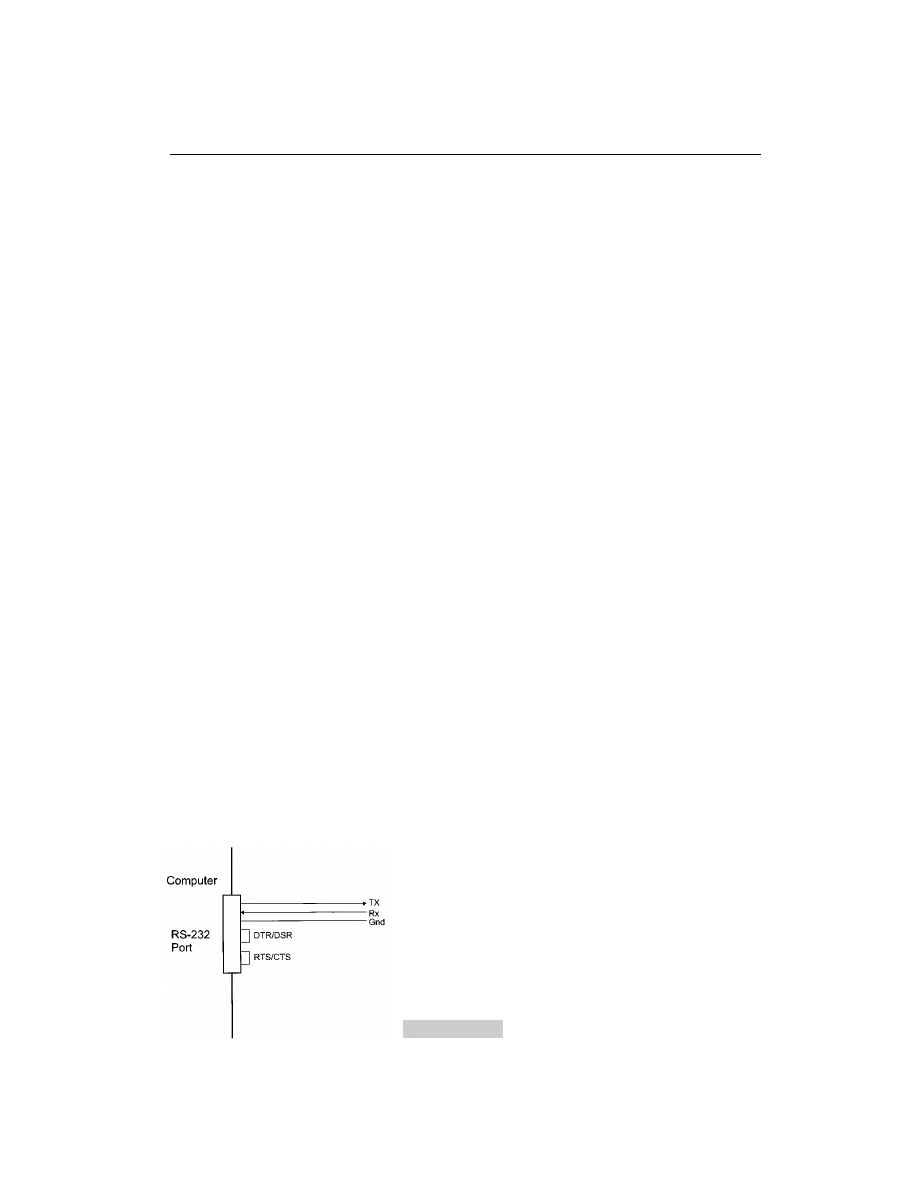
rent flows or be shifted and prevent accurate reading of incoming voltage signals). Incor-
rect grounding of an application can result in the computer or the device it is interfacing to
reset or have they power supplies blow a fuse or burn out. The latter consequences are un-
likely, but I have seen it happen in a few cases.
To avoid these problems, be sure that the chassis and signal grounds are separate or con-
nected by a high-value (hundreds of k) resistor.
Before going too much further, I should expose you to an ugly truth; the handshaking
lines are almost never used in RS-232 (and not just PICmicro® MCU RS-232) communi-
cations. The handshaking protocols were added to the RS-232 standard when computers
were very slow and unreliable. In this environment, data transmission had to be stopped
periodically to allow the receiving equipment to catch up.
Today, this is much less of a concern. Normally, three-wire RS-232 connections are
implemented (Fig. 6-59). I normally accomplish this by shorting the DTR/DSR and RTS/CTS
lines together at the PICmicro® MCU end. The DCD and RI lines are left unconnected.
With the handshaking lines shorted together, data can be send and received without hav-
ing to develop software to handle the different handshaking protocols.
A couple of points on three-wire RS-232 are worth noting. First, it cannot be imple-
mented blindly. In about 20% of the RS-232 applications that I have had to do over the
years, I have had to implement some subset of the total seven-wire (transmit, receive,
ground, and four handshaking lines) protocol lines. Interestingly enough, I have never had
to implement the full hardware protocol. This still means that four out of five times, if you
wire the connection (Fig. 6-59), the application would have worked, but you have to be
prepared for the other twenty percent of cases where more work is required.
With the three-wire RS-232 protocol, there might be applications where you don’t want
to implement the hardware handshaking (the DTR, DSR, RTS, and CTS lines), but you
might want software handshaking. Two primary standards are in place. The first is known
as the XON/XOFF protocol, in which the receiver sends an XOFF (DC3, character 0x013)
when it can’t accept any more data. When it is able to receive data, it sends an XON (DC1,
character 0x011) to notify the transmitter that it can receive more data.
The final aspect of the RS-232 to cover here is the speeds in which data is transferred.
When you first see the speeds (such as 300, 2,400, and 9,600 bits per second), they seem
rather arbitrary. The original serial data speeds were chosen for teletypes because they gave
the mechanical device enough time to print the current character and reset before the next
one came in. Over time, these speeds have become standards and as faster devices have be-
come available, they’ve just been doubled (e.g, 9,600 bps is 300 bps doubled five times).
SERIAL INTERFACES
303
Figure 6-59
Typical RS-232 wiring

In producing these data rates, the PICmicro® MCU’s USART uses clock divider to pro-
duce a clock 16 times the data rate. The PICmicro® MCU’s operating clock is divided by
integers to get the nominal RS-232 speeds. This might seem like it won’t work out well,
but because of the RS-232’s strange relationship with the number 13, the situation isn’t as
bad as it might seem.
If you invert (to get the period of a bit) the data speeds and convert the units to mi-
croseconds, you will discover that the periods are almost exactly divisible by 13. Thus,
you can use an even-MHz oscillator in the hardware to communicate over RS-232 using
standard frequencies.
For example, if you had a PICmicro® MCU running with a 20-MHz instruction clock
and you wanted to communicate with a PC at 9,600 bps, you would determine the number
of cycles to delay by:
1
Find the bit period in microseconds. For 9,600 bps, this is 104
s.
2
Divide this bit period by 13 to get a multiple number. For 104
s, this is 8.
Now, if the external device is running at 20 MHz (which means a 200-ns cycle time),
you can figure out the number of cycles as multiples of 8
13 times in the number of cy-
cles in 1
s. For 20 MHz, five cycles execute per microsecond. To get the total number of
cycles for the 104-
s bit period, you simply evaluate:
5 cycles/
s * 13 * 8 s/bit 520 instruction cycles/bit
The device you are most likely to interface to is the PC. Its serial ports consist of basically
the same hardware and BIOS interfaces that were first introduced with the first PC in 1981.
Since that time, a nine-pin connector has been specified for the port (in the PC/AT) and one
significant hardware upgrade has been introduced when the PS/2 was announced. For the most
part, the serial port has changed the least of any component in the PC for the past 20 or so years.
Either a male 25-pin or male 9-pin connector is available on the back of the PC for each
serial port. These connectors are shown in Fig. 6-60 and Table 6-7.
The 9-pin standard was originally developed for the PC/AT because the serial port was
put on the same adapter card as the printer port. There wasn’t enough room for the serial
port and parallel port to both use 25-pin D-shell connectors. I prefer the smaller form-
factor connector.
RS-232 serial communications have a reputation for being difficult to use and I have to
disagree. Implementing RS-232 isn’t very hard when a few rules are followed and you
have a good idea of what’s possible.
When implementing an RS-232 interface, you can make your life easier by doing a few
simple things. The first is the connection. Whenever I do an application, I standardize by
304
PICmicro® MCU APPLICATION DESIGN AND HARDWARE INTERFACING
Figure 6-60
IBM PC DB-25 and D-9 pin RS-232
connectors

using a nine-pin D-shell with the DTE interface (the one that comes out of the PC) and use
standard “straight-through” cables. In doing so, I always know what my pinout is at the
end of the cable when I’m about to hookup a PICmicro® MCU to a PC.
By making the external device DCE always and using a standard pinout, I don’t have to
fool around with null modems or by making my own cables.
When I create the external device, I also loop back the DTR/DSR and CTS/RTS data
pairs inside the external device, rather than at the PC or in the cable. This allows me to use
a standard PC and cable without having to do any wiring on my own or any modifications.
It actually looks a lot more professional as well.
Tying DTR/DSR and CTS/RTS also means that I can take advantage of built-in termi-
nal emulators. All operating systems have a “dumb” terminal emulator that can be used to
debug the external device without requiring the PC code to run. Getting the external device
working before debugging the PC application code should simplify your work.
As I went through the RS-232 electrical standard earlier in this section, you were prob-
ably concerned about interfacing standard, modern technology (i.e., TTL and CMOS) de-
vices to other RS-232 devices. This is a legitimate concern because, without proper
voltage-level conversion, you will not be able to read from or write to external TTL or
CMOS devices. Fortunately, this conversion isn’t all that difficult because there are meth-
ods to make it quite easy.
If you look at the original IBM PC RS-232 port specification, you’ll see that 1488/1489
RS-232 level-converter circuits were used for the RS-232 serial port interfaces. The pinout
and wiring for these devices in a PC are shown in Fig. 6-61.
There are a few points about the 1488/1489 components that should be discussed. When
transmitting data, each transceiver (except for 1) is actually a NAND gate (with the inputs
being #A and #B outputting on #Y). When I wire in a 1488, I ensure that the second input
to a driver is always pulled high (as I’ve done with 2B in Fig. 6-61).
The second comment has to do with the 1489 receiver. The #C input is a flow control
for the gates (normally RS-232 comes in the #A pin and is driven as TTL out of #Y). This
pin is normally left floating (unconnected).
SERIAL INTERFACES
305
TABLE 6–7
Standard RS-232 Connector Pinouts
PIN NAME
25 PIN
9 PIN
I/O DIRECTION
TxD
2
3
Output (“O”)
RxD
3
2
Input (“I”)
Gnd
7
5
RTS
4
7
O
CTS
5
8
I
DTR
20
4
O
DSR
6
6
I
RI
22
9
I
DCD
8
1
I
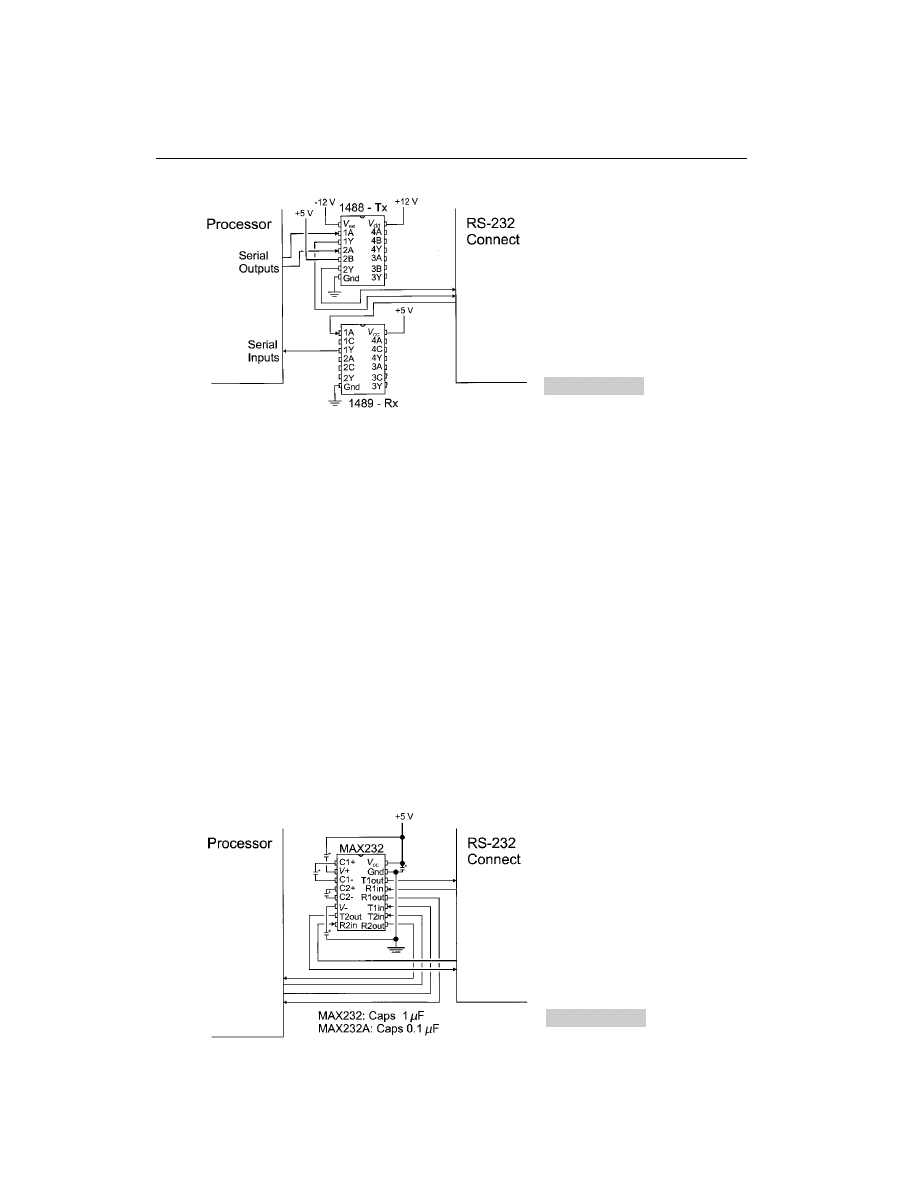
These chips are still available and work very well (up to 115,200 bps maximum RS-232
data rate), only I’d never use them in my own projects because the 1488 (transmitter) re-
quires
12-V sources in order to produce valid RS-232 signal voltages.
This section presents three methods that you can choose from to convert RS-232 signal
levels to TTL/CMOS (and back again) when you are creating PICmicro® MCU RS-232
projects. These three methods do not require I12 V. In fact, they just require the
5-V sup-
ply that is used for logic power.
The first method is using an RS-232 converter that has a built-in charge pump to create
the
12 V required for the RS-232 signal levels. Probably the most well-known chip
that is used for this function is the Maxim MAX232 (Fig. 6-62).
This chip is ideal for implementing three-wire RS-232 interfaces (or adding a simple
DTR/DSR or RTS/CTS handshaking interface). The ground for the incoming signal is
connected to the processor ground (which is not the case’s ground).
Along with the MAX232, Maxim and some other chip vendors have a number of other
RS-232 charge-pump-equipped devices that will allow you to handle more RS-232 lines
(to include the handshaking lines). Some available charge-pump devices do not require the
external capacitors that the MAX232 chip does, which will simplify the layout of your cir-
cuit (although these chips do cost quite a bit more).
The next method of translating RS-232 and TTL/CMOS voltage levels is to use the
transmitter’s negative voltage. The circuit in Fig. 6-63 shows how this can be done and is
demonstrated in Chapter 15.
306
PICmicro® MCU APPLICATION DESIGN AND HARDWARE INTERFACING
Figure 6-62
MAXIM MAX232
RS-232 connections
Figure 6-61
1488/1489
RS-232 connections
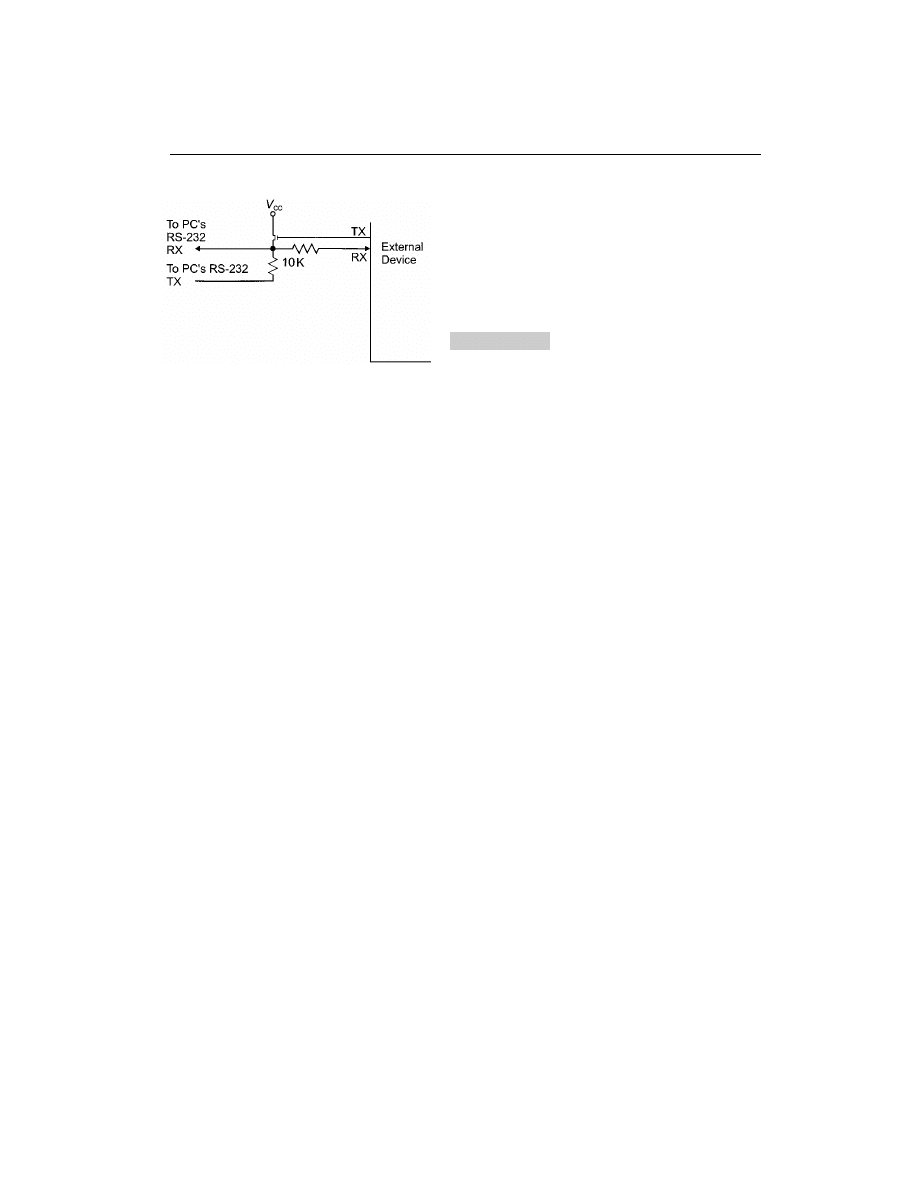
This circuit relies on the RS-232 communications only running in half-duplex mode
(i.e., only one device can transmit at a given time). When the external device “wants” to
transmit to the PC, it sends the data either as a mark (leaving the voltage being returned to
the PC as a negative value) or as a space (by turning on the transistor and enabling the
positive voltage output to the PC’s receivers). If you go back to the RS-232 voltage-
specification drawing, you’ll see that
5 V is within the valid voltage range for RS-232
spaces.
This method works very well (consuming just about no power) and is obviously a very
cheap way to implement a three-wire RS-232 bidirectional interface. Figure 6-63 shows a
NMOS device simply because it does not require a base current-limiting transistor the
same way that a bipolar transistor would.
When the PICmicro® MCU transmits a byte to the external device through this circuit,
it will receive the packet it’s sent because this circuit connects the PICmicro® MCU’s re-
ceiving pin (more or less) directly to its transmitting pin. The software running in the
PICmicro® MCU (as well as the external device) will have to handle this.
You also have to be absolutely sure that you are only transmitting in half-duplex mode.
If both the PICmicro® MCU and the external device attempt to transmit at the same time,
then both messages will be garbled. Instead, the transmission protocol that you use should
wait for requested responses, rather than sending them asynchronously (or, you could have
one device, either the PC or external devices, wait for a request for data from the other).
Another issue to notice is that data out of the external device will have to be inverted to
get the correct transmission voltage levels (e.g., a 0 will output a 1) to ensure that the tran-
sistor turns on at the right time (e.g., a positive voltage for a space).
Unfortunately, this means that the built-in serial port for many microcontrollers cannot
be used because they cannot invert the data output as is required by the circuit. An inverter
could be put between the serial port and the RS-232 conversion circuit to avoid this problem.
The Dallas Semiconductor DS275 incorporates this circuit (with built-in inverters) into
the single package shown in Fig. 6-64.
The DS1275 and the DS275 have the same pinout. Both work exactly the same way, but
the DS275 is a later version of the part.
As an aside, before going on to the last interface circuit, this circuit has a big advan-
tage. The PICmicro® MCU’s RS-232 transmitter is connected to the PC’s RS-232 re-
ceiver if the external device (with this circuit) is connected to a PC. Thus, the
PICmicro® MCU can ping (send a command that is ignored by the external device) via
the RS-232 port and see if the external device is connected to it. But, this technique has
a hitch. Even though the circuit is connected, how do you know that the external
PICmicro® MCU device is working from the PC?
SERIAL INTERFACES
307
Figure 6-63
RS-232 to external
device
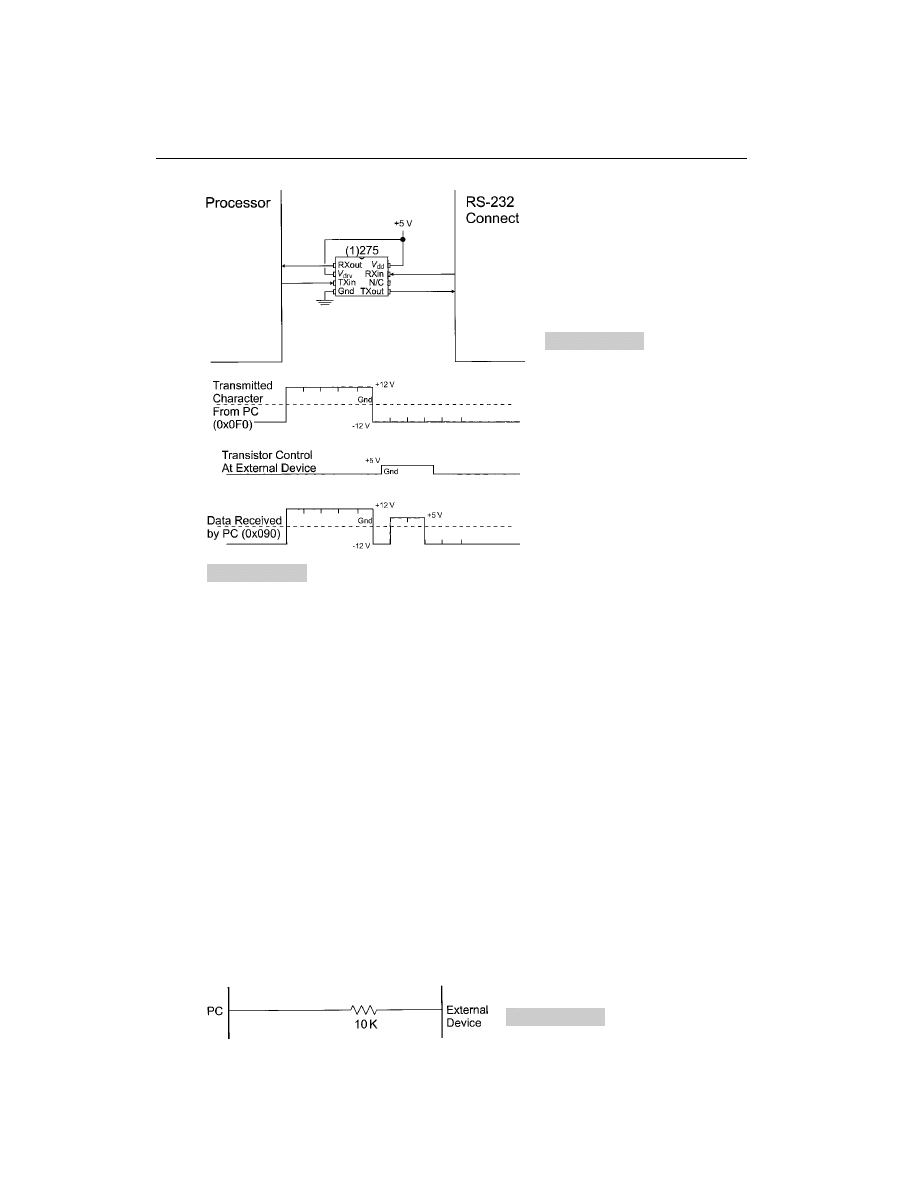
Actually, this isn’t that difficult. Simply specify the ping character as something that the
external device can recognize and have it modify it so that the PC’s software can recognize
that the interface is working.
In the past, I have used a microcontroller with bit-banging software (described in the next
section) to change some mark bits when it recognizes that a ping character is being received.
Figure 6-65 shows a ping character of 0x0F0 that is modified by the external device (by
turning on the transistor) to change some bits into spaces. If the PC receives nothing or
0x0F0, then the external device is not working.
The last interface circuit presented here is simply a resistor (Fig. 6-66). This method of
receiving data from an RS-232 device to a logic input probably seems absurdly simple and
as if could not work. But it does and very well.
This interface works by relying on clamping diodes in the receiver holding the voltage
at the maximum allowable for the receiver. The 10-K resistor limits any current flows and
provides a voltage drop (Fig. 6-67).
Figure 6-68 is the actual circuit of the 10-K current-limiting resistor and PICmicro®
MCU I/O pin with internal clamping diodes.
There are some things to watch out for when using this receive circuit in the PICmicro®
MCU. Although most I/O pins are clamped internally, in some cases, you will have to add
your own clamping diodes externally. These cases are when the open drain (RA4) I/O pin
is used or the optional _MCLR I/O pin is used for input.
308
PICmicro® MCU APPLICATION DESIGN AND HARDWARE INTERFACING
Figure 6-64
Dal Semi 1275
RS-232 interface
Figure 6-65
RS-232 “Ping” using transistor/
resistor TTL/CMOS voltage conversion circuit
Figure 6-66
Simple RS-232 to
TTL/CMOS voltage conversion
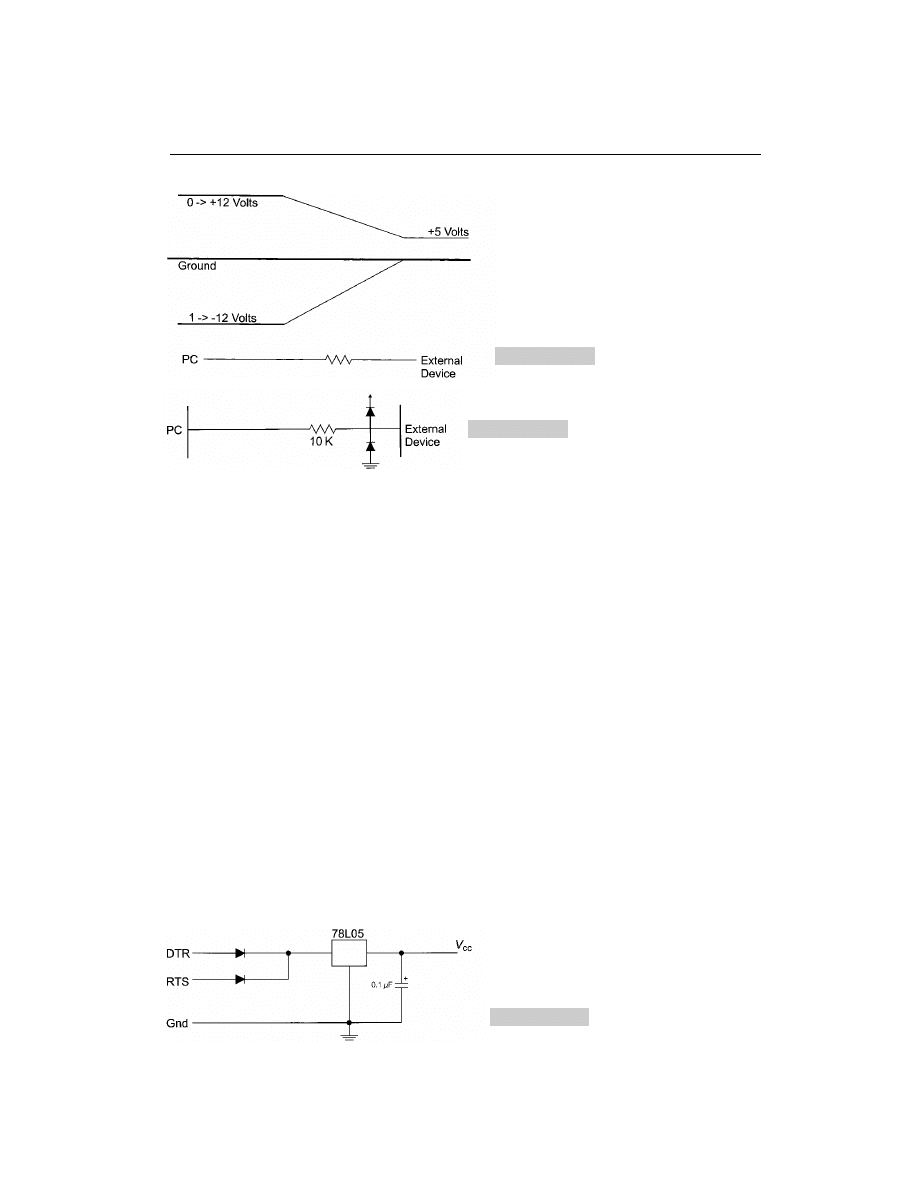
There are a few rules for this implementation. Some people like to use this configura-
tion with a 100-K resistor (or higher value) instead of the 10-K shown. Personally, I don’t
like to use anything higher than 10 K because of the possibilities of induced noise with a
CMOS input (this is less likely with TTL) causing an incorrect bit in the stream to be read.
10 K will maximize the induced current required to change the state of the I/O pin.
With the availability of many CMOS devices requiring very minimal amounts of cur-
rent to operate, you might be wondering about different options for powering your circuit.
One of the most innovative that I have come across is using the PC’s RS-232 ports itself
as powering devices that are attached to it using the circuit shown in Fig. 6-69.
When the DTR and RTS lines are outputting a space, a positive voltage (relative to
ground) is available. This voltage can be regulated and the output used to power the de-
vices attached to the serial port (up to about 5 mA). For extra current, the Tx line can also
be added into the circuit, as well with a break being sent from the PC to output a positive
voltage.
The 5 mA is enough current to power the transistor/resistor type of RS-232 transmitter
and a PICmicro® MCU running at 4 MHz, along with some additional hardware (such as
an LCD). You will not be able to drive an LED with this circuit and you might find that
some circuits that you normally use for such things as pull-ups and pull-downs will con-
sume too much power.
Now, with this method of powering the external device, you do not have use of the
handshaking lines, but the savings of not having to provide an external power supply (or
battery) will outweigh the disadvantages of having to come up with a software pinging and
handshaking protocol. Externally powering a device attached to the RS-232 port is ideal
for input devices, such as serial mice, which do not require a lot of power.
SERIAL INTERFACES
309
Figure 6-67
RS-232/resistor
voltage conversion
Figure 6-68
Simple RS-232 to
TTL/CMOS voltage conversion with
clamping diodes
Figure 6-69
“Stealing” power
from the PC’s serial port
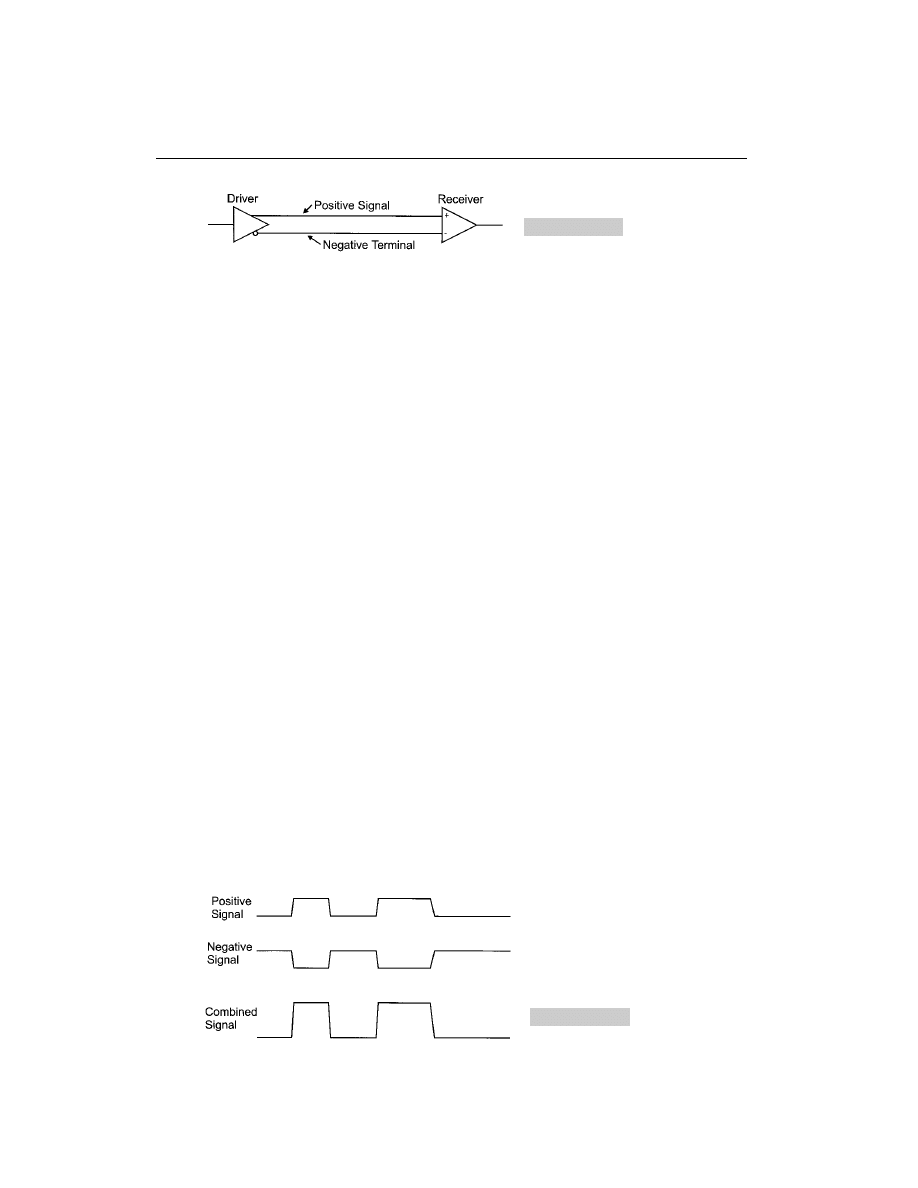
RS-485/RS-422
So far, this book has covered single-ended asynchronous serial com-
munications methods, such as RS-232 and direct NRZ device interfaces. These interfaces
work well in home and office environments, but can be unreliable in environments where
power surges and electrical noise can be significant. In these environments, a double-ended
or differential pair connection is optimal to ensure the most accurate communications.
A differential-pair serial communications electrical standard consists of a balanced dri-
ver with positive and negative outputs that are fed into a comparator, which outputs a 1 or
a 0, depending on whether or not the positive line is at a higher voltage than the negative.
Figure 6-70 shows the normal symbols used to describe a differential pair connection.
This data-connection method has several advantages. The most obvious one is that the
differential pair doubles the voltage swing sent to the receiver which increases its noise
immunity. This is shown in Fig. 6-71, when the positive signal goes high and the negative
voltage goes low. The change in the two receiver inputs is 10 volts, rather than the 5 volts
of a single line. This is assuming that the voltage swing is 5 volts for the positive and neg-
ative terminals of the receiver. This effective doubling of the signal voltage reduces the
impact that electrical interface has on the transmitted signal.
Another benefit of differential pair wiring is that if one connection breaks and there is
common ground, the circuit will continue to operate (although at reduced noise reduction
efficiency). This feature makes differential pairs very attractive in aircraft, and spacecraft,
where loss of a connection could be catastrophic.
To minimize AC transmission-line effects, the two wires should be twisted around each
other. Twisted-pair wiring can either be bought commercially or made by simply twisting
two wires together. Twisted wires have a typically characteristic impedance of 300 Ohms
or greater.
A common standard for differential pair communications is RS-422. This standard,
which uses many commercially available chips provides:
1
Multiple receiver operation.
2
Maximum data rate of 10MBps.
3
Maximum cable length of 4000 meters (with a 100-kHz signal).
Multiple receiver operation (Fig. 6-72) allows signals to be “broadcasted” to multiple
devices.
310
PICmicro® MCU APPLICATION DESIGN AND HARDWARE INTERFACING
Figure 6-70
Differential pair
serial data transmission
Figure 6-71
Differential data
waveform
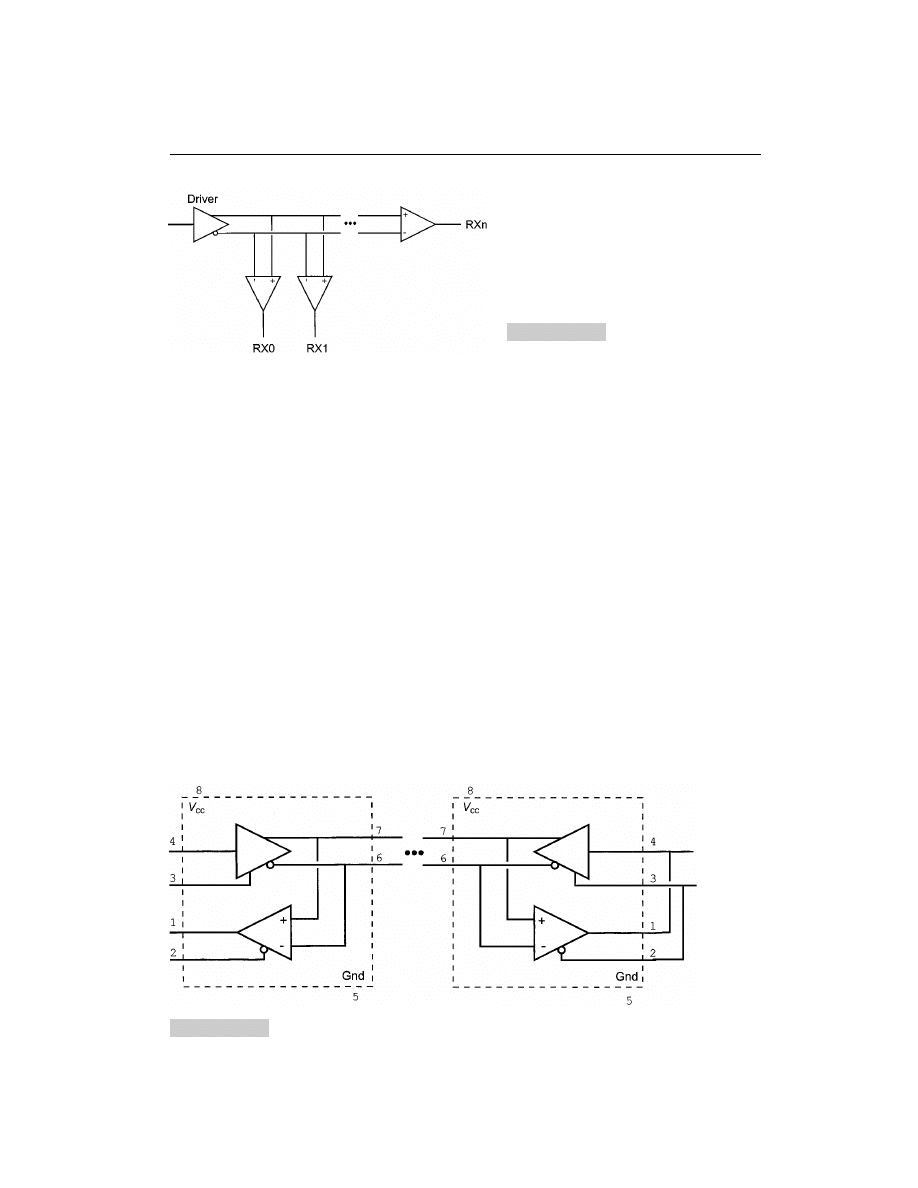
The best distance and speed changes with the number of receivers of the differential pair
along with its length. The 4000 m at 100 kHz or 40 m at 10 MHz are examples of this bal-
ancing between line length and data rate. For long data lengths, a few hundred ohm termi-
nating resistor might be required between the positive terminal and negative terminal at
the end of the lines to minimize reflections coming from the receiver and affecting other
receivers.
RS-422 is not as widely used as you might expect, instead, RS-485 is much more pop-
ular. RS-485 is very similar to RS-422, except that it allows multiple drivers on the same
network. The common chip is the 75176, which has the ability to drive and receive on the
lines (Fig. 6-73).
I have drawn the right 75176 of Fig. 6-73 with the Rx and TX and two enables tied to-
gether. This results in a two-wire differential I/O device. Normally, the 75176 s are left in RX
mode (pin 2 reset), unless they are driving a signal onto the bus. When the unused 75176 s
on the lines are all in receive mode, any one can “take over” the lines and transmit data.
Like RS-422, multiple 75176s (up to 32) can be on the RS-485 lines with the capability
of driving or receiving. When all the devices are receiving, a high (1) is output from the
75176. This means that the behavior of the 75176 in the RS-485 (because these are multi-
ple drivers) is similar to that of a dotted AND bus. When one driver pulls down the line,
all receivers are pulled low. For the RS-485 network to be high, all unused drivers must be
off or all active drivers must be transmitting a 1. This feature of RS-485 is taken advantage
in small system networks, such as CAN, which is covered later in the chapter.
SERIAL INTERFACES
311
Figure 6-72
Multiple
receiver RS-422
Figure 6-73
RS-485 connection using a 75176
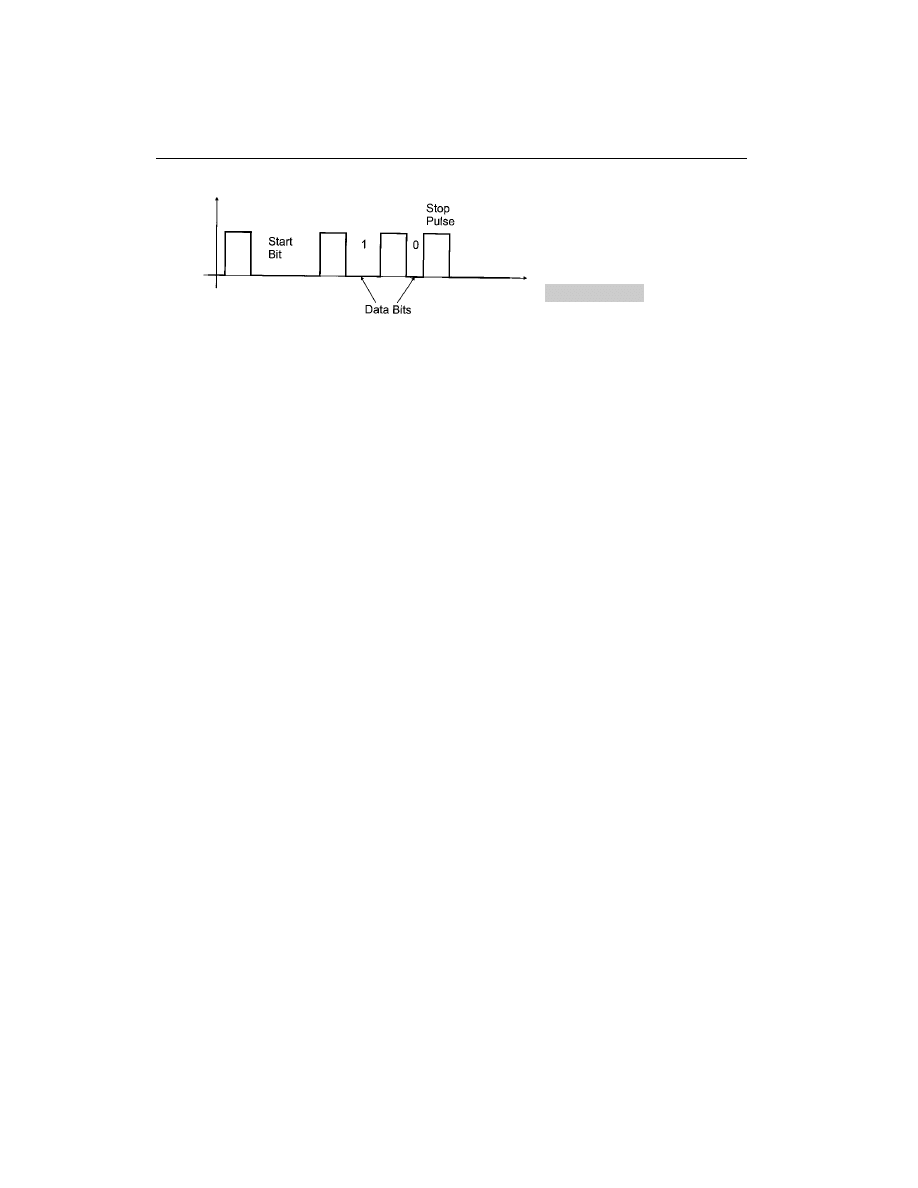
The only issue to be on the lookout for when creating RS-485/RS-422 connections is to
keep the cable polarities correct (positive to positive and negative to negative). Reversing
the connectors will result in lost signals and misread transmission values.
Manchester serial data transfer
Another common method of serially transmitting
data asynchronously is to use the Manchester encoding format. In this type of data trans-
fer, each bit is synchronized to a start bit and the following data bits are read with the space
dependent on the value of the bit (Fig. 6-74).
In this type of data transmission, the data size is known, so the stop pulse is recognized
and the space afterward is not treated as incoming data. Manchester encoding is unique in
that the start bit of a packet is quantitatively different from a 1 or a 0. This allows a receiver
to determine whether or not the data packet being received is actually at the start of the
packet or somewhere in the middle (and should be ignored until a start bit is encountered).
Manchester encoding is well suited for situations where data is not interrupted or
restarted anywhere except at the beginning. Because of this, it is the primary method of
data transmission for infrared control (such as used in your TV’s remote control). Chapter
16 presents two algorithms for reading a TV remote control’s IR packets.
Can
The CAN (Controller Area Network) protocol was originally developed by Bosch
a number of years ago as a networking scheme that could be used to interconnect the
computing systems used within automobiles. At the time, there was no single standard
for linking digital devices in automobiles. Before the advent of CAN (and J1850, which
is the similar North American standard) cars could contain as much as three miles of
wiring, weighing 200 pounds, interconnecting the various parts and systems within the
car.
CAN was designed to be:
1
Fast (1 Mbps).
2
Insensitive to electromagnetic interference.
3
Simple with few pins in connectors for mechanical reliability.
4
Devices could be added or deleted from the network easily (and during manufacturing).
Although CAN is similar to J1850 and does rely on the same first two layers of the OSI
seven-layer communications model, the two standards are electrically incompatible. CAN
was the first standard and is thoroughly entrenched in European and Japanese cars and is
rapidly making inroads (please excuse the pun) with North American automotive manu-
facturers.
312
PICmicro® MCU APPLICATION DESIGN AND HARDWARE INTERFACING
Figure 6-74
“Manchester”
encoded serial data
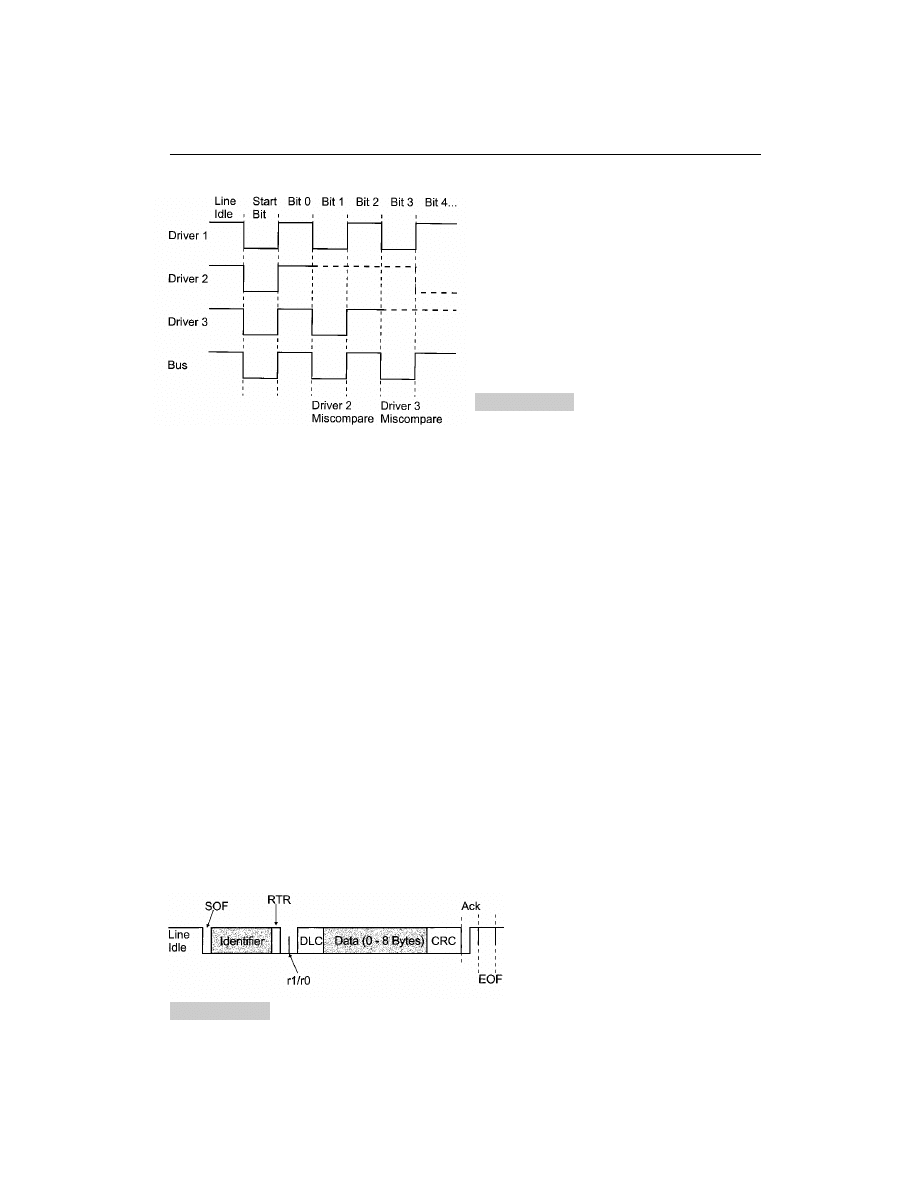
CAN is built from a dotted AND bus that is similar to that used in I2C. Electrically, RS-
485 drivers are used to provide a differential voltage network that will work even if one of
the two conductors is shorted or disconnected (giving the network high reliability inside of
the very extreme environment of the automobile). This dotted AND bus allows arbitration
between different devices (when the device’s “drivers” are active, the bus is pulled down,
like in I2C signal). An example of how this method of arbitration works is shown in Fig.
6-75.
In this example, when a driver has a miscompare with what it is transmitting (e.g., when
it is sending a 1 and a 0 shows up on the bus), then that driver stops sending data until the
current message (which is known as a frame) has completed. This is a very simple and ef-
fective way to arbitrate multiple signals without having to retransmit all of the colliding
messages over again.
The frame (Fig. 6-76) is transmitted as an asynchronous serial stream (which means that
no clocking data is transmitted). Thus, both the transmitter and receiver must be working
at the same speed (typically, data rates are in the range of 200 kbps to 1 Mbps).
In CAN, a 0 is known as a dominant bit and a 1 is known as a recessive bit. The differ-
ent fields of the frame are defined in Table 6-8.
The last important note about CAN is that devices are not given specific names or ad-
dresses. Instead, the message is identified (using the 11- or 19-bit message identifier). This
method of addressing can provide you with very flexible messaging (which is what CAN
is all about).
The CAN frame is very complex, as is the checking that has to be done, both for re-
ceiving a message and transmitting a message. Although it can be done using a micro-
controller and programming the functions in software, I would recommend only imple-
SERIAL INTERFACES
313
Figure 6-75
CAN transmission
arbitration
Figure 6-76
CAN 11 bit identifier frame
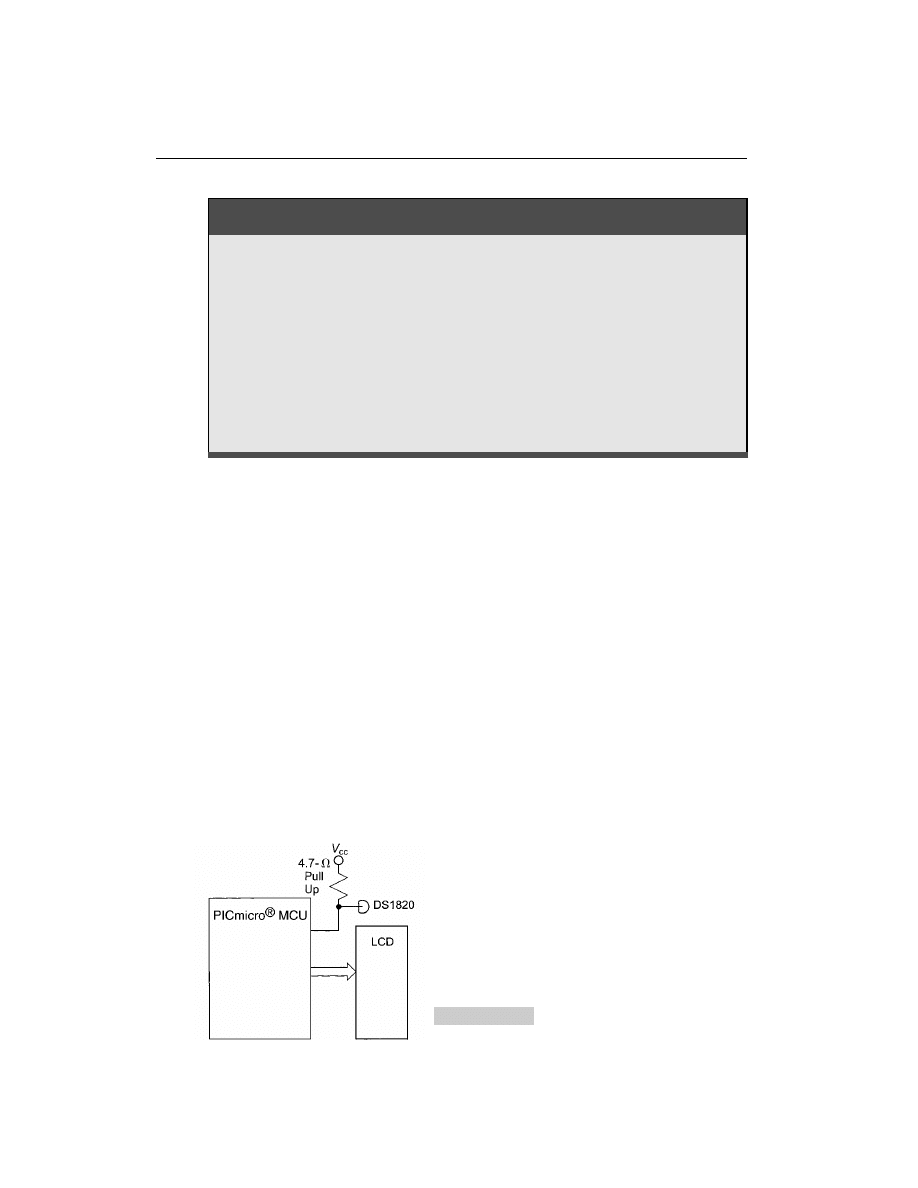
menting CAN using hardware interfaces. Several microcontroller vendors provide CAN
interfaces as part of the devices and quite a few different “standard” chips (the Microchip
MCP2510 is a very popular device) are available to carry out CAN interface functions ef-
fectively and cheaply.
Currently, no PICmicro® MCU devices support CAN. Microchip has announced plans
to create a PICmicro® MCU with CAN built in, but, as I write this, no such device is avail-
able nor are there any preliminary datasheets.
DALLAS SEMICONDUCTOR 1-WIRE INTERFACE
Dallas Semiconductor has created a line of peripherals that are very attractive for use with mi-
crocontrollers because they only require one line for transferring data. This single-wire proto-
col is available in a variety of devices, but the most popular are the DS1820 and DS1821
digital thermometers. These devices can be networked together on the same bus (they have a
built-in serial number to allow multiple devices to operate on the same bus) and are accurate
to within one degree Fahrenheit. This book demonstrates a few applications using these parts,
but I wanted to first introduce you to the protocol and how the devices are used.
Probably the most substantive demonstration of what the DS1820 can do is in an appli-
cation where it is connected to a PICmicro® MCU (Fig. 6-77). The DS1820 is available in
314
PICmicro® MCU APPLICATION DESIGN AND HARDWARE INTERFACING
Figure 6-77
Example thermometer
application
TABLE 6–8
CAN Frame Field Definitions
SOF
Start of Frame, A single Dominant Bit
Identifier
11 or 19 Bit Message Identifier
RTR
This Bit is set if the transmitter is also TX’ing Data
r1/r0
Reserved Bits, Should always be Dominant
DLC
Four Bits indicating the number of bytes that follow
Data
Zero to 8 Bytes of Data, Sent MSB First
CRC
15 bits pf CRC data followed by a recessive bit
Ack
Two Bit field, Dominant/ Recessive Bits
EOF
End of Frame, at least 7 Recessive Bits
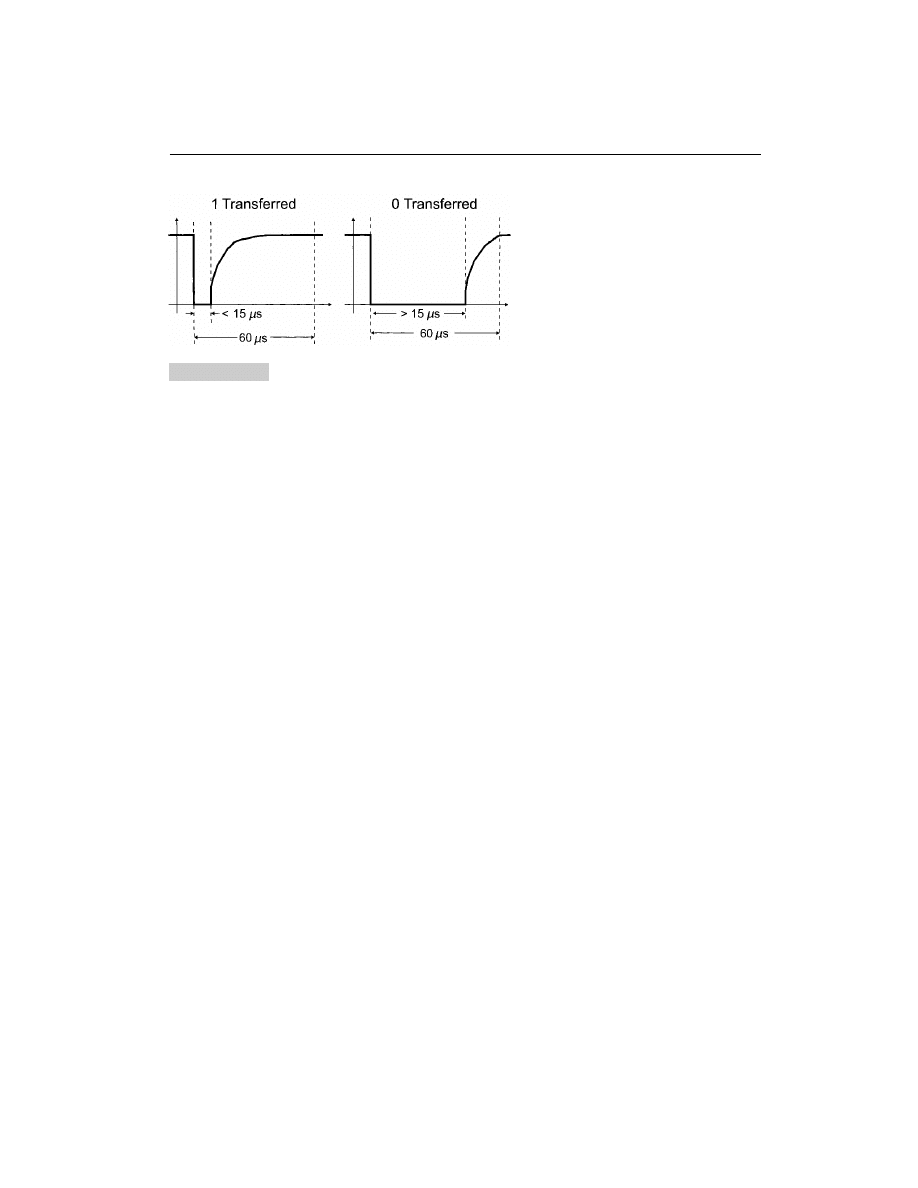
a variety of packages. The one that I use the most is a three-pin TO-92 that looks like a
“tall” plastic transistor package.
The DS1820 has many features that would be useful in a variety of different applica-
tions. These include the ability of sharing the single-wire bus with other devices using a
unique serial number burned into the device that allows it to be written to individually. The
DS1820 has the ability to be powered by the host device. In the applications that use it in
the book, I power DS1820 from V
cc
available to the microcontroller and only have one de-
vice on the bus at a given time. I refrained from covering the single-wire bus interface in
the networking section earlier in the chapter because it is specific to Dallas Semiconduc-
tor products.
Data transfers over the single-wire bus are initiated by the host system (in the applica-
tion cases, this is the PICmicro® MCU) and are carried out eight bits at a time (with the
least significant bit transmitted first). Each bit transfer requires at least 60
s. The single-
wire bus is pulled up externally (Fig. 6-77) and is pulled down by either the host or the pe-
ripheral device to transfer data. If the bus is pulled down for a very short interval, a 1 is
being transmitted. If the bus is pulled down for more than 15
s, then a 0 is being trans-
mitted. The differences in the 1 and 0 bits are shown in Fig. 6-78.
All data transfers are initiated by the host system. If it is transmitting data, then it holds
down the line for the specified period. If it is receiving data from the DS1820, then the host
pulls down the line, releases it, and polls the line to see how long it takes for it to go back
up. During data transfers, I have ensured that interrupts cannot occur (because this would
affect how the data is sent or read if the interrupt takes place during the data transfer).
Before each command is set to the DS1820, a reset and presence pulse is transferred. A re-
set pulse consists of the host pulling down the line for 480 to 960
s. The DS1820 replies by
pulling down the line for roughly 100
s (60 to 240 s is the specified value). To simplify
the software, I typically did not check for the presence pulse (because I knew in the applica-
tion that I had the thermometer connected to the bus). In another application (where the ther-
mometer can be disconnected), putting a check in for the presence pulse might be required.
To carry out a temperature read of a single DS1820 connected to a microcontroller, you
can use the following instruction sequence:
1
Send a reset pulse and delay while the presence pulse is returned.
2
Send 0x0CC, which is the skip ROM command, which tells the DS1820 to assume that
the next command is directed toward it.
3
Send 0x044, which is the temperature conversion initiate instruction. The current tem-
perature will be sampled and stored for later read back.
SERIAL INTERFACES
315
Figure 6-78
Dallas Semi. “1-Wire” data transfer

4
Wait 500
s for the temperature conversion to complete.
5
Send a reset pulse and delay while the Presence pulse is returned.
6
Send 0x0CC, skip ROM command again.
7
Send 0x0BE to read the Scratchpad RAM, which contains the current temperature (in
degrees Celsius times two).
8
Read the nine bytes of scratchpad RAM.
9
Display the temperature (if bit 0 of the second byte is returned from the Scratchpad
RAM is set, the first byte is negated and a
is put on the LCD Display) by dividing the
first byte by 2 and sending the converted value to the LCD.
The total procedure for doing a temperature measurement takes about 5 ms. A good
(and simple) test of whether or not the thermometer is working is to pinch it between your
fingers and see if the returned temperature value goes upward as the application is
executing.
When I have implemented PICmicro® MCU code for accessing the DS1820, I have had
problems ensuring that my timing delays are correct. When sending data to the DS1820,
be sure that a 1 has a delay of about 10
s and a 0 has a delay of 45 s. This will ensure
that the data the DS1820 reads is not ambiguous and doesn’t have any problems with dif-
ferentiating the data sent to it.
316
PICmicro® MCU APPLICATION DESIGN AND HARDWARE INTERFACING
Wyszukiwarka
Podobne podstrony:
Synchronous Generator And Frequency Converter In Wind Turbine Applications System Design And Efficie
Słownik, ACPI (Advanced Configuration and Power Interface): Standard zarządzania energią wypracowany
Słownik, ACPI (Advanced Configuration and Power Interface): Standard zarządzania energią wypracowany
9 Guidelines for Fiber Optic Design and Installation
Blade sections for wind turbine and tidal current turbine applications—current status and future cha
Lab 6, 9.2.1.5 Packet Tracer - Designing and Implementing a VLSM Addressing Scheme Instruct
khuller design and analyze algorithms 65HVWXZDMCYAU3QEPBSDD6TGRTHF3UH7L2EEOGA
Design and performance optimization of GPU 3 Stirling engines
SSP 406 DCC Adaptive Chassis Control Design and Function
Design and implementation of Psychoacoustics Equalizer for Infotainment
DESIGN AND DEVELOPMENT OF MICRO TURBINE
eBook Wind Power Savonius Rotor design and function a new look Mother Earth News
[architecture ebook] Design And Construction Of Japanese Gardens
Design and construction of three phase transformer for a 1 kW multi level converter
Design and Performance of the OpenBSD Statefull Packet Filter Slides
Design and manufacturing of plastic
więcej podobnych podstron