The Geek Gazette - Build Your Own PBX
http://geekgazette.com/index.php?option=com_content&task=view&...
1 de 4
04/03/2005 05:26 PM
Sunday, 03 April 2005
SEARCH
Enter Keywords:
GO
Home
Past Articles
Build Your Own PBX
NEWSFLASH
Welcome to the Geek Gazette, the home of technical information for the more technically inclined. The Geek Gazette is growing
fast and will contain lots of original content written exclusivly for the Geek Gazette. Look for How-To’s, Product Reviews, and trick
tips.
If you have any requests or suggestions for articles, please visit our
Contact Page
and shoot us a line.
BUILD YOUR OWN PBX
User Rating:
/ 41
Poor
Best
Rate
Written by Kerry Garrison
Tuesday, 08 March 2005
What would it mean to you to have your own full-featured PBX system at your home or small office? What would it mean to you if
you could build an entire PBX system (minus the phones) on hardware you probably have laying around, AND that it can probably
also save you money on your phone bill? Sounds too hard to believe doesn’t it, but using old hardware and some open source
software, you really can build a commercial quality phone system that would normally cost thousands of dollars.
The Hardware
As I mentioned in the opening, we are going to build our PBX system from equipment that we have laying around the house. After
cannibalizing three spare systems, what was left was a PII 450, 386mb RAM, 12gb HD, 48x CDROM drive, and an Intel Pro
10/100 network card. This is all you "need" to get going as long as you are going to get VOIP dial tone service from a company
like BroadVoice (more on this later). If you want to use regular analog phone lines you will need modem card. Not every card will
work properly, however, the most recommended card is the Digium Wildcard X100P FXO card which can be purchased brand
new on eBay for $6.95 each. So far, total out of pocket expense for the card plus shipping: $12.90.
The Software
The software for our PBX system is the open source package called
Asterisk
. When I said that this was a full-featured PBX system, I
wasn’t kidding. The following is NOT a complete list of features:
ADSI On-Screen Menu System
Authentication
Automated Attendant
Blacklists
Blind Transfer
Call Forward on Busy
Call Forward on No Answer
Call Monitoring
Call Parking
Call Recording
Call Retrieval
Call Routing (DID & ANI)
Call Transfer
Call Waiting
Caller ID
Conference Bridging
Distinctive Ring
Do Not Disturb
E911
Interactive Directory Listing
Interactive Voice Response (IVR)
Music On Hold
Music On Transfer
Predictive Dialer
Overhead Paging
Remote Call Pickup
Remote Office Support
Roaming Extensions
Route by Caller ID
Spell / Say
Supervised Transfer
Talk Detection
Text-to-Speech (via Festival)
Three-way Calling
VoIP Gateways
Voicemail
While Asterisk can run on numerous systems from Linux to even flash ROM for some LinkSys routers, we will focus on installing
Asterisk on our salvaged equipment as simply as possible. To aid in our install,
Asterisk@Home
is a pre-package ISO image that
automates the installation of Asterisk and adds a usable web interface to monitor and configure your system.
With a VOIP PBX system you have three basic means of providing access to the users (the phones).
SIP Compliant Handsets ($70 - $500)
PC Based SoftPhones (Free)
ATA (Analog Telecommunications Adaptor) ($50 - $500)
Without having to spend any money on our technogeek special PBX system, we will set it up for the time being with X-Lite
softphones.
Installation
With
Asterisk@Home
, you simply need to download the disk image, burn it to a CD, and boot off of it.
Burn Asterisk@Home iso to a blank CD
Boot your Asterisk PC with the CD and press enter
NOTE: This will erase all data on the hard drive of the PC!!!
MAIN MENU
Home
How-To Guides
Product Reviews
Past Articles
News
Links
Contact Us
Search
News Feeds
Forums
WildHobbies.com
FreeOfficeApps.com
Tech Data Pros
Kerry’s Blog
search...
Links
Contact Us
News
Home
Asterisk X100P FXO $39.95
VoIP Starter Kits and more Rock bottom prices for
VoIP gear
Voip Pbx
Deploy smart VoIP clients & capable infrastructure
in your enterprise.
Ads by Goooooogle
IP-Enabled PBX IP???
Full function PBX system
with VoIP & various
network services.
www.eletech.com
Hosted-PBX VoIP
Solution
Don’t buy your next Phone
System Save 80%
compared to typical PBX
www.VoiceNext.com
Outsourced Routes
Control
HostedSwitch Solution for
VoIP Routing, Billing,
Monitoring
www.HostedSwitch.com
Voiceglobe IP
Telephony
Free Voice Around the
Globe Next Generation
VoIP Technology
www.voiceglobe.net
The Geek Gazette - Build Your Own PBX
http://geekgazette.com/index.php?option=com_content&task=view&...
2 de 4
04/03/2005 05:26 PM
After the Linux is loaded the CD will eject. Take out the CD and wait for the system to reboot
During the reboot Asterisk will be built from source for your hardware. This will take some time. Do not cancel the boot!
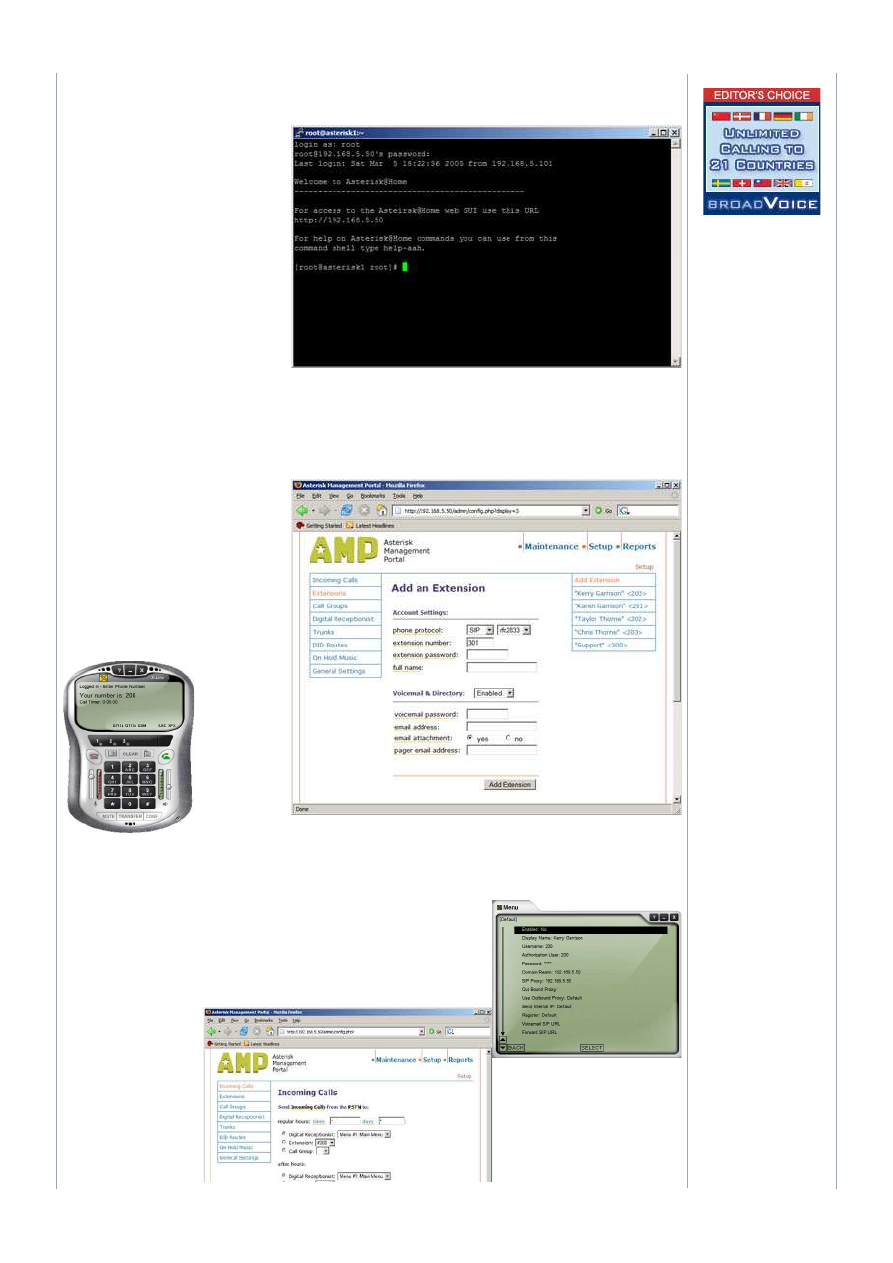
Log in to your new Asterisk box (user:root, password:password)
When you login, you will be given the URL to
the web interface. You will also be told that you
can use the help-aah command to get a list of
quick commands. You can get into the Asterisk
system for advanced settings by using asterisk
-r command. We won’t go into all of the
advanced features of Asterisk in this article,
that topic could consume an entire book.
If this machine is going to have any internet
access, you should immediately change the
root password with the passwd command. If
you want to assign a static IP to the box, run
the netconfig command. A simple interface will
allow you to manually enter IP information. To
configure the Wildcard X100P, simply run the
setup script genzaptelconf script. This will set
everything up for you.
The main menu presents you with the following
choices:
Web-access to Voicemail
Web Address Book
Flash Operator Panel
Web MeetMe Control
Asterisk Management Portal
To get things working, we only need to use the Asterisk Management Portal (AMP). To log in, use maint as the login and
password as the password. At this point you will get the version number and links to Maintenance, Setup, and Reports.
Selecting Setup starts you off with the
Incoming
Calls
setup screen. Before configuring this
screen, you should start by adding at least one
extension.
Click on the Extensions link, you should assign
an extension number, extension password, and
voicemail password.
Optionally you can enable email attachments
and the email address to send them to. Once
you have created an extension, there is a
plethora of advanced options that are available
by clicking on the name in the extension list. In
most cases you will never need to touch any of
the advanced extension options.
Before being able to
record any
messages, you will
need to setup a
handset or a
PC-Based
SoftPhone. One of
the easiest to setup
is X-Lite. X-Lite is
available for free
from
http://www.xten.com.
Another good SoftPhone is SJPhone from SJ Labs (
http://www.sjlabs.com
) but for simplicity, we will focus on the setup of
X-Lite.
If X-Lite cannot connect, the setup screen should open, if not, click on the "drop down" icon just to the left of the green Off-Hook
icon.
Under System Settings, select the SIP Proxy settings, then double-click on the first entry.
You will see the SIP Proxy settings as shown here. The settings I changed are as follows:
Username: 200 (my extension)
Authentication User: 200 (my extension again)
Password: 1111 (my extension password)
DomainRelm: 192.168.5.50 (PBX IP address)
SIP Proxy: 192.168.5.50 (PBX IP address)
Finally, you should record at
least one message in the
Digital Receptionist system.
Whenever you make a
change, there will be a red
bar on the screen that
instructs you to click on it to
apply the settings. Failure to
apply the settings is an easy
mistake to make and will
keep your system from
working properly.
With a extension created, an
opening message in the
The Geek Gazette - Build Your Own PBX
http://geekgazette.com/index.php?option=com_content&task=view&...
3 de 4
04/03/2005 05:26 PM
Digital Assistant, you are
now ready to configure your
incoming calls. For testing, I
suggest not using different
day/night modes (see image
for example), make sure the
radio button is selected for
your opening message. You
should now be setup and
ready to go for you first calls.
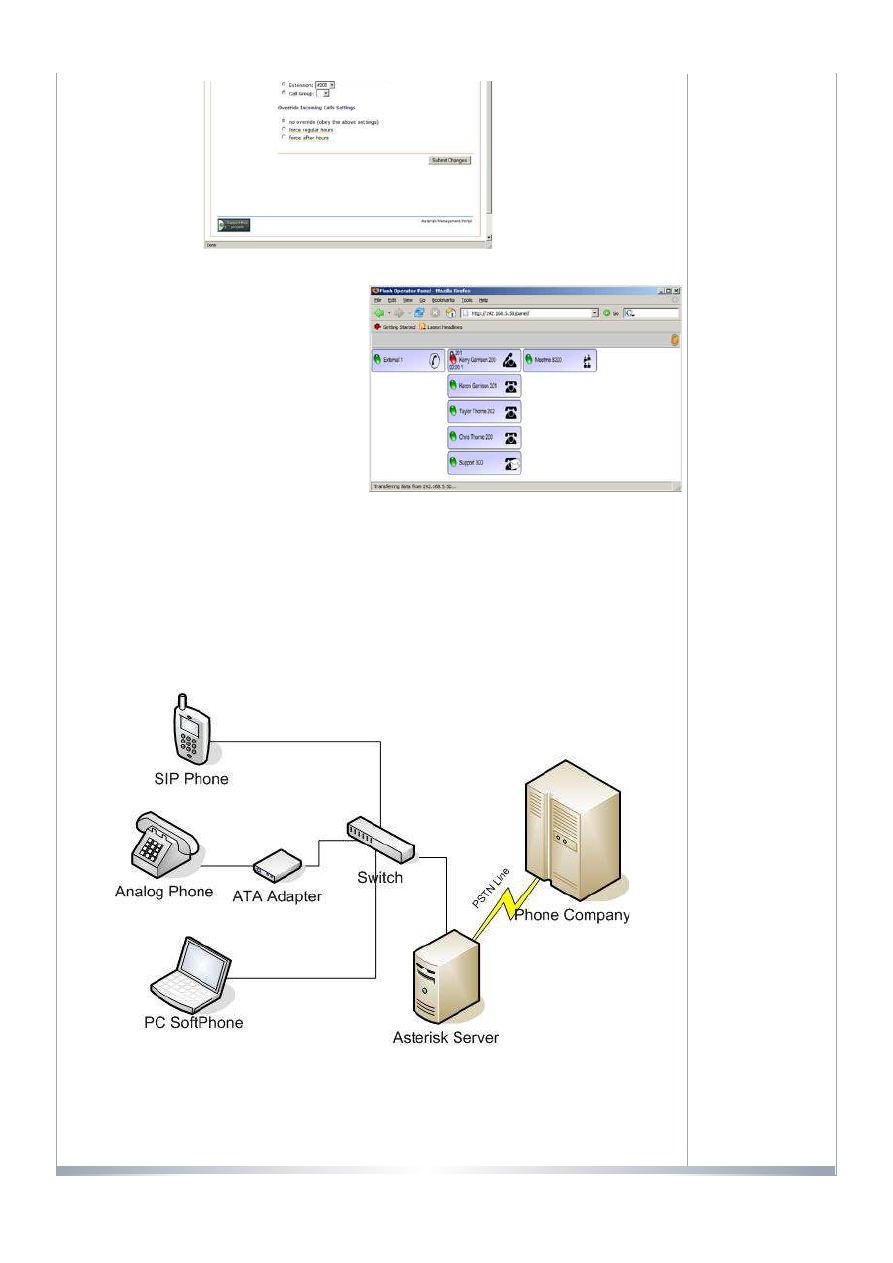
Monitoring
To make sure things are setup, go back to the main menu and launch the
Flash Operator Panel
. This will display your trunk line
status, extension status, and conference room status.
Our screen shot here shows that extension 200 is off the hook
but nothing else is active so you can deduce that the person on
that extension is probably checking voicemail. You can also see
that extension 300 currently has an existing voicemail that is
waiting to be read. In a business environment, I would setup the
receptionist with a second monitor that had only this screen
running on it so she could easily see the status of every line.
Common Commands
Below is a list of command Asterisk commands that will need to
share with all of your users:
*72
Call Forwarding System
*73
Disable Call Forwarding
*77
IVR Recording
*78
Enable Do-Not-Disturb
*79
Disable Do-Not-Disturb
*90
Call Forward on Busy
*91
Disable Call Forward on Busy
*98
Enter Message Center
*99
Playback IVR Recording
7777
Simulate incoming call
1234
System will tell you your extension
With this information, you should be able to get your own PBX system up and running in less than an hour. While there are
numerous functions and features built into Asterisk, covering more of them is not possible in the scope of an article like this.
Addendum
Some people didn’t notice how this became a fully working system. Take note that I used a Digium modem card purchased for
$6.95. This allowed me to plug in my existing analog phone line. If you called my phone number, you were greeted by the auto
attendant. Dialing extension 200 rings the X-Lite SoftPhone on my laptop. The soft phone could easily have been replaced by a
SIP phone or an analog phone with a SIP ATA Adapter. Below is a diagram of what this would look like:
< Prev
Next >
[ Back ]
Copyright 2000 - 2005 Miro International Pty Ltd. All rights reserved.

The Geek Gazette - Build Your Own PBX
http://geekgazette.com/index.php?option=com_content&task=view&...
4 de 4
04/03/2005 05:26 PM
Mambo
is Free Software released under the GNU/GPL License.
Wyszukiwarka
Podobne podstrony:
build your own cupcake
CNC Robotics Build Your Own Workshop Bot By Geoff Williams (McGraw Hill TAB Robotics 2003) 321s
Bazooka How To Build Your Own
How to Build your own Solar Cooker
Build Your Own
Build Your Own Sports Car Chris Gibbs POPRAWKI 1 4
WorkBench Build Your Own Apartment Workshop (2 different plans)
Build Your Own Boat
Build Your Own Lowfer Transceiver
Cabinets Build Your Own Kitchen Cabinets
Bazooka How To Build Your Own
POLICE Build Your Own Obstacle Course By Mary Hamilton
Build Your Money Muscle EFT version
How and When to Be Your Own Doctor
Print your own organs[1]
Making your own Tablets
więcej podobnych podstron