
HOW TO:
FIT A BATH & WASH BASIN
TO COMPLETE THIS PROJECT
YOU WILL NEED...
• Basin Wrench
• Bath
• Bathroom Basin
• Bathroom Suite
• Bathroom Taps
• Club Hammer
• Cold Chisel
• Copper
• Ear Defenders
• Gas Blowtorch
• Gloves
• Goggles
• Hacksaw
• Joint Fittings
• Junior Hacksaw
• Mortar
• Plaster
• Power Drill Bits
• Power Drill (corded)
• Screwdrivers
• Screws
• Silicone Grease & Sealant
• Solvent Weld Adhesive
• Spanners
• Spirit Level
• Tape Measure
• Tile Adhesive & Grout
• Tiling Tools
• Tube Cutter
• Wall Plugs
• Wall Tiles
INTRODUCTION
Changing your bath and washbasin gives you the ideal opportunity to re-style your whole bathroom.
Plan your new installation thoroughly. If you only have one bathroom in the house, the work must be carried out
efficiently to minimize the time that the amenities are unavailable. If you have any concerns, ask professionals to
carry out the work. The methods described here refer to the separate removal and installation of each fitting.
However, in practice it is more convenient to strip out the room first, then carry out the new installation.
SKILL LEVEL
A good knowledge of plumbing techniques and some understanding of building construction would be an
advantage.
SAFETY FIRST
Be careful not to strain yourself whilst manoeuvring the appliances. Ensure that all metal pipes and fittings are
cross-bonded with 6mm squared sheathed earthing wire. Protective goggles, gloves and ear defenders may be
needed for some operations.
.
HOW TO:
FIT A BATH & WASH BASIN
1 - Preparing the room
Clear the room of all storage units and fixtures, such as towel rails and
blinds. If the bath has a shower screen, remove it. Take up carpeting, but
leave sheet vinyl in place until all the fittings have been removed. If you plan
to install new lighting or an extractor fan, make the alterations at this stage.
The bath and basin are connected to the plumbing by water-supply pipes
and wastepipes. These pipes must be disconnected before the fittings can
be removed. First shut off the hot and cold supply.
If your house has old lead pipes, make the most of this opportunity and ask
a plumber to replace them with copper or plastic plumbing.
2 - Removing the old bath
Remove the bath panels to reveal the plumbing. Open the taps to drain
them, then disconnect the supply pipes. Place a shallow bowl under the
bath trap to catch the water, then disconnect the wastepipe.
If the connectors cannot be unscrewed, saw through the pipes. Also, cut
through the old bath overflow.
If the bath has been sealed against the wall with flexible sealant, cut through
this with a craft knife. Pull the bath out from the walls. If the bath has
adjustable feet, it may help to lower these first.
Unless a heavy cast-iron bath is worth salvaging, it is easier to move it by
first breaking it up into manageable pieces. Cover the bath with an old
blanket and strike it with a club hammer. Protective goggles, gloves and ear
defenders should be worn during this operation.
Once the bath has been removed, extract the old overflow pipe from the wall
and repair the hole with mortar and plaster. Also, remove old wall tiles and
prepare the walls for retiling.
When applying new wall tiles, measure out and cut a groove in the plaster to
inset the rim of the bath. This ensures a good waterproof joint.
3 - Fitting the new bath
Before fixing a new bath or its panels, remove
the protective covering and check thoroughly
for damage or colour faults. Any claims made
after the bath is fitted will not be accepted by
the manufacturer.
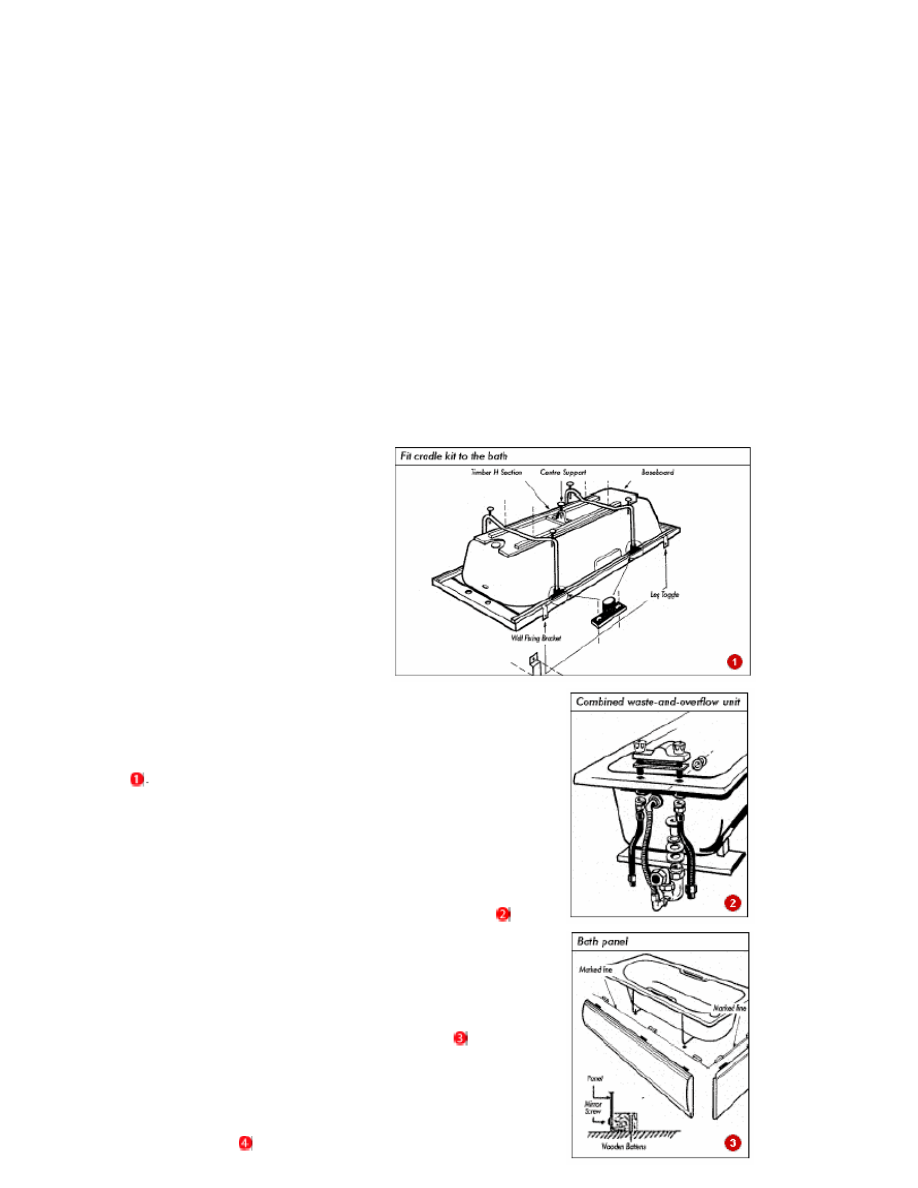
To add stiffness, most moulded plastic baths
have a baseboard bonded underneath and a
wooden frame bonded beneath the rim. A cradle
kit is usually supplied for self assembly.
Following the manufacturer's instructions, fit the
cradle legs to the frame and baseboard. Also fit
the centre support leg, if supplied .
Attach the wall-fixing brackets to the underside
of the rim-support frame. Fit hand grip(s) to the
rim if supplied.
Set the bath upright and fit individual hot and cold taps or a mixer-tap set.
Attach flexible connecting pipes to the tap tails - this allows for any
misalignment when you connect up with the supply pipes.
Fit the overflow outlet and waste outlet into the bath. Connect them with a
combined waste-and-overflow unit that incorporates a deep-seal trap .
Place the bath in the required position and adjust the screw feet to set the
height and level of the rim so that it can accommodate the side panels.
When everything is in place, screw the brackets to the wall and the feet to
the floor. Connect the supply and wastepipes (see below).
Fit the bath panels according to the manufacturer's instructions.
Use a
fine-toothed saw to shape the panels around pipes or to fit the skirting.
If you are constructing your own bath panel, make it easy to remove, so that
it provides simple access to plumbing and some useful long-term storage.
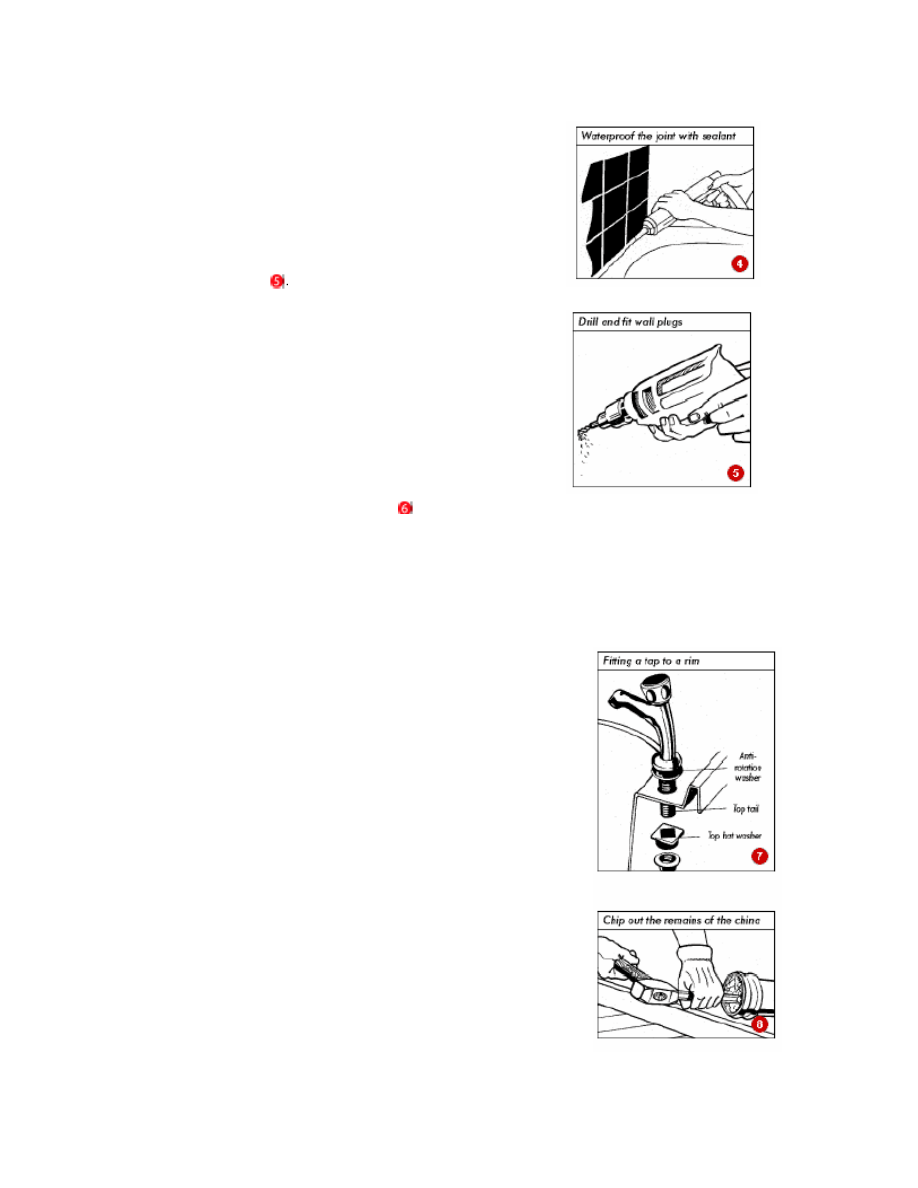
Once the walls have been tiled,
waterproof the joint around the rim of the
bath with silicone sealant.
After using an acrylic bath, clean it while it is still warm, using soapy water.
Then wipe it dry. Do not use organic solvents or abrasive cleaners.
4 - Fitting a pedestal wash basin
Disconnect the supply pipes from the old taps, using a cranked spanner to
reach behind the basin. If this proves difficult, cut the pipes at a convenient
level for connecting with the new flexible tap connectors.
Unscrew the old basin fixings and lift clear. Remove supporting brackets
from the wall or unscrew the pedestal base from the floor.
Place the new basin on its pedestal base and position it against the wall.
Mark the fixing points on the wall and floor.
Drill and fit wall plugs on the marks.
Just drill pilot holes for the screws
when fixing to a wooden floor.
Make any alterations to the 15mm (1/2in) supply pipes so they will be
neatly concealed by the pedestal. Fit miniature in-line isolating valves for
future servicing.
Fit new taps and a waste outlet in the basin. Check that the tap spouts are
correctly aligned. Do not over-tighten the back nuts. Fit flexible connection
pipes to the tap tails. Then fit a 32mm (1.25in) waste trap to the waste
outlet.
When fitting taps to a rim made from a thin material (such as pressed steel),
use a 'top-hat' spacer fitting placed under the back nut .
Place the basin on its pedestal and fix it in place with brass screws. Connect
the trap to the existing 32mm (1.25in) wastepipe. If a new waste pipe is
required in a different position, drill a clearance hole through the wall with a
masonry core drill, and install a new pipe run (see next section).
Connect the flexible tap connectors to the appropriate hot and cold supplies.
Follow the manufacturer's instructions, as some taps require check valves to
be fitted. Turn on the water supply to test the installation.
Unless you are experienced with electrical installations, ask an electrician to
fit supplementary bonding to all metal fittings and pipework.
5 - Supply pipes and wastepipes
Baths are fitted with 22mm (3/4in) taps and supply pipes; basins with 12mm
(1/2in) taps and pipes. Monobloc mixer taps usually have 10mm (3/8in) tails,
and a reducer is needed when connecting them to standard pipework.
You can use copper supply pipes, connected with soldered or compression
joints, or plastic pipes that are usually connected with push-fit joints. Adapter
couplings are available to join pipes of different materials and sizes.
Always follow tap manufacturers' instructions when connecting supply pipes,
as some tap installations require check valves to be fitted.
Plastic pipe is used for wastes: 40mm (1.5in) pipe for baths; 32mm (1.25in)
for washbasins; and 21mm (3/4in) for overflows. Solvent-welded joints, pushfit
connectors or compression joints are used to join plastic wastepipes.
Unless you are connecting to existing wastepipes, new bath and basin
wastes should be connected to a soil-stack with boss fittings .
If a trap cannot be removed to provide access to the wastepipe, include a
rodding-eye fitting so that any blockages can be cleared .
Wyszukiwarka
Podobne podstrony:
How to fit a gutter
HOW TO fit an electric shower
How to fit a shower cubicle
How to fit a toilet & bidet
Fit a bath and wash basin
HOW TO STAY FIT
HOW TO MAKE ESSENTIAL OIL BATH BOMBS
How to wash your hands Bars AW
How to read the equine ECG id 2 Nieznany
CISCO how to configure VLAN
O'Reilly How To Build A FreeBSD STABLE Firewall With IPFILTER From The O'Reilly Anthology
How to prepare for IELTS Speaking
How To Read Body Language www mixtorrents blogspot com
How to summons the dead
How to draw Donkey from Shrek
How to Use Linked In
How to build a Raised Formal Pool
więcej podobnych podstron