Surface Beading
HERE ARE SOME METHODS FOR PUTTING THE PATTERN ONTO THE SURFACE:
PENCIL
Simply draw the pattern onto the surface using a pencil. In most cases, graphite pencil will wash out
with light detergent and water, so this is a good choice for surfaces that will not be damaged by water.
INDELIBLE MARKER PEN
If you’re covering the surface completely, indelible pens such as Sharpie fine point
can work well. If you’re working on a dark color, use a black pen. On lighter colors, use a lighter color,
preferably one that blends with the color scheme of your beadwork.
TRANSFER PENCIL
If your surface won’t be damaged by heat, you can make a mirror image drawing of
your pattern using a transfer marking pencil (available in most fabric and quilting stores) and then iron the
pattern onto the surface. It’s a good idea to preshrink both your paper (before using the transfer pencil on
it) and your surface, or the pattern may “ghost” as shrinkage occurs.
NON-WOVEN SANDWICH
Print, draw or copy your pattern onto very lightweight paper. Iron very light-
weight fusible interfacing over the front of the pattern; when it’s cool, iron heavier fusible interfacing to the
back of the pattern. You’ve created a stiff beadable surface that won’t ravel or shred, with the pattern visible
through the upper layer of fusible interfacing. This method is especially easy when it comes to finishing since
non-wovens don’t ravel and are extremely pliable.
lightweight fusible nonvoven
paper (print facing up)
heavy weight fusible non-woven
NON-WOVEN SANDWICH
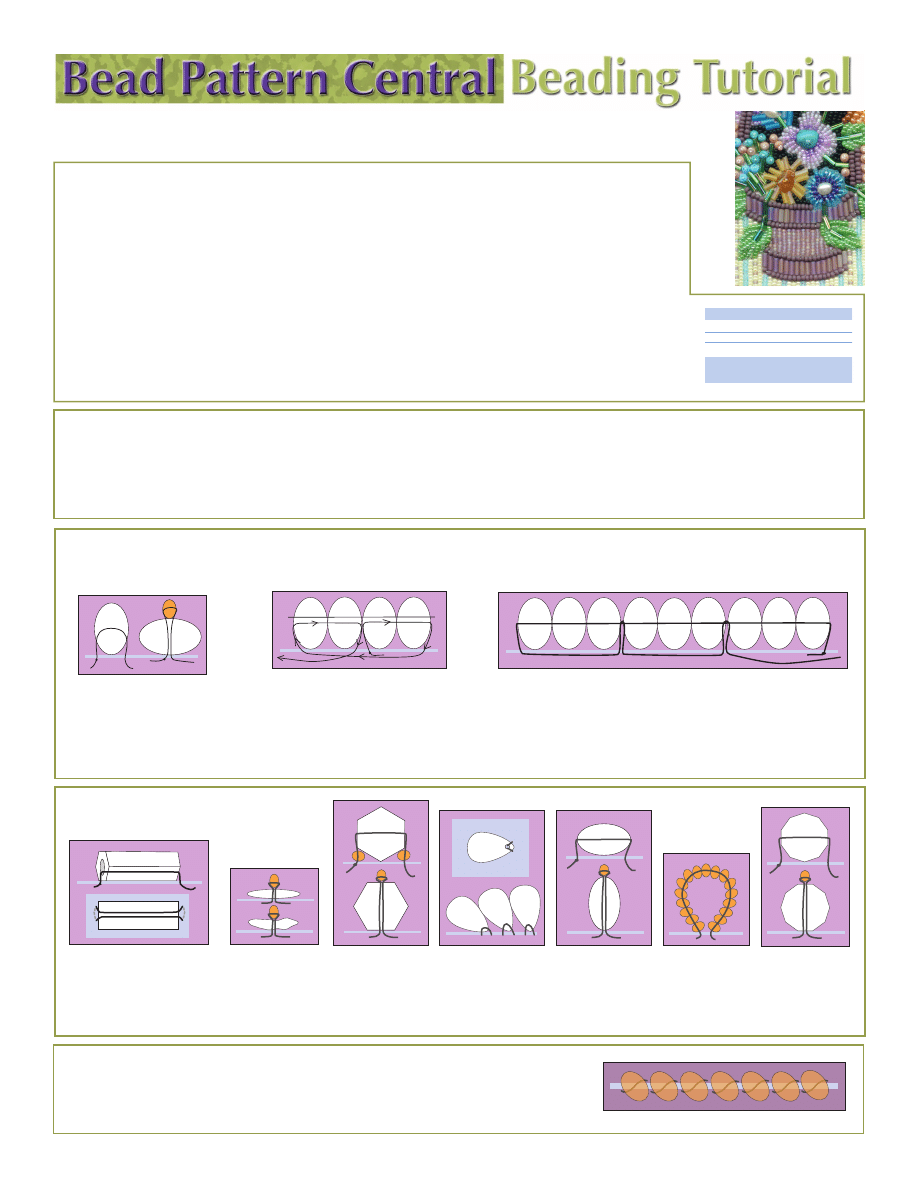
SEWING SEED BEADS IN PLACE
The diagrams below show simple methods for sewing seed beads onto your surface. The diagrams show rounded seed beads, but the
techniques are equally good for Delicas, hexes, cuts and triangles. Seed beads size 6
o
and larger should be sewn on individually.
EQUIPMENT AND SUPPLIES
You’ll want to use needles with sharp points. If you’re working with very tiny beads, you’ll have to use a fine needle such as a #12; these
can break with too much pressure when you’re trying to force them through a surface. It’s helpful to keep a heavier needle such as a
#9 embroidery needle on hand for making holes in the surface. Use the largest needle possible that will fit through your smallest bead.
You can use beading nylon such as Nymo or C-lon for beads that don’t have sharp edges. Ordinary sewing thread works well with seed
beads. For crystals or metal beads, you can use fireline or Toho beading thread, which is less prone to being cut by sharp bead edges.
For a single seed bead of any size,
simply bring the thread from back
to front, put the bead on the nee-
dle, and then run it back from front
to back. Larger seed beads can be
laid flat and anchored with a small
seed bead (14
o
, 15
o
)
Backstitching is great for putting two beads in place
at once. It’s great for encircling a cabochon with
beads in preparation for attaching it to the surface,
because you can use it as a base row for building
peyote stitch. The upper thread in the diagram is
a stabilizing thread; run it through the entire span
of backstitch to smooth curves and make lines look
crisp and neat.
Couching works well for sewing on long continuous lines of beads. Bring the
thread up at the starting point and put the beads on the needle. Check the fit
by laying the beads onto the surface before you commit to running the needle
through the surface to the back. You may need to add or subtract beads to get
a proper fit. The beads should just lay neatly on the surface, and should not ap-
pear crowded. There should be no visible gaps between the beads in the line.
Bring the needle up to the surface every third bead or so and anchor with one
thread. Repeat until the entire line is secure.
SEWING LARGER BEADS IN PLACE
Bugles can be sewn with a
single or double pass of thread
depending on how sharp the
edgs are
Flat beads can simply
be anchored in place
with a seed bead
Bicones may need to
be supported under
the sides with seed
beads, or they can be
anchored with a seed
bead to stand upright
Drops can be laid flat
or they can be forced
to stand up by layering
them over each other;
great for florals!
Oval beads such as
pearls can be laid on
their sides or they can
be made to stand up
by anchoring them
with a seed bead
3-D loops of seed
beads can add a
special texture to
your pattern
Faceted rounds can
be stood upright with
a seed bead anchor
or sewn from side
to side
HINTS FOR FINISHING
When all the beading is complete, you can sew, glue, or fuse a backing in place. Leather,
ultrasuede, felt, vinyl, and other non-fraying materials are good choices. For a decorative
edge, whip-stitch beads around the outer edge as shown in the diagram.
Be sure to visit our animated surface
beading primer at beadpatterncentral.com!
Wyszukiwarka
Podobne podstrony:
bead pattern central spiral
bead pattern central beading tutorial
bead pattern central loom
bead pattern central daisy chain
bead pattern central peyote
bead pattern central beading tutorial brick stitch
beading Varvara Tulip Necklace bead patterns com No 3721
Instructions for Reading a DB Bead Pattern
(CRAFTS) Beading Bead Crochet Pattern
BANK CENTRALNY I JEGO FUNKCJE
Bank centralny 5
Magazyny i centra logistyczne
Europejski Bank Centralny
Bank centralny
surfacefinishmetrologyiss1 140102202845 phpapp01
Centralne ogrzewanie id 109800 Nieznany
Kaniulacja żył obwodowych i centralnych u noworodków
Dance, Shield Modelling of sound ®elds in enclosed spaces with absorbent room surfaces
więcej podobnych podstron