I will below describe how to remove the entire MMI unit in an Audi A8 of the 4E/D3 generation.
Anyone attempting to do the same following this instruction will do so on their own risk.
BE CAREFUL WHEN HANDLING THE MMI UNIT AS IT CAN AUTOCLOSE
SUDDENLY = MAKE SURE YOUR FINGERS ARE OUT OF THE WAY AT ALL TIMES!
A seemingly common problem on the D3 is that one or more of the plastic gear wheels in the MMI
mechanism breaks, resulting in a very noisy and ”hacking” operation of the screen up/down. Some
solve this by simply replacing the broken gear wheel, which is a cheaper b ut more labor intensive
procedure. I chose to buy a complete unit off ebay as I did not have sufficient equipment to replace
single parts.
Tools and time needed:
–
Ratchet or wrench with T25 and Allen #4 bits. Small extender might be handy but no must
–
Thin pointy object to fish up the lugs in the AC vents. I used a fine instrument screwdriver.
–
Normal flat screwdriver, or something similar you can use to pry off trim with
–
Wire cutter, or whatever you have handy to cut off a zip tie
–
One small sized zip tie
–
Camera to document cable routing etc. Not necessary but may come in handy.
–
Budget 2-3h for first timers. If you´re used removing the interior trim you will do it in less
than 2h.
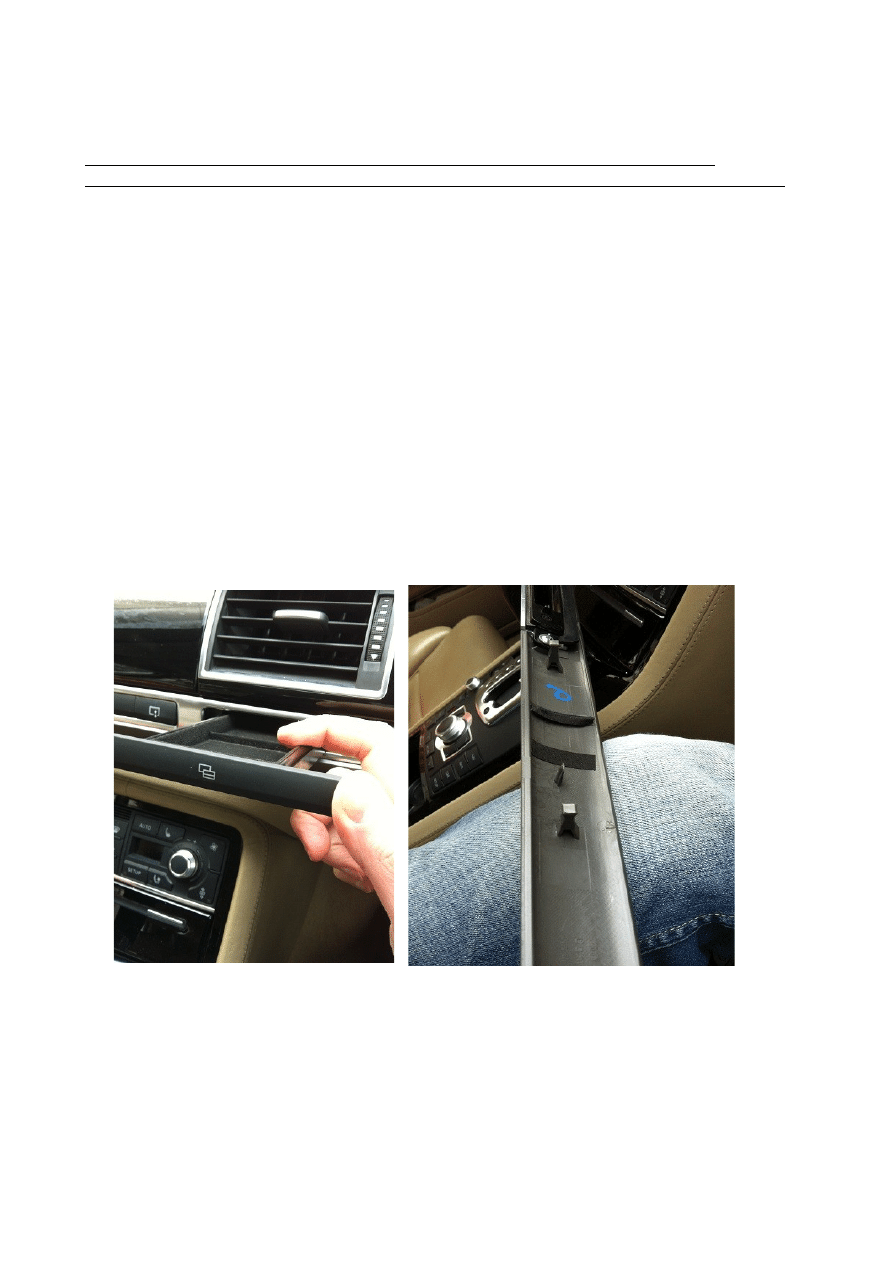
1. Push out the storage compartment, carefully push front facia to the left and it will pop off.
2. Grab the grey plastic interior trim and pop it out starting from the passenger door. The
switch assembly will come off with the trim. Unplug and stowe away.

3. Pop off the MMI cover by inserting something flat in the lower corner areas and carefully
bend. I suggest you wrap whatever tool used with cloth or tape.
4. Remove the rightmost AC vent by lifting up the 2 lugs at the bottom with a pointy object.
This can be a little frustrating but don´t give up...Wiggle it out and disconnect. Behind this
trim is an Allen 4 screw that must be removed. To facilitate potential future operations you
can skip this one when refitting the trim later.
5. One torx for the ”quattro trim” sits behind the storage compartment so it must be removed.
Either remove the vent above it per above instruction or you can also insert a thin object on
top of it, carefully press down on it and it should be possible to pull out. Disconnect.
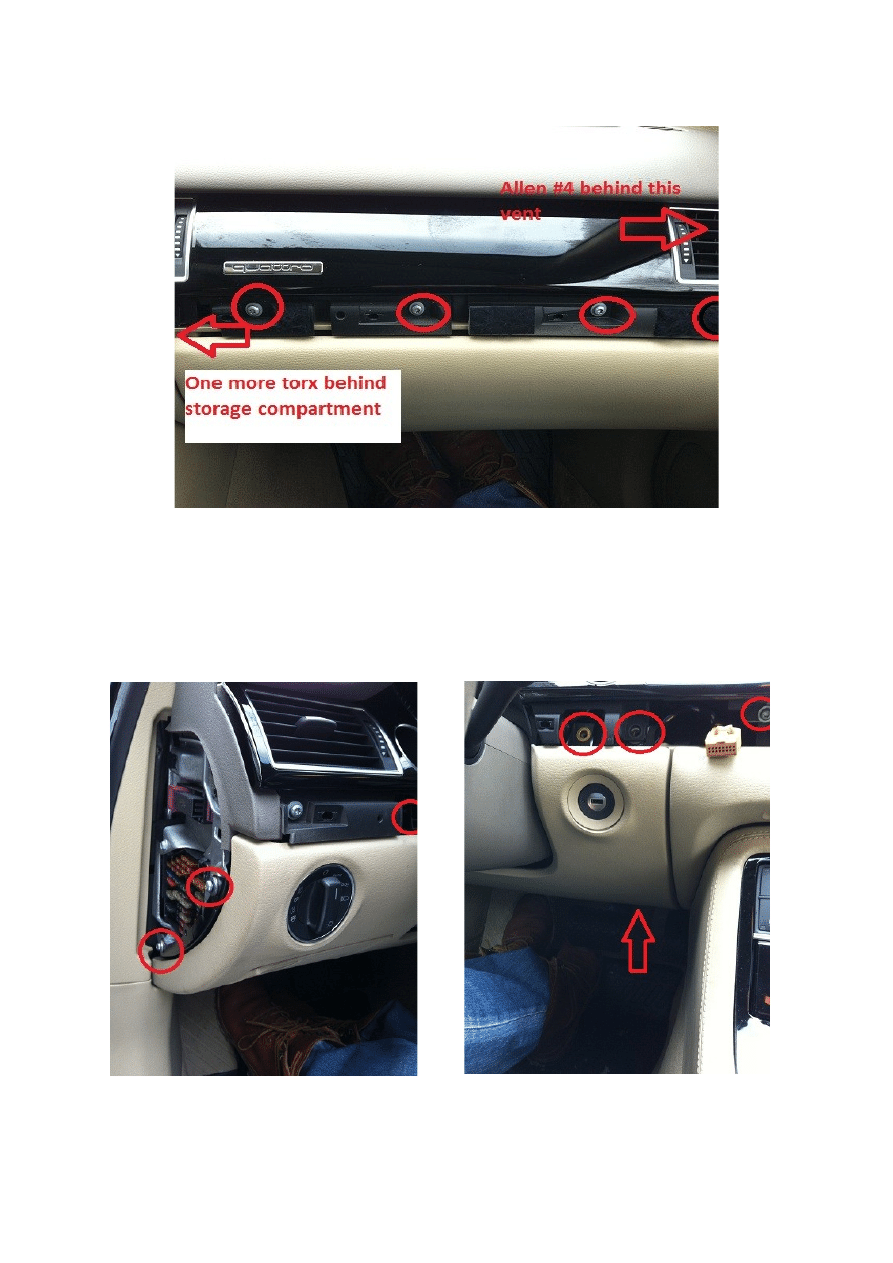
6. Remove the 5 T25 screws on the quattro trim and wiggle it off. Remove AC vent and
disconnect unless already removed in previous step.
7. To get to the electric connector of the MMI, the driver´s knee panel needs to be dropped as
well. Pop off the fuse box cover by the door and remove 2 torx 25s. Remove the small grey
plastic trim piece as well and remove the rightmost torx behind it. Move on to the right side
and remove all 3 T25s behind the trim. The rightmost 2 are for the instrument cluster but
must be removed to allow the MMI to come out. Finally, there is one T25 holding the lower
right portion of the panel before you can pop it out. No need to entirely remove it!
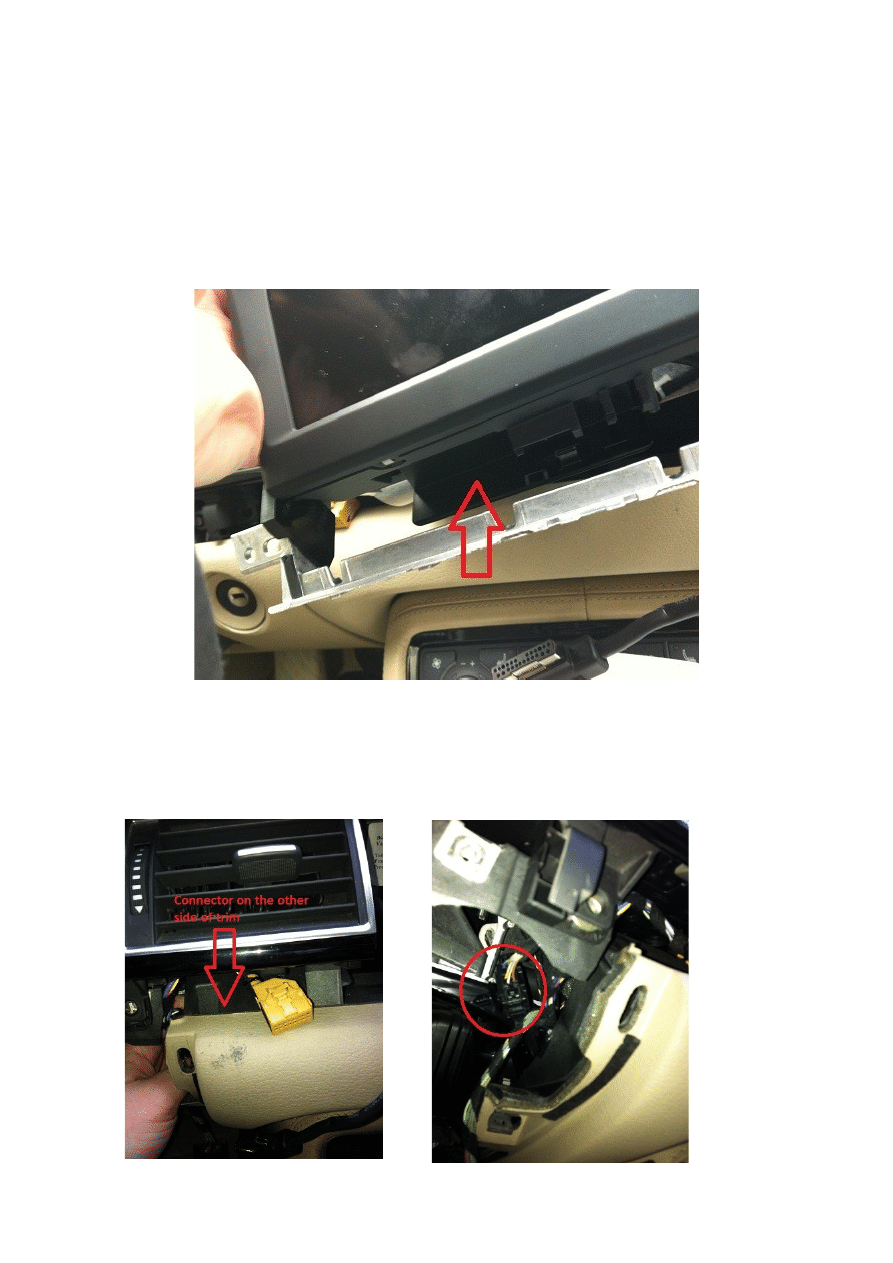
8. MAKE SURE THE MMI SCREEN IS UP. If it closed you can just open it by pressing the
volume button.
Now the MMI screen assembly can be taken out but on the left side it´s held behind the
instrument cluster but since you removed 2 screws you should be able to push it upwards
just enough to allow the MMI bracket to slip out from behind. Carefully take out the MMI,
snap off the metal cover under the screen and unplug the connector. MEMORIZE THE
CABLE ROUTING to the screen, then cut the zip tie holding the screen cable.
9. To avoid removing the small cable harness from the frame you can unplug it instead. To the
right of the ignition, you will be able to feel the connector. It sits to the panel with a ”plug”
so you will need to wiggle it out of the hole. Then disconnect, remove the ”plug” and pull
out the connector from the MMI side. It´s a bit tight so take it easy.

10. Now the entire unit is out so take it inside and fix what´s broken, or replace the entire thing
and reverse the above. If you have a problem getting the connector back in place you can
attach a thin wire or something to easier locate the hole but I have rather fat fingers and got
it back there pretty much on the first try.
Wyszukiwarka
Podobne podstrony:
Jak wyciagnac konsole srodkolwa w Audi A8 D3 instrukcja
Demontaz paneli ze srodka Audi A8 D3 instrukcja
Wymiana filtra kabinowego,przeciwpylkowego Audi A8 D3 instrukcja
Naprawa uchwytu otwierania dzwi Audi A8 D3 instrukcja
Wymiana grila Audi A8 D3 instrukcja
Aktywacja wygodnego przełączania źródła A V i trybów radia w MMI 2G Audi A8 D3
Audi A8 Quick Tips (MINI Instrukcja) Audi A8 1999 ENG up by dunaj2
Audi A8 Quick Tips (MINI Instrukcja) Audi A8 ENG up by dunaj2
Audi A8
Audi A8 S8, 1994 2002
AUDI A8 4E 2003pl
D3 instrukcja tb
audi A8, Motoryzacja ciekawostki, Audi, Audi A8
09 jak skutecznie skorzystac z ulgi na zle dlugi instrukcja dla wierzyciela
Audi A8 hybrid, od 2012
Audi A8 1997 licznik D33 opis kostek, auta, elektryka, elekt AUDI
460 Audi A8 2010 Elektronika systemu Komfort i asystent lkoalizacji Audi
AUDI A8 2000 2001
jak zorganizować naszą przestrzeń dyskową, Do Systemu, Instrukcje instalacji
więcej podobnych podstron