
1
SPACE HULK EXTENDED
Space Hulk Extended........................................................................................................................... 4
NEW RULES........................................................................................................................................ 4
PSYCHIC POWERS........................................................................................................................... 4
RANGED WEAPONS TABLE NOTES.................................................................................................... 4
STRIKING TERROR.......................................................................................................................... 4
SURROUNDED................................................................................................................................. 5
NEW WARGEAR............................................................................................................................... 5
HELLFIRE SHELLS ........................................................................................................................... 5
NEEDLER - BOLTER ......................................................................................................................... 6
POWER FIELD GENERATORS............................................................................................................ 6
CHAOS RULES..................................................................................................................................... 7
CHAOS DREADNOUGHTS ................................................................................................................. 7
Firing A Volley................................................................................................................................. 8
Combi Bolter-Flamer ........................................................................................................................ 8
Reaper Autocannon ......................................................................................................................... 9
DARK ELDAR RULES ............................................................................................................................ 9
Introducing Dark Eldar Warriors and Sybarites ................................................................................... 9
Introducing Wyches and Succubi ...................................................................................................... 9
DARK ELDAR WARGEAR................................................................................................................... 9
HARLEQUIN RULES ........................................................................................................................... 10
Blistering Speed ............................................................................................................................ 12
HARLEQUIN WARGEAR .................................................................................................................. 13
MARINE RULES ................................................................................................................................. 14
Introducing Grey Knights ............................................................................................................... 14
Rapid Fire ..................................................................................................................................... 15
Terminus ...................................................................................................................................... 15
Space Marine Wargear................................................................................................................... 15
CYCLONE MISSILE LAUNCHER........................................................................................................ 15
Firing Quick Shots ......................................................................................................................... 16
Cyclone on Overwatch ................................................................................................................... 16
Firing Guided Shots ....................................................................................................................... 16
Firing a Salvo ................................................................................................................................ 16
Malfunction................................................................................................................................... 16
TARANTULA MOBILE SUPPORT WEAPON ........................................................................................ 17
Line of Sight ................................................................................................................................. 17
Fire Arc ........................................................................................................................................ 17
Firing a Normal Shot...................................................................................................................... 17
Firing on Overwatch ...................................................................................................................... 17
Firing a Barrage ............................................................................................................................ 18
Self Destruct ................................................................................................................................. 18
Destroying the Tarantula................................................................................................................ 18
Moving the Tarantula..................................................................................................................... 19
MUTANT RULES ................................................................................................................................ 20
NECRONS ......................................................................................................................................... 21
Introducing Necron Warriors .......................................................................................................... 22
Introducing Immortals ................................................................................................................... 22
Introducing Flayed Ones ................................................................................................................ 23
Introducing the Necron Lord........................................................................................................... 23
Introducing Wraiths....................................................................................................................... 23
Introducing Pariahs ....................................................................................................................... 24
Introducing Destroyers .................................................................................................................. 24
NECRON WARGEAR ....................................................................................................................... 25
Gauss Flayer ............................................................................................................................. 25
Gauss Blaster ............................................................................................................................ 25
Gauss Cannon ........................................................................................................................... 25
Heavy Gauss Cannon ................................................................................................................. 25
Nightmare Shroud ..................................................................................................................... 25
Phase Shifter............................................................................................................................. 25
Resurrection Orb ....................................................................................................................... 25

2
Veil Of Darkness........................................................................................................................ 26
Warscythe ................................................................................................................................ 26
ORK RULES....................................................................................................................................... 26
Cheering On! ............................................................................................................................ 26
Introducing Ork Boyz..................................................................................................................... 27
Introducing Ork Nobz .................................................................................................................... 27
Introducing Weirdboyz................................................................................................................... 27
The Weirdboy is able to use two Psychic Powers. ............................................................................. 27
Brain Bursta.............................................................................................................................. 27
Waaaaaaaagh! .......................................................................................................................... 27
Introducing Minderz................................................................................................................... 28
Gretchin Bomber ........................................................................................................................... 28
Gretchin Bomber Suicidal Run..................................................................................................... 29
Looting The Dead...................................................................................................................... 29
Introducing Orks vs Genestealers.................................................................................................... 29
ORK WARGEAR ............................................................................................................................. 30
Close Assault Blades .................................................................................................................. 30
Force Spear .............................................................................................................................. 30
Gretchin Bomb .......................................................................................................................... 30
Kombi Bolter – Grenade Launcher............................................................................................... 30
Shokk Attack Gun ...................................................................................................................... 30
Shotgun.................................................................................................................................... 31
TYRANID RULES ............................................................................................................................... 31
Introducing Tyranid Warriors.......................................................................................................... 32
Gaunts and Squigs ........................................................................................................................ 32
Introducing Termagants................................................................................................................. 32
Introducing Hormagaunts .............................................................................................................. 32
Introducing Squigs ........................................................................................................................ 33
Introducing Lictors ........................................................................................................................ 34
Introducing Carnifexs..................................................................................................................... 34
Introducing Zoanthropes................................................................................................................ 34
Psychic Powers.............................................................................................................................. 35
The Horror................................................................................................................................ 35
Psychic Scream ......................................................................................................................... 35
Warp Blast................................................................................................................................ 35
Warp Field ................................................................................................................................ 35
Introducing Hive Tyrants................................................................................................................ 36
Hive Tyrant APs......................................................................................................................... 36
TYRANID COMMAND POINTS ......................................................................................................... 36
TYRANID HIVE SHIPS.................................................................................................................... 36
Acid Blobs..................................................................................................................................... 37
Section Effects .............................................................................................................................. 37
TYRANID WARGEAR ...................................................................................................................... 38
Barbed Strangler ....................................................................................................................... 38
Boneswords .............................................................................................................................. 38
Death Spitter ............................................................................................................................ 38
Devourer .................................................................................................................................. 38
Fleshborer ................................................................................................................................ 38
Lash Whip................................................................................................................................. 38
Scything Talons......................................................................................................................... 38
Spike Rifle ................................................................................................................................ 38
Strangleweb.............................................................................................................................. 39
Venom Cannon.......................................................................................................................... 39
Missions ....................................................................................................................................... 39
Every Last One.......................................................................................................................... 39
Objectives................................................................................................................................. 40
Chapter Pi Marine Forces............................................................................................................ 40
Chapter Theta Chaos Forces....................................................................................................... 40
Deployment .............................................................................................................................. 40
Special Rules............................................................................................................................. 40
Victory...................................................................................................................................... 41

3
Missionen des Chaos...................................................................................................................... 41
Show No Mercy ......................................................................................................................... 41
Objectives................................................................................................................................. 41
Chaos Forces ............................................................................................................................ 42
Dark Eldar Forces ...................................................................................................................... 42
Genestealer Forces .................................................................................................................... 42
Deployment .............................................................................................................................. 42
Special Rules............................................................................................................................. 42
Victory...................................................................................................................................... 42
Show No Mercy ............................................................................................................................. 43
Objectives................................................................................................................................. 43
Chaos Forces ............................................................................................................................ 44
Dark Eldar Forces ...................................................................................................................... 44
Genestealer Forces .................................................................................................................... 44
Deployment .............................................................................................................................. 44
Special Rules............................................................................................................................. 44
Victory...................................................................................................................................... 44
Destroy Those Foul Idols................................................................................................................ 45
Objectives................................................................................................................................. 45
Harlequin Forces ....................................................................................................................... 45
Chaos Forces ............................................................................................................................ 45
Deployment .............................................................................................................................. 45
Special Rules............................................................................................................................. 45
Marines Missions ............................................................................................................................... 46
Rapid Penetration Part 1 - Expunge Campaign ................................................................................. 46
Objectives................................................................................................................................. 47
Marine Forces ........................................................................................................................... 47
Genestealer Forces .................................................................................................................... 47
Deployment .............................................................................................................................. 47
Victory...................................................................................................................................... 47
Perimeter Closure Part 2 - Expunge Campaign ................................................................................. 48
Marine Forces ........................................................................................................................... 48
Genestealer Forces .................................................................................................................... 48
Victory...................................................................................................................................... 48
Campaign Notes ........................................................................................................................ 48
Prolonged Stalking Part 3 - Expunge Campaign ................................................................................ 49
Objectives................................................................................................................................. 49
Marine Forces ........................................................................................................................... 49
Genestealer Forces .................................................................................................................... 49
Victory...................................................................................................................................... 50
Hold Tight Part 4 - Expunge Campaign............................................................................................ 50
Objectives................................................................................................................................. 51
Marine Forces ........................................................................................................................... 51
Genestealer Forces .................................................................................................................... 51
Deployment .............................................................................................................................. 51
Victory...................................................................................................................................... 51
Campaign Notes ........................................................................................................................ 51
Slow The Swarm ........................................................................................................................... 52
Objectives................................................................................................................................. 52
Marine Forces ........................................................................................................................... 52
Tyranid Forces .......................................................................................................................... 52
Deployment .............................................................................................................................. 53
Special Rules............................................................................................................................. 53
Victory...................................................................................................................................... 53
Kill Their Power ............................................................................................................................. 54
Marine Forces ........................................................................................................................... 54
Necron Forces ........................................................................................................................... 54
Marines .................................................................................................................................... 54
Necrons.................................................................................................................................... 54
Special Rules............................................................................................................................. 54
Victory...................................................................................................................................... 54

4
Space Hulk Extended
NEW RULES
The new rules on this page usually apply to every race, so it is worth reading them as they will affect most
of the games that you will play.
PSYCHIC POWERS
Some models are able to use Psychic Powers, which are distinct from the Psychic Attack Cards. These
Psychic Powers are often innate abilities that a Psyker can use in addition to the Psychic Attack Cards. In all
cases, the basic rules for the Psychic Attack Cards still apply, and the Psychic Powers can not break the
established rules for the Psychic Attack Cards. It will not always be explicitly stated in the description of a
Psychic Power how it relates to the Psychic Attack Cards, so players have to keep in mind they are not
breaking any rules to use the Psychic Power.
RANGED WEAPONS TABLE NOTES
Hit Rolls of 1, Miraculous Survival.
Although some weapons are extremely destructive and are capable of ripping apart well armoured tanks,
death is not always a certain event. It has been documented by many Librarians that a few Gretchin are
able to defy the odds and survive purification by a Heavy Flamer. Strange events and random fate can
protect even the weakest models from powerful hits.
On the Ranged Weapons Table there are many weapons that require a 1 to hit. Naturally, any roll of a dice
will always score at least a 1, so the following rule has been introduced to represent a model having a sliver
of hope. Maybe a pipe fell loose from a ceiling and blocked the shot, or a steam cloud burst at the time the
weapon was fired. For whatever reason, it is pure luck that determines if a model survives a powerful shot.
To simulate this blind fate of survival, the player who is shooting must roll one extra dice than the weapon
normally uses, and score at least a 2 on one of them. In other words, if the shooting player rolls all 1s then
his shot has missed. Example One: If a Heavy Flamer is fired in a room with a Gretchin, then two dice are
rolled for the Gretchin, instead of one dice. Provided a double 1 is not rolled, then the Gretchin is killed. If a
double 1 is rolled (Probability of 1/36), the lucky Gretchin lives!
This rule also works when Sustained Fire would reduce the hit roll to 1. Example Two: A stationary Assault
Cannon is fired at a Wych and three 1s are rolled, the Wych lives. The Marine fires a second Sustained Fire
shot at the Wych needing a 1 to hit. The Marine must now roll four dice and score at least one 2. If by
sheer luck four 1s are rolled (Probability of 1/1296) then the Wych survives! Although rare, it may happen,
and this accurately simulates survival from even almost certain death.
Assault Cannons will only Malfunction if all four dice are the same number. Repeated Sustained Fire shots
with any weapon against a model that miraculously survives will still only roll one extra dice than normal.
Automatic Kills
A few effects are listed with an A for Automatic kill. These attacks (usually psychic) are just so powerful
that they will automatically kill models. There are no miracles that protect against the summoned forces of
the Warp when they are focused by a Psyker.
STRIKING TERROR
Most battle hardened races in the galaxy experience fear of varying degree. Experience and training are
usually enough to snap out of the momentary loss of concentration that fear causes. However, some
creatures and special powers are able to go beyond normal fear and unleash true feelings of morbid terror
deep within their enemies psyche.
When an enemy model first gains LOS to a creature that Strikes Terror it can do nothing but gape in awe. It
can not use any APs or CPs and loses any remaining APs for the turn. The Terror lasts until the start of the
model’s next turn where it has managed to snap out of the spell. The model will lose overwatch and is not
allowed to shoot at the Terror causing creature that moved into LOS.
The enemy may only defend itself in Close Assault or play an Aura card to nullify a kill.
Once a model has recovered from being struck with Terror, it is then immune to all other forms of Terror
for the rest of the mission, even if other models capable of Striking Terror move into LOS.
The only way that a model can avoid the effects of Terror is if it manages to perform a successful move and
fire action that hits the Terror causing creature as the model stepped into LOS. The model effectively kills
the creature before the Terror effect can take place. Those acts of extreme bravery and fearlessness are
always noted on the battlefield and often lead to rapid promotion.

5
Many models have immunity to Terror simply because they have seen and experienced far too much to be
affected, or they have a mindless determination that is void of emotion. All Genestealers, Hybrids, Tyranids,
Sergeants, Captains, Librarians, Grey Knights, Ork Nobz, Great Harlequins, Solitaires, Death Jesters,
Shadowseers, Chaos Dreadnoughts, Sybarites, Succubi and Necrons are immune to Terror.
SURROUNDED
There are times when a model in close assault becomes Surrounded by the enemy. Surrounded models are
at a disadvantage as they try to fend off attacks from many directions. Any enemy model that attacks a
surrounded model gains +1 in close assault for every other enemy model that has attacked the surrounded
model and is still alive and surrounding that model. Example: A Terminator Captain is attacked from behind
by a Genestealer, but the Captain survives and faces the Genestealer. However, he is then immediately
attacked from behind by another Genestealer which gains a +1 bonus. The Captain lives again and once
more turns to face the second Genestealer. Unfortunately for the Captain, a third Genestealer is activated
and steps up to his left flank attacking him with a +2 bonus. The Captain is in the middle of a deadly nest
and will be lucky to survive. If the first Genestealer moved away from the Captain, then the second
Genestealer would not have gained the +1 bonus.
In short, there is a natural superiority by attacking in numbers, and being Surrounded only advantages the
enemy models as they close in for the kill. It has even been documented in Imperial Archives that
Dreadnoughts have been brought down by large numbers of Gretchin swamping it from every direction.
Although most of the Gretchin died in the process, their ability to Surround the Dreadnought made their
weight of numbers powerful against the mechanical beast.
NEW WARGEAR
The new wargear listed on this page applies to more than one race, and in some cases can apply to all
races. It is far better to introduce an item of wargear here, rather than duplicate the same information on
more than one rules page for each race.
AUTOCANNONS
Although Autocannons have been introduced to Space Hulk through Genestealer, and the Campaigns Book,
there have been problems with them being used by Hybrids, and Chaos Terminators. Essentially, Chaos
Terminators were not allowed a Move and Fire action when using an Autocannon, and they suffered from
the range penalty of 13+ squares.
Taking all of this into account, it has been decided to split the Autocannon listing on the Ranged Weapons
Table to account for the model that is holding it, and also, to abolish the split ranged distance of 12 and
13+ squares.
Therefore, Hybrids using an Autocannon are not allowed to Move and Fire, and ALL of their shots are
considered to be as the old 13+ range to hit. When you think about this, it makes sense that Hybrids are
penalised with a large, Heavy Weapon like the Autocannon, and suffer with less accuracy.
However, Chaos Terminators benefit as thier armour is designed to incorporate Heavy Weapons, and to
facilitate movement with them when shooting. A Chaos Terminator firing an Autocannon CAN make Move
and Fire actions, and in addition, all of his shots are considered to be the same as the old less than 12
squares range to hit.
In effect the same Autocannon has different statistics on the Ranged Weapons Table, depending if the
firing model is a Hybrid or Chaos Terminator, as they are both able to handle the Autocannon very
differently from each other. One facet of the Autocannon has not changed, it is still too slow to enter
Overwatch.
Note that the Reaper Autocannon is a different type of weapon that is introduced in the Chaos Rules.
HELLFIRE SHELLS
These special ammunition rounds are made from a hollow crystal filled with a mixture of caustic acid and
deadly poisons. When the Shell explodes, the slivers of crystal cut through flesh and armour, while its
contents burn and poison its victims. Hellfire Shells can only be fired from a Heavy Bolter or a Shotgun, so
any race that has access to these weapons is capable of shooting them. They are not a commonly
distributed type of ammunition, and are often looted from dead models on the battlefield. Gretchin are
particularly adept at finding them, which provides the relatively weak creatures a chance to cause serious,
unexpected damage. Each Hellfire Shell must be individually loaded into the weapon's breach before firing.
The Hellfire Shell has the same range as the weapon that propels it, but it otherwise has its own individual
characteristics on the Ranged Weapons Table. Regardless of the weapon used to fire the Shell, each shot
costs 2 APs. Move and Fire actions are not possible due to the extra recoil, and the weapon may not be

6
placed on Overwatch with Hellfire Shells. Once the weapon has fired a Hellfire Shell it may immediately
return to firing normal rounds, unless the firing model chooses to load and shoot another Hellfire Shell.
NEEDLER - BOLTER
This weapon combines the standard Bolter together with a Needle Gun. The Bolter is effectively the same
as the ordinary Bolter and needs no further explanation.
The Needler carries small explosive tipped hypodermic darts that are filled with a cocktail of virulent toxins
and poisons. Upon impacting the shell of the target, the explosive tip detonates and thrusts the toxic
syringe inside to pump the deadly juices inside the target's body. The toxins react inside the victim's body
within seconds and cause the victim to explode. Surrounding models may be killed by the victim's shrapnel.
The Ranged Weapons Table shows the required rolls to directly hit, and the rolls for each adjacent model
who may die in the blast. If the Needler misses its target, there is no need to roll for any blast damage. The
Needler has an ammunition chamber of 10 darts and it may not be reloaded on the battlefield.
It is not possible to fire both barrels of the Needler-Bolter at the same time. The player firing a Needler-
Bolter must declare which barrel he is using to fire at his target.
Being an experimental weapon, the Needler-Bolter is not commonly found during Space Hulk boarding
actions. It is a weapon useful for hunting a foe and subduing them for retrieval purposes. Depending on the
mission objectives, some Needlers are filled with a substance that paralyses the victim for capture rather
than death. The toxins are extremely powerful, but they are not always reliable against Tyranids who can
show remarkable resistance to the poisons.
POWER FIELD GENERATORS
Power Field Generators were introduced in Deathwing, and it is worth reproducing the rules for them here,
along with some modifications that are necessary due to the new creatures and wargear that can be used
against them.
A Power Field Generator is a small device that generates an invisible force field in a sphere centered around
itself. They can be used for sealing hull breaches in emergency situations on board space ships. However,
Marines will sometimes use them to block off a ship's corridors to delay any pursuing enemies.
Priming and throwing a Power Field Generator costs 2 APs. A model can throw a generator up to six
squares away in his LOS and fire arc. To be effective, the generator must go off between two opposing
walls (corridor, room entrance, etc) otherwise it will not be contained and burn out. When throwing a
generator, the player indicates where it's supposed to land and rolls a dice. On a roll of 6, the generator
rolls one square further than intended (unless blocked by a wall or door). On a roll of 1, the generator falls
short by one square, or will go off early in the model's square if it was only meant to be thrown one square
away.
The field fills the entire square in which it lands, automatically killing any model in that space. Psykers can
use an Aura card to be repulsed into any adjacent square, otherwise they too are automatically killed.
Rubble is not affected by the field. The field blocks movement, and all weapons firing, but may or may not
block certain psychic powers and special creature abilities. It does not block LOS.
It costs a model 4 APs to destroy an active Power Field Generator with any of the following weapons: Bone
Sword, Chain Fist, Chain Sword, Disruption Field, Any Force Weapon, Lightning Claws, Power Axe, Power
Sword, Thunder Hammer, Warscythe.
It costs the following creatures 4 APs to destroy an active Power Field Generator due to their extreme size,
force, and strength: Carnifex, Dreadnought, Lictor, Patriarch.
If any other creatures wish to destroy an active Power Field Generator, then they must spend a total of 18
APs attacking it in close assault. They must spend at least 1 AP per turn, otherwise the Power Field
Generator is able to recharge back to full strength. Keep a record of how many APs have been spent
attacking the generator.
Sometimes Power Field Generators can be found onboard Space Hulks. In this case, they can be used by
any race that is capable of using grenades. Necrons, Tyranids, and Genestealers will not use them;
however, Hybrids will use them.
PROXIMITY PLASMA GRENADES
Proximity Plasma Grenades were introduced to Space Hulk in White Dwarf 149 - Strike Deep Campaign. It is
worth reproducing their rules here for completeness.
It costs 1 AP for a Marine to place a Proximity Plasma Grenade in his square, and it is automatically armed
as soon as the Marine has stepped two squares away from it. If other models (friendly or foe) are also
adjacent to the grenade when it is placed then it will not arm itself until all models are at least two squares
from it. A model (friendly or foe) that is capable of using grenades may diffuse the placed grenade for 1 AP
and render it useless if he moves onto the square that contains the grenade.

7
Otherwise once the grenade is armed it will detonate as soon as any model or blip enters an adjacent
square to the grenade. It explodes with a quick firey flash of super-heated plasma and affects the section it
is in along with any other adjacent squares to it. In all other respects the Proximity Plasma Grenade is the
same as a normal Plasma Grenade, but it can never be thrown.
Sometimes Proximity Plasma Grenades can be found onboard Space Hulks. In this case, they can be used
by any race that is capable of using grenades. Necrons, Tyranids, and Genestealers will not use them;
however, Hybrids will use them.
CHAOS RULES
CHAOS DREADNOUGHTS
Dreadnoughts are monstrous machines that accompany Chaos forces into battle. They provide devastating
heavy support that razes all before them. The Dreadnought is under control of its Chaos God at all times, as
it is not a living creature. Its mind coexists in the Warp where it can receive instructions from the
controlling God. They are capable of withstanding huge amounts of firepower, and are equally just as
capable of defeating many squads on their own.
Introducing Dreadnoughts
Dreadnoughts can be purchased from the Chaos Force List along with any other Chaos Marines that are
required. Due to their immense size they occupy 4 squares and they can not walk down a single squared
corridor. A mission involving a Dreadnought would need wider corridors to allow the Dreadnought some
movement through the Space Hulk. A Dreadnought pays more APs than any other model to turn.
APs, CPs, Weapons, Close Assault
A Dreadnought with Short Legs has 4 APs per turn. Dreadnoughts with Long Legs have 6 APs per turn. All
Dreadnoughts can also use CPs, but only if there is at least 1 other Chaos Marine alive on the board. If the
last Chaos models on the board are Dreadnoughts, then the Chaos player can no longer roll for CPs.
All Dreadnoughts have twin linked Heavy Bolters attached below their ‘mouths’. Both of them must aim at
the same target each time they are shot. The Dreadnought’s Heavy Bolters use the normal statistics on the
Weapons Table; however, there is one major difference. A Dreadnought MAY move and fire with the Heavy
Bolters, and it can also turn and fire. The Heavy Bolters can jam in overwatch as normal, and they also
receive any sustained fire bonuses as applicable.
Every Dreadnought has Weapon Mounts, either 2 or 4, that can support a Heavy Weapon. The Mounted
Heavy Weapons are chosen for the Dreadnought when it is purchased from the Force List. The
Dreadnought is NOT able to move and fire with any of its Mounted Heavy Weapons. These rules override
the normal rules for an Assault Cannon, which can be fired when a Terminator Marine is moving.
Dreadnought Assault Cannons never run out of ammunition, and are never in danger of malfunctioning. The
Dreadnought has weapon cooling systems and vast stores of ammunition to last it during most Space Hulk
battles. Similarly, a Dreadnought Heavy Flamer will never run out of ammunition. Dreadnought Heavy
Plasma Guns can only be fired once per turn on Maximal, as they still need to recharge the power packs.
This is still a better rate of fire than the Hybrid weapons. Keep track of a fired Dreadnought Heavy Plasma
Gun with a Fired counter. From its next turn it may shoot the weapon again.
Dreadnoughts are mighty foes in close assault. They are usually able to cut down enemies in front of them
with their Heavy Bolters, which gives them a powerful set of dice rolls in their front square. Dreadnoughts
do not have any special rules for close assault, with the exception that they can never be knocked prone as
they are far too massive. When a Dreadnought is destroyed, either in close assault or from being shot, it is
replaced with a 4 square rubble counter due to the wreckage it leaves on the board.
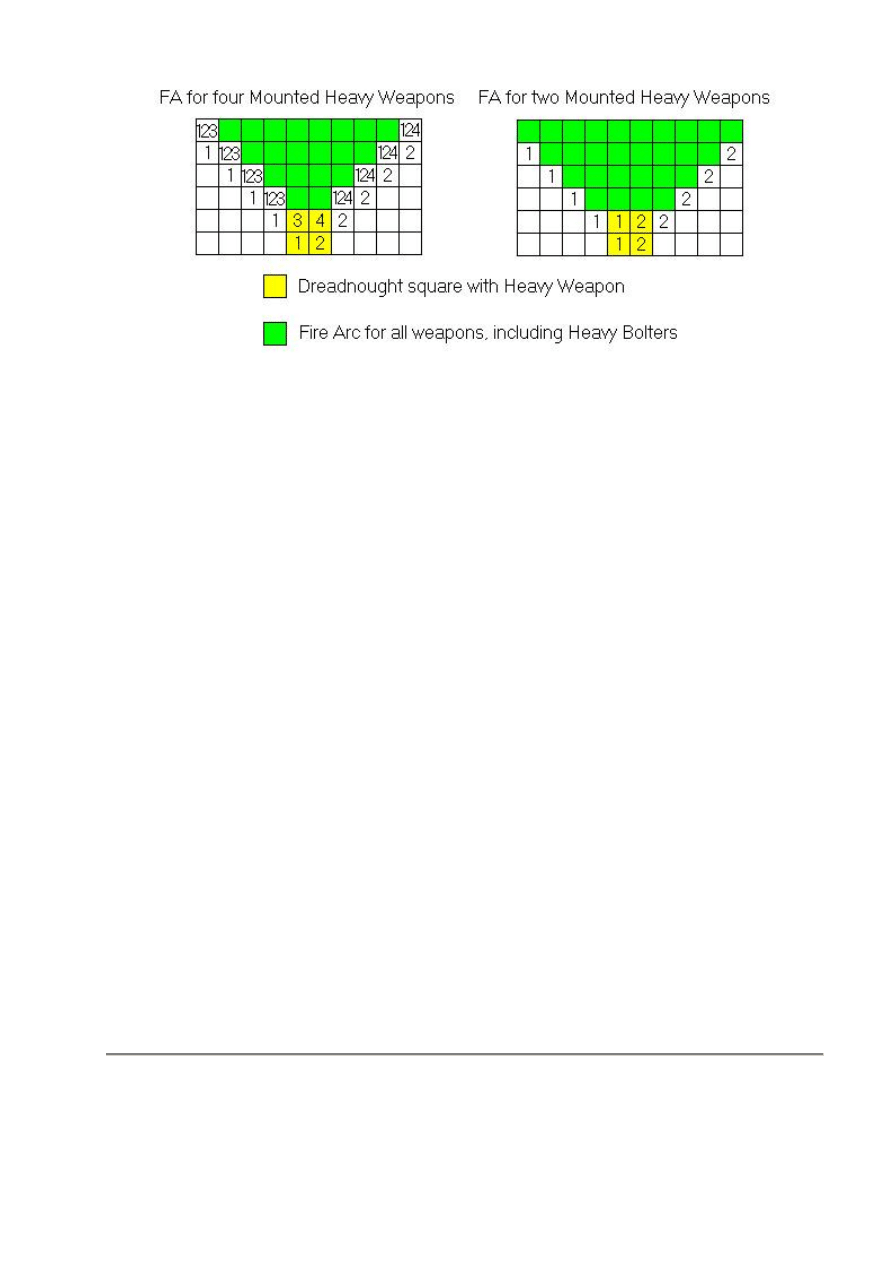
Line Of Sight and Fire Arc
Dreadnoughts have a LOS that extends sideways and forwards from each of their four squares. If an enemy
model can see at least one square of the Dreadnought in its FA then it can target the Dreadnought.
Dreadnought Fire Arcs extend in a 90 degree arc forward from each square that a Heavy Weapon occupies.
A Dreadnought with four weapon mounts contains one Heavy Weapon for each corresponding square. A
Dreadnought with two weapon mounts has a little more manueverability and each Heavy Weapon has a
Fire Arc from both squares that it occupies. The Heavy Bolters on a Dreadnought with four weapon mounts
are more restricted, and have a comparitavely restricted Fire Arc when compared to a Dreadnought with
two weapon mounts.
Note that the Mounted Heavy Weapons may not all have LOS or FA to a target model, particularly when the
Dreadnought and target model are in confined spaces and tight corridors. Refer to the diagrams for more
details.
8
Firing A Volley
Dreadnoughts are walking weapons of mass destruction. They can fire all of their Mounted Heavy Weapons
and their Heavy Bolters AT THE SAME TIME!
The Chaos player can declare that he is going to fire the Dreadnought’s Mounted Heavy Weapons in a
Volley. It must remain still, as no move and fire actions are possible. The Chaos player may elect to fire
some, or all, of the Mounted Heavy Weapons that the Dreadnought carries. The AP cost for the Volley is
based on the most expensive weapon that is participating in the Volley. A Heavy Plasma gun on Maximal
will cost 3APs for the Volley, etc. He then chooses a weapon and fires it as many times as appropriate for
that amount of APs the Volley has. The shots can be at different targets if possible. He repeats this process
for each weapon that is firing, including the Heavy Bolters if they were declared as being fired. If there are
no more targets in LOS and FA ( a very likely event ), then any remaining weapons that have not fired do
not have to fire.
Example: A Dreadnought has the following Mounted Heavy Weapons, Assault Cannon, Heavy Flamer,
Missile Launcher, and Heavy Plasma Gun, along with the Heavy Bolters. The Dreadnought is faced with a
huge hall full of Genestealers. The Chaos player elects that the Dreadnought is going to shoot all of its
weapons with the Heavy Plasma Gun firing on Maximal, the Missile Launcher firing a Crack Missile, and the
Assault Cannon firing Bursts. The cost for the entire Volley is 3 APs as this is what it takes to fire a Heavy
Plasma Gun on Maximal.
Firstly, the Chaos player shoots the Heavy Bolters at a Genestealer, killing it. He targets another
Genestealer with the Heavy Bolters and misses. Using his last AP for the Heavy Bolters he scores a
sustained fire hit on the Genestealer.
He then decides to fire the Heavy Flamer into a section of the hall, killing a few more Genestealers. He can
not fire the Heavy Flamer again as has used 2 APs and only has 1 left over.
Next he decides to fire the Heavy Plasma Gun which uses all 3 APs, but it leaves a trail of dripping
Genestealer gore in the centre of the hall. Newly revealed Tyranid Warriors hiding at the back of the room
are perfect targets for the Chaos player to fire 3 Assault Cannon Bursts at. Two Tyranid Warriors die riddled
with holes.
Finally, the Chaos player sends a Crack Missile at another Tyranid Warrior ripping it into pieces. He has 1
left over AP, but it can not be used in this Volley of shots.
Remember that Mounted Heavy Weapons can be fired one at a time in separate actions. It is just like
shooting a single Volley. Mounted Heavy Weapons can only be fired as a single Volley when using CPs
during an enemy turn.
Overwatch
Only a Dreadnought’s Heavy Bolters can be put into Overwatch. The Mounted Assault Cannon is not able to
enter Overwatch, though this is more than compensated for with unlimited ammunition and no chance of
malfunction. If either of the Heavy Bolters Jam during Overwatch, then they both Jam. Clearing the Jam
costs 1 AP, and must be done so before ANY weapons can be fired at all.
Combi Bolter-Flamer
Chaos Terminators can be armed with the deadly Combi Bolter-Flamer. It incorporates all the features of a
Bolter and Flamer into one single weapon. Note that the Flamer is NOT a Heavy Flamer, and it does not
come with a reload, therefore having enough fuel for six Flamer shots only.

9
The Combi weapon can not fire both barrels simultaneously, so the Chaos player must declare what type of
shot is being fired. In all other respects, the Combi Bolter-Flamer follows the normal rules for each of the
Bolter and Flamer rules on the Ranged Weapons Table.
Reaper Autocannon
Based on the standard Autocannon, the Reaper Autocannon is a larger twin-barreled Heavy Weapon that is
designed to take down massive, heavily armoured targets. It is only used by Chaos Terminators, being far
too cumbersome to place in the hands of any other type of trooper. The Reaper Autocannon is equipped
with autofeeders that supply the barrels with large calibre rounds that shoot at high velocity towards their
target where they erupt with thunderous booms.
If the Reaper Autocannon has any disadvantage, it is on board Space Hulks where it is too slow to enter
Overwatch as the ammunition feeders are not capable of supplying faster rates than the barrels can spit
out. Usually the Chaos Terminator with a Reaper Autocannon is ready to recieve immediate instruction via
Command Points to take care of enemies that present themselves within the weapon's arc of destruction.
DARK ELDAR RULES
The Dark Eldar inhabit a realm called Commorragh, a place as darkly twisted as its rulers, from which they
launch piratical raids across the galaxy. They often raid drifting Space Hulks for the promise of lost fortune,
and also lost souls. The other purpose of these raids is not to conquer planets or protect territory, but to
cause mayhem, steal and pillage, and – most important of all – capture new victims to be taken back to
Commorragh. The fate of the captured slaves is best not even contemplated, for the Dark Eldar are truly an
evil race who thrive on inflicting pain, and suffering, torture, and slow death, murder, and eternal agony.
Fleet Of Foot
Dark Eldar prefer to complete their piracy in as little time as possible. They can choose to run at full speed
through the confines of a Space Hulk using Fleet Of Foot. A Dark Eldar who uses Fleet Of Foot can only use
his 5 APs for movement actions, but he also gains a further 3 APs, for a total of 8 APs to use only for
movement actions (which includes opening doors). A Dark Eldar using Fleet Of Foot CAN NOT fire any
weapons, nor attack in close assault, or end his movement in Overwatch or Defensive Stance.
Introducing Dark Eldar Warriors and Sybarites
Warriors are the backbone of any Dark Eldar force. They attack rapidly, killing or crippling those who
oppose them, and enjoy nothing better than dragging survivors back to Commorragh. Warriors are sleek,
and agile, and only slightly armoured. They prefer fast raids where there they are not pinned into defensive
positions against heavy weapon barrages. All Warriors have 5 APs and they are not able to use CPs.
Proven Warriors are promoted as Sybarites, and typically lead a squad of Dark Eldar Warriors during their
lightning fast attacks. Sybarites are immune to the effects of Terror.
Introducing Wyches and Succubi
Wyches spend their entire lives perfecting the skills of gladiatorial combat. Few survive their first duel, but
those who live learn quickly. They are barely armoured at all, and do not have the ready supply of heavy
weapons that Warriors are familiar with having. Wyches have 5 APs, and are at their deadliest in close
assault. Wyches are able to run with Fleet Of Foot.
A Wych can never be attacked from the side or rear, they are always able to turn free to face their attacker
at the start of close assault. In addition a Wych can also assume Defensive Stance to gain +1 in close
assault during the enemy turn.
Wyches that excel in their ability earn the title of Succubus. Each Succubus has a personal honour roll of
countless victims that bled their last drops of life delivered by the neat surgical swipes of the Succubus. A
Succubus is almost without equal in any close confined arena of death. All Succubi are immune to Terror,
they delight in seeing the foulest forms of pain, agony and other horrific visions.
DARK ELDAR WARGEAR
Blaster
The Blaster is a smaller version of the Dark Lance, and works along the same principals. However, it has a
shorter range, and a comparatively reduced firepower.
Dark Lance

10
The Dark Lance fires a stream of dark matter which catastrophically reacts with its target, producing a blast
that is more than capable of destroying a heavily armoured tank. Dark Eldar are able to move and fire with
a Dark Lance, which somewhat compensates for the loss of freedom during close assault.
Shredder
The Shredder unleashes a web or mesh of monofilament wire, often with minuscule barbs or serrations
along its lines. This mesh entangles the victim, slicing them to pieces as they struggle. Its dense cloud is
highly effective at finding weak points in heavily armoured objects such as Terminators.
Splinter Pistol
A smaller version of the Splinter Rifle is the Splinter Pistol. Its smaller size means that it has less firepower,
and a more limited range. It is often fitted with specialised combat blades, which the Dark Eldar are able to
use to slash and stab at opponents in close assault.
Splinter Rifle
The standard armament of Dark Eldar pirates is the so-called Splinter Rifle. This gun derives its name from
its ammunition, as it fires a hail of splinter-like shards at the enemy. A highly sophisticated magno-electric
impulse is used to break the ammunition crystal into smaller fragments, which are then propelled along the
barrel at incredible speed with the same energy pulse. If the Splinter Rifle Jams, then it loses Overwatch.
There is no need to un-jam the gun before shooting from the next turn.
Splinter Cannon
The Splinter Cannon is the most murderous of Splinter weapons. With its highly efficient firing mechanism
and lack of recoil, the Splinter Cannon can be fired even when on the move. If the Splinter Cannon Jams,
then it loses Overwatch. There is no need to un-jam the gun before shooting from the next turn.
Combat Drugs
Dark Eldar use Combat Drugs to increase their performance during battle. The exact effect of the drugs can
not be predicted and must be randomly determined. At the start of the Dark Eldar turn the player must
declare that the whole squad will use the drugs. They are administered by thought alone, and the process
of releasing them does not use any APs, nor is it counted as an action. The whole squad gains the same
effect for each model, lasting until the start of the next Dark Eldar turn.
The Dark Eldar player can choose to make a second roll on the table, and combine the effect with the first
roll. However, if the second roll is the same as the first, the drugs overload their systems, and each model
instantly suffers painful spasms before they die twitching from the overdose.
The Dark Eldar player should roll the dice in secret and let his enemies discover the effects as play
happens. A neutral party should confirm the dice rolls to keep the evil Dark Eldar player honest!
Dice Roll
Effect
1
No Effect
2
Speed: +2 APs
3
Strength: +2 in close assault
4
Accuracy: +2 for each ranged weapon shot
5
Toughness: –2 for each enemy ranged weapon shot
6
Awareness: +1 CP
DARK ELDAR TURN SEQUENCE
• Declare the use of Combat Drugs
• Use Action Points (Main Phase)
• Roll to move Vortices
• Roll for additional Section Effect damage
• Roll for Decay of Psychic Effects
• Dispersal of Psychic Effects
• Remove next player's Overwatch counters and Section Effect Markers
HARLEQUIN RULES
The very presence of Harlequins has been known to throw strong enemy armies into retreat and the arrival
of a Harlequin Masque in the middle of a battle has been known to turn the tide from bitter defeat to
outright victory. The Harlequins represent the cream of the Eldar fighting forces and owe no allegiance to
any Craftworld. A Harlequin force can appear anywhere at anytime, responding to their own plans or
whims.
The Harlequins have one great overriding passion, to make war on Chaos. When the first Space Hulk
carrying Genestealers appeared in Eldar space it was seen as a challenge to the ideals of the Harlequins.

11
Since then Harlequin Masques have always appeared to deal with Genestealer incursions. How they know
when and where they will occur remains a mystery to the leaders of the Craftworlds but they are very
grateful. The stories of these fights against such a deadly foe are full of heroism and valour and have only
served to increase the awe surrounding the Harlequins.
Deathdance
A Deathdance is a special manoeuvre performed by Harlequins who are faced by a foe many times their
number. The Harlequin performs a swirling melee of acrobatics and deadly close combat attacks, cutting
cruel blows with his weapons while his opponents weapons seem to pass right through him.
To enter the Deathdance a Harlequin must pay 3APs. For the duration of the dance the Harlequin receives
+1 to Close Assault rolls. The Harlequin can now attack an enemy in an adjacent square in close combat for
free. If the Harlequin wins the close combat then the Harlequin may follow up and move into the recently
vacated square. The Harlequin may now attack another target in an adjacent square and follow up for free.
This process continues until either a combat is drawn, the Harlequin is killed or there are no targets left to
close assault.
Defensive Stance And Overwatch
Harlequins have the option of setting overwatch the same as Space Marines or they may assume a
defensive stance. A Harlequin armed with a Power Sword, Force Claw or Harlequin's Kiss faced by the
prospect of close assault may choose to prepare to face it. A Defensive Stance marker is placed next to the
figure as the Harlequin becomes poised to explode into violent action. During the enemy player's turn the
Harlequin receives a +1 bonus in all close assault battles.
Leap
Harlequins may Leap one square over an intervening obstacle, or even over another Harlequins. The
direction of the Leap is not important, but the Harlequin retains the same facing in the new square as
before he leaped. Unlike the Hormagaunt Leap, a Harlequin can not avoid Overwatch fire, as it still presents
as a sufficient sized target for Overwatch to activate. The square being leaped into must be empty,
otherwise the Harelquin can not perform the Leap.
Solo Actions
Harlequins do not have command points like Space Marines. In battle Harlequins fight in a very open,
flowing style, more a linked series of individual actions than a cohesive attack. In the confined corridors of
Space Hulks and building complexes this becomes even more extreme. This is reflected in the game by the
Harlequin player allowing one model per turn to perform a Solo, giving the Harlequin an additional 3 APs. At
the start of each turn the Harlequin player place a Solo marker next to the model who is to use the extra
points that turn.
The chosen model now gets 9 APs in which it must attack. At least l AP must be used to attack the enemy
player by engaging an enemy in close assault, you cannot simply move the model nine squares or stand
and fire nine times. The Harlequin may not end a Solo on overwatch or assume defensive stance.
A Harlequin may not perform a Solo in two consecutive turns but must be given to a different Harlequin
each turn. To aid memory it is best to leave the command marker next to the Harlequin until the beginning
of the next turn. Obviously the player doesn't have to use all three of the points and may opt to use none
at all.
A Harlequin may only be selected for a Solo if it is able to spend at least 1 AP in close assault with an
enemy. The Harlequin who is performing the Solo MUST make every attempt to close assault an enemy
during his Solo. The Harlequin player can not declare a Solo and then not even try to engage an enemy in
close assault. If at the end of the Solo the Harlequin did not spend 1 AP in close assault, then the Harlequin
player may not perform a Solo on his next turn, and the Harlequin who failed his Solo does not get any APs
on the next turn. Great shame is brought to the Masque when a Solo is uninspiring, and the penalties are
heavy for failure to dance death over an enemy.
Introducing Troupers and Troupe Leaders
A typical Harlequin Masque consists of Troupers who are lead by skilled
Troupe Leaders. These are the standard Harlequin that enter battle for
the dance, and for the kill.
Troupers dress brightly, and are uniquely flamboyant. They are only
lightly armoured; however, their natural aerobic skill combined with their
anti-gravity flip belts make them an extremely difficult to hit with
targetted weaponry. Dancing between bullets and incoming blows is the
greatest dance of all, on the stage of life and battle.
Troupe Leaders act in a similar role as Sergeants, overseeing the battle,
and lending their consumate experience to the fray. They are often armed
with the Harlequin's Kiss, having sufficient experience in the use of the
deadly weapon during close quarters fighting.
12
Image: A Harlequin Trouper
armed with a Shuriken Pistol
and a Chain Sword. Painted by
Luke Wilkinson.
Introducing Death Jesters
Death Jesters are the heavy weapon specialists of the Harlequin Masque. They
are as agile as all other Harlequins, and combined with their flip belts, they are
able to move and fire unrestricted. A Death Jester armed with any heavy
weapon may make move and fire actions as per the AP table for Harlequins.
Ignore the usual move and fire characteristics of the Missile Launcher when it is
being carried by a Death Jester.
Image: A Death Jester
armed with a Shuriken
Cannon.
Introducing Great Harlequins
The Great Harlequin is the overall leader of the Masque. There can only
ever be one Great Harlequin for each Masque. If another Harlequin
becomes sufficiently skilful, he will leave and found a new Masque. The
Great Harlequin is always armed with a Power Sword, Shuriken Pistol, and
wears a Domino Field. He has the option of some other rather unique
weapons that make him an elusive foe.
Image: A Great Harlequin
armed with a Shuriken Pistol
and a Power Sword.
Introducing Solitaires
Even amongst the Harlequin, little is known about Solitaires. They seem to
act on their own agenda and freely choose to join a Masque for as long as
they feel necessary. There are rumours that a Solitaire has no true soul to
speak of. There can only be one Solitaire in any Harlequin Masque as they
truly do work alone.
Solitaires are not able to perform a Solo. While they do work with the
Masque, they are not truly a part of the Masque, and are not able to take
their place in the performance with individual recognition.
A Solitaire moving at full speed appears to be a blur of light. This
unnatural speed gives the Solitaire two unique abilities.
Image: A Solitaire armed with a
Power Sword and Shuriken
Pistol. Painted by Luke
Wilkinson.
Blistering Speed
A Solitaire may move two squares with blistering speed for 1 AP. The direction of movement is not
important, but the movement must not be interrupted by any other action. The Solitaire can not fire while
moving at blistering speed. Not only is the Solitaire able to move further than most other models, blistering
speed also allows the Solitaire to move so fast that it can avoid some overwatch fire. If the Solitaire is
crossing a junction that is guarded by an enemy model on overwatch, he can run at blistering speed past
the junction too fast for the enemy to fire. However, if the Solitaire is running towards an enemy model on
overwatch with blistering speed, the enemy model is still able to take a shot every second square that the
Solitaire moves. In effect, blistering speed allows the Solitaire to move a free square before it pays 1 AP for
the second square moved. While in the free square the Solitaire is safe from overwatch fire.

13
Death Step
A Death Step is similar to the Death Dance, but it is only an action that a Solitaire can perform due to his
phenomenal speed. During the Solitaire’s turn if he defeats an enemy in close assault then he is allowed to
step into the square that the enemy occupied for 0AP. The Death Step is still counted as an action and the
Solitaire can be fired upon by enemy models in overwatch. The Death Step must be performed immediately
after the victorious Close Assault, otherwise the Solitaire loses the opportunity to do so. The Death Step
allows the Solitaire to continuously charge into melee as he chooses. Note that the Death Step does not
give any close assault bonuses as it is merely a free movement action. A Solitaire can perform a Death
Dance like all other Harlequin if he chooses.
Soulless
Solitaires are immune to all forms of Terror. They are also immune to Smite and Control from the Psychic
Attack cards. The Brain Bursta Attack has no effect on them either.
HARLEQUIN WARGEAR
Domino Field
Worn by the most powerful of Harlequins, the Domino Field creates a more complex distortion pattern than
a normal Harlequin Holosuit, shattering the wearer’s image into a cloud of blindingly brilliant shards of
multicoloured light. The wearer is harder to hit with ranged weaponry, and in addition, any model attacking
the wearer in close assault must subtract 1 from each dice roll.
Dread Mask
The Dread Mask contains a psychic pickup that detects the worst fears of the wearer’s enemies and
amplifies them, sending shivers of terror through them. A model wearing a Dread Mask projects an aura of
horror about him and is able to Strike Terror to enemy models that gain LOS to the Harlquin wearing the
Dread Mask.
Force Claw
A Shadowseer is always armed with a single Force Claw, allowing him to channel his psychic energy into his
close assault blows. The Force Claw is similar in all other respects to other Force weapons and is subject to
the same rules that affect Force weapons. Some Shadowseers practice a technique where they charge their
Force Claw with an incandescent glow and wave it rapidly before them. Onlookers see an extremely bright
curtain of energy that drips colourful balls of power. They usually don't see much more after witnessing the
Shadowseer's creative display as their mesmerised minds are too slow to react to prevent their own deaths.
Harlequin Plasma Pistol
Harlequins have advanced technological knowledge that even the Adeptus Mechanicus can not fathom.
They are able to harness plasma weapons with greater efficiency than other races. A Harlequin armed with
a Plasma Pistol can fire once per turn, rather than waiting for the weapon to recharge on the next turn.
Once the Harlequin has fired the Plasma Pistol place the green recharge counter next to the model. At the
start of the next turn remove the counter and the Harlequin may fire once more. The Harlequin Plasma
Pistol is a far deadlier weapon than that used by other races. It packs a similar punch to most other Plasma
Guns; however, it does not give any close assault bonuses to the Harlequin.
Harlequin’s Kiss
This terrifying weapon is the Harlequins' trademark. It consists of a slim tube, generally strapped to the
back of the forearm, which fires a long stream of monofilament wire. In close assault the Harlequin thrusts
the Kiss at any opening in the opponent's armour. The long tube penetrates deep into the target's body
where the monofilament wire streams out of the Kiss, where it twists and coils killing the target from the
inside. Then the wire retracts and the victim simply collapses, dead! Because it is such a deadly weapon the
Harlequin's Kiss gives a close assault bonus of +2.
However, the Harlequin's Kiss is a weapon with a drawback, sometimes the wire gets caught inside the
victim's body and can leave the Harlequin wide open. After killing an opponent the Harlequin player rolls a
d6. On a score of a 1 the Kiss gets caught inside the victim and the Harlequin must spend l AP to free it. If
it happens during the opponent's turn place a jammed marker next to the Harlequin, the Kiss can not be
freed until the Harlequin player s next turn and the Harlequin will lose Defensive Stance. The Harlequin's
Kiss is not a fast weapon and therefore is not of great use in a Deathdance where speed of the blows
counts. This double-edged weapon, a danger for opponent and wielder alike, typifies the Harlequin ideal.
Phase Field
Harlequin warp technology allows the wearer of a Phase Field to shift between realspace and the webway.
The wearer can use the Phase Field once per turn by paying at least 2 APs. The wearer can then shift
through the webway and teleport through the Space Hulk at one square per AP point spent. The Phase
Field is able to teleport through any section effect, including a Miasma. The exit square must be empty for
the wearer to step out of the webway. The wearer can choose to step into a section effect, but will
immediately suffer the consequences of being in an affected section.

14
Shuriken Cannon
The heavy version of the Shuriken weapon is the favoured armament of the Death Jester. Laying down a
devastating hail of discs, the Death Jester gracefully twists and turns leaving destruction and death in his
wake. On the battlefield Death Jesters have earned a fearsome reputation. Death Jesters provide vital long
range support during an assault on a Space Hulk, covering the Harlequins advance and checking flank
attacks by the enemy. The great agility of the Death Jester combined with the use of Flip-Belts enables
them to make every move look effortless.
Shuriken Cannons in overwatch roll two dice per shot. The Shuriken Cannon jams if a double is rolled.
Shuriken Pistol
The Shuriken pistol is another favoured weapon of the Harlequins. The Shuriken pistol works by using a
gravitic reaction to propel circular discs with mono-molecular cutting edges. These discs slice through
armour or bone and every burst of fire catapults a hail of the discs at the enemy.
Tanglefoot Grenades
Used by the Harlequin, these grenades cause a micro negative gravity effect over an entire section. The
gravity disruption violently shakes like a mini earthquake and unsettles the balance of all models on the
section. Models that are ‘hit’ by a Tanglefoot grenade are not killed, instead they are immediately knocked
prone. A common tactic for many Troupers is to throw a Tanglefoot grenade into a section before they
whirl into close assault and dance death over the fallen enemy. A prone model may use APs to get up from
being prone, or CPs.
Vortex Grenades
Vortex Grenades erupt with a split second burst filling the section with raw warp energy. Models that are hit
are dragged into the warp and rent asunder from the chaotic forces around them. Survivors barely manage
to keep a firm grip of their souls in normal material space. A Vortex grenade instantly removes any other
normal section effect marker, but has no effect on psychic markers.
HARLEQUIN TURN SEQUENCE
• Declare Solo
• Use Action Points (Main Phase)
• Roll to move Vortices
• Roll for additional Section Effect damage
• Roll for Decay of Psychic Effects
• Dispersal of Psychic Effects
• Remove next player's Overwatch counters and Section Effect Markers
MARINE RULES
Introducing Grey Knights
Grey Knights have already been introduced to Space Hulk through the Genestealer Rule Book. They are
equipped to face and overcome Daemonic covens of Chaos and other creatures that spread evil from the
Warp. Each Grey Knight enters battle with his own personal hand-crafted copy of the Libra Daemonicus
prominently displayed in a beautifully decorated ceraminte case fastened to his breastplate. To many, their
monastries are memories as they are often deployed for decades at a time serving the Emperor in distant
quadrants of the galaxy.
All Grey Knights are Psykers. They are immune to normal forms Terror, but they are not immune to a
Pariah's Terror. Grey Knights are superior warriors, and their presence always signifies an enemy of raw
psychic power.
Dressed in Aegis Terminator Armour with a Psychic Hood, they wield impressive Nemesis Force Weapons.
These weapons can channel psychic energy, and additionaly, they can be fired upon an attacker in close
assault if the round of combat was drawn. Refer to the Ranged Weapons Table for the extra free attack.
A Grey Knight Sergeant is usually armed with a Nemesis Force Sword which allows him to parry. The
presence of a Grey Knight Sergeant allows the Marine player to add 2 CPs to his roll.
Grey Knights are sometimes sent to accompany regular squads of Librarians, although not in full strength.
It is common to see one or two Grey Knights attached as special advisors during tough campaigns. Any
more than two Grey Knights requires the presence of a Grey Knight Sergeant to coordinate the battle. It is
extremely rare to see a full squad of five Grey Knights in battle, against all but the most powerful of
Daemons.
Grey Knights have the following Psychic Power that they can use;
Psychic Blast

15
Range: 12
Target: One enemy model in LOS and FA (except a Pariah).
Cost: 1 AP and discard at least 1 Psychic Attack Card.
Effect: The Grey Knight may choose to lay down as many Psychic Attack Cards as he wishes. He adds the
close assault bonuses generated by the cards and fights a round of close assault with the chosen enemy as
if he were facing the front square of his enemy. If the Grey Knight wins the psychic battle, the enemy
model's brain is burnt out and dies. Performing a Psychic Blast is a draining procedure. Regardless of
whether the Grey Knight wins or loses, he must immediately end his turn and can't use any further APs or
CPs until his next turn. He may still defend himself with Force and Aura cards, and in close assault.
Rapid Fire
All Marines are expertly trained at using their basic side-arm; the Bolter. While other races are able to use a
Bolter, none can do so as efficiently, or effectively as a Space Marine. Space Marines are trained to strip
and reassemble their weapons under water in the dark on zero gravity worlds. They have such an intimate
bond with their weapon that they consider it an extension of their hand rather than a foreign object.
Any Space Marine wearing Power Armour and armed with a Bolter may pay 4 APs to Rapid Fire. He is
allowed to stand and shoot his Bolter up to 6 times without moving or breaking for any other action. The
first 4 of the Rapid Fire shots are considered actions, so the Marine can be fired upon if he is standing in
enemy overwatch. However, the last 2 shots are not considered actions and can not draw any more
overwatch fire from enemies. All other normal rules and restrictions apply for the 6 shots.
A Space Marine may use CPs before he enters Rapid Fire; however, he can not use any CPs after he has
finished his Rapid Fire. Therefore he can not enter overwatch with CPs or react to an enemy during their
turn. Players need to be aware which Marines performed Rapid Fire during their turn so they don't continue
to react with CPs. Rapid Fire can only be performed during the Space Marine's turn. He can not Rapid Fire
during an enemy turn with CPs.
Terminus
Often in particularly deadly missions, a Space Marine may set Terminus if he is armed with Crack Grenades.
Taking a single grenade out, he primes it for detonation, but keeps a firm hold of it in his hand. Only when
the Space Marine is killed does the Crack Grenade detonate blowing him internally to bits and pieces. The
purpose of this is two-fold. Firstly, to prevent his body being stolen by enemies so they can perform rites of
heresy against it. Secondly, if he was killed in Close Assault then his attacker must take an immediate roll
against being hit by a Crack Grenade. If the attacker fails the roll, then it too is killed along with the Space
Marine.
A Space Marine killed by Ranged Weaponry will still detonate with a muffled blast, but it is only confined to
the square that he was standing in, presenting no immediate danger to other models around him. Setting
Terminus is a last, desperate action that a Space Marine can take to inflict agony on his enemies. No other
races can ever set Terminus. They are not as strong-willed or as determined to sell their lives with zealous
glory like a Space Marine is born and bred to do.
Space Marine Wargear
CYCLONE MISSILE LAUNCHER
The Cyclone Missile Launcher is designed to be part of a Marine’s Terminator
Armour. It provides heavy support with a variety of ways in which it can be
fired. Despite its bulk, the Cyclone does not interfere with the Marine’s normal
movement as the Terminator Armour compensates for the load with automated
load distributing systems. The Marine carries a Storm Bolter in his right hand,
and a Guidance System in his left hand that is able to very accurately acquire
targets for the Cyclone. The Marine does not have a Power Glove, so if he is
attacked in close assault he gets a –2 modifier to his roll.
The Cyclone is typically armed with 6 Crack and 6 Plasma Missiles for a broad
range of offensive and defensive options, although it can be rearmed when
purchasing from the Force List. A Cyclone can never be reloaded on the
battlefield as this requires the entire removal of the Terminator Armour. The
Marine player has to choose his targets carefully with such a limited supply of
ammunition, and to also keep track of all the missiles he has fired.
Image: Terminator with

16
Cyclone Missile Launcher.
Ice world camouflage
scheme.
Firing Quick Shots
A Marine can only fire a Quick Shot with a Crack Missile. It is not possible to fire a Quick Shot with a Plasma
Missile. When firing a Quick Shot, the Marine does not use the Cyclone’s Guidance System. He chooses to
forego accuracy for a quicker shot that can be fired when moving and turning, or even on Overwatch. The
hit rolls to destroy his target are not as good when firing a Quick Shot. If the Marine has no Crack Missiles
left he is not able to fire a Quick Shot or enter Overwatch with the Cyclone.
Cyclone on Overwatch
The Marine can choose to enter Overwatch with the Cyclone if he has at least 1 Crack Missile left. The
Marine player must state that the Overwatch is for the Cyclone, not the Storm Bolter. It is not possible for a
Marine to be on Overwatch for both weapons at the same time. In all other respects the normal rules for
Overwatch apply. A target will be fired upon with a Quick Shot if it performs an action within the Marine’s
LOS and Range of 12 squares. If the Cyclone runs out of Crack Missiles during Overwatch then the Marine
can choose to automatically continue the Overwatch onto his Storm Bolter instead. The Marine can always
voluntarily drop out of Overwatch if he chooses, and he is not forced to fire at a target more than 12
squares away while in Overwatch.
Firing Guided Shots
When firing a Guided Shot the Marine is using the Cyclone’s Guidance System to accurately track the target
for a better chance to hit. Both Crack and Plasma Missiles can be fired as Guided Shots. The Marine player
needs to state which missile he is firing and the intended target before any dice are rolled. Move and fire
options are not allowed with Guided Shots.
Firing a Salvo
The Marine can choose to fire a Salvo of at least 2 missiles up to the number he has remaining. The Salvo
can deliver a deadly hail of missiles almost instantaneously, but it is a risky option that can knock the
Marine prone from the combined reverse thrust. When firing a Salvo the Marine resolves the first missile
fired, then the second missile, and so on until he chooses not to fire any more missiles in that Salvo. He
does not need to initially declare the number of missiles or targets that he is firing in the Salvo, but he must
fire at least 2 missiles. New targets in the Marine’s LOS that are revealed as a result of an earlier missile hit
may be fired upon with later missiles. The Marine may fire more than 1 missile at the same target if it
survives an earlier strike. At the end of the Salvo, the Marine player must roll a dice and get at least the
number of missiles fired or higher or else he falls prone from the thrust blast. Example: If 4 missiles were
fired in a Salvo, the Marine player needs to roll a 4, 5, or 6 for the Marine to stay on his feet, a roll of 1, 2,
3 means that the Marine has fallen prone. Note that firing 7 missiles in a Salvo will automatically knock the
Marine prone. All rules for being prone apply, in addition the Marine can not spend any more APs or CPs
until his next turn. He is too disoriented from the shock wave to immediately react.
Malfunction
The Cyclone can only Malfunction if there is at least 1 missile remaining. If the Marine is killed by any
means, roll a dice. On a roll of 1 the Cyclone Malfunctions with a large blast. All models and features on the
section must roll to see if they are destroyed. If the Marine is involved in a round of close assault and the
result is a draw, then roll a dice. On a roll of 1, the Cyclone has been struck and Malfunctions. The Marine
and his attacker are both automatically killed, while all other models and features on the section must roll
to see if they are destroyed in the blast.

17
TARANTULA MOBILE SUPPORT WEAPON
Image: Side and Top views of a Tarantula Mobile Support Weapon with twin-linked Las-Cannons and
operating Marine.
The Tarantula is a devastating weapon that is more commonly seen on open battlefields rather than the
confined interior of Space Hulks. It provides deadly heavy support that can be almost impenetrable in
defensive positions, as such it can sometimes be useful to mount a Tarantula along key junctions when
establishing a perimeter on protracted Space Hulk incursions. The Tarantula consists of twin linked Las-
Cannons that are mounted upon a suspensor platform that has been reinforced with armour shielding to
protect both the weapon and user. It has a few modes of fire that are usually lethal to most targets,
however, the biggest drawback is the lack of free mobility within the tight corridors and junctions of the
Space Hulk. The Tarantula is capable of turning, but sometimes at a severe cost when it has restricted
space that makes it difficult for the barrels to swivel along a horizontal plane. When given an open Field of
Fire it cuts down most enemies as they step into sight, capable of rebelling wave after wave of fanatical
attacks.
All Space Marines are trained to use a Tarantula, but it can only be operated by a Marine wearing Power
Armour. The Marine plugs the Tarantula into his Power Armour and effectively becomes one with the
weapon. He has a display screen that shows all targets being tracked as well as the status of other vital
weapon systems. Even the Marine’s own bio-data can be viewed as his Power Armour acts as an
information uplink feed into the Tarantula. The Tarantula occupies 2 squares, while the Marine takes the
controls and fills a third square. All movement is effectively treated as a unit of 3 squares.
Line of Sight
The Marine always maintains his own LOS from his square as the normal rules dictate. The Tarantula does
not block LOS in any way to or from any model in the game. However, when firing with the Tarantula, the
Marine must use the Tarantula’s LOS which may or may not be different from his own. LOS for the
Tarantula is taken from both squares that the control unit and barrels occupy, NOT the square the Marine is
occupying. It has built in target acquisition systems and can sense most electromagnetic spectrums for
itself, requiring the Marine only to choose which targets to fire upon.
Fire Arc
FA for a Tarantula is based on the forward 90 degree arc from the square that the barrels occupy. Due to
the presence of barrel cameras, the Tarantula is able to shoot at targets that are only visible from the barrel
square. The Marine, or control unit do not need to have their own LOS to shoot. Similarly, there may be
targets in LOS to the Tarantula’s control square that are not in the FA of the Tarantula. These targets can
not be fired upon.
Firing a Normal Shot
A Marine can only fire the Tarantula at a target that is in its FA and LOS. The weapon can not move and
fire; however, the resulting shot is extremely deadly. The rate of fire for a Tarantula using Normal Shots is
sufficient for it to keep firing indefinitely as the huge power packs are never drained to critical levels
between shots.
Firing on Overwatch
The Tarantula can be placed on Overwatch; however, the power of each shot is decreased to compensate
for the increased rate of fire. All normal rules for Overwatch apply and the Marine can voluntarily drop the
Tarantula out of Overwatch if he chooses. The Marine does not have to fire at targets that are more than
12 squares away. The Tarantula does not jam in Overwatch as its onboard regulators maintain a steady
supply of power for the Las-Cannons to be effective.

18
Firing a Barrage
When surrounded by multiple targets within the Tarantula’s FA, the Marine may choose to fire a Barrage.
This awesome display of firepower lays down curtains of laser shots that fill the entire FA (similar to an
Assault Cannon) in a swift sweeping motion. The individual shots are not nearly as powerful as a Normal
Shot, but they blanket the FA so that every model must roll to be destroyed. The Marine player must keep
shooting each target (models and features) within the FA and roll for it to be destroyed. He can choose the
order in which the targets are hit, and newly revealed targets that are also within the FA are then subject to
being hit. If a target survives then it will block LOS to any other targets that are behind it as appropriate.
The Barrage ends when there are no more targets in the FA, or the only remaining targets have all survived
being hit. Firing a Barrage drains the Tarantula’s power to critical levels so the Marine player must place a
‘fired’ counter next to the model. At the start of the Marine’s NEXT turn, flip the counter over to
‘recharging’. The counter is removed at the start of the Space Marine’s following turn and the Tarantula can
once more resume firing.
Self Destruct
A Tarantula can Self Destruct in 3 ways. Automatic and Timer Self Destruction can be prevented if done in
time. Terminal Self Destruction is instant and final. When Self Destructing, the Tarantula affects the section
it is in. If it happens to be in 2 sections at the same time, then both sections are affected. Destroying a
Tarantula will prevent Automatic and Timer Self Destruction, if done in time.
Automatic: If the Marine operating the Tarantula is killed, the bio-sensors on the Tarantula automatically
set it for Self Destruct. The Imperium dictates that it is far better to sacrifice the weapon than to see it
turned against them in enemy hands. During the Section Effects Endphase when rolling for additional
damage on the Space Marine’s NEXT turn, the Tarantula will violently explode. However, this can be
prevented if the Marine player is able to get another Marine in Power Armour to take over the controls of
the Tarantula. The Marine must face the Tarantula from the Marine square and pay 1 AP to plug himself
into the Tarantula. This prevents the Self Destruct sequence. The new Marine must put aside his previously
carried personal weapons in the storage clip and can then use the Tarantula as normal.
Timer: A Marine can unplug himself from the Tarantula at the cost of 2 APs which then starts the Automatic
Self Destruct sequence. The Marine player can then take his stored weapon and make a hasty retreat from
the impending blast. As with Automatic Self Destruct the Tarantula will explode at the end of the Space
Marine’s NEXT turn. The Marine player can always try and reverse this if he is able to have any Marine
(including the original Marine) plug himself into the Tarantula at the cost of 1 AP to take control again. This
type of Self Destruction is favoured if the Marine is about to be overrun by the enemy but he has the
possibility of escaping while the enemy are caught in the blast. Note that Marines may swap control of the
Tarantula, but when they do so the Timer is activated, so they can’t waste valuable time in the exchange of
controls otherwise the weapon will detonate with certain destruction!
Terminal: A Marine can set the Tarantula to Self Destruct Terminally while he is still plugged in for the cost
of 1 AP. This desperate act is usually performed if he is about to be overrun with numerous enemies and no
chance for escape. The effect is instantaneous. The Marine may also activate Terminal Self Destruct instead
of defending when he is about to be close assaulted for 0 APs, but he must have LOS to the enemy that is
attacking him. He must announce this before any dice are rolled.
Destroying the Tarantula
The Tarantula can be destroyed if either square that it occupies is hit. It is not destroyed if the Marine is
killed, as this merely puts it into Automatic Self Destruct sequence. The Tarantula has its own entry on the
Ranged Weapons table to be destroyed. If Blast is cast on the Tarantula then it is destroyed and it will act
as a feature for the Blast effect. The controlling Marine will be killed if he is caught in the Blast. A close
assault of 6 on either square will also Destroy the Tarantula. A Destroyed Tarantula will not Self Destruct in
any way, even if it was on Self Destruct before it was Destroyed. A Destroyed Tarantula will not otherwise
harm the Marine, but he will lose his original personal weapons that were stored on the Tarantula. From
then on the Marine is unarmed, unless he has been equipped with any Grenades.
APs, Effects on the Marine, Hybrids, Chaos Marines
A Marine operating the Tarantula has 4 APs per turn. The Tarantula itself does not get any APs. CPs can be
spent on the Marine if desired and as required.
When purchased from the Force List, the Tarantula comes with a Power Armoured Marine to operate it.
This Marine has a Bolter that is stored in the weapons clip built into the Tarantula. If the Marine abandons
the Tarantula for Self Destruction then he can take the Bolter with him. Otherwise his Bolter is lost if the
Tarantula is Destroyed or Self Destructed for any other reason.
The Marine operating the Tarantula can unplug himself for 2 APs and take his Bolter to use as normal, but
he must plug himself back in for 1 AP before the Self Destruct sequence detonates.
19
A Marine can not be the target of a ranged attack if he is fired upon from the Tarantula’s FA. He is too well
shielded by the heavily plated control console to be hit. The Tarantula must first be destroyed before the
Marine can be hit from the Tarantula’s FA. Of course, any attack made at him from outside the FA is treated
as normal as he can not gain the benefit of protection from the Tarantula. Section Effects include both the
Marine and Tarantula where appropriate, and each must roll separately. If a Section Effect targets the
Marine only, then the Tarantula is safe and vice versa. However, if the Marine is killed, then the Tarantula
will initiate Automatic Self Destruct as per normal.
A Marine operating a Tarantula can barely defend himself in close assault. If he is close assaulted while
operating (plugged into) a Tarantula then roll a single dice. The Marine is Automatically killed on a roll of 1
to 5. If he rolls a 6, then he has just managed to fend off the attack.
Hybrids can not use a Tarantula. They may be able to enter the control square if it is vacant, but the Self
Destruct sequence will already be operating. Chaos Marines similarly can not use the Tarantula. Though
they are familiar with how to operate one, they do not have the codes required to plug themselves in and
stop the Self Destruct sequence.
Moving the Tarantula
The Tarantula can move into a front square for 1 AP, and into a back square for 2 APs. All squares that it
moves into must be vacant, and there must be a clear path along each of the 3 moving squares. The
Tarantula can move into a side square for 3APs, as long as all the new squares are vacant.
Turning a Tarantula 90 degrees when in a 3 square wide room or
corridor section costs 1 AP, and is performed as a pivot about the
centre square. However, the whole block of 9 squares must be
vacant for this to take place.
Turning a Tarantula in a cross-road corridor of 5 squares costs 2
APs when the control square is used as a pivot. All 5 squares must
be vacant for this to take place.
Turning a Tarantula in a T-junction corridor of 4 squares costs 3 APs after first paying 1
AP to ‘move’ the barrel square into the wall. In reality the barrels are inclined at a sharp
angle to allow the Tarantula to complete the turn. The control square is once again used
as the pivot. All the squares that the Tarantula moves into must be vacant. A Tarantula
can not end its move with the barrel square ‘in the wall’.
This type of turn must be taken as two consecutive actions. Even CPs can't be used on
another Marine to interrupt the turning sequence.
Turning a Tarantula in an L-shaped corner of 3
squares costs 4 APs after first paying 1 AP to
‘move’ the barrel square into the wall. The control
square is once again used as the pivot. All the
squares that the Tarantula moves into must be
vacant. A Tarantula can not end its move with the
barrel square ‘in the wall’. Note that a Tarantula
can only negotiate this type of corner by using at
least 1 CP, as it will require 5 APs to complete the
move.
This type of turn must be taken as two
consecutive actions. Even CPs can't be used on
another Marine to interrupt the turning sequence.
If a square that the Tarantula is not moving into is blocked in one of the previous corridor sections, then
that section is treated as though it were a corridor section of one type worse than it is.
20
Example: If a Tarantula is approaching a cross-road section that has a door ahead and wants to turn right,
then it must pay 1 AP to move the barrel ‘into’ the door square, then 3 APs just as if it were cornering a t-
section. However, if the door is open, then it only pays 2 APs once it has moved the control square into the
centre of the cross-road corridor section.
MARINE TURN SEQUENCE
• Roll for Command Points
• Draw new Psychic Attack Cards
• Discard Psychic Attack Cards
• Use Action Points (Main Phase)
• Roll to move Vortices
• Roll for additional Section Effect damage
• Roll for Decay of Psychic Effects
• Dispersal of Psychic Effects
• Remove next player's Overwatch counters and Section Effect Markers
MUTANT RULES
Even amongst the genetic diversity of Tyranids and Genestealers, the Hive Ships continue to adapt and
refine their species. They sometimes produce mutant versions of stock creatures in an attempt to perfect
their combat abilities.
Many mutations are flawed and the creatures are wiped out in battle, or even devoured by the Hive Ship.
However, some mutations prove to be successful and the mutated creatures are encountered by other
races where they wreak havoc during battle.
The purpose of this page is to showcase some mutant Tyranid and Genestealer creatures, and to provide
combat statistics for them to be used in Space Hulk games.
You can adapt the ideas given here to include your own mutated creatures for your games.
Mutant Tyranid Warrior
Departing from the standard six limb construction, this Tyranid Warrior has eight limbs.
There are six arms; two support a Deathspitter, two wield Boneswords, while the
remaining two are standard Tyranid Claws.
APs: 6 as Tyranid Warrior
Hit As: Tyranid Warrior
Close Assault: Front = 3d + 3 with 2 Parries; Left or Right = 2d + 2 with 1 Parry; Rear =
2d + 1
Notes: Treat as a Tyranid Warrior in all respects (CPs, etc). Armed with two Boneswords
and a Deathspitter.
Mutant Genestealer
This mutated Genestealer has an extra two arms that wield Boneswords.
It also has an extended torso comprising of two standard Genestealer
carapaces. This is a viscious Genestealer that can bust its way through
most enemies in close assault.
APs: 6 as Genestealer
Hit As: Genestealer
Close Assault: Front = 4d + 2 with 2 Parries; Left or Right = 3d + 1 with
1 Parry; Rear = 3d
Notes: Treat as a Genestealer in all respects. Can be introduced via a
lettered blip. Armed with two Boneswords.
Hybrid Genestealer-Tyranid
Comprised of a Genestealer torso and Tyranid head, this creature is also armed with a
Deathspitter. It seems that the Hive Ship may have intended for a smaller creature
designed to carry a Deathspitter, with the intelligence of a Tyranid.
APs: 6 as Genestealer
Hit As: Genestealer
Close Assault: Front = 2d; Left or Right = d; Rear = d
Notes: Treat as a Tyranid with respects to CPs as this creature has the mind of a Tyranid,
even though it is pyhsically more Genestealer. Armed with a Deathspitter.
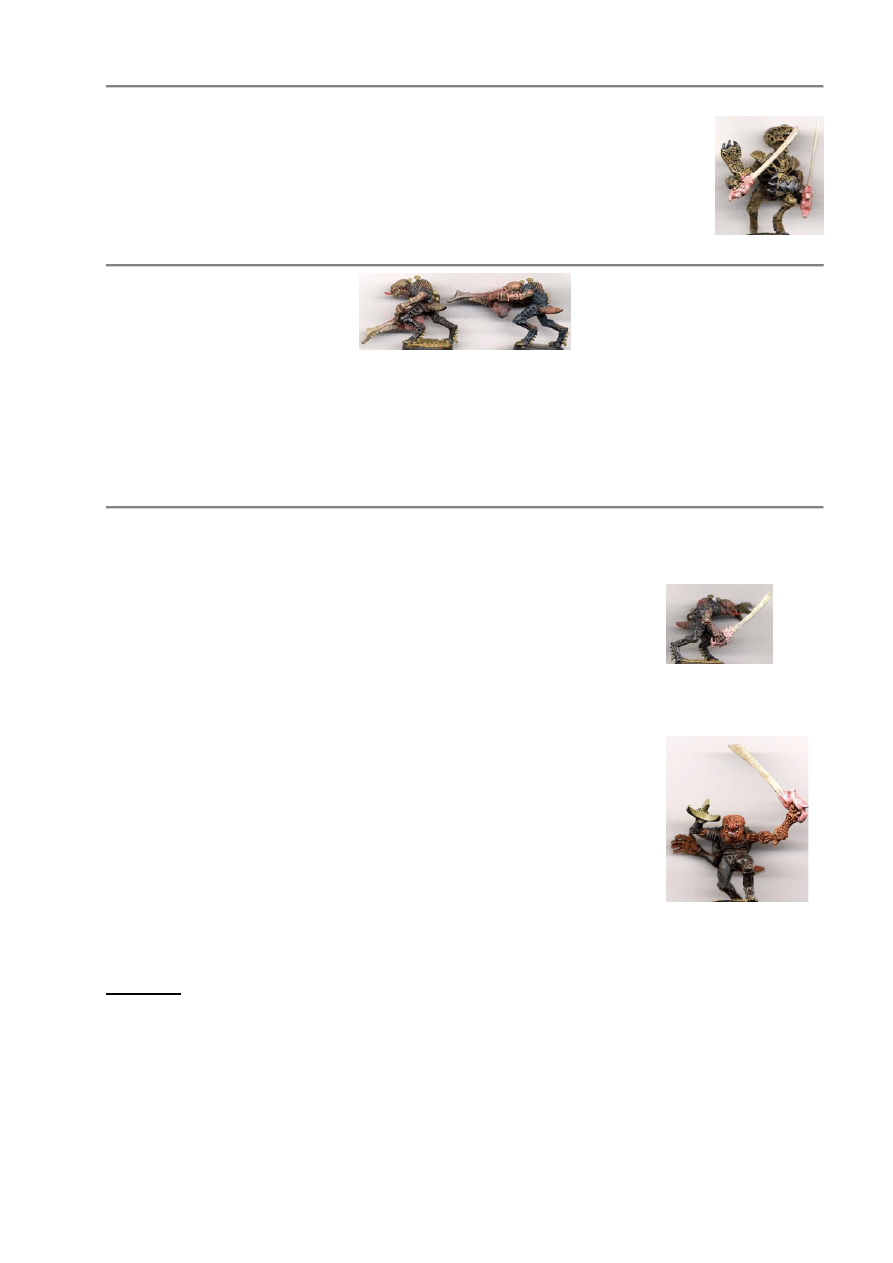
21
Hybrid Tyranid-Genestealer
Similar to the previous design; however, this creature has Tyranid Claws and two
Boneswords making it stronger in close assault.
APs: 6 as Genestealer
Hit As: Genestealer
Close Assault: Front = 3d + 2 with 2 Parries; Left or Right = 2d + 1 with 1 Parry; Rear =
2d
Notes: Treat as a Tyranid with respects to CPs as this creature has the mind of a Tyranid.
Armed with two Boneswords.
Genestealers with Deathspitters
These two Genestealers have both mutated so they are armed only with Deathspitters. Lacking the fierce
close assault abilities of other Purestrain Genestealers, they provide some heavy firepower for a brood
caught in a firefight against superior weaponry.
APs: 6 as Genestealer
Hit As: Genestealer
Close Assault: Front = d; Left or Right = d; Rear = d
Notes: Treat as a Genestealer in all respects. Armed with a Deathspitter.
Genestealers with Boneswords
These Genestealers have mutated so that a pair of arms on one side of their
body have been replaced with a single arm weilding a Bonesword. This is a rare
variety of mutation, and generally it does not produce Genestealers who are any
more combat effective than their normal Purestrain Brood. They have been
reported attacking heavily fortified areas where the Boneswords are capable of
smashing through barracades and other defensive shields even faster than
ordinary brute force of claw.
APs: 6 as Genestealer
Hit As: Genestealer
Close Assault: Front = 2d + 1 with 1 Parry; Left = 2d; Right = d + 1 with 1
Parry; Rear = 2d
Close Assault: Front = 2d + 1 with 1 Parry; Left = d + 1 with 1 Parry; Right =
2d; Rear = 2d
Notes: Treat both as Genestealers in all respects. Armed with a single
Bonesword each, along with their natural weaponry.
NECRONS
The Necrons, an alien race ancient beyond imagining, are awakening from their sixty-million year dormacy
to plauge the living once more. Thousands of immortal, soulless warriors have risen from dusty stasis-
tombs, intent on preying on the teeming spieces of the galaxy. Their miraculous technology was far in
advance of any contemporary equivalent long before the Eldar, reckoned the oldest among races, had even
come into existence. Although the Imperium of Mankind has only recently acknowledged the Necron's
reappearance, their monstrous Gods feasted upon collosal stars before the planets themselves were born.
Silent mechanical warriors that specialise in terror attacks, the Necrons prey on every other race to use
them as cattle for their Gods and masters. Humanity must prepare itself to battle the arcane powers that
Necrons possess, with their efficient weapons and phase shift technology, they are an elusive opponent
from another time, and another world.

22
Necrons are somewhat slow and steady on the battle field. They move suredly, but never hurridly. Necrons
never gain or use CPs in any way. They merely continue their ghostly march down the halls and rooms of
their tombs, or even Space Hulks. All Necrons are immune to any form of Terror.
Self Repair
Many Necrons possess the ability to Self Repair even some of the most horrendous battle field damage.
Their skin and skeletal bone structure is comprised of a living metal that meshes wounds together and
keeps the Necron alive to fight later rounds of battle. Countless enemy squads have stood over charred
piles of Necron Warriors only to watch them Self Repair and stand up again to fight! Only the surest of
firepower will sufficiently blast them into fragments from which ressurection is impossible.
Ranged Weapons marked with (NR - No Repair) on the Ranged Weapons Table do not allow a Necron to
Self Repair. Hits from these weapons are enough to prevent the Necron from reforming. Similarly, if a
Necron is killed in Close Assault by a weapon or creature that has (NR) on the Close Assault Table, then it
can not Self Repair. These Close Assault attacks are sufficient to rip apart a Necron beyond Self repair. All
automatic kill weapons are considered to be (NR) weapons.
When a Necron with Self Repair is killed from an attack that does not prevent Self Repair, place the Necron
model face down, off the board, near the square that it was killed. At the start of the next Necron Turn
each Necron that was killed is checked to see if it Self Repairs. The Necron must be within six squares of
the same type of Necron that is alive, or, it must be within 12 squares of any Tomb Spyder. The Necron
player then rolls a dice and must score equal to or higher than its Self Repair roll to live again. If the Necron
makes the Self Repair roll then turn it face up to represent it regenerating. Necrons that are face up can not
be attacked with a target weapon, or in close assault, as they are still 'off the board' and are not considered
as being prone. Regenerating Necrons are not considered to be alive for any other fresh Necrons who are
killed. At the start of the next Necron turn, all regenerating Necrons are considered to be alive again, and
may return to play from the square that they were killed. If this square is blocked, then the Necron may
return to play in an adjacent square if available, otherwise it may not return to play and is destroyed. A
Necron will immediately suffer from the effects of any section effect markers that are in play as it returns to
the board. Once a Necron has returned to play it is considered prone, and must pay the appropriate
amount of APs to stand up and continue its turn as normal. All regenerating Necrons are placed prone on
the board before the Necron player starts his turn.
If while a Necron is off the board as dead or regenerating, and the section the Necron is in takes a hit, then
the Necron also suffers from the effects. Any 'off the board' Necron will automatically take another hit. Face
down Necrons are destroyed, while face up Necrons are either destroyed, or turned face down depending if
the weapon was a (NR) effect or not. Repeated heavy fire is one sure way to snuff out the Necron's ability
to Self Repair. Any Vortex that hits a section with 'off the board' Necrons in it will automatically destroy
them all.
Phase Out
If the Necron Force is ever reduced to 25% or less of its original number, then it mysteriously Phases Out
leaving ghostly smoke in its wake. The opposing force will usually score an immediate victory (depending
on the mission criteria) as the Necrons vanish into thin air. Tomb Spyders and Pariahs are not counted as
part of the Necron Force for the Phase Out rule to take effect. The Phase Out test is taken at the start of
the Necron Turn before any Self Repair rolls have been made, any 'off the board' Necrons are considered
killed for the purposes of the Phase Out rule, even those that are ready to return to play.
Introducing Necron Warriors
Warriors make up the core of a Necron Force, and are used as front line troops in assaults. Although they
do not move very fast and they are slow with close assault blows, they make no sound, and eerily march at
a steady pace with only the echoes of their footsteps preceding their arrival. They are reasonably well
armoured, and wield the deadly Gauss Flayer which is capable of destroying any target that it fires upon.
However, probably the most unnerving aspect of their composition is their ability to stand up moments after
receiving a hit that would kill most creatures with flesh and blood.
Necron Warriors have 4 APs, and need to roll a 4 for their Self Repair roll.
Introducing Immortals
Immortals were among the first servants of their gods to give themselves over to eternal life. Casting off
their flesh, and their souls, they are giants with gleaming bodies that wield the lethal Gauss Blaster.
Tougher and stronger than Warriors, Immortals are elite troops in a Necron Force, and they are used with
precision in most attacks.
Immortals have 4 APs, and need to roll a 3 for their Self Repair roll.

23
Introducing Flayed Ones
Flayed Ones are twisted and ghoulish terrors of the night. Thin and wiry, they adorn themselves with the
wet hides of their victims as a sign of derision for the flesh that they once cast off from themselves. They
attack with long taloned claws that can strip the skin from their prey in seconds. They are nightmarish
creatures of horror that cause revulsion in Close Assault. Any enemy model that can be Struck with Terror
which is in Close Assault with a Flayed One must subtract 1 from its Close Assault roll. The model is not
actually Struck with Terror, but it is distracted by the gruesome visage before it. Models that are not
affected by Terror do not suffer from this Close Assault penalty.
Flayed Ones have 4 APs, and need to roll a 4 for their Self Repair roll.
Introducing the Necron Lord
The Necron Lord not only leads the Warriors into battle, it is also the focus of all the mysterious Necron
energy that shimmers about a battlefield. Glowing fires of soulless fury burns in its eye sockets as they
radiate their endless millenia of power about them. They are often garbed in the crumbling attire of their
former lives as a symbol of mockery to all creatures that bleed from cut flesh. Necron Lords are capable
warriors that wield a Warscythe, and are often equipped with an array of unforgiving wargear that is
ruthlessly efficient, allowing the Necron Lord to carry out his murderous plans with ease.
The Necron Lord has 6 APs, and needs to roll a 3 for his Self Repair roll. Note that the Necron Lord can
attempt a Self Repair roll regardless of how far it is from any other Necron.
Introducing Wraiths
Wraiths are floating killers that coexist in the real and immaterial world. They shift in and out of phase with
their flittering movements and are able to drift along a corridor faster than most other Necrons. Their
spines are extremely elongated and fluid, enabling them to strike out in close assault and deliver fatal
shocks with their claws and tail. Wraiths do not use Ranged Weaponry as they are built to deliver extreme
pain with their hands that are constructed sharper than scalpels.
Wraiths are able to move through closed doors, bulkheads, crates, rubble, and other features, with no
movement penalty. They do not have LOS through a closed door until they have moved through it. Wraiths
can not move through a square that is occupied by another model (friendly or foe), and they can not end
their turn being 'inside' a solid object. They can move past a Proximity Plasma Grenade without detonating
it, through a Power Field Generator, and they can move through a Miasma. Other section effects block a
Wraith's movement as normal - a Wraith can not move into a Flamed section, Vortex, Stasis, etc.
Wraiths have 6 APs, and need to roll a 3 for their Self Repair roll.
Phase Shifting
Wraiths are able to aviod many lethal attacks aimed at them as they Phase in and out of realspace. When a
Wraith is hit with a Ranged Weapon, the firing model must roll to score another hit to check if the shot
actually killed the Wraith while it was Phased in the material plane. This second hit roll is not actually a
shot, it does not use extra ammunition, and it does not count as an action. In addition, the second hit roll
does not Jam Overwatch or Malfunction any weapon. The second hit roll purely determines if the original
shot actually killed the Wraith. If the original shot misses the Wraith then there is no need for the second
hit roll. A model firing at a Wraith can take as many shots as it likes, but it must always make a second hit
roll for shots that hit to determine if the Wraith is killed. Naturally, more powerful weapons are likely to kill
a Wraith as opposed to weaker weapons that may hit a Wraith, but not actually kill it.
Weapons and effects that automatically kill a Wraith do not need a second hit roll. They hit the first time.
A Wraith's ability to Phase Shift also works during Close Assault. If a Wraith loses a Close Assault, it may
have Phased out just in time to avoid the killing blows. Both models roll for a second round of Close Assault
to determine if the Wraith was able to Phase out. If the Wraith loses again, then it is killed. If the second
round of Close Assault is drawn, or the Wraith wins, then it managed to Phase out and avoid being killed.
The second round of Close Assault is not actually a combat as such, it is only used to determine if the
Wraith was actually killed from its previous loss. The second round does not count as an action, and the
opponent can not be defeated in any way during the mock second round of Close Assault. If the original
Close Assault was drawn, or the Wraith won, then naturally there is no need for the second round of Close
Assault.
A Wraith will be killed in Close Assault (no need for a second round) if it loses to a Patriarch, Hybrid Psyker,
Hive Tyrant, or Zoanthrope (all Psychic), or if a model armed with a Force Weapon channels some psi
energy into the blow. Psychic opponents are able to reach into the immaterial world and sever the Wraith's
life energy. Note that a model with a Force Weapon must have augmented the original blow with some psi
energy to guarantee a kill against the Wraith, otherwise it will have to roll for a second round to check that
the Wraith did not Phase out. Augmented psi energy is able to slice a Wraith apart.

24
Wraiths are elusive creatures that are able to cheat death many times over. It is particularly demoralising
for enemy troops to kill a Wraith and then watch it regenerate minutes later to stalk them once more!
Introducing Pariahs
Pariahs are elite Necron troopers who are able to interfere with enemy Psykers' abilities to effectively
channel from the warp. A Pariah is armed with a Warscythe making it a very competent opponent in close
assault and ranged firing.
However, a Pariah is at its best when it is confronted with enemy Psykers. A Pariah is considered to have an
infinite supply of Force and Aura cards at its disposal that it may use (within the normal psychic rules)
against any enemy psychic effect that targets it. This effectively means that a Pariah will automatically
nullify an enemy psychic attack that is directed towards it as the casting model will eventually run out of
Force cards to reinforce its own attack. In other words, a Pariah is immune to all psychic effects as it
automatically dispels the effect. In addition a Pariah that walks into an existing section effect (if the effect
does not block movement) will dispel the effect as it walks into the section. Enemy psykers feel the
disturbing presence of a Pariah and know that they can not affect it with their powers. They know that it is
futile to waste their powers on a Pariah as they will be anulled by the skeletal horror. Note that a Pariah can
not use the Aura ability to prevent death by normal weapons, it can only nullify psychic effects.
Furthermore, a Pariah can use this nullifying ability even if a Zoanthrope is using a Psychic Scream to
silence all other Psykers. It is important to note that a Pariah IS NOT psychic, it is instead able to nullify all
psychic attacks against it. In addition Force weapons can not channel psychic power when used against a
Pariah. They may be used normally as a close assault weapon as they are still powerful weapons in their
own right, but they can't take advantage of the psychic might that can be pumped through them.
Finally, when an enemy Psyker first gains LOS to a Pariah it is Struck with Terror. Psykers are not
indominable, and even the most powerful feel a sick sense of loss when confronted with a creature that
they can not affect. The Psyker can only defend itself in close assault or defend itself with Force or Aura
cards until its next turn. It loses all remaining APs and can not use CPs, just as the normal rules for Striking
Terror dictate. Even the mightiest of Grey Knights, and the most bloated Patriarchs will stop at the first
sight of a Pariah. They find it disconcerting that a creature with no presence in the warp can exist, and are
momentarily shaken. Enemy Psykers that survive a turn being Struck with Terror will not be affected for the
rest of the mission/campaign as they manage to keep their fears in check.
Unlike other Necrons, Pariahs can not Self Repair. Once they are killed, they are dead and take no further
part in the mission. They are not counted as part of the Necron force for the Phase Out rule to take effect,
but they will Phase Out with the rest of the force if it does so. Example: A Necron force initially consists of
16 Warriors, 4 Immortals, and 4 Pariahs. Even though there are 24 models, the Phase Out rule works on
25% of 20 as the Pariahs are excluded. At the start of each Necron turn if there are 5 or less
Warriors/Immortals (regardless of the number of Pariahs remaining), then the whole force will Phase Out
and probably lose the mission.
Introducing Destroyers
Destroyers use anti-gravity technology allowing them to drift across a battlefield providing long range heavy
support. A Destroyer is basically the torso of a Warrior that has been fused to a heavily armoured skimmer
platform. The platform supports a Gauss Cannon for often needed massive firepower against larger enemy
targets. Destroyers are able to withstand greater punishment from targetted weapons; however, they are
not as well shielded against section effect weapons.
A Destroyer occupies four squares on the Space Hulk board sections, just as a Chaos Dreadnought does.
This means that it can not travel down narrow corridors that are only one square wide. It must stay in the
wider corridor sections or rooms where it has some freedom of movement. This is important to consider
when playing missions that require the Necron force to enter play using only one square wide entry
passages, as the Destroyer will not be able to enter the board!
A Destroyer has LOS from all of its four side squares, and its Fire Arc projects in a 90 degree arc from the
four squares in front of it, just as a Chaos Dreadnought does. A Destroyer can be seen or targetted by an
enemy if any of its four squares can be seen or targetted.
Destroyers are not slowed by rubble on the Space Hulk. Their ability to hover above the surface of the Hulk
allows them to drift over rubble without hinderance to their movement, but they are not allowed to drift
over any other model at all whether they are friendly, foe, or prone.
Heavy Destroyers are similar in all respects to a Destroyer. The only significant difference is that they are
armed with a Heavy Gauss Cannon. This weapon is extremely powerful, and can bring down small buildings
with ease. It is not commonly found in tight confines as it has a relatively slow rate of fire due to the
massive amounts of energy that it withdraws from the skimmer platform to recharge it.

25
Both Destroyers and Heavy Destroyers have 6 APs, and they need to roll a 3 for their Self Repair roll.
NECRON WARGEAR
Disruption Field
Disruption Fields allow the claws of a Necron to grasp and pulse with an unnatural energy. Their claws are
able to seemingly warp the armour and skin of all that they touch, and tear apart the defences of an enemy
during Close Assault. Disruption Fields give Necrons some useful power in Close Assault combat that
compensates for their lack of speed. Flayed Ones in particular are able to benefit from the extra arcane
might of the Disruption Field.
Gauss Flayer
The Gauss Flayer is the most basic of Gauss weaponry. It is the standard weapon used by the Necron
Warriors, being very reliable and ancient in its design. When fired it produces a focussed bipolar magnetic
field, and anything that the weapon is targetted at is pulled towards the gun on a subatomic level. Simple
combat attachments on the gun aid in close assault, but the true power of the weapon is the fact that it can
destroy most medium to sized targets with one hit.
Gauss Blaster
The Gauss Blaster has twin linear accelerator chambers, giving the weapon a deadlier punch than the
standard Gauss Flayer. The Blaster is usually carried by elite troops who use it with devastating effect. As
well as being the oldest technology in the galaxy, it is also the most reliable; a Gauss Blaster will never Jam
in Overwatch.
Gauss Cannon
Usually mounted on Destroyers, the Gauss Cannon is a heavy support weapon that is capable of ripping
apart enemy vehicles, and armoured columns. It is a weapon that is not often seen on Space Hulks, but it is
sometimes used to guard vital chambers within stasis tombs. A Gauss Cannon does not Jam in Overwatch.
Heavy Gauss Cannon
The Heavy Gauss Cannon is the pinnacle of Gauss weaponry. It can only be mounted on Heavy Destroyers
as they provide the ultimate firepower against any enemies daring to stand before a Necron force. The
Heavy Gauss Cannon does not Jam in Overwatch as it is far more efficient than the weaponry of the flesh
and blood races.
Nightmare Shroud
Necron Lords sometimes wear Nightmare Shrouds to summon unspeakable horrors into their enemies'
minds. They can activate the Nightmare Shroud for 1 AP during their turn, and the effect lasts until the end
of their turn. Any model that gains LOS to the Necron Lord will be struck with Terror as per the Terror
rules, lasting until the start of the model's next turn. The Nightmare Shroud can never be activated during
an enemy's turn for any reason as the Lord needs to generate the initial propogation of wavelike dread that
eminates from the Shroud.
Phase Shifter
A Necron Lord may possess a Phase Shifter which works exactly the same way as a Wraith's ability to Phase
Shift. The Necron Lord seems hazy and indistinct, as though he were not completely corporeal. Ranged
Weapons must make a second hit roll to see if they kill the Lord, just as a Wraith. Enemies in Close Assault
must roll for a mock second round to see if they kill the Lord, again, just as a Wraith. The Phase Shifter
does not give a Necron Lord the ability to move through solid objects like a Wraith. It is a protective device
against all types of attacks only.
Resurrection Orb

26
The Necron Lord is able to augment the Self Repair systems of all Necrons within 6 squares of him
(including himself). Any 'off the board' Necrons within range of the Lord may attempt Self Repair rolls even
if they were destroyed by a Weapon labelled as NR, or by a Close Assault enemy with an NR ability. The
Resurrection Orb can be a powerful tool to help the Lord regenerate his fallen Warriors even after they
have been subjected to catastrophic damage. If the Lord is destroyed and fails to Self Repair then the Orb
becomes useless. A Vortex will still prevent a Necron from trying to Self Repair as it leaves no remains to
regenerate.
Veil Of Darkness
The Necron Lord can summon a dark etheral breeze that twists about him, then envelopes him, and
teleports him to any other square within a range of 12 squares. He can teleport through any section effect
at all, including psychic section effects, and even a Miasma. The Lord can only teleport himself and the
effect is immediate. However, the cost of such rapid transportation is high. If the Necron Lord uses the Veil
Of Darkness then he can do nothing else for his turn. It must be the only action he takes, effectively costing
all of his APs. If the Necron Lord has taken any single prior action then he can not use the Veil Of Darkness.
Warscythe
The Warscythe is built for use in Close Assault where its blade is able to phase through real space and
penetrate into the armour of a vehicle. Warscythes can quite easily shear the legs from a Dreadnought, or
cleave Terminator Armour in two. In addition the Warscythe also has a Gauss Blaster built into the shaft!
Only powerful Necron characters use a Warscythe as it requires a higher level of skill to wield with full
effect. The Warscythe uses the Gauss Blaster statistics on the Ranged Weapons Table. It does not Jam in
Overwatch as it is by far a more superior weapon than most.
NECRON TURN SEQUENCE
• Check for Phase Out
• Return regenerated models to the board prone
• Make Self Repair rolls for each face down Necron
• Use Action Points (Main Phase)
• Roll to move Vortices
• Roll for additional Section Effect damage
• Roll for Decay of Psychic Effects
• Roll for Dispersal of Psychic Effects
• Remove next player's Overwatch counters and Section Effect Markers
ORK RULES
Orks are mostly a wild and unpredictable race. They are abundant in many parts of the galaxy and often
raid drifting Space Hulks for some plunder. They have a warlike nature that can see them fighting against
old friends, and even themselves. Orks share only one common view about life as the Space Marines do –
that Tyranids are an abomination to life itself. Even Orks are disgusted at how the Tyranids capture their
clan brothers and strip their genetic stocks for spare parts. Many Orks have died fighting the Tyranid
invasion, and many more are ready to die to save their own unique Orky culture from extinction.
Gretchin are closely related to Orks, and they usually follow their Ork Bosses around in packs with heroic
worship. Orks encourage their Gretchin with the subtlety of a slave master, and they are known to cheer
the Gretchin on in the front lines of battle to absorb the first rounds of enemy fire.
All Orks and Gretchin have 5 APs each per turn. They are not able to use CPs.
Cheering On!
Orks and Gretchin are able to cheer each other on during battle. They can feed from the morale that their
mob creates and perform extra actions that allow them to boast of heroic or stupid actions after the combat
has ceased. If an Ork or Gretchin model has LOS at all times to another Ork or Gretchin model, then it may
be able to cheer that model on. The model that is Cheering On is not allowed to spend any APs at all.
However, because of the extra motivation and effort that it puts in to supporting its battle brother, the Ork
or Gretchin model that is being Cheered On gains an extra 2 APs. An Ork or Gretchin model can be Cheered
On by many other Ork or Gretchin, provided that they are always in LOS at all times. Cheering On a
Gretchin Bomber’s Suicidal Run is not possible, as the Gretchin is sufficiently pumped up for its final few
seconds of life.
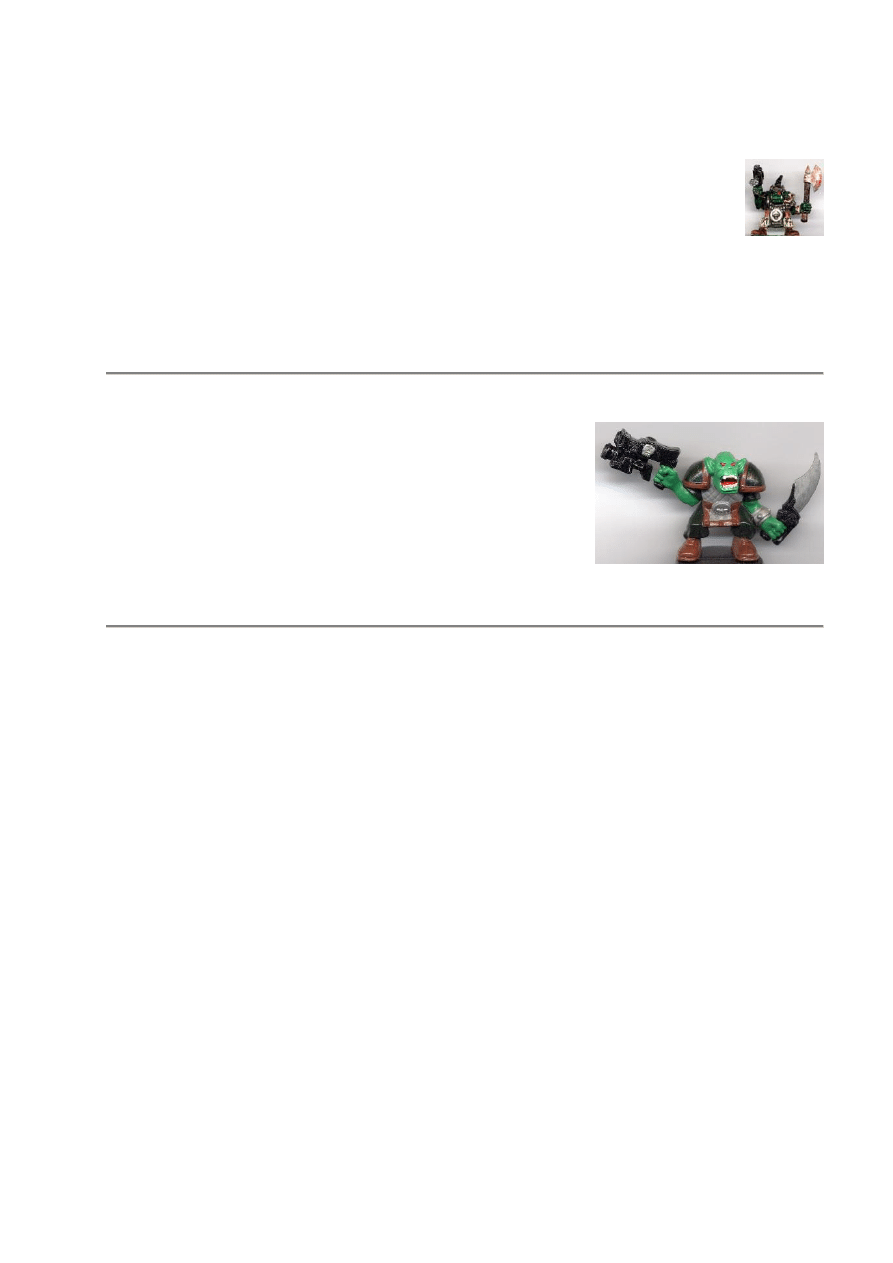
27
Introducing Ork Boyz
Orks usually call themselves Boyz. Boyz are the troops who live to plunder and
fight, and drink, and boast, and drive fast. Many are armed with Bolt Pistols and a
close assault blade, while others prefer bigger, louder, heavy weapons. They
usually have a few grenades at their disposal for use in tight situations. The Boyz
are the backbone of an Ork force, and are also the masters of the Gretchin. Each
mob of Boyz will have an even larger mob of Gretchin surrounding them.
Boyz have naturally tougher hides and combined with their flak armour, they prove
annoyingly difficult to kill. The Boyz brutal nature in savage hand to hand fighting
gives them a basic close assault factor of d – 2 unless they are holding a combat
blade of some type.
Image: An Ork Boy
armed with a Bolt
Pistol and Close Assault
Blade.
Introducing Ork Nobz
Some Orks aspire to be leaders amongst the mob. They come
to power by any and all means necessary to take command
over a small crew of Boyz. These Nobz are usually somewhat
smarter and a lot tougher than their rivals. Nobz often get first
choice of the loot, and are usually armed with Kombi Weapons
that incorporate Orkish ingenuity and cunning. They are more
capable in close assault, and can never be struck with Terror.
They are the Sergeants of Orkish armies, though they do value
self preservation in high regard as opposed to self sacrifice.
Image: An Ork Nob armed with a Kombi
Bolter - Grenade Launcher and Close
Assault Sword.
Introducing Weirdboyz
Ork Weirdboyz are psykers. They are often dragged along into battle by the Nobz to provide psychic
support. Most Weirdboyz are afraid of their power and are very reluctant to use it. They need to be
escorted by Minderz (see below) who encourage the Weirdboy to use his powers. Weirdboyz can be of any
psychic level, but even 4
th
Level mastery does not give them any better control over their own powers.
At the start of the game roll a dice and deal that many psychic cards to the Ork player. He can only use the
cards if a Weirdboy is converted in play. At the start of EACH turn that a Weirdboy is in play, the Ork player
must discard his entire hand, and then roll a dice to see how many more cards he is able to draw. Random
fate is often the key to a Weirdboyz’ power, so every turn he will never be sure how many cards he has, or
what they will be.
If the Ork player has more than one Weirdboy in play, then add 1 to the dice roll to see how many cards he
is dealt each turn. The Weirdboyz then share the cards as Hybrids and Space Marines normally do.
Psychic Power
The Weirdboy is able to use two Psychic Powers.
Brain Bursta
Range: 8
Target: Any model in LOS.
Cost: 1 AP and all remaining Psychic Attack Cards.
Effect: The Weirdboy releases massive amounts of raw warp energy focused straight at the target model.
The target is automatically destroyed, unless it can play an Aura card. Force cards and Aegis Hoods are not
enough to stop a Brain Bursta attack. Once the attack is resolved, the Ork player must roll a dice. If the
result is a 1, then his Weirdboyz’ head explodes as a side effect of the raw warp material that was
concentrated through him. Brain Bursta is unstoppable.
Waaaaaaaagh!

28
Range: The entire map, except for any sections that may be isolated by a Miasma.
Target: All Orks and Gretchin, except for the casting Weirdboy.
Cost: 7 APs and all remaining Psychic Attack Cards.
Effect: The Weirdboy is an accumulator of all of the latent psychic energy of the Boyz. As they are whipped
into battle frenzy, their psychic energy grows stronger, and the Weirdboy froths with pent up Orky power.
If a Weirdboy is Cheered On, he can cast the Waaaaaaaagh across the entire Hulk releasing his power to
touch all of his battle brothers. Until the start of their next turn all Orks and Gretchin gain +1 on all rolls to
hit with ranged weaponry, +1 on all close assault rolls, -1 to be hit by ranged weapon fire, -1 to be hit by
psychic attacks, +1 AP each, and finally, they are immune to all effects of Terror. The Waaaaaaaagh can
only be cast ONCE per game regardless of how many Weirboyz are in the Ork Force. The Waaaaaaaagh is a
gross display of Orky power and can prove to be a deciding factor in cut throat missions.
Introducing Minderz
Minderz have no special powers as such, but they have the responsibility of taking care of the Weirdboy.
Many Weirdboyz grow up with the same pair of Minderz and form a special relationship with them. Minderz
are considered as normal Boyz on the Close Assault Table, armed with their respective weapons.
A Weirdboy must ALWAYS have LOS to a Minder, or be in the LOS of a Minder for the Weirdboy to function
as normal. If the Weirdboy is not able to see, or be seen by a Minder at the end of the Ork turn, he will
panic. The Weirdboy may complete his current turn as normal; however, at the start of the next turn the
Ork player must roll a dice and consult the table.
Dice Roll
Out of Control Effect for the Weirdboy
1
The Weirdboy stands still and does nothing. He only defends himself from attacks.
2
The Weirdboy will only spend his APs on moving to the nearest Ork, then he defends.
3
The Weirdboy will try and kill the nearest enemy model with any means at his disposal.
Once achieved, he stands still and does nothing, except defend himself from attacks.
4
The Weirdboy will only use psychic powers this turn. No other Actions are possible.
5
The Weirdboy refuses to use any psychic powers this turn, otherwise he is normal.
( This includes Force and Aura cards )
6
The Ork player has normal control over the Weirdboy this turn.
If there are any disputes about what the Weirdboy will do, then the benefit will go to the Ork player.
Weirdboyz will not do obviously suicidal things, but they will walk into overwatch if it means getting closer
to another model. They will not directly kill another Ork or Gretchin to reach an enemy, but they can kill
another Ork or Gretchin that gets caught in an effect cast by the Weirdboy. If during an out of control turn
the Weirdboy is seen by or sees a Minder, then immediate control is regained over the Weirdboy.
The Ork player needs to take very good care of the Weirdboy and his Minderz. If both Minderz are killed,
then the Weirdboy will be out of control for the rest of the mission. There is no time during a mission for a
Weirdboy to form a close bond with another new pair of Minderz. It is possible to purchase more than 2
Minderz for the Weirdboy from the Force List, but they do not come cheap.
Introducing Gretchin
Gretchin follow the Boyz mob around and scavenge any left over loot from the
plunder. They are commonly armed only with a Shotgun. Other weapons of greater
power are often confiscated by the Boyz for their own use. Gretchin have a close
assault factor of d – 4, making them weak opponents in hand to hand fighting. They
are not as tough as other creatures, and can be cut down in numbers by most
weapons. However, their dedication is strong and they often giggle as they charge
into battle with great numbers. They even laugh when they see their own comrades
die in comic fashion!
Image: A Gretchin
armed with a
Shotgun.
Gretchin Bomber
Occasionaly some Gretchin are very eager to prove themselves as superior warriors. They agree to wear a
powerful bomb strapped to their chest and are able to detonate it in a destructive blast. The fact that they
do not survive the blast is secondary to the hero status they earn as a result of their bravery. A Gretchin
Bomber can detonate the bomb on his chest for 1 AP. He can also detonate the bomb for 0 AP before

29
rolling for close assault if he is attacked, provided that he has LOS to the model attacking him. A Gretchin
Bomber is otherwise the same as a normal Gretchin.
Gretchin Bomber Suicidal Run
A Gretchin Bomber is able to perform a Suicidal Run. Before the Gretchin Bomber has been activated, the
Ork player can declare that the Gretchin Bomber is going to perform a Suicidal Run. The Gretchin has 10
APs with which it can ONLY move, no shooting or other specialised actions are allowed. It is allowed to
open doors to continue moving. However, the Gretchin Bomber must at some stage during his Suicidal Run
detonate the bomb that he is carrying. He does not need to use all 10 APs, but if he has not already done
so, the last AP must be used to detonate the bomb.
Looting The Dead
Gretchin are masters at looting dead bodies on the battlefield in the hope that they find good gear to use.
In fact if it wasn't for their looting ability, they would barely be armed with any weapons as their Ork
masters rarely ever supply them with any good wargear at all. Gretchin are numerous creatures that are
easily killed, but their reckless sense of scavenging allows them to take advantage of their numbers to
swarm over dead bodies and claim items of wargear, including better weapons.
It costs a Gretchin 2 APs to loot a dead body when it is standing in the square of the body. A Gretchin can
not loot a body if there is an enemy model adjacent to the dead body square. Otherwise the Gretchin may
loot a body even if it is in LOS of an enemy model and being fired at from Overwatch! The body must have
been killed in the Ork players current turn, otherwise the chance to loot is lost.
To successfully loot a body the Ork player needs to roll a dice and score a 6. Most dead bodies are often
smashed to bits in the intense heat of battle, so Gretchin need good fortune to help them find useful items.
Vortices do not leave dead bodies at all, so naturally it is impossible to loot anything after a Vortex has
dissipated. If the loot is successful, the Gretchin may select and take only one item of wargear, or weapon
that the dead body carried. He may then immediately use it by spending further APs. A Gretchin will always
swap his Shotgun for a new Ranged Weapon! He can not carry both weapons at once.
Gretchin can only loot bodies that carried wargear or weapons that they can use. They will not waste time
trying to loot Tyranid or Necron bodies, as they know that they will not find anything that is useful to them.
In addition, they can only loot the following weapons: Bolter, Bolt Pistol, Lasgun, Laspistol, Plasma Gun,
Plasma Pistol (not the Harlequin version), any type of thrown Grenades, Proximity Plasma Grenades, Power
Field Generators, Kombi Bolter-Grenade Launcher, any type of Gretchin specific weapon or wargear that is
listed below on this page.
Looting The Dead requires that players will have to make some type of note as to where dead bodies fell
during each Ork turn. Spare coins or counters can be used as place markers if it is likely that there will be
many dead bodies, otherwise players can agree to remember from round to round. A dead body can only
ever be looted once, regardless of whether the loot was successful or not. The looting rules are not meant
to be too cumbersome, so if you find they are slowing down your games, then don't use them.
Introducing Orks vs Genestealers
In games where an Ork force battles against Genestealers, the Orks can be represented using their
appropriate models. After the Genestealer force has been decided, both players can bid for the number of
points they have to construct the Ork force. The lowest bid gets to be the Orks, and the player can then go
about choosing his force from the list with the number of points that he bid.
These types of games are handled as a Space Marine vs Genestealer game in all other respects. The Ork
models are placed and the mission is then played.
Introducing Orks vs Space Marines ( or Chaos, or Harlequins, etc )
When an Ork force battles against a Space Marine ( or Chaos or
Harlequins ) force, the Orks can sometimes enter play as blips. There
are 8 Ork blip tokens, and 14 Gretchin blip tokens. Before play begins
both players can construct the Ork force by listing six different
options for the Ork and Gretchin blips. The Ork player chooses his
reinforcement blips at the start of his turn ( in a similar way to
Genestealer reinforcements ) and places them at the entry areas.
However, the Ork player is not sure what each blip represents UNTIL
the blip is converted. All that the Ork player knows is which blips are
Ork blips, and which blips are Gretchin blips. Orks are chaotic

30
creatures by nature and are haphazard in the way that they plan
attacks and run through drifting Hulks.
Image: Ork and Gretchin Blips.
When an Ork or Gretchin blip is converted, the Ork player rolls a dice, and consults the appropriate list. The
models are then placed as their identity has been confirmed. It is possible that the next blip to be converted
will be exactly the same as the first blip if the dice roll is the same. If there are not enough models to
represent the new blip, then the Ork player has to re-roll until the new blip can be placed as the models it
represents. In the rare case that there are no appropriate models, the blip is lost and can be considered as
a false alarm similar to Genestealer Ambush blips.
All blips are treated in a similar way to Genestealer blips in regards to LOS, movement, and conversion. All
blips have 5 APs, and are as tough as an Ork to hit with weapons, even if the blip represents Gretchin
models.
ORK WARGEAR
Close Assault Blades
Favoured by Orks, these monomolecular edged weapons are used during close assault. There are many
variants to the basic theme, some look like axes, others resemble knives and even meat cleavers. Ork Nobz
usually wield swords as a show of status and rank. These are not power swords or force swords so there
are no fancy parrying manoeuvres allowed.
Force Spear
Used only by Weirdboyz, the Force Spear is a Close Assault weapon that can channel psychic energy. The
Weirdboy may enhance his close assault bonus by laying down as many cards as he likes and adding them
to his close assault dice roll. While it is similar in all other respects to normal force weapons, it can not be
used by any other psyker other than a Weirdboy. It takes a sepcial kind of Orky understanding to swing a
Force Spear.
Gretchin Bomb
A Gretchin Bomb is a huge explosive device that is strapped to the chest of a Gretchin volunteer. It
explodes violently with a mix of chemical, poison, fragmentation, plasma, melta, and anything else that was
available at the time of construction. Place a Frag marker on the section that the Gretchin Bomb exploded
in, to be removed at the start of the Ork player’s next turn. LOS is blocked while the Frag marker is on the
board. The Gretchin may detonate the bomb at a cost of 1 AP, or he may detonate the bomb for 0 AP
instead of defending in close assault. He must have LOS to his attacker to do this.
Kombi Bolter – Grenade Launcher
This Kombi Weapon combines both features of the standard Bolter, and also the Grenade Launcher that is
built into a Power Glove. The Kombi Weapon can not fire both barrels at the same time. The Ork player
must state which of the barrels is going to fire when he chooses to shoot the Kombi Weapon. It can shoot
each barrel in the same turn, provided that each shot is a separate action. All the normal statistics for each
weapon apply as per the Weapons Table. The Grenade Launcher is typically armed with 10 Plasma
Grenades, though it can be reloaded to take most other types of Grenades.
Shokk Attack Gun
Being unlike most other weapons in the galaxy, the Shokk Attack Gun empitomises the unique savagery
that Orks possess. It is a huge gun with three gyro-wheels that spin around the barrel to create a rift into
the Warp. This projection field is then aimed at the target, where the Shokk Attack Gun's ammunition - a
Gretchin - is discharged. The Gretchin is propelled through the Warp and materialises inside the target,
killing both the Gretchin and the target. Large targets are easier to hit, so the Shokk Attack Gun is an
excellent weapon to take down Dreadnoughts and Terminators. Even if the Gretchin misses its target, it
may still materialise from the Warp in an adjacent square where it discharges its psychotic energy from
travelling through the Warp.

31
To fire the Shokk Attack Gun, there must be a Gretchin in an adjacent, unblocked square to the Ork with
the Gun. It does not matter if the Gretchin has already been activated during the turn or not. The Gretchin
is automatically sucked into the Gun and is shot towards the target through the Warp. If the Shokk Attack
Gun hits, both the Gretchin and the target are killed. Enemy models may only fire on Overwatch at the Ork
model with the Shokk Attack Gun if they can see the Ork. They can not fire until after the Shokk Attack Gun
shot has been fully resolved.
However, if the Shokk Attack Gun misses, roll a dice and consult the
scatter-diagram to see where the Gretchin may materialise. If the
square is blocked by an inanimate feature (not rubble), then the
Gretchin is pasted from the inside-out all over the feature and is killed.
Similarly, if the square is a wall space, the Gretchin is killed. If the
square is occupied by ANY other model, then a hit roll must be made
against that model to see if it is killed by the materialising Gretchin!
If the Gretchin materialises in a vacant square, then it MUST immediately attack the original target with all
of the rage it can muster. The Gretchin is beyond sane from its moments spent in the Warp and explodes in
beastial fury, attacking the target in close assault. Regardless of whether or not the Gretchin has been
previously activated, and before ANY other action can take place (even enemy Overwatch fire) the Gretchin
makes one free close assault against the target. But, because the Gretchin is beyond hyper-enraged it gains
+ 6 on its close assault roll making it a formidable foe still dripping with raw Warp power! If the Gretchin
survives the close assault round, it can not take any further actions until the next Ork turn as it has
expended more than its fair share of energy in a burst.
After the Gretchin's round of close assault, enemy models may first fire at the Gretchin from Overwatch,
then secondly, they may fire at the Ork with the Shokk Attack Gun if they were initially able to do so when
it fired, and if they can still see the Ork. Enemy models on Overwatch can not fire twice at both the
Gretchin and the Ork. If they are able to see both the materialising Gretchin and the Ork, then they can
only shoot at one target. This will always be the Ork if they were initially able to make an Overwatch shot
on it, otherwise it is the Gretchin. It is possible for an Ork to fire a Gretchin in front of it, with the Gretchin
materialising so that it blocks LOS from the Ork to the model on Overwatch. Therefore, the enemy model
on Overwatch can, at best, only shoot at the Gretchin after it has close assaulted the target, and not the
original Ork who fired the Gun.
Shotgun
The standard Shotgun is usually an overbored, single barrel weapon that is capable of shooting different
types of shells. It is a common weapon that is readily available throughout the galaxy, and is mostly used
for hunting purposes. Shotguns are not a relatively powerful weapon for Space Marines or other armed
forces to use; however, they are often used by Gretchin who do not have access to other more powerful
weapons. Most Gretchin have ready access to the basic armour piercing shells that consist of hardened
slugs or dum-dum rounds. Although a Shotgun is capable of firing Hellfire shells, it is rare for a Gretchin to
obtain any. Their Ork bosses usually confiscate such finds for their own Heavy Bolters instead.
ORK TURN SEQUENCE (As Blips)
• Draw and place Reinforcement Blips
• Discard all Psychic Attack Cards
• Roll a dice for new Psychic Attack Cards and draw them.
• Use Action Points (Main Phase)
• Roll to move Vortices
• Roll for additional Section Effect damage
• Roll for Decay of Psychic Effects
• Dispersal of Psychic Effects
• Remove next player's Overwatch counters and Section Effect Markers
TYRANID RULES
Although Genestealers are the bioconstructs of Tyranids and act independently of them, Tyranids are
sometimes found on Space Hulks for many reasons. Some may have been isolated from their Hive Fleets in
hasty escapes. Others may have been assigned as a special force to protect a fledgling Brood through the
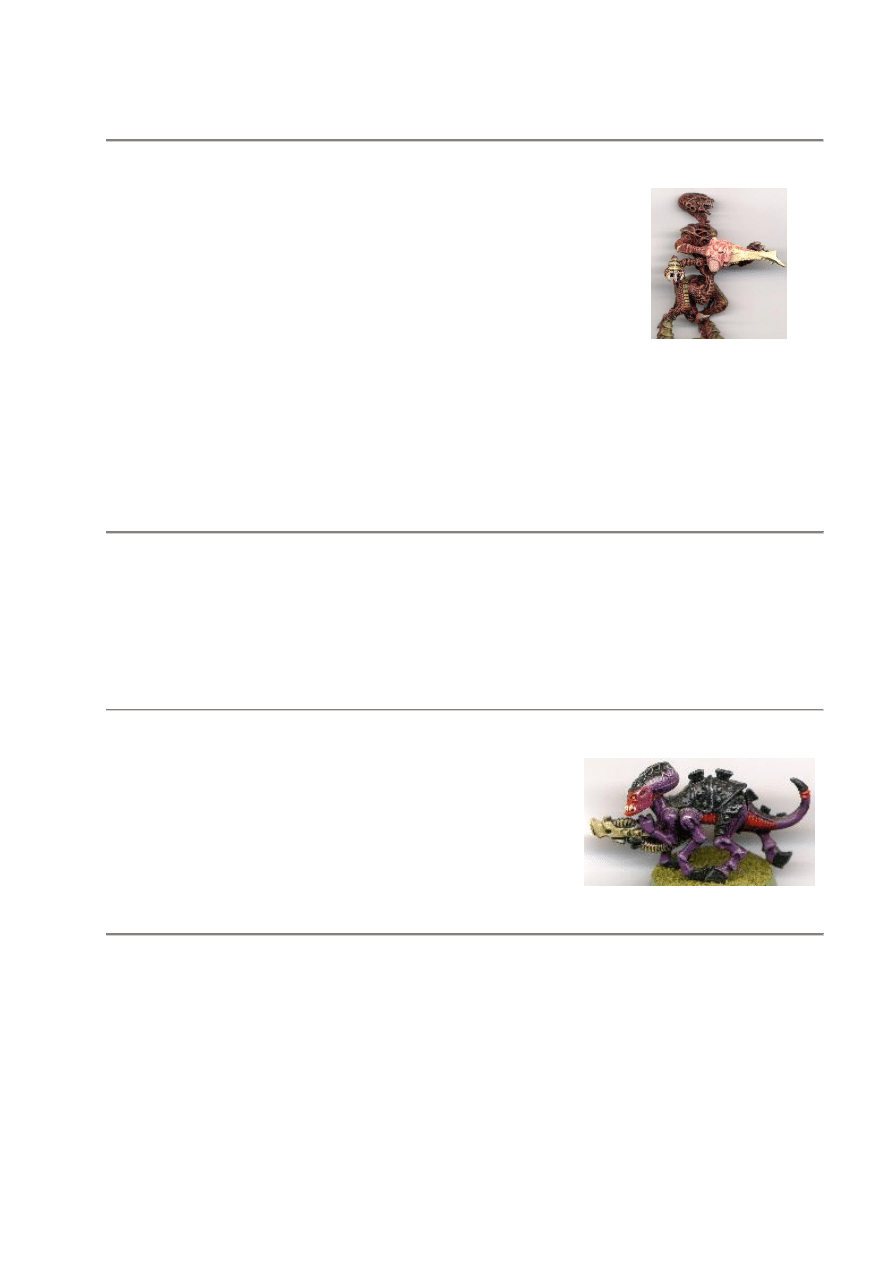
32
currents of the Warp. In any event, the Tyranids are awesome warriors that send shivers of formidable
dread down the spines of even the battle hardened Space Marines.
All Tyranid models have 6APs each per turn ( Except the Hive Tyrant ).
Introducing Tyranid Warriors
Tyranid Warriors tower over the heads of Space Marines. They are fast, deadly,
impossibly strong, and cunning. Though they are psychically attuned to the Hive
Mind, they do not share or participate in the Genestealer’s Brood intelligence.
Therefore, Tyranid Warriors do not use Psychic Powers, and they can not
influence Reinforcement Blips. They are usually armed with at least one hideous
bioweapon or sometimes more. Tyranid Warriors have stronger and tougher
carapaces than Genestealers, in many ways better than Terminator Armour.
They have their own column to be hit on the Ranged Weapons Table.
Image: Tyranid Warrior
armed with Deathspitter
Before playing the mission, both players can agree to use some of the lettered blips to represent Tyranid
Warriors. A typical blip would either have 1 or 2 Tyranid Warriors armed with either 2 Boneswords, or a
ranged bioweapon. Do not overuse Tyranid Warriors in a force unless the Marine player has superior
firepower to deal with their presence. If the bidding system for missions is used, then this will not be a
problem as the players can decide for themselves what they think will be an appropriate force required to
complete the mission.
Tyranid Warriors entering play as blips are treated as though they are normal Purestrain blips. They do not
get any benefits of being a Tyranid Warrior until they are converted
Gaunts and Squigs
Hordes of smaller Tyranid bioconstruct creatures often accompany the larger Warriors. They are typically
smaller than a Space Marine, very fast and agile. They do not have the sheer bulk or toughness of larger
Tyranids, but their numbers can swiftly overrun unsuspecting enemies. Due to their speed and small size,
all Gaunts and Squigs are relatively hard to hit with ranged weaponry, effectively requiring the same roll to
hit as a Purestrain Genestealer for targeted shots. However, when caught in section effects they are much
more easily destroyed requiring the same roll to be hit as a Hybrid does. They have their own column to be
hit on the Weapons Table.
Introducing Termagants
Termagants usually propel themselves forward on four legs and can be
armed with a Fleshborer, Devourer, Strangleweb, or Spike Rifle. They
are often found in numbers and can be deadly in packs. Blips of
Termagants usually number at least 2 to 4 creatures. Space Marines
need to be very cautious around a swarm that has so many models
capable of firing back.
Image: Termagant armed with
Fleshborer.
Introducing Hormagaunts
Hormagaunts bound along on two legs and usually have two sharp Scything Talons ready to cut their
enemies into confetti. They are the most agile of Tyranid bioconstruct creatures and can leap along corridor
walls and ceilings, sometimes even faster than overwatch can react to. They are very similar to
Termagants, but they do not generally use ranged bioweapons. Hormagaunts use their great speed and
agility to close in quickly on their enemies and tear them to shreds with swift strikes of the Scything Talons.
A typical Hormagaunt blip has at least 3 to 6 creatures all ready to run.
Hormagaunt Leap
A Hormagaunt can pay 2 APs to Leap over its forward facing square. It can not Leap over an enemy model
or section effect, but it can Leap over another Genestealer or Tyranid model, including blips, and also crates
and rubble. The square the Hormagaunt lands in must be empty, otherwise it can not perform the Leap. A
Hormagaunt can Leap over a square that would normally be in LOS for overwatch without being targeted.

33
In this manner, a Hormagaunt can also Leap down a corridor to rush a Marine who is on overwatch. The
Marine can not take an overwatch shot at the Hormagaunt while it is leaping in the air, he can only shoot
when the Hormagaunt lands.
Introducing Squigs
Squig bases are comprised of tens to hundreds of smaller bioconstruct creatures that are often the genetic
leftovers of the Tyranids other creations. Typical Squig creatures can be as small as a toe or as tall as a
knee, and they collectively form a tangle of living, crawling organisms that exist merely on a primordial
level. A Squig base will consume most waste matter it passes, regardless of wether it is alive or inorganic.
They effectively serve as biocleaners that recycle resources on a Space Hulk. A Squig blip is only ever
converted to be 1 base of Squig creatures, their special abilities are listed below.
Squig Facing, LOS, Close Assault, Movement, Regeneration.
A Squig base is always considered to only have a forward facing, it has no side or rear squares. It has LOS
in all directions.
Due to the size of the individual Squig creatures being small, Squig bases DO NOT block LOS to or from any
other model on the board. This is important, as the Genestealer player can not hide more powerful models
behind Squigs without being seen. Squigs are not big enough to provide sufficient cover, so other blips
behind them will be converted.
Similarly, Squig bases do not block shooting of any ranged weapon or psychic attack. Any Model can shoot
over Squigs to other models that are within LOS. Squigs can be targeted as normal, so the shooting player
must declare if he is targeting the Squig base or a model behind it. Many enemies fall to Squigs when they
are too preoccupied at shooting larger and more dangerous targets behind them.
Squig bases do not close assault as other models normally would. They try to crawl all over the enemy
model while tearing, ripping and devouring to process the organic matter. This does not affect game
mechanics so a Squig base will roll d - 3 in close assault to see if it wins, or otherwise. If a Squig base wins
a close assault against an organic enemy (not doors, crates, etc) during its turn, then it must immediately
stop and can take no further actions for the turn. The Squig creatures are too busy devouring the fresh kill
to continue spending their remaining APs.
Any Tyranid or Genestealer model CAN pass through a square occupied by a Squig base without harm or
penalty. Similarly, a Squig base can pass through a Tyranid or Genestealer square without penalty. Note
that a Squig base, Tyranid, or Genestealer model can never end its move sharing a square with another
model. The special movement can only take place while passing through the shared square. No other
action, other than a movement action, can be taken when a model is sharing a square with a Squig.
When a Squig moves through a rubble square it must pay the extra AP like other models do. However,
when it leaves the rubble square, the rubble counter is removed entirely from the board. The Squig
creatures have actively consumed much of the rubble freeing the square for unhindered movement. Crates
and doors block Squig base movement. They must wait until the obstacle is removed before they can
continue on their way.
Squig bases that are killed in close assault, by targeted weapon, or targeted psychic attack, are not entirely
dead. While many of the creatures may have been killed, the remaining creatures on the Squig base
actively consume them to remultiply. The Squig base spends its entire next turn regenerating. During this
time it does not block movement for enemy models. If the section the Squig base is regenerating in takes a
hit from any section effect that causes damage, then the Squig base is killed before it can regenerate. The
following turn after regeneration, the Squig base is able to continue to move as normal since it has fully
healed. If an enemy model is standing in the square of a regenerated Squig base, then it is knocked prone
to an adjacent square of the Genestealer player’s choosing. If there is no empty adjacent square, the
enemy model is automatically killed as the Squig creatures permeate even Terminator Armour. The Squig
base then has its full APs to spend for the turn. Any friendly models standing in a regenerated Squig base
square must be moved to an adjacent square, otherwise they too are automatically consumed by the
ravenous Squigs!
Section effect weapons and psychic attacks will remove a Squig base if killed. The devastation is sufficient
to kill all of the Squig creatures entirely.
Some mission objectives require the total destruction of a Tyranid force as victory conditions for the Space
Marines. If the last remaining models on the board for the Tyranid player are Squig bases, then the Space
Marines have won. It is a routine procedure for the Space Marines to mop up stray Squig bases once the
more deadly opponents have been destroyed.

34
Introducing Lictors
Lictors are the advance scouts of a Tyranid attack force. They have extremely acute sensory organs that
allow them to see, hear, and even taste their enemy before they come into contact with them. A Lictor also
has the ability to change its appearance with chameleon like scales so that it can remain near invisible. It is
the perfect creature designed to flush out and infiltrate enemy positions before the main swarm of Tyranid
creatures can arrive to deal swift death.
If both players agree, then you can use Ambush Blips to introduce Lictors into the Space Hulk. They
typically lie in wait until the enemy have passed, and can then attack vulnerable rear guard positions. When
an Ambush Blip is converted roll a dice. On a result of 1, the Blip is revealed to be a Lictor. This will require
both players to designate before the game begins the nature of Ambush Blips. It may be confusing to use
Purestrain Genestealers, Hybrid Magi as well as Lictors on the Ambush Blips.
Lictors are usually unarmed, however, they are extremely deadly in close assault. Their huge talons are
able to puncture their enemy’s skulls and drink their brains dry. Lictors are tougher than most other
Tyranids and can withstand greater amounts of damage before they are destroyed. A Lictor is so swift in
close assault that it can never be attacked from the sides or from behind. It is always able to turn and face
its attacker before close assault begins.
Introducing Carnifexs
Carnifexs are monstrous creatures that are like living battering rams of invulnerable strength and muscle.
Though not often found on Space Hulks, they can sometimes be placed as part of a Tyranid Brood that is
about to send an invasion force onto a nearby planet. The usual role of a Carnifex is to rip apart enemy
tanks and heavy support weapons, often by purely smashing into them and shredding them with their
awesome might. Both players can agree to include a Carnifex, but there would rarely be more than one
present during a mission.
The sheer size of a Carnifex poses it some problems on a Space Hulk. It occupies four squares instead of
just one. Therefore, it can only move in areas that are large enough to contain it. A Carnifex can never be
found or moved on a narrow one square wide corridor section. A typical mission would have the Carnifex
model on the board at the start of play, either in a room or a three square wide corridor. From there it
would only be allowed to move in areas that are wide enough to allow it access. LOS to a Carnifex can be
traced to or from any of the four squares that it occupies. A Carnifex is not able to climb up or down
ladders or pitfall squares, as they do not provide enough room for it to pass through. Carnifexs can never
be knocked prone, they are just too powerful.
A Carnifex can withstand extraordinary amounts of damage before it is destroyed, making it one of the
toughest creatures in the known galaxy. Carnifexs are deadly in close assault. They are able to kill enemy
models that attack them from the left or right squares, even though they are not facing them. However, the
close assault rolls for the appropriate left or right square are still used, and the Carnifex must win the close
assault. It does not have the option to turn and face the attacker if the attacking model is killed.
A Carnifex is even more terrifying than other Tyranid creatures. It will Strike Terror into enemies, as
detailed in the New Rules section.
Bioplasma Bolt
A Carnifex is able to spew forth a giant ball of living bioplasma from its gut and hold it in an electric field
generated by its claws. It can then shoot the bioplasma bolt at any target within range. This ability can only
be used once per turn, as the bioplasma needs a short time to recharge before another bolt can be spewed
forth.
Introducing Zoanthropes
Zoanthropes are extremely psychic Tyranids. They are able to gather information about their enemies in
split seconds, and have an intimate knowledge of speech, thought, culture, fears and even emotions of love
and hate. Zoanthropes speak with silk tounges and are able to mask their hideously alien appearance with
friendly gestures of assurance. It is often Zoanthropes that are called upon by the Hive Mind to persuade
weak minded resistance into peaceful surrender.
They walk on two stocky legs and are always unarmed, though by no means are they defenceless. While
not as powerful as many of their counterparts in close assault, they are comparatively as tough as a Warrior
to destroy.
A Zoanthrope’s true power is its ability to harness the psychic energy of the brood and wield it with
consummate ease. When a Zoanthrope is in play it is treated as a 4
th
level psyker. It is able to use one free
force card against every psychic attack, just as the Aegis Hood functions for the Marine Librarians. The
Zoanthrope shares the Psychic Attack cards that the Hybrids use if they are present. If there are no Hybrids

35
in the mission, then the Zoanthrope will be dealt a hand of four Psychic Attack cards once it is converted
from a blip.
Psychic Powers
The Zoanthrope has a choice of four Psychic Powers that it can use.
The Horror
Range: 12
Target: Any Termagant, Hormagaunt, Squig Base, or Tyranid Warrior in LOS.
Cost: 6 APs
Effect: The target model is imbued with warp energy and glows with a pulsating field of Terror. It is able to
Strike Terror to all models that have LOS, as they are touched by the fear of the radiated warp currents. If
the target model has not been activated, then it may still be activated normally and Strike Terror to all
enemy models that gain LOS as it moves about. The effect lasts until the start of the next Tyranid turn. The
Horror is unstoppable, but it will immediately end if the model walks into a Miasma.
Psychic Scream
Range: The entire map, except for any sections that may be isolated by a Miasma.
Target: All enemy Psykers.
Cost: 8 APs and discard 4 Psychic Attack Cards.
Effect: The Hive Mind releases a shrill piercing scream across the battlefield that affects all enemy Psykers.
They are not able to use ANY psychic abilities in any way. Force and Aura Cards are not allowed (except for
Pariahs who can nullify psychic attacks), and Force Weapons can not channel any bonuses in close assault.
Existing psychic effects remain on the board, and other Zoanthropes, and Hybrids are still allowed to use
their Psychic Powers. Tyranids will often defend a Zoanthrope that continually Screams across the Hulk to
nullify any enemy Psykers. The effect lasts until the start of the next Tyranid turn, but it CAN NOT be
played in two consecutive turns by the same Zoanthrope. Psychic Scream is unstoppable, but it will
immediately end if the casting Zoanthrope is killed.
Warp Blast
Range: 8
Target: Section in LOS.
Cost: 4 APs and discard 3 Psychic Attack Cards.
Effect: Similar to a cross between the Vortex Psychic Attack Card and the Vortex Grenade, Warp Blast
opens up an instantaneous rift to the warp. It will drag unfortunate victims into the warp and consume
them. Warp Blast is not unstoppable. A Force Card of any colour can be used to counter it, along with Aegis
Hoods, Aura Cards or other latent psychic defences.
Warp Field
Range: 0
Target: Self
Cost: 4 APs and discard all remaining Psychic Attack Cards (must discard at least one card).
Effect: The Zoanthrope is surrounded in a defensive Warp Field that acts like a personal Miasma. The Warp
Field protects the Zoanthrope with as many Force Cards or Aura Cards that the Zoanthrope needs.
However, it does not provide Aura Cards to defend against ordinary weapons such as bullets or close
assault blades. The Warp Field is only attuned to protect the Zoanthrope against all forms of Psychic Attack
Cards and Powers. It will also immediately dispel a section effect that the Zoanthrope walks into (such as
Jinx, Warp Time), but the Zoanthrope can not walk into a Miasma. The Zoanthrope is not able to use any
other psychic abilities until the Warp Field dissipates. Warp Field is unstoppable. The effect lasts until the
start of the next Tyranid turn, the Zoanthrope can not choose to drop out of the Warp Field voluntarily.

36
Introducing Hive Tyrants
Hive Tyrants are the generals in an attack force of Tyranids. They are extremely intelligent, highly psychic,
and actively lead their Brood against the enemy. Hive Tyrants are monstrous creatures that Strike Terror,
and they are always armed with a variety of bioweapons. Though not as tough as a Carnifex, the Hive
Tyrant can still withstand abnormal amounts of punishment before it is destroyed.
If both players agree, then the Hive Tyrant can be placed on the board at the start of a game. It can
otherwise enter play as the 'J blip'. Despite its size the Hive Tyrant is more mobile than a Carnifex. It only
occupies one square and can move freely about the Space Hulk. It is deadly in close assault and can kill
models that attack it from the left or right square if it wins the combat. However, the close assault rolls for
the appropriate square are still used, and the Hive Tyrant can not turn to face the attacker if the attacker is
killed.
Hive Tyrant APs
A Hive Tyrant is able to assimilate vast amounts of sensory information from all other nearby Tyranids. It is
an active beacon for the presence of the Hive Mind, and can act with incredibly quick judgement based on
split second information that it receives. Based on this superior awareness, a Hive Tyrant has 9APs per turn.
Hive Tyrant Psychic Attack Cards
While the Hive Tyrant is the accumulator of the psychic energy of a brood, it is not the main focal point of
the release of such energy. If there are already Psykers or Zoanthropes on the board that are using attack
cards, then the Hive Tyrant increases their hand of cards by two. Example: A Patriarch and a Hive Tyrant
on the board will give a hand of eight Psychic Attack cards. A Hive Tyrant may only use the Psychic Attack
cards if there was already a hand of Psychic Attack cards in play. The Hive Tyrant can not generate a hand
of Psychic Attack cards by itself as the energy needed to do so detracts from its efforts to coordinate the
Hive Mind’s will through all of the other Tyranid creatures.
The Hive Tyrant is treated as a 4
th
level psyker, but it can only ever use one Psychic Attack card per turn if
a hand of cards is already present.
TYRANID COMMAND POINTS
Many Tyranid models are able to use CPs, just as the Hybrid Genestealers are able to do so. Any Tyranid
Warrior, Lictor, Carnifex, Zoanthrope, or Hive Tyrant can use CPs. Therefore, in a mixed force of
Genestealer Hybrids, and Tyranids, the CPs can be shared amongst the appropriate models. However, the
only Tyranid that can generate CPs in its own right is the Hive Tyrant. If there are no Hybrids in play, the
presence of a Hive Tyrant allows for d6 + 2 CPs just as a Patriarch generates. Other Tyranid models
capable of using CPs are not allowed to do so until they are generated by the presence of a model that can
offer the use of CPs. It is not important that the CPs come from Hybrids or the Hive Tyrant, as long as there
is a converted model on the board capable of allowing the Tyranid/Genestealer to have CPs.
TYRANID HIVE SHIPS
There comes a time when Space Marines must take the fight to the Tyranid’s own ships and battle through
the living arterial corridors to reach their objective. The Hive Ship is an alien environment that houses the
Tyranids and actively defends them while trying to repel intruders. Only the highly trained Marines, or
craziest of Orks, or the most suicidal of Harlequins would enter a Hive Ship. Fraught with danger in every
living alcove, the ship itself dispatches whatever it needs to mop up the invading genetic stock and to use it
for processing purposes in the bio-factories on board.
37
Image: The arterial passageways of a Tyranid Hive Ship.
Using Hive Ship Floor Tiles
The floor tiles can be generated randomly with the set up cards, or placed for a pre-designed mission. They
are of a grid design that is similar to the normal corridors of a Space Hulk. However, the Ship will aid the
Tyranids, while hindering any other life form on board.
Doors, LOS, Carnifexs
Some rooms in the Hive Ship have doorway sphincter muscles. These muscles are normally closed off, but
they contract to open when a model steps onto a square adjacent to the doorway, or when standing in the
doorway square. If there are no models keeping a doorway sphincter open, then it is shut. Enemy models
can not trace any LOS beyond the closed off doorway sphincters. This will hinder their shooting with any
ranged weapon. A closed doorway sphincter will block Blind Targeted Psychic Attacks, but will not affect
Free Targeted Psychic Attacks.
The Hive Ship is in direct communication with all of the Tyranid models on board, and is aware of their
intentions. If a doorway sphincter is shut, then it DOES NOT block LOS for any Tyranid or Genestealer
model. It is possible for Tyranid models to shoot at enemies on the other side of a closed doorway
sphincter, as the Hive Ship briefly opens the sphincter for the shot to pass through. Enemy models may
return overwatch fire if they are alive, or spend CPs as usual for the single attack. Any Tyranid blips will be
converted if they are revealed as the result of a doorway sphincter opening for a ranged or psychic attack.
As soon as the Tyranid attack is resolved, the doorway sphincter shuts to protect the Tyranid model. It will
be ready to briefly open if another attack is announced.
The Hive Ship actively supports the movement of all Tyranid models through the living arteries. The
passages will swell open and freely allow a Carnifex to move unhindered. A Carnifex only ever occupies one
square when it is on a Hive Ship floor tile. This makes it even more lethal as it is able to charge into
enemies with disregard for being caught in tight places or narrow passages.
Acid Blobs
The Hive Ship secretes Acid Blobs that routinely travel the arteries mopping up any
stray genetic material which is then reabsorbed into the Ship’s system. Acid Blobs can
be selected in place of a normal blip just as Ambush Blips are selected. However, they
must always start on a single closed red cell that is not within six squares of an enemy
model. There can only ever be a maximum of three Acid Blobs in play at any time.
Acid Blobs have 6 APs and move as blips. They are automatically destroyed by any
section effect weapon or section effect psychic attack, and they are immune to all
other forms of attack. Acid Blobs automatically kill any model that they come into
contact with, even Tyranid models. When this happens, the Acid Blob and the
contacted model are removed from the game. The Acid Blob has to pay 1 AP to move
onto the model. Standing adjacent to a model is not enough to dissolve it. The only
way a model can save itself from an Acid Blob is by playing an Aura card, in which
case only the Acid Blob is dissolved. Acid Blobs are a powerful motivator for enemy
forces to have a ready supply of section effect weapons at their disposal.
Acid Blobs are never able to move onto the ordinary squares of a Space Hulk corridor.
Image: Two Acid
Blobs.
Section Effects
The interior of a Hive Ship is not regimented in its design. Some cells are small, while other cells are as
large as normal sized rooms. It is difficult to define what a ‘section’ is for area of effect weapons, when
there is no consistency within a Hive Ship. Therefore, considering that the Hive Ship will naturally try to
neutralise any section effect weapons, a ‘section’ is generally much smaller than in a Space Hulk corridor. A
section effect blast or marker will only occupy a 3 by 3 area at most.
When firing a section effect weapon or using another effect, a target square has to be nominated. The
section effect then affects the target square and all of the immediate 8 squares surrounding the target
square. If there are less than 8 squares surrounding the target square then the effect only covers those
squares touching the target square.
Grenades that target by ‘section’ are similarly affected. They can be thrown at any target square that is in a
range of 3 to 8 squares, and they affect an area of 3 by 3 squares instead of the ‘section’.
If a doorway sphincter is opened adjacent to a section effect, then the newly revealed 3 by 3 ‘section’ may
be affected as well ( in the case of an existing flamer hit spreading to an adjacent section when a door is
opened ).
A Vortex will move around as a 3 by 3 section, but it can not move through a closed doorway sphincter.

38
TYRANID WARGEAR
Barbed Strangler
The Barbed Strangler is a Tyranid Bioweapon that shoots a small seed pod towards its intended target. If
the target is hit, the seed pod rapidly matures inside the host body and sprouts into hideous vines and
tentacles that rip the victim apart from the inside. Such a grotesque death is unsettling to most enemies.
The Barbed Strangler can only be fired once per turn as each new seed pod needs a short amount of time
to germinate in the ammunition sac of the weapon.
The Barbed Strangler has no effect on any Tyranid or Genestealer model as the seed pod is genetically
programmed not to sprout inside a Tyranid or Genestealer host.
Boneswords
These Tyranid Bioweapons are used for close assault. They are living creatures that are capable of sending
a static charge through their horned blade, similar to Power Swords. Tyranids can parry attacks with
Boneswords as they are adept in using them for attack and defence.
Death Spitter
The Death Spitter is a Tyranid Bioweapon that shoots a large slug like creature towards the section. When it
hits it splatters with corrosive juices that eat away the flesh and armour of enemy models. A Death Spitter
has a relatively slow rate of fire because each slug bullet takes a short amount of time to crawl into the
weapon’s chamber.
The Death Spitter is not able to kill other Tyranids or Genestealers as they are immune to the effects of the
juices.
Devourer
The Devourer is a Tyranid Bioweapon that is sometimes carried by Termagants as well as Warriors. It is
another vile weapon that shoots clusters of miniature worms towards the target. If hit, the worms burrow
into the victim and rapidly crawl towards the brain stem. This kills the victim, but not before they
experience moments of screaming agony as their pain threshold internally explodes. Tyranids and
Genestealers are immune to the effects of a Devourer.
Fleshborer
The Fleshborer is a Bioweapon that is commonly used by Termagants as they run rampant towards enemy
lines. It fires a single beetle that bores through bone and armour to cause massive internal trauma.
Fleshborers are not a relatively powerful weapon, but they do have a high rate of fire. Tyranids and
Genestealers are immune to the effects of a Fleshborer.
Lash Whip
The Lash Whip is a Tyranid Bioweapon that is used for close assault. It is a creature that has strong
squirming tentacles that try to grasp hold of the enemy models around them. If a Tyranid with a Lash Whip
is involved in a draw during close assault, then the enemy model is knocked prone by the Lash Whip. The
enemy suffers the normal effects of being prone. The Tyranid need not be the attacker in the close assault
as the Lash Whip can take effect even in defence.
Scything Talons
Scything Talons are excessively long sharp claws that have mutated on some Tyranids. They have the same
bonuses in close assault as a Bonesword, but do not allow the Tyranid to parry. Rather than being a
bioweapon as such, the Scything Talons are a grown part of the Tyranid creature that has them.
Spike Rifle

39
The Spike Rifle is a form of heavy bioweapon that is mostly used by Termagants. It is similar to old
fashioned whaling harpoon guns that were used in the founding days on Terra to hunt whales in the open
oceans. The Tyranid harpoon is a large creature that consists of a sharp spiked head that is capable of
penetrating through layers of solid armour. This is attached to the main body of the slim, cylindrical shafted
creature and is slightly barbed so that the spike will not fall out of the victim. Often the impacting blast of
the spike at high velocity is enough to kill many victims; however, once the shaft is lodged inside the victim
it quickly corrodes and releases toxic bioacids as a by-product. The acid is strong enough to burn through
many substances and can reduce victims to steaming pools of sludge. Once the Spike Rifle is fired place a
Fired counter next to it. On the next Tyranid turn flip the counter over to show that the Spike Rifle is
Recharging. The Spike Rifle does not have a fast rate of fire, as each spike creature takes some seconds to
regerminate inside the barrel of the weapon.
Strangleweb
Just as a spider is able to spin a web, so does the Strangleweb shoot a silken net of Tyranid slime over the
target. When a target is hit by a Strangleweb, it is not killed, instead, it is knocked prone and is unable to
spend APs or CPs until the start of its next turn. If in the unlikely event that the target has survived long
enough to see its next turn, it can then spend 4 APs cutting itself free from the web. Stranglewebs have a
slow rate of fire as the spinner sacs in the bioweapon need a short amount of time to construct another net
ready to fire. All Tyranids and Genestealers are immune to the effects of a Strangleweb.
Venom Cannon
The Venom Cannon is another type of Tyranid Bioweapon. It fires a burst of acidic poison crystals at
supersonic speeds towards its target. The high pitched blast is unmistakable across the roar of a battlefield,
and is even more profound on a Space Hulk. If the target is hit the crystals shatter in a blast that
instantaneously covers the whole section that the target model was standing in. If the Venom Cannon
misses its intended target then you do not roll for section effect shatter. The Venom Cannon can be aimed
at an empty square so that the resulting hit will shatter across the section.
The Venom Cannon is able to kill other Tyranid and Genestealer models, not as a result of the acidic poison
of the crystals, but from the force of the impacting blast alone.
TYRANID TURN SEQUENCE
• Roll for Command Points
• Draw and place Reinforcement Blips
• Return regenerated Squigs to the board.
• Discard Psychic Attack Cards
• Draw new Psychic Attack Cards
• Use Action Points (Main Phase)
• Roll to move Vortices
• Roll for additional Section Effect damage
• Roll for Decay of Psychic Effects
• Dispersal of Psychic Effects
• Remove next player's Overwatch counters and Section Effect Markers
Missions
Every Last One
After the initial perimeter skermishes were over, both forces had ground to a halt. Countless centuries of
training had been drilled into each force, and the Marines of Chapter Pi were not going to retreat. Only an
unexplored sector of the Hulk lay between them and the Chaos Marines of Chapter Theta. Both forces were
once very close in the distant time before the Horus Heresy. They shared patrol duties along adjacent
sectors at the Galatic fringe, until Chapter Theta was lured by Chaos, where they fled to the safety of the
Warp.
Captain Lawickium of Chapter Pi lead the assault on the Hulk immediately after it materialised with a course
vector passing dangerously close to the core systems of their patrol sector. Long range sensors detected
the familiar transmissions on secure frequencies. The detatchment of Chapter Pi Marines knew they were
blessed with the chance to deal vengeance upon their distant kin.

40
Bombarding the Hulk would deny the opportunity for discovery, and more importantly, deny the Chapter Pi
Marines the chance to exterminate the taint of chaos with their righteous justice. Captain Lawickium's men
fought well, and died with honour. But the Marines of Chapter Theta were an impressive foe. To a man,
they were a match for Chapter Pi, and their bestial howls were cries of fury born from pure rage and
hatred.
Although little information was gained from the Hulk, the Chapter Pi Marines were hungry for the final
battle. They were ready to hunt down and kill every last one of the Chaos Marines. No survivors, no
escapees. No more Chapter Theta.
Captain Lawickium heard the cries beyond the forward corridors, he could hear the sharp precise sounds of
fresh magazines being slapped into trusty, ancient weapons. He knew that his Chapter was about to write a
page of glory into its history books. He was first to step forward into the fray, his men following with eager
thoughts of retribution.
Objectives
Each force is trying to kill the other. Chapter Pi will not retreat, and will keep fighting until every last Marine
is killed. Chapter Theta is also trying to destroy Chapter Pi; however, Chapter Theta may decide to retreat if
they feel that they could be entirely destroyed. They would prefer to flee to the Warp rather than become
extinct. Chaos Marines lost all their virtues and Honour when they chose to shun the Emperor.
Chapter Pi Marine Forces
The Chapter Pi player has 30 points to purchase his force of Terminators. He must have only one Captain in
the force (an option on the Standard Squad Force List). He is not allowed to purchase any Librarians at all
(no Command Squads). The Chapter Pi player is otherwise free to purchase any combination of squads that
he wishes.
Chapter Theta Chaos Forces
The Chapter Theta Chaos player has 30 points to purchase his force. He must have only one Chaos Captain
in the force. He is not allowed to purchase any Chaos Librarians or Chaos Dreadnoughts. The Chapter Theta
player is otherwise free to purchase any other Chaos Marines that he chooses. Since the force represents
the remains of Chapter Theta, the Chaos player does not need to worry about any squad coherency.
Purchasing Chaos Sergeants is the player's choice.
Deployment
Before the game begins, both players should study the layout of the map. They can mutually agree on
which force starts from the two blue entry areas (A), and which force starts from the two pink entry areas
(B). It is important to note that the force on the blue A entry areas ALWAYS moves first.
If the players can not agree on which entry areas to use, then decide randomly. Remember that the force
on the blue A entry areas always moves first.
The players may split their forces up between their own two entry areas as they desire, but the Chapter Pi
player must make sure that each squad starts from the same entry area.
Special Rules
If either force has purchased Assault Cannons, then they are already hot from previous battles and may
malfunction from the start of the game.
The eight rooms of the Hulk can be searched, as they appear to be old weapon stores. Any Marine from
either force can search a room. It costs 4 APs to search a room if the Marine is standing in the section. He
can not search the room if there is an enemy model in LOS or in the section, or if he is being fired upon, or
if a section effect in the room blocks LOS (Heavy Flamers and Blind Grenades). Once a room has been
searched, roll a dice to see what the Marine has found.
Dice Roll
Item Found
1
Nothing
2
Nothing
3
5 Proximity Plasma Grenades

41
4
1 Power Field Generator
5
1 Assault Cannon Reload
6
1 Heavy Flamer Reload
The opposing player places the appropriate weapon token/s on a single square in the section. It costs 1 AP
for a Marine to pick up the token/s from his front square. Note that Reloads can ONLY be picked up by the
appropriately armed Marine, if he has room to carry another reload. Each room can only be searched once.
If the Chapter Theta Chaos player's force is reduced to three (or less) remaining Marines, he has the option
of retreating. The remaining Chaos Marines may head to the Disposal Chute and pay 1 AP to dive in and
escape from the Hulk. The Chapter Pi player can not catch a Chaos Marine that has dived into the Disposal
Chute, so he will not follow them. The fabric of space is ripped by the Warp to suck any retreating Chaos
Marines back into the void. Of course the Chaos player does not have to retreat, especially if his remaining
Marines are only hunting one Chapter Pi Marine!
Victory
Chapter Pi scores a win if they find retribution by killing ALL of the Chapter Theta Chaos Force, with none of
them escaping.
Chapter Theta scores a win and presses on to threaten the core worlds if they are able to kill all of Chapter
Pi.
If at least one Marine from Chapter Theta managed to escape while the rest of the force was destroyed,
then the game is a draw. While they won the battle for the Hulk, Chapter Pi fell short of destroying every
last one of Chapter Theta.
Missionen des Chaos
Show No Mercy
Millenia ago, in a long distant past, the Chaos powers were stirred. In the days when Terra was still known
as Earth, and as Humanity was sending it's first fledgling vehicles to the planets, a CD was recorded. The
CD was noted by the Chaos powers for it contained lyrics that worshipped them, and honoured their
presence. However, Chaos was not able to interfere in the matters of the primitive days on Earth. Late in
the 2nd Millenium there were only a handful of psykers on Earth, but popular science had dismissed them
as charlatans and hoaxers. Thus the Chaos powers could not channel their evil schemes onto Humanity
until after the acceptance of psykers as a true phenonemon, where there were many weak willed minds
only too eager to accept false promises of glory and power. By the time that Chaos was able to pervade the
minds and souls of Human psykers, many hundreds of years had passed since the recording of the CD, and
all known copies had been either lost or destroyed...
...until two days ago.
The Hulk dropped into a steady orbit around a barren binary star system near the fringe of the Eye of
Terror. It was magnifying a broad spectrum communications cycle that repeated over and over. Although
the Hulk was tiny in comparison to the twin stars, it was pumping out more readable noise than the two
stars combined, jamming all local frequencies with the same message. The nearest settlements were all
hell-worlds of Chaos, and they immediately dispatched a contingent of Terminators to board the Hulk. Their
orders were clear: Do not return without the CD. The Chaos powers were decadent beyond all mortal
comprehension, and the Hulk's broadcast message was of that CD recorded in 1983. The Chaos powers
wanted the CD that they did not own, Show No Mercy, recorded by Slayer.
A Dark Eldar Force was also skimming by the star system, and they too had their frequencies jammed by
the noise. Even though they had a cargo hold with fresh victims on board they decided that a detour was in
order. For the magnitude of power that the CD contained was not restricted to Humanity. It lured all evil,
and the deep vibrating sounds pulsed through the Dark Eldar like a fresh wave of vitalising fluid. They knew
that to secure an ancient relic like the CD would earn them riches and fame in their worlds of pure evil.
The Dark Eldar changed course to intercept the Hulk, and they could see the Chaos battlebarge docked
alongside. It was too risky for the Dark Eldar to strike at the warship, so they docked further away and
hoped that their preternal speed would catch the Terminators as they were retrieving the CD.
Both Forces were prepared to Show No Mercy to gain the CD titled Show No Mercy. Viscious fighting
erupted, as Chaos Terminators, and Dark Eldar were trying to steal the CD. Killing each other, and fighting
off the local Genestealer population, they were hell-bent on fury as they listened to 1983 Slayer.
Objectives

42
The Chaos and Dark Eldar Forces are both trying to secure the CD and escape with it. They are not working
together, as they each want the CD for their own purposes!
The Genestealers are trying to kill all the invaders on their Hulk. They have no interest in the CD at all, even
though they are aware that it is playing, they will ignore it and concentrate on the life forms running around
their decayed ship.
Chaos Forces
The Chaos Player has 40 points to spend on his Force. He may not buy Dreadnoughts. He must have four
Sergeants, or three Sergeants and a Captain. Otherwise he is free to choose the remaining Terminators.
Dark Eldar Forces
The Dark Eldar Player has 20 points to spend on his Force. He is free to choose whatever force he desires.
Genestealer Forces
The Genestealer Player starts with two blips and gains two blips per turn for the first 12 turns. After that he
is reduced to one blip per turn. The Genestealer Player uses the 1, 2, 3, 4, 5, and 6 blips ONLY.
Deployment
The Chaos Forces begin on the shaded squares, but there is only enough room for 17 Terminators. If there
are any excess Terminators, they must be placed off the board lurking, but they may enter normally as the
mission progresses. Note that any Terminators that are lurking off the board by the end of their sixth turn
will be lost as the Dark Eldar Force arrives. Terminators are not allowed to start lurking off the board if
there is a vacant square for them to deploy into, only excess Terminators are allowed to lurk!
The Dark Eldar Force arrives at the sector at the end of the Genestealer's sixth turn. Place all of the Dark
Eldar models so they are lurking between the two entry areas. The Chaos player will have his seventh turn,
then the Dark Eldar player will have his first turn where he is allowed to enter the board. Dark Eldar models
are never forced to lurk, but they can choose to do so.
The Genestealer Player may place his starting blips anywhere at a marked Genestealer Entry Area. He is
free to place his reinforcement blips at any Genestealer Entry Area also. Blips must lurk, as usual, if they
are placed with an enemy model within six squares of an Entry Area.
The Chaos Forces move first, followed by the Genestealers for the first six turns. From the seventh turn
onwards the order becomes; Chaos, Dark Eldar, Genestealers for the rest of the game.
Special Rules
The CD is kept in a ceramite casing and will never be harmed or destroyed (except by a Vortex, DRAWN
GAME). It is hooked up to a mega-amplifier that is blasting the recorded sound around the Hulk and nearby
space. Any Chaos or Dark Eldar model can enter the square with the CD and pick it up for 1 AP. It can be
passed or put down without risk of breaking or dropping for 1 AP to another model in any adjacent square.
The Chaos Player needs to be aware that from the seventh turn onwards he will have the Dark Eldar Force
behind him, and entering the sector. The Dark Eldar may choose to lurk, but should be careful if they do so.
Once a lurking model enters the board it can not leave, except if it is holding the CD.
If any Chaos or Dark Eldar model is holding the CD it can leave the board via either of the two entry areas.
If a Chaos model leaves via an entry area that has Dark Eldar lurking around it, then ONLY ONE Dark Eldar
model may try and either shoot or Close Assault the Chaos model. If the Chaos model lives, then it gets
away with the CD. If it dies, the CD falls into the first square on board the Hulk. The Chaos model may
initially make a single Move and Fire action at ONE lurking Dark Eldar model as it leaves the board.
Victory
The Chaos Player wins if one Terminator is able to escape with the CD. Remember that leaving the board
with lurking Dark Eldar may not mean that he has escaped. He can still be shot or die in Close Assault. The
Chaos powers rejoice in owning a rare copy of dedicated music.
The Dark Eldar Player wins if one of his models escapes with the CD. They retreat quickly to their world and
study the CD for all of the evil that it contains.
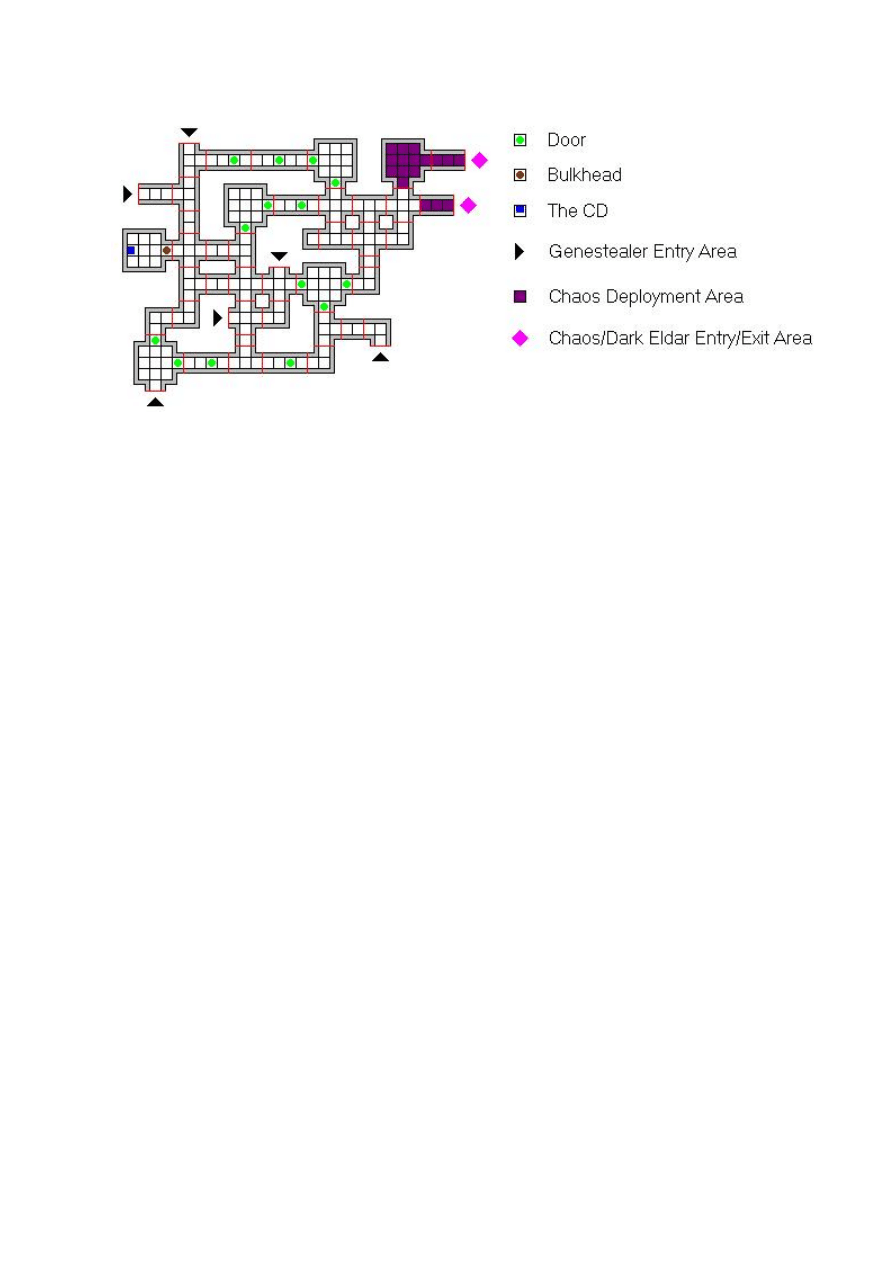
43
The Genestealer Player wins if the CD remains on the Hulk.
Show No Mercy
Millenia ago, in a long distant past, the Chaos powers were stirred. In the days when Terra was still known
as Earth, and as Humanity was sending it's first fledgling vehicles to the planets, a CD was recorded. The
CD was noted by the Chaos powers for it contained lyrics that worshipped them, and honoured their
presence. However, Chaos was not able to interfere in the matters of the primitive days on Earth. Late in
the 2nd Millenium there were only a handful of psykers on Earth, but popular science had dismissed them
as charlatans and hoaxers. Thus the Chaos powers could not channel their evil schemes onto Humanity
until after the acceptance of psykers as a true phenonemon, where there were many weak willed minds
only too eager to accept false promises of glory and power. By the time that Chaos was able to pervade the
minds and souls of Human psykers, many hundreds of years had passed since the recording of the CD, and
all known copies had been either lost or destroyed...
...until two days ago.
The Hulk dropped into a steady orbit around a barren binary star system near the fringe of the Eye of
Terror. It was magnifying a broad spectrum communications cycle that repeated over and over. Although
the Hulk was tiny in comparison to the twin stars, it was pumping out more readable noise than the two
stars combined, jamming all local frequencies with the same message. The nearest settlements were all
hell-worlds of Chaos, and they immediately dispatched a contingent of Terminators to board the Hulk. Their
orders were clear: Do not return without the CD. The Chaos powers were decadent beyond all mortal
comprehension, and the Hulk's broadcast message was of that CD recorded in 1983. The Chaos powers
wanted the CD that they did not own, Show No Mercy, recorded by Slayer.
A Dark Eldar Force was also skimming by the star system, and they too had their frequencies jammed by
the noise. Even though they had a cargo hold with fresh victims on board they decided that a detour was in
order. For the magnitude of power that the CD contained was not restricted to Humanity. It lured all evil,
and the deep vibrating sounds pulsed through the Dark Eldar like a fresh wave of vitalising fluid. They knew
that to secure an ancient relic like the CD would earn them riches and fame in their worlds of pure evil.
The Dark Eldar changed course to intercept the Hulk, and they could see the Chaos battlebarge docked
alongside. It was too risky for the Dark Eldar to strike at the warship, so they docked further away and
hoped that their preternal speed would catch the Terminators as they were retrieving the CD.
Both Forces were prepared to Show No Mercy to gain the CD titled Show No Mercy. Viscious fighting
erupted, as Chaos Terminators, and Dark Eldar were trying to steal the CD. Killing each other, and fighting
off the local Genestealer population, they were hell-bent on fury as they listened to 1983 Slayer.
Objectives
The Chaos and Dark Eldar Forces are both trying to secure the CD and escape with it. They are not working
together, as they each want the CD for their own purposes!

44
The Genestealers are trying to kill all the invaders on their Hulk. They have no interest in the CD at all, even
though they are aware that it is playing, they will ignore it and concentrate on the life forms running around
their decayed ship.
Chaos Forces
The Chaos Player has 40 points to spend on his Force. He may not buy Dreadnoughts. He must have four
Sergeants, or three Sergeants and a Captain. Otherwise he is free to choose the remaining Terminators.
Dark Eldar Forces
The Dark Eldar Player has 20 points to spend on his Force. He is free to choose whatever force he desires.
Genestealer Forces
The Genestealer Player starts with two blips and gains two blips per turn for the first 12 turns. After that he
is reduced to one blip per turn. The Genestealer Player uses the 1, 2, 3, 4, 5, and 6 blips ONLY.
Deployment
The Chaos Forces begin on the shaded squares, but there is only enough room for 17 Terminators. If there
are any excess Terminators, they must be placed off the board lurking, but they may enter normally as the
mission progresses. Note that any Terminators that are lurking off the board by the end of their sixth turn
will be lost as the Dark Eldar Force arrives. Terminators are not allowed to start lurking off the board if
there is a vacant square for them to deploy into, only excess Terminators are allowed to lurk!
The Dark Eldar Force arrives at the sector at the end of the Genestealer's sixth turn. Place all of the Dark
Eldar models so they are lurking between the two entry areas. The Chaos player will have his seventh turn,
then the Dark Eldar player will have his first turn where he is allowed to enter the board. Dark Eldar models
are never forced to lurk, but they can choose to do so.
The Genestealer Player may place his starting blips anywhere at a marked Genestealer Entry Area. He is
free to place his reinforcement blips at any Genestealer Entry Area also. Blips must lurk, as usual, if they
are placed with an enemy model within six squares of an Entry Area.
The Chaos Forces move first, followed by the Genestealers for the first six turns. From the seventh turn
onwards the order becomes; Chaos, Dark Eldar, Genestealers for the rest of the game.
Special Rules
The CD is kept in a ceramite casing and will never be harmed or destroyed (except by a Vortex, DRAWN
GAME). It is hooked up to a mega-amplifier that is blasting the recorded sound around the Hulk and nearby
space. Any Chaos or Dark Eldar model can enter the square with the CD and pick it up for 1 AP. It can be
passed or put down without risk of breaking or dropping for 1 AP to another model in any adjacent square.
The Chaos Player needs to be aware that from the seventh turn onwards he will have the Dark Eldar Force
behind him, and entering the sector. The Dark Eldar may choose to lurk, but should be careful if they do so.
Once a lurking model enters the board it can not leave, except if it is holding the CD.
If any Chaos or Dark Eldar model is holding the CD it can leave the board via either of the two entry areas.
If a Chaos model leaves via an entry area that has Dark Eldar lurking around it, then ONLY ONE Dark Eldar
model may try and either shoot or Close Assault the Chaos model. If the Chaos model lives, then it gets
away with the CD. If it dies, the CD falls into the first square on board the Hulk. The Chaos model may
initially make a single Move and Fire action at ONE lurking Dark Eldar model as it leaves the board.
Victory
The Chaos Player wins if one Terminator is able to escape with the CD. Remember that leaving the board
with lurking Dark Eldar may not mean that he has escaped. He can still be shot or die in Close Assault. The
Chaos powers rejoice in owning a rare copy of dedicated music.
The Dark Eldar Player wins if one of his models escapes with the CD. They retreat quickly to their world and
study the CD for all of the evil that it contains.
The Genestealer Player wins if the CD remains on the Hulk.
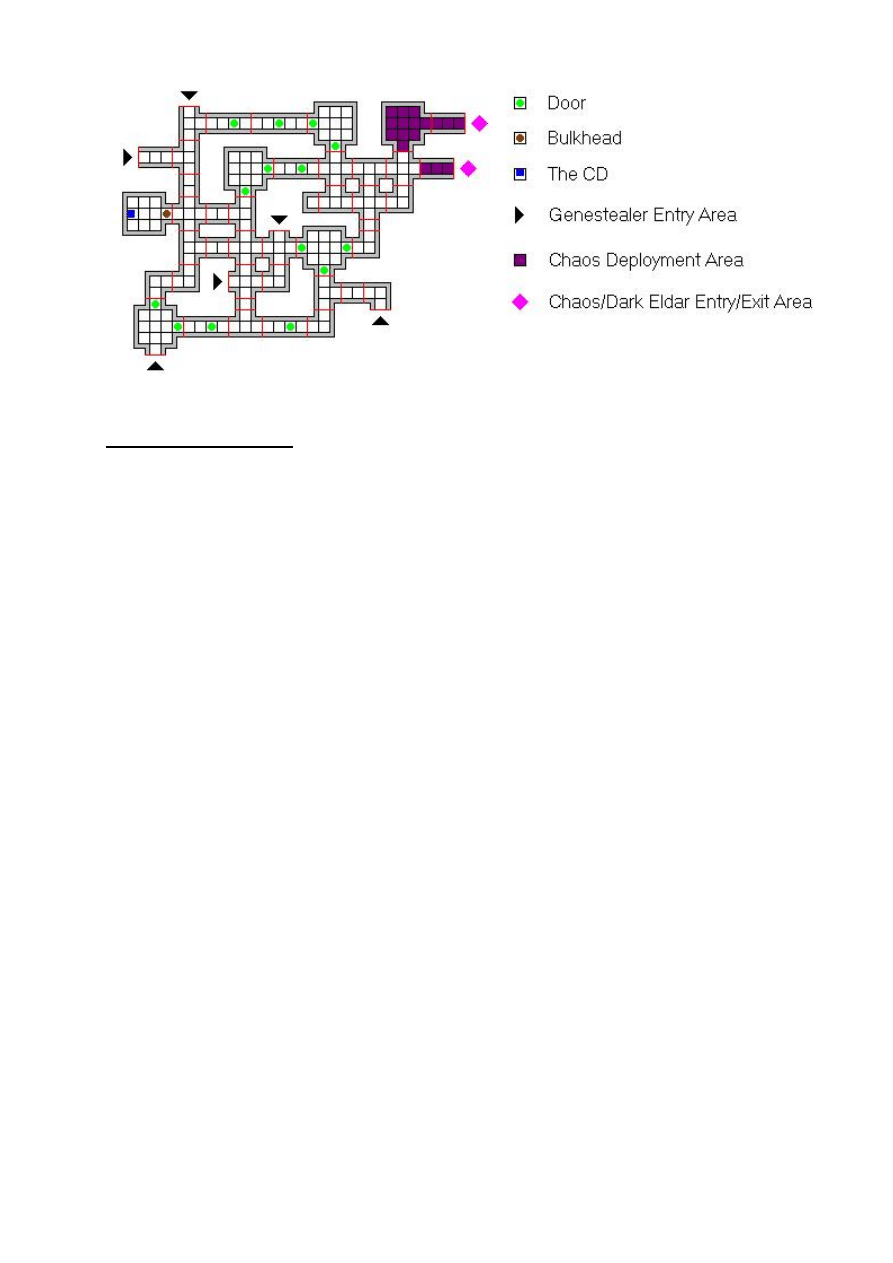
45
Destroy Those Foul Idols
The lure of the Chaos Idols was too much for the Harlequin Troupe to ignore. They could not allow such
foul icons of Daemonic worship to pass through the system unchecked. With a swift boarding action, the
Troupe began to perform. Each knew that the climax of their performance would be the destruction of the
Idols. Seconds after they breached the hull, the Harlequins sensed that they were outnumbered by their
foe. Calculated strategy would ensure that their movements were precise, and devastating. Each Trouper
was determined to celebrate the victory dance that would follow the banishment of the Chaos ship from the
system. There could be no defeat, regardless of the enemy numbers, they would triumph.
Objectives
The Harlequins are trying to destroy all five of the Chaos Idols on board the ship.
The Chaos Marines are trying to kill all of the Harlequin while defending their Idols.
Harlequin Forces
The Harlequin player has 30 Points to purchase his Force. He may choose anything that he wishes, but he
must purchase enough Vortex Grenades (for the correct models) to complete the mission (at least 3 pairs).
Chaos Forces
The Chaos player has 35 Points to purchase his Force. He must have at least 1 Sergeant or Captain. At
most he can only have 1 Captain and 3 Sergeants. He may choose anything else that he wishes including
Librarians or Dreadnoughts.
Deployment
The Chaos Force begins play anywhere in the 5 small 3×3 rooms. The Sergeant(s) and/or Captain must be
seperated from each other in different rooms so that they each lead their own squads.
The Harlequin player may then divide his force (if he wishes) between the two entry areas. The models are
placed next to their respective entry area (but they are NOT lurking like blips). The Harlequin player MUST
enter at least 6 Harlequins onto the board every turn, until they are all on the board. He can enter more if
possible, but if he enters less than 6 for any reason, then he loses ALL of the lurking models.
The Harlequins move first.
Special Rules
No models may leave the board via the entry areas, not even the Harlequin once they have stepped into
play.
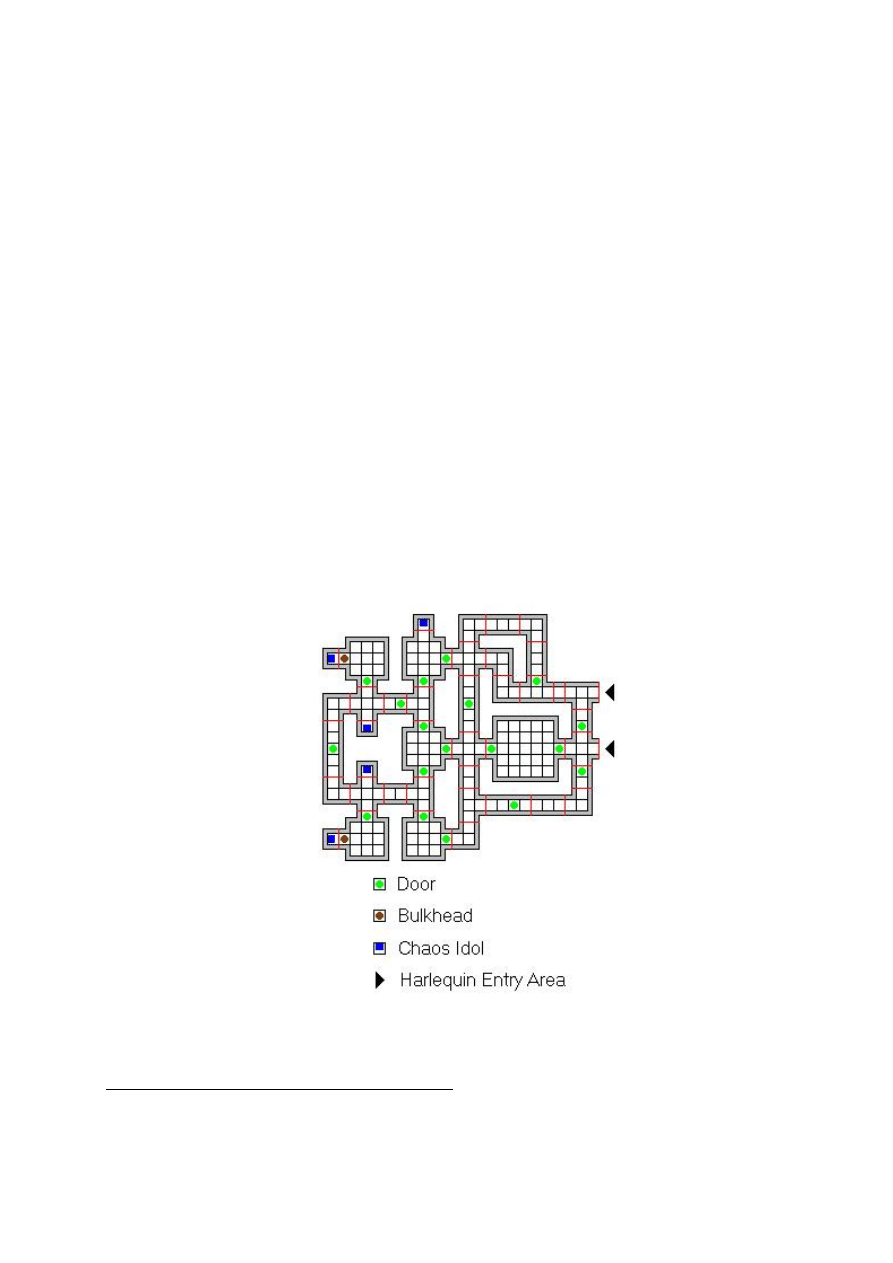
46
There are 5 Chaos Idols situated in very small temples around the ship. The only way that they can be
destroyed is by a Vortex Grenade (or a psychic Vortex Marker). Models are not allowed to enter the Chaos
Idol squares, as there is not enough room due to the altars and other fixed ornamental statues.
The Harlequins need to make sure that they have enough Vortex Grenades to use against the 5 Idols. Each
Idol is automatically destroyed if the square is hit by a Vortex Grenade. When an Idol is destroyed, remove
the single board section from the map. The Chaos Idol continually burns in the purifying warp fires that the
Vortex Grenade ignites.
When an Idol is destroyed, a portion of the Chaos power is sucked out from the ship. The Idol not only
collapses in on itself, but it also drags the soul of the nearest Chaos model instantly into the burning fires
and consumes it immediately. The Chaos model can not defend itself under any circumstances from being
destroyed by a fallen Idol (Not even an Aura). Any Chaos model can be affected, including Dreadnoughts
and Librarians. If there are two or more equally close Chaos models to a destroyed Idol, then the Harlequin
player chooses which model is destroyed. It is entirely removed from the game the instant that the Idol
takes the hit from the Vortex Grenade.
The Harlequins need to carefully plan their attack, as they must keep alive their models that are armed with
the Vortex Grenades. The Harlequin are (hopelessly ?) outnumbered and can not afford any mistakes at all.
Chaos players need to be aware of leaving powerful models near Idols. A surprise Harlequin attack may aim
for the Idol and kill the powerful model as a secondary effect.
Victory
The Harlequins win if they destroy all five Chaos Idols. The spirit of each Trouper rejoices in their victory,
whether or not each spirit survived. As the last Idol is destroyed, the Chaos Gods are so enraged that they
will automatically, and instantly kill any remaining Chaos Models on the board. Their souls will know new
tortures each morning of their eternal lives spent in the most barren wastelands of the warp.
If the Harlequins do not manage to destroy one Idol, then their spirits are hounded with eternal torment at
their dismal failure.
The Chaos Forces win if they kill all of the Harlequins, and there is at least one surviving Chaos Idol. They
will still be punished by their Gods if any of their Idols were destroyed. If no Idols were destroyed, then the
Chaos Gods reward each Marine with fresh Eldar souls to feast upon.
Marines Missions
Rapid Penetration Part 1 - Expunge Campaign
Scouting a deserted outpost, the Marines were not sure what they would find, or encounter. As often
happens, it was only by good fortune that a detachment of the chapter were in the nearby vicintity when
the local planetary defence forces were alerted by locals about "Nightmare creatures". Suspecting that
something more powerful than pirates may be behind the unrest, Sergeant Lenja was ordered to enter the
compound for an initial sweep. With very little other information, the Marines were cautious, but not afraid.

47
Tense minutes passed until their sensoriums burst to life with multiple readings, almost impossibly fast and
converging on their position. They were in the middle of an approaching wave of death by claws and fangs.
Lenja's transmittor offered the scratchy signal of hope for his squad. Push forward, fight through the throng
and enter the next sector. CAT units and X-Ray scanners confirmed it to be enemy free, for now...
Lenja's squad rallied, and fought forward. Knowing that their brothers had smashed into the next sector
ahead from the planetary surface, they would join with them. Rapidly penetrate, or stay and die where they
stood.
Objectives
The Marines are caught in the entry sector, but can not retreat as they have been cut off from behind. They
need to move forward into the next sector, at all costs.
The Genestealer player is attempting to isolate Squad Lenja and prevent as few of them as possible from
entering the next sector.
Marine Forces
The Marine player has 12 Points to spend on his Force. He may ONLY purchase POWER ARMOUR Marines.
He must have only one Sergeant (Lenja) who is leading the initial assault.
Genestealer Forces
The Genestealer player uses the Standard Blip set. He may not choose Ambush Blips.
Deployment
The Marines set up by squads in the marked blue corridor sections.
The Genestealer player has 2 starting blips which must be placed at different areas. He receives 1
reinforcement blip per turn. The Marines can not secure Genestealer entry areas in this mission.
The Marines move first.
Victory
The Marine player needs to exit 4 Marines from the board to win the mission.
If the Marine player only exits 2 or 3 Marines, then the mission is drawn.
The Genestealer player wins the mission if he manages to prevent all but 1 Marine escaping.
Campaign Notes
If you are playing the campaign as the series of linked missions then you should note the consequences of
the above victory conditions.
If the mission was drawn, then the Marine player suffers a casualty from his Forces for the next mission. He
must purchase his force for the next mission, then decide which Marine is removed. This reflects the lack of
support that Sergeant Julinon received from Squad Lenja's approaching move.
If the Genestealers won the Rapid Penetration mission, then the Marines have already lost the campaign.
Sergeant Julinon's squad was over-run in their attempt to hold the breach alone without any support from
Squad Lenja. All entrances to the compound are sealed and guarded until more Marines arrive with heavy
bombing equipment.
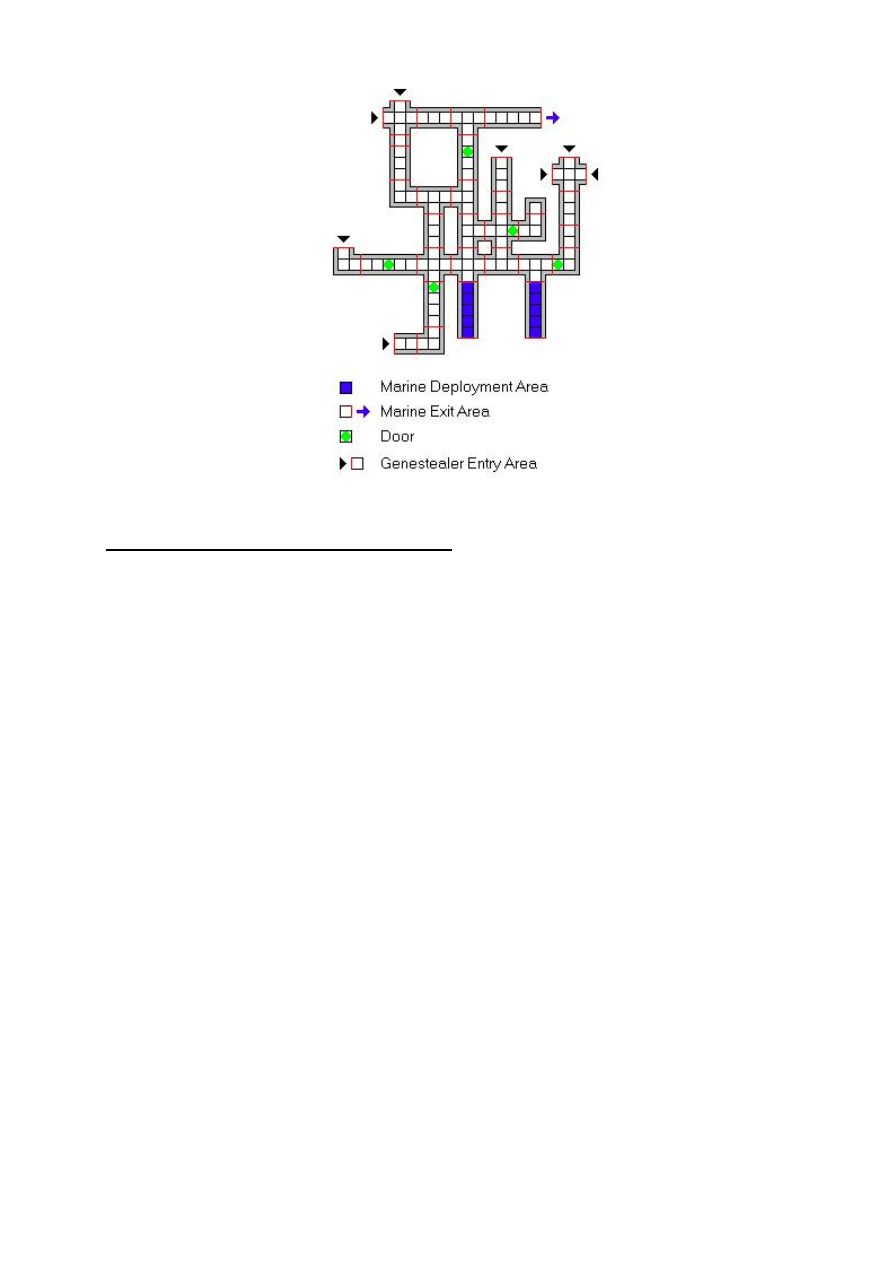
48
Perimeter Closure Part 2 - Expunge Campaign
Catching the enemy from behind on the ground level of the compound, Sergeant Julinon's squad needed to
close of their sector. Squad Lenja were now chapter memories, but their valiant service would not be
forgotten. Even in their deaths they managed to seal off part of Julinon's perimeter task. Julinon thanked
the devotion that his brother's had, as their deaths afforded him a tactical advantage.
Yet there were more Genestealers, a roused fighting vanguard that were mustering along the perimeter
lines. Squad Julinon pressed forward to close off the dangerous ground level perimeter, allowing more
Marines free access to bolster the lines from behind.
Objectives
The Marines have taken advantage of a lull in the Genestealer awareness as they blasted into the
compound bypassing the main entry area. They need to seal off the Genestealer entry areas in this sector
to slow their advance from the lower levels.
The Genestealer player must try to kill all of the Marines before they are able to seal off the sector. Failure
to do so will enable the Marines to muster a greater force against them for a lower level assault.
Marine Forces
The Marine player has 13 Points to spend on his Force. He may ONLY purchase POWER ARMOUR Marines.
He must have only one Sergeant (Julinon) who is in charge of the mission.
Genestealer Forces
The Genestealer player uses the Standard Blip set. He may not choose Ambush Blips.
Deployment
The Marines set up by squads in the marked blue corridor sections.
The Genestealer player has 2 starting blips. He receives 1 reinforcement blip per turn.
The Marines move first.
Victory
The Marine player needs to seal off the 4 Genestealer Entry Areas to win the mission.
If the Marine player only seals 3 Genestealer Entry Areas, then the mission is drawn.
The Genestealer player wins if the Marines fail to seal at least 3 Genestealer Entry Areas.
Campaign Notes
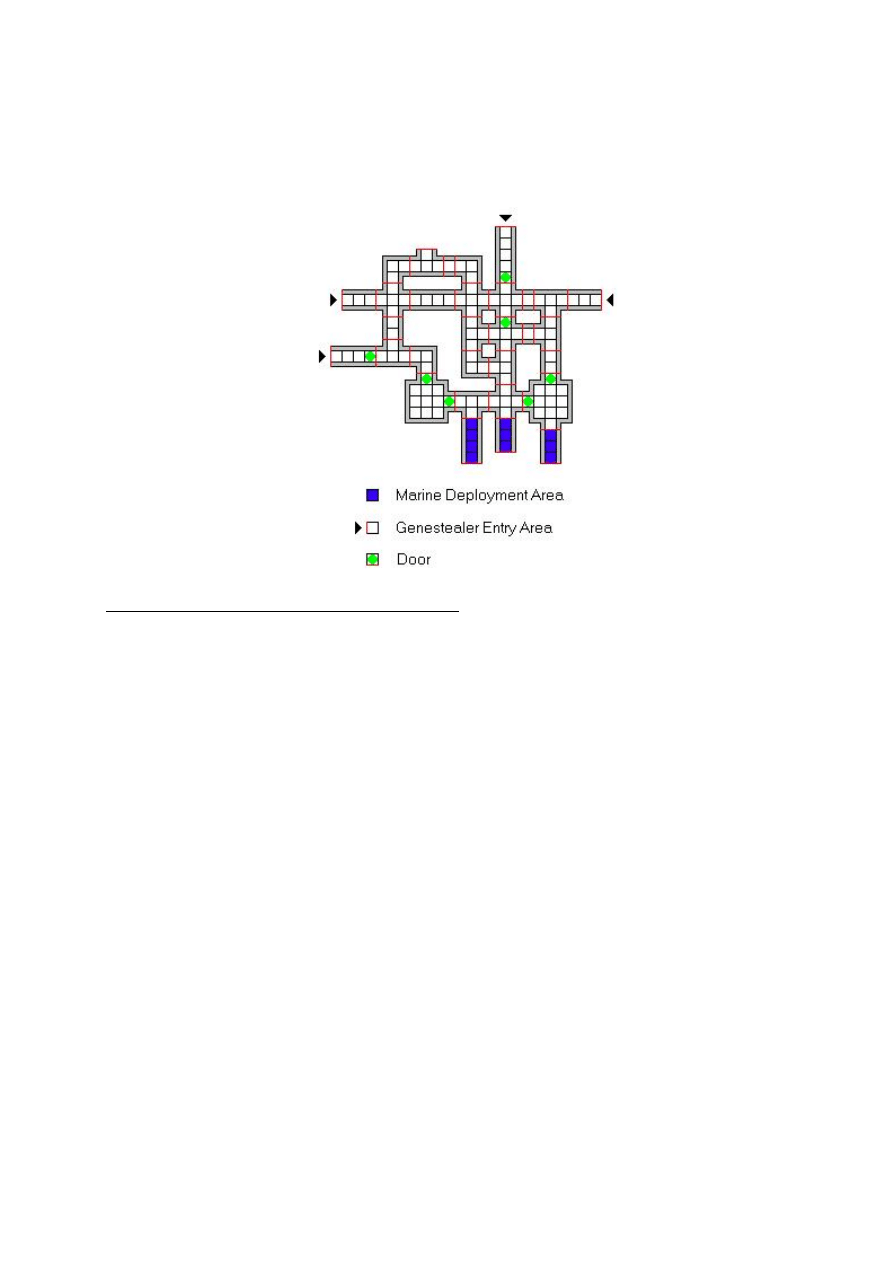
49
If you are playing the campaign as the series of linked missions then you should note the consequences of
the above victory conditions.
If the mission was drawn, then the Marine player suffers a casualty from his forces for the next mission. He
must purchase his force for the next mission, then decide which Marine is removed.
If the Genestealers won the Perimeter Closure mission, then the Marines have already lost the campaign.
Captain Nashemrarod withdraws all forces and decides to heavy bomb the compound down to a fine
powder, losing all chance of a thorough interrogation of the site.
Prolonged Stalking Part 3 - Expunge Campaign
With their initial forays into the compund proving to be successful, Captain Nashemrarod decided to take
advantage of their ascendancy on the ground level. He ordered Sergeants Brayden, Tuscarny and Forst to
drop themselves into the lower level of the compound. Expecting to meet further resistance, Nashemrarod
needed to gauge the strength of the Genestealer force that remained. If their numbers were weak he could
allow his Marines the luxury of time to rout the remaining beasts. IF their numbers were weak...
Squads Brayden and Tuscarny seperated from Squad Forst as they descended into the darkened
compound. Only the emergency lights were operating on the damp, stone walls. No doubt all power had
been cut by the Genestealers as they came under attack.
Sergeant Brayden took point with his squad as Tuscarny followed behind. They were pushing ahead leaving
Sergeant Forst's squad covering their rear a sector behind. The two Sergeants were never comfortable with
silence, which is why both men smiled as their sensoriums spoke to them so gleefully. Genestealers
surrounding them, from everywhere. Time to stalk and to hold their ground.
Objectives
After the Marines fired their first few rounds, they could tell that the Genestealer force attacking them was
only limited. There were no fanatical wave like attacks being thrust at them. Knowing this, the Marines are
desperate to hold the sector and clear it of all Genestealers. They must stay alive at all costs to keep their
forward thrust moving.
The Genestealer player must try to kill all of the Marines and claim the sector as their own. With a limited
force, they need to be careful, and to set their traps wisely.
Marine Forces
The Marine player has 24 Points to spend on his Force. He may ONLY purchase POWER ARMOUR Marines.
He must have only two Sergeants (Brayden and Tuscarny) who are both in charge of the mission.
Genestealer Forces

50
The Genestealer player uses the Standard Blip set; however he only has a total of 30 blips to complete the
mission. He may use Ambush Blips if he chooses, in which case he can take one per turn in place of a
normal blip. Each Ambush Blip is only counted as one of the 30 blips if it is revealed to be a Genestealer,
otherwise it is disregarded. The Genestealers have had more than enough time to hide themselves in the
sector, so the Marines need to be very wary.
Deployment
The Marines set up by squads in the two marked blue rooms. Place Squad Brayden in the room with four
exits.
The Genestealer player has 2 starting blips. He receives 2 reinforcement blips per turn. Remember that he
can take Ambush Blips, and they only count to the 30 blip total if they are revealed to be a Genestealer.
The Marines are allowed to seal off any Genestealer Entry Areas if they wish. If any blips are lurking at a
sealed Genestealer Entry Area, then it is lost and it still counts as one of the Genestealer's 30 blips.
The Marines move first.
Victory
The last remaining model alive wins the mission.
Remember that the Genestealer player may also use Ambush Blips, so even in the unlikely event that the
Marines manage to seal off all of the Genestealer Entry Areas, the Genestealer player can still continue on
using 1 Ambush Blip per turn.
If there are no models left alive on the board at all, then the Genestealers win.
Campaign Notes
If the Genestealers won the mission, then the Marines have lost the campaign. Squad Forst is withdrawn,
and the compound is abandonded in readiness for the waiting bombardment.
Hold Tight Part 4 - Expunge Campaign
Reports from Sergeant Brayden indicated that his Squad still had presence in their sector. Sergeant
Tuscarny was killed, along with most of his squad. They died for the greater glory. Brayden never mourned
a battle brother lost in true service to the Emporer of Humankind. He worshipped their death with the
mystical ceremony that it deserved. For the fallen brothers were those who would greet their Father at the
moment of their deaths. Brayden also managed to relay back some crucial information - there were Hybrids
surfacing. One of his finest warriors was taken by surprise and cut down with Autocannon fire. Brayden
sent the word to Sergeant Forst to expect the worst, heavily armed Hybrids approaching his sector.
Captain Nashemrarod was not a gambling man, he would never squander the lives of his Marines on a
whim. Knowing that Forst was about to be assaulted by Hybrids heading for the surface, he decided to end
the battle swiftly... the Terminators were ready, and he would lead them himself.

51
Sergeant Forst heard his orders above the static - "Hold tight, the Terminators are coming." Sergeant
Forst's squad were spread throughout their sector performing routine search operations. Now they were
about to be overrun with Hybrids making a dash to the surface through all of their secret, hidden
passageways.
"Hold tight." Thought Forst, "The Terminators are coming..." No other thought could possibly comfort him
more.
Objectives
The Marines are about to be overrun with a powerful force of Hybrid Genestealers. They must try to retain
a presence in the sector for enough time to allow the Terminators to approach.
The Genestealer player must try to kill all of the Marines so that he can ambush the approaching
Terminators.
Marine Forces
The Marine player has 15 Points to spend on his Force. He may ONLY purchase POWER ARMOUR Marines.
He must have only one Sergeant (Forst) who is in charge of the mission.
Genestealer Forces
The Genestealer player uses the Expanded Blip set. He may not use Ambush Blips.
Deployment
The Marine player takes any three of his Marines and
places them in a room of his choice. Then, the
Genestealer player takes another three Marines and
places them in an unoccupied room of his choice.
Finally, all of the remaining Marines are placed by the
Marine player in the last unoccupied room.
The Genestealer player has 3 starting blips. He
receives 3 reinforcement blips per turn for the first 10
turns. After that he gets no more blips. The table lists
the result of drawing a lettered blip.
The Marines move first.
Blip
Model
A
Hybrid with Autocannon
B
Hybrid with Conversion Beamer
C
Hybrid with Missile Launcher
D
Hybrid with Bolter
E
Hybrid with Lasgun
F
Hybrid with Plasma Gun
G
Hybrid with Heavy Bolter and 1 Hellfire
Shell
H
Hybrid with Las-Cannon
I
Hybrid with Bolt Pistol and Chain Sword
J
Hybrid with Heavy Plasma Gun
Victory
If at the end of 15 complete turns there is still a Marine model alive on the board, then the Marines win.
If at the end of 12 complete turns there is still a Marine model alive on the board, then the mission is
drawn.
If there are no surviving Marines on the board at the end of 12 turns, then the Genestealers win.
Campaign Notes
If the Marines won the mission, then the Genestealers lose 2 random lettered blips from A - I (chosen by
the Marine player) for the final mission.
If the Genestealers won the mission, then the Marines have 5 less points to spend on their force for the
final mission.
If the mission was drawn, then the Genestealers lose 1 random lettered blip from A - I, and the Marines
have 3 less points to choose their force for the final mission.
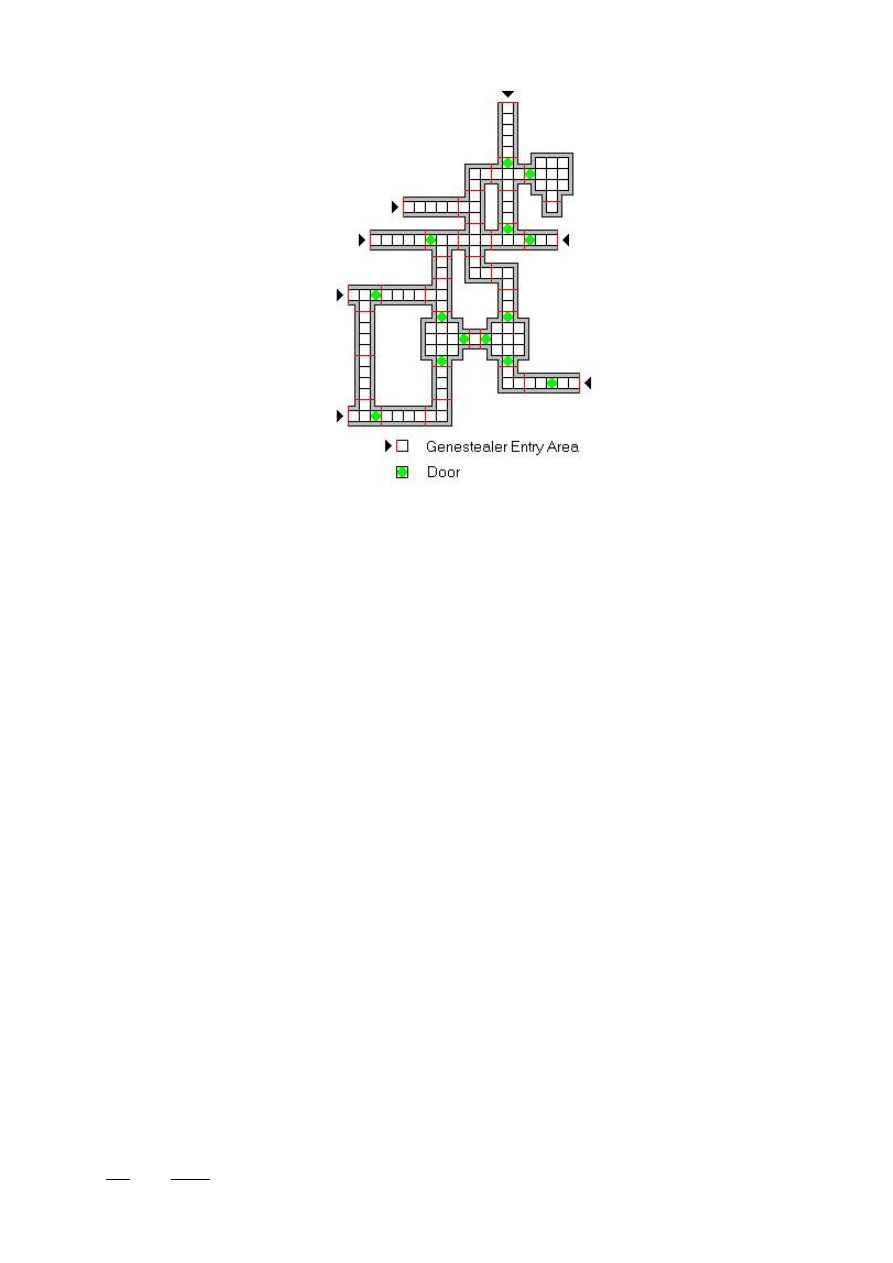
52
Slow The Swarm
The few Marines had penetrated deep into the Hulk beyond the initial boarding perimeter. Each looked grim
as their sensoriums burst to life with massive amounts of fast moving blips, all converging on their location.
However, they were not to retreat. There was no way that they could relinquish the tactical advantage of
their forward position. Their orders were clear; slow the swarm and buy precious time for the Terminators
to arrive. C.A.T units reported the approaching swarm was only the vanguard of the enemy, their own
leaders were lumbering further behind. The swarm could not be allowed to breach the sector and run
unchecked into the advancing Terminators. Without the full heavy support of the Terminators, the boarding
action would fail.
The Marines stood ready and were poised to hold their defensive positions against the swarm. Then the
rush began, Bolters screamed shells of death, tearing into the first ranks of Genestealers. For every Stealer
killed, two more were bursting from behind with charging fury.
Objectives
The Marines are trying to buy time for the Terminators by killing as much of the initial wave of the
swarming Tyranids as possible. They are desperately defending the Exit Areas from any swarm creatures
escaping towards the Terminators.
The Tyranid player is trying to exit the sector so he can swamp the unprepared Terminators as they
approach. However, he is also trying to minimalise his casualities so that his ambush force is strong enough
to take on the Terminators.
Marine Forces
The Marine player has 18 Points to spend on his Force. He may ONLY purchase POWER ARMOUR Marines.
They were able to strike deeper into the Hulk with the slower moving Terminators closing in from behind.
Tyranid Forces
The Tyranid player uses the Expanded Blip set. No Ambush Blips are allowed. Numbered Blips are normal
Genestealers. Refer to the table below for the lettered Blips.
Blip
Model
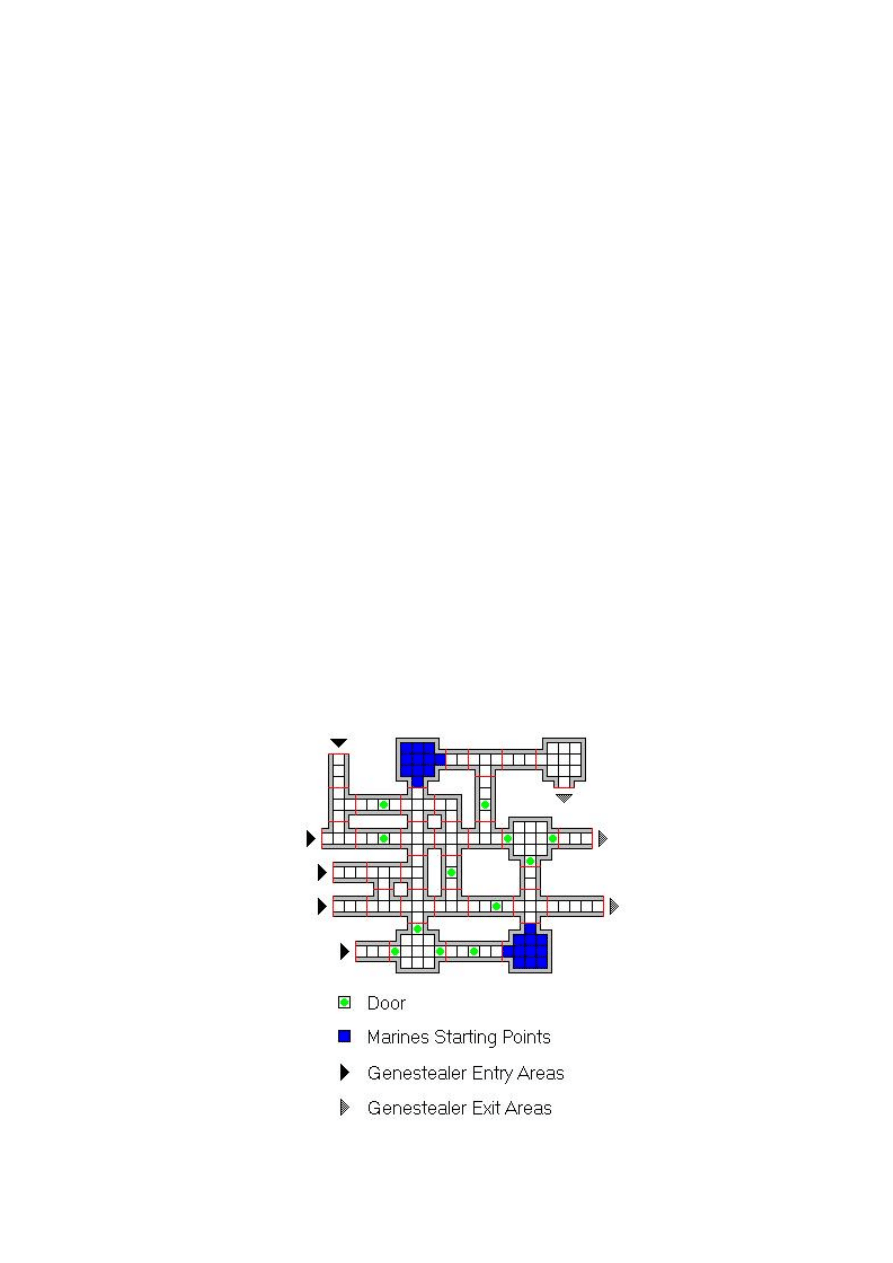
53
A
1 Termagant with Devourer
B
1 Termagant with Devourer
C
1 Termagant with Devourer
D
2 Hormagaunts with Small Scything Talons
E
2 Hormagaunts with Small Scything Talons
F
2 Hormagaunts with Small Scything Talons
G
3 Termagants with Fleshborers
H
3 Termagants with Fleshborers
I
3 Termagants with Fleshborers
J
3 Termagants with Fleshborers
Deployment
The Marines set up by squads in the marked blue rooms. All members of the same squad must be in the
same room at the start of play.
The Tyranid player does not have any starting blips. He receives 5 reinforcement blips per turn.
The Marines move first.
Special Rules
Each of the 5 reinforcement blips must start at a different entry area. Blips are not allowed to lurk. Each
blip MUST enter play on the turn that it is placed, even if there is a Marine within 6 squares. If the blip can't
enter play (flamer effect marker), then it is lost. Lost blips do not count towards the Marines' kills.
Victory
The game immediately ends in a Marine victory as soon as the Marines have killed 40 swarm creatures. The
Marines have been able to slow the progress of the swarm long enough for the Terminators to arrive.
The game immediately ends in a Tyranid victory as soon as one of the swarm creatures manages to
escape. The Terminators will be ambushed as they approach the sector.

54
Kill Their Power
The Marines were retreating. Earlier they had busted into a section of tombs that needed exploration. The
Scouts reported Necrons in stasis, so they pulled back. The Marines went in unprepared for the full force of
the waking Necron army, they knew it was time to retreat, and to rethink their strategy. Fortunately, there
were some Terminators who were close to a group of Gauss Generators along their line of retreat.
Destroying the generators would impact upon the Necrons as they woke from their lifeless slumber.
The Necrons acted in defence and flanked the Terminators to the sector of tombs containing the
generators. Losing the generators would hinder the further revival of more Necrons, leaving them exposed
for any follow-up assaults by the Marines. The immediate survival of the Terminators was secondary to
their efforts to destroy the generators. Each Marine knew that they had been given their orders, and that
they were completely surrounded by their foe.
Objectives
The Marines are trying to destroy all four Gauss Generators to kill some of the Necron's power.
The Necrons are trying to kill all of the Marines, while saving their Gauss Generators.
Marine Forces
The Marine player has 20 points to purchase his force of Terminators. He must purchase at least two
squads of Terminators.
Necron Forces
The Necron player has 20 points to purchase his force. He must have at least one Warrior Squad, or one
Flayed One Squad. Otherwise he is free to choose the remainder of the force.
Deployment
Marines
The Marine player must place at least one squad in each of the pink Deployment Areas.
Necrons
The Necron player must split up his force so that he has models in each of the four green Deployment
Areas. He is allowed to split up squads so they can be placed in different rooms at the start of play.
The Marines move first.
Special Rules
The Gauss Generators are powerful devices that radiate Gauss energy which revitalises any Necron. Any
dead Necron may modify his Self Repair roll by +1 when it is within 6 squares of a working Gauss
Generator. A dead Necron does not need another similar model within 6 squares if it is Self Repairing via a
Gauss Generator.
As powerful as the Gauss Generators are, they are fragile, and can be destroyed in the same way as a door.
They block movement in their section, even when they are destroyed.
When the Necron force is reduced to 25% or less of its starting number it will Phase Out. Provided there is
at least one Marine remaining, the Marines will automatically win.
Victory
If the Marines destroy all four Gauss Generators, they win.
If the Necrons kill the Marines and they have at least two working Gauss Generators, they win.
If the Marines are killed, but they managed to destroy three Gauss Generators, they can claim a draw.
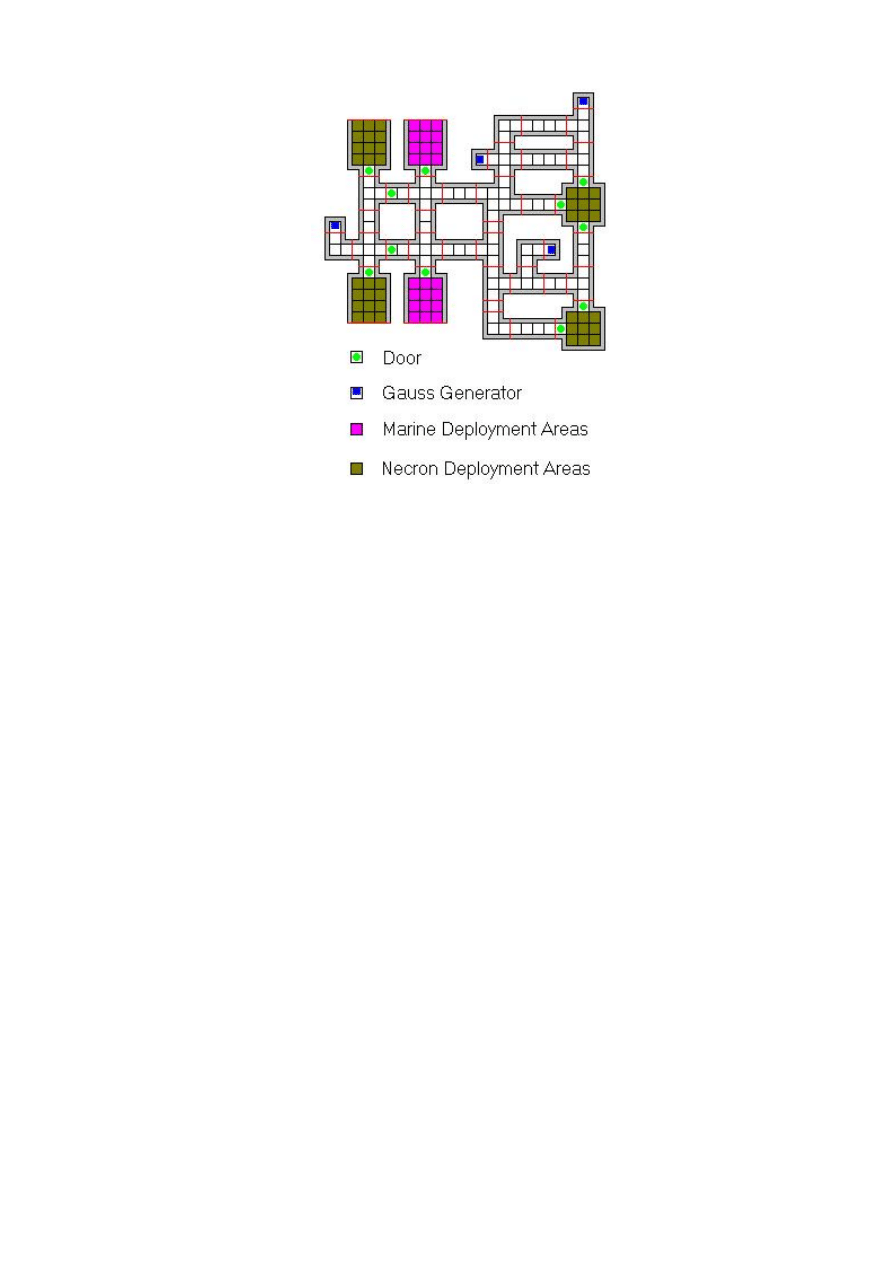
55
Wyszukiwarka
Podobne podstrony:
White Dwarf 199 Space Hulk Bringer Of Sorrow Campaign
Space Hulk
White Dwarf 203 Space Hulk The Fate Of The Sword Of Halcyon Campaign
WH40K Gav Thorpe Space Hulk
ADOBE PHOTOSHOP CS6 EXTENDED PL
word formation od EXTEND
Grosz Virtual and Real Space Architecture
extended model
Mitsubishi Space Star
Analiza Space, Inżynieria Produkcji, Zarządzanie Strategiczne
To what extend?n?ucation help protect the environment
A neural network based space vector PWM controller for a three level voltage fed inverter induction
Creating Space in the Midfield
Your Bones in Space
HONDA 2006 2007 Ridgeline Bed Extender User's Information
Iron Space Bitwa o Merkurego
extended
więcej podobnych podstron