
Solar Greenhouse Plans
Calling a greenhouse solar is somewhat redundant, since all greenhouses
are solar heated to some extent. The greenhouse itself traps the heat
each day, as anyone who has been inside a greenhouse for just a few
minutes on a sunny day knows. But although a traditional greenhouse acts
as a natural solar collector on sunny days, it does not retain the sun's
heat at night. Consequently, 75 to 80 percent of the cost of heating a
greenhouse by conventional energy sources is expended at night.
To retain the sun's heat, the greenhouse requires something into which
the heat can sink and be stored. This heat sink can consist of barrels of
water, rocks, concrete walls, or other thermal mass. At night the stored
heat emanates back through the greenhouse.
There are two types of solar energy systems: active and passive. The
system most commonly used in home greenhouses is passive. Here, a
thermal mass, such as rocks or water-filled drums, captures heat during
the day and radiates it back at night.
The active system requires electricity or another conventional source of
energy to pump heated air into a storage area, such as a basement, filled
with rocks or water drums. More efficient than passive solar heating, this
type of system is also more expensive and more complex.
Both types of solar systems work better in areas with a high percentage
of sunny days, even if they are cold, than they do in areas where overcast
days are common.
Solar Heat Storage
Heat arrives from the sun in the form of short waves, which strike and
heat objects in the greenhouse. A south-facing greenhouse with a sloping
roof permits maximum penetration of sunlight. Inside the greenhouse the
heated objects radiate warmth in the form of long waves, which do not
readily penetrate the greenhouse covering. These long waves are the ones
that can be trapped and stored.
Probably the most widely used heat sink is water in ordinary 55-gallon
drums painted a dark, non-reflective color for better heat absorption.
Piles of rocks in wire-mesh cages are also common. Place the storage units

where they will collect the most heat. Make sure they don't touch the
exterior wall or glazing; the outside cold will quickly draw the heat away.
To calculate the minimum heat storage required, allow 2 gallons of water
or 80 pounds of rocks for each square foot of greenhouse that admits
sunlight directly onto the storage units. Generally, just calculate the
south-facing roof and wall.
Another efficient heat sink consists of either a brick wall or cinder
blocks poured full of concrete. If you already have an attached
greenhouse, cover the back wall--the house wall--with bricks. Buy black
bricks or paint them dark for maximum heat absorption. Firmly affix this
brick facing to the side of the house with steel braces set in mortar and
screwed to the house studs at regular intervals. The disadvantage of
most traditional heat sinks is that they are cumbersome and take up a
great deal of space. Newer lightweight materials occupying less space are
in the experimental stage. For example, researchers at the University of
Delaware are studying solar heat storage in inexpensive chemical
compounds known as eutectics. These salts store the heat from the sun's
rays at a constant temperature for use on cloudy days and at nights.
Whatever type of heat sink you use in a passive system, you can't count
on it to eliminate conventional heating altogether unless your greenhouse
operates under ideal conditions. You should have a conventional backup
unit ready, although you may not need it very often. You will probably find
that the solar heat storage principles put into practice in your
greenhouse will help you conserve energy and reduce your heating costs.
Insulation
All the heat you hope to store in your greenhouse will be lost if you can't
prevent it from escaping as soon as it is radiated from the heat sink. The
greenhouse should be made as airtight as possible. Put weather stripping
around the doors and vents, and use a flexible sealant to close all joints
between the roof and walls. Make sure the glazing fits snugly.
Even in a tightly sealed greenhouse, heat is lost through the glazing
material. The quickest Way to cut this loss is to install double or triple
glazing, line the interior with inflated layers of polyethylene plastic, or
use insulating greenhouse curtains that roll down the inside of the glazing
at night.
The north wall of the greenhouse provides a quick escape route for heat.
You can retain some of that heat by covering the wall with a material that
insulates as well as reflects light back into the interior. For an aluminum

and glass structure, one effective method is to seal the north wall with
panels of white, rigid insulation cut to fit each opening. In a frame
greenhouse, you can fill the north wall with fiberglass insulation and cover
it with exterior grade plywood. Apply a coat of water seal to the plywood
and then paint it white.
When thinking about insulation, it is easy to forget the floor and
foundation. During the winter months in some regions, the ground is
frozen many inches deep. That cold surface is a severe drain on
greenhouse heat. To block it, put sheets of rigid insulation 1 or 2 inches
thick around the outside of the foundation from the footing to the top of
the foundation wall. An alternative is to dig a 4-inch-wide trench down to
the bottom of the footing and fill it with pumice stone.
The floor, particularly a brick or flagstone floor is a good heat sink, but
its heat gain will be quickly lost if it is not insulated. An effective
insulation consists of 4 inches of pumice rock laid beneath the flooring.
Water will still drain through.
Solar Heat Sinks
Here are some materials used for capturing and storing solar heat in
greenhouses:
Stacked water filled steel drums
Concrete-filled cinder or pumice concrete blocks
Brick, stone, or adobe wall
Concrete slab on top of a bed of rocks
Bin or loose pile of rocks
Water filled steel drums in metal racks
Concrete wall and slab floor
Rock wall held in place with wire-mesh fencing
Passive System
The sun's warmth is deposited and held in the thermal-mass heat sink
during the day. At night, this heat radiates out and keeps the greenhouse
warm.
Active System
The sun's heat warms the transfer fluid (water or air) in a solar collector.
The fluid is pumped to another location and stored for redistribution as
heat later.

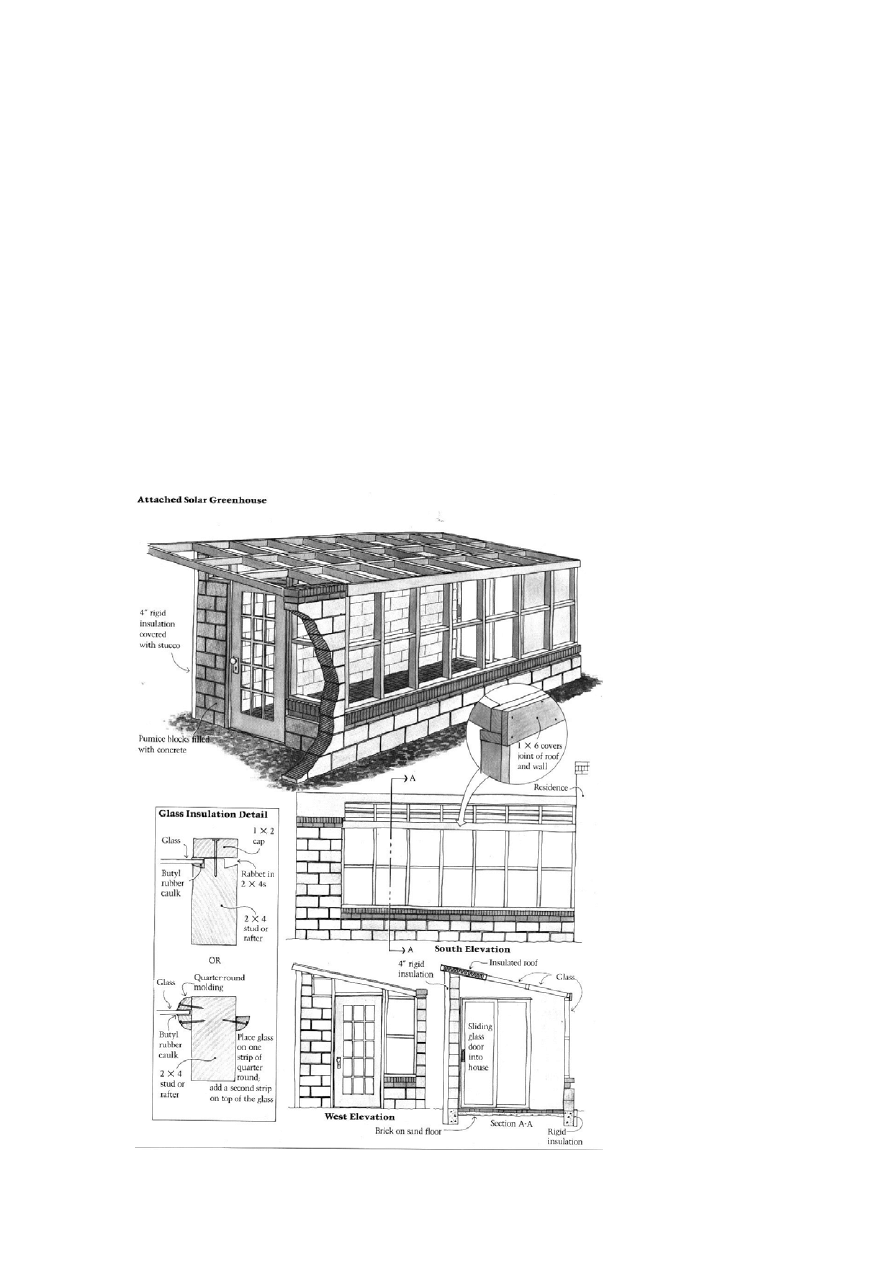
Attached Solar Greenhouse
Designed and built by New Mexico landscape architect John Mosely for
his own Santa Fe home, the solar greenhouse shown below is attached by
a sliding glass door to the house not only for convenience but also to take
advantage of greenhouse heat during the winter. In the summer, cooler
air in the house is vented through the greenhouse to the outside.
The roof of the 8- by 14-foot glass and redwood structure is angled for
maximum exposure to the summer sun. The upper third of the roof is
covered with insulation to provide relief from the overhead summer sun.
The 14-foot-wide north wall, made from pumice block poured with
concrete, is the heat sink. The outside of the 8-foot-high wall is insulated
with 4-inch-thick rigid insulation stuccoes to protect it from the weather.
The front wall and the roof were originally designed to hold only one pane
of glass in each opening, but the local code required two. The code also
required that the glass windows be separated at the corners, so the block
wall was extended and a work area formed beside the outside entrance.
You can adapt this greenhouse to your area, eliminating the block wall
extension if it is not required locally. Begin the construction by laying out
the site and excavating the ground so that the floor of the greenhouse
will be level with the house floor. Position slip forms of 1 by 4s for the
footing around the inside perimeter and level them. Form the outside of
the footing with rigid insulation braced against the excavated wall. Pour
the concrete; when the footing has hardened, build the walls with
standard sized pumice blocks.
Rabbet each vertical stud, plus the top and bottom plates and the
crosspieces, to receive the panes of glass. If you don't have access to a
table saw for rabbeting, you can install the glass using quarter-round
molding or 1 by 1 redwood strips as stops nailed to the studs and rafters.
The next step is to frame piece by piece the west wall, which holds the
exterior door. The 2 by 6 door frame goes in first. The next elements to
be installed are the top plate, the door header, and the window and vent
frames.
With the front and side walls in place, it is time to put up the roof.
Instead of installing each rafter individually, measure and lay out the
roof as if it were a wall. Cut the front end of the rafters so that they are
in a vertical line with the front wall. Rabbet each piece as you did the
front wall. Then nail together the entire roof section. Lift it into place
and toenail it to the top plate of the front wall; nail on a 1 by 6 to cover
the seam. With exterior-grade plywood, cover the back area where the
roof extended above and slightly over the wall; insulate it inside and
outside.
Install the glass, sealing each piece on both sides with butyl rubber. Use 1
by 2 strips to hold the glass in place. Complete the greenhouse by
installing a brick-and-sand floor.
Wyszukiwarka
Podobne podstrony:
greenhouse and storage building
greenhouse and storage building
LOGO! in Building Automation
'Building the Pack 3 The Alpha's Only
Building A Wind Machine
4 2 2 7 Lab Building an Ethernet Crossover?ble
Steps in Building a Shed
konspekt obwód stacyjny z użyciem body building
12x16 Greenhouse szklarnia
24 foot pole utility building
SCI03 Model Making Workshop Structure of Tall Buildings and Towers
building tools
D20 building guideline FEWE pl
Core Wall Survey Control System for High Rise Buildings
greenhouse 2
więcej podobnych podstron