Part 2 of 3
ZOOM
SIZED FOR PRINT
Page 1 of 24
2000 Toyota Celica GT -S L4-1762cc 1.8L DOHC MFI - Part 2 of 3
12/13/2001
http://www.alldatadiy.com/alldata/AFI~V1046639~C34697~R0~OD~N/0/77993956/788...
ZOOM
SIZED FOR PRINT
Page 2 of 24
2000 Toyota Celica GT -S L4-1762cc 1.8L DOHC MFI - Part 2 of 3
12/13/2001
http://www.alldatadiy.com/alldata/AFI~V1046639~C34697~R0~OD~N/0/77993956/788...
ZOOM
SIZED FOR PRINT
Page 3 of 24
2000 Toyota Celica GT -S L4-1762cc 1.8L DOHC MFI - Part 2 of 3
12/13/2001
http://www.alldatadiy.com/alldata/AFI~V1046639~C34697~R0~OD~N/0/77993956/788...
ZOOM
SIZED FOR PRINT
Page 4 of 24
2000 Toyota Celica GT -S L4-1762cc 1.8L DOHC MFI - Part 2 of 3
12/13/2001
http://www.alldatadiy.com/alldata/AFI~V1046639~C34697~R0~OD~N/0/77993956/788...
ZOOM
SIZED FOR PRINT
Page 5 of 24
2000 Toyota Celica GT -S L4-1762cc 1.8L DOHC MFI - Part 2 of 3
12/13/2001
http://www.alldatadiy.com/alldata/AFI~V1046639~C34697~R0~OD~N/0/77993956/788...
REASSEMBLY
NOTICE:
l
The automatic transaxle is composed of highly precision-finished parts, necessitating careful inspection before
reassembly because even a small nick could cause fluid leakage or affect the performance. The instructions here are
organized so that you will work on only one component group at a time. This will help avoid confusion from similar-
looking parts of different sub -assemblies being on your workbench at the same time. The component groups are
ZOOM
SIZED FOR PRINT
Page 6 of 24
2000 Toyota Celica GT -S L4-1762cc 1.8L DOHC MFI - Part 2 of 3
12/13/2001
http://www.alldatadiy.com/alldata/AFI~V1046639~C34697~R0~OD~N/0/77993956/788...
inspected and repaired from the converter housing side. As much as possible, complete the inspection, repair and
reassembly before proceeding to the next component group. If a defect is found in a certain component group during
reassembly, inspect and repair this group immediately. If a component group cannot be assembled because parts are
being ordered, be sure to keep all parts of that group in a separate container while proceeding with disassembly,
inspection, repair and reassembly of other component groups. Recommended
ATF
: TYPE T-IV or equivalent
l
All disassembled parts should be washed clean and any fluid passages and holes should be blown through with
compressed air.
l
Dry all parts with compressed air-never use shop rags.
l
When using compressed air, always aim away from yourself to prevent accidentally spraying
ATF
or kerosene on
your face.
l
The recommended automatic transaxle fluid or kerosene should be used for cleaning.
l
After cleaning, the parts should be arranged in the correct order for efficient inspection, repairs, and reassembly.
l
When disassembling a
valve body
, be sure to match each valve together with the corresponding spring..
l
New discs for the brakes and clutches that are to be used for replacement must be soaked in
ATF
for at least 15
minutes before reassembly.
l
All oil seal rings,
clutch discs
, clutch plates, rotating parts, and sliding surfaces should be coated with
ATF
prior to
reassembly.
l
All gaskets and rubber O-rings should be replaced.
l
Do not apply adhesive cements to gaskets and similar parts.
l
Make sure that the ends of a snap ring are not aligned with one of the cutouts and are installed in the groove correctly.
l
If a worn bushing is to be replaced, the sub -assembly containing the bushing must also be replaced.
l
Check thrust bearings and races for wear or damage. Replace if necessary. Use petroleum jelly to keep parts in place.
l
When working with Formed In Place Gasket (FIPG) material, you must observe the following: Using a razor blade
and a gasket scraper, remove all of the old packing from the gasket surface.
Thoroughly clean all components to remove all of the loose material. Clean both sealing surfaces with a non -residue solvent.
Parts must be reassembled within 10 minutes of application. Otherwise, the packing Formed In Place Gasket (FIPG) material
must be removed and reapplied.
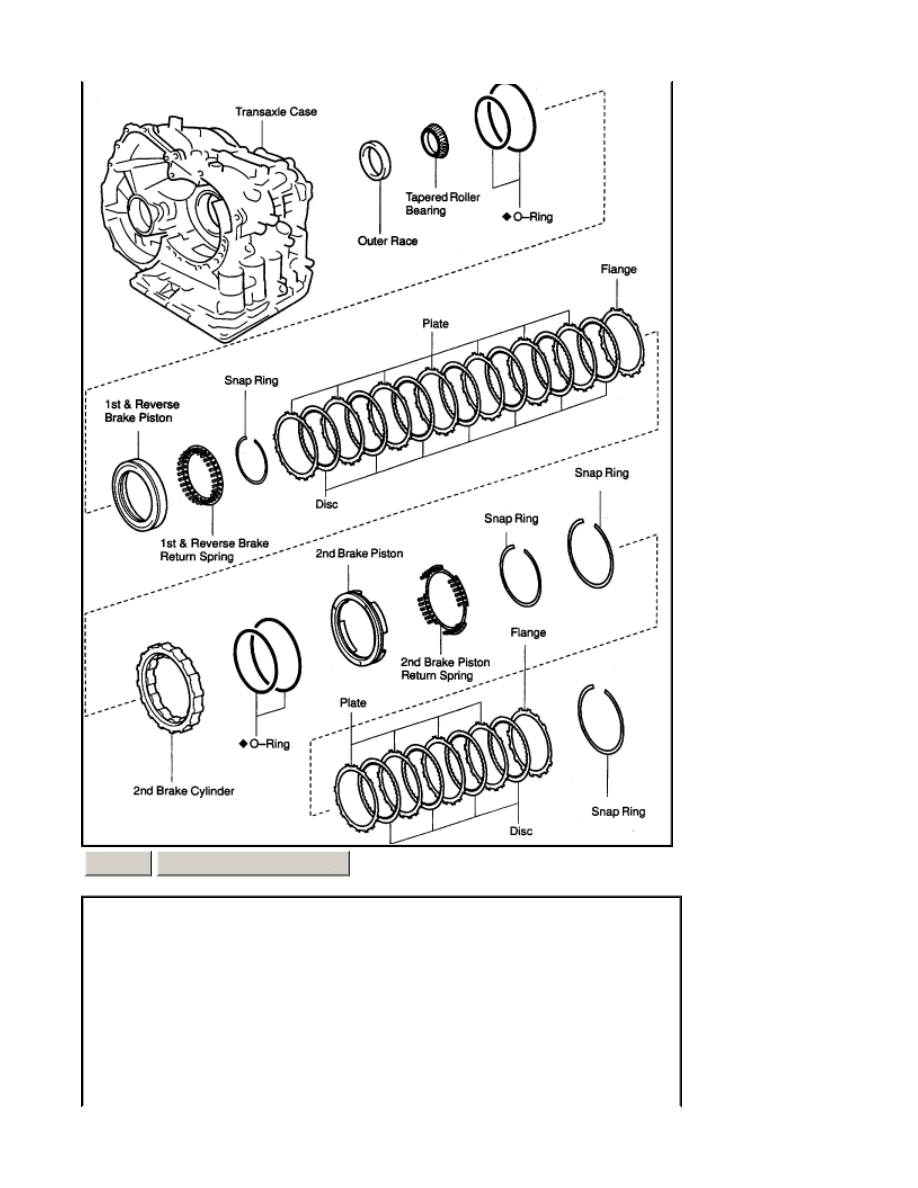
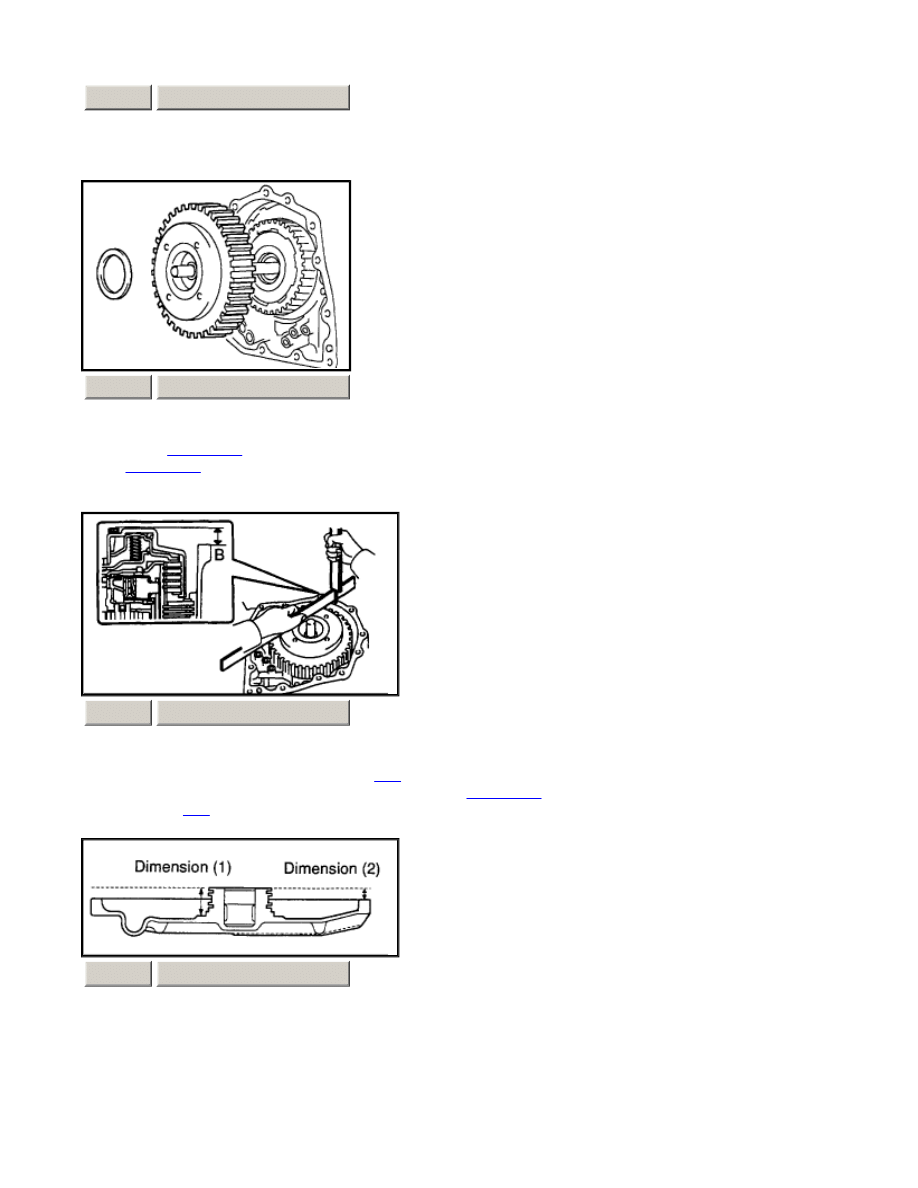
15.
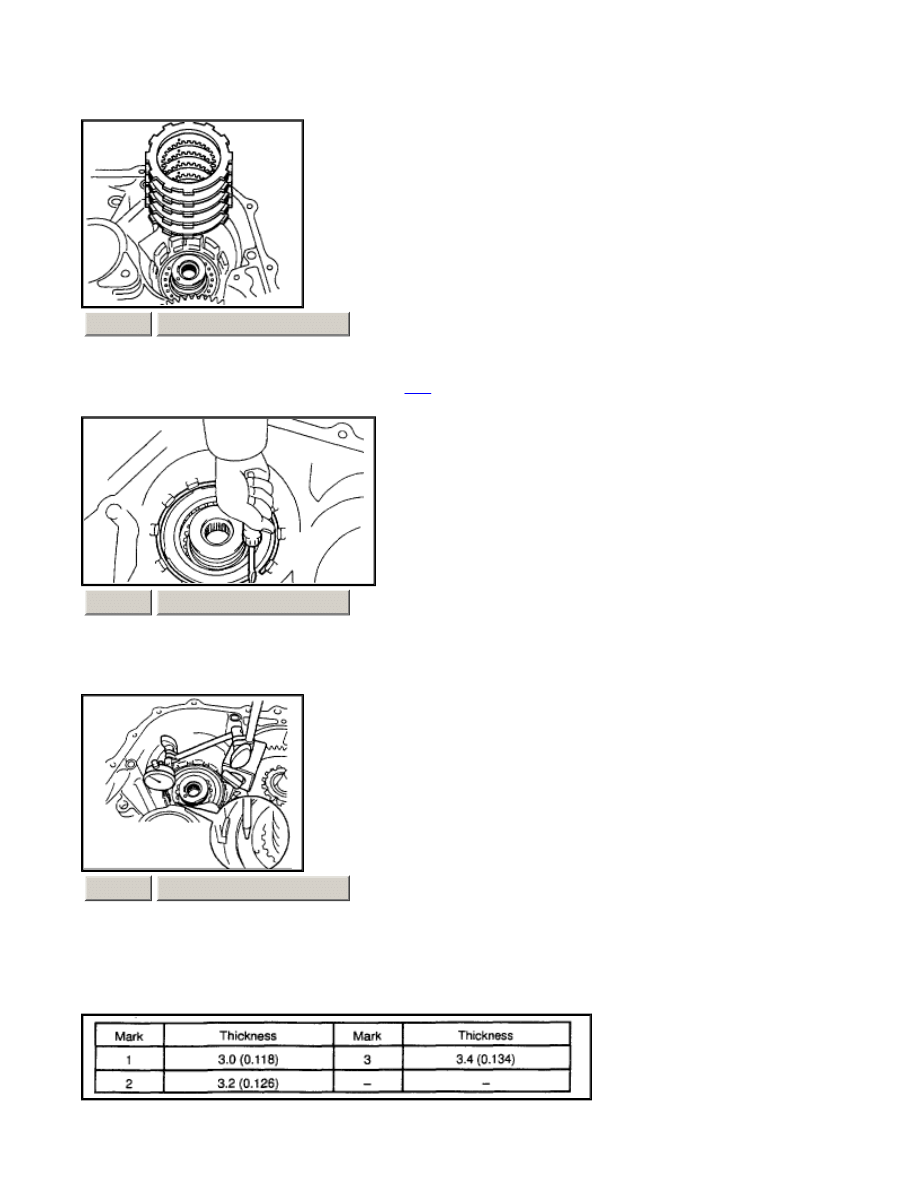
INSTALL 2ND BRAKE CYLINDER ASSEMBLY, ONE WAY
CLUTCH
NO.1 AND REAR PLANETARY SUN
GEAR ASSEMBLY
a.
Install the 2nd brake cylinder assembly to the transaxle
case
.
ZOOM
SIZED FOR PRINT
Page 7 of 24
2000 Toyota Celica GT -S L4-1762cc 1.8L DOHC MFI - Part 2 of 3
12/13/2001
http://www.alldatadiy.com/alldata/AFI~V1046639~C34697~R0~OD~N/0/77993956/788...
b.
Using a screwdriver, install the snap ring.
c.
Using vernier calipers, measure the inside diameter. Inside diameter: More than 167 mm (6.57 inch) NOTICE:
¡
Because the taper snap ring has the positioning direction, check it when installing.
¡
When the diameter does not satisfy the specified value, replace the snap ring with new one.
d.
Install the one-way clutch outer race sleeve to the 2nd brake cylinder assembly. NOTICE: Check the positioning
direction of the outer sleeve.
ZOOM
SIZED FOR PRINT
ZOOM
SIZED FOR PRINT
ZOOM
SIZED FOR PRINT
Page 8 of 24
2000 Toyota Celica GT -S L4-1762cc 1.8L DOHC MFI - Part 2 of 3
12/13/2001
http://www.alldatadiy.com/alldata/AFI~V1046639~C34697~R0~OD~N/0/77993956/788...
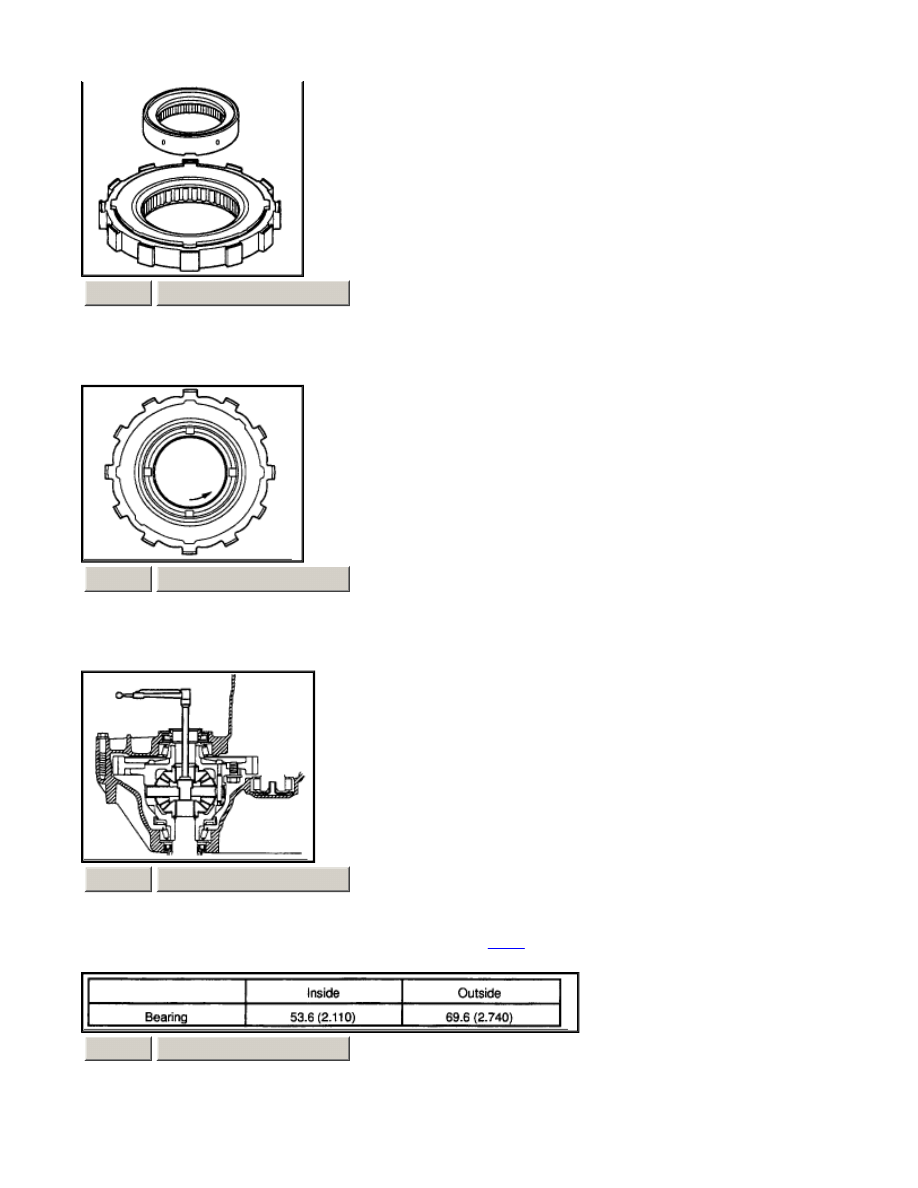
e.
Install the inner race to the one-way clutch. NOTICE: Check the direction of the inner race.
f.
Check the rotating direction of one-way clutch for the lock or free operation as shown in illustration.
g.
Install the one-way clutch No. 1 and bearing to the one way
clutch
outer race sleeve.
ZOOM
SIZED FOR PRINT
ZOOM
SIZED FOR PRINT
ZOOM
SIZED FOR PRINT
ZOOM
SIZED FOR PRINT
Page 9 of 24
2000 Toyota Celica GT -S L4-1762cc 1.8L DOHC MFI - Part 2 of 3
12/13/2001
http://www.alldatadiy.com/alldata/AFI~V1046639~C34697~R0~OD~N/0/77993956/788...
Bearing diameter: mm (inch)
NOTICE: Install the thrust bearing properly so that the black race will be risible.
h.
Install the thrust bearing.
i.
Coat the thrust washer No. 1 with petroleum jelly install it onto the rear planetary sun gear.
j.
Coat the bearing with petroleum jelly and install it onto the rear planetary sun gear.
Bearing diameter: mm (inch)
k.
Install the rear planetary sun gear assembly to the rear planetary gear.
ZOOM
SIZED FOR PRINT
ZOOM
SIZED FOR PRINT
ZOOM
SIZED FOR PRINT
Page 10 of 24
2000 Toyota Celica GT -S L4-1762cc 1.8L DOHC MFI - Part 2 of 3
12/13/2001
http://www.alldatadiy.com/alldata/AFI~V1046639~C34697~R0~OD~N/0/77993956/788...
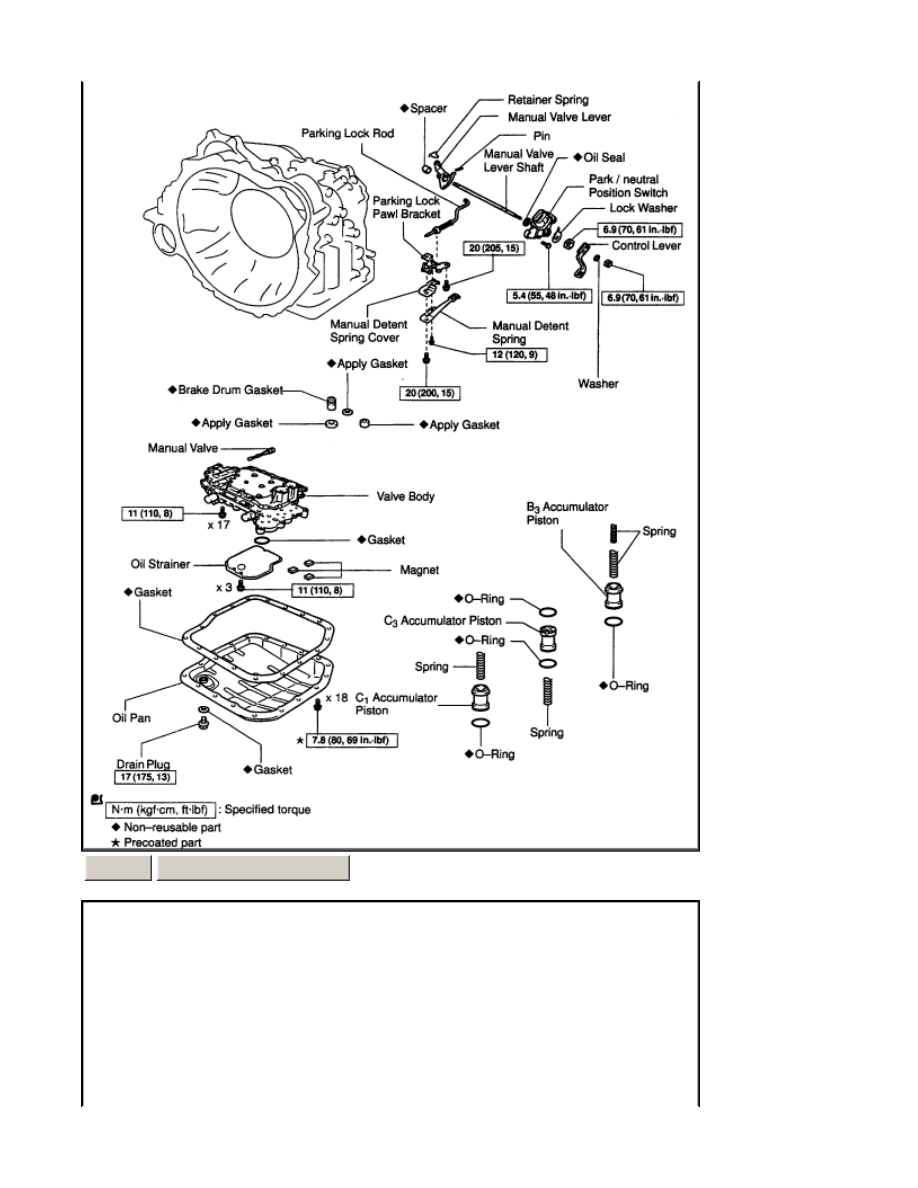
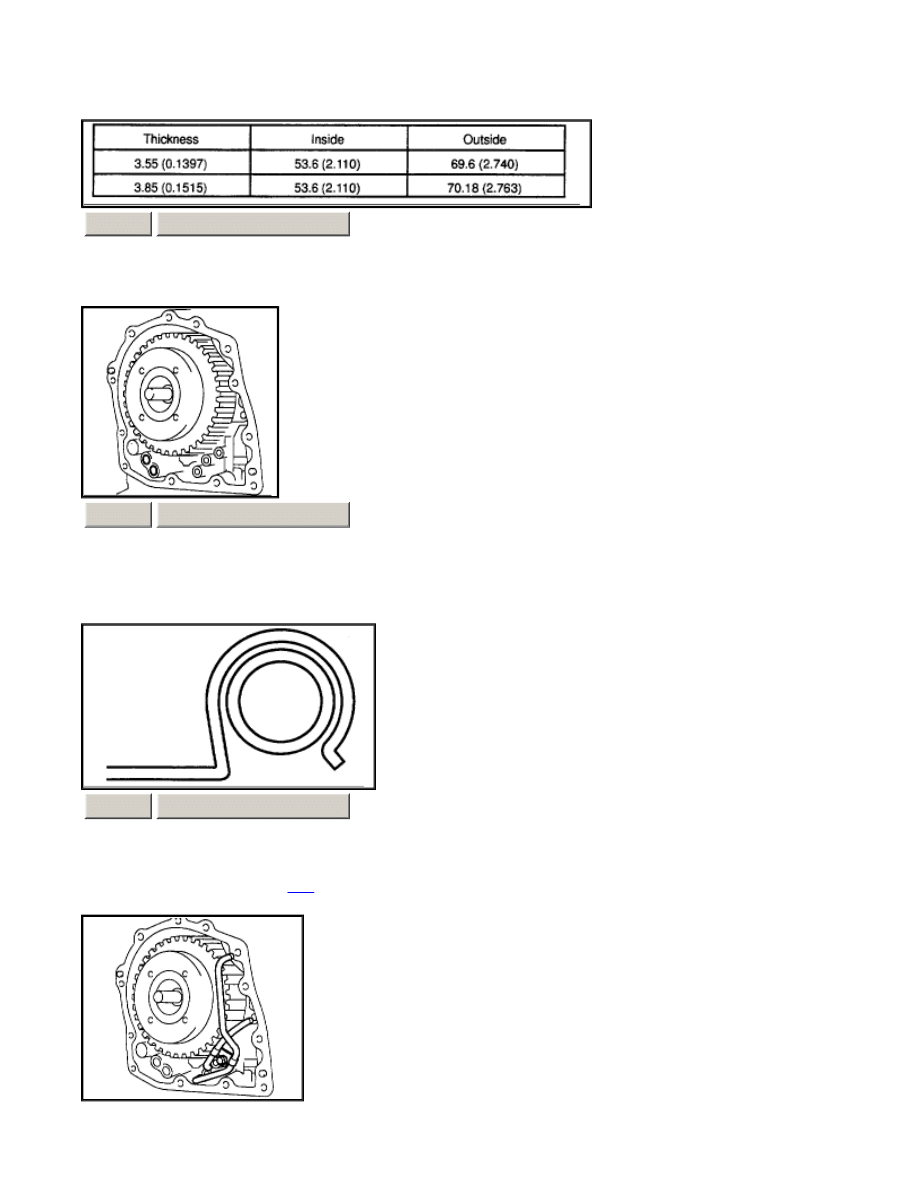
16.
INSPECT DISC AND FLANGE OF 2ND BRAKE Check to see if the sliding surface of the disc, plate and flange are
worn or burnt. If necessary, replace them. HINT:
¡
If the lining of the disc is peeling off or discolored, or even if a part of the printed mark is defaced, replace all
discs.
¡
Before assembling new discs, soak them in
ATF
for at least 15 minutes.
17.
INSTALL 2ND BRAKE
a.
Install the 4 discs and 4 plates to the transaxle
case
.
b.
Temporarily install the snap ring.
c.
Using vernier calipers, measure the distance between the disk surface and snap ring surface.
d.
Select an appropriate flange so that the piston stroke will meet the specified value. Piston stroke: 0.62 - 0.73 mm
ZOOM
SIZED FOR PRINT
ZOOM
SIZED FOR PRINT
ZOOM
SIZED FOR PRINT
Page 11 of 24
2000 Toyota Celica GT -S L4-1762cc 1.8L DOHC MFI - Part 2 of 3
12/13/2001
http://www.alldatadiy.com/alldata/AFI~V1046639~C34697~R0~OD~N/0/77993956/788...
(0.0244 - 0.0287 inch) HINT: Piston stroke = Clearance - Flange thickness - Snap ring thickness 1.6 mm (0.063
inch).
Flange thickness: mm (inch)
e.
Temporarily remove the snap ring, attach the selected flange and restore the snap ring. NOTICE: Secure the snap
ring so that its end gap is visible through the groove of the transaxle
case
.
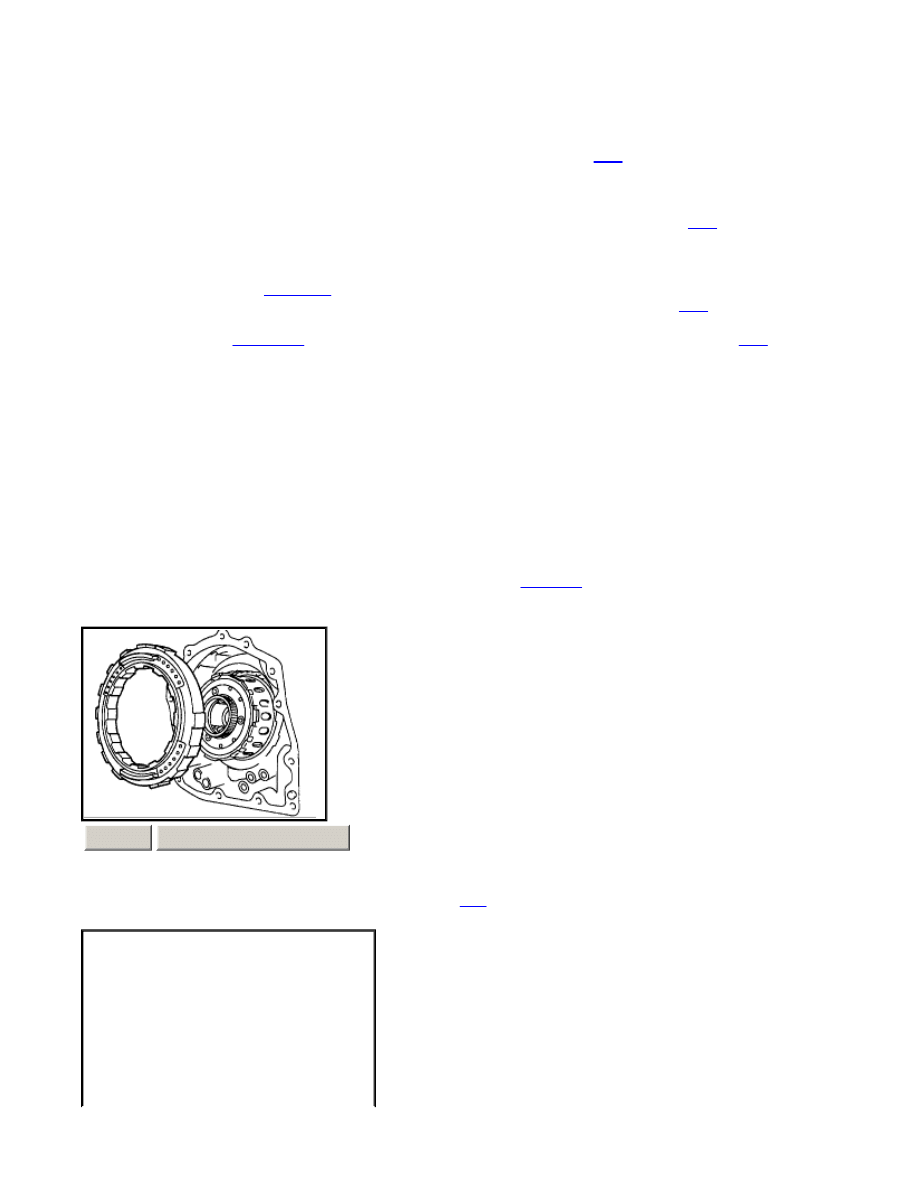
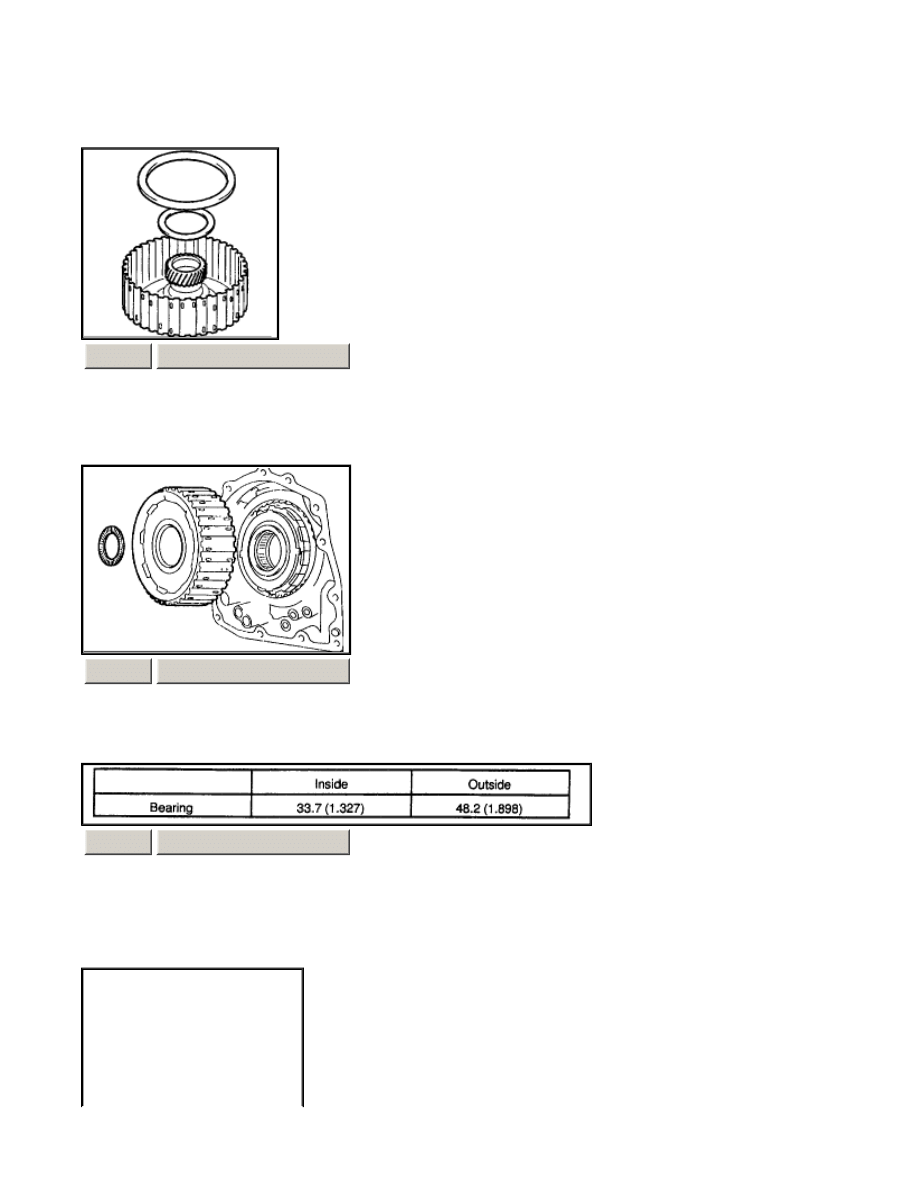
18.
INSTALL
DIRECT CLUTCH
ASSEMBLY
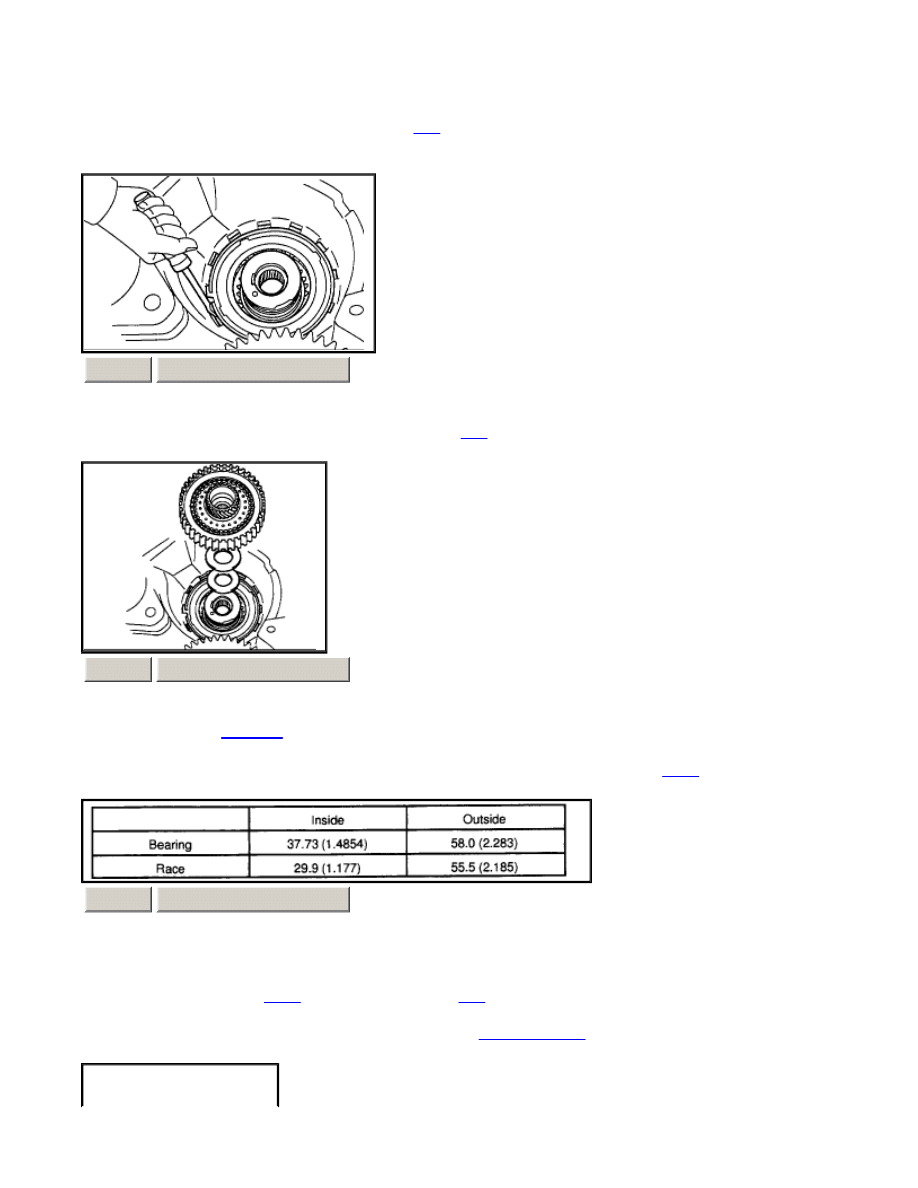
a.
Install the bearing race to the
direct clutch
.
ZOOM
SIZED FOR PRINT
ZOOM
SIZED FOR PRINT
ZOOM
SIZED FOR PRINT
Page 12 of 24
2000 Toyota Celica GT -S L4-1762cc 1.8L DOHC MFI - Part 2 of 3
12/13/2001
http://www.alldatadiy.com/alldata/AFI~V1046639~C34697~R0~OD~N/0/77993956/788...
Bearing race diameter:
b.
Install
direct clutch
assembly and thrust bearing to the rear planetary sun gear assembly. NOTICE: The disk in the
direct clutch
should completely mate with the hub attached outside the rear planetary sun gear. Otherwise, the rear
cover can not be installed.
c.
Clean the connected part of the transaxle
case
and rear cover.
d.
As shown in the illustration, place a straight edge on the
direct clutch
drum and measure the distance between the
transaxle
case
and the straight edge using vernier calipers (Dimension B).
e.
Measure the 2 places of the rear cover as shown in the illustration and calculate a dimension C using the following
formula. HINT: Dimension C = Dimension (1) - Dimension (2)
f.
Calculate the end play value using the following formula. Select a thrust bearing which satisfies the end play value
and install it. End play: 0.2 - 0.9 mm (0.008 - 0.035 inch) NOTICE: Make sure that the black race side is facing the
ZOOM
SIZED FOR PRINT
ZOOM
SIZED FOR PRINT
ZOOM
SIZED FOR PRINT
ZOOM
SIZED FOR PRINT
Page 13 of 24
2000 Toyota Celica GT -S L4-1762cc 1.8L DOHC MFI - Part 2 of 3
12/13/2001
http://www.alldatadiy.com/alldata/AFI~V1046639~C34697~R0~OD~N/0/77993956/788...
rear cover. HINT: End play = Dimension C - Dimension B
Bearing thickness and diameter: mm (inch)
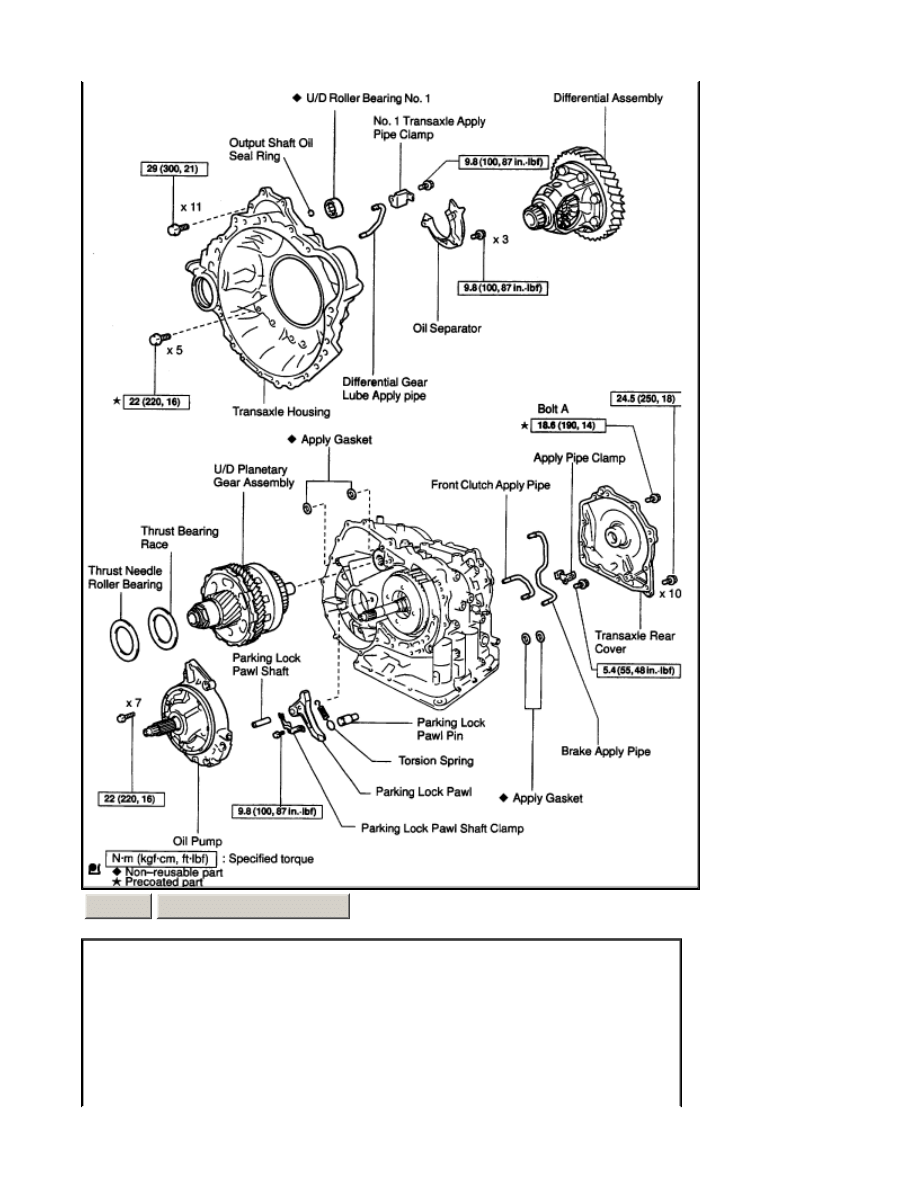
19.
INSTALL 2 NEW APPLY GASKETS
20.
INSTALL APPLY TUBE
a.
Install the clamp to the apply pipe. NOTICE: Make sure to install the clamp to the apply pipe before installing the
apply tube to the transaxle
case
. This prevents the apply pipe from being deformed or damaged.
ZOOM
SIZED FOR PRINT
ZOOM
SIZED FOR PRINT
ZOOM
SIZED FOR PRINT
Page 14 of 24
2000 Toyota Celica GT -S L4-1762cc 1.8L DOHC MFI - Part 2 of 3
12/13/2001
http://www.alldatadiy.com/alldata/AFI~V1046639~C34697~R0~OD~N/0/77993956/788...
b.
Install the 2 apply pipe and a bolt to the transaxle
case
. Torque: 5.4 Nm (55 kgf-cm, 48 inch lbs.) NOTICE: Each
pipe is securely inserted until it reaches the stopper.
21.
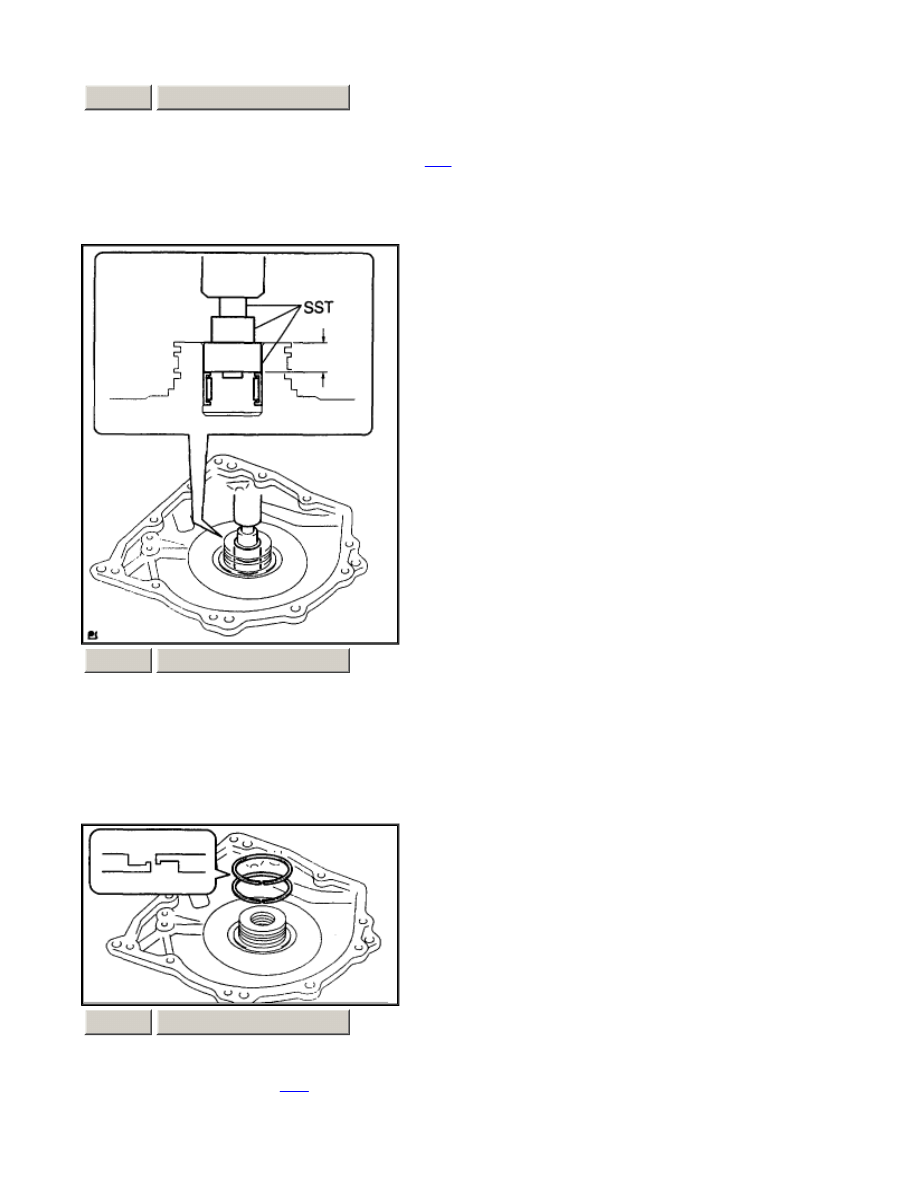
INSTALL TRANSAXLE REAR COVER
a.
Using SST and a press, install the bearing. SST 09950-60010 (09951-00230, 09951-00350) Press fit depth: 12.05 -
12.75 mm (0.4744 - 0.5020 inch) NOTICE:
¡
Face the inscribed mark side of the bearing race up.
¡
Repeat the press fit until the specified value is obtained.
b.
Coat 2 oil seal rings with
ATF
, install them to the transaxle rear cover.
ZOOM
SIZED FOR PRINT
ZOOM
SIZED FOR PRINT
ZOOM
SIZED FOR PRINT
Page 15 of 24
2000 Toyota Celica GT -S L4-1762cc 1.8L DOHC MFI - Part 2 of 3
12/13/2001
http://www.alldatadiy.com/alldata/AFI~V1046639~C34697~R0~OD~N/0/77993956/788...
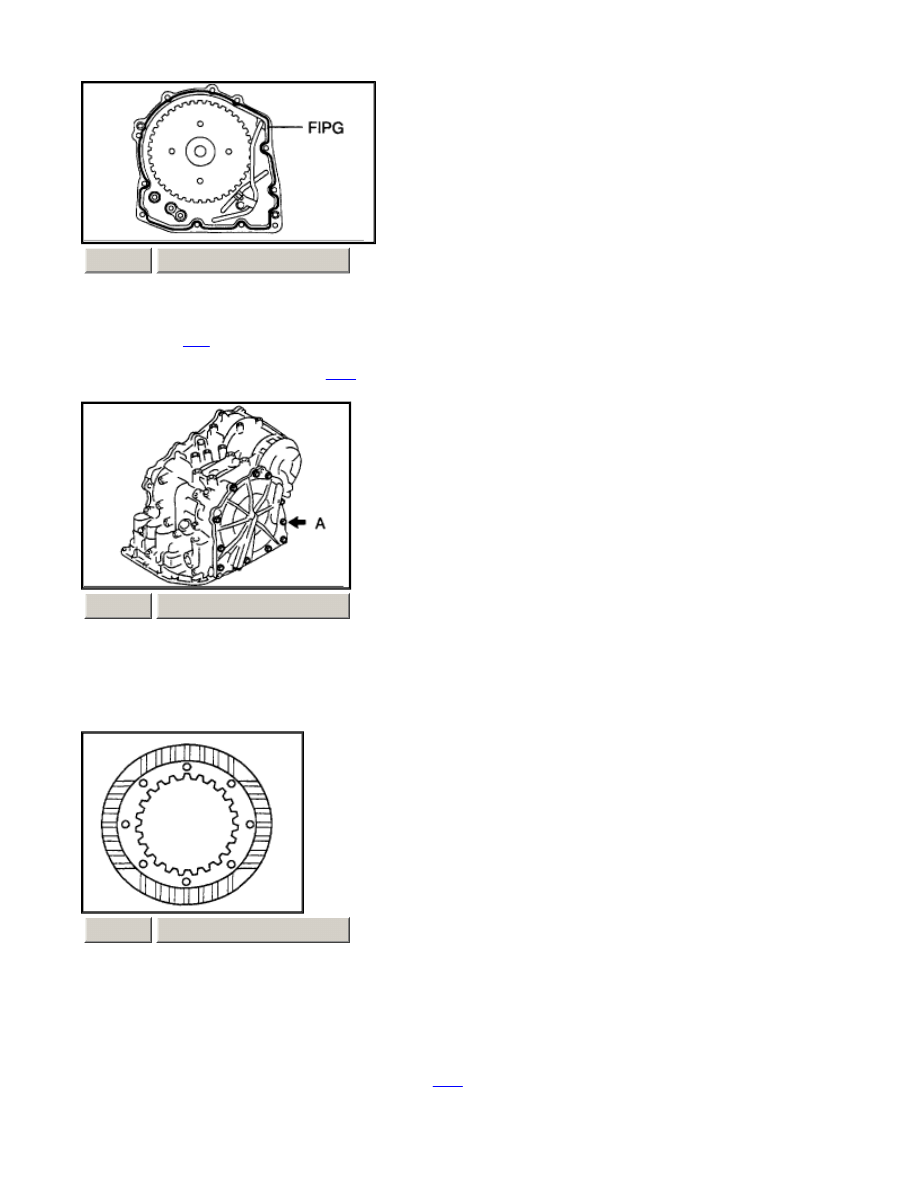
c.
Remove any packing material and be careful not to get oil on the contacting surfaces of the transaxle rear cover or the
transaxle
case
.
d.
Apply FIPG to the rear cover. FIPG: Part No. 08826 -00090, THREE BOND 1281 or equivalent.
e.
Coat a needle roller bearing with
ATF
.
f.
Apply liquid sealer to the "A" bolt threads. Sealant: Part No. 08833-00080, THREE BOND 1344, LOCTITE 242 or
equivalent.
g.
Install the 11 bolts. Torque: A bolt: 18.6 Nm (190 kgf-cm, 14 ft. lbs.) Other bolt: 24.5 Nm (250 kgf-cm, 18 ft. lbs.)
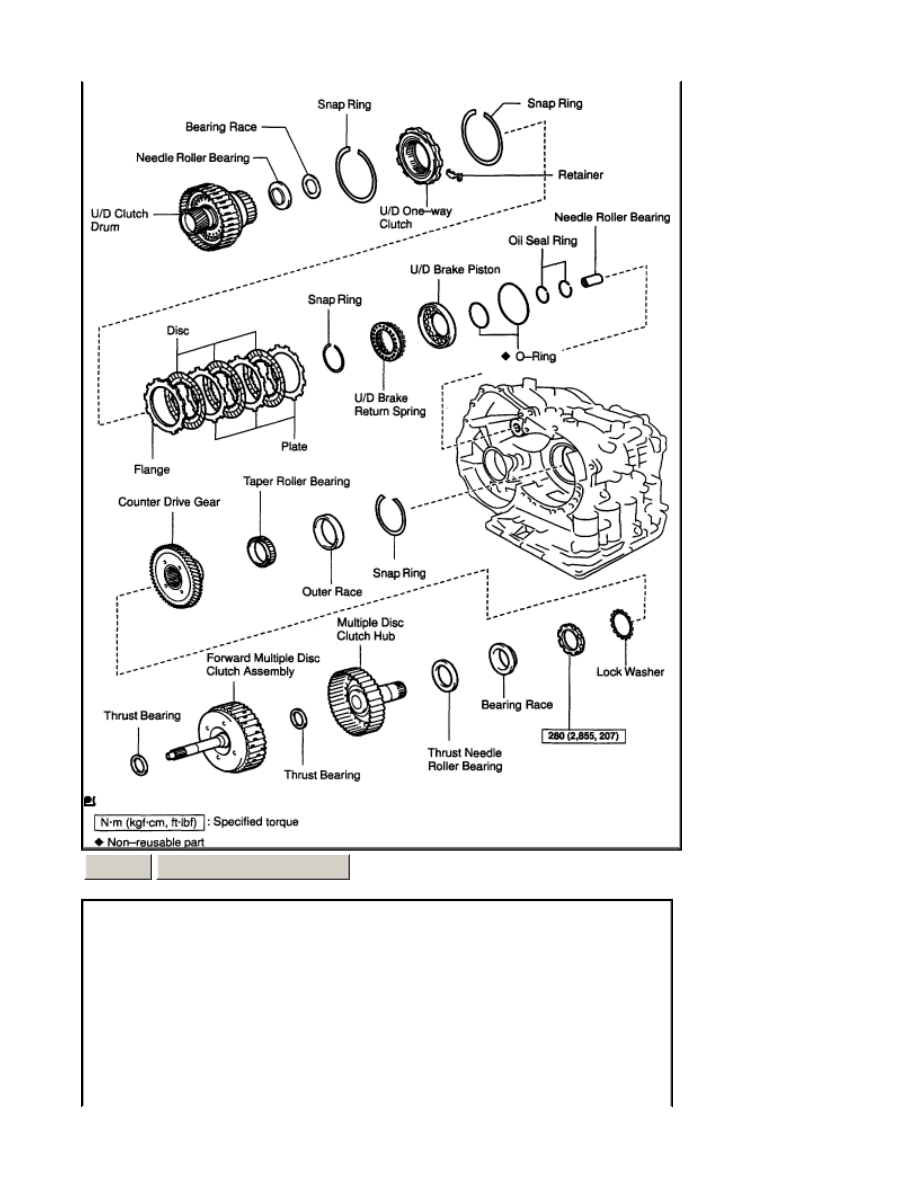
22.
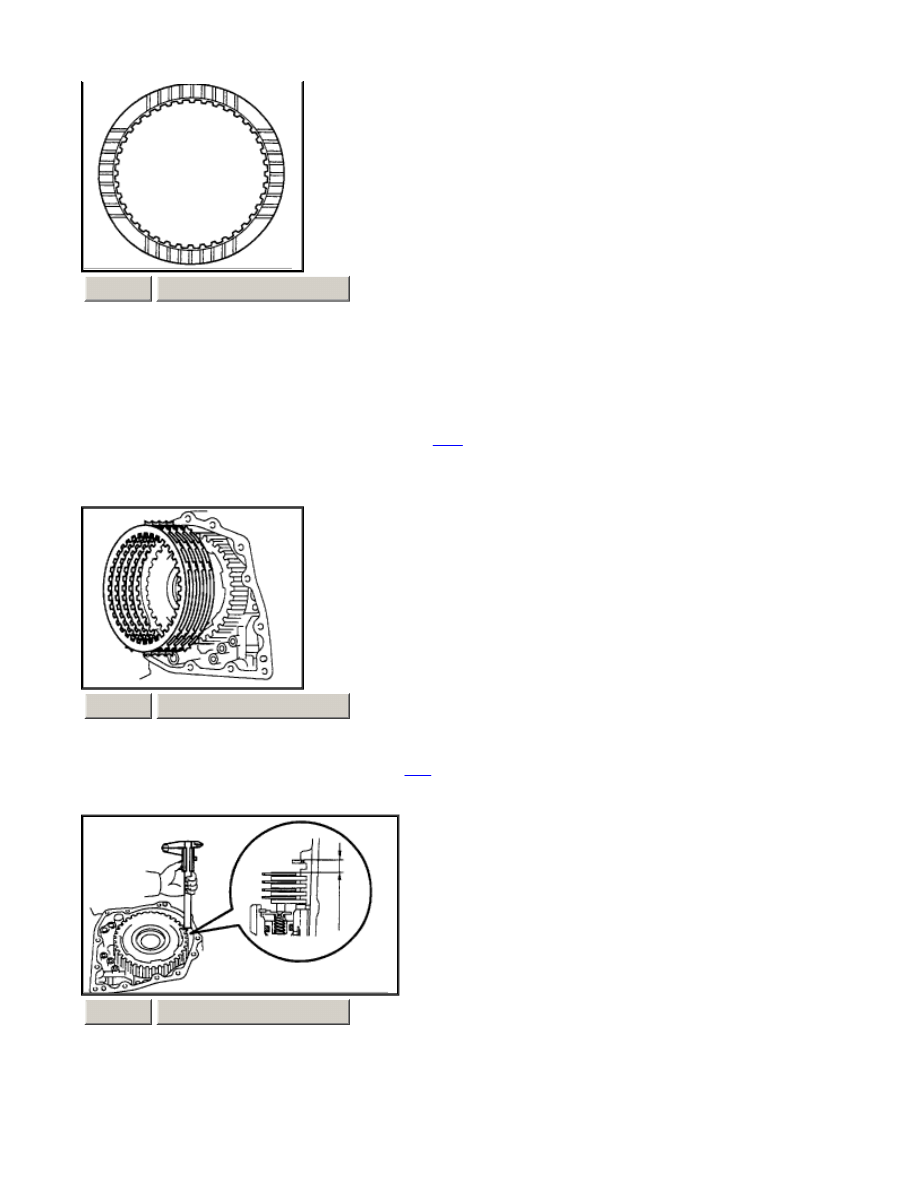
INSPECT DISC AND FLANGE OF U/D BRAKE Check to see if the sliding surface of the disc, plate and flange are
worn or burnt. if necessary, replace them. HINT:
¡
If the lining of the disc is peeling off or discolored, or even if a part of the printed mark is defaced, replace all
discs.
¡
Before assembling new discs, soak them in
ATF
for at least 15 minutes.
ZOOM
SIZED FOR PRINT
ZOOM
SIZED FOR PRINT
ZOOM
SIZED FOR PRINT
Page 16 of 24
2000 Toyota Celica GT -S L4-1762cc 1.8L DOHC MFI - Part 2 of 3
12/13/2001
http://www.alldatadiy.com/alldata/AFI~V1046639~C34697~R0~OD~N/0/77993956/788...
23.
INSTALL U/D BRAKE
a.
Install the 3 discs and 3 plates to the transaxle
case
.
b.
Using a screwdriver, install the snap ring.
c.
Using a dial indicator, measure the U/D brake piston stroke while applying and releasing compressed air (392 kPa,
4.0 kgf/cm2, 57 psi). Piston stroke: 1.87 - 2.08 mm (0.0736 - 0.0819 inch) HINT: Select an appropriate flange from
the table so that it will meet the specified value.
ZOOM
SIZED FOR PRINT
ZOOM
SIZED FOR PRINT
ZOOM
SIZED FOR PRINT
Page 17 of 24
2000 Toyota Celica GT -S L4-1762cc 1.8L DOHC MFI - Part 2 of 3
12/13/2001
http://www.alldatadiy.com/alldata/AFI~V1046639~C34697~R0~OD~N/0/77993956/788...
Flange thickness: mm (inch)
d.
Temporarily remove the snap ring and attach the flange. Restore the snap ring.
24.
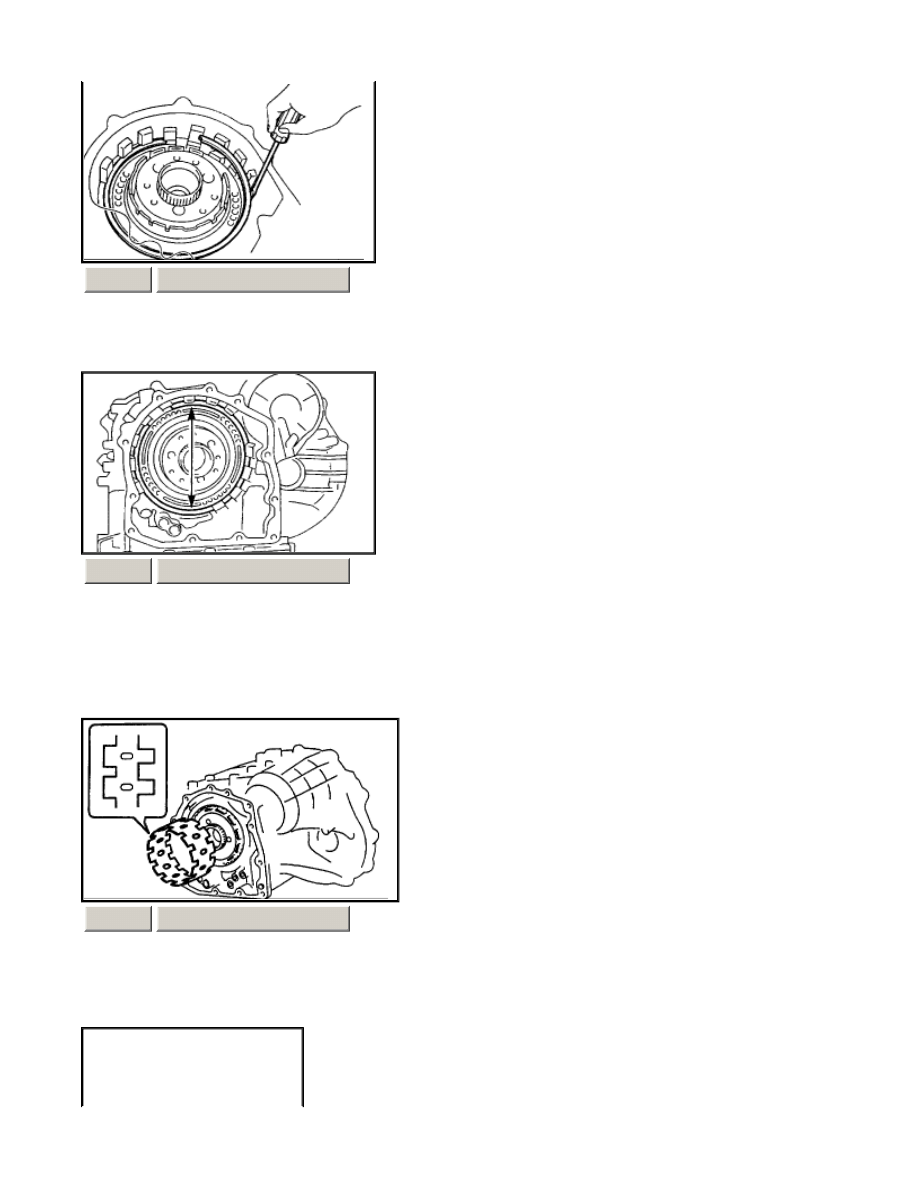
INSTALL ONE-WAY CLUTCH NO.2
a.
Install the outer race retainer to the one-way clutch No.2.
b.
Install the U/D
clutch
assembly to the one -way clutch. Rotate the U/D clutch assembly to check the rotating direction
for the lock or free operation.
25.
INSTALL ONE-WAY CLUTCH NO.2
ZOOM
SIZED FOR PRINT
ZOOM
SIZED FOR PRINT
ZOOM
SIZED FOR PRINT
ZOOM
SIZED FOR PRINT
Page 18 of 24
2000 Toyota Celica GT -S L4-1762cc 1.8L DOHC MFI - Part 2 of 3
12/13/2001
http://www.alldatadiy.com/alldata/AFI~V1046639~C34697~R0~OD~N/0/77993956/788...
a.
Install the one-way clutch No.2 to the transaxle
case
. NOTICE: Make sure that the mark on the one-way clutch outer
race is visible.
b.
Using screwdriver, install the snap ring to the transaxle
case
.
26.
INSTALL U/D
CLUTCH
ASSEMBLY
a.
Coat the bearing and bearing race with petroleum jelly and install it onto the U/D
clutch
.
Race diameter: mm (inch)
b.
Install the U/D
clutch
assembly to the transaxle
case
.
27.
INSTALL U/D PLANETARY GEAR ASSEMBLY AND
DIFFERENTIAL
ASSEMBLY
ZOOM
SIZED FOR PRINT
ZOOM
SIZED FOR PRINT
ZOOM
SIZED FOR PRINT
Page 19 of 24
2000 Toyota Celica GT -S L4-1762cc 1.8L DOHC MFI - Part 2 of 3
12/13/2001
http://www.alldatadiy.com/alldata/AFI~V1046639~C34697~R0~OD~N/0/77993956/788...
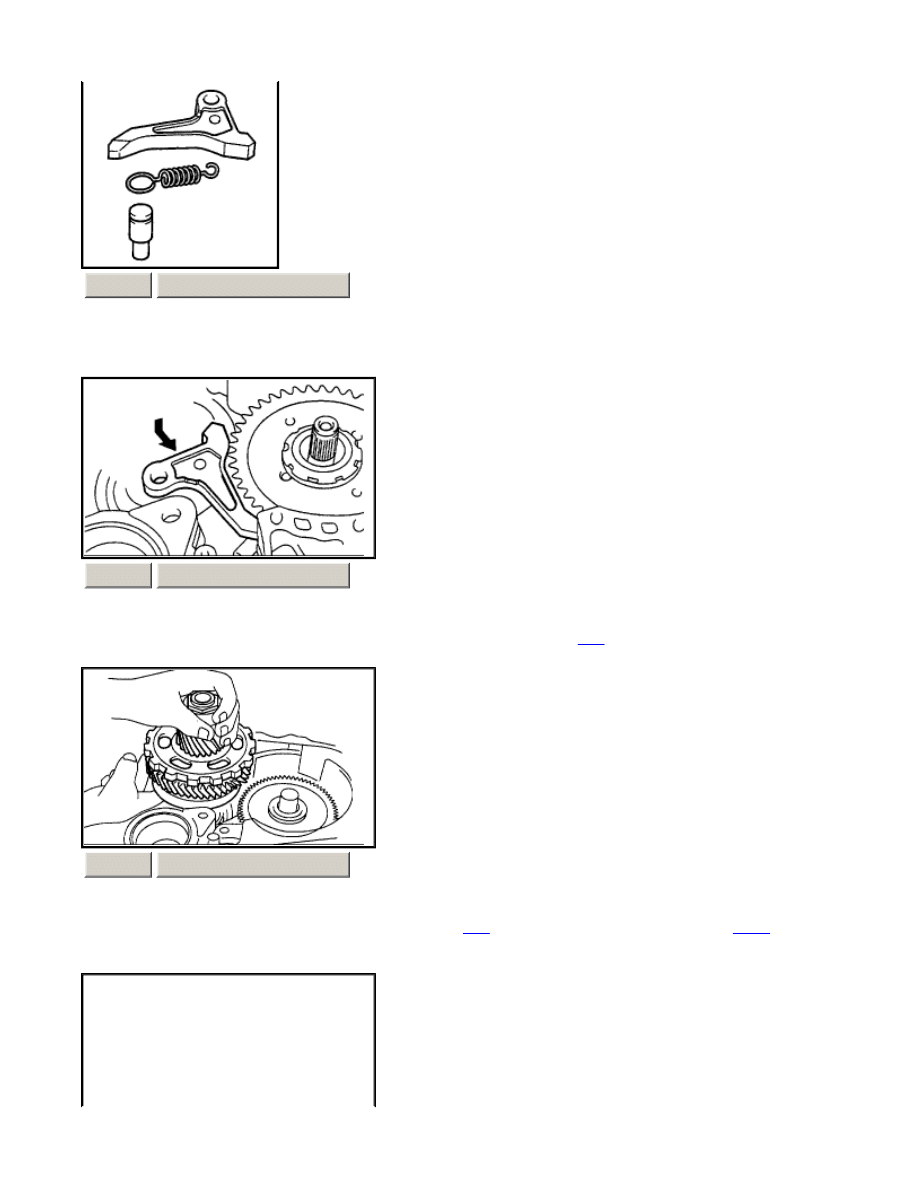
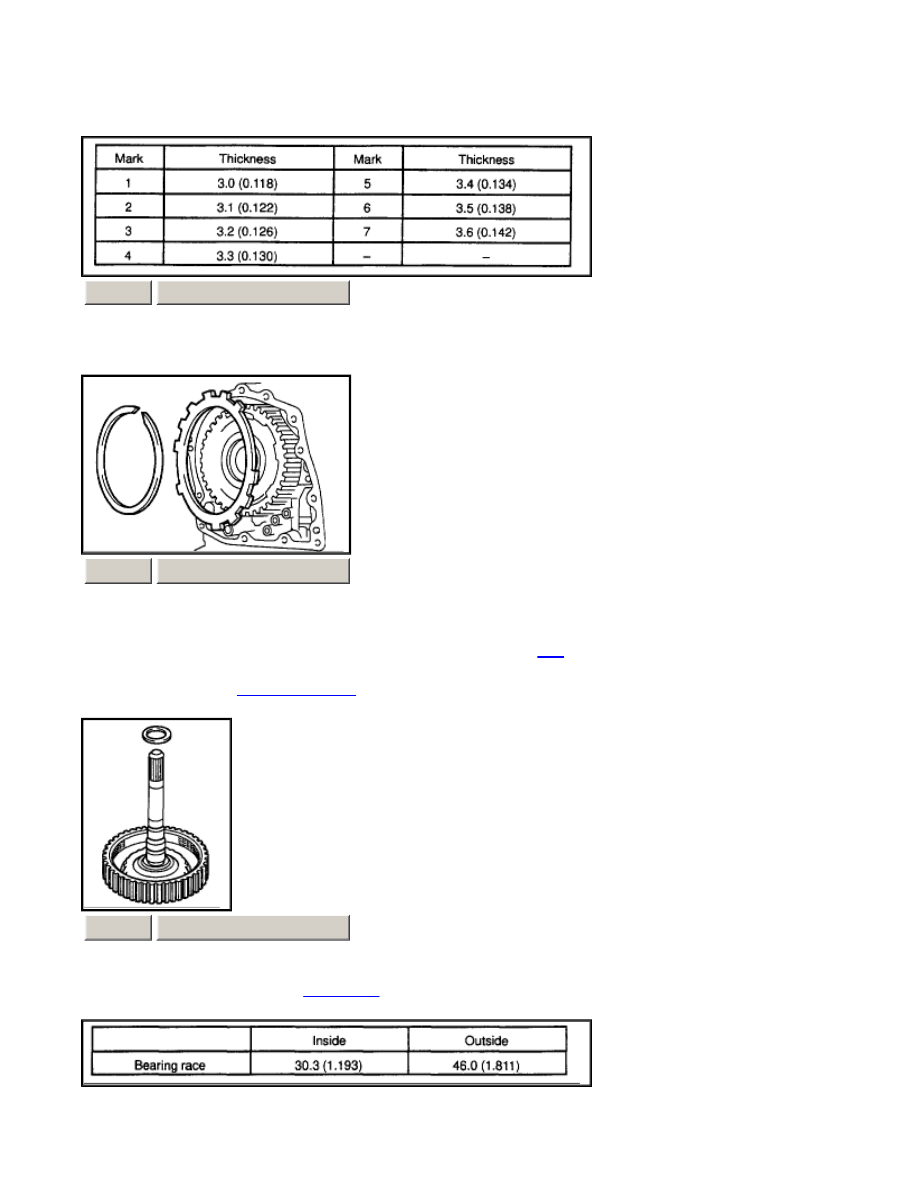
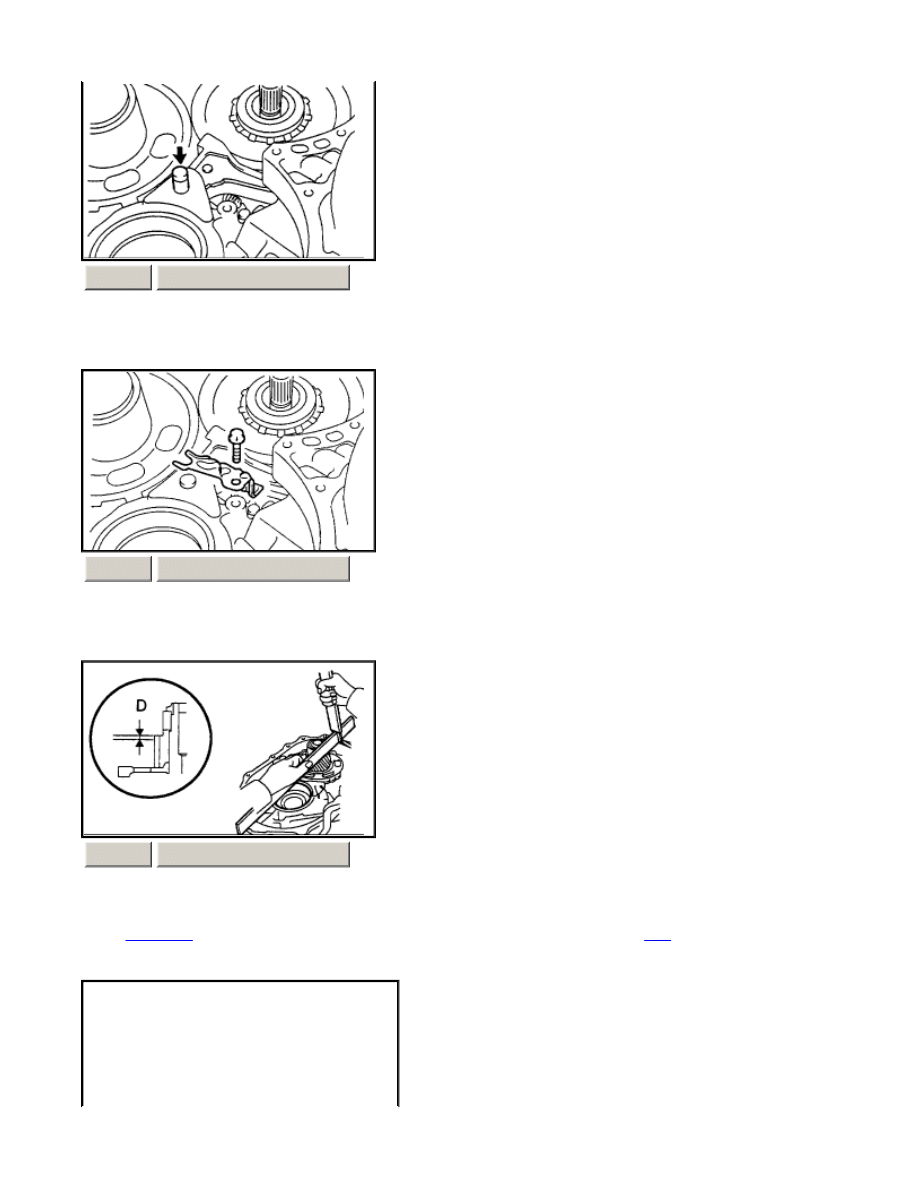
a.
Install the pawl pin and spring to the parking lock pawl.
b.
Temporarily install the parking lock pawl, shaft and spring to the transaxle
case
as shown in the illustration.
c.
Install the U/D planetary gear assembly to the transaxle
case
. NOTICE: Engage all the discs of U/D
clutch
and hub
spline of the U/D planetary gear assembly firmly and assemble them securely.
ZOOM
SIZED FOR PRINT
ZOOM
SIZED FOR PRINT
ZOOM
SIZED FOR PRINT
Page 20 of 24
2000 Toyota Celica GT -S L4-1762cc 1.8L DOHC MFI - Part 2 of 3
12/13/2001
http://www.alldatadiy.com/alldata/AFI~V1046639~C34697~R0~OD~N/0/77993956/788...
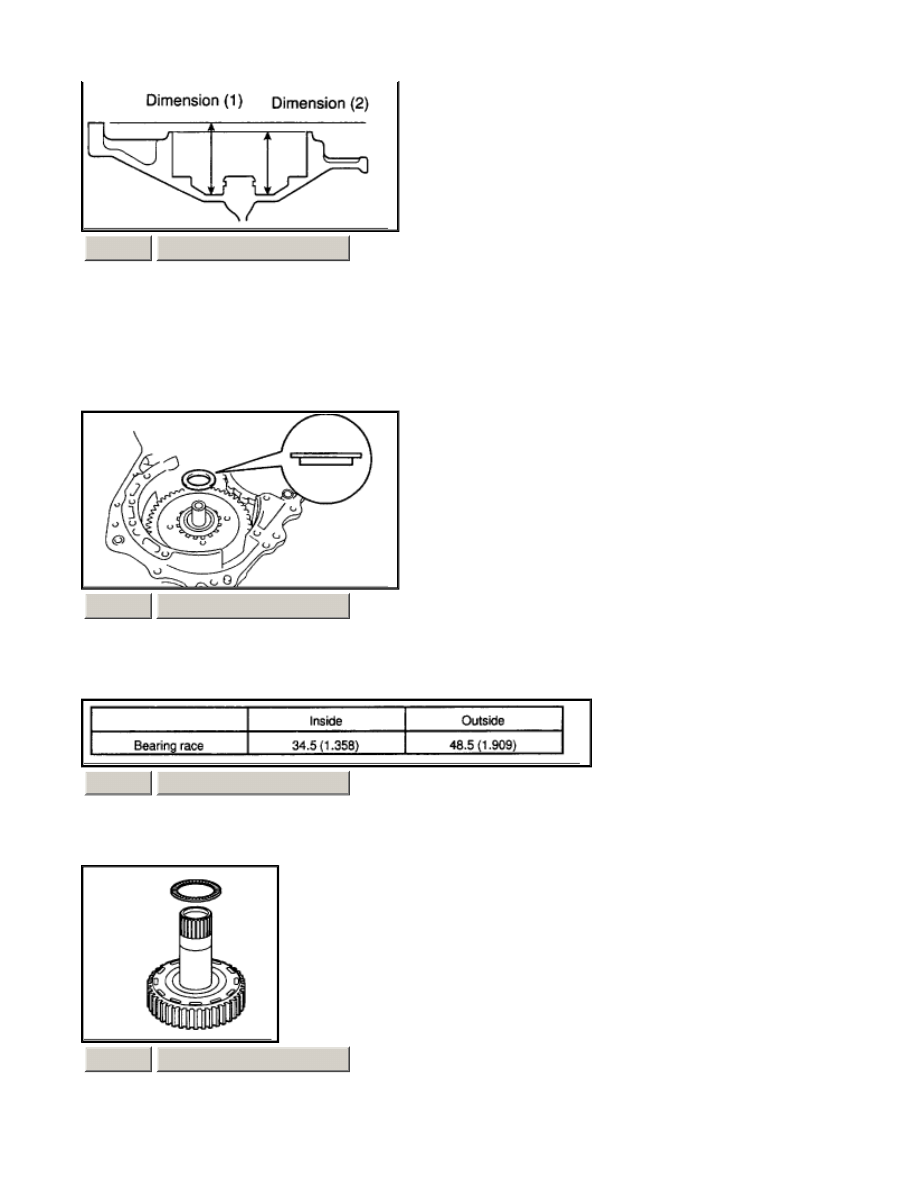
d.
Install the parking lock pawl shaft.
e.
Install the pawl shaft with the bolt. Torque: 9.8 Nm (100 kgf -cm, 7 ft. lbs.)
f.
Using a straight edge and vernier calipers as shown in the illustration, measure the gap between the top of the
differential
drive pinion in the U/D planetary gear and contact surface of the transaxle
case
and housing. (Dimension
D) NOTICE: Note down the dimension D as it is necessary for the following process.
ZOOM
SIZED FOR PRINT
ZOOM
SIZED FOR PRINT
ZOOM
SIZED FOR PRINT
Page 21 of 24
2000 Toyota Celica GT -S L4-1762cc 1.8L DOHC MFI - Part 2 of 3
12/13/2001
http://www.alldatadiy.com/alldata/AFI~V1046639~C34697~R0~OD~N/0/77993956/788...
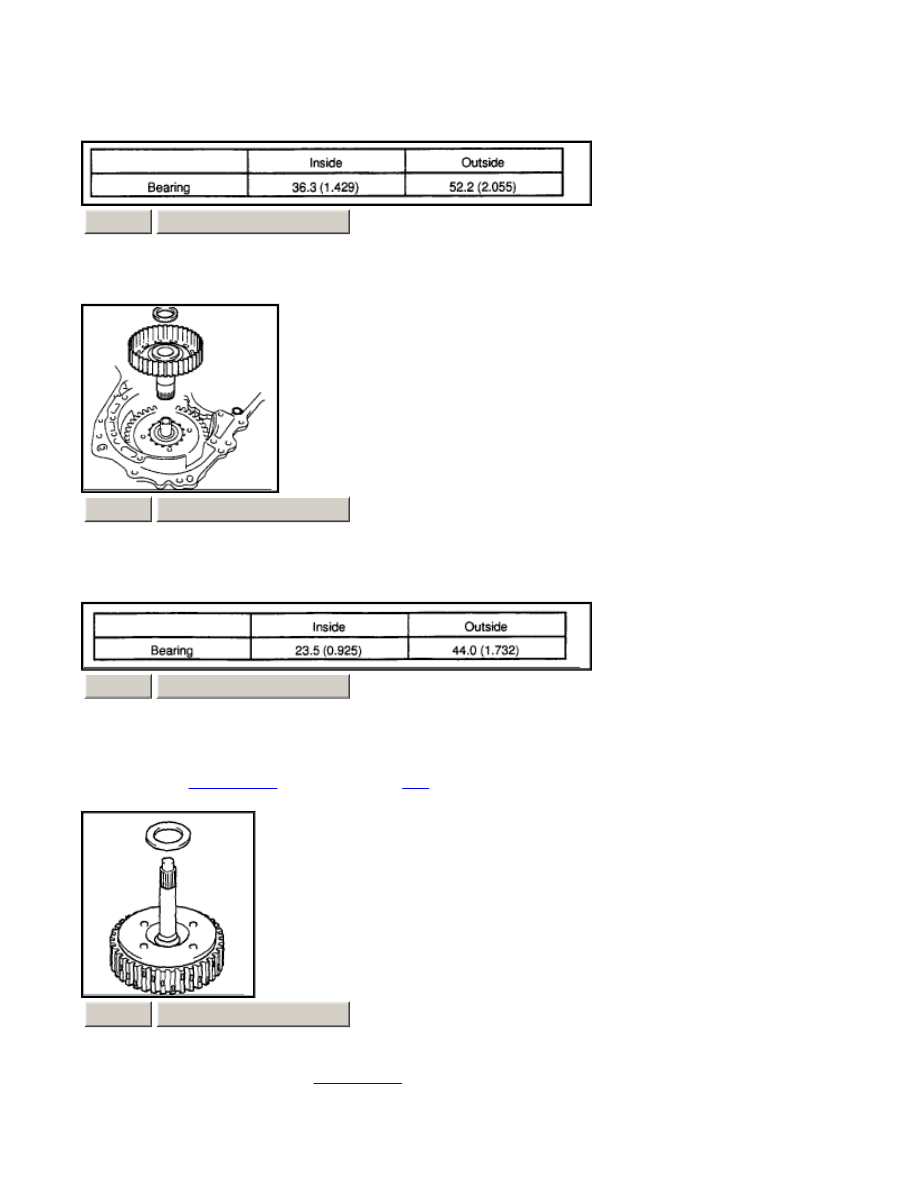
g.
As shown in the illustration, measure the 2 places of the transaxle housing. Calculate the dimension E using the
formula. NOTICE: Note down the dimension E as it is necessary for the following process. HINT: Dimension E =
Dimension (1) - Dimension (2)
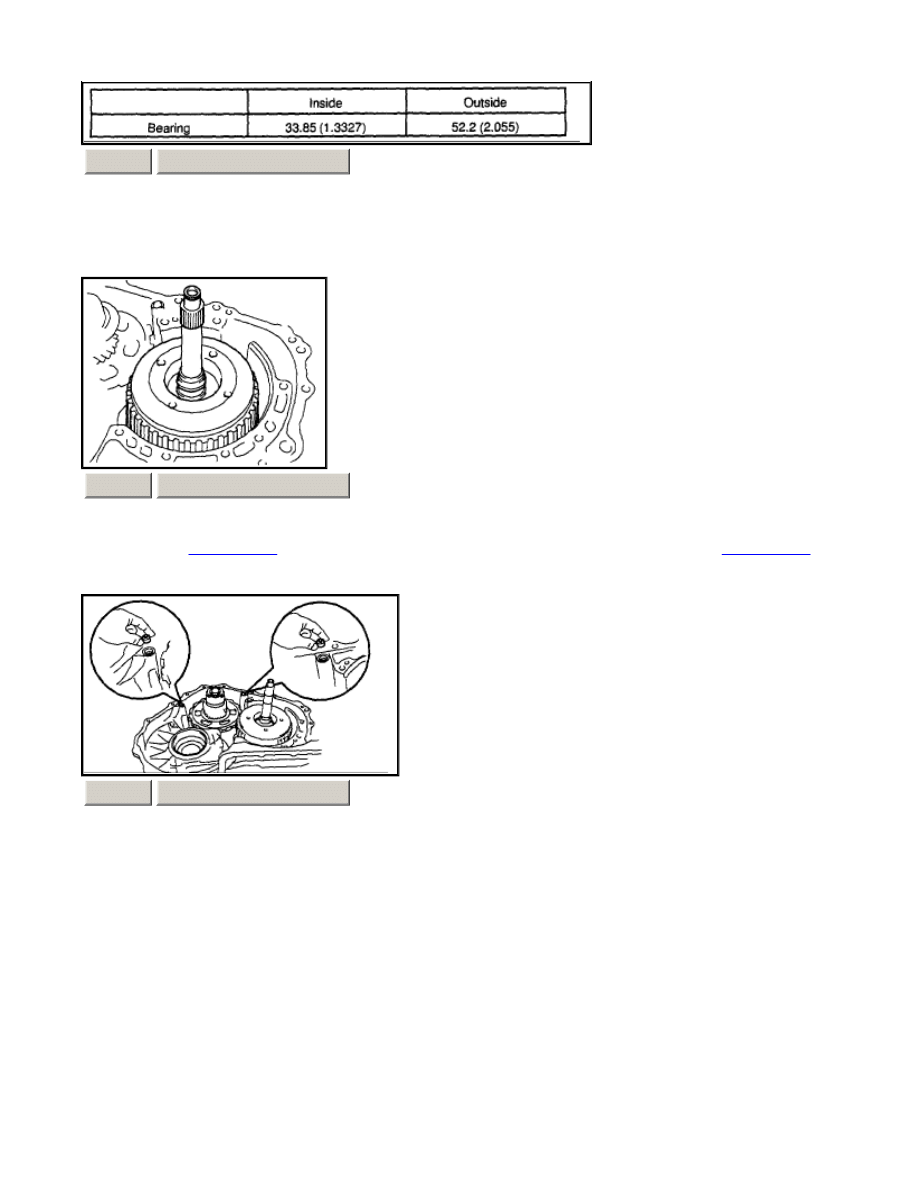
28.
INSTALL MULTIPLE DISC CLUTCH HUB
a.
Install the bearing race to the transaxle while checking its direction.
Bearing race diameter: mm (inch)
ZOOM
SIZED FOR PRINT
ZOOM
SIZED FOR PRINT
ZOOM
SIZED FOR PRINT
ZOOM
SIZED FOR PRINT
Page 22 of 24
2000 Toyota Celica GT -S L4-1762cc 1.8L DOHC MFI - Part 2 of 3
12/13/2001
http://www.alldatadiy.com/alldata/AFI~V1046639~C34697~R0~OD~N/0/77993956/788...
b.
Coat the thrust bearing and race with petroleum jelly and install them onto the multiple disc clutch hub.
Thrust bearing and race diameter: mm (inch)
c.
Install the bearing to the multiple clutch hub.
Bearing diameter: mm (inch)
d.
Install the
forward clutch
hub to the transaxle
case
.
e.
Install the thrust bearing to the
forward clutch
.
ZOOM
SIZED FOR PRINT
ZOOM
SIZED FOR PRINT
ZOOM
SIZED FOR PRINT
ZOOM
SIZED FOR PRINT
Page 23 of 24
2000 Toyota Celica GT -S L4-1762cc 1.8L DOHC MFI - Part 2 of 3
12/13/2001
http://www.alldatadiy.com/alldata/AFI~V1046639~C34697~R0~OD~N/0/77993956/788...
Bearing diameter: mm (inch)
NOTICE: Install the thrust bearing properly so that the black race will be visible.
f.
Install the
forward clutch
to the multiple clutch hub. NOTICE: Align the splines of all discs in the
forward clutch
with those of multiple clutch hub to assemble them securely.
29.
INSTALL 2 NEW APPLY GASKET
ZOOM
SIZED FOR PRINT
ZOOM
SIZED FOR PRINT
ZOOM
SIZED FOR PRINT
Page 24 of 24
2000 Toyota Celica GT -S L4-1762cc 1.8L DOHC MFI - Part 2 of 3
12/13/2001
http://www.alldatadiy.com/alldata/AFI~V1046639~C34697~R0~OD~N/0/77993956/788...
Wyszukiwarka
Podobne podstrony:
ARTICLE TRANNY AUTO REASSEMBLE PART1
ARTICLE TRANNY AUTO DISASSEMBLE PART2
ARTICLE TRANNY AUTO REASSEMBLE PART3
ARTICLE TRANNY AUTO REMOVE INSTALL
ARTICLE TRANNY AUTO DISASSEMBLE PART1
ARTICLE SUSPENSION STRUT FRONT DISASSEMBLE REASSEMBLE
ARTICLE SUSPENSION STRUT REAR DISASSEMBLE REASSEMBLE
The Definite or Zero Article Exercise at Auto
Gdzie kupić używane auto
ARTICLE SUSPENSION STRUT FRONT REPLACE INSTALL
więcej podobnych podstron