91
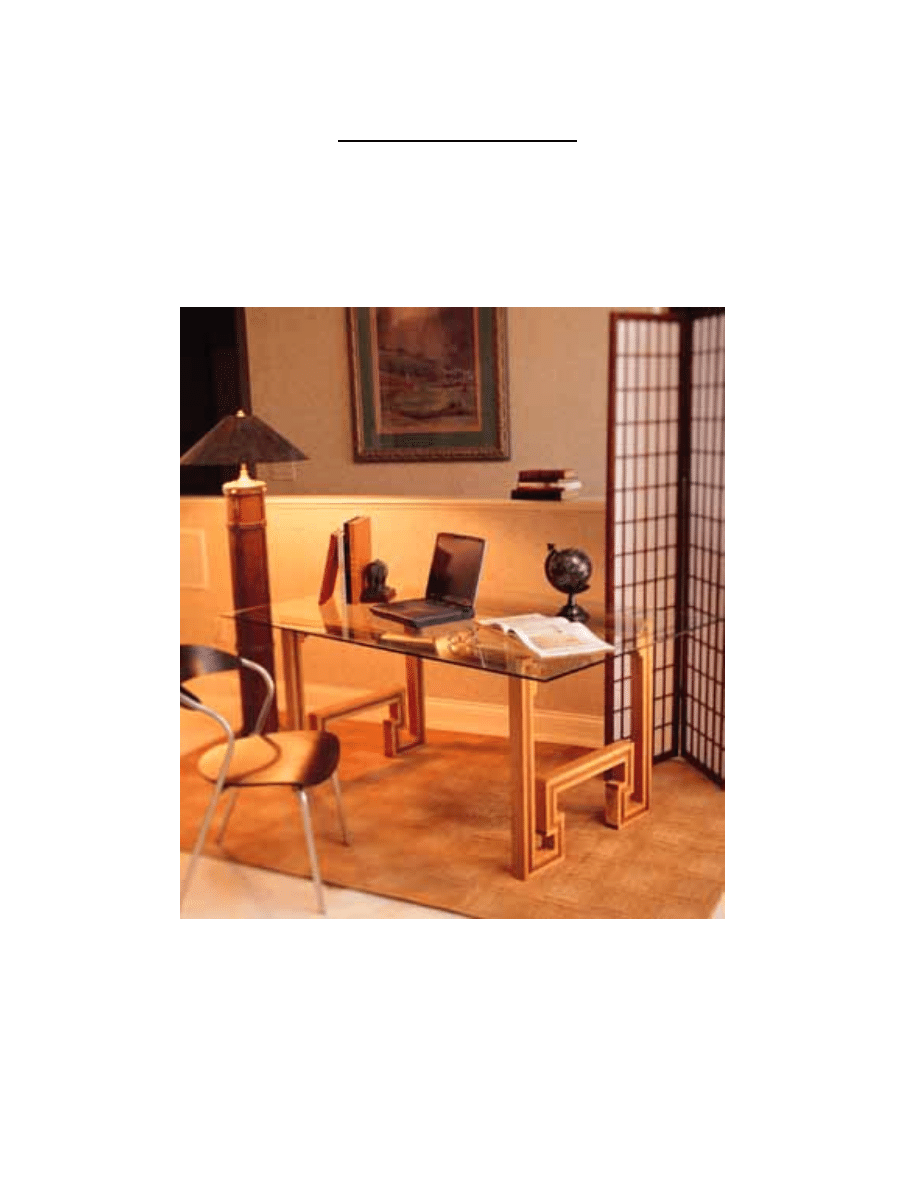
GREEK KEY DESK
Copyright 2004 Martian Auctions
449
Copyright 2004 Martian Auctions
450
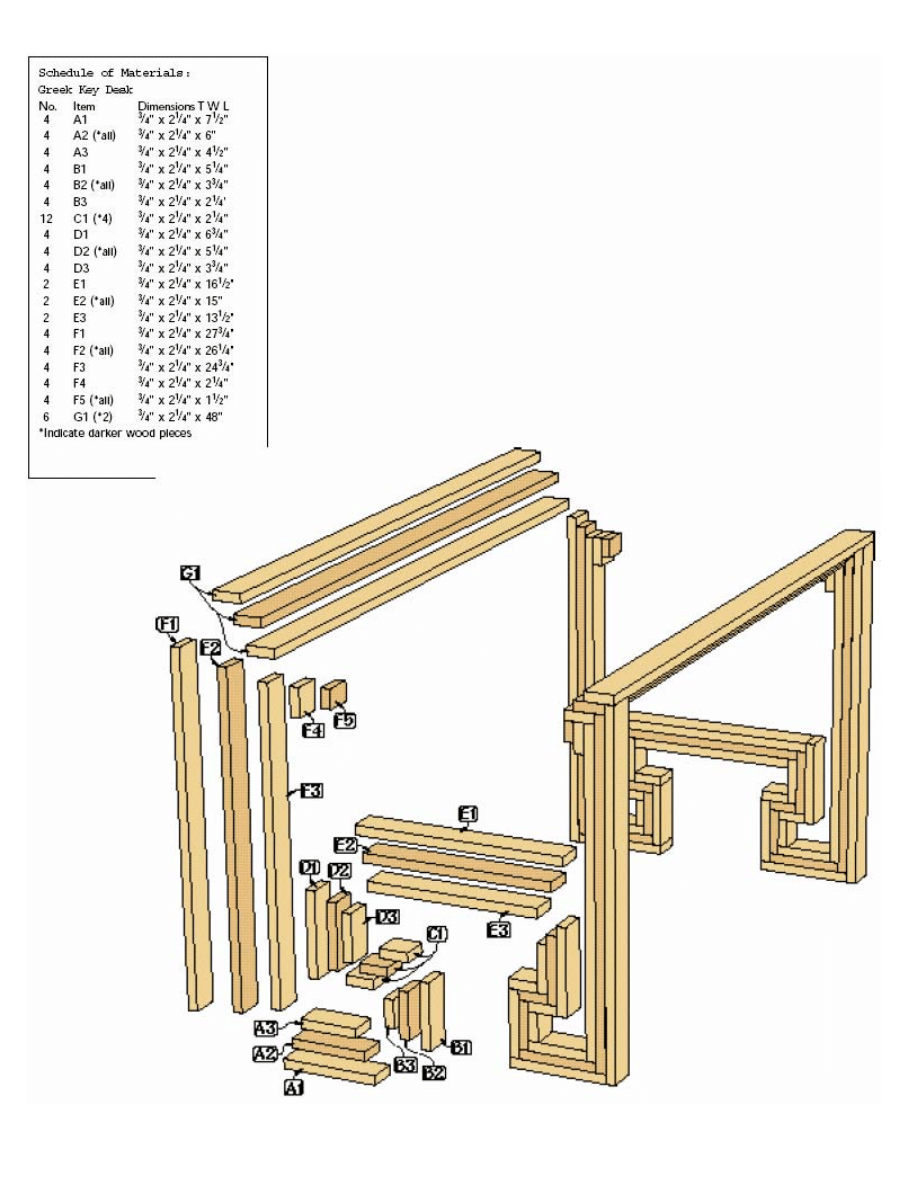
The desk is constructed by laminating strips of wood together. By making some of
the layers shorter than others, you make the joints for attaching that lamination to
another. As a result, all of the materials for this project must be machined precisely.
Any variances will show up as gaps in the joints after final assembly.
Tricks to Dead-on Components
There are two tricks to make sure your pieces are all the right size and won’t slide
around when you glue them up. First, when cutting out the pieces for this desk, I
found it easier to cut them grouped by letters, such as A1, A2, A3. A1 is the longest
piece, A2 is 1½" shorter, and A3 is 3" shorter than A1. Because all of the desk’s
components are stepped like this, I came up with a quick way to make these cuts.
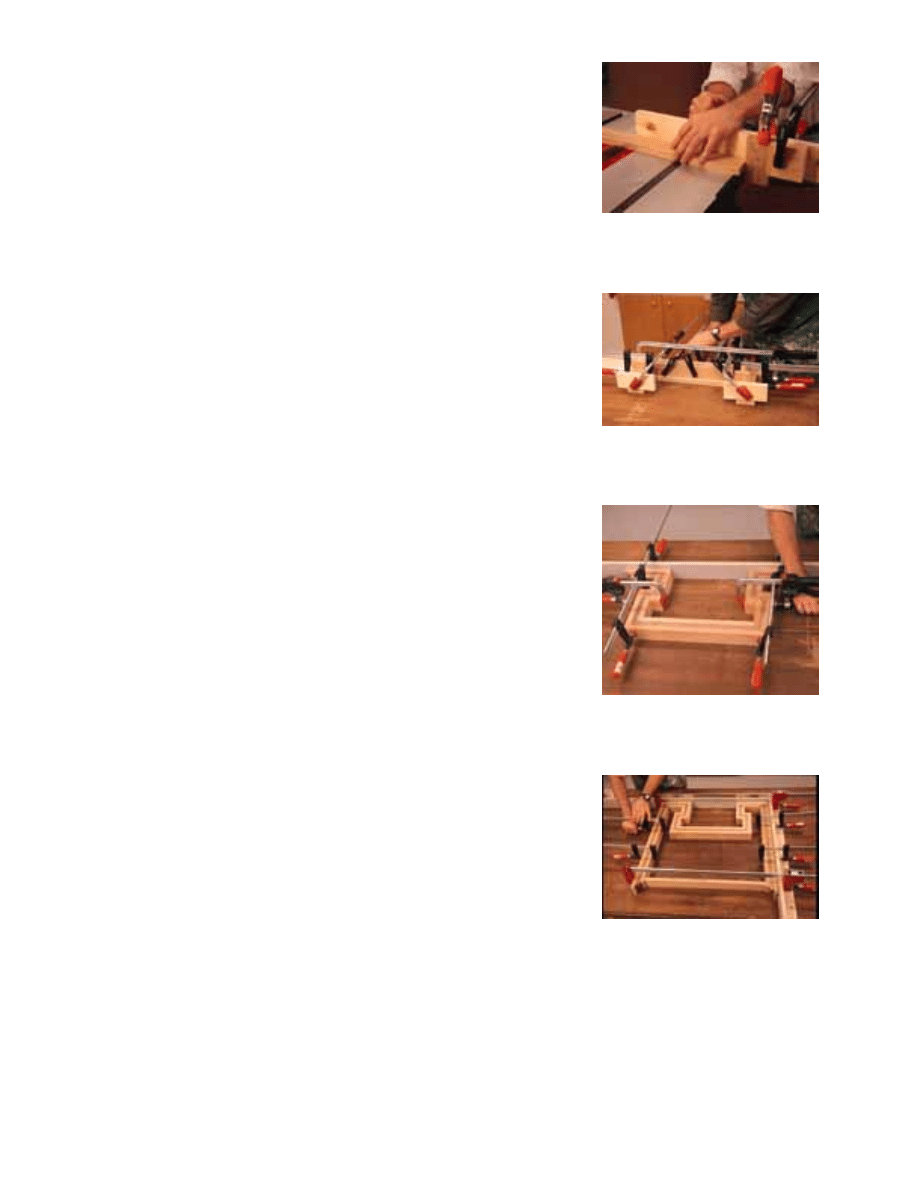
Cut the longest piece first using a stopblock on the fence of your table saw’s sled or
miter gauge. Then take two scrap pieces of ¾"-thick wood from the project and glue
them together to form a 1½"-thick spacer. Hold this piece against the stop block to
cut the second piece. Then make a second spacer using two more scraps and use
both spacers to cut the third piece. This method makes the desk components
perfectly sized. Cut out all your pieces, then get ready to glue them up.
To keep your pieces from sliding around during gluing, make a jig from two pieces
of melamine-faced particleboard put together lengthwise at a right angle to create a
straight fence. Then put a small piece of wood on the end of the jig to act as a stop.
This gives you a square corner to work out of.
On to Assembly
Start by gluing the E pieces and two sets of the D pieces together to form a shallow
“U.” (When gluing these step-mitered joints, I found it best to use polyurethane glue.
It provides a strong bond for this type of joint.) I dry-fit all the parts to be sure I
would be able to get all the pieces to come together tightly. After applying the glue,
clamp the length of the E pieces first. By using ¾" spacers at the ends of the D
parts, applying even clamping pressure is easy on the lengths of the D parts. Make
two of these assemblies.
The next assembly consists of the C, B and A parts. The glue-up of this assembly is
done the same way as the E and D assembly. Make four of these assemblies.
Next glue one of the E and D assemblies and two of the ABC assemblies together
to form the Greek key part of the end assembly. I had to clean the glue squeeze-out
at the joints and pare the wood down in a couple places with a chisel to get a tight
fit. If your pieces don’t come together tightly, your joints will not be strong.
For the next assembly, put two glue-up jigs at a right angle. This makes the glue-up
of the two legs (F) to the Greek key assembly easy to keep square.
Glue the F4 and F5 pieces to the tops of each leg. Use a stop block to keep the
pieces even with the end of the F3 piece of each leg.
The G pieces attach the two end assemblies together. It is easier to control gluing
and alignment of the G1 pieces if they are glued into place one at a time, starting at
the bottom and working up.
Sanding and Finishing
I used a random orbital sander, going up to 150 grit sandpaper. Break all the sharp
edges with a sanding block using 150 grit sandpaper. For a top coat, I applied three
coats of a clear finish.
For the top I used a ½"-thick piece of 30" x 50" tempered glass polished on all
edges. (To keep the glass in place, use six clear door bumpers applied to the top
Here I’m cutting the A2 piece with one of the
spacers in place. To cut the A3 piece, use two of
the spacer blocks.
Here I’m clamping the E and D pieces together.
Use spacers on the ends of the D parts to hold
them in place against your gluing jig.
This is where your parts start to look like
something. Joining the three assemblies creates
the Greek key at the bottom of the base.
When assembling the legs to the Greek key, I
used a spacer (seen at the bottom of the photo
above) to keep the legs spaced properly while
gluing-up.
Copyright 2004 Martian Auctions
451

stretchers.) It wasn’t until I completed this desk and had the glass top in place that I
appreciated how striking it looked.
The stop block clamped at the end of the glue-up
jig keeps the F4 and F5 pieces level with the top
of the G3 piece.
Start by gluing G1 in place, then work your way
up. As you can see in the photo, I clamped the
entire leg to my assembly bench to make things
easier.
Copyright 2004 Martian Auctions
452
Wyszukiwarka
Podobne podstrony:
05 DFC 4 1 Sequence and Interation of Key QMS Processes Rev 3 1 03
high key
first certificate practice tests and key 2
CARPROG BMW Key programmer manual
03 Teach Yourself Speak Greek With Confidence
CD-KEY The Godfather (PC GAME) All, CD KEY'E
Answer Key Grammar Test 4, grammar tests 1-5
Midsummers Day Wordsearch Answer Key
Key Skills 4
automat bram garazowych key wiper
Marura Repetytorium PR Quick Test 12B key
Clockwise Advanced Practice Key
ListeningPracticeThroughDictation 3 Answer key
Key Concepts in Language and Linguistics
Answer Key Short Tests 11AB
Matura Repetytorium PR Quick Test 2B key
how to use toyota lexus smart key programmer
więcej podobnych podstron