
How to Play the Dilworth Attack
by Eric Schiller
Chess Enterprises,
Moon Township PA
This is an excerpt from the book, published by
Chess Enterprises. You can order the book via email by
sending a message to sales@chessworks.com. This file
may be freely distributed as long as it is complete and
unaltered.

Chess Enterprises, Inc., Moon Township PA 15108–2607
© 1995 by Eric Schiller. All rights reserved.
Printed in the United States of America.
96 95 5 4 3 2 1
Editor: B.G. Dudley
Proofreading: Thomas Magar
Typesetting: Chessworks Unlimited
Manuscript completed August 1, 1994.
Cover Design:
ISBN:0-945470-46-0
The following hardware and software were involved in the
prepartaion of this book:
Deja Vu Chess Library 1.0 was used to research the games, which were
then exported to Bookup and Chess Assistant. Bookup 8.1 organized the
game and trapped all the transpositions. Games were annotated in Chess
Assistant 1.32. which also helped to organize the games into sets of related
endgames Both Chess Genius 2 and Zarkov 3 were used to check some of
the analysis. Zarkov scored the Bookup database, which was then
backsolved and manually reorganized. The material was then exported
from Chess Assistant into Microsoft Word for Windows 6.0, applying
Tilburg Laserfonts, Arial Rounded MT Bold and Agincourt fonts. All of this
work was completed on a 486/50 PC running Microsoft Windows 3.1, and
printed on a 600 dpi Apple Laserwriter Pro 630.
The Bookup 8.1 files and Chess Assistant files used in the preparation
of this book are available from:
Chessworks Unlimited
Post Office Box 1048
El Granada CA 94018-1048
1-800-700-1242
chesswks@netcom.com

Contents
Introduction ..........................................................................4
Theory I: Early Deviations.....................................................5
Theory 2: Approaching the Main Lines................................20
Theory 3: The Main Lines....................................................55
Endgames I: Bishop and Knight versus Rook.....................75
Endgames 2: Two Bishops versus Rook.............................87
Index of Games...................................................................97

How to Play the Dilworth Attack
4
Introuduction
The Dilworth Attack is one of the most interesting variations of the
Spanish Game. Black gives up a bishop and knight for a rook and one or
two pawns, and then launches an attack against the White King. If White
plays correctly, then a rich and complex endgame arises. From Black’s
point of view, this has great practical advantages. After all, anyone who
plays the Dilworth regularly as Black is going to have much more
experience with the particular endgame strategies and tactics which are
part of the Dilworth environment. Theory already considers those
endgames to be about equal, and the added advantage of experience
really gives Black a significant advantage. In addition, the experience of
playing these endgames is instructive, and the lessons learned can be
applied in other endgame situations. Therefore the Dilworth, with both
attacking chances and endgame strategy, is an ideal opening for the
aspiring chessplayer as well as the professional player. Among the top
players who play the opening as Black are Open Spanish Guru Artur
Yusupov, Eugene Torre and mega-theoreticial Lev Polugayevsky (in rare
excursions outside Sicilian territory). And how has the opening held up
against superstars? Well, look at the dismal results Bobby Fischer, Boris
Spassky and Nigel Short have as White!
This book contains everything you need to know to play the exciting
Dilworth Variation of the Ruy Lopez from either side, though it does
examine most material from Black’s point of view. What sets this
monograph apart from most opening books is the thorough examination
of the typical endgames which arise. Many opening books simply end a
variation with a symbol indicating an advantage for one side or another, or
worse yet, the omnipresent “unclear”. The Dilworth defies such a
treatment, because the endgames are so complicated that only a great deal
of experience can lead to correct evaluation of the positions. So almost all
of the games cited in this book are presented in full.
How to Play the Dilworth Attack
5
Theory I: Early Deviations
1.e4 e5 2.Nf3 Nc6 3.Bb5 a6 4.Ba4 Nf6 5.0 -0 Nxe4
The Open Variation is an aggressive system which has appealed to
such diverse talents as the dogmatic Siegbert Tarrasch, the creative Viktor
Korchnoi, the dynamic Bent Larsen and World Champion Max Euwe. It is
quite different from the solid maneuvering lines of the Closed variations,
and not nearly as thoroughly investigated.
6.d4
White almost always plays this move, since after 6.Re1 Black can
follow theory with 6...Nc5, or even 6...Nf6!? which is better than its
reputation.
6...b5 7.Bb3 d5 8.dxe5 Be6 9.c3
The most popular move for White, from an historical point of view.
Karpov, in his 1981 Merano match against Korchnoi, explored some of the
alternatives, and he still prefers 9.Nbd2 which lies outside the scope of this
book. But current theory suggests that Black is holding his own in those
lines.
9...Bc5 10.Nbd2 0-0 11.Bc2 Nxf2!?
Here we go! Vernon Dilworth popularized the opening in the 1940’s in
England, and now these lines bear his name. Kevin O’Connell points out a
precursor from 1924, but in fact the opening was actually played in the
19th century. No surprise, really, since the Open Ruy was quite in vogue
then. By the way, O’Connell’s 1978 book Spanish (Ruy Lopez): Open was
a landmark in the history of the theory of the line, and contains massive
amounts of well-reseached material and original ideas, many of which
remain valid.
12.Rxf2 f6

How to Play the Dilworth Attack
6
White almost always captures at f6, and the few examples of
alternative plans do not inspire confidence. After 13.exf6 Black usually
plays 13...Bxf2+. This is not forced, and the lines with 13...Qxf6 are
perhaps playable, but even if there is no refutation, there is little point in
capturing with the queen and giving White additional options with 14.Qf1.
So after 13...Bxf2+ 14.Kxf2 Qxf6 we reach the positions discussed in the
next chapter.
Schrump&Mehrlen–Goetz
Postal 1887
1.e4 e5 2.Nf3 Nc6 3.Bb5 a6 4.Ba4 Nf6 5.0 -0 Nxe4 6.d4 b5
7.Bb3 d5 8.dxe5 Be6 9.c3 Bc5 10.Nbd2 0 -0 11.Bc2 Nxf2
As far as I have been able to establish, this is the first game featuring
the Dilworth attack, and indeed, were it better known, perhaps the line
would bear the name of Alphonse Goetz!
12.Rxf2 f6
The basic idea of the Dilworth Attack is quite simple. Having
weakened the defensive barrier surrounding the White King, Black attacks
quickly and vigorously, exploiting the fact that White's queenside pieces
are not properly developed. By contrast, the Black forces are well-placed
to converge on the enemy king. With this move Black pries open the f-file,
and the attacking formation will involve rooks at e8 and f8, minor pieces
aimed at f3 (the bishop at c5 will be exchanged for the rook at f2 at an
early opportunity), and the queen will work from f6 or h4. Such a simple
plan rarely succeeds, however, because White, by giving up the pawn at
f3, can usually arrange the exchange of queens and one pair of rooks. That
means Black plays an endgame with rook and a pawn or two against two
minor pieces. Such endgames are by no means clear, especially when one
takes into account the awkwardness of White's queenside, which prevents
White from getting pieces, especially the rook at a1, into the game. So in
most cases, the Dilworth comes down to an endgame, and the study of the
endgame structures which arise is critical. We discuss a variety of examples
in the chapters on Dilworth Endgames.
How to Play the Dilworth Attack
7
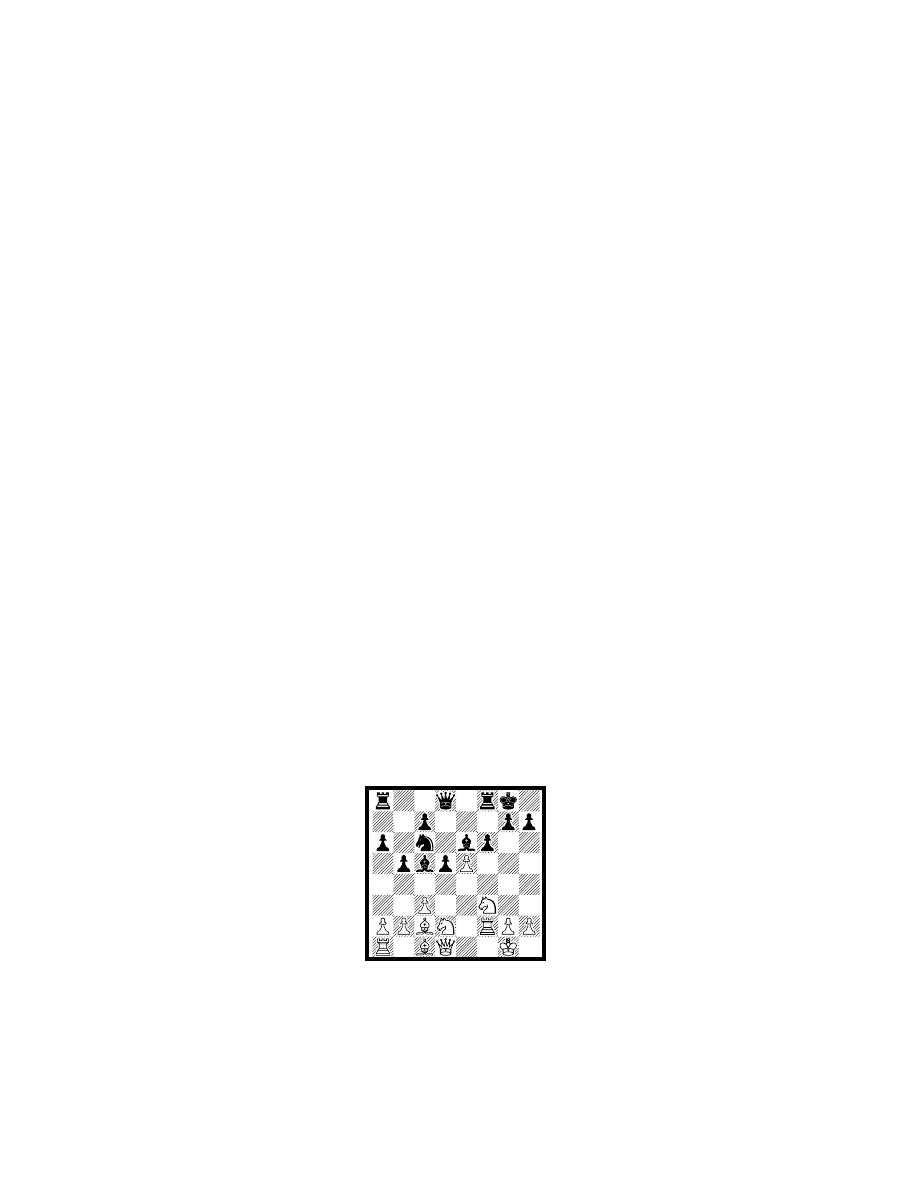
13.Nb3
The Dilworth Attack has roots back in the 19th Century, as this game
shows. But the fact that it was played in a correspondence game kept the
idea from widespread circulation, despite considerable interest in the
Open Variation in general. The capture on f6 is considered mandatory
now, but over the years there have been a number of attempts to do
without it. The problem is that the strong pawn center Black obtains if
allowed to play f6xe5 is very solid, and the f-file gets opened in any case.
13...Bxf2+ 14.Kxf2
14...fxe5 15.Kg1
For 15.Nc5 see Daniels-Farrell.
15...Bg4 16.Qe1
White does not gain anything by attacking the bishop with 16.h3. See
Farooqui-Corden.
16...Bxf3 17.gxf3 Qf6!? 18.f4 exf4 19.Nc5 Rae8 20.Qf1 Nd4
21.Bd1 f3
Some sources give 21...c6 here, but that is likely to be a mistranslation
of descriptive to algebraic notation.
How to Play the Dilworth Attack
8
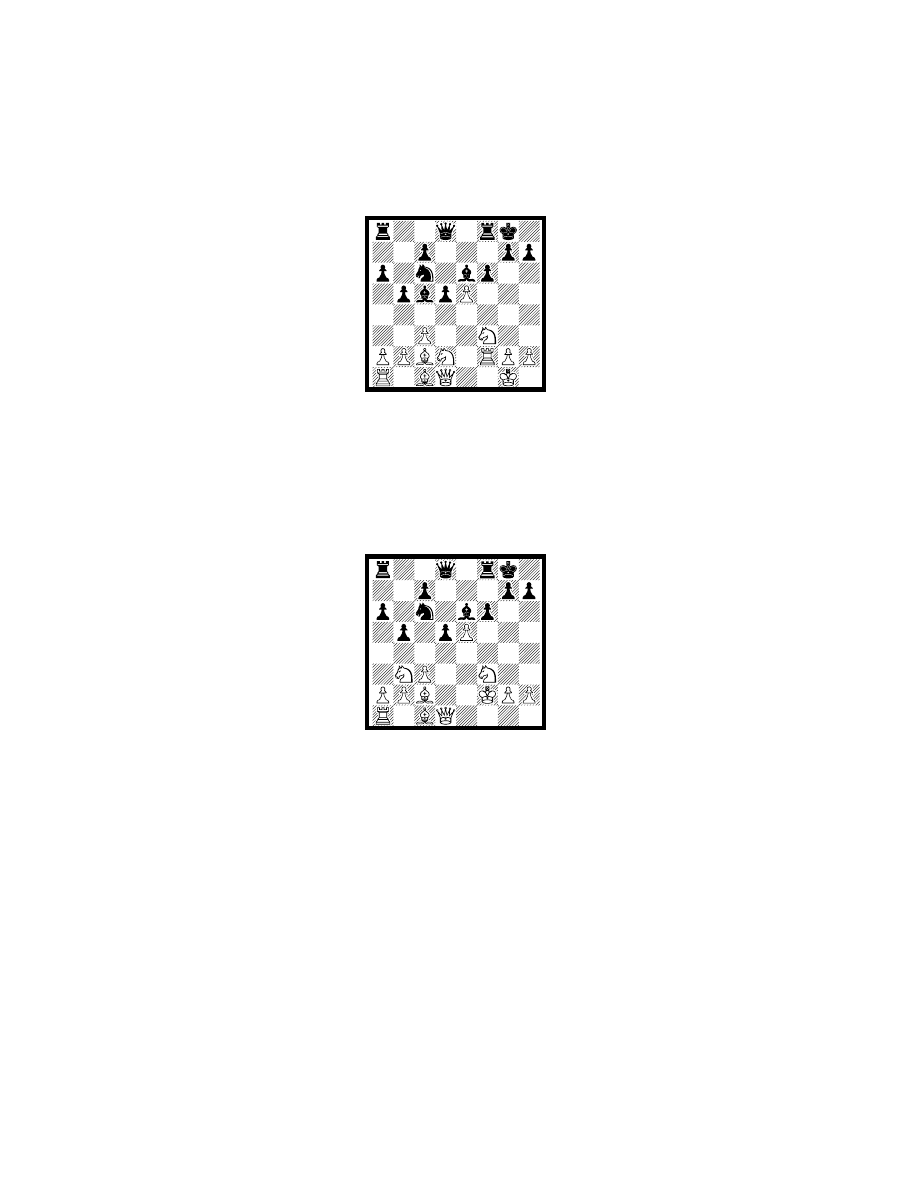
22.Nd3
This allows a pretty finish, but White was obviously busted anyway.
22...Qg6+ 23.Kh1 Qxd3!! 0-1
Farooqui–Corden
British Ch 1970
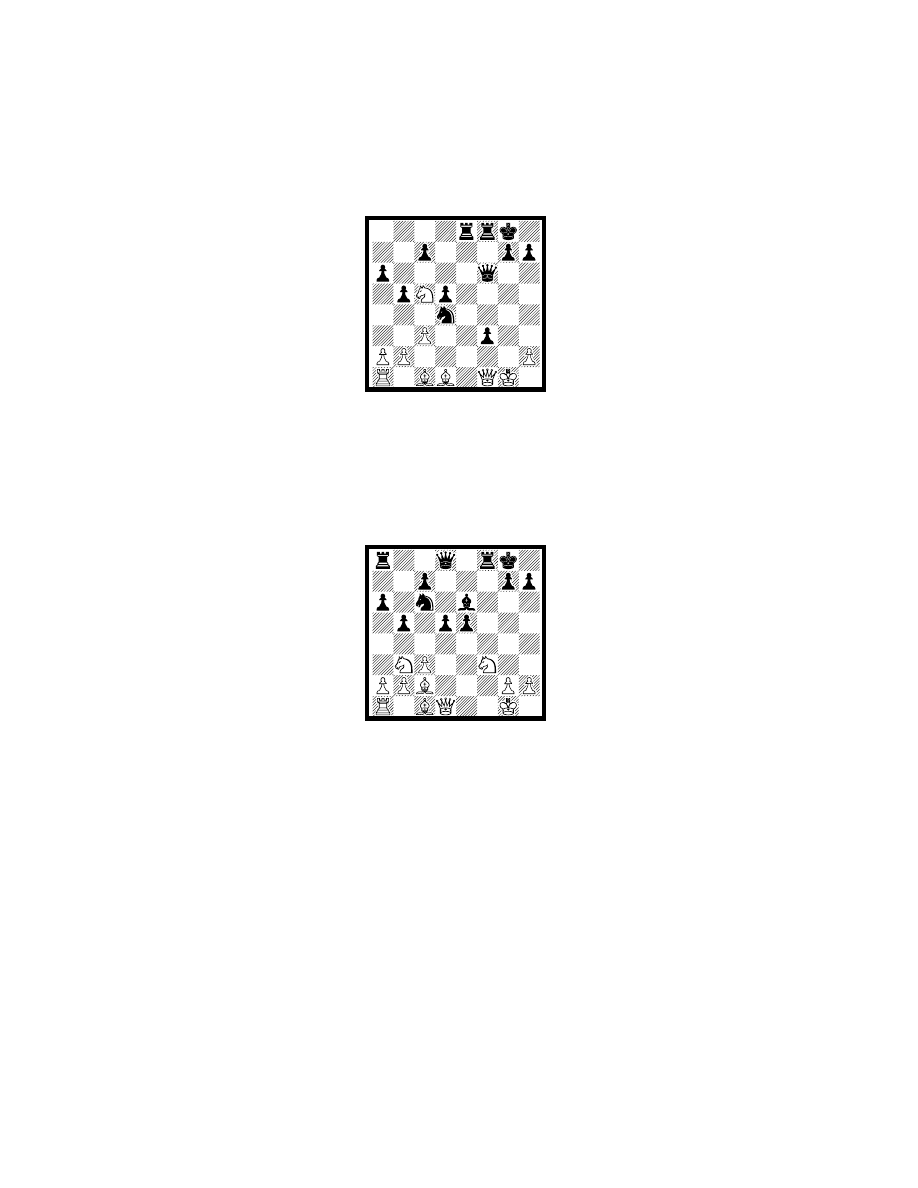
13.Nb3 Bxf2+ 14.Kxf2 fxe5 15.Kg1
15...Bg4 16.h3 Bxf3
The retreat to h5 is better, as the following analysis from O'Connell
(with a few additions) shows.
16... Bh5 17.g4 e4 18.gxh5 and now:
a) 18.Nfd4 Qd6 19.gxh5 Qg3+ 20.Kh1 Rf2-+ ;
b) 18.Bg5 Qd6 19.Nh2 Qg3+ 20.Kh1 Rf2 21.Qg1 Qxg1+P 22.Rxg1
Rxc2 23.gxh5 Ne5 ;
c) 18.Nh2 Ne5 19.gxh5 Nf3+ 20.Nxf3 Rxf3 21.Qe1 Qd7P) 18... Rxf3
19.Qe1 Qd7 20.Bxe4 dxe4 21.Qxe4 Qxh3 22.Qxc6 Qg4+ 23.Kh2
Rh3#
17.gxf3 Qd6
17...Kh8 comes into consideration, just to free the queen from
defensive duty for the weak pawn at d5. Then the queen can move and
How to Play the Dilworth Attack
9
the pawn does not fall with check. On the other hand, 17...Qh4 doesn't
seem to get the job done, see both Devos-Lupi and Suares-Borrello.
18.Be3 e4
19.f4
White keeps control of f5 and the h2-b8 diagonal remains closed. Here
Black might well simply bring the other rook into the game with 19...Rae8,
and then Re6-g6. Another advantage of that move is that the e-pawn is
defended so that if White ever does get in Qxd5+, the e-pawn won't fall as
well.
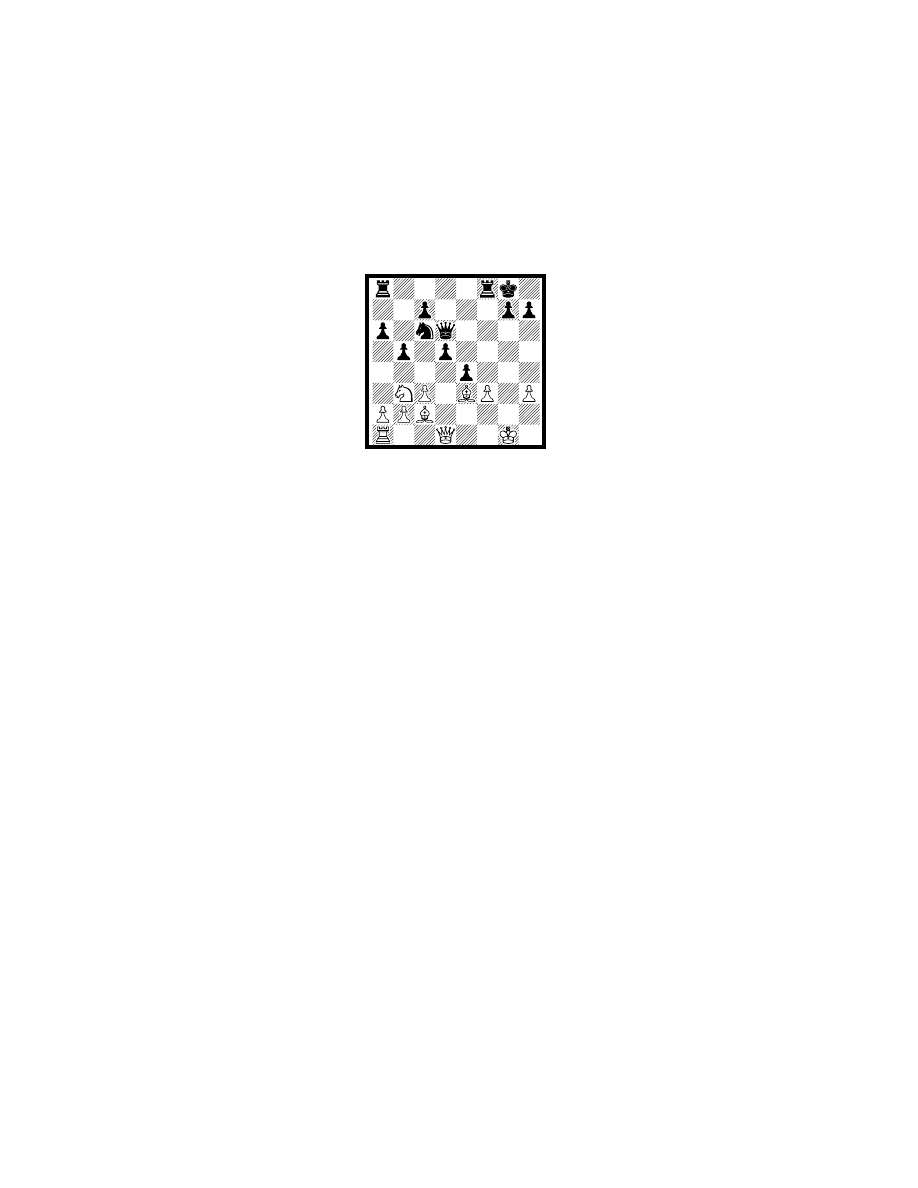
19...Rf6 20.Qd2 Qe6 21.Kh2 Raf8?!
This seems entirely beside the point. The f-file is not where Black is
going to break through White's defenses. White's pieces really aren't doing
anything, though the rook is finally ready to leave home and take up a
useful post on the kingside. Though it looks a bit artificial, I prefer
21...Qf5!?, using the mighty queen as a mere blockader for the moment, so
that the rook can transfer to h6 without worrying about the advance of
White's f-pawn. Black seems to be in too much of a hurry, even though
White's minor pieces have no easy path to a position from which they can
provide significant assistance with the defense of the king.
22.Rg1 Ne7 23.Bd1!?
Since the bishop has no future in the center, why not let it help out on
the kingside?
23...Nf5
How to Play the Dilworth Attack
10
24.Nd4!
An important move, exchanging a piece which is doing nothing for a
potential attacker. White's defense is beginning to gel.
24...Qd6 25.Nxf5 Rxf5 26.Rg3 c5
It is obvious that Black will not get anywhere by a direct attack. At the
very least White can defend the king with rook, queen and bishop, and all
Black can throw into the fight is a queen and two rooks. But if the White
pieces can be tied down in the center or the queenside, perhaps
something will turn up.
27.b4!? cxb4 28.cxb4 R8f7
Black can play 28...Rc8, but it doesn't seem to be particularly effective,
since there is no entrance square on the c-file. Nevertheless, Black's move
and the next one seem rather defensive.
29.Kg2
What is the point? Did White fear some sort of exploitation of the b8-
h2 diagonal?
29...Kh8
Hard to see what the point is, unless it is simply to get off the g-file so
that the g-pawn can advance.
30.Bb3 Rd7
31.Qd4 Rxf4?
How to Play the Dilworth Attack
11
There is simply no justification for this sacrifice. White's task is now
much easier.
32.Bxf4 Qxf4 33.Bxd5 Qf5 34.Bxe4
Perhaps Black simply miscalculated, assuming that this would win the
piece and lead to an endgame with two extra pawns and some attacking
chances. But even if this were the case, the endgame would still be
difficult to win.
34...Rxd4 35.Bxf5 Rd2+
35... Rxb4 36.Ra3+-
36.Kg1 Rxa2 37.Rc3 g6
Black is now fighting to hold the draw.
38.Bc8 Rb2 39.Bxa6 Rxb4 40.Rc7 Rc4 41.Rb7 Rc3 42.Kg2 Rb3
43.h4 Rb4 44.Kg3 h5 45.Bxb5 Rg4+ 46.Kf3
This looks strange, but it does not matter, since one way or the other
the h-pawn is going to leave the board.
46...Rxh4 47.Bd3 Rg4 48.Be4 Kg8 49.Bd5+ Kh8 50.Be6 Ra4
51.Bf7 Rg4 52.Bd5 Rh4 53.Be4 Rg4 54.Ke3 h4 55.Kf3 Rg1
56.Kf4 h3 57.Rb3 Kg7 58.Rxh3 Kf6 59.Ra3 g5+ 60.Kf3 Ke5
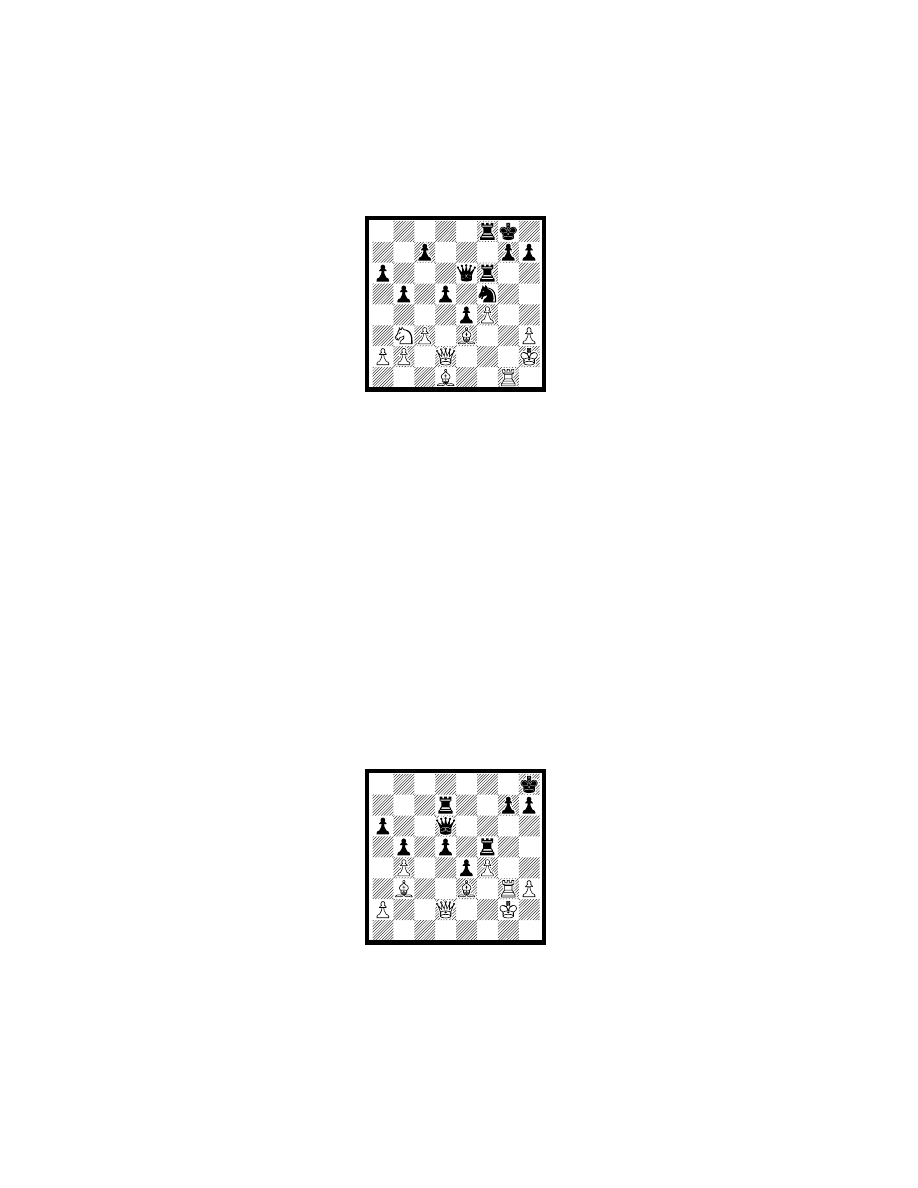
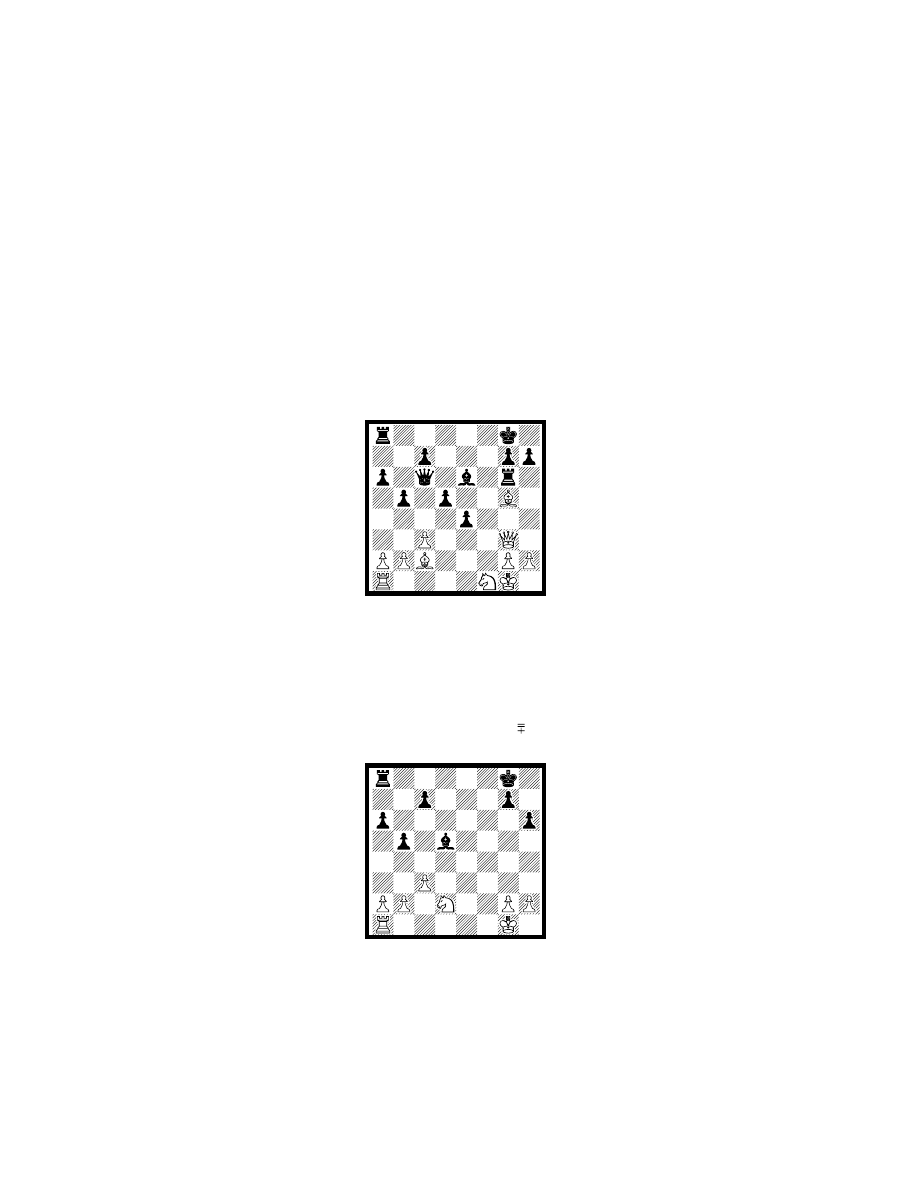
61.Ra5+ Kd4 62.Rd5+ Kc4 63.Kf2 Ra1 64.Rxg5 Kd4 1/2
Daniels–Farrell
England 1943
13.Nb3 Bxf2+ 14.Kxf2 fxe5
15.Nc5
This is a logical move as an alternative to 15.Kg1 (Schrump & Mehrlen-
Goetz). But Black can obtain the advantage easily with proper play. The
correct plan for Black is to pin the enemy knight at f3, drop the friendly
knight back from c6 to e7, and then bolster the center with c7-c6.
15...Bg4 16.Bb3 Ne7
How to Play the Dilworth Attack
12
16... Qh4+ 17.Kg1 Bxf3 18.gxf3 Ne7 19.Bxd5+ Nxd5 20.Qxd5+
Kh8 21.Be3
17.h3
This is better than 17.Bg5, where 17...c6 gives Black a better game,
according to Shamkovich & Schiller.
17...Bxf3
There are some options worth pursuing here:
a) 17... Bh5!? 18.Ne6 Qd6 19.Nxf8 Rxf8
b) Magar suggests 17...Qh4+ e.g., 18.Kg1 Bxf3 19.gxf3 Qg3+
20.Kh1 Qxh3+ 21.Kg1 Qg3+ 22.Kh1 c6 which is clearly better for
Black.
18.gxf3 Qd6
18... e4 19.Nxe4 ; 18... c6 19.Ne6 Qb6+ 20.Be3
19.Ne4 Qd7
20.Ng5 h6!?
There is nothing happening on the kingside at the moment, but the
center has not yet been consolidated. So instead of forcing the knight to
retreat, it would be wiser to simply play 20...c6 and let White figure out
what to do. In my opinion, Black is still better here. White can, of course,
play 21.Bc2 and try to play on the kingside, but this releases the grip on
the light-squares, and in particular the e4-square. After 21...Nf5 Black will
play h6, and the knight can no longer retreat to e4 comfortably, for
example: 22.Kg1 h6 23.Ne4 (taboo because of the pin on the queen)
23...Nh4! with threats at h3 and f3, and the added bonus that if Black plays
Qxh3 the knight at e4 is suddenly en prise.
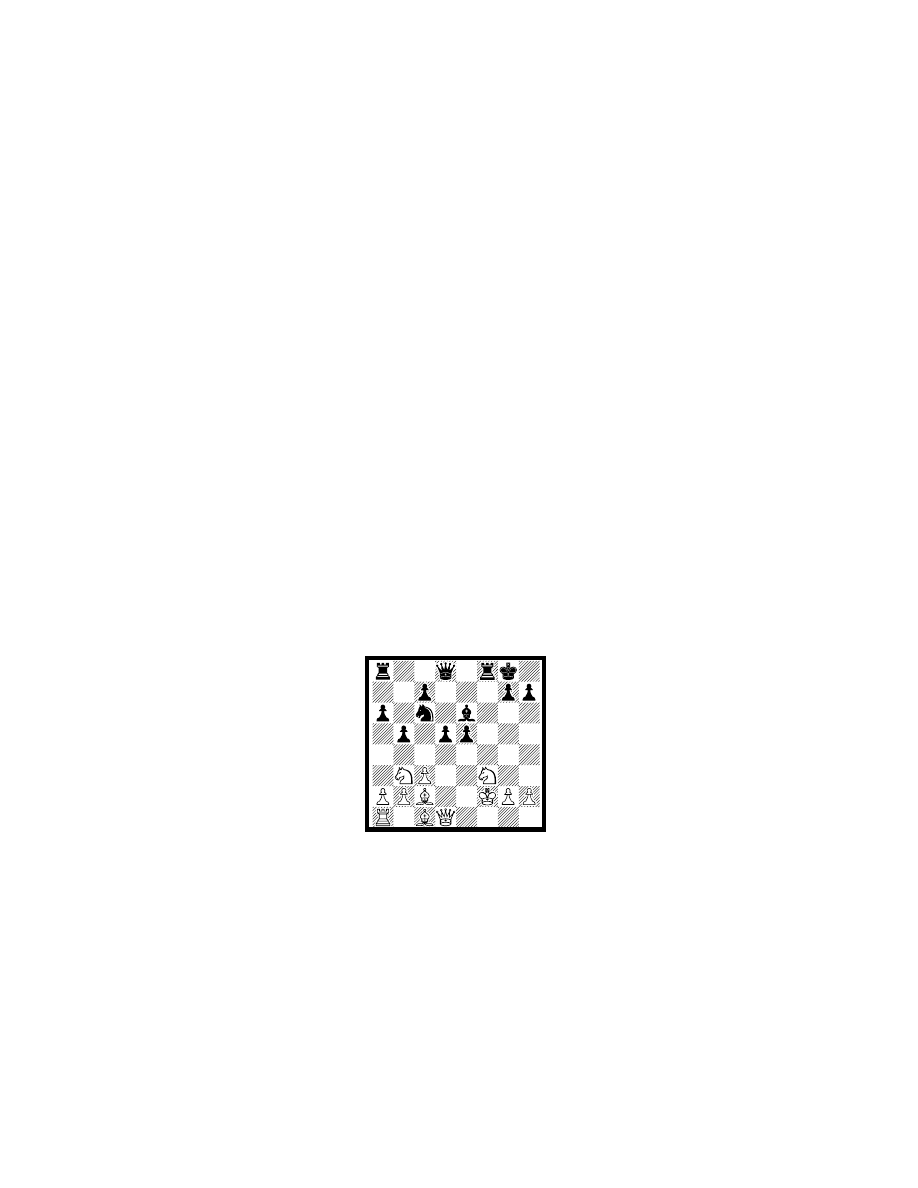
21.Ne4 c6 22.Be3 Qxh3 23.Bc5 Qh4+
How to Play the Dilworth Attack
13
24.Ke2 Rxf3!!
After 24...Qh2+ and 25...Rae8 or 25...Kh8, Black's advantage is beyond
dispute. But the temptation to end the game with a flashy combination
proves irresistable.
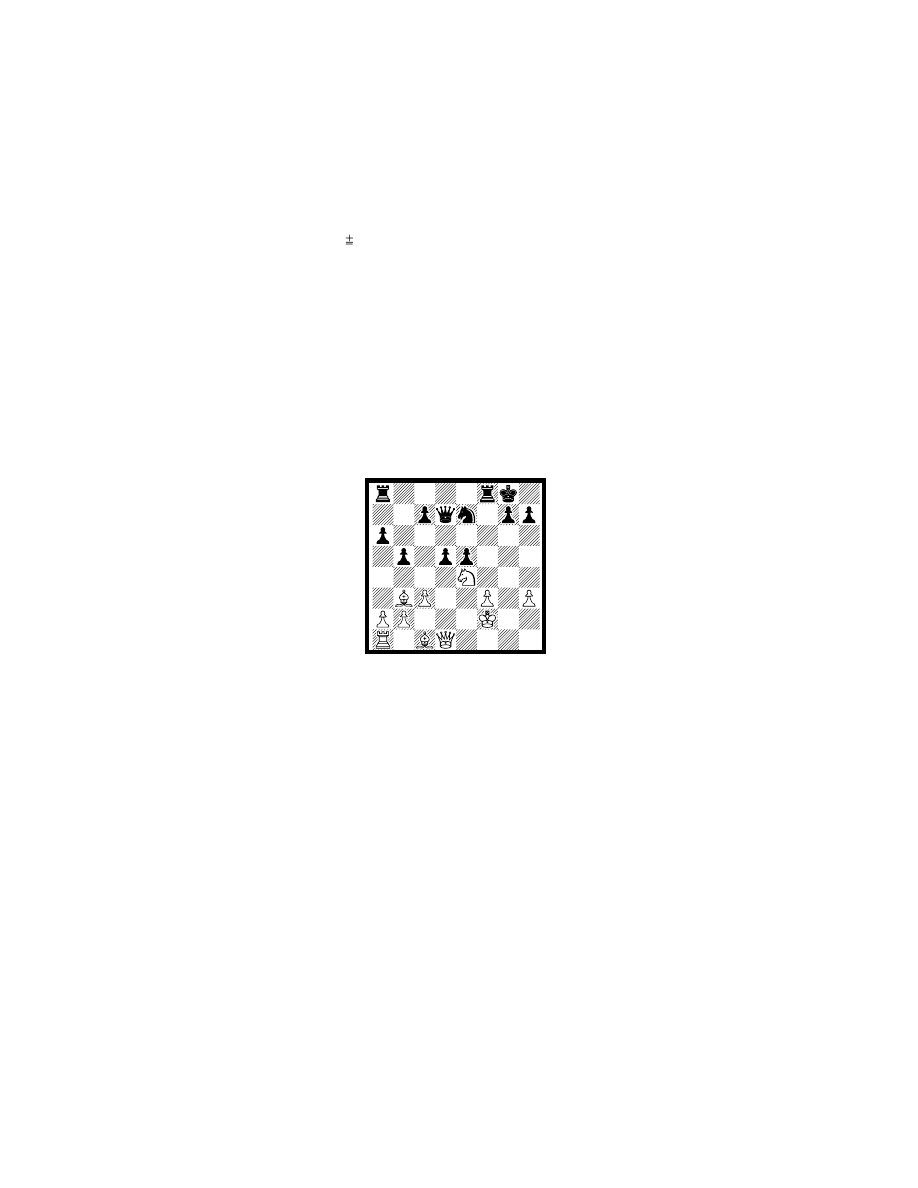
25.Nf2!
25.Kxf3 Qxe4+ 26.Kg3 Nf5+ 27.Kh2 Qh4+ 28.Kg1 Re8
25...Raf8
Everybody's gotta get into the act! Actually, this is yet another
instructive example of a successful attack requiring the participation of the
entire army. Often the key to Black's success is the inclusion of Rae8 or
Raf8 at an appropriate moment, when more direct attacking methods seem
to be available. A key point to remember is that while the extra firepower
might not seem necessary now, it may be needed later in the battle.
26.Qg1 e4 27.Qg2 Ng6 28.Qf1 Nf4+ 29.Kd2 Nd3 30.Nxd3
There is nothing better.
30...Rxf1 31.Rxf1 Rxf1 0-1
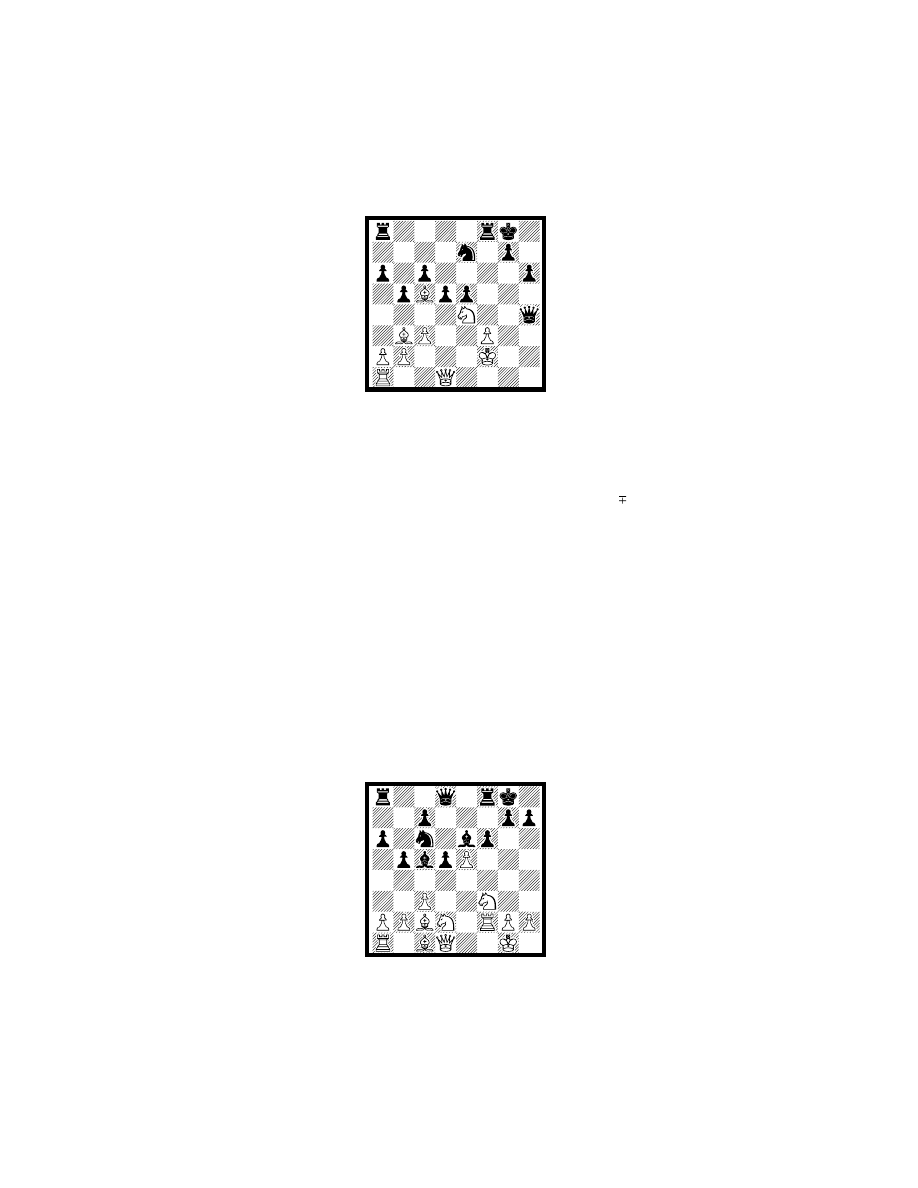
Tocanita–Ofstad
Postal 1986
How to Play the Dilworth Attack
14
13.Qe2
The queen does not do much here, except that it can be used to
recapture at f2 after Black picks off the rook.
13...fxe5 14.Nf1
For 14.Nb3 see Kluger-Szabo.
14...Bxf2+ 15.Qxf2 Qd7
Black is already better, with a solid pawn center.
16.Qg3 e4!
This cuts off the Bc2 and makes the g6-square available to a rook.
17.Nd4 Rf6 18.Bg5 Rg6 19.Nxc6 Qxc6
20.Qe3
The queen is overworked, even though all it is doing is defending the
bishop at g5.
20...d4 21.Qxe4 Bd5 22.Qh4 h6
The convergence of Black's pieces on g2 is lethal.
23.Bxg6 Qxg6 24.Qxd4 Qxg5 25.Qd2?
25.Qf2! Rf8 26.Qg3 Qxg3 27.Nxg3 Re8
25...Qxd2 26.Nxd2
26...Re8 27.Rf1

How to Play the Dilworth Attack
15
White has a great deal of difficulty holding such endgames, because
the bishop is much stronger than the knight. Here White gives up a pawn
in order to get a more active position. But notice that if the knight were at
g3 rather than d2, this could have been accomplished more effectively by
placing the rook at d1 and then heading for d7.
27...Bxa2 28.Kf2 Bd5 29.Rd1 a5 30.Ra1 a4 31.c4 Bc6! 32.b3
Rd8!
The rest is easy.
33.Ke3 axb3 34.g3 bxc4 35.Nxc4 Bb5 36.Nb2 Re8+ 37.Kd2
Re2+ 38.Kc3 Rxh2 39.Rg1 Rf2 0-1

Index of Games
Antonov–Pozin .......................................................................73
Ardbring–Losa........................................................................37
Arnason–Petursson................................................................61
Balashov Y–Tukmakov V .......................................................88
Baroin–Karch .........................................................................53
BELLE–Schiller ......................................................................69
Browne W–Acers J.................................................................79
Brunner–Mikhalchishin ...........................................................55
Cuasnicu–Rossetto ................................................................42
Damant–Agarkoff ...................................................................16
Daniels–Farrell .......................................................................11
Dekker–Van der Zijpp.............................................................56
Doncevic–Samarian ...............................................................58
Drefke–Hanel .........................................................................25
Edwards–Horner ....................................................................74
Enders P–Chekhov V.............................................................80
Farooqui–Corden .....................................................................8
Findlay I–Southam D..............................................................93
Fischer–Stevens.....................................................................26
Fritsch–Preuszner ..................................................................44
Geller–Chekhov......................................................................59
Grabner–Zerbe.......................................................................46
Grefe–Rowley ........................................................................70
Guillou–Bouttier P ..................................................................30
Hutter–Ashcroft ......................................................................39
Ivanchuk–Yusupov.................................................................49
Kaminsky M–Chekhov V ........................................................94
Kashdan I–McCormick E.......................................................75
Kluger–Szabo.........................................................................15
Larsen I–Eriksen ....................................................................18
Lein–Kotliar ............................................................................64
Ljubojevic L–Korchnoi V.........................................................91
Magalotti A–Wagman S .........................................................84
Manic–Torres .........................................................................21
Matanovic A–Wade R ............................................................87
Michel–Medina Garcia............................................................23

Morovic Fernandez I–Yusupov A............................................83
Nightingale–Ritson Morry .......................................................41
Ostojic–Karaklaic....................................................................28
Perera–Torre ..........................................................................44
Pierrot–Rodi ...........................................................................38
Piszcz K–Fredrich M...............................................................84
Pupko–Monin N......................................................................26
Renet O–Kotliar M..................................................................85
Richardson K–Estrin Y ...........................................................90
Richter–Samarian...................................................................57
Rose–Friedel..........................................................................66
Savon–Serper ........................................................................72
Schrump&Mehrlen–Goetz ........................................................6
Shakirov–Polugayevsky .........................................................34
Short–Yusupov.......................................................................48
Sinoviyev–Mikhalevsky...........................................................51
Spassky–Neunhoffer..............................................................31
Spitzenberger E–Ericson........................................................20
Thomas–Schiller.....................................................................34
Tocanita–Ofstad.....................................................................13
Van Perlo G–Schmidt J ..........................................................77
Voltolini L–Bertino G...............................................................92
Weir–Dilworth.........................................................................36
$9.95
The Dilworth Attack is one of the most interesting lines in the
Ruy Lopez. Black gives up two pieces in return for a rook and
two pawn, with excellent attacking prospects. In most cases,
White weathers the storm but must then play a complicated
endgame. This works to Black’s advantage, since Black is more
likely to be familiar with the typical endgame structures and
strategies. The Dilworth continues to be seen at the highest
levels of chess, especially in the hands of Artur Yusupov.
In this, the first ever monograph devoted to the line, noted
author Eric Schiller explains all of the critical ideas in the
opening and endgame, and provides many examples of each
from tournament play. With this weapon in your arsenal for
Black, the Spanish Inquisition can prove to be a most
unpleasant experience for White!
Eric Schiller is a National Master
and author of over 50 books on
opening strategy. He holds a PhD in
Linguistics from the University of
Chicago, and is the owner and
manager of Chessworks Unlimited,
which develops and markets software.
Dr. Schiller lives and works in El
Granada, California, on the Pacific
coast near San Francisco.
ISBN:
0-945470-46-0
Wyszukiwarka
Podobne podstrony:
How to Play the Brain Game for Fun and Profit
NLP Brain101 How to Play the Brain Game for Fun and Profit
How to Play the Guitar by Ear
Garry Kasparov How to Play the Najdorf Vol 2
Gordon Smyth How to Beat the Computer at Chess (1995)
How to read the equine ECG id 2 Nieznany
How to summons the dead
How to Install the Power Quality Teaching Toy
Fearless Interviewing How to Win the Job by Communicating with Confidence
How to Use the Electrical Wiring Diagram
How to get the new iPod Touch(8GB) for nothing (easy to complete)
How to Get the Most Out of Conversation Escalation
how to use the flash tool for Xperia
How to Meditate the Silva Method
How to Examine the Nervous System
How To Gyp The Tv Repairman
Dane Rudhyar HOW TO INTERPRET THE LUNAR NODES
więcej podobnych podstron