
This redwood can cradle will hold a 30-gallon can at an accessible
angle for removing soil or fertilizer.
1. Frames and posts
Trim the rear and bottom frames to
15
1
⁄
4
inches. Cut 1
1
⁄
2
x2-inch notches in the ends of the front
bottom frame. Trim 2x4 redwood posts to 10
1
⁄
2
inches and notch
one end to 1
1
⁄
2
x3 inches. Attach the posts to the front frame at the
notch with 3-inch deck screws. Use 10d nails to fasten the 2x4 rear
frame to the bottom frame. Trim side frames to 18 inches and cut
the ends on one side
to a 45° by
1
⁄
2
-inch
bevel. Use 3-inch
deck screws to attach
the side frames to
the assembled front
frames at their
notches. The rear
frame attaches to the
side frame
1
⁄
2
inch
from the bottom edge
(see detail illustration),
also with 3-inch screws.
2. Front boards
Trim three 1x4 redwood boards to 20 inches. Mark the center line
of the top board and using a cardboard template, transfer and cut
a 9-inch radius cut to a depth of 2 inches. Lightly sand the cut.
Attach the front 1x4
redwood boards with two
6d nails per board end,
remembering to predrill
nail holes.
When built, this redwood storage bin will be 19 inches square and 18
inches high and will hold up to 3.5 cubic feet of material. Add casters
for greater mobility and line with plastic to minimize water damage.
1. Side panels
Use
6d nails or 2-inch deck
screws for most attach-
ments. Trim ten each
1x4 boards to 19 inches
and 17
5
⁄
8
inches. Nail
the short side 1x4
boards to the four 2x4
vertical cleats trimmed
to 15
3
⁄
4
inches, starting
the boards from the top
to allow for a lip at the
bottom for the base
installation. Trim and
install two base cleats to fit between the vertical cleats. Attach the
ten 1x4 long side boards to the 2x4 vertical cleats.
2. Base
Tack together 2x4s trimmed to
17
5
⁄
8
and 10
5
⁄
8
inches to form the base.
Trim 1x4 bottom boards to 17
5
⁄
8
inches
and attach to the 2x4 base with 6d nails.
Insert the base inside the bin butting
up to the base cleats. Use five nails
or screws per side to secure the base.
Attach optional casters.
Redwood
For beauty and performance, redwood is naturally superior to
other woods. That’s why it’s the first choice for decks, fences and
most outdoor projects. Redwood retains its beauty outdoors,
shrinks and swells less than other woods and is less likely to warp,
split, check or cup. With little or no pitch, redwood is easy to drill,
saw and shape. Redwood heartwood has natural durability and
resistance to insects and will last longer outdoors than most woods.
Grades
The knotty garden grades of redwood are ideal for outdoor projects.
These grades are beautiful, durable and economical.
Construction Heart/Deck Heart
is all heartwood and con-
tains knots; used for load-bearing applications near the ground.
Deck Heart is graded for strength and is available in 2x4 and 2x6.
Construction Common/Deck Common
contains sapwood
and knots; used for decking and above-ground uses. Deck Common
is graded for strength and is available in 2x4 and 2x6.
Merchantable Heart
is all heartwood and contains larger knots
than Construction grades; used near the soil.
Merchantable
contains sapwood and larger knots; used for
fence boards, rails and above-ground uses.
Finishes
Redwood accepts finishes better than most woods. Some heighten
redwood’s natural beauty, bringing out the color and the grain.
Others help the wood harmonize or contrast with surrounding
structures. Keep in mind that unfinished redwood will gradually
turn soft driftwood gray. Read the labels on all finish products
before using.
Clear water repellent finish
with mildewcide is recommended
to stabilize the color at tan.
Bleaching and weathering stains produce a permanent drift-
wood gray effect, a good, low-maintenance option.
Semitransparent stains
in “redwood” shades tint the wood
without hiding the grain.
Solid-color stains or paints
should be applied over compatible
oil-based primers.
Fasteners
Use only non-corrosive hardware such as aluminum, stainless
steel or top quality hot-dipped galvanized screws or nails. Ordinary
nails and screws will cause stains.
405 Enfrente Drive, Suite 200
Novato, CA 94949
Telephone 415 382-0662
Toll Free 888 Cal-Redwood
Fax 415 382-8531
www.calredwood.org
Other Construction Tipsheets
Also Available
Deck Over Concrete
Deck Construction
8x10 Deck
Deck Grades, Nails and Finishes
Butcherblock Bench
Fences for All Reasons
4x4 Planter
Exterior Finishes
Sonoma Picnic Table
Landscape Architecture
Lake Tahoe Gazebo
Petaluma Planters
Windsor Shade Shelter
Mendocino Bench
Calistoga Spa Surround
R E D W O O D S T O R A G E B I N
Contact the California Redwood Association for more great pub-
lications containing redwood technical and building information.
Call us at 415 382-0662 for a complete literature list or to ask for
any of the titles listed here:
2x4
vertical
cleats
2x4 base cleat
1x4
long side
boards
1x4
long side
boards
1x4
short side
boards
1x4
bottom
boards
2x4 base
6d nails
R E D W O O D C A N C R A D L E
1x4
front
boards
2x4 post,
1 x 3" notch
1 x 2"
notch
2x4
side frame
2x4
bottom
frame
2x4
rear
frame
3" deck
screws
45
°
bevel
6d
nails
"
1
⁄
2
"
1
⁄
2
"
1
⁄
2
6d
nails
1x4s
1x4s
Caster (optional)
2x4
2x4s
"
1
⁄
2
Materials For Redwood Storage Bin
Quantity Size
Length
Short side boards
10
1x4
17
5
⁄
8
inches
Long side boards
10
1x4
19 inches
Bottom boards
5
1x4
17
5
⁄
8
inches
Vertical cleats
4
2x4 15
3
⁄
4
inches
Base cleats
2
2x4 10
5
⁄
8
inches
Base
2 each
2x4
10
5
⁄
8
,17
5
⁄
8
inches
Nails or screws
6d nails or 2-inch deck screws
Materials For Redwood Can Cradle
Quantity Size
Length
Front, bottom and rear frames 3
2x4
17 inches
Side frames
2
2x4
18 inches
Posts
2
2x4
10
1
⁄
2
inches
Front boards
3
1x4
20 inches
Nails
6d, 10d nails
Deck screws
3 inches
9" rad.
2"
1x4 redwood front board
C
15 "
1
⁄
4
R E D W O O D
Naturally beautiful
Easy to use
Practical and economical
Durable and stable
Resistant to decay and insects
B U I L D
I T
W I T H
REDWOOD
M o n t e r e y P o t t i n g C e n t e r
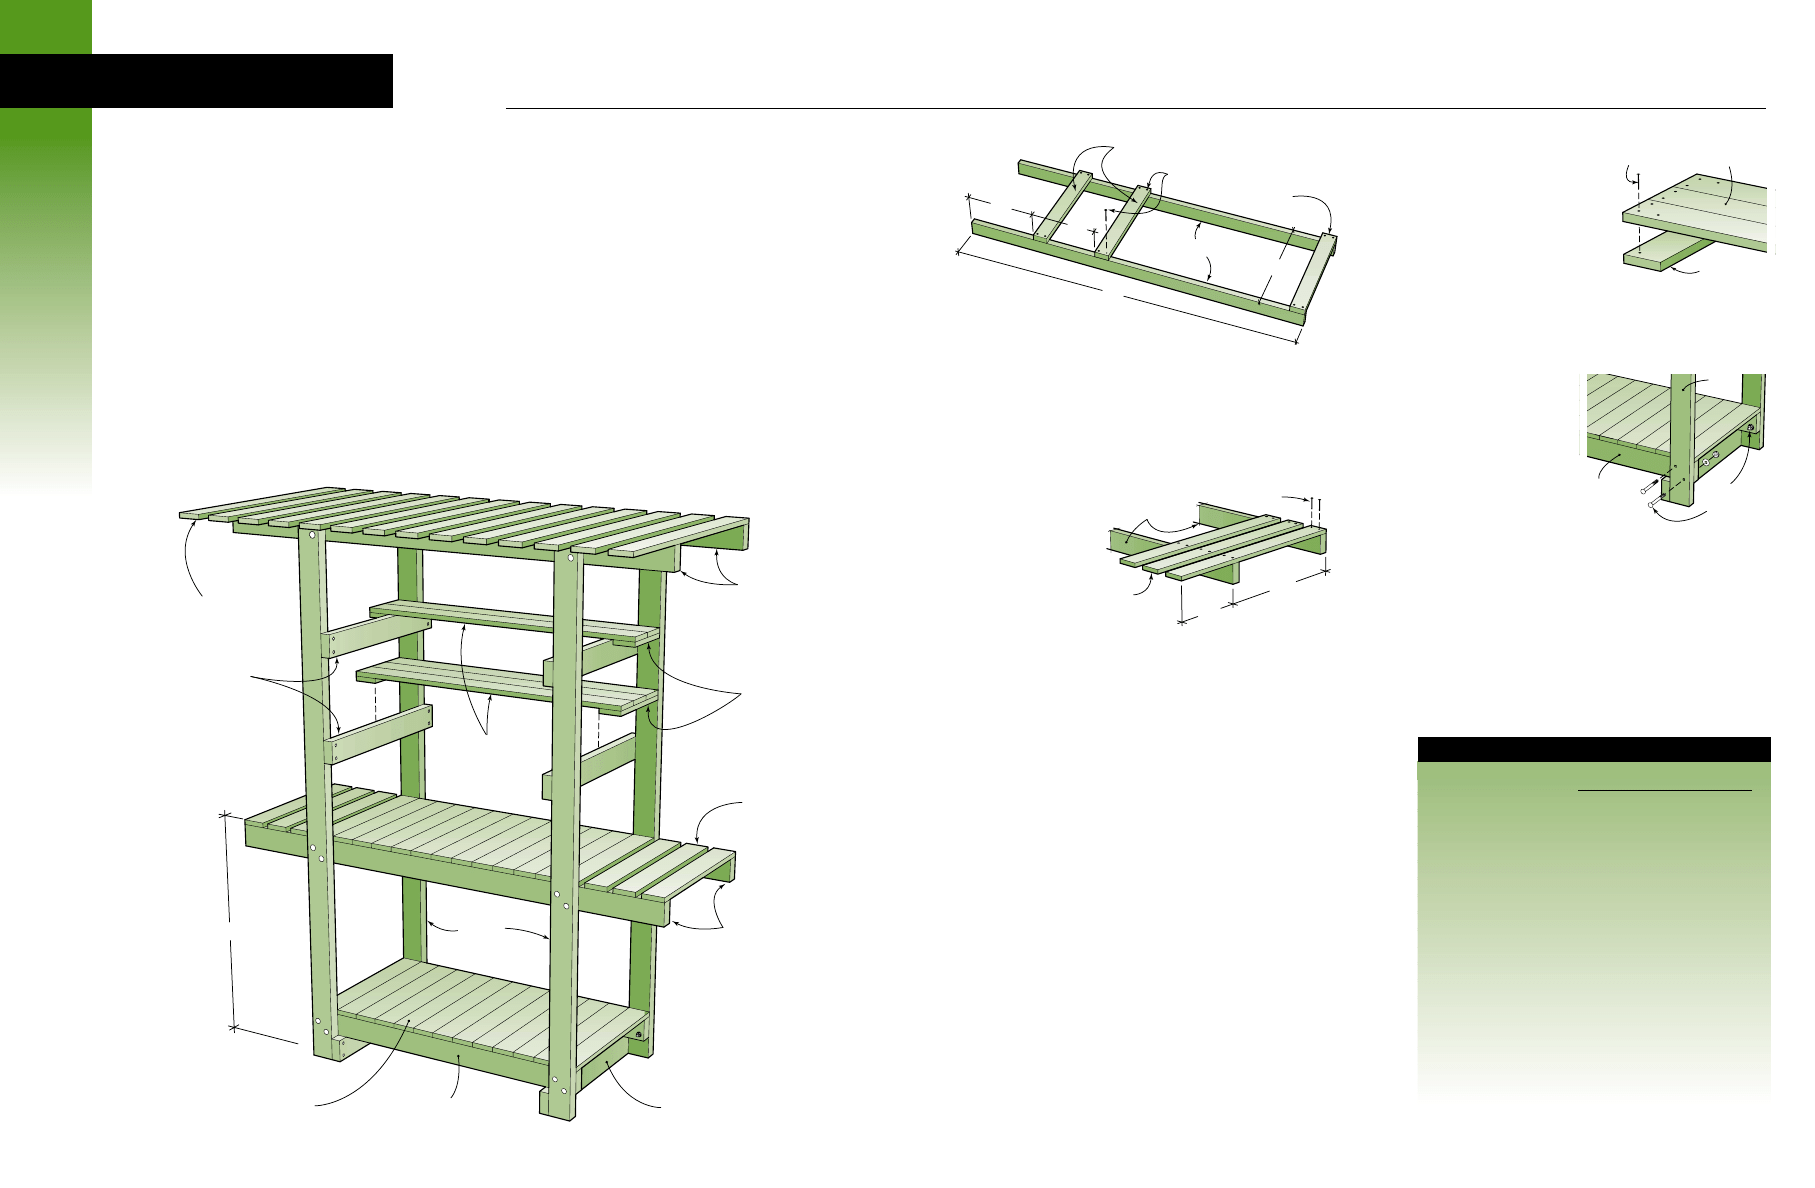
2. Roof
The six-foot-long roof calls for fourteen 36-inch 1x4 slats
spaced approximately 1
1
⁄
2
inches apart and with a front overhang of
12 inches. This spacing will give plants moderate sun protection.
Vary the slat quantity and spacing to suit your shading requirements.
Lay out the 2x4 roof supports on edge and spaced 24 inches apart.
Attach the end slats first, flush to the rear support and overhanging
the front. Use two 6d
nails or two 2-inch
deck screws per joint.
Position the rest of the
roof slats with equal
spaces, approximately
1
1
⁄
2
inches, before
attaching them.
3. Middle shelf
With a few minor construction changes, the
middle shelf can be built to provide various work or display areas.
Here are three options:
Overhang with drainage
This variation, shown at left, turns
the overhang area into a work surface with water drainage. On six-
foot-long frames, lay out thirteen 1x4 slats in the center without
spaces and then space three slats at each end 1
1
⁄
4
-1
1
⁄
2
inches apart.
Attach with 6d nails or 2-inch deck screws.
Simple overhang
In this design, the middle shelf is gap-free and
overhangs the potting center legs by about 11 inches at each side.
Trim twenty 1x4 slats to 24 inches. Begin assembly by laying two six-
foot 2x4 middle shelf frames on edge, spaced to 24 inches. Starting at
one end, attach all the slats without spaces with nails or screws. Trim
the shelf frames to this length.
No overhang
For a more compact potting center, construct the
middle shelf using just 13 slats with no spacing and no overhang.
Follow the directions for the bottom shelf.
4. Bottom shelf
Trim two 2x4 shelf frames to 45
1
⁄
2
inches or to
match the length of 13 slats nailed side by side with no spaces. Trim
thirteen 1x4 slats to 24 inches. Drive two 6d nails or 2-inch deck
screws through the slat ends to attach them to the shelf frames.
Predrill nail holes.
P O T T I N G C E N T E R
M o n t e r e y P o t t i n g C e n t e r
A good starter do-it-yourself project, the potting center is constructed
in simple sections, then fastened together with carriage bolts, washers
and nuts for easy set up or knock down. There are plans on the back
of this brochure that show an easy-to-build redwood can cradle or a
redwood storage bin to complement your potting center.
Measure and cut as you build for best results. Use only non-corrosive
nails, bolts and screws to prevent staining. Predrill nail holes to
minimize splitting near board ends.
1. Leg module
On a level surface, lay out two seven-foot 2x4s
on edge to start the first leg module (illustration at right, top). Trim
three 2x4s to 27
3
⁄
8
inches for one leg brace and two shelf supports.
Attach the leg brace flush to the bottom of the legs, using two 16d
nails or two 3
1
⁄
2
-inch deck screws per joint. Attach the shelf supports
16 and 32 inches from the top of the legs. Repeat these steps for
constructing the second potting center leg module.
5. Upper shelves
Use two or three
slats per shelf for the upper shelves,
trimmed to 45
1
⁄
2
inches. Trim
1x4 cross braces to match the width
of the slats and drive 3d nails or
1
1
⁄
4
-inch screws through 1x4 slats
into the cross braces. These braces
secure the shelving to the structure.
6. Potting center assembly
Join the potting center modules
together by drilling two
3
⁄
8
-inch bolt holes through the legs and
frames at each junction, starting with the bottom shelf, which
rests on the bottom leg brace.
This job will be easier if you
temporarily clamp the
frames or the roof supports
into position while drilling.
Measure carefully and check
for square. Use non-corrosive
3
⁄
8
-inch by 3
1
⁄
2
-inch carriage
bolts with washers and nuts.
Finishing
Lightly sand all cut ends. Apply a clear water repellent
or stain containing a mildewcide and UV protector to extend the
life of your project. Read important finishes descriptions on the
back of this brochure.
Tools you will need
Tape measure, carpenter’s square,
hammer, electric drill with Phillips head drill bit (for driving
deck screws), twist drill bits, adjustable wrench or
3
⁄
8
-inch socket,
C-clamps and hand or power saw.
Whether you are displaying prize bonsai or
potting new impatiens, this free-standing
redwood potting center creates a peaceful
sanctuary and will give years of service.
Construction Common, Deck Common,
Merchantable Heart and Merchantable are
knotty garden grades of redwood and offer a
colorful mix of sapwood and heartwood.
Wherever increased decay resistance is needed,
use the all-heartwood grades: Construction
Heart, Deck Heart or Merchantable Heart.
1x4 redwood
upper shelf slats
1x4 redwood
cross brace
3d
nails
1x4 redwood
roof slats
2x4 redwood
roof supports
1x4 redwood
shelf slats
1x4 redwood
shelf cross braces
2x4 redwood
shelf supports
2x4 redwood leg brace
2x4
redwood
legs
1x4 redwood
middle shelf slats
1x4 redwood
bottom shelf slats
2x4 redwood
middle shelf frames
2x4 redwood shelf frame
32-36"
2x4 redwood legs
16"
16"
84"
2x4 redwood
leg brace
16d nails
2x4 redwood
shelf supports
27
"
3
⁄
8
Materials For Potting Center
Quantity
Size
Length
Legs
4
2x4
7 feet
Leg braces
6
2x4
27
3
⁄
8
inches
Roof supports
2
2x4
6 feet
Roof slats
14
1x4
36 inches
Middle shelf slats
13-20*
1x4
24 inches
Middle shelf frames
2
2x4
45
1
⁄
2
-72 inches*
Bottom shelf slats
13
1x4
24 inches
Bottom shelf frames
2
2x4
45
1
⁄
2
inches
Upper shelf slats
4-6*
1x4
45
1
⁄
2
inches
Upper shelf cross braces
4
1x4
7-10
1
⁄
2
inches*
Carriage bolts,
24 sets
3
⁄
8
3
1
⁄
2
inches
washers and nuts
Nails
1 pound
3d, 6d, 16d
Deck screws
1 pound
1
1
⁄
4
, 2 inches
*
Depends upon design options chosen
Leg
2x4
shelf
frame
x 3
carriage bolt,
washer,
and nut
"
3
⁄
8
"
1
⁄
2
1x4
redwood
slats
2x4 redwood
roof supports
12"
overhang
24"
6d nails
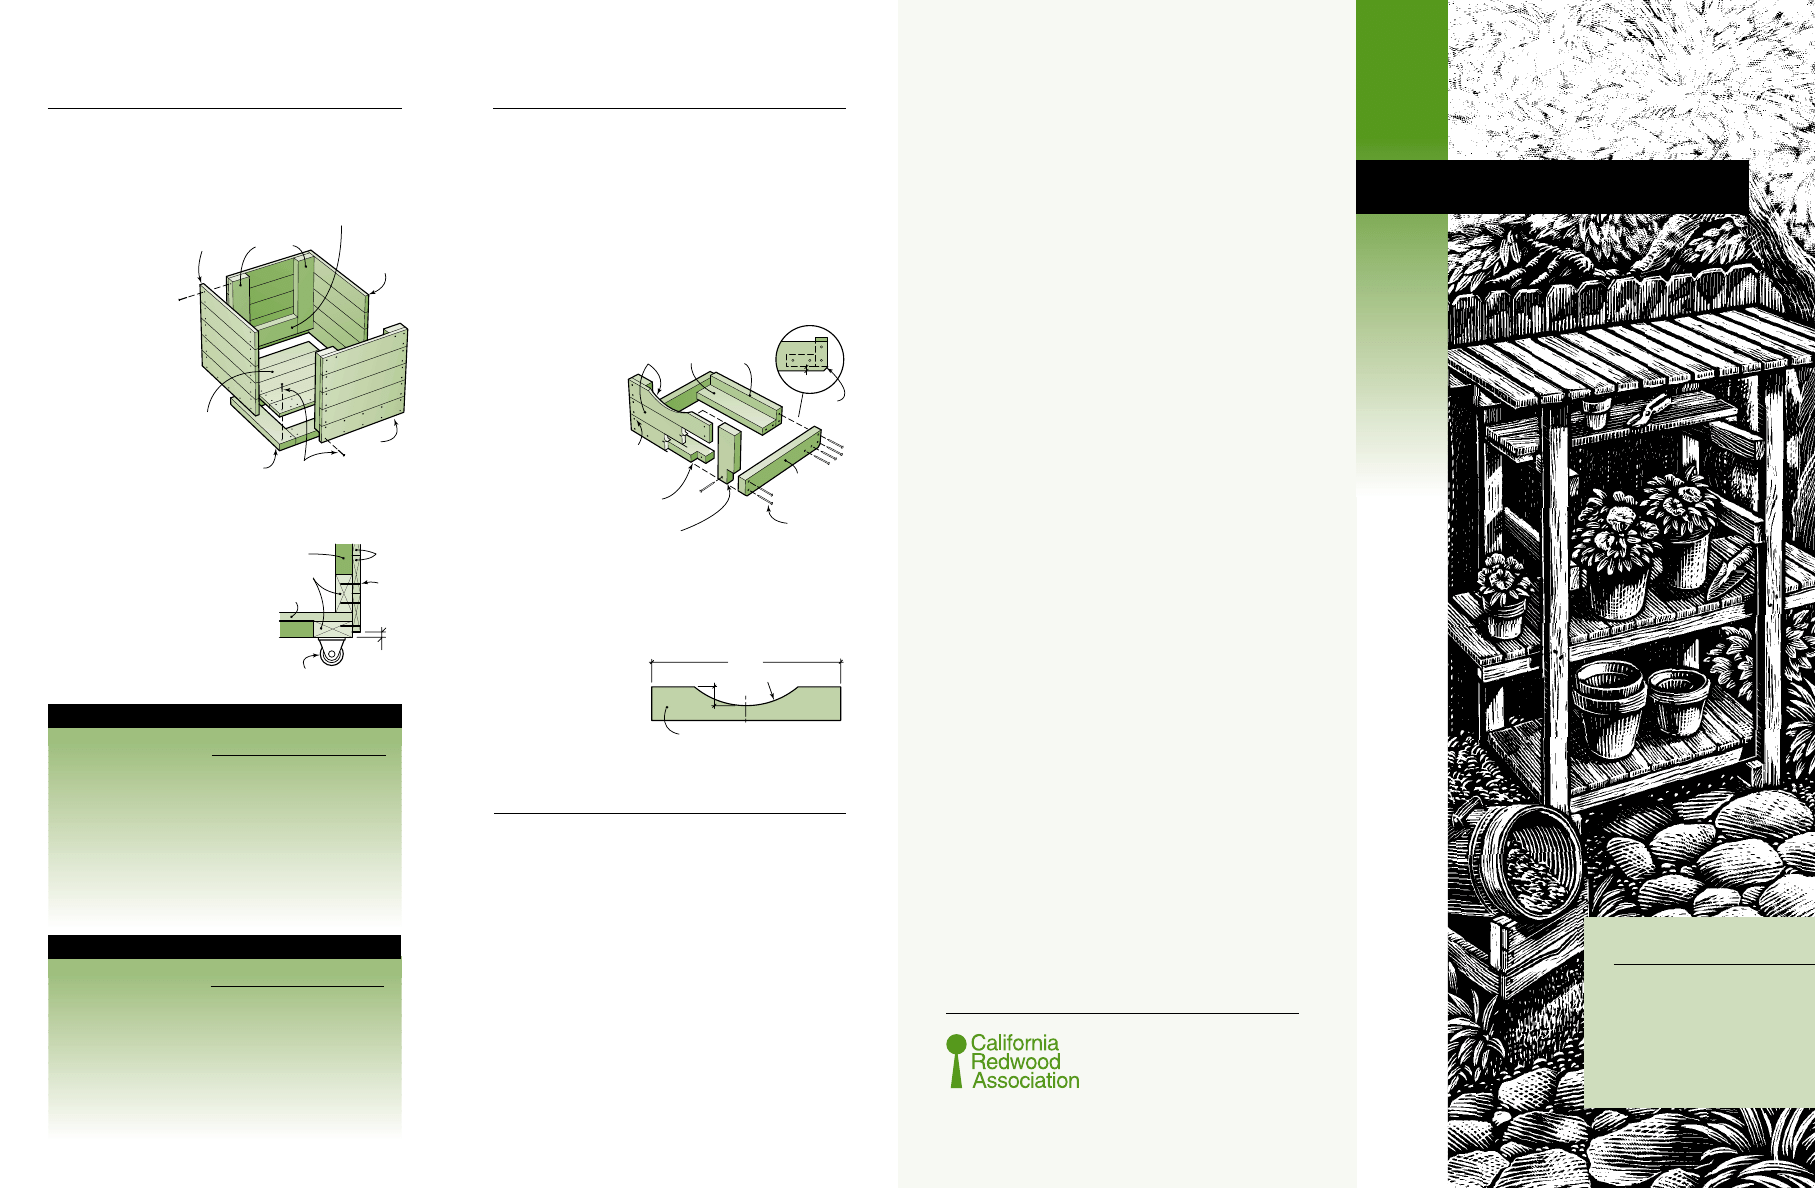
This redwood can cradle will hold a 30-gallon can at an accessible
angle for removing soil or fertilizer.
1. Frames and posts
Trim the rear and bottom frames to
15
1
⁄
4
inches. Cut 1
1
⁄
2
x2-inch notches in the ends of the front
bottom frame. Trim 2x4 redwood posts to 10
1
⁄
2
inches and notch
one end to 1
1
⁄
2
x3 inches. Attach the posts to the front frame at the
notch with 3-inch deck screws. Use 10d nails to fasten the 2x4 rear
frame to the bottom frame. Trim side frames to 18 inches and cut
the ends on one side
to a 45° by
1
⁄
2
-inch
bevel. Use 3-inch
deck screws to attach
the side frames to
the assembled front
frames at their
notches. The rear
frame attaches to the
side frame
1
⁄
2
inch
from the bottom edge
(see detail illustration),
also with 3-inch screws.
2. Front boards
Trim three 1x4 redwood boards to 20 inches. Mark the center line
of the top board and using a cardboard template, transfer and cut
a 9-inch radius cut to a depth of 2 inches. Lightly sand the cut.
Attach the front 1x4
redwood boards with two
6d nails per board end,
remembering to predrill
nail holes.
When built, this redwood storage bin will be 19 inches square and 18
inches high and will hold up to 3.5 cubic feet of material. Add casters
for greater mobility and line with plastic to minimize water damage.
1. Side panels
Use
6d nails or 2-inch deck
screws for most attach-
ments. Trim ten each
1x4 boards to 19 inches
and 17
5
⁄
8
inches. Nail
the short side 1x4
boards to the four 2x4
vertical cleats trimmed
to 15
3
⁄
4
inches, starting
the boards from the top
to allow for a lip at the
bottom for the base
installation. Trim and
install two base cleats to fit between the vertical cleats. Attach the
ten 1x4 long side boards to the 2x4 vertical cleats.
2. Base
Tack together 2x4s trimmed to
17
5
⁄
8
and 10
5
⁄
8
inches to form the base.
Trim 1x4 bottom boards to 17
5
⁄
8
inches
and attach to the 2x4 base with 6d nails.
Insert the base inside the bin butting
up to the base cleats. Use five nails
or screws per side to secure the base.
Attach optional casters.
Redwood
For beauty and performance, redwood is naturally superior to
other woods. That’s why it’s the first choice for decks, fences and
most outdoor projects. Redwood retains its beauty outdoors,
shrinks and swells less than other woods and is less likely to warp,
split, check or cup. With little or no pitch, redwood is easy to drill,
saw and shape. Redwood heartwood has natural durability and
resistance to insects and will last longer outdoors than most woods.
Grades
The knotty garden grades of redwood are ideal for outdoor projects.
These grades are beautiful, durable and economical.
Construction Heart/Deck Heart
is all heartwood and con-
tains knots; used for load-bearing applications near the ground.
Deck Heart is graded for strength and is available in 2x4 and 2x6.
Construction Common/Deck Common
contains sapwood
and knots; used for decking and above-ground uses. Deck Common
is graded for strength and is available in 2x4 and 2x6.
Merchantable Heart
is all heartwood and contains larger knots
than Construction grades; used near the soil.
Merchantable
contains sapwood and larger knots; used for
fence boards, rails and above-ground uses.
Finishes
Redwood accepts finishes better than most woods. Some heighten
redwood’s natural beauty, bringing out the color and the grain.
Others help the wood harmonize or contrast with surrounding
structures. Keep in mind that unfinished redwood will gradually
turn soft driftwood gray. Read the labels on all finish products
before using.
Clear water repellent finish
with mildewcide is recommended
to stabilize the color at tan.
Bleaching and weathering stains produce a permanent drift-
wood gray effect, a good, low-maintenance option.
Semitransparent stains
in “redwood” shades tint the wood
without hiding the grain.
Solid-color stains or paints
should be applied over compatible
oil-based primers.
Fasteners
Use only non-corrosive hardware such as aluminum, stainless
steel or top quality hot-dipped galvanized screws or nails. Ordinary
nails and screws will cause stains.
405 Enfrente Drive, Suite 200
Novato, CA 94949
Telephone 415 382-0662
Toll Free 888 Cal-Redwood
Fax 415 382-8531
www.calredwood.org
Other Construction Tipsheets
Also Available
Deck Over Concrete
Deck Construction
8x10 Deck
Deck Grades, Nails and Finishes
Butcherblock Bench
Fences for All Reasons
4x4 Planter
Exterior Finishes
Sonoma Picnic Table
Landscape Architecture
Lake Tahoe Gazebo
Petaluma Planters
Windsor Shade Shelter
Mendocino Bench
Calistoga Spa Surround
R E D W O O D S T O R A G E B I N
Contact the California Redwood Association for more great pub-
lications containing redwood technical and building information.
Call us at 415 382-0662 for a complete literature list or to ask for
any of the titles listed here:
2x4
vertical
cleats
2x4 base cleat
1x4
long side
boards
1x4
long side
boards
1x4
short side
boards
1x4
bottom
boards
2x4 base
6d nails
R E D W O O D C A N C R A D L E
1x4
front
boards
2x4 post,
1 x 3" notch
1 x 2"
notch
2x4
side frame
2x4
bottom
frame
2x4
rear
frame
3" deck
screws
45
°
bevel
6d
nails
"
1
⁄
2
"
1
⁄
2
"
1
⁄
2
6d
nails
1x4s
1x4s
Caster (optional)
2x4
2x4s
"
1
⁄
2
Materials For Redwood Storage Bin
Quantity Size
Length
Short side boards
10
1x4
17
5
⁄
8
inches
Long side boards
10
1x4
19 inches
Bottom boards
5
1x4
17
5
⁄
8
inches
Vertical cleats
4
2x4 15
3
⁄
4
inches
Base cleats
2
2x4 10
5
⁄
8
inches
Base
2 each
2x4
10
5
⁄
8
,17
5
⁄
8
inches
Nails or screws
6d nails or 2-inch deck screws
Materials For Redwood Can Cradle
Quantity Size
Length
Front, bottom and rear frames 3
2x4
17 inches
Side frames
2
2x4
18 inches
Posts
2
2x4
10
1
⁄
2
inches
Front boards
3
1x4
20 inches
Nails
6d, 10d nails
Deck screws
3 inches
9" rad.
2"
1x4 redwood front board
C
15 "
1
⁄
4
R E D W O O D
Naturally beautiful
Easy to use
Practical and economical
Durable and stable
Resistant to decay and insects
B U I L D
I T
W I T H
REDWOOD
M o n t e r e y P o t t i n g C e n t e r
Wyszukiwarka
Podobne podstrony:
potting bench stojak na kwiaty stojak na kwiaty
potting bench stojak na kwiaty stojak na kwiaty (2)
potting bench
Potting Bench stojak na kwiaty
Potting and Garden Shed Gazeb1029/9544
Gardening Bench
Boot Bench(1)
Bridgewater Bench Swing lawka
Outdoor Table and Bench
planter bench plan
Classic Cedar Garden Bench
0 50V 2A LM10C, 0 50V 2A Bench power supply circuit diagrams, schematics, electronic projects
więcej podobnych podstron