Retaining Wall
How to build a low garden retaining wall
This section will explain how to make a garden retaining wall a
an existing fence, which can transform a dull front or back yard
into an exciting garden.
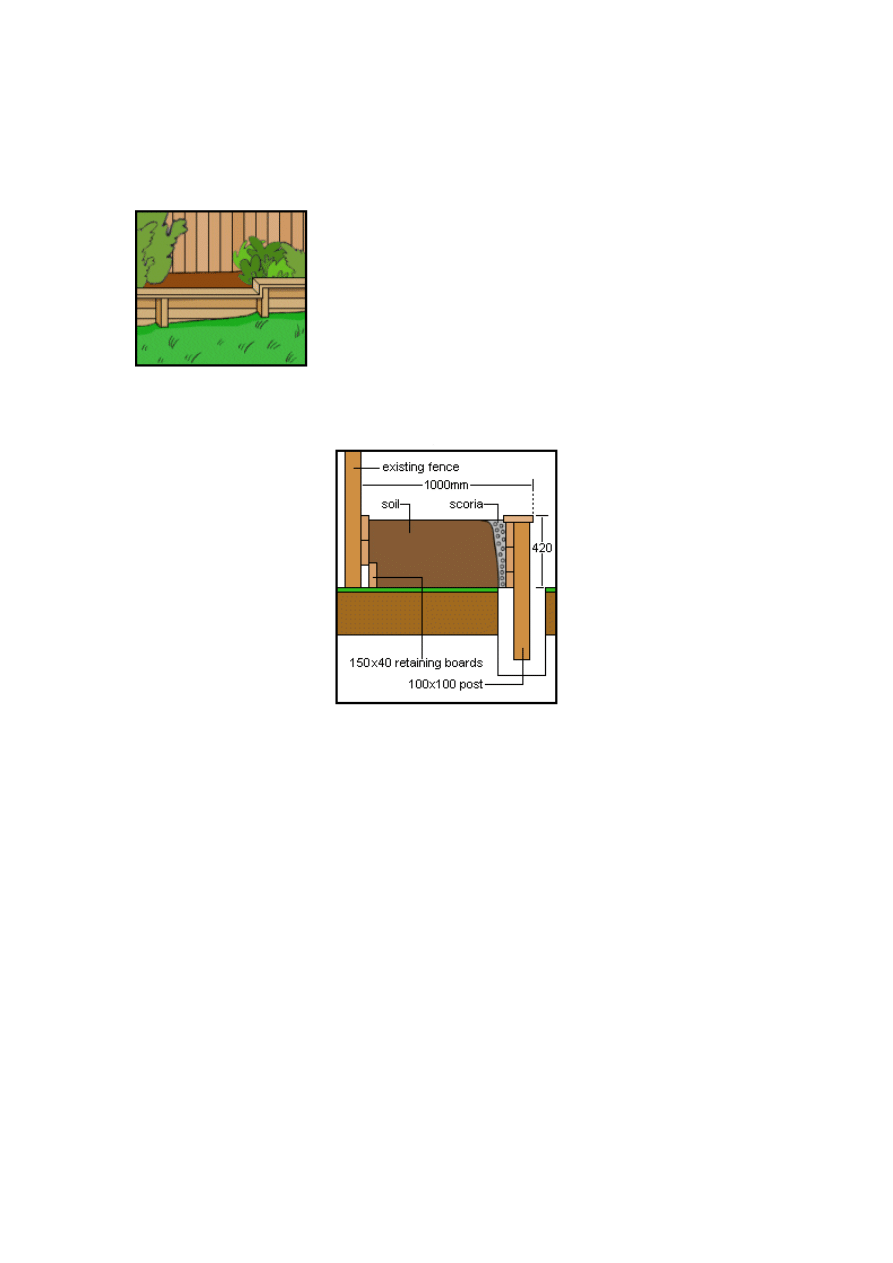
The retaining wall will be 1 metre in from the fence and on a
420mm high (depending on the contour of the section), and with a
capping board on top will also double for a seat the length of the
retaining wall.
The drawing on the left shows an example of the shape the
ut other shapes and ideas are only limited by the imagination.
long
verage
retaining wall might take, b
Retaining Wall - cross section:
osts: H4 treated 100x100 sawn posts obtainable in 3 metre lengths. Each length will do 3
etaining boards: H4 treated 150x40 sawn. Usually sold in random lengths.
tep 1: Determine perimeters
ers of the retaining wall and mark out with a string line
tep 2: Preparing holes
post holes first. External corners will have 2 posts and internal
Materials:
P
posts. The posts will be spaced a maximum of 1200mm and in post holes 500mm deep.
R
Capping: H4 treated 150x40 sawn. Usually sold in random lengths.
Instructions
S
Determine the shape and perimet
slightly above ground and tied to stakes where needed. The stringline will mark the outside
boundary of the retaining wall.
S
Mark out all end and corner
corners will have 1 post (see drawing below)
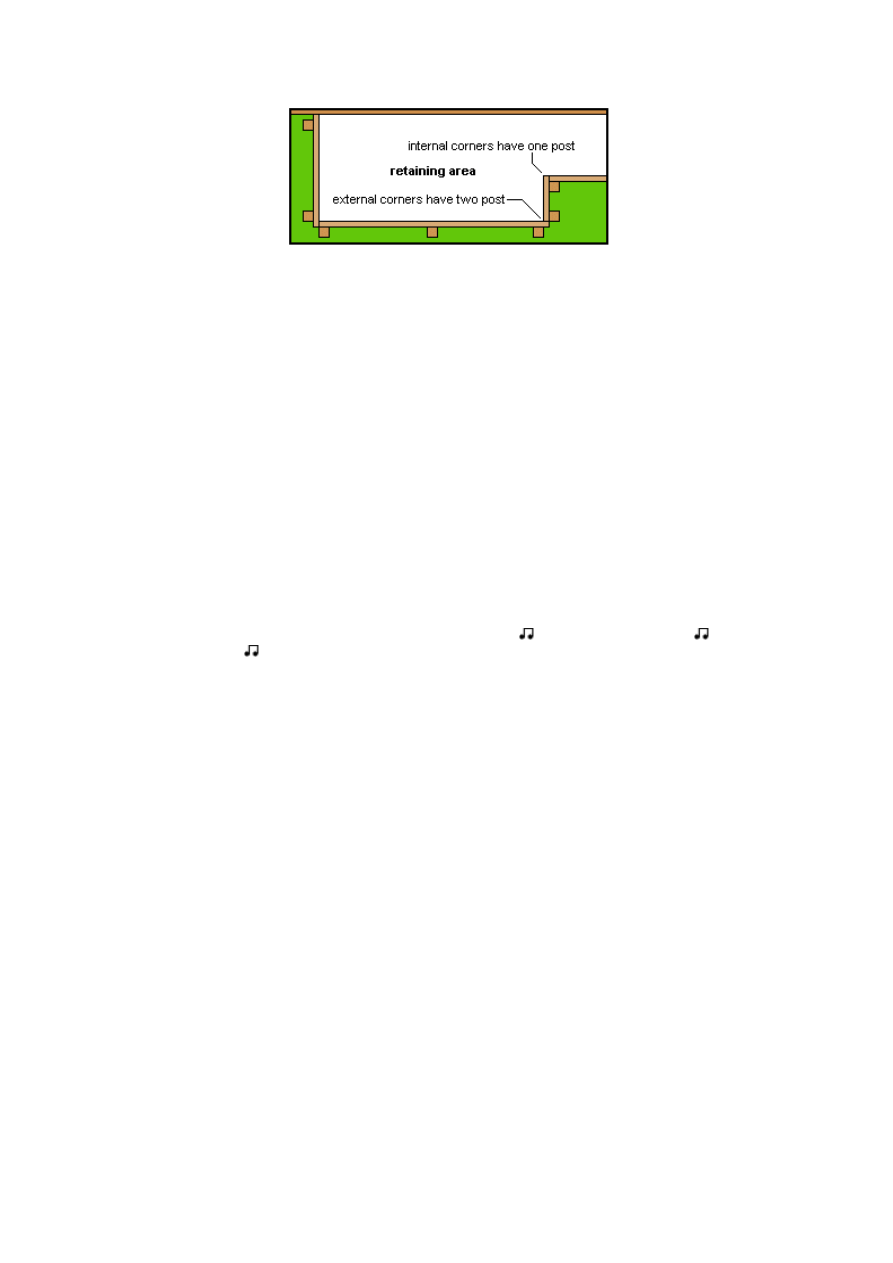
Measure and divide the straight lines between the corners and ends into equal distances not
exceeding 1200mm and mark for post holes.
Dig all the post holes 250mm diameter and 500mm deep.
NOTE: If the ground is exceptionally soft then the hole should be deeper and the diameter
larger, where as if the ground is exceptionally hard then the hole would not need to be so
deep. Commonsense stuff.
Step 3: Putting in the posts
Cut all the posts 1 meter long. That is slightly longer than required, but the tops will be
trimmed later.
Make a mix of concrete.
In a wheelbarrow or concrete mixer make a mix consisting of 5 parts builders mix, to one part
cement. Pour in clean water and mix to a uniform consistancy with a spade or shovel. The
mix should be stiff enough to hold up the posts without the need of bracing props yet wet
enough to work around the posts
Put the corner and end posts in first. position the posts to almost touching the stringline and
ensure post is plumb or vertical by way of holding a spirit level against two adjacent sides of
the post. Shovel concrete around the post and fill to within 50mm from the top of the hole.
Lift the post up slightly in order to allow some concrete to flow under the post. Shake the post
repeatedly slightly back and forward (having a vibrating effect) to enable the concrete to flow
evenly under and around the post. You shake it to the left
you shake it to the right
you do
the hippy shake
and you shake it all about...
Check the post again for position and plum.
Repeat this action untill all posts are in. First the corner and end posts and then the
intermediate posts.
Leave a couple of days to set.
Step 4: Fixing the retaining boards
The posts should be approximately 550mm out of the ground. That is more than needed, but
the tops will be trimmed off later.
The retaining boards are 150x40 sawn h4 treated, and the required finished height of the wall
including the capping is 420mm which is a good seat height, but of course the height will vary
in places due to the contour of the ground.
To obtain the required height (420mm), the first (bottom) board needs to be 80mm above
ground level. Achieve this by either ripping (cutting) along the board or by digging the board
into the ground. Fix the first board level to the inside of the posts with 90mm galvanised nails.
Join boards only on posts.
Fix another two boards on top of the first.
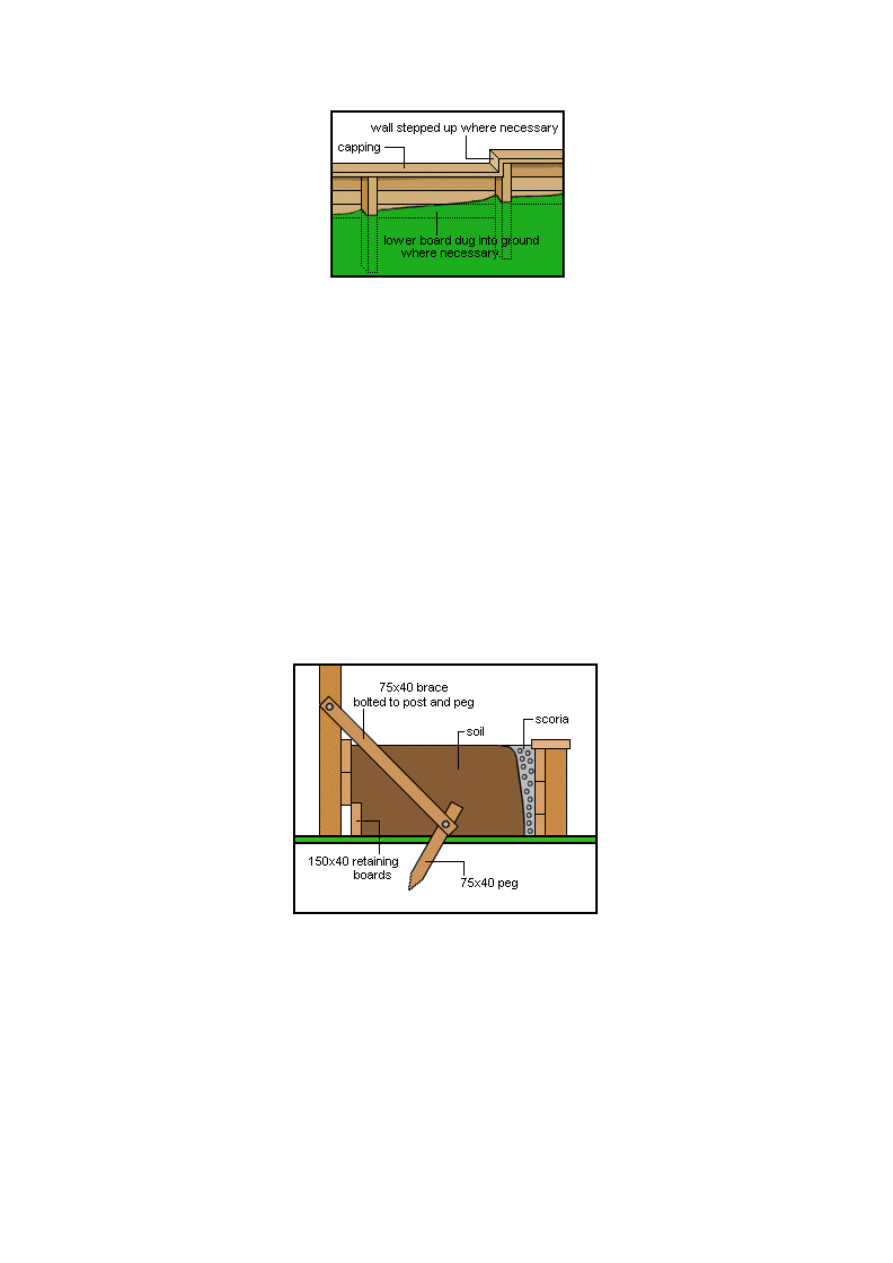
If the ground is not even, it will be necessary to either step up or step down the retaining wall
depending on the contour of the ground. Do this as shown in drawing below.
Step 5: Trimming the posts and fixing the capping.
With a handsaw, trim the top of the posts off level and flush with the top of the retaining
boards.
Fix the capping (150x40 sawn H4 treated timber) on it's flat so it covers both retaining board
and post. Mitre corners and rises and fix to both retaining boards and posts with 100mm
galvanised flathead nails.
Step 6: Fixing the retaining boards to the fence.
Fix the top retaining board to the fence posts with 100mm galvanised nails so it is level with
the top of the retaining wall capping
Fix the second board under the first and nail also to the fence posts.
The third board (bottom) can be placed on the ground and against the second board. It does
not have to be ripped (cut) or dug into the ground. The loose fit is good for water seepage.
Fence posts are not purpose designed as retaining wall posts, so a brace is required to stop
the fence from leaning or being forced out when the soil is placed in the retained area.
Brace each post as shown in the drawing below using 75x40 h4 treated timber for both
braces and pegs (rip 150x40 retaining board in half to get the braces and pegs. Bolt the
braces to both the fence posts and the pegs using galvanised bolts or galvanised coach
screws.
Step 7: Drainage and fill.
This retaining wall retains little soil and not subject to the forces of higher walls, however, a
drainage system is still advisable to take seepage away and to avoid any possible
waterlogging.
Position old sheets of cardboard, hardboard or gibboard (or some other material that will
disintegrate) down the back, about 100mm behind the retaining wall. Commence filling the
retaining area up. Fill between the sheets and the wall with drainage metal and behind with
soil, keeping the level the same on both sides of the sheets.
If there are gaps between the retaining boards, that will be enough to let the seepage through
and complete the drainage system.
If there are no gaps between the retaining boards, either drill weep holes in the bottom

retaining board about every 1200mm or run a drain coil or drain tile the length of the wall at
the bottom of the drainage metal backfill.
An average size trailer holds half a cubic metre.
Material
Comments
100x100 sawn h4
treated
Comes in lengths of 2400mm, 3000mm and random
150x40 sawn h4
treated
Random lengths up to 6m long
Top soil
sold loose from quater cubic metre upwards
Scoria ap20
Drainage metal. Sold loose from quater cubic metre upwards
Builders mix 20mm
For concrete. Sold loose from quater cubic metre upwards or sold in
handy bags for smaller jobs.
Cement
For concrete. Sold by the bag. Usually 40kg and 25kg
Wyszukiwarka
Podobne podstrony:
Parry, Jason Lee How to Build and Infinity Wall
O'Reilly How To Build A FreeBSD STABLE Firewall With IPFILTER From The O'Reilly Anthology
How to build a Raised Formal Pool
How to build an arbor id 206318 Nieznany
How to build a solar icemaker
Distillation How to build an Electric Still
HOW TO BUILD A DECK jak zbudowac taras
How to build a USB device with PIC 18F4550 or 18F2550 (and the microchip CDC firmware)
How To Build an Acid Alkaline Water Charger health healing search for [!B!]
How to Build a Walk Through Garden Pergola
Bazooka How To Build Your Own
O'Reilly How To Build A FreeBSD STABLE Firewall With IPFILTER From The O'Reilly Anthology
How to build a Raised Formal Pool
Box How To Build A Firewood Box
How to Build your own Solar Cooker
więcej podobnych podstron