
How to Build a Walk-through
Garden Pergola
Tools required
• carpenters hammer
• carpenters square
• carpenters pencil
• measuring tape
• handsaw
• adjustable spanner
• builders string line
• powersaw
• electric drill
• 12mm drill bit
• bucket or hose
• spade
• wheelbarrow
Materials list
Posts: 100x100 dressed h4 - 4 at 3000mm
Bearers: 200x50 dressed h3 - 2 at 4200mm
Rafters: 75x50 dressed h3 - 8 at 1800mm
Bolts: 12mm galvanised coach bolts 110mm long - 8 of
Nails: 90mm galvanised jolthead - 1kg of
Concrete: 1/4 cub metre of builders mix and 1 40kg bag cement. (this is more than you will
require, but is the cheapest way to buy.)
Profile timber: 5metres of 50x50 - 8metres of 100x25 boxing grade
Materials cost
Note These prices are indicative only.
Posts: 100x100 mg h4 - 12m at $10.80
$129.60
Beam: 200x50 mg h3 - 9m at $10.50
$94.50
Rafters: 75x50 mg h3 - 16m at $3.80
$60.80
Bolts & Nails:
$24.00
Builders Mix: 1/4 cubic metre
$25.00
Cement: 1 40kg bag
$15.00
Profile Timber: untreated (to be discarded)
$26.00
Total = $374.00
Garden Pergola
construction details
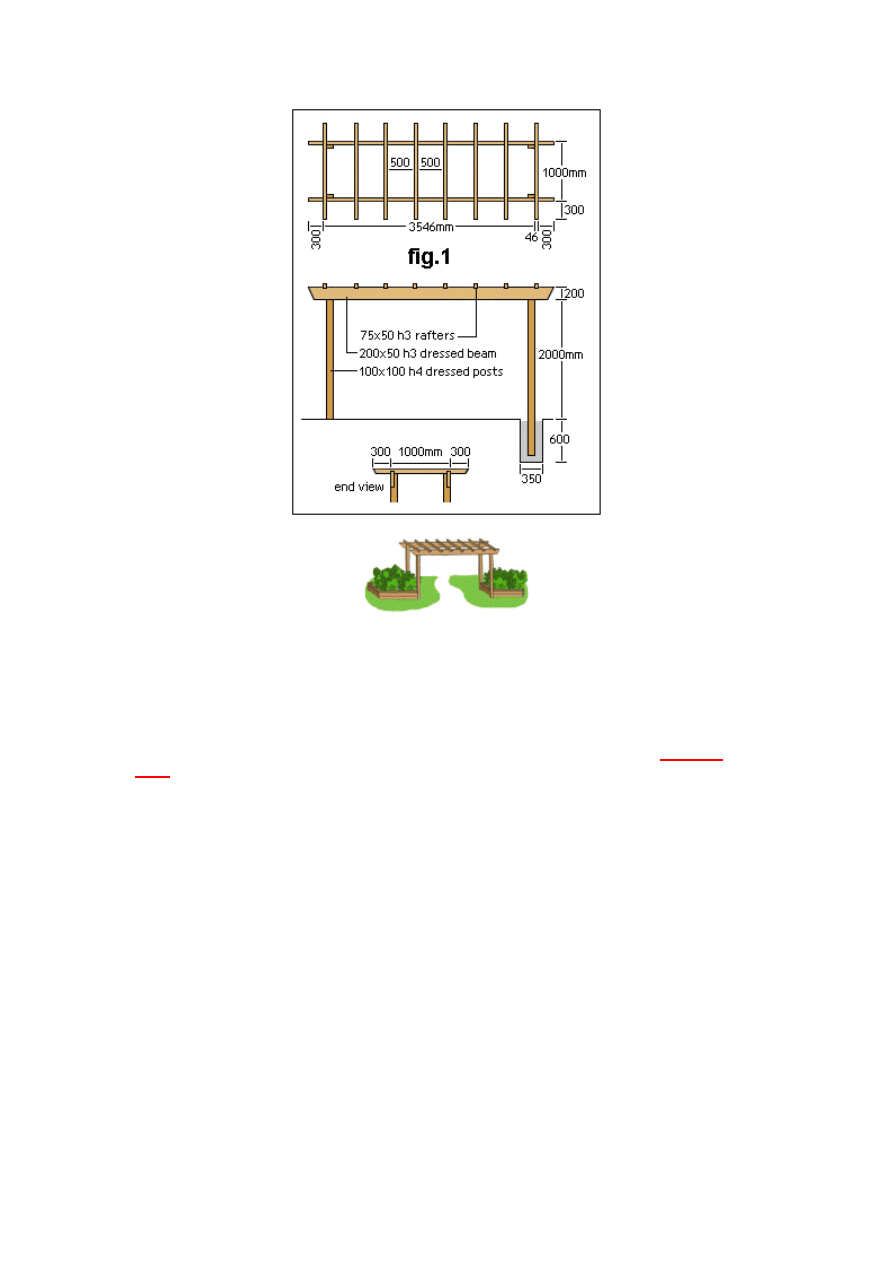
Step 1:
Determine the position of the 4 posts. The dimensions are shown in fig.1 in the
(3500mm x 1000mm)
Step 2:
Set up a building profile around the project. If you do not know how to set up a profile see
instructions at bottom of this plan for instructions.
Step 3:
Mark where the centres of the four posts are to go (50mm in from each corner of the stringline
on the profile)
Step 4:
Take down the stringline and dig the four post holes, 350mm square and 600mm deep.
Step 5:
When the holes are dug, replace the stringline on the profile. (The string marks the outside
face of the posts.)
Step 6:
Make a mix of concrete in a wheelbarrow at a ratio of 5 builders mix to 1 cement. Add clean
water and mix to a uniform consistancy, wet enough to fill around the posts, yet stiff enough to
hold the posts upright without the need of supports or braces.

Step 7:
Carefully shovel some concrete into the bottom of each hole before placing the posts.
(minimum 50mm)
Step 8:
This step will require two people.
Have one person position a post into one of the holes ensuring that it is vertical and next to
(but not quite touching) the corner stringlines on the profile.
Check the post for vertical by holding a plumb level against two adjacent sides of the post.
The other person can then proceed to shovel concrete around the post to within 50mm from
the top of the hole.
Repeat this action until all four posts are concreted in place. Check again for vertical and
leave to set.
The next day
Step 9:
Trim the top off one of the posts, 2200mm from the ground. (remember, from the timber list all
posts are slightly over length)
Step 10:
Measure down from the top of the trimed post to the stringline on the profile and transfer that
measurement to the other three posts.
This gives a level mark for the top of the posts. Trim the other three posts.
Step 11:
On the outside edge pencil mark a horrizontal line 195mm down from the top of each post.
Step 12:
Cut along the pencil mark with a powersaw to a depth of 46mm (the thickness of the beam)
Do this to all four posts.
safety first
When using a powersaw make sure you have firm footing.
Erect a scaffold if neccessary.
Wear safty goggles and earmuffs.
Step 13:
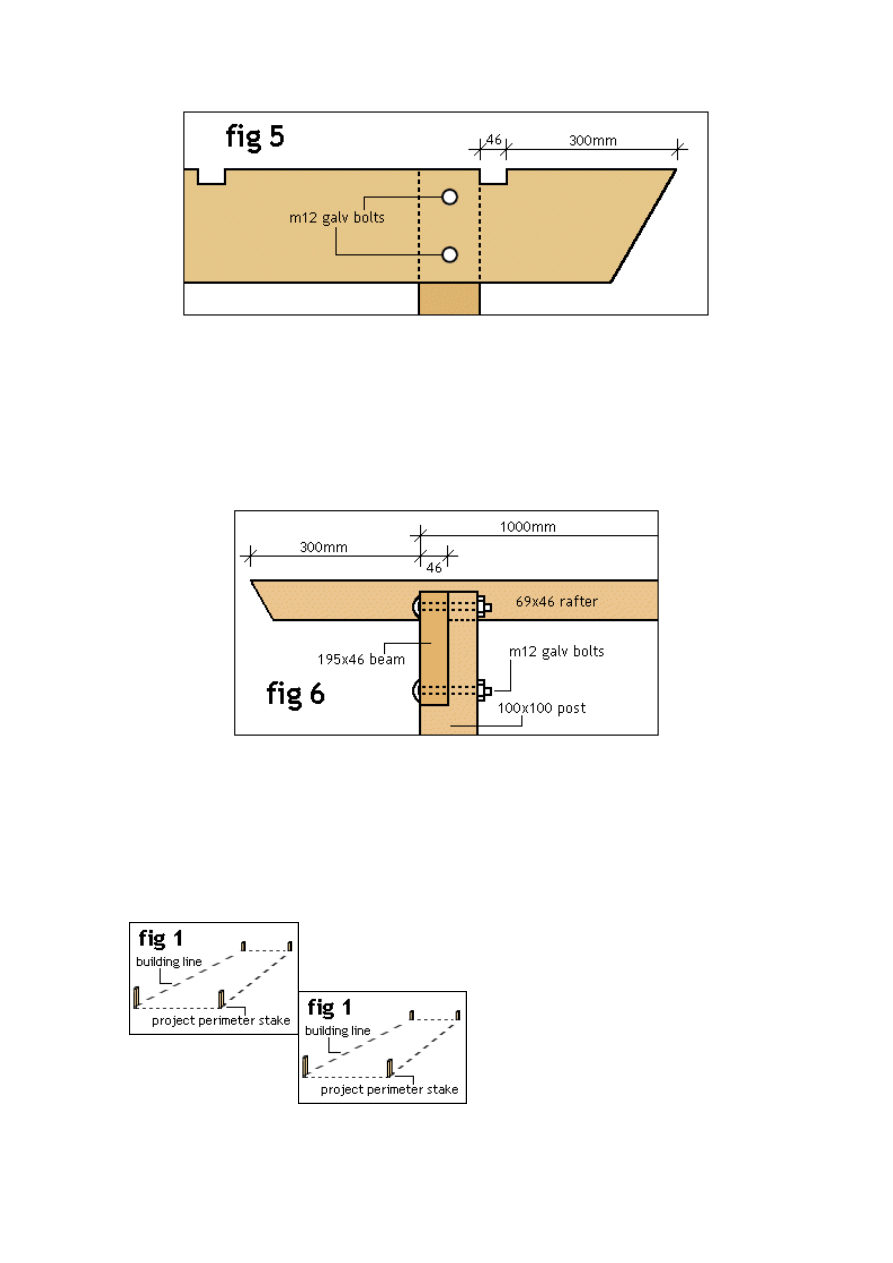
Scribe a line 46mm in from the outside edge of each post from the top, down 195mm. Cut
down that line using a sharp handsaw. See fig.2

Step 14:
Cut a 200x50 beam (195x46 dressed size) 4192mm long tapering the cut in 30 degrees each
end. (see fig. 3)
Step 15:
On top of the beam (the long edge, 4194mm), measure 300mm and also 346mm in from each
end and mark square.
In between the two marks (46mm apart) at each end run a series of saw cuts 25mm deep and
then chisel out. see fig.3.
Step 16:
Do similar checkouts on top of and along the length of the beam at 500mm centers or 454mm
apart. In all a total of 8 checkouts along each beam.
Step 17:
Cut 8 75x50 rafters (69x46 dressed size) 1600mm long tapering the cut in 30 degrees each
end.
Make two checkouts on the bottom side of each rafter in the same manner as described in
step 15 and to dimensions as shown in fig.4
Step 18:
Place the two beams in the rebates at the top of the posts and align the beams so as each
end overhangs the posts 346mm and that the end beam checkouts line up flush with the
outside of the posts. see fig.5.
Step 19:
Drill and bolt beams to post using m12 galvanised coach bolts and washers.
Step 20:
LAST AND LEAST. Place the rafters on top of the beams so the checkouts on the underside
of the rafters line up with the checkouts on the top side of the beams. Tap the rafters into
place and nail down through the top of the rafter into the beam with 90mm galvanised nails.
see fig.6.
How to Make a Profile
To Ensure Your Project is Square and Level
useful for square or oblong projects
Step 1:
measure and stake the four outside corners of your project (fig.1).
The stakes can be any timber, as they will be discarded. 20x20 and
150mm long would suffice or even bits of steel rod.
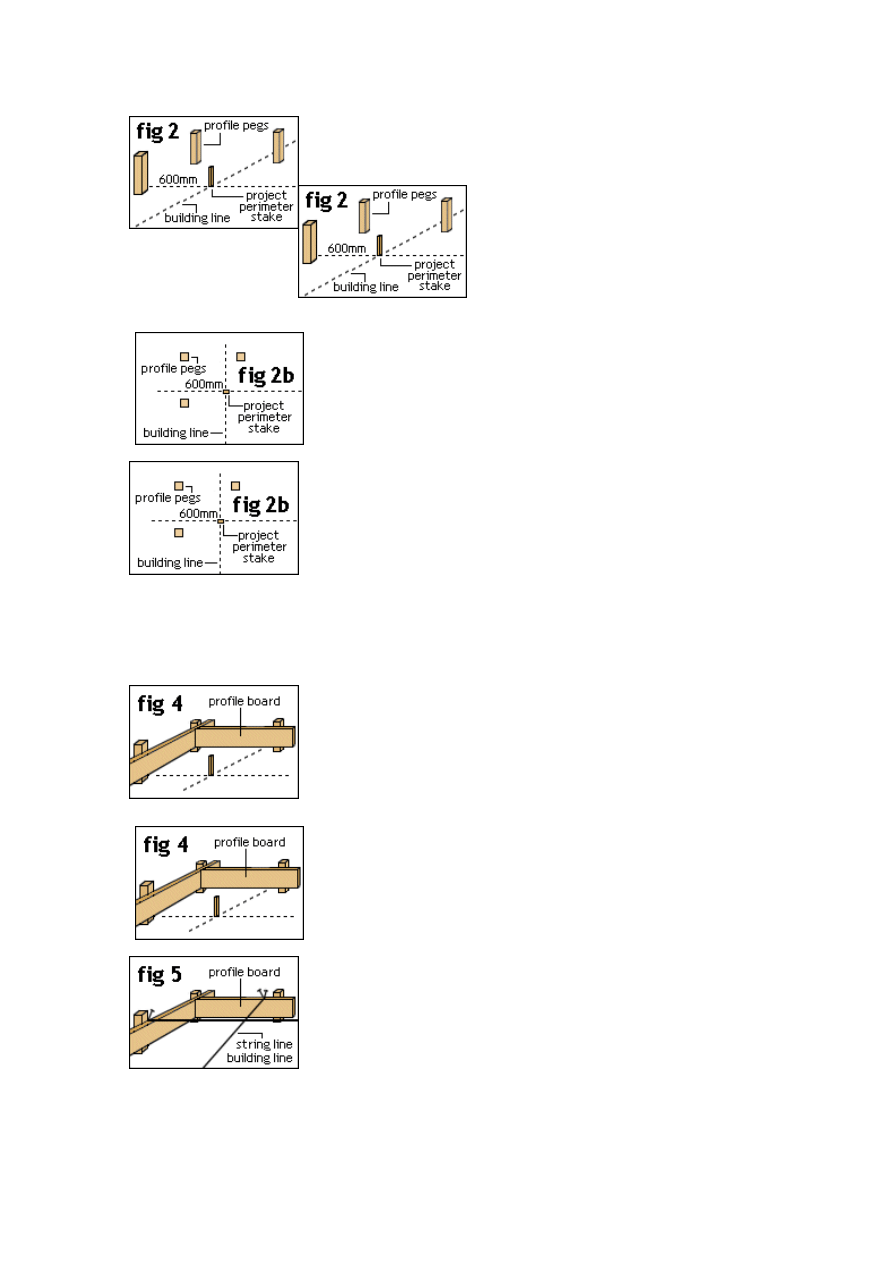
Step 2:
Cut 12 profile pegs 600mm long out of 50x50 timber (or similar).
Cut a point on one end of each profile peg so they can be hammered
into the ground easily.
Position the twelve profile pegs as shown in fig.2 and fig.2b, (3 at each corner) and hammer
them into the ground until they are firm.
The profile pegs should be at least 600mm out from the building line
to allow room to dig the corner footing holes.
Step 3:
Mark a level line on all twelve profile pegs approx 100mm above ground level. (by keeping the
profile boards close to the ground saves the need for profile bracing). Find a level line by
using the bucket and hose water level method.
Step 4:
Once a level line has been established and marked on all twelve
profile pegs, procceed nailing profile boards to the profile pegs so
that the top of the profile board is flush with the level line that has
been marked on the profile pegs.
The profile boards (8 in all) can be 100x25 boxing grade timber, e
about 1 metre long. see fig.4
ach
Step 5:
Run a stringline from profile board to profile board passing over the
perimeter stakes and fixed to the profile boards between 2 nails as
shown in fig.5.
This will now show the approximate building line and perimeter of
your project, but more exact measurements are needed.
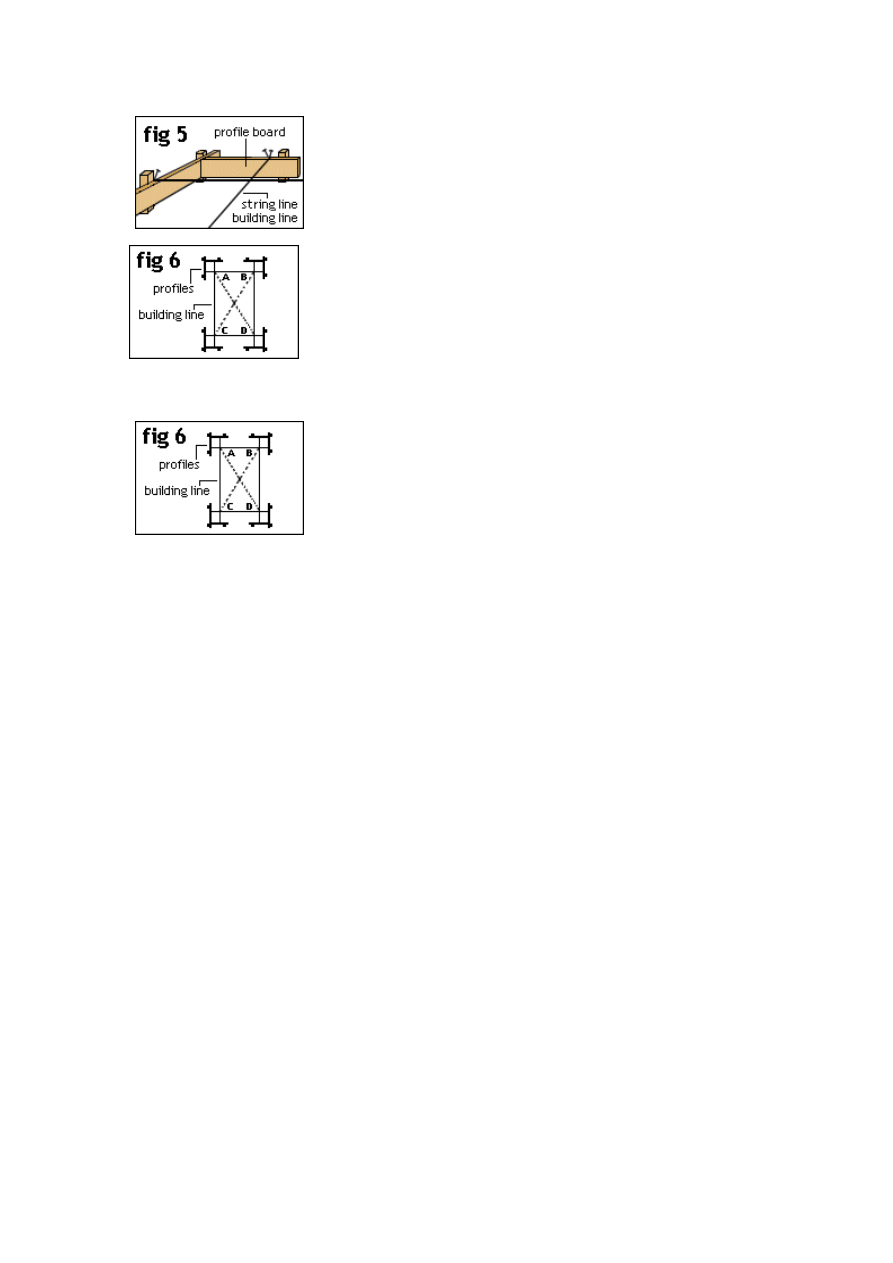
Step 6:
Parallels.
Check that distance between A and B (fig.6) and the distance
between D and C. are equal. If not, make any necessary a
by moving the stringline in or out along the profile board. Also th
distance between A and C and the distance between B and D need
to be equal. Make any necessary adjustments.
Once the perimeters are parallel, the diagonals need to be measured to see if the building line
is square.
djustments
e
Do this by measuring the distance between A and D and the distance between B and C (the
diagonals). Make any necessary adjustments to ensure the diagonals are equal and if
adjustments are required, recheck the parallels again as altering the diagonals will also
change the parallels.
When the building lines are parallel and the diagonals are equal the building line is then
square. You now have a level, square building line to work off.
Wyszukiwarka
Podobne podstrony:
O'Reilly How To Build A FreeBSD STABLE Firewall With IPFILTER From The O'Reilly Anthology
How to build a Raised Formal Pool
How to build a Retaining Wall
How to build an arbor id 206318 Nieznany
How to build a solar icemaker
Distillation How to build an Electric Still
HOW TO BUILD A DECK jak zbudowac taras
How to build a USB device with PIC 18F4550 or 18F2550 (and the microchip CDC firmware)
How To Build an Acid Alkaline Water Charger health healing search for [!B!]
Bazooka How To Build Your Own
O'Reilly How To Build A FreeBSD STABLE Firewall With IPFILTER From The O'Reilly Anthology
How to build a Raised Formal Pool
Box How To Build A Firewood Box
Parry, Jason Lee How to Build and Infinity Wall
How to Build your own Solar Cooker
How to Build Big Muscles without Weights
więcej podobnych podstron