
I
nstalling Deck Joists
OVERVIEW
Introduction
Joists provide the framing platform for the deck boards. Before you can install the joists, the ledger should be in
place along the house and the grider(s) should be secured to the posts. The joists will be anchored to the house
via the ledger and then supported by the girders.
Time to complete this project depends on the size of the deck and the level of help available, the times listed
here are for two people on a 10’x 30’ deck with the house defining two sides of the deck.
• Beginner - 2 to 3 days
• Intermediate - 1 to 2 days
• Advanced - about 1 day
STEPS
1.
Cut the two outside joists to length. Take the first joist and position it next
to the end of the ledger. Screw it in place with a screw gun. Position the
opposite end of the joist on top of and flush with the end of the beam.
Screw it in place by angling a screw through the edge of the joist and into
the beam. Repeat for the other outside joists that attach to the house.
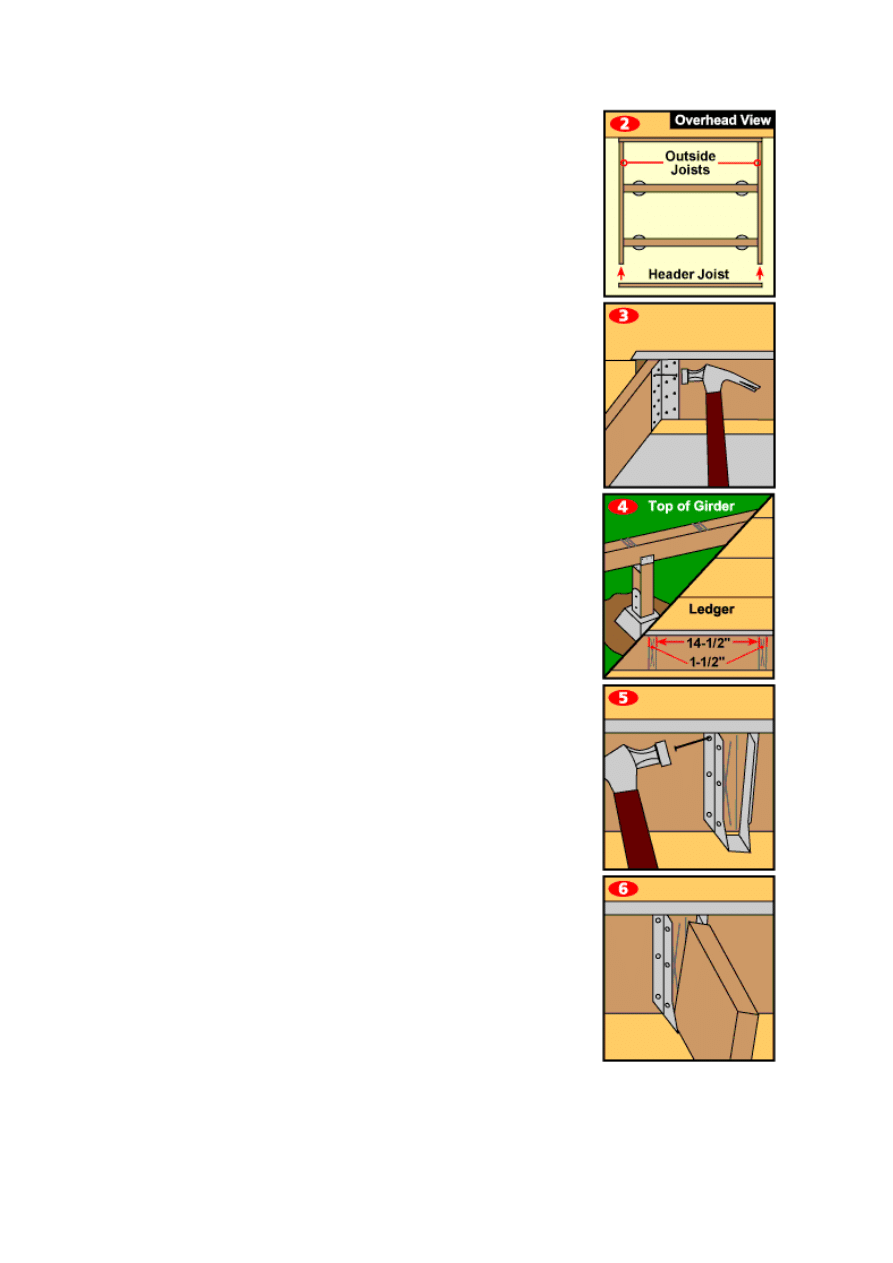
2.
Measure and cut the header joist. Position it across the ends of the outside
joists and screw it into the ends of the outside joists.
3.
To add support to each of the 4 corners of the deck, screw in angle
brackets in each inside corner. You can now remove the braces that were
holding the posts in position. Your deck frame should now be locked in
position.
4.
On the ledger, on top of the girders and on the inside of the header joist,
mark the locations for the joists. They should be 16" on center. You need 2
marks to indicate either side of each joist. This translates to 14-1/2" in
between each joist and 1-1/2" for the thickness of each joist. Then use a
square to scribe the lines across the face of the board. Take a short piece
of joist material, butt it up along the line and scribe the other line for
positioning each joist. Put an X in between the lines to indicate the location
of the joist.
5.
Position a joist hanger along one of the scribed line. Screw or nail 1 side of
it in place through its flange.
6.
Take the short piece of joist material and put it in place in the open joist
hanger.
7.
Flex the joist hanger up tight against the board. Make sure the top of the
board is flush with the ledger of header joist. Nail the other side of the joist
hanger in place. Repeat the last 2 steps until all the joist hangers are in
place.
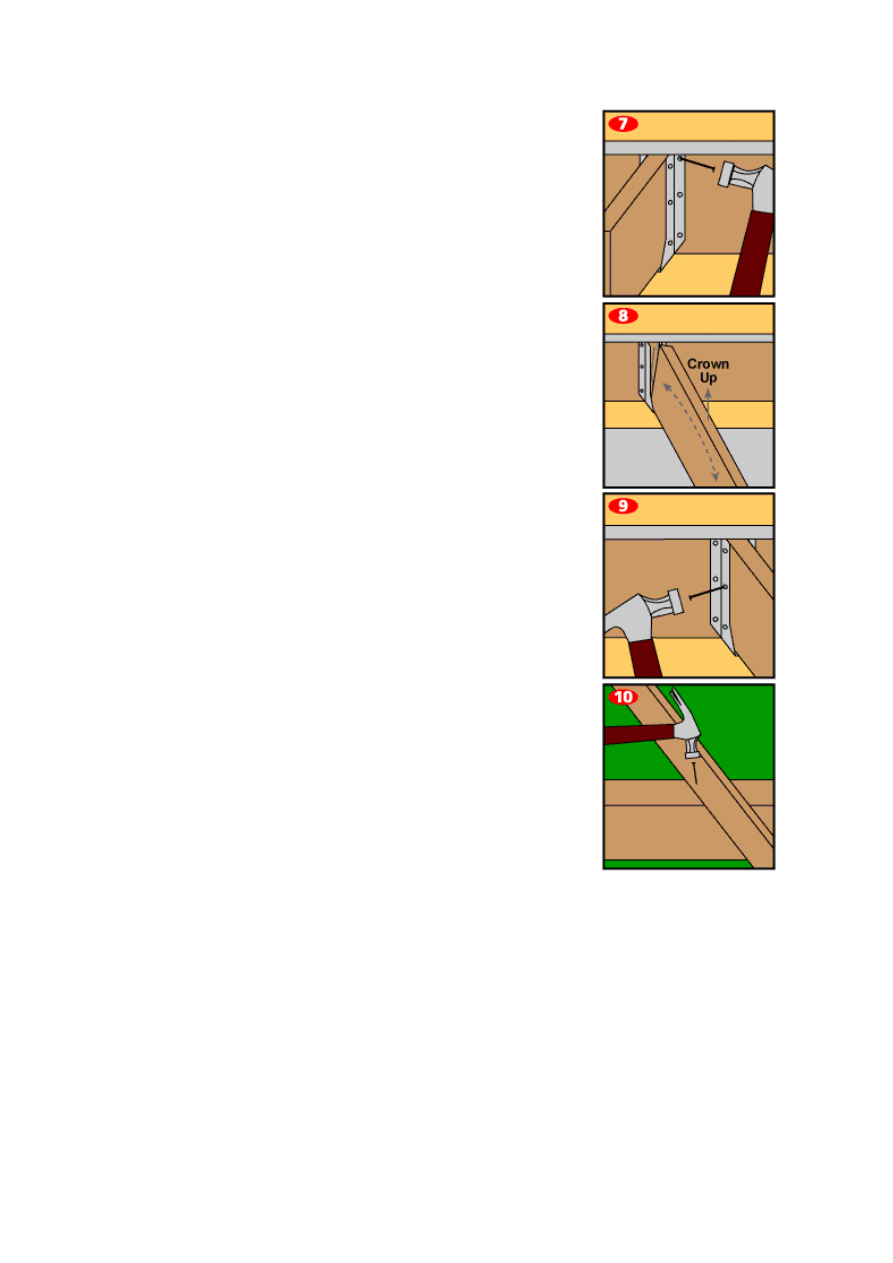
8.
Measure and cut each joist to length using a circular saw. Use a square to
mark each board to ensure a square cut edge. View down the end of each
joist to determine which side has a crown. Lay each joist in place with the
crown side up.
9.
Screw or nail the ends on each joist to the joist hanger.
10.
Where each joist crosses the beam, screw or toe-nail the joist to the beam.
The deck frame is now complete. It is time to proceed with decking and
railings.
SHOP LIST
Materials Needed
•
Lumber for joists
•
Joist hangers
•
Screws
Tools Needed
•
Miter saw
•
Circular saw
•
Pry bar
•
Square

•
Level
•
Screw gun
•
Reciprocating saw
•
Tape measure
Wyszukiwarka
Podobne podstrony:
Installing Deck Stairs schodki
Installing Deck Posts podstawa
SS015 Plan rozwoju Otwory w środnikach belek do przeprowadzania przewodów instalacyjnych w budynkach
instalacja debiana
INSTALACJE TRYSKACZOWE I ZRASZACZOWE
Urządzenia i instalacje elektryczne w przestrzeniach zagrożonych wybuchem
Instalacje elektroenergetObl1
Projekt Instalacji deponowanie 2
Instalacje odgromowe
Wybrane elementy automatyki instalacyjnej
instalacje grzewczaet
monter instalacji gazowych 713[07] z2 03 u
8 Instalacja spalin wylotowych id
Installation instructions
więcej podobnych podstron