
Business Agility!
First Workshop for Product Evaluation
My First Process

2
Workshop Manual for Product Evaluation
CONFIDENTIAL
www.bizagi.com
Table of Contents
3
Workshop Manual for Product Evaluation
CONFIDENTIAL
www.bizagi.com
1.
BizAgi
BizAgi® is a Business Process Management solution that supports the management in process-oriented
organizations by allowing the visualization, control, and improvement of all the processes in real time. Its main
application is the management, control, tracking and analysis of procedures such as processing of insurance
claims, approvals of credit requests, and handling of complaints and reclamations. BizAgi® offers immediate
results. The processes are modeled and implemented in an agile way, no matter its complexity, but they
conserve sufficient flexibility, so that they can be easily modified, according to the changing requirements of
the business.
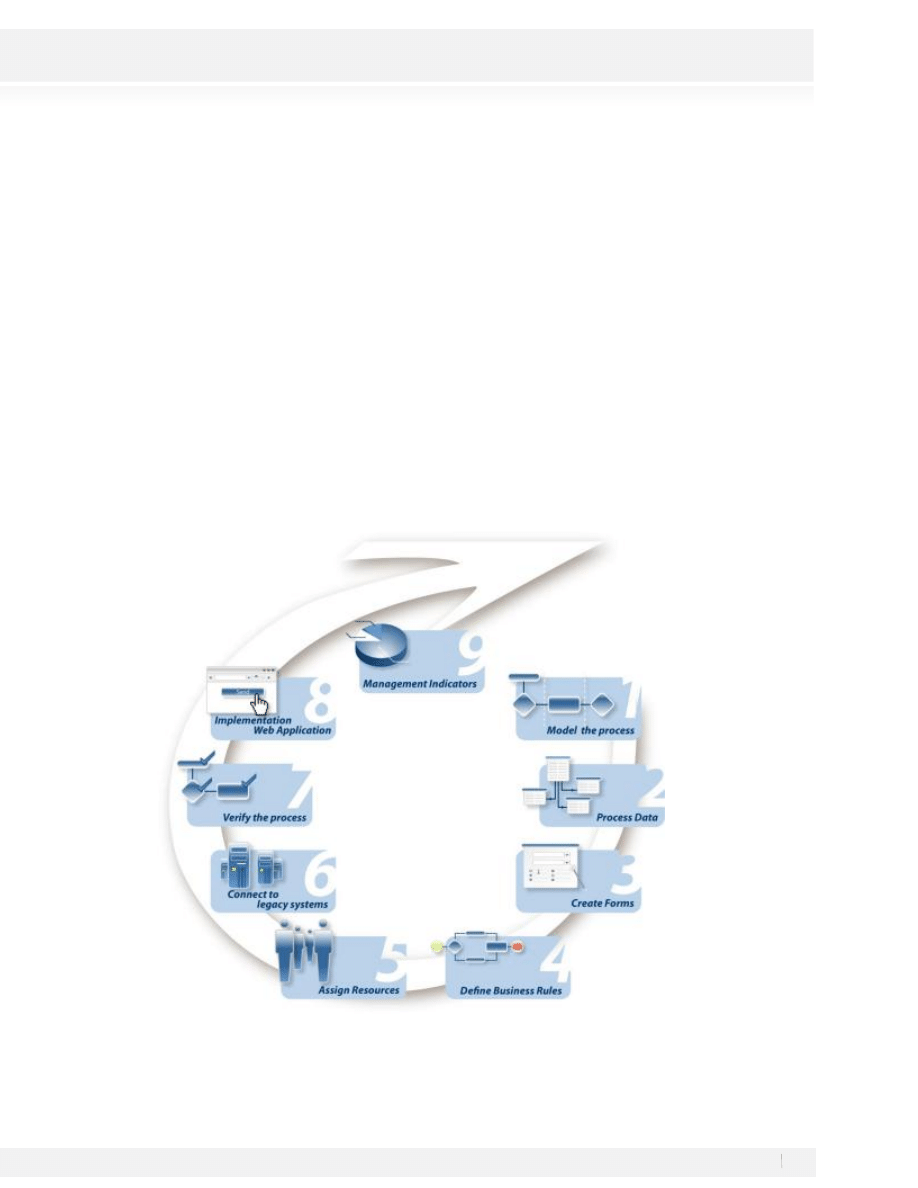
How does BizAgi work?
BizAgi is a solution developed for the organizations oriented to the optimization, automation, and management
of business processes. They are organizations with a vision of processes in each of its functional areas,
regardless of the amount of areas or departments involved in the process.
Taking into account the agility and flexibility in the optimization, automation, and management that the
organizations in the continuous execution of the processes currently require, BizAgi is based on the following
fundamental steps for its operation:
4
Workshop Manual for Product Evaluation
CONFIDENTIAL
www.bizagi.com
2.
WORKSHOP: VACATIONS REQUEST
A company has initiated a BPM strategy and has chosen BizAgi to support it. You have been selected to
implement the process of Vacation Request, which is described as follows.
The information about the process and data to be controlled and visualized can be found in the following
pages. Follow step by step the instructions of this manual and at the end you will have automated the process
of Vacation Request.
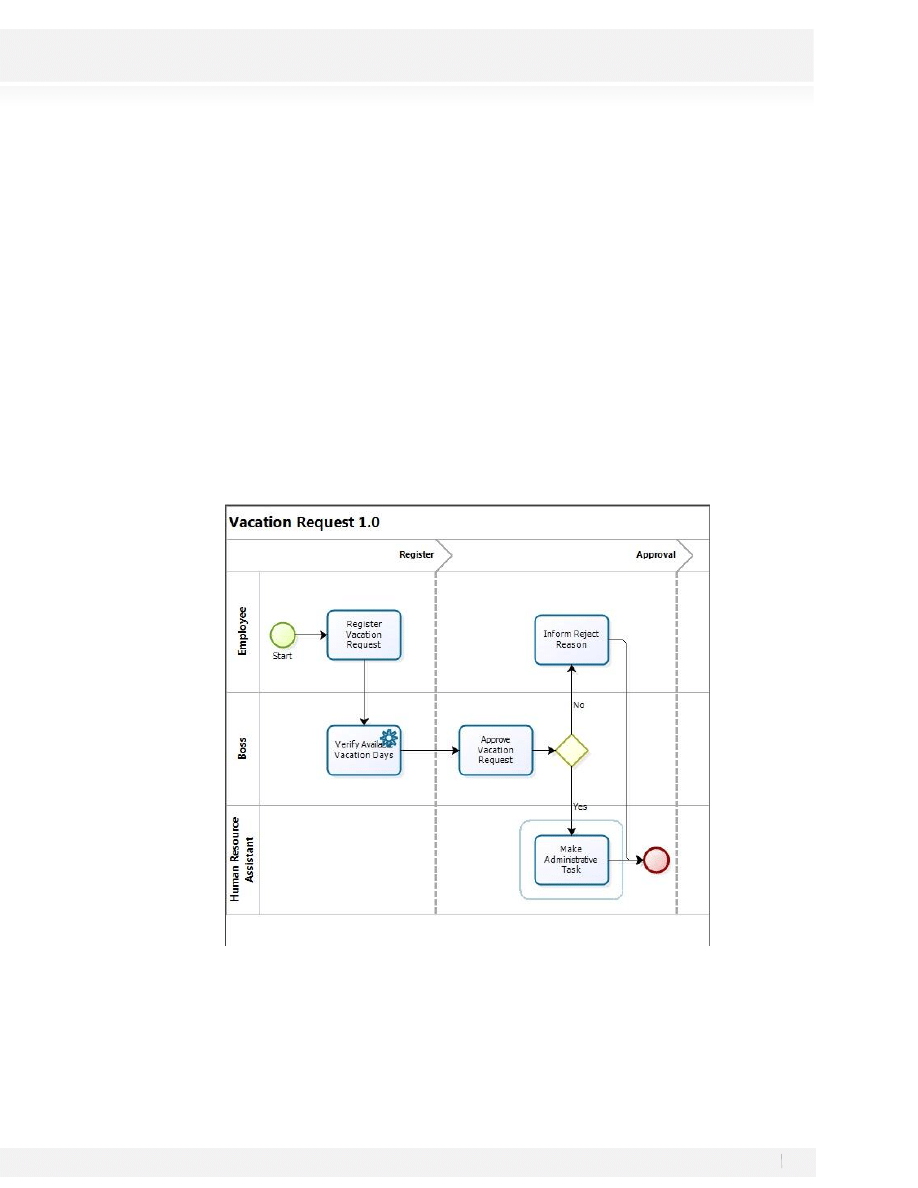
Description of the Process of Vacation Request
The process of Vacations Request starts when any employee of the organization submits a vacation request,
once the requirement is registered, the request is received by the immediate supervisor of the employee
requesting the vacation, the supervisor must approve or reject the request, if the request is rejected the
application is returned to the applicant/employee who can review the rejection reasons. If the request is
approved a notification is generated to the Human Resources Representative, who must complete the
respective management procedures.
Scope
This process focuses in controlling the requests of Vacations of the organization, from the initial request up to
its approval or rejection.
5
Workshop Manual for Product Evaluation
CONFIDENTIAL
www.bizagi.com
Modeling the process step by step
BizAgi has two main products:
BizAgi Process Modeler: Used to diagram and document the processes
BizAgi BPM Suite: Used to turn the diagrammed processes into real running applications
We’ll use the Process Modeler to diagram the process and then we’ll automate it using BizAgi Xpress. BizAgi
Xpress is a version of the BPM Suite that you can download
STEP 1: DEFINING AND MODELING THE PROCESS
The process modeling is one of the first steps for the implementation of BizAgi. This stage is vital because it is
the phase where the real flow of the process is created or designed. The variables and elements required,
according with the organization needs, will be added to this chain of activities or flow, which is the
fundamental base of the project.
In this stage, BizAgi offers a modeler with a set of figures or templates to draw processes flowcharts; the figures
available are part of the Business Process Modeling Notation (BPMN), which makes possible the standardization
of the process layout.
ADDITIONAL INFORMATION TO CREATE THE PROCESS:
The company seeks to have the organization and consolidation of all processes related to the internal services
in one site.
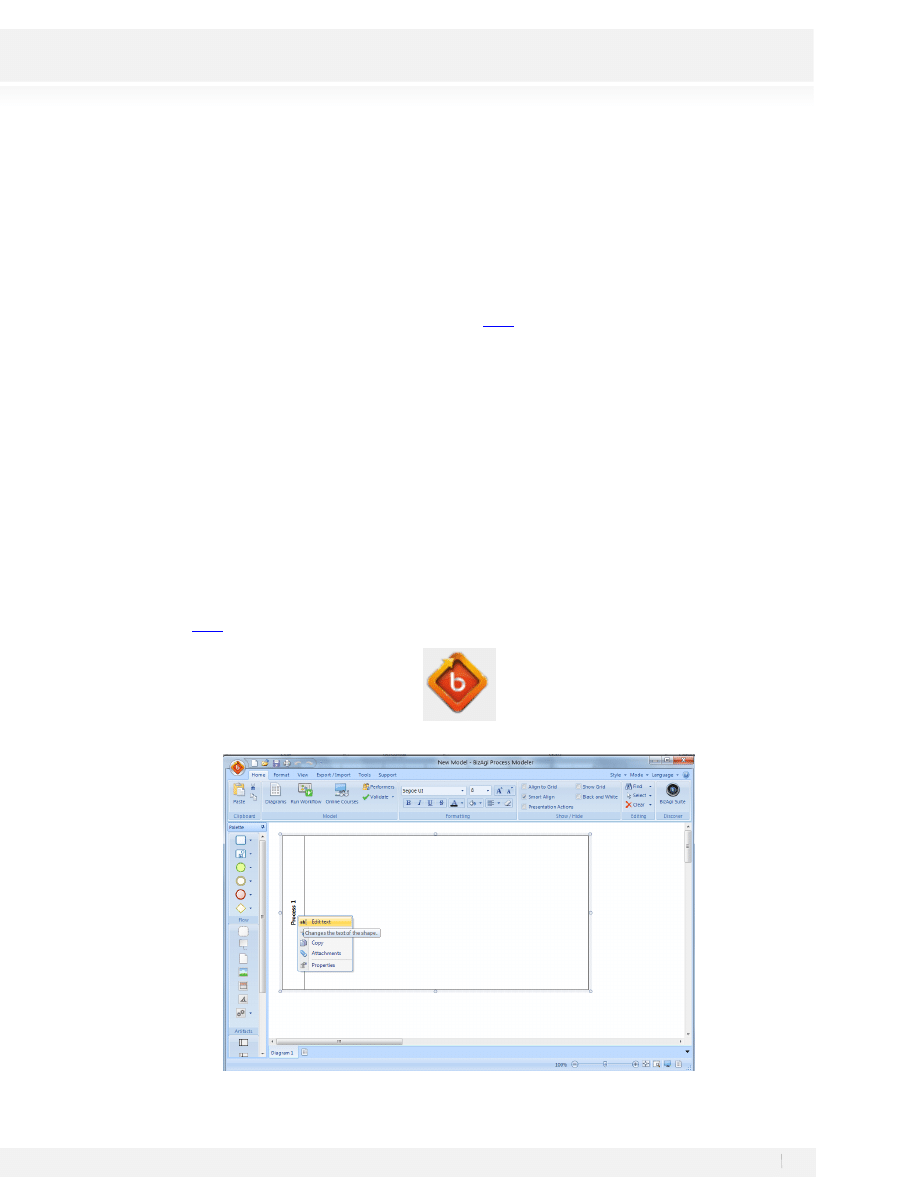
Double click on the BizAgi Process Modeler Shortcut. If you have not downloaded BizAgi Process Modeler, you
can download it
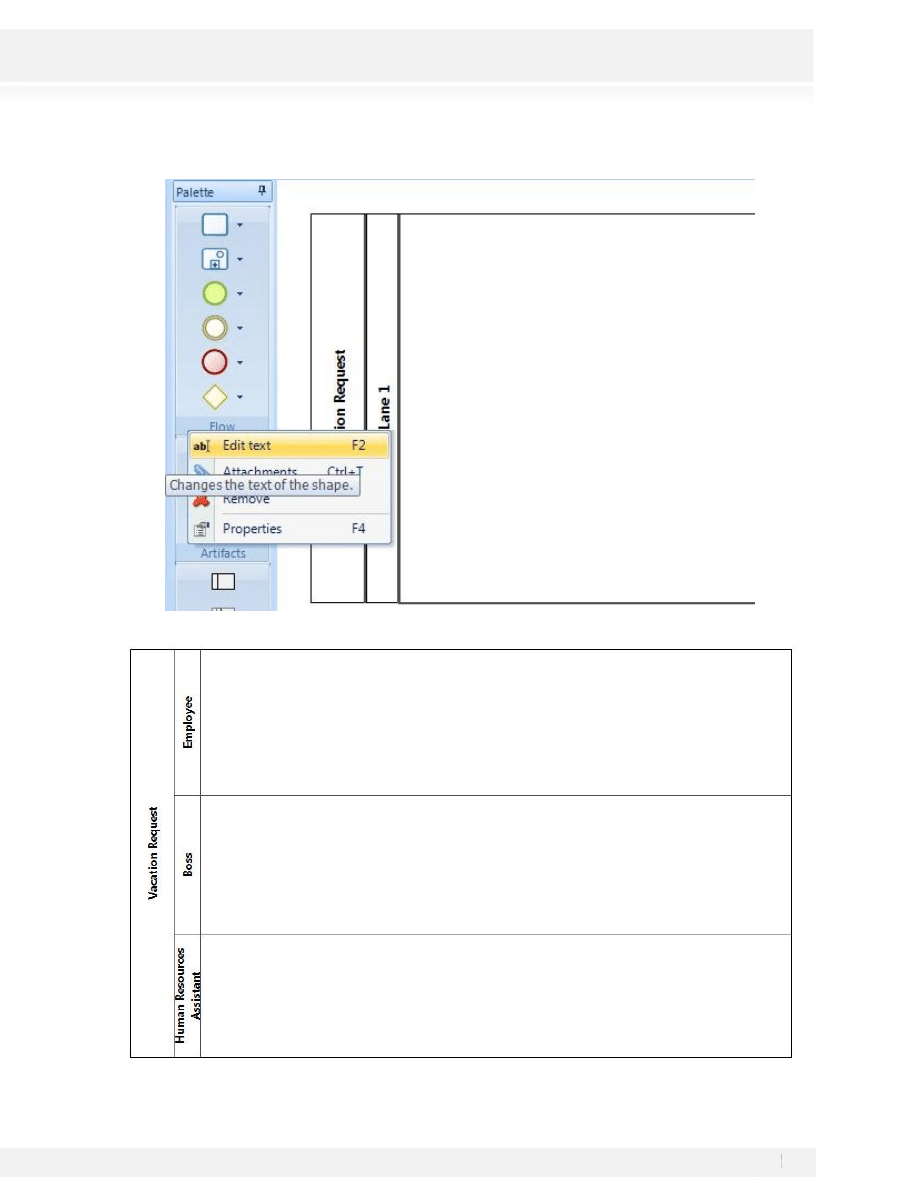
1. Name your process; right click on the Pool (Process) and select Edit Text, type Vacation Request
6
Workshop Manual for Product Evaluation
CONFIDENTIAL
www.bizagi.com
2. Change the name of the main diagram; double click on the Diagram name and type Vacation Request:
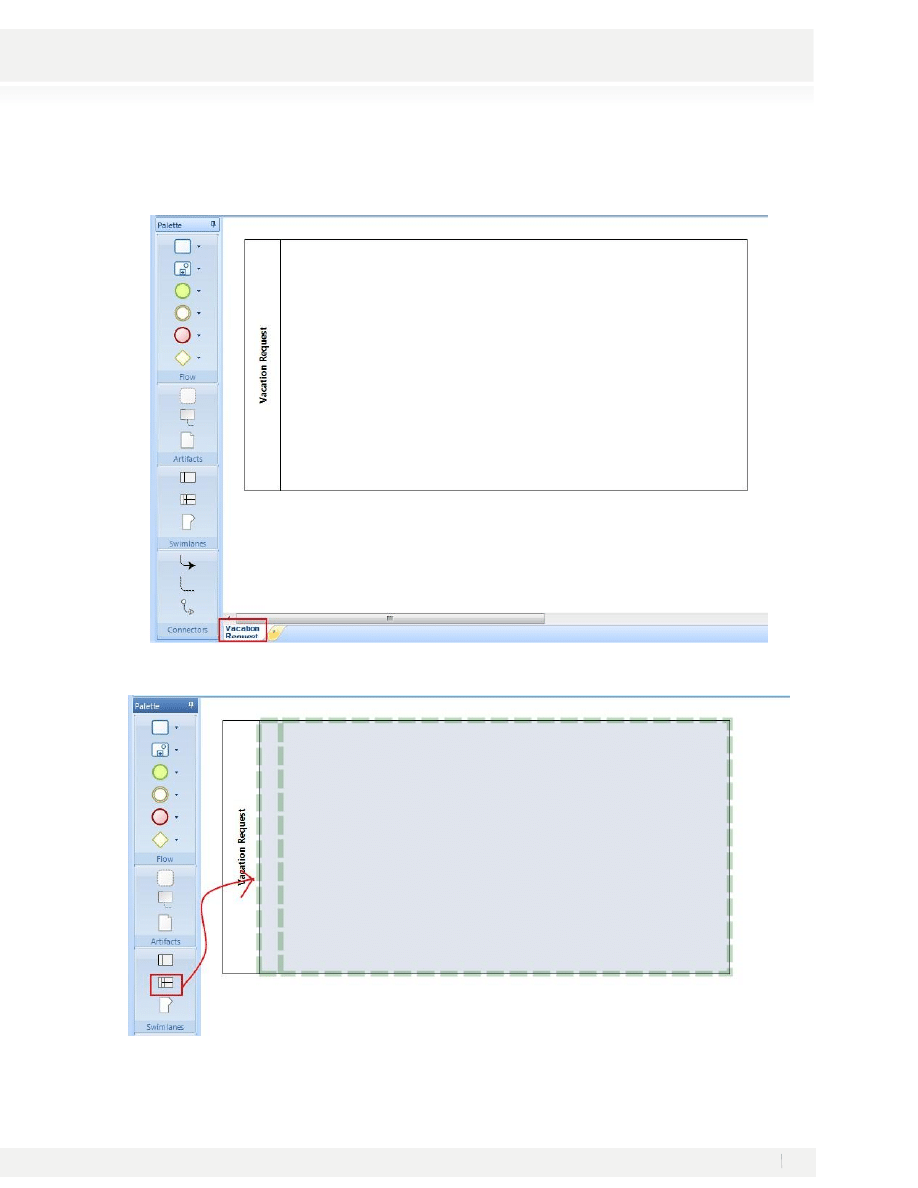
3. Include lanes for the process. Drag and drop the lane symbol from the Palette:
7
Workshop Manual for Product Evaluation
CONFIDENTIAL
www.bizagi.com
4. Rename the Lane; Right click on the lane and select Edit Text. Type Employee
5. Enter two more lanes, name them Boss and Human Resources Assistant:
8
Workshop Manual for Product Evaluation
CONFIDENTIAL
www.bizagi.com
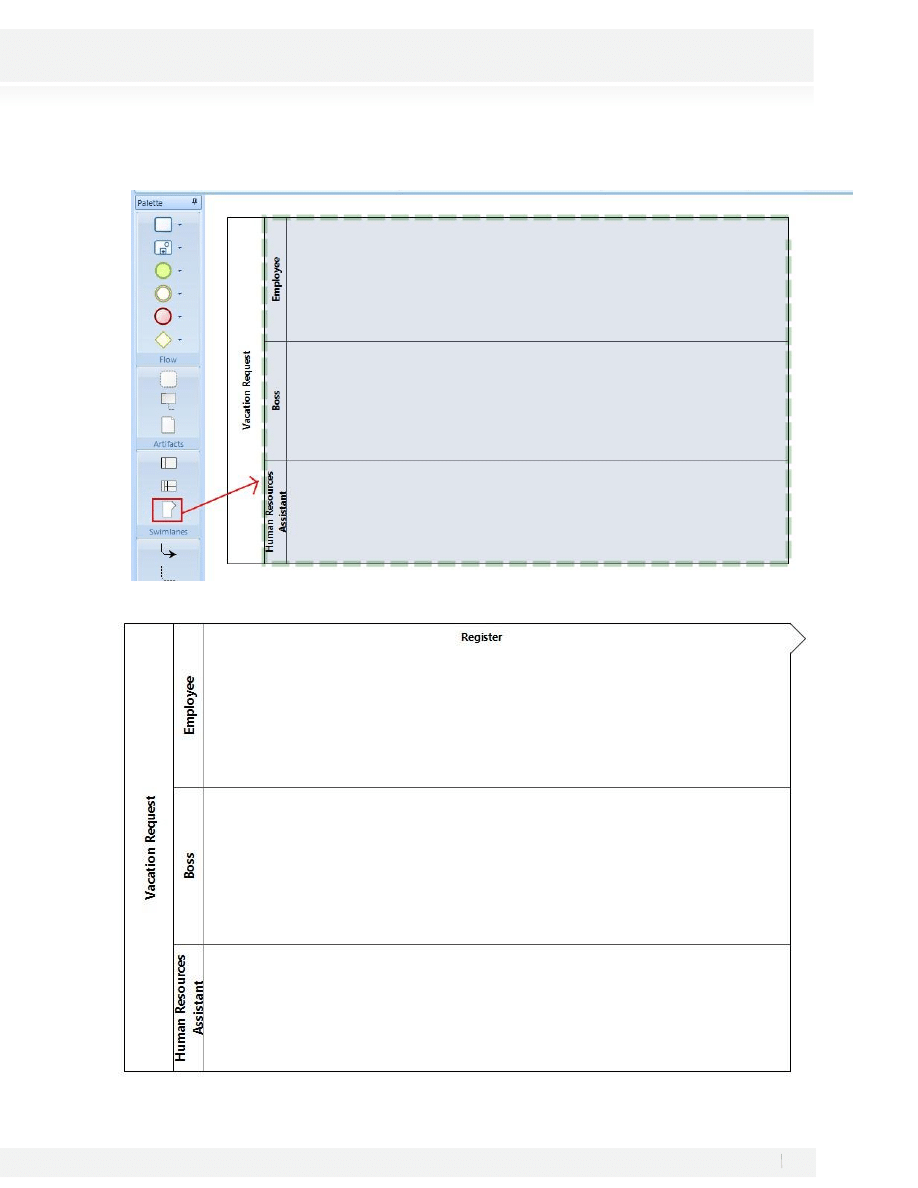
6. Drag and Drop the Milestone Symbol from the Palette to the Process to add phases:
7. Rename your phase; double click on the Milestone Name and type Register
9
Workshop Manual for Product Evaluation
CONFIDENTIAL
www.bizagi.com
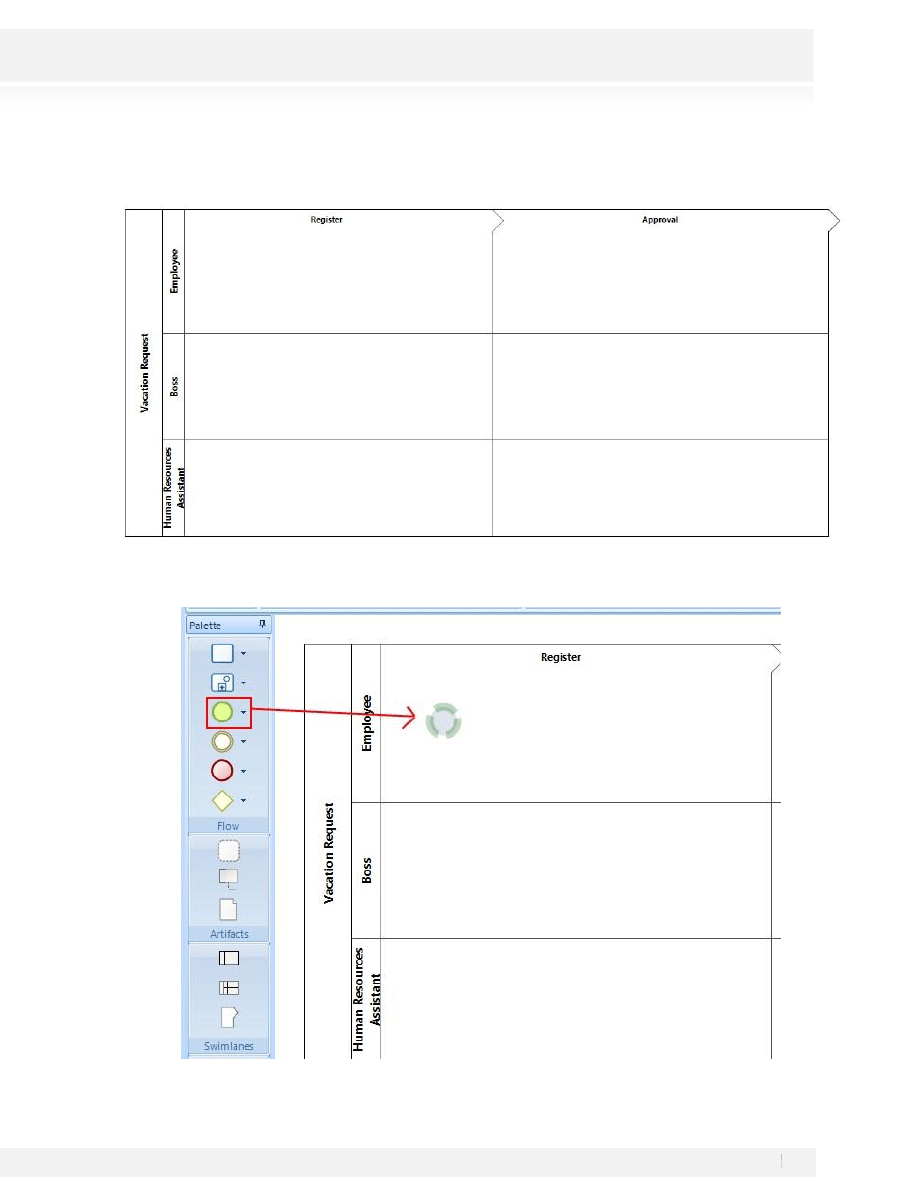
8. Add a second Milestone/Phase and rename it Approval
9. We’ll start adding the shapes to our Process. Select the Start Event from the Palette ah drop it to the
position of the process diagram where it must be located:

10
Workshop Manual for Product Evaluation
CONFIDENTIAL
www.bizagi.com
10. The figures have a Pie Menu that allows the selection of figures for interconnection into the diagram. A
translucent edge of the same color of the figure is displayed when positioning the cursor on the figures of
the diagram. The icons of the figures, with which a connection may be created, are displayed when clicking
on the figure. These icons are drag and drop enabled, so that a new figure and sequence flow may be
created.
Select the rectangle of the Pie Menu and place the selection inside the area of the diagram where the Register
activity is going to be displayed.
11. Rename the new task as Register Vacation Request.
You may rename the shapes and transitions (arrows
connecting shapes) by double clicking on them.
Warning… All the transitions must be properly connected and all the figures must be inside the area of
the phases and functional areas and NOT on the limit of a phase or functional area.
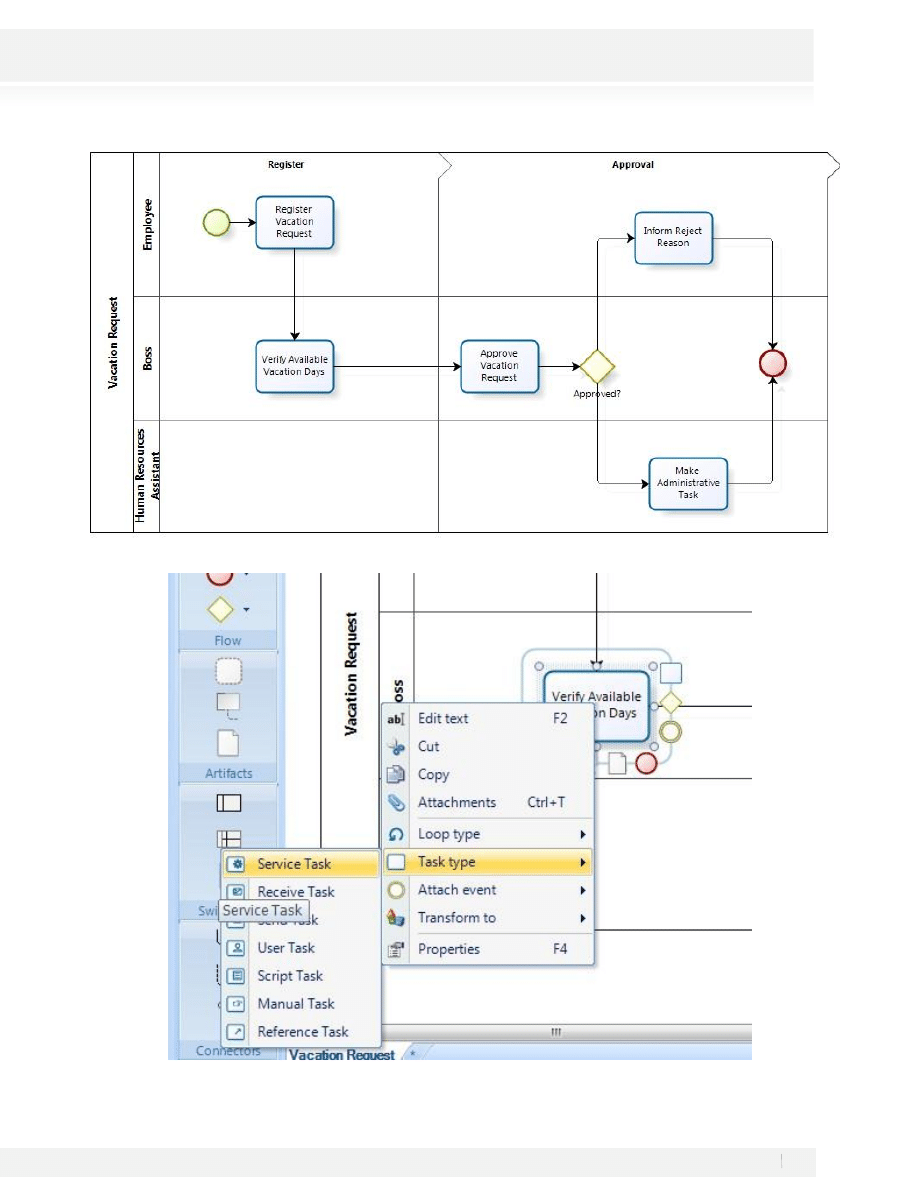
12. Keep adding your shapes until the diagram look like this figure:
11
Workshop Manual for Product Evaluation
CONFIDENTIAL
www.bizagi.com
13. Right click on the Verify Available Vacation Days Activity and transform it to a Service Task
12
Workshop Manual for Product Evaluation
CONFIDENTIAL
www.bizagi.com
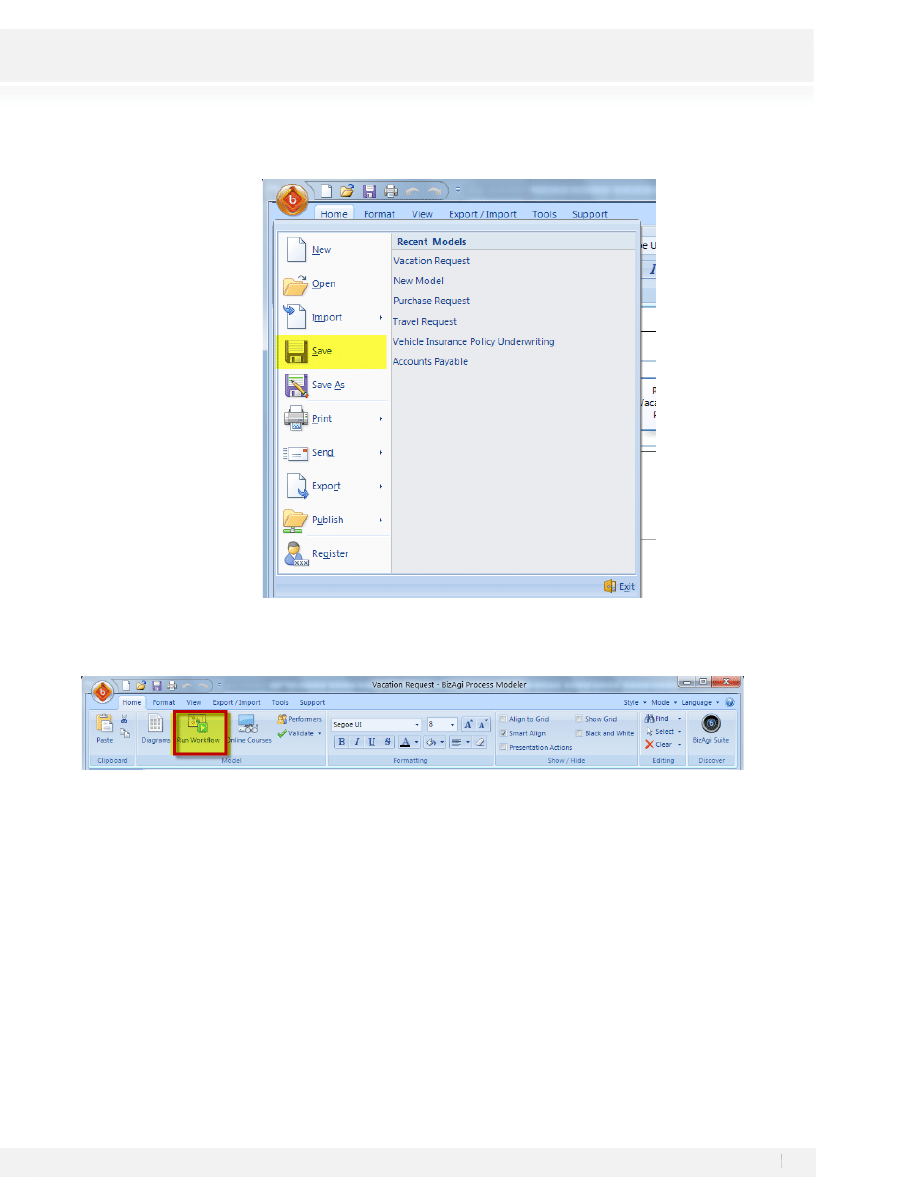
14. Save your BPM File. The file will be available for later documentation and changes.
15. Run your Process. This procedure will take your diagrammed process to the automation environment.
13
Workshop Manual for Product Evaluation
CONFIDENTIAL
www.bizagi.com
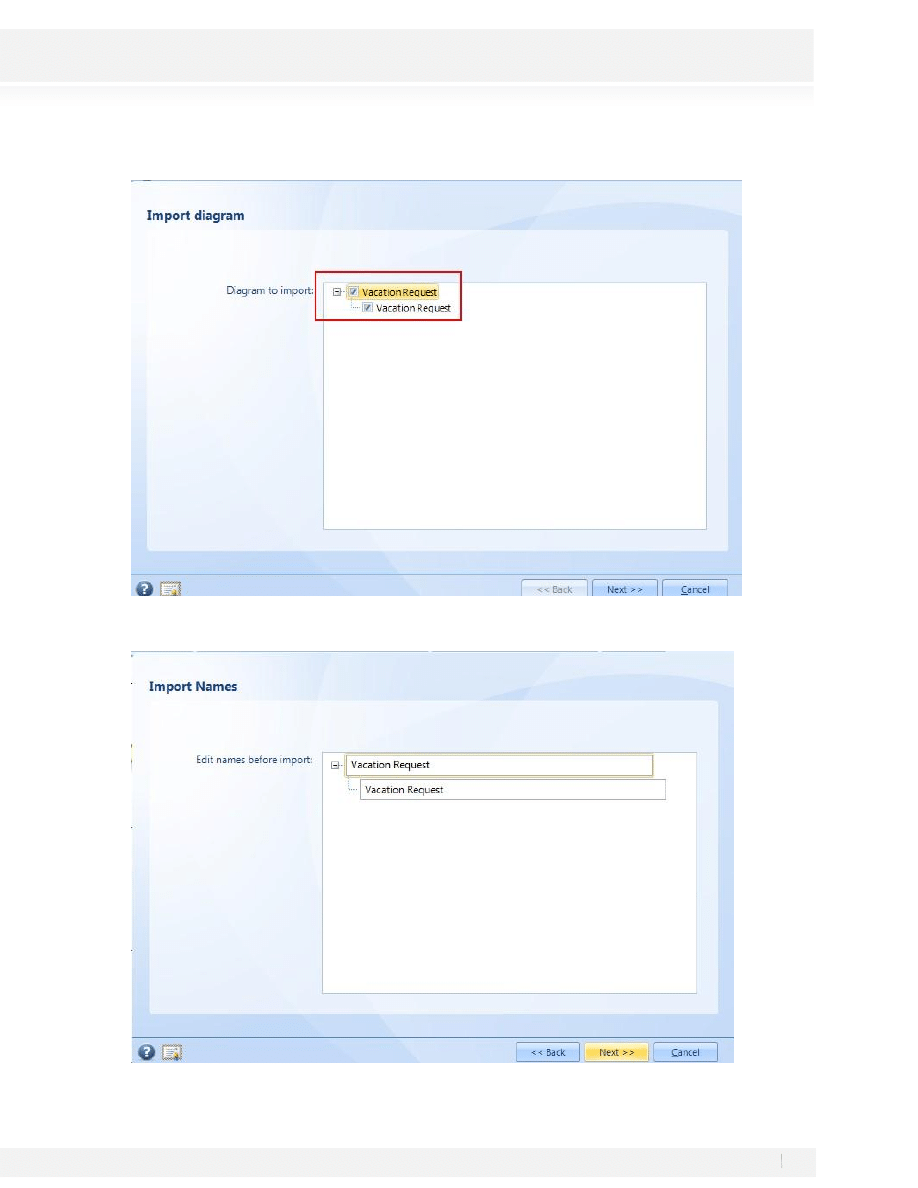
16. In the next window select the Diagram to be exported and click on Next:
17. In the next window, you may rename your process, for this example just click on Next:
14
Workshop Manual for Product Evaluation
CONFIDENTIAL
www.bizagi.com
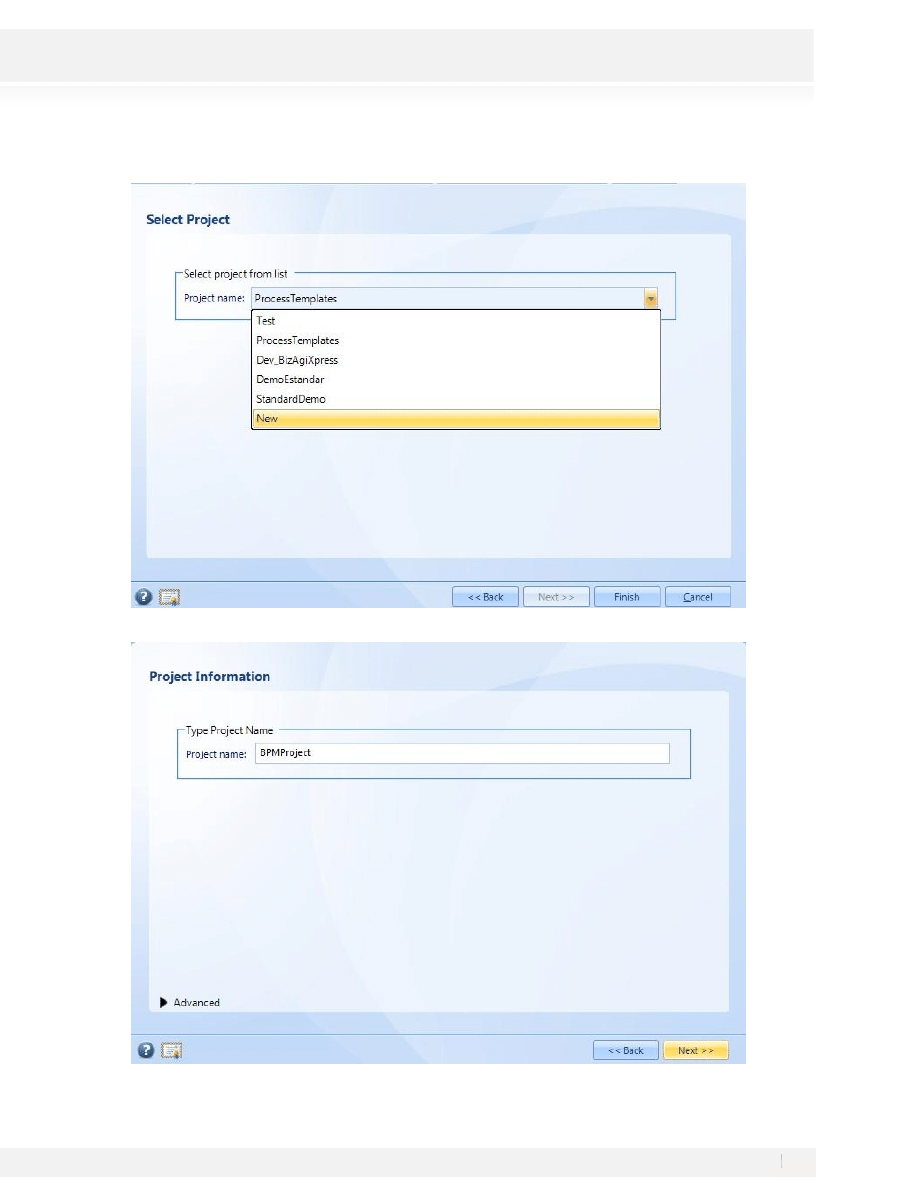
18. Create a new BizAgi Xpress Project; Select the New Option and click on Next:
19. Type a name for the Project: BPMProject and click on Next:
15
Workshop Manual for Product Evaluation
CONFIDENTIAL
www.bizagi.com
20. After creating the project, you’ll be located in the BizAgi Studio’s Modeler. Some parameters must be
integrated to the process’ activities once the diagramming of the process has been completed, such as the
duration, the help text, and the description among others. The properties for each activity must be updated
to perform this configuration.
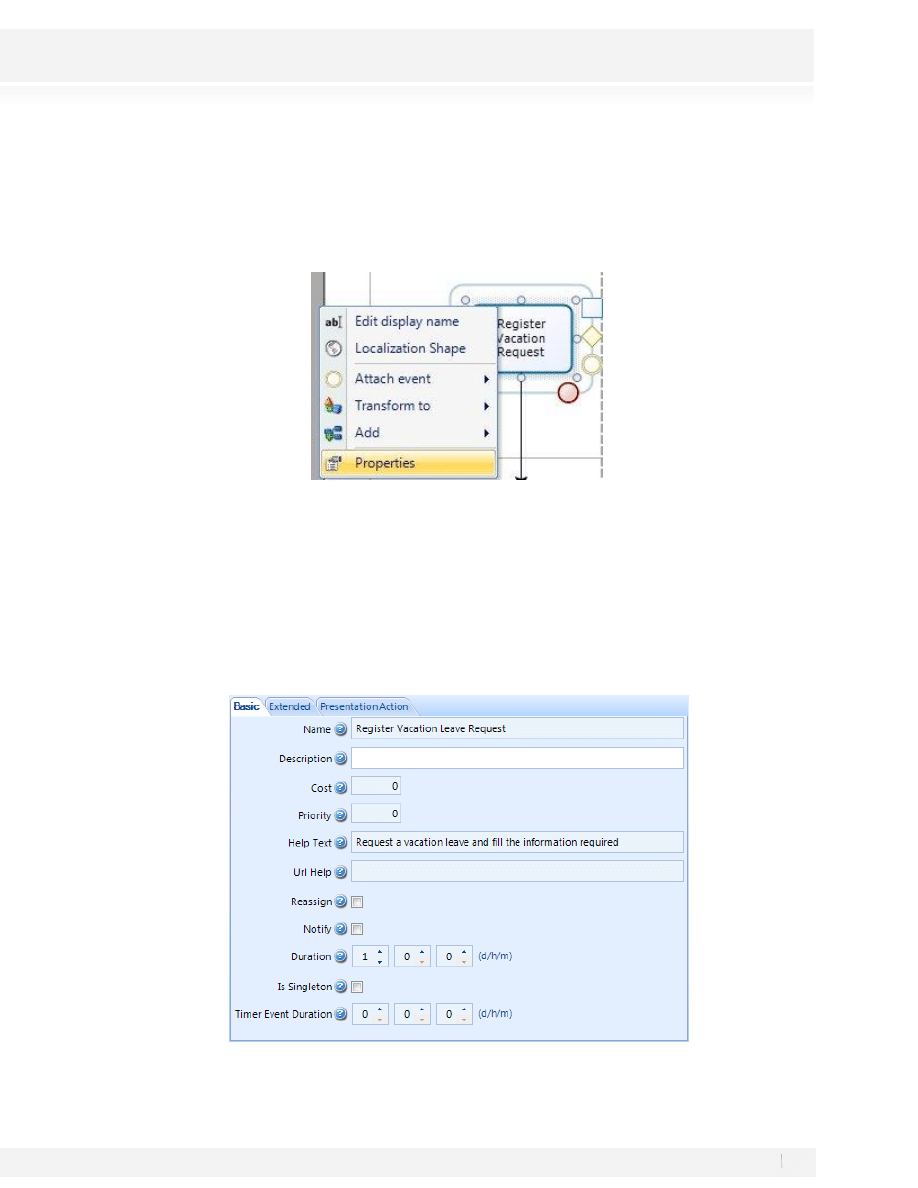
Right click on the figure; select Properties, to enter the properties of the activity.
21. Click on the Help Text and enter the following help text for the activity.
Include all the information in your vacation request.
The help text will be displayed to the end user when the activity is executed in the web application.
22. Click on the Duration (format: ddd – hh:mm where ddd:Days, hh:Hours and mm: minutes) field and enter the
days as follows:
16
Workshop Manual for Product Evaluation
CONFIDENTIAL
www.bizagi.com
Click Ok once the properties have been entered; close the properties window for the activity.
23. Once the properties of the activity Register Vacations Request have been entered, configure the following
properties for each process activity; do not forget to save the changes for every activity and to close the
properties window.
Activity
Help Text
Duration
Approve Vacation Request
2 days
Inform Reject Reason
Review the reasons for rejection request.
3 days
Make Administrative Task
Post the event into the payroll system.
3 days
Once you finish do not forget to close the modeler to go back to the Process Wizard.
17
Workshop Manual for Product Evaluation
CONFIDENTIAL
www.bizagi.com
STEP 2: PROCESS DATA
Once the Process Diagram has been created we’ll proceed to the Data Model Creation. This Data Model will
include all the information required by the process.
The process of Vacations Request requires the following information:
• Date Request
• Vacation Starting Date
• Return Date
• Days requested number
• Days available number
• Applicant
• Authorizer (Supervisor)
• Flag for Approval or Rejection
• Rejection Reason
• Code Voucher of Payroll
• Administrative Task Date
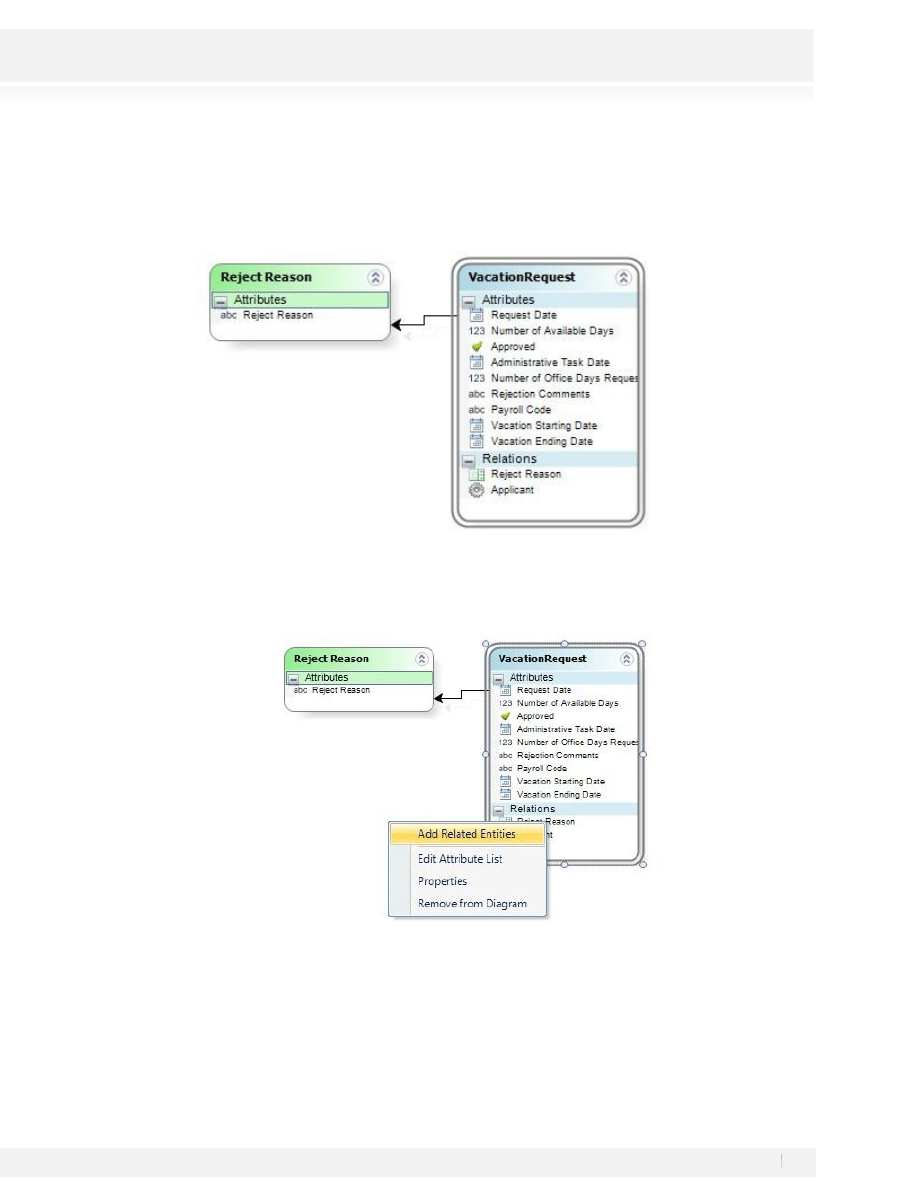
A structured data model will be used to represent the information; therefore, the entity relation model for the
previous information would be:
All the information about the request, such as dates and number of requested and available days will be
grouped in the entity VacationRequest. A standardized list about the rejection reasons will be found in the
entity RejectedReason, which is manageable, and the entity User will contain the information about the
applicant and respective supervisor.
1. In the second step on the wizard in BizAgi Studio select Model Data:
18
Workshop Manual for Product Evaluation
CONFIDENTIAL
www.bizagi.com
2. A window will appear asking for the Process Entity, it will be named as our process Vacation Request. Click
Ok to see the model.
3. A new window containing the Process entity will be displayed.
19
Workshop Manual for Product Evaluation
CONFIDENTIAL
www.bizagi.com
The entire entity relationship model, which can be a partial or total representation of the project, is
displayed in the diagram. Furthermore, the creation of entities, attributes, and relationships can be
completed from the diagram, which allows the visualization of the relationships between existent entities.
4. Right click on the Vacation Request entity and select Edit Attribute List.
5. The Attribute List Window for the Vacation Request Entity will be displayed; click on the Add
button to create an attribute; for each new attribute complete the following information:
·
Display Name: Enter the attribute name Request Date which is the form that will be displayed to the
end user; this field does not allow special characters.
·
Type: Enter data type. Date – time
Create the following attributes under the entity Vacation Request:
Display Name
Type
Length
Request Date
Date - Time
None
Vacation Starting Date
Date - Time
None
Vacation Ending Date
Date - Time
None
Number of Office Days
Requested
Integer
None
Number of Available Days Integer
None
Approved
Boolean
None
Rejection Commentss
String
100
Payroll Code
String
20
Administrative Task Date
Date - Time
None
6. The Attribute list for Entity Vacation Request will look as illustrated in the following screen:

20
Workshop Manual for Product Evaluation
CONFIDENTIAL
www.bizagi.com
7. After you create the basic attributes, create those related to other entities:
21
Workshop Manual for Product Evaluation
CONFIDENTIAL
www.bizagi.com
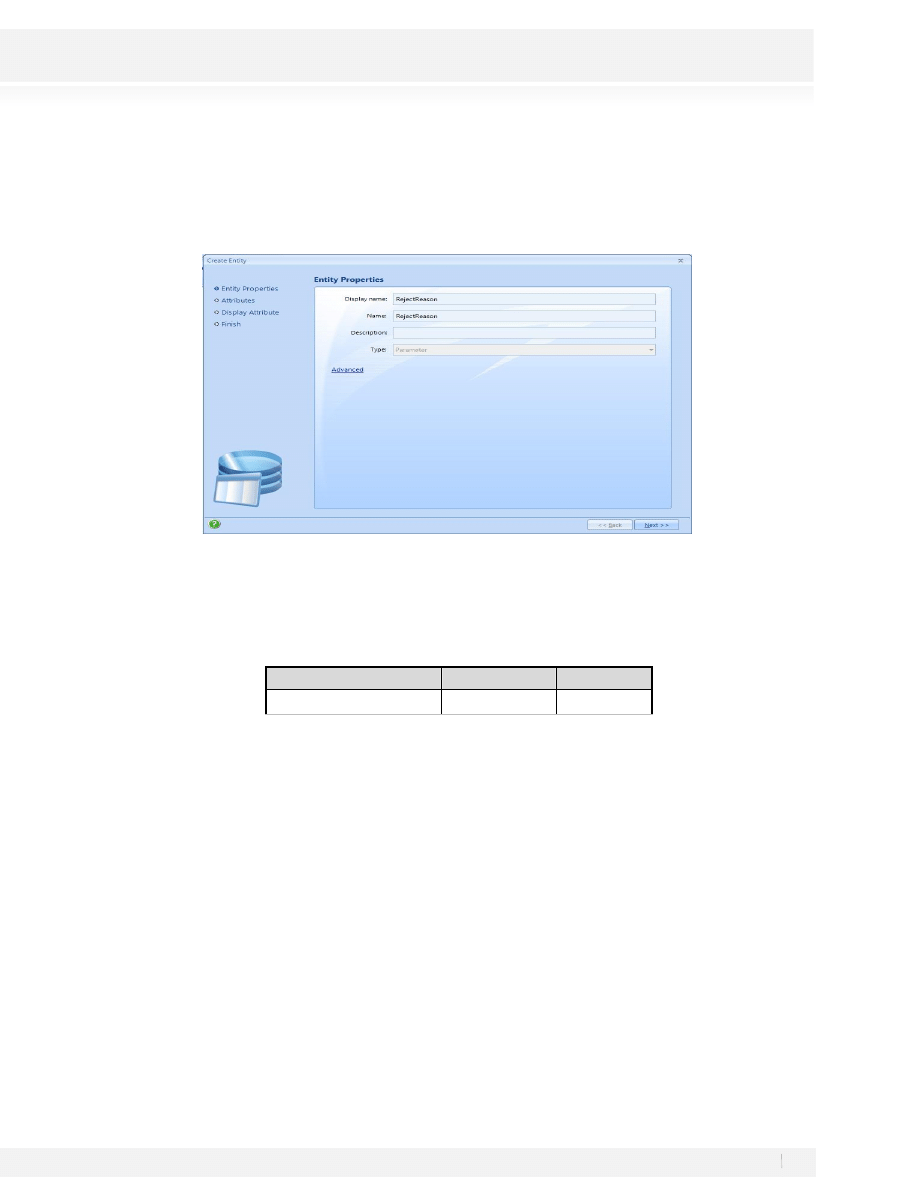
• Display Name: Reject Reason.
• Type: Entity – Parameter – New Entity
• Display Name: Enter the displayable name for the entity, Reject Reason.
• Name: Enter the name of the entity RejectReason; this field allows no special characters.
Click on next and create the attribute for the entity, notice that in the bottom you can select the Length for the
String type Attribute:
Display Name
Type
Length
Reject Reason
String
100
22
Workshop Manual for Product Evaluation
CONFIDENTIAL
www.bizagi.com
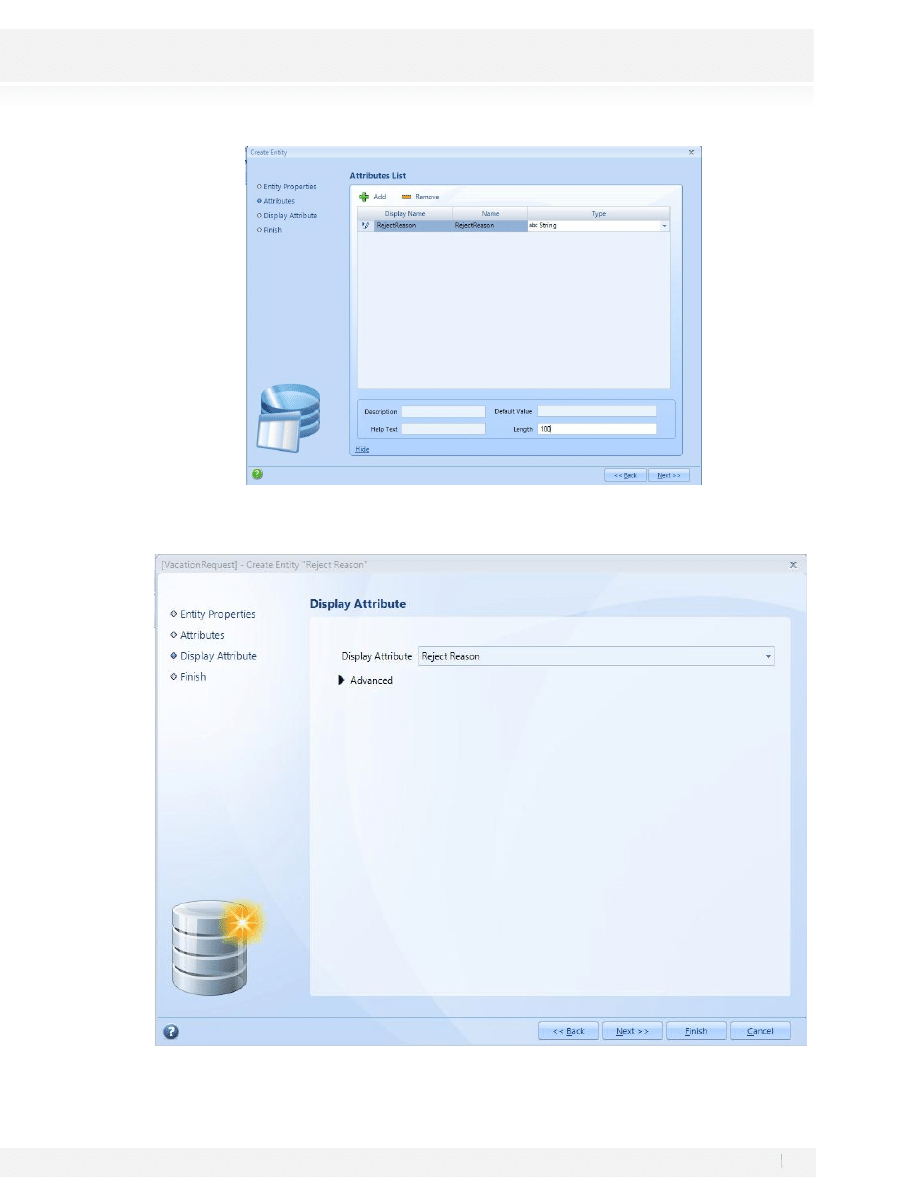
8. Since this is a Parameter entity, click Next and you’ll be asked for a Display Attribute, select the one you just
created:
23
Workshop Manual for Product Evaluation
CONFIDENTIAL
www.bizagi.com
Click on next to continue
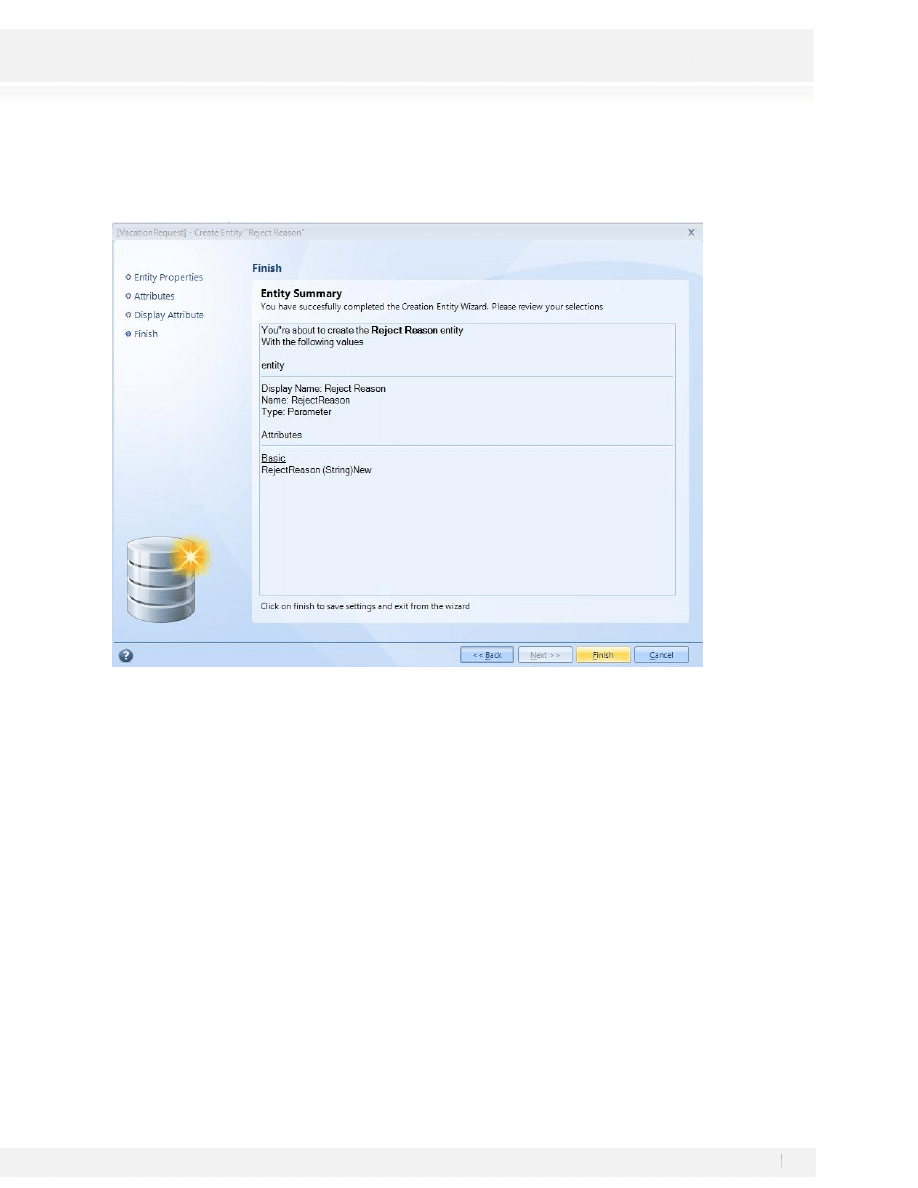
9. A new Summary window will appear:
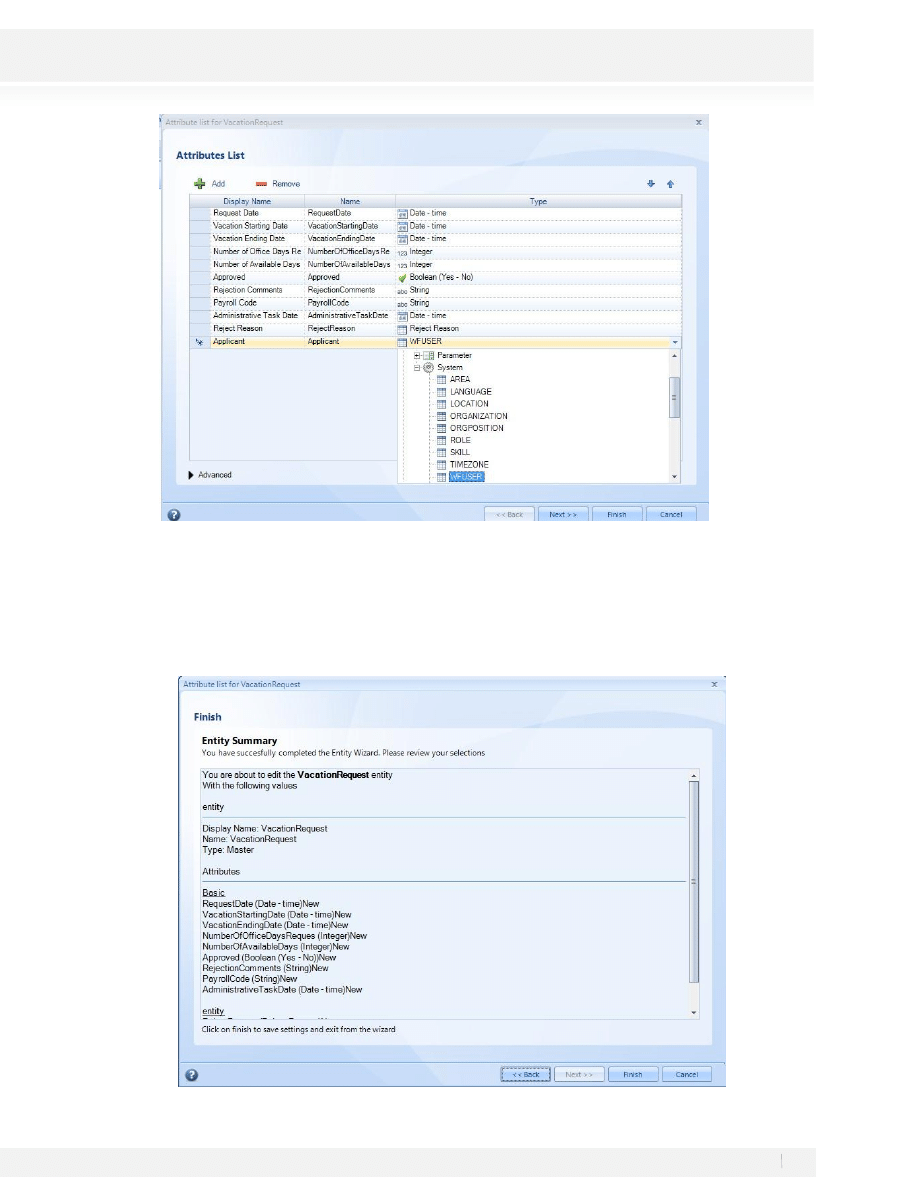
10. Click on Finish and you’ll return to the Vacation Request Attribute List. The entity VacationRequest is also
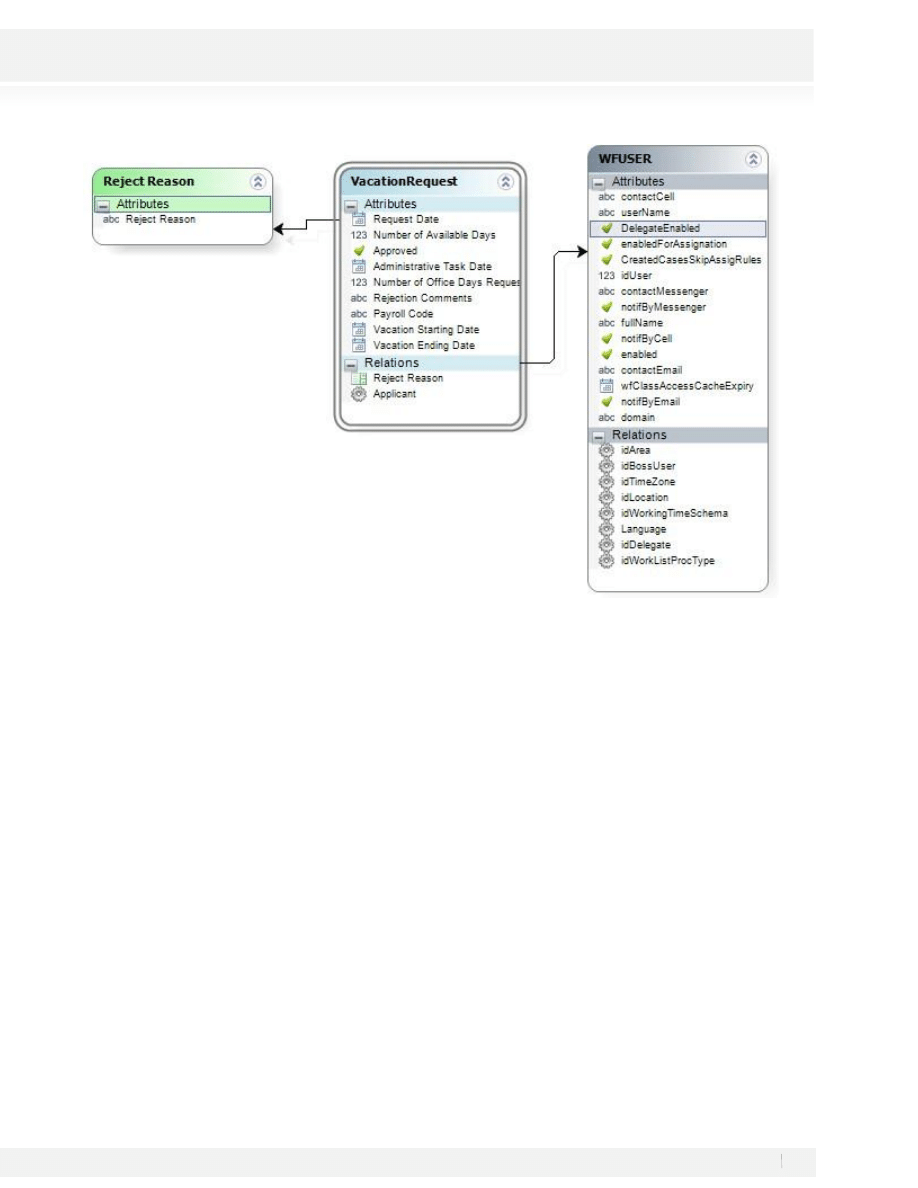
related to the entity User, keep in mind that BizAgi includes by default the entity User (WFUSER), which is
used to store all the information related to the users of the system. Hence, this entity may be used to
display all the information related to the employee requesting the vacation. This entity can be found under
the group of entities of the system.
An attribute must be added along with the information below listed to create the attribute related to the
WFUSER (User) entity:
24
Workshop Manual for Product Evaluation
CONFIDENTIAL
www.bizagi.com
• Display Name: Enter the attribute’s name in the form that will be displayed to the end user; this field
does not allow special characters. Applicant
• Type: Enter data type. Entity – System - WFUSER
11. Click on next and a new summary window will appear for the Vacation Request Entity:
25
Workshop Manual for Product Evaluation
CONFIDENTIAL
www.bizagi.com
12. Click on Finish. The work completed so far will result in the following screen (You may need to re-organize
the entities on the screen by dragging and moving them):
13. Select the option Add Related Entities by right clicking on the Vacation Request Entity:
The diagram will be displayed in the following way:
26
Workshop Manual for Product Evaluation
CONFIDENTIAL
www.bizagi.com
Save and close the diagram once the data model has been completed.
27
Workshop Manual for Product Evaluation
CONFIDENTIAL
www.bizagi.com
STEP 3: FORMS CREATION
Once the Process Diagram and the Data Model are ready we’ll proceed to create the forms associated to each
one of the activities of the process.
In BizAgi a web form is used to represent every process activity; this form is used to enter and display required
information, so that users may interact and complete in a friendly way each one of the activities of the process.
Let us create the form for the first activity of the process, Register Vacation Request, which must contain the
following information:
ACTIVITY: REGISTER VACATION REQUEST
The entity VacationRequest must be selected for the creation of the form due that this entity contains the
information required for display.
1. To create the forms please select the Third Step on the wizard:
2. After selecting the step you’ll see a diagram where only user tasks will be available for you to select, select
the activity Register Vacation Request by clicking on it. The following screen will appear:
28
Workshop Manual for Product Evaluation
CONFIDENTIAL
www.bizagi.com
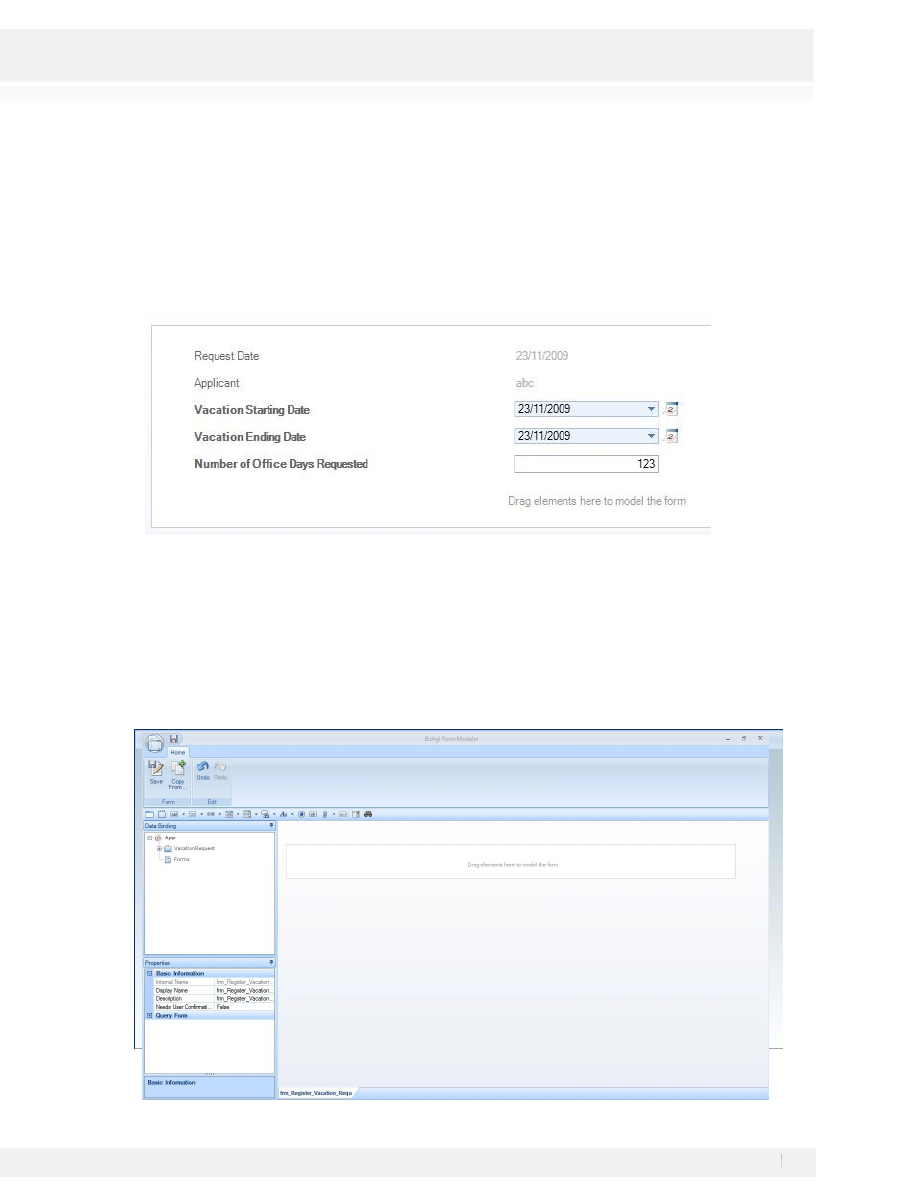
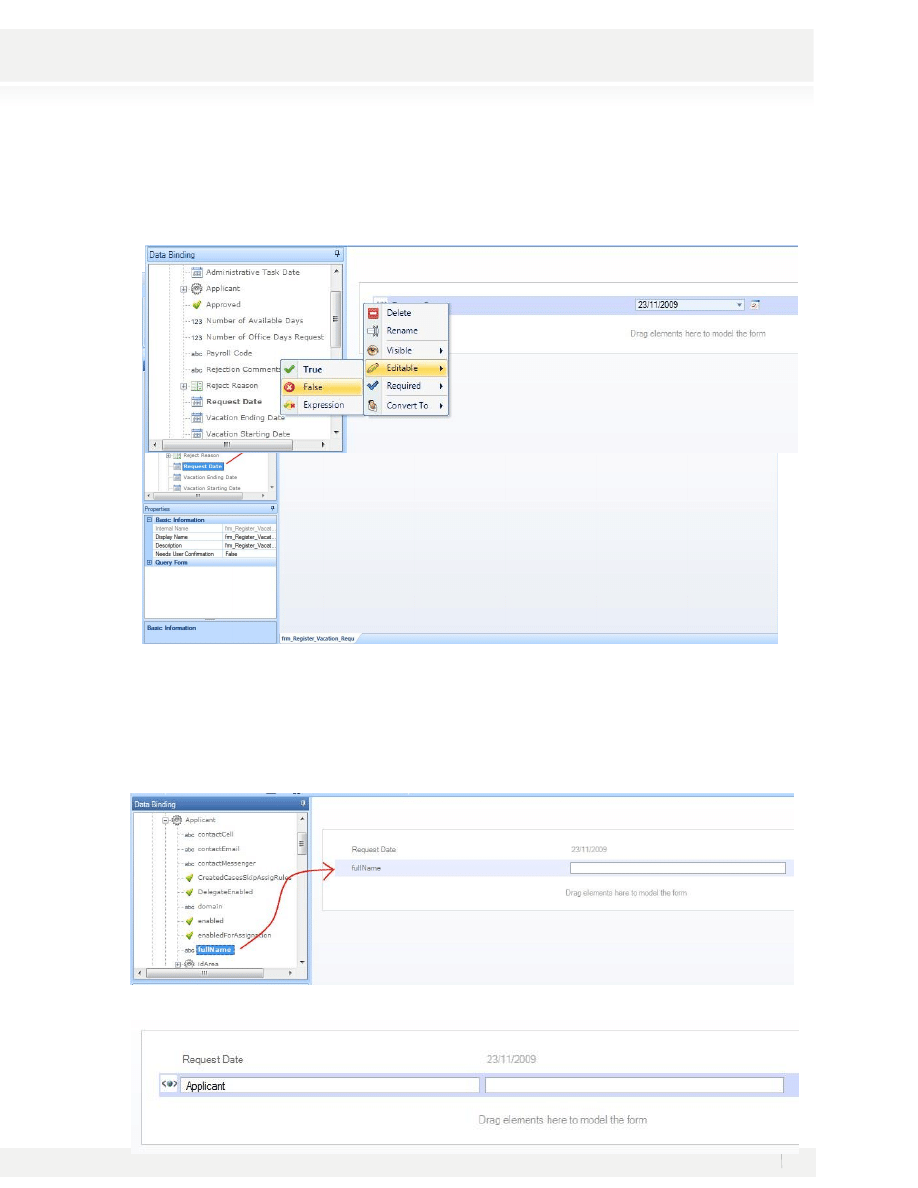
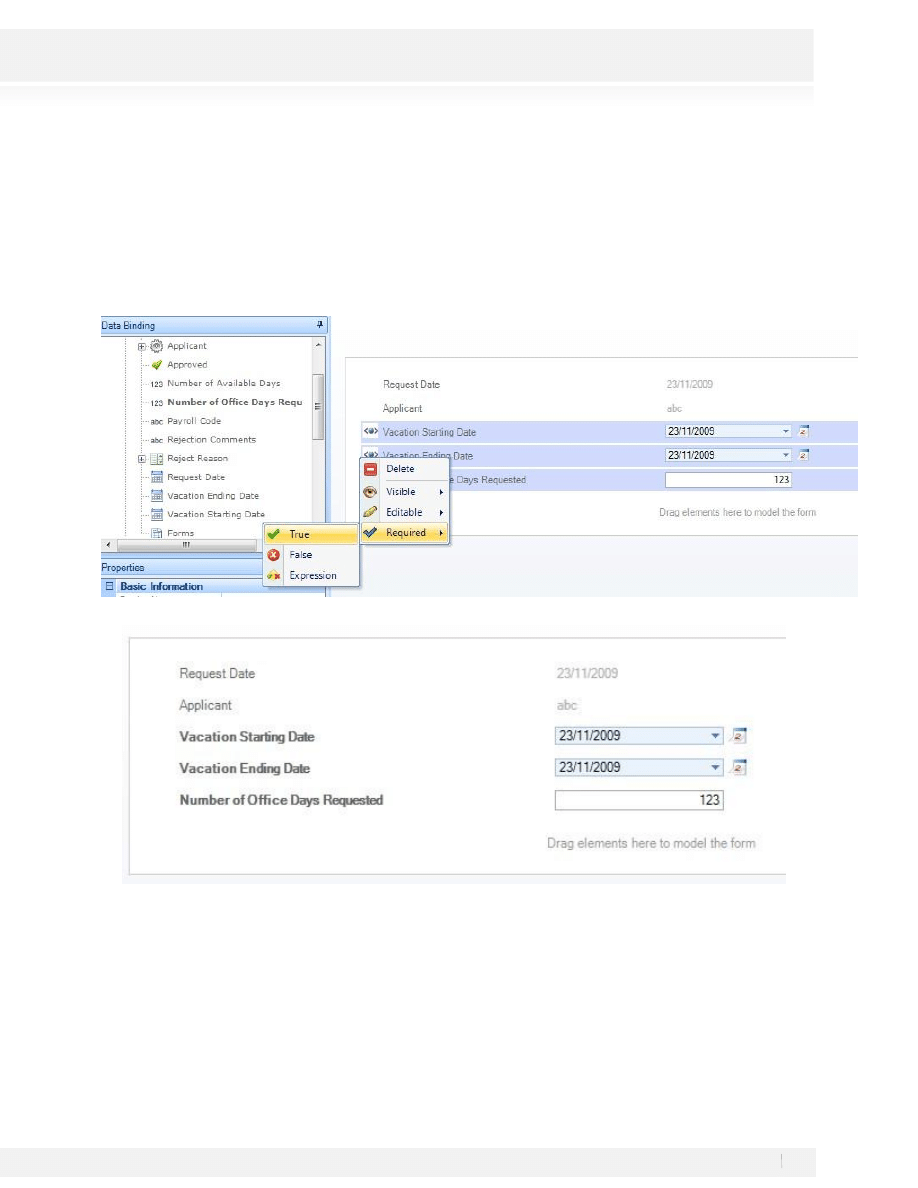
3. Navigate through the Data Binding to find the elements in the Data Model, then drag and drop the elements
from the Data Binding:
·
Request Date: This field must be read only. Right click on the field and select Editable and then False
·
Applicant: To add the Applicant, navigate the Data Binding and once in the Applicant entity (WFUSER),
select the fullName Attribute. Edit the Display Name for the attribute by double clicking on it. This field
must be read only. Right click on the field and select Editable and then False
29
Workshop Manual for Product Evaluation
CONFIDENTIAL
www.bizagi.com
Add the following fields from the Data Binding. These fields will be required. Selec these fields, right click on
them and select Required and then True
·
Vacation Starting Date
·
Vacation Ending Date
·
Number Of Office Days Requested
Click on the Save button once the form has been completed and close it.
ACTIVITY: VERIFY AVAILABLE VACATION DAYS
Since this is an automatic task it won’t use any form to be displayed. In step 6 of the process wizard we’ll see
how the configuration is done for this activity.
30
Workshop Manual for Product Evaluation
CONFIDENTIAL
www.bizagi.com
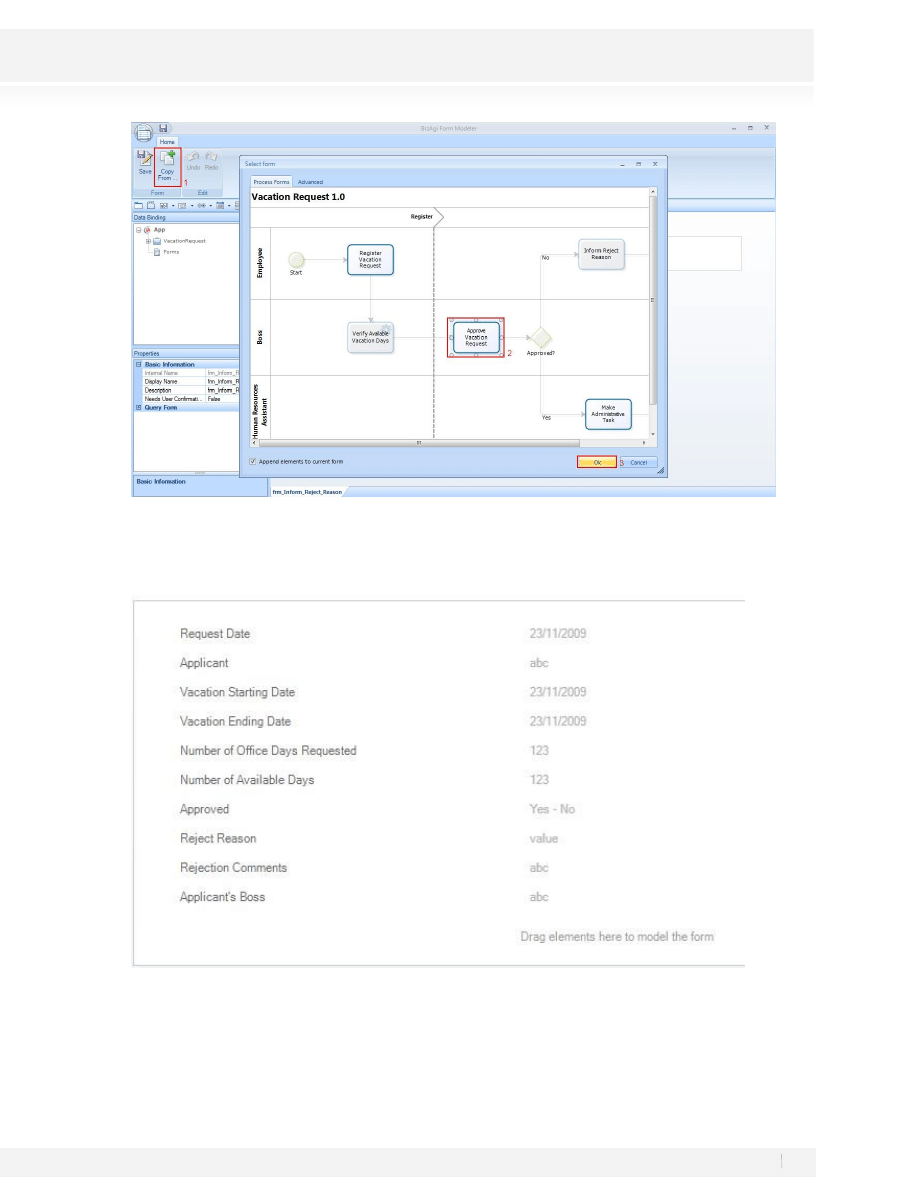
The creation of the form Approve Vacation Request is the second step. This form will display the information
for the vacation request approval in read-only mode. The form design for the activity will be:
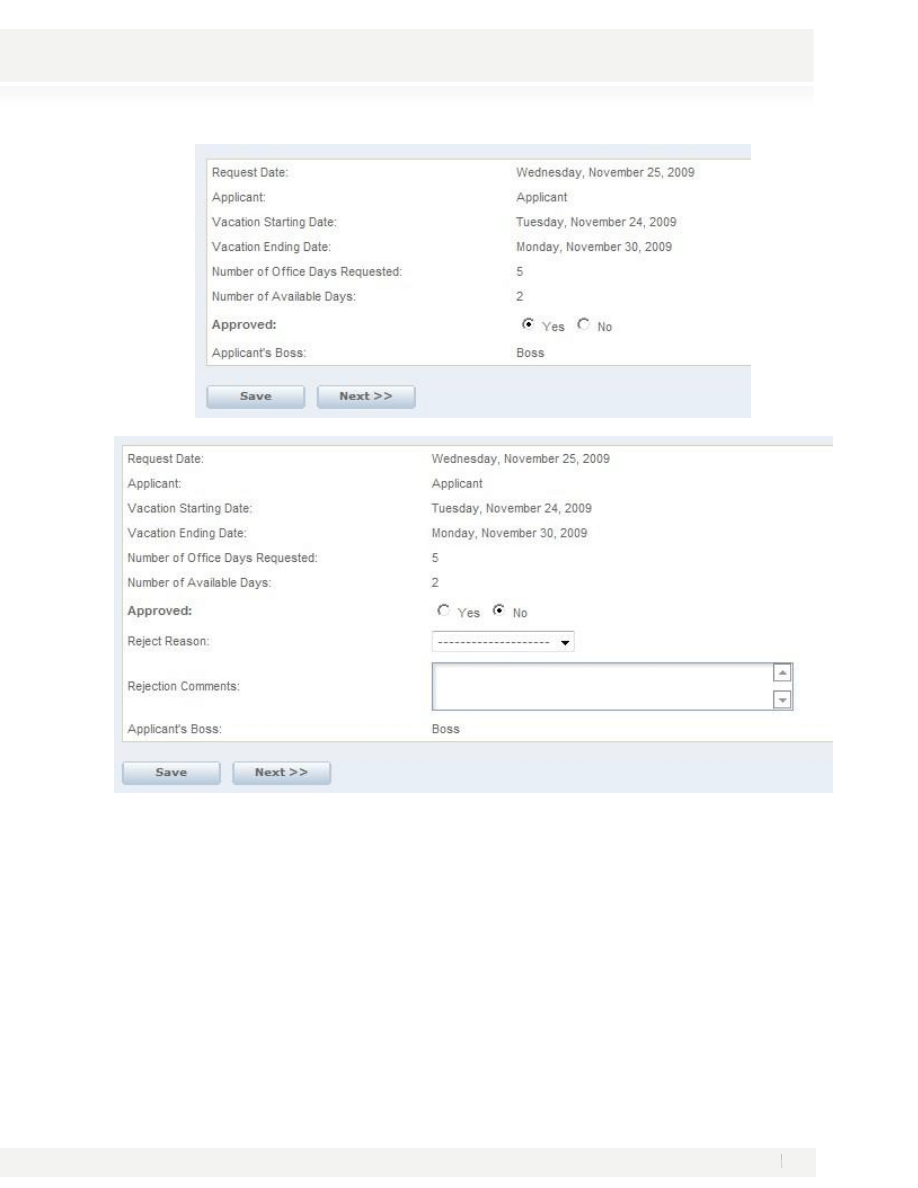
ACTIVITY: APPROVE VACATION REQUEST
1. After entering into the flow chart area, select the activity Approve Vacation Request, by clicking on it.
The forms editor will be opened after clicking on the Activity; the form will be created in the same way as the
last one. Since we will use the same fields we’ll use the Copy From option to bring the information from the last
form.
31
Workshop Manual for Product Evaluation
CONFIDENTIAL
www.bizagi.com
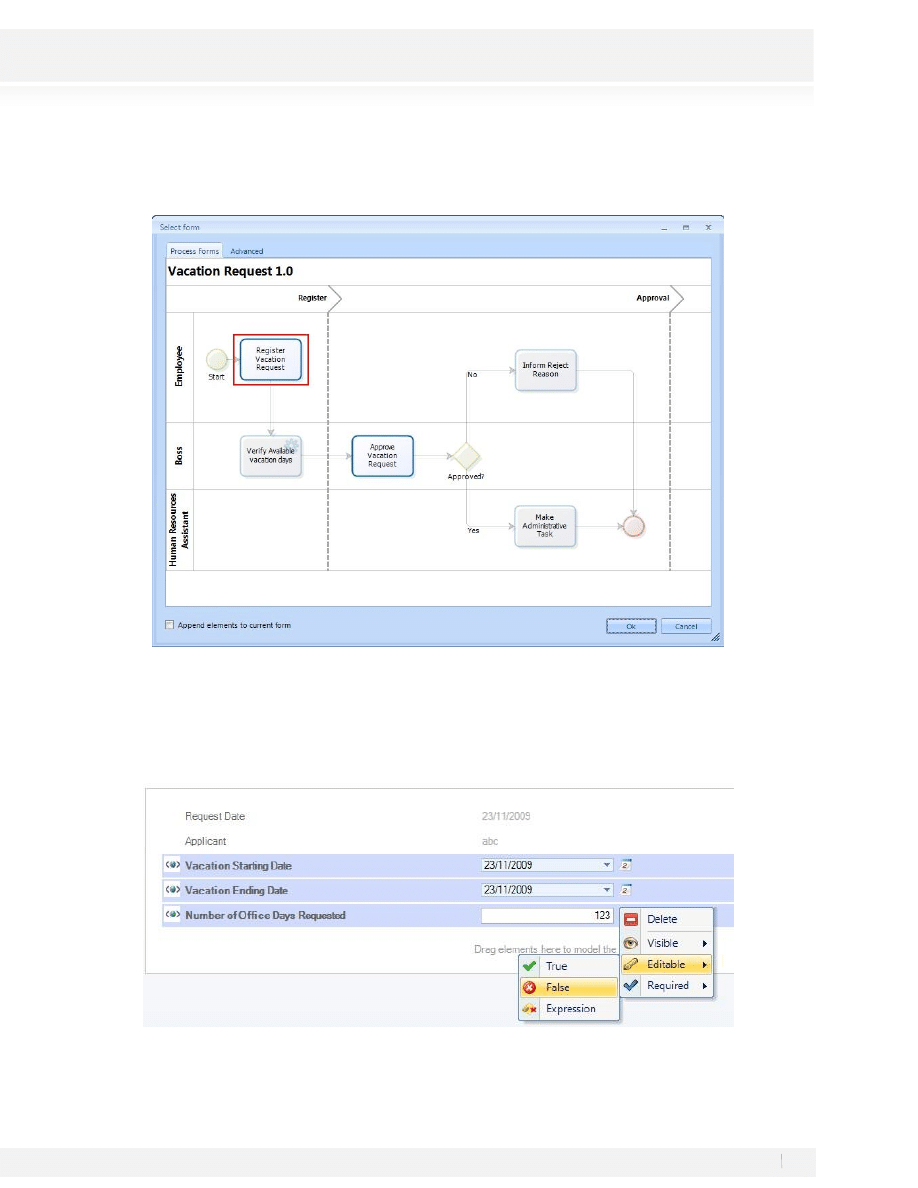
A new window displaying the process will open. Select the Register Vacation Request Activity by clicking on it.
Click on Ok.
2. The information is copied the same as in the original form. Right click on the fields Vacation Starting Date,
Vacation Ending Date and Days Requested Number and make the Editable property False.
3. Additionally the following fields will be entered:

32
Workshop Manual for Product Evaluation
CONFIDENTIAL
www.bizagi.com
·
Number of Available Days: Right click on the field and select Editable and then False
·
Approved: Drag and drop the attribute from the Data Binding. Right Click on this field and select the
Required property and click on True since this field is mandatory.
·
Reject Reason
·
Rejection Comments
·
Applicant’s Boss: Locate the applicant Attribute from the Data Binding and expand this, drag and drop
the Applicant -idBossUser – fullName attribute to the form.
This field must be read only. Right click on the field and select Editable and then False. Change the display
name to Applicant’s Boss by double clicking on the field and typing:
4. Click on the Save button once the form has been completed and close it.
33
Workshop Manual for Product Evaluation
CONFIDENTIAL
www.bizagi.com
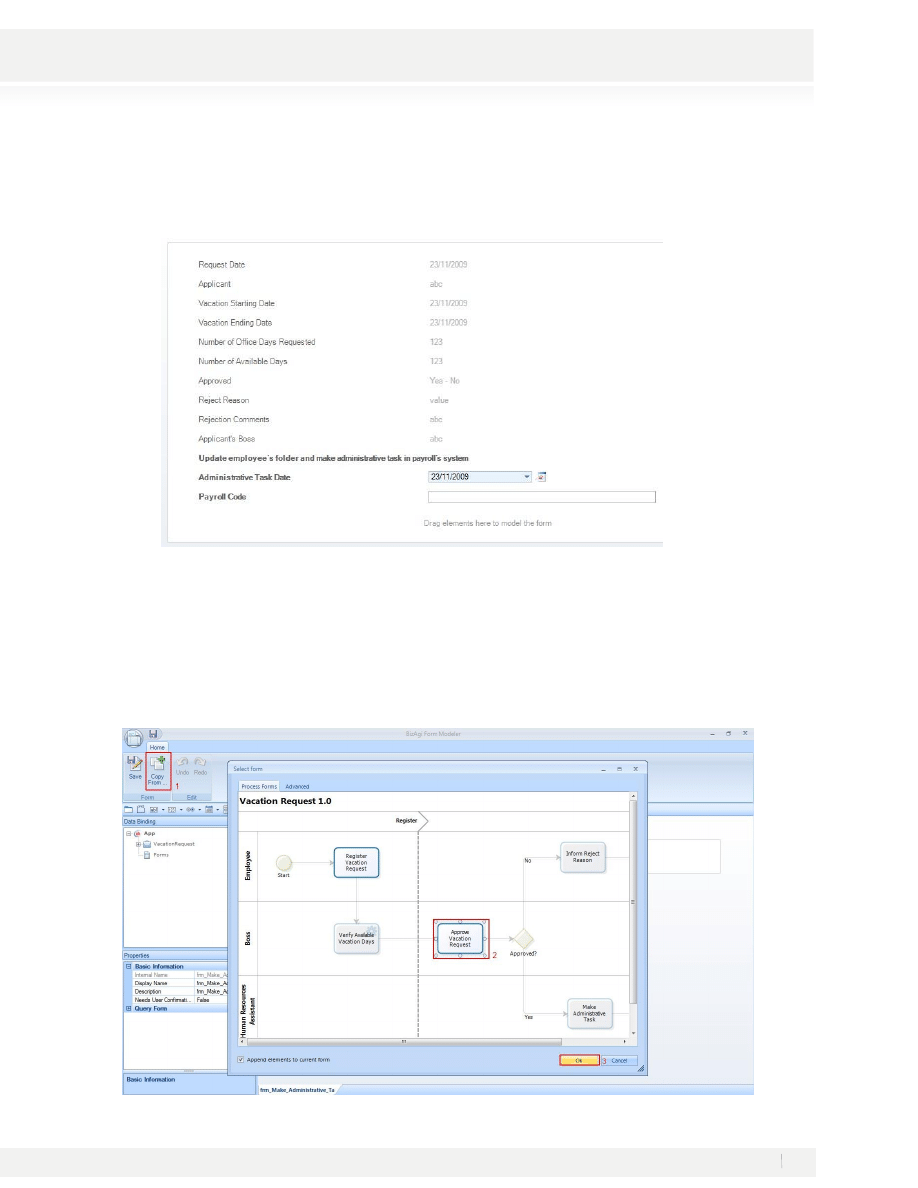
The creation of the form Make Administrative Task is the following step after designing the forms Register
Vacation Request and Approve Vacation Request. The read-only information for the Vacation Request and
Applicant Boss will be displayed for this activity along with the information to be entered by the Human
Resources Representative.
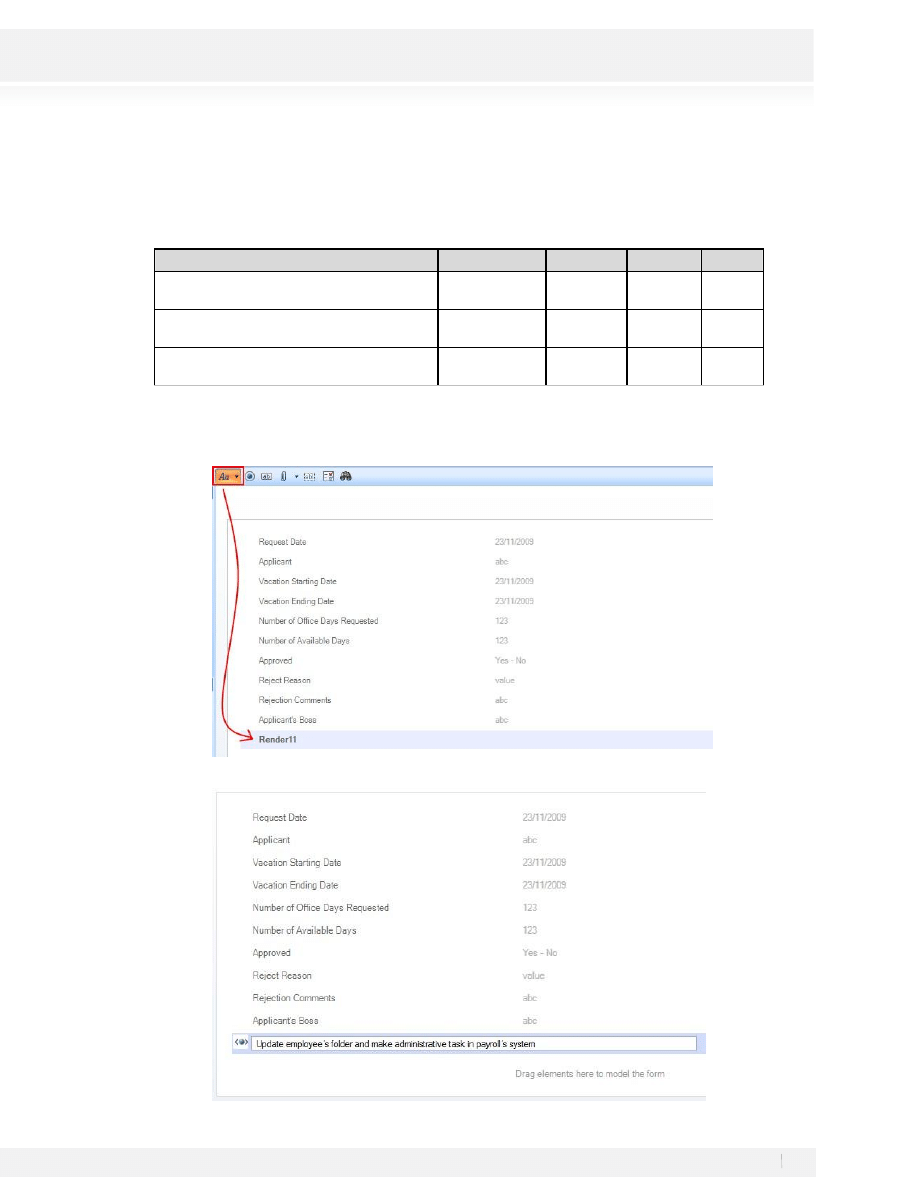
ACTIVITY: MAKE ADMINISTRATIVE TASK
24. After entering into the flow chart area by clicking on the BPMProject at the bottom of the screen, select the
activity Make Administrative Task by clicking on it.
25. We’ll add all the information we included on the Register Vacation Request and Approve Vacation Request
activities, this information won’t be editable. Copy the information from the Approve Vacation Request
34
Workshop Manual for Product Evaluation
CONFIDENTIAL
www.bizagi.com
26.
3. Select False for the Editable Property for the Fields Approved, Reject Reason and Rejection Comments.
4. In the form editor we’ll add the activity information from the Vacation Request entity:
Display Name
Field
Required Editable Visible
Update
employee’s
folder
and
make
administrative task in payroll’s system
none
No
No
Yes
Administrative
Task Date
Yes
Yes
Yes
Code Voucher of
Payroll
Yes
Yes
Yes
To Add a Label, select the button from the upper bar, drag and drop the label to its position and then double
click on the field to edit the Display:
35
Workshop Manual for Product Evaluation
CONFIDENTIAL
www.bizagi.com
Click on the Save button once the form has been completed and close it.
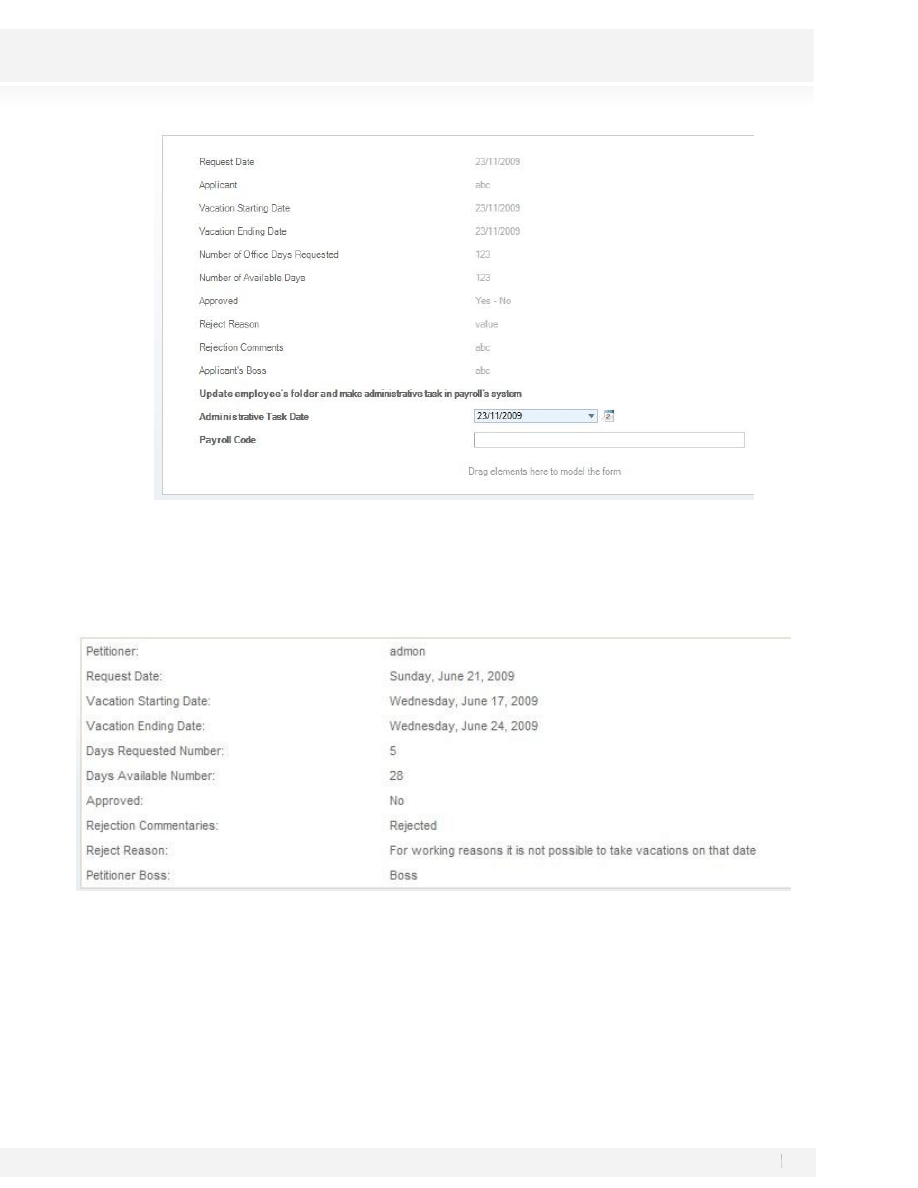
The creation of the form Inform Reject Reason is the next step. The read-only information for the Vacation
Request and Applicant Boss Approval will be displayed for this activity.
The activity will be displayed as follows:
ACTIVITY: INFORM REJECT REASON
27. After entering into the flow chart area, select the activity Inform Reject Reason, by clicking on it.
28. Copy the information from the Approve Vacation Request Activity:
36
Workshop Manual for Product Evaluation
CONFIDENTIAL
www.bizagi.com
29. Select Editable – False for the fields Approved, Reject Reason and Rejection Comments.
30.
31. Click on the Save button once the form has been completed and close it.
32. Close the Forms editor by clicking on the arrow as follows:
37
Workshop Manual for Product Evaluation
CONFIDENTIAL
www.bizagi.com
33.
34.
38
Workshop Manual for Product Evaluation
CONFIDENTIAL
www.bizagi.com
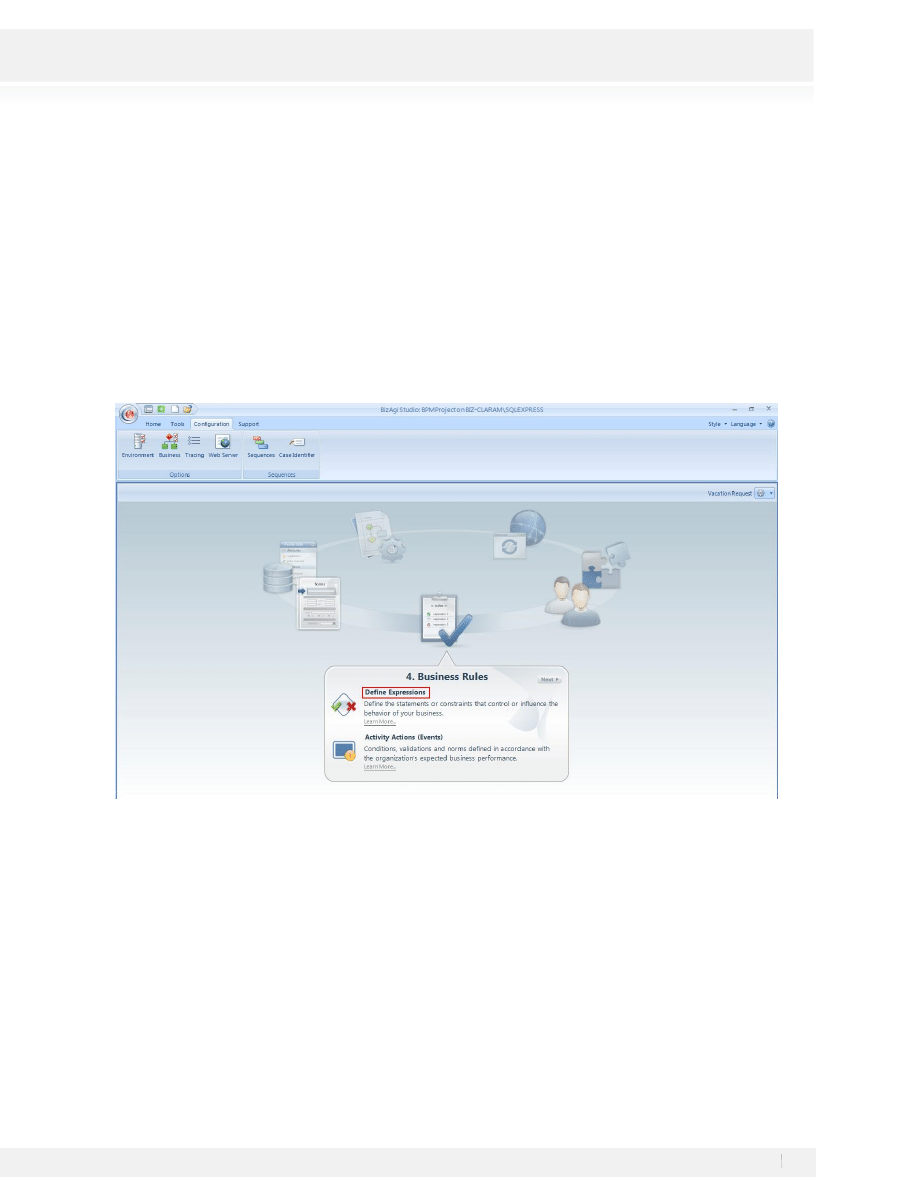
STEP 4: BUSINESS RULES
Once we have defined the forms we must create the business rules that control the process route.
The first rules to be completed are the transition rules, these rules, are the ones that allow verifying that a
specific condition is being fulfilled at some point during the process. These rules must always return true or
false and they are associated to the decision figures.
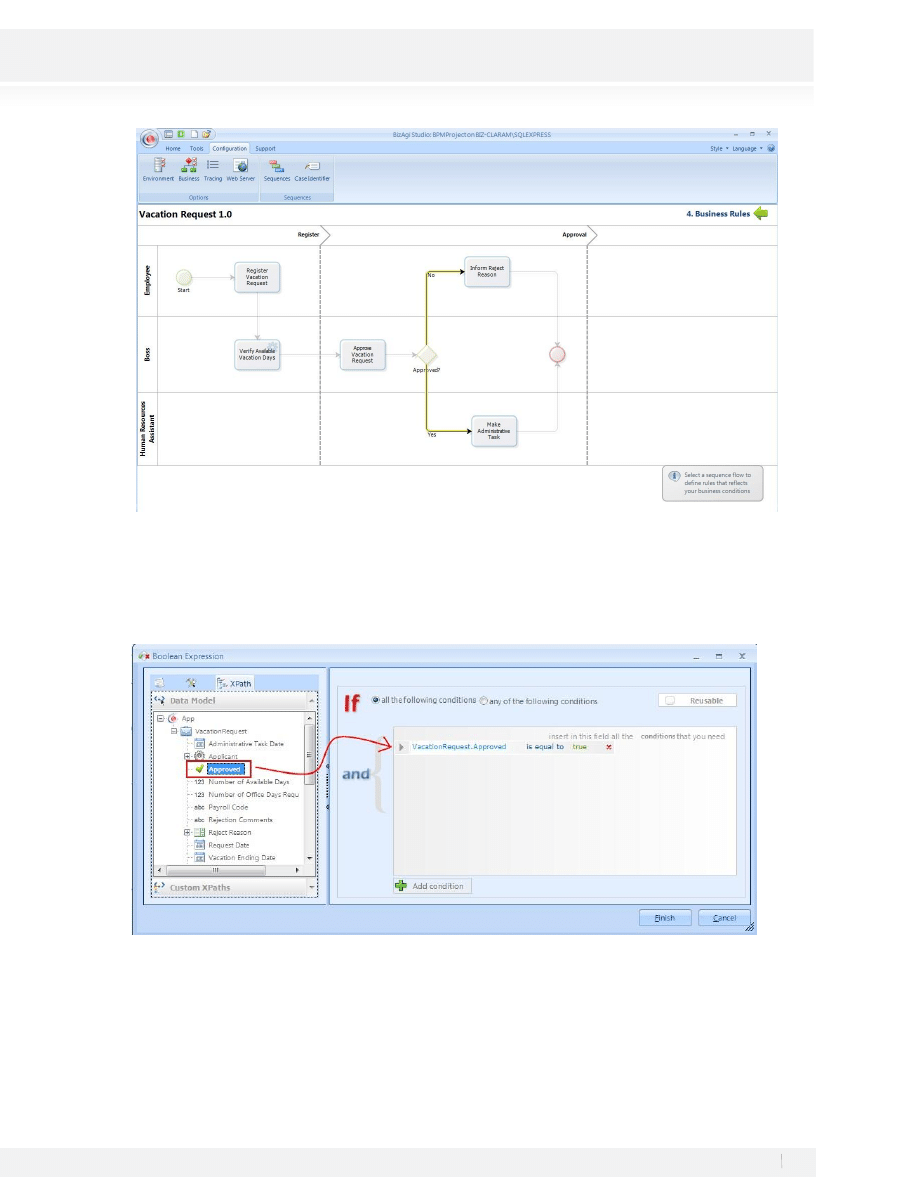
·
We are going to create a rule for the Authorized Decision, this rule must return true if the field
Authorized Request is true, and it must also be associated within the decision to the transition “Yes”,
which takes the flow to the activity Make Administrative Task.
Transition Conditions
1. To create the Business Rules please select the Fourth Step from the wizard and Select Define Expressions:
2. The Rule editor will be open indicating the transitions with no rule associated with a yellow shade:
39
Workshop Manual for Product Evaluation
CONFIDENTIAL
www.bizagi.com
3. Select the transition named YES (the arrow) from the decision to the Make Administrative Task by clicking
on the yellow flow line.
4. Drag and drop the attribute from the Data Binding components to the condition, select the function is Equal
to and in the Insert Value check the true option:
5. Click Finish.
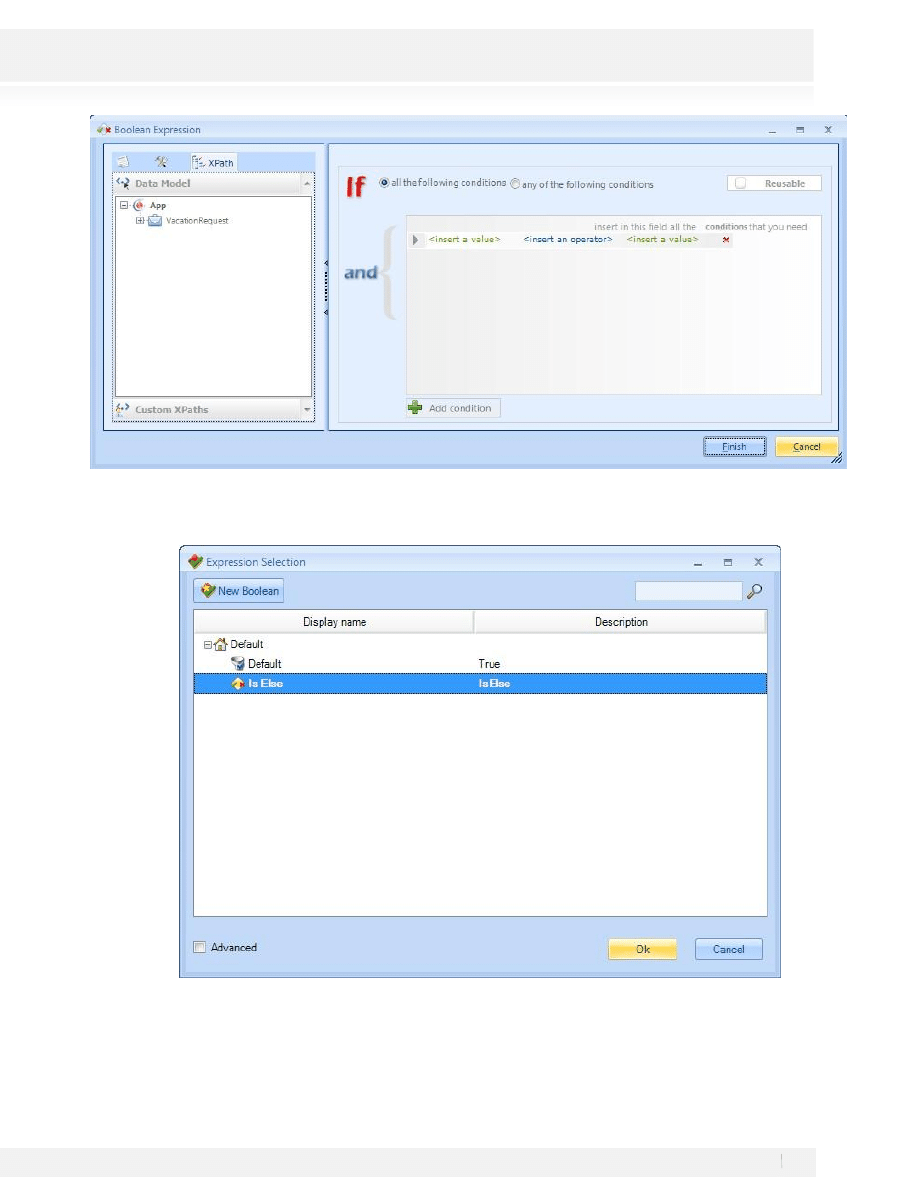
6. Select the transition from the gateway to the Inform Reject Reason Task by clicking on it, you will find the
Boolean Expression window, click on Cancel to close the window.
40
Workshop Manual for Product Evaluation
CONFIDENTIAL
www.bizagi.com
7. Select the IsElse condition in the Expression Selection window and click on Ok.
8. Close the Editor and go back to the Process Wizard by pressing the green arrow on the top right corner of
the screen.
41
Workshop Manual for Product Evaluation
CONFIDENTIAL
www.bizagi.com
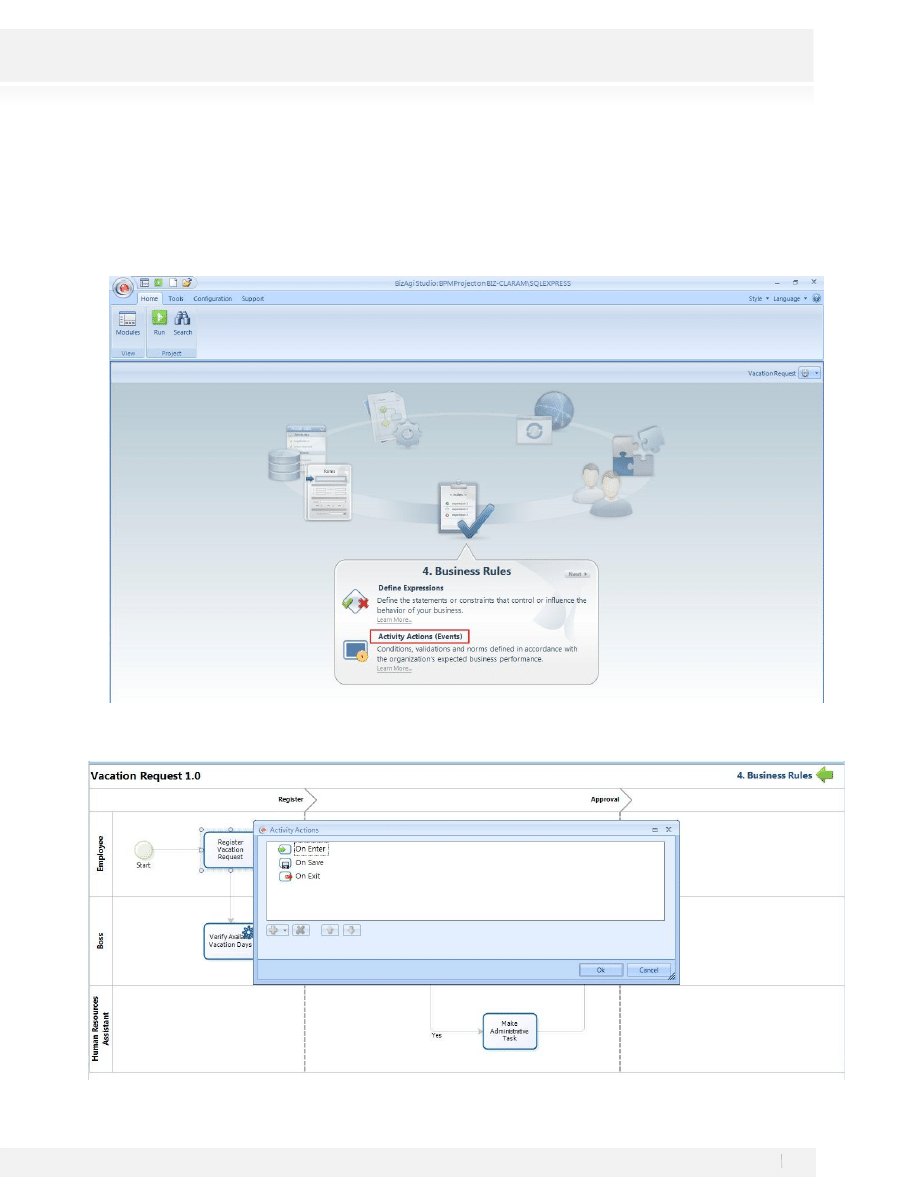
ACTIVITIES ACTIONS
We must create certain rules to fill the fields Request Date and Applicant; this information must be stored
automatically by the application when a case is started.
For the First Activity of the process we must create a rule to set the Date of the Request and to save the Case
Creator as the applicant:
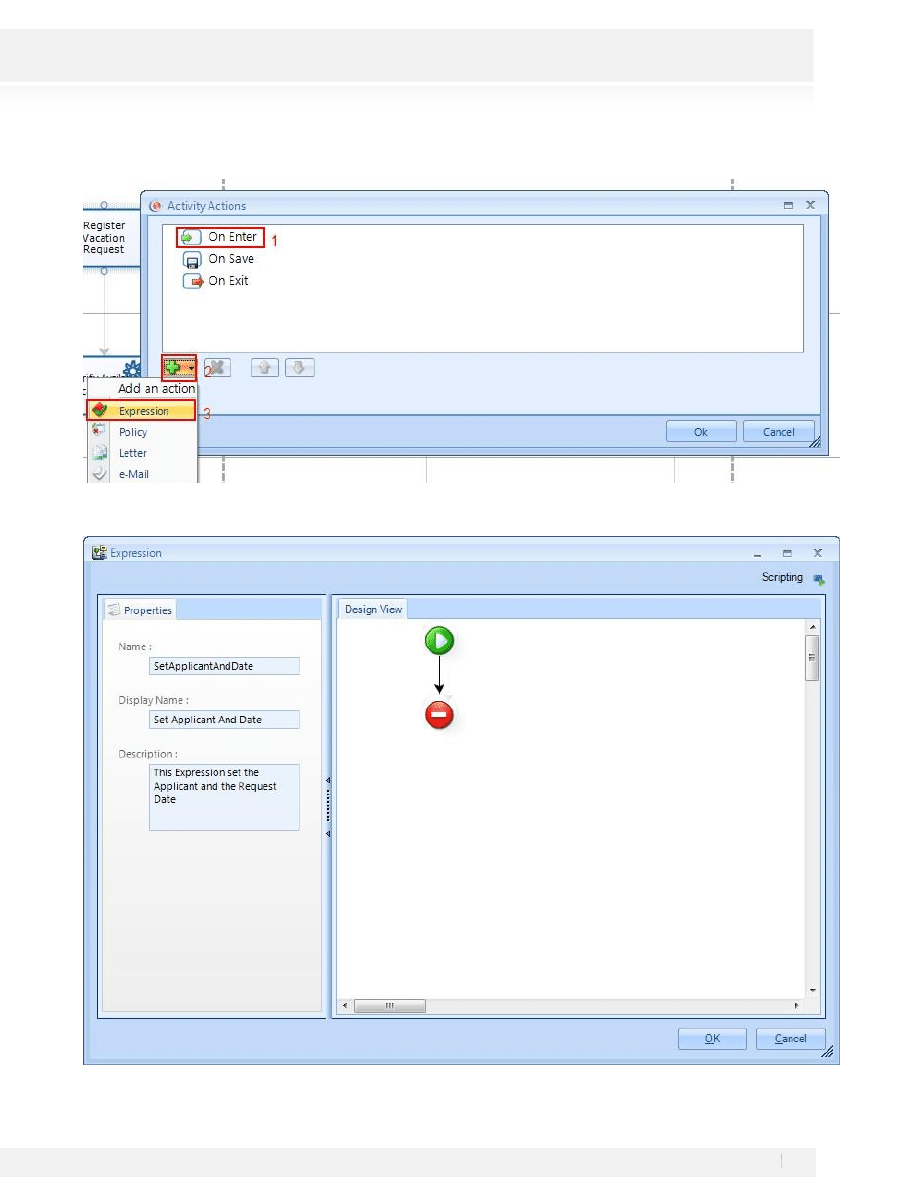
1. Go to the step 4 of the Wizard Process, select the Activities Actions
Option
2. A new window will appear displaying the activities where you can add actions. Select the Register Vacation
Request Activity by clicking on it
42
Workshop Manual for Product Evaluation
CONFIDENTIAL
www.bizagi.com
3. Select the On Enter Option, then click on Add an Action:
4. Fill the Name, Display Name and Description as follows, this information will let you identify the Expression
for later use:
43
Workshop Manual for Product Evaluation
CONFIDENTIAL
www.bizagi.com
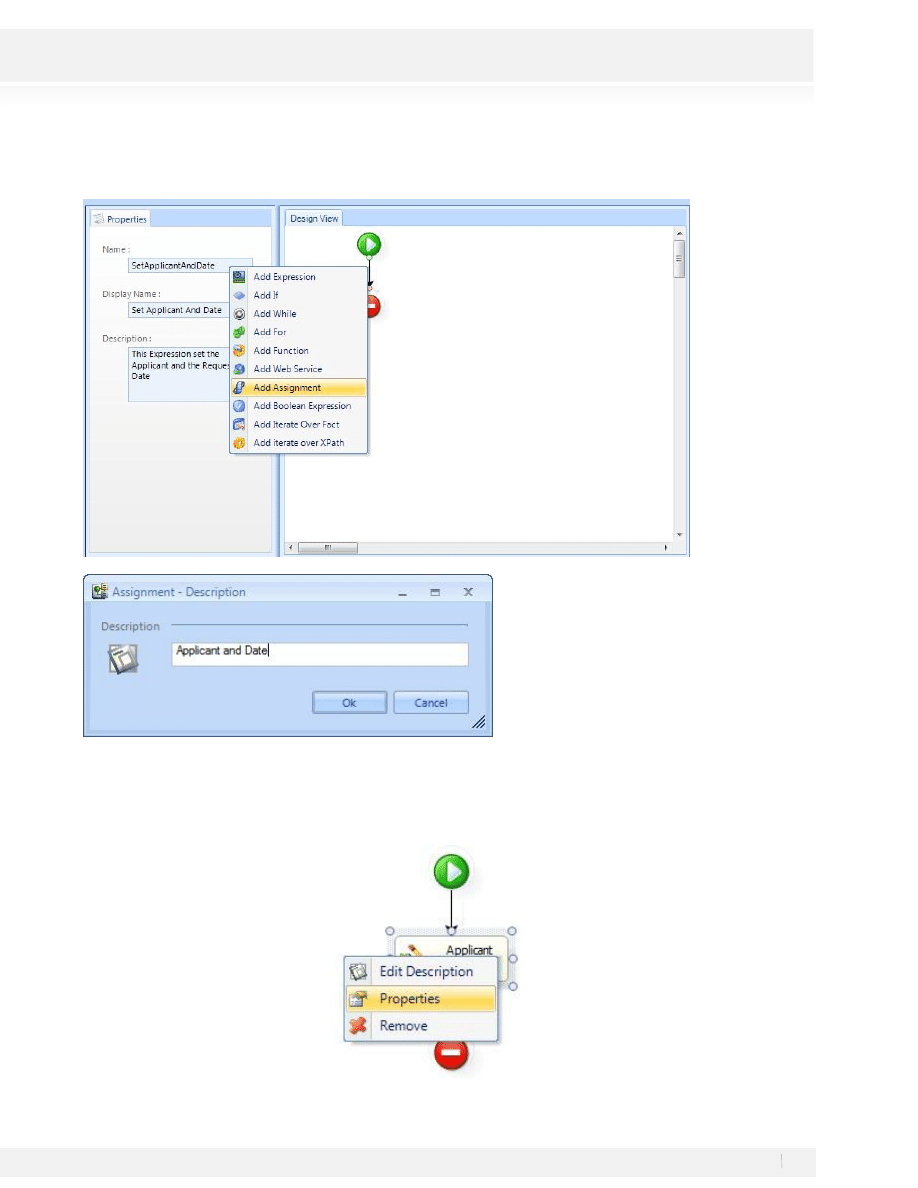
5. Right Click on the Arrow from Begin to End and select “Add Assignment”
Click on Ok.
6. Right click on the Applicant Assignment and Select Properties
44
Workshop Manual for Product Evaluation
CONFIDENTIAL
www.bizagi.com
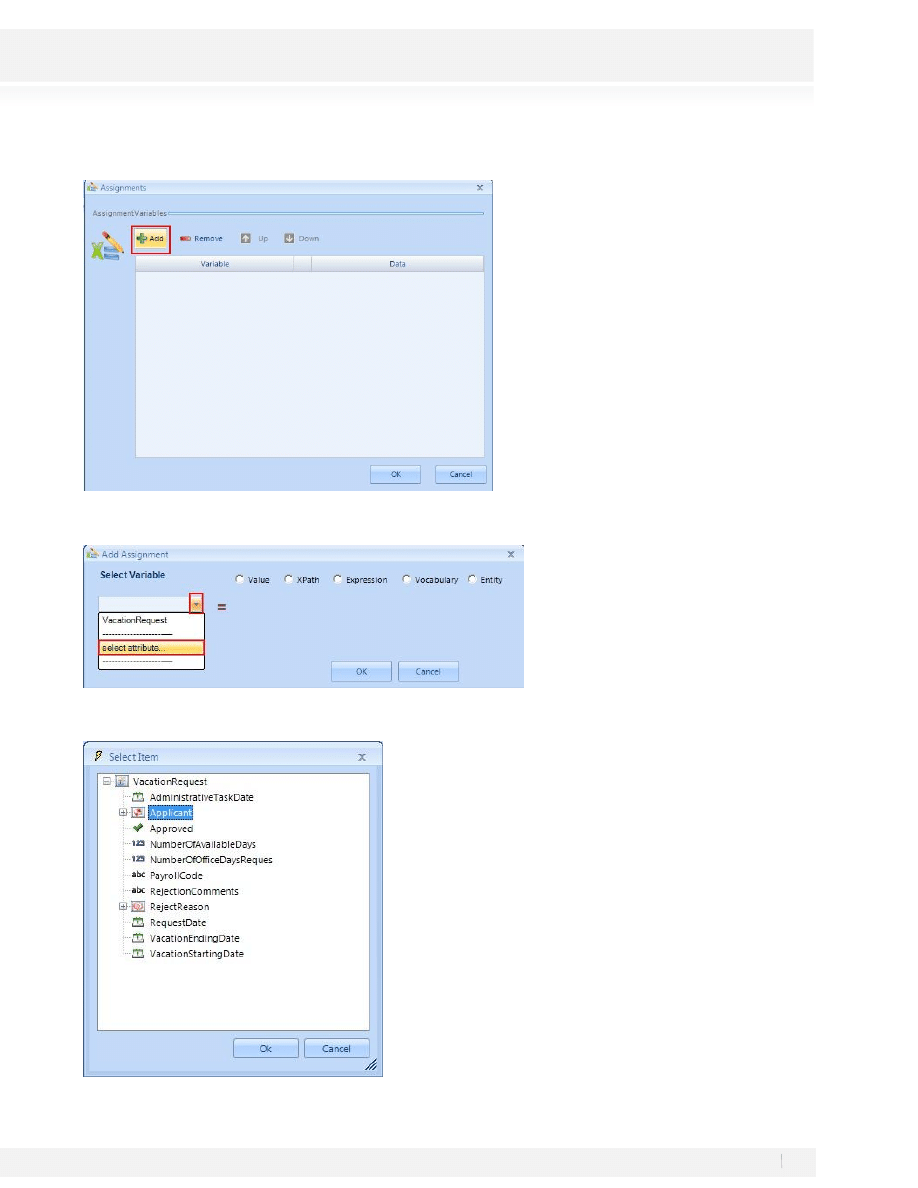
7. The Assignments Windows will open, Add a new Assignment Variable
8. In the Add Assignment Window Click on the Drop Down List and Select the Select Attribute option
9. Select the Applicant Item from the Data Model and click on Ok
45
Workshop Manual for Product Evaluation
CONFIDENTIAL
www.bizagi.com
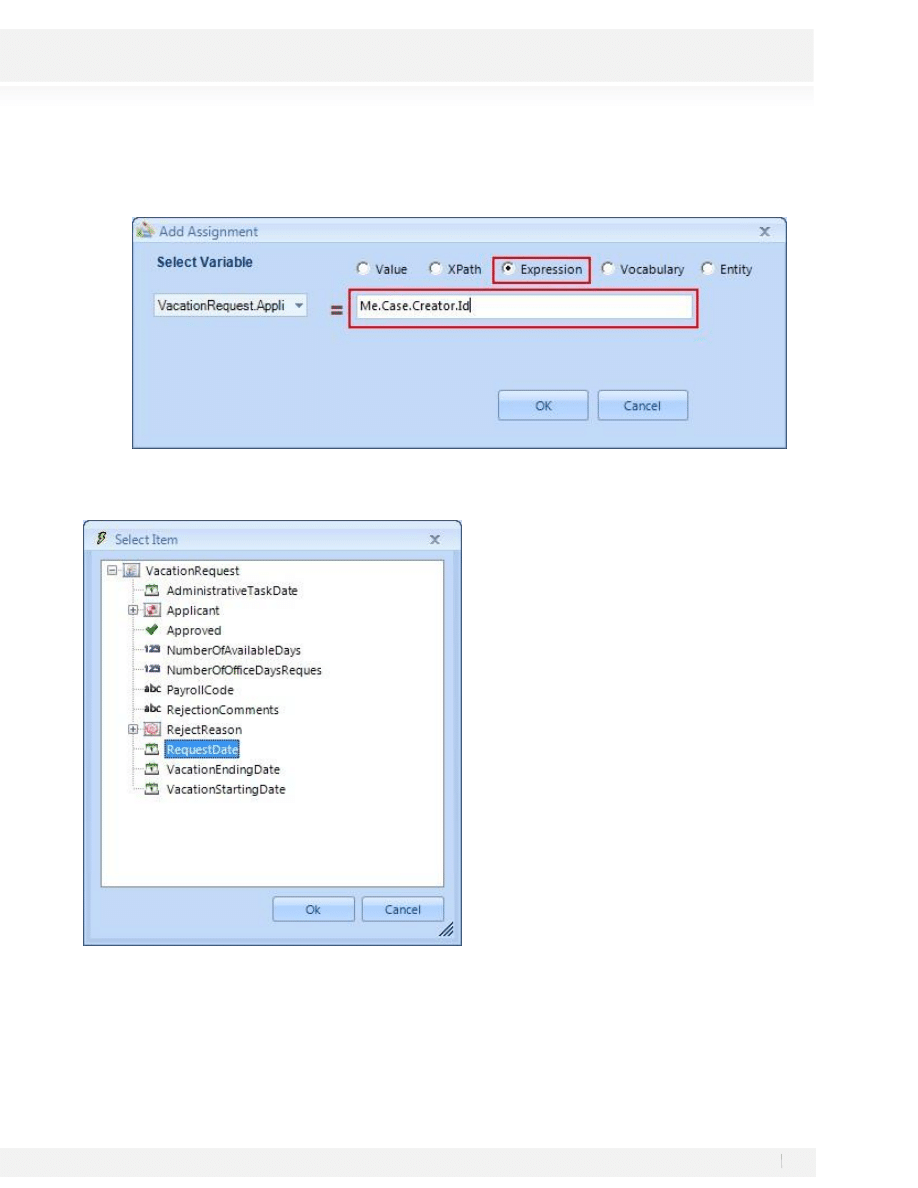
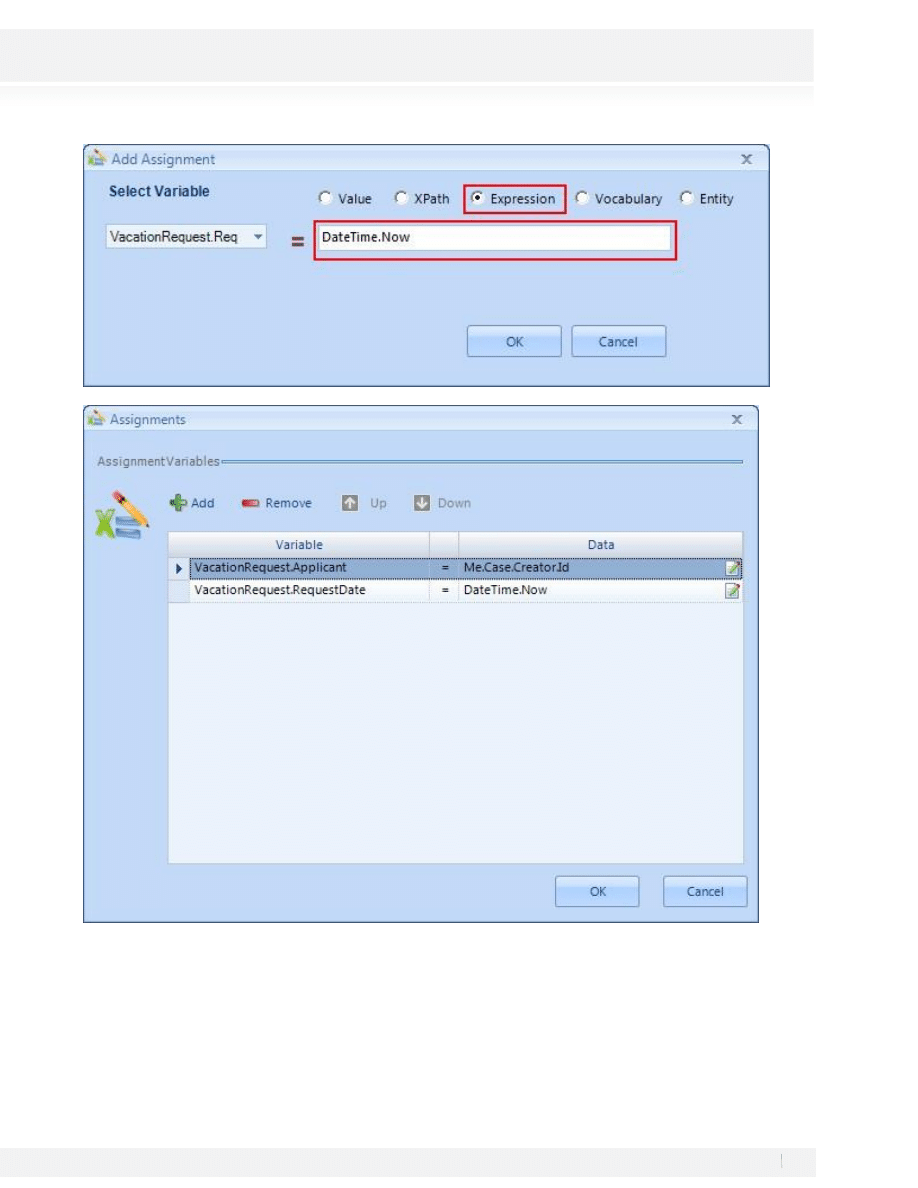
10. Select the Expression Radio Button and type in Me.Case.Creator.Id, this Expression is a default Expression in
BizAgi that will allow us to take the Creator id.
11. Click on Ok to Close the Add Assignment Window
12. In the same rule we’ll add a new Assignment for the date, Add a new row (step 7 and 8), in the first combo
select the RequestDate Attribute:
13. Select the Expression Radio Button for this assignment and the text DateTime.Now will appear
automatically, indicating the function BizAgi uses to get the Real Date when the Case was created. Click Ok
when done.
46
Workshop Manual for Product Evaluation
CONFIDENTIAL
www.bizagi.com
14. Click Ok to save the Assignments, Ok to save the rule, and Ok on the Properties menu to apply the changes
to the Activity. Don’t forget to close the modeler after adding this rule.
47
Workshop Manual for Product Evaluation
CONFIDENTIAL
www.bizagi.com
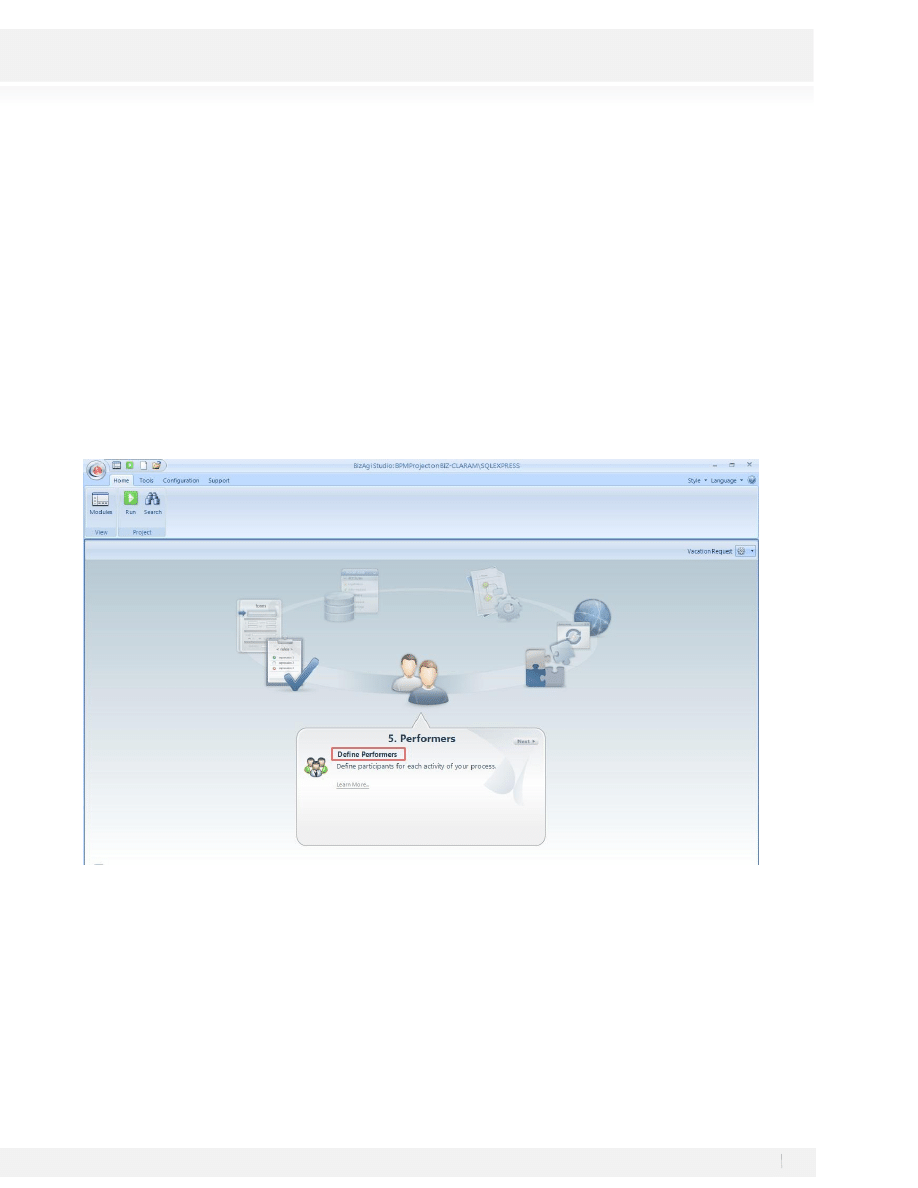
STEP 5: PERFORMERS
The resources assignment is a very important stage within BizAgi. The people or responsible resources for each
one of the process activities are defined at this stage.
BizAgi identifies the relation that exists between the different employees based on the variables that
characterize and differentiate them. Thanks to this functionality, BizAgi assigns activities or tasks intelligently
to the different company members with the purpose of executing a process satisfactorily.
First of all, let us define what would be an appropriate assignment for each one of the process activities; later
on, the configuration will be completed within BizAgi.
The access to the process of vacation request will not be limited because this is an internal process that must
be available for all the employees of the organization.
The first activity must always be available to the person who created the case.
The requester's boss or the creator of the vacation request will ALWAYS complete the activity Approve Request.
The user who submitted or created the request will ALWAYS complete the activity Inform Reject Reason
The Human Resources Representative will ALWAYS be responsible for the Make Administrative Task activity.
The configuration in BizAgiStudio must be completed for the activities once the assignment rules have been
defined. To configure the Assignment select the step 5 from the process wizard:
We’ll find the different activities and we can identify the ones whose performer has not been assigned:

48
Workshop Manual for Product Evaluation
CONFIDENTIAL
www.bizagi.com
ACTIVITY: REGISTER VACATION REQUEST
This activity must be assigned to the creator of the case; this is a default functionality BizAgi provides, so we
don’t have to create an assignment for it.
ACTIVITY: APPROVE VACATION REQUEST
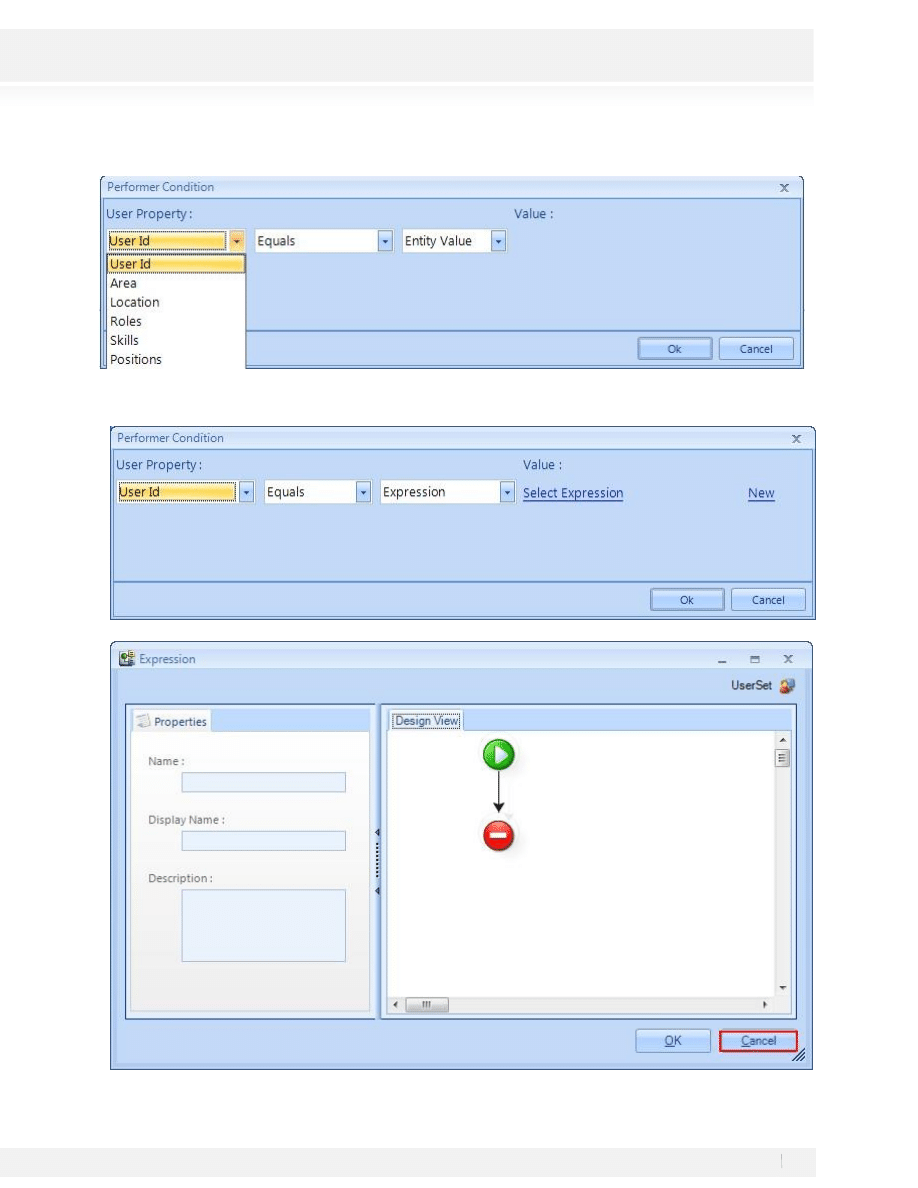
1.
Once in the diagram select the activity by clicking on it, you’ll find the performers Assignment window
2. Click on the Add a condition link
49
Workshop Manual for Product Evaluation
CONFIDENTIAL
www.bizagi.com
3. In the new window we’ll define the parameter for the performer, in the first box select User Id
4. Click on Select Expression Link and click Cancel in the new window. Don’t save any change to the
Expression:
50
Workshop Manual for Product Evaluation
CONFIDENTIAL
www.bizagi.com
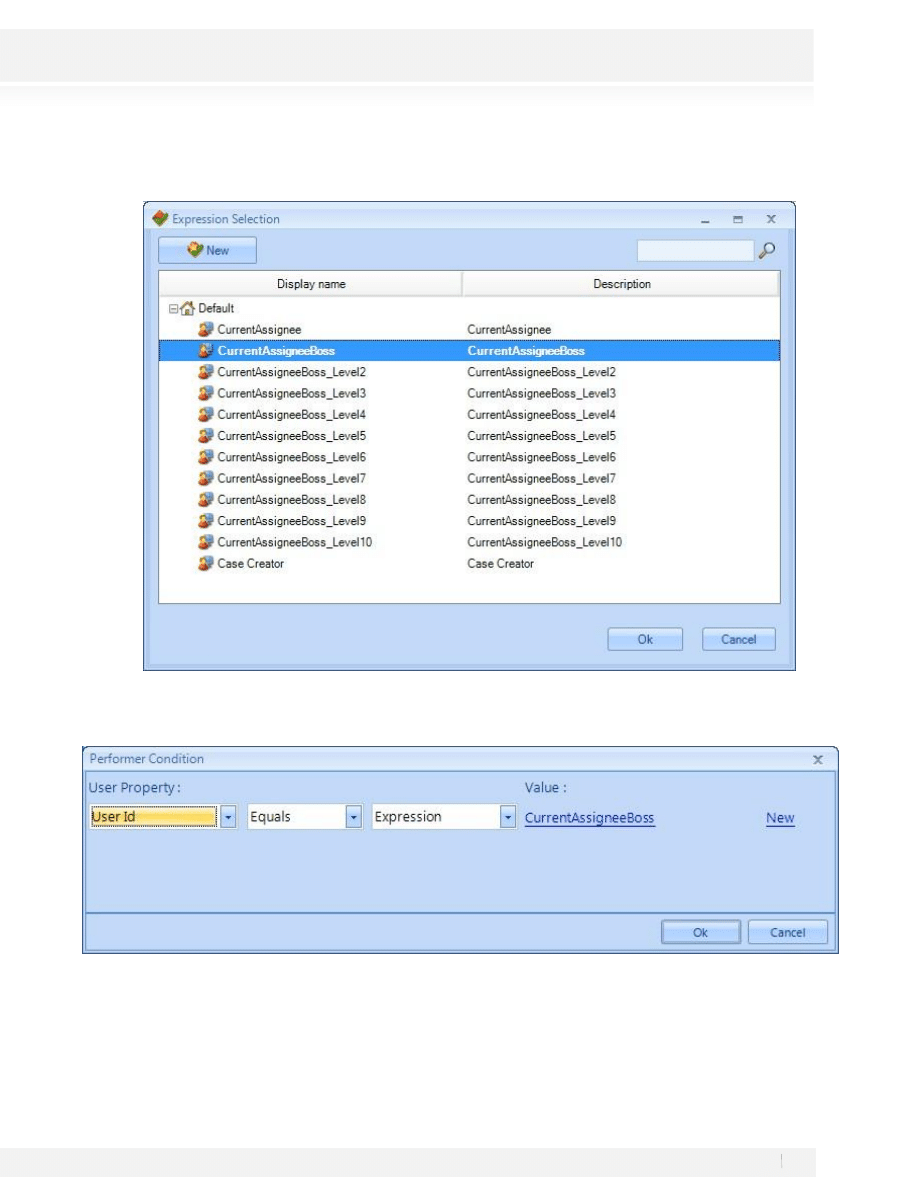
5. Select the CurrentAssigneeBoss and click Ok, this is a BizAgi Default Rule to bring the id of the current
(applicant) assignee boss id that is configured in the user.
6. The Expression must look like this:
7. Click on Ok to save the Performer Condition and Ok again to save the performer.
51
Workshop Manual for Product Evaluation
CONFIDENTIAL
www.bizagi.com
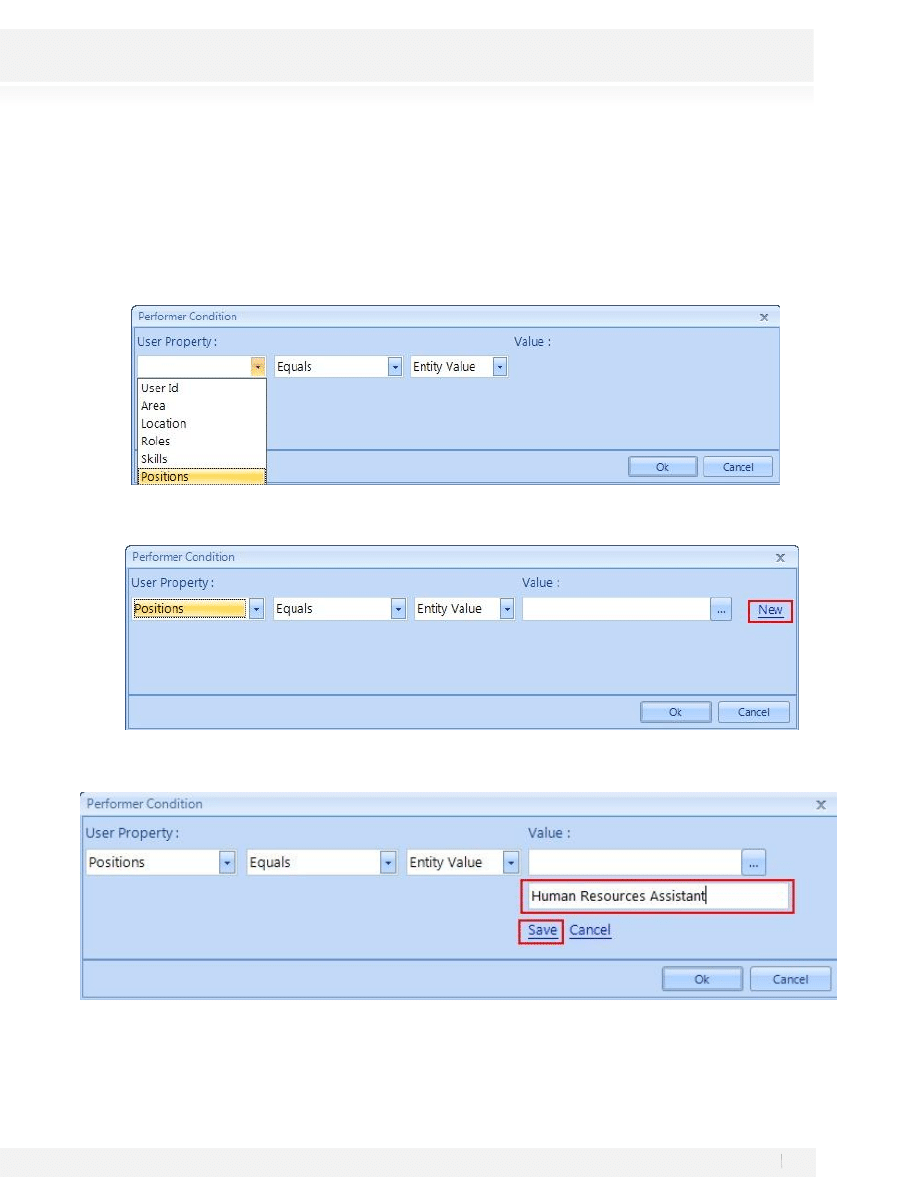
ACTIVITY: MAKE ADMINISTRATIVE TASK
1. Repeat steps 1 and 2 from the Approve Vacation Request Activity
2. In the first Combo select position
3. Click on New Link to Create a new Position
4. Write the value for the new Position and Click on Save. Human Resources Assistant.
5.
Click Ok on all the windows to Save the Assignment
52
Workshop Manual for Product Evaluation
CONFIDENTIAL
www.bizagi.com
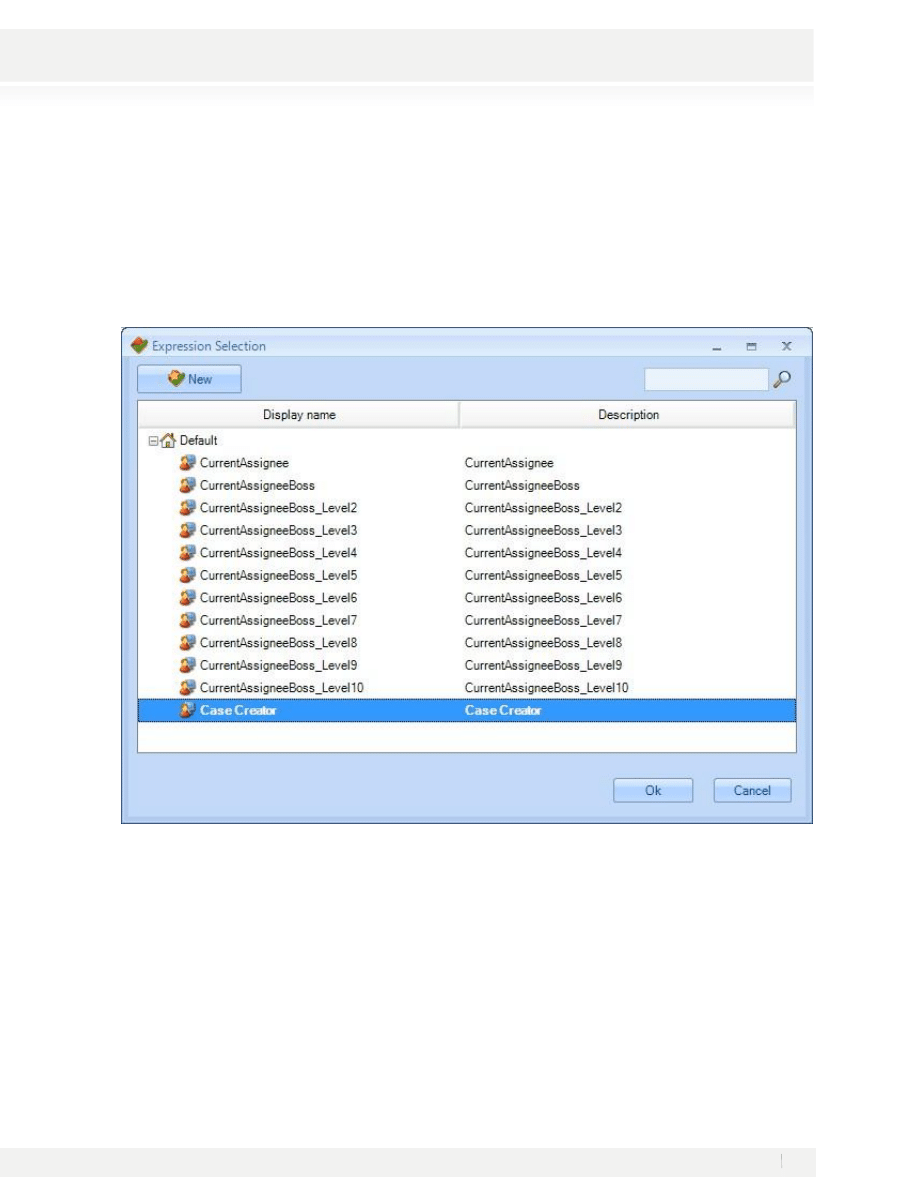
ACTIVITY: INFORM REJECT REASON
We’ll set the assignment for the Inform Reject Reason Activity and like we explained before it should ALWAYS
be assigned to the person who created the case.
1.
Repeat steps from 1 to 4 from the Approve Vacation Request Activity
2. Select the Case Creator of the Case and click Ok to save the condition
3. Save the rule by clicking Ok for the Performers Window.
Close the Diagram by clicking the green arrow located on the top right corner of the screen to go back to the
Process Wizard.
53
Workshop Manual for Product Evaluation
CONFIDENTIAL
www.bizagi.com
STEP 6: INTEGRATE WITH OTHER SERVICES
BizAgi uses distinct mechanisms, which allow the connection with existent systems from the organization by
using the necessary information for the business processes execution.
Web Services will be used to integrate the application with the payroll system, which contains the available
vacation days for each employee; the username input parameter will be accepted by the web service to return
the number of available vacation days.
There are two options to be able to implement this step. One option is, if you have an Internet connection
available, to use this URL:
http://www.bizagi.com/VacationService/Vacations.asmx
, and no further
configuration is needed and you can jump directly to the section “Invoke the Web Service from BizAgi”.
Otherwise, follow these steps to install the web services locally.
Install the Web Service
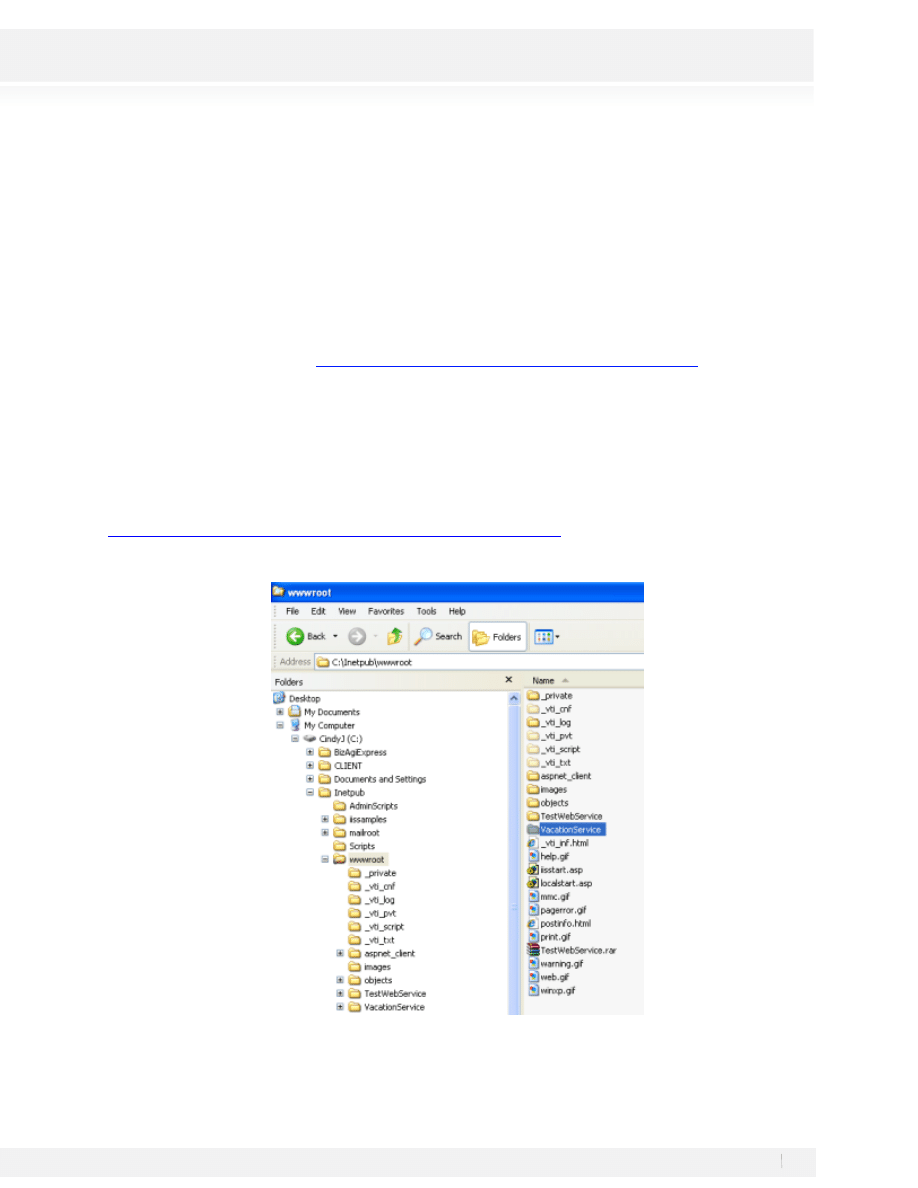
1. Download and unzip the file VacationService.zip that is found in:
ftp://bizagiWSUser:bizagiWSUser@ftp.bizagi.com/VacationService
2. Copy the unzipped folder into your default web site local path, usually C:\Inetpub\wwwroot
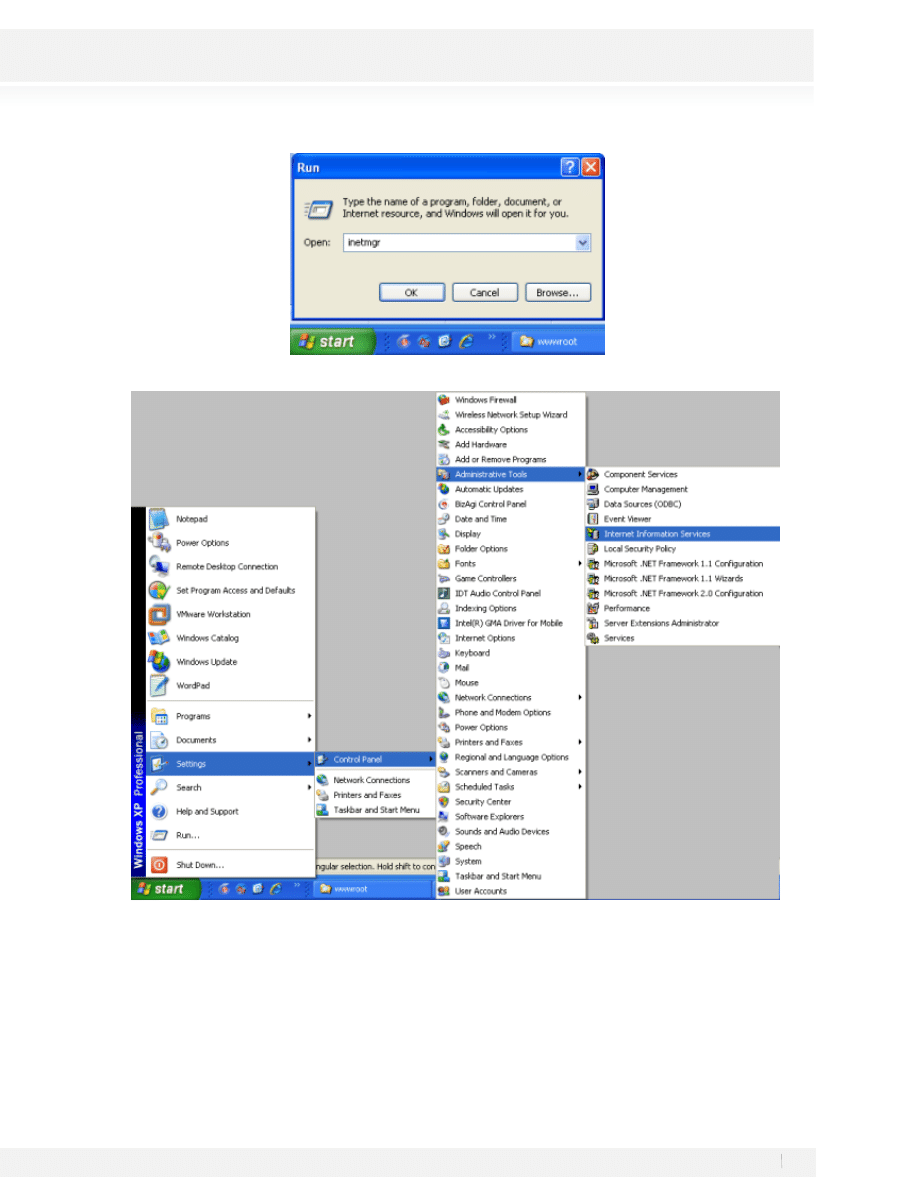
3. Open the IIS Manager either by running the command inetmgr or by selecting it form the Administrative
Tools in the Control Panel.
54
Workshop Manual for Product Evaluation
CONFIDENTIAL
www.bizagi.com
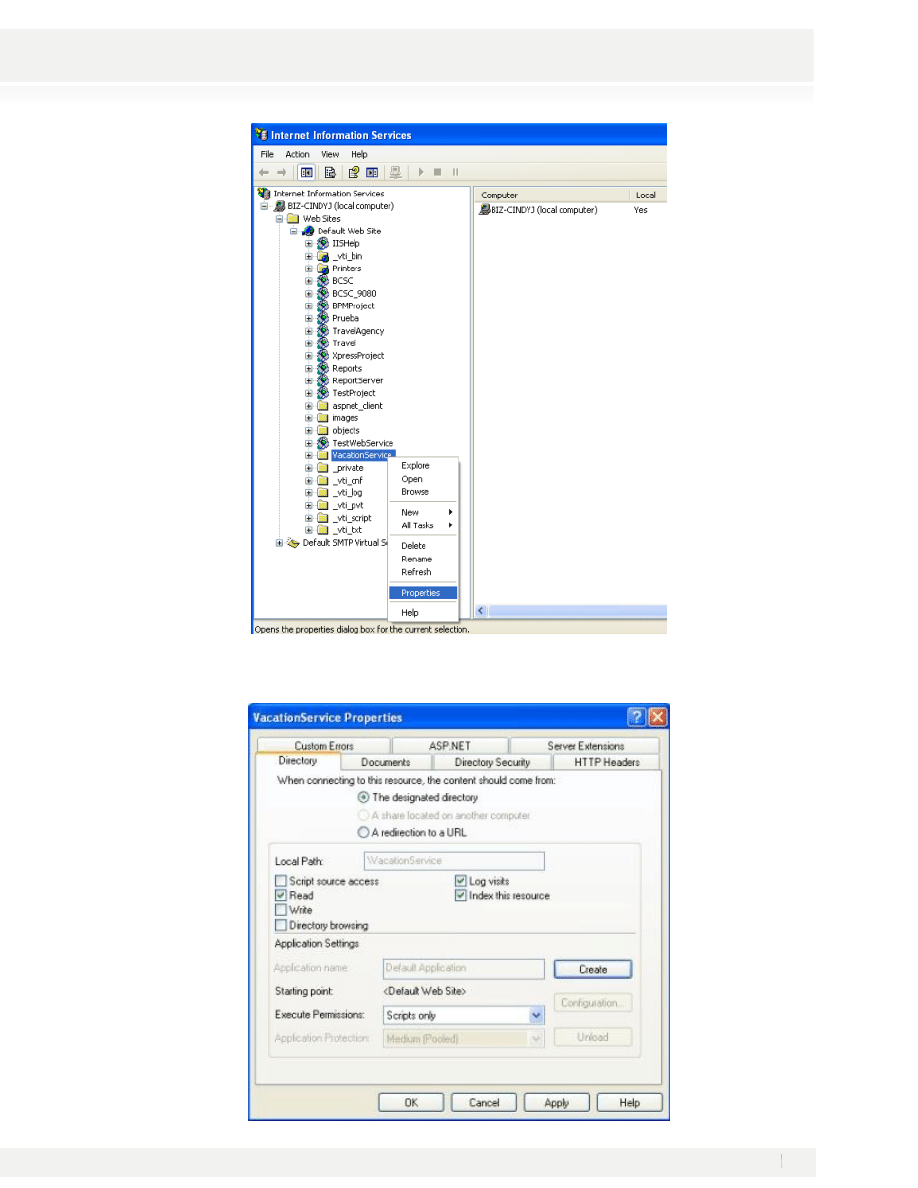
4. In the manager open the Default Web Site and find the VacationService folder. Right click on it and select
Properties.
55
Workshop Manual for Product Evaluation
CONFIDENTIAL
www.bizagi.com
5. In the VacationService Properties window click the Create button and then OK.
56
Workshop Manual for Product Evaluation
CONFIDENTIAL
www.bizagi.com
INVOKE THE WEB SERVICE FROM BIZAGI
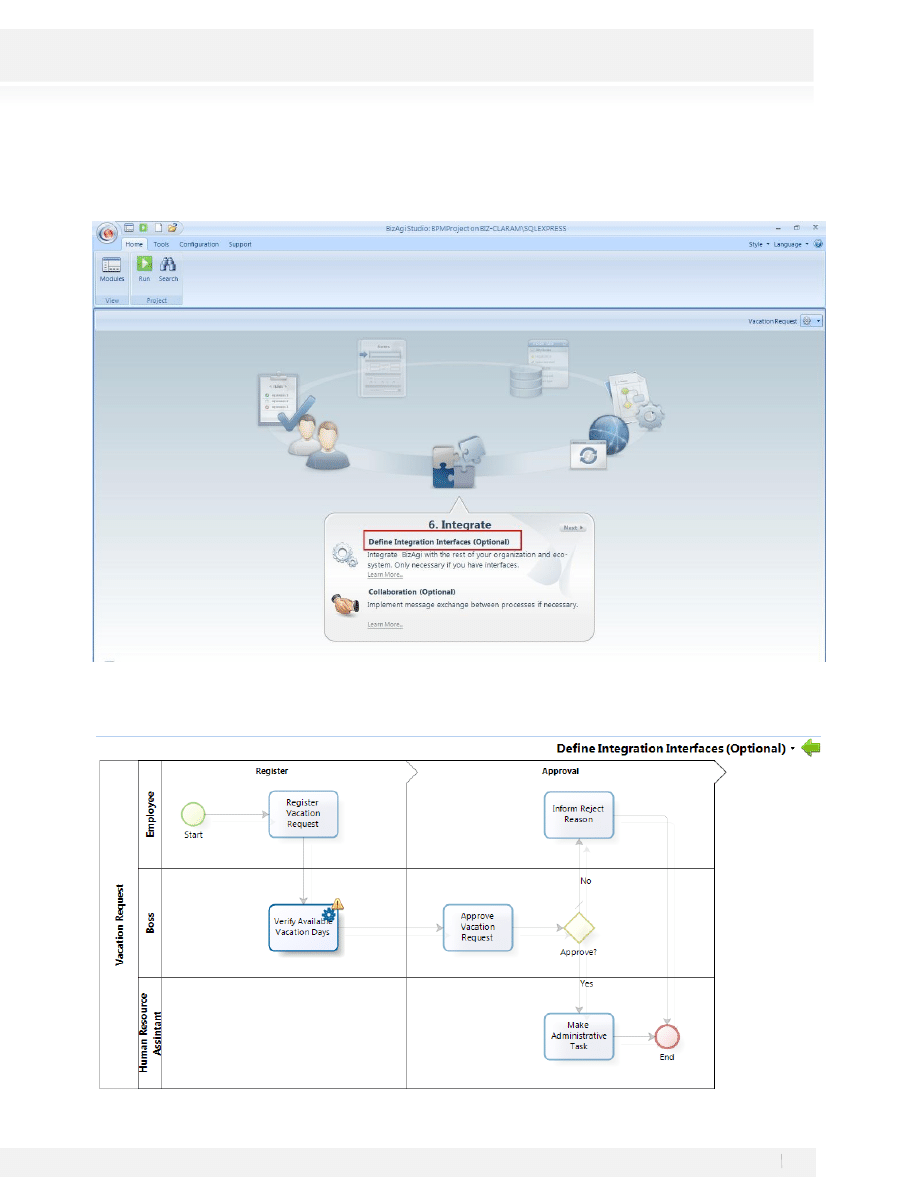
1. From the Project Wizard select the Sixth Step.
2. A view of the process is presented. In this view only the service tasks will be active. Click on the task Verify
Available Vacation Days.
57
Workshop Manual for Product Evaluation
CONFIDENTIAL
www.bizagi.com
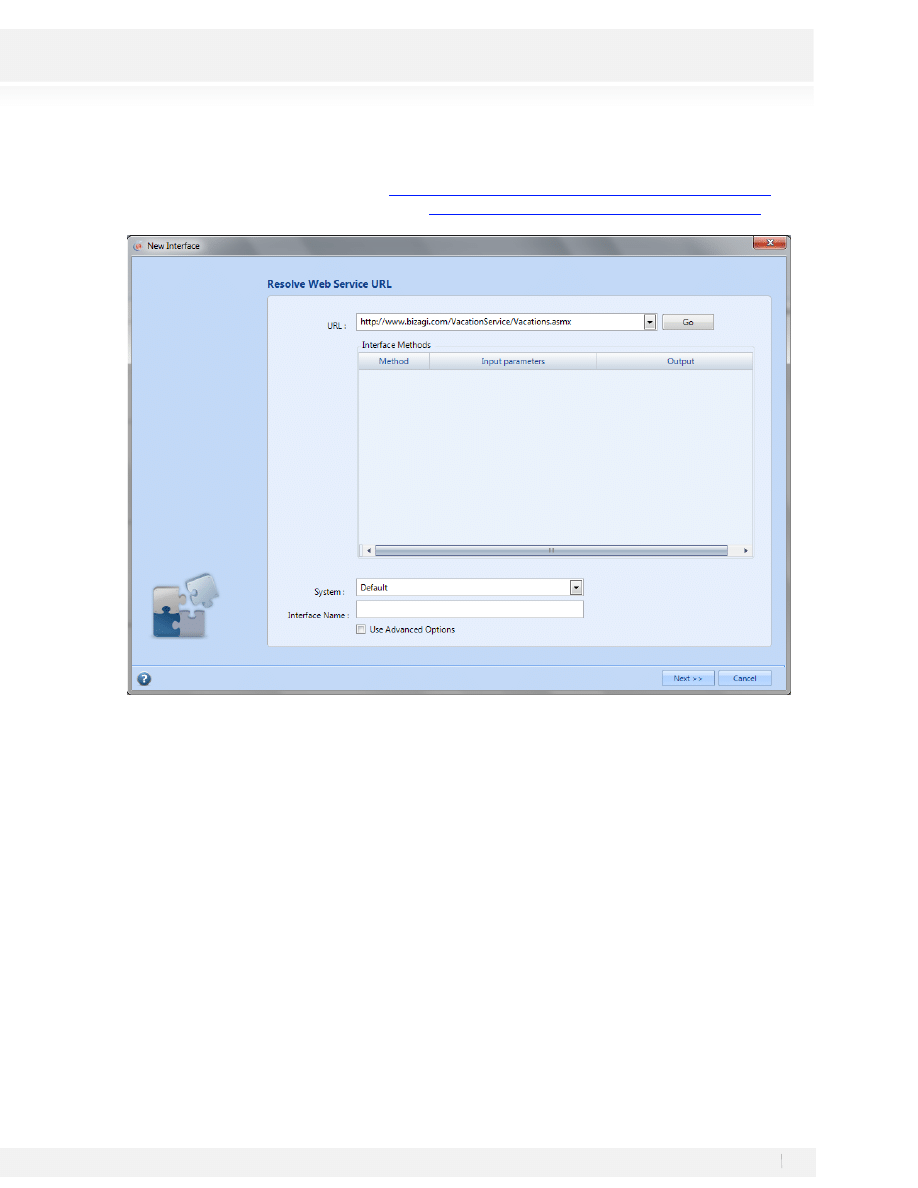
3. The Interface Wizard opens up. Type the URL.
If an Internet connection exists, type:
http://www.bizagi.com/VacationService/Vacations.asmx
If the web service is installed locally, type:
http://localhost/VacationService/Vacations.asmx
4. Click the Go button (this operation could take some time to finish) to see the available methods. Select the
method and click Next (the System and Interface Name take default values that can be change if desired).
58
Workshop Manual for Product Evaluation
CONFIDENTIAL
www.bizagi.com
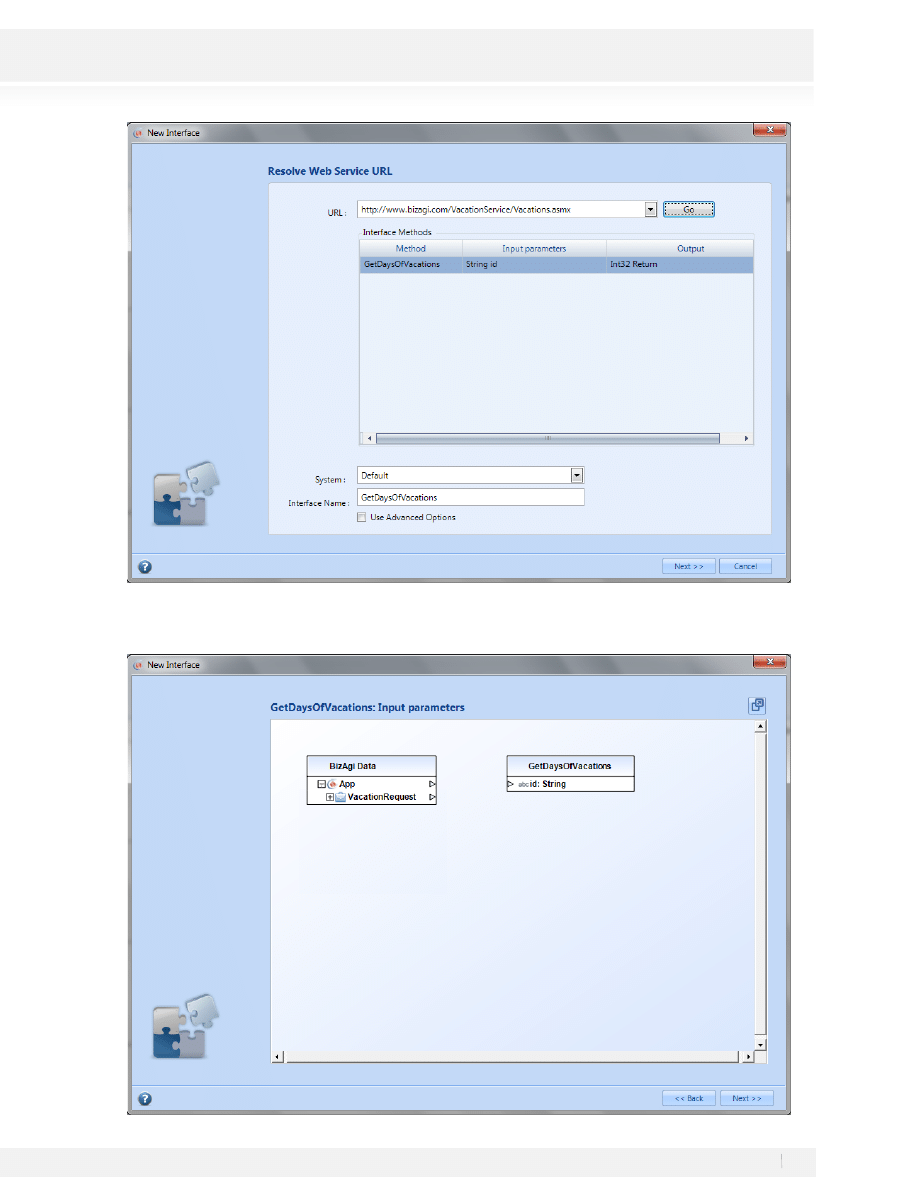
5. In this step the information from BizAgi to the web service will be configured. Two tables are shown, on the
left is BizAgi data model and on the right the information the web service method expects.

59
Workshop Manual for Product Evaluation
CONFIDENTIAL
www.bizagi.com
Since the Applicant’s username is used to obtain the available Vacation Days, in the BizAgi Data table,
expand the VacationRequest element and go through the entities tree until you see the Applicant’s
username. Once the desired attribute is reached, click on the arrow beside the attribute and connect the
line to the arrow of the element in the right side table.
The tables may be move and re-size if needed; also the window can be maximize using the button on the upper
right corner.
If the window is maximized, restore it and click on Next to continue.
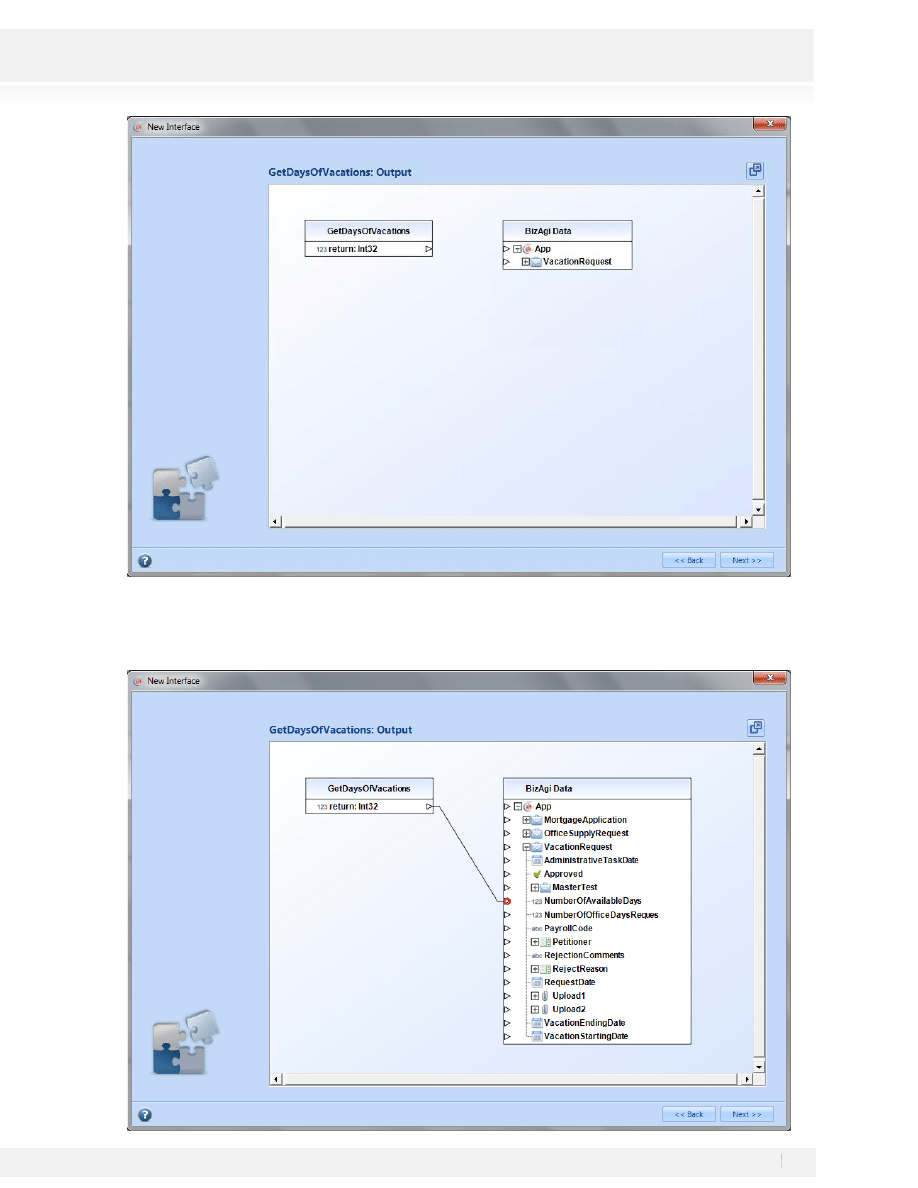
6. In the next window select where, in BizAgi’s data model, the web service response is going to be saved. Like
for the previous step, two tables are shown but now the table with the web service response is on the left
and the one with BizAgi Data on the right.
60
Workshop Manual for Product Evaluation
CONFIDENTIAL
www.bizagi.com
In BizAgi Data, under VacationRequest find the attribute NumberOfAvailableDays and match the response
from the web service to this attribute.
61
Workshop Manual for Product Evaluation
CONFIDENTIAL
www.bizagi.com
Then Click Next.
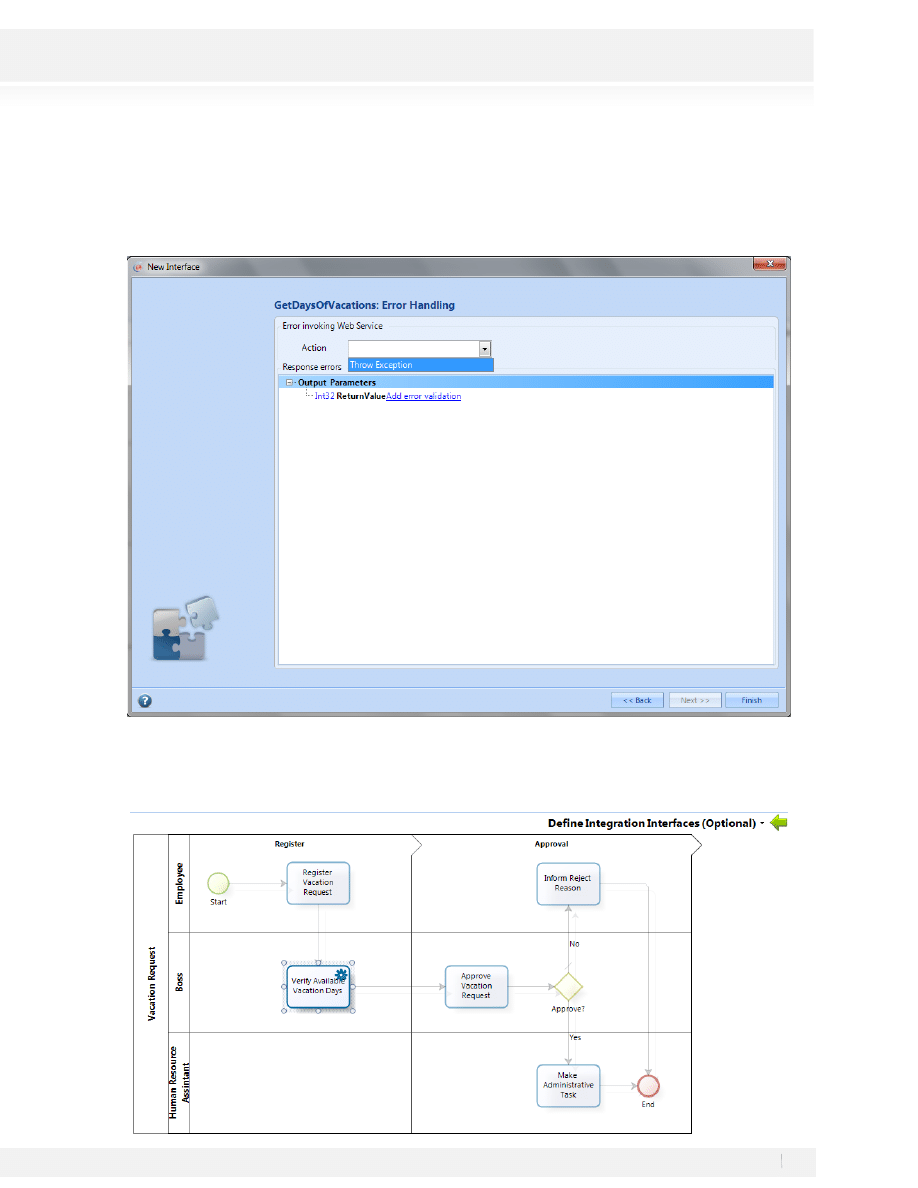
7. On the final step we’ll configure what to do if an error occurs, select the option Throw Exception from the
Action list and click Finish.
8. The Interface wizard closes. Finally, click on the green arrow at the top right corner of the process view to
return to the process wizard.
62
Workshop Manual for Product Evaluation
CONFIDENTIAL
www.bizagi.com
STEP 7: WEB APPLICATION
So far, the process flow chart has been completed along with the inclusion of some properties, the structuring
of the process information, the forms design for each one of the process activities, and the definition of the
business rules for the decision process. Based on the tasks previously completed, we are ready to configure
the web application.
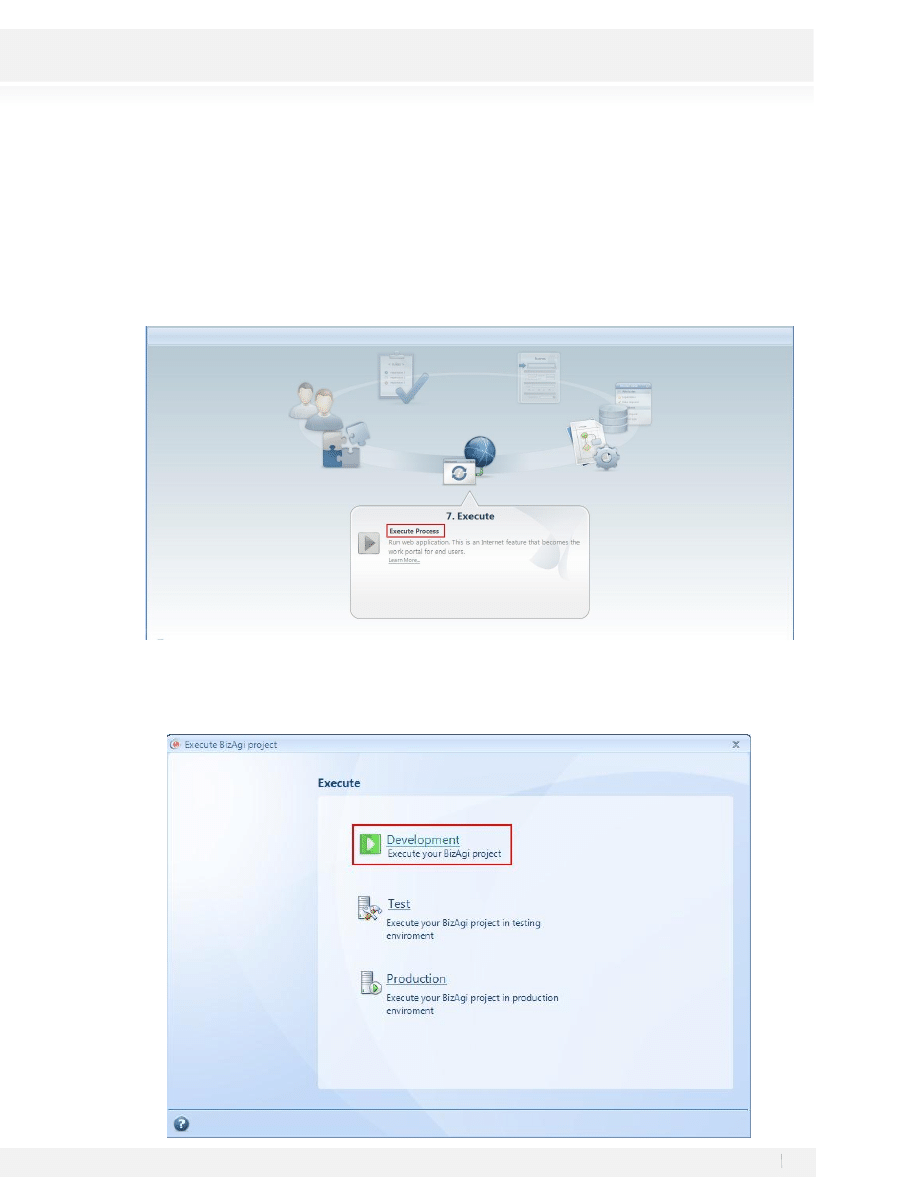
Click on the step 7 of the process wizard:
In the new Window select Development:
USERS
The web application has 3 users, so that the behavior of the assignments can be verified.
63
Workshop Manual for Product Evaluation
CONFIDENTIAL
www.bizagi.com
The following table presents the user list:
USER
PASSWORD
DOMAIN
IMMEDIATE
BOSS
JOB TITLE
Boss
Boss
domain
Applicant
Applicant
domain
Boss
Assistant
Assistant
domain
Human
Resources
Assistant
BOSS
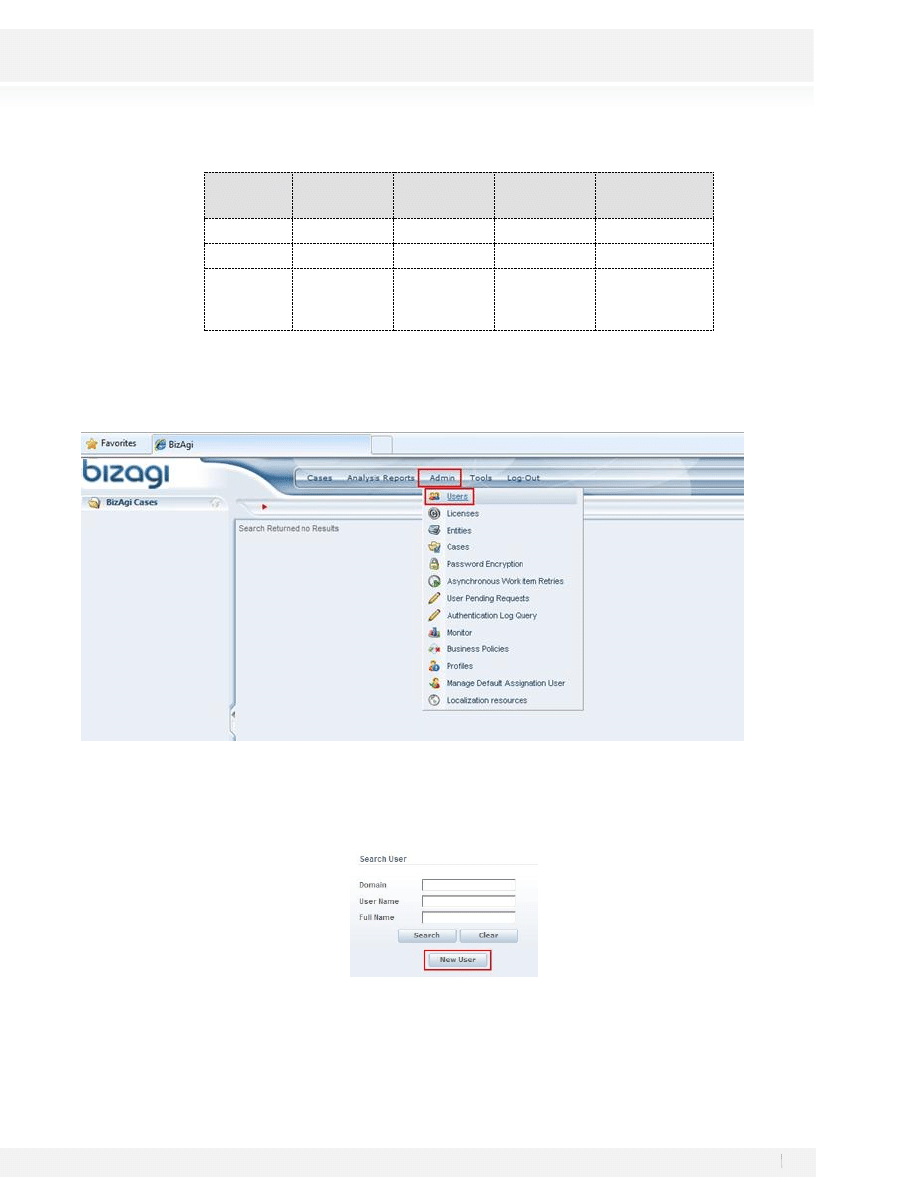
1. To create the users select the Admin Menu and go to the Users Section
2. Click on New User
3. Fill out the information from the table
64
Workshop Manual for Product Evaluation
CONFIDENTIAL
www.bizagi.com
BE CAREFULL to include a password you can remember or use the one in the previous table. BizAgi will
assign the User Name as password by default.
4. Click on Add to Save the Boss User
APPLICANT
1. Repeat steps 1 to 3 from the Boss user Creation
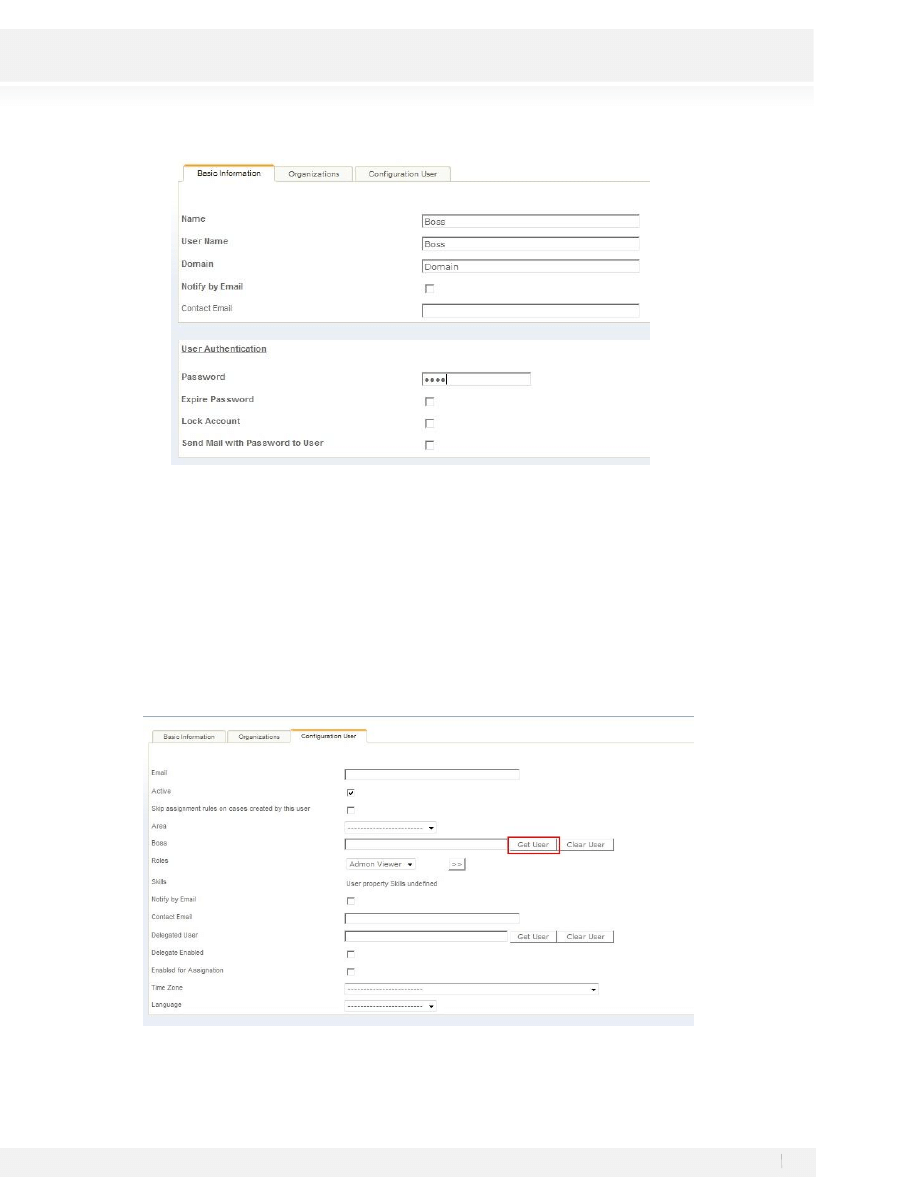
2. To get the Boss field for the Applicant User move to the Configuration User Tab and select Get User
65
Workshop Manual for Product Evaluation
CONFIDENTIAL
www.bizagi.com
3. Click on the Select Link
4. Click on Add to Save the Applicant User.
ASSISTANT
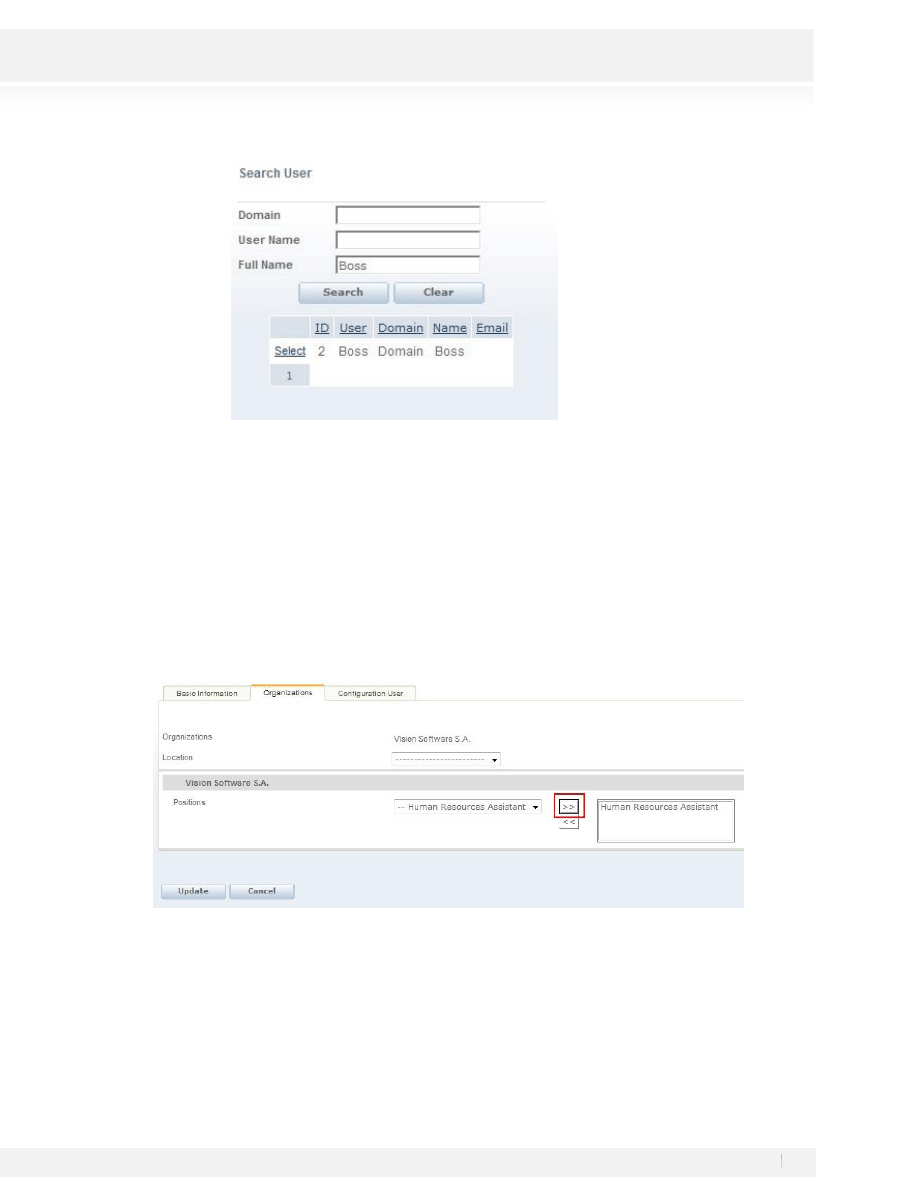
1. Repeat steps 1 to 3 from the Boss user creation.
2. To Add the Position for the Assistant User move to the Organizations Tab and select the position you want
to Add as shown in the figure and save the User by clicking Update.
66
Workshop Manual for Product Evaluation
CONFIDENTIAL
www.bizagi.com
PARAMETERS
Before executing the process we must define the rejection reasons.
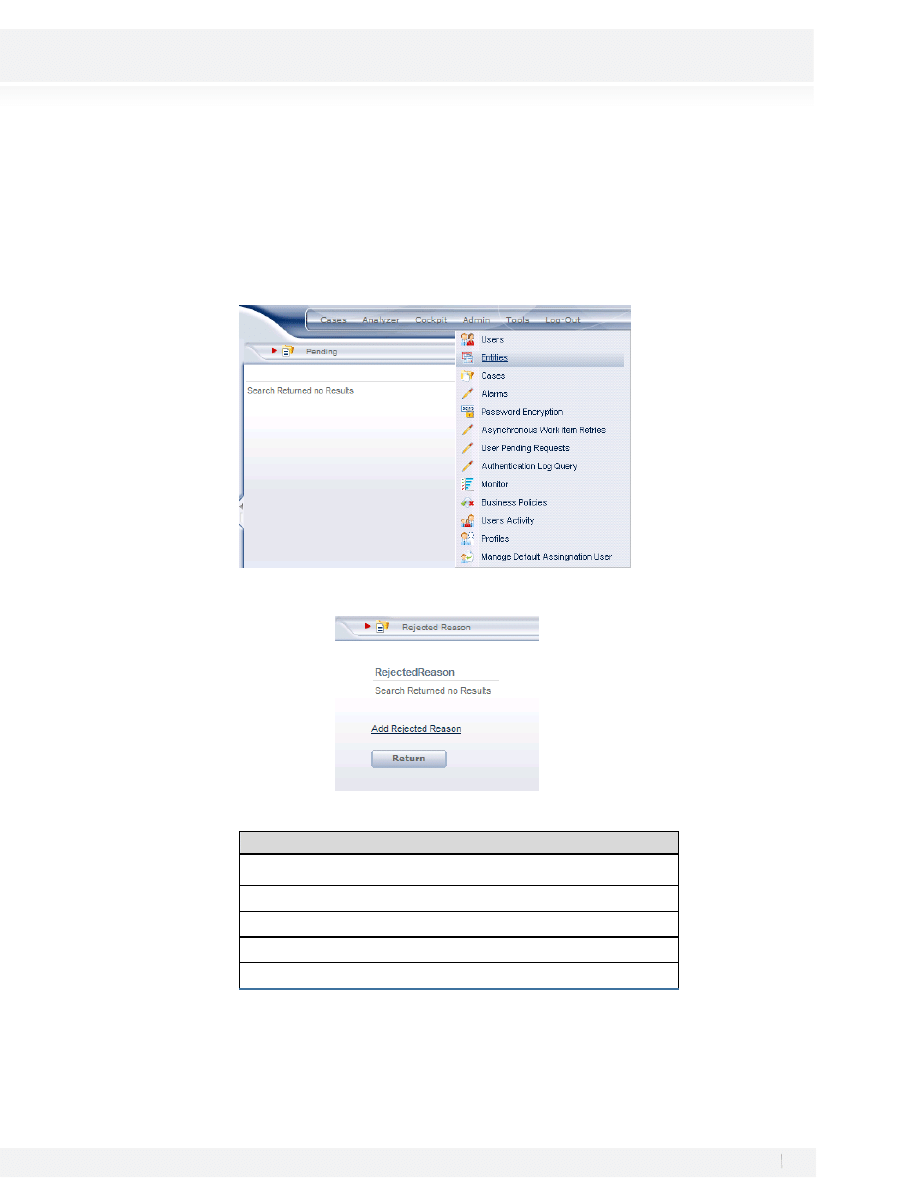
1. In the application administration section, click on Entities; immediately, a screen with the listing of entities
for which parameters may be created will be displayed.
2. Select the RejectReason entity, click on Add Reject Reason
3. Enter some rejected reasons, which can be:
Rejected Reasons
For working reasons it is not possible to take vacations on that date
No replacement
Important Event on Date Requested
No Available days
Other Reason
67
Workshop Manual for Product Evaluation
CONFIDENTIAL
www.bizagi.com
4. Press log out and then close the browser
TESTING THE WEB APPLICATION
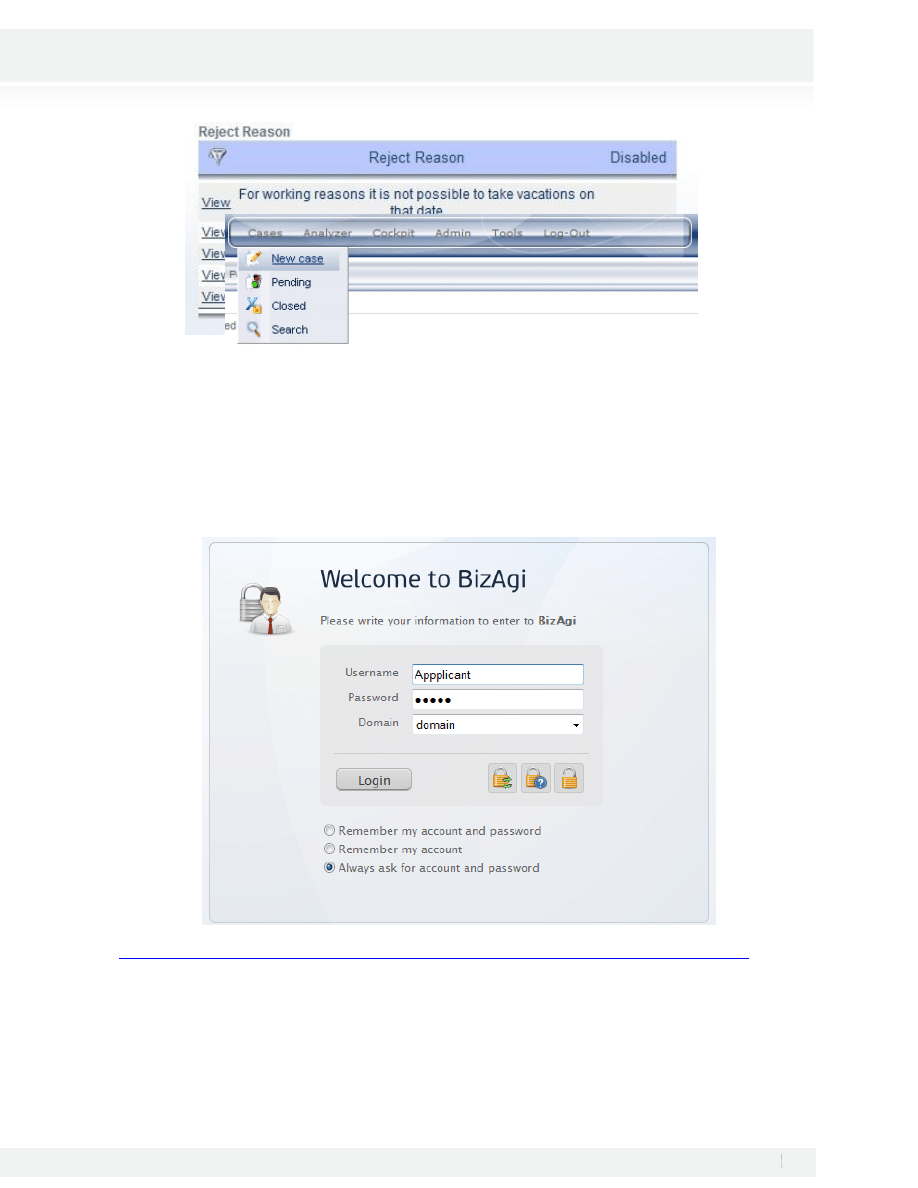
Let us verify the process after the information for the parametric entities and users has been entered; Open
once more the application, you’ll be asked to enter one of the credentials for the users created. Enter the
application using the Applicant User:
Visit
http://wiki.bizagi.com/en/index.php?title=Web_Application#Login_to_the_Web_Application
to activate the Quick Login option.
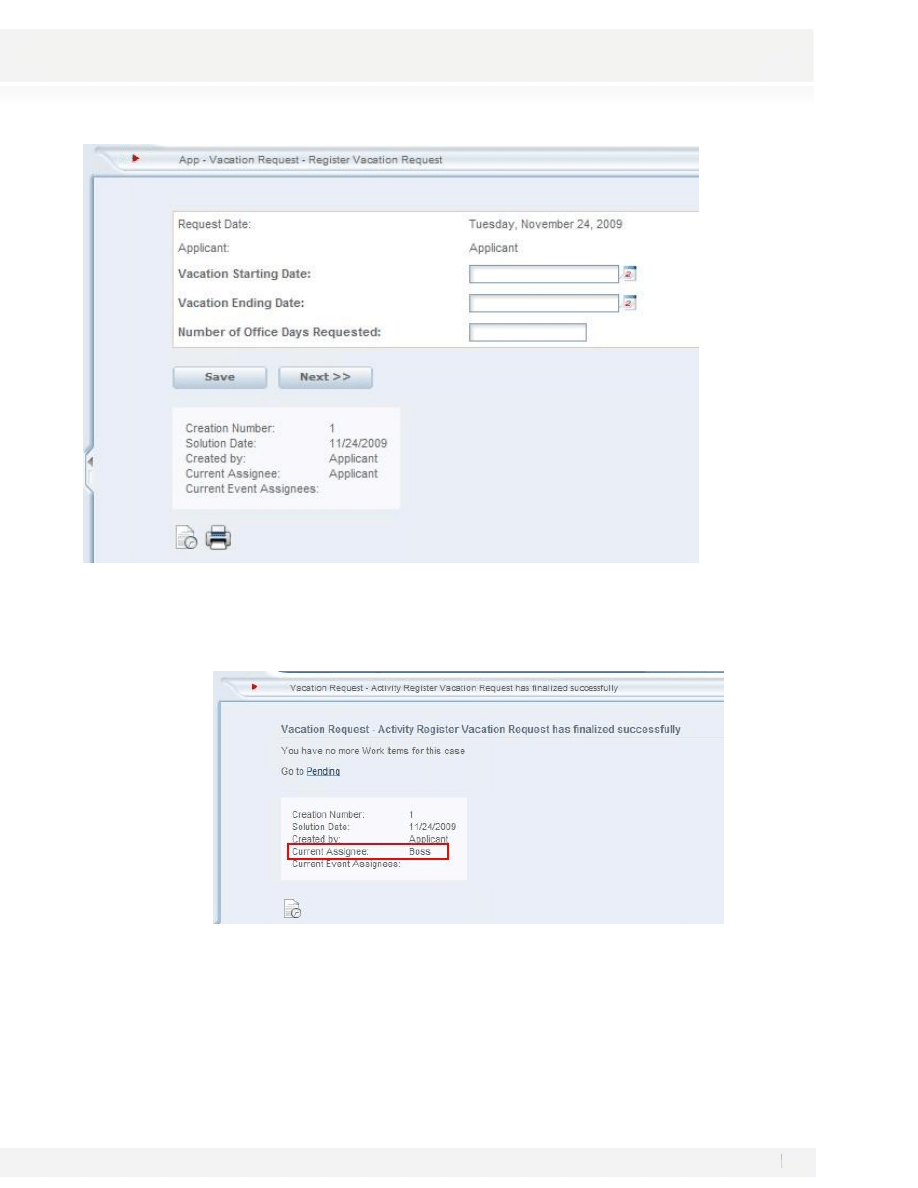
1. Select New case from the Cases submenu; the screen will be displayed for the first process activity after
clicking on New case.
68
Workshop Manual for Product Evaluation
CONFIDENTIAL
www.bizagi.com
The application name, followed by the process name, and finally the activity name can be observed in the
upper bar of the screen.
2. Complete the information for the activity; click on Next to continue with the process. The summary form
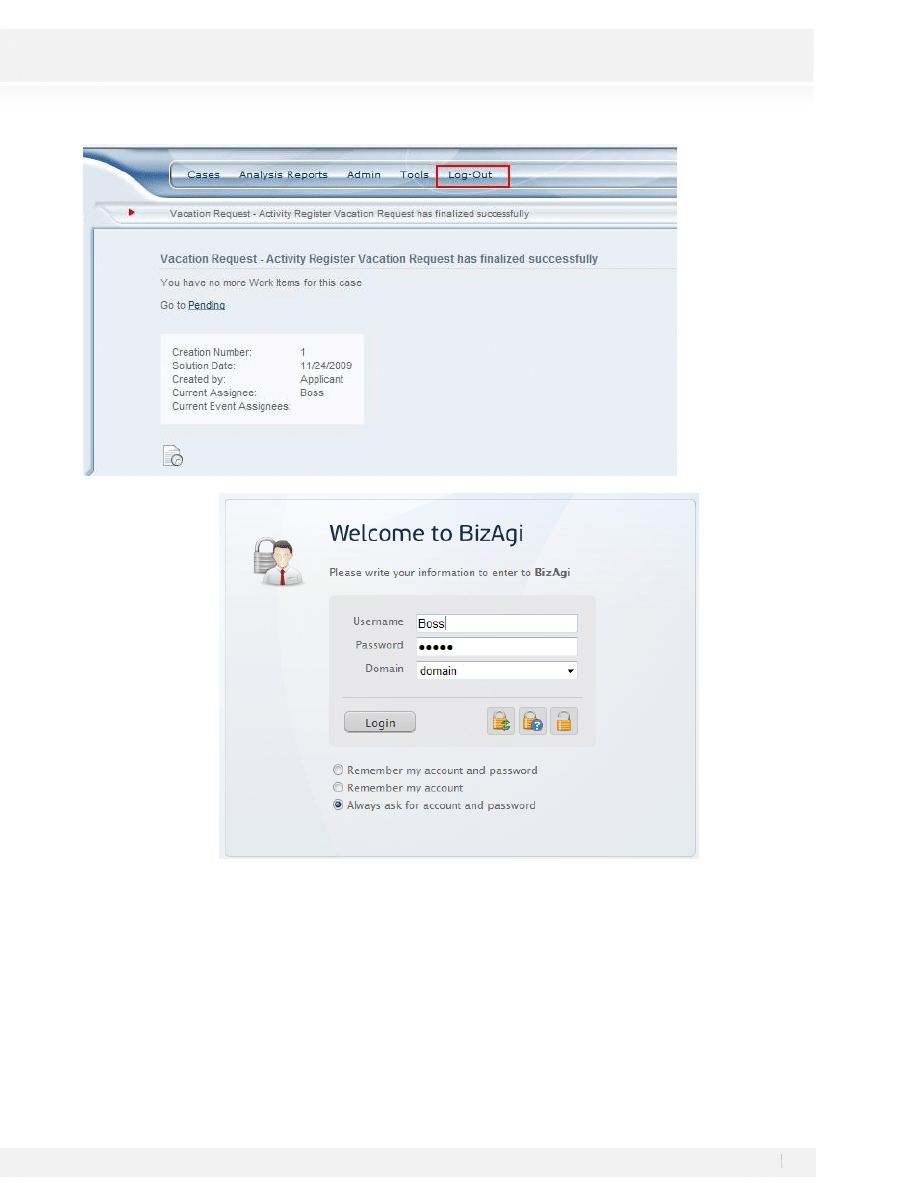
will appear indicating the current Assignee for the Case:
3. Log out from the application and Log in again with the Boss User
69
Workshop Manual for Product Evaluation
CONFIDENTIAL
www.bizagi.com
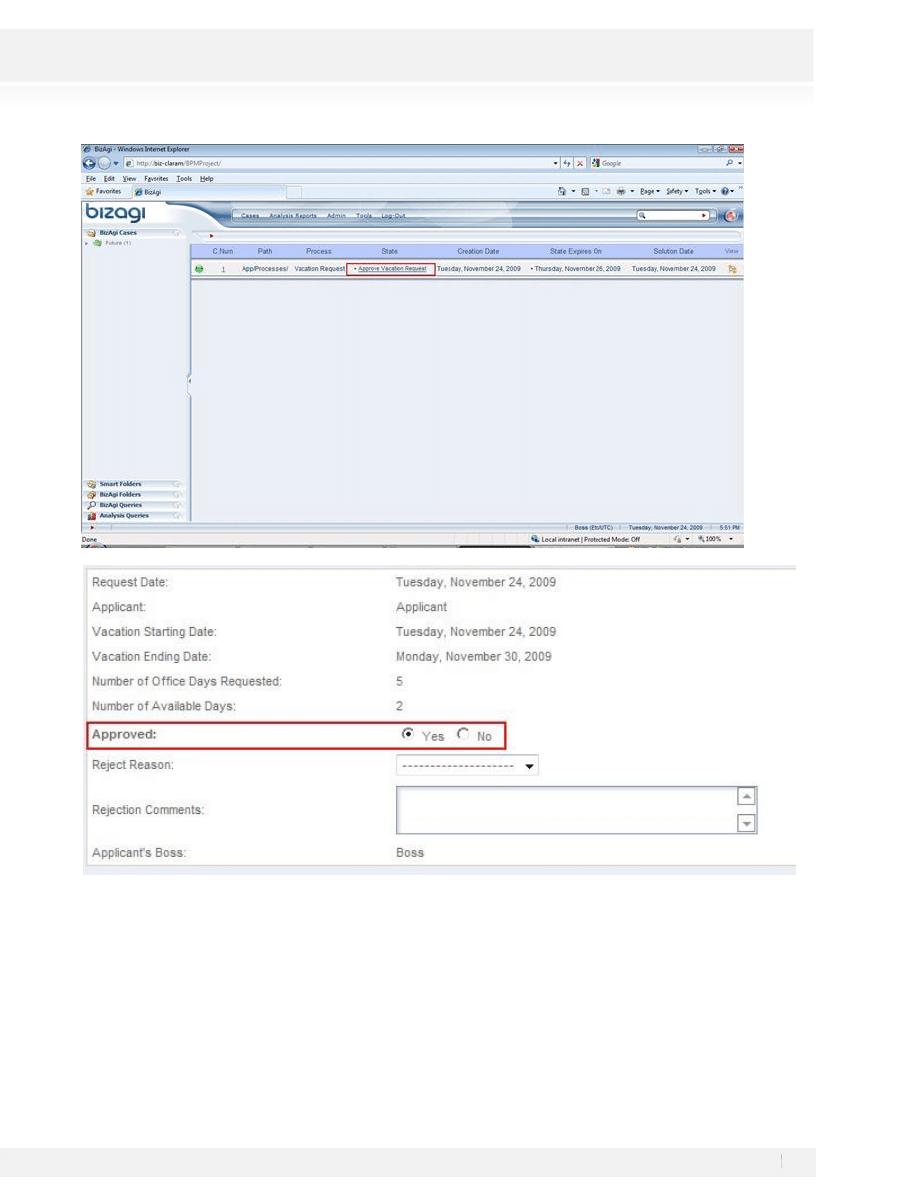
4. The information for the activity Approve Vacation Request is displayed in the following screen; complete
the information for the user and then you’ll see the work portal and you can select the case:
70
Workshop Manual for Product Evaluation
CONFIDENTIAL
www.bizagi.com
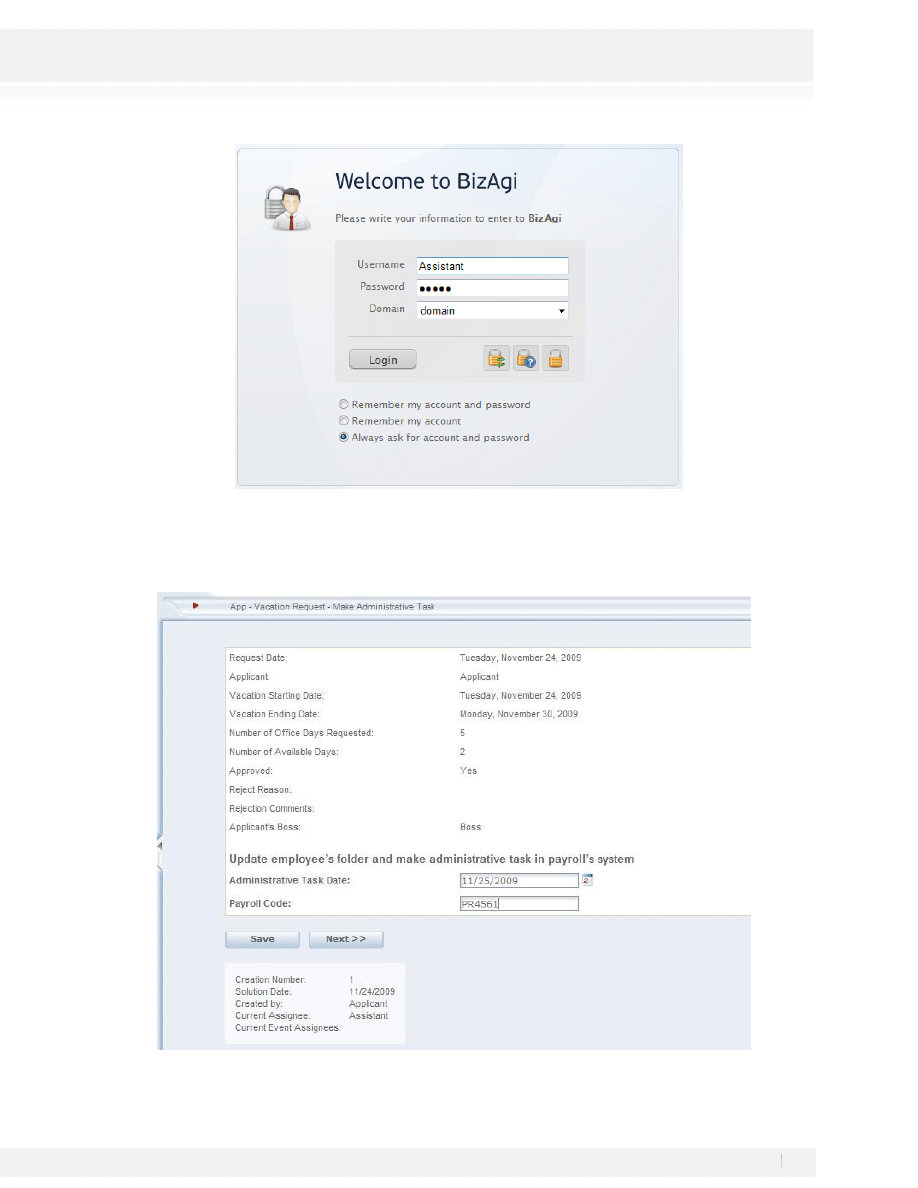
Click on Next to continue the process; keep in mind that if the request was approved, then the next screen to be
displayed by the system is the activity Make Administrative Task, to see his activity log out and log in again
with the Assistant User.
71
Workshop Manual for Product Evaluation
CONFIDENTIAL
www.bizagi.com
At any rate, if the request was not approved, then the Inform Request Rejection screen will be displayed; to
see this activity log out and log in with the Applicant User
72
Workshop Manual for Product Evaluation
CONFIDENTIAL
www.bizagi.com
73
Workshop Manual for Product Evaluation
CONFIDENTIAL
www.bizagi.com
IMPROVING THE WEB APPLICATION
BizAgi allows the modification of the fields’ appearance within the forms. BizAgi also offers a set of tools,
which allows validating the information entered to ensure that the capture of the data is adequate for each
activity and in fulfillment of the different conditions that have been settled down throughout the process.
For this workshop only one exercise will be completed to improve the user interface.
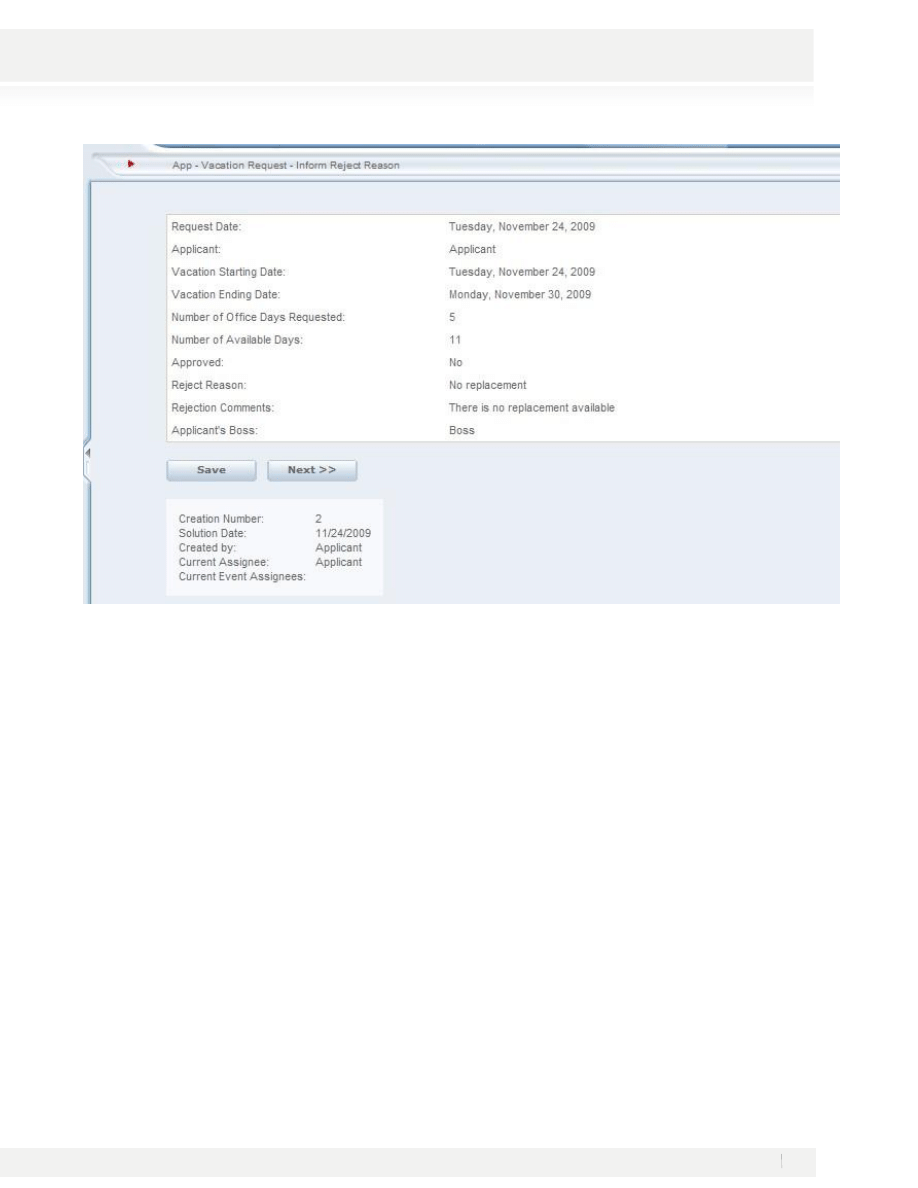
The Rejected Reason in the Approve Vacation Request Activity should be displayed to the user only when the
request is rejected; some actions will be implemented inside the forms editor to implement that functionality.
1. Go to the step 3 of the Process wizard and Open the form associated to the Approve Vacation Request
activity.
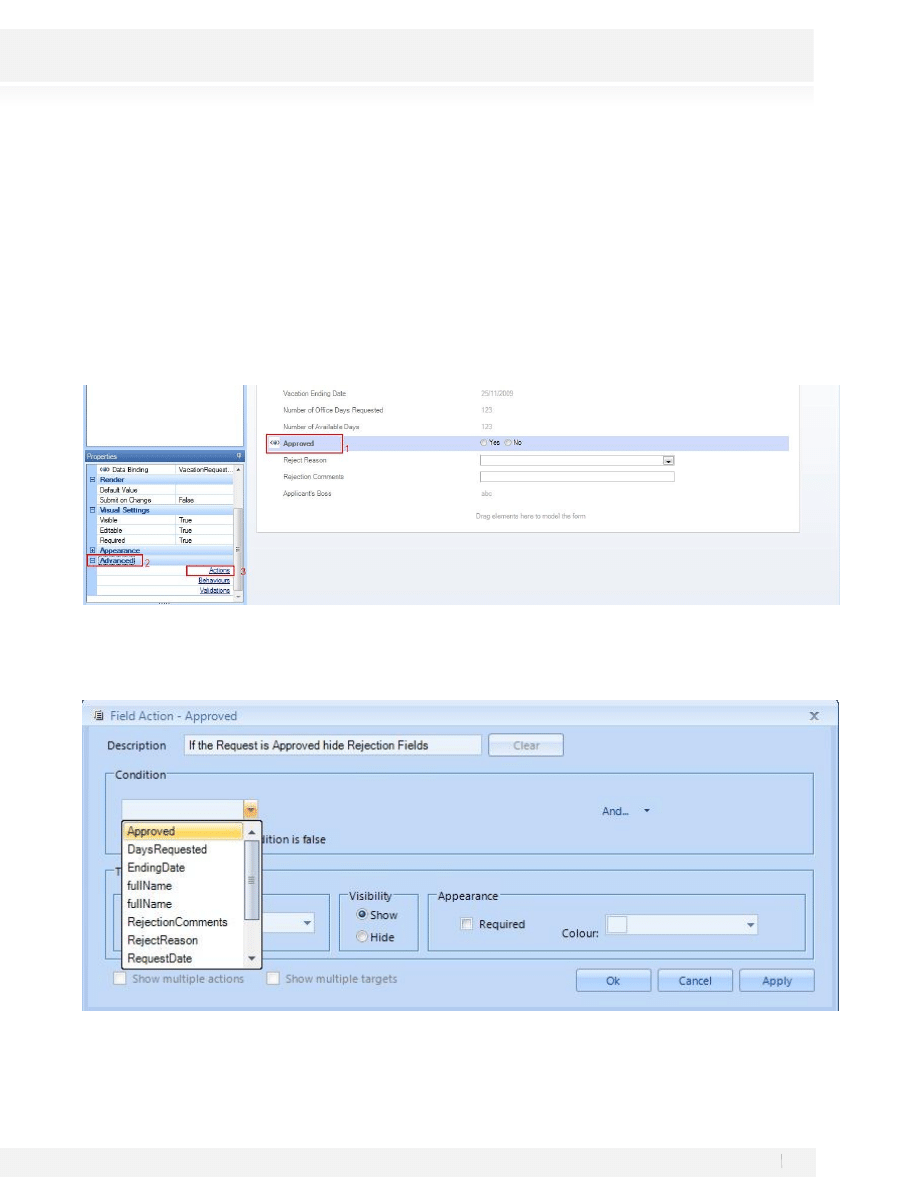
2. Select The Approved Field. Identify and select the Advance submenu; click on the Action Link; the Field
Action window will be displayed.
3. Enter the description If the Request is Approved hide Rejection Fields, for the action and select the
condition to be evaluated. The object to be evaluated is selected in the first group; the system will display
a list of the attributes that may be selected for evaluation; here, the Approved attribute is selected.
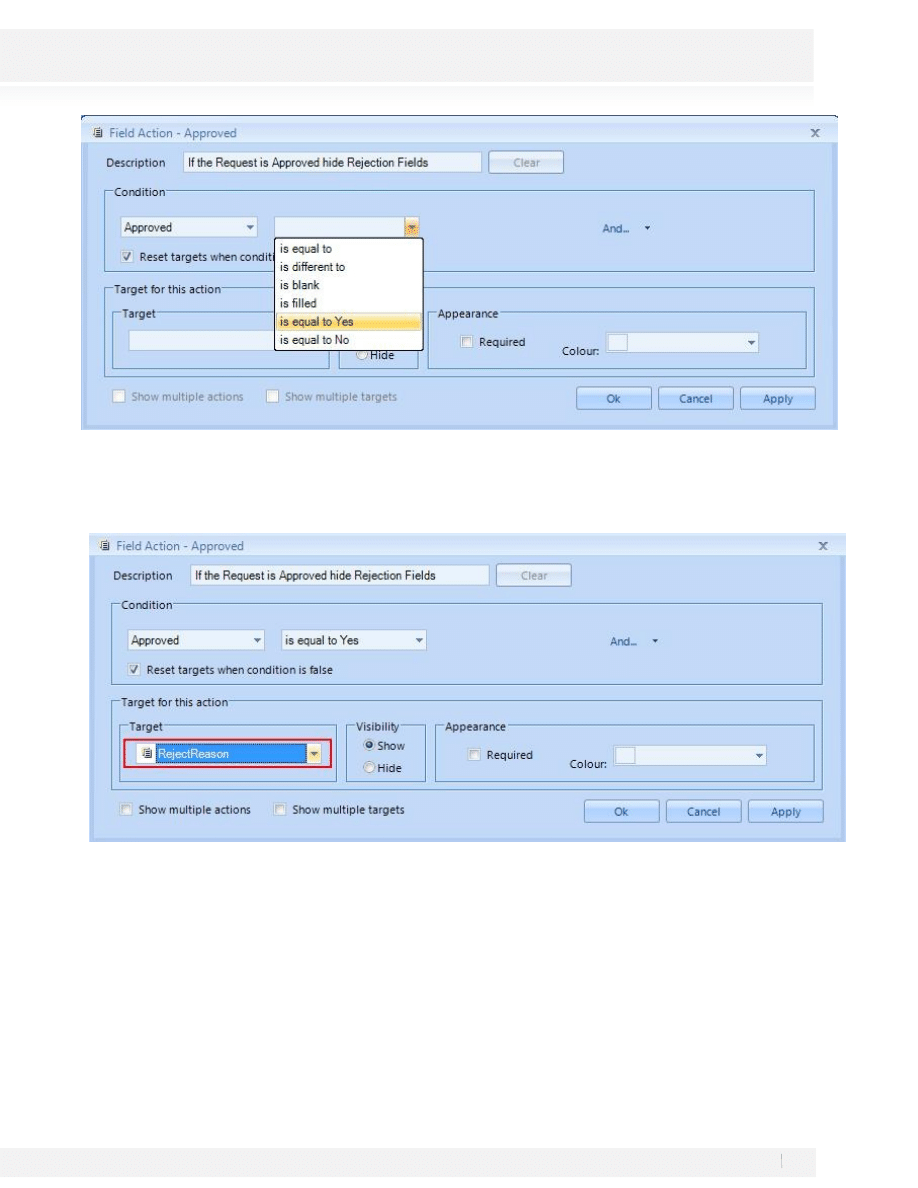
4. In the second Box select the Is Equal to Yes option.
74
Workshop Manual for Product Evaluation
CONFIDENTIAL
www.bizagi.com
5. The operator to be used must be defined after the element for evaluation is entered; here, if the request is
Approved the fields RejectReason and RejectionComments must be hidden. In the Target Box select
RejectReason
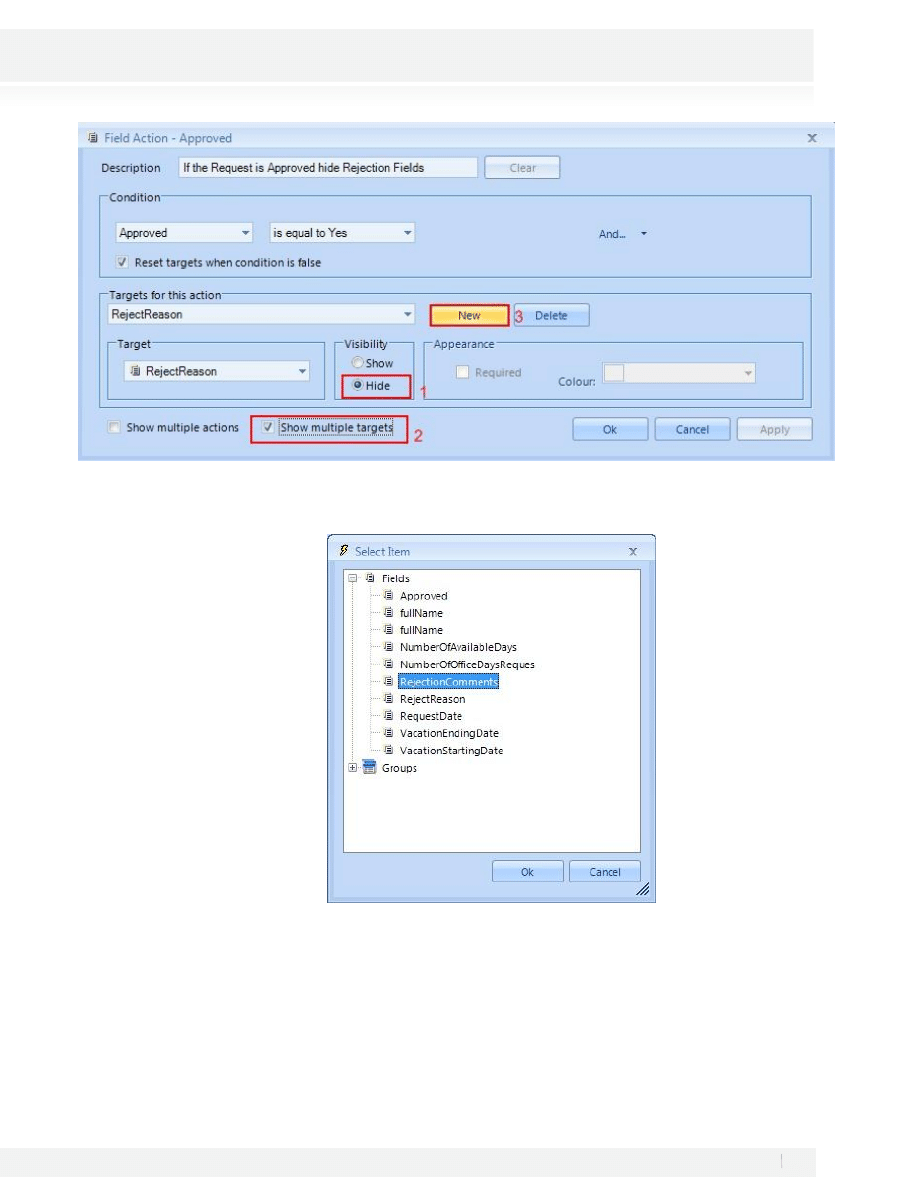
6. Select Hide under visibility for the RejectReason attribute; click on Show multiple targets; click on the
button New to create another target.
75
Workshop Manual for Product Evaluation
CONFIDENTIAL
www.bizagi.com
7. The Select Item window will be displayed; select RejectionComments.
8. Click on the “Ok” button to save the changes after selecting the intermediate event type and the rule; close
the task’s form and save the changes.
The new behavior for RejectedReason and RejectionComments can be observed by going to the Approve
Vacation Request Task in the web application and selecting Yes or No for the Field Approved.
76
Workshop Manual for Product Evaluation
CONFIDENTIAL
www.bizagi.com
77
Workshop Manual for Product Evaluation
CONFIDENTIAL
www.bizagi.com
SENDING A NOTIFICATION (OPTIONAL)
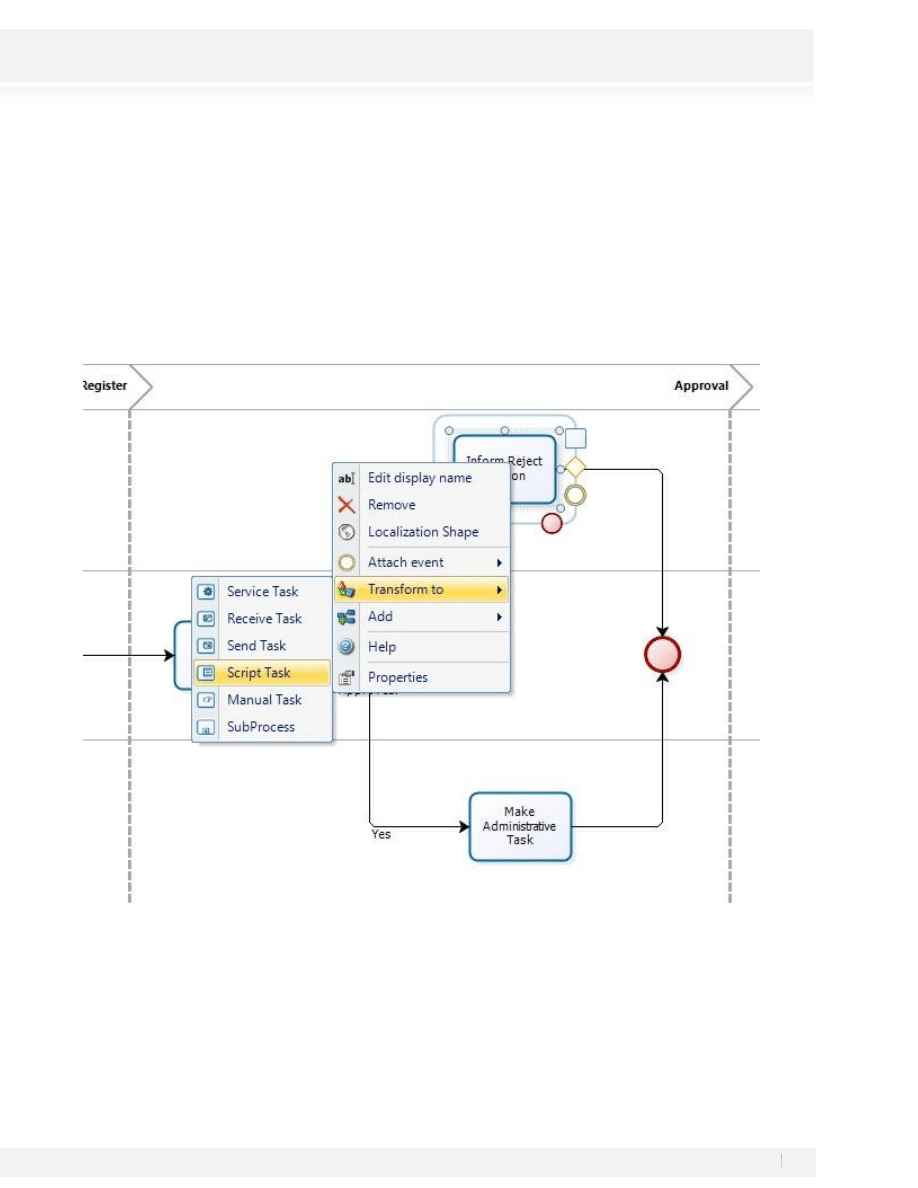
The process could be changed to send an automatic notification for the Inform Reject Reason Activity, in order
to do this the activity need to be converted into a service task. A SMTP Server would also be required, execute
this step if you already have one.
1. Go to the step 1 of the process wizard
2. Right click on the Inform Reject Reason Activity and select Transform to- Script Task:
3. Save the Process and Close the Modeler and go to the step 4 of the process wizard, select the option
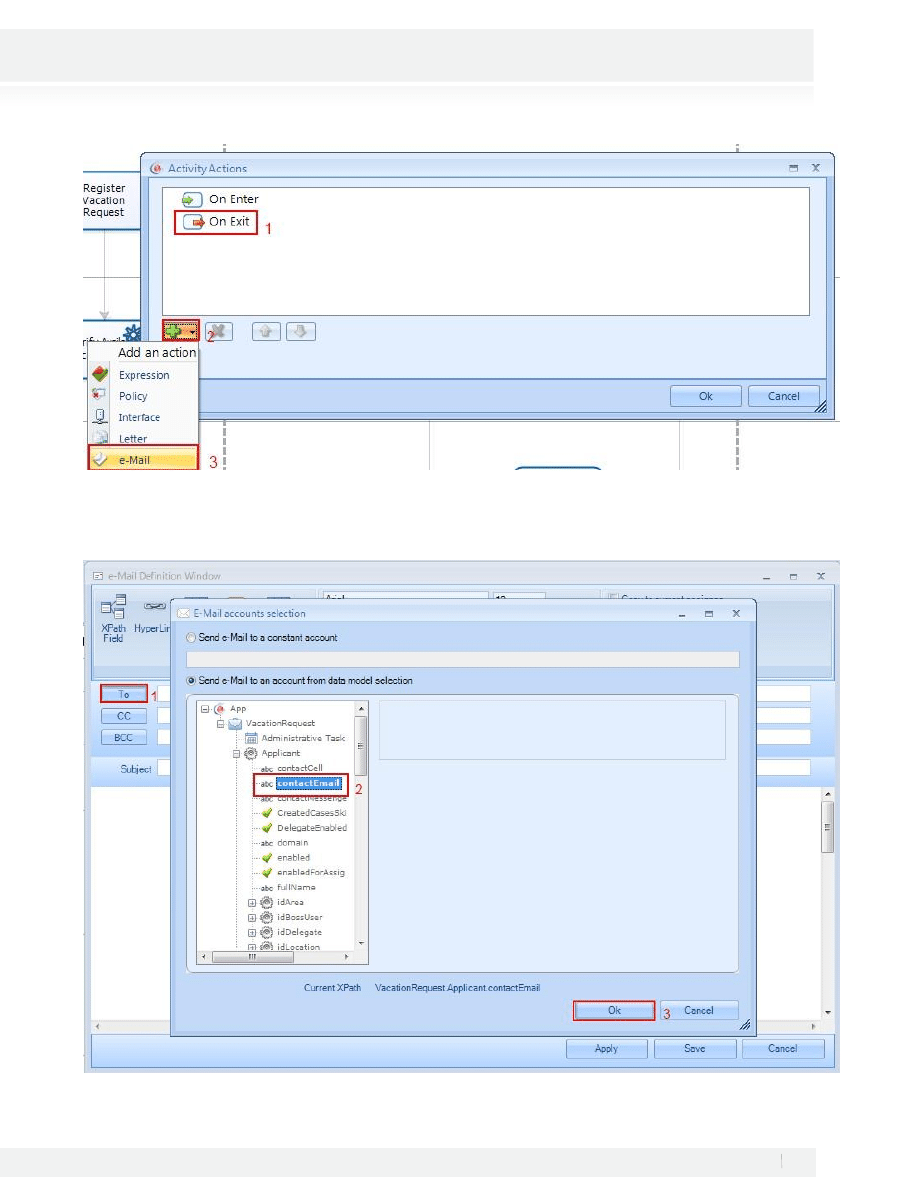
Activity Actions. The BizAgi Business Process Modeler will be opened.
4. Right click on the Inform Reject Reason Task and Add an On Exit Email
78
Workshop Manual for Product Evaluation
CONFIDENTIAL
www.bizagi.com
5. On the Message Window fill the To Information as follow VacationRequest-Applicant-ContactEmail
79
Workshop Manual for Product Evaluation
CONFIDENTIAL
www.bizagi.com
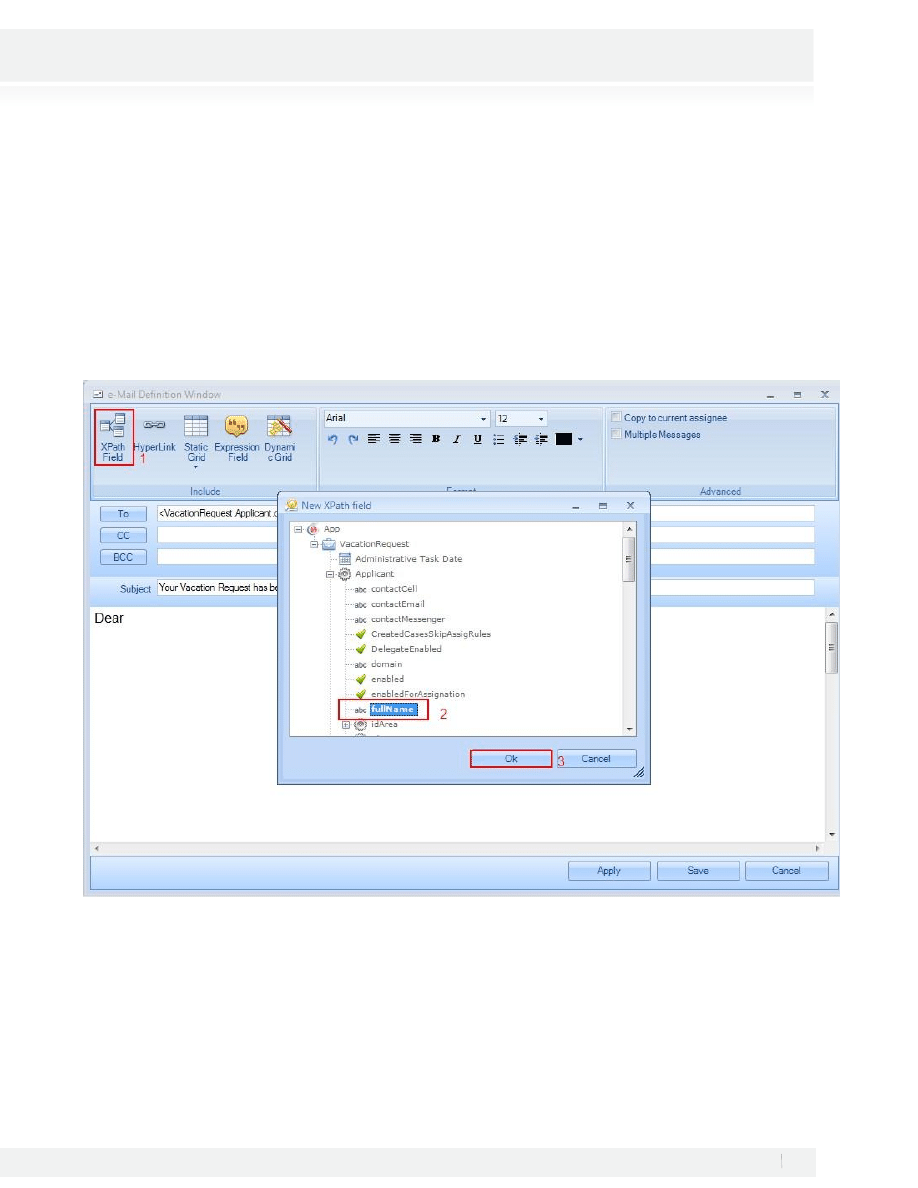
6. Include a subject as Your Vacation Request has been Rejected
7. A text like this one must be included in the message:
Dear (Applicant full name):
We are sorry to inform your Vacation Request has been rejected. The reason for this rejection as follow:
(Reject Reason)
To include the applicant full name and Reject Reason select the XPath Field Option and navigate in the Data
Model to find the required attribute
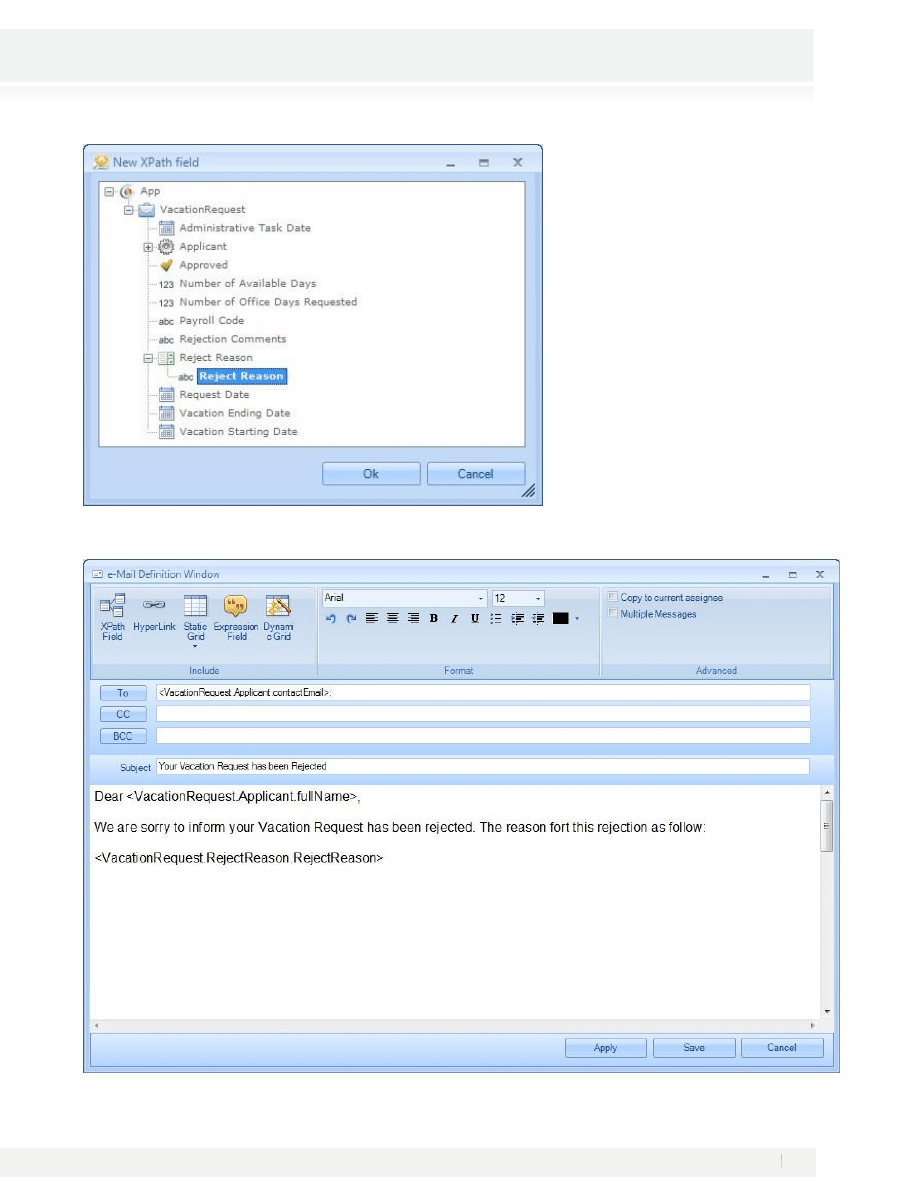
80
Workshop Manual for Product Evaluation
CONFIDENTIAL
www.bizagi.com
The result will look like this:
81
Workshop Manual for Product Evaluation
CONFIDENTIAL
www.bizagi.com
8. Click on Save to close the Message Definition Window and then Ok on the Activiti Actions Window.
9. Save the changes made to the process and close the Activity Actions after doing so.
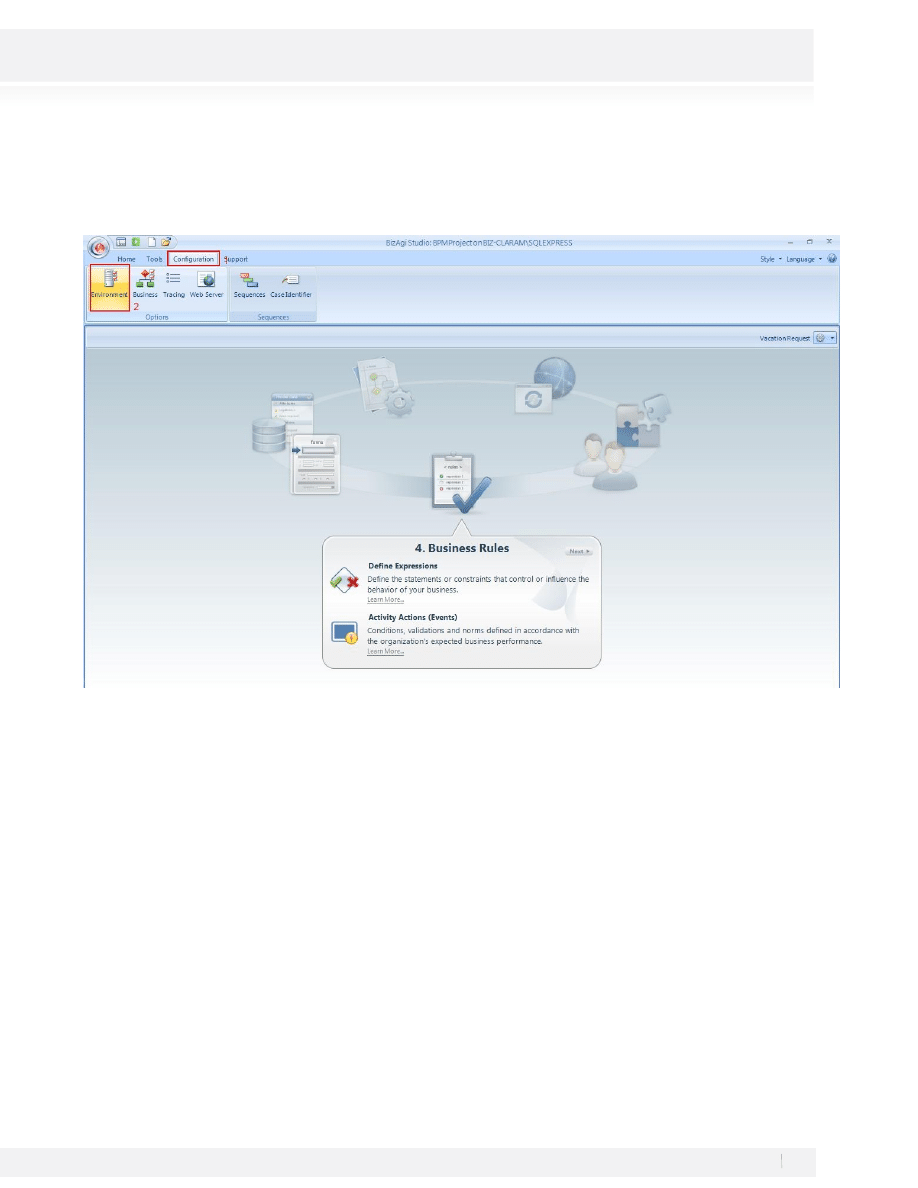
10. Go to the Configuration tab and select Environment
82
Workshop Manual for Product Evaluation
CONFIDENTIAL
www.bizagi.com
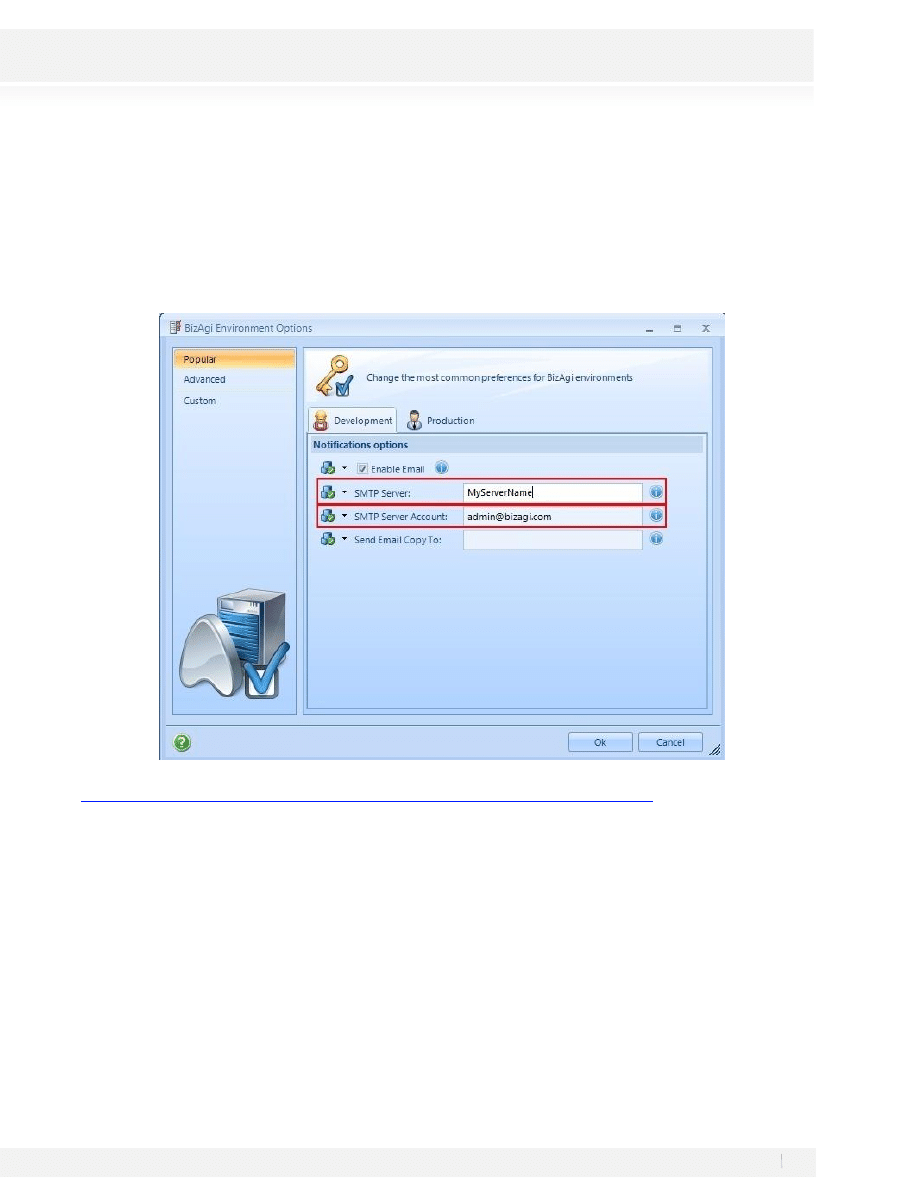
11. The BizAgi Environment Options Window will appear, fill the Require information for the SMTP server as
follow:
a. SMTP Server: Your SMTP Server Name
b. SMTP Server Account: A Valid E-mail Account on the domain. It will appear as return recipient of the
emails sent.
You may review how to check your SMTP server name if you are using outlook at
http://wiki.bizagi.com/en/index.php?title=Find_SMTP_Server_in_Outlook
Make sure the information included is correct.
12. Configure the Contact Email for the Applicant. Go to the Web Application, Admin-Users:
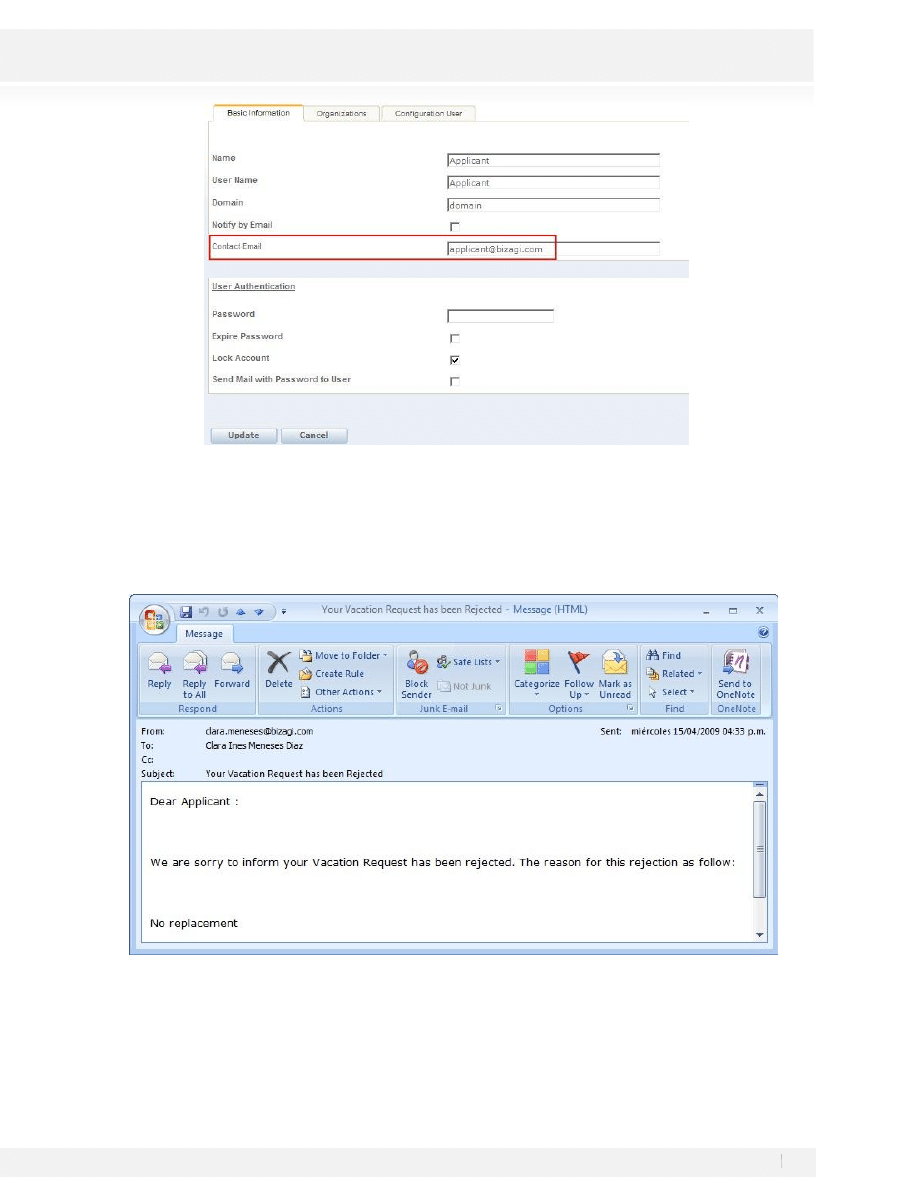
83
Workshop Manual for Product Evaluation
CONFIDENTIAL
www.bizagi.com
Make sure the Email is a valid Email address and click on Update.
13. Run The Application, start a new case and reject the request, instead of looking to a form for the Inform
Reject Reason Activity an e-mail will be sent and the case will be closed. The e-mail would have to look like
this:

84
Workshop Manual for Product Evaluation
CONFIDENTIAL
www.bizagi.com
3. CONCLUSION
In this workshop, you learned to diagram the flow of processes, the design and creation of its data structure, the
definition of business rules, configuration of assignation rules for each one of the manual activities, and to
connect with other applications via web. The final result was an easy-to-use web application, which shows
accurately the model created in BizAgi Studio; this result could be achieved because of the data driven concept
of BizAgi.
Thank you for completing this workshop, for BizAgi it has been a pleasure to show you why we are the most
agile solution to automate process.
We hope that your experience with BizAgi has been satisfactory; should you have any questions or comments,
please feel free to contact us at:
http://www.bizagi.com/eng/bizagi/contact/contact.aspx
If you need to review the solution of the workshop, you may open BizAgi and the project will be available.
NEXT STEPS
1. There is an additional more advanced workshop, in which an office supply request process is automated.
Interested? Please
2. To learn more about BizAgi and BPMN please take our online courses at
3. At any moment you may press F1 to get help in BizAgi Studio
4. Visit our resource center at
Wyszukiwarka
Podobne podstrony:
ho ho ho lesson 1 v.2 student's worksheet for 2 students, ho ho ho
Time Series Models For Reliability Evaluation Of Power Systems Including Wind Energy
christmas esl vocabulary word snake puzzle worksheet for kids
Anti Virus Product Evaluation in the Real World
US Patent 568,177 Apparatus For Producing Ozone
Mellin Transform Method for Integral Evaluation [Intro and Appln for Electromagnetics] G Fikioris (
US Patent 577,670 Apparatus For Producing Electric Currents Of High Frequency
US Patent 568,179 Method Of And Apparatus For Producing Currents Of High Frequency
US Patent 583,953 Apparatus For Producing Currents Of High Frequency
#0574 – Shopping for Produce
islcollective worksheets e nofrills worksheet for all ages 1 present simple vs present continuous 17
A very simple CFR for producing BingoFuel by JL Naudin
US Patent 568,180 Apparatus For Producing Electrical Currents Of High Frequency
Price is the amount of money charged for a product or service
Energetic and economic evaluation of a poplar cultivation for the biomass production in Italy Włochy
all i want for christmas song worksheet
61 881 892 Evaluation of PVD Coatings for Industrial Applications
GB1008594A process for the production of amines tryptophan tryptamine
CAN Bus Drivers for Atmel C51 Products
więcej podobnych podstron