Peyote stitch
Peyote stitch can be very confusing for beginners, especially if you need to follow an intricate
pattern. The confusion starts from the very beginning, when you learn that the first row is
actually two rows. The rows in peyote stitch are not continuous as in flat square stitch, which
makes it harder to keep track of where you are in the pattern. Instructions also differ depending
on whether you use even-count or odd-count peyote. Many books are devoted entirely to this
stitch, but I will try to simplify it as much as possible.
In this book we will be using peyote stitch to create petals and leaves for different flowers. To
make a leaf shape you will need to learn how to increase and decrease the number of beads in
your beadwork.
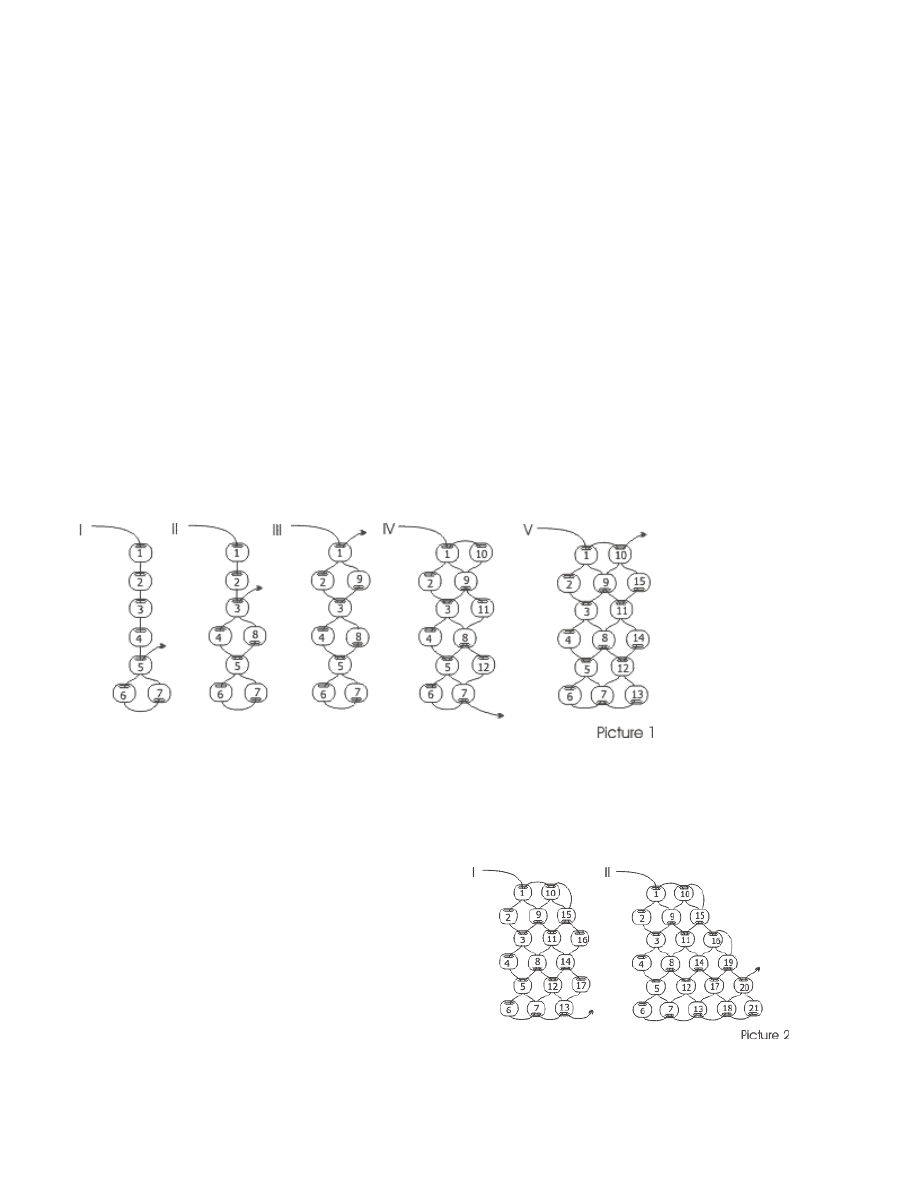
I will start by showing you the basic peyote stitch. Start by stringing seven beads, and then pass
the needle up through bead 5. See Picture 1, step I.
String one bead and pass the needle up through bead 3. See Picture 1, step II.
String one bead and pass the needle up through bead 1. See Picture 1, step III.
You have completed the first three rows.
String one bead and pass the needle down through bead 9.
String one bead and pass the needle down through bead 8.
String one bead and pass the needle down through bead 7. See Picture 1, step IV.
You have completed the forth row.
String one bead and pass the needle up through bead 12.
String one bead and pass the needle up through bead 11.
String one bead and pass the needle up through bead 10. See Picture 1, step V.
You have completed the fifth row.
Now I’d like to show how we can decrease the
number of beads from the top. Your thread is
coming out of bead 10. Pass the needle down
through bead 15 without stringing a new bead,
as you did before, and finish the row. See
Picture 2, step I.
In the next row you won’t be going all the way
up.
After passing the needle up through bead 16, pass it down through bead 19 and finish the row.
See Picture 2, step II.
Copyright © Jewelry by Varvara
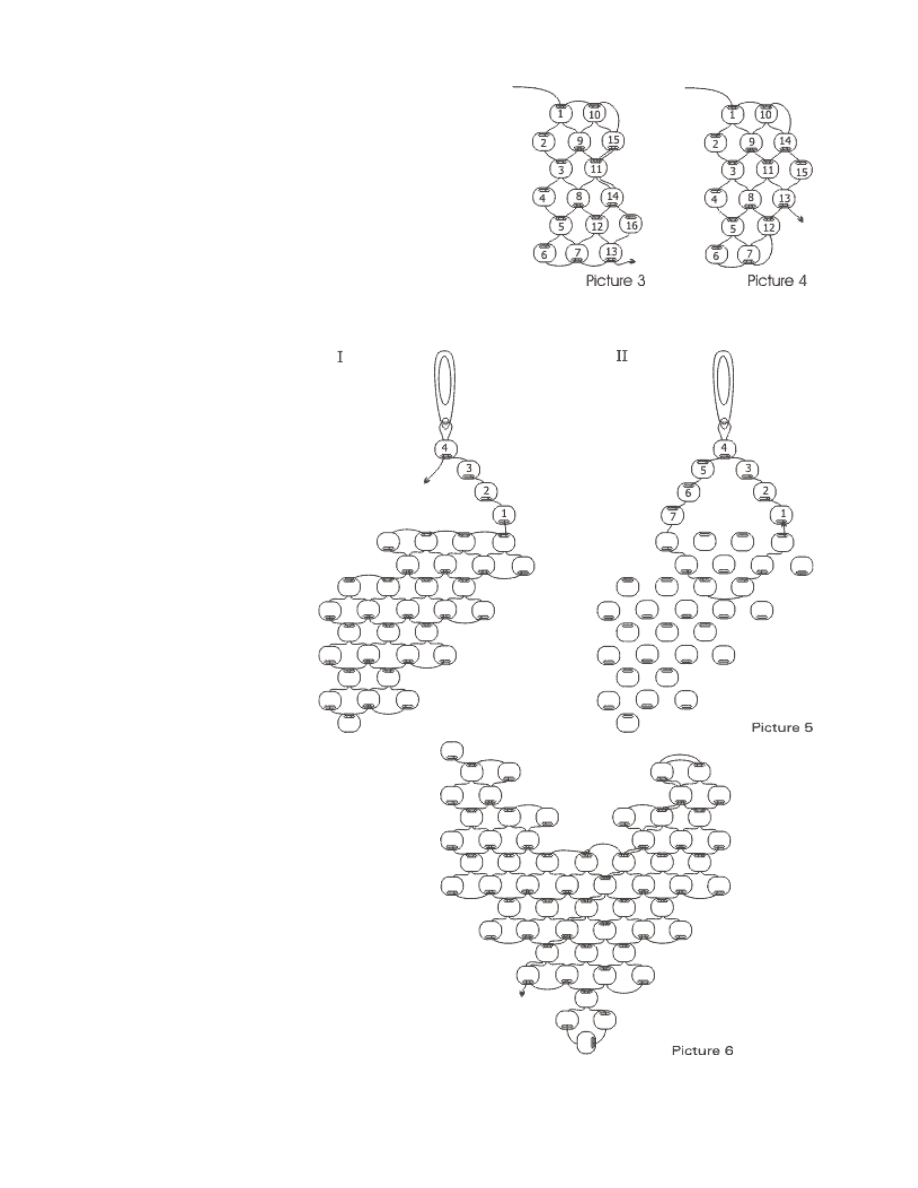
The next example, illustrated in Picture 3, shows how to
make a steeper decrease. Your thread is coming out of
bead 10. Pass the needle down through beads 15, 11
and 14 and finish the row.
Sometimes you will have to decrease the number of
beads from the top and from the bottom. Picture 4
illustrates this. As you can see, it’s very easy to create any
shape with peyote stitch. These examples will help us to
make leaves with smooth edges.
It’s very important to keep an even tension throughout your work; uneven tension can create
noticeably unattractive irregularities.
Attaching a Clasp
I would like to show how to
attach a clasp to a V-shape
peyote necklace. When you
reach the desired length, string
four beads, as shown in Picture
5, step I, and bring the needle
through the hole in the clasp.
Pass the needle down through
the bead 4 and string three
more beads. Following the
beadwork, come back to bead
1, as shown in Picture 5, step II.
Repeat this three times for
strength. Finish the thread off,
as shown in Picture 6. Make
sure to cut the thread as close to
your beadwork as possible.
Wyszukiwarka
Podobne podstrony:
peyote stitch basics
Peyote Stitch Bail Patterns
bead&button pearls add pizazz to a peyote stitch bangle
Stitch Two Bead Peyote
Stitch Odd Count Two Bead Peyote
Brick Stitch or Flat Peyote Graph Paper (for Oval Seed Beads)
Brick Stitch or Flat Peyote Graph Paper
Cross Stitch DMC Chocolate time XC0165
Pattern Peyote Little Mouse Amulet
Pattern Peyote Tiny Ladybug Earrings
Peyotefishbracelet
Stitching up the Enemy
14 stitchin 6 (2)
450 Knitting Stitches
Pattern Peyote Fall Tree
Basics Bead Stitch Orientation
Peyote Graph Paper
Circular Flat Peyote Tutorial
Cross Stitch DMC Chocolate time XC0165
więcej podobnych podstron