STANDARD STUDIO
LIGHTING
author:
Wouter Wynen
brought to you by:

©2006 VisMasters. All rights reserved.
VisMasters and the VisMasters logo are trademarks of ArchVision, Inc.
All other trademarks belong to their respective owners.

Standard Studio Lighting
by:
Wouter Wynen
April 2006


Standard Studio Lighting
This tutorial assumes you have already completed the previ-
ous tutorials in the tutorial list.
It will provide a general workflow for a standard studio light-
ing setup: create the environment, place lights, adjust render
settings.
The V-Ray version I used for this tutorial is 1.47.03.
INTRODUCTION
5
Standard Studio Lighting
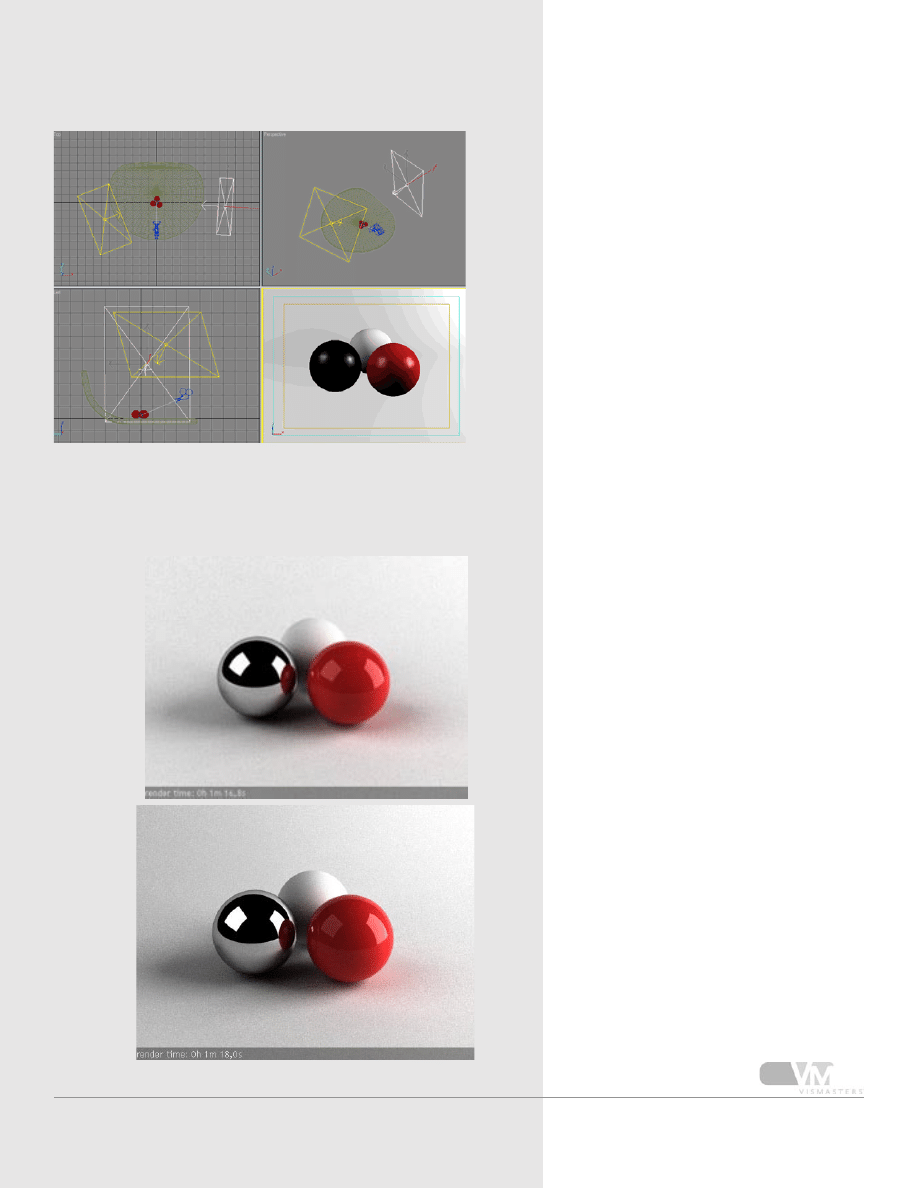
1. Build a test scene lighting tutorial
Start up max and set V-Ray as the renderer.
Go to ‘customize - units setup’ and set both the display
unit scale and system unit scale to metric: millimeters.
Create 3 geospheres with radius 35mm and position
them like I did.
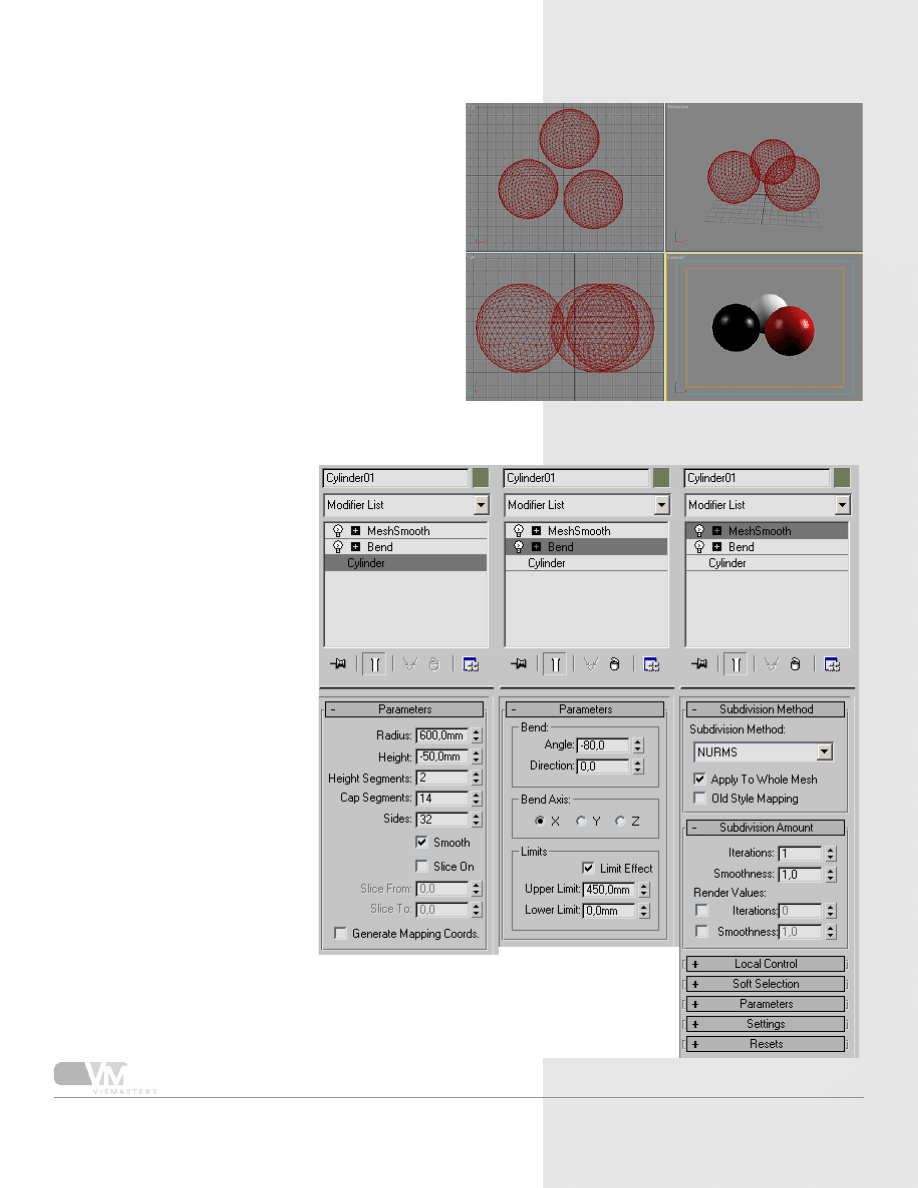
2. The ground plane
We will try to
build an infinite
background in
a simple way.
Usually pho-
tographers use
a big white or
black cloth be-
hind their scene,
curved at the
bottom, so that
you will not see
a sharp edge be-
tween back wall
and floor.
There are of
course lots of
ways to do this.
I will start from
a cylinder, bend
it locally and
round it off with
a MeshSmooth
modifier. This
way, your
ground plane
is very smooth
and round in
all directions,
making sure you
will not have
disturbing re-
flections from it
(like you would
when using a
box for ex-
ample as ground
plane).
Click the image
on the right to
see all settings
of the cylin-
der, bend and
MeshSmooth
modifier.
6
Standard Studio Lighting
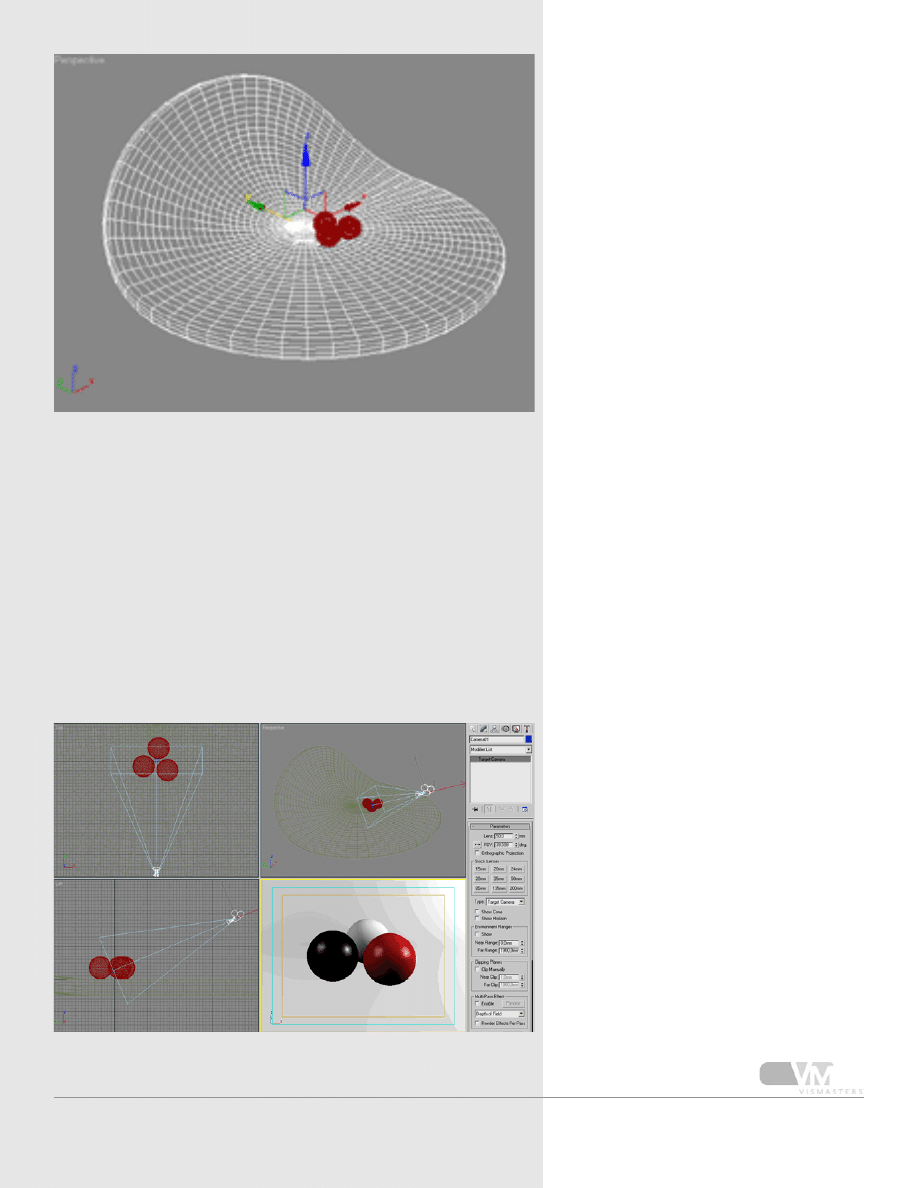
3. Create a camera
Now create a camera and position it like in the image
on the right. Give it a 50mm lens. Set the perspective
viewport to use this camera, enable ‘show safe frame’
so you can clearly see what part of the scene will be
rendered.
7
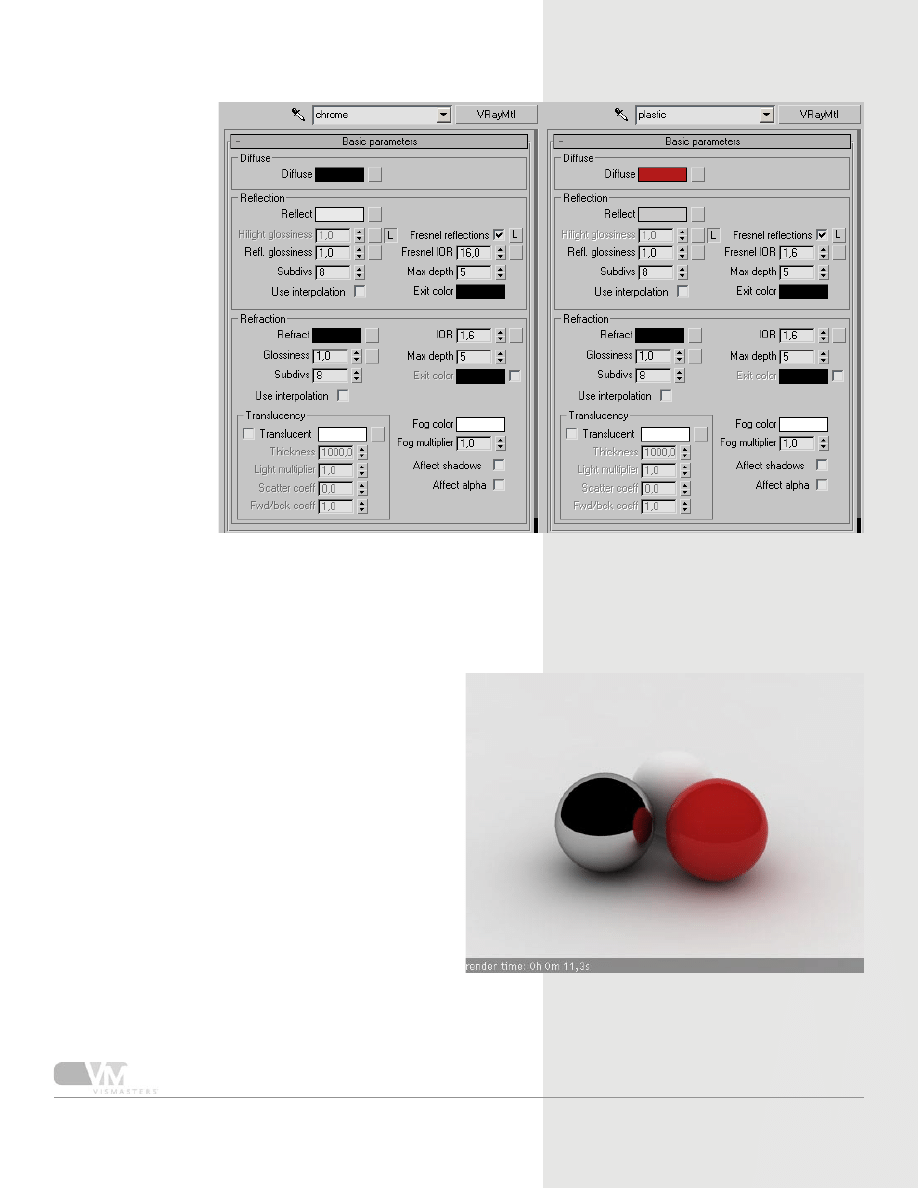
Standard Studio Lighting
We need three
materials: almost
white, chrome and
red reflective.
Click on the image
to see what set-
tings I used for the
chrome and red
material (this should
look familiar if you
completed the V-Ray
basic materials tuto-
rial).
Assign the materi-
als to the spheres.
The ground plane
also uses the almost
white material.
4. Create materials
5. Test render settings
Open the render settings dialog and do the following:
- set V-Ray as the renderer if you haven’t done so
- output size to 480x360px
- global switches: turn off default lights
- image sampler to adaptive QMC
- antialiasing filter “mitchell-netravali”
- indirect illumination ON
- Secondary bounces multiplier to 0.8
- Irradiance map settings:
- “low” preset
- HSph subdivs = 20
- environment:
- skylight pure white color, 1.0 multiplier
- reflection/refraction pure black, 1.0 multiplier
- system:
- render region division 50x50px
- frame stamp: delete all except render time part.
Render the scene, it should look similar to my image.
8
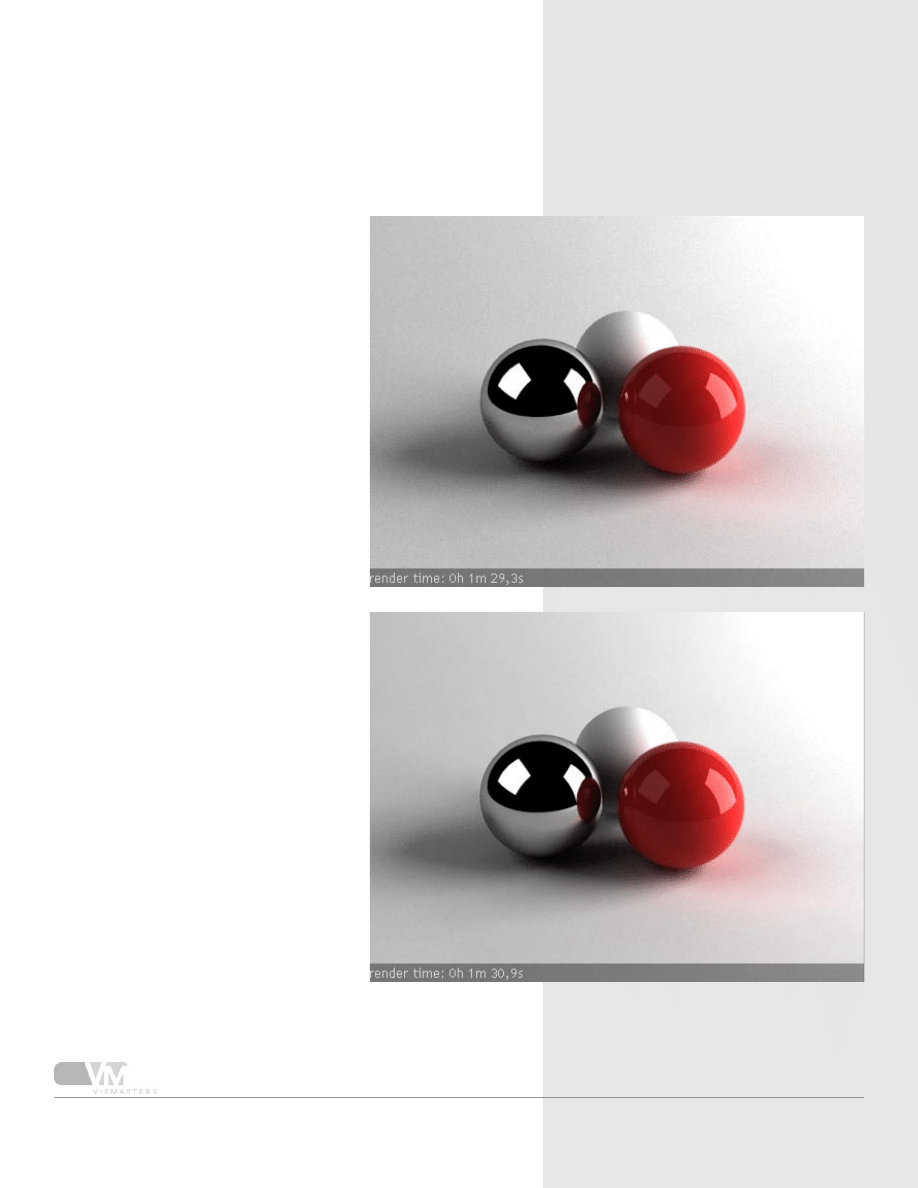
Standard Studio Lighting
Instead of the skylight, we will use big rect-
angular V-ray lights to light the scene. They
will also be useful for creating nice reflec-
tions (like we did in page 2 of the material
settings tutorial).
Create two V-ray lights and position them
more or less like I did.
The left light is 400x350 mm with a
3.5 multiplier and the one on the right
360x500mm with 5.5 multiplier.
Then go to the V-Ray environment rollout
and change the skylight multiplier to 0.1.
6. Reflection planes / lights
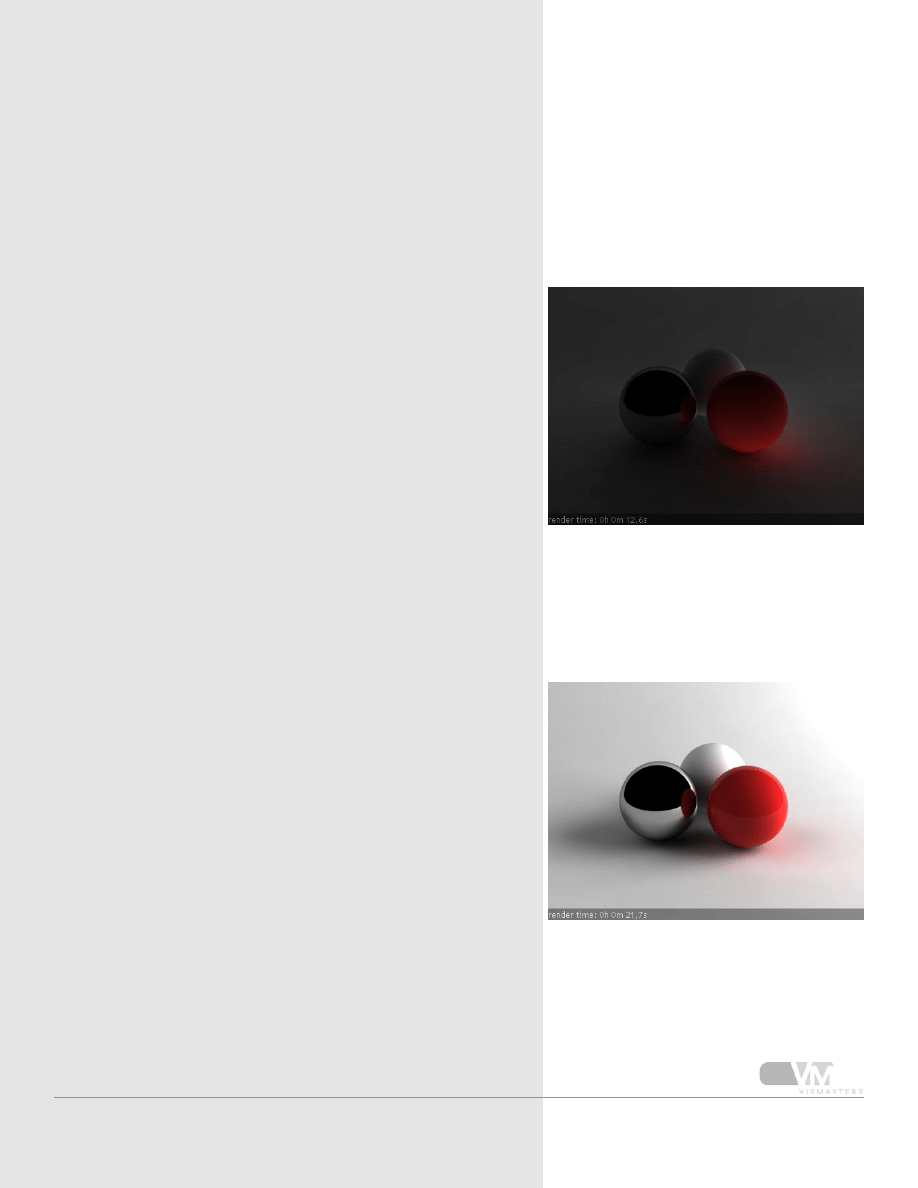
7. Render what we have for now
I made the right light brighter on purpose,
that way you create shadows falling in one
direction. If you would set them at equal
strengths, the image will be uninteresting
as lighting will be a bit flat, coming in equal
strength from all directions. The bigger
the difference between the two lights, the
more dramatic lighting will be.
The first pic shows left=3.5 and right=5.5
The second one has left=2 and right=7
We will continue with the 2/7 settings.
9
Standard Studio Lighting
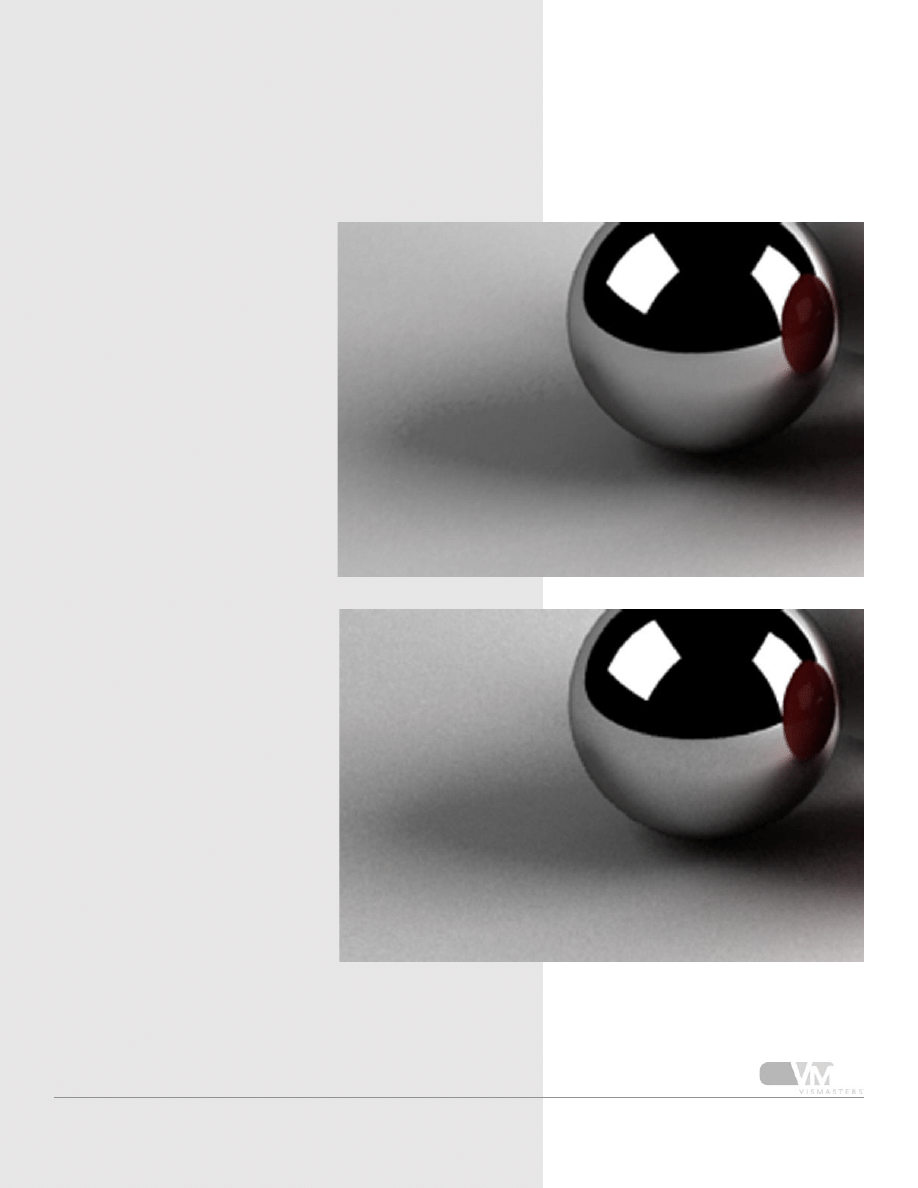
8. Noise!
You’re probably wondering why
the images are so noisy and take
pretty long to render. This is
because V-Ray area lights produce
raytraced area shadows, and these
are very processor intensive. The
noise is coming from the low sub-
div value in the lights properties.
Because we are using adaptive
QMC AA, it is necessary to use
high subdivs values for the area
lights to get rid of the noise. Try
30 subdivs for both lights and ren-
der again. You can see the result
in image 1 (click to enlarge).
Now go to the anti aliasing set-
tings and change to adaptive
subdivision AA with min/max=0/2.
With this anti aliasing sampler, you
can use lower subdivs than with
adaptive QMC to have a similar
noise quality. So change the lights
subdivs both to 10 and render
again. This is image 2 (click to
enlarge).
10
Standard Studio Lighting
At first sight, you might think the
adaptive subdivision image is bet-
ter (less noisy). But if you look
closely, the noise is just different,
not ‘better’. In the shadow area
you get a ‘blotchy’ kind of noise,
compared to the QMC example
which is sharp constant noise.
The top image is the adaptive
subdivision AA, the bottom one is
the adaptive QMC AA.
9. Subdivision vs QMC
11
Standard Studio Lighting
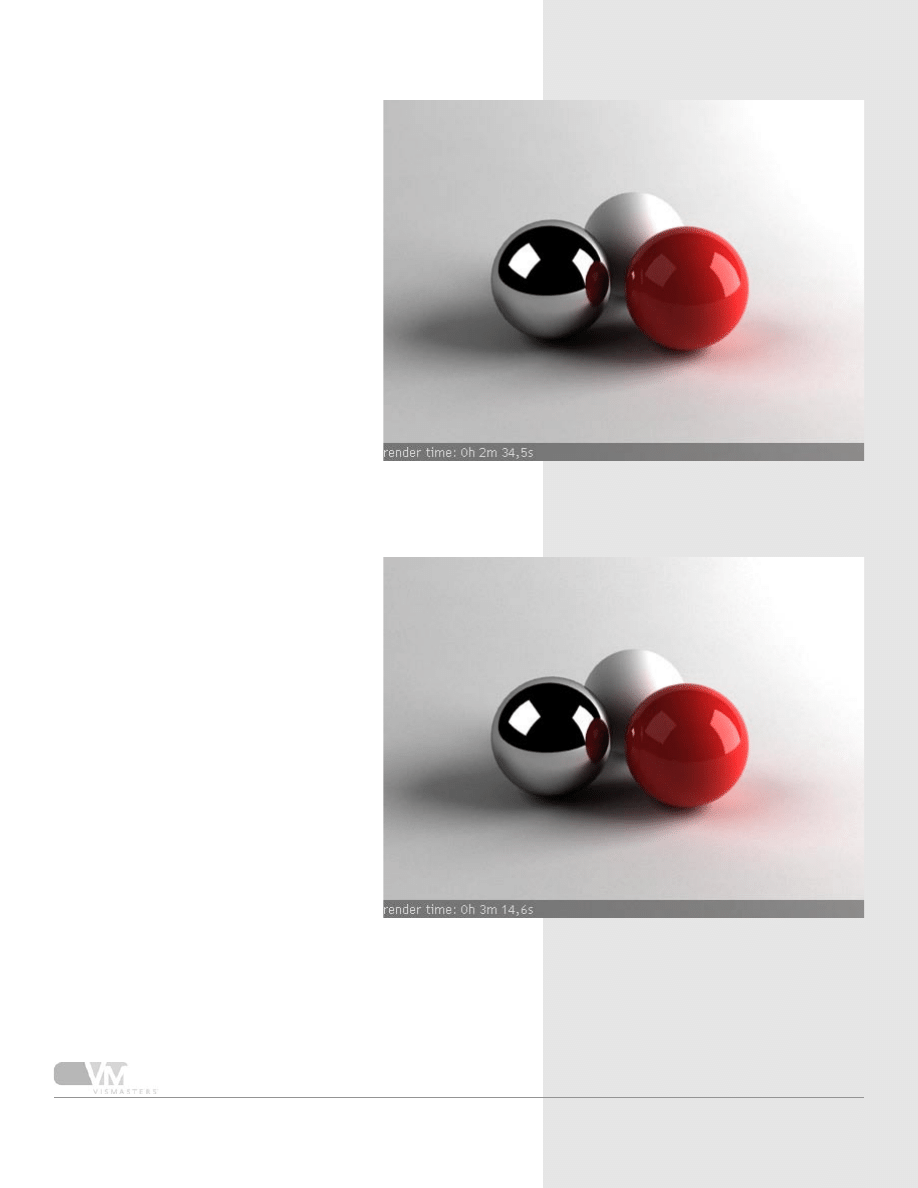
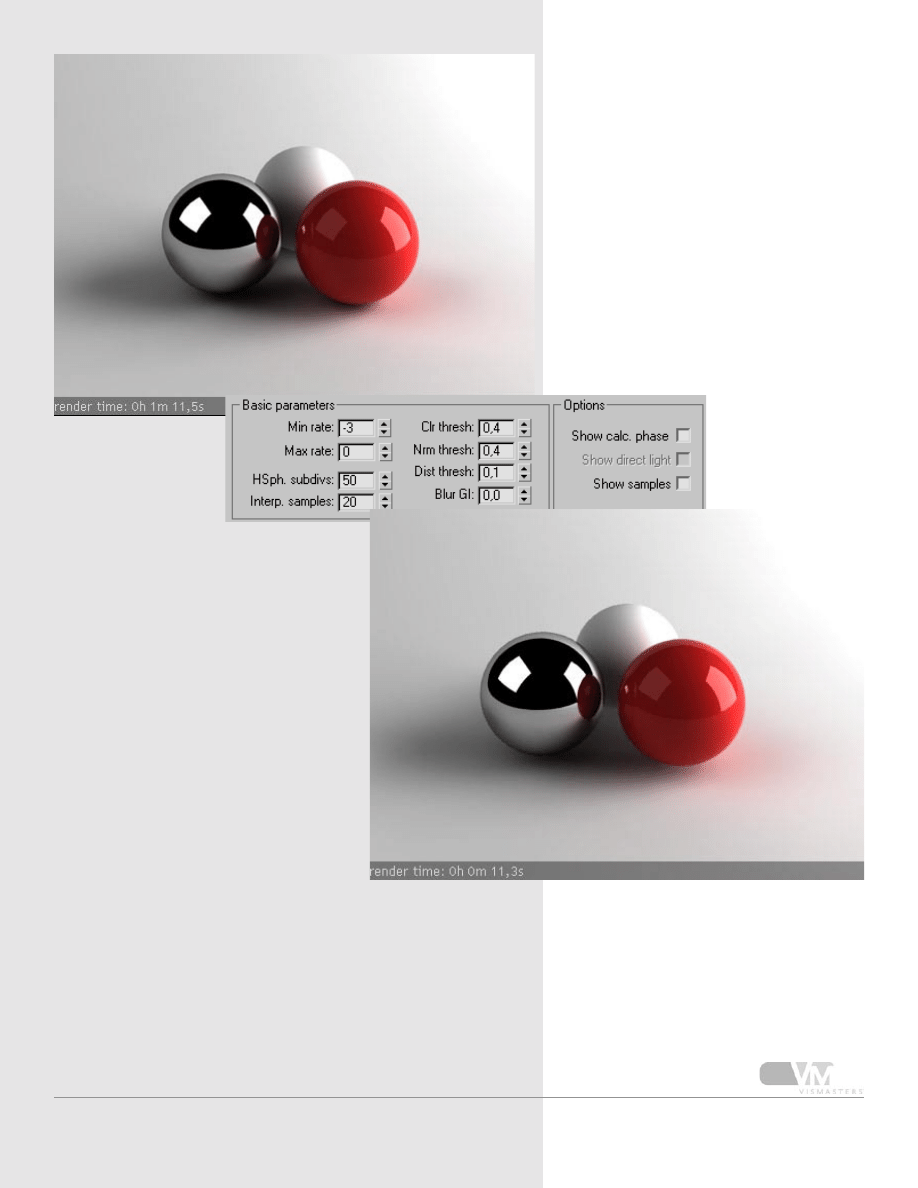
10. Reduce the noise
We will now try to reduce the noise for
both image samplers to see which one is
the fastest for high quality images.
Set image sampler to adaptive subdivision
AA, min/max=0/2
Adjust subdivs for both lights to 30 and
render.
The image is noise free. If you zoom
in a lot, you can see a tiny bit of the
blotchiness.
Now change to adaptive QMC AA, min/
max=1/4
Adjust lights subdivs to 36.
In the QMC sampler rollout, change the
noise threshold to 0.002. The adaptive
QMC AA is very sensitive to the QMC
sampler settings. The noise threshold is
the most important one. (QMC sampler
controls the quality of all ‘quasi monte
carlo’ related calculations. In short, all
subdivs settings are qmc related, except for
lightcache subdivs)
If you zoom in here, you can also see a bit
of noise, but sharper and smoother than
the blotchiness of adapt subdiv AA.
But in this case, adaptive subdiv AA wins
from adapt QMC AA. When you will
add more complex materials like glossy
ones, and more area lights, fine textures,
displacement maps etc, render times for
adaptive QMC will not rise as fast as ren-
der times with adaptive subdiv AA. Usually
when you have lots of glossy effects (also
DOF, motion blur...) it is better to use
adaptive QMC AA..
12
Standard Studio Lighting
11. Store with irradiance map
Like I said, the reason for the
noise are the raytraced area
shadows. Especially for test
rendering, we can easily disable
them.
The light coming from a V-Ray
light (or also from standard
Max lights) is called ‘direct’
light. This means it is not
GI light (first or secondary
bounce). Once this direct light
hits a surface, it bounces back
a bit (depending on how dark
and reflective that surface is).
That bounce is called the ‘first’
bounce, and it is calculated by
the irradiance map (because we
have set first bounce GI engine
to irradiance map).
But the V-Ray light has an
option ‘store with irradiance
map’. This option actually
means ‘treat direct light as first
bounce GI light’. Instead of
casting direct light, the V-Ray
light will now cast first bounce
GI light and thus it will be cal-
culated by the irradiance map.
This also means that when it
hits a surface, and bounces
back, it will become secondary
GI light, and it will be calculated
by the secondary GI engine,
QMC GI in this case.
So by setting the V-Ray light to
‘store with IR map’, the result
will be that there is no direct
light anymore, only GI light.
This means that all shadows
will also be created by the GI
light. The consequence of this
is, that shadow quality doesn’t
depend on the V-Ray light
subdivs anymore, but the it is
controlled by the GI settings,
namely the irradiance map (and
QMC GI for secondary bounc-
es). This is important, the V-Ray
light subdivs do absolutely
nothing if ‘store with IR map’ is
checked!
(Note that this option only
works if IR map is set as first
bounce GI engine. If you have
for example QMC GI for first
and second bounce, and lights
with the ‘store with IR map’
turned on, these lights will not
cast any light!)
To illustrate the store with IR
map option, I rendered two
images with the ‘show GI only’
option (global switches rollout).
This option renders the image
only with the GI light, so with-
out any direct light that may be
present in the scene.
The first one is with normal
V-Ray light (without ‘store with
IR map’ option).
The second one with the ‘store
with IR map’ option turned on.
You clearly see that in the first
example, with the direct light
extracted, there is not that
much GI light to be calculated.
And in the second example, all
light is GI light.
This step is very important, you
should really understand the
difference between ‘store with
IR map’ turned off or on, and
the difference between direct/
first bounce and secondary
bounces.
13

Standard Studio Lighting
12. Store with irradiance map option (2)
The disadvantage of this option is that
there will be more first bounce GI light,
but worse, also more secondary bounced
GI light (calculating detailed GI light,
especially second bounce, is very proces-
sor intensive). This means you have to rely
on IR map and QMC GI calculations for
the creation of nice shadows. In product
renders this is not such a big problem,
because there will not be much second-
ary bounces anyway. Light that hits the top
of the spheres for example (first bounce),
will bounce back (second bounce) right
into the sky. So this second bounce will
have no effect on the rendering. Only a bit
will bounce in between floor and objects,
or from one object to the other. But the
secondary bounces will not have such a big
influence on lighting and shadow creation.
This will become more of a problem in
interior scene lighting. There, the second
bounce will not go to the sky, but it will
probably hit a ceiling or wall, bouncing
again and again... So in these scenes, the
secondary bounces do have a great im-
pact on final lighting look and shadows.
So in this case, it would be a good idea to
reduce the amount of GI light, by replacing
the first bounce by direct light (‘store with
IR map’ turned off). Think about it, instead
of relying on first bounce GI light to start
with, you now start with direct light which
will illuminate a lot of the scene already
(quality is perfect, it is direct light), then
there is first bounce (IR map) and then
second bounce. I will show this in the inte-
rior lighting tutorial.
To summarize, for product renders you
can greatly benefit from the store with IR
map option, as there are not much second-
ary light bounces. You will need to improve
the IR map settings, resulting in longer GI
calculation, but the actual rendering of the
image will be a lot faster, as there are no
difficult area shadows to render anymore.
The total render time (GI calculation +
raytracing the image) will be a lot lower
than when you use true raytraced area
shadows (here GI calculation will go faster,
but actual raytracing will take a lot longer,
so combined total result is much longer).
See top image with following settings:
- adaptive QMC AA 1/4
- noise threshold=0.002 in QMC sampler
rollout
- IR map: see settings below top image
As you can see, render times are cut in
half, and compared to the raytraced area
shadows examples, there is absolutely no
noise at all! But shadows are a bit less
precise.
Go to the IR map settings and change the
min/max to -4/-3 and the HSph subdivs to
20. In the QMC sampler rollout set noise
threshold to 0.005 again. These are very
fast test render values. Render the image
again. Notice how less detailed the shad-
ows are now (bottom image, spheres look
like they float a bit). But hey, 11.3 seconds
is not bad for a fully antialiased image :-)
14
13. The end
This concludes the studio setup tuto-
rial.
By now, you should better understand
the difference between adaptive subdi-
vision AA and adaptive QMC AA, the
effect of the ‘store with IR map’ option,
and how to create a simple efficient
studio lighting setup.
Save this scene so you can reuse it
in some of the other tutorials still to
come.
Standard Studio Lighting
15

Standard Studio Lighting
©2006 VisMasters. All rights reserved.
VisMasters and the VisMasters logo are trademarks of ArchVision, Inc.
All other trademarks belong to their respective owners.
16
About the author
Wouter Wynen has studied product development for
5 years at the university in Antwerp, Belgium. During
these years, his interest in 3D modeling and visualization
grew more and more. In the end, it even overpowered
the interest in product design.
After graduation, he founded the company Aversis, offer-
ing 3D viz & webdesign services.
Standard Studio Lighting
17
17
17

Standard Studio Lighting
HDR Images in V-Ray
share - learn - inspire
™
Wyszukiwarka
Podobne podstrony:
v ray basics of the render settings part 4 of 5
v ray rendering glass and liquid part 2 of 5
9 Ask?out the underlined part of the sentence
ANOTHER PART OF ME, Michael Jackson, Teksty z tłumaczeniami
7 Ask?out the underlined part of the sentence
Table to?lculate Value of Part of Fortune
20091002 02?ghans turn over weapons and armament?ches as part of the SRP
95554bdab453a5e745 41874913the present perfect simple part 1 of 3
KL Part of Your World
Part of His Charm
Middle School General Music, The Best Part of Your Day
61754bdab7b93849c6 97470827song present perfect we are the champions by queen part 3 of 3
Lot or Part of Fortune by Robert Hand 2
Hal Clement Star Light (Part 1 of 4)
high part of the road
Kulesza, Mariusz; Kaczyńska, Dorota Multinational cultural heritage of the Eastern part of the Comm
Karmic Astrology Joy and the Part of Fortune Volume III by Martin Schulman
więcej podobnych podstron