B
ALD
E
AGLE
Design by Atelier56
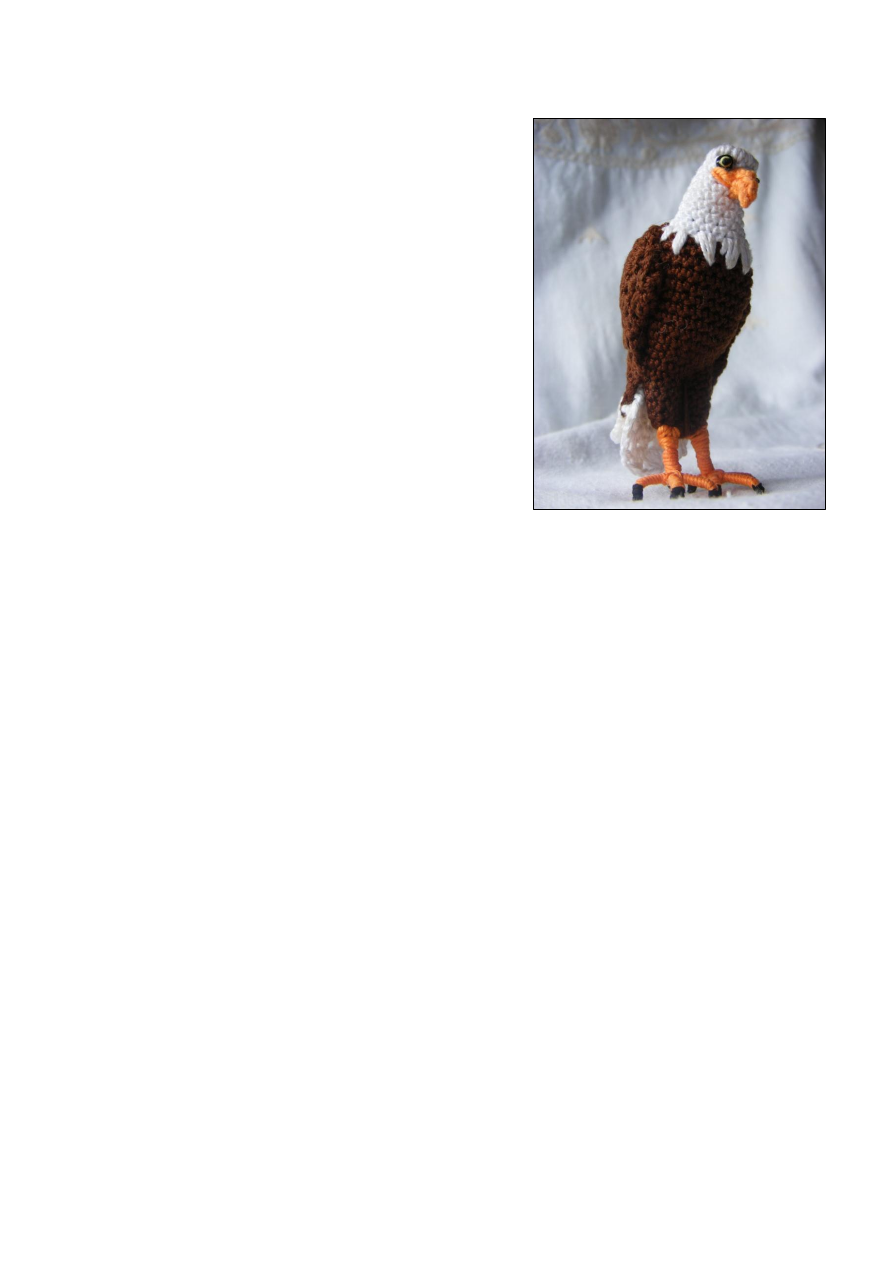
This crochet eagle, as well as this written pattern, was created by
me. She measures 10 cm and as in her composition small and pointy
parts, so it´s not an appropriate toy for small children. You may use
this pattern, as well as the dolls you make from it or from a variation
or adaptation of it, as you like… if you manage to sell this pattern,
please let me know how .
This crochet pattern is mostly worked in rounds, as a spiral and from
a magic ring. The type and number of stitches will be specified thru
out the pattern. In this work I used cotton crochet string n.º 6 in the
colors chocolate brown, white and orange and a crochet needle n.º
2.0mm. These measures are not relevant. You may use the thickness
of string you would like as long as you use a needle with the right
scale. Choosing a different string thickness will result in a scale
variation on the finished doll.
The abbreviations I use in this pattern are the ones I use when I write or transcript crochet dolls patterns, here’s the
translation
1slst – 1 slip stitch;
1sc – 1 single crochet;
2sc – 1 single crochet in each of the next 2 stitches;
2X sc – 2 single crochets in the next stitch;
1hdc – 1 half double crochet;
1dc – 1 double crochet;
3Xdc (popcorn stitch) – make 3 double crochets in the same stitch but do not end any of the double crochets
stitches, leaving one loop of each double crochet on the hook crocheting these loops together in the last stitch;
1 htr – half treble crochet;
1tr- 1 treble crochet;
1 st. – 1 stitch;
Inc. – make 2 crochets in the next stitch;
Dec. – Decrease 1 stitch by joining 2 stitches together;
Ch1 – chain 1 crochet;
T. – Turn, working in the opposite direction;
F.O. – Finish off, leaving a long tail.
L
ET
’
S BEGIN
BODY (C
HOCOLATE BROWN
)
Magic ring 6sc (6);
(2X Inc., 1sc) X 2 (10);
(3X Inc., 2sc) X 2 (16);
5 x 16sc = 80sc (16);
(3sc, inc.) X 2 (18);
this is not a complete round, after the
second increase start counting stitches of next round…
2X 18sc = 36sc (18);
4sc, inc., 3sc, inc., 3sc, inc., 5sc (21);
5sc, Inc., 3sc, Inc., Inc., 3sc, Inc., 6sc (25);
4X 25sc = 100sc (25);
8sc, Inc., 6sc, Inc., 9sc (27);
2X 27sc = 54sc (27);
(7sc, Dec.) X 2 (24);
(2sc, Dec.) X 2 (18);
(7sc, Dec.) X 2 (16);
(6sc, Dec.) X 2 (14);
F.O.
HEAD (W
HITE
)
Magic ring 6sc (6);
(2X Inc., 1sc) X 2 (10);
2X Inc., 8sc (12);
1sc, 2X Inc., 9sc (14);
8sc, 2 X Dec., 2sc (12);
1X 12sc = 12sc (12);
(5sc, Inc.) X 2 (14);
1X 14sc = 14sc (14);
(6sc, Inc.) X 2 (16);
1X 16sc = 16sc (16);
F.O.
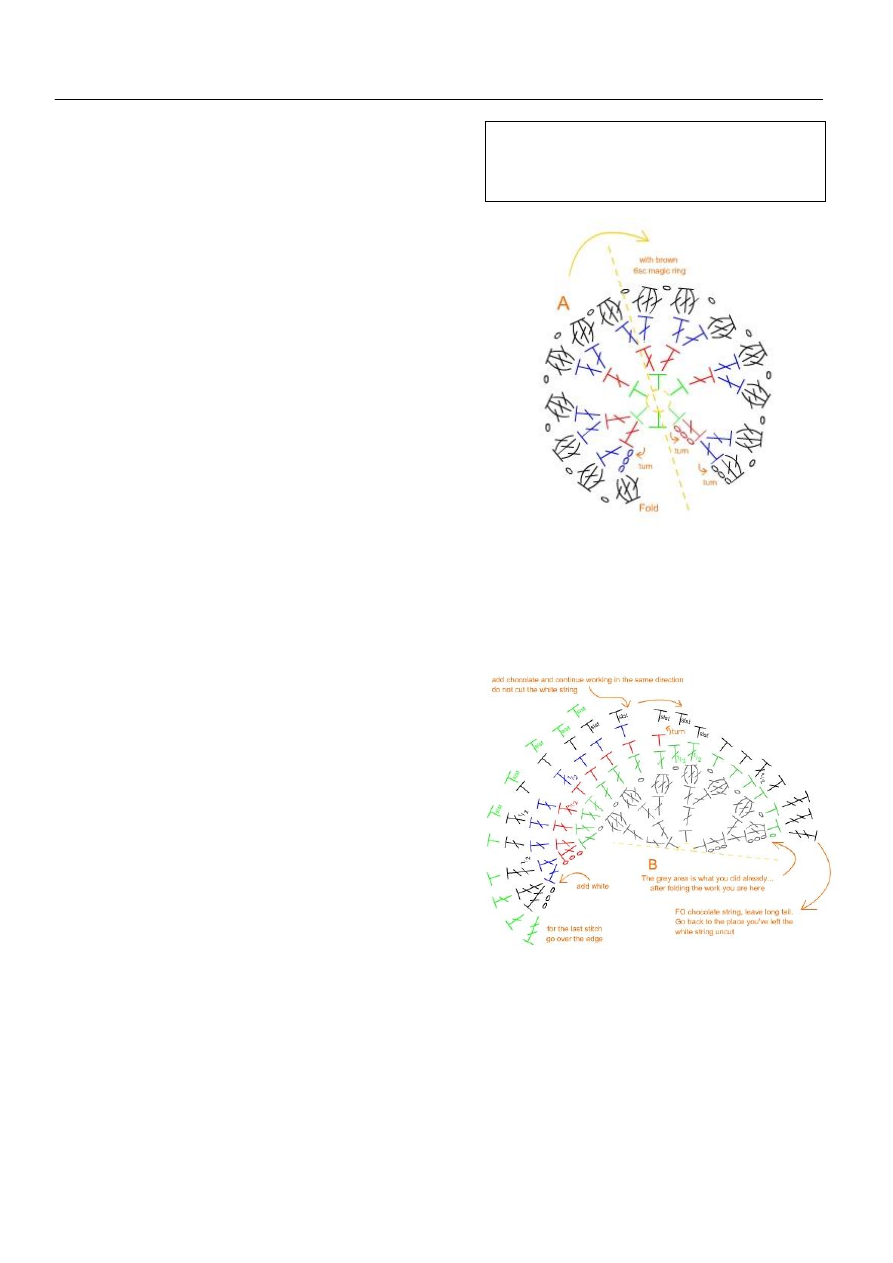
WINGS make two (C
HOCOLATE
B
ROWN AND
W
HITE
)
Begin with chocolate; this piece is not made in rounds:
Magic ring 6sc (6sc);
Ch3, T., dc in the same stitch, dc, 2Xdc, dc, 2xdc (7);
the
last stitch will be left unworked you can follow these
instructions from the drawings A and B…
Ch3, T., dc in the same stitch, (2X dc) X 6 (14);
Ch3, T., [3X dc (popcorn stitch), ch1] X14;
Fold in half, like shown in the picture above, and join
them together with:
Ch1, T., 6sc, 2hdc, 4dc, 2 X dc, 2 X dc;
Ch3, T., 2X dc, 1dc, 1hdc, 8sc;
T., 3sc, 1hdc, 5dc;
Add white:
Ch4, T., 2Xtr, 1htr, 1dc, 1hdc, 3sc, 2slst;
Add chocolate and work in the same direction as you
were working. Do not cut the white string, we will use
it to finish the white feathers:
Wings pattern: Make two. Start with chocolate string in drawing
A (each round is marked in a different color). Fold the work in
half (marked with the dotted line) and continue working with
drawing B.
3slst, 2sc, 1hdc, 1dc, 1tr., 2 X tr. (until the edge), F.O.
the chocolate string and leave a big tail.
Go back to the place where you add the chocolate and
left the uncut white string, insert your hook in the last
white stitch of the last round, pull the white string
through and turn. We will make one more round in
the direction of the end of the white feathers:
5slst, 2sc, 2dc, 1tr;
F.O.
TAIL (W
HITE
)
This piece is not made in a spiral:
Ch8, 5tr starting from the 4
th
chain from hook;
Ch3, T., [3x tr (popcorn stitch), Ch1] X 5;
Ch3, T., [3x tr (popcorn stitsh), Ch1] X 5;
T., [3X tr (popcorn stitch), Ch1] X 3, 1tr;
F.O.
BEAK (O
RANGE
)
This piece is not made in a spiral:
Ch5, 4sc starting from the 2
nd
chain from hook;
Ch1, T., 2X Dec.;
Ch1, T., 2sc;
T., 1sc;
F.O. flatten and sow the ends together shaping the
beak as you go along.
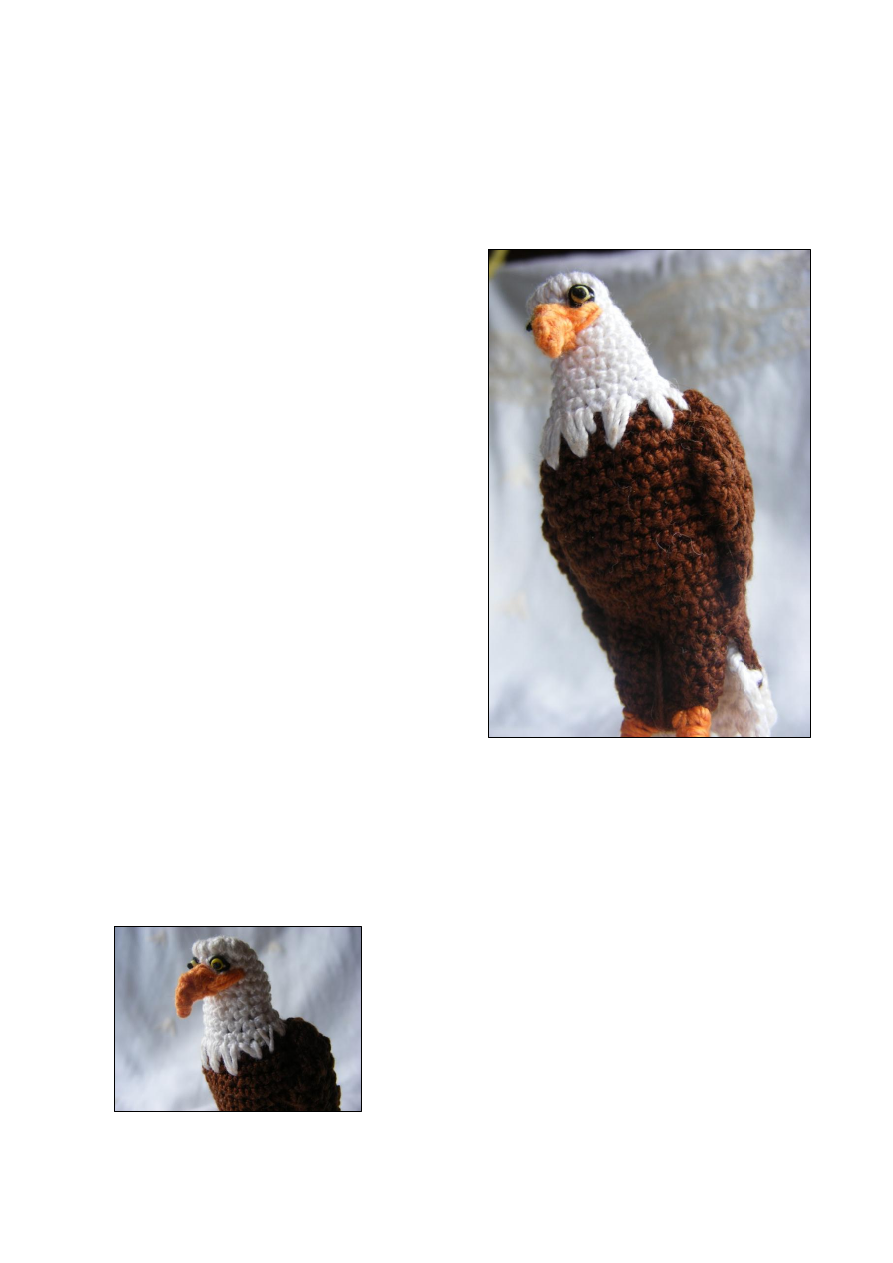
ASSEMBLAGE
Stuff the body and head lightly and assemble the two
pieces making sure you center the head and body
properly. Use the white string that is left to embroider
the neck feathers (see picture).
Do not cut the white string. We are using it to make
the eyebrow.
Sew the beak in place and embroider to each side of
the face the beak’s extensions.
Using the white string from the embroidered feathers,
place the needle at the top of the head, aligned with
one end of the beak, and embroider the eyebrow
making stitches in all the front of the head until you
reach the alignment with the other end of the beak.
For the eyes I used two yellow beads that were
attached to the head by a black string with a knot. Use
the remaining black string to embroider the contour
of the eyes (see picture above).
For the feet I used wire to make the claws and ankles
struture, and covered it with orange string rolled
around the wire and glued with white glue and water
(white glue, normaly used for wood, becames
transparent when dry). Don’t forget to leave a piece
of bare wire in each feet, and a long orange string tail.
After the glue is dry and with the help os plyers bend
the end of each claw to make the nails and paint them
with black watercolor. Sew the legs in place by
inserting the bare wire in the body and using the
orange string to fix them.
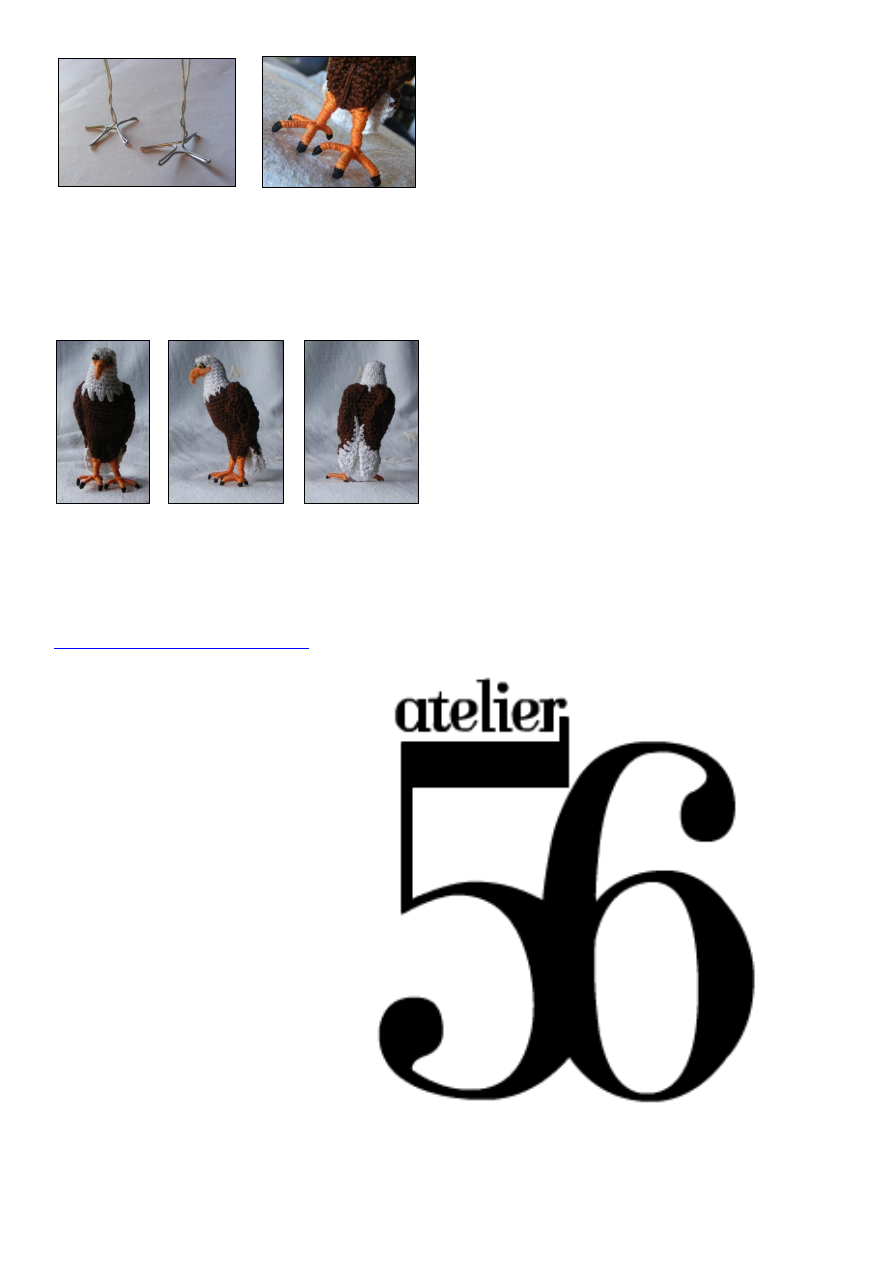
Sew the tail in place positioning it to reach the floor.
Then assemble the wings putting them in a position
where it gives the illusion of a larger chest and resting
the white feathers end on top of the tail like it’s
shown in the pictures below.
This pattern was written while making the crocheted
eagle and was not tested, so it could have mistakes. If
you have any problems with the pattern and need
help please contact me thru facebook message in
http://www.facebook.com/oatelier56
Last reviewed October 4, 2014~
Ana Casals
Wyszukiwarka
Podobne podstrony:
ACESSE 75 LIVROS DE MODA EM PDF EM http
Em Ashcroft [The Tigers of Texas 01] On the Prowl [Siren Menage Everlasting] (pdf)
poker wspolczesny texas hold em i inne odmiany pokera darmowy ebook pdf
Em Ashcroft [The Tigers of Texas 02] Her Tiger Protectors [Siren Menage Everlasting] (pdf)
EM Lynley Sex, Lies & Wedding Bells (pdf)(1)
EM DYSTRYBUCJA
EM t 4 Ceny
EM t 6 produkcja
instr 2011 pdf, Roztw Spektrofoto
Poker współczesny Texas Hold'em i inne odmiany pokera (2)
(ebook PDF)Shannon A Mathematical Theory Of Communication RXK2WIS2ZEJTDZ75G7VI3OC6ZO2P57GO3E27QNQ
KSIĄŻKA OBIEKTU pdf
zsf w3 pdf
CAD CAM KWPPWPS Zad graf PDF
em
10 Produkty strukt PDF
biuletyn katechetyczny pdf id 8 Nieznany
excel 2013 pdf converter
więcej podobnych podstron