
SELinux System Administration
A comprehensive guide to walk you through SELinux
access controls
Sven Vermeulen
BIRMINGHAM - MUMBAI

SELinux System Administration
Copyright © 2013 Packt Publishing
All rights reserved. No part of this book may be reproduced, stored in a retrieval
system, or transmitted in any form or by any means, without the prior written
permission of the publisher, except in the case of brief quotations embedded in
critical articles or reviews.
Every effort has been made in the preparation of this book to ensure the accuracy
of the information presented. However, the information contained in this book is
sold without warranty, either express or implied. Neither the author, nor Packt
Publishing, and its dealers and distributors will be held liable for any damages
caused or alleged to be caused directly or indirectly by this book.
Packt Publishing has endeavored to provide trademark information about all of the
companies and products mentioned in this book by the appropriate use of capitals.
However, Packt Publishing cannot guarantee the accuracy of this information.
First published: September 2013
Production Reference: 1170913
Published by Packt Publishing Ltd.
Livery Place
35 Livery Street
Birmingham B3 2PB, UK.
ISBN 978-1-78328-317-0
www.packtpub.com
Cover Image by Jarek Blaminsky (
milak6@wp.pl
)

Credits
Author
Sven Vermeulen
Reviewers
Thomas Fischer
Dominick Grift
Acquisition Editor
Kartikey Pandey
Commissioning Editor
Neha Nagwekar
Technical Editor
Krishnaveni Haridas
Project Coordinator
Suraj Bist
Proofreaders
Ameesha Green
Maria Gould
Simran Bhogal
Indexer
Priya Subramani
Graphics
Abhinash Sahu
Production Coordinator
Nitesh Thakur
Cover Work
Nitesh Thakur

About the Author
Sven Vermeulen
is a long term contributor to various free software projects
and the author of various online guides and resources. He got his first taste of free
software in 1997 and never looked back since then. In 2003, he joined the ranks of the
Gentoo Linux project as a documentation developer and has crossed several roles
after that, including Gentoo Foundation’s trustee, council member, project leads for
documentation, and (his current role) project lead for Gentoo Hardened’s SELinux
integration.
In this time frame, he has gained expertise in several technologies, ranging from
operating system level knowledge to application servers as he used his interest
in security to guide his projects further: security guides using SCAP languages,
mandatory access controls through SELinux, authentication with PAM, (application)
firewalling, and more.
On SELinux, he has contributed several policies to the reference policy project and
participates actively in policy development and user space development projects.
Sven is an IT infrastructure architect working at a European financial institution.
Secured implementation of infrastructure (and the surrounding architectural
integration) is of course an important part of this. Prior to this, he graduated with an
MSc in Computer Engineering at the University of Ghent and then worked as a web
application infrastructure engineer with IBM WebSphere AS.

Sven is the main author of Gentoo’s Handbook which covers the installation
and configuration of Gentoo Linux on several architectures. He also authored the
Linux Sea online publication, which is a gentle introduction to Linux for novice
system administrators.
I would like to thank the SELinux community for their never-ending
support in the field, especially the guys frequenting the #selinux chat
channel (you know who am I referring to, especially you Dominick.)
Without their assistance, I probably wouldn’t have probably been
able to be where I am today with SELinux. The same goes to the
team members of the Gentoo Hardened project, who despite their
geographically distributed nature, are always working together to
get Gentoo Linux to a more secure state. Finally, I would like a to
give special mention to my colleague “wokwok” for making security
a fun field. His approach to security always makes me smile and
ensures that this (very) broad and multi-disciplinary field is always
alive and kicking.

About the Reviewers
Thomas Fischer
is a Computer and IT security specialist since the last 15 years. He
is experienced in most fields of IT security and is a master in different programming
languages. He was the CEO of a German web and IT company over eight years,
and also was also the system architect and administrator for various companies
in the professional bike sport scene, Germany. He studied computer networking
and security and safety engineering in Furtwangen in the Black Forest. A specialist
had made talks at different conferences on the topics of web security and the Linux
workstation. Thomas Fischer took part in different international IT security war
games and the ICTF 2012. When he is not busy with his machine, he enjoys long
distance cycling or extreme mountain bike races.
Dominick Grift
has been an SELinux contributor and enthusiast. He has almost
10 years of experience in providing SELinux support to the community. He has
been a reference policy contributor and co-maintainer, and Fedora SELinux policy
co-maintainer.
I would like to thank the SELinux community for bringing me to the
position where I am today.

www.PacktPub.com
Support files, eBooks, discount offers and more
You might want to visit www.PacktPub.com for support files and downloads related to
your book.
Did you know that Packt offers eBook versions of every book published, with PDF and ePub
files available? You can upgrade to the eBook version at www.PacktPub.com and as a print
book customer, you are entitled to a discount on the eBook copy. Get in touch with us at
service@packtpub.com
for more details.
At www.PacktPub.com, you can also read a collection of free technical articles, sign up for
a range of free newsletters and receive exclusive discounts and offers on Packt books and
eBooks.
http://PacktLib.PacktPub.com
Do you need instant solutions to your IT questions? PacktLib is Packt’s online digital book
library. Here, you can access, read and search across Packt’s entire library of books.
Why Subscribe?
• Fully searchable across every book published by Packt
• Copy and paste, print and bookmark content
• On demand and accessible via web browser
Free Access for Packt account holders
If you have an account with Packt at www.PacktPub.com, you can use this to access
PacktLib today and view nine entirely free books. Simply use your login credentials for
immediate access.


Table of Contents
Preface 1
Chapter 1: Fundamental SELinux Concepts
Providing more security to Linux
Linux security modules to the rescue
Enabling SELinux – not just a switch
Policies – the ultimate dictators
SELinux policy store names and options
Dealing with unknown permissions
Chapter 2: Understanding SELinux Decisions and Logging
Switching to permissive (or enforcing) temporarily
Disabling SELinux protections for a single service

Table of Contents
[
ii
]
Configuring SELinux' log destination
Chapter 3: Managing User Logins
The rationale behind unconfined
Limiting access based on confidentiality
Jumping from one role to another
Full role switching with newrole
Managing role access with sudo
Context switching during authentication
Chapter 4: Process Domains and File-level Access Controls
Reading and changing file contexts
Working with context expressions
Placing categories on files and directories
Transitioning towards a domain

Table of Contents
[
iii
]
Chapter 5: Controlling Network Communications
Integrating with Linux netfilter
Packet labeling through netfilter
Differentiating between server and client communication
Introducing labeled networking
Limiting flows based on the network interface
Accepting communication from selected hosts
Chapter 6: Working with SELinux Policies
Inspecting the impact of Boolean
Handling SELinux policy modules
Troubleshooting using audit2allow
Building reference policy modules
Creating roles and user domains

Table of Contents
[
iv
]
Other uses of policy enhancements
Creating customized SECMARK types

Preface
Be it for personal use or for larger enterprises, system administrators have often
an ungrateful job of protecting the system from malicious attacks and undefined
application behavior. Providing security to systems is a major part of their job
description, and to accomplish this there are a large set of security technologies
are at the administrator's disposal, such as firewalls, file integrity validation tools,
configuration enforcement technologies, and many more. Major parts of system
security is the authentication of users, authorization of these users, and auditing of
all changes and operations made on the system. Users, however, are becoming more
experienced with working around regular access controls that are designed to keep
the system safe, and application vulnerabilities are often exposing much more of the
system than what the application should have access to.
Fine-grained access controls and enforcement by the system are needed so that users
do not need to look for workarounds, and application vulnerabilities remain within
the scope of the application. Linux has replied to this demand with a flexible security
architecture in which mandatory access control systems can be defined. One of these
is SELinux, the security-enhanced Linux subsystem.
More and more distributions are bundling SELinux support with their offerings,
making SELinux available to the mass population of Linux administrators. Yet
SELinux is often found to be a daunting technology to work with. Be it due to
misunderstandings or lack of information, too many times SELinux is being disabled
in favor of rapid fixing of permission issues. This, however, is not fixing an issue but
it is ignoring an issue and removing the safe barriers that were put in place to protect
the system from them.
In this book, we will describe the SELinux concepts and show how to leverage
SELinux to improve the secure state of a Linux system. Together with examples and
command references, this book will offer a complete view on SELinux and how it
integrates with various other components on a Linux system.

Preface
[
2
]
What this book covers
Chapter 1, Fundamental SELinux Concepts, describes SELinux covering the basic
concepts of this mandatory access control system needed to understand how
and why SELinux-enabled systems behave as they do.
Chapter 2, Understanding SELinux Decisions and Logging, focuses on the enforcement
of rules within an SELinux system and how are they related to a Linux system. It
explains how and what SELinux logs on the system and how SELinux can be enabled
or disabled.
Chapter 3, Managing User Logins, teaches how to manage users and logins on a
SELinux system and how to assign roles based on the user's needs. It describes the
integration of SELinux with other technologies such as PAM or
sudo
, and gives us a
first taste of what unconfined domains mean to an SELinux system.
Chapter 4, Process Domains and File-level Access Controls, describes the SELinux access
control rules based on file accesses. We see how SELinux uses file contexts and
process contexts and how we can interrogate the SELinux policy.
Chapter 5, Controlling Network Communications, introduces us to access controls on
the network level. We see how the standard SELinux socket-based access controls
work, and how we can leverage the Linux netfilter system to label network packets.
The chapter also gives a brief introduction to the labeled IPSec and NetLabel/CIPSO
support, two technologies that can transport SELinux labels across systems.
Chapter 6, Working with SELinux Policies, discusses how to tune SELinux policies,
either through SELinux Booleans or by adding additional rules on top of the
existing policy. This chapter covers how to use distribution provided tools, as
well as manually maintaining additional SELinux policy modules and finish
off with a set of use case-driven examples for enhancing SELinux policies.
Who this book is for
This book targets Linux system administrators who have a good understanding
of how does Linux work and want to understand and work with the SELinux
technology. It might also be interesting for IT architects to understand how SELinux
can be positioned to enhance the security of Linux systems within their organization.
Preface
[
3
]
Conventions
In this book, you will find a number of styles of text that distinguish between
different kinds of information. Here are some examples of these styles, and an
explanation of their meaning.
Code words in text are shown as follows: "The context can be seen using the regular
file listing tools such as
ls -Z
or
stat
."
A block of code is set as follows:
/etc/resolv.conf
/etc/mtab
/var/run/utmp
~/public_html
~/.mozilla/plugins/libflashplayer.so
When we wish to draw your attention to a particular part of a code block, the
relevant lines or items are set in bold:
<VirtualHost *:80>
DocumentRoot /var/www/sales
ServerName sales.genfic.com
selinuxDomainMap /etc/apache/selinux/mod_selinux.map
</VirtualHost>
Any command-line input or output is written as follows:
$ chcat -- +Customer2 index.html
New terms and important words are shown in bold. Words that you see on the
screen, in menus or dialog boxes for example, appear in the text like this: "This
usually is "denied", although some actions are explicitly marked for auditing and
would result in "granted"".
Warnings or important notes appear in a box like this.
Tips and tricks appear like this.

Preface
[
4
]
Reader feedback
Feedback from our readers is always welcome. Let us know what you think about
this book—what you liked or may have disliked. Reader feedback is important for
us to develop titles that you really get the most out of.
To send us general feedback, simply send an e-mail to
feedback@packtpub.com
,
and mention the book title through the subject of your message.
If there is a topic that you have expertise in and you are interested in either writing
or contributing to a book, see our author guide on
www.packtpub.com/authors
.
Customer support
Now that you are the proud owner of a Packt book, we have a number of things to
help you to get the most from your purchase.
Downloading the example code
You can download the example code files for all Packt books you have purchased
from your account at
http://www.packtpub.com
. If you purchased this book
elsewhere, you can visit
http://www.packtpub.com/support
and register to
have the files e-mailed directly to you.
Errata
Although we have taken every care to ensure the accuracy of our content, mistakes
do happen. If you find a mistake in one of our books—maybe a mistake in the text or
the code—we would be grateful if you would report this to us. By doing so, you can
save other readers from frustration and help us improve subsequent versions of this
book. If you find any errata, please report them by visiting
http://www.packtpub.
com/support
, selecting your book, clicking on the errata submission form link, and
entering the details of your errata. Once your errata are verified, your submission
will be accepted and the errata will be uploaded to our website, or added to any list
of existing errata, under the Errata section of that title.

Preface
[
5
]
Piracy
Piracy of copyright material on the Internet is an ongoing problem across all media.
At Packt, we take the protection of our copyright and licenses very seriously. If you
come across any illegal copies of our works, in any form, on the Internet, please
provide us with the location address or website name immediately so that we
can pursue a remedy.
Please contact us at
copyright@packtpub.com
with a link to the suspected
pirated material.
We appreciate your help in protecting our authors, and our ability to bring you
valuable content.
Questions
You can contact us at
questions@packtpub.com
if you are having a problem with
any aspect of the book, and we will do our best to address it.


Fundamental SELinux
Concepts
SELinux (Security Enhanced Linux) brings additional security measures for your
Linux system to further protect the resources on the system.
In this chapter, we will cover:
• Reasons for SELinux using labels to identify resources
• The way SELinux differentiates itself from regular Linux access controls
through the enforcement of security rules
• How to know these rules are provided through policy files
At the end, we will provide an overview of the differences between SELinux
implementations across distributions.
Providing more security to Linux
Seasoned Linux administrators and security engineers already know that they need
to have some trust in the users and processes on their system in order for the system
to remain secure. Part of that is because users can attempt to exploit vulnerabilities
found on the software running on the system, but a large part of it is because the
secure state of the system depends on the behavior of the users. A Linux user with
access to sensitive information can easily leak that out to the public, manipulate the
behavior of the applications he launches, and can do many more things. The default
access controls in place in a regular Linux system are discretionary, meaning it is up
to the user's discretion how the access controls should behave.

Fundamental SELinux Concepts
[
8
]
The Linux DAC (Discretionary Access Control) mechanism is based on the user
and/or group information of the process versus the user and/or group information
of the file, directory, or other resource that is being manipulated. Consider the
/etc/
shadow
file, which contains the password and account information of the local Linux
accounts:
$ ls -l /etc/shadow
-rw------- 1 root root 1010 Apr 25 22:05 /etc/shadow
Without additional access control mechanisms in place, this file is readable and
writable by any process that is owned by the root user, regardless of the purpose
of the process on the system. The
shadow
file is a typical example of a sensitive file
that we don't want to see leaked or abused in any other fashion. Yet, the moment
someone has access to the file he can copy it elsewhere, for example, to their home
directory or even mail it to his own computer and attempt to attack the password
hashes stored within.
Another example of how Linux DAC requires trust from its users is when a database
is hosted on the system. Database files themselves are (hopefully) only manageable
by the runtime user of the database management system (DBMS) and the Linux
root user. Properly secured systems will grant the additional users access to these
files (for instance through
sudo
) by allowing these users to change their effective user
ID from their personal user to the database runtime user, or even root. Those users
too can analyze the database files and gain access to potentially very confidential
information in the database without going through the DBMS.
But users are not the only reason of securing a system. Lots of software daemons
run as the Linux root user or have significant privileges on the system. Errors within
those daemons can easily lead to information leakage or might even be exploitable
remote command execution vulnerabilities. Backup software, monitoring software,
change management software, scheduling software, and so on, they all often run
with the highest privileged account possible on a regular Linux system. Even when
the administrator does not fully trust the users, their interaction with the daemons
still induces a potential security risk. As such, the users still get some kind of trust in
order for the system to function properly. And through that, he leaves the security of
the system to the discretion of its (many) users.

Chapter 1
[
9
]
Enter SELinux which provides an additional access control layer on top of the
standard Linux DAC mechanism. SELinux provides a MAC (Mandatory Access
Control) system that, unlike its DAC counterpart, gives the administrator full
control over what is allowed on the system and what isn't. It accomplishes this by
supporting a policy-driven approach on what processes are and aren't allowed to
do and what not, and enforcing this policy through the Linux kernel.
The word "mandatory" here, just like the word "discretionary" before, is not
chosen by accident to describe the abilities of the access control system. Both
are known terms in the security research field and have been described in many
other publications, including the TCSEC (Trusted Computer System Evaluation
Criteria) (
http://csrc.nist.gov/publications/history/dod85.pdf
) standard
(also known as the "Orange Book") by the Department of Defense, in the United
States of America's in 1985. This publication has lead to the common criteria
standard for computer security certification at (ISO/IEC 15408)
http://www.
commoncriteriaportal.org/cc/
.
Mandatory means that access control is enforced by the operating system and
defined solely by the administrator. Users and processes that do not have the
permission to change the security rules cannot work around the access control;
security is not left at their discretion anymore.
Linux security modules to the rescue
Consider the example of the
shadow
file again. A MAC system can be configured
so that the file can only be read from and written to by particular processes. A user
logged on as root cannot directly access the file or even move it around. He can't
even change the attributes of the file:
# id
uid=0(root) gid=0(root)
# cat /etc/shadow
cat: /etc/shadow: Permission denied
# chmod a+r /etc/shadow
chmod: changing permissions of '/etc/shadow': Permission denied
Fundamental SELinux Concepts
[
10
]
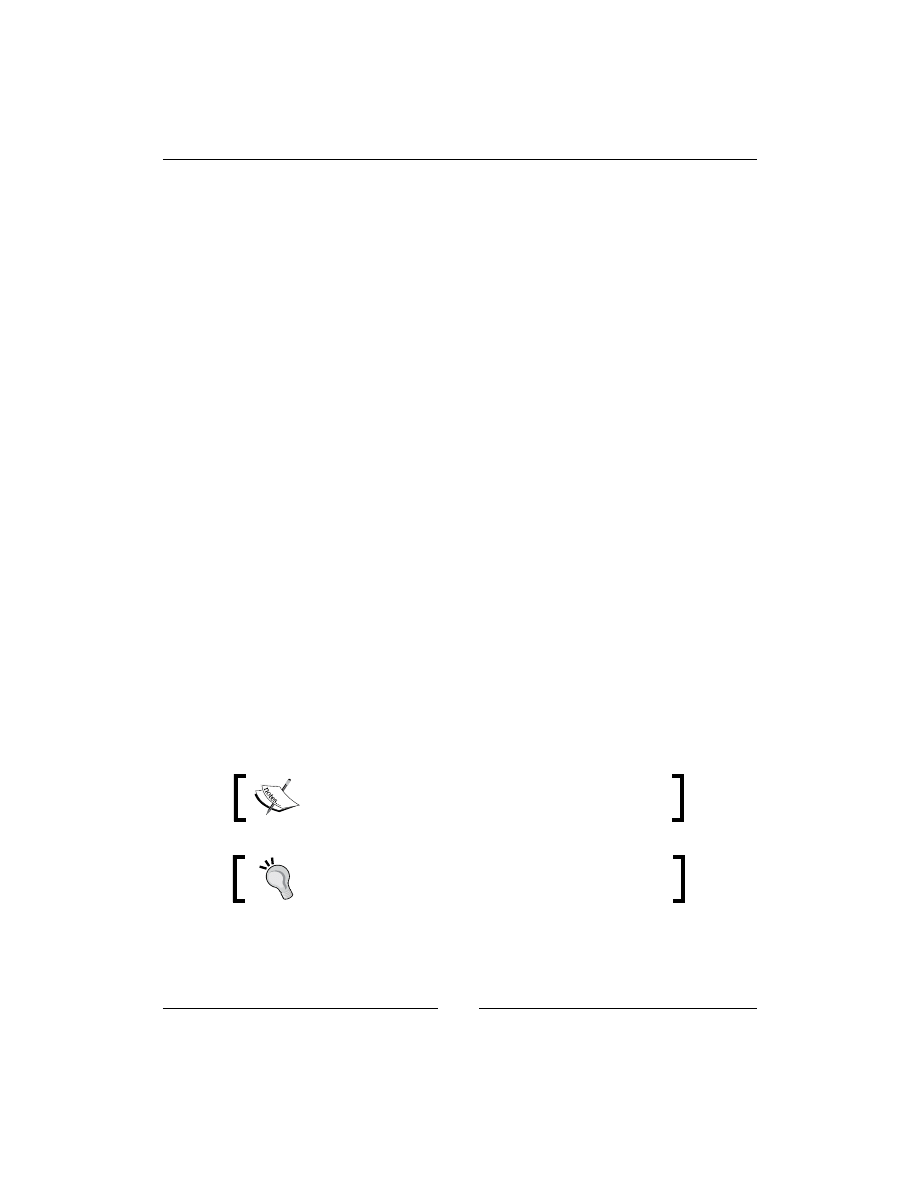
This is enforced through rules that describe when the contents of a file can be read.
With SELinux, these rules are defined in the SELinux policy and are loaded when the
system boots. It is the Linux kernel itself that is responsible for enforcing the rules,
and does so through LSM (Linux Security Modules).
Call ok?
LSM returns yes/no
Process
Lookup data
Error checks
DAC checks
LSM hook
Linux Security
Module
(e.g. SELinux)
OK
User space
Kernel space
Return
system call
result
Permission
denied
Permission
denied
LSM ok
DAC ok
no errors
system call
error
High-level overview of how LSM is integrated in the Linux kernel
LSM has been available in the Linux kernel since version 2.6, somewhere in
December 2003. It is a framework that provides "hooks" inside the Linux kernel
on various locations, including the system call entry points, and allows a security
implementation (for example, SELinux) to provide functions to be called when a
hook is triggered. These functions can then do their magic (for instance, checking
the policy and other information) and give a go / no go back to allow the call to go
through or not. LSM by itself does not provide any security functionality, instead
it relies on security implementations that do heavy lifting. SELinux is one of these
implementations that uses LSM, but others such as TOMOYO Linux and AppArmor
also use it.

Chapter 1
[
11
]
SELinux versus regular DAC
SELinux does not change the Linux DAC implementation, nor can it override denials
made by the Linux DAC permissions. If a regular system (without SELinux) prevents
a particular access, there is nothing SELinux can do to override this decision. This is
because the LSM hooks are triggered after the regular DAC permission checks have
been done.
If you need to allow an additional user access to a file, you will need to look into
other features of Linux such as the use of POSIX Access Control Lists through the
setfacl
and
getfacl
commands. These allow the user (not only the administrator!)
to set additional access controls on files and directories, opening up the provided
permission to additional users or groups.
Restricting root privileges
The regular Linux DAC allows for an all-powerful user: root. Unlike most other
users on the system, a logged on root user has all the rights needed to fully manage
the entire system, ranging from overriding access controls to controlling audit,
changing user ID, managing the network, and many more. This is handled through a
security concept called capabilities (for an overview of Linux capabilities, check out
the capabilities manual page:
man capabilities
). SELinux is also able to restrict
access to these capabilities in a fine-grained manner.
Due to this fine-grained authorization aspect of SELinux, even the root user can
be quite confined without impacting the operations on the system. The example of
accessing
/etc/shadow
previously is just one example of things that a powerful user
as root still might not be able to do due to the SELinux access controls in place.
When SELinux was added to the mainstream Linux kernel, some security projects
even went as far as providing public root shell access to a SELinux protected system,
asking hackers and other security researchers to compromise the box. The ability to
restrict root was welcomed by system administrators that sometimes need to pass on
the root password or root shell to other users (for example, database administrators)
that needed root privileges when their software went haywire. Thanks to SELinux,
the administrator can now pass on a root shell while reassuring himself that the user
only has those rights he needs, and not full system administration rights.

Fundamental SELinux Concepts
[
12
]
Enabling SELinux – not just a switch
To enable SELinux on a Linux system, it is not just a matter of enabling the SELinux
LSM module within the Linux kernel. SELinux comprises not only of the kernel
implementation, but also has libraries and utilities that are needed on the system.
These libraries and utilities are called the SELinux userspace (
http://userspace.
selinuxproject.org/trac
). Next to the userspace applications and libraries,
various components on a Linux system need to be updated with SELinux-specific
code, including the
init
system, core utilities, and the C library. And finally, we
need a policy that tells SELinux how it should enforce access.
Because SELinux isn't just a switch that needs to be toggled, Linux distributions
that support SELinux usually come with SELinux predefined and loaded: Fedora
and RedHat Enterprise Linux (with its derivatives, for example, CentOS and Oracle
Linux) are the most well-known examples. Other supporting distributions might not
automatically have SELinux enabled but can easily support it through the installation
of additional packages (which is the case for Debian and Ubuntu), and others have
a well-documented approach on how to convert a system towards SELinux (for
example, Gentoo and Arch Linux).
Throughout the book, examples will be shown from Gentoo and Fedora 19 (which
is similar to RedHat Enterprise Linux). We opt to use these two because they have
different implementation details, allowing us to show the full potential of SELinux.
Everything gets a label
In natural language, the term "context" can be used in a sentence for example, "it
depends on the context". Well, with SELinux, it does depend on the context! The
context of a process is what identifies the process to SELinux. SELinux has no notion
of Linux process ownership and frankly doesn't care how the process is called, which
process ID it has and under which account the process runs. All it wants to know is
what the context is of that process. Let's look at an example context: the context of the
current user (try it out yourself if you are on a SELinux enabled system):
$ id -Z
unconfined_u:unconfined_r:unconfined_t:s0-s0:c0.c1023
The
id
command, which returns information about the current user, with the
-Z
switch (a commonly agreed switch for displaying SELinux information) shows us the
context of the current user (actually the context of the id process itself when it was
executing). As we can see, the context is a string representation, and looks like it has
five fields (it doesn't, it has four fields. The last field just happens to contain a ':').

Chapter 1
[
13
]
SELinux developers decided to use contexts (strings) instead of real process metadata
as well as contexts on resources (often called labels) for its access controls. This is
different to MAC systems such as AppArmor which use the path of the binary (and
thus the process name) and the paths of the resources to handle permission checks.
The decision to make SELinux a label-based mandatory access control was taken for
various reasons, which are as follows:
• Using paths might be easier for administrators, but this doesn't allow to keep
the context information close to the resource. If a file or directory is moved,
remounted, or a process has a different namespace view on the files, the
access controls might behave differently. With contexts, this information
is retained and the system keeps controlling the resource properly.
• Contexts reveal the context of the process very well. The same binary
application can be launched in different contexts depending on how it got
started. The context value (for example, the one shown in the
id -Z
output
earlier on) is exactly what the administrator needs. With it, he knows what
the rights are of each of the running instances, but he can also deduce from
it how the process might have been launched.
• Contexts also make abstraction of the object itself. We are talking now about
processes and files, but this is also applicable to less tangible resources, for
example: pipes (inter-process communication) or database objects. Path-
based identification only works as long as you can write a path.
As an example, consider the following two sentences:
• Allow the
httpd
processes to bind to the TCP port 80
• Allow the processes labeled with "
httpd_t
" to bind to TCP ports labeled
with "
http_port_t
"
In the first example, we cannot easily reuse this policy when the web server process
isn't using the
httpd
binary (perhaps because it was renamed, or it isn't Apache but
another web server), or when we want to have HTTP access on a different port. With
the labeled approach, the binary can be called "
apache2
" or "
MyWebServer.py
"; as
long as the process is labeled
httpd_t
then the policy applies. The same with the
port definition, you can label port 8080 with
http_port_t
and thus allow the web
servers to bind to that port as well.
The context fields
To come to a context, SELinux uses at least three, and sometimes four values. Let us
look at the context of the Apache web server as an example:
$ ps -eZ | grep httpd
system_u:system_r:httpd_t:s0 511 ? 00:00:00 httpd

Fundamental SELinux Concepts
[
14
]
As we can see, the process is assigned a context which is made up of the
following fields:
•
system_u
- represents the SELinux user
•
system_r
- represents the SELinux role
•
httpd_t
- represents the SELinux type (also known as domain in case
of a process)
•
s0
- represents the sensitivity
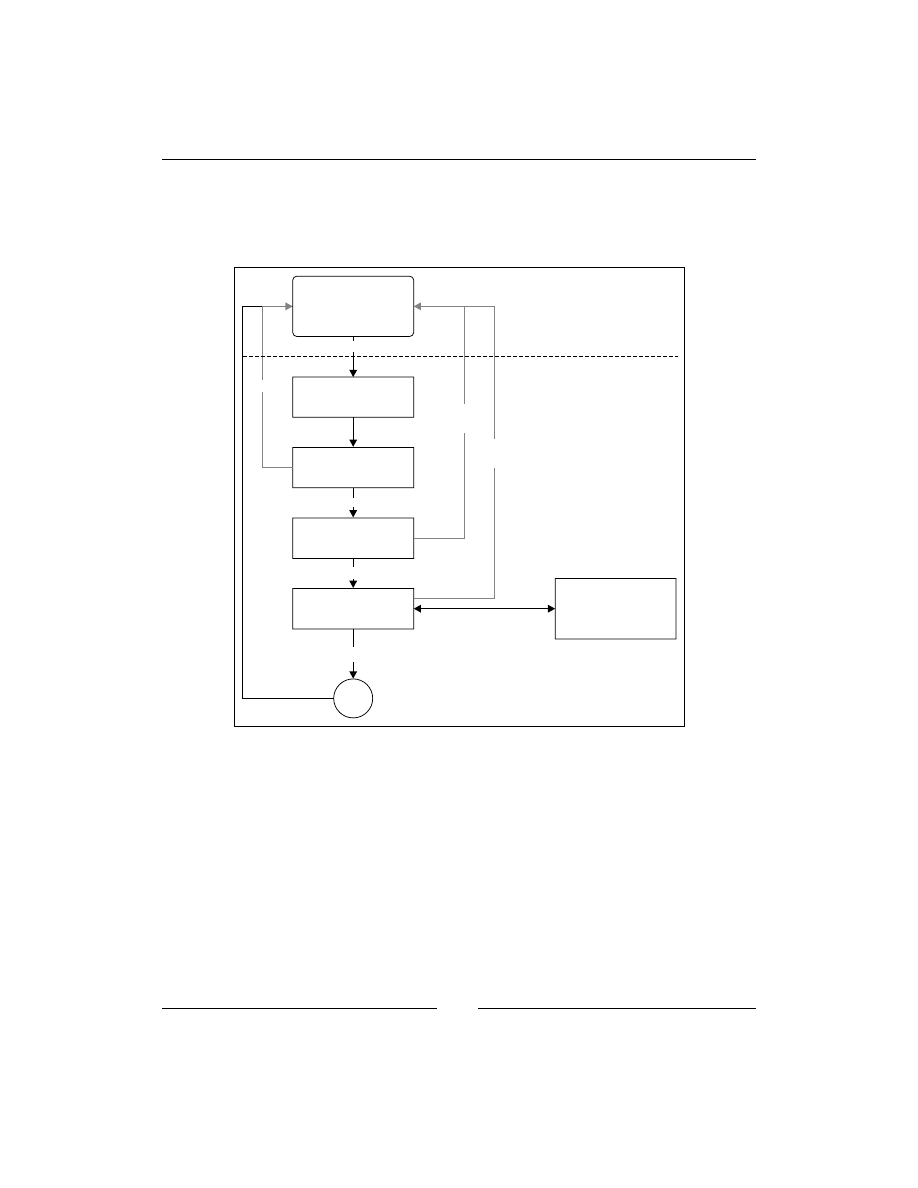
The roles can be depicted as follows:
unconfined_u
unconfined_r
unconfined_t
s0-s0:c0.c1023
SELinux user
SELinux role
SELinux type
Sensitivity level
Structure of a SELinux context, using the id -Z output as an example
When we work with SELinux, contexts are all that we need. In the majority of cases,
it is the third field (called the domain or type) that is most important as the majority
of SELinux policy rules (over 99 percent) consists of rules related to the interaction
between two types (without mentioning roles, users, or sensitivities).
SELinux types
As mentioned, SELinux is a label-based access control mechanism. In most SELinux
literature, this is fine-tuned to say that SELinux is a type enforcement mandatory
access control system. This is because the type of a process (called the domain)
defines the fine-grained access controls of that process with respect to itself or other
types (which can be processes, files, sockets, network interfaces, and more). When
some access attempts are denied, the fine-grained access controls on the type level
are most likely to blame.
With type enforcement, SELinux is able to control what an application is allowed
to do based on how it got executed in the first place: a web server that is launched
interactively by a user will run with a different type than a web server executed
through the
init
system, even though the process binary and path are the same. The
web server launched from the
init
system is most likely trusted (and thus allowed to
do whatever web servers are supposed to do), whereas a user launched web server is
less likely to be of "normal behavior" and as such will have different privileges.

Chapter 1
[
15
]
For instance, look at the following
dbus-daemon
processes:
# ps -eZ | grep dbus-daemon
system_u:system_r:system_dbusd_t 4531 ? 00:00:00 dbus-daemon
staff_u:staff_r:staff_dbusd_t 5266 ? 00:00:00 dbus-daemon
In the preceding example, one
dbus-daemon
process is the system
D-Bus daemon
running with the aptly named
system_dbusd_t
type, whereas another one is
running with the
staff_dbusd_t
type assigned to it. Even though their binaries are
completely the same, they both serve a different purpose on the system and as such
have a different type assigned. SELinux then uses this type to govern the actions
allowed by the process towards other types, including how
system_dbusd_t
can
interact with
staff_dbusd_t
.
SELinux types are by convention suffixed with "
_t
", although this is not mandatory.
SELinux roles
SELinux roles - the second part of a SELinux context, enable SELinux to support
role-based access controls. Although type enforcement is the most used (and known)
part of SELinux, role-based access control is vital in order to keep a system secure,
especially from malicious user attempts. SELinux roles are used to define which
types a user processes can be in. As such, SELinux roles help define what a user
can and cannot do.
On most SELinux enabled systems, the following roles are made available to be
assigned to users. By convention, SELinux roles are defined with an "
_r
" suffix.
Some of the roles and their descriptions are as follows:
user_r
This role is meant for restricted users, the user_r SELinux role is only
allowed to have processes with types specific to end-user applications.
Privileged types, for instance, those used to switch Linux user are not
allowed for this role.
staff_r
This role is meant for non-critical operator tasks, the SELinux staff_r
role is generally restricted to the same applications as the restricted
user, but is also allowed to (a very few) more privileged types. It is the
default role for operators to be in (so as to keep those users in the "least
privileged" role as long as possible).
sysadm_r
This role is meant for system administration tasks, the sysadm_r
SELinux role is very privileged, allowing for various system
administration tasks. However, certain end user application types
might not be supported (especially if those types are used for
potentially vulnerable or untrusted software) to try and keep the
system free from infections.

Fundamental SELinux Concepts
[
16
]
system_r
This role is meant for daemons and background processes, the
system_r
SELinux role is quite privileged, supporting the various
daemon and system process types. However, end user application
types and other administrative types are not allowed in this role.
unconfined_r
This role is meant for end users, the unconfined_r role is allowed
a limited number of types, but those types are very privileged as it is
meant for running any application launched by a user in a more or less
unconfined manner (not restricted by SELinux rules). This role as such
is only available if the system administrator wants to protect certain
processes (mostly daemons) while keeping the rest of the system
operations almost untouched by SELinux.
Other roles might be supported as well, such as
guest_r
and
xguest_r
(Fedora).
It is wise to consult the distribution documentation for more information about the
supported roles.
SELinux users
A SELinux user is different from a Linux user. Unlike the Linux user information
which can change while the user is working on the system (through tools such as
sudo
or
su
), the SELinux policy will enforce that the SELinux user remains the same
even when the Linux user itself has changed. Because of the immutable state of
the SELinux user, specific access controls can be implemented to ensure that users
cannot work around the (limited) set of permissions granted to them, even when
they get privileged access. An example of such an access control is the UBAC (User
Based Access Control) feature that some Linux distributions (optionally) enable,
not allowing access to files of different SELinux users.
But the most important feature of SELinux users is that SELinux user definitions
restrict which roles the (Linux) user is allowed to be in. Once a user is assigned a
SELinux user, he cannot switch to a role that he isn't meant to be in. This is the role-
based access control implementation of SELinux.
SELinux users are, by convention, defined with a "
_u
" suffix, although this is not
mandatory. The SELinux users that most distributions have available are named
after the role they represent, but instead of ending with "
_r
" they end with "
_u
".
For instance, for the
sysadm_r
role, there is a
sysadm_u
SELinux user.

Chapter 1
[
17
]
Sensitivity labels
Although not always present (some Linux distributions by default do not enable
sensitivity labels), the sensitivity labels are needed for the MLS (Multi-Level
Security) support within SELinux. Sensitivity labels allow classification of resources
and restriction of access to those resources based on a security clearance. These labels
consists of two parts: a confidentiality value (prefixed with "s") and a category value
(prefixed with "c").
In many organizations and companies, documents are labeled internal, confidential,
or strictly confidential. SELinux can assign processes a certain clearance level
towards these resources. With MLS, SELinux can be configured to follow the
Bell-LaPadula model, a security model that can be characterized by "no read up,
no write down": based on a process' clearance level, that process cannot read
anything with a higher confidentiality level nor write to (or communicate otherwise
with) any resource with a lower confidentiality level. SELinux by itself, does not
use the "internal", "confidential", and other labels. Instead, it uses numbers from
0
(lowest confidentiality) to whatever the system administrator wants to be as the
highest value (this is configurable and set when the SELinux policy is built).
Categories allow for resources to be tagged with one or more categories on which
access controls are also possible. The idea behind categories is to support multi-
tenancy (for example, as systems hosting applications for multiple customers)
within a Linux system, by having processes and resources belonging to one tenant
to be assigned a particular category whereas the processes and resources of another
tenant getting a different category. When a process does not have proper categories
assigned, it cannot do anything with resources (or other processes) that have other
categories assigned.
In that sense, categories can be seen as tags, allowing access to be granted only when
the tags of the process and the target resource match.
Policies – the ultimate dictators
Enabling SELinux does not automatically start enforcement of access, if SELinux is
enabled and it cannot find a policy, it will refuse to start. That is because the policy
defines the behavior of the system (what should SELinux allow). Because SELinux
is extremely flexible, its policy developers already started differentiating one policy
implementation from another through what it calls a policy type or policy store.

Fundamental SELinux Concepts
[
18
]
A policy store contains a single policy, and only a single policy can be active on
a system at any point in time. Administrators can switch a policy, although this
requires the system to be rebooted, and might even require relabeling the entire
system (relabeling is the act of resetting the contexts on all files and resources
available on that system). The active policy on the system can be queried using
sestatus
(SELinux status) as follows:
# sestatus | grep "Loaded policy"
Loaded policy name: targeted
In the preceding example, the currently loaded policy is named
targeted
. The policy
name that SELinux will use upon its next reboot is defined in the
/etc/selinux/
config
configuration file as the
SELINUXTYPE
parameter.
Most SELinux supporting distributions base their policy on the reference policy
[
http://oss.tresys.com/projects/refpolicy/
], a fully functional SELinux
policy set managed as a free software project. This allows distributions to ship with
a functional policy set rather than having to write one themselves. Many project
contributors are distribution developers, trying to push changes of their distribution to
the reference policy project itself, where the changes are peer-reviewed to make sure
no rules are brought into the project that might jeopardize the security of any platform.
SELinux policy store names and options
The most common SELinux policy store names are
strict
,
targeted
,
mcs
, and
mls
.
None of the names assigned to policy stores are fixed though, so it is a matter of
convention. Hence, it is recommended to consult the distribution documentation to
verify what should be the proper name of the policy. Still, the name often gives some
information about the options that are enabled on the system.
MLS status
One of the options is MLS support that can either be enabled or disabled. If disabled,
then the SELinux context will not have a fourth field with sensitivity information in
it, making the contexts of processes and files look as follows:
staff_u:sysadm_r:sysadm_t
To check if MLS is enabled, it is sufficient to see if the context indeed doesn't contains
such a fourth field, but it can also be acquired from the
Policy MLS status
line in the
output of
sestatus
:
# sestatus | grep MLS
Policy MLS Status: disabled

Chapter 1
[
19
]
Another method would be to look into the pseudo file,
/sys/fs/selinux/mls
. a
value of
0
means disabled, whereas a value of
1
means enabled:
# cat /sys/fs/selinux/mls
0
Dealing with unknown permissions
Permissions (such as read, open, and lock) are defined both in the Linux kernel and
in the policy itself. However, sometimes newer Linux kernels support permissions
that the current policy doesn't.
A recently introduced one is
block_suspend
(to be able to block system
suspension) and when that occurs, SELinux has to take the decision: as the
policies are not aware of this new permission, how should it deal with the
permission when triggered? SELinux can allow (assume everything is allowed
to perform this action), deny (assume no one is allowed to perform this action),
or reject (stop loading the policy at all and halt the system) the request. This is
configured through the
deny_unknown
value.
To see the state for unknown permissions, look for the
Policy deny_unknown
status
line in
sestatus
:
# sestatus | grep deny_unknown
Policy deny_unknown status: denied
Administrators can set this for themselves in the
/etc/selinux/semanage.conf
file
through the
handle-unknown
key (with allow, deny, or reject).
Supporting unconfined domains
A SELinux policy can be written as very strict, limiting applications as close as possible
to their actual behavior, but it can also be written to be very liberal in what applications
are allowed to do. One of the concepts available in many SELinux policies is the
idea of unconfined domains. When enabled, it means that certain SELinux domains
(process contexts) are allowed to do almost anything they want (of course within the
boundaries of the regular Linux DAC permissions which still hold) and only a few
selected are truly confined (restricted) in their actions.
Unconfined domains have been brought forward to allow SELinux to be active on
desktops and servers where administrators do not want to fully restrict the entire
system, but only a few of the applications running on it.

Fundamental SELinux Concepts
[
20
]
With other MAC systems, for example, AppArmor, this is inherently part of the
design of the system. However, SELinux was designed to be a full mandatory
access control system and thus needs to provide access control rules even for those
applications that shouldn't need any. By marking these applications as unconfined,
almost no additional restrictions are imposed by SELinux.
We can see if unconfined domains are enabled on the system through
seinfo
:
# seinfo -tunconfined_t
unconfined_t
# seinfo -tunconfined_t
ERROR: could not find datum for type unconfined_t
Most distributions that enable unconfined domains call their policy
targeted
,
but this is just a convention that is not always followed. Hence, it is always best
to consult the policy using
seinfo
to make this sure.
User-based access control
When UBAC is enabled, certain SELinux types will be protected by additional
constraints. This will ensure that one SELinux user cannot access files (or other
specific resources) of another user. UBAC gives some additional control on
information flow between resources, but is far from perfect. In its essence,
it is made to isolate SELinux users from one another.
Many Linux distributions disable UBAC. Gentoo allows users to select if they
want UBAC or not through a Gentoo
USE
flag (which is enabled by default).
Policies across distributions
As mentioned, policy store names are not standardized. What is called
targeted
in Fedora is not
targeted
in Gentoo. Of the options mentioned previously, the
following table shows us how some of the policy stores are implemented across
these two distributions:
Distribution
Policy
store name
MLS?
deny_
unknown
Unconfined
domains?
UBAC?
Gentoo
strict
No
denied
No
Yes
(configurable)
Fedora 19
minimum
Yes
(only
s0
)
allowed
Yes, but limited No

Chapter 1
[
21
]
Distribution
Policy
store name
MLS?
deny_
unknown
Unconfined
domains?
UBAC?
Gentoo
targeted
No
denied
Yes
Yes
(configurable)
Fedora 19
targeted
Yes
(only
s0
)
allowed
Yes
No
Gentoo
mcs
Yes
(only
s0
)
denied
Yes
(configurable)
Yes
(configurable)
Gentoo
mls
Yes
denied
Yes
(configurable)
Yes
(configurable)
Fedora 19
mls
Yes
allowed
Yes
No
Other distributions might even have different names and implementation details.
Yet, besides the naming differences, many of the underlying settings can be changed
by the administrator. For instance, even though Fedora does not have a
strict
policy, it does have a documented approach on running Fedora without unconfined
domains. It would be wrong to state that Fedora as such does not support fully
confined systems.
MCS versus MLS
In the feature table, we notice that for MLS, some policies only support a single
sensitivity (
s0
). When this is the case, we call the policy an MCS (Multi Category
Security) policy. The MCS policy enables sensitivity labels, but only with a single
sensitivity while providing support for multiple categories (and hence the name).
With the continuous improvement made in supporting Linux in PaaS (Platform as a
Service) environments, implementing proper multitenancy requires proper security
isolation as a vital part of its offering.
Policy binaries
While checking the output of
sestatus
, we see that there is also a notation of policy
versions:
# sestatus | grep version
Max kernel policy version: 28

Fundamental SELinux Concepts
[
22
]
As the output states,
28
is the highest policy version the kernel supports. The policy
version refers to the supported features inside the SELinux policy: every time a
new feature is added to SELinux, the version number is increased. The policy file
itself (which contains all the SELinux rules loaded at boot time by the system) can
be found in
/etc/selinux/targeted/policy
(where
targeted
refers to the policy
store used, so if the system uses a policy store named
strict
, then the path would
be
/etc/selinux/strict/policy
).
If multiple policy files exist, we can use the output of
seinfo
to find out which
policy file is used:
# seinfo
Statistics for policy file: /etc/selinux/targeted/policy/policy.27
Policy Version & Type: v.27 (binary, mls)
...
The next table gives the current list of policy feature enhancements and the Linux
kernel version in which that feature is introduced. Many of the features are only of
concern to the policy developers, but knowing the evolution of the features gives us
a good idea on the evolution of SELinux.
Version
Linux
kernel
Description
12
It is the "Old API" for SELinux, now deprecated
15
2.6.0
It is the "New API" for SELinux
16
2.6.5
It provides conditional policy extensions
17
2.6.6
It provides IPv6 support
18
2.6.8
It adds fine-grained netlink socket support
19
2.6.12
It provides enhanced multi-level security
20
2.6.14
It doesn't access vector table size optimizations”, the version
(20) improved the access vector table size (it is a performance
optimization).
21
2.6.19
It provides object classes in range transitions
22
2.6.25
It provides policy capabilities (features)
23
2.6.26
It provides per-domain permissive mode
24
2.6.28
It provides explicit hierarchy (type bounds)
25
2.6.39
It provides filename based transition support
26
3.0
It provides role transition support for non-process classes
27
3.5
It supports flexible inheritance of user and role for newly created
objects
28
3.5
It supports flexible inheritance of type for newly created objects

Chapter 1
[
23
]
By default, when a SELinux policy is built, the highest supported version as defined
by the Linux kernel and libsepol (the library responsible for building the SELinux
policy binary) is used. Administrators can force a version to be lower using the
policy-version parameter in
/etc/selinux/semanage.conf
.
SELinux policy modules
Initially, SELinux used a single, monolithic policy approach: all possible access
control rules are maintained in a single, binary policy file that the SELinux utilities
then load. It quickly became clear that this is not manageable in long term, and thus
the idea of developing a modular policy approach was born.
Within the modular approach, policy developers can write isolated policy sets for
a particular application (or set of applications), roles, and so on. These policies then
get built and distributed in their own policy modules. Platforms that need access
controls for that particular application load the SELinux policy module that defines
the access rules.
On some Linux distributions, these SELinux policy modules are stored inside
/
usr/share/selinux
, usually within a subdirectory named after the policy store
(such as "targeted" or "strict"). The policy modules that are currently loaded are
always available in
/etc/selinux/targeted/modules/active
and its
modules
subdirectory.
Of all the
*.pp
files in these locations, the
base.pp
one is special. This policy module
file contains core policy definitions. The remaining policy module files are "isolated"
policy modules, providing the necessary rules for the system to handle applications
and roles related to the module itself. For instance, the
screen.pp
module contains
the SELinux policy rules for the GNU
screen
(and also
tmux
) application.
Once those files are placed on the system, the distribution package manager usually
calls the
semodule
command to load the policy modules. This command then
combines the files into a single policy file (for example,
policy.28
) and loads it in
memory.
On Fedora, the SELinux policies are provided by the
selinux-policy-targeted
(or
-minimum
or
-mls
) package. On Gentoo, they are provided by the various
sec-
policy/selinux-*
packages (Gentoo uses separate packages for each module,
reducing the amount of SELinux policies that are loaded on an average system).

Fundamental SELinux Concepts
[
24
]
Summary
In this chapter, we saw that SELinux offers a more fine-grained access control
mechanism on top of the Linux access control. SELinux uses labels to identify
its resources and processes, based on ownership (user), role, type, and even the
security sensitivity and categorization of the resource.
Linux distributions implement SELinux policies which might be a bit different from
each other based on supporting features such as sensitivity labels, default behavior for
unknown permissions, support for confinement levels, or specific constraints put in
place, for example, UBAC. However, most of the policy rules themselves are similar.
Switching between SELinux enforcement modes and understanding the log events
that SELinux creates when it prohibits a certain access, is the subject of our next
chapter. In it, we will also cover how to approach the often-heard requirement of
disabling SELinux and why this is the wrong solution to implement.

Understanding SELinux
Decisions and Logging
Once SELinux is enabled on a system, it starts its access control functionality as
described in the previous chapter. This however might have some unwanted side
effects, so in this chapter, we will:
• Switch between SELinux in full enforcement mode (host-based intrusion
prevention) versus its permissive, logging-only mode (host-based intrusion
detection)
• Use various methods to toggle the SELinux state (enabled or disabled,
permissive or enforcing)
• Disable SELinux protections for a single domain rather than the entire system
• Learn to interpret the SELinux log events that describe to us what activities
that SELinux has prevented
We finish with an overview of common methods for analyzing these logging events
in day-to-day operations.
Disabling SELinux
Perhaps a weird chapter to begin with, but disabling SELinux is a commonly
requested activity. Some vendors do not support their application to be running on a
platform that has SELinux enabled. Luckily, this number is reducing.
SELinux supports three major states that it can be in:
disabled
,
permissive
, and
enforcing
. These states are by default set in the
/etc/selinux/config
file, through
the
SELINUX
variable as follows:
$ grep ^SELINUX= /etc/selinux/config
SELINUX=enforcing

Understanding SELinux Decisions and Logging
[
26
]
When the system
init
triggers loading the SELinux policy, the code checks the state
that the administrator has configured. The states are described as follows:
• If the state is
disabled
, then the SELinux code disables further support,
making the system boot without activating SELinux.
• If the state is
permissive
, then SELinux is active but will not enforce its
policy on the system. Instead, any violations against the policy will be
reported but remain allowed.
• If the state is
enforcing
, then SELinux is active and will enforce its policy
on the system. Violations are reported and also denied.
We can use the
getenforce
or
sestatus
command to get information about the
current state of SELinux as follows:
# sestatus | grep mode
Current mode: enforcing
Try to switch between the
enforcing
and
permissive
mode by modifying the
configuration file. Reboot the system and validate through
sestatus
, that the SELinux
state has indeed been changed. If we disable SELinux completely though, we might
need to fix wrong (or absent) labels later. This is the reason why we switch between
enforcing
and
permissive
for now.
In many situations, administrators often want to disable SELinux when it starts
preventing certain tasks. Sadly, this is similar to removing train crossing gates
because it prevents them from reaching their destination in time. It might help them
to get there faster next time, but remember that the gates are there to protect us.
SELinux on, SELinux off
We can toggle the SELinux state through the
/etc/selinux/config
file and reboot
the system to have the changes being reflected. But this is not the only way.
Switching to permissive (or enforcing)
temporarily
On most SELinux enabled systems, we can call the
setenforce
command to switch
the system between
permissive
(
0
) and
enforcing
(
1
) mode. This takes effect
immediately, allowing us to easily identify if SELinux is preventing access or not.

Chapter 2
[
27
]
Try it out. Switch to the
permissive
mode and validate (again using
sestatus
, that
the SELinux state has indeed been changed immediately as follows:
# setenforce 0
The effect of
setenforce
is the same as writing the value into the
/sys/fs/
selinux/enforce
(or
/selinux/enforce
) pseudo file:
# echo 0 > /sys/fs/selinux/enforce
The ability to switch between the
permissive
and
enforcing
mode can be of
interest for policy developers or system administrators who are modifying the
system to use SELinux properly. This SELinux feature is called the
SELinux
development
mode and is set through a kernel configuration parameter (
CONFIG_
SECURITY_SELINUX_DEVELOP
). Most SELinux supporting distributions leave this
feature on, but on production systems it might be of interest to disable the feature
(considering that this can allow malicious users who gain enough privileges to
disable SELinux altogether).
Disabling this feature usually requires rebuilding the Linux kernel, but SELinux
policy developers have also thought of a different way to disallow users to toggle the
SELinux state. The privileges that the users need to switch to the
permissive
mode
have become 'conditional', and system administrators can easily toggle this policy
to disable switching back to the
permissive
mode. Once toggled, the setting cannot
be reverted if the
-P
option is provided. Without the option, the setting is only valid
until the system is rebooted:
# setsebool -P secure_mode_policyload on
Switching to or from the disabled state however is not supported: once SELinux is
active (in either the
permissive
or
enforcing
mode) and its policy is loaded, only
then a reboot can effectively disable SELinux again.
Using kernel boot parameters
Using the
setenforce
command makes sense when we want to switch to the
permissive
or
enforcing
mode at a point in time when we have interactive
access to the system. But what when we need this upon system boot?
The answer is kernel boot parameters. We can boot a Linux system with one
or two parameters that take precedence towards the
/etc/selinux/config
settings as follows:
•
selinux=0
informs the system to disable SELinux completely, and is
similar to
SELINUX=disabled
in the
config
file. When set, the other
parameter (
enforcing
) is not consulted.

Understanding SELinux Decisions and Logging
[
28
]
•
enforcing=0
informs the system to run SELinux in the
permissive
mode,
and is similar to the
SELINUX=permissive
setting in the
config
file.
•
enforcing=1
informs the system to run SELinux in the
enforcing
mode,
and is similar to the
SELINUX=enforcing
setting in the
config
file.
For instance, the following GRUB part will have SELinux enabled and run in the
permissive
mode, regardless of the
/etc/selinux/config
settings:
title Linux with SELinux permissive
root (hd0,0)
kernel /kernel root=/dev/md3 selinux=1 enforcing=0
initrd /initramfs
Support for the
selinux=
boot parameters is also enabled through a kernel
configuration parameter,
CONFIG_SECURITY_SELINUX_BOOTPARAM
. The
enforcing=
boot parameter is supported through the
CONFIG_SECURITY_SELINUX_DEVELOP
configuration parameter discussed previously.
While using SELinux in production, it might be wise to either disable the options or
properly protect the boot menu, for instance, by password protecting the menu and
regularly verifying the integrity of the boot menu files.
Disabling SELinux protections for a single
service
Since policy version 23 (which came with Linux 2.6.26), SELinux also supports a
more granular approach to switch between
permissive
and
enforcing
: the use
of permissive domains. As mentioned before, domains is the term which SELinux
uses for types (labels) assigned to processes. With permissive domains, we can mark
one particular domain as being
permissive
(and as such not enforcing the SELinux
rules) even though the rest of the system is running in the
enforcing
mode.
Let's say we run a DLNA (Digital Living Network Alliance) server to serve our
holiday pictures to other media devices at our place, or to present the latest company
internal videos to a distributed set of monitors throughout the campus. Somehow
it fails to show the media recently made available and we find out it is SELinux
that is preventing it. Even though it is seriously recommended to fine-tune the
policy, we might be pushed in fixing (read: working around) the problem first and
implementing the fix later properly. Instead of fully disabling SELinux controls, we
can put the domain in which the DLNA server runs (most likely
minidlna_t
) in the
permissive
mode:
# semanage permissive -a minidlna_t

Chapter 2
[
29
]
With the same
semanage
command, we can list the currently running permissive
domains (on Fedora, some domains are, by default, marked as permissive):
# semanage permissive -l
Builtin Permissive Types
openvswitch_t
systemd_localed_t
virt_qemu_ga_t
...
Customized Permissive Types
minidlna_t
When a domain is marked as permissive, the application should behave as if
SELinux is not enabled on the system, making it easier for us to find out if SELinux
really is the cause of a permission issue. Note though that other domains that interact
with a permissive domain are themselves still governed through SELinux.
If an application requires SELinux to be disabled, it makes much more sense to mark
its domain as permissive rather than disabling SELinux protections for the entire
system. Look for an example service and find out what domain it runs in. Then mark
this domain as permissive (and then back).
Use
ps –eZ
to see the SELinux contexts of processes.
Applications that "speak" SELinux
Most applications themselves do not have knowledge that they are running on an
SELinux enabled system. When that is the case, the
permissive
mode truly means
that the application behaves as if SELinux was not enabled to begin with. However,
some applications actively call SELinux code. These applications can be called
'SELinux aware', because they change their behavior if SELinux is enabled, possibly
regardless of SELinux being in the
permissive
or the
enforcing
mode.
When those applications run in the
permissive
mode, they can behave (quite)
differently than when SELinux is completely disabled. Such applications change
their behavior when SELinux is enabled, for instance to query the policy or to check
for the context that it should run in. Examples of such applications are SSH login,
some cron daemons as well as the core Linux utilities (which provide
ls
and
id
).
As a result, they might show permission failures or different behavior based on
the SELinux policy even though SELinux is not in the
enforcing
mode.

Understanding SELinux Decisions and Logging
[
30
]
We can find out if an application is SELinux aware by checking if the application is
dynamically linked with the
libselinux
library. This can be done with
scanelf
or
ldd
as follows:
# scanelf -n /bin/ls
TYPE NEEDED FILE
ET_DYN libselinux.so.1,librt.so.1,libc.so.6 /bin/ls
# ldd /bin/ls | grep selinux
libselinux.so.1 => /lib64/libselinux.so.1 (0x00007f77702dc000)
Knowing if an application is SELinux aware or not can help in troubleshooting failures.
As an exercise, try to find all binaries on a system that are linked with the
libselinux
library.
SELinux logging and auditing
When SELinux is enabled, it will log (almost) every permission check that was
denied. When Linux auditing is enabled, these denials are logged by the audit
daemon. If not, then the regular system logger will get the denials and store
them in the system logs.
Such denial messages are described with the type AVC (Access Vector Cache) as we
can see from the following example:
type=AVC msg=audit(1369306885.125:4702304): avc: denied { append }
for pid=1787 comm=72733A6D61696E20513A526567 name="oracle_audit.log"
dev=dm-18 ino=65 scontext=system_u:system_r:syslogd_t:s0 tcontext=syst
em_u:object_r:usr_t:s0 tclass=file
The
AVC
is part of the SELinux security subsystem in the Linux kernel that is
responsible for checking and enforcing the SELinux rules. Any permission that needs
to be checked is represented as an "access vector" and the cache is then consulted
to see if that particular permission has been checked before or not. If it is, then the
decision is taken from the cache, otherwise the policy itself is consulted. This inner
working of SELinux is less relevant to most administrators, but at least now we
know where the term
AVC
comes from.
Configuring SELinux' log destination
SELinux will try to use the audit subsystem when available, and will fall back to the
regular system logging when it isn't.

Chapter 2
[
31
]
For the Linux audit, we usually do not need to configure anything as SELinux AVC
denials are logged by default. The denials will be shown in the audit logfile (
/var/
log/audit/audit.log
), usually together with the system call that triggered it:
type=AVC msg=audit(1370115017.883:1091): avc: denied { write }
for pid=20061 comm="mount" name="utab" dev="tmpfs"
ino=1494 scontext=user_u:user_r:user_t:s0
tcontext=system_u:object_r:mount_var_run_t:s0 tclass=file
type=SYSCALL msg=audit(1370115017.883:1091): arch=c000003e
syscall=2 success=no exit=-13 a0=7f0e75149879 a1=42 a2=1a4
a3=7fff2ad134a0 items=0 ppid=19903 pid=20061 auid=1001
uid=1001 gid=100 euid=0 suid=0 fsuid=0 egid=100 sgid=100
fsgid=100 tty=pts2 ses=8 comm="mount" exe="/usr/bin/mount"
subj=user_u:user_r:user_t:s0 key=(null)
When auditing is not enabled, we can configure the system logger to direct SELinux
AVC messages into its own logfile. For instance, with the
syslog-ng
system logger,
the possible configuration parameters could be as follows:
source kernsrc { file("/proc/kmsg"); };
destination avc { file("/var/log/avc.log"); };
filter f_avc { message(".*avc: .*"); };
log { source(kernsrc); filter(f_avc); destination(avc); };
Reading SELinux denials
The one thing every one of us will have to do many times with SELinux systems is
to read and interpret SELinux denial information. When SELinux prohibits an access
and there is no
dontaudit
rule in place to hide it, SELinux will log it. If nothing is
logged, it was probably not SELinux that was the culprit of the failure. Remember,
SELinux comes after Linux DAC checks, so if a regular permission doesn't allow a
certain activity, then SELinux is never consulted.
SELinux denial messages are logged the moment SELinux prevents some access from
occurring. When SELinux is in the
enforcing
mode, the application usually returns
a
Permission denied
error, although sometimes it might be a bit more obscure, for
example, with the following attempt of an unprivileged user using
su
to switch to root:
$ su -
Password: (correct password given)
su: incorrect password

Understanding SELinux Decisions and Logging
[
32
]
Most of the time though, the error is a permission error:
$ ls /proc/1
ls: cannot open directory /proc/1: Permission denied
# ls -ldZ /proc/1
dr-xr-xr-x. root root system_u:system_r:init_t:s0 /proc/1
So, what does a denial message look like? The next one shows a denial from the
audit subsystem. We can consult the SELinux messages in the audit or system
logs. When the Linux audit subsystem is enabled, we can also use the
ausearch
command as follows:
# ausearch -m avc -ts recent
----
time->Fri May 31 20:05:15 2013
type=AVC msg=audit(1370023515.951:2368): avc: denied { search }
for pid=5005 comm="dnsmasq" name="net" dev="proc" ino=5403
scontext=system_u:system_r:dnsmasq_t
tcontext=system_u:object_r:sysctl_net_t tclass=dir
Let's break up this denial into its individual components. The following table gives
more information about each part of the preceding denials. As an administrator,
knowing how to read denials is extremely important, so take the necessary time
for this, and also try it out on a SELinux system.
Field name
Description
Example
(SELinux
action)
This is the action that SELinux took (or would
take if run in the enforcing mode). This usually
denied
, although some actions are explicitly
marked for auditing and would result in granted.
denied
(permissions)
These are the permissions that were checked
(action performed by the process). This usually is a
single permission, although it can sometimes be a
set of permissions (for example, read write).
{ search }
Process ID
This is the ID of the process that was performing
the action.
for pid=5005
Process name
The process name (command). It doesn't display
any arguments to the command though.
comm="dnsmasq
"
Target name
It is the name of the target (resource) that the
process is performing an action on. If the target is a
file, this usually is the filename or directory.
name="net"

Chapter 2
[
33
]
Field name
Description
Example
Target device
It is the device on which the target resource resides.
Together with the next field (inode number) this
allows us to uniquely identify the resource on a
system.
dev="proc"
Target file
inode number
It is the inode number of the target file or directory.
Together with the device, this allows us to find the
file on the filesystem.
ino=5403
Source context
It is the context in which the process resides (the
domain of the process).
scontext=syst
em_u:system_r
:dnsmasq_t
Target context
It is the context of the target resource.
tcontext=syst
em_u:object_r
:sysctl_net_t
Resource class
It is the class of the target resource, for example, a
directory, file, socket, node, pipe, file descriptor,
file system, capability, and so on.
tclass=dir
The previous denial can be read as follows: "SELinux has denied the search
operation of the
dnsmasq
process (with PID 5005) against the "
net
" directory
(with inode
5403
) within the proc device. The
dnsmasq
process runs with
the
system_u:system_r:dnsmasq_t
label and the "
net
" directory has the
system_u:object_r:sysctl_net_t
label."
Some denials have different fields, which are as follows:
avc: denied { send_msg } for msgtype=method_call
interface=org.gnome.DisplayManager.Settings
member=GetValue dest=org.gnome.DisplayManager
spid=3705 tpid=2864
scontext=unconfined_u:unconfined_r:unconfined_t:s0-s0:c0.c1023
tcontext=system_u:system_r:xdm_t:s0-s0:c0.c1023 tclass=dbus
Although it has a few different fields, it is still readable and can be read as
follows: "SELinux has denied the process with PID
3705
to invoke a
DBus
remote
method call (the "
GetValue
"method of the "
org.gnome.DisplayManager.
Settings
" interface) against the "
org.gnome.DisplayManager
" implementation
offered by process with PID
2864
. The source process runs with the
"
unconfined_u:unconfined_r:unconfined_t:s0-s0.c0.c1023
" label and the
target process with the "
system_u:system_r:xdm_t:s0-s0:c0.c1023
" label."

Understanding SELinux Decisions and Logging
[
34
]
Depending on the action and the target class, SELinux uses different fields to
give all the information we need to troubleshoot a problem. Try interpreting the
following denial:
avc: denied { name_bind } for pid=23849
comm="postgres" src=6030
scontext=system_u:system_r:postgresql_t
tcontext=system_u:object_r:unreserved_port_t
tclass=tcp_socket
The preceding denial came up because the
PostgreSQL
database was configured to
listen on a non-default port (
6030
instead of the default
5432
).
Identifying the problem is a matter of understanding how the operations work,
and properly reading the denials. In the preceding
DBus
denial, it is difficult to
troubleshoot if we do not know how
DBus
works (or how it uses message types,
members, and interfaces in its underlying protocols). For troubleshooting, the denial
logs give us enough to get us started. It gives a clear idea what was denied.
It is wrong to immediately consider allowing the specific denial (by adding an allow
rule to the SELinux policy as described in Chapter 6, Enhancing SELinux policies) as
other options exist, which are as follows:
• Giving the right label on the target resource (usually the case when the target
is a non-default port, non-default location, and so on)
• Switching booleans (flags that manipulate the SELinux policy) to allow
additional privileges
• Giving the right label on the source process (often the case when the source
process is not installed by the distribution package manager)
• Using the application as intended instead of through other means (as
SELinux only allows expected behavior), such as starting a daemon through
a service (
init
script or
systemd
unit) instead of through a command line
Uncovering more denials
Policy writers can tell SELinux not to log some denials because they are expected;
SELinux is able to control very fine-grained access and some applications (many,
to be honest) tend to do some checks or get some permissions they never need in
reality. Constantly seeing denials for those checks would clutter the logs and might
trick us into allowing those calls (even when they do not influence the application at
all or might even become a security hazard if allowed). Such statements are called
dontaudit
statements.

Chapter 2
[
35
]
With
seinfo
we can see how many SELinux rules (such as
allow
and
dontaudit
)
are currently loaded on the system. The
semodule
application can be used to
rebuild the current policy without
dontaudit
statements, which is very useful if an
application is not working properly and we think SELinux is the reason, but we don't
see any denials:
# seinfo | grep -E '(dontaudit|allow)'
Allow: 34631 Neverallow: 0
Auditallow: 1 Dontaudit: 5414
Type_member: 6 Role allow: 7
# semodule --disable_dontaudit --build
The
semodule
command can also be shortened to
semodule -DB
.
Now that we know where to find AVC events, let us disable the
dontaudit
rules
and look at the logs. Notice how many denials are shown. In order not to clutter the
logs, fall back to the previous state by again enabling the
dontaudit
rules: invoke
semodule --build
without the
--disable_dontaudit
argument.
Getting help with denials
On some distributions, additional supporting tools are available that help us identify
the cause of a denial. These tools have some knowledge of the common mistakes (for
instance, setting the right context on application files in order for the web server to
be able to read them). Other distributions require us to use our experience to make
proper decisions, supporting us through the distribution mailing lists, bug tracking
sites, and other cooperation locations, for example, IRC.
setroubleshoot to the rescue
In Fedora and RedHat Enterprise Linux, additional tools are present that help
us troubleshoot denials. The tools work together to catch a denial, look for a
plausible solution and inform the administrator about the denial and its suggested
resolutions. When used on a graphical workstation, denials can even pop up and
ask the administrator to review the denials immediately. On the servers without a
graphical environment, administrators can see the information in the system logs
or can even configure the system to send out SELinux denial messages via e-mail.

Understanding SELinux Decisions and Logging
[
36
]
Under the hood, it is the audit daemon that triggers its audit event dispatcher
application (
audispd
). This application is built to support plugins, something the
SELinux folks gratefully implemented: an application that will act as a plugin
for
audispd
called
sedispatch
. The
sedispatch
application checks whether the
audit event is a SELinux denial and, if so, forwards the event to
DBus
(a system
bus implementation popular on Linux systems).
DBus
forwards the event then to
the
setroubleshootd
application (or launches the application if it isn't running
yet) which analyzes the denial and prepares feedback for the administrator. Then,
when running on a workstation,
seapplet
is triggered to show a pop up on the
administrator workstation. The analyzed feedback is stored on the filesystem and a
message is displayed in the system logs.
Try triggering a SELinux denial (for instance, by configuring a daemon to bind to a
non-default port and restarting the daemon) and see how the event is brought up.
In the system log, a message comes up, for example as follows:
Jun 14 12:05:43 localhost setroubleshoot: SELinux is preventing
/usr/sbin/httpd from 'getattr' accesses on the directory
/var/www/html/infocenter. For complete SELinux messages, run
sealert -l 26f2a1c3-0134-458e-a69b-4ef223e20009
We can then see the complete explanation through the
sealert
command as
mentioned in the log. The
sealert
application is a command-line application that
parses the information stored by the
setroubleshoot
daemon (in
/var/lib/
setroubleshoot
). Try the command and read through the output it provides: the
output is lengthy, but worth reading.
The
sealert
application will provide us with a set of options to resolve the denial.
In case of the Apache-related denial shown earlier,
sealert
would give us four
options, each of them with a certain confidence score.
As we can see from this example, the
setroubleshoot
application has a number of
plugins to analyze denials. These plugins look at a denial to check if they match a
particular, well known use case (for example, when Booleans need to be changed, or
when a target context is wrong) and give feedback to
setroubleshoot
about how
"certain" the plugin is so that this denial can be resolved through its recommended
method.

Chapter 2
[
37
]
Using audit2why
If
setroubleshoot
and
sealert
are not available on the Linux distribution, we
can still get some information about a denial. Although it isn't as extensible as
the plugins offered by
setroubleshoot
, the
audit2why
utility (which is short for
audit2allow -w
) does provide some feedback on a denial. Sadly, it isn't always
right in its deduction. Try it out against the same denial for which we used
sealert
:
# ausearch –m avc –ts today | audit2why
type=AVC msg=audit(1371204434.608:475): avc: denied { getattr }
for pid=1376 comm="httpd" path="/var/www/html/infocenter" dev="dm-1"
ino=1183070 scontext=system_u:system_r:httpd_t:s0 tcontext=unconfined_u:o
bject_r:user_home_t:s0 tclass=dir
Was caused by:
The boolean httpd_read_user_content was set incorrectly.
Description:
Determine whether httpd can read generic user home content files.
Allow access by executing:
# setsebool -P httpd_read_user_content 1
The
audit2why
utility here didn't consider that the context of the target location was
wrong, and suggest to enable the web server permission to read user content.
Using common sense
Common sense is not easy to document, but reading a denial often leads to the right
solution when we have some experience with file labels (and what they are used for).
If we would look at the previous denial example (the one about
/var/www/html/
infocenter
), then seeing that its context is
user_home_t
should ring a bell.
user_
home_t
is used for end user home files, not system files inside
/var
.
One way to make sure that the context of the target resource is correct is to check it
with
matchpathcon
. This utility returns the context as it should be according to the
SELinux policy:
# matchpathcon /var/www/html/infocenter
/var/www/html/infocenter system_u:object_r:httpd_sys_content_t:s0

Understanding SELinux Decisions and Logging
[
38
]
Performing this on denials related to files and directories might help in finding
a proper solution quickly.
Furthermore, many domains have specific manual pages that inform the reader
what types are commonly used for each domain, as well as how to deal with
the domain in more detail (for example, the available Booleans, common mistakes
made, and so on.)
$ man ftpd_selinux
Summary
We saw how to enable and disable SELinux both on a complete system level as
well as a per service level using various methods: kernel boot options, SELinux
configuration file, or plain commands. One of the commands is the use of
semanage
permissive
, which can disable SELinux protections for a single service.
Next, we saw where SELinux log its events and how to interpret them, which is one
of the most important capabilities of an administrator when dealing with SELinux.
To assist us with this interpretation, there are tools such as
setroubleshoot
,
sealert
,
and
audit2why
.
In the next chapter, we will look at the first administrative task on SELinux systems:
managing user accounts and their associated SELinux roles and security clearances
towards the resources on the system.

Managing User Logins
When we log in to an SELinux enabled system, we are assigned with a default
context to work in. This context contains a SELinux user part, a SELinux role, a
domain, and optionally a sensitivity range.
In this chapter, we will:
• Define users that have sufficient rights to do their jobs, ranging from
unprivileged users to fully privileged users, running almost without
SELinux protection
• Create and assign categories and sensitivities
• Assign roles to users and use various tools to switch roles
We end the chapter by learning how SELinux integrates with the Linux
authentication process.
So, who am I?
Once logged in to a system, our user will run inside a certain context. This user
context defines the rights and privileges that we, as a user, have on the system.
The command to obtain current user information,
id
, also supports SELinux
context information. Try it out, and use the
-Z
switch as follows:
$ id -Z
unconfined_u:unconfined_r:unconfined_t
On SELinux systems with a targeted policy type, chances are very high that all users
are logged in as
unconfined_u
(the first part of the context). On more restricted
systems, the user can be
user_u
(regular restricted users),
staff_u
(operators),
sysadm_u
(system administrators), or any other of the SELinux user types.

Managing User Logins
[
40
]
The SELinux user defines the roles that the user can switch to, which themselves
define the domains that the user (or his processes) can run in. By default, a fixed
number of SELinux users are available on the system, but administrators can create
different SELinux users. It is also the administrator’s task to assign Linux logins to
SELinux users.
The rationale behind unconfined
SELinux is able to provide full system confinement: each and every application
runs in its own restricted environment from where it cannot break out of. But that
requires fine-grained policies that are equally fast developed as the new versions of
all the applications that they confine.
The following diagram shows this relation between the policies, the domain
applicability towards multiple processes and the development effort. As an example,
postfix_cleanup_t
is shown as a very fine-grained policy domain (which is used
for the cleanup process involved in the Postfix mail infrastructure) whereas the
unconfined_t
domain is shown as the example for a very broad, almost unlimited
access domain:
Fine-grained
access controls
Almost no privilege
restrictions
postfix_cleanup_t
httpd_t
user_t
sysadm_t
unconfined_t
Relationship between domain development complexity and the associated SELinux access controls
Most applications do not have a dedicated policy (although most security-sensitive
or popular ones do) and policies do not adapt as fast as the applications themselves.
For many servers though, this fine-grained mandatory access is not necessary. All
that is needed is to confine the services that are exposed to the network. To support
this, SELinux policy developers created the “unconfined” concept, that is, although
still governed by SELinux, the domain or user is not really restricted.

Chapter 3
[
41
]
Not only are those domains very powerful with respect to privilege, the idea is
also that these domains do not need to switch to other domains (unless when they
need to switch to a confined domain, of course) and that they are not restricted by
constraints that are imposed on confined domains (including MLS).
An important asset in this unconfined story is the
unconfined_t
domain for the
unconfined_u
SELinux user (with the
unconfined_r
SELinux role). This is exactly
the context that we get when logged in to a default Fedora installation or a Gentoo
installation that uses the
targeted
policy store (or
mcs
/
mls
with
USE=”unconfined”
).
Next to the user domains, we also have unconfined process domains for daemons
and other applications. Some of these run in the
unconfined_t
domain as well, but
most of them run in their own domain even though they are still unconfined. The
seinfo
tool can tell us which domains are unconfined by asking for those domains
that have the
selinux_unconfined_type
attribute set as follows:
# seinfo -aselinux_unconfined_type -x
Defining a domain is unconfined or cannot be toggled by administrators, as this is a
pure SELinux policy matter.
SELinux users and roles
Within SELinux systems, the moment a user logs in, the login system checks to
which SELinux user his login is mapped. Then, when a SELinux user is found, the
system looks up the role and domain that the user should be in.
We all are one SELinux user
When we logged in to the system and checked our context using
id -Z
, we noticed
that the presented context is the same regardless of the username through which we
logged in to the system. SELinux does not care which Linux user we are, as long as it
knows which context we are in.
When our
login
process is triggered, a local definition file will be checked to see
which SELinux user is mapped to our login. Let us take a look at the existing login
mappings using
semanage login –l
as follows:
# semanage login -l
Login Name SELinux User MLS/MCS Range Service
__default__ unconfined_u s0-s0:c0.c1023 *
root unconfined_u s0-s0:c0.c1023 *
system_u system_u s0-s0:c0.c1023 *

Managing User Logins
[
42
]
In the output, two login names are special for SELinux: the
__default__
and
system_u
definitions:
•
__default__
: It is a catchall rule. If none of the other rules match,
then the users are mapped to the SELinux user identified in the second
column (SELinux user). On targeted systems, all users are mapped to the
unconfined_u
SELinux user because the policies within targeted systems
are meant to confine daemons rather than users. On policy stores that do
not support unconfined domains, administrators usually map regular logins
to restricted SELinux users while administrative logins are mapped to the
staff_u
or
sysadm_u
SELinux users.
• The
system_u
line is meant for system processes (non-interactively logged in
Linux accounts). It should never be assigned to end user logins.
The SELinux user is not the only information of a SELinux mapping. In case of an
MLS-enabled system, the mapping also contains information about the sensitivity
range in which the user is allowed to work (MLS/MCS Range). This way, two users
might both be mapped to the
user_u
restricted SELinux user, but one might only
be allowed to access the low sensitivity (
s0
) whereas another user might also have
access to higher sensitivities (for example,
s1
). Or, in case of MCS, one user might be
mapped to a different set of categories different from another user.
As an exercise, let us create a new Linux user called
myuser
and make sure that,
when this user is logged in, the context is that of the unprivileged SELinux
user_u
user. We accomplish this using the
semanage login
tool as follows:
# semanage login -a -s user_u myuser
The
-s
parameter is used to map a login to a SELinux user, whereas sensitivity
(and categories) can be handled with the
-r
parameter. In the next example, we
modify the newly created mapping by limiting the user to the sensitivity range
s0-s2
and categories
c0
to
c4
:
# semanage login -m -r “s0-s2:c0.c4” myuser
The changes take effect when a new login occurs so we should force a logout
for these users. The following command locks our
myuser
account, kills all the
processes of that user, and unlocks the user again as follows:
# passwd -l myuser
Locking password for user myuser.
passwd: Success
# pkill -KILL -u myuser

Chapter 3
[
43
]
# passwd -u myuser
Unlocking password for user myuser.
passwd: Success
Also, when an existing user is modified, we should also reset the contexts of
that users’ home directory (while he is not logged on). To accomplish this, use
restorecon
using the
-F
option as follows:
# restorecon -RF /home/myuser
That is quite easy. Of course, in larger environments, creating mappings this way for
individual users is not manageable. In such cases, it might be better to use (primary)
group information. Most regular users are part of the user's Linux group, so let us
assign those users to the
user_u
SELinux user. Accounts that are in the
admins
Linux
group are mapped to
sysadm_u
. To accomplish this, we use the percentage sign to
tell the SELinux tools that this mapping is for groups:
# semanage login -a -s user_u “%users”
# semanage login -a -s sysadm_u “%admins”
Now that the group mappings are in place, we can remove the
myuser
individual
mapping we made earlier as follows:
# semanage login -d myuser
Creating additional users
When we want to use the UBAC feature, we might not have enough facilities
with the users that are available by default (which can be obtained using
semanage user -l
):
# semanage user -l
Labeling MLS/ MLS/
SELinux User Prefix MCS Level MCS Range
SELinux Roles
git_shell_u user s0 s0 git_
shell_r
guest_u user s0 s0
guest_r
root user s0 s0-s0:c0.c1023
staff_r sysadm_r system_r unconfined_r
…

Managing User Logins
[
44
]
Luckily, creating additional SELinux users is a breeze. In the next examples, we
create a new SELinux user called
finance_u
. We configure the user with a default
sensitivity (
-L s0
), its security clearance (the sensitivity range, using
-r “s0-s0:c0.
c127”
), the roles the user is allowed access to (
-R user_r
), and the new SELinux
username as follows:
# semanage user -a -L s0 -r “s0-s0:c0.c127” -R user_r finance_u
When the SELinux user is created, its information is made as a part of the SELinux
policy, and will also result in a
seusers
file within
/etc/selinux
.
Just similar to login mappings,
semanage user
also accepts the
-m
option to modify
an existing entry, or
-d
to delete one, as in the following example:
# semanage user -d finance_u
Separate SELinux users are not only interesting for UBAC, but also provide
additional audit information (as SELinux users do not change during a user’s
session whereas the Linux effective user id can), and if the user creates files or other
resources, these resources also inherit the SELinux user part in their security context.
Limiting access based on confidentiality
Sensitivity labels and their associated categories are identified through numeric
values, which is great for computers but not that obvious for users. The SELinux
utilities luckily support translating the levels and categories to human-readable
values, even though they are still stored as numbers.
The translations are managed through the
setrans.conf
file, located in the proper
policy store subdirectory within
/etc/selinux
. Inside this file, we can name specific
values (for example,
s0:c102
) or ranges (similar to
s0-s0:c1.c127
) with a string
that is much easier for administrators to use.
Consider our example of the
finance_u
SELinux user who was allowed access to
the
c0.c127
category range. Two of the categories within that range are
c102
, which
we will tag as
Contracts
, and
c103
which we will tag as
Salaries
. The
c1.c127
range will be labeled as
FinanceData
. The following diagram shows the relationship
between these various categories:
Chapter 3
[
45
]
Contracts
Salaries
c103
c0
c1
...
c102
...
c127 c128
...
FinanceData
Relationship of the example categories and category ranges
To accomplish this, the following code should be placed in the
setrans.conf
file:
s0:c102=Contracts
s0:c103=Salaries
s0-s0:c1.c127=FinanceData
With RedHat Enterprise Linux 6, the file needs to be edited manually. However,
recent Fedora releases support the
semanage translation
command to list, create,
and modify entries:
# semanage translation -a -T FinanceData “s0-s0:c1.c127”
These translations are handled by the SELinux utilities, which connect to the
mcstrans
daemon through a socket located in
/var/run/setrans
to query the
setrans.conf
file. If the daemon is not running or the communication with the
daemon fails, the sensitivity and category numeric values are displayed.
We can view the available sensitivities and their human-readable counterparts using
the
chcat
tool. The following one displays the default translations offered by RedHat
Enterprise Linux 6:
$ chcat -L
s0 SystemLow
s0-s0:c0.c1023 SystemLow-SystemHigh
s0:c0.c1023 SystemHigh
The same
chcat
utility can be used to assign categories to users. For instance, to
grant the
Salaries
category (assuming it is defined in
setrans.conf
) to the
myuser
Linux user:
# chcat -l -- +Salaries myuser
Using the preceding command, the
Salaries
category (
c103
) is granted to the Linux
user
myuser
. The user mapping is immediately updated with this information. The
myuser
user needs to log out again for the changes to take effect.

Managing User Logins
[
46
]
Jumping from one role to another
Although we can be assigned with multiple roles, we still need to switch roles
based on our needs. SELinux supports multiple methods for switching roles and
sensitivities or launching applications in specific categories.
Full role switching with newrole
The SELinux
newrole
application can be used to transition from one role to another.
Consider an SELinux system without unconfined domains, and where we are by
default logged in as the
staff_r
role. In order to perform administrative tasks, we
need to switch to the
sysadm_r
administrative role, which we can do with
newrole
.
If the SELinux user we are mapped to (for example,
sysadm_u
) is allowed to access
the specified role (in the example,
sysadm_r
), then our context is changed from the
previous role to the new one. Usually, this also changes the user domain.
Let’s check our current context, change our role, and then check the context again to
ensure that we properly switched to our role as follows:
$ id -Z
staff_u:staff_r:staff_t
$ newrole -r sysadm_r
Password:
$ id -Z
staff_u:sysadm_r:sysadm_t
Notice how the SELinux user remains constant, but the role and domain
have changed.
The
newrole
application can also be used to transition to a specific sensitivity
as follows:
$ newrole -l s0:c0.c100
When we switch towards another role or sensitivity, a new session is used (with a
new shell). It does not change the context of the current session, nor does it exit from
the current session. We can exit from our assigned role and return to the first session
by exiting (through
exit
,
logout
, or Ctrl + d).

Chapter 3
[
47
]
Managing role access with sudo
Most administrators use
sudo
for privilege delegation: allowing users to run certain
commands in a more privileged context than the user is otherwise allowed. The
sudo
application is also capable of handling SELinux roles and types.
We can pass on the target role and type to
sudo
directly. For instance, we can tell
sudo
to switch to the database administrative role when we edit a PostgreSQL
configuration file:
$ sudo -r dbadm_r -t dbadm_t vim /etc/postgresql/pg_hba.conf
However, we can also configure
sudo
through the
/etc/sudoers
file to allow users
to run particular commands within a certain role/type, or get a shell within a certain
context. Consider a user that has access to both the
user_r
as well as
dbadm_r
role (a
role designated for database administrators). Within the
sudoers
file, the following
line allows the user to run any command through
sudo
which, when triggered, will
run by default run with the
dbadm_r
role and within the
dbadm_t
domain:
myuser ALL=(ALL) TYPE=dbadm_t ROLE=dbadm_r ALL
Often,
sudo
is preferred over
newrole
as most operations that we need another
role for require switching effective user IDs anyway. The
sudo
application also has
great logging capabilities, and we can even have commands switching role without
requiring the end user to pass on the target role and type. However, it does not
support changing sensitivities.
Switching to the system role
Sometimes we need to invoke applications that should not run under our current
SELinux user context, but instead as the
system_u
SELinux user with the
system_r
SELinux role. This is acknowledged by the SELinux policy administrators who allow
a very limited set of domains (applications) to transition even the SELinux user to a
different user. One of those applications is
run_init
.
The
run_init
application is used mainly (almost exclusively) to start services on a
Linux system. Through the use of this application, the daemons do not run under the
user’s SELinux context, but the system one instead. As an example, let us start the
mcstrans
daemon and check its context as follows:
# run_init /etc/rc.d/init.d/mcstrans start
# ps -Z $(pidof mcstransd)
system_u:system_r:setrans_t 7972 ? Ss 0:00 mcstransd

Managing User Logins
[
48
]
Since release 15, Fedora used
systemd
as the service management tool which has the
advantage that daemons are no longer started by the user, but by
systemd
itself on
request of the user. As a result, services launched by
systemd
inherit the
system_u
SELinux user that
systemd
runs in, and therefore
run_init
is not needed there.
On Gentoo,
run_init
is integrated in the OpenRC service management tool so we
do not need to explicitly call it. In Fedora (up to release 14),
run_init
is only needed
when the user is in the
sysadm_r
role.
Most SELinux policies enable role-managed support for selective service management
(for non-
systemd
distributions). This allows users that do not have complete system
administration rights to still manipulate particular services on a Linux system if
allowed by the SELinux policy. These users are to be granted the
system_r
role, but
once that has been accomplished they do not need to call
run_init
to manipulate
specific services anymore. The transitions happen automatically and only for the
services that are assigned to the user, other services cannot be launched by these users.
For instance, the database administrative role (
dbadm_r
) can directly execute the
postgresql
service (preferably through
sudo
) as follows:
$ sudo /etc/rc.d/init.d/postgresql stop
If these users would have access to
run_init
, they can launch any service they want,
requiring additional protection to access
run_init
. For this reason, the users granted
with
system_r
are preferred over the
run_init
tool.
The runcon user application
The last application that can switch roles and sensitivities is the
runcon
application.
runcon
is available for all users and is used to launch a specific command as a
different role, type, and/or sensitivity. It even supports changing the SELinux user.
Unlike the previous commands,
runcon
runs in the context of the user rather than
its own domain, so any change in role, type, sensitivity, or even SELinux user is
governed by the privileges of the user itself.
Most of the time,
runcon
is used to launch applications with a particular category.
This allows users to take advantage of the MCS approach in SELinux without
requiring their applications to be MCS-enabled.
For instance, to run the Firefox browser with the
Salaries
category, enter the
following:
$ runcon -l Salaries firefox

Chapter 3
[
49
]
This method can also be used to assign categories to daemons, but the command
needs to be added in the daemon service script itself.
Getting in the right context
With all the information about SELinux users and roles, we still haven’t touched how
we get our context when we log in, or how we can change the type in the context.
Context switching during authentication
Traditionally, we log in to a Linux system through either a
login
process (triggered
through a
getty
process) in case of a command-line login, a certain service (for
example, the OpenSSH daemon), or through a graphical login manager (
xdm
,
kdm
,
gdm
,
slim
, and so on).
These services are responsible for switching our effective user ID (upon successful
authentication of course) so that we are not logged on to the system as the root user.
In case of SELinux systems, these processes also need to switch the SELinux user
(and role) accordingly.
In theory, all these applications can be made fully SELinux aware, consulting the
information we entered through
semanage user
and
semanage login
. But instead
of converting all these applications, the developers decided to take the authentication
route to a next level use the PAM (Pluggable Authentication Modules) services that
Linux systems provide.
PAM offers a very flexible interface for handling different authentication methods
on a Linux (and Unix) system. All applications mentioned earlier use PAM for their
authentication steps. What SELinux does is aligns with the PAM session service to
switch the context to the right one.
The following code listing is an excerpt of the Gentoo
/etc/pam.d/system-login
file, limited to the session service directives. It triggers the
pam_selinux
code as
part of the authentication process as follows:
session optional pam_loginuid.so
session required pam_selinux.so close
session required pam_env.so
session optional pam_lastlog.so
session include system-auth
session optional pam_ck_connector.so nox11
session required pam_selinux.so multiple open
session optional pam_motd.so motd=/etc/motd
session optional pam_mail.so

Managing User Logins
[
50
]
The supported arguments to the
pam_selinux
code are described in the
pam_
selinux
manual page. In the preceding example, the close option clears the current
context (if any) whereas the open option sets the context of the user.
SELinux supports the aspect of selective contexts. The context is based on the
process through which the user logs in. A perfect example of this is to differentiate
administrators when they log in through the console (where they can be in the
sysadm_r
role immediately) versus log in through a remote shell, where we might
want to put them in the
staff_r
role first and force them to reauthenticate (using
newrole
or
sudo
) before being given elevated privileges.
Application-based contexts
To cover application-based contexts, SELinux introduces the notion of a default
context. Based on the context of the tool through which a user is logged in (or
through which it executes commands), a different user context is chosen.
Inside the
/etc/selinux/targeted/contexts
directory, a file called
default_
contexts
exists that uses a simple syntax. Each line starts with the context
information of the parent process, and is then followed by an ordered list of all the
contexts that could be picked based on the role(s) that the user is allowed to be in.
Consider the following line of code for the
sshd_t
context:
system_r:sshd_t:s0 user_r:user_t:s0 staff_r:staff_t:s0
sysadm_r:sysadm_t:s0 unconfined_r:unconfined_t:s0
This line of code mentions that when a user logs in through a process running in the
sshd_t
domain (or the process wants to set the user context because it needs to run
something as a particular user), then the first role that matches a role that the user is
assigned to is used.
Assume that we are assigned the roles
staff_r
and
sysadm_r
then we will log in as
staff_r:staff_t
, as that is the first match.
Next to the
default_contexts
file, there are also similar files in the
users/
subdirectory. These files are named after the SELinux user for which they take effect.
If such a file exists, then its lines take precedence over the
default_contexts
file.
This allows us to assign different contexts for particular SELinux users even if they
share the same roles with other SELinux users. And because the precedence is line-
based, we do not need to copy the entire content of the
default_contexts
file, only
the line that is different is sufficient.

Chapter 3
[
51
]
Let’s modify the default contexts so that the
dbadm_u
SELinux user logs in with the
dbadm_r
role (with the
dbadm_t
type) when logged in through SSH. To do so, use
the
sshd_t
line but set
dbadm_r:dbadm_t:s0
as the only possible context and save
the result as
/etc/selinux/targeted/contexts/users/dbadm_u
:
system_r:sshd_t:s0 dbadm_r:dbadm_t:s0
To validate if our change succeeded, we can ask SELinux what will be the result of
a context choice without having to parse the files ourselves. This is accomplished
through the
getseuser
command, which takes two arguments, namely, the Linux
user account and the context of the process that switches the user context.
As an example, to see what the context would be for the
myuser
user when he logs
on through a process running in the
sshd_t
domain:
# getseuser myuser system_u:system_r:sshd_t
seuser: dbadm_u, level (null)
Context 0 dbadm_u:dbadm_r:dbadm_t
One of the advantages of the
getseuser
command is that it asks the SELinux code
what the context would be, which not only looks through the
default_contexts
file, but also checks whether the target context can be reached or not, and that there
are no other constraints that prohibit the change to the context.
Summary
SELinux maps Linux users onto SELinux users and defines the roles that a user is
allowed to be in through the SELinux user definitions. We learned how to manage
those mappings and the SELinux users with the
semanage
application and were
able to grant the right roles to the right people.
We also saw how the same commands are used to grant proper sensitivity to the
user and how we can describe these levels in the
setrans.conf
file. We used the
chcat
tool to do most of the category-related management activities.
After assigning roles to the users, we saw how to jump from one role to another using
newrole
,
sudo
,
runcon
, and
run_init
. We ended this chapter with the important
insight on how SELinux integrates in the Linux authentication process and how it
implements application-specific contexts.
In the next chapter, we will learn to manage the labels on files and processes and see
how we can query the SELinux policy rules.


Process Domains and
File-level Access Controls
When we work on an SELinux-enabled system, gathering information about the
contexts associated with the files and processes is extremely important. We also
need to understand how these contexts are used in policies and what the applicable
security rules are for a specific process.
In this chapter, we will:
• Work with file contexts and learn where they are stored
• Understand how contexts are assigned
• Look at how processes get into the context they are in
• Get our first taste of the SELinux policy and how we can query it
We end with another SELinux feature called constraints and how it is used to
provide the user-based access control feature.
Reading and changing file contexts
Let us immediately start off with an example here: a web server hosting
dokuwiki
,
a popular PHP wiki site that uses files rather than a database as its backend system.

Process Domains and File-level Access Controls
[
54
]
Getting context information
The application is hosted at
/var/www/localhost/htdocs/dokuwiki
and stores
its wiki pages (user content) in subdirectories of the
data/
directory. Getting the
contexts of files can easily be accomplished using the
-Z
option to
ls
. Most utilities
that are able to provide feedback on contexts will try to do so using the
-Z
option, as
we saw already with the
id
and
ps
utilities. Let's look at the context of the
dokuwiki
directory itself:
# ls -lZ /var/www/localhost/htdocs
drwxr-xr-x. 1 root root root:object_r:httpd_sys_content_t 45 May 9 20:05
dokuwiki
File and directory contexts are stored on the filesystem as extended attributes when
the filesystem supports this. If not, the context of the files is usually defined by the
mounted filesystem type or its
mount
options. We can query the existing extended
attributes using the
getfattr
application as shown in the following example:
$ getfattr -m . -d dokuwiki
# file: dokuwiki
security.selinux="system_u:object_r:httpd_sys_rw_content_t"
As we can see, the
security.selinux
key is used for the SELinux context. The
use of the
security
namespace enforces specific restrictions on manipulating the
attribute: if no security module is loaded (for instance, SELinux is not enabled) then
only processes with the
CAP_SYS_ADMIN
capability are able to modify this parameter
(and thus influence the behavior of the SELinux system when SELinux is enabled).
Go ahead and look at the various file contexts on an SELinux-enabled system. You
can also use the
stat
application which also provides context information, shown in
the following example where we get the
dokuwiki
context information again:
$ stat dokuwiki | grep Context
Context: system_u:object_r:httpd_sys_rw_content_t
Getting context information from a file or directory should be as common to an
administrator as getting regular access control information (read, write, and execute
flags). After a while, we will notice that files are labeled based on their intended
usage. An important context type is
file_t
, which is used when SELinux does not
find any context information.
Consider the contexts of a user file in its home directory (
user_home_t
), a temporary
directory in
/tmp
for a Java application (
java_tmp_t
), and a socket of
rpcbind
(
rpcbind_var_run_t
). All these files or directories have considerably different
purposes on the filesystem, and this is reflected in their assigned contexts.

Chapter 4
[
55
]
Policy writers will always try to name the context consistently, making it easier
for us to understand the purpose of the file, but also to make the policy almost self
documented and to detect anomalies in the file contexts.
An example of a common anomaly is when a file is moved from the user home
directory to the web server location. When this occurs, it retains the
user_home_t
context as extended attributes are moved with it. As the web server process isn't
allowed to access
user_home_t
by default, it will not be able to serve this file to its
users.
Working with context expressions
In the SELinux policy, there is a list of regular expressions that informs the SELinux
utilities and libraries what should be the context of a file. Though this expression
list is not enforced on the system, it is meant for administrators to see if a context is
correct or not, and for tools that need to reset contexts to what they are supposed to
be. The list itself is stored on the filesystem in
/etc/selinux/strict/contexts/
files
in the
file_contexts.*
files.
As an administrator, we can query parts of this list through
semanage fcontext
as follows:
# semanage fcontext -l
Not all the entries are visible through the
semanage
application though.
Entries related to user home directories or that are explicitly marked to not
have a hardcoded context are not visible. For those entries that do match,
the output of the command is:
• A regular expression
• The classes on which the rule is applicable, but translated in a more
human-readable format
• The context to assign to the resources that match the expression and class list
The class list allows us to differentiate contexts based on the resource class, which
can be a regular file (
--
), a directory (
-d
), a socket (
-s
), a named pipe (
-p
), a block
device (
-b
), a character device (
-c
), or a symbolic link (
-l
). When it says "all files",
the line is valid regardless of the class.
The option-like statements discussed previously are used in the context list itself
(on the filesystem) and is also used when we would set our own context definition.

Process Domains and File-level Access Controls
[
56
]
An important property of the context list is how it is prioritized. After all, we could
easily have two expressions that both match. Within SELinux, the rule that is the
most specific wins. The logic used is as follows (in order):
• If line A has a regular expression, and line B doesn't, then line B is
more specific
• If the number of characters before the first regular expression in line A is less
than the number of characters before the first regular expression in line B,
then line B is more specific
• If the number of characters in line A is less than in line B, then line B is
more specific
• If line A does not map to a specific SELinux type (the policy editor has
explicitly told SELinux not to assign a type), while if line B does, then
line B is more specific
Consider the rules that all match
/usr/lib/pgsql/test/regress/pg_regress
(shown through the
findcon
application):
$ findcon /etc/selinux/strict/contexts/files/file_contexts -p /usr/lib/
pgsql/test/regress/pg_regress
/.* system_u:object_r:default_t
/usr/.* system_u:object_r:usr_t
/usr/(.*/)?lib(/.*)? system_u:object_r:lib_t
/usr/lib/pgsql/test/regress(/.*)?
system_u:object_r:postgresql_db_t
/usr/lib/pgsql/test/regress/pg_regress --
system_u:object_r:postgresql_exec_t
Although the other five rules match, the last one is the most specific because it does
not contain any expression. If that line doesn't exist, then the line before is the most
specific because the number of characters before the first regular expression is much
longer than the match before, and so on.
These rules, however, only hold for the context expressions provided by the policy. If
we add our own regular expressions to the system (called local context expressions),
and a file matches one of our expressions, then the last expression that we added
which matches the file is used.

Chapter 4
[
57
]
Setting context information
When we think that the context of a file is wrong, we need to correct the context.
SELinux offers several methods to do so, and some distributions even add in more.
In order to be able to change contexts we do need proper rights, which are named
relabelfrom
and
relabelto
. These rights are granted on domains to indicate if the
domain is allowed to change a label from a particular type (similar to
user_home_t
)
and towards another type (similar to
httpd_sys_content_t
). If we find denials in
the audit log related to these permissions, it means that the domain is prohibited
from changing the contexts.
Assuming that we have these rights, we can use tools such as
chcon
,
restorecon
(together with
semanage
),
setfiles
,
rlpkg
(Gentoo), and
fixfiles
(Fedora). Of
course, we could also use the
setfattr
command, but will be the least user friendly
approach for setting contexts.
The
chcon
tool updates the context of the file (or files) directly, but does not update
the context list as provided by
semanage
. Let's try this out against the
/srv/www
directory as follows:
$ chcon -R -t httpd_sys_content_t /srv/www
Another interesting approach through
chcon
is to tell it to label a file with the same
context as a different file. In the next example, we use
chcon
to label
/srv/www/
index.html
, similarly as the context used for the
/var/www/index.html
file:
$ chcon --reference /var/www/index.html /srv/www/index.html
If we change the context of a file through
chcon
and set it to a context different from
the one in the context list, then there is a possibility that the context will be reverted
later: package managers might reset the files back to their intended context, or the
system administrator might trigger a full filesystem relabeling operation.
For this reason, it is seriously recommended to only use
chcon
when testing the
impact of a context change. Once the change is accepted, we need to register
it through
semanage
. For instance, to permanently mark
/srv/www
(and all its
subdirectories) as
httpd_sys_content_t
we need to execute the following:
# semanage fcontext -a -t httpd_sys_content_t "/srv/www(/.*)?"
# restorecon -R /srv/www
What we do here is to first register
/srv/www
and its subdirectories as
httpd_sys_
content_t
through
semanage
. Then, we use
restorecon
to reset the contexts
(recursively) of
/srv/www
to the value registered in the context list. This is the
recommended approach for setting different contexts on most resources.

Process Domains and File-level Access Controls
[
58
]
These registrations are the local context expressions and are stored in a separate file
(
file_contexts.local
). Considering the priority of expressions, the following will
not have the expected behavior since the last rule we added takes precedence:
# semanage fcontext -a -t httpd_sys_content_t "/srv/www(/.*)?"
# semanage fcontext -a -t var_t "/srv(/.*)?"
In this example,
/srv/www
would still be labeled as
var_t
instead of
httpd_sys_
content_t
because the
var_t
rule was added later.
The
semanage fcontext
application can also be used to inform SELinux that a part
of the filesystem tree should be labeled as if it was elsewhere. This allows us to use
different paths for application installations or file destinations, and tell
semanage
to
apply the same contexts as if the destination was the default.
For instance, to have everything under
/srv/www
be labeled as
/var/www
including
subdirectories, so
/srv/www/icons
gets the same context as
/
var/www/icons
,we
use the
–e
option to
semanage fcontext
as follows:
# semanage fcontext -a -e /var/www /srv/www
This will create a substitution entry so that anything under
/srv/www
is labeled as if
it was at the same subdirectory but under
/var/www
.
The
setfiles
application is an older one, which requires the path to the context list
file itself in order to reset contexts. Although it is often used under the hood of other
applications, most administrators do not need to call
setfiles
directly anymore.
Finally, we have the
rlpkg
and
fixfiles
applications. Both of the applications have
a nice feature that they can be used to reset the contexts of the files of a particular
application, rather than having to iterate over the files manually and running
restorecon
against them. In the next example, we use these tools to restore the
contexts of the files provided by the
openssh
package:
# rlpkg openssh
# setfiles -R openssh restore
Another feature of both applications is that they can be used to relabel the entire
filesystem using the options shown here as follows:
# rlpkg -a -r
# setfiles -f -F relabel
Another way of relabeling the entire system is to create a touch file called
.autorelabel
in the root filesystem and reboot (Fedora-only) as follows:
# touch /.autorelabel
# reboot

Chapter 4
[
59
]
We only focused on the type part of a context. Contexts, however, also include a role
part and SELinux user part. If UBAC is not enabled, then the SELinux user has no
influence on any decisions, but if it is enabled, utilities such as
chcon
are able to set
the SELinux user as well. The role for a file usually is
object_r
as roles currently
only make sense for users (processes).
Using customizable types
Some SELinux types are meant for files whose paths cannot be accurately defined
by administrators, or where the administrator does not want the context to be reset
when a relabeling operation is triggered. Such types are called customizable types.
The customizable types are declared in the
customizable_types
file inside
/etc/
selinux/strict/contexts
. When
restorecon
(or any other tool that wants to reset
contexts to the type declared in the context list) wants to relabel a file whose context
is of a type known to be a customizable type, it will not reset the context (except
when the force reset option
-F
is given).
Let's take a look at the contents of this
customizable_types
file:
$ cat /etc/selinux/strict/contexts/customizable_types
As an example, we can mark a file in our home directory (in this example, the
file is called
convert.sh
) as
home_bin_t
, which is a customizable type and as
such will not be relabeled back to
user_home_t
when a filesystem relabeling
operation is done:
$ chcon –t home_bin_t ~/convert.sh
For now, we cannot add customizable types easily. The file needs to be edited
manually, and because the file can be overwritten when a new policy package
(by the distribution) is pushed to the system, it needs to be governed carefully.
Still, the use of customizable types has its advantages. As an administrator, we might
want to create and support specific types usable by end users who can use
chcon
to set the context of individual files in their home directory. By having those types
marked as customizable types, a relabeling operation against
/home
will not reset
those contexts.
Most of the times, however, it is preferred to use
semanage fcontext
to add an
expression, and
restorecon
to fix the context of the files. Take the
convert.sh
file
as an example again, which would result in the following commands:
# semanage fcontext –a –t home_bin_t /home/myuser/convert\.sh
# restorecon /home/myuser/convert.sh

Process Domains and File-level Access Controls
[
60
]
Inheriting the context
By default, SELinux uses context inheritance to identify what context should be
assigned to a file (or directory, or socket, and so on) when it is created. It does not
look at the value in the expression list (the
file_contexts.*
files). A file created
in a directory with a context
var_t
will get assigned the context
var_t
as well.
There are a few exceptions to this though: type transition rules, SELinux-aware
applications, or the use of
restorecond
.
Type transition rules are policy rules that force the use of a different type upon
certain conditions. In the case of file contexts, such a type transition rule can be
as follows: if a process running in the
httpd_t
domain creates a file in a directory
labeled
var_log_t
, then the
type
identifier of the file becomes
httpd_log_t
instead of
var_log_t
.
Basically, this rule ensures that any file placed by web servers in a log directory is
assigned the context specific to web server logs.
We can query these type transition rules using
sesearch
, one of the most important
tools available to query the current SELinux policy. For the preceding example, we
need the (source) domain and the (target) context of the directory:
httpd_t
and
var_
log_t
. In the next example, we use
sesearch
to find the type transition declaration
related to the
httpd_t
domain towards the
var_log_t
context:
$ sesearch -T -s httpd_t -t var_log_t
Found 1 semantic te rules:
type_transition httpd_t var_log_t : file httpd_log_t;
The
type_transition
line is an SELinux policy rule, which maps perfectly on the
description. Let's look at another set of type transition rules for the
tmp_t
label
(assigned to the top directory of temporary file locations, for example,
/tmp
and
/
var/tmp
):
$ sesearch -T -s httpd_t -t tmp_t
Found 4 semantic te rules:
type_transition httpd_t tmp_t : file httpd_tmp_t;
type_transition httpd_t tmp_t : dir httpd_tmp_t;
type_transition httpd_t tmp_t : lnk_file httpd_tmp_t;
type_transition httpd_t tmp_t : sock_file httpd_tmp_t;
Found 2 named file transition rules:
type_transition httpd_t tmp_t : file krb5_host_rcache_t "HTTP_23";
type_transition httpd_t tmp_t : file krb5_host_rcache_t "HTTP_48";

Chapter 4
[
61
]
The policy tells us that if a file, directory, symbolic link, or socket is created in a
directory labeled
tmp_t
, then this resource gets the
httpd_tmp_t
context assigned
(and not the default, inherited
tmp_t
one). But it also contains two named file
transitions, which is a (rather recent) addition to the SELinux policy (which is not
available in RedHat Enterprise Linux 6).
With named file transitions, the policy can take into account the name of the file (or
directory) created to differentiate the target context. In the preceding example, if a
file named
HTTP_23
or
HTTP_48
is created in a directory labeled as
tmp_t
, then it
does not get the assigned
httpd_tmp_t
context (as would be implied by the regular
type transition rules), but instead the
krb5_host_rcache_t
type (used for Kerberos
implementations).
Type transitions do not only give us insight into what labels are going to be assigned,
but they also give us some clues as to which types are related to a particular domain.
In the web server example, we already found out by querying the policy that its
logfiles are most likely labeled
httpd_log_t
and its temporary files as
httpd_tmp_t
.
Next to type transition rules, contexts can be defined through the application itself if
the application is SELinux-aware (that is linked with and uses SELinux libraries). If
that is the case, the application can force the context of a file to be different (but only
if the policy allows it of course).
Finally, contexts can also be forced by
restorecond
. The purpose of this daemon is
to enforce the expression list rules onto a configured set of locations. These locations
are set in its configuration file,
/etc/selinux/restorecond.conf
. The next is an
example list of locations set in the
restorecond.conf
file, so that
restorecond
will
react upon context changes of these files and directories:
/etc/resolv.conf
/etc/mtab
/var/run/utmp
~/public_html
~/.mozilla/plugins/libflashplayer.so
In this case, if a file that matches any of the previously created paths,
restorecond
will be notified of it (through the Linux inotify subsystem) and will relabel the file
according to the expression list. In the past, the use of
restorecond
was needed
because SELinux didn't support named file transitions yet, so writing
resolv.conf
in
/etc
couldn't be differentiated from writing
passwd
in
/etc
. The introduction of
named file transitions has considerably reduced the need for
restorecond
.

Process Domains and File-level Access Controls
[
62
]
Placing categories on files and directories
We focused primarily on changing types, but another important part is to support
categories (and sensitivity levels). With
chcon
, we can add sensitivity levels and
categories as follows:
$ chcon -l s0:c0,c2 index.html
Another tool that can be used for assigning categories is the
chcat
tool. With
chcat
,
we can assign additional categories rather than having to iterate them again as in the
case with
chcon
, and even enjoy the human-readable category levels as provided by
the
setrans.conf
file:
$ chcat -- +Customer2 index.html
The context of a process
As everything in SELinux works with labels, even processes are assigned a label, also
known as the domain. If a label is absent (or invalid), SELinux will show the process
as
unlabeled_t
. We saw that the Apache web server runs in the
httpd_t
domain,
which can be seen with the
ps -Z
command as follows:
# ps -eZ | grep httpd
system_u:system_r:httpd_t:s0 2270 ? 00:00:00 httpd
The Apache processes don't inform SELinux themselves that they need to run in the
httpd_t
domain. For that, transition rules in SELinux exist.
Transitioning towards a domain
Just as we did with files, if a process forks and creates a new process, this process
inherits the context of the parent process. In case of the web server, the main process
is in the
httpd_t
domain, so all the worker processes that are launched inherit the
httpd_t
domain from it.
In order to differentiate one process from another, domain transitions can be defined.
A domain transition (also known as a process transition) is a rule in SELinux that
tells SELinux another domain is to be used for a forked process (actually, it is when
the parent process calls the
execve()
function, most likely after a
fork()
).

Chapter 4
[
63
]
Similar to the files, domain transitions can be searched through using
sesearch
. Let's
look into the domains that are allowed to transition to the
httpd_t
domain as follows:
$ sesearch -T | grep "process httpd_t"
type_transition initrc_t httpd_exec_t : process httpd_t
In this case, SELinux will switch the context of a launched web server to
httpd_t
if
the parent process is running in the
initrc_t
domain and is executing a file labeled
as
httpd_exec_t
(which is the label assigned to the
httpd
binary).
But in order for this to truly happen, a number of other permissions (next to the type
transition) need to be in place. The following list describes these various permissions:
• The parent process (
initrc_t
here) needs to be allowed to transition to the
httpd_t
domain, which is governed by the
transition
privilege on the
process
class:
$ sesearch -s initrc_t -t httpd_t -c process -p transition -A
Found 1 semantic av rules:
allow initrc_t httpd_t : process transition ;
• This parent process needs to have the
execute
right on the file it is launching
(
httpd_exec_t
):
$ sesearch -s initrc_t -t httpd_exec_t -c file -p execute -A
Found 1 semantic av rules:
allow initrc_t httpd_exec_t : file { ioctl read getattr …
execute … open } ;
• The
httpd_exec_t
type must be identified as an entrypoint for the
httpd_t
domain. An
entrypoint
is used by SELinux to ensure a domain transition
only occurs on the file(s) that should be used to get into a new domain:
$ sesearch -s httpd_t -t httpd_exec_t -c file -p entrypoint -A
Found 1 semantic av rules:
allow httpd_t httpd_exec_t : file { ioctl read … entrypoint
open } ;
• The target domain must be allowed for the role that the parent process is in.
In case of system daemons, the role is
system_r
:
$ seinfo -rsystem_r -x | grep httpd_t
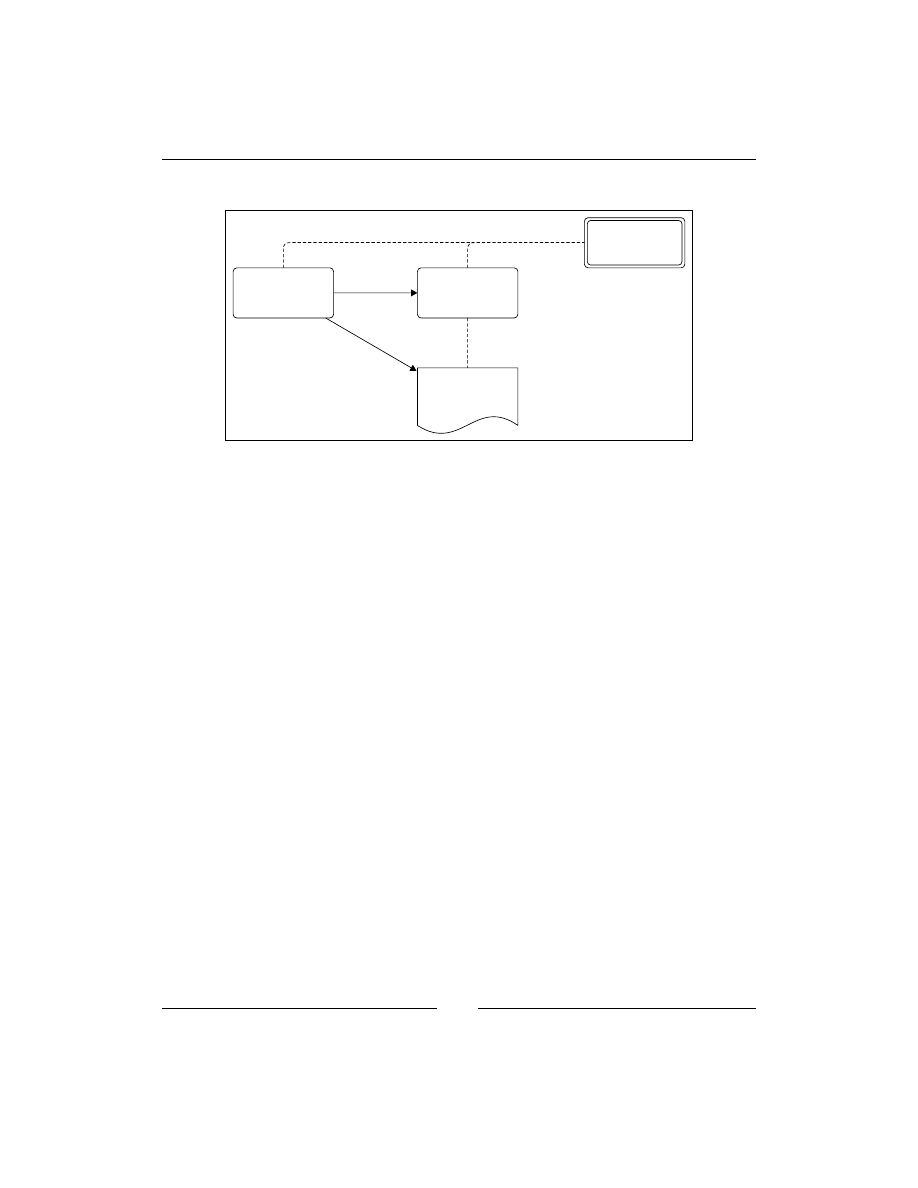
Process Domains and File-level Access Controls
[
64
]
A graphical representation of these rights is shown in the following diagram:
allowed type
initrc_t
httpd_t
transition
entrypoint
execute
http_exec_t
system_r
Graphical overview of the involved permissions to succesfully transition from one domain to another
Only when all these are allowed, a domain transition occurs. If not, either execution
of the application fails (if the domain has no
execute
rights on the file), or it is
running in the same domain as the parent process.
Other supported transitions
Regular domain transitions are the most common transitions in SELinux, but there
are other transitions as well.
For instance, some applications (for example,
cron
or
login
) are SELinux aware and
will specify to which domain a transition needs to be triggered. These applications
call the
setexeccon()
method to specify the target domain, and do not use a type
transition rule. The other requirements, however, still hold.
Some SELinux aware applications are even able to change their current context (and
not just the context of the application they execute). In order to do so, the application
domain needs the
dyntransition
right (one of the privileges supported for process-
level activities). An example of such an application is chromium, which by default
runs in the
chromium_t
domain but can transition to the
chromium_renderer_t
type. Another example is the
httpd_t
domain.
The support for dynamic transitions in
httpd_t
is to support the
mod_selinux
Apache module. With this module, requests for a particular web application can
be handled in a different domain than the (main)
httpd_t
domain, even though
no additional process is launched. Instead, one of the worker processes (or threads,
as SELinux contexts can be put on threads as well) dynamically transitions to the
security domain the administrator wants it to run in.

Chapter 4
[
65
]
Working with mod_selinux
When dynamic transitions are used, we need to know if the process is
single-threaded or not. If it is single-threaded, then the target domain can be
"freely" chosen. However, if the process is multithreaded and we want to change
the context of a single thread, then the target domain must be bounded by the
current (parent) domain. SELinux will enforce this, and refuse to change to a
new domain if this domain isn't bounded.
A bounded domain means that the privileges of the domain are the same or less than
the permissions of the parent domain. This is a requirement because threads share
the same memory segments, so SELinux is not able to control information flows
between different threads. By ensuring that target domains are bounded, SELinux is
able to contain the information flow within the process.
Consider a web server configuration with multiple virtual hosts; for each virtual
host, a different domain can be selected through the
selinuxDomainVal
directive
(or the same domain but with a different sensitivity level or category set).
NameVirtualHost *:80
<VirtualHost *:80>
DocumentRoot /var/www/sales
ServerName sales.genfic.com
selinuxDomainVal *:s0:c1
</VirtualHost>
<VirtualHost *:80>
DocumentRoot /var/www/hr
ServerName hr.genfic.com
selinuxDomainVal hr_site_t:s0
</VirtualHost>
The
mod_selinux
module can also select the domain (or sensitivity level and
category) based on the authenticated web user. To support this, a user mapping file
needs to be created that provides the target context for each authenticated user as
follows:
someuser *:s0:c1
otheruser *:s0:c2
__anonymous__ anon_webapp_t:s0
* *:s0:c0
The
__anonymous__
user is a special one for unauthenticated users.

Process Domains and File-level Access Controls
[
66
]
This mapping file can then be referenced in the web server configuration as follows:
<VirtualHost *:80>
DocumentRoot /var/www/sales
ServerName sales.genfic.com
selinuxDomainMap /etc/apache/selinux/mod_selinux.map
</VirtualHost>
We can also differentiate them based on the origin of the requests. Suppose we want
to assign a different category range if the user is on one subnet than when he is
connected from another subnet:
<VirtualHost *:80>
DocumentRoot /var/www/sales
ServerName sales.genfic.com
SetEnvIf Remote_Addr "10.18.12.[0-9]+$" SELINUX_DOMAIN=*:s0:c0
SetEnvIf Remote_Addr "10.160.18.[0-9]+$" SELINUX_DOMAIN=*:s0:c0.c5
selinuxDomainEnv SELINUX_DOMAIN
selinuxDomainVal anon_sales_t:s0:c0
</VirtualHost>
In this example, if the IP address of the user matches, then the domain mentioned
in the
SELINUX_DOMAIN
variable is used. Otherwise, the context falls back to the
one provided by the
selinuxDomainVal
directive. By supporting variables, more
integrated approaches can be used, such as selecting the target domains through
database queries.
Dealing with types, permissions, and
constraints
Now that we know more about types (both in the context of processes as well as
files and other resources), let's look into how these are used in the SELinux policy
in more detail.
Type attributes
We have discussed the
sesearch
application already and how it can be used to
query the current SELinux policy. Let us look again at the process transitions, this
time on a Fedora system:
$ sesearch -s initrc_t -t httpd_t -c process -p transition -A
Found 1 semantic av rules:
allow initrc_domain daemon : process transition ;

Chapter 4
[
67
]
Even though we asked for the rules related to the
initrc_t
source and the
httpd_t
target, we get a rule back for the
initrc_domain
source and the
daemon
target.
What
sesearch
did here was it told us a privilege of
initrc_t
based on a privilege
assigned to an attribute.
Type attributes in SELinux are used to group multiple types and assign privileges on
these groups, rather than having to assign the privileges on each type individually.
In case of
initrc_domain
, the following types are all "tagged" with the
initrc_
domain
attribute, which can be seen through the
seinfo
application:
$ seinfo -ainitrc_domain -x
initrc_domain
piranha_pulse_t
initrc_t
kdumpctl_t
init_t
rgmanager_t
condor_startd_t
As we can see, the
initrc_t
type is indeed one of the
initrc_domain
tagged types.
Similarly, the
daemon
attribute is assigned to several types (several hundreds even).
So the single allow rule mentioned earlier consolidates more than a thousand rules
into one (hundreds of allow rules, each for the preceding six
initrc
domains).
Attributes are being used increasingly in the policy as a way of consolidating and
simplifying policy development. With
seinfo -a
, you can get an overview of all
attributes supported in the current policy.
Querying domain permissions
The most common rules in SELinux are the allow rules, informing the SELinux
subsystem what permissions a domain has. Allow rules using the following syntax:
allow <source> <destination> : <class> <permissions> ;
The
<source>
field is always a domain, whereas the
<destination>
field can be of
any kind of type.

Process Domains and File-level Access Controls
[
68
]
The
<class>
field allows us to differentiate privileges based on the resource: is it
for a regular file, a directory, a TCP socket, a capability, and so on. A full overview
of all supported classes can be obtained from
seinfo -c
. Each class has a set of
permissions assigned to it that SELinux can control. For instance, the
sem
class
(used for semaphore access) is as follows:
$ seinfo -csem -x
sem
associate
create
write
unix_read
destroy
getattr
setattr
read
unix_write
In the
<permissions>
field, most rules will bundle a set of permissions through the
use of the
{ … }
brackets:
allow user_t etc_t : file { ioctl read getattr lock execute execute_
no_trans open } ;
This syntax allows policy developers to make very fine-grained permission controls.
We can use the
sesearch
command to query through these rules. The more options
that are given to the
sesearch
command, the finer-grained our search parameters
become. For instance,
sesearch -A
would give us all allow rules currently in place.
Adding a source (
-s
) filters the output to only show the allow rules for this domain.
Adding a destination or target (
-t
) filters the output even more. Other supported
options for allow rules with
sesearch
are the class (
-c
) and permission (
-p
).
The syntax also perfectly matches with the information provided by AVC denials:
type=AVC msg=audit(1371993742.009:15990): avc: denied { getattr
} for pid=31069 comm="aide" path="/usr/lib64/postgresql-9.2/bin/
postgres" dev="dm-3" ino=803161 scontext=root:sysadm_r:aide_t tcontext
=system_u:object_r:postgresql_exec_t tclass=file
Allowing this particular denial would result in the following allow rule:
allow aide_t postgresql_exec_t : file { getattr };

Chapter 4
[
69
]
Understanding constraints
The allow statements in SELinux however only focus on the type-related
permissions. Sometimes, however, we need to restrict certain actions based on
the user or role information. In SELinux, this is supported through constraints.
Constraints in SELinux are rules that are applied against a class and a set of its
permissions which have to be true in order for SELinux to further allow the request.
Consider the following constraint on process transitions:
constrain process { transition dyntransition noatsecure siginh
rlimitinh }
(
u1 == u2
or ( t1 == can_change_process_identity and t2 == process_user_
target )
or ( t1 == cron_source_domain and ( t2 == cron_job_domain or
u2 == system_u ) )
or ( t1 == can_system_change and u2 == system_u )
or ( t1 == process_uncond_exempt )
);
This constraint says that the following rule(s) have to be true if a
transition
,
dyntransition
, or any of the other three mentioned process permissions is invoked:
• The SELinux user of the domain (
u1
) and target (
u2
) have to be the same
• The SELinux type of the domain (
t1
) has to have the
can_change_process_
identity
attribute set and the SELinux type of the target (
t2
) has to have the
process_user_target
attribute set
• The SELinux type of the domain (
t1
) has to have the
can_system_change
attribute set and the SELinux user of the target (
u2
) has to be
system_u
• The SELinux type of the domain (
t1
) has to have the
process_uncond_
exempt
attribute set
It is through constraints that UBAC is implemented as follows:
u1 == u2
or u1 == system_u
or u2 == system_u
or t1 != ubac_constrained_type
or t2 != ubac_constrained_type
You can list the currently enabled constraints using
seinfo --constrain
, but the
output expands the attributes immediately and uses a postfix notation, making it not
that obvious to read.

Process Domains and File-level Access Controls
[
70
]
Summary
In this chapter, we saw how file contexts are stored as extended attributes on
the filesystem and where SELinux keeps its definition on what contexts are to
be assigned on which files. We also learned to work with the
semanage
tool to
manipulate this information.
On the process level, we got our first taste of SELinux policies, identifying when
a process is launched inside a certain SELinux domain. With it, we touched the
sesearch
and
seinfo
applications to query the SELinux policy.
In the next chapter, we will expand our knowledge of protecting the
operating system from a regular file, and process protection measures
towards the networking-related features of SELinux.

Controlling Network
Communications
The SELinux mandatory access controls go much beyond the file and process
access controls. One of the features provided by SELinux is controlling network
communications. By default, the socket-based access control mechanism is used for
general network access controls, but more detailed approaches are also possible.
TCP and UDP support
When we confine network facing services, for example, web servers or database
servers, we not only focus on the file-based restrictions and process capabilities,
but also what network activities the services are allowed to do. Many database
servers should not be able to initiate a connection themselves to other systems and,
if they do, these connections should be limited to the expected services (like other
database services).
The first approach on limiting this is to define what sockets a process is allowed to
bind on (as a service) or connect to (as a client). In the majority of cases, the sockets
are either TCP sockets or UDP sockets. In SELinux, these are mapped to the
tcp_
socket
and
udp_socket
classes.

Controlling Network Communications
[
72
]
Labeling ports
In order to easily map SELinux domain accesses to the TCP or UDP ports, SELinux
allows administrators to label these ports and define which domains can access what
ports. When a domain tries to connect or bind to a port, the
name_connect
or
name_
bind
permissions on the socket class related to the port are checked. If it fails, an
AVC
denial similar to the following one is shown:
type=AVC msg=audit(1372361247.465:76): avc: denied { name_bind } for
pid=2880 comm="apache2" src=84 scontext=system_u:system_r:httpd_t:s0
tcontext=system_u:object_r:reserved_port_t:s0 tclass=tcp_socket
As we can see, the
httpd_t
domain tried to bind (
name_bind permission
) against
a
tcp_socket
class labeled with
reserved_port_t
, but was prevented by SELinux.
In the denial, we can find out what the port number is (
src=84
).
The labels for the various ports can be seen using
semanage port
, as shown in the
following example:
# semanage port -l | grep http_port
http_port_t tcp 80, 443, 488, 8008, 8009, 8443
pegasus_http_port_t tcp 5988
In the preceding example, we see that the
http_port_t
label is assigned to a set
of TCP ports. It comes as no surprise that daemons, for example, web servers, are
policywise, allowed to bind to this port. We can check this using the
sesearch
application as follows:
$ sesearch -s httpd_t -t http_port_t -A
Found 1 semantic av rules:
allow httpd_t http_port_t : tcp_socket { recv_msg send_msg name_bind }
;
From the output, we can imagine that there are also recv_msg and
send_msg
permissions. Although these are still known in the policy,
they are no longer used and expected to disappear in the near future.
The only permissions that are checked are the name_bind and name_
connect
ones.
As an administrator, we can change the label assigned to particular ports. For
instance, we can assign the
http_port_t
label to port
84
using
semanage port
as
follows:
# semanage port -a -t http_port_t -p tcp 84

Chapter 5
[
73
]
This is the recommended approach when you have daemons assigned to run on
non default ports to hide them from port scanners: instead of modifying the policy
to allow the daemon to bind on other ports, just assign the same label on the non
standard port as we did in the preceding example with port
84
(which is now also
labeled as
http_port_t
).
Integrating with Linux netfilter
The approach with TCP and UDP ports has a few downsides. One of them is that
there is no knowledge of the target host, so you cannot govern where a domain can
connect to. There is also no way of limiting daemons from binding on any interface: in
a multi-homed situation, we might want to make sure that a daemon only binds on the
interface facing the internal network and not the Internet-facing one, or vice-versa.
In the past, SELinux allowed support for this binding issue through the interface
and node labels: a domain could only be allowed to bind on one interface and not on
any other, or even on a particular address (referred to as the node). This support has
been deprecated for the regular network access control support because it had a flaw;
there was no link between host or interface binding information and the connect or
bind permission towards a particular socket.
Consider the example of a web server on a DMZ system. The web server is allowed
to receive web requests from the Internet (interface
0
) as well as connect to a
database in the internal network (through interface
1
) to serve the dynamic content.
For SELinux, in this previous approach, this allowed the web server to bind on both
interfaces, bind on the
http_port_t
socket and connect to a
postgresql_port_t
socket (or other database socket).
The flaw here is that the domain now is also allowed (SELinux wise) to connect to a
PostgreSQL socket on a database the Internet, which we might not want. To fix this,
packet labeling is introduced which is called SECMARK.
Packet labeling through netfilter
With packet labeling, we can use the filtering capabilities of
iptables
and
ip6tables
to assign particular labels on packets and connections. Because we can use the flexible
options provided by the filtering subsystem, we can mark only the packets related to
the PostgreSQL connection from our web server to the internal PostgreSQL server and
allow the web server to send and receive permissions on these packets.

Controlling Network Communications
[
74
]
Because packets originating from (or going to) a database on the Internet are then
marked with a default label (or an explicit label we assign it with), SELinux is able
to prevent the web server in our DMZ example to connect to an Internet-hosted
database, as SELinux can now control the labeled traffic.
This packet labeling uses the idea of security markings, hence the name SECMARK.
Although we use the term SECMARK, there are actually two markings: one for
packets (
SECMARK
) and one for connections (
CONNSECMARK
).
The filtering capabilities for which we use
iptables
(for IPv4) and
ip6tables
(for
IPv6) are based on the Linux netfilter subsystem, which offers a full-featured packet
filtering framework. Basically, Linux offers a set of packet matching tables based on
the functionality through which the packet "flows":
filter
,
nat
,
mangle
,
raw
, and
security
. For SECMARK, the
mangle
and
security
tables are those that offer the
security marking capabilities.
Next to the tables, there are also chains (where we can define a sequential set
of filtering rules in) assigned to the tables, and which are used by the netfilter
subsystem while it is handling a packet. By default, the netfilter subsystem comes
with a set of chains (
PREROUTING
,
INPUT
,
FORWARD
,
POSTROUTING
, and
OUTPUT
) which
are triggered in a well-defined flow. Custom chains can also be created (and reused),
and can be referred to using rules in the predefined chains.
A rule in a chain provides a matching criterion for a packet which, if the packet
indeed matches, is handled according to the target. Targets can be a custom chain, or
one of the predefined resulting values
ACCEPT
,
DROP
,
QUEUE
,
RETURN
, or (in our case)
SECMARK
.
Assigning labels to packets
When no
SECMARK
related rules are loaded in the netfilter subsystem, then
SECMARK
is not enabled and none of the SELinux rules related to SECMARK permissions are
checked. The network packets are not labeled, so no enforcement can be applied to
them. Of course, the regular TCP/UDP socket related labels still apply.
Once a
SECMARK
rule is enabled,
SECMARK
becomes active and SELinux starts enforcing
the packet label mechanism. This means that all of the network packets now need
a label on them (as SELinux can only deal with labeled resources). This label is
unlabeled_t
, which does not mean that there is no label (because that is the label),
but because there is no marking rule that matches this particular network packet.

Chapter 5
[
75
]
Because SECMARK rules are now being enforced, all domains that interact with
network packets are checked to see if they are allowed to send or receive these
packets. In order to simplify management, some distributions enable send and
receive rights against the
unlabeled_t
packets for all domains. Without these rules,
all network services would stop functioning properly, the moment a single
SECMARK
rule is enabled.
For those systems that accept the
unlabeled_t
packets by default, we can add in a
netfilter rule that automatically marks all packets, which are not labeled otherwise,
with a non default label (for example,
forbidden_packet_t
). So, no
unlabeled_t
packet goes through anymore. This allows us to toggle the default acceptance of
packets on and off easily without rebuilding SELinux policies.
To assign a packet, we need to define a set of rules that match a particular network
flow. It is a common practice to create a separate chain for the security markings, and
jump to this chain when needed. So let's start with an example of marking incoming
HTTP packets (and connection) as
http_server_packet_t
, by performing the
following steps:
1. First, we define the
SEL_M_HTTP
custom chain (which is an arbitrary name)
for the security table. If the security table is not present on the system, we can
use the mangle table as well (the security table is a recent addition and not
fully integrated everywhere yet):
# iptables -t security -N SEL_M_HTTP
2. Next, we label all packets that enter the chain as
http_server_packet_t
:
# iptables -t security -A SEL_M_HTTP -j SECMARK --selctx
system_u:object_r:http_server_packet_t:s0
3. Now we inform netfilter to save the state of the connection based on the
security marking of the packet as follows:
# iptables -t security -A SEL_M_HTTP -j CONNSECMARK –save
4. We end the custom chain with the
ACCEPT
target, so that the packets (and
connection) are allowed (for the security table) and there are no more rules in
this chain that need to be processed.
# iptables -t security -A SEL_M_HTTP -j ACCEPT
We can now define a matching filter: incoming packets (our destination is a local
network address) on port
80
, and jump to the
SEL_M_HTTP
custom chain if the
packets match using the following command:
# iptables -t security -A INPUT -p tcp -d 192.168.1.1/24 --dport 80 -j
SEL_M_HTTP

Controlling Network Communications
[
76
]
That's it. With these rules in place, the matching packets are labeled as
http_server_packet_t
.
Differentiating between server and client
communication
The SELinux policy provides a set of packet types by default, based on the service
that is usually assigned to a particular port, and also on the function of the packet.
Is it a client packet (sent or received by a client application) or a server packet
(sent or received by a daemon)?
Consider the web server example again: we labeled it as
http_server_packet_t
,
because it is a packet intended for the locally running web server. Systems that run a
web browser which connects to a web server, however, would label these packets as
http_client_packet_t
, as they are intended as a client packet.
Although in both cases the rules can be quite equivalent (both can use similar or even
the same filtering rules), this distinction shows one of the most important things to
remember from the
SECMARK
labeling: the markings are local to the system and are
never, ever exposed to the network (nor can they ever be used by other systems).
A label is assigned the moment the packet enters the netfilter subsystem, but the
moment it exits the subsystem the label is gone.
Work is being done to integrate default
SECMARK
labels in distributions, allowing us
to enable the standard service packet labels easily. For now though, we will need to
manage this ourselves.
Introducing labeled networking
Another approach to further fine-tune the access controls on network level is to
introduce labeled networking. With labeled networking, security information is
passed on between hosts (unlike SECMARK which only starts when the packet
is received by the netfilter subsystem). This is also known as peer labeling, as the
security information is passed on between hosts (peers).
The advantage of labeled networking is that security information is retained across
the network, allowing an end-to-end enforcement on mandatory access control
settings between systems, as well as retaining the sensitivity level of communication
flows between systems. The major downside however is that this requires an
additional network technology (protocol) that is able to manage labels on network
packets or flows.

Chapter 5
[
77
]
SELinux currently supports two implementations as part of the labeled networking
approach: NetLabel/CIPSO and labeled IPSec. With NetLabel/CIPSO, only the
sensitivity of the source domain is retained across the communication. Labeled IPSec
supports transporting the entire security context with it.
In this book, we will focus on labeled IPSec and only briefly touch NetLabel/CIPSO,
as labeled IPSec is much more common.
Common labeling approach
Quite some time ago, support for NetLabel/CIPSO and labeled IPSec has been
merged in a common framework called netpeer. The netpeer approach introduces
three additional privilege checks in SELinux: interface checking, node checking, and
peer checking. These privilege checks are only active when labeled traffic is being
used: without labeled traffic, these checks are simply ignored.
In the interface and node checks, the domain that is acting is the peer domain. For
instance, if we are looking at the configuration from a web server perspective, the
peer domain can be
httpd_t
(as that is the context of the socket), if the web server is
initiating something, or
mozilla_t
(as that is the context of the web browser socket
on the client) if the web server is receiving something.
Limiting flows based on the network interface
The idea behind interface checking is that each packet that comes into a system
passes an ingress check on an interface, whereas a packet that goes out of a system
passes an egress check. Ingress and egress are the SELinux permissions involved,
whereas interfaces are given a security context.
Interface labels can be granted using the
semanage
tool, and are especially useful to
assign sensitivity levels and categories to interfaces, as we will do in the following
example where the categories for the
tap0
interface are set:
# semanage interface -a -t netif_t -r s0-s0:c0.c128 tap0
Similar to the other
semanage
commands, we can also view the current mappings
as follows:
# semanage interface -l
SELinux Interface Context
tap0 system_u:object_r:netif_t:s0-s0:c0.c128

Controlling Network Communications
[
78
]
As the communication flows originate from a peer label (as with the web server and
client example) we will see, on the server side, the
mozilla_t
ingress activity, and
not
httpd_t
ingress. The following denial confirms this as follows:
type=AVC msg=audit(1372954432.866:1592): avc: denied { ingress
} for pid=0 comm="swapper/1" saddr=192.168.100.1 src=40854
daddr=192.168.100.152 dest=80 netif=eth0 scontext=staff_u:staff_r:mozi
lla_t:s0 tcontext=system_u:object_r:netif_t:s0 tclass=netif
Accepting communication from selected hosts
Nodes represent specific hosts (or network of hosts) that data is sent towards
(
sendto
) or received from (
recvfrom
) and are handled through the SELinux node
class. Just like with interfaces, these can be listed and defined by the
semanage
tool.
In the following example, we mark the
10.0.0.0/8
network with the
node_t
type,
as follows:
# semanage node -a -t node_t -p tcp 10.0.0.0/8
# semanage node -l
IP Address Netmask Protocol Context
10.0.0.0 255.0.0.0 ipv4 system_u:object_r:node_t:s0
Similarly, as activity will be seen originating from the peer label, we will see the
recvfrom
activity on the server side for the
mozilla_t
peer, as shown in the
following denial:
type=AVC msg=audit(1372954797.871:1636): avc: denied { recvfrom
} for pid=0 comm="swapper/1" saddr=192.168.100.1 src=40864
daddr=192.168.100.152 dest=80 netif=eth0 scontext=staff_u:staff_r:mozi
lla_t:s0 tcontext=system_u:object_r:node_t:s0 tclass=node
Verifying peer-to-peer flow
The final check is a peer class check. In case of labeled IPSec, this is the label of the
socket that is sending out the data (
mozilla_t
). For NetLabel/CIPSO however, the
peer will be static, based on the source, as NetLabel (actually CIPSO) is only able to
pass on sensitivity levels. A common label seen for Netlabel is
netlabel_peer_t
.
The following is an example of an
AVC
denial on the peer class:
type=AVC msg=audit(1372954885.960:1659): avc: denied { recv
} for pid=9 comm="rcu_preempt" saddr=192.168.100.1 src=40870
daddr=192.168.100.152 dest=80 netif=eth0 scontext=system_u:system_r:ht
tpd_t:s0 tcontext=staff_u:staff_r:mozilla_t:s0 tclass=peer

Chapter 5
[
79
]
As we can see, unlike the interface and node checks, peer checks have the peer domain
as the target rather than the source. In this example, we saw that the
httpd_t
domain
(local) does not have the right to receive traffic from the
mozilla_t
peer.
In all of theprevious examples, the process listed in the denial has nothing to do
with the actual denial. This is because the denial is triggered from within a kernel
subsystem rather than through a call made by a user process. As a result, an
unrelated process that was interrupted while the denial was being prepared is listed.
Example – labeled IPSec
Although setting up and maintaining an IPSec setup is far beyond the scope of this
book, let us look at a simple IPSec example to show how labeled IPSec is enabled on
such a system. In the example, a simple IPSec tunnel is set up between two hosts.
Setting up regular IPSec
First, the
racoon
daemon is configured with information about the pre-shared key
(to use during the handshake with the remote side), handshake details for the remote
side, and association information for the "joined" networks. The following code is an
excerpt of the
racoon
configuration file:
# File contains remote address with a shared key, like:
# 192.178.100.153 ThisIsABigSecret
path pre_shared_key "/etc/racoon/psk.txt";
remote 192.168.100.153 { … };
sainfo address 10.1.2.0/24 any address 10.1.3.0/24 any { … };
Most distributions offer sane defaults for the
racoon
configuration. In the
preceding example, the
192.168.100.153
IP address is the address of the remote
side, whereas, the
sainfo
address ranges are used for the VPN (
10.1.2.0/24
is
local,
10.1.3.0/24
is remote).
The
setkey
information (to manipulate the IPSec SA/SP databases) looks as follows:
#!/usr/sbin/setkey -f
flush; spdflush;
spdadd 10.1.2.0/24 10.1.3.0/24 any -P out ipsec esp/
tunnel/192.168.1.5-192.168.100.153/require;
spdadd 10.1.3.0/24 10.1.2.0/24 any -P in ipsec esp/
tunnel/192.168.100.153-192.168.1.5/require;

Controlling Network Communications
[
80
]
With the following proper routing information at hand, any communication towards
an address at the remote site (
10.1.3.0/24
) will go through this IPSec tunnel as
follows:
# ip addr add 10.1.2.1/24 dev eth0
# ip route add to 10.1.3.0/24 via 10.1.2.1 src 10.1.2.1
Enabling labeled IPSec
To enable labeled IPSec, we need to inform IPSec to add a context on the security
policy database. Once enabled,
racoon
will automatically negotiate labeled IPSec
support. Adding a context to the SPD is a matter of adding a
-ctx
option to the
spdadd
commands in the
setkey
configuration. For instance, we can add the
ipsec_
spd_t
context to an IPSec security policy as follows:
spdadd … -ctx 1 1 "system_u:object_r:ipsec_spd_t:s0" -P out ipsec …
With this change in place, we can see the context in the output of
setkey -DP
as
shown in the following example:
# setkey -DP
…
10.1.2.0/24[any] 10.1.3.0/24[any] 255
out prio def ipsec
esp/tunnel/192.168.100.152-192.168.100.153/require
created: Jul 4 21:45:44 2013 lastused:
lifetime: 0(s) validtime: 0(s)
security context doi: 1
security context algorithm: 1
security context length: 33
security context: system_u:object_r:ipsec_spd_t:s0
spid=1 seq=0 pid=3237
refcnt=1
When an IPSec connection (by setting up security associations) is set up to the other
site, the following set of permissions are checked:
• The SELinux domain of the client (for example,
ping_t
for the ping
command or
ssh_t
for the SSH client) must have
polmatch
permissions
against the
ipsec_spd_t
type through the association class

Chapter 5
[
81
]
• The SELinux domain of the target on the server (for example,
kernel_t
for replying to
ping
commands, or
sshd_t
for the SSH server) must have
polmatch
permissions against the
ipsec_spd_t
type through the association
class
Once set up, the following permissions are needed for the communication flow to
work properly:
• The SELinux domains of the client (
ping_t
or
ssh_t
) and server (
kernel_t
or
sshd_t
) must have
sendto
rights on their own domains (actually the
domain of the socket it uses, but that is almost always the type of the
application itself) through the association class
• The SELinux domains of the server (
kernel_t
or
sshd_t
) and client (
ping_t
or
ssh_t
) must have receive (
recv
) rights against the client or server
domains (which are known as the peer domain) through the peer class
The permissions work in both ways because the examples are using packets being
sent in both ways. In case of a single direction flow, this is of course not necessary.
The huge advantage here is that the client and server contexts are sent over the wire,
including the sensitivity and categories.
About NetLabel/CIPSO
With NetLabel/CIPSO support, traffic is labeled with sensitivity information that
can be used across the network. Unlike labeled IPSec, no other context information
is sent over. So when we see communication flows, they will originate from a single
base context, but will have sensitivity labels based on the sensitivity label of the
remote side.
With NetLabel, mappings are defined that inform the system which communication
flows (from particular interfaces, or even from particular IP addresses), are for a
certain DOI (Domain Of Interpretation). The CIPSO standard defines the DOI as a
collection of systems which interpret the CIPSO label similarly, or in our case, use the
same SELinux policy and configuration of sensitivity labels.
With the mappings in place, NetLabel/CIPSO will pass on the sensitivity
information (and categories) between hosts. The context we will see on the
communication flows will be
netlabel_peer_t
, a default context assigned to
NetLabel/CIPSO originated traffic.
Through this approach, we can start daemons with a particular sensitivity range
and thus only accept connections from users or clients that have the right security
clearance, even on remote, NetLabel / CIPSO-enabled systems.

Controlling Network Communications
[
82
]
Summary
SELinux by default uses access controls based on the TCP and UDP ports and
the sockets that are bound on them. This is configurable through the
semanage
command. More advanced communication control can be accomplished through
Linux netfilter support, using the
SECMARK
labeling, and through peer labeling.
In case of
SECMARK
labeling, local firewall rules are used to map contexts to packets,
which are then governed through SELinux policy. In case of peer labeling, either the
application context itself (in case of labeled IPSec) or its sensitivity level (in case of
netfilter/CIPSO support) is used. This allows an almost application-to-application
network flow control through SELinux policies.
In the next chapter, we will see how to enhance the SELinux policy ourselves, not
only through the SELinux Booleans already available, but also through the creation
of additional types (which can be used for the
SECMARK
labeling), user domains,
application policies, and many more.

Working with SELinux
Policies
Until now, we have been working with an existing SELinux policy by tuning our
system to deal with the proper SELinux contexts, assigning the right labels on files,
directories, and even network ports. In this chapter we will:
• Manipulate conditional SELinux policy rules through booleans
• Create our own SELinux policy modules and use this to enhance the SELinux
policies on our systems
Manipulating SELinux policies
One of the methods for manipulating SELinux policies is by toggling SELinux
Booleans.
An SELinux Boolean is a flag that, when enabled or disabled, changes the active
SELinux rules in the policy. Booleans are used by policy writers to make conditional
rules which can then be triggered by administrators to enable or disable additional
access controls.
For instance, a Boolean called
httpd_can_sendmail
enables additional SELinux
rules to allow web servers to send mail. The web servers are then allowed to execute
sendmail
-like applications or connect to SMTP and POP ports. If the Boolean is
disabled, the web server does not have these privileges.

Working with SELinux Policies
[
84
]
Overview of SELinux Booleans
An overview of SELinux Booleans can be obtained using the
semanage
command with
the
boolean
option. On a regular system, we can easily find over a hundred SELinux
Booleans, so it is necessary to filter out the description of the Boolean we need:
# semanage boolean -l | grep httpd_can_sendmail
httpd_can_sendmail (off , off) Determine whether httpd can
send mail.
The output not only gives us a brief description of the Boolean, but also the current
value (actually, it gives us the value that is pending a policy change and the current
value, but this will almost always be the same).
Another method for getting the current value of a Boolean is through the
getsebool
application as follows:
# getsebool httpd_can_sendmail
httpd_can_sendmail --> off
Changing Boolean values
We can change the value of the Boolean using
setsebool
or
togglesebool
. The
latter application flips the value, whereas
setsebool
sets it to the provided value
as follows:
# setsebool httpd_can_sendmail on
# togglesebool httpd_can_sendmail
After the preceding
togglesebool
happens, the value is back to
off
.
SELinux Booleans have a default state defined by the policy administrator. Changing
the value using
setsebool
or
togglesebool
updates the current policy, but this
does not persist across reboots. In order to keep the changes permanently, add the
-P
option to
setsebool
as follows:
# setsebool -P httpd_can_sendmail on
Another way to persist the
boolean
settings is to use
semanage boolean
as follows:
# semanage boolean -m -1 httpd_can_sendmail
In this case, the
boolean
value is modified (
-m
) to
on
(
-1
).
Persisting the changes will take a while (whereas non-persistent changes are almost
instantaneous) as the SELinux policy is being rebuilt. The larger the SELinux policy
on a system, the more time it takes.

Chapter 6
[
85
]
Inspecting the impact of Boolean
To find out what a Boolean does, the description usually suffices, but sometimes we
might want to know which SELinux rules change when a boolean is toggled. With
the
sesearch
application we can query the SELinux policy, including the rules that
are affected by a Boolean. To show this information in detail, we use the
-b
option
(for the boolean) and
-C
option (to show conditional rules):
$ sesearch -b httpd_can_sendmail -ACT
Found 33 semantic av rules:
…
DT allow httpd_t bin_t : dir { getattr search open } ; [ httpd_can_
sendmail ]
DT allow httpd_sys_script_t smtp_client_packet_t : packet { send recv
} ; [ httpd_can_sendmail ]
DT allow httpd_t pop_client_packet_t : packet { send recv } ; [ httpd_
can_sendmail ]
DT allow httpd_t smtp_port_t : tcp_socket { recv_msg send_msg name_
connect } ; [ httpd_can_sendmail ]
…
In the example, we can see the two characters,
DT
. These inform us about the state
of the boolean in the policy (first character) and when the SELinux rule is enabled
(second character).
The state reflects if the boolean is currently disabled (D) or enabled (E). The rule state
itself tells us when the displayed rule is active: when the boolean is enabled (T for
true) or disabled (F for false). So, "DT" means that the boolean (shown at the end of
the line) is currently disabled in the policy, and that the SELinux rule will become
active if the boolean is enabled.
When we query the SELinux policy, it makes sense to always add the conditional
option so that we can easily see if the policy supports a certain access based on one
or more Booleans. This is specially the case when we consider web servers, as the
web server policy has many booleans.
$ sesearch -s httpd_t -t user_home_t -p read -AC
Found 1 semantic av rules:
DT allow httpd_t user_home_t : file { ioctl read getattr lock open } ;
[ httpd_read_user_content ]

Working with SELinux Policies
[
86
]
Enhancing SELinux policies
Not all situations can be perfectly defined by policy writers. At times, we will need
to make modifications to the SELinux policy. As long as the changes involve adding
rules, we can create additional SELinux modules to enhance the policy. If the change
is more intrusive, we might need to remove an existing SELinux module and replace
it with an updated one.
Let's start with SELinux policy modules.
Handling SELinux policy modules
SELinux policy modules are, as mentioned at the beginning of this book, sets of
SELinux rules that can be loaded and unloaded. They are packaged as files with the
.pp
suffix and can be loaded and unloaded using the
semodule
command as follows:
# cd /usr/share/selinux/mcs
# semodule -i screen.pp
To list the current set of installed (loaded) modules, use
semodule -l
:
# semodule -l
aide 1.6.1
apache 2.7.0 Disabled
application 1.2.0
authlogin 2.4.2
…
The output shows each SELinux module with its version (as provided by the policy
authors). In the example we saw that the Apache module (which provides the web
server policies) is disabled: although loaded in memory, none of its rules are active
on the system.
Disabling modules is not done often, but one of the reasons would be when a
module (say
wikiwiki.pp
) requires another module (similar to
apache.pp
because
it refers to SELinux types provided by the
apache.pp
module), but we don't want
this module to be active. In that case, we can load the module (so that dependent
modules can work) and disable it.
To enable or disable modules, use
semodule -e
(enable) or
-d
(disable):
# semodule -d apache
Knowing how to handle SELinux modules is important when we enhance the
existing policy, as these enhancements will be done using SELinux modules.

Chapter 6
[
87
]
Troubleshooting using audit2allow
When SELinux prevents certain actions, we already know it will log the appropriate
denial in the audit logs. Consider the following denials:
type=AVC msg=audit(1373121736.897:6882): avc: denied { use } for
pid=15069 comm="setkey" path="/dev/pts/0" dev="devpts" ino=3 scontext=
root:sysadm_r:setkey_t:s0-s0:c0.c1023 tcontext=root:staff_r:newrole_t
:s0-s0:c0.c1023 tclass=fd
type=AVC msg=audit(1373121736.907:6883): avc: denied { search }
for pid=15069 comm="setkey" name="/" dev="dm-4" ino=2 scontext=root:
sysadm_r:setkey_t:s0-s0:c0.c1023 tcontext=system_u:object_r:var_t:s0
tclass=dir
If there is no solution offered by
sealert
other than running
audit2allow
, and a
quick investigation reveals that there are no SELinux Booleans using which we can
toggle to allow this, then we only have few options left. We can refuse to handle this
solution, telling the user to log in directly as
sysadm_r
(as then no
newrole
command
needs to be invoked, so the file descriptor that
setkey
wants to use will not have the
newrole_t
type), but let us use this as an example to enhance the policy.
The
audit2allow
application transforms a denial or a set of denials into SELinux
allow rules. Then, it can build an SELinux policy module based on these allow rules,
which we can then load in memory.
$ grep setkey /var/log/audit/audit.log | audit2allow
#============= setkey_t ==============
allow setkey_t newrole_t:fd use;
allow setkey_t var_t:dir search;
Based on the denials, two allow rules are prepared. We can also ask
audit2allow
to
immediately create a SELinux module as follows:
$ grep setkey /var/log/audit/audit.log | audit2allow -M localpolicy
A file called
localpolicy.pp
will be available in the current directory, which we can
load in memory using
semodule -i localpolicy.pp
. We only need to do this once
as the loaded modules are retained across reboots.
We can improve
audit2allow
a bit more if we tell it to use reference policy macros.

Working with SELinux Policies
[
88
]
Using refpolicy macros
The reference policy project provides distributions and policy editors with a set of
functions that simplify the development of SELinux policies. As an example, let us
see what the macros can do with the previous example:
$ grep setkey /var/log/audit/audit.log | audit2allow -R
require {
type setkey_t;
type newrole_t;
class fd use;
}
#============= setkey_t ==============
allow setkey_t newrole_t:fd use;
files_search_var(setkey_t)
As
audit2allow –R
uses an automated approach for finding potential functions,
we still need to review the results carefully.
One of the rules in the example has been written as
files_search_var(setkey_t)
.
This is a reference policy macro that explains a particular SELinux rule (or set of
rules) in a more human-readable way. In this case, it allows the
setkey_t
domain
to search through the
var_t
labeled directories.
All major distributions base their SELinux policies upon the macros and content
provided by the reference policy. The list of methods we can call while building
SELinux policies is available online (
http://oss.tresys.com/docs/refpolicy/
api/
) but can also be installed on our local filesystem at
/usr/share/doc/selinux-
base-*
(for Gentoo) or
/usr/share/doc/selinux-policy
(for Fedora).
These named methods bundle a set of rules that are related to the functionality that
we, as SELinux policy administrators, want to enable. For instance, the
storage_
read_tape()
method allows us to enhance the SELinux policy to allow the given
domain read access on tapes.
Using selocal
On Gentoo, a script called
selocal
is available that allows administrators to
add rules to the policy. These are the rules written in the raw SELinux policy or
reference policy macros, and can be documented by the administrator to keep
track of the changes.

Chapter 6
[
89
]
For instance, to allow all domains to send and receive unlabeled packets as follows:
# selocal -a "allow domain unlabeled_t:packet { send recv };" -Lb
Going back to our example, we had
setkey_t
trying to use a
newrole_t
file
descriptor. If we investigate the SELinux policy further, we can see that
newrole_t
has an attribute called
privfd
:
$ seinfo -tnewrole_t -x
One of the reference policy methods available is
domain_use_interactive_fds()
,
which allows the domains to use file descriptors of types with the
privfd
attribute
set. To allow this for the
setkey_t
domain using
selocal
:
# selocal -a "domain_use_interactive_fds(setkey_t)" -c "Needed to get
output of setkey" -L -b
The
selocal
application maintains a single SELinux policy module, unlike
audit2allow
where we need to continuously create new SELinux policy modules
(for example, localpolicy1, localpolicy2, and so on) as time goes by. The application
also builds this module for us (
-b
) and loads it in memory (
-L
).
We can of course easily list the existing set of "enhancements" that
selocal
manages:
# selocal -l
23: domain_use_interactive_fds(setkey_t) # Needed to get output of setkey
Creating our own modules
We can always maintain our own SELinux policy modules as well. To accomplish
this, we need to have at least a file with the
.te
suffix (which stands for type
enforcement) and optionally an
.fc
file (file context) and
.if
(interface). All these
files need to have the same base name, which will be used as a module name later.
There are two "formats" in which SELinux policy modules can be written: the native
one, and the reference policy one. The native one does not understand reference policy
macros but remains supported (as the reference policy builds on this). Formats using
the reference policy support all functions of the "native" one as well, so this format is
becoming more and more popular for building and maintaining our own modules.

Working with SELinux Policies
[
90
]
Building native modules
A native SELinux policy language module starts with a line defining the name of
the module, followed by a set of requirements (types or attributes, classes, and
permissions) and then the rules themselves, as follows:
module localpolicy 1.0;
require {
type setkey_t;
type newrole_t;
class fd { use };
}
allow setkey_t newrole_t:fd use;
The
localpolicy.te
file can then be transformed into an intermediate module file
as follows:
$ checkmodule -M -m -o localpolicy.mod localpolicy.te
Then, the SELinux policy module is built as follows:
$ semodule_package -o localpolicy.pp -m localpolicy.mod
The resulting
localpolicy.pp
file can then be loaded in memory using
semodule
.
Building reference policy modules
In case of a reference policy module, a similar structure as with the native format is
used, but the leveraging functions provided by the various SELinux policy module
definitions are as follows:
policy_module(localpolicy, 1.0)
gen_require('
type setkey_t;
')
domain_use_interactive_fds(setkey_t)
The
localpolicy.te
file can then be built using a specific
Makefile
command
on the system which transforms the functions to the raw SELinux policy rules and
builds the policy packages afterwards. On Gentoo systems,
Makefile
resides in
/
usr/share/selinux/mcs/include
while Fedora has it in
/usr/share/selinux/
devel
:
$ make -f /usr/share/selinux/devel/Makefile localpolicy.pp
Now the
localpolicy.pp
file is created and can be loaded using
semodule -i
.

Chapter 6
[
91
]
Creating roles and user domains
One of the best features of SELinux is its ability to confine end users and only grant
them the rights they need to do their job. To accomplish this, we need to create a
restricted user domain that these users should use (either immediately, or after
switching from their standard role to the more privileged role).
Such user domains and roles need to be created through SELinux policy
enhancements. These enhancements, however, require a deep understanding of
the available permission checks, reference policy macros and more, which one can
only obtain through experience (or assistance). Still, that shouldn't prevent us from
giving a working example of how to create a special end user role and domain for
the PostgreSQL administration.
The pgsql_admin role and user
First, let us look at the file. Each line is commented to explain why the various
methods are used as follows:
policy_module(pgsql_admin, 1.0)
# Define the pgsql_admin_r role
role pgsql_admin_r;
# Create a pgsql_admin_t type that has minimal rights a regular
# user domain would need in order to work on a Linux system
userdom_base_user_template(pgsql_admin)
# Allow the pgsql_admin_t type to execute regular binaries (f.i. id)
corecmd_exec_bin(pgsql_admin_t)
# Allow the user domain to read its own selinux context
selinux_getattr_fs(pgsql_admin_t)
# Allow the user to administer postgresql, but do not fail
# if no postgresql SELinux module is loaded yet
optional_policy('
postgresql_admin(pgsql_admin_t, pgsql_admin_r)
')
# To allow transition from staff_r to pgsql_admin_r
gen_require('
role staff_r;
')
allow staff_r pgsql_admin_r;

Working with SELinux Policies
[
92
]
Creating the user rights
With this policy loaded, the
pgsql_admin_r
and
pgsql_admin_t
role and types are
now available. Next, we create a SELinux user called
pgsql_admin_u
that is allowed
access to the
staff_r
role (for non-privileged activities),
system_r
role (for handling
the PostgreSQL service) and
pgsql_admin_r
role (for administering the PostgreSQL
files and commands) as follows:
# semanage user -a -R "staff_r system_r pgsql_admin_r" pgsql_admin_u
Now we need to map one or more users to this SELinux user, assuming the user is
named
janedoe
, as follows:
# semanage login -a -s pgsql_admin_u janedoe
Now we need to reset the contexts of the user, as the contexts of all files now need to
be changed, as follows:
# restorecon -RvF /home/janedoe
Finally we need to edit the
sudoers
file, so that every command the user
launches through
sudo
will be with the
pgsql_admin_r
role (and in the
pgsql_
admin_t
domain):
janedoe ALL=(ALL) ROLE=pgsql_admin_r TYPE=pgsql_admin_t ALL
With these changes in place, the user can now log in and handle PostgreSQL.
By default,
janedoe
will remain logged in through the
staff_r
role (and in the
staff_t
domain), so that most end user commands work. The moment a more
privileged activity needs to be launched,
janedoe
has to use
sudo
. As the user is not
in the
wheel
group, using
su
to get a root shell is not possible. And through
sudo
,
this and the
pgsql_admin_t
domain will fail as well as the does not have the right to
execute a shell.
Still, the
pgsql_admin_t
domain has enough rights to manage PostgreSQL as
janedoe
can restart the service or even edit its configuration file:
$ sudo rc-service postgresql-9.2 start
* Starting PostgreSQL... [ ok ]
$ sudo vim /etc/postgresql-9.2/pg_hba.conf
By updating the policy as additional rights are needed, the
pgsql_admin_t
domain
can become a better match for the requirements that the user can have in his job.

Chapter 6
[
93
]
Shell access
Eventually, users might want to ask for shell access, either indirectly (through
sudo
)
or perhaps immediately after login (so that the user can log in to the
pgsql_admin_r
role directly). This is not a problem for SELinux, even if that would mean that the
user now holds a root shell: SELinux still prevents the user from making changes
that the user is not allowed to.
By adding
corecmd_exec_shell(pgsql_admin_t)
, the user is allowed to run shells.
Still, because the
pgsql_admin_t
type is forced on the user, the security impact on
the system is still quite low.
If we want a user to be logged in directly to the new type, a few more changes
are needed.
First, we need to create a default context file for the SELinux user (in
/etc/selinux/
mcs/contexts
). We can work from a copy (for instance from
staff_u
) and
substitute
staff_r
with
pgsql_admin_r
everywhere. This file will tell SELinux what
the default type should be when a login is handled through one of the mentioned
contexts.
Next, the
/etc/selinux/mcs/default_type
file has to be updated to tell SELinux
that
pgsql_admin_t
is the default type for the
pgsql_admin_r
role (as a fallback).
Finally, we need to add a few more privileges to the policy as follows:
# Unprivileged login shell
userdom_restricted_user_template(pgsql_admin)
# Allow sudo to be called
sudo_role_template(pgsql_admin, pgsql_admin_r, pgsql_admin_t)
With these changes in place, we can update the role mappings for the user to only
contain
pgsql_admin_r system_r
(don't forget to reset the contexts of the user files)
as follows:
# semanage user -m -R "pgsql_admin_r system_r" pgsql_admin_u
Creating new application domains
By default, Linux distributions come with many prepackaged application domains.
However, we will most likely come across situations where we need to build our
own application policy.
Building such a policy can be to allow a particular application to run without
SELinux protections (by marking the domain as a permissive domain) or perhaps
with more controls that are currently in place.

Working with SELinux Policies
[
94
]
Unlike users and roles, application domains usually have file context-related
information with them.
An example application domain
The following SELinux policy is for
mojomojo
, an open source, catalyst-based wiki.
The code is pretty light in weight as it is a web application. Thus, calling a template
for the web server module (
apache_content_template
) that provides most of the
rules already:
policy_module(mojomojo, 1.1.0)
# Create all types based on the apache content template
apache_content_template(mojomojo)
# Needed by the mojomojo application
allow httpd_mojomojo_script_t httpd_t:unix_stream_socket rw_stream_
socket_perms;
# Network connectivity
corenet_sendrecv_smtp_client_packets(httpd_mojomojo_script_t)
corenet_tcp_connect_smtp_port(httpd_mojomojo_script_t)
corenet_sendrecv_smtp_client_packets(httpd_mojomojo_script_t)
# Additional File system access
files_search_var_lib(httpd_mojomojo_script_t)
# Networking related activities (name resolving & mail sending)
sysnet_dns_name_resolve(httpd_mojomojo_script_t)
mta_send_mail(httpd_mojomojo_script_t)
This is not much different from the user domain module we created earlier.
Obviously, there are lots of different calls, but the method is the same. Let us
look at the file context definition file (
mojomojo.fc
):
/usr/bin/mojomojo_fastcgi\.pl -- gen_
context(system_u:object_r:httpd_mojomojo_script_exec_t,s0)
/usr/share/mojomojo/root(/.*)? gen_context(system_u:object_r:httpd_
mojomojo_content_t,s0)
/var/lib/mojomojo(/.*)? gen_context(system_u:object_r:httpd_mojomojo_
rw_content_t,s0)
The first column is the same as we used with the
semanage fcontext
command.
The
--
in the first line tells the SELinux policy that the regular expression is only
for a regular file. Again, just like what we could do with
semanage fcontext
.
The last column is a reference policy macro again. The macro generates the right
context as well as the target policy based on the options given. If the target policy is
MLS-enabled, then the sensitivity level is also used (
s0
), otherwise it is dropped.

Chapter 6
[
95
]
Creating interfaces
When we are building a policy for end user applications, we will eventually need to
tell SELinux that existing (and new) roles and types are allowed to execute the new
application. Although we can do this through standard SELinux rules, it is much
more flexible to create an interface for this. Regular rules that refer to several types
break the isolation provided by SELinux policy modules. Interfaces allow us to
group rules coherently.
As an example, let us look at the interfaces of the
zosremote
module (in the
zosremote.if
file), which is as follows:
interface('zosremote_domtrans','
gen_require('
type zos_remote_t, zos_remote_exec_t;
')
corecmd_search_bin($1)
domtrans_pattern($1, zos_remote_exec_t, zos_remote_t)
')
interface('zosremote_run','
gen_require('
attribute_role zos_remote_roles;
')
zosremote_domtrans($1)
roleattribute $2 zos_remote_roles;
')
The interface file provides the following interfaces:
•
zosremote_domtrans
: It allows a given domain to transition to the
zosremote_t
domain upon executing a file labeled
zos_remote_exec_t
•
zosremote_run
: It allows a given domain to transition to the
zosremote_t
domain, but also ensures that
zosremote_t
is allowed for the given role
The difference lies with the use:
zosremote_domtrans
will be used for transitions
between applications, whereas
zosremote_run
will be used for users (and user
roles). For instance, to allow our PostgreSQL user to run
zosremote
applications,
we need to execute the following code:
zosremote_run(pgsql_admin_t, pgsql_admin_r)

Working with SELinux Policies
[
96
]
Other uses of policy enhancements
Throughout the book, we covered quite a few technological features of SELinux.
By creating our own SELinux policies, we can augment this further.
Creating customized SECMARK types
A use case for building our own policy is to create a custom
SECMARK
type and
make sure that a particular domain is the only domain that is allowed to handle
this communication.
The following SELinux rules create an
invalid_packet_t
type (to match packets
that should not be sent out, for example, the PostgreSQL communication that is
directed to the Internet rather than the internal network) and an
intranet_packet_t
type (to match packets being sent to an intranet server):
type invalid_packet_t;
corenet_packet(invalid_packet_t)
type intranet_packet_t;
corenet_packet(intranet_packet_t)
With these rules loaded, we can now create
SECMARK
rules that label packets with
invalid_packet_t
and
intranet_packet_t
.
The next step is to allow certain domains to send and receive
intranet_packet_t
.
For instance, for
nginx_t
(a reverse proxy application, which is shown in the
following code) it makes sense to keep this rule close to the packet definitions as they
are very much related:
allow nginx_t intranet_packet_t:packet { send recv };
Using different interfaces and nodes
In the Chapter 5, Controlling Network Communications, we also discussed the ability to
put labels on interfaces and nodes (hosts). To create types for network interfaces and
nodes, the following SELinux rules can be used:
gen_require('
attribute netif_type;
')
# Mark external_netif_t as a network interface.
# There is no macro for this (yet) though.
type external_netif_t, netif_type;
# Create a node for vpn addresses
type vpn_node_t;
corenet_node(vpn_node_t)

Chapter 6
[
97
]
Once these policy enhancements are loaded, the
external_netif_t
and
vpn_node_t
interface types are available to use with
semanage interface
and
semanage node
.
Auditing access attempts
Some applications have privileges that we still want to be notified about when
they are used. The Linux auditing subsystem has powerful features to be notified
about various activities on the system, and SELinux enhances those capabilities by
supporting the
auditallow
statement.
The
auditallow
SELinux statement has a similar syntax as the regular
allow
statement. But instead of telling SELinux that the access is allowed, it tells SELinux
that the access, if it is allowed, should still be logged to the audit subsystem.
When this occurs, we will see a
granted
statement (rather than a denial) as follows:
# The SELinux auditallow statement; domain is an attribute that is
# assigned to all application domains.
auditallow domain etc_runtime_t:file write;
# The resulting AVC "granted" statement
type=AVC msg=audit(1373135944.183:209339): avc: granted { write }
for pid=23128 comm="umount" path="/etc/mtab" dev="md3" ino=135500
scontext=pgsql_admin_u:sysadm_r:mount_t tcontext=root:object_r:etc_
runtime_t tclass=file
From the (
granted
) message, we can devise that the
pgsql_admin_u
SELinux user
called
umount
has resulted in the modification of
/etc/mtab
.
Creating customizable types
To create a customizable type, we need to create the type definition in SELinux
(which is a regular file type), grant the correct users (and applications) access to the
type, and then register the type as customizable (so that a
relabel
operation does
not change the type back).
For instance, we want to have a separate type for an embedded database file used by
end users through the
sqlite3
command (which does not run in its own domain,
it runs in the caller domain, so
user_t
or
staff_t
). By using a separate type, other
access to the file (by applications that run in a different domain) is by default denied,
even when those other applications have access to the (standard)
user_home_t
type:
gen_require('
type user_t;
')

Working with SELinux Policies
[
98
]
type mydb_embedded_t;
files_type(mydb_embedded_t)
allow user_t mydb_embedded_t:file { manage_file_perms relabel_file_
perms };
Next, we edit the
/etc/selinux/mcs/contexts/customizable_types
file and add
the
mydb_embedded_t
type to it.
With those steps completed, all users (in the
user_t
domain) can now use
chcon
to label a file as
mydb_embedded_t
and (still) use this file through
sqlite
(or other
application programs that run in the user domain).
Summary
We saw how to toggle SELinux policy Booleans using tools such as
setsebool
and
to get more information about Booleans, both from their description (using
semanage
boolean
) and the rules they influence (using
sesearch
).
Next, we created our own policy modules to enhance the SELinux policy using
various examples such as user domain definitions, web application types,
SECMARK
types, and many more.
With all this completed, we now have all the experience needed to successfully
administer a SELinux system.

Index
Symbols
--disable_dontaudit argument 35
A
accesses
Access Vector Cache.
See
AVC
application domain
applications
audit2allow
audit2why
authentication
context switching, using 49, 50
B
Boolean impact
boolean value
C
categories
client
and server, differentiating between 76
common sense
communication
accepting, from selected hosts 78
confidentiality
context
context expressions

[
100
]
context fields
context information
context switching
used, during authentication 49, 50
customizable type
D
database management system.
See
DBMS
Digital Living Network Alliance.
See
DLNA
directories
Discretionary Access Control.
See
DAC
Domain Of Interpretation.
See
DOI
domain permissions
domain_use_interactive_fds() 89
E
enforcing mode
See
permissive mode
F
files
G
H
hosts
communication, accepting from 78
I
interfaces
IPSec
K
kernel boot parameters
L
labeled IPSec
labeled networking
communication, accepting from selected

[
101
]
Linux
Linux DAC
Linux netfilter
Linux Security Modules.
See
LSM
M
MAC (Mandatory Access Control) 9
MCS
MLS
mod_selinux
modules
reference policy modules, building 90
Multi Category Security.
See
MCS
Multi-Level Security.
See
MLS
N
native modules
netfilter
labels, assigning to packets 74, 75
packet, labeling through 73, 74
server and client communication, differenti-
network interface
newrole
nodes
O
P
PaaS 21
packet
labeling, through netfilter 73, 74
peer to peer flow
permissive mode
Platform as a Service.
See
PaaS
Pluggable Authentication Modules.
See
PAM
policy
process transition.
See
domain transitions
R
reference policy
reference policy modules
refpolicy macros

[
102
]
role access
roles
root rights
S
SECMARK types
Security Enhanced Linux.
See
SELinux
SELinux
SELinux denials
SELinux policy
troubleshooting, audit2allow used 87
unconfined domains, supporting 19
unknown permissions, dealing 19
SELinux policy modules
SELinux protections
disabling, for single service 28, 29
SELinux roles
selinux_unconfined_type attribute 41
SELinux user
access, limiting on confidentiality 44, 45
additional users, creating 43, 44
SELinux userspace
selocal

[
103
]
server
and client, differentiating between 76
single service
SELinux protections, disabling for 28, 29
sudo
system role
T
TCP port
TCSEC (Trusted Computer System
U
UDP port
unconfined domains
unknown permissions
User Based Access Control.
See
UBAC
user domains
user rights
users
Z


Thank you for buying
SELinux System Administration
About Packt Publishing
Packt, pronounced 'packed', published its first book "Mastering phpMyAdmin for Effective
MySQL Management" in April 2004 and subsequently continued to specialize in publishing
highly focused books on specific technologies and solutions.
Our books and publications share the experiences of your fellow IT professionals in adapting
and customizing today's systems, applications, and frameworks. Our solution based books
give you the knowledge and power to customize the software and technologies you're using
to get the job done. Packt books are more specific and less general than the IT books you have
seen in the past. Our unique business model allows us to bring you more focused information,
giving you more of what you need to know, and less of what you don't.
Packt is a modern, yet unique publishing company, which focuses on producing quality,
cutting-edge books for communities of developers, administrators, and newbies alike. For
more information, please visit our website:
www.packtpub.com
.
About Packt Open Source
In 2010, Packt launched two new brands, Packt Open Source and Packt Enterprise, in order to
continue its focus on specialization. This book is part of the Packt Open Source brand, home
to books published on software built around Open Source licences, and offering information
to anybody from advanced developers to budding web designers. The Open Source brand
also runs Packt's Open Source Royalty Scheme, by which Packt gives a royalty to each Open
Source project about whose software a book is sold.
Writing for Packt
We welcome all inquiries from people who are interested in authoring. Book proposals
should be sent to author@packtpub.com. If your book idea is still at an early stage and you
would like to discuss it first before writing a formal book proposal, contact us; one of our
commissioning editors will get in touch with you.
We're not just looking for published authors; if you have strong technical skills but no writing
experience, our experienced editors can help you develop a writing career, or simply get some
additional reward for your expertise.
Instant Spring Security Starter
ISBN: 978-1-782168-83-6 Paperback: 70 pages
learn the fundamentals of web authentication and
authorization using Spring Security
1. Learn something new in an Instant! A short,
fast, focused guide delivering immediate
results
2. Learn basic login/password and two-phase
authentication
3. Secure access all the way from frontend to
backend
4. Learn about the available security models,
SPEL, and pragmatic considerations
Linux Shell Scripting Cookbook
Second Edition
ISBN: 978-1-782162-74-2 Paperback: 384 pages
Over 110 practical recipes to solve real-world shell
problems guaranteed to make you wonder how you
ever lived without them
1. Master the art of crafting one-liner command
sequence to perform text processing, digging
data from files, backups to sysadmin tools, and
a lot more
2. And if powerful text processing isn't enough,
see how to make your scripts interact with the
web-services like Twitter, Gmail
3. Explores the possibilities with the shell in a
simple and elegant way - you will see how
to effectively solve problems in your day to
day life
Please check
www.PacktPub.com for information on our titles
Kali Linux Cookbook
ISBN: 978-1-782162-92-6 Paperback: 336 pages
Master Spring's well-designed web frameworks to
develop powerful web applications
1. Recipes designed to educate you extensively
on the penetration testing principles and Kali
Linux tools
2. Learning to use Kali Linux tools, such as
Metasploit, Wire Shark, and many more
through in-depth and structured instructions
3. Teaching you in an easy-to-follow style, full of
examples, illustrations, and tips that will suit
experts and novices alike
Linux Mint System
Administrator’s Beginner's Guide
ISBN: 978-1-849519-60-1 Paperback: 146 pages
A practical guide to learn basic concepts,
techniques, and tools to become a Linux Mint
system administrator
1. Discover Linux Mint and learn how to install it
2. Learn basic shell commands and how to deal
with user accounts
3. Find out how to carry out system administrator
tasks such as monitoring, backups, and
network configuration
Please check
www.PacktPub.com for information on our titles
Document Outline
- Cover
- Copyright
- Credits
- About the Author
- About the Reviewers
- www.PacktPub.com
- Table of Contents
- Preface
- Chapter 1: Fundamental SELinux Concepts
- Chapter 2: Understanding SELinux Decisions and Logging
- Chapter 3: Managing User Logins
- Chapter 4: Process Domains and File-level Access Controls
- Chapter 5: Controlling Network Communications
- Chapter 6: Working with SELinux Policies
- Index
Wyszukiwarka
Podobne podstrony:
tekst slajdów, politologia, systemy administracji publicznej- prezentacja
Principles of system administra Nieznany
ENG LINUX System Administrators Nieznany
System administracji terytorialnej w Prusach, studia
Administrowanie systemami kompu bezpieczenstwo systemu Administ (2)
Program BeSTi, politologia, systemy administracji publicznej- prezentacja
2004 03 Analiza logów systemowych [Administracja]
System administracji publicznej w Polsce, nauka administracji
Solaris8 Certified System Administration II
wspolczesne systemy administracji publicznej
Polecenia systemowe i administracyjne
System administracji publicznej w Polsce Administracj
rh133 red hat linux system administration
Perl for System Administration Jacinta Richardson (pta, 2006)
Unix System Administration Handbook
systemu administracji publicznej 1
Testking 310 014 Sun SCSA Solaris 9 System Administration I Edt4 2
Linux PAM System Administrators Guide
więcej podobnych podstron