
2009 ACCESSORIES & EQUIPMENT
Power Windows - Service Information - Grand Caravan, Town & Country
DESCRIPTION
DESCRIPTION
The Power Window System is activated through switches mounted on the driver door panel, the passenger door
panel and the sliding door inside handle.
OPERATION
OPERATION
Front door window lift motors use permanent type magnets. The B+ and ground applied at the motor terminal
pins will cause the motor to rotate in one direction. Reversing current through the motor terminals will cause the
motor to rotate in the opposite direction.
The power window motors ground through the master switch in the driver door by a black wire attached to the
left cowl panel. Refer to SYSTEM WIRING DIAGRAMS for Town & Country and/or SYSTEM WIRING
DIAGRAMS for Grand Caravan .
The power rear vent windows, if equipped, are operated by switches mounted in the driver door switch bezel. A
separate switch is used for each window. Permanent magnet type motors connected to a crank system are used
to open and close the rear vent windows. A battery positive and negative connection to either of the two motor
terminals will cause the motor to rotate in one direction. Reversing current through these same two connections
will cause the motor to rotate in the opposite direction.
EXPRESS DOWN WINDOW FEATURE
This feature allows you to remotely lower both front door windows at the same time. To use this feature, press
and release the UNLOCK button on the RKE transmitter and then immediately press and hold the UNLOCK
button until the windows lower to the desired level or until they lower completely.
DIAGNOSIS AND TESTING
POWER WINDOWS
NOTE:
If a power window operates, but the glass moves slowly or stalls at any point
during its travel, the problem could be the result of an improperly installed door
glass or the glass binding against the glass run weatherstrips. Be certain to
confirm that the glass moves freely and smoothly up and down by
disconnecting the glass from the regulator and moving it through its complete
travel manually before attempting to diagnose or repair the power window
system switches or motors. Refer to Body/Door - Front/GLASS, Door -
2009 Dodge Grand Caravan SE
2009 ACCESSORIES & EQUIPMENT Power Windows - Service Information - Grand Caravan, Town & Country
2009 Dodge Grand Caravan SE
2009 ACCESSORIES & EQUIPMENT Power Windows - Service Information - Grand Caravan, Town & Country
steve
Monday, May 23, 2011 1:31:09 PM
Page 1
© 2006 Mitchell Repair Information Company, LLC.
steve
Monday, May 23, 2011 1:31:12 PM
Page 1
© 2006 Mitchell Repair Information Company, LLC.

POWER WINDOW SWITCH WIRING VOLTAGE TEST
The Power Window Switch Wiring Voltage Test that follows determines whether or not voltage is continuous
through the vehicle wire harnesses to the power window switch.
1. Check for battery voltage at the power windows fuse in the Totally Integrated Power Module (TIPM).
Refer to SYSTEM WIRING DIAGRAMS for Town & Country and/or SYSTEM WIRING
DIAGRAMS for Grand Caravan for correct fuse identification. If OK, proceed to the next step. If not
OK, repair the shorted circuit or component as required and replace the damaged fuse.
2. Turn the ignition switch to the ON position. Check for battery voltage at the power windows circuit
breaker in the TIPM. Refer to SYSTEM WIRING DIAGRAMS for Town & Country and/or SYSTEM
WIRING DIAGRAMS for Grand Caravan for correct circuit breaker identification. If OK, proceed to
the next step. If not OK, repair the shorted circuit or component as required and replace the damaged
circuit breaker.
3. Turn the ignition switch to the OFF position. Remove the power window switch and bezel assembly from
the door trim panel. See Electrical/Power Windows/SWITCH, Power Window - Removal.
4. Disconnect the door wire harness connector from the back of the power window switch.
5. Check for continuity between each of the ground terminals in the door wire harness connector for the
power window switch and a good ground. Refer to SYSTEM WIRING DIAGRAMS for Town &
Country and/or SYSTEM WIRING DIAGRAMS for Grand Caravan for correct terminal identification.
There should be continuity at each ground terminal. If OK, proceed to the next step. If not OK, repair the
open circuit to ground as required.
6. Turn the ignition switch to the ON position. Check for battery voltage at each of the fused B (+) terminals
in the door wire harness connector for the power window switch. Refer to SYSTEM WIRING
DIAGRAMS for Town & Country and/or SYSTEM WIRING DIAGRAMS for Grand Caravan for
correct terminal identification. If OK, the wiring circuits between the fuse or circuit breaker in the TIPM
are OK. If not OK, repair the open circuits between the fuse or circuit breaker in the TIPM and the power
window switch as required.
POWER WINDOW MOTOR TEST
If the power window switch is receiving proper current and ground, but the power window motor does not
operate, proceed with the Power Window Motor Test. Refer to SYSTEM WIRING DIAGRAMS for Town &
Country and/or SYSTEM WIRING DIAGRAMS for Grand Caravan for correct terminal identification.
1. Remove the front door trim panel and sound pad as necessary to gain access to power window motor wire
harness connector. Refer to Body/Door - Front/PANEL, Door Trim - Removal .
2. Disconnect the power window motor wire harness connector from the door wire harness.
3. Using two jumper wires, connect one wire to a battery (+) source and the other to a good ground (-).
4. Connect the negative (-) jumper wire to one of the window motor connector terminals.
5. Momentarily touch the positive (+) jumper wire to the other window motor connector terminal. When
positive jumper wire is connected, the motor should rotate in one direction to move the window up or
down. If the window is already all the way up or down, the motor will grunt and the inner door panel will
Inspection .
2009 Dodge Grand Caravan SE
2009 ACCESSORIES & EQUIPMENT Power Windows - Service Information - Grand Caravan, Town & Country
steve
Monday, May 23, 2011 1:31:09 PM
Page 2
© 2006 Mitchell Repair Information Company, LLC.

flex when the window is actuated in that direction.
6. Reverse the jumper wires at the window motor connector terminals and the window should now move all
the way through its travel in the opposite direction.
7. If the window motor does not move the glass up or down through its complete travel, replace the window
motor.
STANDARD PROCEDURE
CLEAR/RELEARN
CLEAR/DENORMALIZE USING A SCAN TOOL
To clear/denormalize the door module memory, using a scan tool under the Miscellaneous menu look for
Denormalization Window Command/ECU reset, and follow the directions.
RELEARN/NORMALIZE USING A SCAN TOOL
To relearn/normalize the door module memory, using a scan tool under the Miscellaneous menu look for
Normalization Window command and follow the directions.
CLEAR/DENORMALIZE, RELEARN/NORMIALIZE WITHOUT A SCAN TOOL
Hold up/down the window switch for at least 30 seconds until the DTC is set for stuck switch. This will clear
the memory of the calibration information (CLEAR/DENORMAILIZE). Proceed to relearn/normalize.
1. Put a battery charger on vehicle.
2. If equipped with express-up/express-down, reset the express-up/down module for the door window glass.
The window switch on the corresponding door must be used to control the window. Do not use the master
switch for the passenger window.
3. To calibrate, start by moving the window to the middle position.
4. Drive the glass to the full-up position by pulling up on the window switch to its second detent and hold
the switch until the glass is fully closed. Do not release the window switch. Continue to hold the window
switch up for 2 seconds after the window glass is full closed.
5. Drive the glass to the full - down position by pushing down (depress) the window switch, (second detent
if equipped with express-down) until the window glass is down for 2 seconds after the window glass is
fully open. Do not release the window switch. Continue to hold the window switch down for 2 seconds
after the window glass is fully open.
6. Check the operation of the express-up/express-down feature.
7. If the express up/down doesn't work, repeat step 3, waiting for 3 seconds.
NOTE:
Make sure battery is fully charged before proceeding.
NOTE:
This needs to be completed every time the window glass is adjusted/removed,
motor replaced, and or regulator replaced.
2009 Dodge Grand Caravan SE
2009 ACCESSORIES & EQUIPMENT Power Windows - Service Information - Grand Caravan, Town & Country
steve
Monday, May 23, 2011 1:31:09 PM
Page 3
© 2006 Mitchell Repair Information Company, LLC.
8. Check that the window glass reverses when in the express-up mode by holding a pen in the path of the
glass.
9. Once the proper operation of the express-up/express-down feature has been verified, clear all Diagnostic
Trouble Codes (DTC's).
ARMATURE, WINDOW MOTOR, VENT
REMOVAL
REMOVAL
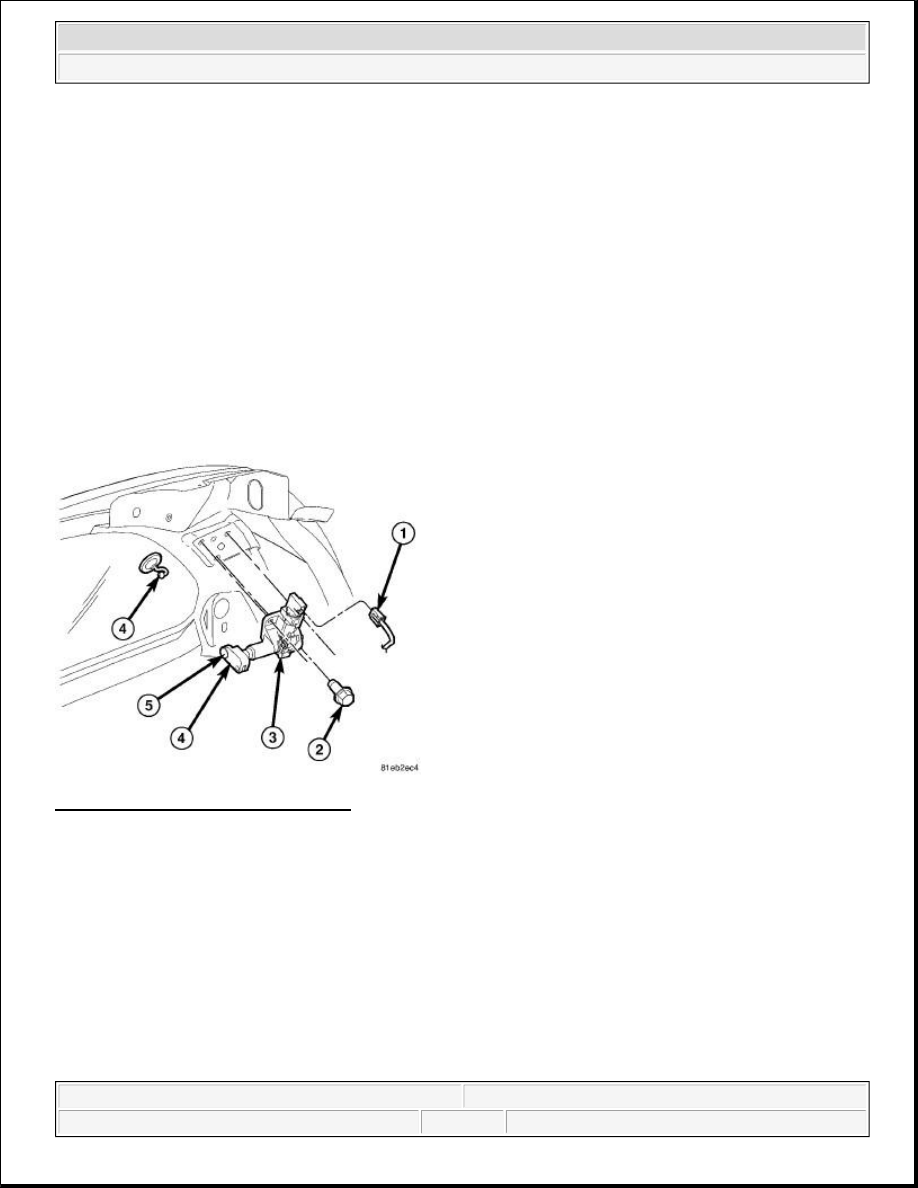
Fig. 1: Vent Window Motor Armature
Courtesy of CHRYSLER LLC
1. Using a flat bladed tool, carefully lift the circular actuator link tab (5).
2. Remove link (4) from window ball socket (4).
3. Remove the armature from the vent window motor (3).
INSTALLATION
INSTALLATION
NOTE:
The vent window motor and armature are replaced separately. This procedure
does not require removal of any items that are normally removed for access to
the motor.
2009 Dodge Grand Caravan SE
2009 ACCESSORIES & EQUIPMENT Power Windows - Service Information - Grand Caravan, Town & Country
steve
Monday, May 23, 2011 1:31:09 PM
Page 4
© 2006 Mitchell Repair Information Company, LLC.
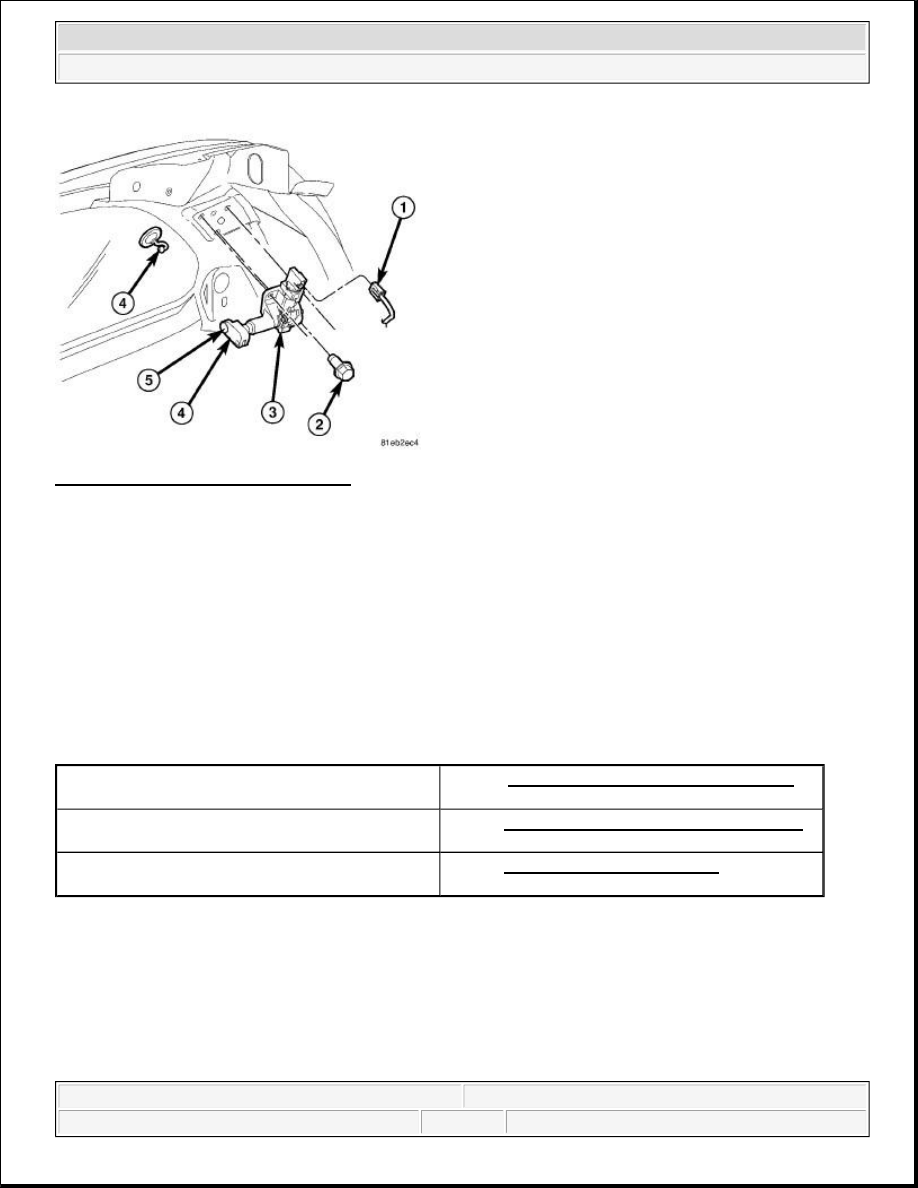
Fig. 2: Vent Window Motor Armature
Courtesy of CHRYSLER LLC
1. Install the armature to the vent window motor (3).
2. Install the armature to the vent window.
3. Snap the actuator link socket (4) onto the quarter window ball socket (4). Using a soft rubber mallet, push
the circular link tab (5) flush with link surface.
MOTOR, WINDOW REGULATOR
REMOVAL
REMOVAL
MOTOR-FRONT DOOR WINDOW
MOTOR-FRONT DOOR WINDOW
Refer to MOTOR-FRONT DOOR WINDOW
removal procedure.
MOTOR-SLIDING DOOR WINDOW
Refer to MOTOR-SLIDING DOOR WINDOW
removal procedure.
MOTOR-VENT WINDOW
Refer to MOTOR-VENT WINDOW removal
procedure.
2009 Dodge Grand Caravan SE
2009 ACCESSORIES & EQUIPMENT Power Windows - Service Information - Grand Caravan, Town & Country
steve
Monday, May 23, 2011 1:31:09 PM
Page 5
© 2006 Mitchell Repair Information Company, LLC.
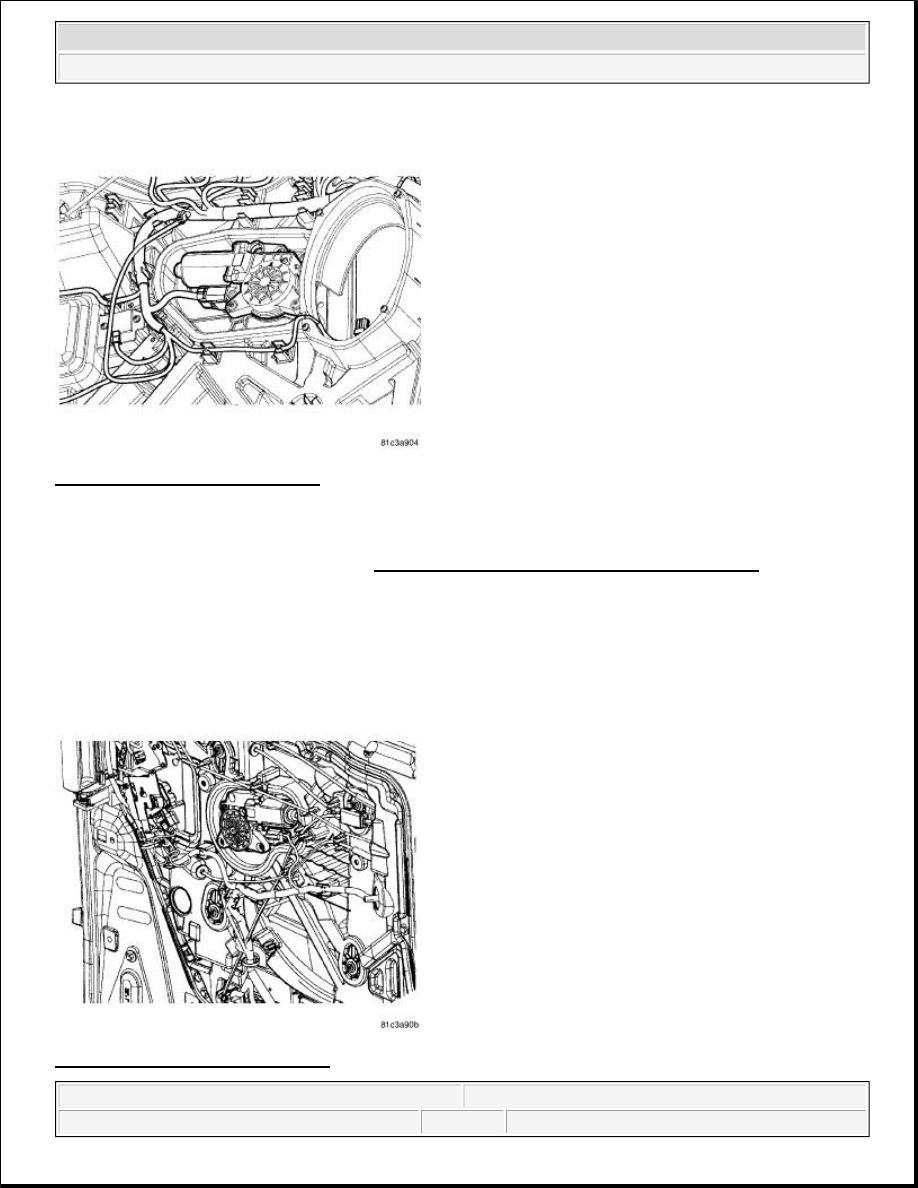
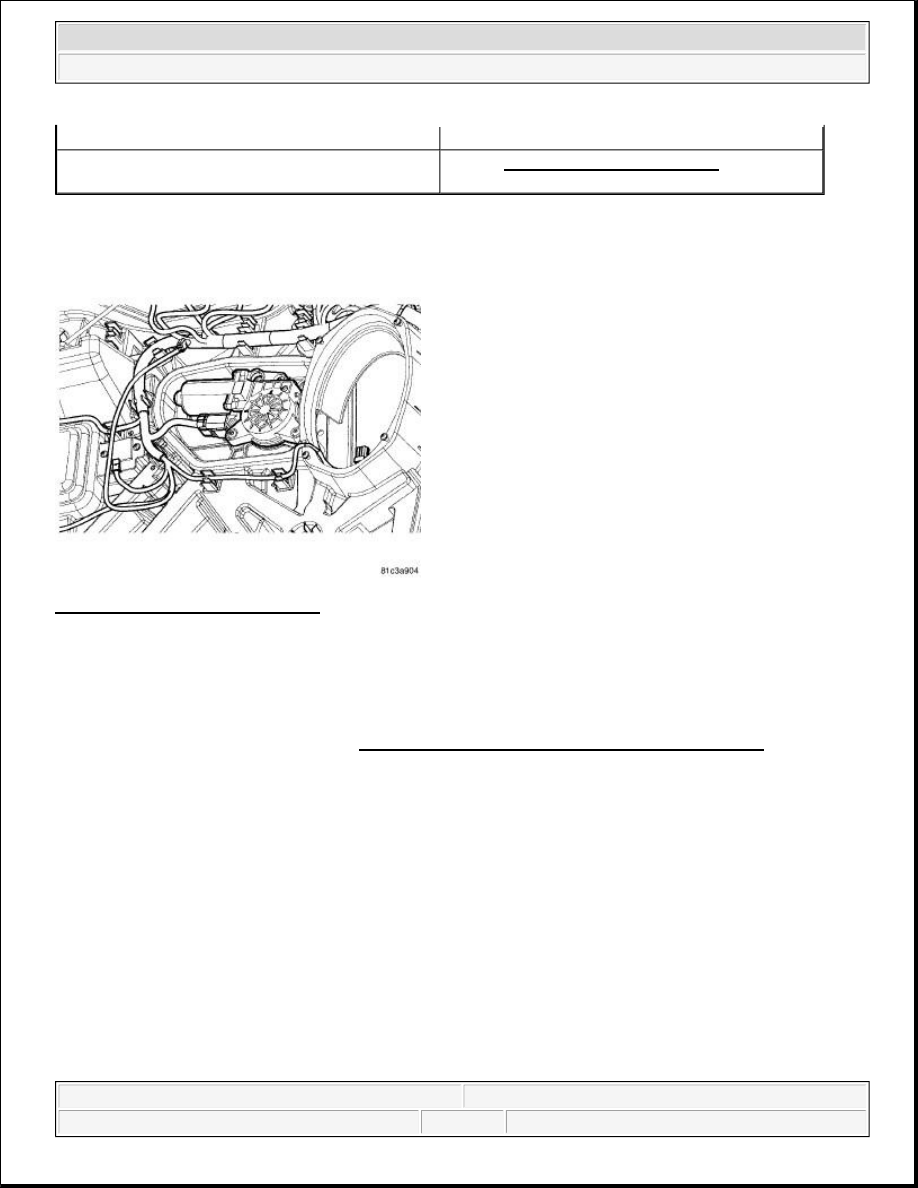
Fig. 3: Front Door Window Motor
Courtesy of CHRYSLER LLC
1. Disconnect and isolate the battery negative cable.
2. Remove the door trim panel. Refer to Body/Door - Front/PANEL, Door Trim - Removal .
3. Disconnect the electrical connector.
4. Remove the mounting fasteners.
5. Remove the window motor.
MOTOR-SLIDING DOOR WINDOW
Fig. 4: Sliding Door Window Motor
2009 Dodge Grand Caravan SE
2009 ACCESSORIES & EQUIPMENT Power Windows - Service Information - Grand Caravan, Town & Country
steve
Monday, May 23, 2011 1:31:09 PM
Page 6
© 2006 Mitchell Repair Information Company, LLC.
Courtesy of CHRYSLER LLC
1. Disconnect and isolate the battery negative cable.
2. Remove the sliding door trim panel. Refer to Body/Doors - Sliding/PANEL, Door Trim - Removal .
3. Disconnect the electrical connector.
4. Remove the mounting fasteners.
5. Remove the window motor.
MOTOR-VENT WINDOW
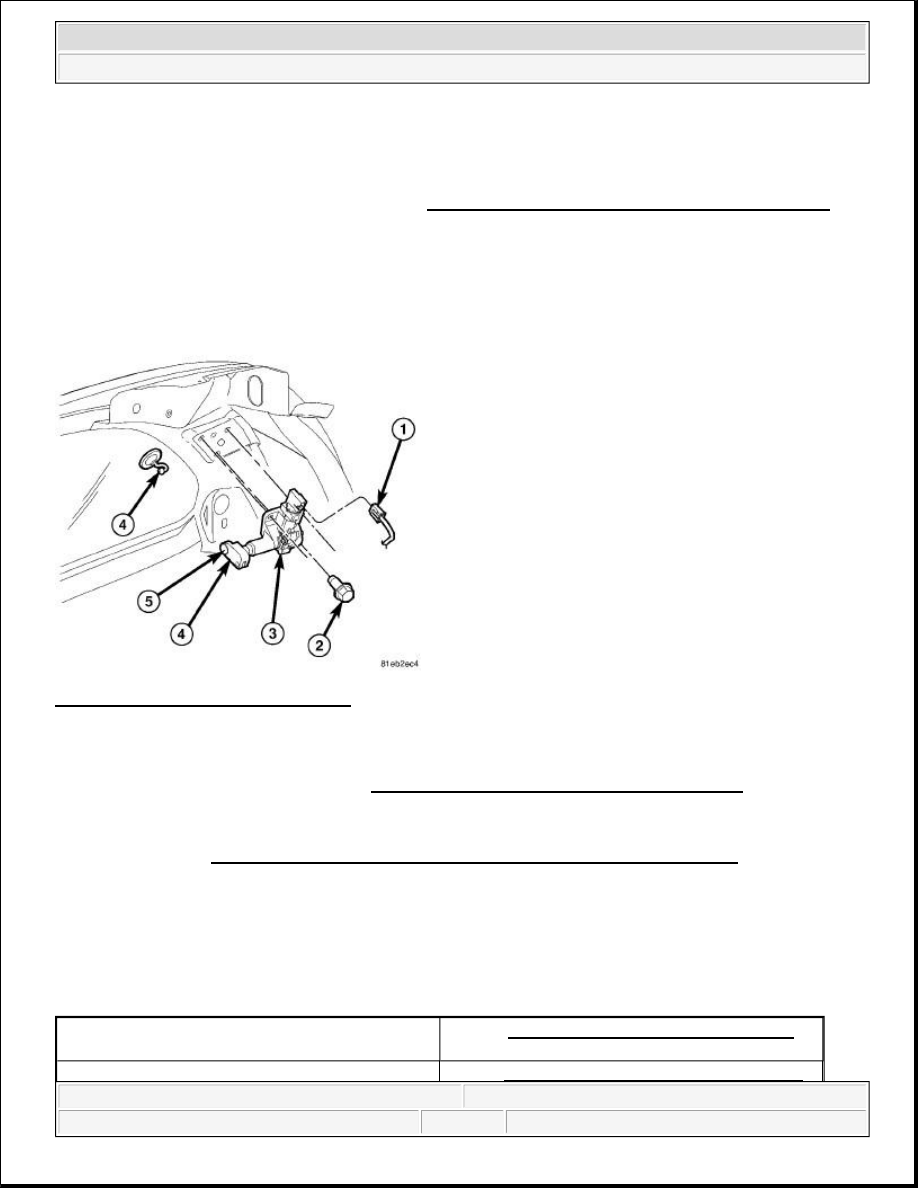
Fig. 5: Vent Window Motor Armature
Courtesy of CHRYSLER LLC
1. Disconnect and isolate the battery negative cable.
2. Remove D-pillar trim panel. Refer to Body/Interior/PANEL, D-Pillar Trim - Removal .
3. Disconnect wire connector (1) from power vent motor (3).
4. Using a flat bladed tool, carefully lift the circular actuator link tab (5). Remove link (4) from window ball
socket (4). See Electrical/Power Windows/ARMATURE, Window Motor - Removal.
5. Remove bolts (2) holding power vent motor to D-pillar.
6. Remove power vent motor.
INSTALLATION
INSTALLATION
MOTOR-FRONT DOOR WINDOW
Refer to MOTOR-FRONT DOOR WINDOW
installation procedure.
MOTOR-SLIDING DOOR WINDOW
Refer to MOTOR-SLIDING DOOR WINDOW
2009 Dodge Grand Caravan SE
2009 ACCESSORIES & EQUIPMENT Power Windows - Service Information - Grand Caravan, Town & Country
steve
Monday, May 23, 2011 1:31:09 PM
Page 7
© 2006 Mitchell Repair Information Company, LLC.
MOTOR-FRONT DOOR WINDOW
Fig. 6: Front Door Window Motor
Courtesy of CHRYSLER LLC
1. Install the window motor.
2. Install the mounting fasteners.
3. Connect the electrical connector.
4. Install the door trim panel. Refer to Body/Door - Front/PANEL, Door Trim - Installation .
5. Connect the battery negative cable.
MOTOR-SLIDING DOOR WINDOW
installation procedure.
MOTOR-VENT WINDOW
Refer to MOTOR-VENT WINDOW installation
procedure.
2009 Dodge Grand Caravan SE
2009 ACCESSORIES & EQUIPMENT Power Windows - Service Information - Grand Caravan, Town & Country
steve
Monday, May 23, 2011 1:31:09 PM
Page 8
© 2006 Mitchell Repair Information Company, LLC.
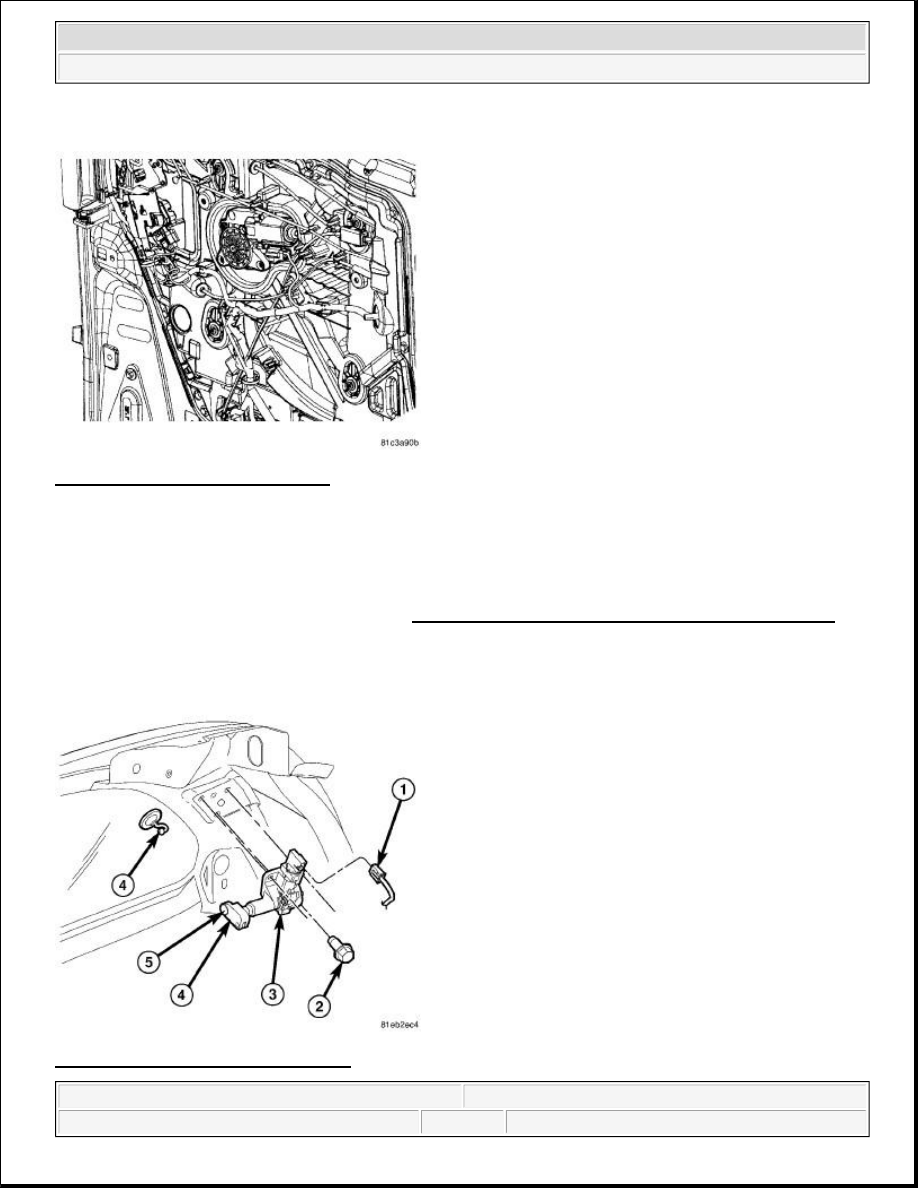
Fig. 7: Sliding Door Window Motor
Courtesy of CHRYSLER LLC
1. Install the window motor.
2. Install the mounting fasteners.
3. Connect the electrical connector.
4. Install the sliding door trim panel. Refer to Body/Doors - Sliding/PANEL, Door Trim - Installation .
5. Connect the battery negative cable.
MOTOR-VENT WINDOW
Fig. 8: Vent Window Motor Armature
2009 Dodge Grand Caravan SE
2009 ACCESSORIES & EQUIPMENT Power Windows - Service Information - Grand Caravan, Town & Country
steve
Monday, May 23, 2011 1:31:09 PM
Page 9
© 2006 Mitchell Repair Information Company, LLC.

Courtesy of CHRYSLER LLC
1. Obtain new vent window motor (3).
2. Install bolts (2) holding power vent motor to D-pillar.
3. Snap the actuator link socket (4) onto the quarter window ball socket (4). Using a soft rubber mallet, push
the circular link tab (5) flush with link surface. See Electrical/Power Windows/ARMATURE, Window
Motor - Installation.
4. Reconnect wire connector (1) to power vent motor.
5. Reconnect the battery negative cable.
6. Cycle quarter window open/close to verify function.
7. Install D-pillar trim panel. Refer to Body/Interior/PANEL, D-Pillar Trim - Installation .
8. Connect the battery negative cable.
SWITCH, POWER WINDOW
DESCRIPTION
DESCRIPTION
DRIVER DOOR SWITCHES
Power window, power mirror and power lock switches are conveniently mounted in the driver's door. The
driver door switched controls the locking/unlocking of all doors and controls the up/down operation of the
driver, passenger and sliding door windows. The driver door switch also controls the opening/closing of the
power vent windows.
PASSENGER DOOR SWITCHES
The front passenger door switches control the power window and power locks.
SLIDING DOOR WINDOW SWITCHES
The power window switch is located on the inside handle assembly for easy access.
QUARTER VENT WINDOW SWITCHES
The quarter vent window switches are located on the driver door.
REMOVAL
REMOVAL
SWITCH-DRIVER DOOR
Refer to SWITCH-DRIVER DOOR removal
procedure.
SWITCH-PASSENGER DOOR
Refer to SWITCH-PASSENGER DOOR removal
2009 Dodge Grand Caravan SE
2009 ACCESSORIES & EQUIPMENT Power Windows - Service Information - Grand Caravan, Town & Country
steve
Monday, May 23, 2011 1:31:09 PM
Page 10
© 2006 Mitchell Repair Information Company, LLC.
SWITCH-DRIVER DOOR
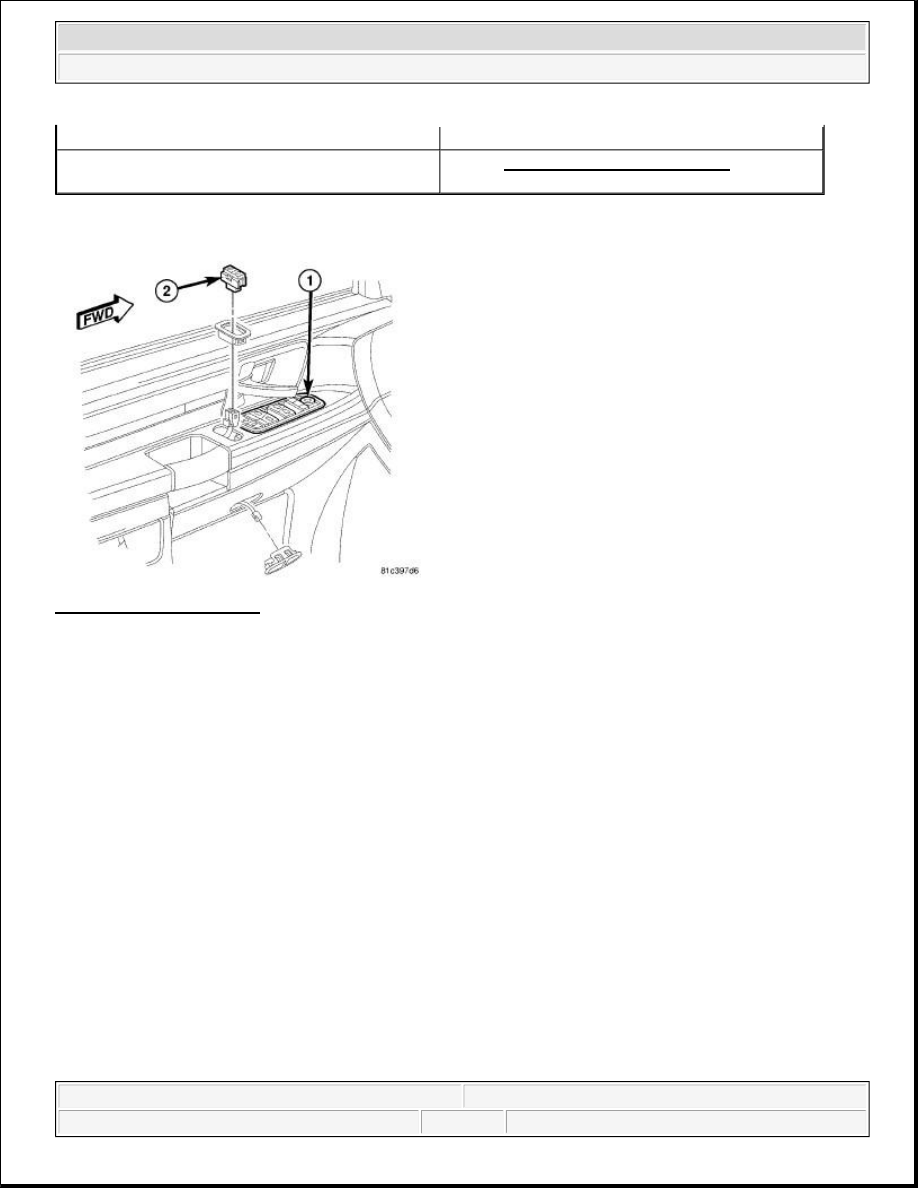
Fig. 9: Driver Door Switch
Courtesy of CHRYSLER LLC
1. Disconnect and isolate the battery negative cable.
2. Using a pry tool, gently remove the switch assembly (1) or the vent window switch (2) from the door trim
panel.
3. Disconnect the electrical connectors.
SWITCH-PASSENGER DOOR
procedure.
SWITCH-SLIDING DOORS
Refer to SWITCH-SLIDING DOORS removal
procedure.
2009 Dodge Grand Caravan SE
2009 ACCESSORIES & EQUIPMENT Power Windows - Service Information - Grand Caravan, Town & Country
steve
Monday, May 23, 2011 1:31:09 PM
Page 11
© 2006 Mitchell Repair Information Company, LLC.

Fig. 10: Passenger Door Switch
Courtesy of CHRYSLER LLC
1. Disconnect and isolate the battery negative cable.
2. Using a pry tool, gently remove the switch assembly from the door trim panel.
3. Disconnect the electrical connector.
SWITCH-SLIDING DOORS
Fig. 11: Sliding Doors Switch
Courtesy of CHRYSLER LLC
1. Disconnect and isolate the battery negative cable.
2. Using a pry tool, gently remove the switch assembly from the door trim panel.
2009 Dodge Grand Caravan SE
2009 ACCESSORIES & EQUIPMENT Power Windows - Service Information - Grand Caravan, Town & Country
steve
Monday, May 23, 2011 1:31:09 PM
Page 12
© 2006 Mitchell Repair Information Company, LLC.
3. Disconnect the electrical connector.
INSTALLATION
INSTALLATION
SWITCH-DRIVER DOOR
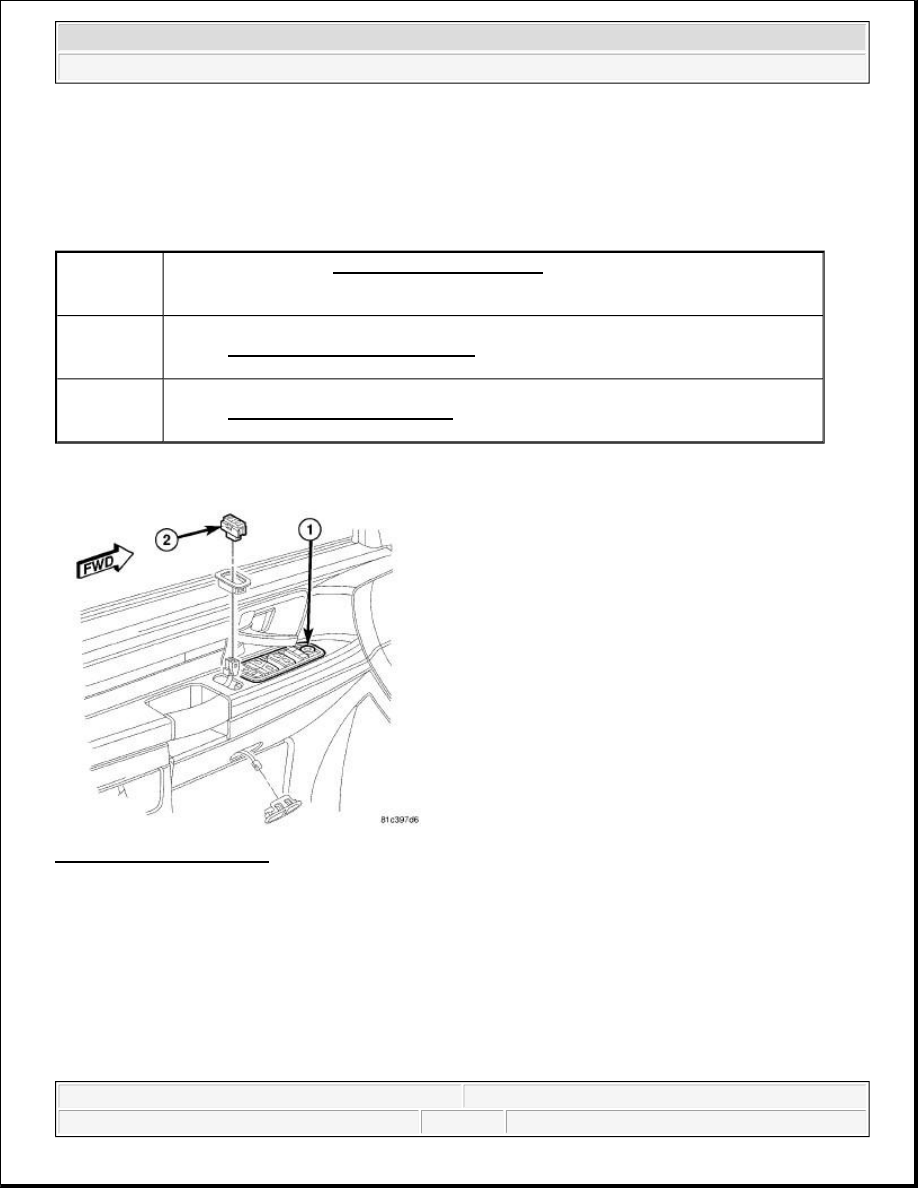
Fig. 12: Driver Door Switch
Courtesy of CHRYSLER LLC
1. Connect the electrical connectors.
2. Firmly snap the switch assembly into the door trim panel.
3. Connect the battery negative cable.
SWITCH-PASSENGER DOOR
SWITCH-
DRIVER
DOOR
Refer to SWITCH-DRIVER DOOR installation procedure.
SWITCH-
PASSENGER
DOOR
Refer to SWITCH-PASSENGER DOOR installation procedure.
SWITCH-
SLIDING
DOORS
Refer to SWITCH-SLIDING DOORS installation procedure.
2009 Dodge Grand Caravan SE
2009 ACCESSORIES & EQUIPMENT Power Windows - Service Information - Grand Caravan, Town & Country
steve
Monday, May 23, 2011 1:31:09 PM
Page 13
© 2006 Mitchell Repair Information Company, LLC.
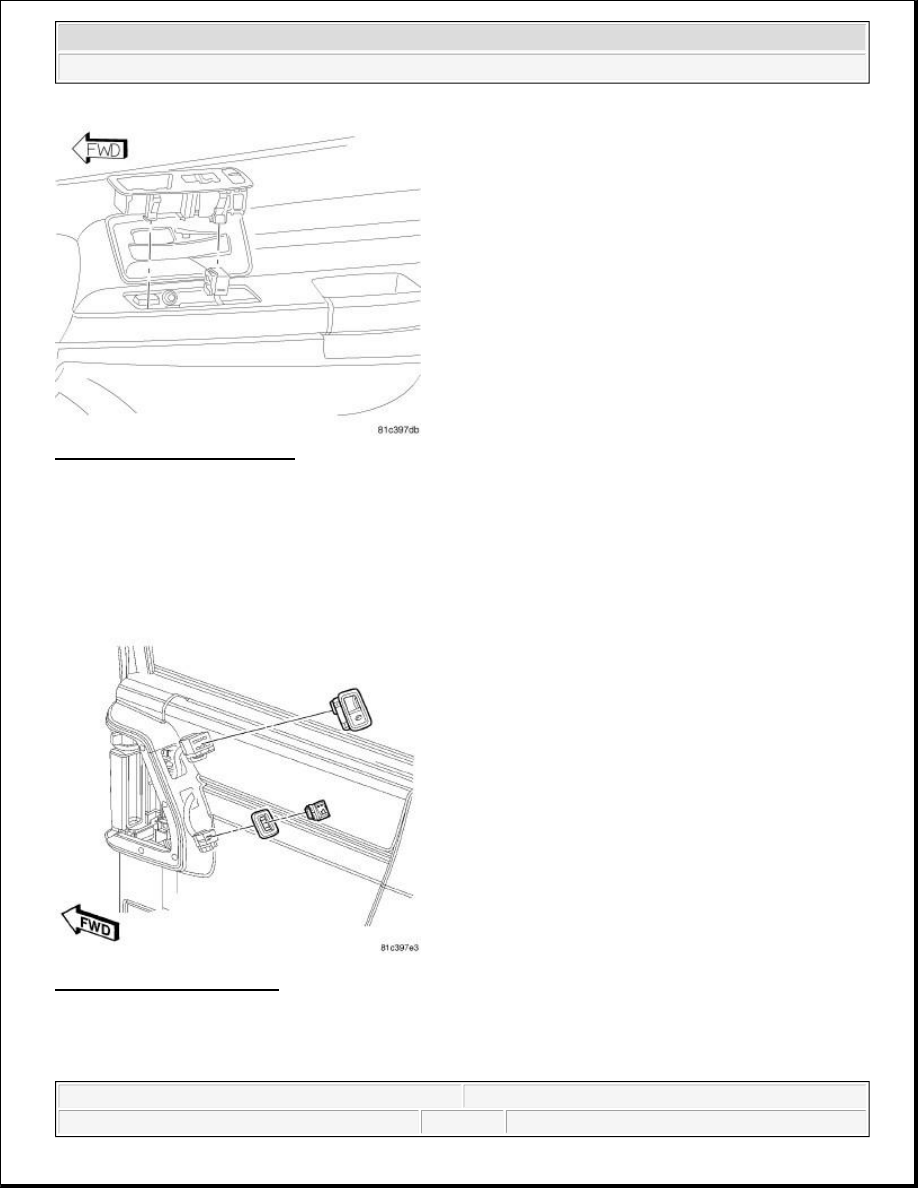
Fig. 13: Passenger Door Switch
Courtesy of CHRYSLER LLC
1. Connect the electrical connectors and install the switch.
2. Firmly snap the switch assembly into the door trim panel.
3. Connect the battery negative cable.
SWITCH-SLIDING DOORS
Fig. 14: Sliding Doors Switch
Courtesy of CHRYSLER LLC
1. Connect the electrical connectors and install the switch.
2. Firmly snap the switch assembly into the inside door handle.
2009 Dodge Grand Caravan SE
2009 ACCESSORIES & EQUIPMENT Power Windows - Service Information - Grand Caravan, Town & Country
steve
Monday, May 23, 2011 1:31:09 PM
Page 14
© 2006 Mitchell Repair Information Company, LLC.

3. Connect the battery negative cable.
2009 Dodge Grand Caravan SE
2009 ACCESSORIES & EQUIPMENT Power Windows - Service Information - Grand Caravan, Town & Country
steve
Monday, May 23, 2011 1:31:09 PM
Page 15
© 2006 Mitchell Repair Information Company, LLC.
Wyszukiwarka
Podobne podstrony:
Popular Mechanics Repairing Power Windows
Power Window
Power Window Circuit (1 of 2)
05 4 F01 Power Windows
96ZJ 8S POWER WINDOW SYSTEMS
05a2 E70 Power Windows
Power Window Circuit (2 of 2)
power windows
POWER WINDOWS CONTROL
BMW E38 schematic Power windows
93ZJ Secc 8S Power Windows
get windows product key power shell
Software Power Off on Windows NT 4 0
6623 Getting started with the Power BI mobile app for Windows 10 WSG 2
Windows 8 1 Power User Guide
Instalacja Windows XP power point
07 Windows
więcej podobnych podstron