
BONSAI TREES:
GROWING,
TRIMMING,
SCULPTING AND
PRUNING

TABLE OF CONTENTS
Introduction
3
Bonsai History
5
Bonsai Styles
9
Formal Upright
10
Informal Upright
11
Slanting
12
Cascade
13
Semi-Cascade
15
Growing Indoors or Outdoors
15
Bonsai Tool Box
17
Grow From Seeds or Buy Trees?
19
Trees Best Suited For Bonsai
21
What to Look For In Your Tree
27
Planting the Bonsai
30
Pruning and Trimming
32
Wiring
35
When to Wire
39
Watering and Fertilizing
41
Repotting the Bonsai
42
Seasonal Care
45
Displaying Your Bonsai
49
General Tips
50
Conclusion
52

INTRODUCTION
"Bonsai art is the display of a landscape - without the
landscape."
--Nobu Kajiwara
This quote couldn’t be truer. Growing and sculpting
bonsai trees can be quite a satisfying hobby. It is a hobby;
however, that requires a tremendous amount of patience.
When you take a simple sapling and mold it to your desire,
you’ll be rewarded with a beautiful piece of art you can truly
be proud of!
The term bonsai literally means plant in a pot or tray
planting. Bonsai however is much more than simply a plant
in a pot. The goal of bonsai is to create the appearance of
great size and age. This is accomplished by creating a
bonsai with strong roots that extend in all directions,
creating a sense of stability, a large trunk which tapers as it
goes upward, a clear apex, and well formed and well placed
branches. These features all combine to create a careful
blend of symmetry, balance and proportion. It also must be
displayed in a pot which harmonizes well with the plant
material.
Bonsai is the art of growing trees in a confined space to
simulate certain environmental conditions such as great age,
extreme weathering, twisted or contorted form, landscape,
or other factors. Bonsai trees are modeled on and take
inspiration from nature. The idea of bonsai is to recreate
some of nature's most stunning and beautiful effects on
trees which are reduced in scale.
When undertaking bonsai, you are beginning an
experience that will expand your horizons in countless ways.

You may find a new sense of appreciation for nature; you
may start looking at trees, bushes and shrubs differently.
You will certainly find yourself looking around all the "worst
parts" of your local nurseries where they keep the plants
that most people wouldn't look twice at. How the art of
bonsai will change you is as unpredictable as nature itself,
but be assured of one thing: Bonsai will change the way that
you look at things.
To the Japanese, there is a link to many of the ideals
that their society is based on. Zen Buddhism - where the
pastime originated, man, nature, elements and change all
are intertwined into this unique method of meditation and
expression. To our world now, bonsai is viewed as a hobby
that allows a greater understanding and being with nature
and also a way to enhance our gardens.
The tree and the pot involved with bonsai form a single
harmonious unit where the shape, texture and color of one,
compliments the other. Then the tree must be shaped. It is
not enough just to plant a tree in a pot and allow nature to
take its course - the result would look nothing like a tree and
would look very short-lived. Every branch and twig of a
bonsai is shaped or eliminated until the chosen image is
achieved. From then on, the image is maintained and
improved by a constant regime of pruning and trimming.
Bonsai is the art of dwarfing trees or plants and
developing them into an aesthetically appealing shape by
growing, pruning and training the trees into containers
according to prescribed techniques.
Overall, bonsai is a great interest, hobby or even
profession to undertake. Although famous theologians have
claimed that it is actually 90% art to a meager 10% of
horticulture, it has to be said that a successful bonsai is
most definitely a horticultural masterpiece.

Once arriving in the Western world, this enjoyable and
rewarding pastime has never turned back, and has gained a
magnificently diverse range of plant material and
techniques.
Given proper care, bonsai can live for hundreds of
years, with prized specimens being passed from generation
to generation, admired for their age, and revered as a
reminder of those who have cared for them over the
centuries. Although these bonsai are extremely beautiful -
meticulously cared for over the years and containing such a
wealth of knowledge, age is not essential. It is more
important that the tree produce the artistic effect desired,
that it be in proper proportion to the appropriate container,
and that it be in good health.
Bonsai is an artistic representation of a natural tree. It
is an image, an illusion of nature. It is smoke and mirrors
that defies the senses. The best bonsai are magicians' tricks
that have fooled the eye into seeing a far off place in the
distant past, or the side of a craggy cliff. We all have to
strive to be the magician."
In this book, we will introduce you to bonsai techniques
and how to grow your own bonsai masterpieces. The beauty
of bonsai is that there is no definitive “right way” to do it.
We can offer up tips and tricks to craft your own bonsai, but
how. Enter into the world of bonsai and gain a new insight
into life!
BONSAI HISTORY
The history of bonsai is long and storied. Bonsai first
appeared in China over a thousand years ago on a very
basic scale, known as pun-sai. Pun-sai was the practice of
growing single specimen trees in pots. These early
specimens displayed little foliage and rugged, gnarled trunks
which often looked like animals, dragons and birds. There

are a great number of myths and legends surrounding
Chinese bonsai. The grotesque or animal-like trunks and
root formations are still highly prized today.
With Japan's adoption of many cultural trademarks of
China - bonsai was also taken up, introduced to Japan
during the Kamakura period (1185 - 1333) by means of Zen
Buddhism - which at this time was rapidly spreading around
Asia. The exact time is debatable, although it is possible that
it had arrived in AD 1195 as there appears to be a reference
to it in a Japanese scroll attributed to that period.
Once bonsai was introduced into Japan, the art was
refined to an extent not yet approached in China. Over time,
the simple trees were not just confined to the Buddhist
monks and their monasteries, but also later were introduced
to be representative of the aristocracy - a symbol of prestige
and honor. The ideals and philosophy of bonsai were greatly
changed over the years. For the Japanese, bonsai represents
a fusion of strong ancient beliefs with the Eastern
philosophies of the harmony between man, the soul and
nature.
In an ancient Japanese scroll written in Japan around
the Kamakura period, it is translated to say: "To appreciate
and find pleasure in curiously curved potted trees is to love
deformity".
Whether this was intended as a positive or negative
statement, it leaves us to believe that growing dwarfed and
twisted trees in containers was an accepted practice among
the upper class of Japan by the Kamakura period. By the
fourteenth century bonsai was indeed viewed as a highly
refined art form, meaning that it must have been an
established practice many years before that time.
Bonsai were brought indoors for display at special times
by the 'Japanese elite' and became an important part of
Japanese life by being displayed on specially designed

shelves. These complex plants were no longer permanently
reserved for outdoor display, although the practices of
training and pruning did not develop until later - the small
trees at this time still being taken from the wild.
In the 17th and 18th century, the Japanese arts
reached their peak and were regarded very highly. Bonsai
again evolved to a much higher understanding and
refinement of nature - although the containers used seemed
to be slightly deeper than those used today. The main factor
in maintaining bonsai was now the removal of all but the
most important parts of the plant. The reduction of
everything just to the essential elements and ultimate
refinement was very symbolic of the Japanese philosophy of
this time.
At around this time, bonsai also became commonplace
to the general Japanese public - which greatly increased
demand for the small trees collected from the wild and
firmly established the art form within the culture and
traditions of the country.
Over time, bonsai began to take on different styles,
each which varied immensely from one another. Bonsai
artists gradually looked into introducing other culturally
important elements in their bonsai plantings such as rocks,
accent plants, and even small buildings and people which is
known as the art of bon-kei. They also looked at reproducing
miniature landscapes in nature - known as sai-kei which
further investigated the diverse range of artistic possibilities
for bonsai.
Finally, in the mid-19th century, after more than 230
years of global isolation, Japan opened itself up to the rest
of the world. Word soon spread from travelers who visited
Japan of the miniature trees in ceramic containers which
mimicked aged, mature, tall trees in nature. Further
exhibitions in London, Vienna and Paris in the latter part of

the century - especially the Paris World Exhibition in 1900
opened the world's eyes up to bonsai.
Due to this phenomenal upsurge in the demand for
bonsai, the now widely expanding industry and lack of
naturally-forming, stunted plants led to the commercial
production of bonsai by artists through training young plants
to grow to look like bonsai. Several basic styles were
adopted, and artists made use of wire, bamboo skewers and
growing techniques to do this - allowing the art to evolve
even further. The Japanese learned to capitalize on the
interest in this art form very quickly - opening up nurseries
dedicated solely to grow, train and then export bonsai trees.
Different plants were now being used to cater for
worldwide climates and to produce neater foliage and more
suitable growth habits. Bonsai techniques such as raising
trees from seed or cuttings and the styling and grafting of
unusual, different or tender material onto hardy root stock
were further developed.
Bonsai has now evolved to reflect changing tastes and
times - with a great variety of countries, cultures and
conditions in which it is now practiced.
In Japan today, bonsai are highly regarded as a symbol
of their culture and ideals. The New Year is not complete
unless the tokonoma - the special niche in every Japanese
home used for the display of ornaments and prized
possessions - is filled with a blossoming apricot or plum tree.
Bonsai is no longer reserved for the upper-class, but is a joy
shared by executive and factory worker alike.
The Japanese tend to focus on using native species for
their bonsai - namely pines, azaleas and maples (regarded
as the traditional bonsai plants). In other countries however,
people are more open to other opinions.
The evolution of bonsai over the past two centuries is
truly amazing. Perhaps it is symbolic of how small the world

is getting as people from Europe to the United States and
even in Greenland are exploring bonsai as a hobby.
And now it’s your turn! First, let’s explore styles of
bonsai.
BONSAI STYLES
It is important for you to remember, as a beginner,
that no single bonsai style is the “right” style. Bonsai is
meant to be a representation of a tree in nature. Crafting a
bonsai masterpiece is tantamount to how YOU view that
tree. You are not learning from a bonsai master, you are
simply being given instruction on how to create your own
bonsai. What you make of it lies simply in your own mind.
You should strive to make your bonsai trees look as
natural as possible. Let the tree suggest its own
possibilities. If the trunk bends to the right, let it bend that
way. Work with it to make it a main feature of your bonsai.
You must listen to the tree and hear what it is telling you.
Then you will come up with a beautiful creation!
Bonsais should simulate age. You should try and
project the appearance of maturity in your tree – just in a
miniature form. Even if your tree is relatively young, you
can groom it so it looks like it has been growing for years
and years.
Two features that give the appearance of age to trees
are the caliper of the trunk and the degree of taper of the
trunk. The trunks of bonsai (in most styles) will be very wide
at the base and taper very smoothly to the top of the tree
There are two general styles of bonsai: the classic
(koten) and the informal or 'comic' (bunjin). In the former,
the trunk of the tree is wider at the base and tapers off
towards the top; it is just the opposite in the 'bunjin', a style
more difficult to master.
When you start a bonsai, always remember that you
are working with a living plant. Look carefully at its natural
characteristics and you may discern within them a suitable
style, or styles. Often you can train a plant into several
styles, even if it is basically upright like a beech or elegantly
slender like a maple. Even if one style only really suits a
particular plant, you still can interpret this in many different
ways.
More than anything else you should not try to train a
bonsai to grow in a style it is not accustomed to. Study the
natural growth patterns of the tree you are going to grow
and enhance on the pattern nature gave it.
The five basic bonsai styles are formal upright, informal
upright, slanting (or windswept), semi-cascade and cascade.
All have their own individual beauty and serenity.
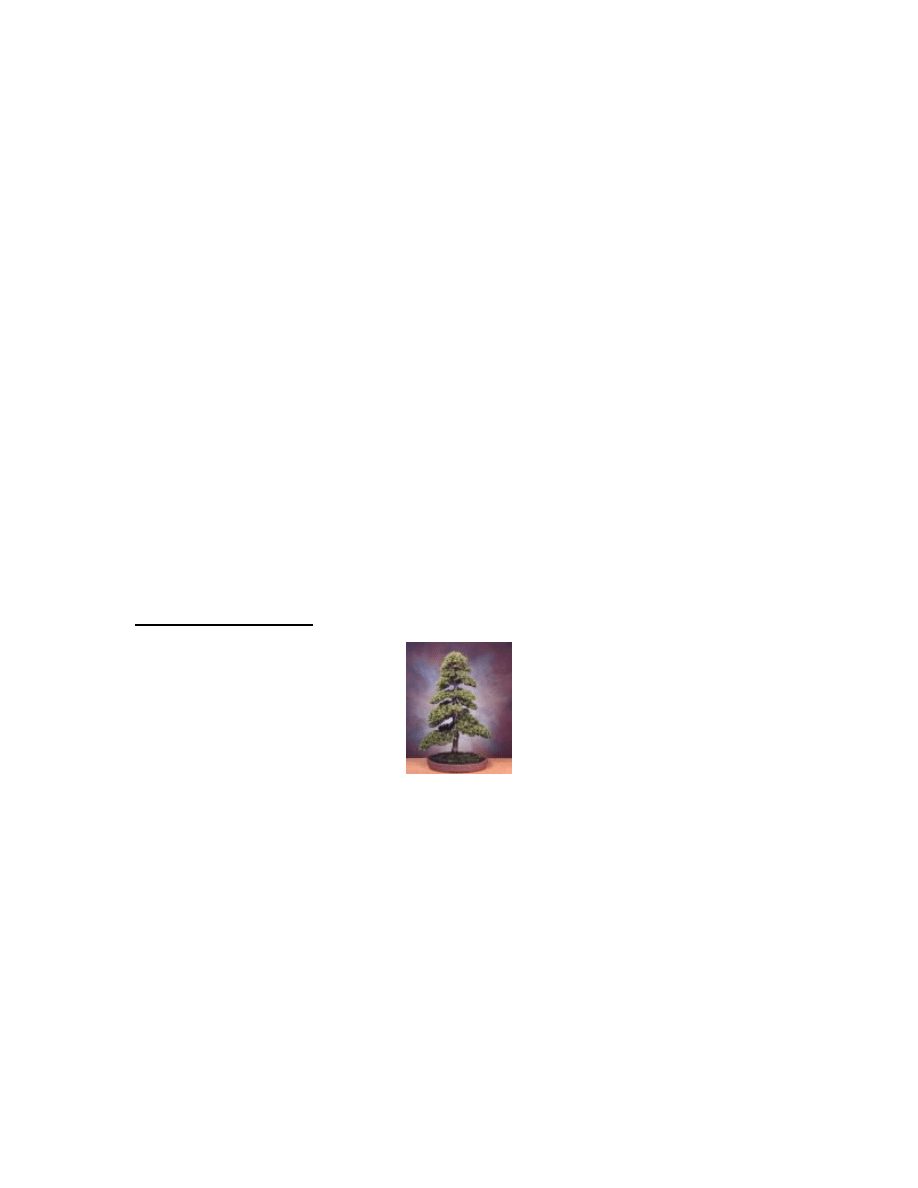
Formal Upright
A tree with a style such as formal upright occurs when
it has grown in the open under perfect conditions. The most
important requirement for this style is that the trunk should
be perfectly straight, tapering naturally and evenly from
base to apex. The branches should be symmetrically spaced
so that they are balanced when viewed from any direction.
It is quite a demanding style to achieve.
Junipers, pines, and spruces are great to try and grow
in the formal upright style.
To achieve an effective formal upright style, make sure
that about one third of the trunk is visible from the front.
This can be from the base to the first branch or
cumulatively, as seen through the tracery of its branches.
Generally, the placement of branches follows a pattern.
The first branch up from the bottom is the longest and in
proportion usually is trained to grow to an equivalent to a
third of the total height of the tree. This is the 'heaviest'
branch almost making a right angle to the trunk.
The second branch directly opposes the first branch and
is higher on the trunk. As the branch structure ascends, they
taper assuming a somewhat cone-like form.
The top of the bonsai is usually very thick with foliage -
so full and tightly ramified that it is difficult to see its
internal structure through the mass of leaves or needles.
The tip of this style of bonsai also has a slight curve, to
lean forward and effectively 'look at the viewer'. Depending
on what species of tree you are using, the whole tree does
not have to be symmetrical but rather the branches could
ascend by alternating on each side.
The branches and trunk of a formal upright bonsai
always take on a very distinctive taper. This is achieved by
cutting off the growing tip of the trunk or branch with each
new year and wiring a new branch into position to form the
apex. This is something quite hard to do, however it
produces a stunning result when the trunk starts to mature
and the taper starts becoming prominent.
Informal Upright
In nature, such trees bend or alter their direction away
from wind or shade other trees or buildings, or towards
light. In an informal upright bonsai the trunk should slightly
bend to the right or left - but never towards the viewer. This
applies to all types of bonsai. Neither the trunk nor branches
should be pointing towards the viewer when the bonsai is
viewed from the front.
For this style, try a Japanese maple, Trident maple, or
almost any conifer and ornamental tree. You’ll have a
dramatic result with a pomegranate or other flowering tree.
An informal upright bonsai basically uses the same
principles of the formal upright bonsai only that it is
informal. The style still requires a tapered trunk, however
the trunk direction and branch positioning is more informal
and closer to the way a tree would look when exposed to the
elements at an early age. The trunk usually takes on an
unexpected curve or series of twists and the branches are
thus positioned to balance this effect.
As with formal upright, the crown of the tree is mainly
very full with foliage and despite the informal trunk, is most
always located directly above the base of the tree. This is an
attribute of the informal upright style, if not done like this,
the tree would be slanting.
Jin (carved remains of dead or unwanted branches to
look like dead and rotting limbs of a tree) is also more
appropriate and effective with the informal upright style.
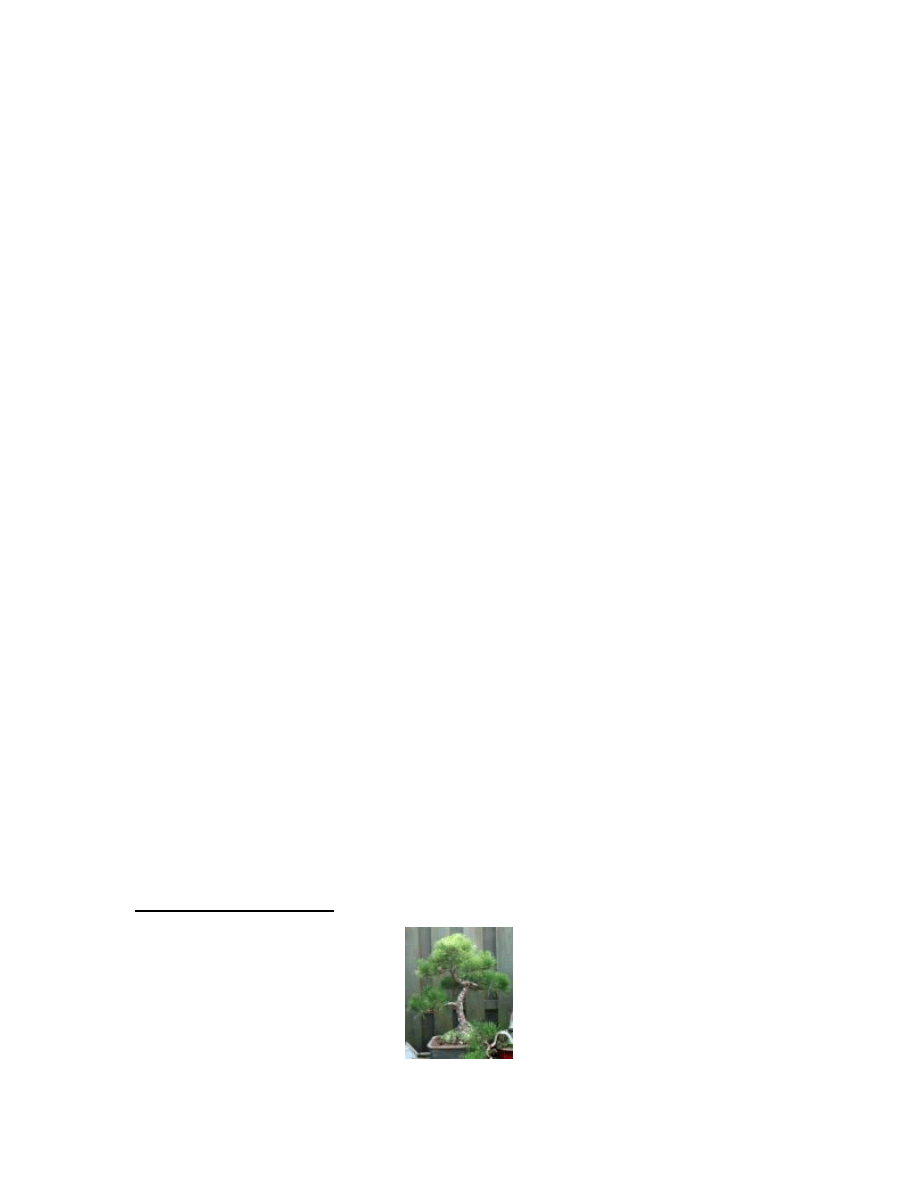
Slanting Style

Trees that slant naturally occur as a result of buff
setting winds or deep shade during early development.
Whether curved or straight, the whole trunk leans at a
definite angle. The stronger roots grow out on the side,
away from the angle of the trunk lean, to support the
weight.
Almost any type of tree will work well with this style.
This style bears a great similarity to the informal
upright. The trunk can be either curved or straight, but
must be on an angle to either the right or left (never to the
front), with the apex not directly over the base of the
bonsai.
This style is quite a simple one that can be achieved by
many methods. At an early age, the bonsai can be trained to
an angle by means of wiring the trunk until it is in position.
Alternatively, the tree can be forced to grow in a slanted
style by putting the actual pot on a slant, causing the tree to
grow abnormally.
With formal upright, informal upright and slanted
styles, the number three is significant.
The lowest branches are grouped in threes, and this
grouping begins one-third of the way up the trunk. The
bottom-most three branches almost encircle the trunk, with
two branches thrusting forward, one slightly higher than the
other. The third branch, emanating from a point between
the first two, is set at such an angle as to make the foliage
appear lower than the other two.
This pattern presents an easy way to tell front from
back and sets the tone of the entire composition.
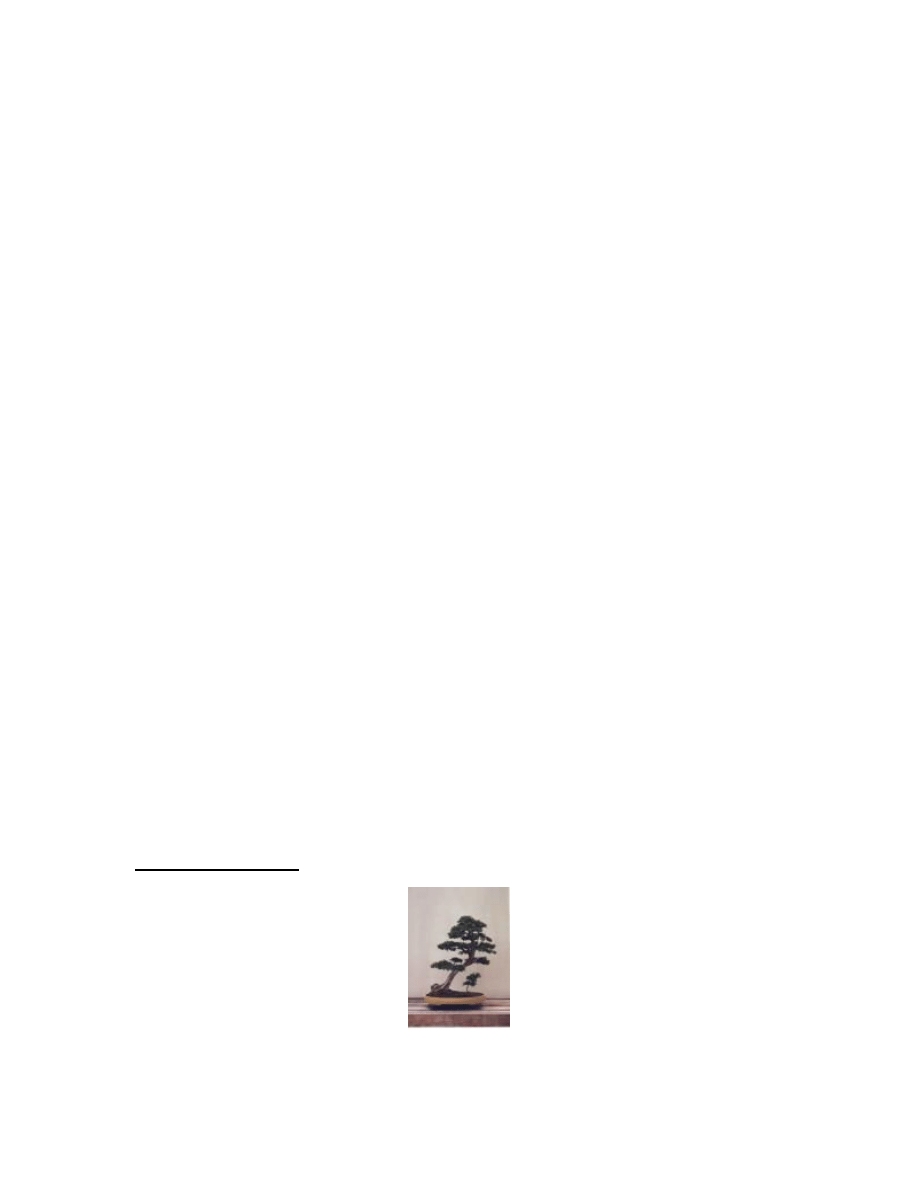
Cascade Style

The growing tip of a cascade bonsai reaches below the
base of a container. The trunk has a natural taper and gives
the impression of the forces of nature pulling against the
forces of gravity. Branches appear to be seeking the light.
The winding main trunk is reminiscent of a stream
meandering down the side of a mountain.
There are many types of trees that can be used to
achieve a cascading bonsai. The key here is to make sure
the tree isn’t naturally straight and upright. You should not
try and coax a naturally straight trunk tree into a cascading
bonsai.
If done right, this style of bonsai can be quite
aesthetically pleasing. The trunk, which is tapered, grows
down below the container and gives the impression of the
tree being forced down by the forces of gravity. The tree
trunk usually also twists as if to emulate a meandering
stream with elegant alternating branches protruding from it.
All that is required to create this style is a tall, narrow
pot which will enhance the style and accommodate the
cascade and a species of plant that will willingly adopt this
style if trained.
The main trunk should be wired to spill over and down
the edge of the pot, with the main focus on the major bend
(forming an upside-down U shape). Emphasis should also be
kept on keeping the branches uniform and horizontal to the
almost directly vertical trunk. Another major aspect to
remember is that both cascade and semi-cascade should be
positioned right into the center of the pot, the opposite to
what you would do for any other style.
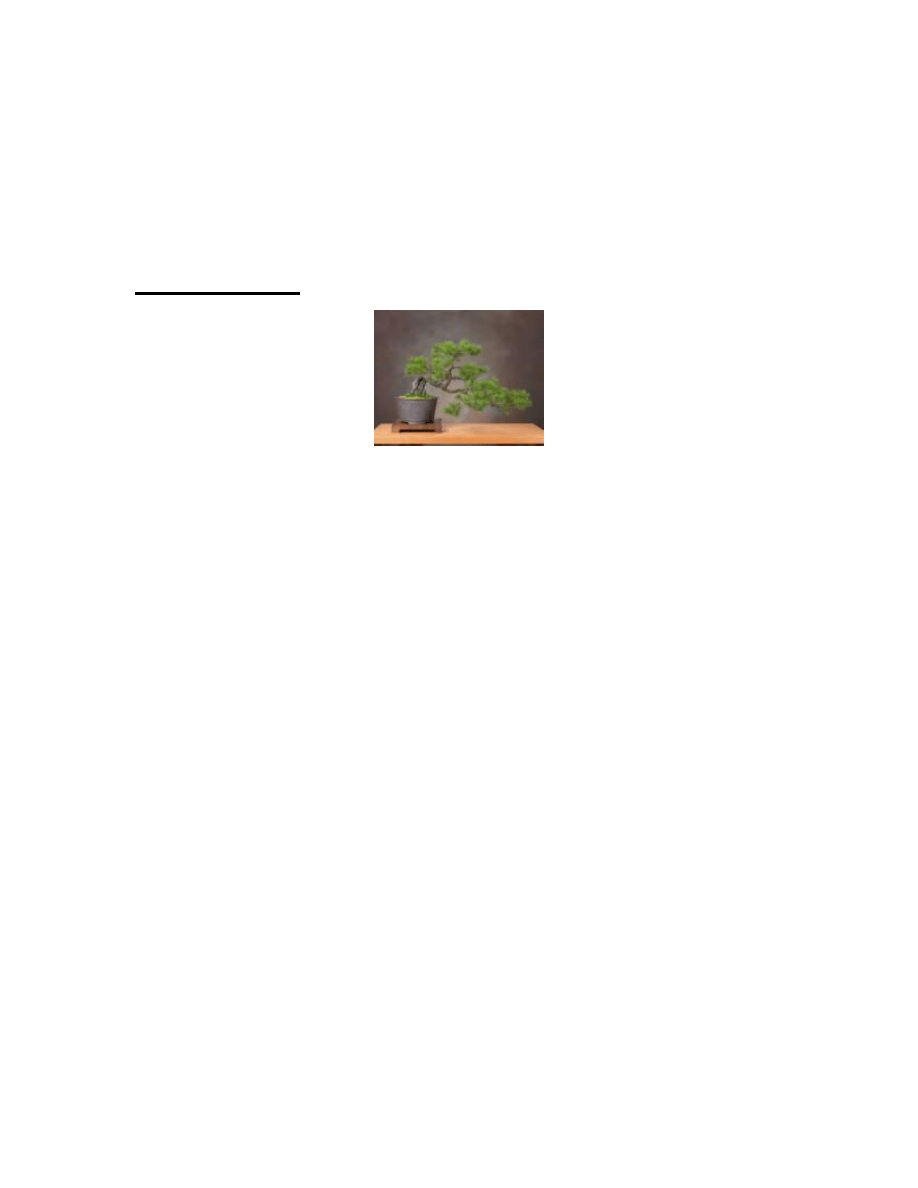
Semi-Cascade
The tip of a semi-cascade, like the cascade, projects
over the rim of the container, but does not drop below its
base. The style occurs in nature when trees grow on cliffs or
overhang water. The angle of the trunk in this bonsai is not
precise, as long as the effect is strongly horizontal, even if
the plant grows well below the level of the pot rim. Any
exposed roots should balance the trunk.
Flowering cherry trees, cedars, and junipers work very
well in this style of bonsai. Many people feel this style of
bonsai is the epitome of beauty in the art.
In general, bonsai cultivation is considered an outdoor
art. Since bonsai is the miniaturization of trees and means
tree in a pot, one may wonder which is better – outside or
inside bonsai gardening. The opinions vary.
INNIE OR OUTTIE?
One school of thought is that trees are outdoor plants
and putting them into pots does not transform them into
indoor plants. Many believe that if you bring bonsai inside,
they will die. While not necessarily true, you will probably

see much better results if you let your bonsai flourish
outside rather than indoors.
Just remember that you are going to be growing and
cultivating a tree in a tray or pot. Trees need lots of
sunlight and care to grow. Just because the trees are in a
tray or pot instead of the ground doesn’t mean they don’t
need the same care.
However, Bonsai are still trees and must have outdoor
living conditions. Trees need good light, good humidity
levels, good air circulation and importantly, many species
NEED the cold of winter to go dormant. Inside our homes,
trees receive comparatively poor light levels and the dry air
with low humidity levels created by central heating systems
can cause many problems.
There are species that will tolerate indoor conditions
and with the correct placement and care can thrive. There
are also many species that are not hardy enough to tolerate
the winter cold. But, these are in the minority.
It is far more difficult to cultivate indoor Bonsai than
outdoor Bonsai. Outdoor species very rarely die immediately
when grown inside, they can survive for months. However
they slowly lose their health and vigor in the adverse
conditions they have to cope with, and become susceptible
to bugs and disease until they finally start to show outward
signs of ill-health; yellowing leaves, lose of foliage and
eventually death.
There are many varieties of plants that do well as an
indoor bonsai such as ficus, aralia, azalea, Norfolk pine,
serissa, gardenia, or boxwood. Note that these are all
woody-stemmed plants and can have their limbs wired to
direct the growth.
Tropical and subtropical varieties can not tolerate
tempers below 40 - 50 degrees F. These plants can be left

outside when the temperatures stay above this. Light inside
the house should be by filtered sunlight from an east, south,
or west window. Grow lights 12 hours per day work well.
Outside in summer place in partial shade
There is NO coniferous species that can tolerate indoor
cultivation for more than 2 or 3 years. This is important to
keep in mind as most successful bonsai trees are of the
coniferous species.
In mild climates, temperate bonsai should remain
outdoors year round. In cold climates, temperate climate
plants should be grown outdoors during the warm seasons
of the year, but will need winter protection. It is possible to
grow temperate climate plants indoors in winter if they are
first given the required period of dormancy.
The urge is strong for beginners to grow their bonsai
indoors. Although a few traditional species for bonsai may be
grown indoors year round if they are given a dormant rest
period, you should be aware that this requires some skills
usually obtained from growing bonsai for a few years. We
can safely say that as a beginner, you should begin with
growing your bonsai outdoors.
Alright, then, how do you start your own bonsai
masterpiece? Let’s first consider the tools you’ll need.
TOOL BOX FOR BONSAI
Bonsai requires very few tools. Tools, however, make
certain jobs or tasks easier and quicker. Tools can range
from a few dollars to a few hundred dollars. As with most
things, you get what you pay for. The range of quality (and
price) in tools is immense and it is suggested that you buy
the best basic set of tools that you can afford. You will come
to appreciate them with time, and, if you care for them, they
will last you a long, long time.

There are three tools that are essential to even
beginning the process of shaping a tree for bonsai.
You need a pair of scissors which will allow you to do
the fine work of trimming in a small space. These scissors
should be sharp and you should only use them for bonsai
work. You may want to try a small set of pruning shears to
start with. Eventually, you will want a pair of shears made
especially for bonsai work.
Possibly the most important tool you can have in bonsai
growing is a pair of concave cutters. Concave cutters allow
you to cut branches off of the tree and leave behind a
concave wound. The wound will heal much faster than a
straight cut, and will callous over in such a way as to make
it very difficult to tell a cut has been made at all. These
cutters are an essential part of your collection.
You will eventually need a pair of wire cutters, although
these won’t need to be purchased immediately. If you put
wire on, you will eventually have to take it off. These wire
cutters allow you to cut the wire right up to the tree's bark,
without harming the tree. These too are essential.
You will also want to get several different thicknesses
of wire. In general, anodized copper wire is recommended.
It is very flexible until it is bent, then it sets and holds its
position. You will use it to position and train branches. We
have more on wire in the wiring section of this book.
Once you become more proficient at bonsai art, there
will be some more tools you will want to add to your tool
chest. These tools make certain tasks easier and allow you
to do more things with your trees.
Knob cutters are very similar to the concave cutters,
except that they have a spherical head, which allows you to
cut branches and leave a small hollowed out scar.

A folding saw is a useful tool for cutting through
branches larger than the diameter of either concave or knob
cutters. These are particularly important for working with
bigger trees.
Small scissors are great for working with really small
trees or really twiggy growth where it is hard to get larger
shears in close. These are a must have if you want to do
detail work on smaller trees.
A root rake is used to clear away dirt from the root ball
before repotting. It is used to gently comb out the roots and
to remove dirt.
Finally, a simple pair of tweezers can be extremely
useful in bonsai grooming. Tweezers have all sorts of
purposes in bonsai, from pinching back new growth and
pruning to removing unwanted objects from your bonsai.
Most bonsai tweezers will have a small trowel on the end,
useful for patting down moss, sowing seeds, and many other
odds and ends.
Now that you have the tools, what about the tree?
Should you start from seed or buy a sapling? You can do
either.
TO GROW OR NOT TO GROW
You can start your bonsai from seed, but be warned, it
can take awhile to see your results. Unless you’re starting
your bonsai hobby at age 4, being able to see the fruits of
your labor will probably not come to reality. While it may be
nice to be able to have complete control over your bonsai
from the beginning, we have to advise against it.
Seeds take a relatively long time to germinate and
become a proper plant to use for bonsai - with preferably a
1/2-1'' (1-2cm) diameter trunk (unless you want to do mini-

bonsai which are about 4" high and a totally different
practice). Life’s too short to sit, watch and wait for a tree to
grow.
Trees used in bonsai aren’t special in any way. They
are exactly the same as the trees you see all around you
every day. So, essentially, don’t plant your bonsai from
seed. Get some more immediate satisfaction by purchasing
a young sapling from a nursery or garden center. In doing
so, you’ll be able to cultivate not only the tree, but your
skills as a bonsai artist as well!
Bonsai are ordinary trees or plants, not special hybrid
dwarfs. Small leafed varieties are most suitable, but
essentially any plant can be used, regardless of the size it
grows to in the wild.
Go to your local nursery or garden store and see if you
can find some low-priced plants that have relatively thick
trunks and good bonsai potential that you can turn into
bonsai through training (pruning, wiring etc.) You can even
look around your garden and see if you have any potential
bonsai plants there that you could use.
A bought Bonsai is not a bad Bonsai. Only the quality
of the tree determines what a good and talented plant is.
Not its origin.
But the experiences and story of a collected tree will
add mental and historical value to a Bonsai that makes it
increase its value as a piece of art.
In general, select a specimen, that will be tolerant of
the stress of being cut, wired, and replanted. Specimens
like Cotoneasters, Lonicera and Juniperus, are advisable
starters for Shohin growing. They can be found on nurseries
in sizes suitable for beginners work.
Make sure that you buy a tree that grows well in your
“neck of the woods”. You must be sure that whatever tree

you choose will thrive well where you live. Be sure that the
plants you consider meet the requirements for good bonsai.
Let’s look at some prime species for bonsai tree
growing.
TREES
Almost any type of tree or shrub will be suitable for
bonsai. In general, most experts agree that pine trees
aren’t good for the beginner. When you are ready to work
on your first tree you should select a species that is
"forgiving" to the beginner.
One of the most often recommended is the dwarf
garden juniper. They are readily available, take pruning
well, can be worked on most of the year, and are generally
inexpensive. They also root well as cutting, so you can begin
starting your own "mini nursery" as you shape your first
tree.
There are some other species of trees that are
“perennial” favorites among bonsai growers.
Beech Trees
Beech make excellent Bonsai, there are types of Beech
spread throughout the world's temperate zones.
They tend to be grown in informal styles, and leaf
trimming every other year will reduce the size of leaves on
the larger types. It is important that leaf trimming is carried
out as early as possible, as beech may not come back into
leaf that year if it is left to late.
The Southern Beeches are closely related to beeches
from the Northern hemisphere, differing in that they have
both deciduous and evergreen species. From a bonsai
viewpoint the can be treated as their Northern counterparts,
except that you should not leaf trim the evergreen species.

They have no special needs but tend to do better in an
alkaline (lime) soil rather than a peat based compost.
Cedar
There are throughout the world many species termed
'Cedar'. Probably the first thing that springs to mind about
cedars is that they have, when in a pot, quite weak root
systems. The roots themselves being rather fleshy, are
prone to damage by frost, so the trees must be sheltered
when conditions demand it.
As with all conifers they will do better in a more open,
grittier soil than their deciduous counterparts.
Cherry
The Cherry is a member of one of the largest family of
plants on the planet, the ‘Rosaceous’, The Rose family is
really diverse, with the Cherry family at one end, apples and
pears, then Quinces, Cotoneasters, through the
Raspberry/Blackberry group, past Roses themselves and on
to Strawberries.
The Cherry family itself includes Apricots, Peaches,
Plums Damsons and Gages, all of which will make good
Bonsai. The Apricot or ‘Mume’, as it’s called in Japan is the
earliest flowering of the group.
The Cherry family propagates easily from seed, sown in
the autumn. The seeds need a cold winter to germinate.
They will take from cuttings but can prove difficult. Plants
grown from seed or cutting can take ten to fifteen years to
flower.
They have no particular needs, as far as their
cultivation is concerned.
Pruning should be carried out in mid summer, allowing
time for next year’s flower buds to develop.

Allowing them to set fruit may stress the tree beyond
its ability to survive.
Elm
The elm family is a group of trees that will forgive you
almost anything, will grow in a range of soils and are easy to
obtain, with species native to most of the Northern
hemisphere.
Zelcova and Chinese Elm are the two species you are
likely to come across on a supplier’s benches. Both are
excellent trees although the Chinese Elm is generally not as
hardy when there is frost about, but try what grows in your
area as all elms are capable of making good bonsai.
The Chinese Elm is a very easy tree to grow. Deciduous
in temperate areas, it may retain its leaves in tropical and
sub tropical regions. The Chinese elm is often wrongly sold
as an indoor tree.
This type of tree is one that many agree can be grown
from seed, although be warned that doing this will not
produce immediate results.
They are easy to propagate. The seed germinates
readily should you wish to try growing them this way;
however cuttings and layering are the best methods to
increase your stock.
Elms respond well to leaf trimming, and on a vigorous
tree this may be carried out twice in one season, but not
every year.
Gingko
Ginkgo Biloba (a.k.a the Maidenhair tree), together
with Larch, Swamp Cypress and Dawn Redwood is a conifer
that sheds its leaves over winter. Until the 1940's, it was
known only from fossilized leaves and assumed to be

extinct; however living specimens were discovered in China.
The tree is sexual, that is to say a tree is either male or
female.
Ginkgo makes a good Bonsai, but due to its growth
patterns tends to be difficult to style, and hence should be
allowed to take on its own shape. This tends to be that of
the flame of a candle. The tree does not like to be wired and
any changes are best made by pruning to a bud pointing in
the desired direction.
It can in all other respects be treated as any other
bonsai, having no unusual needs as far as feeding or
watering. It will however need winter protection as it has
very soft roots.
The soft, new foliage of the Ginkgo can be pruned by
either pinching out, or with tools. Cuts made into old wood
however, will take a long time to heal over.
Camellia
Camellias are favored for their flowers that appear in
profusion. When cultivated, these trees are probably among
some of the most beautiful bonsai. Camellias require partial
shade and protection from frost. They can tolerate hard
pruning in the winter or after flowering.
Camellias can be styled into Informal upright forms
with single or multiple trunks and Cascades in large and
extra-large sizes.
Cedar Elm
Cedar elms are a wonderful species choice for bonsai
and like most elms, can survive quite a bit of neglect. One
of its desirable features is its rough, fissured bark. Most
specimens are collected from the wild and will invariably
have an aged appearance. The branches ramify easily with
normal pinching of shoots and the leaves are not over large.

This species is a good one for beginners and collecting them
is rather easy as well.
These trees will do well in almost any type of soil.
Their natural environment is rather hot and arid and they do
well to being kept on the dry side of moist. Like most trees,
they use more water in the spring.
They can be kept in full sun to dappled sun. They have
an interesting, if annoying habit when they are getting too
much sun. They will rotate their leaves to be edge-up, so as
to limit the exposure of the leaves to the sun's rays. If they
get too much sun, they tend to go a bit yellow.
Chinese Elm
This type of tree can be both and indoor and outdoor
bonsai. Chinese elm are quite good plants to choose for
beginners at bonsai - with a predictable growth pattern and
being quite forgiving when pruned.
The bark of Chinese elms can be quite interesting,
some varieties with smooth bark and the others with rough,
cork-like bark which cracks and becomes deeply fissured
with age - adding character to the bonsai. Generally, the
smoother bark varieties will be less hardy than those with
rough bark and care should be taken.
Being quite versatile plants, they can be kept in a
position of shade to full sun, but make sure that the plant
receives some shade during the hotter months and does not
dry out.
Dwarf Pomegranate
This type of tree is becoming very popular among
bonsai enthusiasts. This is mostly because of its fruiting and
flowering qualities.
Apart from the pomegranate's stunning seasonal
yellow-orange 'trumpet style' flowers, the dwarf

pomegranate presents so many other notable
characteristics.
It has a marvelous naturally-twisting style trunk that
very easily adopts a gnarled, ancient appearance -
something widely sought in bonsai. Its leaves are a dark
green with shades of bronze and after flowering, the plant
fruits, producing attractive spherical-like red golf-ball sized
pomegranates.
Suited to bonsai styles such as informal upright, forest,
cascade, literati, tree on rock, root over rock, twin trunk,
windswept, group and twisting trunk style, this plant
responds well to hot, sunny conditions, such as that which
would be found in the Mediterranean.
Ficus
Many people have “fake” ficus trees in their house.
These are the larger species. However, a miniature ficus
can make a beautiful bonsai addition to the larger ones.
The Ficus - or rainforest fig is a plant which is highly
suited to bonsai treatment. Figs are mostly tropical plants,
naturally growing wild in south-east Asian jungles. Many
hundreds of species make up this large tree family.
The tiny flowers are completely enclosed in the
developing fruits which are borne in the leaf axils and are
produced each year. You may find that as a bonsai,
however, fruiting is not very common. Figs prefer full sun to
part-shade and humus-rich, moist, but well drained soil and
shelter from cold winds.
Most rainforest figs produce aerial roots from the
branches and trunk. Whether to leave these on or not and
incorporate them into the design is a controversial issue for
bonsai enthusiasts, although it does matter on the overall
design of the tree.

The roots are brittle at first, but strengthen and turn
into a very strong part of the tree once they reach nutrients.
The striking aerial roots of the banyan fig are often featured
in clasped-to-rock styles. The striking aerial roots of the
banyan fig are often featured in clasped-to-rock styles.
Japanese Black Pine
Japanese black pine is the epitome of bonsai. Few trees
can convey the stoic power or the subtle profundity of
bonsai to the degree that a black pine can. Black pine is a
tree that takes many years to achieve the mature look of a
superior specimen bonsai. For this reason, it is important
that those who would choose to grow them be steadfast in
their attentive and uncompromising care of the tree.
Growing black pine for bonsai carries with it a healthy
responsibility to prepare and maintain good material for
future generations to work with.
Black pine is a strong tree that responds well to the
techniques used in the creation of bonsai. Working with
black pine is a balancing act and its growth characteristic is
such that it needs ongoing and careful maintenance in order
to stay in bonsai trim.
Left on its own, a black pine will develop long, leggy
branches that emerge in whorls from a leggy trunk. The
branches will have lollypops of foliage at the branch tips. As
pines are atypically dominant like most trees, the upper
branches will get most of the tree's energy, leaving the
lower branches weaker in comparison. All of these
characteristics run counter to the bonsai aesthetic.
There are, of course, other varieties of trees that would
work well with bonsai, but this list gives you a starting point.
It is important that your trees have certain qualities to make
a good bonsai.

WHAT TO LOOK FOR
In general there are five things that you should look for
in nursery stock.
First, look at the roots and check to see if they give the
appearance of a strong foundation. The roots, at the base of
the trunk, should appear to gently spread out in a radial
pattern (this will be less apparent on junipers) and should
both provide a sense of stability and invite you to follow the
line of the tree, focusing your attention on the trunk. Good
roots invite you to examine the tree from the ground up!
If the roots look good, begin to examine the trunk. The
qualities you are looking for in the trunk depend somewhat
on the style of the tree.
In almost all cases, however, a thick base which tapers
gradually and gently to a thin apex will make for a nice tree.
If you are thinking about a formal upright design, you will
want a very straight trunk, with little or no curvature. If you
are considering other styles, you will want to examine how
the trunk "moves."
Try to find a trunk that curves in interesting or unusual
ways, that has some sense of movement, which invites you
to examine it further. Follow the main trunk line to its
highest point (that will, most likely, be the apex). Does it
suggest a design to you? Does it look tree-like? Can you
begin to see the tree within the plant?
Then look at the branching pattern. While most nursery
stock will not be trained as bonsai, you should be looking for
thick low branches and thinner higher ones. These branches
will form the main structure of your tree. Try to imagine how
the fit with and balance out the movement of the trunk.
At this point, a style should be suggesting itself to you.
Does the tree fit any particular style? Can you see it as a
windswept design, as a cascade? What kind of growth and

shaping will be required in order for the tree to emerge? Do
you see something in that mass of branches, twigs, needles
or leaves that others might not? How can you bring it out?
Finally, examine the plant to make sure it is healthy.
Pull it out of its container and look to see if there are white
fibrous roots (a sign of good health and growth) around the
perimeter of the soil. Are the leaves colorful and vibrant? Is
there new growth? Does the plant look healthy?
As you experiment more and more, signs of growth and
health will become more apparent to you. If you suspect the
tree is unhealthy, pass on it. For your first (or one of your
first) time out, try to pick something that will be able to
withstand the process of pruning, wiring and potting that
you are going to undertake.
Plants chosen for bonsai should have attractive bark,
and the trunk must give the illusion of maturity. The trunk
should have girth, but must remain in proportion to the
entire tree and should taper gradually toward the top of the
tree. Sometimes, one or two of the main branches must be
shortened to emphasize the vertical line of the trunk and
give the trunk a balanced appearance.
To give the appearance of age, the upper one-third of
the root structure of a mature bonsai is often exposed.
Everywhere on the tree, but mostly from the front, the
branches should look balanced and appear to be floating in
space; they should not appear lopsided or top heavy. The
branches should not be opposite one another with their lines
cutting horizontally across the trunk. The branches give the
bonsai dimension and establish the tree's basic form.
A bonsai should have a harmonious arrangement of
branches without unsightly gaps. Flaws can be spotted by
looking down on a bonsai. Upper branches should not
overshadow lower branches.

Not all plants are equally effective as bonsai. To
produce a realistic illusion of a mature tree, all parts of the
ideal bonsai - trunk, branches, twigs, leaves, flowers, fruits,
buds, roots - should be in perfect scale with the size of the
tree.
Plants used for bonsai should have small leaves or
leaves that become small under bonsai culture. Plants with
overly large leaves will look out of proportion if chosen for
bonsai.
Now that you’ve got your tree, what do you do next?
Plant it, of course!
PLANTING YOUR BONSAI
Since bonsai trees are meant to be grown in a
container, you’ll want to select an appropriate one to foster
the growth of your tree.
The bonsai with its container and soil are physically
independent of the earth since its roots are not planted in it.
It is a separate entity, complete in itself, yet part of nature.
This is what is meant by the expression "heaven and earth
in one container".
A bonsai tree should always be positioned off-center in
its container, for not only is asymmetry vital to the visual
effect, but the center point is symbolically where heaven and
earth meet, and nothing should occupy this place.
Another aesthetic principle is the triangular pattern
necessary for visual balance and for expression of the
relationship shared by a universal principle (life-giving
energy or deity), the artist and the tree together. Tradition
holds that three basic virtues are necessary to create a
bonsai: truth, goodness and beauty. These three form the
triangle that represents bonsai.

Since roots must be pruned on plants for bonsai, the
initial containers are different from the traditional containers
used later in the plant's development. The beginning
containers are called training pots.
Just about anything will do that will hold the heavy
roots, but it is a good idea to choose something similar to
the sort of pot the plant will be placed in once the roots are
small and fibrous.
Cascading plants should be trained in deep pots, while
tall specimens that will end up in shallow pots need to begin
in fairly shallow containers. Make sure that the drain holes in
all training pots are at least one half inch in diameter.
Traditional bonsai pots, available from large nurseries
and some import stores, are round, oval, square,
rectangular, and hexagonal. Cascade and semi-cascade
styles of bonsai look good in round or rectangular pots.
You should place the plant in the center of the pot with
the branches sweeping over the sides. Upright trees should
be placed off center (about one third the distance from the
edge) in rectangular or oval pots.
The pot needs to complement the tree and not be very
big - usually the depth of the pot should equal the thickness
of the trunk of the plant - but this law doesn't always have
to be obeyed.
Select a wide and shallow pot to keep the attention on
the planting itself. The wide, flat planting gives the feeling of
calm serenity found in the deep forest. Find a container
whose length is about two-thirds the height of the tree.
If the tree is wider than it is tall, use the width as your
gauge for the pot size. Find a planter with a width two-
thirds the height of the tree and a depth of approximately 1
1/2 times the trunk diameter.

Use colors that complement the tree - a brightly
colored pot for a flowering tree or for a deciduous tree that
has stunning fall leaves or more muted and solemn colors
for a pine or cedar. Look at the bark of your tree. If it has a
rough texture, a bit of texture on the pot itself works well.
Remember that no pot is permanent. Your tree will
require repotting over the course of time to keep it from
becoming root bound. We’ll address re-potting in another
chapter.
After the bonsai has been potted you can now add
moss or other small plants around it to give the impression
of a fully sized tree in nature.
You’ve got your tree, you’ve got its container, now let’s
look at how to prune and shape your bonsai.
PRUNING AND TRIMMING YOUR
BONSAI
A great deal of pruning is often necessary if starting
with a nursery plant. Only excess foliage and undesirable
limbs should be removed. Make all cuts above a bud, a side
branch, or a main fork of the tree. Remove all buds except
those on the outside of the trunk to force growth outward
and upward. Leave stubs flush with the stems. Avoid cutting
back so far that the main branches are weakened.
Do not shear bonsai as you would a hedge; the
objective is to make the plant look like a replica of a mature
tree. Keep branches growing toward open space and away
from each other. Do not prune too zealously; plants must
have sufficient leaves for photosynthesis.
Heavy pruning usually only takes place once in the life
of the bonsai. Once the basic form is established, shaping is
done by nipping or pinching back. This procedure controls

new growth. Nipping is done to shape the plant and to
develop luxurious foliage. Nip off tiny spurs that appear on
the trunk before they are large enough to leave scars when
removed.
Roots must also be trimmed. Try to keep all fibrous
roots and maintain a balance of one branch for one root if at
all possible. Remove any roots that were damaged in
digging. Leave surface roots intact. Prune the roots with
sharp, sloping cuts to avoid damaging them.
Pruning is necessary to maintain the right shape of a
bonsai and encourage new growth. Some plants naturally
respond well to pruning, regardless of how intense, while
other plants can find it hard to recover, especially when
pruned at the wrong time of the year.
To prune correctly you must find out the type of plant
your bonsai is and research when the best times are to
prune old and new season growth. Generally, new growth is
pruned during the growing season to maintain the shape of
the bonsai, while pruning of hard wood (old season growth)
is done in mid-autumn.
One of the main forms of pruning for bonsai, especially
evergreen coniferous bonsai such as junipers and cedars is
'finger pruning'. This involves pinching back new growth
which does not come within the general shape of the bonsai
or is at the top of the bonsai - helping to encourage bushy
foliage and a more tree-like looking bonsai.
To do this, take the growth between your thumb and
forefinger while holding the branch with your other hand and
remove with a twisting movement. This is better than
trimming the growth with scissors. Using scissors leaves an
unnatural look and leaves the foliage an unsightly brown.
For deciduous trees such as maples, the Chinese elm
and cotoneaster, scissor tip pruning is best. When trimming
outward or 'overenthusiastic' growth, trim shoots back to

just after the next series of leaves, but don't cut the foliage
as such.
Leaf pruning (also known as defoliation) in bonsai is
used for several deciduous and tropical plants such as ficus
or maples to reduce leaf size, remove unsightly leaves and
speed-up growth by causing two seasons' growth in one. For
deciduous trees such as maples it also means that their
autumn country is brighter. This is done in mid-summer, by
cutting 60-90% of the leaves off the tree, only leaving a few
to ensure that the tree keeps its energy.
Remove leaves with fine scissors, cutting them from
directly behind the leaf. In the next few weeks make sure
that you keep the plant in a hospitable position and climate
and supply it adequate water. Remember however, that this
form of pruning is only applicable to certain types of plants.
Scaffold branches are selected early on as the only
branches to be allowed to prosper, while the excess
branches are mercilessly pruned off.
Be careful that you really consider which branches need
to go and stay so the plant can keep in balance and be
pleasant to the eye. Try to prune the plant into a tree like
form - or a form that is commonly seen in nature - to keep
with the principles of bonsai.
Trimming and pruning are the means by which a bonsai
is kept miniature. This involves the systematic removal of
vigorous growth in the spring. It is important however, to
understand that for the health of the tree one should never
remove all the new growth at one time. The roots are
trimmed and so is the foliage on the plant.
You do not need to prune your bonsai every day as
many people think. Two or three times a year is enough -
usually at the start of spring, end of summer and sometimes
during late autumn or winter.

When the plant has been pruned to your satisfaction, it
can then be wired.
WIRING THE BONSAI
Wiring is an important part of the process of styling
your bonsai and nearly all well designed bonsai have been
wired at some point in their development. Though at first a
daunting technique to master, it gives the bonsai enthusiast
better control and manipulation of the trunk and branches of
his/her bonsai.
By coiling wire around the limbs of the bonsai, the
enthusiast is able to bend the tree into a desired position
upon which it is held by the wire. In a matter of weeks or
months, the branch or trunk 'learns' and stays in position
even after the wire is removed.
With the use of wire, straight trunks or branches can
be given more realistic movement. Young branches can be
wired into a horizontal or downward position to create the
illusion of maturity. Foliage or branching can be moved to
'fill in' bare areas of the trees silhouette.
Without wiring, the enthusiast would otherwise have to
wait for shoots to grow in the desired direction. With wiring,
existing growth can be manipulated there instead.
You will use the wire to shape your bonsai into the style
that most fits it. As we have addressed before, deciding on
the shape of your bonsai, study the tree carefully and take

into account the natural form of the species. Observe the
way mature trees of the same kind grow in their natural
setting to achieve an impression of age and reality. Decide
on the final shape and size of your bonsai before starting.
Make a rough sketch of what you wish to create, and use it
as a guide.
Aluminum wire is perhaps best to use for beginners.
Copper wire has more holding power but is a bit more
difficult to maneuver. Typically, you will need a wire
thickness a 1/3 that of the trunk or branch you are trying to
bend. The wire you use must be thick enough to bend the
branch effectively and for it to remain in position but thin
enough for the wired branch to be manipulated and for
neatness.
To make the branches flexible before wiring, do not
water the plant the day before you wire it. Begin at the
bottom of the tree when wiring and shaping, and work
upward. Anchor the end of the wire at the base of the tree
by pushing it into the soil. Use foam pads under the wire to
protect the branches.
The process of wiring and bending causes a series of
minute splits and fractures in the layers underneath the bark
of the branch; as the cambium layer repairs and heals this
damage, the new position is 'learnt' by the branch. The
faster the branch is growing the faster it heals, the sooner
the wire can be removed without a return to its original
position.
Where possible the wire should be applied at a 45° to
the direction of the branch that is to be wired. Hold the
beginning of the wire/anchor point firmly with your left hand
at all times; as you coil the wire further down the branch,
you can also move the position that you secure using this
hand. At all times, the wire that has already been applied
should not be able to move while you continue to wire the
remainder of the branch.

With the wire in your right hand, feed the wire through
your thumb and first finger as you make a circling motion
with your wrist around the branch; carefully work down the
branch towards your body.
You can either cut a length of wire approximately 1/3
longer than the branch you are wiring or as I prefer, you can
keep the reel of wire in the palm of your hand and cut to
length when you have reached the tip of the branch. Always
wire from the base of the branch to the very tip.
The last turn of the wire should be at 90° to the
direction of the branch to secure the end of the wire at the
very tip.
On fast growing species it can be worth wiring more
loosely to reduce the risk of the wire cutting into the trunk.
When wiring an entire tree, always start with the trunk, wire
the primary branches and then the secondary branches.
Bend branches slowly and steadily. Listen and watch for
signs of the branch cracking and splitting. If it does, STOP!
The thicker the branch, the more force that will be needed to
bend and the less 'elastic' the wood. The branches of certain
tree species are especially prone to splitting or snapping
whatever their size.
You should learn which tree species have branches that
are likely to snap rather than bend comes with experience.
When wiring an unfamiliar species for the first time, test the
tension of the branch with your finger prior to coiling the
wire.
Some species are virtually impossible to bend to any
real degree without the branches splitting. These can only
be wired when branches are very young and haven't
'hardened off'.

If possible, use your hands as a clamp holding the
outside of the branch with your fingers, push and bend the
branch from the inside of the curve with your thumbs. This
gives firmer control while spreading the force of the bend
around the outside of the branch where it is most likely to
split.
Bending branches at the point where they grow from
the trunk can be hazardous; some species can be prone to
ripping out of the trunk completely. Proceed with care.
Allow the soil of trees to be wired to dry out slightly.
With less water, the tree will be less turgid and more pliable.
Above all, be decisive. When a branch is bent into
position do not keep returning to it and moving it, repeated
bending can cause an unnecessary number of fractures in
the branch, and so weakening it.
Make sharp bends at leaf joints and where secondary
branches grow; this is where tree branches naturally have a
change in direction. Bends made in the internodes don't look
as natural.
Add movement so that secondary/sub branches are on
the outside of the bend, not the inside. On deciduous
species in particular, make sure you add movement to all
straight sections of the branch. Don't just create movement
from left to right; make sure the branch also moves up and
down as well.
If allowed time to recover without any further work
being carried out, all bonsai respond well to wiring. Don't
wire unhealthy or weak trees as it will delay recovery.
Some will advise that when wiring the trunk of a tree,
the start of the coil is anchored into the soil and roots of the
tree. This isn’t necessarily the best technique as the
anchorage is poor and the wire will often move and disturb
the roots as the coil around the upper trunk is made. Unless

movement is absolutely necessary in the first few inches of
the trunk, a good suggestion is to keep the entire coil of
wire above soil level.
When is the best time to wire your tree? That
depends!
WHEN TO WIRE
With the large number of tree species commonly used
for bonsai and the wide variation of climates in which
readers will be wiring, it is impossible to state exactly when
your tree should be wired. There are also pros and cons of
wiring at any particular time of the year with any particular
type of bonsai. Theoretically, most tree species can be wired
at most times of the year though trees wired during the
winter may need frost protection in certain climates.
The only time that wiring can negatively impact the
health of your tree to a large degree is during winter, in
areas where temperatures regularly drop below 15°F. In
temperatures this cold, any fractures that have not healed
will be exposed to the cold and possible future dieback of
the branch.
In warmer climates, the best time to wire deciduous
trees is just as the leaves fall in autumn. With the branches
bare it is much easier to wire and adjust the branches with a
complete view of the tree. The branches should heal all but
the largest cracks or severe bends before the tree becomes
completely dormant for the winter.
Deciduous trees can be wired in spring before the
leaves open but great care must be taken that the new leaf
or flower buds are not dislodged. Deciduous and broadleaf

trees can be wired any time through the growing season but
when in leaf it is more difficult to study the structure of the
tree and wiring around the leaves is more difficult. Branches
wired at this time; particularly new shoots, will heal very
quickly. On fast growing species, keep checking every few
days that the wire is not beginning to dig in.
The second best time to wire deciduous trees is at
midsummer after defoliating the tree. Again with the
branches bare, wiring is clear and easy; the branches should
take to their new positions before the end of autumn.
Coniferous species can be wired at any time from
spring through to autumn. Coniferous species will continue
to heal over winter so they can still be wired in autumn. As
the wire on Coniferous species needs to be on the branches
for a longer period of time; often over winter, frost
protection is needed if temperatures drop below 15°F.
Coniferous species need wiring annually and need at
least one complete wiring of the entire tree for a successful
design. They are best wired (particularly if heavy bends are
to be made) from late midsummer through to early autumn.
By late midsummer, new growth will start to need
wiring and will heal faster than at most other times of the
year. Many species such as Pines will have also made most
of their annual increase in branch thickness by August;
wiring after this time will allow the wire to stay on the tree
until the following year without cutting in and scarring the
bark.
Coniferous species can be wired in the spring and this
growth will set into position relatively quickly but will need
reapplying as the years new growth appears. Any wire still
on the tree by midsummer should be checked regularly to
avoid wire scarring; particularly on Pines that swell suddenly
around this time.

Tropical species can be wired at virtually any time of
the year as they are protected from frost and have little or
no dormant period. The wire can cut in fast due to the
typically vigorous growth of tropical species and must be
checked very often.
The wire should be removed after 6 months. Usually
the branch should then stay in that position on its own. Wire
should be carefully cut from the branches. Do not unwind
wires as this could break the branch. Use your wire cutters
for best results. If you try to unwind, you could conceivably,
snap a branch.
If a branch should snap, the ends can be rejoined if
they are not completely broken. Wind some garden tape
around the break. If a branch snaps off, prune it back at the
first side branch.
After spending so much time making your bonsai look
the way you want it to, you must, of course, take care of it!
WATERING AND FERTILIZING
Watering might seem like an easy technique, but it is
the second most common cause of Bonsai-related problems.
Under watering or allowing the compost to dry out
completely will instantly kill or badly damage most trees;
however over watering can just as equally cause ill-health
and eventual death from root rot and disease.
The most important rule to remember is that trees
should be checked for their water requirement daily but
should only be watered as required. You should never water
to a routine. This can lead to continually sodden compost
which literally suffocates the roots.
The surface of the compost must be starting to dry out
between watering. Then the tree can be thoroughly watered

again. The time between watering can vary from 12 hours to
7 days depending on factors such as prevailing
temperatures, wind and humidity levels.
Because of limited space in the confines of a bonsai
pot, bonsai care can be quite difficult. The shallow
containers limit the expanse of the root system and make
proper watering practically an art in itself.
While some species can handle periods of relative
dryness, others require near-constant moisture. Watering
too frequently or allowing the soil to remain soggy can
promote fungal infections and "root rot".
Sun, heat and wind exposure can quickly dry a bonsai
tree to the point of drought, so the soil moisture should be
monitored daily and water given copiously when needed.
The soil should not be allowed to become "bone dry" even
for brief periods.
The foliage of some plants cultivated for bonsai,
including the common Juniper do not display signs of drying
and damage until long after the damage is done, and may
even appear green and healthy despite having an entirely
dead root system.
When fertilizing bonsai you should do so with a water-
soluble fertilizer once or twice per month during the growing
season. Your choice of fertilizer may vary depending on the
species you've chosen to miniaturize.
Apply fertilizer when the soil is wet and only before and
during active growth. A houseplant fertilizer diluted from one
quarter to one half strength will
suffice.
Another area of bonsai that needs to be addressed by
the beginner is repotting; a very straightforward technique if
carried out correctly and at the right time. Most trees need
to be repotted annually or at very least bi-annually in spring
as the years new growth starts to appear. Trees that are not

repotted will eventually lose their health and vigor.
REPOTTING YOUR BONSAI
Bonsai are generally re-potted and re-pruned every few
years. Re-potting prevents them from being pot-bound and
encourages the growth of new feeder roots allowing the tree
to absorb moisture more efficiently. You will also need to
change the soil to prevent it from becoming stale and
hindering growth.
You can tell that a bonsai needs repotting if water takes
a long time to drain through the soil or if the roots are
crowding around the sides.
To repot, carefully lift the tree out of its current pot by
tilting it to one side and trying to move it by the base of the
trunk. You can not pull too hard on the trunk - so if this does
not work, try tapping the pot with the side of your hand to
loosen the root ball or poke a stick through the drainage
holes and 'push' the root ball out.
Next, using a chopstick, knitting needle, metal hook or
similar, remove any moss or accent plants and carefully try
to brush and untangle the roots. Start at the edge and
gradually work around. Try to 'comb' and 'tug' rather than to
'pull' at the roots - for risk of damaging or tearing some very
important main roots.
After this has been done - continue to shake and brush
off the soil until about one third to half of the original soil
has been removed from the edge and base of the root ball.
It would now be a good idea to spray the roots with
water to ensure that they do not dry out and so that they
will not have too much soil on them when it comes time to
pruning the roots.

To prune the roots, use very sharp cutters. There are
bonsai root pruning scissors commercially available,
however you could just use a normal pair of bonsai clippers.
If you have washed away most loose soil the scissors
will stay sharp, but if they have to cut through soil as well as
the roots - they will become blunt very quickly and require
sharpening.
Start by cutting the thick, old brown roots that have
come close to the edge of the pot and are restricting the
growth of the young 'feeder roots'. Remove a third to a half
of these - being careful that you do not remove too many
feeder roots in the process.
Next, prune the thinner roots which hang below the
depth of the pot by trimming them all into a suitable shape
that the pot will accommodate. This should be a shape that
fits comfortably into the pot with a 1-2 cm (1/2 to 3/4 in)
space between the edges.
The demanding part of the repotting is now over - if
you think that you've cut too many feeder roots off, the tree
will be disadvantaged but you probably will get away with it
- as new roots will grow from the cuts.
Clean the original pot thoroughly or select a new pot
that is more suited to the tree and cover the drainage holes
with simple wire mesh. As the plant will now be unstable in
the new pot as it has nothing to anchor it – you need to
make some anchors to prevent the tree from falling over
from winds or from being moved.
Thread some wire through the drainage holes or
specially designed holes for anchoring and leave for later
use. This wire doesn’t have to be very thick.
Add a thin layer of gravel to aid drainage and then a
layer of soil. Moving the tree around, decide a basic position
for it (usually off-center and slightly to the back of the pot)

and make a small mound that it will sit on. Now you can
place your bonsai on the mound by gently nestling it in and
spreading its roots out evenly throughout on top of the soil.
Once you are happy with the height and position of
your tree (it is going to stay like that for 1-2 years), take the
wires that you threaded and twist them together (usually
with the aid of pliers) over the main root ball of the tree
until it is held firmly (but not too tight) and will not rock.
Because these wires are quite unsightly, you can remove
them in a few months time once the tree has settled in.
Add more soil up to the base of the trunk - which
should be just below the base of the pot. Tap the side of the
pot with your hand to ensure that the soil becomes settled
and that there are no gaps around the roots. Use your
chopstick to incorporate the roots into the soil and to make
sure that they are placed correctly.
Once the soil has been applied, you now have the
option to add supplementary features such as rocks, moss,
accent plants or gravel to enhance the design. When
applying moss - be careful that most of the original soil is
cut off from the bottom before you plant it and that the
moss is not too big or vigorous for the pot or tree.
Now you should thoroughly water the tree - being
aware that the soil level may settle further and that more
soil may have to be added. Place the tree in a position
where it will not receive extremes in temperature (i.e. not
direct sun) and where it will be able to recuperate. Do not
fertilize at this time as this can burn or cause stress to the
plant. You can feed in around a month though, when the
roots have recovered.
Note that in order to balance out the extensive pruning
you have just done on the roots you should prune the
branches of the bonsai as well so that it can recover quicker
and not be disadvantaged further. Root growth usually does
equal branch growth.

Since bonsai is essentially meant to be grown outdoors,
you must pay attention to the care of your tree with the
changing seasons.
SEASONAL CARE
As the seasons change, the bonsai grower must take
into consideration the circumstances and dilemmas that
might affect their plants. Because the trees aren’t in the
ground, you need to do what you have to in order to insure
your bonsai survive the seasons.
Bonsai from forest trees must live outdoors except for
short periods of time when they may be brought inside for
viewing. These indoor periods should only be for two or
three hours and should not occur at all in summer unless the
interior is well ventilated.
In the summer, bonsai need cool nights, sunny days,
and mist or rain almost daily. If your climate does not offer
these conditions naturally, you must supply them. Avoid any
extremes in temperature, light, rain, and wind. Water the
entire plant daily, but do not let them become water logged.
Placing bonsai on a slatted stand in the garden is a
good way to keep drainage conditions optimum. Bonsai
should receive three to five hours of direct sunlight a day,
but the site should be shaded in the afternoon if possible.
In the fall, bonsai must be prepared for the winter.
Slow the growth of the plants by watering less frequently
and discontinuing fertilizer application. Do not prune or cut
any branches after mid-August.
Winter's low temperatures and drying winds can easily
kill bonsai. If the winter temperature drops below 28F,
bonsai must be protected by a greenhouse, pit, or cold

frame. A cold frame is basically a box that houses your
bonsai through the winter months.
If you put them in a cold frame, don't forget to water
them while inside. Winter watering may be only necessary
every other day. More bonsai are killed by over watering
than by desiccation.
In the spring, start new bonsai, prune the old ones, and
continue training measures. The remaining part of the
growing season is used for the plants' adjustments to these
practices.
In general, bonsai are fine being outside in
temperatures above 15F. Below this point, some kind of
protection from freezing is needed. You can bring them
inside, but this could jeopardize the plant’s health. In
extreme circumstances, this may be your only option.
Just remember that woody plants must go through a
period of cold dormancy to survive. If you do not give them
this time, they will die.
Dormancy is a survival strategy that temperate climate
species have evolved to stay alive over the winter. These
species have a biological clock that tells them to slow
activity and prepare soft tissues for an onslaught of freezing
temperatures. Species that have well developed dormancy
needs cannot be tricked out of them.
You can try placing a tarp or plastic film over your
bonsai in cold temperatures. Do this at night and remove it
during the day.
Some people advocate wintering bonsai in the ground
since the ground temperature will not get as cold as the air
above it.
Experts feel the best way to accomplish that is to bury
the root balls, still in their pots, in the ground up to the rim
of the pot, and to cover the pots with a mulch of dead

leaves. If you live in an area of abundant snowfall and a
reasonably consistent snow cover, you may do without the
mulch and rely on the snow for insulation.
Wintering bonsai in the ground has the advantage that
they will come out of dormancy in step with outside
conditions. That is often not the case with some of the other
wintering methods, such as unheated garages or sheds, cold
frames dug into the ground, window wells or cold rooms in
basements.
While these methods are very convenient – no digging
in, no mulching and no digging out – the facilities tend to
warm up quickly in spring, and since resumption of growth is
determined solely by warmer temperatures, the trees will
start to grow and require light when outside conditions are
not yet ideal.
Regardless of which method is used, the root balls
should be well moistened before the trees are put away, and
they should be checked regularly – say weekly – to make
sure that they are not about to dry out. If so, the trees need
to be watered. Also, the wintering spot should ideally be in
shade for most of the day, and preferred positions to face
would be either north or east.
It is important to note, that the trees will not be able to
withstand the warmer temperature once they have begun to
grow. Just as trees became gradually ever more frost
resistant in fall, they will get progressively less frost
resistant in spring.
The closed buds, although swollen, will still be able to
survive short periods of mild frosts, but once the buds have
opened and the young leaves start to unfold, frost can cause
serious damage, and trees should be returned to frost-free
shelter when it threatens.
Also remember that full-size trees lose their leaves in
the winter. Your bonsai is a miniature version of a full-size

tree and it, too, will lose its leaves. This is fine and normal.
They will grow back!
You’ve spent such time on grooming and growing your
bonsai, you will, of course, want to show it off! What’s the
best way to display your trees?
DISPLAYING YOUR TREE
When you have finished working on your tree, you will
want to find a nice place to display it for all to see. The way
your bonsai are displayed is as important as their pots, the
types of trees and the styles of the trees. The exact secret
for adding to their beauty by the setting they live in is just
as elusive as the art of bonsai itself.
Ideally, your bonsai should be positioned so that the
front faces forward and the tree is roughly eye level. Trees
should never be placed directly on the ground.
As your collection grows, you will want to create a
display stand of some sort. You may choose to display
bonsai alone on a single stand or together on a larger bench.
Most important, you should make sure that the tree is
positioned so that it either gets the light it needs or is
sheltered from the sun if it requires shade.
Remember that simplicity is very important in Japanese
aesthetics and bonsai should be displayed in an uncluttered
environment where the details of the plant can be
appreciated. This is, after all, a wonder of nature -- trees
and shrubs made miniature.
Gravel beds in the garden are good backgrounds for
bonsai outdoors, and a simple stand or table before a blank
wall makes an appropriate setting indoors.

Try your bonsai in different locations around your
house - both indoors and out if the weather and space
permit. A single display on a window ledge or the sunny spot
on a bookshelf may be just the thing to give specific rooms
elegance and a personal, lived-in touch.
Put a redwood or bamboo shelf unit in a quiet,
reflective room that offers light and air for a grouped display
of all your creations that can create an indoor-garden effect.
Turn the entry hall of your home into a formal walk-
through of bonsai that gives a warm and yet highly stylized
feel to set the tone for the whole house.
Make a patio or deck into a nature-viewing area that
provides guests and family hours of pleasure and quiet
serenity. Railings, benches and plant stands can be used to
show off your works of living art.
Display the bonsai on all types of stands or focal points.
The same rules that apply to pot textures, materials and
colors also apply to possible plant stands ' wood, metal,
stone and any combination could work in different settings
and with the right bonsai.
Remember that bonsai are a product of the artist and
the statement you choose to make is uniquely your own just
as with paints or clay or any artistic medium. Switch your
bonsai positions often to change the look and feel of the
space they occupy.
There are a few additional points to keep in mind when
growing bonsai.
THE REST OF THE STORY

Bonsai is not an art of perfection. It is an art of scope
and personal preference. You will make mistakes. This is
normal and occurs even with bonsai masters.
You will kill trees. This is a sad fact of the activity,
especially as you start out. You are dealing with living
things, and you must be respectful of that. Commit yourself
to understanding why every tree dies and what can be done
to prevent it. Learn from your mistakes and do your best to
prevent them in the future.
Perhaps most importantly, understand that when you
put a tree in a pot you are committing yourself to the care of
that tree. You cannot simply ignore it or it will die. Bonsai is
a responsibility as well as a hobby. If you practice it with
care and patience, he rewards are tremendous.
Almost nothing in bonsai is immediate. Expect your
trees to develop over years, even decades. It may be ten
years or longer before your plant will actually be a "bonsai."
Don't be discouraged by this, but think of it as part of the
experience.
Don't fiddle! The temptation for beginners is to
continually fiddle with their tree(s), cutting bits off here and
there, continually watering, misting, moving them around
etc. Checking daily for water requirements and health
problems is necessary, but otherwise leave the tree to grow
and simply enjoy looking at it!
Pruning back to shape is necessary but don't
continually jump onto every out of place leaf. In order to
keep the tree healthy and vigorous it needs to be able to
grow freely at times.
It is also important to remember timing is very
important, don't carry out jobs such as repotting or major
restyling at the wrong time of the year as this can lead to
poor health in the tree and lack of vigor. A tree repotted at

the wrong time of year for instance may survive if you are
lucky, it may even grow a bit, but, it will very rarely reward
you with vigor.
It is particularly important not to stress the tree by
doing several operations at the same time. Let the tree rest
between for example wiring and replanting. Just as a
human being needs time to recuperate from surgery, a
bonsai tree needs the same treatment.
Plants are living things, and they need full recovery
from one operation, before the next step is taken. A rule of
thumb is to wait one too three months after a transplanting
before you start working on the tree or until you see clear
signs of vigorous growth.
Although bonsai is a very delicate and precise hobby in
many aspects, usually the plants are very forgiving - so
don't be afraid to prune. Also be careful not to leave the wire
on too long so that it cuts into the bark.
Put away any preconceived ideas that bonsai is too
hard to learn, too costly or too time-consuming. It's none of
these. In fact, it's fun, relaxing and beautiful. Remember
that bonsai is an art form - one that uses living plants as its
raw material.
Overall, bonsai trees are quite personalized and there
are no strict rules to abide by if you undertake it merely as a
hobby which to gain enjoyment out of. It does not have to
be an expensive commitment, but it is a commitment that
requires a great amount of time, patience, skill and
endurance.
Although things may not always go to plan, don't give
up. Remember that the Japanese bonsai masters were once
beginners too and they have surely had their share of trial
and error.

CONCLUSION
Though the art of bonsai can be very daunting to
newcomers when they first start out, in reality it is as simple
as you make it. There are many species and varieties of
trees available to grow; many new techniques that can be
learned to improve bonsai appearance and a seemingly
unfathomable quantity of do's and don'ts. The most
important aspect as a beginner is to learn how to simply
maintain the shape of your tree and keep it alive.
Learn to look after your first tree successfully and your
confidence grows enough to widen your horizons and
successfully learn more advanced techniques such as
reselling and creating bonsai. But don't run before you walk.
The first fundamental rules to learn when embarking on this
art is that you are dealing
with something living and ever-
changing; the basic rules of horticulture need be learned
before you can successfully maintain your tree.
There are many bonsai techniques available for the
bonsai enthusiast to use to reach the ultimate goal of a
beautiful tree. Confusingly, information available on the
many bonsai websites and books can often be contradictory.
It should be understood that for every objective such as
repotting, pruning or styling there are a 100 different
techniques or viewpoints.
Some are based on horticultural fact, some are based
on horticultural myth and some are based on horticultural
luck! In fact many of these techniques will work to one
degree or another. Unfortunately though not killing your
tree, some advice and/or techniques can result in diminished
vigor as your trees cope under stress. Sound advice based
on simple horticultural fact can only improve the health,
appearance and vigor of your tree. It is for you to learn

which techniques work for you and your tree in your given
situation.
Just don’t get in a hurry. They say that Rome wasn’t
built in a day. Bonsai aren’t grown in a short time either.
Bonsai certainly takes time, but the rewards are great.
Once it grows and is shaped to your liking, you will have
formed something that is all your own. It will be something
to be proud of – something to display – something to take
credit for.
In the movie “The Karate Kid”, Mr. Miyagi would tell
Daniel that he should have patience while learning the fine
points of karate. Miyagi demonstrated this concept best
with his bonsai. He spent 5 years cultivating one tree –
perhaps the ultimate display of patience. As a beginning
bonsai artist, this should be your cardinal rule. Be patient
and let nature work the magic.
Some people feel they are just not capable of growing a
world-class bonsai. That’s alright, you don’t have to! But if
you grow a bonsai tree that is beautiful to you, you can
ultimately be rewarded if someone else sees the same
beauty you do!
Don’t get frustrated; don’t feel you have to be held to
steadfast rules. Just grow your tree, spend time crafting
your masterpiece, and enjoy the results – along with
everyone else!

The following websites were used in researching this book:
Wyszukiwarka
Podobne podstrony:
(gardening) Pruning Landscape Trees, Shrubs and Groundcoversid 1326
Pruning Trees and Shrubs
Pruning Trees and Shrubs
M 5009 Jacket with shawl collar and decorative trimming
Evergreen Trees and Shrubs
J D Harding On Drawing Trees and Nature
L 5009 Jacket with shawl collar and decorative trimming
Deciduous Trees and Shrubs
J D Harding On Drawing Trees and Nature
The Trees, A brave and startling truth
I van Baalen Male And Female Language Growing Together
the value of trees, water and open space (Netherlands)
(Gardening) Mulching Your Trees And Landscapes
Calendar of Backyard Gardening Operations for Selected Temperate Fruit and Nut Trees
Deciduous Trees and Shrubs
Evergreen Trees and Shrubs
Morphometric and biochemical screening of old mulberry trees pl
A Robbins Jay Abraham How To Get Any Business Going and Growing
więcej podobnych podstron