
A Field Guide to the Excavation of Inhumated
Human Remains
January 2005
OSSAFreelance 2005

Field Guide to the Excavation of Inhumated Human Remains
1
Field Guide to the Excavation of Inhumated Human Remains
Introduction
The purpose of this guide is to act as a brief overview of issues relating to the
recovery and recording of inhumated human remains for field archaeologists.
Hopefully, it will provide an insight for those who may be less experienced in
handling human remains into why we excavate them, what information an
osteoarchaeologist hopes to gain from them, how to go about excavating
human skeletal remains and what to look out for during the process of their
recovery. This guide also aims to provide a few pointers to maximise the
potential information retrieved.
Aims of Excavating Inhumated Remains: the Osteoarchaeological
Perspective
Before tackling the issues of how to excavate and recover human remains, we
need to cover the main reasons for digging up human bones and what an
osteoarchaeologist aims to get from analysing the remains. An
osteoarchaeologist studies the remains of past populations for several
reasons; to study the diseases of past populations and to understand how
well they have adapted to their environment in terms of morbidity, to analyse
age and sex profiles of populations to see how demographic profiles have
changed over the centuries to try and understand patterns of mortality or to
assess how funerary customs and social attitudes to death have changed
through time. There may also be studies regarding more specific areas such
as dietary practices from chemical analyses of teeth, the recording of
estimated stature and bone development to understand if people grew and
matured differently in the past or the recording of a particular disease to see
how its prevalence rates differ between male and females or over time.
In order to carry out this level of analysis, the basic information about each
individual skeleton recovered needs to be recorded. The more bones that are
recovered intact, the more information can be recorded and, therefore, the
more detailed and complete later analytical studies can be. The basic
information that is recorded by the osteoarchaeologist at the first stage of
post-excavation analysis is an inventory of all the bones and teeth that are
present and the state of their preservation, the age and sex of the individual,
their estimated stature, the presence of non-metric (possibly genetic) traits in
the bones and also any pathological changes present in the bones and teeth.
An accurate assessment of age and sex of adult skeletal remains depends on
good preservation and recovery of the skull and pelvis. These are the areas
of the body that show the greatest degree of sexual dimorphism. The pelvis
provides the surfaces that indicate the age of an adult individual (the auricular
surface where the pelvic bones join the sacrum at the bottom of the spine and
the pubic symphysis, where the pelvic bones meet at the front). The wear of
tooth surfaces can also be recorded to provide an estimate of age. Care
should be taken in the recovery of these elements, especially the pubic
symphysis, which is prone to damage being located at the front of the body,
thereby being one of the most protruding parts of the skeleton from the bottom
Field Guide to the Excavation of Inhumated Human Remains
2
of the grave (if the body has been placed on its back, of course!). To age
juvenile remains, the osteoarchaeologist analyses dental development and
takes measurements of the long bones. This means that long bones need to
be recovered in one piece if possible. This is also true of adult long bones,
since these are measured to provide stature estimations. A detailed recording
of non-metric traits and pathological changes requires as many bones to be
recovered as possible. This is especially true of recording and diagnosing
pathology – diagnosis of diseases is made upon observation of the
distribution of pathological lesions around the body. So if a part of the body is
missing or damaged it may be impossible make a specific diagnosis.
To make a good recovery of human skeletal remains, they need to be
excavated thoroughly and lifted appropriately. In order to do this you need to
consider the likely position of the bones in the ground and also to know what
bones a skeleton consists of and how to excavate and lift them.
The Burial
Disposal of the dead has varied tremendously throughout history in Britain.
From rather grand prehistoric barrows to secreted deposition in wells, from
intentional interment in crypts with coffin furniture, interment of babies under
floors and in post-holes; from single burials, mass graves, isolated interments,
planned burial grounds, to the collection of bones in ossuaries, human bone
can be found almost anywhere at anytime! Whilst the location of medieval and
post-medieval burial sites may be known from recorded sources, burials from
earlier periods may only be found by chance from archaeological evaluations
or during excavation. It is, therefore, of paramount importance that any human
bones found and the context from which they came are recorded and
excavated as fully as possible. Obviously, the interpretation as to the nature of
the human remains and their funerary context can only be as accurate as the
information provided by the excavator.
Prior to the Burial Act of 1847
(enforcing a minimum depth of 30” of
soil to be placed between the coffin lid
and the ground surface), burials often
appear to be shallower. The original
ground level associated with the burials
may simply have been truncated by
later activity or the graves may not
have been dug so deep in the first
place. This seems to be particularly the
case with rural burials due to the
erosion of ground levels through the
action of ploughing and general
exposure to the elements, although, of
course, this is not true in all cases.
Field Guide to the Excavation of Inhumated Human Remains
3
Rural contexts may contain
isolated or small clusters of burials, especially
from the late Iron Age and Roman periods, as well as larger burial grounds,
such as Anglo-Saxon cemeteries. In the case of an isolated burial, it may
difficult to identify what the feature is until it is fully excavated, so care should
be taken with all unidentified features. Some clues may exist: burials of this
nature tend to be subrectangular in shape, located outside the main focus of
domestic activity and may be aligned on a north-south or east-west axis.
Small clusters of burials may be located in enclosures within field systems.
However, it is not uncommon to find burials inserted into features initially dug
or made for other purposes, especially during the Iron Age and Romano-
British Periods. For example, bodies have been deposited in ditches, graves
have been cut into banks and the remains of neonates have been found
under floor layers and in postholes. In these cases, the location of skeletal
remains may, on first impressions, appear to be random and can, therefore,
be unpredictable.
Some burials also have been found to contain individuals whose heads have
been removed from their bodies – not infrequently skeletons dating to the
Roman period, for example, have been found with the skull placed between
the legs. Often, bones aren’t quite where you were expecting them to be!
Many burials are found with grave goods, which require careful excavation as
they may be very fragile. Also, the recording of the location of these goods in
relation to the grave cut and the body is important. Some of the grave goods
may contain articulated animal bones, possibly representing the remnants of
food offerings given to the dead. The position of these should also be
recorded carefully to distinguish them from other animal bones that are
unintentionally included or intrusive in the grave back-fill. If you are unfamiliar
with animal and human bone and are not confident about differentiating
between the two, either ask your on-site osteoarchaeologist to help or record
and recover any bone you suspect may be useful for interpretation of the
feature, as you would do normally. As long as the location of bones are
recorded properly, post-excavation analysis should clarify the information
presented.
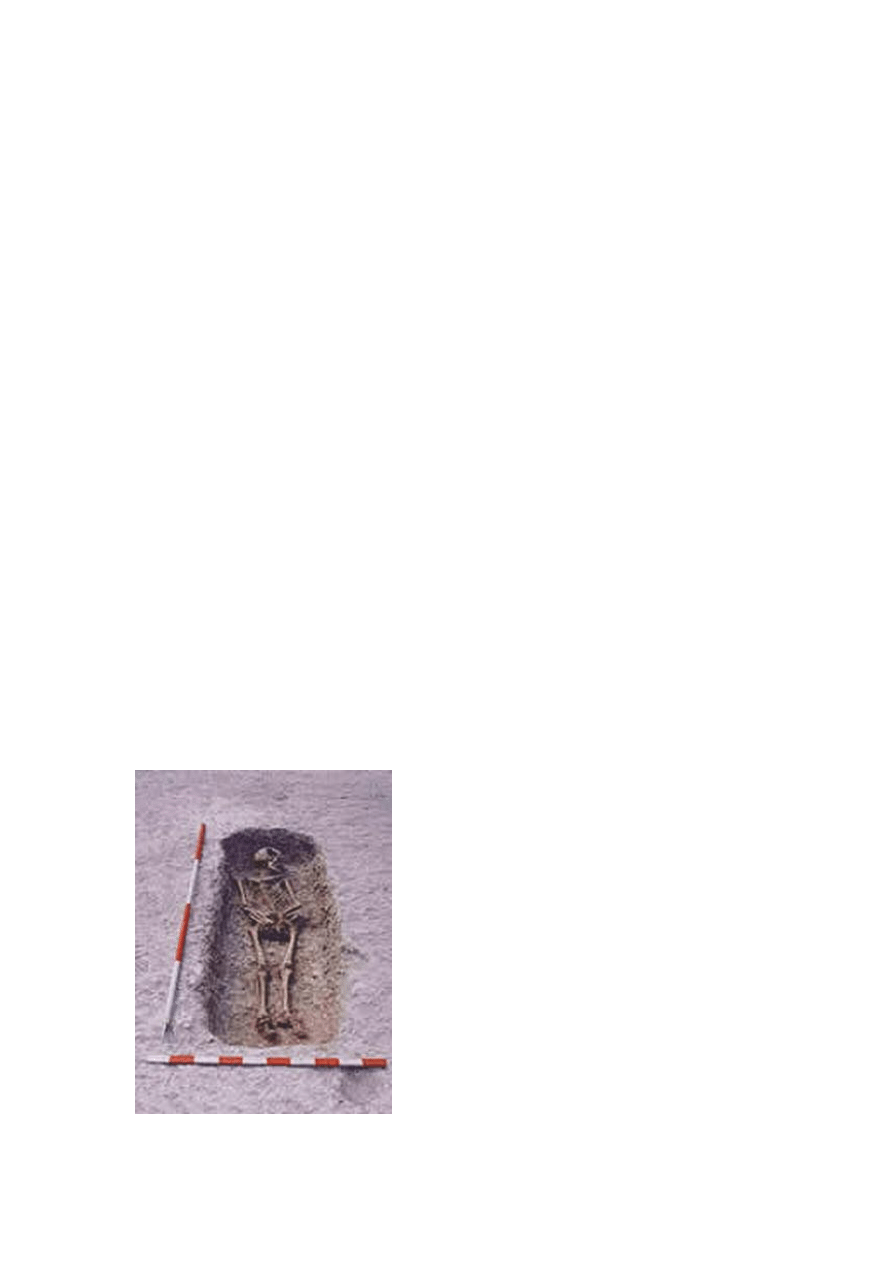
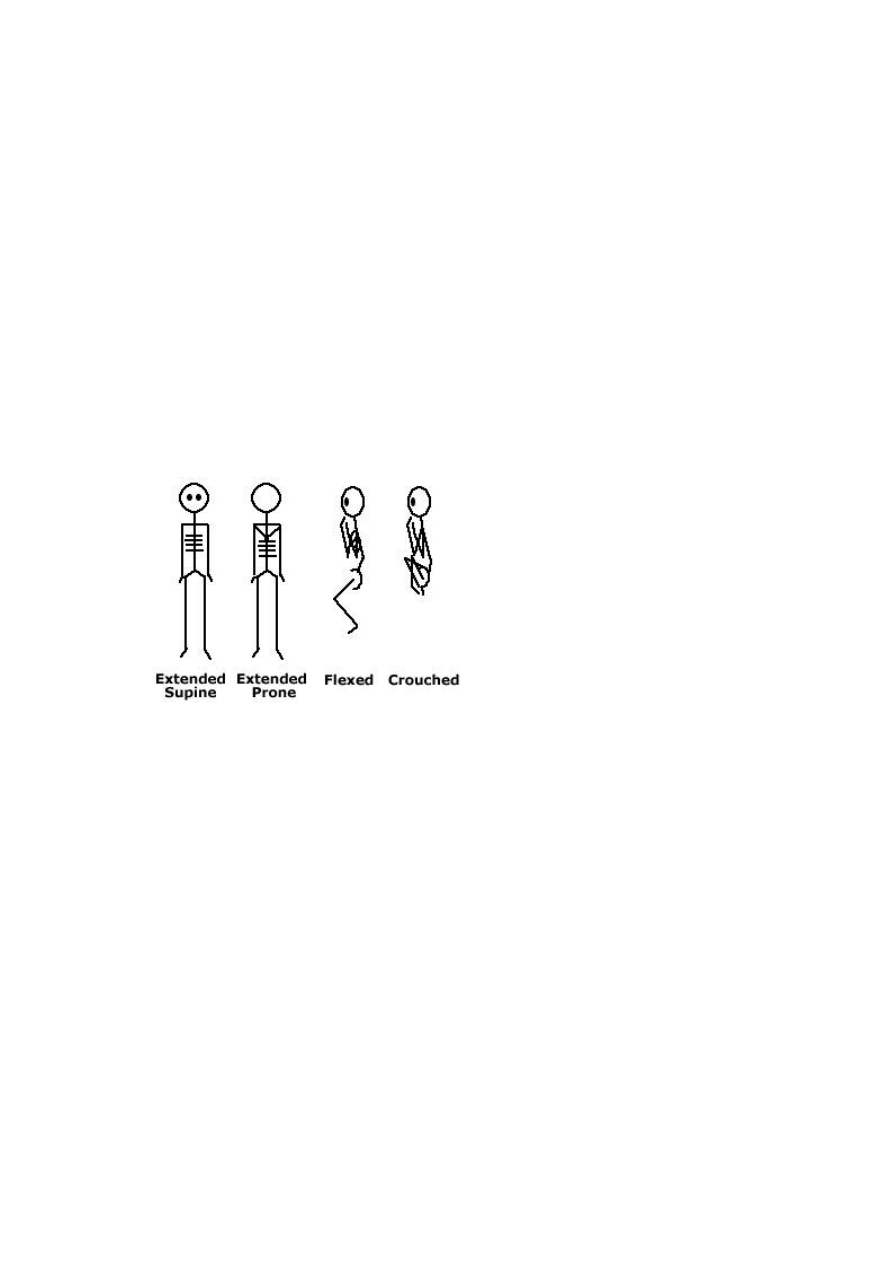
Human remains from rural
contexts tend to be deposited in a
variety of positions – bodies may
have been placed in an extended
position in the ground. They may
also have been placed on their
side in a flexed or even in a very
tightly crouched position. Most
bodies are found to lying on their
backs, or supine, whereas some
are lying on their front, or in a
prone position.
Field Guide to the Excavation of Inhumated Human Remains
4
The location of human remains within the grave is also important to note,
especially in the context of co-mingled remains in prehistoric tombs, where
remains may have been removed and relocated for ritual purposes. It may
also shed light on post-depositional natural site formation processes.
Burials in urban contexts may be found to be deeper and are likely to be part
of complex stratigraphic relationships. There is a much higher chance of these
types of burials having been truncated by other features as well as later
graves. Burial activity in urban centres generally appears to have been
intense at designated sites, such as around parish churches or public
institutions like hospitals until the creation of out of town, large-scale
cemeteries like Sheffield General Cemetery from the 1830’s onwards. In this
case, there is likely to be a high amount of disarticulated human remains
resulting from the disturbance of earlier graves by later ones. Excavators will
need to be able to distinguish between the disarticulated and articulated
remains for the purposes of osteoarchaeological analysis – it is important that
bones referred to by one context number belong to the one and same person.
This is especially true of the excavation of mass graves.
Preservation conditions on sites and between graves on the same site vary a
great deal. Some burials may have occurred in soils that leave no trace of the
bones at all; for example, some sands and boulder clays are very acidic and
this may dissolve the bones completely. However, careful excavation is still
required; firstly, to recover grave goods that may have survived and secondly,
a silhouette of the body may be observable in the form of a “shadow” in the
soil. This silhouette, occurring as a dark stain in the soil, may even be
excavated as a positive feature; that is as if the body itself were present and
the soil form around it is being removed. This proves that the burial actually
contained a body and signifies that the grave is not acting as a cenotaph (a
memorial to the deceased whose body isn’t present) and, therefore, provides
a more informed insight into funerary practices. It may also demonstrate the
position of the body in the grave. If the feature under excavation is isolated,
the presence of an well-defined body stain would indicate that the feature was
certainly a grave rather than, for example, a pit.
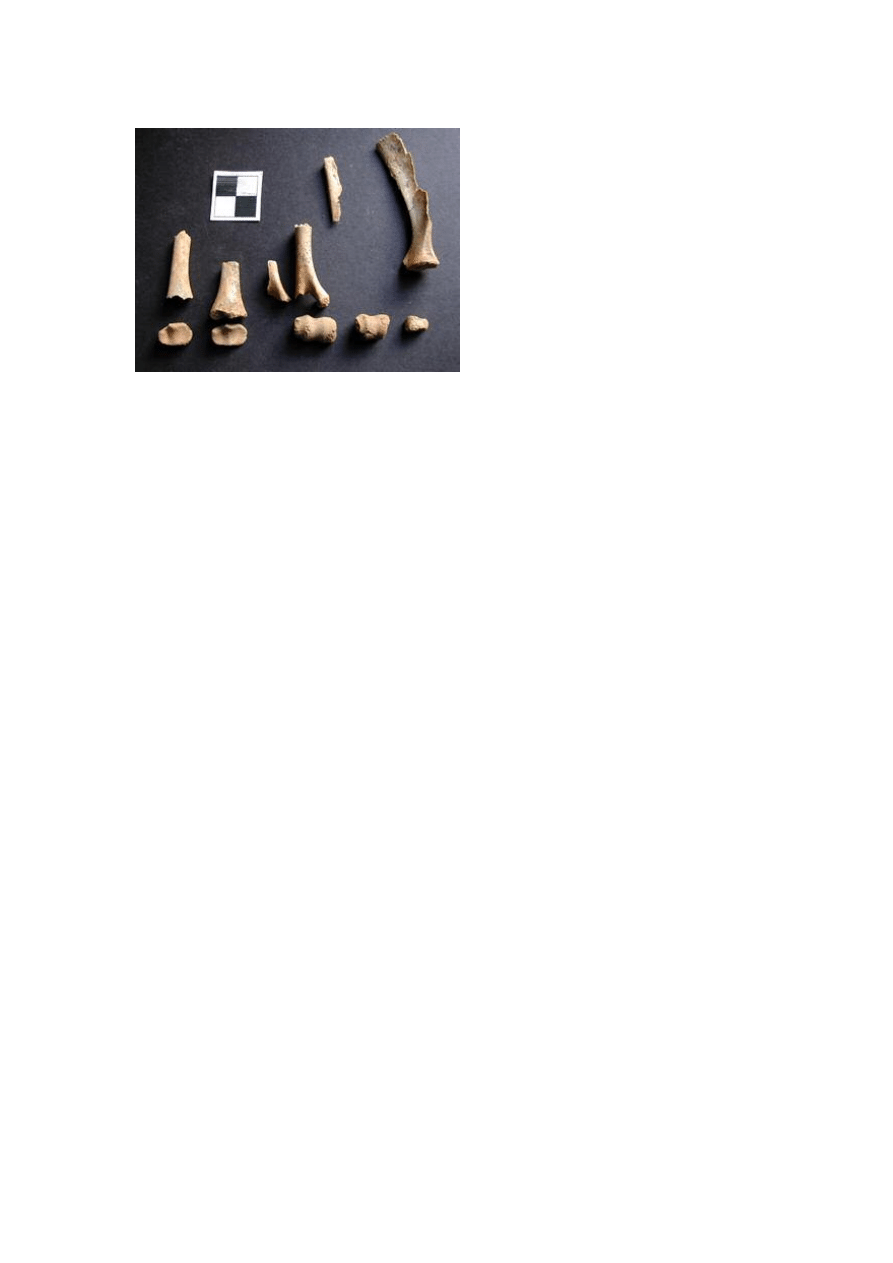
These animal bones were found
in a Roman grave. The recovery
of the bones and the epiphyses,
as well as the recording of their
position in the ground, allowed
an informed interpretation to be
made about the finds. It is
thought that these articulated
remains of neonate sheep were
deliberately placed above the
body (possibly on top of a coffin)
as a food offering.

Field Guide to the Excavation of Inhumated Human Remains
5
On the whole, the state of preservation of human bone is dependant upon a
number of factors (such as soil acidity, hydrolysis, integrity of the grave, age
and sex of the individual, animal activity etc) and since this can vary across a
site it is not easy to predict how well bone will be preserved. Generally, it can
be said that a more alkaline, free draining soil with little post-depositional
activity will result in good bone preservation, though it should be noted that
complete submersion of bone in water may also preserve bone well.
Crypt burials or later burials, especially in lead or solid wood coffins may also
result in soft tissue preservation. This may include hair, fingernails and skin.
These must be treated with caution for health and safety reasons. Precautions
you need to take should be explained to you by your Site Safety Officer. It is
usually only the presence of soft tissue that causes any health and safety
issues. Again, careful excavation of associated grave goods, contextual
recording of grave structures, coffin furniture and recovery of fragile materials
such as textiles and organic items is required.
The Skeleton: so where do I start?
If you suspect that the feature you are about to excavate contains human
remains, you need to consider the contextual information you need to recover
from the grave. For example, if you think that you may well be excavating a
prehistoric barrow, will it be worth putting a section through the grave mound
(if there’s one remaining) or fill to reveal how the mound was built over the
grave? For example, a linear patchwork of turves that have been cut and
placed on top of the grave to form the mound may show up particularly well in
section but not in plan.
It is generally common practice, however, to excavate the whole of the grave
in plan, following the underlying assumption that the back-fill of the grave
occurred as one event. It may be that different fills are found within the grave,
where the original grave has been dug through different strata of soils.
Caution must be taken not to undercut the grave; if the grave was cut through
a layer of silt and the underlying natural, and subsequently the grave was
backfilled with the natural and then the silt on top, the natural would end up
being redeposited at the bottom of the grave and this would be the matrix
surrounding the skeleton. If the redeposited natural is not recognised for what
it is, the grave may be undercut and the skeleton not retrieved. The grave cut
itself may not even be easily distinguishable due to the speedy redepositing of
soil that is the same as the soil into which the grave was cut. In this type of
scenario, if burials are suspected to exist, the area should be stripped back in
shallow spits until bones are exposed. Boxing out test pits of the burial site to
see if anything is there is more likely to result in loss of information, especially
if the bone is not well preserved and the weather is inclement!
Happily, in many cases the grave cut can be detected in plan. So which end
do you start? What tools do you use? Well, take a rational approach. Use
tools that are appropriate for the likely depth of burial and state of bone
preservation as you would on any other feature containing fragile objects.
Generally, it’s a good idea to start at the head end of the grave – so if the
Field Guide to the Excavation of Inhumated Human Remains
6
grave is aligned east-west, the head should be at the west end of the grave
and if the grave is north-south aligned then the head is likely to be at the north
end. Remove the grave fill in spits from this end.
Caution must be taken in removal of the backfill to expose the skull. Where
the body has been place in an extended position, the cranium is the part of
the body that projects out furthest from the bottom of the grave. The cranium
also happens to be one of the most informative parts of the body for
estimating the sex of the individual as well as their age from the teeth. Some
pathological changes that are used to diagnose certain pathologies occur in
the cranium, on the skull vault, around the eyes, nose and mouth. A whole
cranium also allows the osteoarchaeologist to take measurements of it and to
look for any pathological patterns of asymmetrical development. All to often,
especially on commercially run sites, crania are broken and parts are even
lost from using mattocks in the rush to excavate remains. So immediately
analytical data is lost also. Also be aware that whilst working you’re actually
walking up and down on the rest of the body, which contains the particularly
fragile rib bones so it may be appropriate in more silty or sandy soils to work
form a plank or board placed across the grave cut.
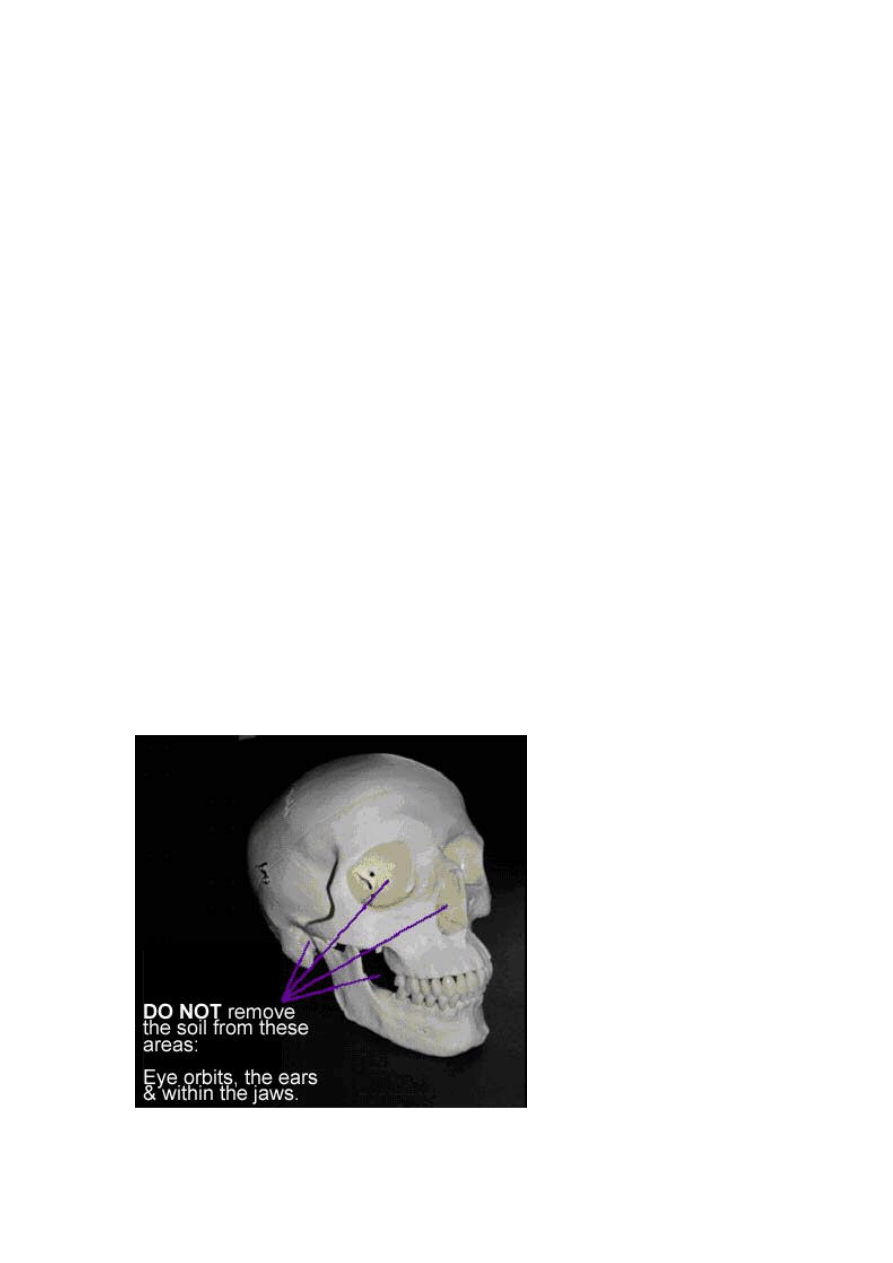
DO NOT excavate soil from within
•
the eye orbits
•
the nasal aperture (nose)
•
the auditory meatus (ear)
•
the mandible (lower jaw) – leave a flat section across one side of the
jaw bone to the other.
•
any holes that occur in any of the bones that may be the result of
disease
The eye sockets contain
delicate bones that are
easily damaged and,
therefore, you should not
attempt to remove soil from
within them. The soil from
within mandible, likewise,
should not be removed as
there are small bones and
potentially pieces of
ossified cartilage contained
within this area that are
easy to miss and/or
damage. Also the ear
contains three very small
and fragile bones and
should be left with the soil
in.
Field Guide to the Excavation of Inhumated Human Remains
7
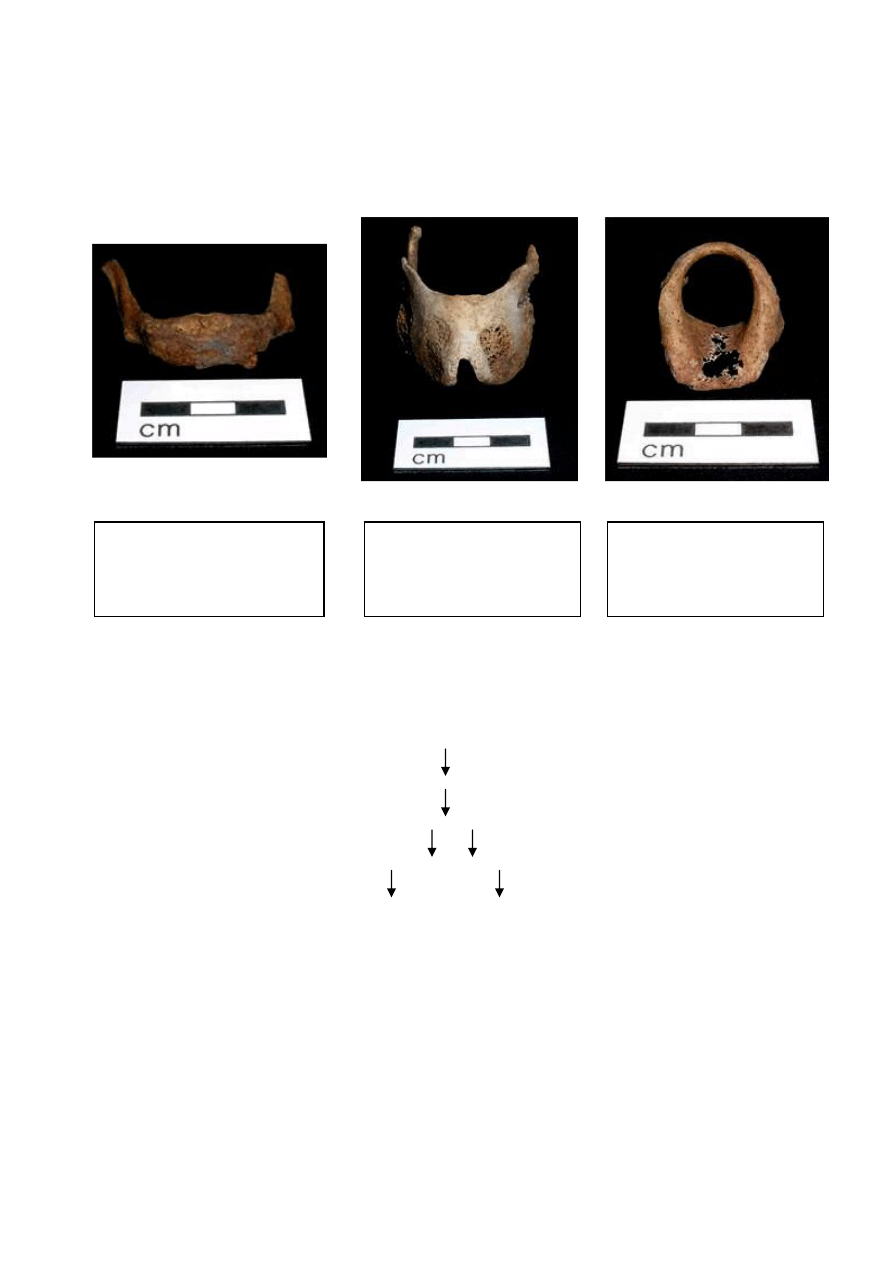
Below are some examples of the bones you might find in the jaw area:
Once you have exposed the skull, you can work your way down the remains
using a plasterer’s leaf trowel in sequential order of body areas i.e.
Skull
Neck
Torso
Arms and Legs
Hands and Feet.
This, of course, may be easier said than done depending on the position of
the body in the grave but it helps to follow a logical sequence of which bones
articulate (or are joined) with which, demonstrated in the diagram below:
Hyoid Bone: Present in all
people, contained within the
jaw area in the throat.
Crickoid cartilage: Present
in a few people, contained
in the jaw area – very
fragile ossified cartilage
Thyroid Cartilage: Present
in some people, contained
in the jaw area – very
fragile ossified cartilage
Field Guide to the Excavation of Inhumated Human Remains
8
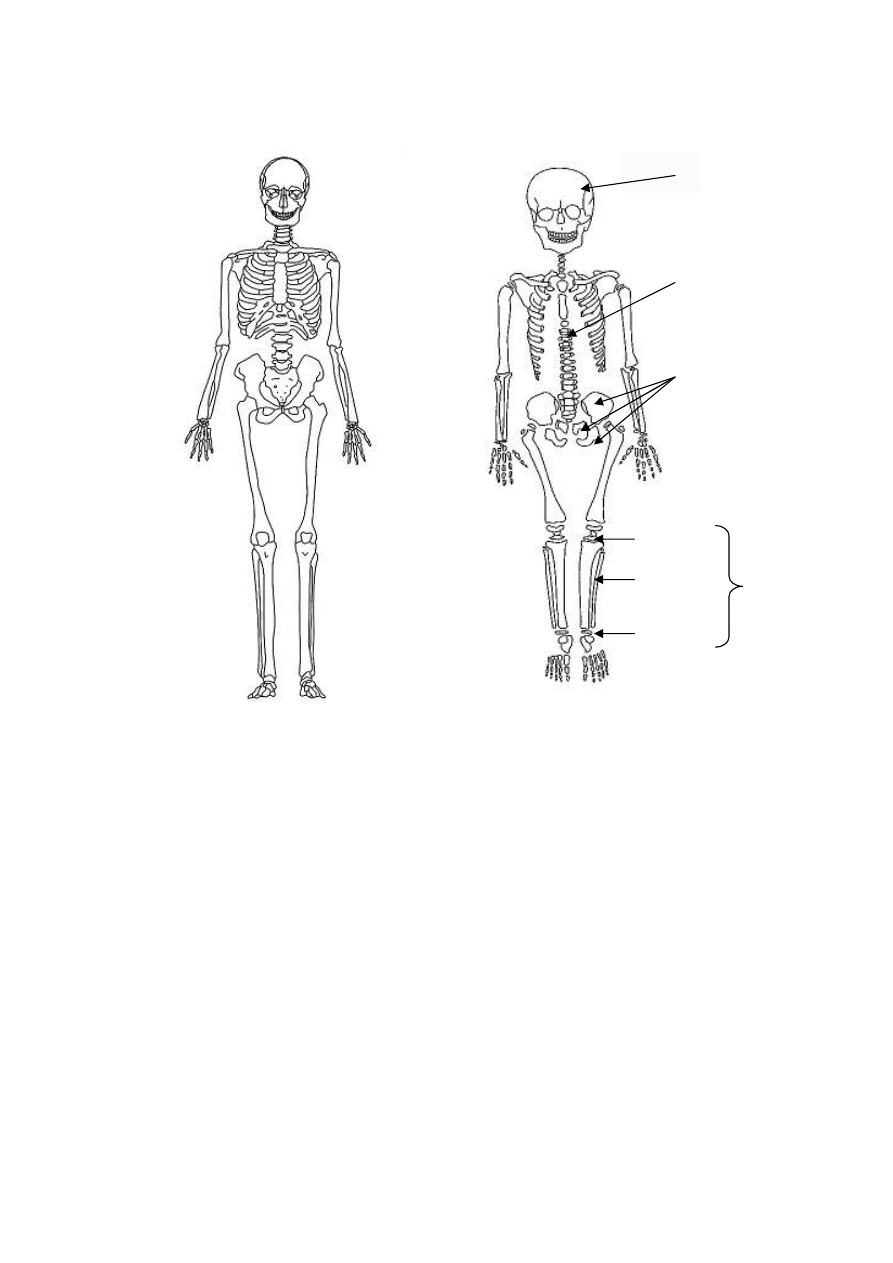
Note that the bones of juvenile skeletons are not fused as they are not fully
developed. The long bones come in three parts – two ends (epipyses) and the
main shaft or diaphysis. There may also be additional smaller epiphyses that
attach around the end of the bones. Extra care should be taken when
excavating juveniles as these extra bones are susceptible to post-depositional
movement. Some bones may resemble small stones and may be difficult to
identify, especially in infants and neonates. When excavating the remains of
young individuals, it is a good idea to retain all the soil from around and
underneath the skeleton as a sample to be processed later for retrieval of
smaller bones. Neonates should be block lifted.
At this stage, if excavating an adult or older juvenile, you should remove as
much soil as is required to reveal to extent of the bones (and associated finds)
and their position in the ground so that can be clearly seen for recording and
photographing. Be careful not to remove so much fill that the bones move
from their original position or to scrape the bone surface with your trowel – if
soil conditions allow it use a brush to remove the soil from the bone surface.
Juvenile Skeleton – note
unfused long bones and pelvis
Epiphysis
Diaphysis
Epiphysis
Adult Skeleton in
anatomical position
Juvenile
Long Bone
Unfused Ilium,
Pubis and
Ischium form the
juvenile pelvis
Vertebral
arches and
bodies may
not be fused
Skull may not
be fused
together
Field Guide to the Excavation of Inhumated Human Remains
9
Care also needs to be taken when excavating hands and feet as these
contain small bones that are easily disturbed through post-depositional activity
such an animal and worm burrowing. If the bones are in a state of good
preservation, it is possible to excavate and recover all of the bones, which is
of great help to the osteoarchaeologist as there are some diseases that can
only be diagnosed through observation of pathological changes to the bones
of the hands and feet, such as rheumatoid arthritis. The plates below
demonstrate the bones of the hands and feet, how they articulate and what
they look like.
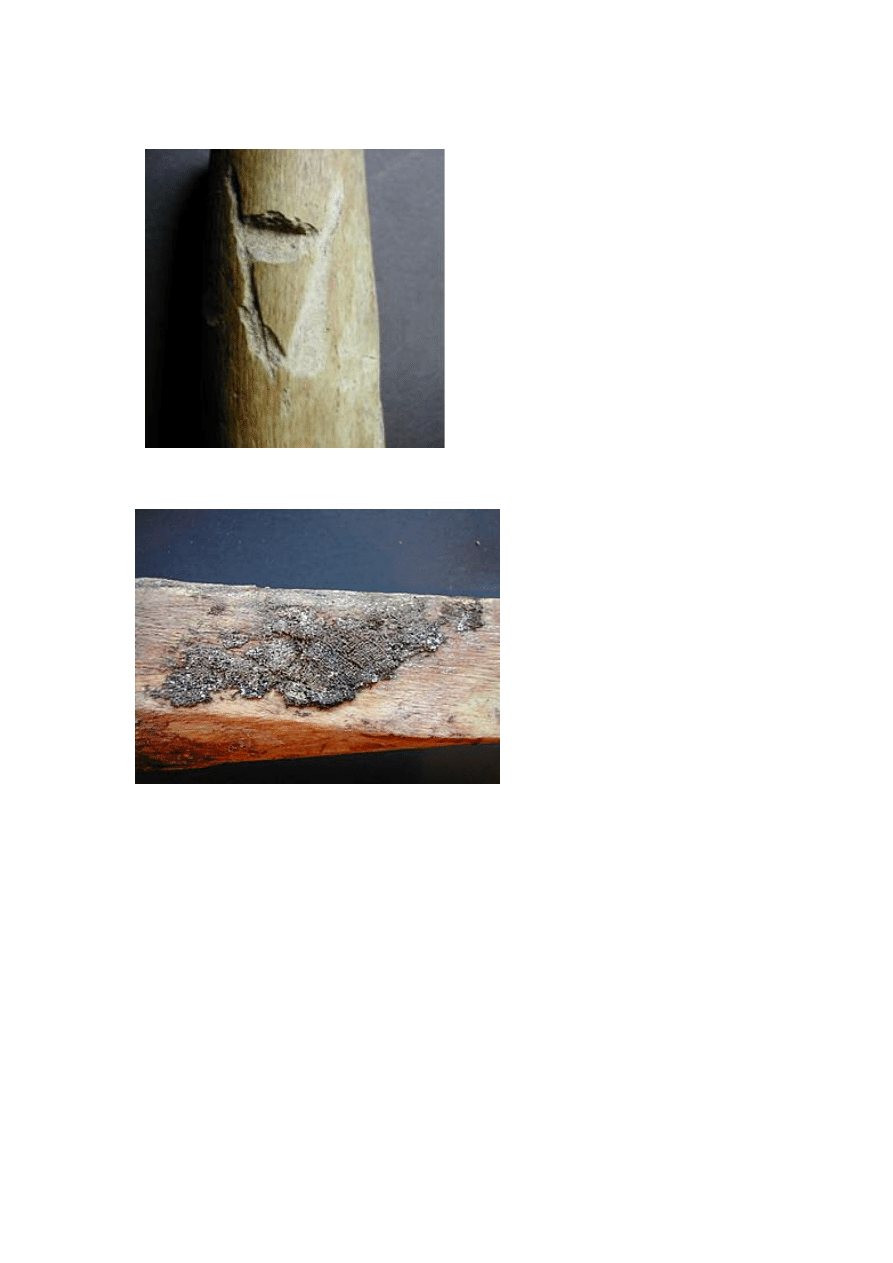
Post-mortem damage caused to
the surface of an otherwise well
preserved femur by using a
mattock to excavate grave fill. It
is better to excavate the back-fill
with a trowel until the depth of
the burial is known.
Careful excavation with
appropriate tools ensured
the survival of this fragile
fragment of shroud
preserved on the tibia of
this individual.
Field Guide to the Excavation of Inhumated Human Remains
10
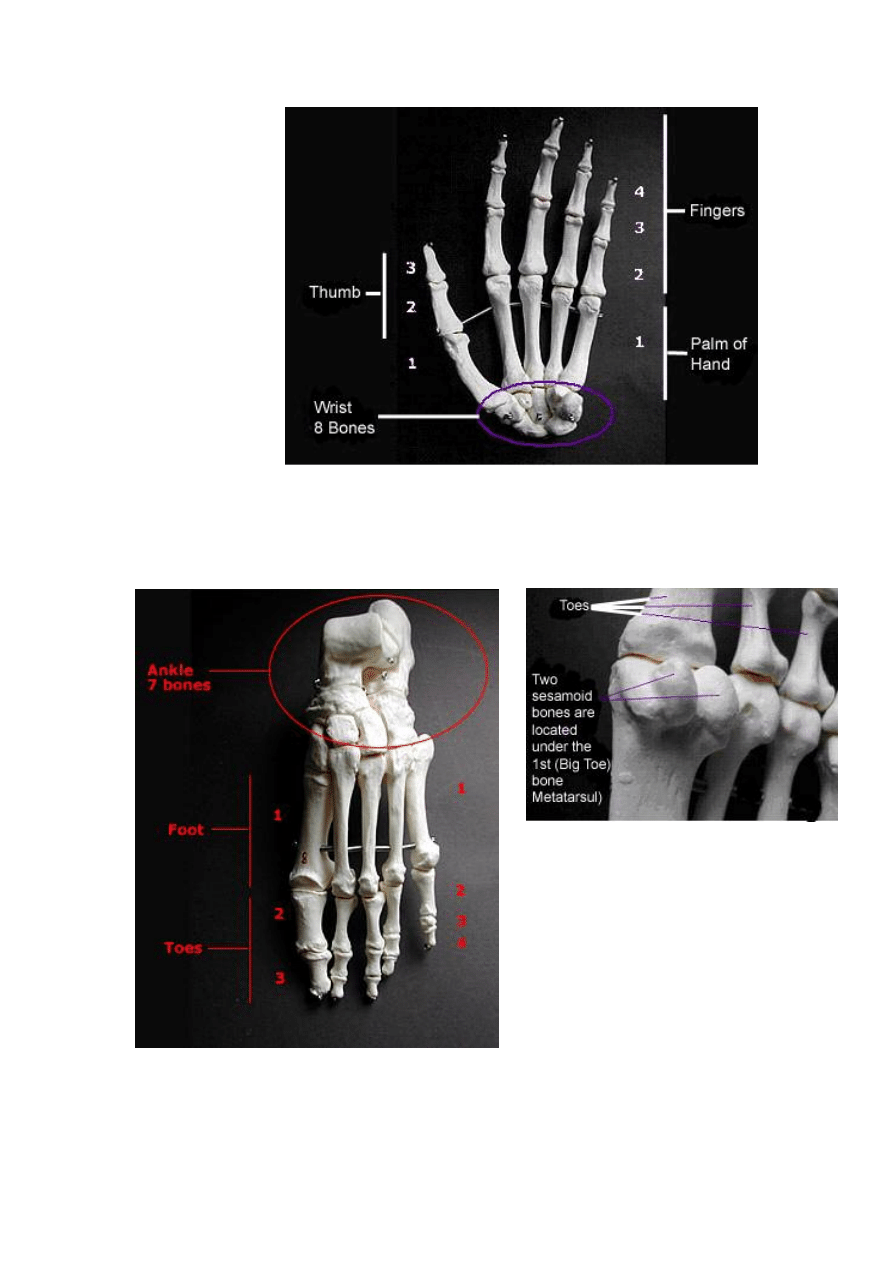
The Bones of the Hand: this hand is palm side up or in the supinated position.
Note that there are 8 separate bones in the wrist and that the fingers have
three rows of phalanges (2,3 and 4), whereas the thumb has only two (2 and
3).
The Bones of the Foot: the ankle area of the foot is made up of 7 individual
bones. Similar to the fingers, toes are made up of three rows of phalanges
(2,3 and 4), whereas the big toe consists of two rows (2 and 3).
Note that there are two small bones
located underneath the first big toe
bone or 1
st
metatarsal. These are
called sesamoid bones and would
have been situated within the tendon
to strengthen the big toe joint to cope
with the stress created by ‘toeing off’
when we walk.

Field Guide to the Excavation of Inhumated Human Remains
11
If you feel that post-depositional movement of the bones of the hands and feet
has occurred, then it may be a good idea to collect some of the soil from the
surrounding area to be processed in order to retrieve as many bones as
possible. It is not possible for the osteoarchaeologist to tell left from right
phalanges (rows 2, 3 and 4 in the figures above) in either the feet or the
hands, so the excavator should be careful to follow the articulated fingers and
toes of each hand and foot. This is especially true if the hands or feet overlie
each other – if the hands or feet are lifted together it will not be possible for
the osteoarchaeologist to determine which phalanges belong with which had
or foot. The right and left sides need to be bagged up separately, clearly
labelled with the side they are from. In some instances, where bones are not
disturbed and are well preserved, the position of the hands and feet may
indicate the time of burial of the individual after they had died. If the body was
still in a state of rigor mortis, the hands and feet may look “clenched” due to
the contraction of the muscles in the arms and feet. This is also true of victims
of fire incidents. Although this is rare, it is useful to bear this in mind when
excavating the extremities, as this kind of evidence can only be revealed by
careful excavation and recording.
Excavation of the torso area should also be mentioned here as the soil
surrounding the vertebrae and ribs may contain cysts, which look very like
small stones. If you are in any doubt, collect anything resembling cysts or ask
your on-site osteoarchaeologist. It may be that you have been asked to take
samples from the gut area of the skeleton, in which case the soil from this
area will be recovered for this purpose. You may also find that at the rib ends,
costal cartilage has ossified as dense, irregular lumps of bone (in life, the ribs
are held together by costal cartilage to form a basket like structure). This is
usually associated with older age.
Also, be aware that the kneecaps or patellae are prone to slipping to one side
or the other of the leg bones. Patellae are not directly fixed in position with the
leg bones and lie above the end of the thigh bones (femora). Once excavated,
they are extremely easy to lose, especially in an extended, supine skeleton,
as only the soil around them keeps them in position. It may be safer to note
which is the left and right patella, place them somewhere safe whilst you are
excavating the rest of the skeleton and later replace them when recording and
photographing. Alternatively, if the skeleton is on its side and flexed, you may
wish to leave a block of soil underneath the patellae to maintain their position
in the ground.
Finally, you need to be aware that the small bones of a foetus that has died in
the womb may be present in the pelvic area of any female body. These bones
are very fragile and also susceptible to post-depositional movement. It is
recommended that, unless conditions are excellent and the bones are very
well preserved, that the pelvis is block lifted and the soil from around the
pelvis contained. If excavation of neonate remains is attempted, it may be
best to use wooden spatulas or ‘skewer’ sticks with rounded ends. You should
Field Guide to the Excavation of Inhumated Human Remains
12
also be aware that small infants or neonates have been discovered alongside
or at the feet of an adult in one burial cut.
At the stage when full extent of the skeleton has been fully exposed, record
the skeleton as you have been instructed. This should include the bones
present, body position, head position, grave alignment, associated finds,
samples, structures and features. Any abnormalities about the body (spinal or
limb deformities) that can be spotted at this stage should be noted and close-
up shots taken with a scale. A plan of the skeleton, associated finds and
grave cut should be made and photographs taken, either digitally or manually.
If manually recording the skeleton, it is traditional to take levels of the skeleton
at the head, pelvis and feet.
Lifting the Skeleton
Once the skeleton is fully recorded, it is ready to be lifted. At this point you
need to remove as much soil as possible (except where mentioned above)
from the bones before lifting them out of the ground. This relieves the bone
you’re lifting of any pressure of resistance from the surrounding soil and the
bone is much less likely to break. Start removing the bones in the same order
you excavated them in, starting with the skull and working down. Never
wrench bones out of the ground: always ensure you have removed enough
soil to remove the bones freely. Bag the bones up as instructed by your site
supervisor; in general, bag bones up as you lift them with the appropriate
labels, keeping left and right side limbs separate.
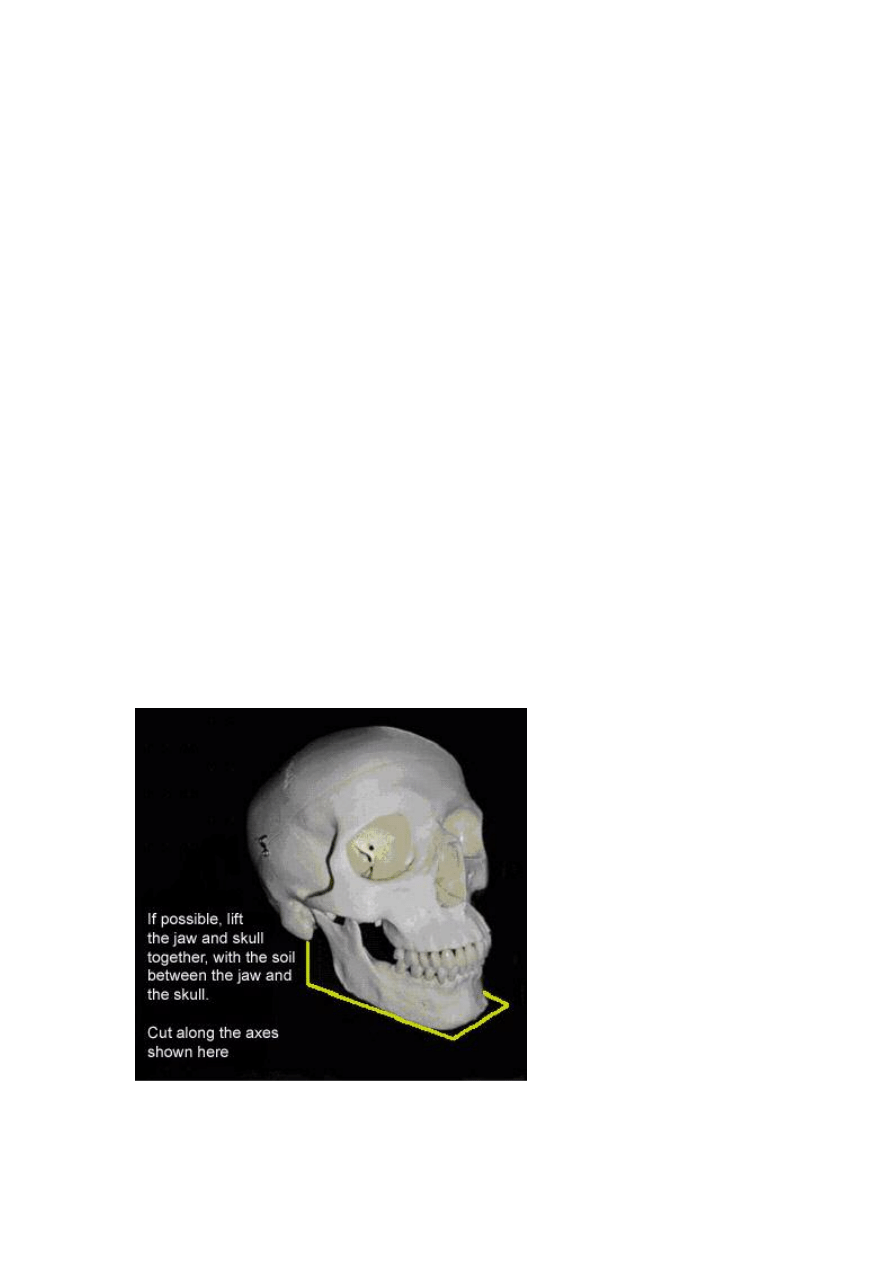
When removing the skull, try
and remove it with the jaw in
one block if possible, due to
the fragile bones contained
in the upper neck region: cut
the soil along the axes
shown in the diagram to
recover the soil contained
between the mandible and
the cranium. Be careful to
recover any loose teeth that
may be lying in the
surrounding soil, as these
are a great source of
information for estimating
age and sex of the individual
as well as being used for
DNA and chemical analysis.
Field Guide to the Excavation of Inhumated Human Remains
13
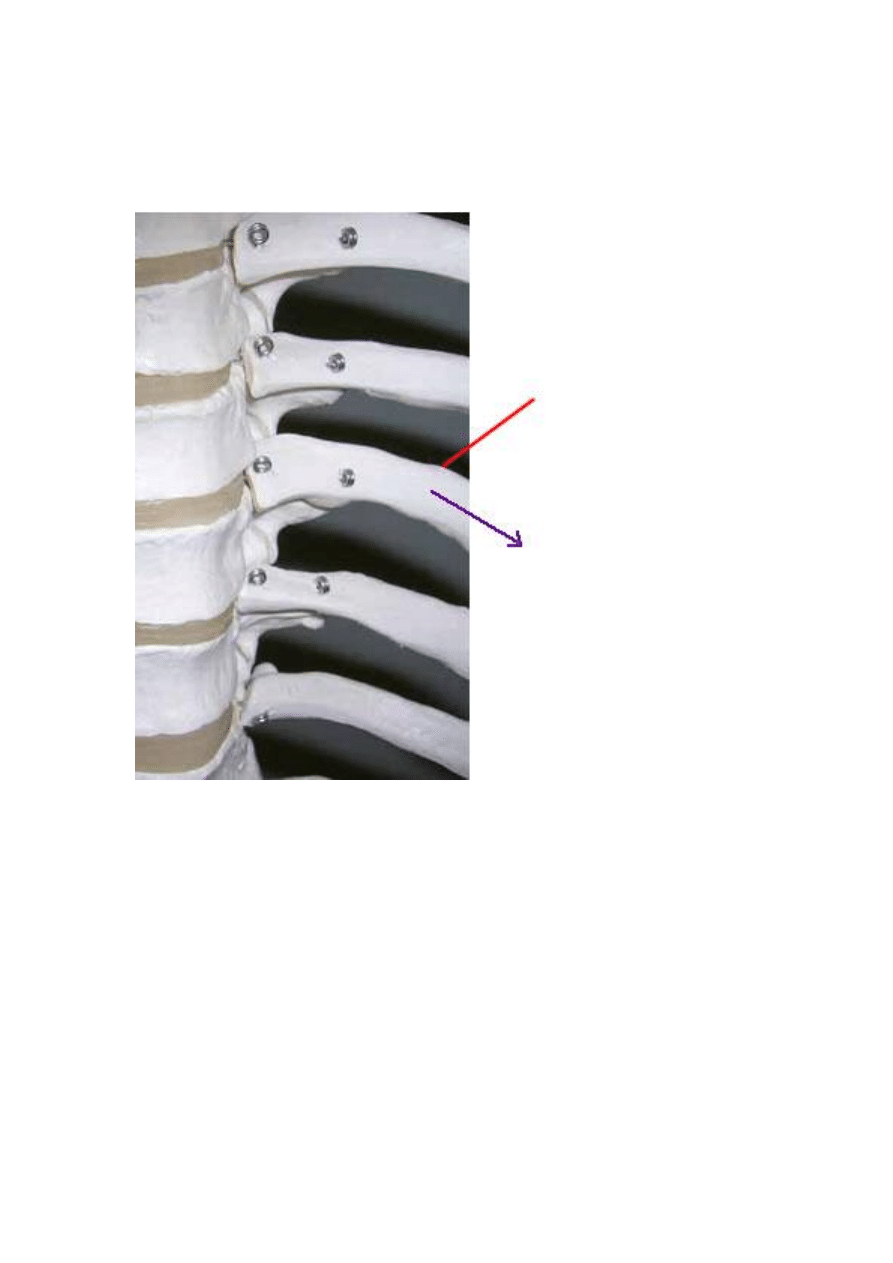
The bones that are undoubtedly the trickiest to remove are the vertebrae and
ribs, as they are interlocked as illustrated below:
In this instance, you need to remove as much soil as possible from around the
ribs and the joint between the rib and vertebra, especially underneath it.
Starting with the top rib, when you can feel that the rib is loose, place your leaf
trowel underneath the rib as close to the joint as possible and peel the rib
away from the vertebra, gently twisting and pulling it towards you with the
trowel. The force generated by lifting the rib in this fashion is more likely to
travel along the length of rib and, therefore, it is less likely to snap. It is also a
much faster technique to employ in the long run when you’ve got the hang of
it!
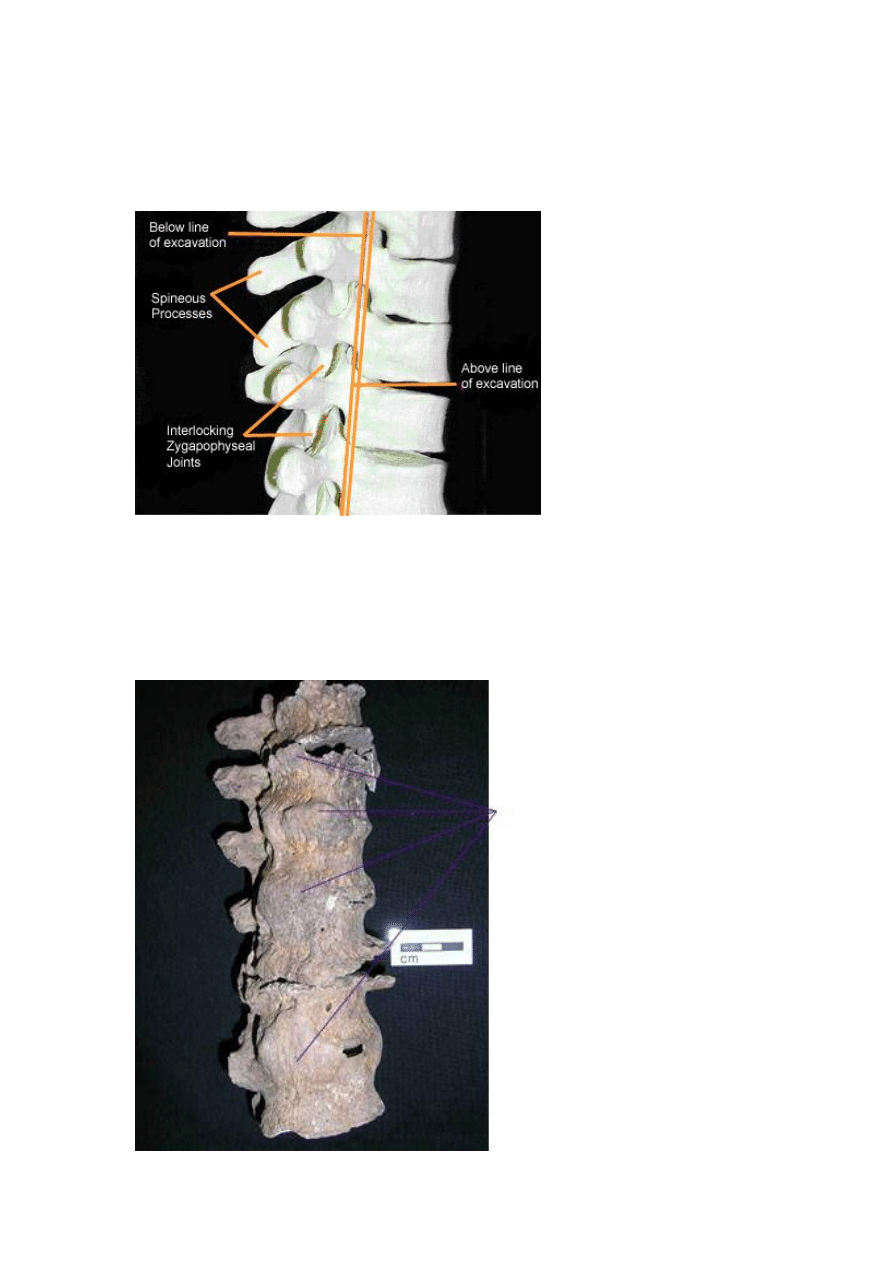
Once all the ribs have been removed, the next step is to remove the
interlocked vertebrae. Start at the top (this vertebra should be easier to
remove as it has been left exposed by removal of the skull) and remember to
remove soil from underneath the vertebra. The spine of the vertebrae are
embedded in the ground when the body is supine and it is this that generally
makes them difficult to remove. If too much soil is left around the spine of the
vertebrae when you try and lift them, the spines are likely to snap off the main
Once the surrounding
soil has been removed
from the whole rib and
vertebrae, place the leaf
trowel behind the rib
here. Support the rib
shaft and rib head with
the trowel and your
fingers.
Lift the rib away from the
vertebra in this direction,
following the length of the
rib shaft, gently twisting
the rib towards you with
the leaf trowel whilst still
supporting the rib with
your fingers.
Field Guide to the Excavation of Inhumated Human Remains
14
body. Again, enough soil should be removed from around and underneath the
vertebrae to ensure they are loose before lifting is attempted. When the top
vertebra is loose, place your leaf trowel between it and the vertebra beneath
and gently lift the top vertebra up and away.
It should be noted that often diseases of the spine result in some vertebrae
being joined through bony bridges – some of which are more obvious and
sturdier than others. Therefore, not all vertebrae can be lifted separately. If a
block of two or more vertebrae appear to be joined in this way, then lift them
in the block. Do not try and force any vertebrae apart.
If the skeleton is in an
extended, supine
position in the ground, it
is likely that only the
bodies of the vertebrae
will be exposed for
recording. For lifting,
removal of the soil
underneath the bodies
from round the spinous
processes is required,
otherwise, due to the
interlocking of the
vertebrae, the
processes will snap off.
These vertebrae are fused together
by osseous or bony growths (in this
case caused by ossification of the
anterior vertebral ligament due to
DISH). Vertebrae like these need to
be block lifted. Care needs to be
taken during lifting not to snap the
bony growths holding the vertebrae
together.

Field Guide to the Excavation of Inhumated Human Remains
15
If soil conditions are heavy and resistant to lifting, such as in clay, lift the
vertebrae in blocks anyway. It is better for the vertebrae to be separated
during the washing process than to be broken at the excavation phase. It
should be noted that this is the rule for any bones – any bones may be fused
together due to pathological processes.
Of course, not all bones are well preserved and some may be more fragile
than others due to pathological processes. For example, if a leg bone is
infected, the bony remodelling that occurred during the process of
inflammation will result in more fragile bone being developed. If you come
across any fragile bone(s) that may not withstand being lifted individually,
block-lift the bone(s). The surrounding soil can then be more gently removed
through washing.
The bony remodelling
visible here in the left
knee (the result of an
infection in the knee
joint) has weakened the
original bone. The
fragile nature of this
bone has caused the
upper bone (femur) to
break near the joint
when lifting was
attempted.
Remember that a small block of
vertebrae exist adjoining and
sometimes fused to the bottom of
the sacrum (see photo) called the
coccyx. If they are not fused to the
sacrum, these bones are also
likely to be lost due to post-
depositional activity. They are
contained within the pelvis area.

Field Guide to the Excavation of Inhumated Human Remains
16
To conclude, the excavation of human remains requires adequate care –
hopefully this guide will have provided a few pointers to bear in mind when
tackling the recovery of human bones:
•
Know your bones! Is the skeleton an adult or a juvenile?
•
Be aware that the skeleton could be lying in one of a number of
positions. Bones may not be where you are expecting them to be!
•
Remember that there may be more than one individual in one burial
cut – infants may have been placed alongside or at the feet of adults
•
Make sure the bones belong to the same skeleton
•
Use the appropriate tools to carefully remove the surrounding soil. Do
not remove the soil from any holes or from within the jaw of the skull.
•
Expose the bones well enough to clearly indicate their position and to
reveal any fused or pathological bones but cautiously to prevent
damage to the bones and their surfaces
•
Record the skeleton and its associated finds/samples thoroughly
•
Bones are fragile – remove enough soil so that bones can be lifted
easily. Block lift neonates and more fragile bones as appropriate.
And, of course, please treat all human remains with the respect and
dignity they deserve at all times. It is a privilege, not a right, to excavate
human remains.
For more detailed information regarding the excavation and processing of
inhumated human remains and also cremated bone, please see the excellent
IFA Technical Paper Number 13 by Jacqueline I McKinley and Charlotte
Roberts.

Field Guide to the Excavation of Inhumated Human Remains
17
Appendix 1
More detailed guidance regarding the recovery of human remains can be found at:
England: Church Archaeology Human Remains Working Group Report:
http://www.english-heritage.org.uk/default.asp
Ireland: Heritage Council Publication, Human Remains in Irish Archaeology:
http://heritagecouncil.ie/publications/human_remains/hr_printer.html
Scotland: Historic Scotland Operational Policy Paper 5.
http://historic-scotland.gov.uk
Other useful Links:
OssaFreelance
http://www.ossafreelance.co.uk
Spoilheaps excellent guide to Burial Archaeology.
Document Outline
- A Field Guide to the Excavation of Inhumated Human Remains
- Field Guide to the Excavation of Inhumated Human Remains
- Introduction
- The Burial
- The Skeleton: so where do I start?
- Lifting the Skeleton
- Ireland: Heritage Council Publication, Human Remains in Irish Archaeology:
Wyszukiwarka
Podobne podstrony:
Guide to the installation of PV systems 2nd Edition
Narratology A Guide to the Theory of Narrative
A Brief Guide To The Rites Of Hajj And Umrah
Robert P Murphy Study Guide to the Theory of Money and Credit
Brenda Shoshanna Ph D Ph D Jewish Dharma A Guide to the Practice of Judaism and Zen(2008)
Lighthouses of the Mid Atlantic Coast Your Guide to the Lighthouses of New York, New Jersey, Maryla
Guide to the properties and uses of detergents in biology and biochemistry
Guide to the Gods A fuller and more detailed list of Asatru heathen deities
Guide to the properties and uses of detergents in biology and biochemistry
A Guide to the Law and Courts in the Empire
Jouni Yrjola Easy Guide to the Classical Sicilian (feat Richter Rauzer and Sozin Attacks)
Zinda; Introduction to the philosophy of science
ESL Seminars Preparation Guide For The Test of Spoken Engl
Jaffe Innovative approaches to the design of symphony halls
AIDS TO THE EXAMINATION OF THE PNS ED 4TH
Players Guide to the Sabbat (Text Only) 1992
więcej podobnych podstron