
Blue Coat
®
Systems
Reference Guide
SSL Proxy
For SGOS 5.3.1

ii
Contact Information
Blue Coat Systems Inc.
420 North Mary Ave
Sunnyvale, CA 94085-4121
http://www.bluecoat.com/support/contactsupport
For concerns or feedback about the documentation:
Copyright© 1999-2008 Blue Coat Systems, Inc. All rights reserved worldwide. No part of this document
may be reproduced by any means nor modified, decompiled, disassembled, published or distributed, in
whole or in part, or translated to any electronic medium or other means without the written consent of
Blue Coat Systems, Inc. All right, title and interest in and to the Software and documentation are and shall
remain the exclusive property of Blue Coat Systems, Inc. and its licensors. ProxyAV™, CacheOS™,
SGOS™, SG™, Spyware Interceptor™, Scope™, ProxyRA Connector™, ProxyRA Manager™,
Remote Access™ and MACH5™ are trademarks of Blue Coat Systems, Inc. and CacheFlow®, Blue
Coat®, Accelerating The Internet®, ProxySG®, WinProxy®, AccessNow®, Ositis®, Powering Internet
Management®, The Ultimate Internet Sharing Solution®, Cerberian®, Permeo®, Permeo Technologies,
Inc.®, and the Cerberian and Permeo logos are registered trademarks of Blue Coat Systems, Inc. All other
trademarks contained in this document and in the Software are the property of their respective owners.
BLUE COAT SYSTEMS, INC. DISCLAIMS ALL WARRANTIES, CONDITIONS OR OTHER
TERMS, EXPRESS OR IMPLIED, STATUTORY OR OTHERWISE, ON SOFTWARE AND
DOCUMENTATION FURNISHED HEREUNDER INCLUDING WITHOUT LIMITATION THE
WARRANTIES OF DESIGN, MERCHANTABILITY OR FITNESS FOR A PARTICULAR PURPOSE
AND NONINFRINGEMENT. IN NO EVENT SHALL BLUE COAT SYSTEMS, INC., ITS
SUPPLIERS OR ITS LICENSORS BE LIABLE FOR ANY DAMAGES, WHETHER ARISING IN
TORT, CONTRACT OR ANY OTHER LEGAL THEORY EVEN IF BLUE COAT SYSTEMS, INC.
HAS BEEN ADVISED OF THE POSSIBILITY OF SUCH DAMAGES.
Document Number: 231-03025
Document Revision: SSL Proxy Reference Guide—SGOS 5.3.1 09/2008

iii
Table of Contents
Introduction to the Blue Coat SSL Proxy
Using an SSL Proxy for Privacy, Authentication, and Data Integrity 8
SSL Proxy Versus HTTPS Reverse Proxy 9
Question: What do I need to know before deploying the SSL Proxy? 11
Question: How do I fix server certificate errors? 12
Question: How do I selectively intercept SSL traffic? 13
Question: Can the ProxySG Distribute issuer certificates to client desktops?
Question: In addition to browser warnings, how do I create a web page to
Question: How do I protect end-user privacy and prevent accidental
exposure of sensitive information when intercepting SSL traffic?
21
Question: How do I set up SSL Proxy in explicit mode? 23
Question: How do I deploy SSL Proxy in transparent mode? 24
Question: How do I deploy the SSL Proxy in a proxy chain? 25
Question: I am using a transparent proxy deployment. How do I allow non-
Question: Windows updates fail when I use the SSL Proxy to intercept all

Table of Contents
iv
Question: Can I use CA hierarchy for certificate emulation? 28
Question: How does the HTTP Proxy securely process the CONNECT
Question: How do I authenticate intercepted SSL traffic and add the
username to the access log? 31
Upgrading and Using SSL Client Certificates with Internet Explorer 40
5
Introduction to the Blue Coat SSL Proxy
HTTPS traffic poses a major security risk to enterprises. Because SSL (Secure
Socket Layer) content is encrypted, it can’t be intercepted by normal means. Users
can bring in viruses, access forbidden sites, and leak business confidential
information over an HTTPS connection, which uses port 443.
Because IT organizations have no visibility into SSL sessions, they are blind to any
potential security threats sent over HTTPS.
In addition to the security threat, encrypted traffic makes it difficult for IT to assess
bandwidth usage and apply intelligent content control policies to ensure maximum
user productivity.
Prior to the SSL Proxy, the only solution for managing HTTPS traffic was to deny
HTTPS altogether or severely limit its usage.
What the SSL Proxy Does
The SSL Proxy can be used to tunnel or intercept HTTPS traffic. The SSL Proxy
tunnels all HTTPS traffic by default unless there is an exception, such as a certificate
error or a policy denial. In such cases the SSL Proxy intercepts the SSL connection
and sends an error page to the user. The SSL Proxy allows interception of HTTPS
traffic even when there are no errors. Such interception enables the application of
various security policies to HTTPS content.
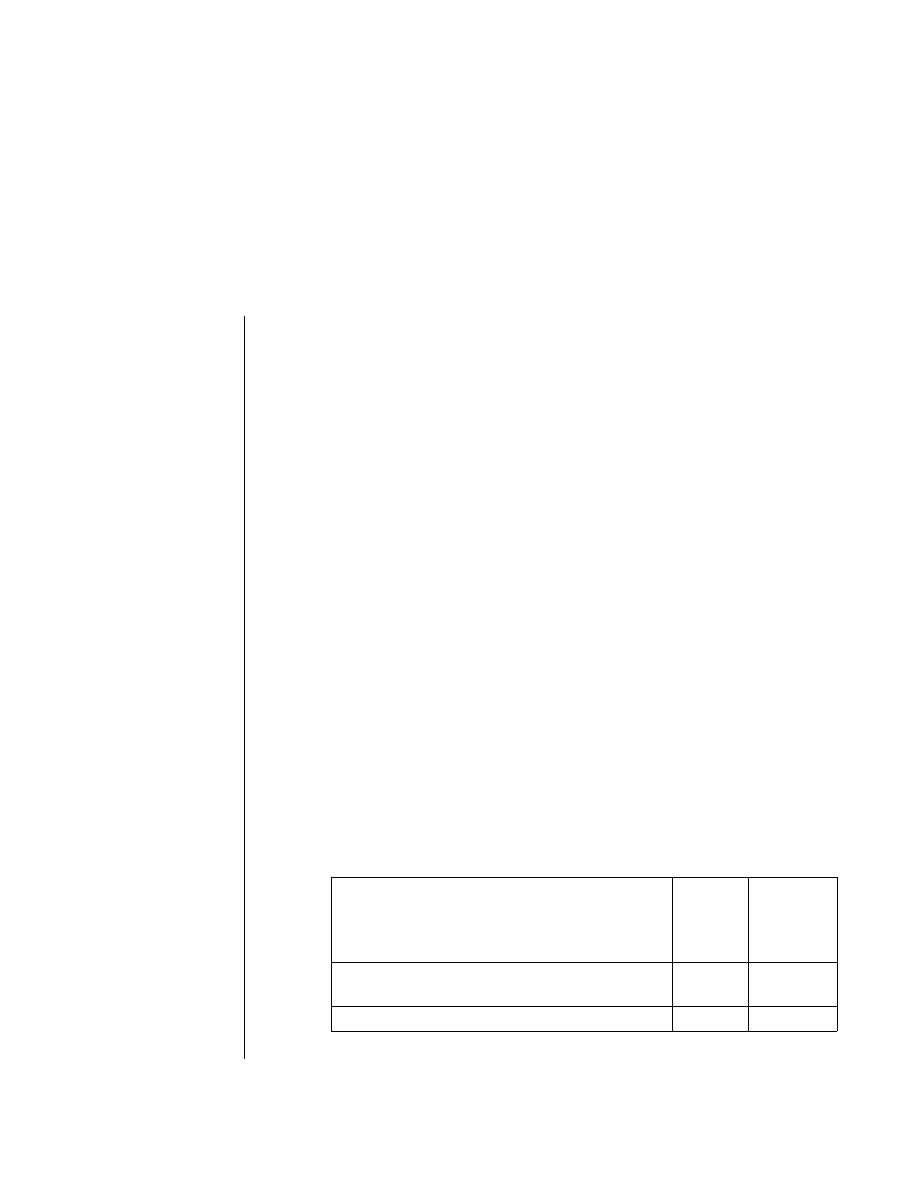
Some HTTPS traffic, such as financial information, should not be intercepted, but
instead passed through in a dedicated tunnel. The following table lists the available
functions depending on whether the SSL proxy is used to tunnel or intercept HTTPS
traffic:
HTTPS traffic is the
same as HTTP traffic
except that it is
encapsulated so that
the content is hidden.
Table 1-1.
SSL Proxy Function
Tunneling Interception
Validate server certificates, including revocation checks
using Certificate Revocation Lists (CRLs) and Online
Certificate Status Protocol (OCSP).
✓
✓
Check various SSL parameters such as cipher and
version.
✓
✓
Log useful information about the HTTPS connection.
✓
✓
Reference Guide: SSL Proxy
6
The Blue Coat SSL proxy allows you to:
❐
Determine what HTTPS traffic to intercept through existing policy conditions,
such as destination IP address and port number. You can also use the hostname
in the server certificate to make the intercept versus tunnel decision.
❐
Validate the server certificate to confirm the identity of the server, and check
Certificate Revocation Lists (CRLs) to be sure the server certificate has not been
revoked.
❐
Apply caching, virus scanning and URL filtering policies to intercepted HTTPS
traffic.
Increasing Control
The SSL proxy allows you to increase control by:
❐
Distinguishing between SSL and non-SSL traffic on the same port.
❐
Distinguishing HTTPS from other protocols over SSL.
❐
Categorizing sites by their SSL server certificate hostname.
❐
Enhancing security through:
•
Server certificate validation, including revocation checks with the help of
CRLs and OCSP.
•
Virus scanning and URL filtering of HTTPS content.
The SSL proxy also improves visibility into SSL traffic by creating log files, and
enhances performancing by caching data.
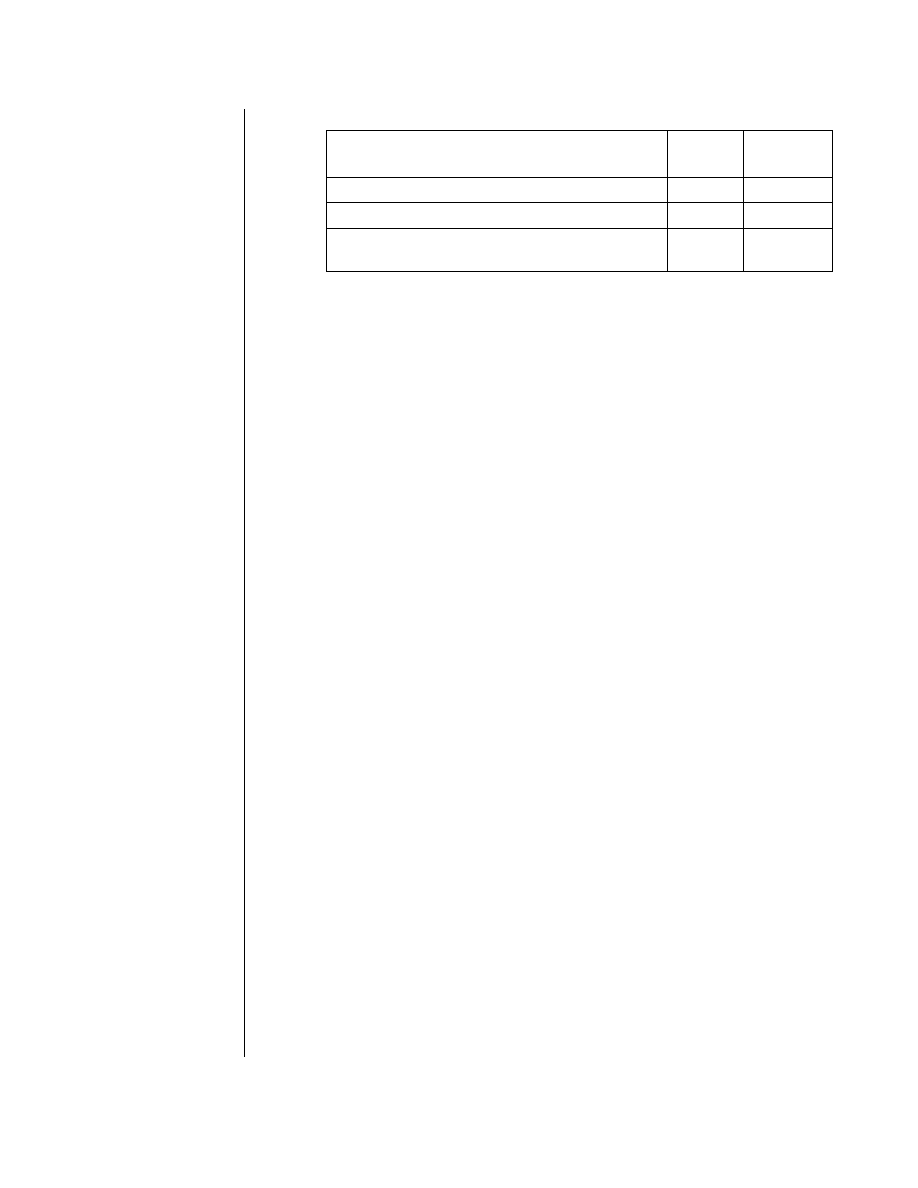
Cache HTTPS content.
✓
Apply HTTP-based authentication mechanism.
✓
Scan for viruses and filter specified URLs.
✓
Apply granular policy (such as validating MIME type
and filename extension).
✓
Table 1-1.
SSL Proxy Function
Tunneling Interception

7
SSL Proxy Overview
SSL and tunneling protocols are closely tied together. To understand SSL, you must
first understand how tunneling applications work.
This chapter discusses:
❐
❐
“Using an SSL Proxy for Privacy, Authentication, and Data Integrity” on page 8
❐
“SSL Proxy Versus HTTPS Reverse Proxy” on page 9
Understanding SSL
At the lowest level, SSL is layered on top of TCP/IP. SSL uses the SSL Handshake
Protocol to allow the server and client to authenticate each other and to negotiate the
encryption cipher before the application protocol transmits or receives its first byte
of data.
SSL has emerged as the de facto standard protocol for establishing a secure,
encrypted link between a remote application server and the client Web browser on
the local user’s desktop.
SSL is a proven technology with strong appeal to IT organizations because each
secure session link is automatically established “on demand” using standards-based
protocols, encryption techniques, and certificate exchange – all without the need for
any IT administration.
The process of setting up the private connection is automatically initiated by the
server communicating directly with the browser. The result is a private, encrypted
tunnel used to move information between the server and client desktop. When the
session is over, the connection is automatically terminated.
However, SSL sessions are rapidly becoming a conduit for a variety of enterprise
security threats – including spyware, viruses, worms, phishing, and other malware.

Reference Guide: SSL Proxy
8
Using an SSL Proxy for Privacy, Authentication, and
Data Integrity
The SSL proxy can manage the SSL sessions in such a way as to prevent enterprise
security threats while at the same time allowing you to determine the level of control.
If the HTTPS traffic contains financial information, you probably do not want to
intercept that traffic.
However, many other kinds of traffic can and should be intercepted by the SSL
proxy.
Determining What HTTPS Traffic to Intercept
The default mode of operation for the SSL Proxy is to intercept HTTPS traffic only if
there is an exception, such as a certificate error. Otherwise, it tunnels all HTTPS
traffic.
To intercept HTTPS traffic for reasons other than error reporting, many existing
policy conditions, such as destination IP address and port number, can be used.
Additionally, the SSL proxy can use the hostname in the server certificate to make
the decision to intercept or tunnel the traffic. The server certificate hostname can be
used as-is to make intercept decisions for individual sites, or it can be categorized
using any of the various URL databases supported by Blue Coat. Categorization of
server certificate hostnames can help place the intercept decision for various sites
into a single policy rule.
Recommendations for intercepting traffic include:
❐
Intercept Intranet traffic.
❐
Intercept suspicious Internet sites, particularly those that are categorized as
none
in the server certificate.
❐
Intercept sites that provide secure web based e-mail, such as Gmail over
HTTPS.
Managing Decrypted Traffic
After the HTTPS connection is intercepted, you can do:
❐
Anti-virus scanning over ICAP.
❐
URL filtering (on-box and off-box). Blue Coat recommends on-box URL/
Content filtering if you use transparent proxy. When the URL is sent off-box for
filtering, only the hostname or IP address of the URL (not the full path) is sent
for security reasons.
❐
Filtering based on the server certificate hostname.
❐
Caching.

9
SSL Proxy Overview
HTTPS applications that require browsers to present client certificates to secure Web
servers do not work if you are intercepting traffic. Such applications should not be
intercepted by creating a policy rule.
If you intercept HTTPS traffic, be aware that local privacy laws might require you to
notify the user about interception or obtain consent prior to interception. You can use
the HTML Notify User object to notify users after interception. You can use consent
certificates to obtain consent prior to interception. The HTML Notify User is easier;
however, note that the ProxySG has to decrypt the first request from the user before
it can issue an HTML notification page.
Digital Certificates and Certificate Authorities
Server certificates are used to authenticate the identity of a server. A certificate is an
electronic confirmation that the owner of a public key is who he or she really claims
to be, and thus holds the private key corresponding to the public key in the
certificate. The certificate contains other information, such as its expiration date.
The association between a public key and a particular server is done by generating a
certificate signing request using the server’s public key. A Certificate Authority (CA)
verifies the identity of the server and generates a signed certificate. The resulting
certificate can then be offered by the server to clients who can recognize the CA’s
signature and trust that the server is who it claims to be. Such use of certificates
issued by CAs have become the primary infrastructure for authentication of
communications over the Internet.
ProxySG appliances come with many popular CA certificates already installed. You
can review these certificates using the Management Console or the CLI. You can
also add certificates for your own internal certificate authorities.
ProxySG appliances trust all root CA certificates trusted by Internet Explorer and
Firefox. The list is updated periodically to be in sync with the latest versions of IE
and Firefox.
CA certificates installed on the ProxySG are used to verify the certificates presented
by HTTPS servers and the client certificates presented by browsers (when browsers
are configured to do so).
ProxySG appliances also check Certificate Revocation Lists (CRLs, which are
provided and maintained by CAs) for certificates that have been revoked.
SSL Proxy Versus HTTPS Reverse Proxy
Depending on your needs, you can use the ProxySG as either an SSL proxy or an
HTTPS reverse proxy. SSL proxy functionality enables the ProxySG to act as
forward proxy for HTTPS requests.
❐
An SSL proxy is a client-side proxy typically used for applying security and
performance features such as authentication, URL filtering, and caching.

Reference Guide: SSL Proxy
10
❐
An HTTPS reverse proxy is a server-side proxy typically used to offload SSL
processing from server to the proxy. Reverse proxies are deployed in proximity
to the server. The communication between the HTTPS reverse proxy and server
might or might not use SSL. The ProxySG can be used as an HTTPS reverse
proxy with the help of the existing HTTPS Reverse Proxy service. Performance
is usually the only objective.
This deployment guide
discusses the HTTPS
forward proxy. To
configure the ProxySG as
an HTTPS reverse proxy,
refer to the
Blue Coat
ProxySG Configuration
and Management Guide
documentation suite.

11
Best Practices and Deployment
This chapter contains answers to frequently-asked SSL Proxy deployment questions.
Question: What do I need to know before deploying the
SSL Proxy?
Answer:
With SGOS 4.2.2 and higher, the default mode of operation for the SSL
proxy is “intercept on exception, tunnel otherwise.” Common examples of
exceptions for which the SSL Proxy intercepts traffic in this default mode are
certificate errors and policy based denials. To intercept HTTPS traffic for purposes
other than error reporting (such as antivirus scanning or caching), you must create
additional policy.
The SSL proxy can detect the following certificate errors for both intercepted and
tunneled traffic:
❐
The certificate has expired (or is valid at a future date).
❐
The certificate issuer is untrusted; that is, the ProxySG does not recognize or
trust the issuer of the certificate.
❐
The certificate has been revoked. The ProxySG does a revocation check using
Certificate Revocation Lists (CRLs) to determine if the issuer of the certificate
has revoked the certificate.
Recommendation:
Audit all internal HTTPS servers to verify that they use
valid certificates before upgrading the ProxySG to SGOS 5.x. This ensures that
internal HTTPS sites accessed through the ProxySG do not break after enabling the
SSL Proxy.
Answer:
After the SSL proxy starts intercepting traffic, it also verifies that the
common-name (CN) in the certificate matches with the request URL, and denies
data exchange between client and server when a mismatch is detected.
Answer:
In the case of server certificate errors, the SSL proxy intercepts the
connection in default mode and sends an exception page to the browser showing the
cause of the error. In addition, from the SSL access logs, you can monitor the
following fields to learn which servers present certificates with errors and what the
ProxySG is doing:

Reference Guide: SSL Proxy
12
❐
x-rs-certificate-observed-errors
: Shows all the actual error(s)
detected with the certificate except
hostname-mismatch
error. Detected errors
include
untrusted-issuer, expired
, and
revoked
.
❐
x-rs-certificate-validate-status
: Shows the certificate validation
status after following policy rules. If policy ignores a specific certificate
validation error, this field shows the status as
CERT_VALID
, although the
certificate presented by a server has the error.
Recommendation:
Leave the SSL proxy in its default mode where it
intercepts the connection in case of errors and reports an exception to the browser. If
no errors are found, traffic is tunneled. This allows you to better understand the SSL
traffic in your network and helps you write suitable interception policy.
Question: How do I fix server certificate errors?
Answer:
The following certificate errors can be detected by SSL Proxy:
❐
untrusted-issuer
❐
expired
❐
revoked
❐
hostname mismatch (intercepted connections only)
The most secure way to fix any of these errors is to get a new certificate that does not
have the detected error. Many times, however, the sites presenting a bad certificate
are not in administrative control. In this case, the SSL proxy provides a way to ignore
certificate errors for certain sites through policy.
Recommendation:
If internal HTTPS servers use certificates issued by an
internal Certificate Authority (CA), the SSL proxy flags such certificates with the
“untrusted-issuer” error. To prevent such errors, import the internal CA certificate to
the ProxySG as a trusted certificate. Do not ignore untrusted-issuer errors through
policy, because an untrusted-issuer error means that nothing from the certificate can
be trusted.
Do not disable certificate validation globally. Assess ignorable certificate errors on a
case-by-case basis, as discussed below.
Procedure: To ignore certificate errors for specific sites
1. Launch the Visual Policy Manager:
a. On the Configuration tab, click
Policy>Visual Policy Manager
.
b. Click the
Launch
button.
2. Add an SSL Access Layer by selecting
Policy>Add SSL Access Layer
from the
menu bar.
A policy row is added by default when you create a layer.
For detailed information
on the Visual Policy
Manager, refer to
Volume 6:
VPM and Advanced Policy
.
13
Best Practices and Deployment
3. Right click the
Destination
field; select
Set
to open the Set Destination Object
window.
4. Click
New
, then:
a. Add a condition for
Destination Host/Port
or
Server URL
.
b. Add the IP address and the port or the server URL.
c.
Click
Close
.
d. Click
OK
.
5. Right click the
Action
field; select
Set
.
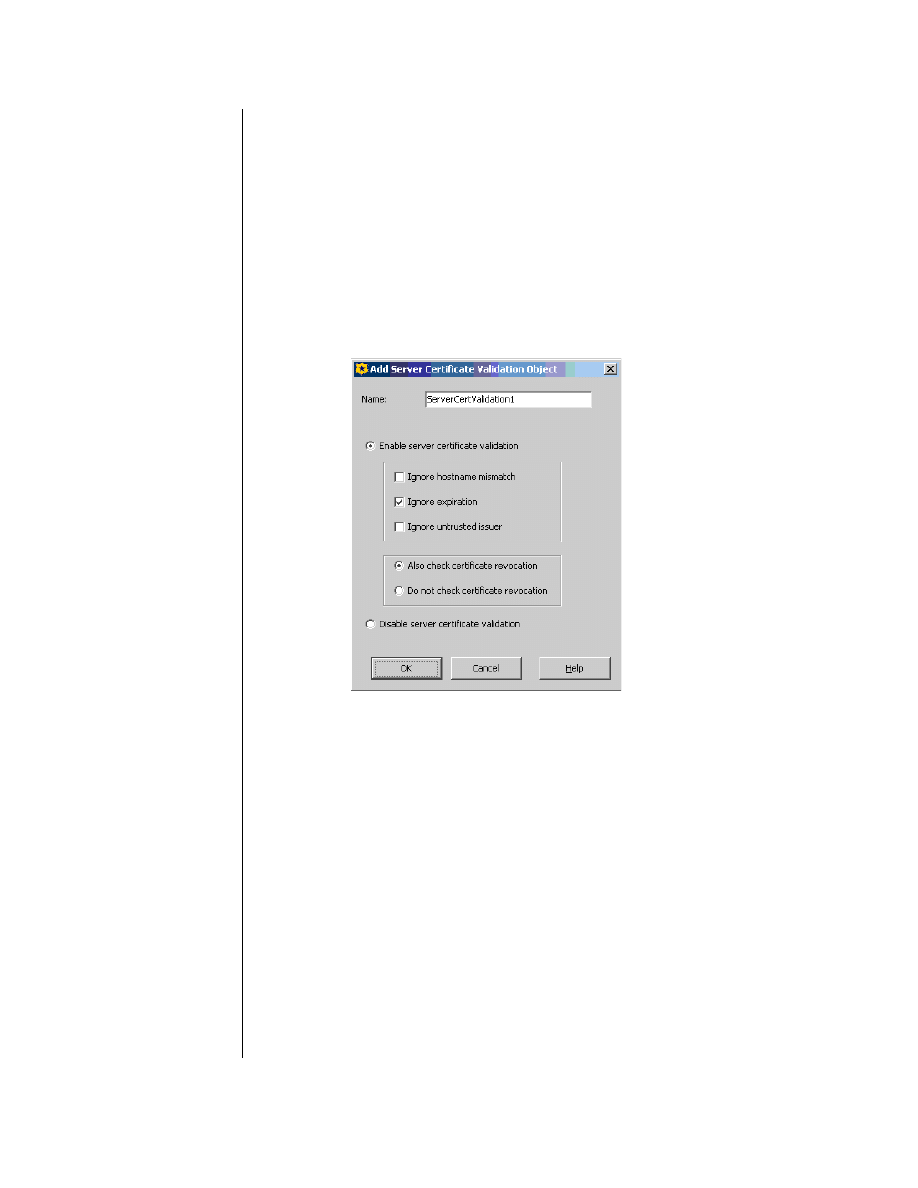
6. Click
New
and select
Set Server Certificate Validation
.
7. Select the certificate errors to ignore (for example,
Ignore expiration
), and then
click
OK
.
8. Click
OK
to close the Set Action Object window.
9. Apply the policy by clicking
Install Policy
in the upper-right-hand corner.
Question: How do I selectively intercept SSL traffic?
Answer:
To selectively intercept SSL traffic using the most preferred method,
configure a URL filter database.
Using the Blue Coat Web Filter as an example, the following steps show how to
create a rule that intercepts selected categories.
1. Launch the Visual Policy Manager from
Configuration>Policy>Visual Policy
Manager
.
2. Add an SSL Intercept Layer by selecting
Policy>Add SSL Intercept Layer
from
the menu bar.
Reference Guide: SSL Proxy
14
A policy row is added by default when you create a layer.
3. Right click the
Destination
field; select
Set
, then
New
.
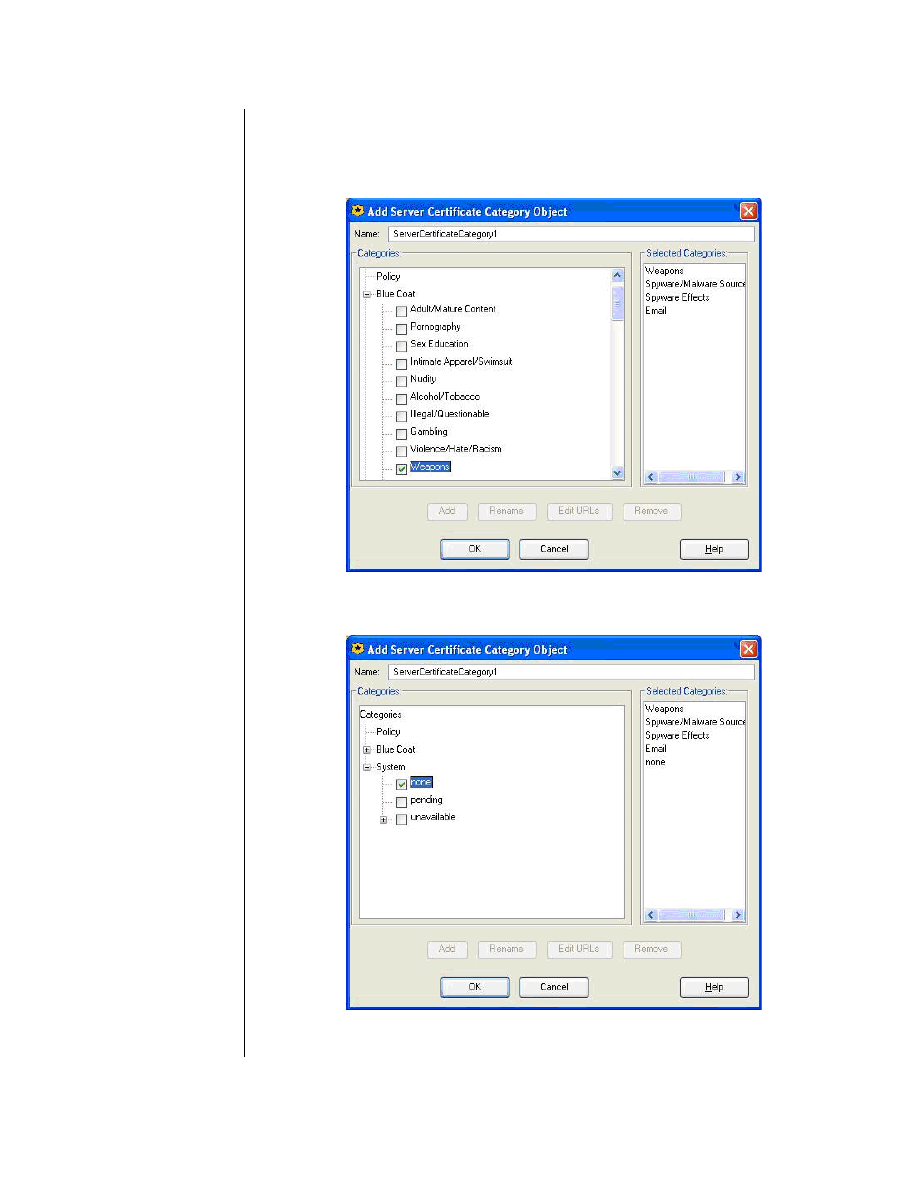
4. Select the
Server Certificate
Category
and expand the Blue Coat category.
5. Select the categories to intercept. Examples include weapons, Spyware/Malware
sources, secure web based e-mail, and the like.
15
Best Practices and Deployment
6. Expand the
System
category; select
none
to intercept Web sites whose
categorization is unknown.
This allows you to treat unrated sites as suspicious and apply security policies to
the data transferred to and from such sites.
7. Click
OK
.
8. Click
OK.
9. Right click the
Action
field; select
Set
, then
New
.
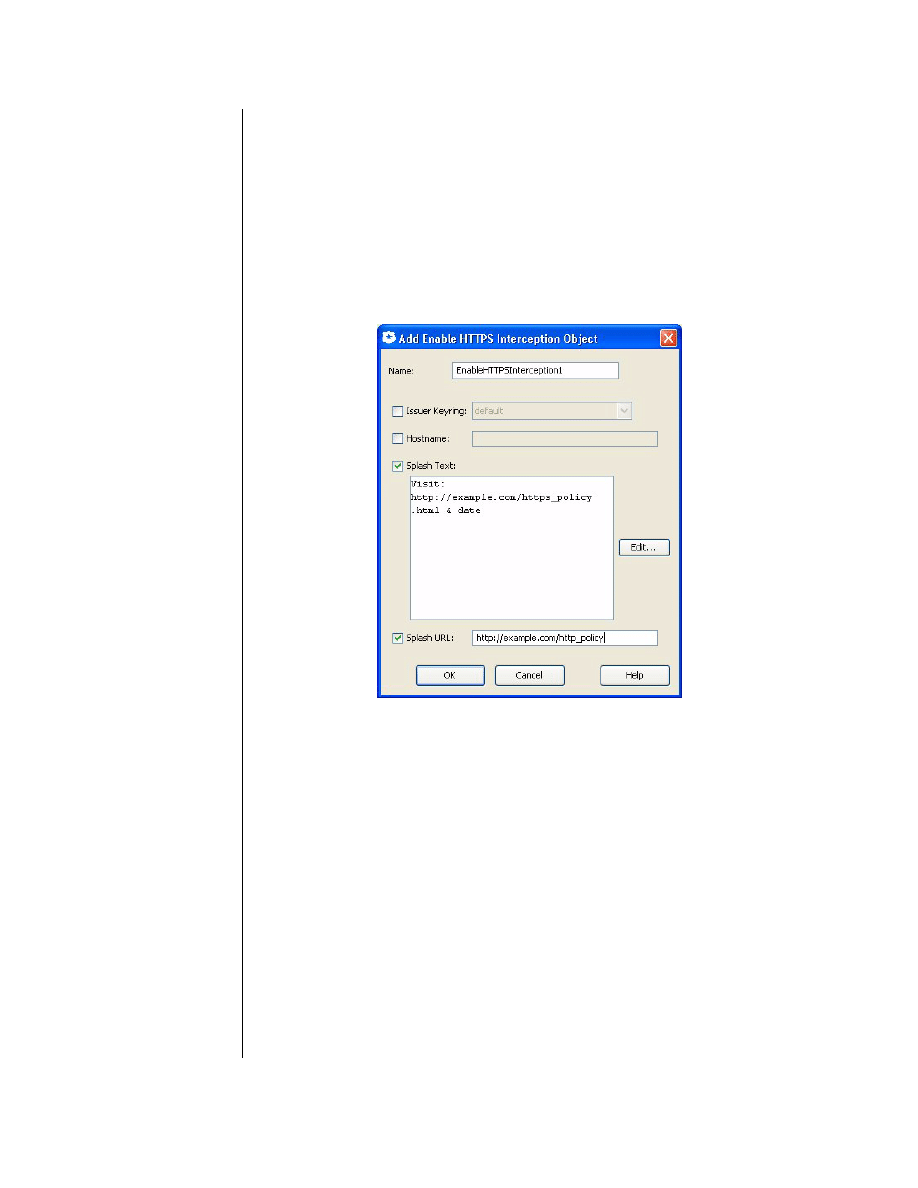
10. Select
Enable HTTPS Interception
11. To allow SSL content to be examined, select:
a.
Issuer Keyring
: Accept the default keyring or select this option and from
the drop-down list select a previously generated keyring. This is the keyring
used for signing emulated certificates.
b.
Hostname:
The hostname you enter here is the hostname in the emulated
certificate.
c.
Splash Text
: The limit is 200 characters. The splash text is added to the
emulated certificate as a certificate extension. The splash text is added to
the emulated certificate as a certificate extension. For example:
Visit http://example.com/https_policy.html
To add substitution variables to the splash text, click
Edit
and select from
the list.
d.
Splash URL
: The splash text is added to the emulated certificate as a
certificate extension.
For additional details on
the SSL Forward Proxy
object, refer to Volume 3
of the
Volume 2: Proxies and
Proxy Services
.

Reference Guide: SSL Proxy
16
The SSL splash can be caused by such occurrences as when a browser
receives a server certificate signed by an unknown CA, or a host mismatch.
12. Click
OK.
13. Click
OK
.
14. Apply the policy by clicking
Install Policy
in the upper-right-hand corner.
Question: Can the ProxySG Distribute issuer certificates
to client desktops?
Answer:
When the SSL Proxy intercepts an SSL connection, it presents an
emulated server certificate to the client browser. The client browser issues a security
pop-up to the end-user because the browser does not trust the issuer used by the
ProxySG. This pop-up does not occur if the issuer certificate used by SSL Proxy is
imported as a trusted root in the client browser’s certificate store.
The ProxySG makes all configured certificates available for download via its
management console. You can ask end users to download the issuer certificate
through Internet Explorer or Firefox and install it as a trusted CA in their browser of
choice. This eliminates the certificate popup for emulated certificates.
To download the certificate through Internet Explorer, see "To download a certificate
through Internet Explorer". To download a certificate through Firefox, see “To
download a certificate through Firefox” on page 17.
Procedure: To download a certificate through Internet Explorer
1. Go to
Statistics>Advanced
.
2. From the
SSL
section, click
Download a ProxySG Certificate as a CA
Certificate
; the list of certificates on the system display.
3. Click a certificate (it need not be associated with a keyring); the File Download
Security Warning displays asking what you want to do with the file.
4. Click Save. When the Save As dialog box displays, click Save; the file
downloads.
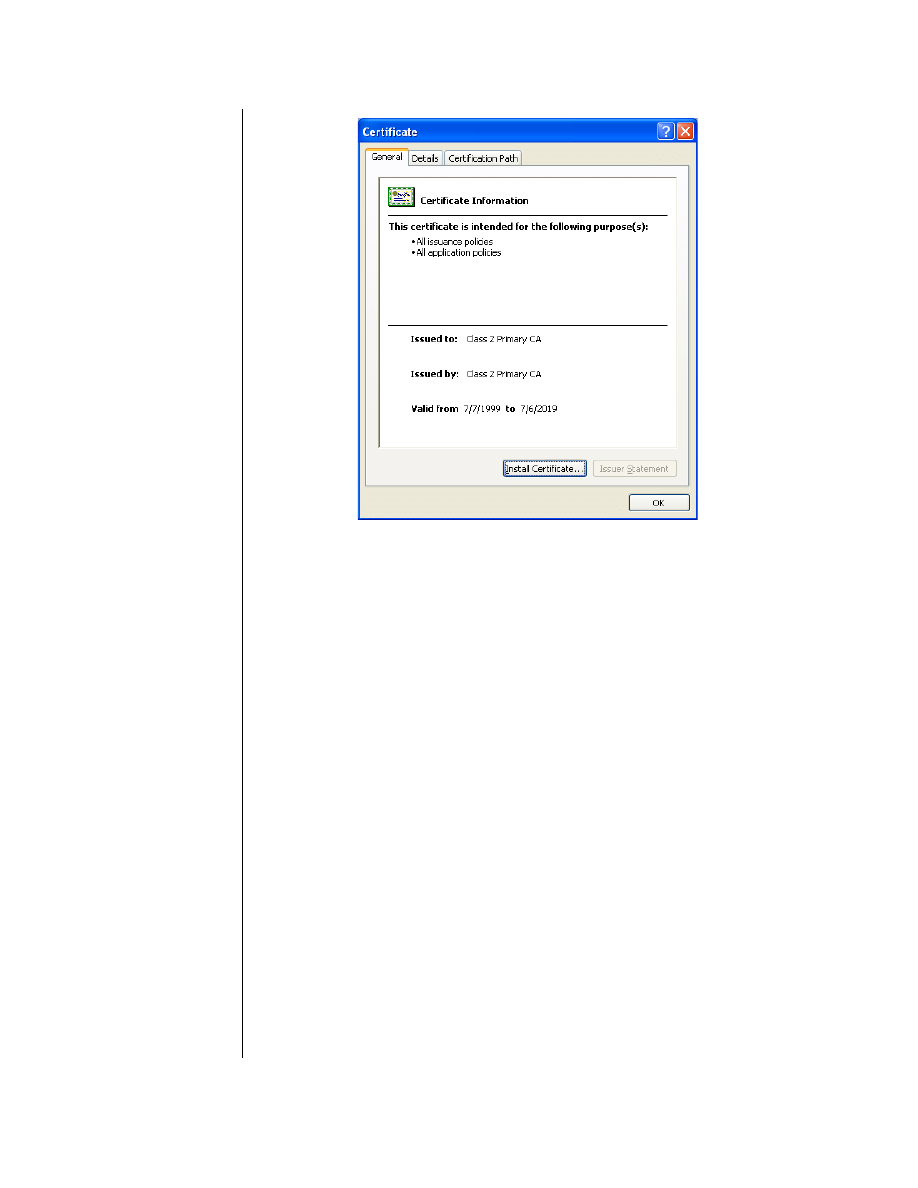
5. Click Open to view the Certificate properties; the Certificate window displays.
Not all browsers
display the splash text
and splash URL
correctly
.
Tip: E-mail the console
URL corresponding to the
issuer certificate to end
users so that the end-user
can install the issuer
certificate as a trusted CA.
17
Best Practices and Deployment
6. Click the
Install Certificate
button to launch the Certificate Import Wizard.
7. Make sure the
Automatically select the certificate store based on the type of
certificate
radio button is enabled before completing the wizard; the wizard
announces when the certificate is imported.
8. (Optional) To view the installed certificate, go to Internet Explorer,
Select
Tools>Internet Options>Contents>Certificates
, and open either the
Intermediate Certification Authorities
tab or the
Trusted Root Certification
Authorities
tab, depending on the certificate you downloaded.
Procedure: To download a certificate through Firefox
1. Go to
Statistics>Advanced
.
2. Select
SSL
.
3. Click
Download a ProxySG Certificate as a CA Certificate
; the list of
certificates on the system display.
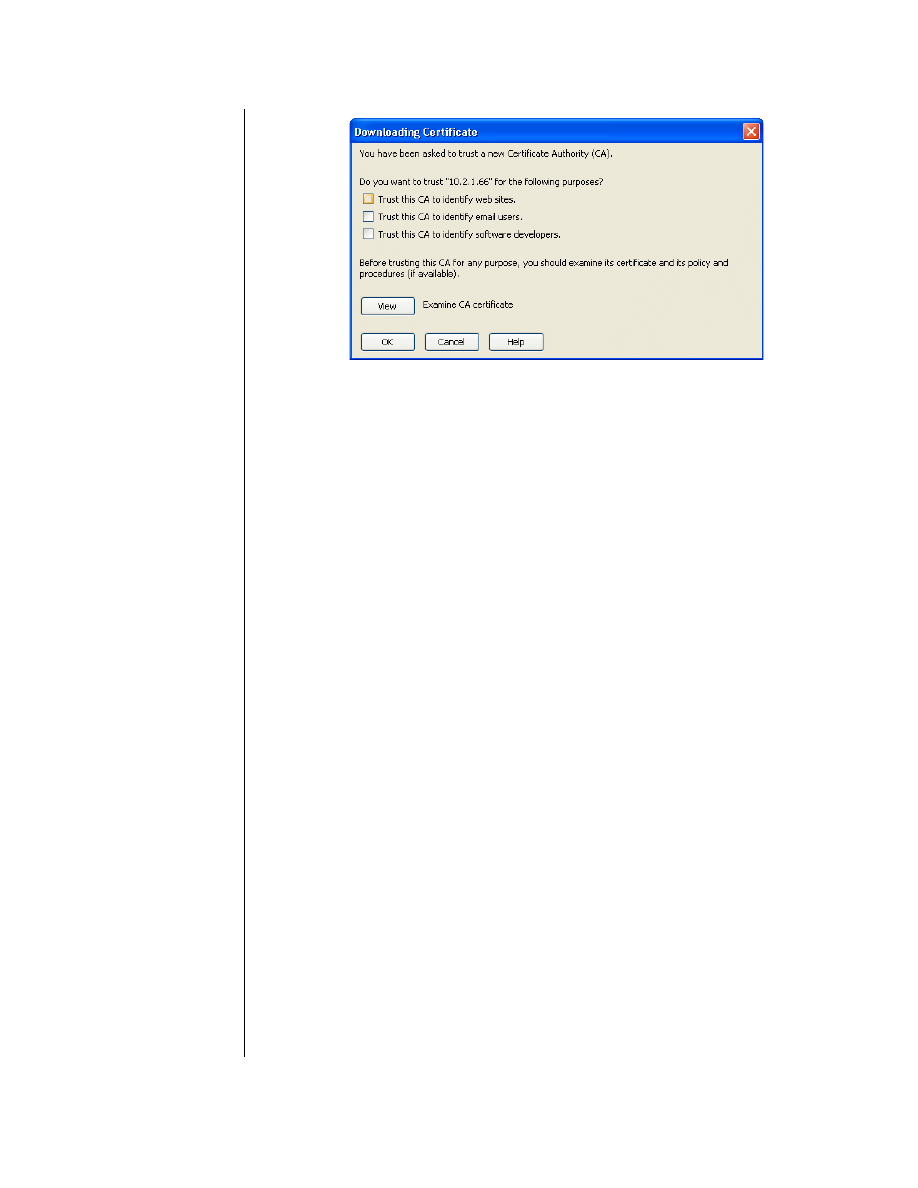
4. Click a certificate (it need not be associated with a keyring); the
Download
Certificate
dialog displays.
Tip: E-mail the console
URL corresponding to
the issuer certificate to
end users so that the
end-user can install the
issuer certificate as a
trusted CA.
Reference Guide: SSL Proxy
18
5. Enable the checkboxes needed. Note that you should view the certificate before
trusting it for any purpose.
6. Click OK; close the Advanced Statistics window.
Question: In addition to browser warnings, how do I create
a web page to explicitly warn users of invalid
certificates and allow them the choice to ignore
the error and continue to the content?
Description: Some servers may have invalid certificates, which trigger warnings
from browsers for instances such as self-signed certificates (untrusted issuer),
expired certificates, and hostname mismatches with the certificate. Users’ connected
to these sites through the ProxySG with the SSL proxy enabled can receive an
additional error page explaining the reason why users could not access the page.
Solution: Present a warning message to users that allows them to connect to the
HTTPS site by clicking on a link. This requires two components: policy and
modified exception pages.
You must
❐
Ensure SSL traffic is in intercept mode:
In
VPM
, create an SSL Intercept layer policy; intercept only the URLs you want
to apply to the Certificate Not Valid policy.
❐
Modify the built-in exceptions:
•
ssl_domain_invalid
•
ssl_server_cert_expired
•
ssl_server_cert_untrusted_issuer.
See “Certificate Not Valid Exception” on page 19.
❐
Install the Certificate Not Valid Policy.

19
Best Practices and Deployment
Certificate Not Valid Exception
This exception needs to be placed in your local policy.
(exception.ssl_domain_invalid
(contact)
(details "Your request contacted a host which presented a
certificate with a Common Name that did not match the domain
requested.")
(format <<--eof--
Your request contacted a host which presented a certificate
with a Common Name that did not match the domain requested.
<br>
<br>
<form method="get" action="$(url)">
<input type="submit" style="width:400;height:24;"
value="Click here if you have a legitimate reason to access
this site"></form>
<br>
--eof--
)
(help "This is typically caused by a Web Site presenting an
incorrect or invalid certificate, but could be because of a
configuration error.")
(summary "SSL Certificate Hostname Mismatch")
(http
(code "409")
(contact)
(details)
(format)
(help)
(summary)
)
)
(exception.ssl_server_cert_expired
(contact)
(details "Your request contacted a host which presented an
expired or Invalid certificate")
(format <<--eof--
Your request contacted a host which presented an expired or
Invalid certificate.
<br>
<br>
<form method="get" action="$(url)">
<input type="submit" style="width:400;height:24;"
value="Click here if you have a legitimate reason to access
this site"></form>
<br>
--eof--
)
(help "This is typically caused by a Web Site presenting an
incorrect or invalid certificate, but could be because of a
configuration error. ")
(summary "Expired SSL Server Certificate")
(http
(code "503")
(contact)

Reference Guide: SSL Proxy
20
(details)
(format)
(help)
(summary)
)
)
(exception.ssl_server_cert_untrusted_issuer
(contact)
(details "Your request contacted a host which presented a
certificate signed by an untrusted issuer.")
(format <<--eof--
Your request contacted a host which presented a certificate
signed by an untrusted issuer.
<br>
<br>
<form method="get" action="$(url)">
<input type="submit" style="width:400;height:24;"
value="Click here if you have a legitimate reason to access
this site"></form>
<br>
--eof--
)
(help "This is typically caused by a Web Site presenting an
incorrect or invalid certificate, but could be because of a
configuration error.")
(summary "Untrusted SSL Server Certificate")
(http
(code "503")
(contact)
(details)
(format)
(help)
(summary)
)
)
Certificate Not Valid Policy
<exception> condition=sslexception
action.mycookie(yes)
<proxy>
condition=sslallow request.header.cookie="sslallow"\
action.rewtohttps(yes)
request.header.cookie="sslallow" action.red(yes)
<ssl>
condition=sslallow server.certificate.validate.ignore(all)
define action mycookie
set(exception.response.header.set-cookie,
"sslallow$(url.cookie_domain)")
end
define action rewtohttps
rewrite(url,"(.*)\?xyzallow","$(1)")
end

21
Best Practices and Deployment
define action red
redirect(307,"(.*)","$(1)?xyzallow")
end
define condition sslallow
url.substring="xyzallow"
end
define condition sslexception
exception.id=ssl_server_cert_untrusted_issuer
exception.id=ssl_server_cert_expired
exception.id=ssl_domain_invalid
end
Note:
❐
For an invalid certificate, the
xyzallow
value is appended to the URL after user
clicks on
Accept.
This is expected behavior.
Question: How do I protect end-user privacy and prevent
accidental exposure of sensitive information
when intercepting SSL traffic?
Answer:
For intercepted SSL traffic, potentially sensitive information is available
in cleartext in the following locations:
❐
If ICAP scanning is enabled for intercepted HTTPS traffic, such data is sent
without encryption to the ICAP server.
❐
You can log request and response headers containing sensitive information to the
access log and event log.
❐
If you use an off-box URL filtering solution, part of the URL may be sent in
cleartext to the URL database service point. Note that such a service point can
be located on the Internet.
❐
Intercepted HTTPS content that is cacheable is also available on the disk in the
clear.
Recommendation:
Take the following measures to prevent accidental
exposure of sensitive information:
•
Use care in determining which sites to intercept. Avoid intercepting well-
known banking and financial sites. On-box URL databases and server
certificate categories can be used in determining which sites to intercept.
•
Use on-box URL databases, such as Blue Coat Web Filter or a third-part
content filtering vendor, to avoid transmitting URLs in cleartext.
•
Implement HTML notification for intercepted sites to inform end-users that
their HTTPS traffic will be monitored and that they can opt-out if they do
not want their traffic to be intercepted. HTML notification is also helpful if
a site is accidentally intercepted.
For information on HTLM
Notification, refer to
Chapter 6 of the Blue Coat
ProxySG Configuration
and Management Guide.
Reference Guide: SSL Proxy
22
•
If you use ICAP scanning for intercepted HTTPS content, make sure that
the network link between the ProxySG and the ICAP server cannot be
snooped.
•
Do not log URL or header information for intercepted HTTPS traffic. (By
default, the SSL log does not log this information.)
The ProxySG allows you to set up notification two ways, HTML notification and
client consent certificates
Setting up HTML Notification
Procedure: Set up HTML notification only for HTTPS sites:
1. Launch the Visual Policy Manager from
Configuration > Policy > Visual Policy
Manager
.
2. Add a new rule to the Web Access layer.
a. Right click the
Action
field; select
Set
.
b. Click
New
, then select the
Notify User
object
.
c.
Customize the
Notify User object
as needed.
d. Click
OK
.
e.
Click
OK.
f.
Right click the
Service
field; select
Set
.
g. Click
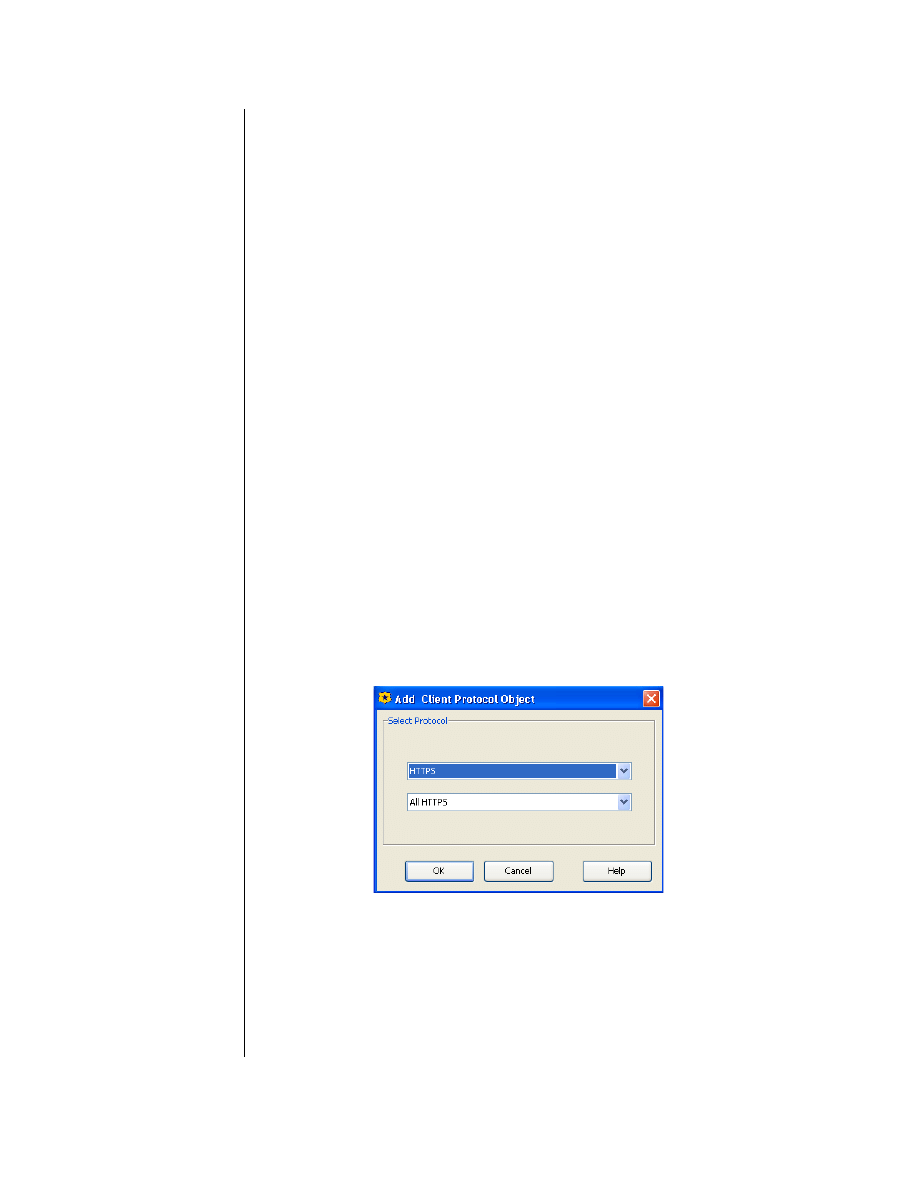
New
, then select the
Client Protocol
object.
h. Select
HTTPS
from the drop-down list in the top field; make sure
ALL
HTTPS
is selected from the drop-down list in the lower field.
i.
Click
OK
.
3. Click
OK
.
4. Apply the policy by clicking
Install Policy
in the upper-right-hand corner.
For information on Client
Consent Certificates, refer
to Chapter 6 of the
Volume
4: Securing the Blue Coat SG
Appliance
.

23
Best Practices and Deployment
Question: How do I set up SSL Proxy in explicit mode?
Answer:
The SSL Proxy can be used in explicit mode in collaboration with the
HTTP Proxy or SOCKS Proxy. You must create an HTTP Proxy service or SOCKS
Proxy service and use it as the explicit proxy from desktop browsers. When requests
for HTTPS content are sent to either a SOCKS proxy or an HTTP proxy, the proxies
can detect the use of the SSL protocol on such connections and enable SSL Proxy
functionality. Note that SSL protocol detection should be enabled for the proxy
service in use (HTTP or SOCKS).
To create an explicit SSL proxy, complete the following steps:
❐
Configure the browser on the desktop to use a proxy or point to a PAC file that
points to the proxy.
❐
Coordinate with other devices, such as a firewall, to prevent users from
accessing the internet without a proxy.
❐
Confirm that an HTTP proxy or SOCKS proxy service is present on the desired
port and that protocol detection is enabled for that service.
❐
Create or import an issuer keyring or use the defaults.
❐
Configure SSL proxy rules through VPM.
Reference Guide: SSL Proxy
24
Question: How do I deploy SSL Proxy in transparent
mode?
Answer:
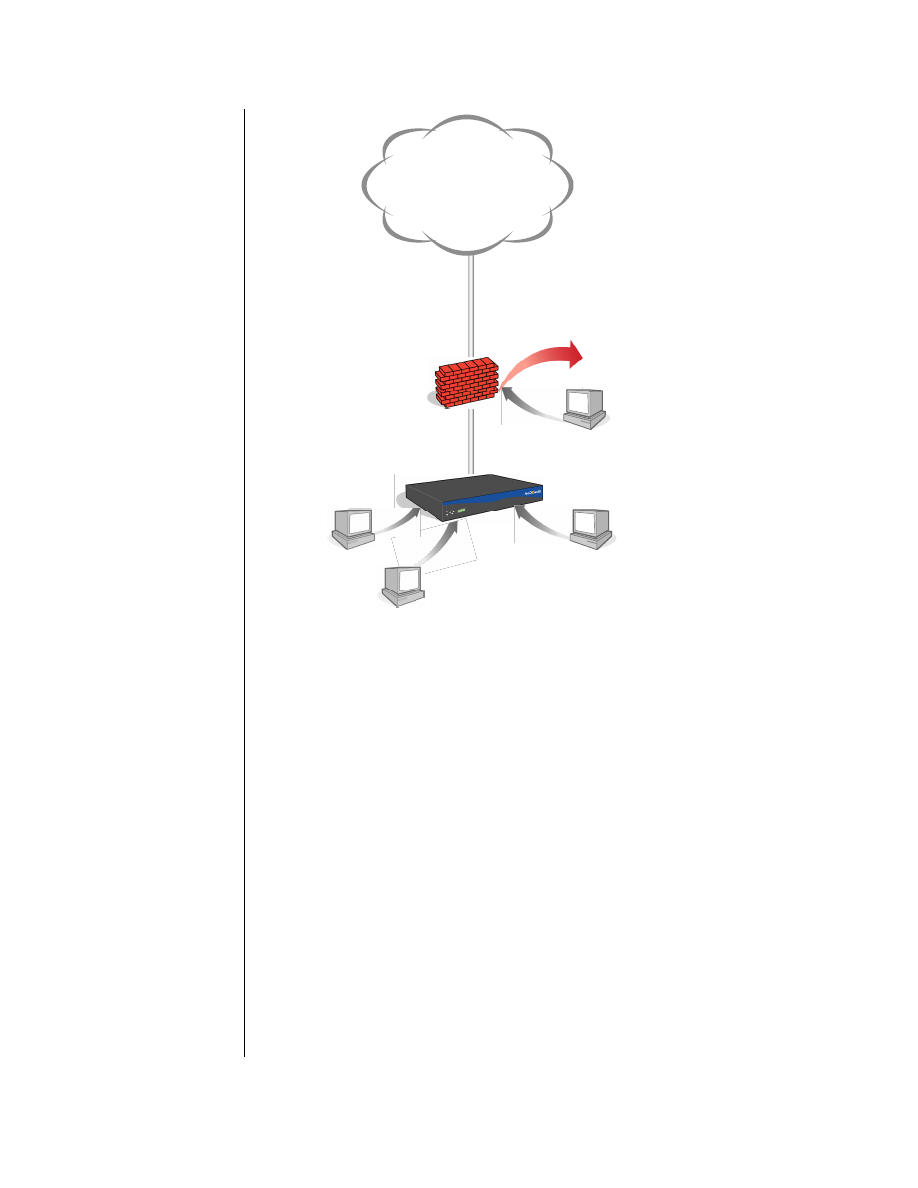
In a transparent proxy configuration, neither the client (browser) nor the
desktop knows that the traffic is being processed by a machine other than the origin
content server (OCS). The browser believes it is talking to the OCS, so the request is
formatted for the OCS; the proxy determines for itself the destination server based on
information in the request, such as the destination IP address in the packet, or the
Host: header in the request.
A transparent proxy requires one of the following:
❐
A hardware bridge
❐
A WCCP switch
❐
An L4 switch
Internet
Disabled Proxy
Settings
Using Proxy Settings to Access
the Internet
25
Best Practices and Deployment
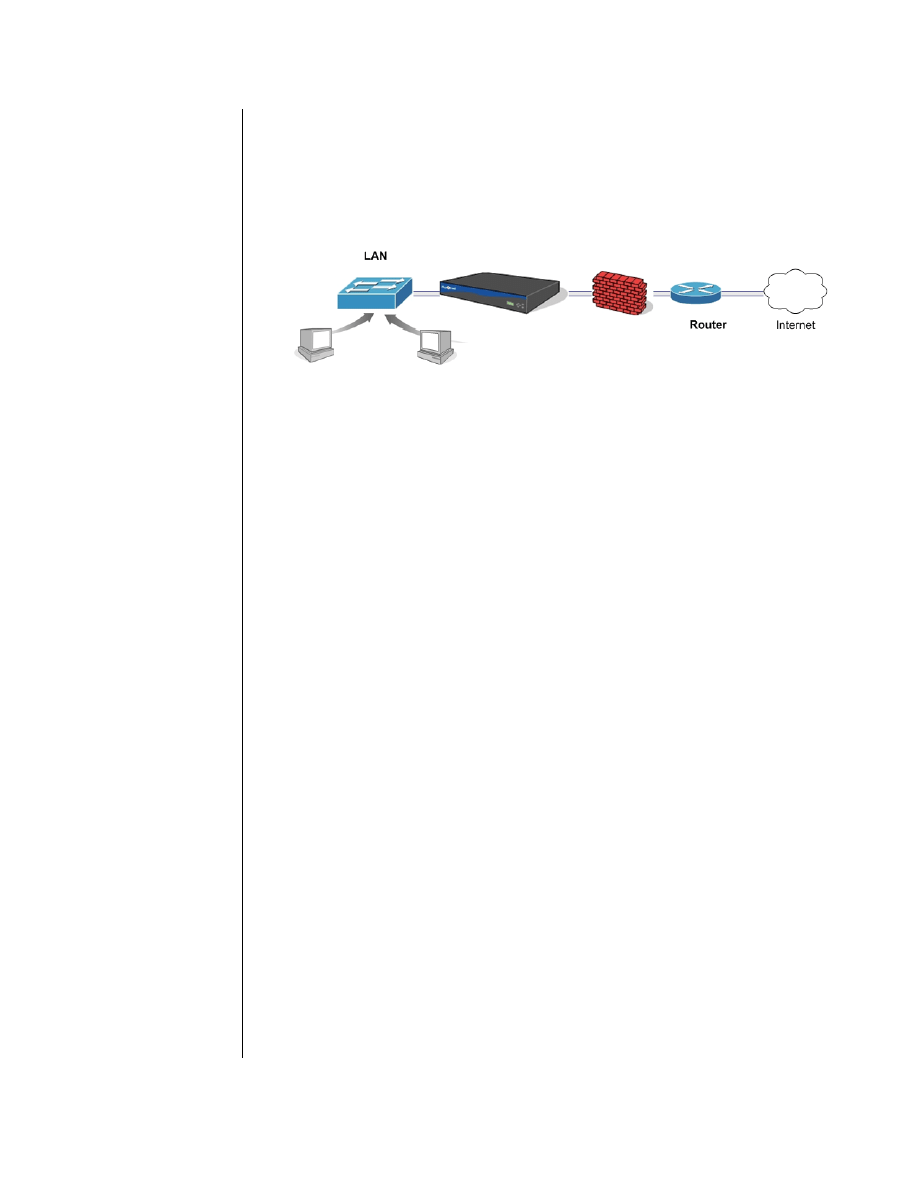
Bridging functionality allows ProxySG appliances to be deployed in environments
where L4 switches, explicit proxies, and WCCP-capable routers are not feasible
options.
A branch office that would take advantage of a bridging configuration is likely to be
small (from 20 to 50 users); for example, it might have only one router and one
firewall in the network, as shown below.
To create a transparent SSL proxy, configure the hardware to use a transparent proxy:
❐
Create an SSL service on port 443.
❐
Create or import an issuer keyring or use the defaults.
❐
Configure SSL proxy through VPM or CPL.
Question: How do I deploy the SSL Proxy in a proxy
chain?
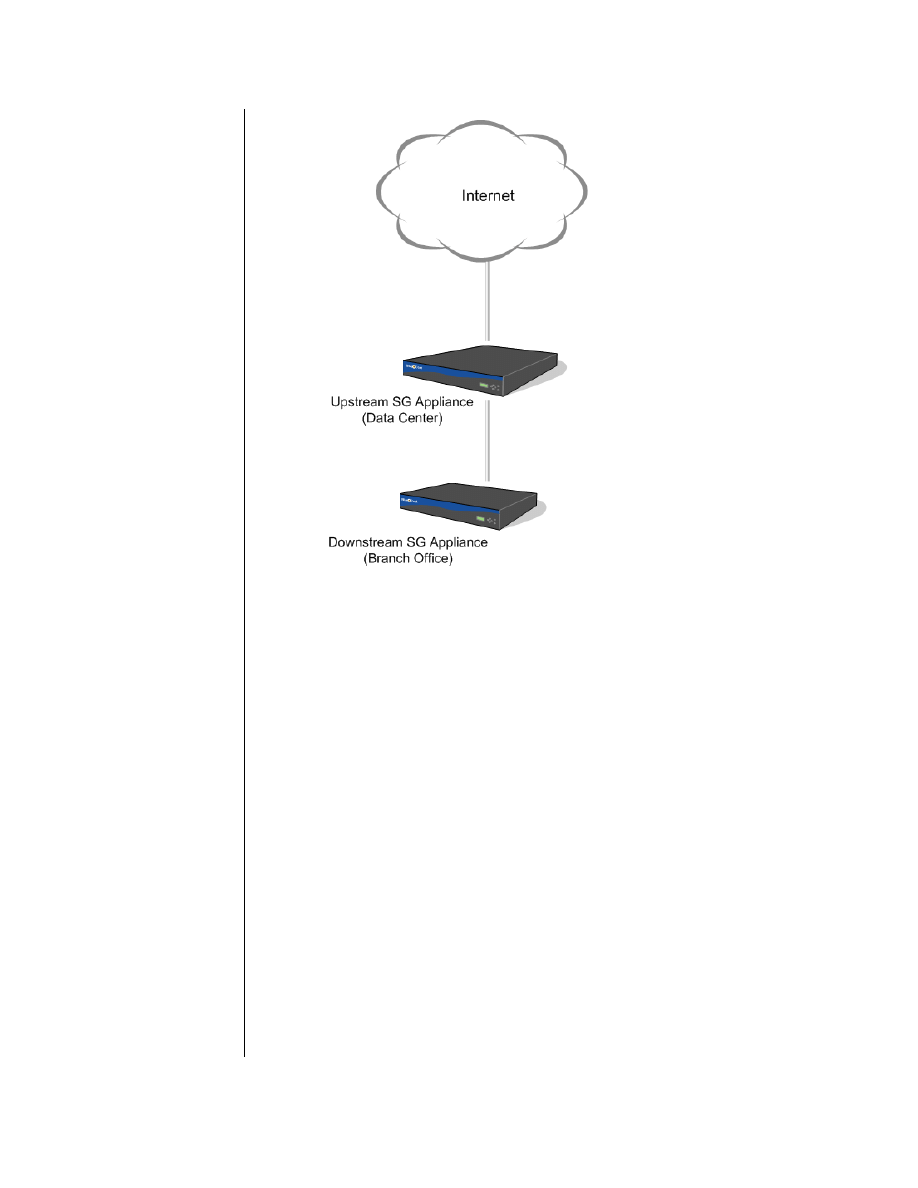
Answer:
A typical SSL proxy chain is shown below.
If you want to use an L4
switch, WCCP, or an
explicit proxy instead of
bridging, disable the
bridging Pass-Thru card.
Reference Guide: SSL Proxy
26
:
The ProxySG at the branch office (the downstream device) uses the ProxySG at the
data center (the upstream device) as its forwarding host, allowing SSL Proxy
functionality to be enabled on both appliances.
Tips on Setting Up SSL Proxy Chaining Functionality
❐
The upstream ProxySG is configured as the forwarding host of type “HTTP
proxy” for the downstream ProxySG.
❐
Both proxies have identical SSL related policy; that is, each should make
identical decisions in terms of which SSL connections are intercepted and which
SSL connections are tunneled.
❐
The issuer certificate used by the upstream ProxySG to sign emulated
certificates should be imported as a CA certificate on the downstream ProxySG.
This ensures that the downstream device can successfully verify emulated
certificates presented by the upstream device.
Note that this applies to intercepted SSL connections only. For tunneled SSL
connections the downstream ProxySG sees the original server certificate.
Now, when an SSL connection is intercepted at the upstream appliance, the ProxySG
emulates the server certificate and presents the emulated server certificate to the
downstream ProxySG.
For information on
using forwarding hosts,
refer to Volume 5 of the
Volume 5: Advanced
Networking
.

27
Best Practices and Deployment
Question: I am using a transparent proxy deployment.
How do I allow non-SSL traffic on port 443 to
certain servers while still enabling the SSL
Proxy for other port 443 traffic?
Answer:
Some legitimate applications, such as the SOCKS-based VPN clients
from Aventail and Permeo, use port 443 to communicate to the VPN gateway.
However, the protocol they use is not SSL. An SSL service created on port 443 that
transparently terminates such TCP connections breaks these applications. That is
because the SSL service enforces the use of the SSL protocol.
Administrators can allow such SOCKS-based VPN tunnels to a few trusted partner
sites.
Procedure: To enable non-SSL protocols on port 443 for certain
applications
1. Create a transparent TCP-tunnel service on port 443. Do not create an SSL
service on port 443.
2. Specify the list of servers that can use port 443 for non-SSL protocols in policy:
define condition Trusted_non_ssl_servers
url.address=1.1.1.1
url.address=2.2.2.2
end condition Trusted_non_ssl_servers
3. Write a <proxy> layer that forces all other traffic on port 443 to use the SSL
protocol:
<proxy>
proxy.port=443 condition =! Trusted_non_ssl_servers
force_protocol(ssl)
These rules ensures that port 443 connections to the list of trusted servers are
tunneled without intervention while all other port 443 connections use the SSL
protocol.
Question: Windows updates fail when I use the SSL Proxy
to intercept all SSL connections.
Answer:
SSL connections for Windows updates should always be tunneled. For
example:
<ssl-intercept>
server.certificate.hostname=update.microsoft.com \
ssl.forward_proxy(no)
ssl.forward_proxy(https)
The same policy can be created in VPM using the
SSL Intercept Layer
, the
Server
Certificate Object,
and the
SSL Forward Proxy object.
Note that you only need to do this if the policy intercepts everything. If you do
selective interception, as recommended, this issue does not arise.
For information on
creating TCP-tunnel
services, refer to
Volume 2:
Proxies and Proxy Services
.

Reference Guide: SSL Proxy
28
Question: Can I use CA hierarchy for certificate
emulation?
Answer:
Some enterprises have a well-defined CA Certificate hierarchy (chain) in
place. Consider the hypothetical example of Clothing-Max, a retail clothing outlet
with 150 stores in the U.S. and Canada.
The Clothing-Max Root CA Certificate is at the top of the hierarchy and has issued a
CA certificate for the Clothing-Max IT department. In turn, the IT department issues
a CA certificate for the IT security team.
If the security team wants to deploy the SSL proxy using its CA certificate as the
issuer for emulated certificates, the team will import this certificate and its private
key on the ProxySG. Note that the intermediate CA must be imported in two places
on the ProxySG:
❐
Under the “Keyrings” panel where both the private key and the certificate are
stored.
❐
Under “CA Certificates” panel on ProxySG. This second step ensures that the
SSL Proxy chains the intermediate CA certificate along with the emulated
certificate.
The ProxySG now signs the emulated certificates using the private key of the
Clothing-Max IT Security Team CA Certificate. The certificate chain for an
emulated certificate for a Clothing-Max server will be:
In this case, the browser does not show a security pop-up if it is able to verify all
certificates in the certificate hierarchy.
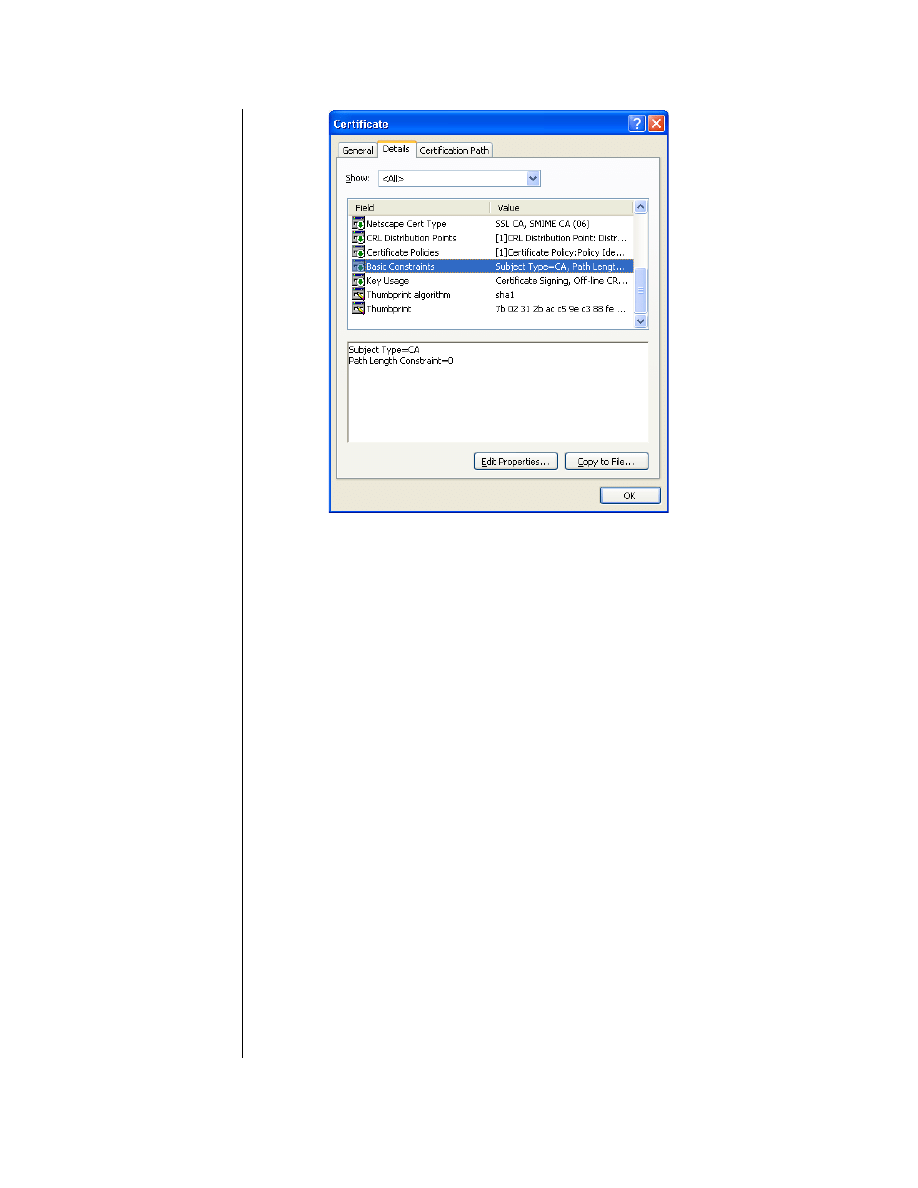
If you use Internet Explorer, additional requirements are necessary on the
intermediate CA certificates in the certificate chain.
Intermediate CA certificates must contain the basic constraints certificate extension
with the Subject Type set to CA. Also, if your intermediate CA certificate has a
KeyUsage extension, make sure it has the “Certificate Signing” attribute present.
Root CA certificates are exempt from this requirement:
The illustration below shows a Verisign Class 2 Intermediate Certificate Basic
Constraints Extension.
Root CA
Intermediate CAs
Emulated Certificate
Clothing-Max
Clothing-Max IT
Clothing-Max IT Security
Team
Clothing-Max Server
Root CA
Intermediate CA
Intermediate CA
Clothing-Max
Clothing-Max IT
Clothing-Max IT Security Team
29
Best Practices and Deployment
d
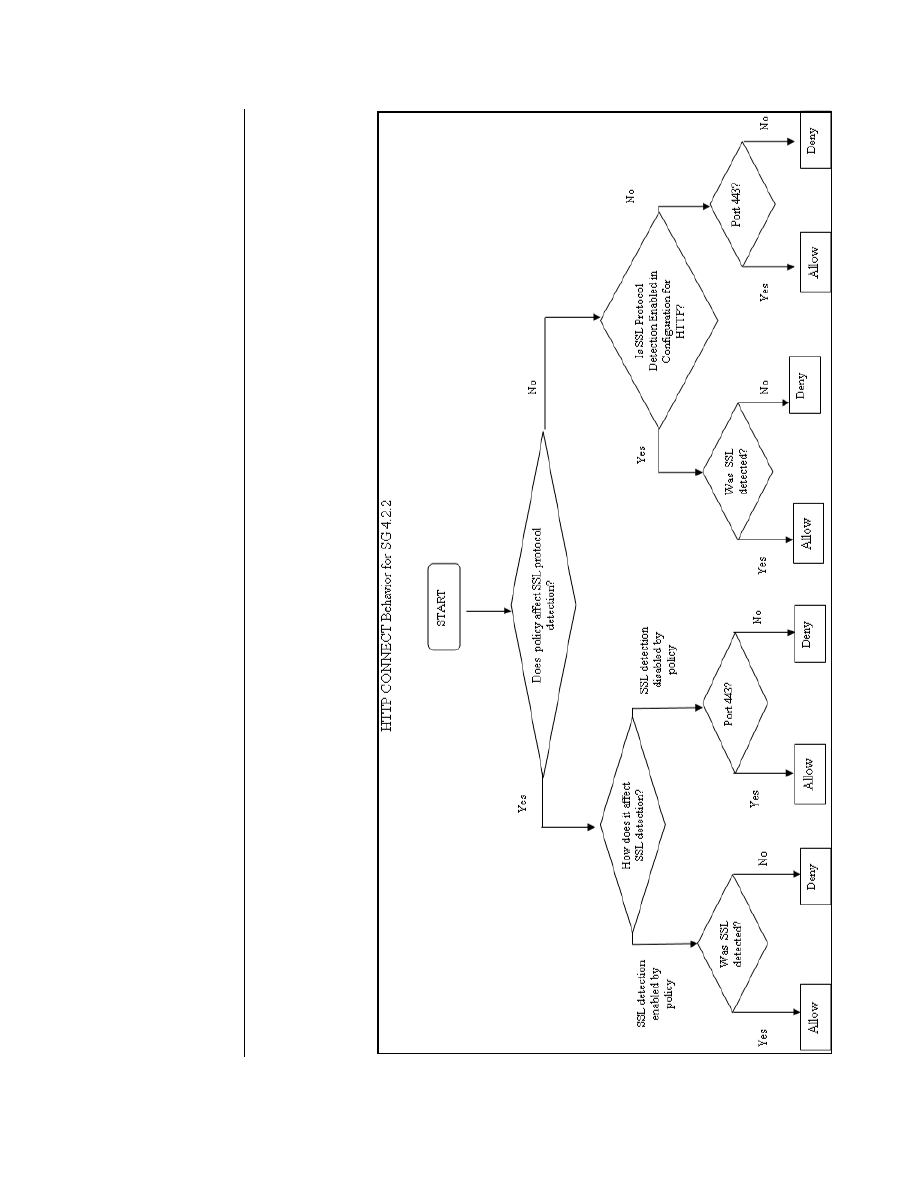
Question: How does the HTTP Proxy securely process the
CONNECT method?
Answer:
A.: It follows the rules outlined in the flow chart below.
For detailed information
on creating an
Intermediate CA using
OpenSSL, refer to Volume
2 of the
Volume 2: Proxies
and Proxy Services
.
Reference Guide: SSL Proxy
30

31
Best Practices and Deployment
Question: How do I authenticate intercepted SSL traffic
and add the username to the access log?
Answer:
For transparent authentication, continue with the next section. For
explicit authentication, skip to “Explicit Authentication” on page 35.
Transparent Authentication
Complete the following steps on the ProxySG:
1. Create an authentication realm, such as LDAP, IWA, or RADIUS, based on the
environment. (Management Console Location:
Configuration > Authentication
>
Realm_Name
)
2. As part of realm authentication, change the virtual URL for the realm to
https://
hostname:444
. The hostname, which must not be a fully qualified domain name,
must resolve to the IP address of the ProxySG. (Management Console Location:
Configuration > Authentication >
Realm_Name
> General
)
3. Make sure that transparent proxy is set to the session cookie method. This is the
default. (Management Console Location:
Configuration > Authentication >
Transparent Proxy
)
4. An HTTPS (SSL) Service already exists on the system by default. Modify the
default HTTPS service, if needed, to intercept traffic on port 443. (Management
Console Location:
Configuration > Services > Proxy Services
> Encrypted
Service Group > HTTPS > Edit Service
)
5. Create an HTTPS reverse proxy on theProxySG so that connections to the
virtual URL are intercepted by the ProxySG (Management Console Location:
Configuration > Services > Proxy Services
> Reverse Proxy Service Group
> New Service
)
6. (Optional) If you use a TCP-tunnel service on 443 in transparent mode instead
of the SSL service, enable protocol detection on the TCP-tunnel service.
(Management Console Location:
Configuration > Services > Proxy Services
>
Other Service Group > New Service
)
7. The following steps describe how to write policy to enable SSL Proxy
functionality using the Visual Policy Manager. For an example of policy using
CPL, see “Sample CPL for Transparent Authentication” on page 34.
a. From the Management Console, launch the Visual Policy Manager:
Configuration > Policy > Visual Policy Manager > Launch
b. From the Policy menu, select Add SSL Intercept Layer.
Note: For more
information about
authentication modes,
refer to
Volume 4: Securing
the Blue Coat SG Appliance
.
Note: For more
information about
creating policy, refer to
Volume 10: Content Policy
Language Guide
Reference Guide: SSL Proxy
32
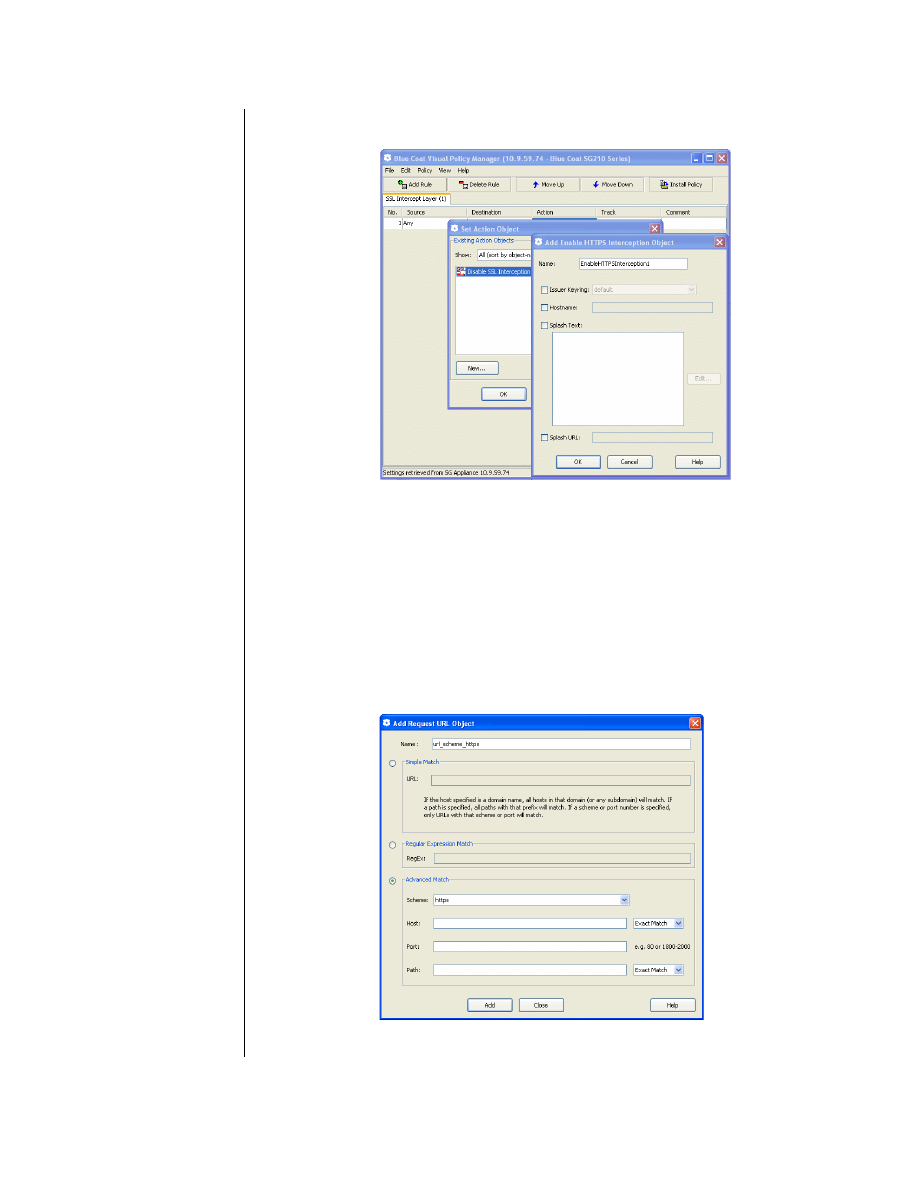
c.
Right-click the Action cell and select Set. Click New and select Enable
HTTPS Interception.
d. Click OK to add the interception object, and then click OK to close the Set
Action Object dialog.
e.
From the Policy menu, select Add Web Authentication Layer. You will be
creating a combined object containing two Request URL objects: HTTPS,
and HTTP.
f.
Right-click the Destination cell and select Set. Click New and select
Request URL.
g. Select Advanced Match. In the Name field, type url_scheme_https. From
the Scheme drop-down list, select https.

33
Best Practices and Deployment
h. Click Add to add the Request URL Object for HTTPS.
i.
Now, repeat the same procedure to add a Request URL Object for HTTP.
Select Advanced Match. In the Name field, type url_scheme_http. From
the Scheme drop-down list, select http.
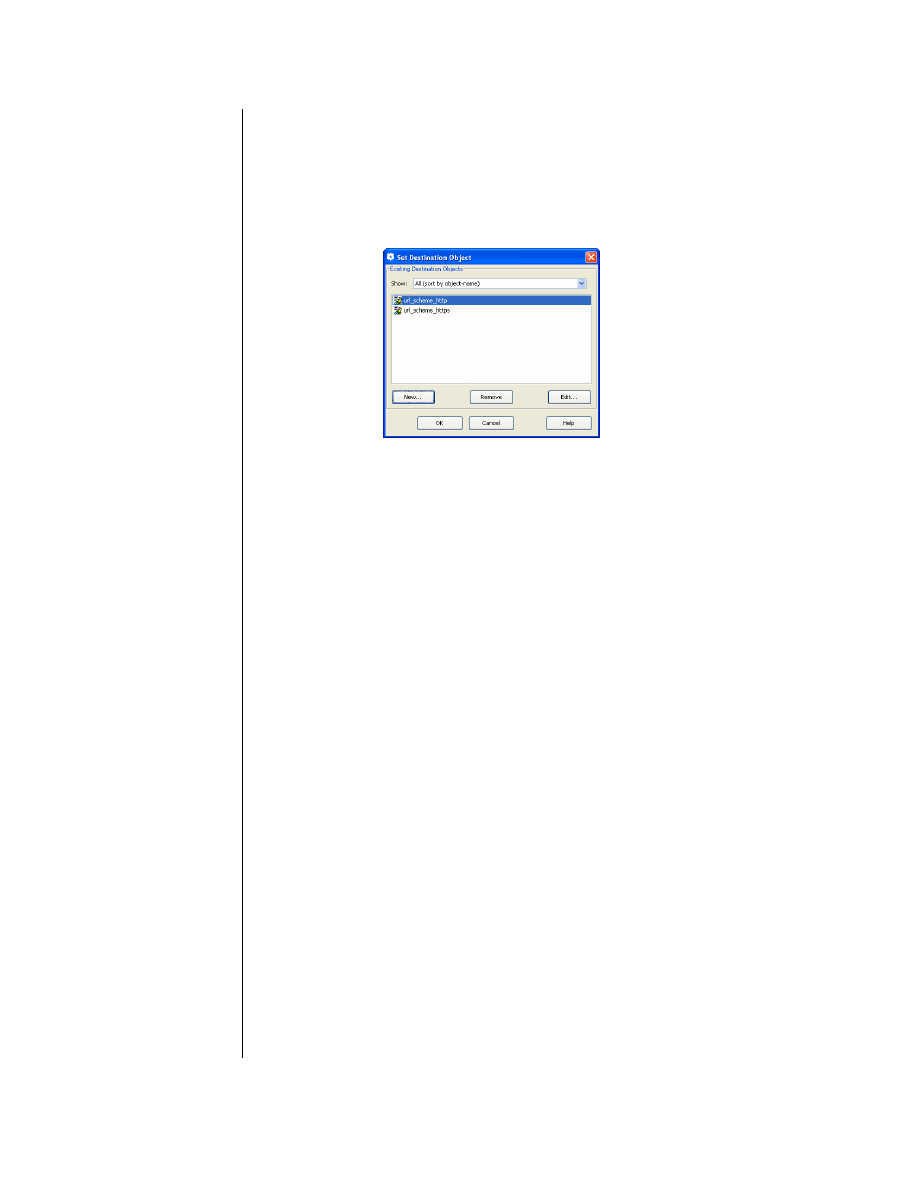
j.
Click Add and then Close. You should now see both url_scheme_http and
url_scheme_https in the Set Destination Object dialog.
k. Click New and select Combined Destination Object.
l.
Shift-click to select both url_scheme_http and url_scheme_https and then
click Add.
m. Click OK to add the Combined Destination Object to the Web Access
Layer, and then click OK to close the Set Destination Object dialog.
n. Right-click the Action cell and select Set.
o. Click New and select Authenticate.
p. Specify the desired Realm and select a redirect Mode:
•
origin-cookie-redirect, where the client is redirected to a virtual URL to
be authenticated, and cookies are used as the surrogate credential.
•
origin-ip-redirect (insecure), where the client is redirected to a virtual
URL to be authenticated, and the client ip_address is used as a
surrogate credential.
•
form-cookie-redirect, where a form is presented to collect the user's
credentials. The user is redirected to the authentication virtual URL
before the form is presented.
•
form-ip-redirect (insecure), where the user is redirected to the
authentication virtual URL before the form is presented.
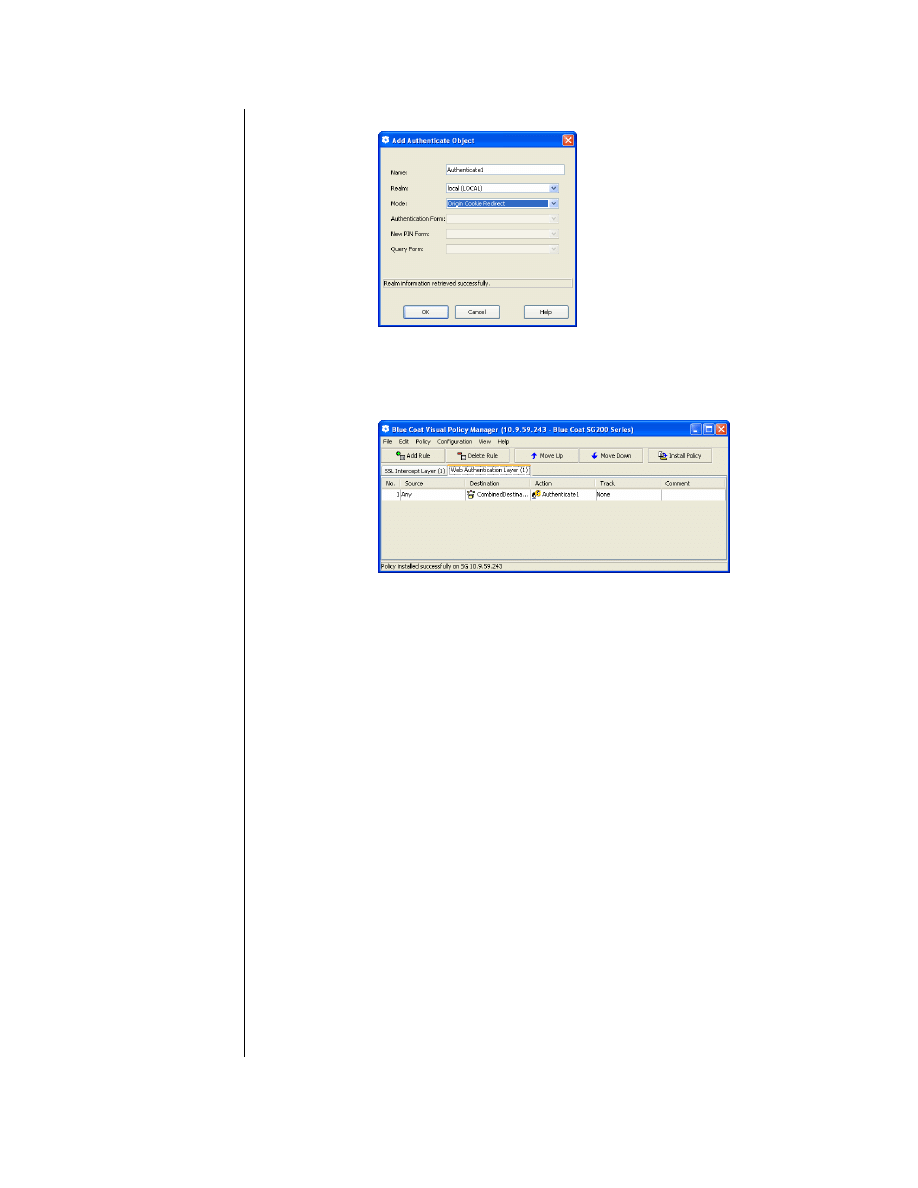
Reference Guide: SSL Proxy
34
In this example, the local realm is set to Origin-Cookie-Redirect.
q. Click OK to add the Authenticate Object, and then click OK to close the
Set Destination Object dialog.
r.
In the Visual Policy Manager, click Install Policy.
8. Add the access log field cs-username to the SSL access log format.
(Management Console Location:
Configuration > Access Logging > Formats
> SSL > Edit
)
Sample CPL for Transparent Authentication
You can also use the CPL to write policy. In this example, realm name is called local
and the authentication mode is origin-cookie-redirect:
<ssl-intercept>
ssl.forward_proxy(https)
<Proxy>
authenticate(local) authenticate.mode(origin-cookie-
redirect)
;Definitions
define condition client_protocol
client.protocol=https
client.protocol=http
end

35
Best Practices and Deployment
Explicit Authentication
Complete the following steps on the ProxySG:
1. Create an authentication realm, such as LDAP, IWA, or RADIUS, based on the
environment. (Management Console Location:
Configuration > Authentication
>
Realm_Name
)
2. As part of realm authentication, change the virtual URL for the realm to
https://
hostname:444
. The hostname, which must not be a fully qualified domain name,
must resolve to the IP address of the ProxySG. (Management Console Location:
Configuration > Authentication >
Realm_Name
> General
)
3. Create an HTTP proxy service that is the explicit proxy from desktop browsers
(Management Console Location:
Configuration > Services > Proxy Services
>
New Service
):
•
Give the service a meaningful name.
•
Select the Service Group where you want the service to live.
•
Enable the Detect Protocol attribute.
•
Configure a new listener with an explicit destination address.
4. Create an HTTPS reverse proxy on the ProxySG so that connections to the
virtual URL are intercepted by the ProxySG (Management Console Location:
Configuration > Services > Proxy Services > Reverse Proxy Service
Group > New Service
).
5. The following steps describe how to write policy to enable SSL Proxy
functionality using the Visual Policy Manager. For an example of policy using
CPL, see “Sample CPL for Explicit Authentication” on page 38.
a. From the Management Console, launch the Visual Policy Manager:
Configuration > Policy > Visual Policy Manager > Launch
b. From the Policy menu, select Add SSL Intercept Layer.

Reference Guide: SSL Proxy
36
c.
Right-click the Action cell and select Set. Click New and select Enable
HTTPS Interception.
d. Click OK to add the interception object, and then click OK to close the Set
Action Object dialog.
e.
From the Policy menu, select Add Web Authentication Layer. You will be
creating a combined object containing two Request URL objects: HTTPS,
and HTTP.
f.
Right-click the Destination cell and select Set. Click New and select
Request URL.
g. Select Advanced Match. In the Name field, type url_scheme_https. From
the Scheme drop-down list, select https.
37
Best Practices and Deployment
h. Click Add to add the Request URL Object for HTTPS.
i.
Now, repeat the same procedure to add a Request URL Object for HTTP.
Select Advanced Match. In the Name field, type url_scheme_http. From
the Scheme drop-down list, select http.
j.
Click Add and then Close. You should now see both url_scheme_http and
url_scheme_https in the Set Destination Object dialog.
k. Click New and select Combined Destination Object.
l.
Shift-click to select both url_scheme_http and url_scheme_https and then
click Add.
m. Click OK to add the Combined Destination Object to the Web Access
Layer, and then click OK to close the Set Destination Object dialog.
n. Right-click the Action cell and select Set.
o. Click New and select Authenticate.
p. Specify the desired Realm and select a redirect Mode:
•
origin-cookie-redirect, where the client is redirected to a virtual URL to
be authenticated, and cookies are used as the surrogate credential.
•
origin-ip-redirect (insecure), where the client is redirected to a virtual
URL to be authenticated, and the client ip_address is used as a
surrogate credential.
•
form-cookie-redirect, where a form is presented to collect the user's
credentials. The user is redirected to the authentication virtual URL
before the form is presented.
•
form-ip-redirect (insecure), where the user is redirected to the
authentication virtual URL before the form is presented.

Reference Guide: SSL Proxy
38
In this example, the local realm is set to Origin-Cookie-Redirect.
q. Click OK to add the Authenticate Object, and then click OK to close the
Set Destination Object dialog.
r.
In the Visual Policy Manager, click Install Policy.
6. Add the access log field cs-username to the SSL access log format.
(Management Console Location:
Configuration > Access Logging > Formats
> SSL > Edit
)
Sample CPL for Explicit Authentication
You can also use the CPL to write policy. In this example, realm name is called local
and the authentication mode is origin-cookie-redirect:
<ssl-intercept>
ssl.forward_proxy(https)
<Proxy>
condition=client_protocol http.method=!CONNECT
authenticate(local) authenticate.mode(origin-cookie-
redirect)
;Definitions
define condition client_protocol
client.protocol=https
client.protocol=http
end

39
Troubleshooting Tips
Can’t Reach an HTTPS Site
Description: A request to an HTTPS site results in a failure to reach the site and the
browser displays an HTML error page that describes a certificate error . In the
ProxySG event log, one of the following is displayed:
"Server certificate validation failed for
support.bluecoat.com at depth 0, reason Untrusted Issuer" 0
310000:1 ../ssl_proxy/sslproxy_worker.cpp:1157
"Server certificate validation failed for www.etrade.com at
depth 0, reason Certificate expired or not valid yet" 0
310000:1 ../ssl_proxy/sslproxy_worker.cpp:1157
Solutions:
Option 1 (Most Secure):
❐
For untrusted issuer errors:
Get the CA certificate from the server administrator and import it to the
ProxySG. This is secure only if you can trust the CA’s policies when they issue
server certificates. When validating the new server certificate, make sure that a
new browser instance is used.
❐
For expired certificate errors:
•
First check the clock on your proxy. Since the expiration check compares
the dates in the certificate against the proxy’s clock, make sure that the
correct date and time is set.
•
If you still get certificate expired errors, the most secure solution is to get a
new certificate with valid dates. This may not possible if you do not control
the server.
Option 2 (Less Secure):
Create and install policy to ignore specific errors.
❐
To ignore untrusted issuer errors
<ssl>
server_url.host="intranet.company.com" \
server.certificate.validate.ignore.untrusted_issuer(yes)
If a site is rejected by
the ProxySG, it does
not necessarily mean
the certificate is self-
signed or not valid.
Certificates not signed
by a commercial
signing authority, such
as those signed by the
United States
Department of Defense,
are rejected until the
CA is added to the
ProxySG’s store.

Reference Guide: SSL Proxy
40
❐
To ignore certificate expiration errors:
<ssl>
server_url.host=”intranet.company.com” \
server.certificate.validate.ignore_expiration(yes)
Upgrading and Using SSL Client Certificates with
Internet Explorer
After upgrading to SGOS 4.2.x or higher, client certificate authentication can stop
working with Internet Explorer if the HTTPS reverse proxy service in question is not
using a CA-Certificate List
(CCL). This is because IE cannot handle the long list of
CAs presented by SG in he handshake messages.
Problem: Client certificates do not work with Internet Explorer
Description: When the ProxySG requests a client certificate from the browser, it
includes the list of CAs it trusts in the “Certificate Request” message. The default list
of CA certificates configured on the ProxySG has grown and now spans multiple
SSL records. Internet Explorer cannot handle SSL handshake messages than span
multiple SSL records.
Solutions:
❐
For the SSL Proxy, this issue means that the client consent certificate feature
that allows the ProxySG to notify users in advance of HTTPS interception does
not work with Internet Explorer. No workaround exists.
❐
For the HTTPS Reverse Proxy, you can create a CCL, which reduces the number
of CAs trusted by a service to the point where Internet Explorer can handle it.
Problem: How to use client certificates to communicate with
servers using the SSL Proxy
Description: When the SSL Proxy is intercepting HTTPS traffic, requests to a
HTTPS site result in failure if the server requires a client certificate.
Solution: You can use client certificates to communicate with the server when the
SSL proxy is used in tunnel mode. You cannot use client certificates to communicate
with the server when the SSL proxy is intercepting traffic.
Logging
Problem: How to include other information in the SSL access log
Description: The default access log fields for the SSL log do not contain any
sensitive information. Only information that can be seen in the clear on the wire is
included in the SSL access log.
Solution: The SSL access log is customizable, meaning that you can add fields that
containing sensitive information. For more information on configuring access logs,
This problem only affects
Internet Explorer. Other
browsers do not have this
issue.

41
Troubleshooting Tips
refer to Chapter 21 in the Blue Coat ProxySG Configuration and Management
Guide.
Problem: SSL access log contains no data
Description: When you intercept and log all traffic, the log remains empty.
Solution: You might be logging all https-forward-proxy connections (that is,
intercepted connections) to the main facility instead of the SSL facility.
Microsoft
Problem: Windows Update
Description: Windows Update fails when the SSL Proxy intercepts Windows
Update connections. This is because Windows Update does not trust the emulated
certificate presented by the SSL Proxy.
Solution: Always tunnel SSL connections for Windows Update.
<ssl-intercept>
server.certificate.hostname=update.microsoft.com \
ssl.forward_proxy(no)
ssl.forward_proxy(https)
Problem: Login through HTTP with MSN IM client fails
Description: Logging in to the MSN IM client fails if the SSL Proxy is intercepting
HTTP traffic, and the proxy does not display a certificate pop-up. This is because the
IM client does not trust the emulated certificate presented by the SSL Proxy.
Solution: Write policy to disable SSL interception for login.live.com, such as:
ssl-intercept>
condition=!DoNotInterceptList ssl.forward_proxy(https)
; Definitions
define condition DoNotInterceptList
server.certificate.hostname=login.live.com
server.certificate.hostname=loginnet.passport.com
end
Solution: Import the ProxySG’s issuer certificate as trusted in the browser.
SKYPE
Problem: How to allow Skype for a specific user
Description: While Skype uses HTTP and SSL as transport protocol, the application
content is proprietary to Skype and does not adhere to HTTP standards.
Solution: To allow Skype for a specific user:
❐
Create a firewall policy that denies clients from going directly to the Internet.

Reference Guide: SSL Proxy
42
❐
Allow only the ProxySG to connect to the Internet for HTTP, HTTPS and FTP
services.
❐
Install SGOS 4.2.2 or higher with a valid SSL proxy license.
❐
Ensure that the ProxySG has SSL detection enabled for HTTP CONNECT,
SOCKS, and TCP Tunnel under
Configuration > Services > SSL Proxy
.
❐
Verify the policy as described in Verifying Skype Request Blocking in the
following TechBrief:
http://www.bluecoat.com/downloads/support/tb_skype.pdf
Error Messages
Problem: How do I decipher error messages?
Description: How do error messages indicate whether the ProxySG was acting as an
SSL server or as an SSL client?
Solution: When reading SSL-related event log messages, remember that:
❐
If an error message begins with
CFSSL:SSL_accept error
, that means the
ProxySG encountered errors on the client-side connection when acting as an
SSL server.
❐
If an error message begins with
CFSSL:SSL_connect error
, that means the
ProxySG encountered errors on the server side or upstream connection when
acting as an SSL client.
For example, the following are errors when the ProxySG was acting as an SSL
server:
2007-06-05 21:43:57+02:00CEST "CFSSL:SSL_accept
error:1408E0F4:SSL routines:SSL3_GET_MESSAGE:unexpected
message" 0 310000:1 ../cf_ssl.cpp:1505
2007-06-05 21:44:03+02:00CEST "CFSSL:SSL_accept
error:14089087:SSL
routines:SSL3_GET_CLIENT_CERTIFICATE:cert length mismatch"
0 310000:1 ../cf_ssl.cpp:1505
The following are errors when the ProxySG was acting as an SSL client:
2007-06-05 21:43:57+02:00CEST "CFSSL:SSL_connect
error:1408E0F4:SSL routines:SSL3_GET_MESSAGE:unexpected
message" 0 310000:1 ../cf_ssl.cpp:1505
2007-06-05 21:44:03+02:00CEST "CFSSL:SSL_connect error:
1408E10B: SSL routines: SSL3_GET_SERVER_HELLO:
wrong ssl
version" 0 310000:1 ../cf_ssl.cpp:1505
Document Outline
- SSL Proxy
- Contact Information
- Introduction to the Blue Coat SSL Proxy
- SSL Proxy Overview
- Best Practices and Deployment
- Question: What do I need to know before deploying the SSL Proxy?
- Question: How do I fix server certificate errors?
- Question: How do I selectively intercept SSL traffic?
- Question: Can the ProxySG Distribute issuer certificates to client desktops?
- Question: In addition to browser warnings, how do I create a web page to explicitly warn users of invalid certificates and allow them the choice to ignore the error and continue to the content?
- Question: How do I protect end-user privacy and prevent accidental exposure of sensitive information when intercepting SSL traffic?
- Question: How do I set up SSL Proxy in explicit mode?
- Question: How do I deploy SSL Proxy in transparent mode?
- Question: How do I deploy the SSL Proxy in a proxy chain?
- Question: I am using a transparent proxy deployment. How do I allow non-SSL traffic on port 443 to certain servers while still enabling the SSL Proxy for other port 443 traffic?
- Question: Windows updates fail when I use the SSL Proxy to intercept all SSL connections.
- Question: Can I use CA hierarchy for certificate emulation?
- Question: How does the HTTP Proxy securely process the CONNECT method?
- Question: How do I authenticate intercepted SSL traffic and add the username to the access log?
- Troubleshooting Tips
Wyszukiwarka
Podobne podstrony:
więcej podobnych podstron