How to make a Wendy house
Part One: The Floor and the Frame
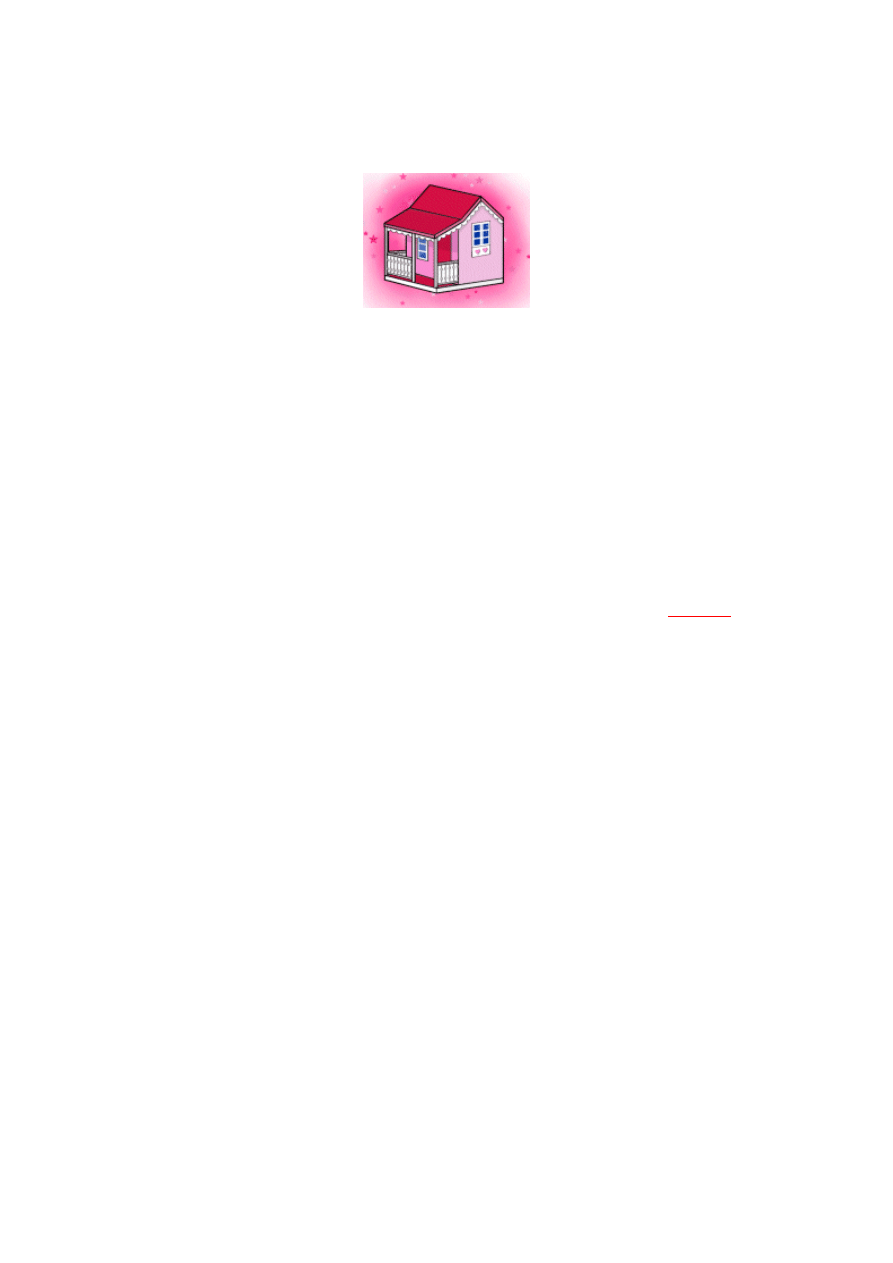
The Wendy House.
This wendy house is basically a playhouse with a few feminine touches added. A wendy
house can give children hours of enjoyment. And with a little imagination, customized touches
can be added to create a unique and special environment.
This house stands 2 metres high, is 2.3 metres long and 1.2 metres wide with a 700mm wide
deck along the front.
Explanation of timber sizes.
The timber sizes referred to in this project are the finished or 'actual' sizes.
For example:
If you went along to the timber yard and asked for a piece of 75x50 mg framing, the actual
timber size would not be 75x50, but rather 65x46. Confused? Well 75x50 was the
approximate size of the timber before it was planed, dressed or gauged and is still referred to
in timber yards as 75x50, even though the finished size is 65x46, give or take a mil. Hence
the term used in this page 'ex 75x50'. For more timber terminology explanations
About the timber.
All timbers used for the construction of the wendy house are readily available at most timber
merchants or building suppliers.
The floor base is constructed of 145x46 (ex 150x50) tanalised mg (gauged, smooth finish)
with standard 90x32 pine decking.
All the framing timbers are 65x46 (ex 75x50) mg H1 f2. That means the timber is gauged,
treated for inside use only, and No2 framing, with the exception of the ridge beam (90x46 mg
H1 f2) and the posts (65x46 mg H3), the latter is tanalised, a treatment for outside use.
The Plans. (The following images might take a tick to load)
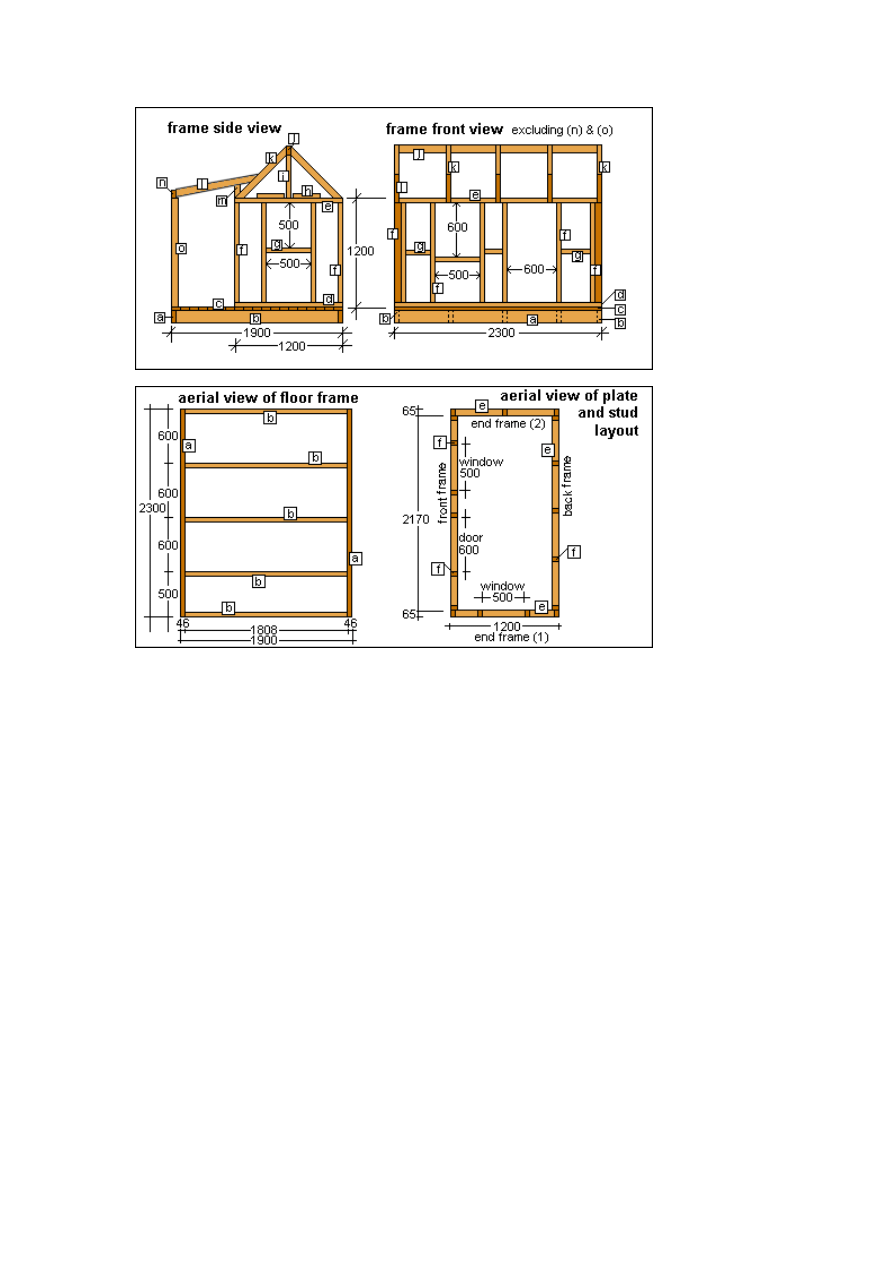
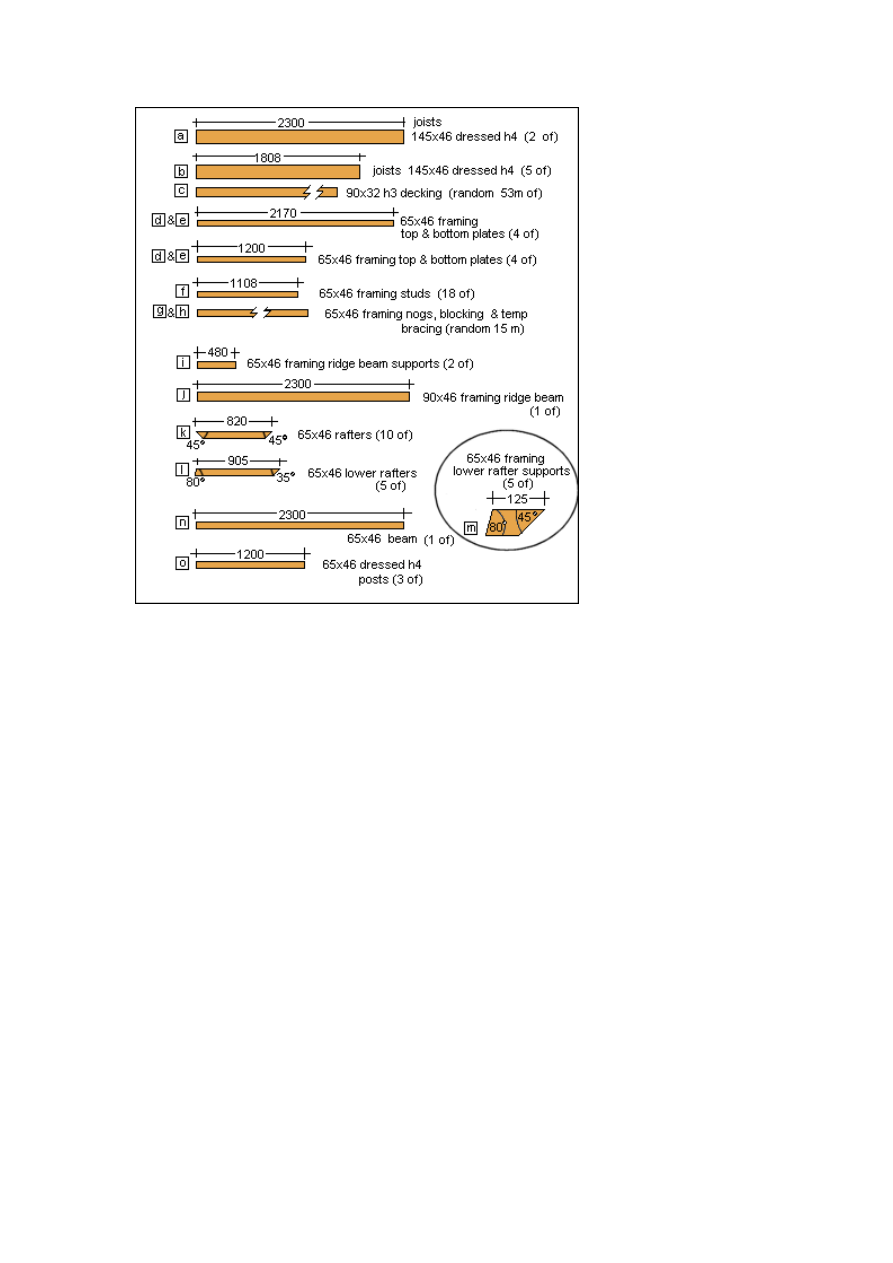
The Floor and Frame Cutting List.
The Instructions.
Step one: The pieces
Cut all the timber as shown in the cutting list above.
Step two: The base and floor
On a level, flat piece of ground make a rectangle by nailing the two longer joists (a) to two of
the shorter joists (b). Nail another three intermediate joists (b) in place evenly spaced (see
above floor frame plan). Use 90 or 100mm galvanized nails.
Check that the floor base is square by measuring diagonally from corner to corner. When the
diagonals are equal, then the base is square.
Cut the decking to length (20 lengths @ 2300mm) and Lay and fix to the base beginning from
one side. Use 75mm galvanized jolthead nails.
Step three: the wall frames
Lay out the bottom plates (d) flat on the floor to form a rectangle 2300x1200. Lay the top
plates (e) on top of the bottom plates and mark the stud positions on the edge of both plates
(see above plate and stud layout diagram).
Separate the plates (d & e) and lay the studs (f) in place. Cut and fix nogs (g) between studs
(f) as shown in 'the plans' diagram above.
Nail the wall frame together.
There will be four wall frames in all, the two end frames and the front and back frame.
Stand the frames up in place and nail together, ensure the bottom plates are straight and fix
to the floor.
Check all corners are vertical (plumb) and fix temporary diagonal braces to the insides of the
wall frames.
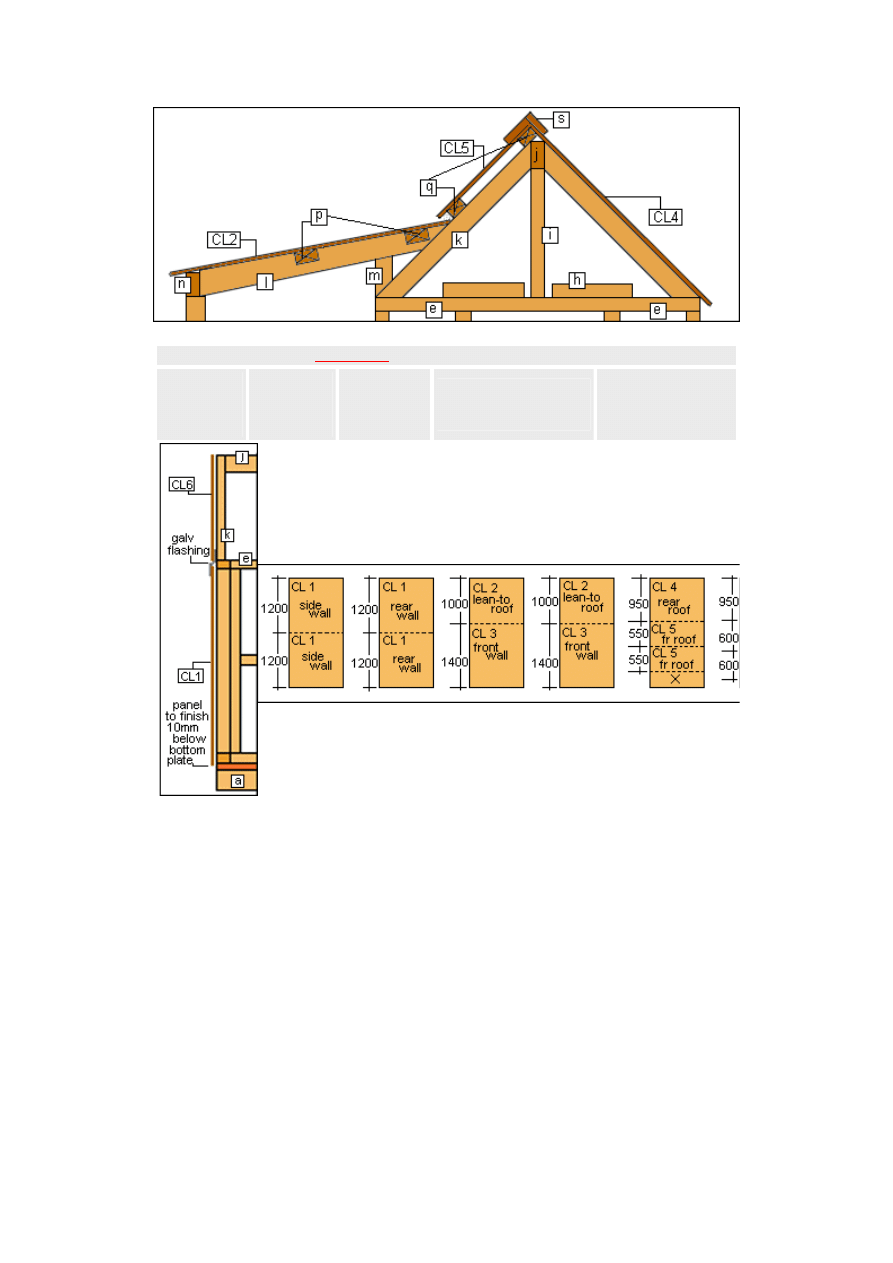
Step four: the roof frame
Centralize the two ridge supports (i) on top of the two end frames and fix in an upright
position.
Balance the ridge beam (j) on top of the ridge supports (i) and fix in place with nails skewed
(angled) through the ends of the ridge beam into the supports.
Fix the 10 rafters (k) in place (5 each side) beginning with the end rafters and then the
intermediates.
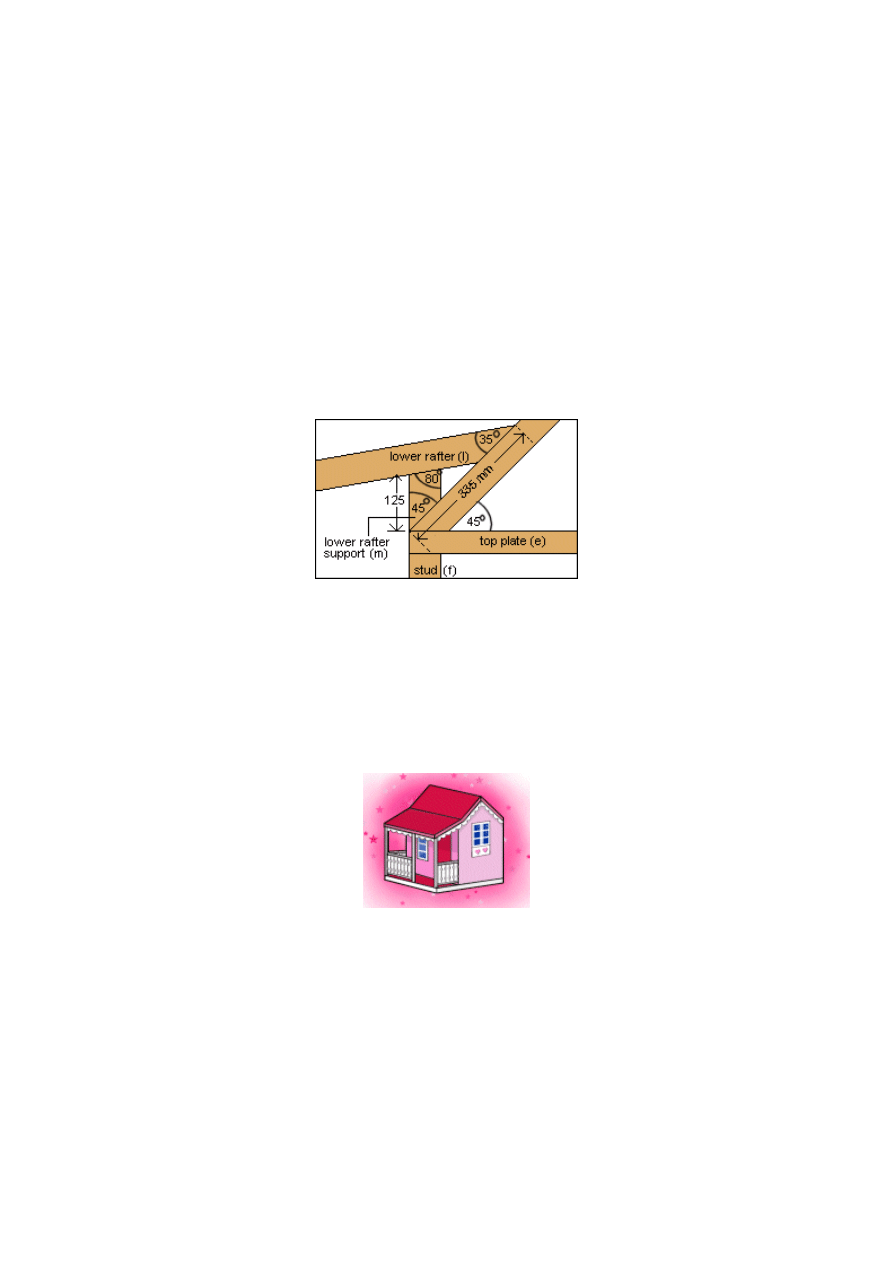
Fix the lower rafter supports (m) in place at the lower end of the top rafters (k). (see diagram
below ).
Fix the lower rafters (l) in place on top of the lower rafter supports (m) and so that the top of
the lower rafters (l) are at a point running 335mm up from the bottoms of the top rafters (k).
(see diagram below)
Nail the beam (n) to the end of the lower rafters.
Fix three posts (o) plumb under the beam (n). One post in the middle and one at each end.
How to make a Wendy house
Part Two: The Cladding and fascia
The Instructions continued...
Step five: The roof nogging and purlins
From 65x46 timber, Measure, cut and fix two rows of nogs (p) between the lower rafters
(l), one row along the top and one row along the middle as shown in diagram below.
Also using 65x46 timber, fix two rows of purlins (q) on top of the front upper rafters (k).
Position as shown in diagram below, with one row at the apex and one row just above
the lower rafters (l).
for timber sizes)
a: joists
b: joists
c: decking
d: bottom plates
e: top plates
f: studs
g: nogs
h: blocking
i: beam support
j: ridge beam
k: rafters
l: lower rafters
m: rafter support
n: lean-to beam
o: posts
p: nogs
q: purlins
s: ridge capping
CL1: rear & side wall cladding
CL2: lean-to roof cladding
CL3: front wall cladding
CL4: rear roof cladding
CL5: front roof cladding
CL6: gable wall cladding
Step six: The wall cladding
Cut six sheets of 2400 x 1200 x 7mm cd (smooth one side) tanalised
plywood to the lengths as shown in the patterns below.
note: (CL) is short for cladding.
Fix the wall panels (CL1 and CL3) in place so that the bottom of the s
and rear panels finish 10mm below the bottom plate. The front panels
will need to be checked (marked and cut) around the lower rafters (l
Mark and cut out any windows (you might want to do a fancy shape here), doors or
overhanging edges. Nail with 40 or 50mm flathead galvanized nails. Keep the door
cutout intact, as this will later become the door.
Next hold the gable side panel (CL6) in place on top of the sidewall panel (CL1), mark to
the triangular shape of the gable, cut and fix in place. Insert a length of galvanized
horizontal weather strip flashing so it tucks under the bottom of the gable side panel
(CL6), and over the top of the sidewall panel (CL1). See diagram.
Step seven: The roof cladding
The roof plywood panels (CL2, CL5 and CL4) can be fixed in the same way as the wall
panels. The roof panels will overhang the perimeter (front, back and sides) by approx.
50mm.
Step eight: The ridge capping, fascia and bargeboard
The ridge capping, fascia and bargeboard are (in this case) all the same type of timber,
ide
).
namely 100x25 sawn (rough sawn) tanalised pine.
The ridge capping is the boards on the ridge of the roof and it's purpose is for
waterproofing. The Fascia and bargeboard are the boards encompassing the house at
the top of the walls tucked under the roof overhang. The boards along the front and
back of the house are called the fascia boards and the boards running up the gable on
the sides of the house are called the bargeboards. Fix all with 75mm galvanized
jolthead nails.
A pattern can be cut into the fascia and bargeboards. Soley personal preference.
A pattern like this can be made on the fascia and bargeboards by using the bottom of a
paint tin (or similar) as a template to mark the rounds and then by cutting out with a
jigsaw.
How to make a Wendy house
Part Three: The door, windows and handrail
The Instructions continued...
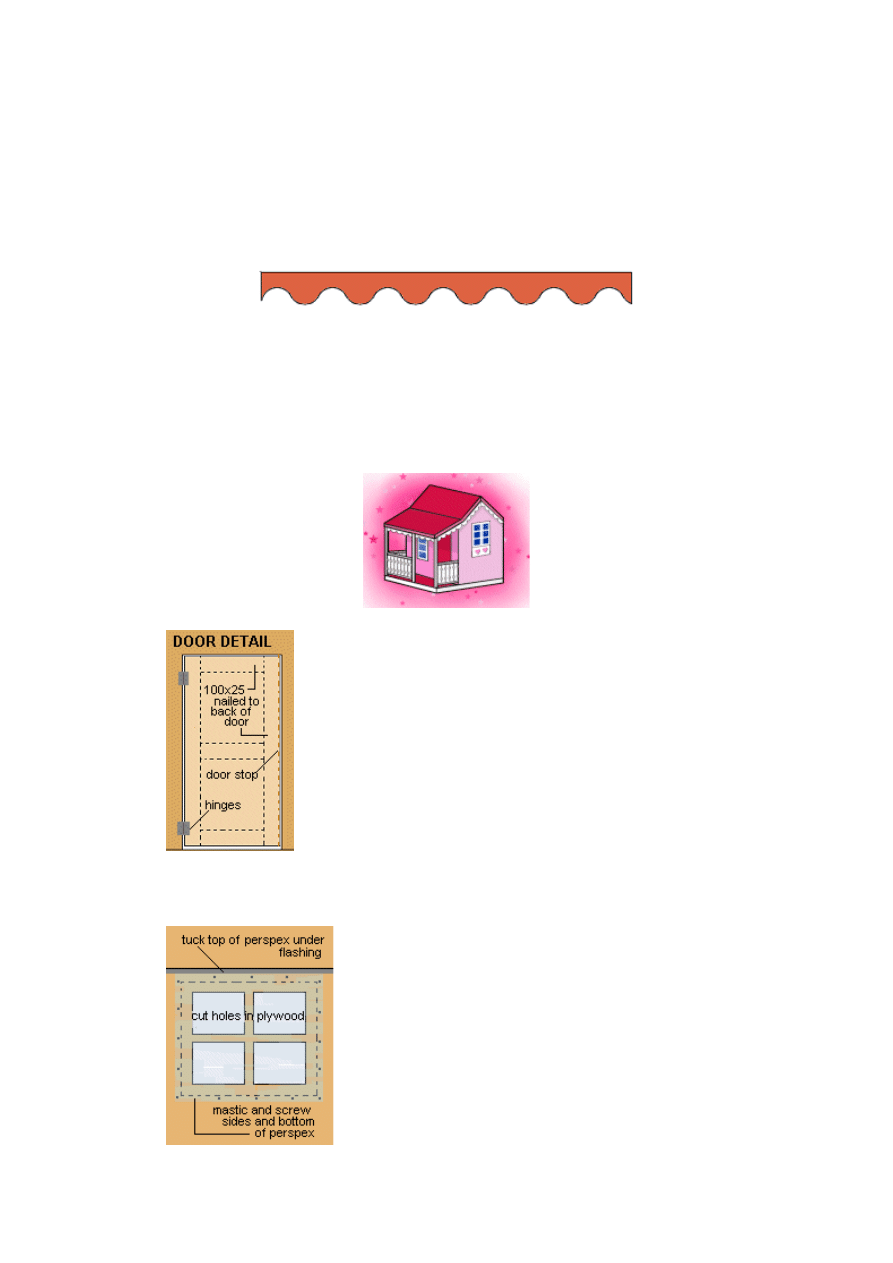
Step nine: The door
The cutout piece of plywood saved from the door hole can now
be made into the door. Trim the bottom edge (about 20mm) to
ensure the door will easily open and sand the edges. There
should be about 5mm clearance both sides of the door.
Reinforce the door with 100x25 strips of wood nailed to the back.
Pack the door in place and screw on the hinges. See diagram.
Nail a piece of doorstop (25x25) down the doorjamb stud 32mm
in from the outside (the thickness of the door). This acts as both a doorstop and
wind and weather seal.
A preferred door handle / lock / or latch can be fitted.
Step ten: The windows
Draw a window pattern such as an oblong or heart or 4
squares (keeping within the perimeters of the window
frame) and cut out with a jigsaw. First drill a hole through
the plywood using a drill bit large enough to make a hole
that will accept the jigsaw blade.
Once the windows are cut out, cover with an oblong piece
of 3mm perspex. Ensure the perspex is larger than the
window holes to allow for waterproof mastic sealant and
screwing.
The tops of the perspex on the sidewalls should tuck under the existing flashing.
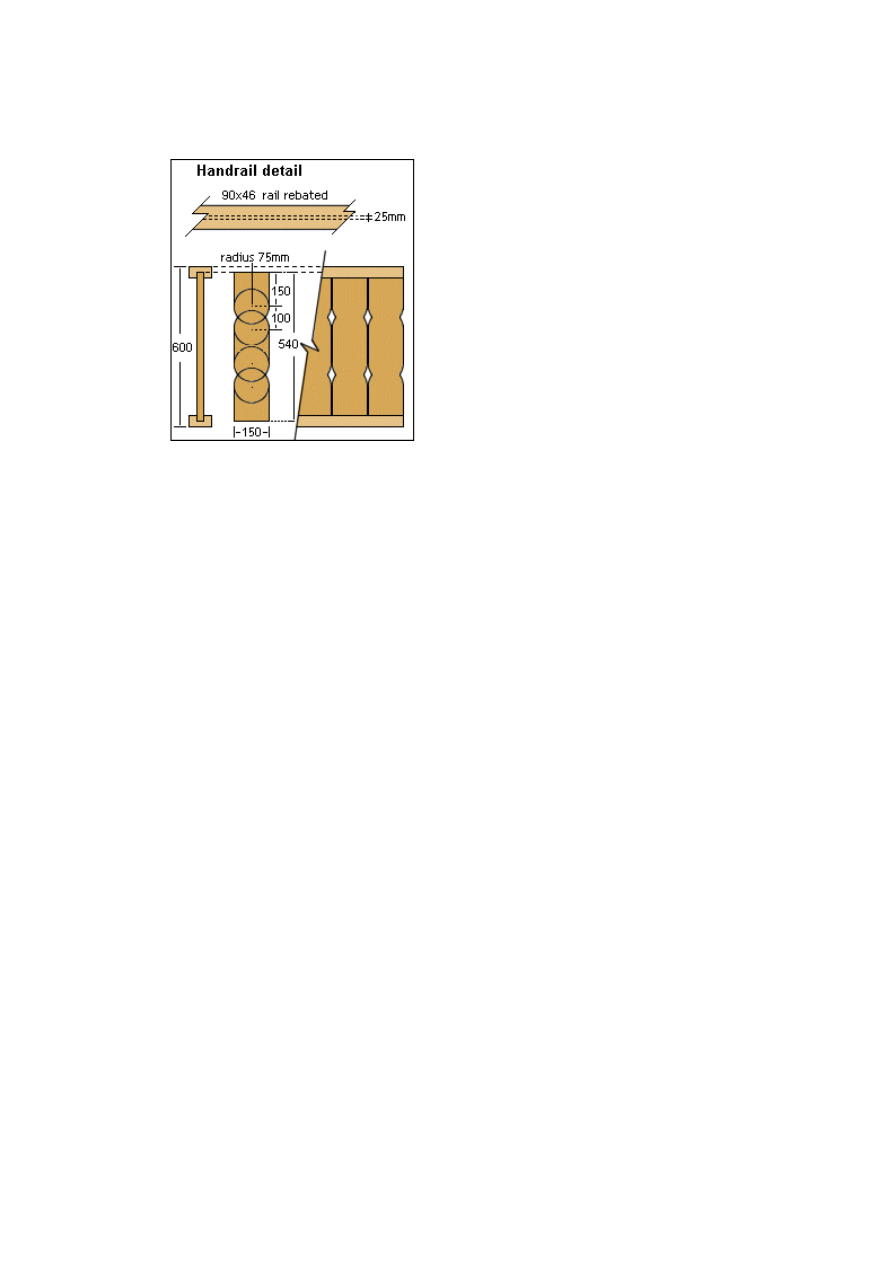
Step eleven: The handrail
Cut the 90x46 mg h3 top and bottom rails to
length (to fit between the posts) and rebate
them.
On one side only, pencil two lines 25mm
apart along the length in the centre of the
rails.(see handrail detail diagram).Set the
blade on your circular saw to a depth of
20mm and do repeated cuts along and
between the two pencil lines.
Clean out with a chisel.
This will give you a rebated groove 25mm
wide x 20mm deep along the centre of the
rails.
Cut 150x25 timber (standard fence palings ) into 540mm lengths and implement a
pattern of your choice. The pattern shown in the handrail detail diagram is just one
idea. Make the pattern on one piece of paling and use that as a template to do the
rest.
Fit the palings into the rebated grooves in the top and bottom rails.
This is best done by laying the top and bottom rails on the ground and then inserting
the palings into the grooves.
If the number of palings does not work out exactly, one of the palings will need to be
marked and ripped (cut) down. When one section is finished, tie a rope around each
end so the palings will not fall out while that section is being installed. Nail each
section in, and fix the rails to the posts with 90mm galvanized jolthead nails. Do this
to all 3 sections.
Eazy with a z. Have fun
Materials, quantities and cost
NOTE 2: Prices include GST. These prices are indicative only.
MATERIAL
AMOUNT
COST
145x46 (ex 150x50) mg h3
15 metres @ $5.00 per m
$75.00
90x32 (ex 100x40) std pine decking
50 metres @ $2.50 per m
$125.00
65x46 (ex 75x50) mg f2
80 metres @ $2.00 per m
$160.00
90x46 (ex 100x50) mg f2
2.4 metres @ $3.00 per m
$7.20
90x46 (ex 100x50) mg h3
6 metres @ $4.00 per m
$24.00
65x46 (ex 75x50) mg h3
4 metres @ $3.00 per m
$12.00
2400x1200x7mm tanalised cd plywood
6 sheets @ $43.00ea
$258.00
150x25 rs h3 paling
20m @ $1.30 per m
$19.50
galvanized horizontal weather strip flashing
2.4m length @ $6.00 ea
$6.00
3mm perspex
1.2 sq m @ $71.00 per sq m
$85.20

assorted nails, mastic sealant, hinges, door handle, misc
$60.00
TOTAL COST INCLUDING CST
$838.40
Wyszukiwarka
Podobne podstrony:
How to make
How to make an inexpensive exte Nieznany
How to Make an Atomic Bomb
How To Make It And Enjoy It
how to make a draino bomb 6W5PMX3CSBHVWUCD22KIJY34P667TPDLPPATGOY
how to make a?ke id D5O42G7A4RE7MNTMEISZ7BJSGUVLODZANAC376Y
How to Make a Solar Cell id 808 Nieznany
How to Make a German Paper Star
How to Make a Complete Map of Every Thought
How to make your own power Bleeder
How to Make Your Own Perfume
How to make perfume
how to make a?lloon bomb XCB7P55Q7X6LGLOJKZ3IQ6OE5ZREAE3OWS62SDI
Do It Yourself How To Make Hash Oil
how to make lsd LDS3NNI4PCNDMCLWMDEAYCQPTBGR4JJXDCRK5KY
Leil Lowndes How to Make Anyone Fall in Love with You UMF3UZIGJVMET6TLITVXHA3EAEA4AR3CAWQTLWA
how to make a scrapbook 1202695580375736 5
Kenjutsu How To Make A Bokken
How to Make Russian Frost Earrings 1
więcej podobnych podstron