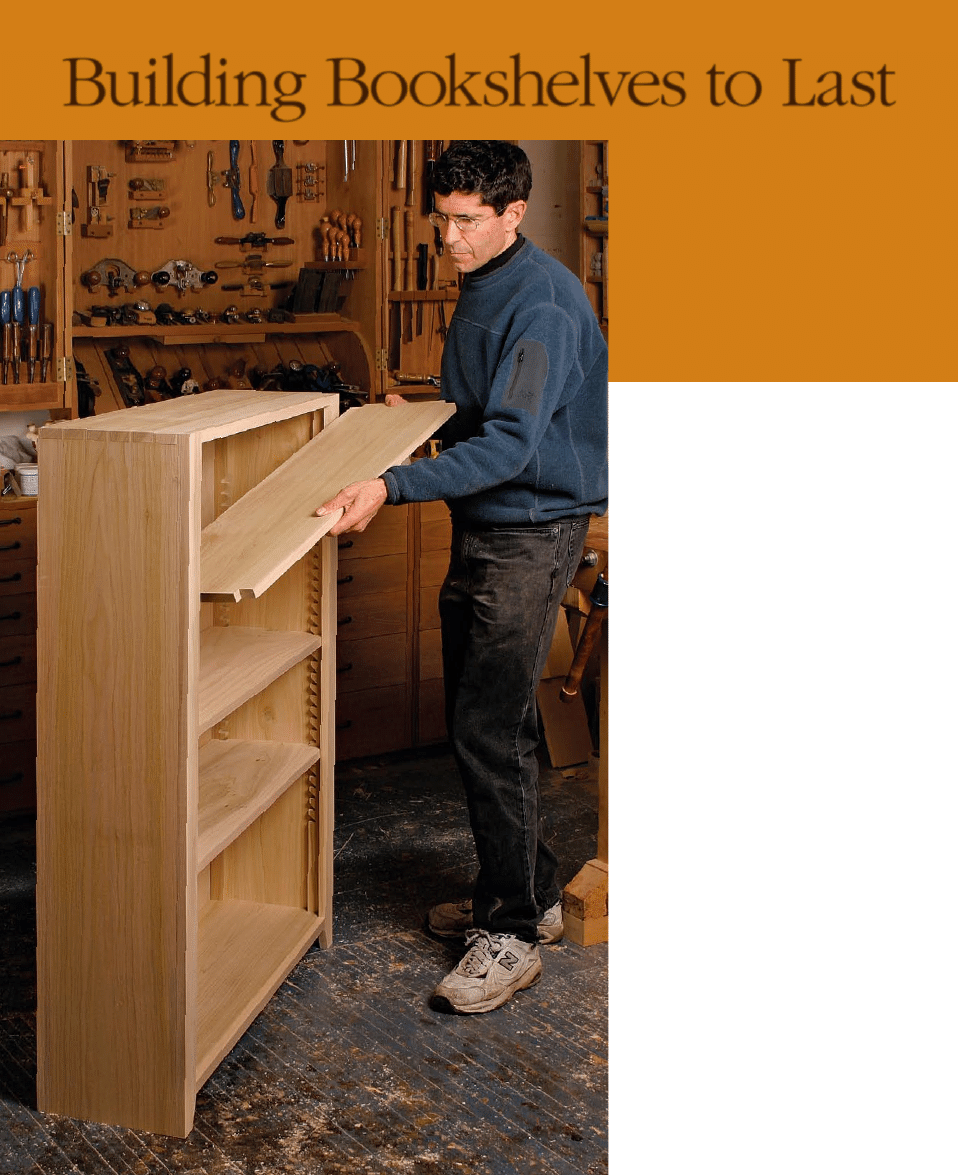
Building Bookshelves to Last
E
veryone can use a few more shelves.
Indeed, in many homes, an avail-
able shelf can be as difficult to find
as the TV remote. So if you build a set of
bookshelves, they’ll probably be filled as
soon as the finish dries.
Bookshelves can work in any room. You
can make them free-standing or built-in.
They can be big or small. And they can
take any form, from simple screwed-
together and painted plywood for use
in a utility room, to sophisticated for-
mal library shelves made from beautiful
hardwoods.
A shelf should look good
A successful bookshelf design must
achieve a balance between appearance
and function. A shelf with the perfect look
might not be adequately strong. That often
means making changes as you work out
the design.
A good approach is to start by writing out
a wish list that summarizes your ideal shelf
design. The list should include the shelf
depth, a factor determined by the width of
the books going on the shelf. Next, choose
a shelf length (bookcase width). Then,
choose a shelf thickness—
3
⁄
4
-in. stock is
readily available, but let your eye make
the final determination. After that, decide
if you want the shelves to be fixed, adjust-
able, or some of each. Finally, choose a
joint or mounting system that offers the
look you want.
The design process is just beginning
once you’ve worked out your bookshelf
How to support
loads of any
size and weight
for years to come
B Y J E F F M I L L E R
COPYRIGHT 2006 by The Taunton Press, Inc. Copying and distribution of this article is not permitted.
F I N E W O O D W O R K I N G
38
Drawing: Stephen Hutchings

Building Bookshelves to Last
design “brief.” Now you must determine
if your initial choices will be strong
enough. If not, you’ll have to make some
design changes. But before we get to that,
it helps to understand how a shelf reacts
to load.
Sag is the main enemy
As the load on a shelf increases, the weight
eventually reaches a point where the shelf
bends, or sags. The same factors that af-
fect appearance also affect shelf sag: the
thickness, width, and length of the shelf;
the wood species used; and the method
used to mount the shelf.
As a general rule, our eyes won’t notice
sag if it’s less than
1
⁄
32
in. (0.031 in.) per
foot. With time, even if the contents don’t
change, a shelf’s initial sag could increase
by 50% or more as the wood fibers “tire.”
Wood engineers call this “creep.” To be on
the safe side, design shelves to limit any
initial sag to no more than 0.02 in. per foot
under a load of full-size books.
In extreme cases (loading a bookcase
with your anvil collection, for example),
shelves can deflect so much that the wood
actually fails. This is not a common worry.
More common, especially on long shelves,
is that sag causes the effective length of the
shelf to become shorter, causing it to slip
off the shelf supports. Or, too much weight
on a long shelf can cause some adjustable
shelf supports to crush the wood fibers in
the case sides. As a result, the supports tilt
downward.
Fixed or adjustable
The method used to mount a shelf affects
how much it will bend under a load. All else
equal, a fixed shelf will bend less than an
adjustable shelf. That’s because on a well-
secured fixed shelf, the ends resist both
tilting and being pulled inward by the sag
(see pp. 40-43 for fixed- and adjustable-
shelf options).
Be aware that fixed shelves aren’t im-
mune to failure. With enough weight (per-
haps adding your spouse’s anvil collection
to your own on the same shelf) and its
consequential sag, even fixed shelves can
fail at the ends. When that happens, the
shelf curves and effectively shortens, the
ends pull free, and everything can head
south in a hurry.
Jeff Miller builds furniture and teaches
woodworking in Chicago.
You don’t need to guess at how much a shelf
is going to sag. The chart below provides a
quick way to determine if your shelf will be
sag-free. If the chart doesn’t work for your
shelf, you can use the Sagulator, an online
program that makes it easy to determine sag.
Both the chart and the Sagulator assume un-
fixed shelf ends. Fixed ends sag less.
The chart is easy to use. It provides the
maximum shelf-weight limits (in pounds per
foot) and works for most designs. You need to
know the thickness of the shelf (¾
in. or 1 in.)
and its length (24 in., 30 in., 36 in., or 42 in.).
If the expected load exceeds the
weight limit shown in the
chart, you’ll have to
make compromises.
To do that, use
the Sagulator
(www.finewoodworking.com/sagulator).
An answer of more than 0.02 in. per foot of shelf
means you need to put less load on the shelf; use a
stronger wood; make the shelf thicker, wider, or short-
er; or add wide edging. With the Sagulator, you can
adjust those values and calculate a new sag number.
Approximate shelf loads:
Hardcover books (9 in. by 11 in.), 20 lb. per ft.
Magazines (9 in. by 11 in.), 42 lb. per ft.
The eye can detect
shelf sag as slight as
1
⁄
32
in. per foot.
A severely sagging
shelf may slip off
supports.
Design shelves for maximum load
SHELF WEIGHT LIMITS
(pounds per foot*)
TYPE
LENGTH
Species
Thickness
24 in.
30 in.
36 in.
42 in.
RED OAK
¾
in.
49
21
9
5
1 in.
116
47
23
12
¾
in. with 2-in. edging
112
47
21
12
POPLAR
¾
in.
42
17
8
4
1 in.
101
41
20
10
¾
in. with 2-in. edging
97
39
20
10
EASTERN
WHITE PINE
¾
in.
33
14
6
3
1 in.
74
32
15
8
¾
in. with 2-in. edging
76
32
14
8
FIR
PLYWOOD
¾
in.
32
13
6
3
¾
in. with 2-in. edging**
96
39
18
9
MDF
¾
in.
9
4
2
1
¾
in. with 2-in. edging**
73
30
14
7
Material
makes a difference.
Some shelf materials resist
sag better than others. Red
oak is one of the better ones,
eastern white pine less so.
MDF makes a weaker shelf.
*Based on 11-in.-wide shelves **Edging is red oak; other edgings are the same wood as the shelf.
COPYRIGHT 2006 by The Taunton Press, Inc. Copying and distribution of this article is not permitted.
www.finewoodworking.com
M A R C H / A P R I L 2 0 0 7
39
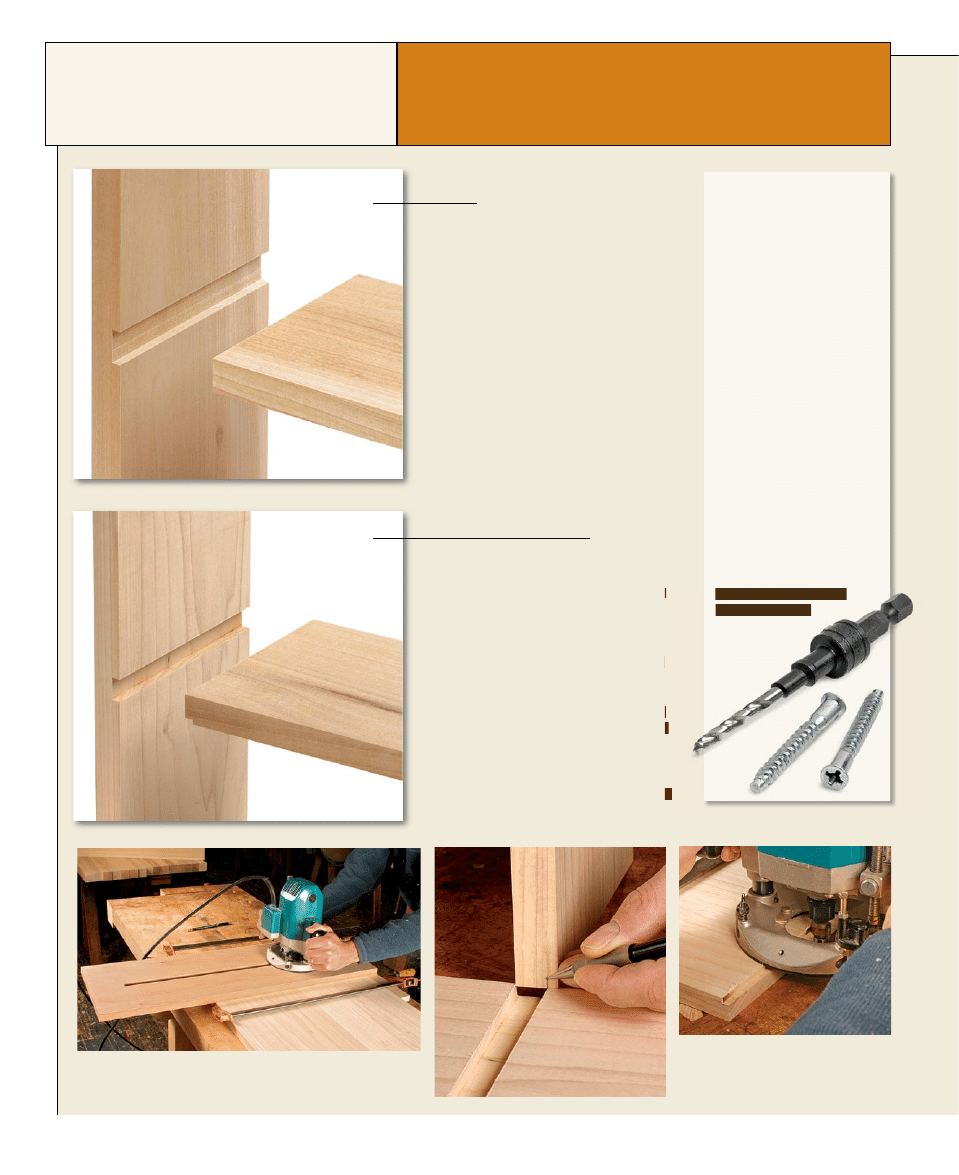
Fixed shelves attach to the sides of a case with either wood joinery,
hardware, or a combination of both. Unlike adjustable shelves, fixed shelves
help strengthen the entire case. And because they are attached to the case
sides, fixed shelves sag less.
Fixed shelves sag less
and strengthen the case
DADO
Strength: Good
Appearance: Good (excellent if using a
stopped dado or if covered by a face frame)
A dado joint effectively houses the ends of
the shelf in a long notch, providing some
mechanical strength. Because a dado joint
produces mostly end-grain surfaces, adding
glue increases the strength only nominally.
The attachment strength of a shelf can be
improved further by combining Confirmat
screws (see sidebar, right) with either a dado
joint or a rabbeted dado joint. The screws
keep the ends of the shelves in the dado, and
the dado adds extra shear strength.
CONFIRMAT
SCREWS ADD
STRENGTH
I’m not a fan of screwing
shelves in place with the
typical tapered woodscrew.
They rarely hold up long-
term. That said, I have found
a specialized screw that
works much better. Called
a Confirmat screw, it has a
thick body with sharp, deep
threads. It’s mainly used with
particleboard, melamine,
and MDF, but it also holds
well in solid wood. When
used in a dado or a rabbeted
dado, the joint strength is
excellent. Confirmat screws
require a pilot hole and a
shank hole. A special bit
is available that does the
drilling in one step (see
“Sources,” p. 43).
Rabbeted dado starts with a dado. A T-square jig helps cut
a dado across the side. The slot in the jig is just wide enough to
accept the bearing of a top-mounted bearing-guided straight bit.
Mark and cut the rabbet. First, mark
the rabbet location on the end of the
shelf (left), then use a bearing-guided
rabbeting bit to cut the rabbet (above).
RABBETED DADO
Strength: Good
Appearance: Good (excellent if using a
stopped dado or if covered by a face frame)
A minor variation on the dado joint is to
rabbet the ends of the shelf to fit into a
narrower dado. The main advantage is the
ability to fit the joint more easily, especially
if the shelf thicknesses are inconsistent.
This joint is useful when working with
hardwood plywood, a material that typically
measures less than ¾
in. thick. In this case,
a dado cut by making a single pass with
a ¾
-in.-dia. straight router bit ends up too
wide. However, with a rabbeted dado, you
cut a narrow dado first, then the rabbet for a
perfect fit.
COPYRIGHT 2006 by The Taunton Press, Inc. Copying and distribution of this article is not permitted.
F I N E W O O D W O R K I N G
40
Photos, except where noted: Tom Begnal; individual shelf and product shots: Michael Pekovich
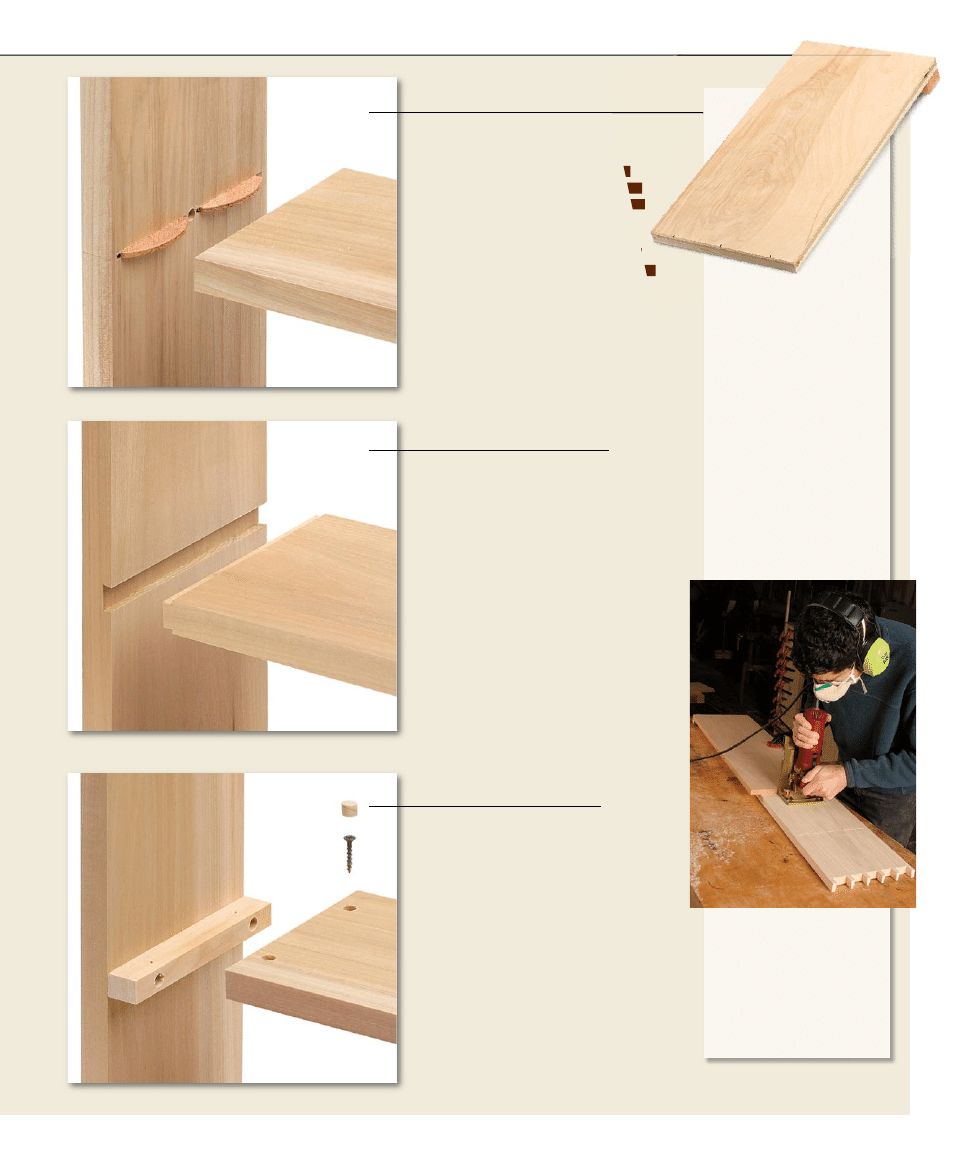
JIG SPEEDS
BISCUITING
A jig for cutting slots in the
sides makes it easy to locate
shelves accurately. The jig
has just two parts: a cleat
and a fence. The cleat keeps
the end of the fence square
to the side. Centerlines for
the slots are marked on the
end of the fence. With each
new set of shelf slots, the
fence is crosscut to a shorter
length. Toss the jig when
done.
Clamp and cut. Clamp
the jig to the case. Cut one
set of slots, then use the
jig to cut the same slots
on the other side. Crosscut
the fence to the next shelf
position, and repeat until all
slots are cut.
BISCUITS
Strength: Fair
Appearance: Excellent
It’s easy to fix a shelf in place using a
biscuit joiner. And, because the biscuits
are hidden when assembled, there is no
joinery, support parts, or hardware to
distract the eye. Use at least two
biscuits on each end of the shelf. Add a
third biscuit if there’s room. The jig shown
at right is a good one to use here. Invest
a few minutes making it and you’ll be
rewarded many times over by the time
saved.
SLIDING DOVETAIL
Strength: Excellent
Appearance: Very good (excellent if
stopped, or covered by a face frame)
A sliding dovetail adds considerable
mechanical strength, but sliding a
10-in.-long dovetail into a tight-fitting slot
before the glue sets up is a challenge.
Using a fairly slow-setting epoxy glue will
help considerably. Epoxy is a slippery glue
that helps get this type of joint together
without excessive expansion and stress.
See p. 74 to learn how to cut a sliding
dovetail.
SCREWED CLEATS
Strength: Very good
Appearance: Fair
Screwed cleats let you add shelves without
too much fuss, but they come up a little
short in the appearance department. With
the exception of the hole closest to the
front, all of the holes in the shelf should be
slotted to accommodate wood expansion.
For the same reason, if you wish to glue
this joint, bear in mind that you should
glue only the front inch or so.
COPYRIGHT 2006 by The Taunton Press, Inc. Copying and distribution of this article is not permitted.
M A R C H / A P R I L 2 0 0 7
41
www.finewoodworking.com
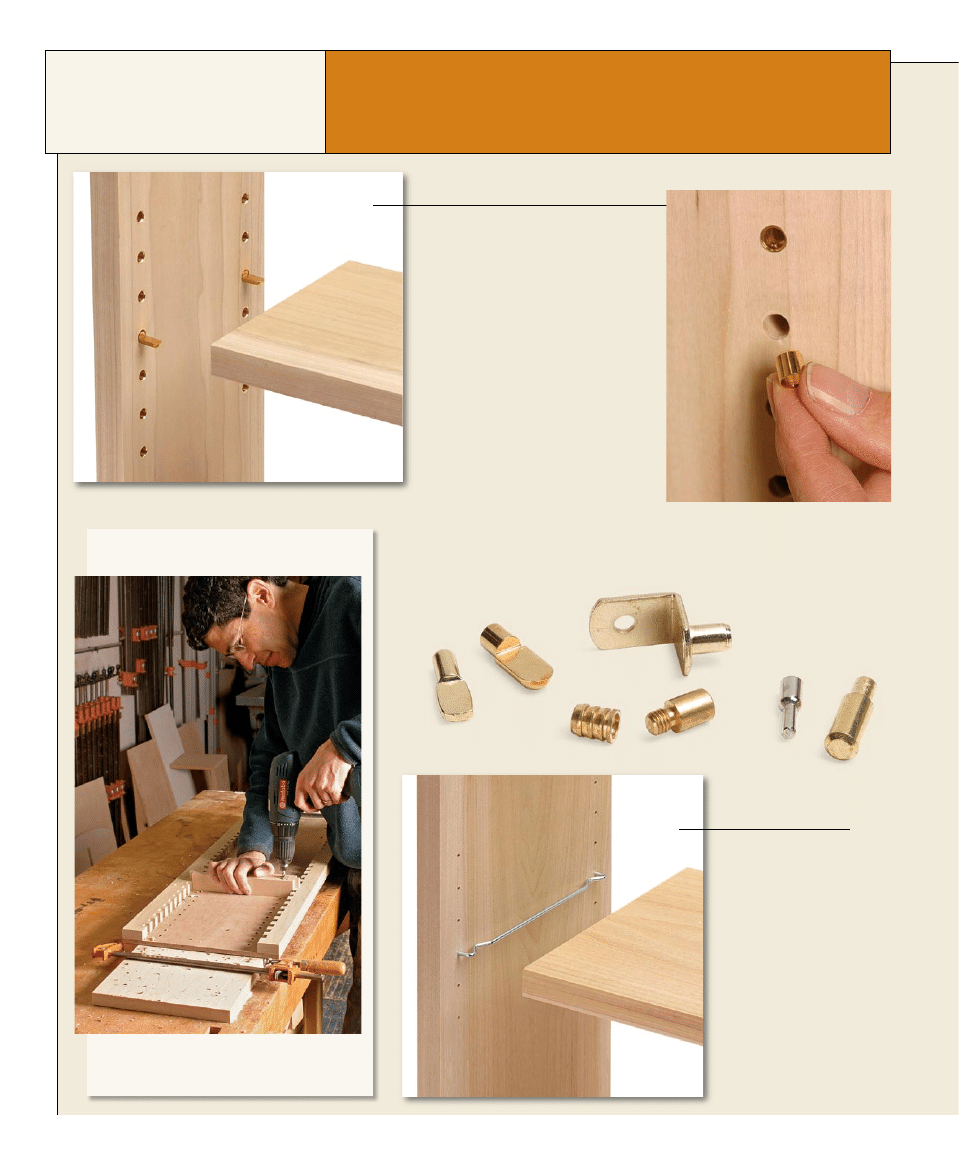
Adjustable shelves make it easy to change the spacing as needs change. But there is
a structural cost: These shelves do nothing to hold the cabinet sides together. So, on
taller bookcases it’s a good idea to have one fixed shelf to help anchor the case sides.
Adjustable shelves
add versatility
Strength: Good (very good with sleeves)
Appearance: Good
Shelf pins come in a wide variety of
shapes, sizes, materials, and finishes.
My favorites are the machined solid
brass ones from Lee Valley. I also like
the very small round pins by Häfele for
smaller cases. Shelf pins also come
with special clips for securing the
shelves or for holding glass shelves.
Sleeves are a great way to recover from
poorly drilled holes. Stamped sleeves
(short tubes with a flared and rounded-
over end) tend to look like shoelace
eyelets when installed in a cabinet.
Solid brass machined sleeves look
better, even though they accentuate
the row of holes in the case sides
somewhat. Some sleeves are threaded
for specially threaded shelf pins.
Strength: Good
Appearance: Very good
These bent-wire supports fit
into holes drilled in the case
sides. A stopped kerf cut in
the ends of the shelf slips
over the support, hiding the
hardware. Structurally, this
means the end of the shelf is
thinner. This affects the shelf’s
shear strength, but will have
little effect on sag.
Sleeve adds refinement and
strength. You can improve both the
appearance and strength of a shelf pin
simply by slipping a brass sleeve into
the pin hole.
A JIG FOR PIN HOLES
HIDDEN
WIRES
SHELF PINS
Shelf-pin holes in a jiffy. Thanks to this shop-
made jig, Miller quickly drills shelf-pin holes
that are the same depth and perfectly spaced.
COPYRIGHT 2006 by The Taunton Press, Inc. Copying and distribution of this article is not permitted.
F I N E W O O D W O R K I N G
42
Photos, facing page (right): Kelly J. Dunton
Strength: Very good
Appearance: Very good
Wooden shelf standards have
been around in various styles for
generations. They are easy to
make and add an interesting look
to almost any bookcase. The style
shown in the top-left photo (I call
it zig-zag) is one of the more
common forms.
Another style (I call it half-moon)
is shown in the lower left photo.
To make a pair, you’ll need a piece
of stock that’s at least double the
width of each standard. Scribe a
lengthwise centerline along the
stock, then lay out the shelf spacing
by making a series of evenly
spaced marks along the centerline.
Use a spade bit or a Forstner bit
to drill a through-hole at each
marked centerpoint. Finally, using
a tablesaw, rip the stock down the
middle. The net result is a pair of
standards, each with a series of half-
moon shapes.
Make the cleats just loose enough
to slip in and out with ease.
S O U R C E S
O F S U P P LY
HÄFELE
www.hafele.com; 800-423-3531
LEE VALLEY/VERITAS
www.leevalley.com; 800-871-8158
M
C
FEELY’S
www.mcfeelys.com; 800-443-7937
ROCKLER
www.rockler.com; 800-279-4441
WOODEN
STANDARDS
Strength: Very good
Appearance: Fair
It’s hard to beat metal shelf standards
for ease of installation. Just run a pair of
dadoes down each side of the case, and
nail, staple, or screw the shelf standards
into place. Shelf supports usually just
hook into place, although one new
version has brass support pins that
screw into threaded holes in the brass
standards. In general, shelf standards
seem out of place on finer furniture.
But they are great for utilitarian pieces,
and even in larger bookcases, where
any support system will be pretty much
invisible once the shelf is full of books.
METAL
STANDARDS
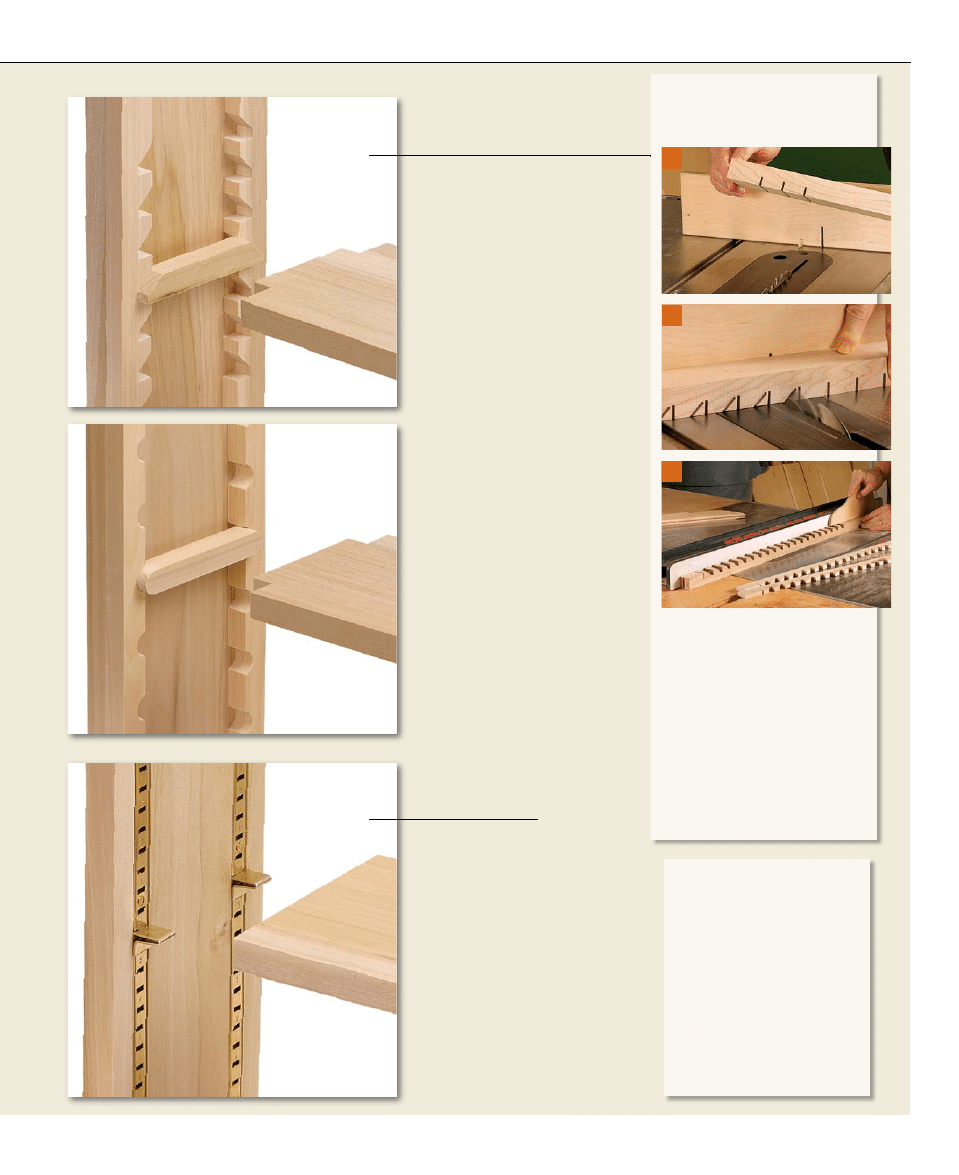
ZIG-ZAG SUPPORT
IN THREE STEPS
1
2
3
Start with stock wide enough to
make four standards. Using the
tablesaw, make a vertical cut at
each shelf location (1). An auxiliary
miter-gauge fence with a location
pin in front (much like a finger-joint
jig) makes it easy to position the
stock for subsequent cuts. Follow
with 45º cuts (2) after relocating the
location pin. Remove the triangular
waste piece, then clean the
resulting flat with a chisel. Rip the
stock to create four standards (3).
COPYRIGHT 2006 by The Taunton Press, Inc. Copying and distribution of this article is not permitted.
M A R C H / A P R I L 2 0 0 7
43
www.finewoodworking.com
Wyszukiwarka
Podobne podstrony:
The algorithm of solving differential equations in continuous model of tall buildings subjected to c
A timber Shed to last 200yrs altanka
Oh Yum! 17 Sierra Dafoe Built to Last (EC)
SEISMIC ANALYSIS OF THE ‘SOUTH GATE’ TALL BUILDING ACCORDING TO EUROCODE 8
TO JEST KOMPENDIUM Pytania - Materialoznawstwo Spawalnicze LAST, IWE EWE, IWE 2014
From Stabilisation to State Building, (DEPARTMENT FOR INTERNATIONAL?VELOPMENT)
Team Building ins Sport Linking Theory and Research to Practical Application
THE TEAR GARDEN The Last Man To Fly
James Grippando Jack Swyteck 03 Last to Die
Hubert Selby Jr Last Exit to Brooklyn
17 Last Ditch Approch to reviving 108 114 115 Blower repair
Document M Access to Buildings 2004 combined
Mike Resnick Will the Last Person to Leave the Planet Please Shut Off the Sun # SS
Seismic Analysis Modeling to Satisfy Building Codes
Gwendolyn Zepeda To the Last Man I Slept with and All the Jerks Just Like Him (retail) (pdf)
Winning The Mortgage Game Real Estate Finance Expert Reveals Amazing Secrets To Wealth Building Thr
Will the Last Person to Leave t Mike Resnick
Girls’ guide to building a million dollar business Susan Wilson Solovic
więcej podobnych podstron