
119
TV/DVD CABINET
Copyright 2004 Martian Auctions
529
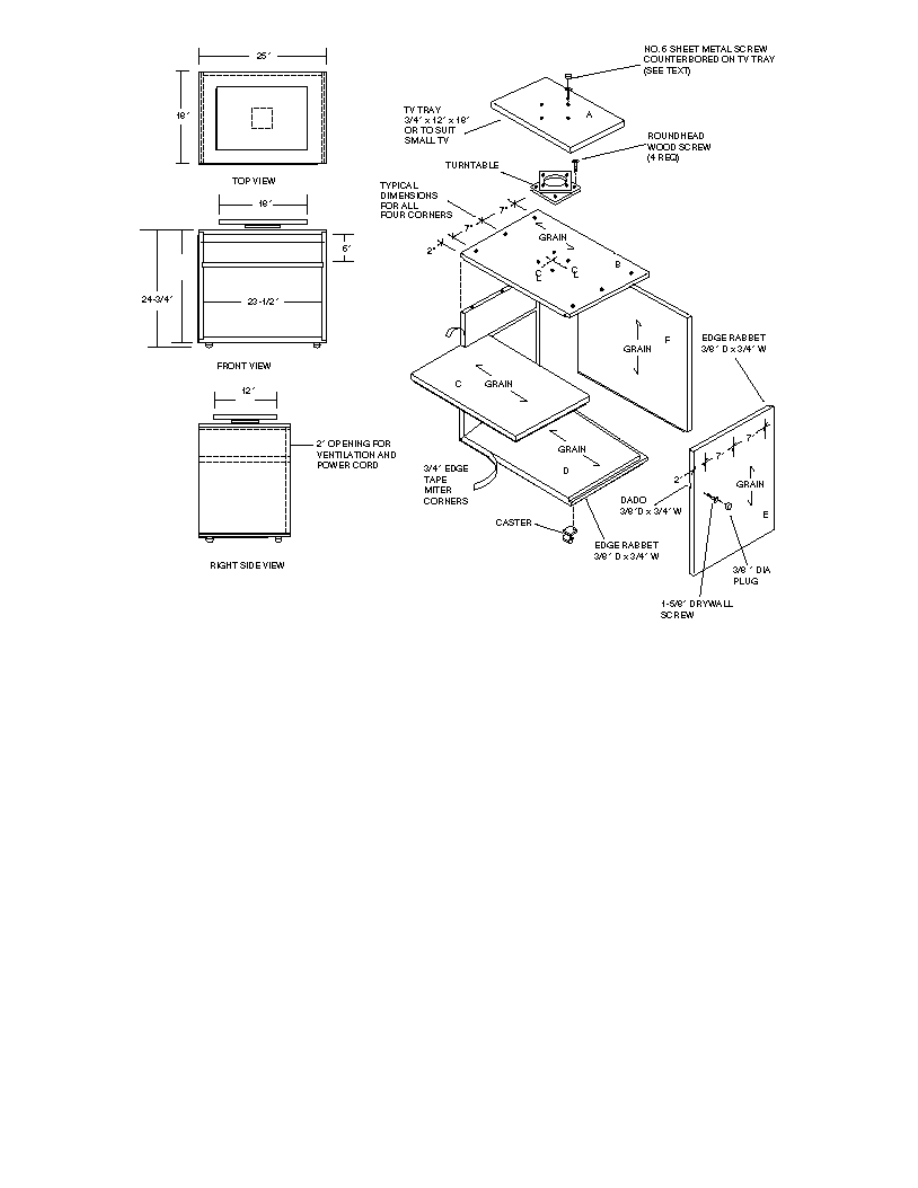
Builder's Tip: When building quality furniture, remember all wood grains should "run" in a certain direction. For this project: sides
and back - vertical; top and bottom - left to right.
1. After checking direction of wood grain, rough cut all members (slightly oversized). Note: The easiest way to work a large
sheet of plywood initially is by placing it on top of three lengths of 2x3s laid across a pair of sawhorses. This improvised
"table" puts the material at a convenient height.
2. Using a securely-clamped 4-ft. T-square as the straightedge, carefully trim the top, shelf, bottom and side pieces to size.
Note: Back and tray piece will be trimmed later.
Builder's Tip: Whether you use a table, radial arm, or portable circular saw, a fine tooth, plywood veneer blade should be
installed to ensure perfectly clean cuts. Always cut wood with the veneer side down when using a portable circular saw, and
with the veneer side up when cutting with table and radial arm saws.
3. Mark locations for ploughing all dadoes and rabbets on sides, top and bottom pieces.
Builder's Tip: No edge rabbet is required at back edge of the top piece to accommodate the back piece because the back is
installed with a 2" space between its top edge and the cabinet top. This space ensures ventilation for the VCR, plus easy
ingress/egress for the cords.
4. Plough grooves and rabbets using a 3/4" straight bit in the router guided by a securely-clamped straightedge. If necessary,
set up dado heads in the table saw to make these cuts.
Builder's Tip: Cut edge rabbets for bottom piece in veneer side of plywood, so "good" side will face up into the cabinet. All
other rabbets should be cut into the non-veneer or "lesser" side of the plywood panels.
II. Cabinet Assembly
Copyright 2004 Martian Auctions
530

1. Temporarily assemble cabinet by tack-nailing parts together with partially driven 1-1/4" finishing nails; if necessary, use
several bar clamps as well. Note: Try to position nails where 1-5/8" drywall screws will eventually be driven, so nail holes will
not be visible in veneer.
2. With piece assembled, bore screw holes using a counterbore bit, which makes the pilot, shank, countersink and counterbore
holes in one step. Note: Drive home several strategically-placed screws to secure the piece until all the holes are bored.
3. With piece assembled, measure and trim back piece to size; temporarily install with veneer side out.
4. Lightly sand cabinet using 150-grit paper in the pad sander; always use with-the-grain strokes. Thoroughly dust all surfaces
and disassemble.
5. Reassemble cabinet using carpenter's glue and 1-5/8" drywall screws. Immediately install back piece to ensure that cabinet
remains square during glue drying period. Note: Since you may want access to cabinet from the back in the future, install
back using screws only - no glue.
6. Use flexible veneer tape to cover exposed plywood edges:
a. Cut tape slightly overlength for each edge.
b. Work one edge at a time; apply contact cement to back of tape and mating surface, allowing adhesive to dry until it
can be touched with a piece of clean brown paper without sticking.
c. Carefully position first end of tape and guide along edge. Trim off any overlap.
d. Allow entire assembly to rest for at least four hours.
III. TV Tray
1. Trim TV tray to size.
2. Install turntable (swivel) hardware. Note: Select and install turntable hardware that will accommodate the size and weight of
the television it will support.
a. Center "blind" side of turntable on tray's underside and mark screw holes.
b. Remove turntable and bore holes for four No. 6 (1" long) self-tapping screws. On top side of tray, bore countersink
holes (about 1/4" deep) using drill and countersink bit, so screw heads will be slightly below the wood surface when
turned home.
c. To make certain that self-tapping screws are correct length and won't interfere with turntable operation, temporarily
attach the tray to the turntable by driving at least two of the screws into the turntable's small holes.
d. Remove turntable from tray.
e. Center turntable on top of cabinet; "blind" side up, mark and bore pilot screw holes for bottom plate.
f. Lubricate turntable's ball bearings with a light to heavy oil, depending on the degree of rotating action wanted.
g. Mount turntable on cabinet using four 1" No. 8 roundhead wood screws.
h. Place the tray on the turntable using 6d finishing nails as guide pins to position the pre-drilled holes over the small
turntable holes. Remove nails one at a time and drive home four self-tapping screws.
3. Cut the required number of 1/4" long dowel plugs from a length of 3/8" dowel to conceal screws holding cabinet together. To
keep sanding on veneer surface to a minimum, do not cut plugs too long. Squirt glue into each hole and press plugs into
place. Immediately remove excess glue from surface with clean, damp rag. Allow glue to dry overnight if possible.
4. Position plate casters on underside of bottom piece; mark for screws and bore pilot holes.
5. Fasten casters to cabinet bottom using screws that come with the hardware.
6. Inspect cabinet inside and out for smoothness. Sand lightly where necessary and wipe clean.
Copyright 2004 Martian Auctions
531
Wyszukiwarka
Podobne podstrony:
Love On Wheels by Bratty Vamp COMPLETE
Geoffrey A Landis Hot Death On Wheels
Love on Wheels by Bratty Vamp
Geoffrey A Landis Hot Death On Wheels
constitution of cabinet commitee on uidai 2009
Cabinet Compact TV Cabinet
Cabinet TV Stand (Part 1)
constitution of cabinet commitee on uidai 2009
Cabinet TV Stand (Part 2)
Cabinet TV Stand #2 (Part 1)
Cabinet TV Stand #2 (Part 2)
TV VCR Cabinet
Cabinet TV & Video cabinet
Corner Buffet Cabinet(1)
SHSBC 270 TALK ON TV?MO FINDING RR's
cabinetmakerupho00sher
Corner Cabinet 1
Plan and Install Kitchen Cabinets
więcej podobnych podstron