
LABORATORY MANUAL
OF
FOOD MICROBIOLOGY
FOR
ETHIOPIAN HEALTH AND NUTRITION
RESEARCH INSTITUTE
(FOOD MICROBIOLOGY LABORATORY)
UNIDO PROJECT
(YA/ETH/03/436/11-52)
DEC. 2003
DRAFTED BY
DR. CIIRA KIIYUKIA
(INIDO / FOOD ANALYSIS – MICROBIOLOGY)

1
TABLE OF CONTENTS
INTRODUCTION
..................................................................................................... 4
MICROORGANISMS MORPHOLOGY AND STAINING
............. 7
M
ICROSCOPY
..................................................................................................................... 7
S
TAINED PREPARATIONS
................................................................................................... 7
M
AKING A SMEAR
. ............................................................................................................ 8
A
SIMPLE STAIN
................................................................................................................. 8
A
DIFFERENTIAL STAIN
: G
RAM
’
S STAINING METHOD
......................................................... 9
B
ACTERIAL
M
OTILITY
....................................................................................................... 9
E
NDOSPORE STAINING
(S
CHAEFFER
–F
ULTON OR
W
IRTZ
–C
ONKLIN
)................................. 10
F
LAGELLA STAINING
: W
EST AND
D
IFCO
’
S
S
POT
T
EST
M
ETHODS
...................................... 11
BASIC LABORATORY PROCEDURES AND CULTURE
TECHNIQUES
......................................................................................................... 14
P
REPARATION OF CULTURE MEDIA
................................................................................... 14
P
OURING A PLATE
............................................................................................................ 14
S
TORAGE OF MEDIA
......................................................................................................... 14
S
TERILIZATION VS
. D
ISINFECTION
.................................................................................... 14
S
TERILIZATION OF EQUIPMENT AND MATERIALS
.............................................................. 15
D
ISINFECTANTS
............................................................................................................... 15
I
NOCULATION AND OTHER ASEPTIC PROCEDURES
............................................................. 15
E
SSENTIAL POINTS
........................................................................................................... 15
S
TREAK PLATE
. ............................................................................................................... 17
P
OUR PLATE
.................................................................................................................... 17
S
PREAD PLATE
................................................................................................................. 19
I
NCUBATION
.................................................................................................................... 19
C
LEARING UP
................................................................................................................... 20
P
URE CULTURES
............................................................................................................... 20
M
AINTAINING STOCK CULTURES
...................................................................................... 20
C
OTTON WOOL PLUGS
...................................................................................................... 21
A
SEPTIC TRANSFER OF CULTURES AND STERILE SOLUTIONS
.............................................. 21
T
ESTING SENSITIVITY TO ANTIBACTERIAL SUBSTANCES
.................................................... 22
COMMON BIOCHEMICAL TESTS
.......................................................... 24
1. I
NDOLE
T
EST
................................................................................................................ 24
2. H
2
S
PRODUCTION TEST
: ............................................................................................... 24
3. N
ITRATE REDUCTION TEST
........................................................................................... 24
4. M
ETHYL RED TEST
....................................................................................................... 24
5. V
OGES
- P
ROSKAUER
’
S TEST
........................................................................................ 24
6. U
TILIZATION OF CITRATE AS THE SOLE SOURCE OF CARBON
......................................... 25
7. F
ERMENTATION OF SUGAR
:.......................................................................................... 25
8. G
ELATIN LIQUEFACTION
: ............................................................................................. 25
9. A
CTION ON LITMUS MILK
:............................................................................................ 25
10. U
TILIZATION OF URIC ACID AS THE SOLE CARBON SOURCE
......................................... 26

2
FOOD SAMPLING AND PREPARATION OF SAMPLE
HOMOGENATE
..................................................................................................... 28
S
AMPLE COLLECTION
....................................................................................................... 29
S
AMPLE ANALYSIS
.......................................................................................................... 31
C
LASSIFICATION OF FOOD PRODUCTS FOR SAMPLING PURPOSES
....................................... 32
E
QUIPMENT AND MATERIALS
.......................................................................................... 34
R
ECEIPT OF SAMPLES
....................................................................................................... 34
T
HAWING
........................................................................................................................ 35
M
IXING
............................................................................................................................ 35
W
EIGHING
........................................................................................................................ 35
B
LENDING AND DILUTING OF SAMPLES REQUIRING ENUMERATION OF MICROORGANISMS
.. 35
ENUMERATION OF MICROORGANISMS IN FOODS
.............. 37
A. D
ETERMINATION OF
A
EROBIC COLONY COUNT IN
F
OODS .................... 37
B. M
OST
P
ROBABLE
N
UMBER
M
ETHOD
(MPN)
............................................... 41
C
ALCULATION OF
M
OST
P
ROBABLE
N
UMBERS
(MPN).................................................... 43
MPN T
ABLES
.................................................................................................................. 45
C. E
NUMERATION OF YEASTS AND MOULDS IN FOODS................................. 47
D.
E
NUMERATION OF COLIFORMS FAECAL COLIFORMS AND
E.
COLI IN
FOODS USING THE
MPN
METHOD ........................................................................ 53
ISOLATION AND ENUMERATION OF PATHOGENIC
MICROORGANISMS IN FOOD.
................................................................. 64
A. I
SOLATION OF
E.
COLI
0157
IN FOODS ......................................................... 64
B. E
NTEROCOCCUS .................................................................................................. 71
C. I
SOLATION OF
S
ALMONELLA FROM FOODS ................................................. 75
D. E
NUMERATION OF
S
TAPHYLOCOCCUS AUREAUS IN
F
OODS ................... 81
E. I
SOLATION OF
L
ISTERIA MONOCYTOGENS FROM ALL FOOD AND
ENVIRONMENTAL SAMPLES ................................................................................... 96
F. I
SOLATION AND
E
NUMERATION OF
B
ACILLUS CEREUS IN FOODS ...... 111
G. D
ETECTION OF
C
LOSTRIDIUM BOTULINUM IN HONEY AND SYRUPS... 121
H. E
NUMERATION OF
C
LOSTRIDIUM PERFRIGENS IN FOODS ..................... 125
MICROBIOLOGY OF WATER
.................................................................. 130
S
TANDARD
Q
UALITATIVE
A
NALYSIS OF
W
ATER
........................................................... 130
Q
UANTITITIVE ANALYSIS OF WATER
.............................................................................. 133
P
URPOSE
........................................................................................................................ 133
HOWARD MOULD COUNT
......................................................................... 136
EXAMINATION OF CANNED FOODS
................................................ 148
STANDARD OPERATING PROCEDURES (SOPS)
..................... 161
Q
UALITY ASSURANCE IN MICROBIOLOGY LABORATORIES ......................... 168

3
I
NSTRUMENTAL
M
AINTENANCE
,
QUALITY CONTROL AND CALIBRATION
...................................................................................................................................... 169
L
ABORATORY
A
UDIT.............................................................................................. 185
MICROBIAL STANDARDS OF FOODS
.............................................. 187
GUIDELINES FOR WRITING LAB REPORTS
.............................. 198
REFERENCES AND SELECTED READINGS
................................ 201

4
Introduction
The purpose of this manual is to provide the new food microbiology laboratory at the Ethiopian
Health and Nutrition Research Institute with the standard methods for qualitative and quantitative
detection of microorganisms in food and water. The manual contains detailed description of
microbial enumeration, isolation and identification of pathogenic food-borne bacteria. Methods of
estimating sanitary indicator microorganisms as well as enumeration of moulds and yeasts are
documented. These methods have been adapted from methods recommended by the ICMSF,
AOAC, FDA, APHA and Health Canada. The standard operating procedures and quality
control guidelines relating to food sampling and methods of analysis are included. The manual is
written in such a manner that it can be used for in-house training of new technicians. Description
of equipment maintenance and calibration is detailed including quality control of media and
internal laboratory audit. Isolation and identification of microbial food contaminants help to
understand how infectious agents enter and spread through the food chain and therefore come up
with procedures to prevent or minimize exposure of the consumer to such agents. There is the
need to estimate the risk that foodborne pathogens pose to human health in a national and
international context and to identify possible interventions to reduce or eliminate these risks. The
standards, guidelines and recommendations adopted by international trade agreements, such as
those administered by the WTO, are playing an increasingly important role in protecting the health
of consumers. In the case of microbiological hazards, Codex has elaborated standards, guidelines
and recommendations that describe processes and procedures for the safe preparation of food.
The application of these standards, guidelines and recommendations is intended to prevent or
eliminate hazards in foods or reduce them to acceptable levels. This requires an elaborate
laboratory with equipment and personnel well trained to carry out the analysis. Most developing
countries lack the resources to put up food microbiology laboratories and to man them
adequately to international standards. The globalization of food trade and increasing problems
worldwide with emerging and re-emerging foodborne diseases have increased the risk of cross-
border transmission of infectious agents. Because of the global nature of food production,
manufacturing, and marketing, infectious agents can be disseminated from the original point of
processing and packaging to locations thousands of miles away. In this regard, developing
countries are required to ensure that their sanitary and phytosanitary measures are based on an
assessment, as appropriate to the circumstances, of the risks to human, animal or plant life or
health, taking into account the risk assessment techniques developed by the relevant international
organizations. The manual details microbiological risk assessment of various food categories,
guidelines and recommendations related to food safety. There is a critical need for technical
advice on risk assessment of microbiological hazards in foods to meet the needs of national
governments, the food industry, the scientific community, trade organizations and international
consumer groups. UNIDO, FAO and WHO have a direct role to play in assisting developing
countries in matters related to food safety and should strengthen efforts to facilitate access to
specific advice on microbiological risk assessment. This manual has been developed with the help
of UNIDO inline with the above stated spirit.

5
Microbial Food analysis
1: Reasons for microbial food analysis.
•
to meet certain set standards
•
to estimate the shelf-life of the product
•
to determine quality of the food
•
for public health purposes
2: The organisms to look for;
i) Indicator organism(s);
Definition: an indicator organism or group of organisms is one whose numbers in a
product reflect the success or failure of "good manufacturing practices". Coliform group
of microorganisms and Escherichia coli are commonly used as indicator organisms.
ii) Index organism;
Definition: an index organism is one whose presence implies the possible occurrence of a
similar but pathogenic organism. E. coli is used an index organism and its presence
indicates possible presence of pathogenic enterobacteriacea e.g. Salmonella sp.
iii) Food poisoning organisms
The are two types of food poisoning organisms
•
those which cause the decease by infection
•
those which produce toxin in food
a)Those which cause infection must grow in food in large numbers and cause infection when
consumed together with food. The most common microorganisms in this category
includes Salmonella typimurium, enteropathogenic E. coli, Vibrio parahaemolyticus,
Yersinia enterocolytica etc.
b) Those which cause intoxication must grow in food in large numbers and produce enough
toxin and when consumed together with food cause intoxication. The most common
microorganisms in this category includes, Clostridium botulinum, Staphylococcus
aureus and toxigenic fungi e.g. Aspergillus flavus.
iv) Infectious microorganisms
Definition: Organisms whose presence in small numbers in food or water and when
consumed can cause infection. In this case the food acts as a vector but not necessarily as
a growth medium.Infectious organisms can be transmitted by various ways including man
to man and are said to be contagious. Organisms in this group includes;
Vibrio
cholerae O1, Salmonella typhi, Shigella sonnei, Bacillus anthracis, Hepatitis B virus
etc.
v) Spoilage organisms
Definition: Spoilage organisms are the organisms whose growth in the food creates
undesirable characteristics in that food. Any microorganism which is not intentionally
added into food or intentionally allowed to grow in food so as to impart certain qualities
in that food is considered a contaminant. Growth of the contaminant in that food will spoil
the food making it unfit for human consumption. Some useful microorganisms e.g. lactic
acid bacteria are considered as spoilage organisms when in beer, wine and fruit juices but
not in milk.

6
3: How to analyze
i) Quantitative analysis
•
Serial decimal dilution
•
Aerobic plate count
•
Pour plate count
•
Total viable count
•
Most Probable Number (MPN) method
•
Yeast and Molds count
ii) Qualitative analysis
presence or absence of a specified microorganism e.g.
•
Salmonella sp.
•
E. coli
•
V. cholerae O1
4: Culture Methods
•
pre-enrichment broth
•
enrichment broth
•
selective enrichment
•
selective agar
•
Differential agar
Biochemical tests
•
sugar fermentation
•
amino acid decarboxylation
•
gelatin liquefaction
•
lecithinase production
Serology
•
agglutination
•
precipitin
•
coagulation
Colony morphology
•
shape
•
colour
•
texture
•
size
Cell shape by microscope
•
bacillus
•
coccus
•
streptococcus
Gram stain characteristics
•
gram positive
•
gram negative
Motility
motile
number of flagella
arrangement of flagella
non-motile

7
Microorganisms morphology and staining
Microscopy
Using the microscope
The setting up of a microscope is a basic skill of microbiology yet it is rarely mastered. Only when
it is done properly can the smaller end of the diversity of life be fully appreciated and its many
uses in practical microbiology, from aiding in identification to checking for contamination, be
successfully accomplished. The amount of magnification of which a microscope is capable is an
important feature but it is the resolving power that determines the amount of detail that can be
seen.
Bacteria and yeast
Yeast can be seen in unstained wet mounts at magnifications x100. Bacteria are much smaller and
can be seen unstained at x400 but only if the microscope is properly set up and all that is of
interest is whether or not they are motile. A magnification of x1000 and the use of an oil
immersion objective lens for observing stained preparations are necessary for seeing their
characteristic shapes and arrangements. The information gained, along with descriptions of
colonies, is the starting point for identification of genera and species but further work involving
physiology, biochemistry and molecular biology is then needed. .
Moulds
Mould mycelium and spores can be observed in unstained wet mounts at magnifications of x100
although direct observations of “mouldy” material through the lid of a Petri dish or specimen jar at
lower magnifications with the plate microscope are also informative (but keep the lid on!).
Routine identification of moulds is based entirely on the appearance of colonies to the naked eye
and of the mycelium and spores in microscopical preparations.
Stained preparations
A “smear” of bacteria or yeast is made on a microscope slide, fixed, stained, dried and, without
using a coverslip, examined with the aid of a microsope. Aseptic technique must be observed
when taking samples of a culture for making a smear. A culture on agar medium is much
preferable to a liquid culture for making a smear. A smear that is thin and even enables the shape
and arrangement of cells to be clearly seen and ensures that the staining procedure is applied
uniformly. There are two broad types of staining method:
(1) a simple stain involves the application of one stain to show cell shape and arrangement and,
sometimes, inclusions that do not stain, e.g. bacterial endospores;
(2) a differential stain involves a sequence of several stains, sometimes with heating, and
includes a stage which differentiates between either different parts of a cell, e.g. areas of fat
storage, or different groups, e.g. between Gram-positive and Gram-negative bacteria. The
reaction of bacteria to Gram’s staining method is a consequence of differences in the chemical
structure of the bacterial cell wall and is a key feature in their identification. Yeast cells can be
stained by Gram’s method but it is of no value in their identification. The basis of Gram’s staining
method is the ability or otherwise of a cell stained with crystal violet to retain the colour when

8
treated with a differentiating agent, usually alcohol (although professionals sometimes use
acetone). Bacteria that retain the violet/purple colour are called Gram-positive. Those that lose
the colour, i.e. called Gram negative, are stained in the contrasting colour of a counterstain,
usually pink/red.
Making a smear.
1. Clean a plain microscope slide thoroughly using lens tissue.
2. Label a microscope slide with a marker pen to record the culture being used, date and
initials; this is also a useful reminder of which side of the slide is being used.
3. Flame a wire loop to ensure that no culture accidentally remains from a previous
operation.
4. Transfer one or two loopfuls of tap water on to the centre of the slide.
5. Flame loop and allow to cool.
6. Using aseptic technique, transfer a very small part of a single colony from a plate or
slope of agar medium into the tap water.
If the amount of culture on the loop is easily visible you have taken too much!
7. Make a suspension of the culture in the tap water on the slide and thoroughly but
gently spread it evenly over an oval area of up to 2 cm length.
8. Flame the loop. If it is necessary to use a liquid culture or sample, the use of tap water
to prepare the smear will probably be unnecessary and may result in a smear with too
few cells.
9. Dry the suspension by warming gently over a Bunsen burner flame and then “fix” it by
quickly passing it through the flame a few times. This is called a heat-fixed smear; it
should be visible to the naked eye as a whitish area. Fixing is necessary to ensure that
cells adhere to the slide and to minimise any post mortem changes before staining.
A simple stain.
1. Put the slide with the fixed smear uppermost on a staining rack over a sink or staining
tray.
2. Thoroughly cover the smear with stain and leave for, usually, 30 seconds.
3. Hold the slide with forceps (optional but avoids stained fingers), at a 45° angle over the
sink.
4. Rinse off the stain with tap water.
5. Blot dry the smear with filter/fibre free blotting paper using firm pressure but not sideways
movements that might remove the smear.
6. Examine under oil immersion.
7. When finished, dispose of slides into discard jar.
Suitable stains include basic dyes (i.e. salts with the colour-bearing ion, the chromophore, being
the cation) such as methylene blue, crystal violet and safranin.
Staining solutions (relevant to procedures described below)
Crystal violet solution: A. crystal violet 2.0g dissolved in absolute alcohol 100 ml
B. ammonium oxalate 1.0g in distilled/deionised water 100ml
Add 25 ml A to 100 ml B
Lugol’s iodine solution: iodine 1.0g, potassium iodide 2.0g distilled/deionised water 300 ml

9
A differential stain: Gram’s staining method
Times of the staining periods depend on the formulation of the staining solutions which are not
standard in all laboratories. Therefore, the times given here relate only to the solutions specified
here.
a. Put the slide with the fixed smear uppermost on a staining rack over a sink or
staining tray.
b. Thoroughly cover the smear with crystal violet solution and leave for 1 minute.
c. Hold the slide with forceps (optional but avoids stained fingers), at a 45° angle
over the sink.
d. Pour off the stain, wash off any that remains (and any on the back of the slide)
with iodine solution.
e. Put the slide back on staining rack.
f. Cover the smear with iodine solution and leave for 1 minute. Iodine solution acts
as a “mordant” (a component of a staining procedure that helps the stain to
adhere to the specimen), a crystal violet-iodine complex is formed and the smear
looks black.
g. Hold the slide with forceps at a 45° angle over the sink wash off the iodine
solution with 95% (v/v) ethanol (not water); continue treating with alcohol until
the washings are pale violet.
h. Rinse immediately with tap water.
i. Put the slide back on staining rack.
j. Cover the smear with the counterstain, e.g. safranin solution, 0.5% w/v, for 30
seconds.
k. Rinse off the stain with tap water.
l. Blot dry the smear with filter/fibre free blotting paper using firm pressure but not
sideways movements that might remove the smear.
m. Examine under oil immersion.
n. When finished, dispose of slides into discard jar.
Always use a young culture because older cultures of Gram-positive bacteria tend to lose the
ability to retain the crystal violet-iodine complex and appear to be Gram-negative; but some
bacteria are naturally only weakly Gram-positive. The amount of alcohol treatment (the
differential stage) must be judged carefully because over-treatment washes the crystal violet-
iodine complex from Gram-positive bacteria and they will appear to be Gram-negative. Take
care to make an even smear otherwise alcohol will continue to wash the violet/purple colour from
thick parts of the smear while thin parts are being over-decolorised. At the end of the procedure,
check that the labeling has not been washed off by the alcohol. Don’t despair if the stained smear
is not visible to the naked eye; this may happen with a Gram-negative reaction.
Bacterial Motility
1. Hanging drop method of motility:
- use the special microscope slide with a depression

10
- a cover slip
- a micropscope
- immersion oil
- actively growing bacterial culture
Procedure
Place one drop of the culture onto the cover slip
Touch the corners of the cover slip with lanolin and invert it on the grooved microscope slide
glass. Observe for motility using the high power lens. Motility is characterized by fast
unidirectional movement as compared to the Brownian motion whereby the cells move round in
one particular point.
2. Semi-solid agar method
The agar medium is prepared with the agar content of 0.2%. The medium is put into test tubes.
Inoculation is done by stabbing the medium at the center. The inoculated medium is incubated at
appropriate temperature for 24 hr. motility is detected by observing turbidity at the line of
inoculation.
Endospore staining (Schaeffer–Fulton or Wirtz–Conklin)
Materials
24-to 48 hours nutrient agar slant cultures of Bacillus megaterium (ATTC 12872) and Bacillus
macerans (ATCC 8244), and old (more than 48 hours) thioglycollate cultures of Clostridium
butyricum (ATCC 19398) and Bacillus circulars (ATCC 4513)
Clean slides
Microscope
Immersion oil
Wax pencil
Inoculating loop
Hot plate or boiling water bath with staining rack or loop
5 % malachite green solution
Safranin
Bibulous paper
Paper toweling
Lens paper
Slide warmer
Forceps
Principle
Bacteria in genera such as Bacillus and Clostridium produce quite a resistant structure capable
for surviving of long periods in an unfavorable environment and then giving rise to a new bacterial
cell. This structure is called an endospore since it develops within the bacterial cell. This location
and size of endorspores vary with the species; thus, they are often of value in identifying bacteria.
Endospores are spherical to elliptical in shape and may be either smaller or larger than the parent
bacterial cell. Endospore position within the cell is characteristic and may be central, subs
terminal, or terminal.
Endospores do not stain easily but, once stained, they strongly resist decolorization. This property
is the basis of the Schaeffer-Fulton or Wirtz-Conklin method of staining endospores. The

11
endorspores are stained with malachite green. Heat is used to provide stain penetration. The rest
of the cell is then decolirized and counterstained a light red with safranin.
Procedure
1. With a wax pencil, place the names of the respective bacteria on the edge of four clean
glass slides.
2. Aseptically transfer one species of bacterium with an inoculating loop to each of the
respective slides, air dry (or use a slide warmer), and heat-fix.
3. Place the slide to be stained on a hot plate or boiling water bath equipped with a staining
loop or rack. Cover the smear with paper toweling that has been cut the same size as the
microscope slide.
4. Soak the paper with the malachite green staining solution. Gently heat on the hot plate
(just until the stain steams) for 5 to 6 minutes after the malachite green solution begins to
steam. Replace the malachite green solution as it evaporates so that the paper remains
saturated during heating.
5. Remove the paper using forceps, allow the slide to cool, and rinse the slide with water for
30 seconds.
6. Counterstain with safranin for 60 to 90 seconds
7. Rinse the slide with water for 30 seconds.
8. Blot dry with bibulous paper and examine under oil immersion. A coverslip is not
necessary. The spores, both endospores and free spores, stain green; vegetative cells
stain red.
Flagella staining: West and Difco’s SpotTest Methods
Materials
Young, 18-hour tryptic soy agar slants of Alcaligenes faecalis (ATCC8750, peritrichously
flagellated) and Pseudomonas fluorecens (ATCC 13525, polarly flagellated)
Wax pencil
Inoculating loop
Acid-cleaned glass slides with frosted ends
Clean distilled water
Microscope
Immersion oil
Lens paper
Boiling water bath (250 ml beaker with distilled water, rind stand, wire gauze pad, an Bunsen
burner or hot plate)
Pasteur pipettes with pipettor
West stain
Solution A

12
Solution B
Difco’s SportTest Flagella stain
Principle
Bacterial flagella are fine, threadlike organelles of locomotion. They are slender (about 10 to 30
nm in diameter) and can only be seen directly using the electron microscope. In order to observe
them with the light microscope, the thickness of the flagella are increased by coating them with
mordants like tannic acid and potassium alum, and staining them with basic fuchsin (Gray method)
or crystal violet (Difco’s method). Although flagella staining procedures are difficult to carryout,
they often provide information about the presence and location of flagella, which is of great value
in bacterial identification.
Difco’s SportTest flagella stain employs an alcoholic solution of crystal violet as the primary stain,
and tannic acid and aluminum potassium sulfate as mordants. As the alcohol evaporates during
the staining procedure, the crystal violet forms a precipitate around the flagella, thereby increasing
their apparent size.
Procedure
1. With a wax pencil, mark the left-hand corner of a clean glass slide with the name of the
bacterium.
2. Aseptically transfer the bacterium with an inoculating loop from the turbid liquid at the
bottom of the slant to 3 small drops of distilled water in the center of a clean slide that has
been care fully wiped off with clean lens paper. Gently spread the diluted bacterial
suspension over a 3cm area using the inoculating needle.
3. Let the slide air dry for 15 minutes
4. Cover the dry smear with solution A (the mordant) for 4 minutes
5. Rinse thoroughly with distilled water
6. Place a piece of paper toweling on the smear and soak it with solution B (the stain). Heat
the slide in a boiling water bath for 5 minutes in an exhaust hood with the fan on. Add
more stain to keep the slide from drying out.
7. Remove the toweling and rinse off excess solution B with distilled water. Flood the slide
with distilled water and allow it to sit for 1 minute while more silver nitrate residue floats
to the surface.
8. Then, rinse gently with water once more and carefully shake excess water off the slide.
9. Allow the slide to air dry at room temperature
10. Examine the slide with the oil immersion objective. The best specimens will probably be
seen at the edge of the smear where bacteria are less dense.

13
Procedure (Difco)
1. Draw a border around the clear portion of a frosted microscope slide with a wax pencil.
2. Place a drop of distilled water on the slide, approximately 1 cm from the frosted edge.
3. Gently touch a colony of the culture being tested with an inoculating loop and then lightly
touch the drop of water without touching the slide. Do not mix.
4. Tilt the slide at a slight angle to allow the drop preparation to flow to the opposite end of
the slide.
5. Let the slide air-dry at room temperature. Do not heat-fix.
6. Flood the slid with the contents of the Difco SportTest flagella stain ampule.
7. Allow the stain to remain on the slide for approximately 4 minutes. (Note: the staining
time may need to be adjusted from 2 to 8 minutes depending on the age of the culture,
the age of the stain, the temperature, and the depth of staining solution over the culture)
8. Carefully rinse the stain by adding water from a faucet or wash bottle to the slide while it
remains on the staining rack. Do not tip slide before this is done.
9. After rinsing, gently tilt the slide to allow excess water to run off and let the slide air-dry at
room temperature or place on a slide warmer.
Examine the slide microscopically with the oil immersion objective. Begin examination at thinner
areas of the preparation and move toward the center. Look for fields which contain several
isolated bacteria, rather than fields which contain clumps of many bacteria. Bacteria and their
flagella should stain purple

14
Basic laboratory procedures and culture techniques
Media, Sterilization and Disinfectants
Media
Preparation of culture media
Re-hydrate powder according to manufacturer’s instructions. Before sterilization, ensure
ingredients are completely dissolved, using heat if necessary. Avoid wastage by preparing only
sufficient for either immediate use (allowing extra for mistakes) or use in the near future. Normally
allow 15-20 cm
3
medium/ Petri dish. Dispense in volumes appropriate for sterilization in the
autoclave/pressure cooker. Agar slopes are prepared in test tubes or Universal/McCartney
bottles by allowing sterile molten cooled medium to solidify in a sloped position.
Pouring a plate
1. Collect one bottle of sterile molten agar from the water bath.
2. Hold the bottle in the left hand; remove the lid with the little finger of the right hand.
3. Flame the neck of the bottle.
4. Lift the lid of the Petri dish slightly with the right hand and pour the sterile molten agar into
the Petri dish and replace the lid.
5. Flame the neck of the bottle and replace the lid.
6. Gently rotate the dish to ensure that the medium covers the plate evenly.
7. Allow the plate to solidify.
8. Seal and incubate the plate in an inverted position.
The base of the plate must be covered, agar must not touch the lid of the plate and the
surface must be smooth with no bubbles.
Storage of media
Store stocks of prepared media at room temperature away from direct sunlight; a cupboard is
ideal but an open shelf is satisfactory. Media in vessels closed by cotton wool plugs that are
stored for future use will be subject to evaporation at room temperature; avoid wastage by using
screw cap bottles. Re-melt stored agar media in boiling water bath, pressure cooker or
microwave oven. Sterile agar plates can be pre-poured and stored in well-sealed plastic bags
(media-containing base uppermost to avoid heavy condensation on lid).
Sterilization vs. Disinfection
Sterilization means the complete destruction of all the micro-organisms including spores, from an
object or environment. It is usually achieved by heat or filtration but chemicals or radiation can be
used.
Disinfection is the destruction, inhibition or removal of microbes that may cause disease or other
problems e.g. spoilage. It is usually achieved by the use of chemicals.
Sterilization
Use of the autoclave
The principle of sterilization in an autoclave is that steam under pressure is used to produce a
temperature of 121ºC which if held for 15 minutes all micro-organisms including bacterial
endospores will be destroyed.

15
Sterilization of equipment and materials
Wire loop
Heat to redness in Bunsen burner flame.
Empty glassware and glass (not plastic!) pipettes and Petri dishes
Either, hot air oven, wrapped in either grease proof paper or aluminum and held at 160ºC for 2
hours, allowing additional time for items to come to temperature (and cool down!).
Note: plastic Petri dishes are supplied in already sterilized packs; packs of sterile plastic pipettes
are also available but cost may be a consideration.
Culture media and solutions - Autoclave/pressure cooker.
Glass spreaders and metal forceps - Flaming in alcohol (70% industrial methylated spirit).
Disinfectants
Choice, preparation and use of disinfectants
Specific disinfectants at specified working strengths are used for specific purposes.
Commonly available disinfectants
Hypochlorite (sodium chlorate I)
used in discard pots for pipettes and slides
At 2500 ppm (0.25%, v/v) available chlorine
Ethanol
70% (v/v) industrial methylated spirit
When preparing working strength solutions from stock and dealing with powder form, wear eye
protection and gloves to avoid irritant or harmful effects. Disinfectants for use at working strength
should be freshly prepared from full strength stock or powder form.
Use working strength hypochlorite on day of preparation.
Inoculation and other aseptic procedures
Essential points
There are several essential precautions that must be taken during inoculation procedures to
control the opportunities for the contamination of cultures, people or the environment.
- Operations must not be started until all requirements are within immediate reach and must be
completed as quickly as possible.
- Vessels must be open for the minimum amount of time possible and while they are open all
work must be done close to the Bunsen burner flame where air currents are drawn upwards.
- On being opened, the neck of a test tube or bottle must be immediately warmed by flaming
so that any air movement is outwards and the vessel held as near as possible to the horizontal.
- During manipulations involving a Petri dish, exposure of the sterile inner surfaces to
contamination from the air must be limited to the absolute minimum.
- The parts of sterile pipettes that will be put into cultures or sterile vessels must not be touched
or allowed to come in contact with other non-sterile surfaces, e.g. clothing, the surface of the
working area, outside of test tubes/bottles.
Using a wire loop
Wire loops are sterilized using red heat in a Bunsen flame before and after use. They must be
heated to red hot to make sure that any contaminating bacterial spores are destroyed. The handle
of the wire loop is held close to the top, as you would a pen, at an angle that is almost vertical.
This leaves the little finger free to take hold of the cotton wool plug/ screw cap of a test
tube/bottle.
Flaming procedure

16
The flaming procedure is designed to heat the end of the loop gradually because after use it will
contain culture, which may “splutter” on rapid heating with the possibility of releasing small
particles of culture and aerosol formation.
1. Position the handle end of the wire in the light blue cone of the flame. This is the cool area
of the flame.
2. Draw the rest of the wire upwards slowly up into the hottest region of the flame,
(immediately above the light blue cone).
3. Hold there until it is red hot.
4. Ensure the full length of the wire receives adequate heating.
5. Allow to cool then use immediately.
6. Do not put the loop down or wave it around.
7. Re-sterilize the loop immediately after use.
If a loop does not hold any liquid the loop has not made a complete circle. To correct the
problem, first ensure that the loop has been sterilized and then reshape the loop with
forceps. Do not use your fingers because of the possibility of puncturing the skin.
Using a pipette
Sterile graduated or dropping (Pasteur) pipettes are used to transfer cultures, sterile media and
sterile solutions.
1. Remove the pipette from its container/ wrapper by the end that contains a cotton wool
plug, taking care to touch no more than the amount necessary to take a firm hold.
2. Fit the teat.
3. Hold the pipette barrel as you would a pen but do not grasp the teat. The little finger is
left free to take hold of the cotton wool plug/lid of a test tube/bottle and the thumb to
control the teat.
4. Depress the teat cautiously and take up an amount of fluid that is adequate for the amount
required but does not reach and wet the cotton wool plug.
5. Return any excess gently if a measured volume is required.
The pipette tip must remain beneath the liquid surface while taking up liquid to avoid the
introduction of air bubbles which may cause “spitting” and, conseque ntly, aerosol
formation when liquid is expelled.
6. Immediately put the now contaminated pipette into a nearby discard pot of disinfectant.
The teat must not be removed until the pipette is within the discard pot otherwise drops
of culture will contaminate the working surface.
A leaking pipette is caused by either a faulty or ill-fitting teat or fibres from the cotton wool plug
between the teat and pipette.
Flaming the neck of bottles and test tubes
1. Loosen the lid of the bottle so that it can be removed easily.
2. Lift the bottle/test tube with the left hand.
3. Remove the lid of the bottle/cotton wool plug with the little finger of the right hand. (Turn
the bottle, not the lid.)
4. Do not put down the lid/cotton wool plug.
5. Flame the neck of the bottle/test tube by passing the neck forwards and back through a
hot Bunsen flame.
6. Replace the lid on the bottle/cotton wool plug using the little finger. (Turn the bottle, not
the lid.)

17
Label tubes and bottles in a position that will not rub off during handling. Either marker pens or
self-adhesive labels are suitable. Occasionally cotton wool plugs accidentally catch fire. Douse
the flames by immediately covering with a dry cloth, not by blowing or soaking in water.
Streak plate.
The loop is used for preparing a streak plate. This involves the progressive dilution of an inoculum
of bacteria or yeast over the surface of solidified agar medium in a Petri dish in such a way that
colonies grow well separated from each other. The aim of the procedure is to obtain single
isolated pure colonies.
1. Loosen the top of the bottle containing the inoculum.
2. Hold the loop in the right hand.
3. Flame the loop and allow to cool.
4. Lift the bottle/test tube containing the inoculum with the left hand.
5. Remove the lid/cotton wool plug of the bottle/test tube with the little finger of the left
hand.
6. Flame the neck of the bottle/test tube.
7. Insert the loop into the culture broth and withdraw.
At all times, hold the loop as still as possible.
8. Flame neck of the bottle/test tube.
9. Replace the lid/cotton wool plug on the bottle/test tube using the little finger. Place
bottle/test tube on bench.
10. Partially lift the lid of the Petri dish containing the solid medium.
11. Hold the charged loop parallel with the surface of the agar; smear the inoculum
backwards and forwards across a small area of the medium
12. Remove the loop and close the Petri dish.
13. Flame the loop and allow it to cool. Turn the dish through 90º anticlockwise.
14. With the cooled loop streak the plate from area A across the surface of the agar in three
parallel lines. Make sure that a small amount of culture is carried over.
15. Remove the loop and close the Petri dish.
16. Flame the loop and allow to cool. Turn the dish through 90º anticlockwise again and
streak from B across the surface of the agar in three parallel lines.
17. Remove the loop and close the Petri dish.
18. Flame the loop and allow to cool. Turn the dish through 90º anticlockwise and streak
loop across the surface of the agar from C into the centre of the plate
19. Remove the loop and close the Petri dish. Flame the loop.
20. Seal and incubate the plate in an inverted position.
Label the half of the dish that contains medium; use abbreviations and keep them to the edge of
the plate so as not to interfere with the later observation of colonies. The same applies to the pour
and spread plates described below. Either marker pens or self-adhesive labels are suitable. There
are two approaches to making a streak plate: (1) with the base (containing medium) placed on
the working surface, lift the lid vertically (i.e. still covering the base) the least amount that will
allow access of the loop; (2) with the lid placed on the working surface, lift out the base, invert it
and inoculate the upwards - facing agar surface.
Pour plate
A pour plate is one in which a small amount of inoculum from broth culture is added by pipette to
a molten, cooled agar medium in a test tube or bottle, distributed evenly throughout the medium,

18
thoroughly mixed and then poured into a Petri dish to solidify. Pour plates allow micro-organisms
to grow both on the surface and within the medium. Most of the colonies grow within the medium
and are small in size; the few that grow on the surface are of the same size and appearance as
those on a streak plate. If the dilution and volume of the inoculum, usually 1 cm³, are known, the
viable count of the sample i.e. the number of bacteria or clumps of bacteria, per cm³ can be
determined.
Pouring the pour plate
1. Roll the bottle gently between the hands to mix the culture and the medium thoroughly.
Avoid making air bubbles.
2. Hold the bottle in the left hand; remove the lid with the little finger of the right hand.
3. Flame the neck of the bottle.
4. Lift the lid of the Petri dish slightly with the right hand and pour the mixture into the Petri
dish and replace the lid.
5. Flame the neck of the bottle and replace the lid.
6. Gently rotate the dish to ensure that the medium covers the plate evenly.
7. Allow the plate to solidify.
8. Seal and incubate the plate in an inverted position.
(The base of the plate must be covered, agar must not touch the lid of the plate and the
surface must be smooth with no bubbles).
Pouring the inoculated medium
If pipettes are not available then a wire loop can be used. Several loopfuls of culture must be
added to the cooled molten nutrient agar to ensure that there is enough inoculum present for
growth.
Using a spreader
Sterile spreaders are used to distribute inoculum over the surface of already prepared agar plates.
Wrapped glass spreaders may be sterilized in a hot air oven. They can also be sterilized by
flaming with alcohol.
It is advisable to use agar plates that have a well-dried surface so that the inoculum dries quickly.
Dry the surface of agar plates by either incubating the plates for several hours, e.g. overnight,
beforehand or put them in a hot air oven (ca 55-60ºC) for 30-60 minutes with the two halves
separated and the inner surfaces directed downwards.
Sterilization using alcohol
1. Dip the lower end of the spreader into a small volume of 70% alcohol contained in a
vessel with a lid (either a screw cap or aluminium foil).
2. Pass quickly through a Bunsen burner flame to ignite the alcohol; the alcohol will burn and
sterilize the glass.
3. Remove the spreader from the flame and allow the alcohol to burn off.
4. Do not put the spreader down on the bench.
Flaming a glass spreader
Ensure that the spreader is pointing downwards when and after igniting the alcohol to avoid
burning yourself. Keep the alcohol beaker away from the Bunsen flame.

19
Spread plate
Spread plates, also known as lawn plates, should result in a culture spread evenly over the
surface of the growth medium. This means that they can be used to test the sensitivity of bacteria
to many antimicrobial substances, for example mouthwashes, garlic, disinfectants and antibiotics.
The spread plate can be used for quantitative work (colony counts) if the inoculum is a measured
volume, usually 0.1 cm
3
, of each of a dilution series, delivered by pipette.
1. Loosen the lid of the bottle containing the broth culture.
2. Hold a sterile pipette in the right hand and the bottle/test tube containing the broth culture
in the left.
3. Remove the lid/plug of the bottle/test tube with the little finger of the right hand and flame
the neck.
4. With the pipette, remove a small amount of broth.
5. Flame the neck of the bottle/test tube and replace the lid/plug.
6. With the left hand, partially lift the lid of the Petri dish containing the solid nutrient
medium.
7. Place a few drops of culture onto the surface about 0.1 cm3 (ca 5 drops, enough to
cover a 5 pence piece).
8. Replace the lid of the Petri dish.
9. Place the pipette in a discard jar.
10. Dip a glass spreader into alcohol, flame and allow the alcohol to burn off.
11. Lift the lid of the Petri dish to allow entry of spreader.
12. Place the spreader on the surface of the inoculated agar and, rotating the dish with the left
hand move the spreader in a top-to-bottom or a side-to-side motion to spread the
inoculum over the surface of the agar. Make sure the entire agar surface is covered.
This operation must be carried out quickly to minimize the risk of contamination.
13. Replace the lid of the Petri dish.
14. Flame spreader using alcohol.
15. Let the inoculum dry.
16. Seal and incubate the plate in the inverted position.
HINT
Consider the calibrated drop method for colony counts of pure cultures of bacteria and yeast as a
more economical method than the pour plate and spread plate. The procedure is as for the
spread plate but fewer plates are needed because: (1) the inoculum is delivered as drops from a
dropping pipette that is calibrated (by external diameter of the tip) to deliver drops of measured
volume e.g. 0.02 cm³; (2) many drops (six or more) can be put on one plate. The method is not
suitable for use with cultures that produce spreading growth including mixed cultures in many
natural samples such as soil although yoghurt and cheese are among the exceptions.
Incubation
The lid and base of an agar plate should be taped together with 2-4 short strips of adhesive tape
as a protection from accidental (or unauthorized!) opening during incubation. (Although tape is
the preferred method Parafilm could be used as an alternative for sealing the plates.) Agar plates
must be incubated with the medium-containing half (base) of the Petri dish uppermost otherwise
condensation will occur on the lid and drip onto the culture. This might cause colonies to spread
into each other and risk the spillage of the contaminated liquid.

20
Water baths are used when accurately controlled temperatures are required, e.g. for enzyme
reactions and growth temperature relationships, when temperature control of incubators is not
sufficiently precise. They should be used with distilled or deionised water to prevent corrosion
and emptied and dried for storage.
Overlong incubation of mould cultures will result in massive formation of spores which readily
escape, particularly from Petri dishes, and may cause contamination problems in the laboratory
and be a health hazard. This can occur in an incubator, at room temperature and even in a
refrigerator.
Clearing up
Working surfaces must be cleared after use. If cultures have been used the benches must be
swabbed with disinfectant Discarded cultures, empty media tubes and all contaminated material
must be placed in the appropriate labeled receptacles. Discard containers must be carefully and
securely packed and never overloaded. Plastic Petri dishes must never be stacked above the lip
of the discard container. Cultures and contaminated paper towels, gloves etc. must be autoclaved
at 121ºC for 15 minutes before disposal. Slides, pipettes and Pasteur pipettes must be discarded
in the appropriate containers of Hypochlorite (sodium chlorate 1). They must be soaked for at
least 24 hours before disposal.
Never discard sharp or broken items in a way which would endanger. After sterilization, all
materials can be disposed of with normal waste. Care must be taken that glass is adequately
packaged to prevent injury. Before leaving the laboratory, laboratory coats must be removed and
hands washed with hot water and soap.
Pure cultures
The ability to keep pure cultures from becoming contaminated during inoculation and use is a key
feature of GMLP. This skill is crucial for reasons of safety and for maintaining the scientific
integrity of an investigation. Clearly, it is also vital skill to recognize when a culture has become
contaminated.
Maintaining stock cultures
It may be convenient to maintain a stock of a pure culture instead of re-purchasing it when
needed. Most of those considered suitable for use are also relatively easy to maintain by sub-
culturing on the medium appropriate for growth but maintenance of stock cultures needs to be
well organized with attention to detail. Be prepared to transfer cultures four times a year to
maintain viability. Cultures on streak plates are not suitable as stock cultures. Slope cultures in
screw cap bottles are preferred because the screw cap reduces evaporation and drying out and
cannot be accidentally knocked off (cf. a streak plate culture). Slope cultures are preferred to
broth (i.e. liquid medium) cultures because the first sign of contamination is much more readily
noticed on an agar surface. Two stock cultures should be prepared; one is the “working” stock
for taking sub-cultures for classes, the other is the “permanent” stock which is opened only once
for preparing the next two stock cultures. Incubate at an appropriate temperature until there is
good growth. For growing strict aerobes it may be necessary to slightly loosen the cap for
incubation (but close securely before storage) if there is insufficient air in the headspace. As soon
as there is adequate growth, store the cultures at room temperature in either a cupboard or
drawer.
Keep on the lookout for contamination.

21
Checking cultures for contamination Evidence for a culture being pure or otherwise is given by the
appearance of colonies on a streak plates and of cells in a stained microscopical preparation.
There should be uniformity of colony form and cell form (and consistency with the appearance of
the original culture!). It is sensible to check purity on suspicion of contamination of the working
stock culture from time to time and of the permanent stock when preparing new stock cultures. If
a culture becomes contaminated, it is not advisable to try to remedy the situation by taking an
inoculum from a single colony from a streak plate of the mixed culture because of the possibility
of (1) not being able to distinguish between the colony forms of the contaminant and the original
culture, and (2) culturing a variant of the original culture that does not behave as the original
culture did. Instead, go back to the working (or permanent) stock cultures; that’s what they are
for!
Cotton wool plugs
Plugs made of non-absorbent cotton wool are used in test tubes and pipettes to prevent micro-
organisms from passing in or out and contaminating either the culture or the environment. The
necessary movements of air in and gaseous products out are not prevented and the gaps between
the cotton wool fibres are even wide enough for micro-organisms to pass through. However, this
does not happen because micro-organisms (negatively charged) are “filtered” out by being
attracted to and adsorbed on the oppositely charged cotton wool. The cotton wool must remain
dry because this filtration property is lost if the cotton wool becomes moist – hence the use of
nonabsorbent cotton wool. For use in test tubes a plug should be properly made to ensure that it
can be held comfortably without being dropped and its shape and form are retained while being
removed from and returned to a test tube several times. Aseptic technique cannot be maintained
with poorly made plugs; working surfaces, floors and cultures may become contaminated and
students may become understandably (but avoidably) frustrated and lose interest.
Aseptic transfer of cultures and sterile solutions
Regular practice is necessary to ensure that the manipulations involved in aseptic transfer of
cultures and sterile
Making a streak plate is a basic procedure that tests several skills and serves several purposes.
During the inoculation procedure, the agar surface is protected from contamination by micro-
organisms that are carried in the air by keeping the time that the Petri dish is open to a minimum.
There are two approaches: (1) with the base (containing medium) placed on the working surface,
lift the lid vertically (i.e. still covering the base) the least amount that will allow access of the loop;
(2) with the lid placed on the working surface, lift out the base, invert it and inoculate the
upwards- facing agar surface. The second method is best reserved for older students working in
a relatively dust and draught-free laboratory; it is the one used by professional microbiologists.
The choice of loop or pipette for transfers between test tubes and screw cap bottles depends on
whether they contain agar slopes, liquid media or sterile solutions. Although omitted from the
table for simplicity, a straight wire may also be necessary for taking a small inoculum from liquid
cultures for nutritional investigations. The wire loop is usually satisfactory for inoculating a tube or
bottle from a separate colony on a plate but a straight wire is occasionally needed for dealing with
very small colonies such as occur with pure cultures of some bacteria, e.g. species of
Streptococcus and Lactobacillus, and on plates that are being used for isolating cultures from
natural samples. Appropriate instruments for aseptic transfer procedures
Microbial stock cultures for use in food microbiology are the equivalent of, say, solutions of
chemicals or electrical circuits in other disciplines. The big difference, however, is that microbial

22
cultures cannot be taken from a shelf and instantly be ready for use. It is necessary to begin to
prepare cultures well in advance otherwise the outcome might not be as expected and the
experience will be either diminished or lost. It is usual to grow moulds on the surface of an agar
medium, allowing an incubation period of from several days to a week. The main points to
observe are use of an adequate amount of inoculum, an appropriate culture medium and
incubation temperature and, if it is necessary to grow a strictly aerobic organism in a single large
volume of liquid culture and provision of adequate aeration.
Moulds
It is sometimes appropriate to prepare a mould inoculum as a spore suspension (particular care is
necessary to prevent them from escaping into the air) but often the inoculum is a portion of the
mycelium taken with a loop or straight wire with the end few millimetres bent at a right angle.
When an agar plate with a mould inoculated at the centre is required, it is easy to inoculate
accidentally other parts of the plate with tiny pieces of mould, usually spores, that fall off the loop
or wire. This can be avoided by placing the Petri dish on the working surface lid down, lifting the
base (containing medium) vertically above the lid and introducing the inoculum upwards onto the
centre of the downwards-facing agar surface with a bent wire.
Testing sensitivity to antibacterial substances
The agar diffusion method is widely used in industry for testing the sensitivity of micro-organisms
to antibiotics, antiseptics, toothpaste, mouthwashes, disinfectants, etc. The method involves
preparing a pour or spread plate of a test micro-organism, adding small amount of test substance
to either a well cut in the agar medium or (preferably) a paper disc which is then placed on the
agar surface. After incubation, an inhibitory effect on the test organism is indicated by a clear zone
(no growth) around the test substance; microbial growth is visible to the naked eye in areas of the
plate that are unaffected.
This is a straightforward activity that tests several practical skills and is relevant to other aspects
of biology and to everyday life. In addition to using laboratory reagents, e.g. stains, and antibiotic
discs, many preparations with antimicrobial activity are readily available in pharmacists and
supermarkets. There is also opportunity to think of less obvious materials, e.g. plants and their
products.
Materials
- Take one of the pour or spread plates prepared earlier in the day.
- Sterile Filter paper discs,
- Distilled/demineralised water (control)
- Samples to be tested, 3 (e.g. mouthwashes, selected for a range of active ingredients)
- Bunsen burner
- Forceps
- 70% (v/v) industrial methylated spirit in a small beaker covered in foil
(CAUTION:flammable, should be kept covered away from flames)
- Incubator at 25-30 °C (if available)
Aseptic technique should be used throughout.
1. Mark and label four sections on the base of the Petri dish, for the three different
samples and control (sterile water).

23
2. Using sterile forceps (flamed with alcohol and cooled) remove one filter paper disc.
Dip into the first test sample, drain on the side of the container and place firmly onto
the appropriate section of the seeded agar plate.
3. Wash the forceps free of the sample.
4. Repeat for the remaining samples and the control (sterile water). Remember to rinse
and sterilize the forceps between each sample and to open the plate for the minimum
possible time.
5. Seal the lid to the base with tape.
Incubation of the plate.
6. Invert the plate and incubate at 25-30°C or at room temperature for 48 hours.
7. Examine the plate (without opening). Measure and record the size of any zones of
inhibition around the filter paper discs. Consider what factors might be affecting the
size of the zones of inhibition.

24
Common Biochemical Tests
1. Indole Test
This test demonstrates the ability of certain bacteria to decompose the amino acid tryptophan to
indole.
Method
Inoculate 1% peptone water with one loop-full of culture and incubate at 37
o
C for 24 hrs. Then
add 0.5 ml Ehrlich’s reagent. A red colour indicates a positive reaction.
2. H
2
S production test:
The activity of some bacteria on sulfur containing amino acids frequently results in the liberation of
H
2
S. The H
2
S is usually tested for by demonstrating its ability to form black lead salt.
Method
Inoculate a loop-full of culture in 2% peptone water. Insert a lead acetate paper and incubate at
37
°
C for 24 hrs. If H
2
S is produced, the blackening of lead acetate paper will take place.
3. Nitrate reduction test
This is a test for the presence of the enzyme nitrate reductase, which causes the reduction of
nitrate to nitrite.
Method
Inoculate a loop-full of culture in peptone nitrite water and incubate at 37
°
C for 24 hr. to test
culture add 0.1 ml of solution A and swirl. Add solution B drop by drop. A red color developing
within a few minutes indicates the presence of nitrite and hence the ability of the organism to
reduce nitrate.
4. Methyl red test
The methyl red test is employed to detect the production of sufficient acid during fermentation of
glucose and the maintenance of acid condition. Such that the pH of an old culture is sustained
below a value of about 4.5.
Method:
Inoculate glucose phosphate broth with test culture and incubate at 37
°
C for 24 hr. Add about
five drops of methyl red indicator solution. A distinct red colour is considered to be a positive test
and yellow is negative.
5. Voges- Proskauer’s test
This is a test for the production of acetylmethyl carbinol from glucose. To the inoculated medium
after incubation, alkali is added, in the presence of which any acetylmethyl carbinol present
becomes oxidized to diacetyl. The diacetyl will combine with creatine to give a red colour.
Method
Inoculate glucose phosphate broth with test culture and incubate for 24 hr at 37
°
C. Pour ¼ th of
the culture into a clean test tube. Add 0.5 ml (8- 10 drops) of the L-naphthol solution and 0.5 ml
of the 40% KOH solution containing 0.3% creatine. Shake thoroughly and allow to stand for 5 to

25
30 minutes. The appearance of a pink to red colour indicates the presence of acetylmethyl
carbinol.
6. Utilization of citrate as the sole source of carbon
This is a test for the ability of an organism to utilize citrate as the sole carbon and energy source
for growth.
Method
Inoculate koser’s citrate medium with a wire needle. Incubate at 37oC for 24 hrs. Growth in he
medium involving utilization of citrate as sole carbon source of carbon is shown by turbidity in the
medium.
7. Fermentation of sugar:
Most of bacteria will ferment a variety of sugars to form one or more acid end products.
Method
Inoculate sugar medium with the test culture. Inoculate it at 37oC for 24 hr. Acid production is
shown by change in the colour of Andrade’s indicator to pink. Gas, if produced, accumulates in
the Durham tube.
8. Gelatin liquefaction:
Proteolytic organisms digest proteins and consequently may liquefy gelatin. Liquefaction of gelatin
is a routinely used index of proteolytic activity useful in differentiating certain microorganism but a
positive result may take many days to develop.
Method:
A stab culture of organisms to be tested is made using an inoculum from culture. Incubate at 37
oC for 24 hrs. Liquefaction is tested by removing the nutrient gelatin culture from the incubator
and holding it at 4oC for 30 minutes before reading the results.
9. Action on litmus milk:
The end results of the action of bacteria on milk depend on whether the organism attacks the
carbohydrates and the protein of the skim milk.
1. a) Acid production – shown by a change in the colour of the litmus to pink.
b) If sufficient acid is produced the milk will clot. This is known as acid clot (AC)
c) Reduction of the litmus and loss of colour may occur (R)
d) Gas may also be produced and can be seen as gas bubbles in the medium (G),
although normally this is only visible if clotting has occurred.
2. a) Coagulation of the milk may occur as a result of proteolytic enzyme activity affecting
the casein, the colour of litmus remaining blue.
b) Hydrolysis of the casein as a result of proteolytic activity causes clearing and loss of
opacity in the mix medium, usually referred to as peptonization. Proteolysis may also
result in an alkaline reaction due to ammonia production.
Method:
Inoculate a tube of litmus milk with a culture to be tested and incubate at 37 oC. Observe
the changes which have taken place, after 24 hr.

26
10. Utilization of uric acid as the sole carbon source
This is a test for the ability of an organism to utilize uric acid as the sole source of nitrogen
for growth.
Method:
Inoculate koser’s uric acid medium with a wire needle. Incubate at 37oC for 24 hr.
growth in the medium is shown buy turbidity in the medium.
Reagents:
Composition
1. Ehrlich’s reagent
p-dimethylaminobenzaldehyde
4gm.
95% ethanol
380 ml
Conc. HCL
80 ml
2. Griess- Ilosvay’s reagents:
Solution A:
Dissolve 8 gm of sulphanilic acid in 1 liter of 5N acetic acid.
Solution B:
Dissolve 5 gm of á– naphthyl amine in 1 liter of 5N acetic acid.
3. Methyl red indicator
Methyl red
0.1gm
95% ethanol
300 ml
Distilled water
top to 500 ml
4. Naphthol solution
L-Naphthol
5 gm
95% ethanol
top to 100 ml
5. KOH– Creatine solution:
Creatine
0.3 gm
40% KOH
100 ml
6. Andrades’s indicator:
Add 1 N NaOH to a 0.5 % solution of acid fuchsin until the colour just becomes yellow.

27
OBSERVATIONS
Organism
No. Test.
Medium
Regent (If
any)
E. coli
E. aerogenenes
1
Indole test
1% peptone
water
Ehrlich’s
reagents
+ve
-ve
2
Methyl red test
Glucose
phosphate
broth
Methyl red
soln
+ve
-ve
3
Voges-proskaner’s test Glucose
phosphate
broth
KOH and á–
naphthol
soln.
–ve
+ve
4
Utilization of citrate
Koser’s citrate
-ve
+ve
5
Nitrate reduction test
Peptone nitrate
water
L-naphthyl
amine and
sulfanilic acid
+ve
+ve
6
H
2
S production test
2% peptone
water
Lead acetate
paper
–ve
–ve
7
Utilization of uric acid
Koser’s uric
acid
–ve
+ve
8
Liquefaction of gelatin
Nutrient gelatin
–ve
–ve
9
Action on litmus milk
Litmus milk
Acidic Acidic
10 Fermentation of urea
Urea broth
–ve
–ve
11 Fermentation of sugars
Glucose
+
+
Lactose
+
+
Maltose
+
+
Sucrose
+
+
Mannitol
+
+
Xylose
+
+

28
Food Sampling and Preparation of Sample Homogenate
The adequacy and condition of the sample or specimen received for examination are of primary
importance. If samples are improperly collected and mishandled or are not representative of the
sampled lot, the laboratory results will be meaningless. Because interpretations about a large
consignment of food are based on a relatively small sample of the lot, established sampling
procedures must be applied uniformly. A representative sample is essential when pathogens or
toxins are sparsely distributed within the food or when disposal of a food shipment depends on
the demonstrated bacterial content in relation to a legal standard. The number of units that
comprise a representative sample from a designated lot of a food product must be statistically
significant. The composition and nature of each lot affects the homogeneity and uniformity of the
total sample mass. The collector must determine the proper statistical sampling procedure,
according to whether the food is solid, semisolid, viscous, or liquid, at the time of sampling.
Whenever possible, submit samples to the laboratory in the original unopened containers. If
products are in bulk or in containers too large for submission to the laboratory, transfer
representative portions to sterile containers under aseptic conditions. There can be no
compromise in the use of sterile sampling equipment and the use of aseptic technique. Sterilize
one-piece stainless steel spoons, forceps, spatulas, and scissors in an autoclave or dry-heat oven.
Use of a propane torch or dipping the instrument in alcohol and igniting is dangerous and may be
inadequate for sterilizing equipment. Use containers that are clean, dry, leak-proof, wide-
mouthed, sterile, and of a size suitable for samples of the product. Containers such as plastic jars
or metal cans that are leak-proof may be hermetically sealed. Whenever possible, avoid glass
containers, which may break and contaminate the food product. For dry materials, use sterile
metal boxes, cans, bags, or packets with suitable closures. Sterile plastic bags (for dry, unfrozen
materials only) or plastic bottles are useful containers for line samples. Take care not to overfill
bags or permit puncture by wire closure. Identify each sample unit (defined later) with a properly
marked strip of masking tape. Do not use a felt pen on plastic because the ink might penetrate the
container. Submit open and closed controls of sterile containers with the sample. Deliver samples
to the laboratory promptly with the original storage conditions maintained as nearly as possible.
When collecting liquid samples, take an additional sample as a temperature control. Check the
temperature of the control sample at the time of collection and on receipt at the laboratory. Make
a record for all samples of the times and dates of collection and of arrival at the laboratory. Dry
or canned foods that are not perishable and are collected at ambient temperatures need not be
refrigerated. Transport frozen or refrigerated products in approved insulated containers of rigid
construction so that they will arrive at the laboratory unchanged. Collect frozen samples in pre-
chilled containers. Place containers in a freezer long enough to chill them thoroughly. Keep frozen
samples solidly frozen at all times. Cool refrigerated samples, except shellfish and shell stock, in
ice at 0-4°C and transport them in a sample chest with suitable refrigerant capable of maintaining
the sample at 0-4°C until arrival at the laboratory. Do not freeze refrigerated products. Unless
otherwise specified, refrigerated samples should not be analyzed more than 36 h after collection.
Collection of samples
1. A sample, consisting of a specified number of sample units (usually five) drawn at random
from each lot, shall be taken.
2. Each sample unit shall consist of at least 100 ml or g, unless stipulated in the method.
3. Collect original unopened container wherever possible.

29
4. If the product is in bulk, several sample units can be collected from one container, while
ensuring that the total number of sample units are not collected from one container. More
than one sample unit may also be collected from large institutional or bulk containers
when the total number of sample units required exceeds the number of containers in the
lot. Place the collected sample units in sterile containers. A sample unit will consist of
more than one container when the lot consists of containers smaller than 100 ml or g eg.
four 25 ml or g containers in each sample unit.
5. Employ aseptic techniques in collecting the sample units.
6. Keep the sample unit refrigerated (0-4
o
C) or frozen, depending on the nature of the
product, during transport.
7. Do not allow sample units, that are usually frozen, to thaw during shipment
Defination of Terms
1. Lot: A batch or production unit which may be identified by the same code. When there is
no code identification, a lot may be considered as (a) that quantity of product produced
under essentially the same conditions, at the same establishment and representing no more
than one day's production; or, (b) the quantity of the same kind of product from one and
the same manufacturer available for sampling at a fixed location.
2. Sample: The sample units taken per lot for analysis.
3. Sample Unit: Usually a consumer size container of the product, and should consist of a
minimum of 100 g (ml), unless stipulated in the method.
4. Analytical Unit: That amount of product withdrawn from the sample unit for analysis.
5. HGMF Count: Is the number obtained when counting either those HGMF grid-cells
which contain colonies or those which do not. Counts may be made over the whole
HGMF, or a central portion (one-fifth) of the HGMF.
6. HGMF Score: Is the total number of HGMF grid-cells containing colonies. It may equal
the HGMF count, or be derived from this by multiplication and/or subtraction operations,
as necessary.
7. Most Probable Number of Growth Units (MPNGU): On HGMF the Growth Unit (GU)
is equivalent to the more familiar Colony Forming Unit (CFU). The MPNGU is derived
from the HGMF score.
1. Salmonella species
Sample collection
Because of the continuing occurrence of Salmonella in foods, sampling plans for these organisms
have received the attention of committees of national and international organizations. Each of
these committees has recommended varying the number of samples from a particular lot of food
according to the sampling category to which a food is assigned. Generally, the assignment to a
sampling or food category depends on 1) the sensitivity of the consumer group (e.g., the aged,
the infirm, and infants); 2) the possibility that the food may have undergone a step lethal to
Salmonella during the manufacturing process or in the home; and 3) the history of the food. The

30
selection of a sampling plan depends mainly on the first 2 criteria cited. The history of the food
would be important in deciding whether to sample, i.e., whether there was a past history of
contamination. For the Salmonella sampling plan discussed here, 3 categories of foods are
identified.
Food Category I. - Foods that would not normally be subjected to a process lethal to
Salmonella between the time of sampling and consumption and are intended for consumption by
the aged, the infirm, and infants.
Food Category II. - Foods that would not normally be subjected to a process lethal to
Salmonella between the time of sampling and consumption.
Food Category III. - Foods that would normally be subjected to a process lethal to Salmonella
between the time of sampling and consumption.
In certain instances, it may not be possible to fully conform to the sampling plan. Nonetheless it is
still important to ascertain whether or not Salmonella is present in the suspect food. Therefore, the
analyst should still try to analyze as many analytical units as is required for the food of interest,
i.e., 60 analytical units for Category I foods, 30 analytical units for Category II foods, and 15
analytical units for Category III foods. Individual 25 g analytical units may be combined into 375
g composites as described above unless otherwise indicated in Chapter 5 or the OMA. Below
are examples of situations that might confront the analyst.
1. The number and weights of the sample units is correct.
Each sample should be mixed to ensure homogeneity before withdrawing a 25 g analytical unit.
The analytical units can be composited (fifteen 25 g units into a 375 g composite), unless
otherwise indicated in Chapter 5 or in the OMA. Samples should be preenriched at a 1:9
sample-to-broth ratio.
2. The number of sample units is correct, but several of the sample units have been damaged
and are unusable.
For example, fifteen 1 lb bags of pasta have arrived for testing, but 5 of the bags are torn and
unusable. In this case, the analyst should only sample from the 10 intact bags. The contents of
each intact bag should be mixed to ensure homogeneity before the analytical units are withdrawn.
Since the analyst needs one 375 g composite, ten 37.5 g analytical units, from the remaining 10
intact bags, should be used to form the composite. The composite should be combined with its
preenrichment medium at a 1:9 sample-to-broth ratio (375 g sample/3375 ml preenrichment) as
directed in Chapter 5 or the OMA.
3. The number of sample units is incorrect, but the total weight of the sample unit(s) is greater
than what would be necessary to perform the sample analysis.
For example, a single 10 lb wheel of cheese has arrived for testing. Since cheese is a Category II
food, thirty 25 g analytical units must be analyzed. These analytical units should be taken
randomly from a wide variety of locations around the wheel. If Salmonella is present in a food,
then the odds of detecting it will be enhanced if two 375 g composites are analyzed rather than a
single 25 g analytical unit, as would be the case if the analyst were to treat the entire wheel as a
single sample.

31
4. There is less sample available than is necessary to form the required number of composites.
For example, an 8 oz (226.8 g) bag of almonds has arrived for testing. Almonds are a Category
II food. Category II foods require thirty 25 g analytical units (750g), so it is impossible to analyze
the amount of almonds required by the sampling plan. In this case, the analyst should analyze all
of the almonds at a 1:9 sample-to-broth ratio (226.8g sample/2041 ml preenrichment medium).
If, in the above example, the total weight of the almonds had been less than 2 composites (750
g), but more than 1 composite, then the analyst should analyze both a whole and a partial
composite. The analytical units comprising these composites should be taken randomly from a
wide variety of locations in the lot of almonds. Both composites, should be preenriched at a 1:9
sample-to-broth ratio.
This sampling plan applies to the collection of finished products under surveillance and/or for
determination of compliance for regulatory consideration. It also applies to the collection of
factory samples of raw materials in identifiable lots of processed units and/or finished products
where regulatory action is possible. It does not apply to the collection of in-line process sample
units at various stages of manufacture since those samples do not necessarily represent the entire
lot of food under production.
A sample unit consists of a minimum of 100 g and is usually a consumer-size container of
product. Take sample units at random to ensure that a sample is representative of the lot. When
using sample containers, submit a control consisting of one empty sample container that has been
exposed to the same conditions as those under which the sample was collected. Collect more
than one sample unit from large institutional or bulk containers when the number of sample units
required exceeds the number of containers in the lot. A sample unit will consist of more than one
container when containers are smaller than 100 g (e.g., four 25 g containers could constitute a
sample unit).
The numbers of sample units to be collected in each food category are as follows: Food Category
I, 60 sample units; Food Category II, 30 sample units; Food Category III, 15 sample units.
Submit all samples collected to the laboratory for analysis. Advise the laboratory in advance of
perishable sample shipments.
Sample analysis
The laboratory will analyze each sample for the presence of Salmonella according to methods
described in this manual. Take a 25 g analytical unit at random from each 100 g sample unit.
When a sample unit consists of more than one container, aseptically mix the contents of each
container before taking the 25 g analytical unit. To reduce the analytical workload, the analytical
units may be composited. The maximum size of a composite unit is 375 g or 15 analytical units.
The minimum number of composite units to be tested for each food category is as follows: Food
Category I, 4 composite units; Food Category II, 2 composite units; Food Category III, one
composite unit. For each 375 g composite, the entire amount of 375 g is analyzed for
Salmonella.
Refrigerate perishable samples and samples supporting microbial growth. An analytical control is
required for each sample tested. The sampled lot is acceptable only if analyses of all composite
units are negative for Salmonella. If one or more composite units are positive for Salmonella,
the lot is rejected, provided that the analytical control is negative for Salmonella. A lot will not be
resampled unless the environmental control for Salmonella is positive. For all samples positive

32
for Salmonella, determine the somatic group. See Chapter 5 for information on further handling
of these cultures. Recommendations for regulatory action may be based on the identification of
the Salmonella somatic group and will not require definitive serotyping before initiation of
regulatory action.
Imports.
These sampling plans apply to imported food products intended for human consumption.
Classification of food products for sampling purposes
Foods that have been classified into the 3 categories described above for regulatory sampling are
listed in the categories according to the Industry Product Code sequence and nomenclature.
Listing does not necessarily mean that these products are probable sources of Salmonella.
Food Category I. - Foods that would not normally be subjected to a process lethal to
Salmonella between the time of sampling and consumption and are intended for consumption by
the aged, the infirm, and infants.
Food Category II. - Foods that would not normally be subjected to a process lethal to
Salmonella between the time of sampling and consumption. Examples are as follows:
Industry Product Code
2
Milled grain products not cooked before consumption (bran and wheat germ)
3
Bread, rolls, buns, sugared breads, crackers, custard- and cream-filled sweet
goods, and icings
5
Breakfast cereals and other ready-to-eat breakfast foods
7
Pretzels, chips, and other snack foods
9
Butter and butter products, pasteurized milk and raw fluid milk and fluid milk
products for direct consumption, pasteurized and unpasteurized concentrated
liquid milk products for direct consumption, dried milk and dried milk products
for direct consumption, casein, sodium caseinate, and whey
12
Cheese and cheese products
13
Ice cream from pasteurized milk and related products that have been
pasteurized, raw ice cream mix and related unpasteurized products for direct
consumption
14
Pasteurized and unpasteurized imitation dairy products for direct consumption
15
Pasteurized eggs and egg products from pasteurized eggs, unpasteurized eggs
and egg products from unpasteurized eggs for consumption without further
cooking
16
Canned and cured fish, vertebrates, and other fish products; fresh and frozen
raw shellfish and crustacean products for direct consumption; smoked fish,
shellfish, and crustaceans for direct consumption
17
Meat and meat products, poultry and poultry products, and gelatin (flavored and
unflavored bulk)
20-22 Fresh, frozen, and canned fruits and juices, concentrates, and nectars; dried

33
fruits for direct consumption; jams, jellies, preserves, and butters
23
Nuts, nut products, edible seeds, and edible seed products for direct
consumption
24
Vegetable juices, vegetable sprouts, and vegetables normally eaten raw
26
Oils consumed directly without further processing; oleomargarine
27
Dressings and condiments (including mayonnaise), salad dressing, and vinegar
28
Spices, flavors, and extracts
29
Soft drinks and water
30
Beverage bases
31
Coffee and tea
33
Candy (with and without chocolate; with and without nuts) and chewing gum
34
Chocolate and cocoa products
35
Pudding mixes not cooked before consumption, and gelatin products
36
Syrups, sugars, and honey
37
Ready-to-eat sandwiches, stews, gravies, and sauces
38
Soups
39
Prepared salads
54
Nutrient supplements, such as vitamins, minerals, proteins, and dried inactive
yeast
Food Category III: Foods that would normally be subjected to a process lethal to
Salmonella between the time of sampling and consumption. Examples are as follows:
Industry
Product
Code 2
Whole grain, milled grain products that are cooked before consumption (corn
meal and all types of flour), and starch products for human use
3
Prepared dry mixes for cakes, cookies, breads, and rolls
4
Macaroni and noodle products
16
Fresh and frozen fish; vertebrates (except those eaten raw); fresh and frozen
shellfish and crustaceans (except raw shellfish and crustaceans for direct
consumption); other aquatic animals (including frog legs, marine snails, and
squid)
18
Vegetable protein products (simulated meats) normally cooked before
consumption
24
Fresh vegetables, frozen vegetables, dried vegetables, cured and processed
vegetable products normally cooked before consumption
26
Vegetable oils, oil stock, and vegetable shortening
35
Dry dessert mixes, pudding mixes, and rennet products that are cooked before
consumption
2.
Aerobic plate counts, total coliforms, fecal coliforms, Escherichiacoli (including
enteropathogenic strains), Staphylococcus spp., Vibrio spp., Shigella spp., Campylobacter
spp., Yersinia spp., Bacilluscereus, and Clostridium perfringens

34
a.
Sample collection. From any lot of food, collect ten 8-oz subsamples (or retail packages) at
random. Do not break or cut larger retail packages to obtain an 8-oz subsample. Collect the
intact retail unit as the subsample even if it is larger than 8 oz.
b.
Sample analysis. Analyze samples as indicated in current compliance programs.
Equipment and materials
3.
Mechanical blender. Several types are available. Use blender that has several operating
speeds or rheostat. The term "high-speed blender" designates mixer with 4 canted, sharp-edge,
stainless steel blades rotating at bottom of 4 lobe jar at 10,000-12,000 rpm or with equivalent
shearing action. Suspended solids are reduced to fine pulp by action of blades and by lobular
container, which swirls suspended solids into blades. Waring blender, or equivalent, meets these
requirements.
4.
Sterile glass or metal high-speed blender jar, 1000 ml, with cover, resistant to autoclaving
for 60 min at 121°C
5.
Balance, with weights; 2000 g capacity, sensitivity of 0.1 g
6.
Sterile beakers, 250 ml, low-form, covered with aluminum foil
7.
Sterile graduated pipets, 1.0 and 10.0 ml
8.
Butterfield's phosphate-buffered dilution water, sterilized in bottles to yield final volume of
90 ± 1 ml
9.
Sterile knives, forks, spatulas, forceps, scissors, tablespoons, and tongue depressors (for
sample handling)
Receipt of samples
The official food sample is collected by the FDA inspector or investigator. As soon as the
sample arrives at the laboratory, the analyst should note its general physical condition. If the
sample cannot be analyzed immediately, it should be stored as described later. Whether the
sample is to be analyzed for regulatory purposes, for investigation of a foodborne illness
outbreak, or for a bacteriological survey, strict adherence to the recommendations described here
is essential.
Condition of sampling container. Check sampling containers for gross physical defects.
Carefully inspect plastic bags and bottles for tears, pinholes, and puncture marks. If sample units
were collected in plastic bottles, check bottles for fractures and loose lids. If plastic bags were
used for sampling, be certain that twist wires did not puncture surrounding bags. Any cross-
contamination resulting from one or more of above defects would invalidate the sample, and the
collecting district should be notified.
Labeling and records. Be certain that each sample is accompanied by a completed copy of the
Collection Report and officially sealed with tape bearing the sample number, collecting official's

35
name, and date. Assign each sample unit an individual unit number and analyze as a discrete unit
unless the sample is composited as described previously in this chapter.
Adherence to sampling plan. Most foods are collected under a specifically designed sampling
plan in one of several ongoing compliance programs. Foods to be examined for Salmonella,
however, are sampled according to a statistically based sampling plan designed exclusively for
use with this pathogen. Depending on the food and the type of analysis to be performed,
determine whether the food has been sampled according to the most appropriate sampling plan.
Storage. If possible, examine samples immediately upon receipt. If analysis must be postponed,
however, store frozen samples at -20°C until examination. Refrigerate unfrozen perishable
samples at 0-4°C not longer than 36 h. Store nonperishable, canned, or low-moisture foods at
room temperature until analysis.
Notification of collecting district. If a sample fails to meet the above criteria and is therefore
not analyzed, notify the collecting district so that a valid sample can be obtained and the
possibility of a recurrence reduced.
Thawing
Use aseptic technique when handling product. Before handling or analysis of sample, clean
immediate and surrounding work areas. In addition, swab immediate work area with commercial
germicidal agent. Preferably, do not thaw frozen samples before analysis. If necessary to temper
a frozen sample to obtain an analytical portion, thaw it in the original container or in the container
in which it was received in the laboratory. Whenever possible, avoid transferring the sample to a
second container for thawing. Normally, a sample can be thawed at 2-5°C within 18 h. If rapid
thawing is desired, thaw the sample at less than 45°C for not more than 15 min. When thawing a
sample at elevated temperatures, agitate the sample continuously in thermostatically controlled
water bath.
Mixing
Various degrees of non-uniform distribution of microorganisms are to be expected in any food
sample. To ensure more even distribution, shake liquid samples thoroughly and, if practical, mix
dried samples with sterile spoons or other utensils before withdrawing the analytical unit from a
sample of 100 g or greater. Use a 50 g analytical unit of liquid or dry food to determine aerobic
plate count value and most probable number of coliforms. Other analytical unit sizes (e.g., 25 g
for Salmonella) may be recommended, depending on specific analysis to be performed. Use
analytical unit size and diluent volume recommended for appropriate Bacteriological Analytical
Manual method being used. If contents of package are obviously not homogeneous (e.g., a
frozen dinner), macerate entire contents of package and withdraw the analytical unit, or,
preferably, analyze each different food portion separately, depending on purpose of test.
Weighing
Tare high-speed blender jar; then aseptically and accurately (± 0.1 g) weigh unthawed food (if
frozen) into jar. If entire sample weighs less than the required amount, weigh portion equivalent to
one-half of sample and adjust amount of diluent or broth accordingly. Total volume in blender
must completely cover blades.
Blending and diluting of samples requiring enumeration of microorganisms
All foods other than nut meat halves and larger pieces, and nut meal. Add 450 ml
Butterfield's phosphate-buffered dilution water to blender jar containing 50 g analytical unit and

36
blend 2 min. This results in a dilution of 10
-1
. Make dilutions of original homogenate promptly,
using pipets that deliver required volume accurately. Do not deliver less than 10% of total volume
of pipet. For example, do not use pipet with capacity greater than 10 ml to deliver 1 ml volumes;
for delivering 0.1 ml volumes, do not use pipet with capacity greater than 1.0 ml. Prepare all
decimal dilutions with 90 ml of sterile diluent plus 10 ml of previous dilution, unless otherwise
specified. Shake all dilutions vigorously 25 times in 30 cm (1 ft) arc in 7 s. Not more than 15 min
should elapse from the time sample is blended until all dilutions are in appropriate media.
Nut meat halves and larger pieces. Aseptically weigh 50 g analytical unit into sterile screw-
cap jar. Add 50 ml diluent (G-l, above) and shake vigorously 50 times through 30 cm arc to
obtain 10
0
dilution. Let stand 3-5 min and shake 5 times through 30 cm arc to resuspend just
before making serial dilutions and inoculations.
Nut meal. Aseptically weigh 10 g analytical unit into sterile screw-cap jar. Add 90 ml of diluent
(G-l, above) and shake vigorously 50 times through 30 cm arc to obtain 10
-1
dilution. Let stand
3-5 min and shake 5 times through 30 cm arc to resuspend just before making serial dilutions and
inoculations.

37
Enumeration of microorganisms in foods
A. Determination of Aerobic colony count in Foods
1. Application
This method is applicable to the enumeration of viable aerobic bacteria (psychrophilic, mesophilic
and/or thermophilic bacteria) in foods.
2. Principle
The Aerobic Colony Count (ACC) estimates the number of viable aerobic bacteria per g or mL
of product. A portion of the product is mixed with a specified agar medium and incubated under
specific conditions of time and temperature. It is assumed that each viable aerobic bacterium will
multiply under these conditions and give rise to a visible colony which can be counted.
Psychrophilic bacteria: an organism which grows optimally at or below 15
o
C, which has an upper
limit for growth at ca. 20
o
C, and which has a lower limit of growth of 0
o
C or lower.
Mesophilic bacteria: an organism whose optimim growth temperature lies within a range generally
accepted as ca. 20 - 45
o
C.
Thermophilic bacteria: an organism whose optimimum growth temperature is > 45
o
C.
3. Materials and special equipment
The following media and reagents (1-4) are commercially available and are to be prepared and
sterilized according to the manufacturer's instructions.
1) Plate count agar (PC)
2) Peptone water diluent (0.1%)(PW)
3) 2% sodium citrate (tempered to 45
0
C) (for cheese samples only)
4) Sodium 2,3,5 triphenyltetrazolium chloride (0.1%) (optional)
5) 1N HCl and 1N NaOH
6) pH meter or paper capable of distinguishing to 0.3 to 0.5 pH units within a range of 5.0 to 8.0
7) Stomacher, blender or equivalent
8) Incubator capable of maintaining the growth temperature required for the specific type of
aerobic bacteria being enumerated (i.e. for psychrophilic bacteria: 15 - 20
o
C, for mesophilic
bacteria: 30 - 35
o
C, and for thermophilic bacteria: 55
o
C) and 45
o
C waterbath
9) Colony counting device (optional)
4. Procedure
Determine which type of aerobic bacteria are being enumerated. Analyze each sample unit
individually.

38
The test shall be carried out in accordance with the following instructions:
4.1. Handling of Sample Units
4.1.1. During storage and transport, the following shall apply: with the exception of shelf-
stable products, keep the sample units refrigerated (0-5
o
C). Sample units of frozen products
shall be kept frozen.
4.1.2. Thaw frozen samples in a refrigerator or under time and temperature conditions which
prevent microbial growth or death.
4.1.3. Analyze sample units as soon as possible after receipt in the laboratory.
4.2. Preparation of Media
4.2.1. Prepare plate count agar and dispense in appropriate quantities. Sterilize.
4.2.2. Temper prepared melted agar in a waterbath to 45
o
C ensuring that the water level is
1 cm above the level of the medium in the bottles.
4.2.3. Clean surface of working area with a suitable disinfectant.
4.2.4. Clearly mark the duplicate Petri plates.
4.3. Preparation of Dilutions
4.3.1. Prepare sterile 0.1% peptone water diluent.
4.3.2. To ensure a truly representative analytical unit, agitate liquid or free flowing materials
until the contents are homogeneous. If the sample unit is a solid, obtain the analytical unit by
taking a portion from several locations within the sample unit.
4.3.3. Prepare a 1:10 dilution of the food by aseptically blending 25 g or mL (the analytical
unit) into 225 mL of the required diluent, as indicated in Table I. If a sample size other than
25 g or mL is used, maintain the 1:10 sample to dilution ratio, such as 11 (10) g or mL into
99 (90) mL.
NOTE: Volume in brackets indicates alternate procedure for marking dilutions.
4.3.4. If a homogeneous suspension is to be obtained by blending, the blending time should
not exceed 2.5 min in order to prevent over-heating. With foods that tend to foam, use
blender at low speed, and remove an aliquot from below the liquid/foam interface. If a
homogeneous suspension is to be obtained by shaking, shake the dilution bottles 25 times
through a 30 cm arc in approximately 7 sec.
4.3.5. In some instances it may be advantageous to prepare the initial dilution on a percent
basis to obtain a more accurate test material weight than is attained by the dilution ratio
method; i.e., a 10% solution (suspension) is represented by 10 g (mL) per 100 g (mL) of
solution (suspension), whereas a 1:10 dilution is based on 10 g (mL) of product (solute) plus
90 g (mL) of diluent (solvent).
4.3.6. Check the pH of the food suspension. If the pH is outside the range of 5.5-7.6,
adjust the pH to 7.0 with sterile NaOH or HCl.

39
4.3.7. Prepare succeeding decimal dilutions as required, using a separate sterile pipette for
making each transfer.
4.3.8. Shake all dilutions immediately prior to making transfers to ensure uniform distribution
of the microorganisms present.
4.4. Plating
4.4.1. Agitate each dilution bottle to resuspend material that may have settled out during
preparation.
4.4.2. Pipette 1 mL or 0.1 mL of the required dilutions to appropriately marked duplicate
Petri plates.
4.4.3. In the case of products that tend to adhere to the bottom of the plates, add the
inoculum to 1.0 mL of sterile diluent previously placed in the Petri plate.
4.4.4. Pour 12-15 mL of tempered agar into each plate, and mix by rotating and tilting.
Allow to solidify. Plates should be poured not more than 15 min after preparation of
dilutions.
4.5. Incubation
Incubate plates in the inverted position for 48 h ± 4 h. Incubation temperature is dependent
on the growth temperature requirements of the target organisms (for psychrophilic bacteria:
15 - 20
o
C, for mesophilic bacteria: 30 - 35
o
C, and for thermophilic bacteria: 55
o
C). The
plates used to enumerate psychrophilic and thermophilic bacteria may be incubated up to 5
days. Other combinations of time and temperature may be used, if the lab has verified their
suitability. Avoid crowding or excessive stacking of plates to permit rapid equilibration of
plates with incubator temperature.
4.6.
Counting Colonies
4.6.1. Count colonies promptly after the incubation period.
4.6.2. If possible, select plates with 20-200 colonies (including pinpoint colonies). If counts
do not fall within this range select plates that fall nearest to the 20-200 range.
4.6.3. If plates contain colonies which spread, select a representative portion of the plates
free from spreaders, if possible, and count the colonies in this area. The total count of the
entire plate is estimated by multiplying the count for the representative area counted by the
reciprocal of the fraction of the plate counted; e.g., 30 colonies counted on 1/4 of area of
the plate; count for the whole plate: 30 x 4 = 120 colonies.
4.7 Differentiation of Colonies from Interfering Particles
4.7.1. Food particles such as meat, milk powder, etc., often interfere with the enumeration
of the plates. This can be eliminated by making one extra plate of each dilution containing
interfering particles and holding it under refrigeration as a control for comparison during
counting.

40
4.7.2. Alternatively, after incubation flood plates with 2 mL of 0.1% 2,3,5,
triphenyltetrazolium chloride. Gently rock plates from side to side to cover the entire area
with solution. Pour off excessive solution and allow the plates to remain at room temperature
for 3 hrs. in an inverted position. The bacteria reduce the indicator to a formazan which
colours the colonies red and aids in distinguishing the food particles. Colonies cannot be
picked for isolation after this method has been used.
4.8. Recording Results
4.8.1. Calculate the average count (arithmetic mean) of the duplicate plates4.8.2 When
reporting results (Table II) round-off the counts to two significant figures and record only the
first two left hand digits; (e.g., record 2,850 as 2,900).
4.8.3. If the lowest dilution plated shows no colonies, the recorded value will be the lowest
average obtainable with given volume plated onto a given set of replicate plates preceeded
by a "less than" (<) sign, e.g., for one millilitre and a set of duplicate plates (1 mL/plate) the
value is < 0.5. The lowest possible average with one colony on one of the two duplicate
plates is:
1 + 0 /2
= 0.5
This value is for a 10
o
dilution (Dilution Factor = 1). For other dilutions, the numerical value
of 0.5 must be multiplied by the reciprocal of the dilution; i.e., the Dilution Factor,
1 /10
-1
=
10
4.8.4. To compute the Aerobic Colony Count (ACC), use the formula: N = A x D, where
N is the number of colonies per g (mL) of product, A is the average count per plate, and D
is the respective dilution factor.
Table I
Type of Food
Preparation*
Treatment
Liquids:
milk, water etc. pipette directly into Petri dishes and/or into peptone water
diluent
shake
viscous lipids
weigh into peptone water diluent
shake
Solids:
water soluble
solids
weigh into peptone water diluent
shake
powder, meats weigh into peptone water diluent
stomach or
blend
all cheese
weigh into previously warmed (45
o
C) 2% sodium citrate
(Na
3
C
6
H
5
O
7
.2H
2
O)
stomach or
blend
spices
weigh into diluent
shake
Shellfish
weigh into peptone water diluent
stomach or
blend
*Sample may be weighed into a stomacher or blender jar with the diluent added prior to mixing.

41
Table II
Examples for Recording Results
Examples of the average number of
colonies
Dilution
Report as no. of bacteria per g
(mL)
Counts between 20-200, e.g., 144
1:1000
140,000
Counts higher than 200, e.g., 440
Highest dilution
1:1000
440,000 E
counts lower than 20, e.g., 15
Lowest dilution
1:1000
15,000 E
No count 0
Lowest dilution
1:1000
<500
B. Most Probable Number Method (MPN)
The most probable number (MPN) is particularly useful for low concentrations of organisms
(<100/g), especially in milk and water, and for those foods whose particulate matter may interfere
with accurate colony counts. Only viable organisms are enumerated by the MPN determination.
If, in the microbiologist's experience, the bacteria in the prepared sample in question can be found
attached in chains that are not separated by the preparation and dilution, the MPN should be
judged as an estimate of growth units (GUs) or colony-forming units (CFUs) instead of individual
bacteria. For simplicity, however, here we will speak of these GUs or CFUs as individual
bacteria.
The following assumptions are necessary to support the MPN method. The sample is prepared in
such a way that the bacteria are distributed randomly within it. The bacteria are separate, not
clustered together, and they do not repel each other. The growth medium and conditions of
incubation have been chosen so that every inoculum that contains even one viable organism will
produce detectable growth.
The essence of the MPN method is the dilution of a sample to such a degree that inocula will
sometimes but not always contain viable organisms. The "outcome", i.e., the numbers of inocula
producing growth at each dilution, will imply an estimate of the original, undiluted concentration of
bacteria in the sample. In order to obtain estimates over a broad range of possible
concentrations, microbiologists use serial dilutions, incubating several tubes (or plates, etc.) at
each dilution.
The first accurate estimation of the number of viable bacteria by the MPN method was published
by McCrady (1915). Halvorson and Ziegler (1933), Eisenhart and Wilson (1943), and Cochran
(1950) published articles on the statistical foundations of the MPN. Woodward (1957)
recommended that MPN tables should omit those combinations of positive tubes (high for low
concentrations and low for high concentrations) that are so improbable that they raise concerns
about laboratory error or contamination. De Man (1983) published a confidence interval method
that was modified to make the tables below.

42
Confidence Intervals
The 95 percent confidence intervals in the tables have the following meaning. Before the tubes
are inoculated, the chance is at least 95 percent that the confidence interval associated
with the eventual result will enclose the actual concentration.
Selecting Three Dilutions for Table Reference
An MPN can be computed for any numbers of tubes at any numbers of dilutions. MPN values
based on 3 decimal dilutions, however, are very close approximations to those based on 4 or
more dilutions. When more than three dilutions are used in a decimal series of dilutions, refer to
the 3 dilution table according to the following two cases, illustrated by the table of examples
below (with 5 tubes at each dilution).
Case 1. One or more dilutions show all tubes positive. Select the highest dilution that gives
positive results in all tubes (even if a lower dilution gives negative results) and the next two higher
dilutions (ex. a and b); if positive results occur in higher unselected dilutions, shift each selection to
the next higher dilution (ex. c). If there are still positive results in higher unselected dilutions, add
those higher-dilution positive results to the results for the highest selected dilution (ex. d). If there
were not enough higher dilutions tested to select three dilutions, then select the next lower
dilutions (ex. e).
Case 2. No dilutions show all tubes positive. Select the 3 lowest dilutions (ex. f). If there are
positive results in higher unselected dilutions, add those higher-dilution positive results to the
results for the highest selected dilution (ex. g).
Table 1
Example 1.0 g 0.1 g 0.01 g 0.001 g 0.0001 g
Combination of Positives
MPN/g
a
5
5
1
0
0
5-1-0
33
b
4
5
1
0
0
5-1-0
33
c
5
4
4
1
0
4-4-1
40
d
5
4
4
0
1
4-4-1
40
e
5
5
5
5
2
5-5-2
5400
f
0
0
1
0
0
0-0-1
0.20
g
4
4
1
1
0
4-4-2
4.7
Other compendia of methods require that no excluded lower dilutions may have any negative
tubes. This manual differs when the highest dilution that makes all tubes positive follows a lower
dilution that has one or more negative tubes. Example b above would be read according to other
compendia as (4, 5, 1, 0, 0) with MPN 4.8/g. The BAM reading, 33/g, is 7 times larger. The
BAM selection method is based on FDA experience that for some organisms in some food
matrices such outcomes as (2, 5, 1, 0, 0) and (0, 3, 1, 0, 0) occur too often to be random
occurrences. In these cases, it appears that some factor (a competing organism or adverse set of
compounds) is present at the lowest dilutions in such concentrations that it can reduce the
detection of the target microbes.
Until further research clarifies this situation, analysts should continue to exclude dilutions lower
than the highest dilution with all tubes positive. The findings should, however, report the extent to
which such lower, partially-negative dilutions have been excluded. Analysts working with

43
materials with known limited complexity in research settings will want to use their professional
judgement to read outcomes such as (4, 5, 1, 0, 0) as (4, 5, 1, 0, 0). They may also read
outcomes such as (3, 5, 1, 0, 0) as too improbable to record, because they are not included in
the tables.
Inconclusive Tubes
In special cases where tubes or plates cannot be judged either positive or negative (e.g., plates
overgrown by competing microflora at low dilutions), these tubes or plates should be excluded
from the results. The entire dilutions at or below those in which exclusion occurs may be
excluded. If it is not desired to exclude the remaining tubes at or below the dilution of the
excluded tubes, the results will now have an unequal number of tubes at several dilutions.
Conversion of Table Units
The tables below apply directly to inocula 0.1, 0.01, and 0.001 g. When different inocula are
selected for table reference, multiply the MPN/g and confidence limits by whatever multiplier is
required to make the inocula match the table inocula. For example, if the inocula were 0.01,
0.001, and 0.0001 for 3 tubes each, multiplying by 10 would make these inocula match the table
inocula. If the positive results from this 3 tube series were (3, 1, 0), one would multiply the Table
1 MPN/g estimate, 43/g, by 10 to arrive at 430/g.
Calculation of Most Probable Numbers (MPN)
Table I shows the most probable numbers of coliforms per 100 ml or g of test material
corresponding to the number of gas-positive tubes in the coliform test.
Table I has been adapted from a conversion table prepared for the analysis of drinking waters
where 10, 1.0 and 0.1 ml of the water under test are used as test portions. When other sized
portions of the test material are placed in the tubes, MPN values obtained from Table II must be
multiplied by an appropriate number, to correct for the actual amount of test material in the tubes,
and also to obtain the MPN per g (ml) as is usually done for foods, rather than per 100 ml (g),
for which the values are given in the table. The volume of diluent added to the tubes (and which
accompanies the test material) is ignored when calculating the MPN.
Example:
The following inoculated tubes give a positive reading:
(1) 5 tubes with 10 ml of 1:10 dilution of test material - all 5 are positive
(2) 5 tubes with 1 ml of 1:10 dilution of test material - 1 is positive
(3) 5 tubes with 1 ml of 1:100 dilution of test material - none are positive
The quantities in each of the five tubes of the three dilution series represent 1, 0.1 and 0.01 g
(ml), respectively of the test material. According to Table I, a reading of 5-1-0 gives a value of
33 when 10, 1 and 0.1 g (ml) respectively are used. However, since only 1/10 of these amounts
were actually used in the analysis, the value of 33 obtained from Table II must be multiplied by 10
giving 33 x 10 = 330 organisms per 100 g (ml) of test material. If the results need to be
expressed per g (ml), the MPN value is 330 ÷ 100 = 3.3. When higher dilutions are used, the
same procedure is followed, but the multiplier (dilution factor) is enlarged to relate the amount of
test material actually present to the values given for 10, 1.0 and 0.1 g (ml) in Table I.

44
Dilution factor = Reciprocal of the dilution of the analytical unit.
For calculating the MPN, use the dilution factor of the middle set of the three dilutions selected.
To determine which consecutive dilutions to use, refer to the combinations shown below: (See
also Table III).
1. If only 3 dilutions are made, use the results for those 3 dilutions to compute the MPN.
Examples a and b, Table II.
2. If more than 3 dilutions are employed, use the results of only 3 consecutive dilutions.
Select the highest dilution (last dilution, i.e. dilution with the smallest quantity of product), in
which all 5 tubes are positive and 2 subsequent higher dilutions. Examples c and d, Table II.
3. If more than 3 dilutions are made, but none of the dilutions tested have all 5 tubes
positive, use the first 3 dilutions. Example e, Table II.
4. If a positive tube occurs in the dilution higher than the 3 chosen to rule, the number of
such positive tubes should be added to those of the next lower dilution. Example f, Table II.
5. If the tubes of all sets of a dilution series are positive, choose the 3 highest dilutions of the
series and indicate by a "greater than" symbol (>) that the MPN is greater than the one
calculated. Example g, Table II.
Refer to Table II and look up the value which corresponds to the number of positive tubes
obtained.
MPN/100 ml = No. microorganisms
(Table I)
x dilution factor of middle set of tubes

45
MPN Tables
Table II. For 3 tubes each at 0.1, 0.01, and 0.001 g inocula, the MPNs per gram and 95
percent confidence intervals.
Pos. tubes
Conf. lim. Pos. tubes
Conf. lim.
0.10 0.01 0.001
MPN/g
Low High 0.10 0.01 0.001
MPN/g
Low
High
0
0
0
<3.0
--
9.5 2
2
0
21
4.5
42
0
0
1
3.0
0.15 9.6 2
2
1
28
8.7
94
0
1
0
3.0
0.15 11
2
2
2
35
8.7
94
0
1
1
6.1
1.2 18
2
3
0
29
8.7
94
0
2
0
6.2
1.2 18
2
3
1
36
8.7
94
0
3
0
9.4
3.6 38
3
0
0
23
4.6
94
1
0
0
3.6
0.17 18
3
0
1
38
8.7
110
1
0
1
7.2
1.3 18
3
0
2
64
17
180
1
0
2
11
3.6 38
3
1
0
43
9
180
1
1
0
7.4
1.3 20
3
1
1
75
17
200
1
1
1
11
3.6 38
3
1
2
120
37
420
1
2
0
11
3.6 42
3
1
3
160
40
420
1
2
1
15
4.5 42
3
2
0
93
18
420
1
3
0
16
4.5 42
3
2
1
150
37
420
2
0
0
9.2
1.4 38
3
2
2
210
40
430
2
0
1
14
3.6 42
3
2
3
290
90
1,000
2
0
2
20
4.5 42
3
3
0
240
42
1,000
2
1
0
15
3.7 42
3
3
1
460
90
2,000
2
1
1
20
4.5 42
3
3
2
1100
180
4,100
2
1
2
27
8.7 94
3
3
3
>1100 420
--

46
Table III
Most Probable Number (MPN) of Bacteria Per 100 g (ml) of Test Material Using 5 Tubes
With 10, 1 and 0.1 ml or g of Test Material
10;1;0,1 MPN 10;1;0,1 MPN 10;1;0,1 MPN 10;1;0,1 MPN 10;1;0,1 MPN 10;1;0,1 MPN
000
<1.8
100
2
200
4.5
300
7.8
400
13
500
23
001
1.8
101
4
201
6.8
301
11
401
17
501
31
002
3.6
102
6
202
9.1
302
13
402
21
502
43
003
5.4
103
8
203
12
303
16
403
25
503
58
004
7.2
104
10
204
14
304
20
404
30
504
76
005
9
105
12
205
16
305
23
405
36
505
95
010
1.8
110
4
210
6.8
310
11
410
17
510
33
011
3.6
111
6.1
211
9.2
311
14
411
21
511
46
012
5.5
112
8.1
212
12
312
17
412
26
512
64
013
7.3
113
10
213
14
313
20
413
31
513
84
014
9.1
114
12
214
17
314
23
414
36
514
110
015
11
115
14
215
19
315
27
415
42
515
130
020
3.7
120
6.1
220
9.3
320
14
420
22
520
49
021
5.5
121
8.2
221
12
321
17
421
26
521
70
022
7.4
122
10
222
14
322
20
422
32
522
95
023
9.2
123
12
223
17
323
24
423
38
523
120
024
11
124
15
224
19
324
27
424
44
524
150
025
13
125
17
225
22
325
31
425
50
525
180
030
5.6
130
8.3
230
12
330
17
430
27
530
79
031
7.4
131
10
231
14
331
21
431
33
531
110
032
9.3
132
13
232
17
332
24
432
39
532
140
033
11
133
15
233
20
333
28
433
45
533
180
034
13
134
17
234
22
334
31
434
52
534
210
035
15
135
19
235
25
335
35
435
59
535
250
040
7.5
140
11
240
15
340
21
440
34
540
130
041
9.4
141
13
241
17
341
24
441
40
541
170
042
11
142
15
242
20
342
28
442
47
542
220
043
13
143
17
243
23
343
32
443
54
543
280
044
15
144
19
244
25
344
36
444
62
544
350
045
17
145
22
245
28
345
40
445
69
545
440
050
9.4
150
13
250
17
350
25
450
41
550
240
051
11
151
15
251
20
351
29
451
48
551
350
052
13
152
17
252
17
352
32
452
56
552
540
053
15
153
19
253
26
353
37
453
64
553
920
054
17
154
22
254
29
354
41
454
72
554
1600
055
19
155
24
255
32
355
45
455
81
555
>1600

47
C. Enumeration of yeasts and moulds in foods
1. Application
This method is applicable to the enumeration of viable yeasts and moulds in foods and food
ingredients It may also be used to confirm the viability of apparent yeast and mould material
scraped from food plant equipment and the manufacturing environment.
2. Principle
In the past, acidified media were used to enumerate yeasts and moulds in foods. Such media are
now recognized as inferior to antibiotic supplemented media that are formulated to suppress
bacterial colony development, enhance resuscitation of injured fungi, and minimize precipitation of
food particles.
A medium, containing (a) adequate nutrients for growth of most yeasts and moulds and (b)
antibiotics for inhibition of most bacteria, is inoculated with a given quantity of the product or with
scrapings from equipment or the manufacturing environment. It is incubated at 22-25
o
C for 3-5
days. Colonies appearing on the medium are then counted and/or examined. The method
described here is a "general purpose" method and may not be suitable for detection of yeasts and
moulds adapted to certain foods, e.g., foods of very low water activity.
3. Defination of terms
3.1. Scrapings: Suspected yeast and mould material scraped from food plant equipment and the
manufacturing environment.
3.2. Xerophilic: Moulds capable of growing at reduced water activity (a
w
). (Yeasts preferring
reduced a
w
are also sometimes referred to as xerophilic.) (7.5)
3.3. Osmophilic: Yeasts preferring reduced a
w
for growth.
Precautions
Some yeasts and moulds can be infectious or can cause allergic responses, therefore, it is
important to be fairly cautious when working with fungi. Ideally, plates should be held in
incubators, not in an open room. Plate lids should generally only be removed for procedures such
as the preparation of a slide for microscopic examination.
Flamed needles should be cooled before making transfers to avoid dispersal of conidia and other
cells. Cultures should never be smelled.
4. Materials and special equipment
The following media and reagents (1-8) are commercially available and are to be prepared and
sterilized according to the manufacturer's instructions. and reference 7.3 for the formula of
individual media.
Note: If the analyst uses any variations of the media listed here (either product that is
commercially available or made from scratch), it is the responsibility of the analyst or Laboratory
Supervisor to ensure equivalency.
Enumeration of yeasts and moulds in foods (not specified below)
These agars are suitable for foods where the a
W
is above 0.95, such as fresh foods (fruit,
vegetables, meat and dairy).

48
1) Dichloran rose bengal chloramphenicol agar (DRBC)
2) Plate count agar with chloramphenicol (PCA-C)
3) Potato dextrose agar with chloramphenicol (PDA-C)
4) Potato dextrose salt agar with chloramphenicol (PDSA-C) (for analysis of 'spreader' moulds)
Enumeration of xerophilic yeasts and moulds in grains, flours, nuts, and spices
5) Dichloran-glycerol DG 18 agar (DG-18)
Enumeration of xerophilic yeasts and moulds in jams, jellies, fruit concentrates, and
dried fruits
6) 20% sucrose (diluent additive for osmophiles, see 6.3.1)
7) Malt extract agar containing 50% (w/w) sucrose
Other:
8) Peptone water (0.1%) (PW)
9) 2% sodium citrate tempered to 45
o
C (diluent for high fat foods, such as cheese) (optional)
10) 1N HCl and 1N NaOH
11) Gram stain solutions
12) Stomacher, blender or equivalent
13) pH meter or paper capable of distinguishing to 0.3 to 0.5 pH units within a range of 5.0 to
8.0
14) Light microscope
15) Colony counting device (optional)
16) Incubator (darkened) capable of maintaining 22 to 25
o
C, 55
o
C waterbath (and 45
o
C
waterbath if sodium citrateistobeused).
5. Procedure
Each sample unit shall be analyzed individually. The test shall be carried out in accordance with
the following instructions:
5.1. Handling of Sample Units and Scrapings
5.1.1. During storage and transport, the following shall apply: with the exception of shelf-
stable products, keep the sample units refrigerated (0-5
o
C). Sample units of frozen products
shall be kept frozen.
5.1.2. Thaw frozen samples in a refrigerator or under time and temperature conditions which
prevent microbial growth or death.

49
5.1.3. Analyze the sample units as soon as possible after receipt at the laboratory.
5.2. Preparation of Medium
5.2.1. Prepare the appropriate media for the analysis being carried out (see Section 5).
NOTE: DRBC agar should not be exposed to light, since photo-degradation of rose bengal
produces compounds that are toxic to fungi.
5.2.2. Temper melted agar in a 55
o
C waterbath, ensuring that the water level is 1 cm above
the level of the medium in the bottles.
5.2.3. Clean surface of working area with a suitable disinfectant.
5.2.4. Mark clearly the duplicate petri plates identifying sample, sample unit, dilution and
date of inoculation.
5.3. Preparation of Dilutions
5.3.1. Prepare 0.1% peptone water as diluent. An appropriate solute, such as 20%
sucrose, should be added to the diluent when enumerating osmophiles in foods such as
syrups and fruit juice concentrates. In addition, a 2% solution of sodium citrate, pre-warmed
to 45°C, can be used as diluent for high-fat foods such as cheese.
5.3.2. To ensure a representative analytical portion, agitate liquid or free flowing materials
until the contents are homogeneous. If the sample unit is a solid, obtain the analytical unit by
taking a portion from several locations within the sample unit.
5.3.3. Some degree of soaking may be beneficial for the recovery of yeasts and moulds
from dried or intermediate-moisture foods. Soaking may allow for the repair of sub-lethally
damaged cells (resuscitation). Rehydrate dried foods for 1 h with an equal amount of
distilled water or peptone water and store at room temperature.
5.3.4. Prepare a 1:10 dilution of the food by aseptically blending 25 g or mL (the analytical
unit) into 225 mL of the required diluent, as indicated in Table I. If a sample size other than
25 g or mL is used, maintain the 1:10 sample to dilution ratio, such as 11 (10) g or mL into
99 (90) mL.
NOTE: Weight or volume in brackets indicates alternate procedure for making dilutions.
5.3.5. Stomach, blend or shake according to the type of food as indicated in Table 1.
Blend or stomach for the minimum time required to produce a homogeneous suspension. To
prevent over-heating, blending time should not exceed 2.5 min. With foods that tend to
foam, use blender at low speed and remove aliquot from below liquid/foam interface.
5.3.6. Verify the pH of the suspension. If the pH is not between 5.5 and 7.5, adjust the pH
to 7.0 with a sterile solution of 1N NaOH or 1N HCl.
5.3.7. If the 1:10 dilution is prepared in a dilution bottle, it should be mixed by shaking the
bottle 25 times through a 30 cm arc in approximately 7 sec.

50
5.3.8. Prepare succeeding decimal dilutions as required, using a separate sterile pipette for
making each transfer.
5.3.9. Because mould propagules may settle out within a few minutes, it is important to
shake all dilutions (as in 5.3.7) immediately prior to making transfers to ensure uniform
distribution of the microorganisms present.
5.4. Plating
5.4.1 Agitate each dilution bottle to resuspend material that may have settled out during
preparation.
5.4.2 Moulds should be enumerated by a surface spread-plate technique rather than with
pour plates. This technique provides maximal exposure of the cells to atmospheric oxygen
and avoids heat stress from molten agar. Agar spread plates should be dried overnight
before being inoculated. Spread 0.1 mL onto duplicate plates (see Section 5 for appropriate
plating media)
5.4.3 For determination of viability of suspected yeast and mould material from food plant
equipment and the manufacturing environment, aseptically tease the scrapings apart and
distribute the pieces over the surface of solidified medium.
5.5. Incubation
Incubate plates undisturbed in an upright position at 22 to 25
o
C for 3-5 days. Incubate plates in
the dark. Normally, count colonies on plates after 5 days. Examine on the third day and if mould
colonies are numerous, count them and then count again on the fifth day, if possible. Handle the
plates as little as possible when counting on day 3 so spores will not be dislodged, which may
result in secondary growth
5.6. Counting Colonies and Examining Growth
5.6.1. Count colonies, distinguishing, if required, yeast colonies from mould colonies,
according to their colonial morphology. Microscopic examination with crystal violet stained
smears may be necessary to distinguish yeast colonies from some bacterial colonies that may
look like yeast.
5.6.2. If possible, select plates with 10-150 colonies. Determine the identity of pin-point
colonies microscopically. If counts do not fall within this range, select plates that fall nearest
to the 10-150 range. If the mycoflora consists primarily of moulds, the lower population
range is selected; if primarily yeast colonies, the upper limit is counted.
Alternatively,
5.6.3. If plates contain colonies which spread, select a representative portion of the plates
free from spreaders, if possible, and count colonies in this area. The total count of the whole
plate is estimated by multiplying the count for the representative area by the reciprocal of the
fraction of the plate counted, e.g., 30 colonies counted on 1/4 of the area of the plate; count
for the whole plate: 30 x 4 = 120 colonies. Results are expressed as an estimated count.

51
5.6.4. Wet mounts and gram stains of several diverse types of cells per sample should be
examined to confirm that bacteria are not present. Yeast cells and asexual mould spores are
generally gram-positive, whereas mould mycelia are gram-negative.
5.7. Differentiation of Colonies from Interfering Particles
5.7.1. Food particles such as meat, milk powder, etc., often interfere with the enumeration
of colonies. This can be eliminated by making one extra plate of each dilution containing
interfering particles, and holding it under refrigeration as a control for comparison during
counting.
5.8. Recording Results
5.8.1. Calculate the average count (arithmetic mean) of the duplicate plates, following the
examples in Table II: Standard Methods for the Examination of Dairy Products.
5.8.2. Avoid creating erroneous ideas of precision and accuracy when computing counts
(Table II). Round-off counts to two significant figures and record only the first two left hand
digits.
5.8.3. If the lowest dilution plated shows no colonies, the recorded value will be the lowest
average obtainable with a given volume plated onto a given set of replicate plates preceded
by a "less than" (<) sign, e.g., for 1 mL and a set of duplicate plates (1 mL/plate), the value
is <0.5. (The lowest possible average with one colony on one of the two duplicate plates is:
1+0/2 = 0.5).
This value is for a 10
0
dilution (Dilution Factor = 1). For other dilutions, the numerical value
of 0.5 must be multiplied by the reciprocal of the dilution, i.e., the Dilution Factor.
E.g. 1/10
-1
= 10.
5.8.4. To compute the yeast and mould count, use the formula: N = A x D, where N is the
number of colonies per g (mL) of product, A is the average count per plate, and D is the
respective dilution factor
TABLE I
Preparation of Initial Dilution
Type of food
Preparation*
Treatment
Liquids
milk, water, juice, etc.
pipette directly into peptone water diluent
shake
Viscous liquids
Weigh into peptone water diluent
shake
Solids
Water soluble solids
Weigh into peptone water diluent
shake
Powder, meats
Weigh into peptone water diluent
stomach or blend
all cheese
Weigh into previously warmed 45
o
C 2% aqueous stomach or
sodium citrate (NA
3
C
6
H
5
O
7
-2H
2
O)
blend
Spices
Weigh into peptone water diluent
shake
shellfish, fish products
Weigh into peptone water diluent
stomach or blend

52
Sample may be added into an empty stomacher bag, blender jar or dilution bottle and the diluent
added prior to mixing.
TABLE II
Examples for Recording Results
Examples of the average number of
colonies
Dilution
Report as no. of yeasts and moulds per
g (mL)
count between 10-150, e.g., 144
1:1000
140,000
counts higher than 150, e.g., 440
Highest dilution
1:1000
440,000 E*
counts lower than 15, e.g., 10
Lowest dilution
1:1000
10,000 E
no count
Lowest dilution
1:1000
<500
* E is the estimated count

53
D.
Enumeration of coliforms faecal coliforms and E. coli in foods using
the MPN method
1. Application
The Most Probable Number (MPN) method is applicable to the enumeration of coliforms, faecal
coliforms and aerogenic Escherichia coli in foods, food ingredients and water, including contact
water from food manufacturing plants.
Note: This method is not intended to be used to isolate and enumerate E. coli serotypes
associated with human illness, particularly the enterohemorrhagic serotype O157:H7. Many of the
pathogenic serotypes do not give a positive faecal coliform reaction and therefore would not be
detected and recovered by this method.
2. Description
The MPN procedure involves a multiple tube fermentation technique where three or more
decimal dilutions of the sample are inoculated into tubes of broth medium and incubated at a
specific temperature and for a specific time. The method is progressive; i.e., first determining the
presence of coliforms in the tubes, then determining if these tubes also contain faecal coliforms,
and then confirming whether E. coli is present. Based on the number of tubes indicating the
presence / absence of the three groups of organisms, the most probable number present can be
estimated from a standard statistical MPN table. The method has been shown to produce
satisfactory results with naturally-contaminated foods and water for the detection of coliforms,
faecal coliforms and aerogenic E. coli.
3. Principle
The terms “coliform” and “faecal coliform” have no taxonomic validity and, therefore, are only
meaningful when expressed in terms of the analytical test parameters of medium, time and
temperature of incubation.
Coliforms, faecal coliforms, and E. coli are considered “indicator organisms.”
The presence of “indicator organisms” in foods processed for safety may indicate one of the
following possibilities: 1. inadequate processing and/or post-processing contamination; and/or 2.
microbial growth. The presence of faecal coliforms and E. coli may indicate faecal contamination;
however, it must be understood that these microorganisms can survive and multiply in a variety of
non-intestinal environments, including the processing plant. When assessing the presence of
“indicator organisms” in a sample, one must assess the results against the tolerance limits
specified by government standards or guidelines, health agencies, or a laboratory’s in-
house specifications, keeping in mind that established standards and guidelines are specifically
linked to the method used to develop these standards.
As indicated in section 1, the presence of coliforms, faecal coliforms and aerogenic E. coli in
food and water may be determined by means of the MPN procedure. Briefly, this method
involves serially diluting out the target organisms in the sample, in 5-replicate aliquots, to
extinction. The probable level of the target organisms is then statistically estimated from an MPN
table.
Gas production is used as an indication of ability to ferment lactose from LST broth (presumptive
coliform test); gas production from BGLB broth is considered confirmation of coliform presence;

54
gas production at 44.5 or 45
o
C from EC broth is used as confirmation of faecal coliform
presence; and appearance of typical nucleated, dark-centred colonies with or without metallic
sheen when positive EC broths are streaked onto L-EMB agar are indicative of E. coli. The
typical colonies on L-EMB agar must be confirmed by further biochemical tests to prove the
presence of E. coli.
4. Materials and special equipment
The media listed below (1 to 8) are commercially available and are to be prepared and sterilized
according to the manufacturer's instructions.
Note: If the analyst uses any variations of the media listed here (either product that is
commercially available or made from scratch), it is the responsibility of the analyst or Laboratory
Supervisor to ensure equivalency.
1) Peptone Water (0.1% and 0.5%)
2) Aqueous Sodium Citrate (2.0%), tempered to 40-45
o
C
3) Lauryl Sulfate Tryptose (LST) broth
4) Brilliant Green Lactose 2% Bile (BGLB) broth
5) Escherichia coli (EC) broth or EC broth with MUG (4-methylumbelliferyl-ß-D-glucuronide)
6) Levine's Eosin Methylene Blue (L-EMB) agar or Endo agar
7) MacConkey agar
8) Nutrient Agar (NA) or other non-selective agar
9) Covered water baths, with circulating system to maintain temperature of 44.5
o
C and 45
o
C.
Water level should be above the medium in immersed tubes.
10) Thermometer, calibrated and traceable
11) Incubator, 35
o
C.
12) Stomacher, blender or equivalent.
13) Control cultures (use ATCC cultures or equivalent): positive control(s): E. coli that is known
to produce gas at 44.5 / 45
o
C and is capable of fermenting lactose to produce typical reactions
on L-EMB agar; if using EC-MUG, a strain that is known to produce ß-glucuronidase EMB /
IMViC negative control: Enterobacter aerogenes or an equivalent gram negative rod that does
not produce “positive” reactions on EMB and is indole-negative, methyl red-negative, Voges-
Proskauer-positive, and citrate positive. MPN broths negative control: Salmonella berta or an
equivalent gram negative rod that is gas-negative in MPN broths and in the secondary EC broth
NOTE: Some strains of E. aerogenes will give false-positive reactions in the MPN broths (LST,
BGLB and EC broths) by producing a small gas bubble. Therefore, use S. berta or an equivalent
culture for these broths and E. aerogenes or an equivalent culture for EMB agar and IMViC
tests.

55
14) pH meter capable of distinguishing to 0.1 pH units within the range of pH 5.0 to 8.0 or pH
paper capable of distinguishing from 0.3 to 0.5 pH units, within the same range.
15) Supplies needed for confirmation (commercially available): The following supplies may be
needed for confirmation; use A or B (see 7.9). The choice of further identification schemes
(7.9.5) may require alternate media
A. IMViC media and reagents:
a. Tryptone (or tryptophane) broth Indole reagents (available commercially)
b. Buffered Glucose broth Voges-Proskauer test reagents (available commercially) Methyl
red solution
c. Simmon's Citrate (SC) agar
B. Rapid Identification Kits or Systems (such as API, Vitek or equivalent)
5. Procedure
Each sample unit may be analyzed individually or the analytical units may be combined where
requirements of the applicable sampling plan can be met. Carry out the test in accordance with
the following instructions:
5.1. Handling of Sample Units
5.1.1. In the laboratory prior to analysis, except for shelf-stable foods, keep sample units
refrigerated (0-5
o
C) or frozen, depending on the nature of the product. Thaw frozen
samples in a refrigerator, or under time and temperature conditions which prevent microbial
growth or death.
5.1.2. Analyze sample units as soon as possible after their receipt in the laboratory. Shellfish
must be analyzed within 24 hours of collection.
5.2. Preparation for Analysis
5.2.1. Have ready sterile peptone water.
5.2.2. Clean the surface of the working area with a suitable disinfectant.
5.2.3. Arrange LST broth tubes in rows of five and mark them identifying the sample unit
and the dilution to be inoculated (Table II).
5.3. Preparation of Sample, Initial Set-up and Reporting- Raw and Processed Shellfish
5.3.1. For all shellfish, always use 0.5% peptone water for all dilutions.
5.3.2. Include only live animals in the sample for unfrozen shellfish. Select 10 or more
animals to obtain a minimum of 200 g of meat and liquor.
5.3.3. Scrape off all extraneous growth and loose material from the shell and scrub the
shellfish (including the crevices at the juncture of the shells) with a sterile stiff brush under
running water of potable quality. Do no use faucets equipped with aerators. Drain shellfish in
a clean container or on clean towels.

56
5.3.4. Disinfect hands (soap and water, rinse with potable water then rinse with 70%
alcohol) or gloves (dipped in iodophore solution or other suitable disinfectant then rinsed
with potable water) prior to shucking shellfish. Alternatively, use disposable gloves
disinfected with 70% alcohol. A protective mail glove may be worn under the disposable
glove to prevent accidental injury. Using a sterile shucking knife, open the shellfish through
the bill, not hinge, and collect meats and liquor into a sterile container.
5.3.5. Weigh at least 200 g of shellfish and liquor into a tared blender jar and add an equal
amount of 0.5% peptone water. Blend for 1 - 2 minutes. Blended homogenate represents a
1 in 2 dilution.
5.3.6. To obtain a 1 in 10 dilution, add 20 g of the homogenate to 80 g of peptone water
and shake. Shake dilutions 25 times through a 1-foot (30 cm) arc in approximately 7
seconds.
5.3.7. Prepare succeeding decimal dilutions as required using a separate sterile pipette for
making each transfer.
5.3.8. Shake all dilutions immediately prior to making transfers to ensure uniform distribution
of the microorganisms present.
5.3.9. Immediately (i.e., within 2 minutes after blending) prepare the dilutions from the
ground sample and then proceed to inoculate into tubes. Inoculate each of separate sets of
five tubes of LST broth with each dilution to be tested, according to the scheme in (Table II)
as follows:
Inoculate shellfish samples into LST: 10 mL of a 1 in 10 dilution into each of 5 tubes of
double strength LST, 1 mL of 1 in 10 dilution into each of 5 tubes of single strength LST,
and 1 mL of 1 in 100 dilution to each of 5 tubes of single strength LST.
5.3.10. Follow incubation of LST and confirmation steps for coliforms, faecal coliforms and
E. coli as required, and record results as MPN per 100 g of shellfish.
5.4. Preparation of Sample, Initial Set-up and Reporting - Water
5.4.1. Inoculate each of separate sets of five tubes of LST broth with each dilution to be
tested, according to the scheme in (Table II), as follows.
Inoculate each of the five tubes of 10 mL double strength LST broth (first row) with 10 mL
of the undiluted water sample. Inoculate each of the five tubes of 10 mL single strength LST
broth (second row) with 1 mL undiluted water. Inoculate each of the five tubes of 10 mL
single strength LST broth (third row) with 0.1 mL of undiluted water.
5.4.2. Follow incubation of LST and confirmation steps for coliforms, faecal coliforms and
E. coli as required, and record results as MPN per 100 mL of water
5.5. Preparation of Sample, Initial Set-up and Reporting - All other commodities
5.5.1. To ensure a truly representative analytical unit, agitate liquids or free flowing materials
until the contents are homogeneous. If the sample unit is a solid, obtain the analytical unit by
taking a portion from several locations within the sample unit. To reduce the workload, the

57
analytical units may be combined for analysis. It is recommended that a composite contain
not more than 500 g.
5.5.2. Prepare a 1 in 10 dilution of the food by aseptically blending 11 (10) g or mL (the
analytical unit) into 99 (90) mL of the required diluent, as indicated in Tables I and II. If five
sub-samples are composited for analysis, aseptically blend 50 g or mL into 450 mL of the
required diluent.
For fish products an alternative method may be used. Weigh 100 g fish products and add
300 mL of 0.1% peptone water. Blend for 2 minutes. Blended homogenate represents a 1
in 4 dilution. Weigh 40 g of homogenate into 60 mL of 0.1 % peptone to obtain a 1 in 10
dilution. Pipette into LST as in 5.3.9 and express results as MPN/100g.
5.5.3. With products that require blending, blend or stomach for the minimum time required
to produce a homogeneous suspension and to avoid overheating, blending time should not
exceed 2.5 min. When blending foods that tend to foam, use blender at low speed and
remove aliquot from below liquid/foam interface.
5.5.4. Check pH of the food suspension. If the pH is outside the range of 5.5-7.5, adjust
pH to 7.0 with sterile 1N NaOH or 1N HCl.
5.5.5. Allow the food homogenate (1 in 10 dilution) of dry foods to stand at room
temperature for 15 min. In all other instances, continue the analysis without this delay.
5.5.6. Prepare succeeding decimal dilutions as required using a separate sterile pipette for
making each transfer. Shake dilutions 25 times through a 1-foot (30 cm) arc in
approximately 7 seconds.
5.5.7. Shake all dilutions immediately prior to making transfers to ensure uniform distribution
of the microorganisms present.
5.5.8. Inoculate each of separate sets of five tubes of LST broth with each dilution to be
tested, according to the scheme in (Table II) as follows.
5.5.9. Inoculate each of the five tubes of 10 mL single strength LST broth (first row) with 1
mL of the10
-1
dilution. Inoculate each of the five tubes of succeeding rows of single strength
LST with 1 mL additional dilutions.
5.5.10. Follow incubation of LST and confirmation steps for coliforms, faecal coliforms and
E. coli as required. Compute MPN per g (mL) of food (per 100 g of shellfish or fish
products or per 100mL of water) convert the number of gas-positive tubes to MPN values.
5.6. Incubation of LST
5.6.1. In order to verify growth conditions in the elevated temperature water baths,
inoculate one LST broth tube with the MPN broths positive control and one LST broth tube
with the MPN negative control, for each bath used. Transfer into all media used at different
stages of the procedure. Set up an uninoculated tube of medium corresponding to each step
in the procedure as a media control.
5.6.2. Mix inoculum and medium by gently shaking or rotating the tubes, but avoid
entrapping air in the gas vials.

58
5.6.3. Incubate the inoculated LST broth tubes at 35
o
C for 24 ± 2 h. Examine for gas
formation (gas formation may be either a gas bubble or effervescence), record results, and
begin the confirmed coliform, faecal coliform, and E. coli tests for all gas-positive tubes, as
required.
5.6.4. Incubate gas-negative tubes (except raw shellfish and fish products) for an additional
24 ± 2 h, examine, record the number of additional gas-positive tubes, add to the result
obtained in 5.6.3 and begin the confirmed coliform, faecal coliform and E. coli tests for the
additional gas-positive tubes, as required.
5.6.5. The absence of gas in all of the tubes at the end of 48 ± 4 h (24 ± 2 h for raw
shellfish and fish products) of incubation constitutes a negative presumptive test.
5.7. Confirmation Steps for Determination of Coliforms
5.7.1. Use BGLB broth dispensed in 10 mL volumes in tubes containing gas vials.
5.7.2. Shake or rotate the positive LST broth tubes to mix the contents and transfer one
loopful from each tube to a tube of BGLB broth (avoid transferring pellicle). Sterile wood
applicator sticks or other appropriate transfer devices may be used for making the transfers.
5.7.3. Mix inoculum and medium by gently shaking or rotating the tubes, but avoid
entrapping air in the gas vials.
5.7.4. Incubate the inoculated BGLB broth tubes at 35
o
C for 24 ± 2 h. Examine for gas
formation (gas bubble or effervescence) and record results.
5.7.5. Incubate gas-negative tubes for an additional 24 ± 2 h, re-examine, record the
numbers of additional gas-positive tubes and add to the result obtained in 5.7.4.
5.7.6. Formation of gas during 48 ± 4 h incubation constitutes a positive confirmed test.
5.7.7. Compute the MPN of Confirmed Coliforms per g (mL) of food (per 100 g of
shellfish or fish products or per 100 mL of water) convert the number of gas-positive tubes
to MPN values.
5.8. Confirmation Steps for Determination of Faecal Coliforms
5.8.1. Use EC broth (with or without MUG), dispensed in 10 mL volumes in tubes
containing gas vials.
5.8.2. Shake or rotate the positive LST broth tubes (obtained in 5.6) to mix the contents
and transfer one loopful from each tube to a tube of EC broth (avoid transferring pellicles).
Sterile wood applicator sticks or other appropriate transfer devices may be used for making
the transfers. This transfer should be made simultaneously with 5.7 above
5.8.3. Mix inoculum and medium by gently shaking or rotating the tubes, but avoid
entrapping air in the gas vials.
5.8.4. Incubate the inoculated EC broth tubes in a water bath at 45
o
C for 24 ± 2 h (for
shellfish and fish products analysis incubate at 44.5
o
C). Maintain the water level in the bath
at least 1 cm above the level of the medium in the tubes.

59
5.8.5. Examine for gas production (gas bubble or effervescence), record results, and begin
on the same day E. coli identification for all gas-positive tubes (5.9).
5.8.6. Incubate gas-negative tubes (except raw shellfish and fish products) for an additional
24 ± 2 h, examine, record the number of additional gas-positive tubes, add to the results
obtained in 5.8.5 and begin the E. coli identification for the additional gas-positive tubes.
5.8.7. The absence of gas in all of the tubes at the end of 48 ± 4 h (24 ± 2 h for raw
shellfish and fish products) of incubation constitutes a negative presumptive test.
5.8.8. Formation of gas during 48 ± 4 h (24 ± 2 h for raw shellfish and fish products)
incubation constitutes a positive faecal coliform test.
5.8.9. Tubes containing EC-MUG broth should also be examined under UV light (366 nm)
for glucuronidase activity. Blue-green fluorescence indicates a positive presumptive E. coli
test; these tubes may be used for further testing described in 5.9 to confirm presence of E.
coli.
Precautions: Follow safety precautions in the manufacturer’s instructions when using the
UV light. Negative controls of the EC-MUG broth should be also examined under the UV
light to ensure that the tubes do not fluoresce.
5.8.10. Compute faecal coliform MPN per g (mL) of food (per 100 g of shellfish and fish
products or per 100 mL of water) convert the number of gas-positive tubes to MPN values.
5.9. Confirmation Steps for Identification of E. coli
5.9.1. Gently shake each gas-positive EC broth tube or each fluorescing EC- MUG broth
tube (5.8.5 and 5.8.6) and streak a loopful of the culture onto a L-EMB or Endo agar plate.
5.9.2. Incubate the plates at 35
o
C for 18 to 24 h, and examine for typical non-mucoid,
nucleated, dark-centred colonies with or without a metallic sheen which are indicative of E.
coli.
Note: It is up to the Laboratory Supervisor to determine which dilutions and sets of
presumptive (gas- positive) MPN tubes are to be confirmed (and, subsequently, the number
of colonies picked per plate) to adequately determine the final and confirmed MPN count.
5.9.3. If the colonies are well isolated on L-EMB or Endo agar plates, pick one typical
colony and streak onto a non-selective agar such as NA (EMB or MacConkey can also be
used). Circle one other typical colony on EMB before storing the plates at 4
o
C, to be taken
to non-selective media if the initial colony does not confirm as E. coli. Incubate at 35
o
C for
18-24 h. Use these cultures for further confirmation. If the colonies are not well isolated on
L-EMB or Endo agar plates, pick two typical colonies and re-streak onto EMB to obtain
discrete colonies. Select one well isolated typical colony from one of the EMB plates and
streak onto a non-selective agar such as NA (EMB or MacConkey can also be used).
Refrigerate the second EMB plate in case it is needed at a later point. Incubate as above
and use these cultures for further confirmation.
Note: Confirmation can be done by either completing the GIMViC tests (5.9.4) or by the
use of a rapid identification kit (7.9.5).

60
5.9.4. GIMViC
From the streaked plates (NA, EMB or MacConkey), transfer inoculum into a separate
tube of each of EC broth (G medium) and the IMViC media. Collectively they are referred
to as the GIMViC media, where the "G"-medium is the secondary EC broth, "I" -medium is
Tryptone broth, "M"- and "V"-medium is Buffered Glucose broth, and "C"-medium is
Simmon's Citrate agar. If GIMViC tests are not carried out within 96 h of inoculating the
non-selective agar, prepare fresh plates or slants prior to inoculating the GIMViC media.
Inoculate one tube of each of the GIMViC media for each of the isolates to be identified.
Inoculate IMViC positive and negative controls into each of the IMViC media and MPN
positive and negative controls into secondary EC broth.
Alternatively, IMViC tests may be done using any commercially available testing system.
Gas Production at 44.5
o
C or 45.0
o
C (G)
Incubate inoculated tubes of G medium (EC broth) in a water bath at 44.5
o
C or 45.0
o
C for
24 ± 2 h. Examine for gas production. If no gas has been produced, incubate for an
additional 24 ± 2 h and re-examine. Record results.
Indole (I)
Incubate inoculated tubes of Tryptone or tryptophane broth at 35
o
C for 24 ± 2 h. Add
indole reagent (commercially available) to each tube following manufacturer’s instructions. A
dark red colour in the alcohol layer indicates a positive test. An orange colour probably
indicates the presence of skatole and may be reported as a ± reaction. A yellow colour
would be considered negative.
Methyl-Red (MR) and Voges-Proskauer (VP) Tests (MVi)
Inoculate 2 tubes of Buffered Glucose broth and incubate at 35
o
C for 48 ± 2 h. Use MR
and VP reagents (commercially available) following manufacturer’s instructions. The test is
VP-positive if an eosin pink colour develops after 5-10 minutes. The MR test is positive if a
red colour develops, and negative if a yellow colour develops.
Simmon's Citrate Test (C)
In inoculating the slants of SC agar, use a straight needle and apply a light inoculum. Use
care to avoid transferring nutrients together with inoculum as these nutrients (carbon) could
lead to the development of a blue colour and an incorrect interpretation. Incubate the slants
at 35
o
C for 48 ± 2 h and observe for growth. Visible growth (positive reaction) is usually
accompanied by a change of colour from green to deep blue
Interpretation
The characteristic GIMViC reaction pattern for E. coli is given in Table III. If necessary,
commonly occurring coliforms may be differentiated by using the data in Table IV. If
characteristic reactions for E. coli are obtained with GIMViC tests, the other isolate need
not be further tested. However, if the first isolate gives a non-characteristic IMViC pattern,
test the second isolate for its GIMViC reaction pattern. Repeat confirmation steps. If both
isolates fail to produce IMViC reaction patterns characteristic of E. coli, then E. coli is

61
considered to be absent from the tube of primary EC broth from which the isolates
originated.
5.9.5. Rapid Identification Kits
Rapid identification kits may be used to identify E. coli. Follow manufacturer’s instructions.
5.9.6. Calculation of MPNs
Compute the MPN of E. coli per g(mL) of food (per 100 g of shellfish and fish products or
per 100 mL of water) based on the number of tubes found to contain isolates that produce
GIMViC reaction patterns characteristic of E. coli as given above or confirmed by rapid
identification kits as E. coli.
TABLE I
Preparation of the Initial Dilution
Type of Food
Product
Preparation*
Treatment
Liquids:
pipette directly into LST and/or into peptone water diluent
milk, water, etc.
weigh into peptone water diluent
shake
viscous liquids
shake
Solids:
Water soluble
solids
weigh into peptone water diluent
shake
Powder, meats weigh into peptone water diluent
blend or
stomach
all cheese
weigh into previously warmed (40-45
o
C) 2% aqueous sodium
citrate (Na
3
C
6
H
5
O
7
.2H
2
O)
blend or
stomach
spices
weigh into peptone water diluent
shake
shellfish, fish
products
weigh into peptone water diluent
blend or
stomach
* Sample may be added into an empty stomacher bag, blender jar or dilution bottle and the
diluent added prior to mixing.

62
TABLE II Marking and Inoculating Scheme
Tube
Marking*
Dilution
Volume of dilution inoculated into LST
broth tubes
Amount of product
represented per tube
WATER
1
undil.
10
1
10 mL of undiluted water into 10 mL
double strength medium
10 mL
0
undil.
10
0
1 mL of undiluted water into 10 mL
single strength medium
1 mL
-1
undil.
10
-1
0.1 mL of undiluted water into 10 mL
single strength medium
0.1 mL
RAW SHELLFISH (Optional for Fish Products)
0
undil.
10
0
10 mL of 10
-1
dilution of solids into 10
mL of double strength medium
1 g
-1
1 in 10 10
-1
1 mL of 10
-1
dilution into 10 mL single
strength medium
0.1 g
-2
1 in 100 10
-2
1 mL of 10
-2
dilution into 10 mL single
strength medium
0.01 g
ALL OTHER COMMODITIES
0
undil.
10
0
1 mL of undiluted liquids into 10 mL
single strength medium
1 mL
0
undil.
10
0
10 mL of 10
-1
dilution of solids into 10
mL of double strength medium
1 g
-1
1 in 10 10
-1
1 mL of 10
-1
dilution into 10 mL single
strength medium
0.1 g or mL
-2
1 in 100 10
-2
1 mL of 10
-2
dilution into 10 mL single
strength medium
0.01 g or mL
-3
1 in 1000 10
-3
1 mL of 10
-3
dilution into 10 mL single
strength medium
0.001 g or mL
-4
1 in
10000
10
-4
1 mL of 10
-4
dilution into 10 mL single
strength medium
0.0001 g or mL
Further dilutions of the food may be inoculated in the same manner, into single strength medium,
depending on the anticipated level of contamination of the food. For inoculation of initial dilution
of shellfish see Section 5.3
* Other marking schemes may be used.
Table III
GIMViC Pattern for E. coli Biotypes
Gas at 44.5 - 45
o
C Indole Methyl Red Voges-Proskauer Citrate
Type I
G
I
M
V
C
Type II
+
+
+
-
-
(Anaerogenic) -
-
+
-
-

63
TABLE IV**
Differentiation of Commonly Occurring Coliforms
Gas in EC broth at
44.5 - 45
o
C
Indole
test
Methyl red test
Proskauer
Voges-
test
Growth on
citrate
Escherichia coli
Type I (typical)
+
+
+
-
-
Type II
(anaerogenic)
-
-
+
-
-
Intermediates
Type I
-
-
+
-*
+
Type II
-
+
+
-*
+
Enterobacter aerogenes
Type I
-
-
-
+
+
Type II
-
+
-
+
+
Enterobacter cloacae
Irregular
-
-
-
+
+
Type I
-
+
+
-
-
Type II
+
-
+
-
-
Type VI
+
-
-
+
+
Irregular
Other types
Reactions variable
* Weak positive reactions are occasionally found.

64
Isolation and Enumeration of pathogenic microorganisms in food.
A. Isolation of E. coli 0157 in foods
1. Application
This method is applicable to the isolation of viable Escherichia coli O157 in foods.
2. Description
The method has been shown to produce satisfactory results with artificially-contaminated meats
(including beef, veal and pork), vegetables, dairy products, spices and environmental samples.
This method can be used successfully for the detection of E. coli O157 in other foods, food
ingredients and environmental samples.
3. Principle
The sample is enriched in a selective broth and plated on selective agars. Presumptive positives
are determined within 48 h. Confirmatory biochemical and serological tests are performed on
purified colonies.
4. Materials and special equipment
Broths and agars (base media and supplements are commercially available)
1) Modified Tryptic Soy Broth with Novobiocin (mTSB-n)
2) Enterohemorrhagic E. coli (EHEC) Enrichment Broth (EEB)
3) Modified Hemorrhagic Coli Agar (mHC) with Tellurite and Cefsulodin
4) Modified Sorbitol MacConkey agar (TCCSMAC) with Tellurite, Cefixime, and Cefsulodin
5) Purple broth base with cellobiose
Other necessary supplies and equipment
6) 0.5% K
2
SO
4
(needed for some spices and foods containing large amounts of spices)
7) 1N HCl and 1N NaOH
8) pH meter or paper capable of distinguishing 0.3 to 0.5 pH units within a range of 6.0 to 7.5
9) Stomacher, blender, or equivalent
10) Control cultures (use ATTC cultures or equivalent) positive control: E. coli O157 (H7 or
other serovars) negative control: E. coli (NOT an O157)
11) Incubators capable of maintaining 35 and 42°C
Confirmation media and reagents (commercially available)
12) Trypticase Soy Agar with Yeast Extract (TSA-YE)
13) Rapid Identifcation kits
14) Latex Agglutination kits

65
Optional (commercially available)
15) IMVIC Reagents (see MFHPB-19)
16) urea agar slants
17) MUG (4-methylumbelliferyl-$-D-glucuronide)
18) BCIG (5-bromo-4-chloro-3-indolyl-$-D-glucuronide) either
-Na or
-CHX
(cyclohexylammonium) salt
19) O157 and H7 antisera
5. Procedure
Each sample unit may be analyzed individually or the analytical units may be combined. Carry out
the test in accordance with the following instructions:
5.1. Handling of Sample Units
5.1.1. In the laboratory prior to analysis, except for shelf-stable foods, keep sample units
refrigerated (0-5
o
C) or frozen, depending on the nature of the product. Thaw frozen
samples in a refrigerator, or under time and temperature conditions which prevent
microbial growth or death.
5.1.2. Analyze sample units as soon as possible after their receipt in the laboratory.
5.2. Preparation for Analysis
5.2.1 Have ready sterile mTSB-n (and/or EHEC enrichment broth (EEB)).
5.2.2 Clean the surface of the working area with a suitable disinfectant.
5.3. Preparation of Sample
5.3.1. To ensure a truly representative analytical unit agitate liquids or free flowing
materials until the contents are homogeneous. If the sample unit is a solid, obtain the
analytical unit by taking a portion from several locations within the sample unit. To reduce
the workload, the analytical units may be combined for analysis. It is recommended that a
composite contain not more than five analytical units.
Note: When analyzing larger volumes, the enrichment broth should be
prewarmed to 35
o
C.
5.3.2. Prepare a 1:10 dilution of the food by aseptically adding 25 g or mL (the analytical
unit) into 225 mL of the enrichment broth mTSB-n (and EEB if applicable). Stomach or
blend. A second primary enrichment broth started directly in EEB should be done when
there is a high bacterial load of competing organisms in the sample.
Note: Some spices, such as onion and garlic powder are antimicrobial in nature.
When analysing spices or products containing large amounts of spices, add 0.5%
K
2
SO
4
to mTSB-n before autoclaving. Garlic especially affects E. coli O157,
therefore garlic or garlic containing products need to be diluted 1:100. Other
spices also may need to be analyzed using larger dilutions

66
5.3.4. After the addition of the sample to the broth adjust the pH of the mixture, if
necessary, to 6.0 to 7.0 with 1N NaOH or 1N HCl.
5.3.5. A positive and a negative control should be set up at the same time.
5.3.6. Incubate the enrichment mixture and controls for 22-24 h at 42
o
C.
5.3.7. Either screen the enrichment broth for E. coli O157 by using rapid kits or proceed
to 7.5.
Note: When using the rapid kits, the incubation temperature (5.3.6) may be adjusted
to the manufacturer’s instructions. Retain enrichment broths (5.3.7) under
refrigeration temperatures as all rapid kits that show positive reactions must be
confirmed culturally following this method.
5.4. Secondary Enrichment in EEB
Note: This step must be used when a rapid kit has identified the presence of E. coli
O157 but it was not isolated when the primary enrichment broths, mTSB-n and/or
EEB, were plated onto the selective agars. E. coli O157 may be difficult to isolate
from some samples with high ACC levels. After agitation of the enrichment broth,
transfer 1 mL of the mTSB-n and/or EEB to 9 mL of EEB. Incubate 18-24 h at 35
o
C.
Plate 0.1 mL of 10
-4
to 10
-6
dilutions (made in 0.1% peptone water) from the
enrichment broths onto the selective agars, as below. Follow confirmation steps for
typical colonies.
5.5. Selective Isolation
5.5.1 Plate dilutions of 10
-4
to 10
-6
from each enrichment broth onto mHC and
TCCSMAC agar plates. Incubate for 18-24 h at 42
o
C. Due to the increased selectivity
of TCCSMAC, the counts may be one log less than on mHC.
5.5.2 On the mHC agar, typical E. coli O157:H7 colonies appear blue. On TCCSMAC,
typical E. coli O157:H7 colonies appear colorless, bear the tint of the medium or are gray
to pink with smokey centers. Other serovars of E. coli, including O157 (not H7) will be
yellow on mHC and red on TCCSMAC. Some of these sorbitol positive colonies may
be pathogenic also.
5.6. Confirmation Steps
5.6.1. If the suspect colonies are well isolated, confirm that they are sorbitol negative and
cellobiose negative (5.6.2) using the same isolate for all tests. Rapid identification kits
may be used (5.6.6). If not well isolated, streak suspect colonies onto mHC and/or
TCCSMAC and/or TSA-YE for purity, and then continue, as below.
5.6.2. Draw a grid on mHC and TCCSMAC. Inoculate 5-10 typical and isolated
colonies onto the grid cells of mHC agar and TCCSMAC plates. Incubate at 42°C for
18-24 h. Inoculate the same isolates into tubes of purple broth base containing 1%
cellobiose. Incubate at 35°C for 18-24 h.

67
5.6.3. Continue confirmation of colonies that are sorbitol negative and cellobiose negative
(no acid production). See Table 1 for typical biochemical and serological reactions.
Rapid identification kits may also be used. Repick from the original plates (5.5.1) if the
cellobiose reactions are positive, i.e. show acid production (yellow reaction), until a total
of 10 colonies have been screened. Secondary enrichment may be necessary. (See 5.4.)
5.6.4. Use the purified colonies (5.6.1) and continue confirmation steps. Unless
stipulated, incubate all tests at 35
o
C for 22-24 h.
5.6.5. Do a Gram stain.
5.6.6. Use rapid identification kits following manufacturers’ instructions.
5.6.7. Confirm isolates as an O157 using latex agglutination kits.
Optional Confirmation Steps: See Table 1 for typical reactions.
5.6.8. Streak suspect colonies onto Phenol red sorbitol agar with MUG (PSRA), and/or
Sorbitol MacConkey agar with BCIG. Incubate plates at 35
o
C for 22-24 h.
5.6.9. Inoculate IMViC tests and Urea slants). Incubate at 35
o
C.
5.6.10 Complete serological testing using O157 antisera and H7 antisera. Follow
manufacturer’s instructions. The isolate must be "resuscitated" in M broth or on motility
agar several times (at least three times).
6. Preparation of media
When steam sterilization is used, it is essential to allow sufficient time for the load to reach the
required temperature before the actual sterilizing period commences. This varies with the nature
and size of the load. Thus, proper exposure times should be followed to ensure sterilization of
solutions in flasks and heat stable culture media. Refer to the sterilizer manual.
6.1. EHEC Enrichment broth (EEB
)
mTSB without novobiocin (9.2)
33 g
Vancomycin
8 mg
Cefsulodin
10 mg
Cefixime
0.05 mg
Distilled water
1.0 L
Dissolve, and adjust pH to 7.4 - 7.6. Autoclave for 15 min at 121
o
C. Cool to 50
o
C and just
before use add the filter sterilized antibiotics.
6.2. Modified TSB with Novobiocin (mTSB-n)
Tryptic Soy Broth or Tryptone Soya Broth
30g
Bile Salts No. 3
1.5 g
Dipotassium phosphate
1.5 g
Distilled water
1.0 L

68
Dissolve, adjust pH to 7.4-7.6, heat to boiling, dispense in 225 mL to 1 L amounts. Autoclave
for 15 min at 121
o
C. After cooling store at 4
o
C.
Novobiocin Solution (100 mg/mL)
Novobiocin (sodium salt)
100 mg
Deionized water
1.0 mL
Dissolve novobiocin. Filter sterilize, using 0.2 µm filter and syringe. May be stored several
months in a dark bottle at 4
o
C. Add 0.2 mL solution per 1 L of mTSB before use.
6.3. Modified HC Agar (mHC)
Tryptone
20.0 g
Bile Salts No. 3
1.12 g
Sodium chloride
5.0 g
Sorbitol
20.0 g
4-methylumbelliferyl-ß-D-
0.10 g
glucuronide (MUG) (optional)
1.6% Bromocresol purple
0.94 mL
0.1% K Tellurite
2.5 mL
1% Cefsulodin
1.0 mL
Agar
15.0 g
Distilled water
1.0 L
Heat to boiling with stirring to dissolve completely. Autoclave 15 min at 121
o
C and dispense.
Final pH should be 7.4 ± 0.2. Temper to 50°C. Filter sterilize cefsulodin and add aseptically to
the agar before dispensing. Store prepared plates at 4
o
C for two weeks. Note: Cefsulodin is not
needed if the enrichment broth EEB is used.
6.4. Modified Sorbitol MacConkey Agar (TCCSMAC)
Sorbitol MacConkey Agar
0.1% K Tellurite (50 mg/mL)
60 µ L
1% Cefsulodin
1.0 mL
Cefixime (1.0 mg/mL)
60 µL
Distilled water
1.0 L
Prepare Sorbitol MacConkey Agar according to manufacturers’ instructions. Add the tellurite
and heat to dissolve completely. Autoclave 15 min at 121
o
C and dispense. Final pH should be
7.2 ± 0.2. Temper to 50
o
C. Filter sterilize antibiotics and add aseptically to the agar before
dispensing. Store prepared plates at 4
o
C for two weeks. Note: Cefsulodin is not needed if the
enrichment broth EEB is used.
6.5. Nutrient Agar
Follow manufacturers’ instructions.

69
6.6. Phenol Red Sorbitol Agar with MUG
Adjust pH to 6.8 to 6.9 and autoclave 15 min at 121
o
C. Cool and dispense. Store at 4
o
C. When
using the MUG supplement, follow manufacturers’ instructions.
Phenol Red Broth Base
Agar
20 g
D-sorbitol
20 g
4-methylumbelliferyl-ß-D-glucuronide (MUG)
0.005%
or MUG supplement
6.7. Purple broth base
Proteose peptone
10 g
Beef extract
1 g
Sodium chloride
5 g
Bromcresol purple 0.02 g
Distilled water
1.0 L
Heat to boiling to dissolve completely. Final pH should be 6.8 ± 0.2 at 25
o
C. Add 10 g of the
cellobiose.
Stir. Dispense 10 mL into tubes and autoclave at 121
o
C for 15 min.
6.8. Sorbitol MacConkey Agar with BCIG
Sorbitol MacConkey Agar
(BCIG) 5-bromo-4-chloro-3-indolyl-$-D-glucuronide-Na (or -
CHX) salt
0.1 g
Distilled water
1 L
Prepare Sorbitol MacConkey agar according to manufacturers’ instructions and add BCIG-Na
salt.
Autoclave 15 min at 121
o
C, cool and dispense. Store at 4
o
C. Note: If using BCIG-CHX, it
must be in solution, as follows: dissolve 0.1 g BCIG in 2.5 mL 95% ethanol and 0.5 mL of 1N
NaOH. Heat slightly to dissolve and add to 1 L Sorbitol MacConkey agar.
6.9. Tryptic Soy Agar - Yeast Extract (TSA-YE)
TSA
40 g
Yeast extract
6 g

70
Distilled water
1.0 L
Autoclave for 15 min at 121
o
C, cool and dispense in Petri plates.
6.10. Urea Agar Slants
Table 1. Characteristics of E. coli O157:H7
E. coli O157:H7
Reactions
A
Other or non-E. coli
Reactions
Gram Stain
Negative
Positive
IMViCs
Indole
+ (Red)
- (No Color)
Methyl Red
+ (Red)
- (Yellow)
Vogues-Proskauer
- (No Color)
+ (Red)
Citrate
- (Green or No Growth) + (Blue or Growth)
Cellobiose
- (Purple)
+ (Yellow)
Urea slants
- (Pale)
+ (Brilliant Pink)
Pigment Production on Nutrient Agar
- (No Pigment)
+ (Pigment)
MUG Reaction
- (No fluorescence
b
)
+ (Fluorescence)
BCIG Reaction
- (Pale)
+ (Coloured)
Latex Agglutination
+ (Positive)
- (Negative)
O157
+ (Positive)
- (Negative)
H7
+ (Positive)
- (Negative)
A
+ (Positive Reactions); - (Negative Reactions)
B
E. coli O157:H16 and H45 fluoresce when MUG is present.

71
B. Enterococcus
1. Identifying characteristics
•
Gram positive
•
Cocci shape
•
Nonmotile
•
Occur in pairs or short chains
•
Cells are one micrometer in diameter
•
Predominately inhabit human intestines
•
Faculative anaerobes (prefer anaerobic)
•
Complex and variable nutritional requirements
•
Resistant to many Gram positive antibiotics
•
Perform simple fermentation
•
Mechanism of pathogenicity unknown
•
Used as indicators of fecal pollution in the purification of water and dried and frozen
foods
•
Members of genus streptoccous
•
Belong to Lancefield's serologic group D Streptococcus
•
Catalase negative
•
Can grow in 6.5% NaCl
•
Can grow at a pH range of 9.6 to 4.6
•
Can grow at temperatures ranging from 10 to 45°C
•
Optimunm growth at 37°C
•
Sensitive to chlorination
2. Taxonomic description
The enterococcus group is a subgroup of the fecal streptococci that includes at least five species:
S. faecalis, S. faecium, S. durans, S. gallinarum, and S. avium. The enterococci are
differentiated from other streptococci by their ability to grow at high pH (9.6 at 10), high
temperature (45°C) and in high salt concentrations (6.5% sodium chloride). The enterococcus
are generally resistant to many Gram positive antibiotics such as the tetracyclines,
aminoglycosides, sulfonamides, some penicillins, and lincosamides. E. faecalis and E. faecium
are the most frequent species found in humans. E. faecalis is the only enterococcus species that
has been genetically characterized. Its genome is 3 mb in length. The two genetic mechanisms first

72
discovered in the enterococci were conjugative transposons and sex pheromone plasmids. Some
strains require vitamin B and amino acids for growth.
Selected differential physiological characteristics for species of the enterococci.
E.faecalis
E. faecium
E. durans
E. bovis
E.equinus
Hemolysis
-/+
-
+/-
-
-
Growth at10 °C
+
+
+
-
-
Growth at 45°C
+
+
+
+
+
Growth at 50°C
+
+
-
-
-
Growth at pH 9.6
+
+
+/-
-
-
Growth at 6.5% NaCl
+/-
+/-
+/-
-
-
Growth at 40% bile
+
+
+
+
+
Resists 60°C for 30 min
+
+
+/-
-
-
NH3 from arginine
+
+
+
-
-
Gelatin liquefied
-/+
-
-
-
-
Tolerates 0.04% Pot. tellurite
+
-
-
-
-
Acid from Glycerol
+
-
-
-
-
Acid from Mannitol
+
+
-
-/+
-
Acid from Sorbitol
+
-
-
-/+
-
Acid from L-arabinose
-
+
-
+/-
-
Acid from Lactose
+
+
+
+
-
Acid from Sucrose
+
+/-
-
+
+
Acid from Raffinose
-
-
-
+
-

73
Acid from Melibiose
-
+
-
+
-
Acid from Melezitose
+
-
-
-
-
Starch hydrolyzed
-
-
-
+
-
Tetrazolium reduced at pH 6.0
+
-
-
+/-
-
3. Isolation and ecology
Most procedures employ presumptive media followed by confirmatory tests. Primary selective
agents can be azide, tellurite, bile, neonycin, Tween 80, taurocholate, selenite, NaCl, alcohol,
phenylethyl, and thallium. For isolation, the Association of Food and Drug Officials of the United
States recommends KF agar medium. This is selective differential agar that contains sodium
azide, that inhibits catalase positive organisms, and tetrazolium chloride which produces a red
color in the colonies.
Ethyl violet azide (EVA) broth can be used as a confirmation. Fecal enterococci from water can
be isolated, cultivated, and enumerated in this broth. Growth of fecal enterococci in EVA results
in turbidity and a purple sediment in the bottom of liquid cultures. There is also a tyrosine
decarboxylase activity procedure and a mentagan test that works well.
Enterococci are able to grow in the presence of bile and hydrolyze the esculin; the liberated
diphydroxycourmarin complexes with ferric citrate present in the media to form a dark
brown/black soluble compound. The picture on the left shows the differential reaction that
identifies the enterococci on bile esculin agar.
Enterococci occur naturally in soil and can be readily isolated from most plant roots as well. They
are also found routinely in frozen seafood, cheese, dried whole egg powder, raw and pasteurized
milk, frozen fruits, fruit juices, and vegetables. Occasionally they are used as starter cultures for
making hard cheese. Some strains produce high levels of the amines tyramine and histamine.
Tyramine may be involved in causing migraines. They are capable of producing extracellular
proteinases and peptidases to hydrolyse large peptides and transport them into the cell to convert
them to amino acids. Due to diet, E. faecalis dominates the guts of humans in the United States
and England. In India and Japan, E. faecalis and E. faecium are equally found in the intestines.
They get into food through vegetation, processing equipment, processing environments, or fecal
contamination. Symptoms are similar to B. cereus and C. perfringens. Symptoms include
nausea, vomiting, and diarrhea, but are milder than those caused by other food borne illnesses.
The picture at left shows hemolysis on blood agar by S. pyogenes, a group A streptococcus.
Blood agar is often used as a diagnostic test for the enterocococci, especially when isolations are
made from food or clinical samples. Two of the five enterococcal species (faecalis and durans)
will usually produce hemolysis on blood agar (see above table).
4. Public health significance
The enterococci are used as a bacterial indicator for determining the extent of fecal contamination
in foods and in recreational surface waters. Water quality guidelines based on enterococcal
density have been proposed for recreational waters. The guideline is 33 enterococci/100 mL for

74
recreational fresh waters. For marine waters, the guideline is 35 enterococci/100 mL. The
guidelines are based on the geometric mean of at least five samples per 30-d period during the
swimming season. There are two types of selection methods. The membrane filter technique is
used for samples of fresh and saline waters; however, it is unsuitable for highly turbid waters. The
multiple-tube technique is also applicable to fresh and marine waters, but is primarily used for raw
and chlorinated wastewater.
For the presumptive test procedure of the multiple-tube technique, a series of azide dextrose
broth tubes are inoculated and incubated. If not turbid, tubes are reincubated. Tubes showing
turbidity are streaked onto Pfizer selective enterococcus (PSE) agar. Brownish-black colonies
with brown halos confirm the presence of fecal streptococci. These colonies are transferred to a
tube of brain-heart infusion broth containing 6.5% NaCl. Growth indicates colonies of the
enterococcus group.
In the membrane filter technique, the sample is filtered, the filter containing the colonies are
transferred to an agar medium which is incubated. The filter is transferred to EIA medium
containing esculin and ferric acid as selective agents. Pink to red enterococci colonies develop a
black or reddish-brown precipitate. A well isolated colony from brain-heart infusion agar is then
transferred onto a brain-heart infusion broth tube and incubated. After growth, a sample of the
culture is transferred to bile esculin agar, brain-heart infusion broth, and brain-heart infusion broth
with 6.5% NaCl. Growth at 45°C in 6.5% NaCl indicates presence of enterococcus group.
For clinical or food samples, additional tests that may be conducted include bile solubility (above
left picture; the tube on the far left is positive), and antibiotic sensitivity (the above right picture
shows the antibiotic disk assay for bacitracin).

75
C. Isolation of Salmonella from foods
1. Principle
The procedure consists of six distinct stages. The initial handling of the food and the non-selective
enrichment stage (preenrichment) vary according to the type of food examined.
Non-Selective Enrichment (Preenrichment).
The test sample is initially inoculated into a non-inhibitory liquid medium to favour the repair and
growth of stressed or sublethally-injured salmonellae arising from exposure to heat, freezing,
desiccation, preservatives, high osmotic pressure or wide temperature fluctuations
Selective Enrichment
Replicate portions of each preenrichment culture are inoculated into two enrichment media to
favor the proliferation of salmonellae through a selective repression or inhibition of the growth of
competing microorganims.
Selective Plating
Enrichment cultures are streaked onto selective differential agars for the isolation of salmonellae
Purification
Presumptive Salmonella isolates are purified on MacConkey agar plates or SS agar plates.
Biochemical Screening
Isolates are screened using determinant biochemical reactions.
Serological Identification
Polyvalent and/or somatic grouping antisera are used to support the tentative identification of
isolates as members of Salmonella spp. For confirmation, cultures should be sent to a reference
typing centre for complete serotyping.
2 Collection of samples
Sampling
Food control efforts frequently target processes and products presenting significant human health
risks. The International Commission on Microbiological Specifications for Foods (ICMSF) has
categorized foods according to the degree of hazard associated with product use. Each food
category carries an appropriately stringent sampling plan to determine the acceptability of the
food product. The choice of sampling plan may require some subjective judgement based on the
number and kinds of factors that contribute to the degree of hazard.
3. Materials And Special Equipment
1) Nutrient Broth (NB).
2) Trypticase (Tryptic, Tryptone) Soy Broth.

76
3) Brilliant Green Water.
4) Buffered Peptone Water (BPW).
5) Skim Milk Medium.
6) Tetrathionate Brilliant Green Broth (TBG).
7) Selenite Cystine Broth (SC).
8) Bismuth Sulfite Agar (BS).
9) Brilliant Green Sulfa Agar (BGS).
10) MacConkey Agar, SS agar
11) Nutrient Agar.
12) Triple Sugar Iron Agar (TSI).
13) Lysine Iron Agar (LIA).
14) Urea Agar (Christensen's).
15) Commercial biochemical test kits.
16) Polyvalent and single grouping somatic (O) and flagellar (H) antisera.
17) Physiological Saline.
18) Blender, stomacher or other homogenizing device.
19) Incubator or water bath capable of maintaining 35±0.5
o
C and 43±0.5
o
C.
4. Procedure
Handling of Sample Units
Analyze samples as soon as possible. If necessary, store samples under time and
temperature conditions that will prevent the growth or death of native microflora. If sample
units have been abused in transit, resampling of the lot should be carried out.
a. Frozen Foods: Sample units that show no signs of thawing upon receipt may be
stored in the freezer at -10
o
C to -20
o
C.
b. Dried and shelf stable foods may be stored at room temperature.
c. Refrigerate all other foods, including those that are received in a partially thawed
condition; analyze these samples as soon as possible preferably within 24 h of receipt.
Thaw frozen samples at room temperature within 60 min; if this is not possible, thaw the
samples at refrigerator (4 to 10
o
C) temperature.

77
NOTE: a) Large samples (e.g. whole chicken) may not readily thaw at refrigerator
temperatures. For greater expediency, enclose the frozen sample in a heavy-walled paper
bag and thaw overnight at room temperature. This technique maintains the product surface
cold during the thawing process.
b) Appropriate containers should ensure that the drippings from the product do not
contaminate the laboratory environment.
If the sample unit received for analysis is less than the recommended analytical unit, analyze
the entire amount and record the weight used.
Blending of samples should be limited to the minimum time required to produce a
homogeneous suspension. Excessive blending could result in physical damage that would
adversely affect the viability of endogenous microflora. For products that do not require
blending, disperse the analytical unit into the appropriate preenrichment broth.
Use aseptic techniques and sterile equipment at all stages of analysis. Containment during
the handling of powdered products is critical if cross-contamination of the work environment
is to be avoided.
Non-selective Enrichment (Preenrichment)
Compositing of Analytical Units
To reduce the workload, up to 15 x 25 g (mL) analytical units may be composited into a
single test sample (e.g. 375 g or mL). If a sample unit consists of more than one container,
aseptically mix the contents of the containers prior to withdrawal of the analytical unit. If not
possible or practical, the analytical unit shall then consist of equal portions from each of the
containers.
Sample Analysis
The required analytical unit is dispersed into a suitable non-selective enrichment broth
Nutrient broth (NB) and buffered peptone water (BPW) are equally reliable and can
be used interchangeably as general purpose preenrichment. If the pH of the pre-
enrichment mixture lies outside the range of 6.0 - 7.0, adjust with 1N NaOH or 1N
HCl.
NOTE: If the sample unit consists of a container with little food material, thoroughly
rinse the interior of the container with a suitable preenrichment broth medium and
incubate the rinse in a sterile flask. This eventuality is more frequently encountered in
situations involving consumer complaints or food poisoning investigations. A positive
Salmonella and a negative medium control should be set up in parallel with the test
samples. Incubate the preenrichment mixture and the positive and negative controls at
35±0.5
o
C for 18 - 24 h.
NOTE: The negative medium control should not show any evidence of growth after
incubation whereas the absence of growth in the positive control would invalidate test
results.

78
Selective Enrichment
With a sterile pipette, transfer 1.0 mL of the preenrichment culture into each of 9 mL of
selenite cystine (SC) and tetrathionate brilliant green (TBG) broths.
Incubate SC and TBG broths for 24±2 h at 35±0.5
o
C and 43±0.5
o
C, respectively.
Selective Plating
Streak replicate loopsful of each selective enrichment culture onto BS and BGS agar to
obtain well isolated colonies. The enrichment cultures may be streaked onto additional
plating media for the isolation of Salmonella. Incubate plates at 35±0.5
o
C for 24±2 h. If
colonies suggestive of Salmonella have not developed on BS plates, incubate for an
additional 24±2 h. Examine incubated plates for colonies suggestive of Salmonella. Typical
Salmonella usually occur as pink to fuchsia colonies surrounded by red medium on BGS
agar, and as black colonies on BS agar with or without a metallic sheen, and showing a
gradual H
2
S- dependent blackening of the surrounding medium with increasing incubation
time.
NOTE:
a. Lactose-and/or sucrose-fermenting Salmonella strains develop a coliform-like
(greenish) appearance on BGS agar. A heavy growth of non-salmonellae may also
mask the presence of Salmonella on this medium.
b. BS agar can retard the growth of Salmonella serovars other than S. typhi unless
poured plates are refrigerated (4 to 10
o
C) for 24 h prior to streaking. The absence
of suspect colonies on the plates indicates that the analytical or composite test
samples did not contain Salmonella spp.
Purification
Streak suspect colonies onto MacConkey agar for purification. Incubate plates at 35±0.5
o
C
for 24±2 h. Typical Salmonella colonies are lactose-negative and will appear as colourless
colonies on this medium. However, lactose-positive biotypes will occur as pink colonies.
Biochemical Screening
With a sterile needle, inoculate suspect colonies into the biochemical media or in commercial
diagnostic kits that would yield equivalent results. Incubate the biochemical media for 18-24
h at 35±0.5
o
C.
NOTE: Erroneous biochemical results may be obtained if tubes are not loosely capped
during incubation.
Commercially available diagnostic kits may be used to obtain detailed biochemical profiles
of bacterial isolates. If none of the isolates from a particular analytical unit are suggestive of
Salmonella, the analytical unit is considered to be free of salmonellae. If the presence of
Salmonella is suspected, proceed with serological testing. If serological testing is not to be
performed within 72 h, inoculate suspect isolates into nutrient agar slants and incubate at
35±0.5
o
C for 24±2 h. Store the agar slants at refrigerator (4 to 10
o
C) temperature. Nutrient

79
agar slants that have been stored for more than 72 h should not be used for serological
testing. Prepare fresh agar slants for this purpose.
Serological Identification
Testing with somatic polyvalent antiserum
- Mark the following sections on an agglutination plate: C+ (positive control), C-
(negative control) and T (test culture).
- Add one drop of physiological saline to each of the areas marked T and C+, and
two drops to the area marked C-.
- Remove sufficient culture material from a triple sugar iron, lysine iron or nutrient
agar slant to prepare a heavy suspension in the test area (T) and in the negative
control (C-) area. The inoculum should be withdrawn from the slope portion of
agar slants.
- For the positive control, prepare a heavy suspension of a known Salmonella
culture in the area marked C+.
- Prepare somatic polyvalent antisera as directed by the manufacturer; add one drop
to each of the areas marked T and C+.
- Mix the culture-saline-antiserum suspensions in T and C+ and the saline-culture
mixture in C- with a sterile needle or loop. Tilt the slide preparation back and forth
for 1 min.
- Hold the slide against a dark background and observe for agglutination. Salmonella
cultures usually agglutinate within 1 min.
- False positive reactions from microorganisms that are closely related to Salmonella
may occur. Such misleading reactions can be resolved through further testing with
somatic grouping and flagellar antisera.
- The serological test for a given culture is invalidated if the negative control shows
agglutination (autoagglutination).
Testing with Somatic Grouping Antisera
It is advantageous to test presumptive Salmonella cultures with somatic grouping antisera
whenever possible. Many foodborne Salmonella belong to somatic groups B,C,D, or E.
Nevertheless, it is important to recognize that unless a complete set of grouping antisera is
available, Salmonella belonging to uncommon serogroups may be missed.
NOTE: It should be stressed that any non-agglutinating culture possessing the biochemical
reactions suggestive of Salmonella should be sent to a reference typing centre for
identification.
Mark the following sections on an agglutination plate: C-(negative control) and T (test
culture).

80
If a Salmonella control culture is available for each somatic group tested, prepare C+
(positive control)
Add one drop of physiological saline to each of the areas marked T and C+, and two
drops to the area marked C-.
Remove sufficient culture material from a triple sugar iron, lysine iron or nutrient agar
slant to prepare a heavy suspension in the test area and in the negative control area.
The inoculum should be withdrawn from the slope portion of the agar slants.
Prepare somatic group antiserum as directed by the manufacturer; add one drop to
each of the areas marked T and C+.
Mix the culture-saline-antiserum suspensions in T and C+ and the saline- culture
mixture in C- with a sterile needle or loop. Tilt the slide preparation back and forth for
1 min.
Hold the slide against a dark background and observe for agglutination. Salmonella
cultures usually agglutinate within 1 min.
If the culture-saline-antiserum mixture does not agglutinate, repeat the procedure with
another somatic group antiserum.
If the serological test is positive, the culture should be sent to a Salmonella typing
centre for complete serotyping.
The serological test for a given culture is invalidated if the negative control shows
agglutination (autoagglutination).
A biochemically suspect Salmonella isolate (Table IV) that fails to yield any positive
serological reaction should be sent to a reference typing centre for identification.
Testing with Flagellar (H) Antisera
In instances where the services of a reference typing centre are not available, Salmonella
isolates agglutinable with somatic antisera should be further identified by testing with
polyvalent H antiserum.

81
D. Enumeration of Staphylococcus aureaus in Foods
1. Application
This method is applicable to the enumeration of Staphylococcus aureus in foods.
2. Description
The method has been shown to produce satisfactory results with naturally-contaminated meats,
fish, poultry, vegetables, cereals and dairy products, and artificially-contaminated foods. This
method can be used successfully for the detection of Staphylococcus aureus in other foods, food
ingredients and environmental samples.
3. Principle
Certain staphylococci produce enterotoxins which cause food poisoning. This ability to produce
enterotoxins, with few exceptions, is limited to those strains that are coagulase-positive, and/or
produce a heat-stable nuclease (TNase). This method determines the presence of S. aureus by
plating known quantities of (dilutions of) a food sample onto a selective agar. After incubation,
presumptive staphylococcal colonies are selected, and subjected to confirmatory tests. From the
results of these tests, the number of S. aureus per g or mL of the food is calculated. The numbers
present may indicate a potential for the presence of enterotoxin, or they may also indicate a lack
of adherence to Good Hygienic Practices.
4. Materials and special equipment
1) Baird-Parker (BP) agar base
2) Egg Yolk Tellurite emulsion
3) Brain Heart Infusion (BHI) broth.
4) A non-selective agar; either Blood agar (BA), Nutrient agar (NA), or Trypticase Soy
agar (TSA)
5) TSA slants
6) Peptone Water diluent
7) pH meter or paper capable of distinguishing to 0.1 pH units within the range of pH 5.0 to
8.0
8) Stomacher, blender or equivalent
9) Vortex mixer or equivalent
10) Control strains; use the following or equivalent strains. Positive Controls: S. aureus
coagulase positive, e.g. ATCC 27154, 25923 S. aureus coagulase negative, e.g. ATCC
14990, 33501 Negative Controls: Escherichia coli, e.g. ATCC 23509 Pseudomonas
aeruginosa, e.g. ATCC 7700
11) Crystal violet stain
12) Coagulase (Rabbit) Plasma. Follow manufacturer's instructions for reconstitution

82
13) Incubator capable of maintaining 35
o
C.
14) Waterbath capable of maintaining 50-55
o
C
15) Supplies needed for confirmation:
(The following supplies may be needed for confirmation)
A. Accuprobe
B. Enterotoxin assay
C. Latex Agglutination kits
D. Rapid ID kits
E. Anaerobic utilization of glucose (Phenol red carbohydrate broth with 0.5%
glucose, sterile paraffin oil)
F. Anaerobic utilization of mannitol (Phenol red carbohydrate broth with 0.5%
mannitol, sterile paraffin oil)
G. Lysostaphin sensitivity (phosphate saline buffer, lysostaphin solution)
H. TNase
5. Procedure:
Each sample unit shall be analyzed individually. The test shall be carried out in accordance with
the following instructions:
5.1. Handling of Sample Units
5.1.1 During storage and transport, the following shall apply: with the exception of shelf-
stable products, keep the sample units refrigerated (0-5
o
C). Sample units of frozen products
shall be kept frozen. Thaw frozen samples in a refrigerator, or under time and temperature
conditions which prevent microbial growth or death.
5.1.2 Analyze the sample units as soon as possible after receipt at the laboratory.
5.2. Preparation for Analysis
5.2.1 Have sterile peptone water prepared (may be stored under refrigeration for up to 12
weeks).
5.2.2 Clean the surface of the working area with a suitable disinfectant.
5.3. Preparation of sample
5.3.1. Combine portions from several locations within each solid sample unit, to ensure a
representative analytical unit,
or

83
5.3.2. If the sample unit is a liquid or a free-flowing solid (powder), thoroughly mix each
sample unit by shaking the container.
5.3.3. Prepare a 1:10 dilution of the food by adding aseptically 11(10) g or mL (the
analytical unit) to 99(90) mL of diluent (peptone water, see Table I). Shake, stomach or
blend according to the type of food as indicated in Table I.
NOTE: Weight or volume in brackets indicates alternate procedure for making
dilutions.
5.3.4. Blend/stomach for the minimum time required to produce a homogeneous suspension;
to avoid overheating, blending time should not exceed 2.5 min. With foods that tend to
foam, use blender at low speed and remove aliquot from below liquid/foam interface.
5.3.5 If the 1:10 dilution is to be mixed by shaking, shake the dilution bottle 25
times through a 30 cm arc in approximately 7sec.
5.3.6. Check pH of the food suspension. If the pH is outside the range of 5.5-7.6, adjust
pH to 7.0 with sterile NaOH or HCl.
5.3.7. The food homogenate (1:10 dilution) of dry foods should stand at room temperature
for 15 min. In all other instances, the analysis should be continued as soon as possible.
5.3.8. Prepare succeeding decimal dilutions in peptone water as required, using a separate
sterile pipette for making each transfer.
5.3.9.
Shake all dilutions immediately prior to making transfers to ensure uniform distribution
of the microorganisms present.
5.4 Enumeration of Presumptive S. aureus
5.4.1. Plating
5.4.1.1. Agitate each dilution to resuspend material that may have settled during
preparation. Plating should be carried out within 15 min of preparing the dilutions.
5.4.1.2a. If counts of fewer than 1,000 S. aureus per g of a solid food are expected,
spread 0.4 mL of the 1:10 dilution evenly over the surface of each of five B.P. agar
plates.
5.4.1.2b. If the sample units are liquid, 0.2 mL of the undiluted analytical unit may be
spread onto duplicate B.P. agar plates.
5.4.1.3. Routinely (i.e. for counts higher than 1,000 S. aureus per g or mL of the
food), spread 0.2 mL of each dilution to be used onto duplicate B.P. agar plates.
5.4.1.4. The liquid should not be spread right to the edge of the plate, since this causes
confluent growth at the plate-agar interface which is difficult to count.
5.4.1.5. Retain the plates in an upright position until the inoculum has been absorbed
by the medium (approximately 10 minutes on properly dried plates). If the inoculum is
not readily absorbed by the medium, the plates may be placed in an upright position in
an incubator for up to one hour.

84
5.4.2. Incubation
5.4.2.1. Invert the plates and incubate at 35
o
C for 48 ± 2 h. Plates should be
observed at 24-30 h for possible overgrowth; presumptive colonies may be counted at
this time but the count should be verified at 48 ± 2 h.
5.4.2.2. Avoid excessive crowding or stacking of plates in order to permit rapid
equilibration of plates with incubator temperature.
5.4.3. Counting Colonies and Recording Results
5.4.3.1. Observe the following four types of presumptive staphylococcal colonies:
Type 1. Convex, entire, shiny black surrounded by clear zones extending into the
opaque medium.
Type 2. Convex, entire, shiny black without well defined clear zones.
Type 3. Grey colonies similar to type 1.
Type 4. Grey colonies similar to type 2.
Each colony type may show grey-white margins around the colonies and/or
opaque zones (double halos).
Black mucoid colonies larger than 2 mm in diameter and swarmers should not be
counted. Such colonies usually belong to the genus Bacillus.
5.4.3.2. Count the colonies of each type and record separately, but add together to
give the total presumptive count.
5.4.3.3. Count colonies immediately after the incubation period.
5.4.4. Counting of five plates of the 1:10 dilution (solid food only)
5.4.4.1. If the number of all presumptive staphylococcal colonies per plate is fewer
than 20, add separately the counts for each type from all five plates and record as the
respective presumptive count. This is the count of one of the four types per 2 mL (0.2
g of food). Multiply each count by 5, and record as the respective presumptive count
per g of food (C). Add the results, and report as the total presumptive count per g of
food.
5.4.4.2. If the number of all presumptive staphylococcal colonies per plate is between
20 and 200, select two plates at random, count separately the colonies of each type
and compute the respective average presumptive count per plate (per 0.4 mL; which is
equivalent to 0.04 g of food) (A/2). Multiply each count by 25 and record as the
respective presumptive count per g of food (C). Add the results and report as the total
presumptive count per g of food.
5.4.4.3. If the number of presumptive staphylococcal colonies on some of the five
plates is < 20, but on others is 20, proceed as in 5.4.4.1. above.
5.4.5. Counting of duplicate plates (any dilution)

85
5.4.5.1. Select plates containing 20-200 presumptive staphylococcal colonies per
plate consisting of the combined counts of all types.
5.4.5.2. Compute the average presumptive count per plate for each type (A/2),
multiply by five and by the appropriate dilution factor, and record as presumptive
count per g or mL of food for each type (C). Add the results and report as the total
presumptive count per g or mL of food.
5.4.5.3. If plates from more than one dilution are used, the counts are to be averaged
as shown below.
5.4.5.4. If no plate containing 20-200 presumptive S. aureus is available, estimated
counts may be made on plates giving presumptive counts outside this range. Report
results as estimated counts when results are outside the range of 20-200.
5.4.5.5. When an estimated count contributes to an average count, this average itself
becomes an estimated value.
5.4.6. Averaging of counts over two dilutions
If plates from two consecutive decimal dilutions contain counts within the range of 20-200
presumptive staphylococcal colonies per plate, the counts on all four plates should be used
to arrive at the average count. Inasmuch as the four different types of colonies are to be
counted separately and it is quite possible that individual counts may be < 20, although the
combined counts are within range, estimates and true values would have to be combined in
order to arrive at an average value. This can be avoided by using the following formula:
Total number of colonies counted /
( 1 /(Dilution
1
) + 1 / Dilution
2
)
Average colony count/g or mL =
Volume used per
dilution
For an example of counting colonies, see Table II.
5.4.6.1. If no presumptive staphylococcal colonies are obtained, record presumptive
counts as < 5 per g or mL for the five plates of the 1:10 dilution, or < 2.5 x the dilution
factor for duplicate plates.
5.5. Confirmatory Tests
For confirmation of S. aureus, perform the coagulase test (following manufacturer’s instructions)
as an initial step. A firm clot which does not move when the tube is tipped on its side (4+
coagulase reaction) is considered a positive test for S. aureus; no further confirmation is required.
Run controls (positive and negative cultures as well as media controls) simultaneously when
performing all confirmation tests.
If the coagulase reaction is 3+ or less, perform at least two of the following confirmation tests. If
two of these tests are positive, then the isolate is considered S.aureus. 1) Accuprobe method, 2)
Staphylococcal enterotoxin assays, 3) Latex agglutination kits, 4) Rapid ID kits or5) at least one
of the additional confirmatory tests listed in section 5.5.3, it is important that lysostaphin sensitivity

86
and anaerobic utilization of glucose are not the only two tests carried out since these do not
distinguish between S. aureus and S. epidermidis.
5.5.1. Selection of Colonies
5.5.1.1. From the replicate plates counted, a number of each colony type observed is
selected as follows to check for culture purity:
When the total count per type for all the plates of a dilution is less than five, pick all
colonies of that type.
When the total count per type for all plates of a dilution is equal to or greater than five
colonies, pick five colonies of that type at random.
5.5.1.2. Streak each colony picked onto a non-selective medium, such as BA, NA or
TSA to obtain discrete colonies.
5.5.1.3. Incubate at 35
o
C for 24 ± 2 h.
5.5.1.4. Make a smear from the growth of each isolate on the non-selective medium
and stain with a simple stain (e.g., crystal violet). Observe microscopically for the
presence of cocci.
5.5.1.5. If the isolates are composed of cocci only, transfer inoculum from each into a
separate tube of BHI broth. If an isolate is not pure, choose another colony at step
5.5.1.2 above and repeat colony isolation steps above.
5.5.1.6. Incubate the inoculated BHI broth tubes at 35
o
C for 18-24 h and observe for
growth.
5.5.1.7. Retain BHI broth cultures.
5.5.1.8. Transfer a representative colony from one of the non-selective media to a
TSA slant.
5.5.1.9. Inoculate a culture of Staphylococcus aureus known to produce coagulase
and TNase, utilizes glucose and mannitol anaerobically, and is lysostaphin-sensitive,
into BHI broth to serve as a positive control. Use uninoculated medium from the same
batch of BHI broth as a negative control. Inoculate the controls along with the test
cultures, and submit them to the subsequent tests as required.
5.5.2. Coagulase Test
5.5.2.1 Transfer 0.2 mL of each BHI broth culture into sterile 13 x 100 mm tubes
containing 0.5 mL certified coagulase plasma. Mix thoroughly.
5.5.2.2 Incubate tubes at 35
o
C and examine after 1 h and after 4 h. Do not shake
tubes during incubation. Negative tubes should be incubated overnight at room
temperature and rechecked.
5.5.2.3 Distinct clotting as shown in Fig. 2 is considered a positive coagulase reaction.
5.5.3. Additional Confirmatory Tests

87
At least one of the following additional tests may be done; keeping in mind that Anaerobic
utilization of glucose and Lysostaphin sensitivity must not be the only two tests
performed.
5.5.3.1. Anaerobic utilization of glucose.
Inoculate culture to be tested into a tube of carbohydrate fermentation medium
containing 0.5% glucose. Overlay with sterile paraffin oil and incubate at 35
o
C for 18-
24 h. Colour change indicating an acid reaction is a positive test for S. aureus.
5.5.3.2. Anaerobic utilization of mannitol.
Same as for glucose utilization except that the source of carbohydrate is mannitol. S.
aureus usually gives a positive reaction but some strains do not ferment mannitol.
5.5.3.3. Lysostaphin sensitivity
Inoculate culture to be tested into 0.2 mL of phosphate saline buffer and emulsify.
Transfer one half of the suspended cells to another tube (13 x 100 mm) and mix with
0.1 mL of phosphate saline buffer to serve as a negative control. Add 0.1 mL of
lysostaphin solution to the original tube to give a concentration of 25 mg lysostaphin
per mL of cell suspension. Incubate both tubes at 35
o
C for up to 2 h. If the turbidity
clears in the tube containing cells plus lysostaphin, and there is no clearing in the control
tube, the test is positive for S. aureus. If clearing has not occurred in 2 h, the test is
negative.
5.5.3.4. Thermonuclease Test
Perform the test for the presence of thermostable nuclease (TNase).
5.5.3.5. If two of the three additional confirmatory tests are positive, the isolate is
considered to be S. aureus.
On the basis of the confirmatory tests for each of the four types of cultures, record the
total number of S. aureus per g or mL of food (N
T
). Total No. S. aureus per g or mL
equals the sum of No. S. aureus types 1, 2, 3 and 4 (N
T
= N
1
+ N
2
+ N
3
+ N
4
)
No. of colonies confirmed as
S. aureus (P) /
No. S. aureus type 1 per
g or mL (N
1
)
=
No. colonies tested (G)
x
presumptive count type
1(C)
Same for types 2, 3 and 4. See Table II
6. Preparation of media
For steam sterilization, it is essential that the load be sufficiently pre-heated before the actual
sterilization period commences. This varies considerably with the nature and size of the load.
Hence, proper exposure times should be followed to ensure sterilization of flask solutions and
heat stable culture media, particularly when prepared in large volumes (Refer to your sterilizer
manual).
6.1 Baird-Parker (BP) Medium

88
a. Basal medium
Tryptone
10 g
Beef extract
5 g
Yeast extract
1 g
Glycine
12 g
Lithium chloride
5 g
Sodium pyruvate 10 g
Agar
20 g
The basal medium is commercially available. Add above ingredients to 950 mL of distilled water
and heat to boiling to dissolve the medium completely. Sterilize at 121
o
C (15 lb pressure) for 15
min. Cool to 50-55
o
C in a water bath. The pH should be 7.2.
b. Filter-sterilized 1% tellurite solution.
c. Egg yolk emulsion (50%).
Soak fresh clean eggs in 70% alcohol for 15 min. Separate egg yolks aseptically and mix with an
equal amount of physiological saline for about 5 min on a magnetic stirrer at low speed (do not
heat).
Egg yolk emulsion is commercially available and usually contains about 50% egg yolk. Use as per
manufacturer’s instructions.
Egg yolk emulsion containing tellurite is also commercially available. (EY-Tellurite Enrichment).
Use as per manufacturer’s instructions.
6.1.1 Preparation of complete medium.
a. Add aseptically 10 mL of the prewarmed (50-55
o
C) tellurite solution and 50 mL of the
prewarmed (50-55
o
C) egg yolk emulsion to 950 mL of the tempered (50-55
o
C) basal
medium. Mix thoroughly but gently and dispense into petri plates.
b. If commercial egg yolk emulsion is used, make certain to add the equivalent of 2.5% egg
yolk. Adjust the total volume of the complete medium to 1000 mL.
c. If commercial EY-Tellurite Enrichment is used, add 50 mL to 950 mL of the tempered
(50-55
o
C) basal medium.
The surface of the agar should be dried before inoculation. It has been observed that freshly
prepared BP medium may be toxic to injured cells. It is therefore advisable to store the
plates at room temperature overnight before inoculation. Poured plates may be stored in the
refrigerator for up to 4 days. The medium should be opaque; do not use non-opaque plates.
6.2 Brain Heart Infusion (BHI) Broth
Calf brain, infusion from
200 g
Beef heart, infusion from
250 g
Proteose peptone
10 g
Dextrose
2 g

89
Sodium chloride
5 g
Sodium Phosphate (Na
2
HPO
4
) 2.5 g
pH 7.4 ± 0.1
Dissolve ingredients in 1,000 mL of distilled water. Distribute as required (tubes or flasks) and
sterilize at 121
o
C. This medium is commercially available.
6.3 Blood Agar - (Trypticase Blood agar base)
Trypticase
10 g
Beef extract
3 g
Sodium chloride (NaCl)
5 g
Agar
15 g
pH 7.2 ± 0.1
Suspend ingredients in 1000 mL distilled water. Heat to boiling to dissolve ingredients. Sterilize at
121
o
C. Cool to 45-50
o
C and add aseptically 5% sterile defibrinated blood. Mix thoroughly but
avoid incorporation of air bubbles. Dispense. The solidified, complete medium cannot be
reliquified.
6.4 Coagulase Plasma
Certified rabbit plasma containing EDTA is commercially available. Reconstitute as directed by
the manufacturers. The reconstituted plasma may be kept in the refrigerator for five days without
loss of potency. It is not satisfactory for use if gross contamination occurs. After being kept in the
refrigerator, the plasma solution is cold enough to delay clotting for 10-15 min. This delay can be
prevented by warming the plasma solution to 35
o
C before use.
If dehydrated product is not available, use fresh rabbit plasma collected aseptically in containers
with EDTA (1 mL of a 15% solution of the potassium salt per 100 mL blood). Dilute plasma 1:2
or 1:3 with sterile distilled water and test each batch with coagulase-positive and coagulase-
negative strains of staphylococci before putting it into routine use.
6.5 Lysostaphin Solution
Dissolve lysostaphin in phosphate saline buffer (0:02 M; pH 7.3-7.4) to obtain a concentration of
50 mg lysostaphin per mL.
6.6 Nutrient Agar (NA)
Beef extract 3 g
Peptone
5 g
Agar
15 g
pH 6.8 ± 0.1
Suspend ingredients in 1000 mL of distilled water. Heat to boiling to dissolve ingredients.
Dispense and sterilize at 121
o
C. This medium is commercially available.
6.7 Peptone Water
Dissolve 1.0 g of Bacto peptone or equivalent in 1,000 mL of distilled water. Dispense 99 mL
into dilution bottles and sterilize at 121
o
C. Peptone is commercially available.

90
6.8 Phenol Red Carbohydrate Broth
Trypticase or proteose
10 g
peptone no. 3
Sodium chloride
5 g
Beef extract (optional)
1 g
Phenol red (or 7.2 mL of 0.25% solution of phenol red)
0.018 g
Distilled water
1000 mL
Dissolve 5 g of glucose or mannitol in this basal broth. Dispense 2.5 mL portions in 13 x 100 mm
test tubes containing inverted 6 x 50 mm fermentation tubes. Autoclave for 10 min at 118
o
C; final
pH, 7.3 ± 0.2.
Alternatively, dissolve the ingredients, omitting carbohydrate, in 800 mL of water with heat and
occasional agitation; and dispense 2 mL portions in 13 x 100 mm test tubes containing inverted
fermentation tubes. Autoclave for 15 min at 118
o
C and allow to cool. Dissolve carbohydrate in
200 mL of water and sterilize by passing the solution through a bacteria retaining filter. Aseptically
add 0.5 mL of sterile filtrate to each tube of sterilized broth after cooling to 45
o
C. Shake gently to
mix. Final pH, 7.4 ± 0.2
6.9 Phosphate Saline Buffer (pH 7.3-7.4, 0.02 m)
Prepare stock solutions of 0.2 M mono- and di-sodium phosphate in 8.5% salt (NaCl) solutions.
These stock solutions are for preparation of the 0.02 M phosphate saline buffer.
Stock Solution 1
Na
2
HPO
4
(Anhydrous Reagent Grade)
28.4 g
NaCl (Reagent Grade)
85.0 g
Distilled water to make
1000 mL
Stock Solution 2
NaH
2
PO
4
H
2
O (Reagent Grade) 27.6 g
NaCl (Reagent Grade)
85.0 g
Distilled water to make
1000 mL
Make 1:10 dilutions of aliquots of each stock solution to obtain 0.02 M phosphate saline
(0.85%) buffers; e.g.
Stock solution 1
50 mL
Distilled water
450 mL
Approximate pH = 8.2
Stock solution 2
10.0 mL
Distilled water
90.0 mL
Approximate pH = 5.6
By means of a pH meter, titer the diluted solution 1 to a pH of 7.3-7.4 by adding approximately
65 mL of diluted solution 2.
The resulting solution will be 0.02 M phosphate saline buffer for use in the lysostaphin
susceptibility test on S. aureus.

91
QC: Do not titer 0.2 M phosphate buffer to pH 7.3-7.4 and then dilute to 0.02 M strength. This
results in a drop in pH of approximately 0.25. Addition of 0.85% salt after pH adjustment also
results in a drop of approximately 0.2.
6.10 Trypticase Soy (TSA) Agar
Trypticase peptone
15 g
Phytone peptone
5 g
Sodium chloride (NaCl)
5 g
Agar
15 g
pH 7.3 ± 0.1
Suspend ingredients in 1,000 mL of distilled water. Heat with frequent agitation and boil for 1 min
or until solution is accomplished. The pH of the medium should be 7.3. Dispense and sterilize at
121
o
C. This medium is commercially available
TABLE I
Preparation of the Initial Dilution
Type of Food Product
Preparation
Treatment
Liquids:
milk, water etc.
pipette directly into Petri dishes and/or into peptone water
diluent
shake
viscous liquids
weigh into peptone water diluent
shake
Solids:
water soluble solids
weigh into peptone water diluent
shake
powder, meats
weigh into peptone water diluent
blend
Spices
weigh into peptone water diluent
shake
Shellfish
weigh into peptone water diluent
blend

92
TABLE II
Example of Computing S. aureus Count per g or mL of Food
Total No. of
Colonies of one of
the four Types on
Duplicate Plates "A"
No. of
Isolates
Tested "G"
No. of Isolates
Confirmed as S.
aureus "P"
Total No. of Colonies of
one of the four Types
per g or mL. "C" C =
1/2AxD*5**
No. of S. aureus
from one of the four
Types per g or mL
"N" N = (P/G)xC
Fewer than 5 (e.g.
4)
All (4)
2
1,000
500
More than 5 (e.g.
18)
5(5)
4
4,500
3,600
Calculate N
1
, N
2
, N
3
and N
4
for each colony type to obtain total number of S. aureus. (N
T
) per g
or mL N
T
= N
1
+ N
2
+ N
3
+ N
4
e.g. if N
1
= 1,000 and N
2
= 100 and N
3
= 0, and N
4
= 0
N
T
= 1,000 + 100 = 1,100 per g
* Dilution factor = 100
** For duplicate plates, 0.2 mL per plate. Divide by 2 since "A" represents the total count of one
of the four types on two duplicate plates. Likewise, when 5 plates of the 1:10 dilution are
counted, divide by 5.
Report total number of Staphylococcus aureus per g or mL of food to two significant figures
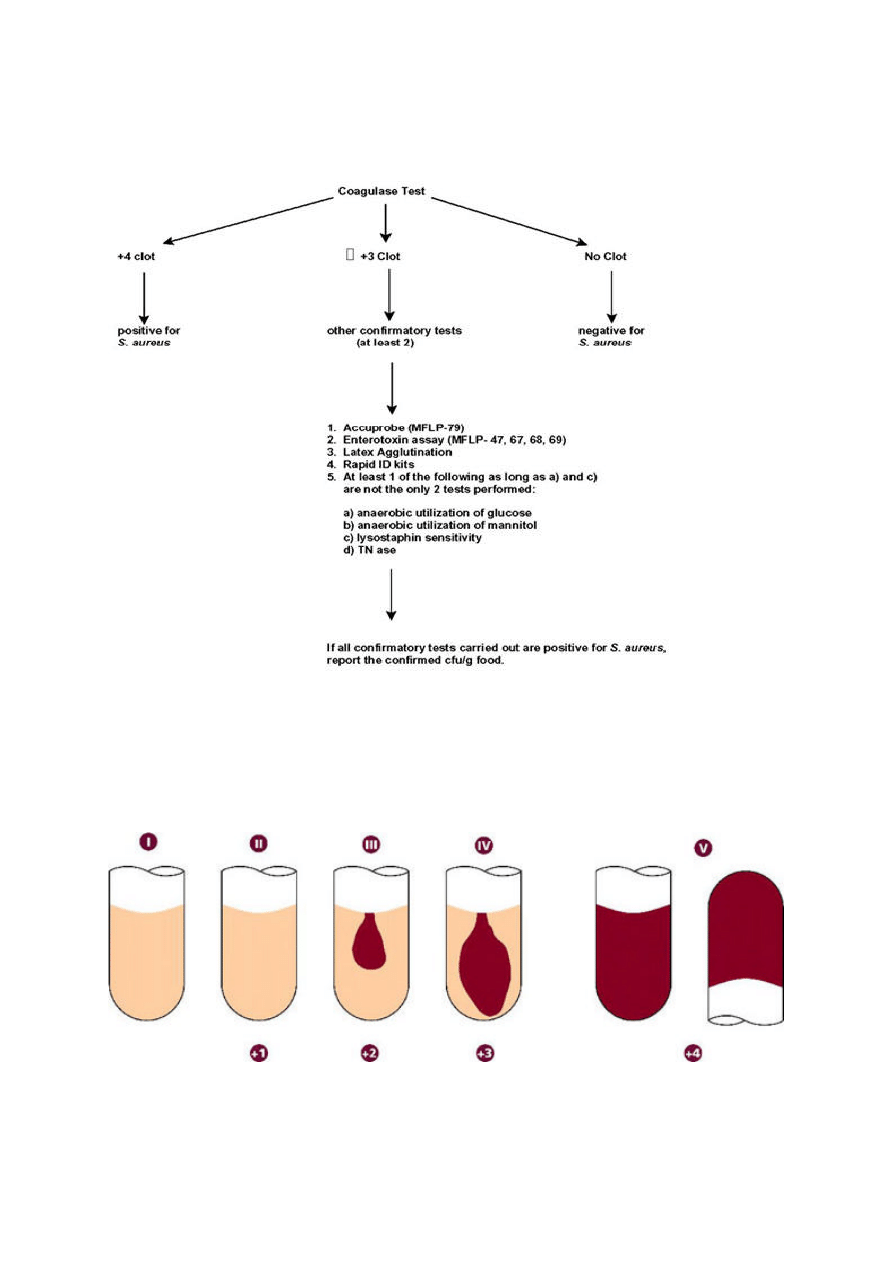
93
FIGURE 1
Flow Diagram for Confirmation Process
FIGURE 2
Coagulase test reaction
Tube number
Intensity of reaction
(degree of clotting)
NEGATIVE POSITIVE

94
Description (E-Y-T Emulsion) :
Baird-Parker' developed this medium from the tellurite-glycine formulation of Zebovitz et al.2 and
improved its reliability in isolating S. aureus from foods. Baird-Parker added sodium pyruvate, to
protect damaged cells and aid their recovery2 and egg yolk emulsion as a diagnostic agent. It is
now widely recommended by national and international bodies for the isolation of S. aureus. The
selective agents glycine, lithium and tellurite have been carefully balanced to suppress the growth
of most bacteria present in foods, without inhibiting S. aureus. Egg yolk emulsion makes the
medium yellow and opaque. S. aureus reduces tellurite to form grey-black shiny colonies and
then produces clear zones around the colonies by proteolytic action. This clear zone with typical
grey-black colony is diagnostic for S. aureus. On further incubation, most strains of Staph. aureus
form opaque haloes around the colonies. and this is probably the action of a lipase. Not all strains
of S. aureus produce both reactions. Some strains of S. saprophyticus produce both clear zones
and opaque haloes but experienced workers can distinguish these from S. aureus by the longer
incubation time required-5. Colonies typical of S. aureus but without an egg yolk reaction should
also be tested for coagulase production . Egg yolk reaction negative strains of S. aureus may
occur in some foods, especially cheese.
Growth Characteristics:
Microorganism
Growth
Colony Morphology
S. aureus
Good
Grey-black shiny convex 1-1.5mm diameter
(18 hours) up to 3mm (48 hours) narrow
white entire margin surrounded by zone of
clearing 2-5mm.
S. epidermidis
Variable
Not shiny black and seldom produces
clearing.
S. saprophyticus
Variable
Irregular and may produce clearing. Wide
opaque zones may be produced in 24hrs.
Bacillus sp.
Variable
Dark brown matt with occasional clearing after
48hrs.
Escherichia coli
Variable
Large brown-black
Micrococcus sp.
Variable
Very small in shades of brown and black. No
clearing.
Proteus sp.
Variable
Brown-black with no clearing.
Yeasts
Variable
White, no clearing.
Technique
1. Dry the surface of agar plates for a minimal period of time prior to use.

95
2. With a glass spatula or spreader (spread O.1 ml aliquots of food dilutions made up in buffered
peptone water on the agar surface until it is dry. Up to 0.5 ml may be used on larger dishes (24
cm).
3. Incubate the inverted dishes at 35'C. Examine after 24 hours and look for typical colonies of
S. aureus. Re-incubate negative cultures for a further 24 hours.
Results
Incubate the dishes for 48 hours and select those with 20-200 colonies. Count the S. aureus-
like colonies and test them for coagulase reaction. Report S. aureus results per gram of food.

96
E. Isolation of Listeria monocytogens from all food and environmental
samples
1. Application
The method is applicable to the detection of viable Listeria monocytogenes in foods (seafood,
dairy products, red meat, poultry, vegetables, etc.). Environmental samples can also be analysed
using this method.
2. Principle
This method determines the presence of viable L. monocytogenes in the product. A portion of
the product is enriched first in a primary broth, then in a screening broth, plated onto a specified
agar medium and one additional plating medium, and then incubated under specified conditions of
time and temperature. It is assumed that viable L. monocytogenes cells will multiply under these
conditions and give rise to visible colonies which can be identified . Novel chromogenic and other
isolation agars may be used in conjunction with the above media.
3. Material and special equipment
Listeria broths and agars (base media and supplements are commercially available)
1) Listeria enrichment broth (LEB)
2) Modified Fraser broth (MFB)
3) Oxford agar (OXA)
4) Lithium chloride-phenylethanol-moxalactam medium (LPM)
5) Modified Oxford agar (MOX)
6) PALCAM agar (PAL)
7) Chromogenic media (follow manufacturer’s instructions for preparation and use)
NOTE: The Listeria isolation agar, Oxford, uses cycloheximide as a selective agent. The
organization holding the patent on this antibiotic is no longer producing it, and as a result
cycloheximide will be unavailable shortly. Some media suppliers, such as Oxoid, have
already produced alternative supplements for their media, which can be substituted in the
media. However, it is up to the users of this method to ensure that their in-house validation
data meets their criteria.
Data may be obtained from the manufacturer and should be kept on file.
8) Control cultures (use ATCC strains or equivalent)
Positive controls: Listeria monocytogenes, Listeria ivanovii, Listeria innocua,
(Staphylococcus aureus and Rhodococcus equi - optional)
9) Stomacher, blender or equivalent, vortex mixer
10) Microscope

97
11) Incubators capable of maintaining 30
o
C and 35
o
C
NOTE: It is the responsibility of each laboratory to ensure that the temperature of the
incubators or water baths are maintained at the recommended temperatures. Where 35
o
C is
recommended in the text of the method, the incubator may be at 35 +/-1.0
o
C. Similarly,
lower temperatures of 30 or 25
o
C may be +/- 1.0
o
C. However, where higher temperatures
are recommended, such as 43 or 45.5
o
C, it is imperative that the incubators or water baths
be maintained within 0.5
o
C due to potential lethality of higher temperatures on the
microorganism being isolated.
Confirmation Media and Reagents
12) Tryptose broth and agar (TA)
13) Trypticase soy broth and agar, with 0.6% yeast extract (TSB-YE and TSA-YE)
14) Horse blood agar and (sheep blood agar - optional)
15) Motility test medium
16) Carbohydrate fermentation agars or broths (mannitol, rhamnose and xylose). Note:
these biochemicals may be done via rapid identification kits (see 6.8.1)
Optional
17) Rapid identification kits, such as the Vitek or API Listeria (Bio Mérieux Vitek, Inc.),
Micro-ID Listeria (Organon Teknika Corp.) or the Listeria Accuprobe
TM
Test (Gen-Probe;
MFLP-88) or equivalent
18) Gram stain solutions
19) 3% hydrogen peroxide (catalase)
20) Biochemicals - dextrose, esculin, maltose, -methyl-D-mannoside
21) Beta-lysine discs (Remel)
22) Listeria monocytogenes antisera
4. Procedure
Each sample unit may be analyzed individually or the analytical units may be composited
according to the sampling scheme in Table 4. Maintain a ratio of 1 part sample material to 9 parts
sterile enrichment broth. Information regarding Listeria distribution can be obtained by analyzing
each analytical unit separately. Carry out the test in accordance with the following instructions:
4.1. Handling of Sample Units
4.1.1 In the laboratory prior to analysis, except for shelf-stable foods, keep sample units
refrigerated (0-5
o
C) or frozen, depending on the nature of the product. Thaw frozen
samples in a refrigerator, or under time and temperature conditions which prevent microbial
growth or death.
4.1.2 Analyze sample units as soon as possible after their receipt in the laboratory.

98
4.2. Preparation for Analysis
4.2.1 Have sterile Listeria enrichment broth (LEB) ready.
4.2.2 Clean the surface of the working area with disinfectant.
4.3. Preparation of Sample
To ensure a representative analytical unit, agitate liquids or free flowing materials until the contents
are homogeneous. If the sample unit is a solid, obtain the analytical unit by taking a portion from
several locations within the sample unit.
4.4. Enrichment Procedure (see Figure 1)
Add the environmental sponge to 100 mL of LEB or composite up to 10 sponges with 100 mL
LEB for each sponge. Add 25 g or mL of the food (the analytical unit) to 225 mL of LEB in a
blender jar or stomacher bag. Alternately, add 50 g to 450 mL of LEB. For composite samples,
one of the analytical composites described in Table 4 is added to a sufficient amount of LEB.
Maintain a ratio of 1 part sample material to 9 parts LEB. Place environmental swabs in 10 mL
portions of LEB in test tubes. Blend, stomach or vortex as required for thorough mixing. LEB
culture may be incubated in the stomacher bag or test tube, or transferred to a sterile Erlenmeyer
flask. Incubate LEB culture for 48 h at 30
o
C.
4.5. Selective Enrichment
4.5.1. At 24 and 48 h, mix the LEB culture by swirling or vortexing, and inoculate 10 mL of
modified Fraser Broth (MFB) with 0.1 mL of the LEB culture. Incubate 24-26 h at 35
o
C.
HELPFUL HINT: Vortex the MFB at 20 to 24 h, then reincubate for an additional 2 to 6
h before reading reaction. Reading the MFB at 26 h can substantially reduce the plating
done at 48 h.
4.5.2 Streak MFB onto plates if positive. A positive broth has darkened and may be black,
dark brown or dark green. A negative MFB has the straw colour of a newly made broth. If
negative, reincubate another 24 h and streak if positive. Proceed with Step 4.6.
4.6. Isolation Procedure
4.6.1. Streak positive MFB; those inoculated from LEB at 24 and 48 h onto two different
plating media (streaking LEB is optional but preferable for obtaining all listeriae). Use
Oxford agar (OXA) and one of the following: lithium chloride-phenylethanolmoxalactam
medium (LPM), modified Oxford agar (MOX), or PALCAM agar (PAL). Incubate LPM
plates at 30
o
C for 24-48 h and OXA, MOX and PAL plates at 35
o
C for 24-48 h. Other
media may be used along with the two selective agars (see 4.6.5).
4.6.2. LPM - Examine LPM plates for suspect colonies using beamed white light powerful
enough to illuminate the plate well, striking the plate bottom at a 45
o
angle. Under optimum
transillumination the more isolated and larger (48 h old) Listeria colonies appear as whitish
piles of crushed glass often showing mosaic-like internal structures occasionally having blue-
grey iridescence that tends to sparkle. Alternatively, the colonies can look smooth with a
blue tinge around the perimeter. When growth becomes near confluent, an even blue-grey
iridescent sheen can be observed.

99
4.6.3. OXA and MOX agars - L. monocytogenes forms 1 mm diameter black colonies
surrounded by black haloes after 24 h. At 48 h colonies are 2-3 mm in diameter, black with
a black halo and sunken centre. The colonies can also appear brown-black or green-black.
Other Listeria species show a similar appearance. When examined before 24 h, growth of
Listeria spp. is sometimes apparent but without the characteristic blackening. Some strains
of this genus, other than L. monocytogenes, are inhibited on this medium when incubated at
35
o
C.
4.6.4. PAL agar - L. monocytogenes forms 2 mm grey-green colonies with a black sunken
centre and a black halo on a cherry-red background. Some Enterococcus and
Staphylococcus strains form grey colonies with a brown-green halo or yellow colonies with
a yellow halo.
4.6.5. Chromogenic agar - novel chromogenic and other isolation agars may be used, but
in conjunction with the plating media above. Follow manufacturer’s instructions for
preparation and use.
4.7. Identification Procedure - Confirmation
4.7.1. If the colonies are well isolated on the selective agars: Pick a minimum of 5 typical
colonies from each selective plate to horse blood agar (as in 4.7.2). If the colonies are NOT
well isolated on the selective agars: Pick a minimum of 5 typical colonies from each selective
plate to Tryptose agar (TA) or Trypticase soy agar with 0.6% yeast extract (TSA-YE),
streaking for separation. Incubate plates at 30
o
C for 24-48 h or until growth is satisfactory.
Examine the plates for typical colonies using the light arrangement already described in
4.6.2.
HELPFUL HINT: Listeria confirmation and speciation of L. monocytogenes can be
accomplished by using motility, hemolysis and 3 carbohydrate agars (mannitol, rhamnose
and xylose). Other biochemical tests are optional. Rapid identification kits may be helpful to
reinforce confirmation of these results and differentiate the different Listeria species (see
4.8.1).
4.7.2. Hemolysis:
On horse blood agar plates, draw a grid of 20-25 spaces on the plate bottom. Pick typical
colonies from the selective agars (if colonies are well isolated) or from the TA or TSA-YE
plates (if streaked for purity) and inoculate the horse blood agars by stabbing one culture
per grid. Stab blood agar plates, motility agar and carbohydrate plates
1
concurrently from
the same colony. Ensure that each colony is placed in the same position on all grid plates.
Always stab positive and negative controls (L. monocytogenes, L. ivanovii and L. innocua).
Incubate for 24 h at 35
o
C.
1
Note: Carbohydrate plates may be replaced by rapid
identifcation kits (see 4.8.1).
Examine blood agar plates containing culture stabs by transillumination using a bright light
(holding the plate so that the light shines through from the back of the plate). L.
monocytogenes produces a slight cleared zone around the stab; L. innocua shows no zone
of hemolysis, whereas L. ivanovii produces a well-defined zone of clearing around the stab.
4.7.3. Motility:

100
Agar: Stab motility test medium from selective agars, TA or TSA-YE. (Do blood agar and
carbohydrates concurrently (see 4.7.2)). Incubate for up to 48 h at room temperature.
Observe daily. ONLY Listeria cells give typical umbrella growth pattern.
and/or
Wet mount: Pick at least one typical colony from each selective agar, TA or TSA-YE.
Inoculate TSB-YE broths and incubate overnight at 30
o
C. Transfer a loopful of the
overnight cultures to a fresh TSB-YE and incubate at 25
o
C for 6 hours. Put a drop of each
6 hour culture onto a glass slide and examine for typical Listeria motility using the oil
immersion objective or phase contrast microscope. Listeria appears as slim, short rods with
tumbling motility. Always compare to a known Listeria culture. Cocci, large rods, or rods
with rapid swimming motility are not Listeria.
4.7.4. Carbohydrate Utilisation
Plates On carbohydrate (mannitol, rhamnose and xylose) agar plates, draw a grid of 20-25
spaces on the plate bottom. Pick typical colonies from the selective agars, TA or TSA-YE
plates and inoculate agars by stabbing one culture per grid. Ensure that each colony is
placed in the same position on all grid plates. Always stab positive and negative controls (L.
ivanovii, L. monocytogenes and L. grayi). See Table 1 for guidance. Incubate for 24 h at
35
o
C.
and/or
Broths From TSB-YE culture, inoculate the following carbohydrates set up as 0.5%
solutions in purple carbohydrate broth: dextrose, esculin, maltose, mannitol, rhamnose, -
methyl-D-mannoside and xylose. Incubate 7 days at 35
o
C. Examine daily. Listeria spp.
produce acid with no gas, or no reaction.
Consult Table 1 for the carbohydrate reactions of the Listeria spp. All species should be
positive for dextrose, esculin, and maltose. All Listeria spp. except L. grayi and L. murrayi
should be mannitol-negative
4.8 Identification Procedure - Optional Tests
4.8.1 Rapid Identification Kits
Rapid identification kits, such as the Vitek or API Listeria (Bio Mérieux Vitek, Inc.), Micro-
ID Listeria (Organon Teknika Corp.) or the Listeria Accuprobe
TM
Test (Gen-Probe) or
equivalent. Follow manufacturer’s instructions for use.
4.8.2 Catalase
Test a typical colony for catalase. Transfer a colony onto a clean glass slide and add one
drop of 3% hydrogen peroxide. Development of bubbles is indicative of a positive reaction.
Listeria cells are catalase-positive. Avoid picking test colonies from agars containing blood
as they can produce a false positive result.
4.8.3 Gram stain Listeria is a small Gram-positive rod.

101
4.8.4 CAMP test
For the CAMP test, streak fresh isolates of beta-hemolytic Staphylococcus aureus and
Rhodococcus equi vertically on a sheep blood agar plate. Separate the vertical streaks so
that test strains may be streaked horizontally between them without touching the vertical
streaks. After 24-48 h incubation at 35
o
C, examine the plates for hemolysis in the zone of
the vertical streaks.
4.8.4.1 The hemolysis of L. monocytogenes and L. seeligeri is enhanced in the vicinity
of the Staphylococcus streak; while L. ivanovii hemolysis is enhanced near the
Rhodococcus streak. The other Listeria species are CAMP test negative. The test can
differentiate L. ivanovii from L. seeligeri, and a weakly-hemolytic L. seeligeri from L.
welshimeri.
4.8.4.2 An alternative and convenient CAMP test may be performed using the S.
aureus factor in commercially prepared sterile beta-lysine discs. In this test, a beta-
lysine disc is placed in the center of the sheep blood plate and 4-5 Listeria cultures are
streaked as radiating lines from the disc, being careful not to touch the disc with the
inoculum. After 18-24 h incubation at 35
o
C, a very sharp CAMP reaction between L.
monocytogenes or L. seeligeri cultures and the disc can be observed. L. ivanovii are
strongly hemolytic and form a clear beta hemolytic line along the entire streak.
4.8.5 Serology Follow manufacture's instructions provided with the antisera.
4.9 Interpretation of Results for Speciation
Listeria spp. are small, Gram-positive motile rods that are catalase-positive, urea-negative, and
produce an acid slant and butt in TSI without production of H
2
S. They utilize dextrose, esculin,
and maltose, with some species also using mannitol, rhamnose, and xylose with production of
acid. All species give +/+ reactions in MR-VP broth. L. grayi and L. murrayi are the only two
species which utilize mannitol. L. murrayi is the only species which can reduce NO
3
-
to NO
2
-
.
L. monocytogenes, L. ivanovii, and L. seeligeri (weak) produce hemolysis in horse or sheep
blood agar and are also positive in the CAMP test. Of the three, only L. monocytogenes cannot
utilize xylose, but is rhamnose-positive. L. ivanovii can be differentiated from L. seeligeri by the
CAMP test, where L. seeligeri shows enhanced hemolysis only at the Staphylococcus streak and
L. ivanovii shows enhanced hemolysis in the area of the R. equi streak.
L. innocua can only be differentiated from L. monocytogenes by its lack of hemolysis on blood
agar plates and negative reaction in the CAMP test. L. welshimeri that is rhamnose- negative may
be confused with a weakly-hemolytic L. seeligeri unless the CAMP test is run.
All biochemical, serological, and pathogenicity data are summarized in the tables below.
Complete all data collection before making species determinations.

102
Table 1
Characteristics differentiating the species of the genus Listeria
a
Characteristics
L. monocyto-
genes b
L.
innocua
L.
seeligeri
L.
welshimeri
L.
ivanovii
L.
grayi
L.
murrayi
Gram stain
+
+
+
+
+
+
+
Beta-Hemolysis
+
c
-
+
-
+
d
-
-
Mannitol
-
-
-
-
-
+
+
L-Rhamnose
+
d
-
d
-
-
d
D-Xylose
-
-
+
+
+
-
-
CAMP-test (S.
aureus)
+
e
-
+
-
-
-
-
CAMP-test (R.
Equi)
-
-
-
-
+
-
-
Acid production
from:
L-Arabinose
-
-
-
-
-
Dextrin
d
-
-
+
+
Galactose
d
-
d
+
+
Glycogen
-
-
-
-
-
Lactose
d
+
+
+
+
D-Lyxose
-
-
-
+
+
Melezitose
d
d
d
-
-
Melibiose
-
-
-
-
-
alpha-Methyl-D-
glucoside
+
+
+
+
+
alpha-Methyl-D-
mannoside
+
+
-
f
+
-
Sorbitol
d
-
-
-
-
Soluble starch
-
-
-
+
+
Sucrose
-
d
d
-
-
Voges-Proskauer +
+
+
+
+
+
+
Hydrolysis of:
Cellulose
-
-
-
-
-
Hippurate
+
+
+
-
-
Starch
d
d
-
-
-
Lecithinase
d
d
+
-
-
Phosphatase
+
+
+
+
+
Reduction NO
3
to
NO
2
-
-
-
-
+
Pathogenicity for
mice
+
-
-
-
+
-
-

103
a. Standard symbols: (+) - positive; (-) - negative; +: > or equal to 90% positive; -: > or
equal to 90% negative; d: 11 - 89% of strains are positive
b. Not all strains of L. monocytogenes exhibit beta-hemolysis - the type strain ATCC
15313 is nonhemolytic on horse, sheep and bovine blood.
c. A very wide zone or multiple zones of hemolysis are usually exhibited by L. ivanovii
strains.
d. Of 30 strains, ATCC 15313, the type strain, did not give a positive reaction.
e. Of 10 strains tested, 1 gave a positive reaction.
Table 2
Serology, Hemolytic Activity andMouse Virulence for Listeria Species
species
serotype
hemolysis of horse blood
(7%) stab
mouse
virulence
L. monocytogenes 1/2a, 1/2b, 1/2c, 3a, 3b, 3c, 4a,
4ab, 4b, 4b(x), 4c, 4d, 4e, 7
+
+
L. ivanovii
5
+
+
L. innocua
4ab, 6a, 6b, un*
-
-
L. welshimeri
6a, 6b
-
-
L. seeligeri
1/2b, 4c, 4d, 6b, un*
+
-
* un = undefined.
Table 3
Camp Test Reactions of Listeria Species
hemolytic reaction
species
S. aureus
R. equi
L. monocytogenes
+
-
L. ivanovii
-
+
L. innocua
-
-
L. welshimeri
-
-
L. seeligeri
+
-

104
Table 4
The Sampling Scheme for Ready-to-eat (RTE) Foods
1
being Analyzed for L.
monocytogenes (LM)
Food Product
Sampling
Analysis
Type of analysis
1.
RTE foods causally linked to
listeriosis (e.g. this list presently
includes soft cheese, liver pâté,
coleslaw mix with shelf life > 10d,
jellied pork tongue
2
)
5 sample units
(100 g or mL
each) taken at
random from
each lot.
5x10 g or 2x25 g
analytical units
4
are
either analyzed
separately or
composited.
ENRICHMENT
ONLY
2. All other RTE foods sup- porting
growth of LM with refrigerated
shelf -life >10d (e.g. vacuum-
packaged meats, modified
atmosphere (MAP) sandwiches,
cooked seafood, packaged
salads, refrigerated sauces)
5 sample units
(100 g or mL
each) taken at
random from
each lot.
5x5 g analytical units
4
are either analyzed
separately or
composited.
ENRICHMENT
ONLY
5x10 g analytical 4
units
4
are analyzed
separately.
DIRECT
PLATING
3. RTE foods supporting growth of
LM with refrigerated shelf-life
10d and all foods not 3
supporting growth
(e.g cooked seafood, packaged
salads, ice cream, hard cheese,
dry salami, salted fish, breakfast
and other cereal products)
5 sample units
(100 g or mL
each) taken at
random from the
lot.
Where enrichment is
necessary
5
5x5 g
analytical units
4
are
analyzed separately
or composited.
ENRICHMENT
1
For a definition of RTE foods, please see the latest version of the field compliance guide entitled
"RTE foods contaminated with L. monocytogenes"
2
At present, this product is not commonly found in the Canadian marketplace.
3
Foods not supporting growth of LM include the following:
(a) pH 5.0-5.5 and a
w
<0.95
(b) pH <5.0 regardless of a
w
(c) a
w
0.92 regardless of pH
(d) frozen foods
The pH and a
w
determinations should be done on 3 out of 5 analytical units. The food is
presumed to support the growth of L. monocytogenes if any one of the analytical units fall into the
range of pH and a
w
values which are thought to support the growth of the organism.
4
The designated analytical unit is taken from each sample unit.
5
For Category 3 foods, if GMP is inadequate and L. monocytogenes has been found in the
environment of the finished product area, or where examination of Good Manufacturing Practice

105
(GMP) status is not possible, both MFLP-74 (Enumeration of Listeria monocytogenes in Food)
and MFHPB-30 may be used as appropriate.
Figure 1
A Flow Diagram Showing the Isolation Procedure
Blend or stomach in LEB broth. Incubate at 30
o
C for 48 h.
At 24 and 48 h transfer 0.1 mL of theLEB into MFB. Incubate 24-48 h at 35
o
C.Record
reactions for all tubes. Streak LEB (optional but preferable) onto plates.
Streak positiveMFB onto selective agar plates. Reincubate negative MFB for an additional 24 h.
Incubate plates for 24-48h
Confirmation Testsmotility,hemolysis, mannitol, rhamnose and xylose; other
biochemicals, or rapid identification kits, as required.

106
5. MEDIA
5.1 Blood Agar
Prepare blood agar plates as soon as possible after receiving fresh blood, using blood agar base
or preferably Trypticase Soy agar with 7% defibrinated horse blood. Rehydrate and sterilize as
recommended by the manufacturer. Agar and blood should both be at 45-50
o
C before
combining and pouring plates. Commercial plates may also be used. Plates stored at 4
o
C can last
for 1 month. Sheep blood plates for the CAMP test are prepared and stored in a similar way.
5.2 Carbohydrate Fermentation Broth and Agar
5.2.1 Carbohydrate Fermentation Broth
Purple broth base 16 g
Distilled water
900 mL
Dispense 9 mL portions in 16 x 125 mm tubes each containing a Durham tube. Autoclave at
121
o
C for 15 min. Prepare all carbohydrates, except esculin, as 5% solutions and filter
sterilize. Add 1 mL carbohydrate solution to 9 mL broth base to yield a final concentration
of 0.5% carbohydrate in broth.
Add esculin directly into base broth to make a 0.5% solution and autoclave at 115
o
C for 15
min. A 5% solution of esculin at room temperature is a gel that cannot be pipetted.
5.2.2 Carbohydrate Fermentation Agar
a. Basal Medium:
Purple broth base
16 g
Bromcresol purple (1.6% aqueous)
1 mL
Agar
16 g
Distilled water
950 mL
b. Carbohydrate Solution:
Filter sterilize 100 mL each of 20% aqueous solutions of rhamnose, mannitol and xylose.
Sterilize the base at 121
o
C for 15 minutes. Temper, add 50 mL of the sterile carbohydrate
solution, then pour thick plates. Plates can be stored for at least 2-3 weeks at 4
o
C. Longer
storage times must be validated by the individual lab.

107
5.3 Listeria Enrichment Broth (LEB)
a. Basal Medium:
Proteose peptone
5 g
Tryptose
5 g
Lab lemco powder (Oxoid)
5 g
Yeast extract
5 g
NaCl
20 g
KH
2
PO
4
1.35 g
Na
2
HPO
4
12 g
Esculin
1 g
1
Nalidixic acid (2% solution in 0.1M NaOH)
1 mL
Distilled water
1000 mL
1
NOTE: The amount of nalidixic acid given here is 1/2 the amount given in the original formula.
Sterilize at 121
o
C for 15 minutes. Do not overheat; cool at once after removal from the sterilizer.
Store at 4
o
C. LEB broth is available commercially as UVM 1 formulation.
b. Acriflavin Solution:
Filter sterilize 25 mL of 1.2% aqueous acriflavin solution. Store at 4
o
C for 2 months. On the day
of use, add 1.0 mL of acriflavin solution to 1000 mL of basal medium.
5.4 Lithium Chloride-Phenylethanol-Moxalactam Medium (LPM )
a. Basal Medium:
Phenylethanol agar
35.5 g
Glycine anhydride
10.0 g
Lithium chloride
5.0 g
Distilled water
1000 mL
b. Moxalactam solution: 2 mL
Moxalactam (ammonium or sodium salt)
1 g
Potassium phosphate buffer, 0.1 M, pH 6.0
100 mL
Filter sterilize. Store the solution frozen in 2 mL aliquots
Sterilize the basal medium at 121
o
C for 15 min. Cool to 45
o
C-50
o
C and add 2 mL of
moxalactam solution. Pour 12-15 mL in each petri dish and store at 4
o
C. The basal medium
cannot be made in advance and reheated.

108
5.5 Modified Fraser Broth (MFB)
Proteose peptone
5 g
Tryptose
5 g
Lab lemco powder (Oxoid)
5 g
Yeast extract
5 g
NaCl
20 g
KH
2
PO
4
1.35 g
Na
2
HPO
4
12 g
Esculin
1 g
Lithium chloride
3 g
Nalidixic acid (2% solution in distilled water)
1 mL
Distilled water
1000 mL
b. Stock Solutions:
Acriflavin (0.25% in distilled water)
Ferric ammonium citrate (5.0% in distilled water)
Filter sterilize the solutions. Store at 4
o
C for 2 months.
Dispense 10 mL portions of basal medium in 16 x 150 mm test tubes. Sterilize at 121
o
C for 15
minutes. Do not overheat; cool at once after removal from the sterilizer. Store at 4
o
C. Add 0.1
mL of each stock solution to each tube before use.
OR:
Dispense 100 mL portions of the basal medium in screw capped bottles and sterilize at 121
o
C for
15 min. Cool at once after sterilization and store at 4
o
C. Just prior to use, add 1.0 mL of each
stock solution to each 100 mL bottle and mix. Dispense aseptically in 10 mL amounts in pre-
sterilized 16 x 150 mm test tubes.
5.6 Modified Oxford Agar (MOX
)
MOX agar is a slight modification of the Listeria selective agar (Oxford Formulation).
a. Basal Medium:
Columbia blood agar base (depending of the brand)
39-44 g/L
Agar
2 g/L
Esculin
1 g/L
Ferric ammonium citrate
0.5 g/L
Lithium chloride
15 g/L
Colistin (1% solution; see b.)
1 mL
Distilled water
1000 mL
Rehydrate with constant stirring with a magnetic mixer and adjust pH to 7.2 if necessary.
Autoclave at 121
o
C for 10 minutes, mix again, and cool rapidly to 46
o
C in a water bath.

109
b. Colistin Solution:
Colistin, methane sulfonate
1 g
Potassium phosphate buffer, 0.1 M, pH 6.0
100 mL
Colistin solution is not sterilized. Store at -20
o
C in small aliquots (3-5 mL).
c. Moxalactam Solution:
Moxalactam (ammonium or sodium salt)
1 g
Potassium phosphate buffer, 0.1 M, pH 6.0
100 mL
Filter sterilize. Store the solution at -20
o
C in 2 mL aliquots. Add 2 mL of moxalactam solution to
the basal medium, mix well, and pour 12 mL per plate. Both the basal medium and supplements
are available commercially.
5.7 Motility Test Medium
Rehydrate and sterilize according to manufacture's instructions. Dispense 6 mL portions into 16 x
125 mm screw-capped tubes, or 3 mL portions in 13 x 100 mm screw-capped tubes.
5.8 Oxford Agar (OXA)
a. Basal Medium:
Columbia blood agar base
39.0 g
Esculin
1.0 g
Ferric ammonium citrate
0.5 g
Lithium chloride
15.0 g
Cycloheximide
0.4 g
Colistin
0.02 g
Acriflavin
0.005 g
Distilled or deionised water
1000 mL
Suspend the ingredients in the water. Bring to a boil to dissolve completely. Sterilize by
autoclaving at 121
o
C for 15 min. Cool to 50
o
C.
b. Supplements:
Cefotetan
0.002 g
Fosfomycin 0.01 g
Add the cefotetan and fosfomycin, or manufacturer's supplements, mix and pour the plates.

110
5.9 Palcam Agar (PAL)
a. Basal Medium:
Peptone
23.0 g
Starch
1.0 g
Sodium chloride
5.0 g
Agar
13.0 g
Mannitol
10.0 g
Ferric ammonium citrate
0.5 g
Esculin
0.8 g
Dextrose
0.5 g
Lithium chloride
15.0 g
Phenol red
0.08 g
Distilled or deionized water
1000 mL
Suspend the ingredients in the water and adjust pH if necessary to 7.2±0.1. Bring to a boil to
dissolve completely. Sterilize by autoclaving at 121
o
C for 15 min. Cool to 50
o
C, add the
manufacturer's supplements containing polymxin-B-sulphate, ceftazidime and acriflavine
aseptically, and then pour the plates.
5.10 Tryptose Broth and Agar for Confirmation Tests and Serology
Tryptose
20.0 g
Sodium chloride
5.0 g
Dextrose
1.0 g
Agar (leave out of broth formula)
15.0 g
Distilled water
1000 mL
Autoclave at 121
o
C for 15 min. For agar, make generous slants.
5.11 Trypticase Soy Broth with 0.6% Yeast Extract (TSB-YE)
Trypticase soy broth 30.0 g
Yeast extract
6.0 g
Distilled water
1000 mL
Autoclave at 121
o
C for 15 min and dispense into 16 x 100 mm tubes.
5.12 Trypticase Soy Agar with 0.6% Yeast Extract (TSA-YE)
Trypticase soy agar 40.0 g
Yeast extract
6.0 g
Distilled water
1000 mL
Dispense into screw-capped tubes, autoclave at 121
o
C for 15 min and prepare slants.

111
F. Isolation and Enumeration of Bacillus cereus in foods
1. Application
This method is applicable to the isolation, identification and enumeration of Bacillus cereus (with
limitations as described in the method) in foods.
2. Description
The method has been shown to produce satisfactory results with naturally-contaminated meats,
vegetables, dairy products, cereals and dried foods.
3. Principle
Bacillus cereus is widely distributed in nature and is commonly found in a variety of foods. When
B. cereus grows to high numbers in a food (> 10
6
/g), sufficient enterotoxin may be produced
resulting in foodborne illness. This method determines the presence of B. cereus by plating known
quantities of (dilutions of) a food sample onto a selective agar. After incubation, presumptive B.
cereus colonies are selected and subjected to confirmatory testing. From the results obtained, the
number of B. cereus per g or mL of the food is calculated.
NOTE: B. cereus is not easily distinguished from other closely related organisms in the B. cereus
Group. B. mycoides characteristically produces rhizoid colonies on agar media and B. anthracis
is non-motile and non-hemolytic. However, atypical strains of B. cereus are variable in
expression of motility and hemolysis and further testing may be necessary to identify the isolates.
Consider the source of the sample when identifying the isolates as B. cereus. Only B. cereus and
B. thuringiensis are likely to occur naturally in food products.
4. Materials and special equipment
The following media and reagents (1-5) are commercially available and are to be prepared and
sterilized according to the manufacturer's instructions. See Section 6 for the formula of individual
media.
1) Peptone Water diluent (PW)
2) Citrate solution, 2%, warmed to 45°C (for cheese)
3) Trypticase Soy Broth (TSB)
4) Nutrient Agar plates
5) Polymyxin Pyruvate Egg Yolk Mannitol Bromthymol Blue Agar (PEMBA Medium)
6) Blood Agar plates (TSB agar with 5% sheep blood)
7) Sporulation broth (9.1) or TSA-MnSO
4
agar (optional)
8) Staining solutions (optional): Malachite Green, 5% aqueous solution; Safranin, 0.5% aqueous
solution; Sudan Black B, 0.3% in 70% ethanol; Xylol
9) Basic fuchsin, 0.5% aqueous solution OR TB Carbol-fuchsin ZN stain (Difco) [protein toxin
crystals]

112
Note: Both Basic Fuchsin and TB Carbol-fuchsin ZN stains are toxic and possibly carcinogenic.
Use appropriate safety precautions. It is recommended that commercially-available products be
purchased.
10) Methanol [protein toxin crystals]
11) BC Motility Medium
12) Rapid identification kits (optional)
13) Control cultures, ATCC or equivalent
14) Blender, stomacher or equivalent
15) Microscope
16) Incubators capable of maintaining 30 and 35°C
5. Procedure
Each sample unit shall be analyzed individually. The test shall be carried out in accordance with
the following instructions:
SAFETY NOTE: PEMBA media supports the growth of B. anthracis. No obvious
morphological differentiation between some strains of B. cereus and B. anthracis will occur.
Take suitable precautions.
5.1. Handling of Sample Units
5.1.1. During transport, with the exception of shelf-stable products, keep the sample units
refrigerated (0-5°C) or frozen depending on the nature of the product. Thaw frozen samples
in a refrigerator, or under time and temperature conditions which prevent microbial growth
or death.
5.1.2. Analyze the sample units as soon as possible after receipt at the laboratory.
5.2. Preparation of Dilutions
5.2.1. To ensure a representative analytical unit from a solid sample, combine portions from
several locations within each solid sample unit.
5.2.2. If the sample unit is a liquid or a free-flowing solid (powder), thoroughly mix each
sample unit by shaking the container.
5.2.3 Prepare a 1:10 dilution of the food by adding aseptically 11 (10) g or mL (the
analytical unit) to 99 (90) mL of diluent (Table 1). Shake, blend or stomach according to the
type of food as indicated in Table 1.
Note: Weight or volume in brackets indicates alternate procedure for making dilutions.
5.2.4. The food homogenate (1:10 dilution) of dry foods should stand at room temperature
for 15 min. In all other instances, the analysis should be continued as soon as possible.

113
5.2.5. Mix for the minimum time required to produce a homogeneous suspension to avoid
overheating; blending or stomaching time should not exceed 2 min. With foods that tend to
foam, use blender at low speed and remove aliquot from below liquid/foam interface.
5.2.6. If the 1:10 dilution is to be mixed by shaking, shake the dilution bottle 25 times
through a 30 cm arc in approximately 7 sec.
5.2.7. Prepare succeeding decimal dilutions as required, using a separate sterile pipette for
making each transfer.
5.2.8. Shake all dilutions (as in 5.2.6) immediately prior to making transfers to ensure
uniform distribution of the microorganisms present.
5.3. Enumeration of Presumptive B. cereus
5.3.1. Plating
5.3.1.1. Dry PEMBA plates in a bio-hood or laminar flow hood immediately before
using. Agitate each dilution to resuspend material that may have settled during
preparation. Plating should be carried out within 15 min of preparing the dilutions.
5.3.1.2. Solid foods
(i) If fewer than 1,000 B. cereus per g are expected: spread 0.2 mL of the 1:10
dilution evenly over the surface of one of each of ten selective agar plates (PEMBA).
(ii) Routinely, or if counts higher than 1,000 B. cereus per g are expected: spread 0.2
mL of each dilution on each of duplicate PEMBA plates
5.3.1.3. Liquid sampes:
If the sample units are liquid, 0.2 mL of the undiluted analytical unit may be spread on
each of duplicate PEMBA plates.
NOTE: The liquid should not be spread right to the edge of the plate, since this causes
confluent growth at the plate-agar interface which is difficult to count.
5.3.1.4. Retain the plates in an upright position until the inoculum has been absorbed
by the medium (approximately 10 minutes on properly dried plates). If the inoculum is
not readily absorbed by the medium, the plates may be placed in an upright position in
an incubator for up to 1 h.
5.3.2. Incubation
5.3.2.1. Invert the plates and incubate at 35°C for 24 ± 2 h.
5.3.2.2. Avoid excessive crowding or stacking of plates in order to permit rapid
equilibration of plates with incubator temperature.
5.3.2.3. Examine the plates for presumptive B. cereus. Count the number of
presumptive B. cereus colonies present (Sec. 5.3.3). Re-incubate the plates at room
temperature for an additional 24 h and re-examine.

114
Helpful Hint: Circle presumptive colonies at 24 h. When re-examined at 48 h, look
for colonies that were not present at 24 h and add to the 24 h count. It may appear
that there are fewer colonies at 48 h, due to overgrowth of the colonies. In this case,
the count at 24 h is more accurate.
5.3.3. Counting Colonies and Recording Results
Note: On PEMBA B. anthracis (and some strains of B. cereus) have very little or no zone
of egg yolk precipitate. Colonies of B. anthracis may appear to be smaller, whiter and
more raised when compared to B. cereus.
5.3.3.1. Count colonies immediately after the incubation period. Look for the following
2 types of presumptive B. cereus colonies on PEMBA:
Type 1: Uneven margins, fimbriate or slightly rhizoidal, 2 to 5 mm in diameter,
turquoise to peacock blue (intensity variable) in color with flat ground glass
surface and surrounded by a grey to turquoise halo of dense precipitate (egg yolk
reaction) which may become peacock blue after 48 h incubation.
Type 2: Colonies similar to type 1 but with no surrounding halo of precipitation.
5.3.3.2. Counting the Ten Plates of the 1:10 Dilution (Solid Food Only)
5.3.3.2(a.) (A) If the number of all presumptive B. cereus colonies per plate is fewer
than 20, add separately the counts for each type from all ten plates and record as the
respective presumptive count. This is the count of one of the two types per 2 mL.(0.2
g of food) (B). Multiply the count by 5, and record as the respective presumptive
count per g of food (C). Add the results, and report as the total presumptive count per
g of food.
5.3.3.2(b.) If the number of all presumptive B. cereus colonies is greater than 20 per
plate but the total count of the two types does not exceed 200, select two plates at
random, count separately the colonies of each type and compute the respective
average presumptive count per plate (per 0.2 mL) (A/2). Multiply each count by 50
and record as the respective presumptive count per g of food (C). Add the results and
report as the total presumptive count per g of food.
5.3.3.2(c). If the number of presumptive B. cereus colonies on some of the ten plates
is < 20, but on others is > 20, proceed as in 5.3.3.2(a) above.
5.3.3.3. Counting of Duplicate Plates (Any Dilution)
5.3.3.3(a). Select plates containing 20-200 presumptive B. cereus colonies per plate
consisting of the combined counts of the two types. An alternate counting range of 10-
100 or 10-150 may be used, as these ranges are recommended in other standard
methods due to the spreading nature of Bacillus colonies.
5.3.3.3(b). Compute the average presumptive count per plate for each type (A/2),
multiply by five and by the appropriate dilution factor, and record as presumptive
count per g or mL of food for each type (C). Add the results and report as the total
presumptive count per g or mL of food.

115
5.3.3.3(c). If plates from more than one dilution are used, the counts are to be
averaged as shown below (Sec. 5.3.3.4)
5.3.3.3(d). If no plates containing 20-200 presumptive B. cereus are available,
estimated counts may be made on plates giving presumptive counts outside this range.
Report results as estimated counts when results are outside the range of 20-200.
5.3.3.3(e). When an estimated count contributes to an average count, this average
itself becomes an estimated value.
5.3.3.4. Averaging of Counts Over Two Dilutions
5.3.3.4(a). If plates from two consecutive decimal dilutions contain counts within the
range of 20-200 presumptive B. cereus colonies per plate, the counts on all four plates
should be used to arrive at the average count. Inasmuch as the two different types are
to be counted separately and it is quite possible that individual counts may be < 20,
although the combined counts are within range, estimates and true values would have
to be combined in order to arrive at an average value. This can be avoided by using
the following formula:
Total number of colonies counted /
Average colony
count/g or mL
=
Volume used per dilution (1/dilution
1
+ 1/dilution
2
)
For an example of counting colonies see Table II.
5.3.3.4(b) If no presumptive B. cereus colonies are obtained, record presumptive
counts as < 5 per g or mL for the ten plates of the 1:10 dilution, or < 2.5 x the dilution
factor for duplicate plates.
5.4. Confirmation
5.4.1. Selection of Colonies
5.4.1.1. From the plates counted, a number of each colony type observed is selected
as follows:
a) When the total count per type for all the plates of a dilution is less than five, pick all
colonies of that type.
b) When the total count per type for all plates of a dilution is equal to or greater than
five colonies, pick five colonies of that type at random.
5.4.2. Screening for B. cereus / B. thuringiensis
It is recommended that suspect colonies be streaked onto non-selective agar (Nutrient
or Blood agar) for purity. Inoculate 5 mL of Trypticase-soy broth (TSB) with suspect
colonies, as well as appropriate controls, and incubate for 18 h at 30/C.
5.4.2.1. Motility

116
Inoculate BC motility medium (BCMM) by stabbing down the center of the tube with
a 3 mm loopful of a 24 h culture suspension. Incubate tubes for 18 to 24 h at 30
o
C
and examine for type of growth along the stab line. Most strains of B. cereus and B.
thuringiensis are motile by peritrichous flagella, and produce diffuse growth out into
the medium away from the stab. B. anthracis and all but a few strains of B. mycoides
are non-motile.
NOTE: A few strains of B. cereus are non-motile.
5.4.2.2. Rhizoid growth
Inoculate a pre-dried nutrient agar plate by touching the medium surface near the
center with 2 mm loopful of culture. Let the inoculum be absorbed, and incubate the
plate in an upright position for 24 to 48 h at 30
o
C. Check the plate for rhizoid growth
characterized by root or hairlike structures which may extend several cm from the
point of inoculation. This type of growth is typical for B. mycoides species. B. cereus
strains produce rough irregular colonies that should not be confused with rhizoid
growth.
5.4.2.3. Hemolytic activity
After incubation of broth, divide a blood agar plate into 6 to 8 equal segments. Label each
segment and inoculate one or more segments near the center by gently touching the agar
surface with a loopful of incubated broth.
Let inoculum be absorbed, and incubate plates for 24 h at 30
o
C. Check plates for hemolytic
activity.
B. cereus is usually strongly beta hemolytic. B. thuringiensis and B. mycoides are often
weakly beta hemolytic with production of complete hemolysis only underneath the colonies.
B. anthracis is usually non-hemolytic. Aging cultures may demonstrate weak gamma
hemolysis. Take proper precautions if a non-hemolytic colony is isolated.
Note: This is a subjective test which may not differentiate B. cereus from B. thuringiensis
or B. mycoides, but the detection of beta hemolysis will rule out B. anthracis.
5.4.2.4. Use of a rapid identification system such as VITEK or API may be useful to
confirm that the isolate is B. cereus or B. thuringiensis. Systems such as Vitek will not
differentiate these two species, even though a good identification is made by the system of
B. cereus or B. thuringiensis.
Note: Some labs have trouble differentiating colour reactions with API 50CH.
BioMerieux recommends that API 50CH be used in conjunction with API CHB/E. In
addition, the first 12 tests in API 20E may aid in identification. Check with your BioMerieux
representative.
5.4.2.5. Isolates that are motile, do not exhibit rhizoid growth and are hemolytic have a high
probability of being B. cereus or B. thuringiensis. Strongly hemolytic strains are likely B.
cereus. To confirm the presence of B. cereus, the following test for protein toxin crystals
will differentiate B. cereus from B. thuringiensis.

117
5.4.2.6. Protein toxin crystals
Inoculate nutrient agar slants with 3 mm loopfuls of 24 h TSB culture suspensions. Incubate
slants 24 h at 30/C and then at room temperature 2-3 days. Prepare smears with sterile
distilled water. Air-dry and lightly heat-fix. Place slide on staining rack and flood with
methanol. Let stand 30 s, pour off methanol, and allow slide to air-dry. Return slide to
staining rack and flood completely with 0.5% Basic fuchsin or TB carbolfuchsin ZN stain
(Difco). Heat slide gently from below until steam is seen. Wait 1-2 min and repeat this step.
Let stand 30 s, pour off stain, and rinse slide thoroughly with clean tap water. Dry slide
without blotting and examine under oil immersion for presence of free spores and darkly
stained tetragonal (diamond- shaped) toxin crystals. Crystals are usually smaller than spores.
Toxin crystals are usually abundant in a 3- to 4-day-old culture of B. thuringiensis but
cannot be detected by the staining technique until lysis of the sporangium has occurred.
Therefore, unless free spores can be seen, cultures should be held at room temperature for a
few more days and re-examined for toxin crystals. B. thuringiensis usually produces
protein toxin crystals that can be detected by the staining technique either as free crystals or
parasporal inclusion bodies within the exosporium. B. cereus and other members of the B.
cereus group do not produce protein toxin crystals.
5.4.2.7. Confirm with staining procedure as outlined below if necessary. It is recommended
that a sporulation step be included before following this procedure.
5.4.3. Sporulation Procedure (Optional)
5.4.3.1. Inoculate a prepared flask of sporulation broth with one isolated presumptive
B. cereus colony from PEMBA.. Place on a stir plate (without heat), loosen the cap
and stir moderately at room temperature for five days. Stain as outlined in 5.4.4.
5.4.3.2. Alternately, streak presumptive colony onto TSA-MnSO
4
agar. Incubate at
room temperature for 2-3 days. Stain as outlined in 5.4.4.
5.4.4. Staining Procedure (Optional)
5.4.4.1. Prepare smears on glass microscope slides from the centre of colonies
selected.
5.4.4.2. Air dry the smears and fix with minimal flaming.
5.4.4.3. Place the slides on a staining rack and flood with 5% w/v Malachite Green.
5.4.4.4. Heat slides with a gentle flame until vapour can be seen to rise. Continue for 3
min taking care not to boil the staining solution on the slides.
5.4.4.5. Wash slides well with cold tap water; blot dry.
5.4.4.6. Flood slides with 0.3% w/v Sudan Black B in 70% ethanol. Allow to sit for
15 minutes.
5.4.4.7. Wash slides well with cold water; blot dry.
5.4.4.8. Flood slides with xylol for 5 seconds.

118
Note: Follow suitable safety precautions when using xylol.
5.4.4.9. Wash slides with cold tap water; blot dry.
5.4.4.10. Flood slides with 0.5% aqueous Safranin for 30 seconds.
5.4.4.11. Wash slides with cold tap water and allow to dry in an upright position.
5.4.4.12. Vegetative cells of B. cereus stain red and generally have a characteristic
`boxcar' appearance 4-5 : long and 1.0-1.5 : wide with square ends and rounded
corners usually appearing as chains. Spores stain pale to mid-green and lipid globules
are black. Vegetative cells displaying: i) central or paracentral spores not obviously
swelling the sporangium and ii) lipid globules, confirm the isolates as B. cereus Group.
5.4.5. Calculations and Reporting (See also Table 2)
On the basis of the confirmatory tests for each of the two types of cultures, record the total
number of B. cereus per g or mL of food (N). Total number of B. cereus per g or mL
equals the sum of the number of B. cereus types 1 and 2 (N
T
=N
1
+N
2
).
No. B.cereus/
type 1 per g or mL(N)
=
No. of colonies confirmed
as B. cereus(P)/
No. colonies tested (G)
X
presumptive count
type 1 (C)
6. Preparation of Media
6.1. Sporulation Broth
Glucose
50.0 g
Yeast extract
30.0 g
Manganese sulphate (MnSO
4
) 3.0 g
Distilled water
1.0 L
Add ingredients to 1L of distilled water and bring to a boil to dissolve. Dispense 100 mL into 500
mL erlenmeyer flasks. Autoclave at 121/C for 15 minutes.
6.2. BC Motility Agar (8.3)
Trypticase
10.0 g
Yeast extract
2.5 g
Dextrose
5.0 g
Na
2
HPO
4
2.5 g
Agar
3.0 g
Distilled water 1 L
Heat to dissolve and dispense into tubes (2 mL into 13 X 100 mm tubes is suggested). Autoclave
10 minutes at 121°C. Final pH 7.4 ± 0.2. For best results store at room temperature for 2 to 4
days before use to prevent growth along the side of the medium.

119
6.3. 0.5% Basic Fuchsin Stain (8.3)
basic fuchsin
0.5 g
alcohol
20 mL
distilled water
80 mL
Dissolve 0.5 g basic fuchsin in 20 mL of alcohol and dilute to 100 mL with water. Filter solution if
necessary thru fine paper to remove excess dye particles. Store in tightly stoppered container.
Note: Fuchsin stain is toxic and possibly carcinogenic. Use appropriate safety precautions
TABLE 1
Preparation for the Initial Dilution
Type of Food Product
Preparation
Treatment
Liquids
pipette directly into petri plate and/or peptone water
diluent
shake
Viscous and non-miscible
liquids
weigh into peptone water diluent
blend*
Solids
Water soluble solids
weigh into peptone water diluent
shake
Cheese
weigh into previously warmed (45°C) sterile 2% sodium
citrate (Na
3
C
6
H
5
O
7
.2H
2
O) solution
blend*
Spices
weigh into peptone water diluent
shake
Powders, meat and other
solids
weigh into peptone water diluent
blend*
* A stomacher may also be used to provide the initial blend.
TABLE II
Example of Computing B. cereus / B. thuringiensis Count per g or mL of Food
Total No. of
Colonies of one of
the two Types on
Duplicate Plates
"A"
No. of
Isolates
Tested "G"
No. of Isolates
Confirmed as
B. cereus "P"
Total No. of
Colonies of one of
the two Types per g
or mL "C" C=
1/2AxD*x 5**
No. of B. cereus from one
of the two Types per g or
mL "N" N= (P/G)xC
Fewer than 5(e.g.
4)
All (4)
2
1,000
500
More than 5(e.g.
18)
5(5)
4
4,500
3,600
Calculate N
1
and N
2
for each colony type to obtain total number of B. cereus. (N
T
) per g or mL
N
T
= N
1
+ N
2

120
e.g. if N
1
= 1,000 and N
2
= 100
N
T
= 1,000 + 100 = 1,100/g
* Dilution factor = 100
** For duplicate plates, 0.2 mL per plate (5.4.5). Divide by 2 since "A" represents the total
count of one of the two types on two duplicate plates.
Report total number of Bacillus cereus / Bacillus thuringiensis per g or mL of food to two
significant figures.
N.B.
If the ten plates of the dilution are counted (5.3.3.2(a)); C=Bx10x0.5, where B is the total count
of one of the two types on all ten plates.
If the two of the ten plates of the 1:10 dilution are counted (5.3.3.2(b)); C=1/2Ax10x5

121
G. Detection of Clostridium botulinum in honey and syrups
1. Principle
The procedure involves the removal of botulinal spores from the liquid portion of honey or syrups
by membrane filtration, cultivation of the membrane in a liquid medium, analysis of the culture for
toxin, and identification of toxins with specific botulinal antisera. Of the common human types of
C. botulinum, only types A and B are commonly involved in infant botulism. The procedure is
therefore geared towards the detection of these 2 types. A rare human type (F) may be
considered as the possible source of toxin if (a) injected mice show the typical signs of botulism,
and (b) the toxin cannot be neutralized by Type A or B antisera.
2. Materials and Special equipment
1) Millipore sterilfil holders XXII04710.
2) Millipore membrane filters (MF) HAWP04700.
3) 1 cc tuberculin syringes.
4) 27G
1
/
2
" needles.
5) Botulinal antitoxins.
6) Sterile beakers.
7) Sterile dH
2
O.
8) Sterile 1% Tween 80.
9) 150 mL screw capped dilution bottles.
10) 300 mL centrifuge bottles.
11) Water bath set to 65
o
C.
12) Centrifuge.
13) Laminar flow cabinet.
14) TPGYB medium.
15) Anaerobic jars or anaerobic chamber.
16) Paraffin oil.
17) 0.45 µm filter with Luer lock.
18) Gelatin phosphate buffer.
19) White mice (approx 20 g).
2.1. Filtration Equipment

122
2.1.1. Millipore Sterifil holders XXII 04710. These are placed on 1-litre suction flasks.
Two or more units may be linked, in parallel, to a manifold which is connected to a vacuum
pump.
2.1.2. Millipore membrane filters (MF) HAWP 04700. These are retailed in boxes
containing 4 packages of 25 filters each.
Note: Flow rate and volume of filterable material depend on the direction in which the MF
are placed in the filter units, but the direction of optimum flow bears no relation to their
orientation in the packages.
When a new box is opened, take 2 filters from a package and place them (in succession or
in parallel) in filter units (a) in the same orientation as in the package (keeping the top side
up) and (b) with top and bottom sides reversed. Filter 100 mL of diluted honey (20% w:v),
heated to 65
o
C, through both and record the flow rates. Maintain the orientation with the
higher flow rates for the remaining 25 MF in the first package. Examine at least one filter
each of the remaining 3 packages in the same way to ascertain proper orientation.
2.2 Syringes and Needles
Recommended syringe: 1 cc tuberculin, recorder number 5602, Becton-Dickinson.
Recommended needle: 27G 1/2; also B-D
2.3. Botulinal antitoxins
Trivalent (A,B,E) antiserum;
Connaught Laboratories,
1755 Steeles Ave. West, North York, Ontario, M2R
3T4
416) 667-2701
Monovalent (A and B) antisera;
Wellcome Laboratories, Bechenham, Kent, England.
3. Procedure
3.1. Preparation of diluted samples
Weigh 25 g of honey (or syrup) into a sterile foil-covered beaker. Add 100 mL of sterile distilled
water with 1% Tween 80 and stir until the solution is homogeneous.
3.2. Spore activation, filtration and incubation
For syrups, transfer the 125 mL suspensions to 150 mL screw-capped dilution bottles, hold in a
water bath at 65
o
C for 30 min. and filter through a membrane filter (MF).
For honeys, transfer the 125 mL suspensions to 300 mL centrifuge bottles. Hold in a water bath
at 65
o
C for 30 min. and centrifuge at 15,000 xg for 20 min. Filter the supernate through a
membrane filter. Keep the sediment temporarily at 4
o
C and filter. After filtration rinse dilution
bottle and funnel with about 5 mL of sterile, cold dist. water through each MF. Transfer the MF
in a laminar flow cabinet into 110 mL of TPGYB medium. In the analysis of honey, carefully add
the sediment from the centrifugation to the dilution bottle containing TPGYB medium and the
filter. Incubate at 35
o
C for 7 days under anaerobic conditions. Check the bottles daily. Cap
loosely to prevent pressure build-up.

123
3.3. Modifications of 3.2 in case of clogged filters
In the rare event that the MF filter becomes clogged before the filtration of 125 mL is completed,
transfer the unfiltered portion to a second filter unit. Rinse the funnel of the first unit with water,
transfer the rinse water to the second unit and complete the filtration. Rinse, and transfer both
filters to a single bottle of TPGYB medium.
3.4. Detection of C. botulinum in cereals
Weigh 25 g of cereal directly into 600 mL of TPGYB medium tempered to 65
o
C. Keep at 65
o
C
for 30 min. Incubate anaerobically at 35
o
C for 7 days.
3.5. Preparation of culture filtrate
After 7 days of incubation, select the bottles with signs of growth and withdraw about 20 mL of
culture. Centrifuge at 20,000 x g for 20 min and decant the supernate. Take about 10 mL of
supernate up in a disposable syringe and sterilize by filtration through a Millex HA 0.45 µm
membrane filter (Millipore) fitted on the syringe.
3.6. Detection of toxin
Dilute 4 mL of sterile filtrate with 4 mL of gelatin phosphate buffer. Inject intraperitoneally two
mice
(about 24 g) each with 0.5 mL of diluted filtrate and observe for 4 days. Store the unused
portions of diluted and undiluted filtrate at 4
o
C.
Notes: i) Dilution of filtrate is required to prevent anaphylactic shock from the high protein
content of the medium.
ii) 95% of the mice killed by botulinal toxin in TPGYB medium will be dead or near death after
24 h
3.7. Confirmation of botulinal toxin
Select all samples causing death in 1/2 or 2/2 mice. Place 1.5 mL each of diluted filtrate in four
10 x 75 mm test tubes. Add 0.15 mL of botulinal antiserum (Appendix B, 4): trivalent A, B, E to
the first, monovalent A to the second, monovalent B to the third, none to the fourth. Mix, and
keep the mixtures at ambient temperature for 45 min. to 1 h. Inject two mice each with 0.55 mL
of each filtrate/antiserum mixtures and 0.5 mL of filtrate without antiserum. Observe for 4 days. If
a sample kills only 1/2 mice, inject 2 more mice, if possible within 24 h after the first injection.
Samples are considered positive for toxin if 2/2 or at least 2/4 mice are killed. Clostridium
botulinum type A is confirmed if mice are protected with trivalent A, B, E and monovalent A
antisera; C. botulinum type B is confirmed if mice are protected with trivalent A, B, E and
monovalent B antisera.
Notes: i) If there are signs of botulism prior to death (ruffled fur, laboured abdominal breathing,
weak or paralysed limbs) and none of the antisera has a protective effect, C. botulinum type F
may be the source of toxin. In that case, ship the remaining filtrate to the Botulism Reference
Service for identification and store the original culture at 4
o
C for future reference.
ii) Trivalent (A, B, E) antiserum is used in lieu of divalent (A,B) antiserum.

124
4. Preparation of media
4.1a.Trypticase-Peptone -Glucose-Yeast Extract-Beef Extract (TPGYB) Medium
Trypticase (BBL)*
50 g
Peptone (Difco)
5 g
Dextrose (Difco)
4 g
Yeast extract (Difco)
20 g
Beef extract (Difco)
10 g
Sodium thioglycollate
1 g
Distilled water
1 L
* May be substituted with special peptone L72 (Oxoid)
Note: If the medium is not used on the day of autoclaving, deaerate prior to use by steaming at
100
o
C in the autoclave for 10 min, or by placing the dilution bottles in boiling water, about 6 cm
deep, for 10 min.
4.2. Tween 80 diluent
Tween 80 (polyethylene sorbitan monooleate)
1 L
Distilled water
10 g
Filter-sterilize.
4.3. Gelatin phosphate buffer
Gelatin
2 g
Disodium hydrogen phosphate (Na
2
HPO
4
)
10 g
Distilled water
1 L
Adjust pH to 6.6 with N HCl. Autoclave at 121
o
C and 15 lb pressure for 15 min
POTENTIAL HAZARDS TO THE INVESTIGATOR
Liquid cultures of C. botulinum contain high levels of toxin and should be handled only by
experienced personnel after immunization with botulinal toxoid.
CAUTION: the toxoid supplied by CDC protects only against C. botulinum of types A to E, not
against type F which may be, though rarely, involved in food-borne or infant botulism.
Contaminated sealed products (canned or vacuum-packaged) may be under pressure and must
be opened in a fume hood or safety cabinet for protection from aerosols. Goggles must be worn
whenever an accidental splash may be expected.
CAUTION: immunization does not assure protection of the eye from botulinal toxin, and
splashes may result in blindness. Disposable gloves should be worn and pipetting by mouth is to
be avoided. Used glassware and other supplies in contact with toxin are placed in a sturdy, heat-
resistant container which should be placed in the autoclave by the investigator. Disposable
material such as gloves, cotton or tissue paper is collected in autoclave bags for hazardous waste
and are autoclaved. If accidental spills occur, the toxin may be inactivated with saturated or dry
sodium bicarbonate.

125
Incriminated foods (excepting sealed products) and clinical specimens may be analyzed by
experienced personnel without the need for immunization; if toxic, they usually contain relatively
low levels of toxin.
H. Enumeration of Clostridium perfrigens in foods
1. Application
This method is applicable to the enumeration of viable Clostridium perfringens in foods.
2. Description
This method has been shown to produce satisfactory results with naturally-contaminated meat
and poultry products.
3. Principle
The procedure estimates the number of viable Clostridium perfringens per g or mL of food. A
portion of the product is mixed and incubated with a selective medium by the pour plate
technique. Typical black colonies are counted as presumptive Clostridium perfringens. A
minimum of five of these colonies are subjected to confirmatory tests. The number of confirmed
Clostridium perfringens is calculated from the ratio of presumptive colonies confirmed to
presumptive colonies tested.
4. Material and special equipment
The following media and reagents (1-3) are commercially available and are to be prepared and
sterilized according to the manufacturer's instructions. See also Appendix G of Volume 2 and
reference 8.1 for the formula of individual media.
1) Sulfite cycloserine agar (SC) (originally designated as Egg yolk free tryptose sulfite cycloserine
agar
2) Nitrate-motility (NM) agar
3) Nitrate reagents
4) 2% sodium citrate (tempered to 45
o
C) (may be used for cheese samples)
5) Peptone water diluent (PW) (0.1%)
6) Lactose gelatin (LG)
7) Stomacher, blender or equivalent
8) pH meter or paper capable of distinguishing to within 0.3 to 0.5 pH units within a range of 5.0
to 8.0
9) 1N HCl and 1N NaOH
10) A system capable of generating anaerobic conditions, such as, anaerobic jars (with a venting
system or disposable H
2
/CO
2
gas generator envelopes and a desiccant, such as anhydrous
CaSO
4
); the AnaeroGen
T M
anaerobic atmosphere generation system (Oxoid) or an anaerobic
incubator capable of maintaining 35
o
C.

126
11) 5% C0
2
, 10% H
2
and 85% N
2
(if anaerobic incubator or jars with venting system are used)
12) Anaerobic indicator
13) Aerobic incubator capable of maintaining 35
o
14) 45
o
C waterbath (if sodium citrate is to be used)
NOTE: It is the responsibility of each laboratory to ensure that the temperature of the incubators
or waterbaths is maintained at the recommended temperatures. Where 35
o
C is recommended in
the text of the method, the incubator may be 35 +/-1.0
o
C. Similarly, lower temperatures of 30 or
25
o
C may be +/- 1.0
o
C. However, where higher temperatures are recommended, such as 43 or
45.5
o
C, it is imperative that the incubators or waterbaths be maintained within 0.5
o
C due to
potential lethality of higher temperatures on the microorganism being isolated.
15) Colony counting device
5. Procedure
Each sample unit should be analyzed individually. Carry out the test in accordance with the
following instructions:
5.1. Handling of Samples Units
5.1.1 In the laboratory prior to analysis, except for shelf-stable foods, keep sample units
refrigerated (0-5
o
C) or frozen, depending on the nature of the product. Thaw frozen
samples in a refrigerator, or under time and temperature conditions which prevent microbial
growth or death.
5.1.2 Analyze sample units as soon as possible after their receipt in the laboratory.
5.2. Preparation for Analysis
5.2.1 Have ready 0.1% peptone water diluent or other required diluent (Table 1).
5.2.2 Clean the surface of the working area with a suitable disinfectant.
5.3. Preparation of Sample
5.3.1. To ensure a truly representative analytical unit agitate liquids or free flowing materials
until the contents are homogeneous. If the sample unit is a solid, obtain the analytical unit by
taking a portion from several locations within the sample unit.
5.3.2. Prepare a 1:10 dilution of the food by aseptically shaking, stomaching or blending 25
g or mL (the analytical unit) into 225 mL of the required diluent, as indicated in Table I. If a
sample size other than 25 g or mL is used, maintain the 1:10 sample to dilution ratio, such as
11 (10) g or mL into 99 (90) mL.
NOTE: Weight or volume in brackets indicates alternate procedure for making dilutions.
5.3.3. Blend for the minimum time required to produce a homogeneous suspension; to avoid
overheating, blending time should not exceed 2.5 min. With foods that tend to foam, use
blender at low speed and remove aliquot from below liquid/foam interface.

127
5.3.4. If the 1:10 dilution in a dilution bottle is to be mixed by shaking, shake the bottle 25
times through a 30 cm arc in approximately 7 sec.
5.3.5. If a stomacher is used, macerate for 1 min.
5.3.6. Check pH of the food suspension. If the pH is outside the range of 5.5-7.5, adjust
pH to 7.0 with sterile 1N NaOH or 1N HCl.
5.3.7. The food homogenate (1:10 dilution) of dry foods should stand at room temperature
for 15 min. In all other instances, the analysis should be continued as soon as possible
5.3.8. Prepare succeeding decimal dilutions as required, using a separate sterile pipette for
making each transfer.
5.3.9. Shake all dilutions immediately prior to making transfers to ensure uniform distribution
of the microorganisms present.
5.4. Plating and incubation
5.4.1. Pipette 1 mL of the required dilutions into each of duplicate sterile Petri plates.
5.4.2. Pour into each plate approximately 20 mL of sulfite cycloserine (SC) agar and mix by
gentle rotation.
5.4.3. Incubate plates anaerobically in an upright position at 35
o
C for 20 h. Longer
incubation may result in excess blackening along the bottom rim of the plates. Inversion of
the plates may result in agar displacement by gas.
Small numbers of plates may be incubated in anaerobic jars, either with disposable H
2
/CO
2
gas generator envelopes or with a venting system. If envelopes are used, the bottom of the
jars should be covered with anhydrous CaSO
4
or another suitable desiccant.
Alternately, the AnaeroGen
T M
anaerobic atmosphere generation system (Oxoid) may be
used.
For a large number of plates an anaerobic incubator is preferable. Anaerobic incubators and
jars require three evacuations and replacements with a mixture of 5% CO
2
, 10% H
2
and
85% N
2
. Each jar and incubator must contain an anaerobic indicator.
5.5. Presumptive Clostridium perfringens count
5.5.1 After 20 h of incubation, check the indicators to ascertain anaerobiosis (without
anaerobiosis the analysis is discontinued).
5.5.2 Select plates containing 20-200 black colonies, about 1-2.5 mm in diameter. Pinpoint
black colonies are not to be counted.
5.5.3 Count presumptive colonies and average the count of duplicate plates. The
presumptive count N (as number of colonies per g (mL)) is N=A x D, where A is the
average presumptive count from duplicate plates, and D the dilution factor. If the lowest
number of colonies per plate exceeds 150, count or estimate the number and record the
results with the letter E, e.g., 1.8 x 10
6
E, to indicate a lower degree of accuracy. If the

128
number is too high to be estimated, record the minimum number estimable with a > sign,
e.g., >2.0 x 10
6
.
If the highest number of colonies per plate is below 15, record the result with the letter E,
e.g., 1.2 x 10
3
E. If no presumptive colonies are found, record the count as <0.5 x D.
5.6. Confirmatory tests
5.6.1. Randomly select a minimum of five presumptive colonies from the appropriate plates
(or all presumptive colonies if less than five are encountered). Stab-inoculate with a plain
needle (or a needle with a minute loop) each of the selected colonies into nitrate-motility
(NM) agar. In parallel, inoculate the same colonies deep into lactose gelatin (LG).
5.6.2. Close the tubes tightly and incubate at 35-37
o
C for 24 h. Incubate two uninoculated
NM and LG tubes as controls. Anaerobic incubation is not required.
5.6.3. To each NM tube with a distinct line of non-motile growth along the stab, add 0.2-
0.4 mL of nitrate reagent. Production of a red color at the top indicates reduction of nitrate
to nitrite (a positive test). Faint color reactions, slightly more intense than the blanks, should
be counted as negative. Add a small quantity of zinc dust to a negative culture. The
development of a red color is indicative of a negative test and the absence of a color
change is positive (no nitrate remains having been reduced by the culture beyond the nitrite
stage). If growth is limited to the lower part of the tube and little or no colour develops,
aspirate and discard the upper part of the medium in the tube and again add the nitrate
reagent to the remainder.
5.6.4. Examine LG tubes for gas production, as well as a color change from red to yellow
which is indicative of lactose fermentation (lactose positive).
5.6.5. Place the LG tubes in ice water for 10 min or in the refrigerator (4
o
C) for one h. If no
liquefaction has occurred within 24 h of incubation but the organism is non-motile, reduced
nitrate to nitrite and is lactose fermentation positive, re-incubate the LG tube for another 24
h. Isolates that are non-motile, reduce nitrate, are lactose positive and liquefy gelatin within
48 h are confirmed Clostridium perfringens.
5.6.6. In addition to the tests mentioned, rapid identification kits may be used, such as the
API 20A, API An-ident or Vitek Anaerobic cards.
5.6.7. Calculate the confirmed Clostridium perfringens count from the presumptive count
and the relative number of confirmed colonies:
No. of colonies confirmed /
Confirmed count/g(mL)
= Presumptive count/g(mL)
X
No. of colonies tested
If no colonies are confirmed, record the count as <0.5 x D, where D is the dilution factor.

129
TABLE I
Preparation of the Initial Dilution
Type of Food Product
Preparation*
Treatment
Liquids: milk, water
etc.
pipette directly into Petri plates and/or peptone water
diluent
shake
Viscous and non-
miscible liquids
weigh into peptone water diluent
shake
Solids:
water soluble solids
weigh into peptone water diluent
shake
powder, meats
weigh into peptone water diluent
stomach or
blend
all cheese
weigh into previously warmed (45
o
C) 2% aqueous
sodium citrate (Na
3
C
6
H
5
O
7
.2H
2
O)
stomach or
blend
spices
weigh into peptone water diluent
shake
Shellfish
weigh into peptone water diluent
stomach or
blend
* Sample may be added into an empty sterile stomacher bag, blender jar or dilution bottle and
the diluent added prior to mixing.

130
Microbiology of water
Introduction
The importance of potable (drinking) water supplies cannot be overemphasized. With increasing
industrialization, water sources available for consumption and recreation have been adulterated
with industrial as well as animal and human wastes. As a result, water has become a formidable
factor in disease transmission. Polluted waters contain vast amounts of organic matter that serves
as excellent nutritional sources for the growth and multiplication of microorganisms. As with milk
or water, the presence and number of coliform bacteria and other enteric organisms in water is
indicative of fecal contamination and may suggest the presence of pathogens. These pathogens
are responsible for intestinal infections such as bacillary dysentery, typhoid fever, cholera, and
paratyphoid fever. Analysis of water samples on a routine basis would not be possible if each
pathogen required detection. Therefore, water is examined to detect Escherichia coli, the
bacterium that indicates fecal pollution. Since Escherichia coli is always present in the human
intestine, its presence in water alerts public health officials to the possible presence of other
human or animal intestinal pathogens. Both qualitative and quantitative methods are used to
determine the sanitary condition of water.
Standard Qualitative Analysis of Water
The three basic tests to detect coliform bacterial water are presumptive, confirmed, and
completed. The tests are performed sequentially on each sample under analysis. They detect the
presence of coliform bacteria (indicators of fecal contamination) the gram-negative, non spore-
forming bacilli that ferment lactose with the production of acid and gas that is detectable following
a 24-hour incubation period at 37ºC.
Presumtive coliform test
Determination of the most probable number of coliform
Purpose
1. To determine the presence of coliform bacteria in a water sample.
2. .To obtain some index as to the possible number of organisms present in the sample
under analysis.
Principle
The presumptive test is specific for detection of coliform bacteria. Measured aliquots of the
water to be tested are added to a lactose fermentation broth containing an inverted gas vial
(Durham tubes). Because these bacteria are capable of using lactose as a carbon source (the
other enteric organisms are not), their detection is facilitated by use of this medium. In addition to
lactose, the medium also contains a surface tension depressant, bile salt used to suppress the
growing of organisms other than coliform bacteria. Tubes of this lactose medium are inoculated
with 10-ml, 1-ml, and 0.1-ml aliquots of the water sample. The series consists of at least three
groups, each composed of three tubes of the specified medium. The tubes in each group are then
inoculated with the designated volume of the water sample as described under "procedure". The
greater the number of tubes per group, the greater the sensitivity of the test. Development of gas
in any of the tubes is presumptive evidence of the presence of coliform bacteria in the sample.
The presumptive test also enables the microbiologist to obtain some idea of the number of
organisms present by means of the most probable number test (MPN). The MPN is estimated by
determining the number of tubes in each group that show gas following the incubation period.

131
Materials
Cultures
Water samples from sewage plant, pond, and tap.
Media
lactose broth .
Equipment
Bunsen burner, sterile 10-ml pipettes, sterile 1-ml pipettes, mechanical pipetting device, and
glassware marking pencil.
Procedure
1.
Set up three separate series consisting of three groups, a total of nine tubes per series, in
a test-tube rack; for each tube, label the water source and volume of sample inoculated.
2.
Mix sewage plant water sample by shaking thoroughly. Exercise care in handling
sewage waste water sample because enteric pathogens may be present.
3.
Flame bottle and then using a 10-ml pipette, transfer 10-ml aliquots to the three tubes.
4.
Flame bottle and then using a 1-ml pipette, transfer 1 ml of water to the three
tubes.
5.
Repeat steps 2 through 5 for the tap and pond water sample.
7.
Incubate all tubes for 48 hours at 37 degrees centigrade.
8.
Examine all tubes after 24 and 48 hours of incubation. Record your results in the
chart as:
a.
Positive: 10 percent or more of gas appears in a tube in 24 hours.
b.
Doubtful: Gas develops in a tube after 48 hours.
c.
Negative: There is no gas in the tube in the series in 48 hours.
Confirmed coliform test
Purpose
To confirm the presence of coliform bacteria in a water sample for which the presumptive test
was positive.
Principle
The presence of a positive or doubtful presumptive test immediately suggests that the water
sample is non-portable. Confirmation of these results is necessary, since positive presumptive
tests may be the result of organisms of non-coliform origin that are not recognized as indicators of
fecal pollution. The confirmed test requires that selective and differential media such as eosin-
methylene blue (EMB) or endo agar be streaked from a positive lactose broth tube obtained from
the presumptive test. Eosin-methylene blue agar contains the dye methylene blue, which inhibits
the growth of gram-positive organisms. In the present of an acid environment, EMB forms a
complex that precipitates out onto the coliform colonies, producing dark centers and a green
metallic sheen. This reaction is characteristic for Escherichia coli, the major indicator of fecal
pollution. Endo agar is a nutrient medium containing the dye fuchsin, which forms a dark pink
complex that turns the E. coli colonies and the surrounding medium pink.

132
Materials
Cultures
One 24-hour-old positive broth culture from each of the three series from the presumptive test.
Media
Eosin-methylene blue agar plates and endo agar plates.
Equipment
Bunsen burner, glassware marking pencil, and inoculating loop.
Procedure
1. Label the covers of the three EMB plates and three endo agar plates with the source of
the water sample (sewage, pond, and tap).
2. Using a positive 24-hour lactose broth culture from the sewage water series from
thepresumptive test, streak the surface of one EMB and one endo agar plate.
3. .Repeat Step 2 using the positive lactose broth cultures from the pond and tap water
series to inoculate the remaining plates.
4. Incubate all plate cultures in an inverted position for 24 hours at 37 degree centigrade.
N/B: The confirmed test can also be done using the brilliant green lactose bile broth (BGLB) by
transferring one loop of the positive test tubes of presumptive test into the BGLB broth arranged
as in the presumptive test and containing the Durham tubes.
Completed coliform test
Purpose
To confirm the presence of coliform bacteria in a water sample, or, if necessary, to confirm a
suspicious but doubtful result of the previous test.
Principle
The completed test is the final analysis of the water sample. It is used to examine the coliform
colonies that appeared on the EMB or endo agar plates used in the confirmed test. An isolated
colony is picked from the confirmatory test plate and inoculated into a tube of lactose broth and
streak on a nutrient agar slant to perform a Gram stain. Following inoculation and incubation,
tubes showing acid and gas in the lactose broth and the presence of gram-negative bacilli on
microscopic examination are further confirmation of the presence E.coli, and indicative of a
positive completed test.
Materials
Cultures
One 24-hour coliform-positive EMB or endo agar culture from each of the three series of the
confirmed test.
Media
Nutrient agar slants and lactose broth.

133
Reagents
Crystal violet, Gram's iodine, 95 percent ethyl alcohol, and safranin.
Equipment
Bunsen burner, staining tray, inoculating loop, lens paper, blotting paper, microscope, glassware
and marking pencil.
Procedure
1. Label each tube with the source of its water sample.
2. Inoculate one lactose broth and one nutrient agar slant from the same isolated E. coli
colony obtained from an EMB or an endo plate from each of the experimental water
samples.
3. Incubate all tubes for 24 hours at 37 degrees centigrade.
N/B Completed coliform test can also be carried out using the EC-broth in test tubes and
inoculated with loopful of the positive tubes from the BGLB broth and incubated at 44.5ºC.
Positive results are characterized by the growth and production white precipitate. Streaking onto
EMB and Endo agar from the positive tubes can follow as above.
Quantititive analysis of water
Purpose
To determine the quality of water samples using the membrane filter method.
Principle
Bacteria-tight membrane filters capable of retaining microorganisms larger than 0.45 micrometer
are frequently used for analysis of water. These filters offer several advantages over the
conventional, multiple-tube method of water analysis: (1) Results are available in a shorter period
of time, (2) larger volumes of sample can be processed, and (3) because of the high accuracy of
this method, the results are readily reproducible. A disadvantage involves the processing of
turbid specimens that contain large quantities of suspended materials; particulate matter clogs the
pores and inhibits passage of the specific volume of water. A water sample is passed through a
sterile membrane filter that is housed in a special filter apparatus contained in a suction flask.
Following filtration, the filter disc that contains the trapped microorganisms is aseptically
transferred to a sterile petri dish containing an absorbent pad saturated with a selective,
differential liquid medium. Following incubation, the number of colonies present on the filter is
counted with the aid of a microscope. This experiment is used to analyze a series of dilutions of
water samples collected upstream and downstream from an outlet of a sewage treatment plant.
A total count of coliform bacteria determines the potability of the water sources. Also, the types
of fecal pollution, if any, are established by means of a fecal coliform count, indicative of human
pollution and a fecal streptococcal count, indicative of pollution from other animal origins. The
ratio of the fecal coliforms to fecal streptococci per millimeter of sample is interpreted as follows:
Between 4 indicates human and animal pollution; >4 indicates human pollution; <0.7 indicates
poultry and livestock pollution.

134
Materials
Cultures
Water samples collected upstream (labeled U) and down stream (labeled D) from an outlet of a
sewage treatment plant.
Media
one 20-ml tube of lactose broth, one 20-ml tube of EC - broth, one 20-ml tube of K-F broth,
four 90-ml sterile water blanks, and one 300-ml flask of sterile water.
Equipment
Sterile Millipore membrane apparatus (base, funnel, and clamp), 1-litre suction flask, 15 sterile
millipore membrane filters and absorbent pads, 15 sterile 50-mm Petri dishes, 12 10-ml pipetting
device, small beaker of 95 percent alcohol, forceps, dissecting microscope, and glassware
marking pencil.
Procedure
The following instructions are for analysis of one of the provided water samples. Different
samples may be assigned to individual groups.
1.
Label the four 90-ml water blanks with the source of the water samples and dilution
(10-1, 10-2, 10-3, and 10-4).
2.
Using 10-ml pipettes, aseptically perform a 10-fold serial dilution of the assigned
undiluted water sample, using the four 90-ml water blanks to effect the 10-1, 10-2,
10-3, and 10-4 dilutions.
3.
Arrange the 15 petri dishes into three sets of five plates. Label each set as follows:
a.
For total coliform count (TCC) and dilutions (undiluted, 10-1, 10-2,
10-3, and 10-4).
b. For fecal coliform count (FCC) and dilutions as in Step 3a.
c.
For fecal streptococcal count (FSC) and dilutions as in Step 3a.
4.
Using a sterile forceps dipped in 95 percent alcohol and flamed, add a
sterile pad to all Petri dishes.
a.
Two ml of lactose broth to each pad in the plates labeled TCC.
b. Two ml of EC- broth to each pad in the plates labeled FCC.
c.
Two ml of K-F broth to each pad in the plates labeled FSC.
5.
Aseptically assemble the sterile paper-wrapped membrane filter unit as follows:
a.
Unwrap and insert the sintered glass filter base into the neck of a 1-
liter side-arm suction flask.
b. With sterile forceps, place a sterile membrane filter disc, grid side
up, on the sintered glass platform.
c.
Unwrap and carefully place the funnel section of the apparatus on
top of the filter disc. Using the filter clamp, secure the funnel to the
filter base.
d. Attach a rubber hose from the side-arm on the vacuum source.
6.
Using the highest sample dilution (10-4) and a pipette, place 20ml of the dilution
into the funnel and start the vacuum. When the entire sample has been filtered,
wash the inner surface of the funnel with 20 ml of sterile water.

135
7.
Disconnect the vacuum, unclamp the filter assembly, and with sterile forcepts remove the
membrane filter and place it on the medium saturated pad in the Petri dish labeled TCC,
10-4).
9.
Aseptically place a new membrane on the platform, reassemble the filtration
apparatus, and repeat Steps 7 through 9 twice, adding the filter discs to the 10-4
dilution plates labeled FCC and FSC.
10.
Repeat Steps 8 through 10, using 20ml of the 10-3, 10-2, and 10-1 dilutions and the
undiluted samples.
11.
Incubate the plates in an inverted position as follows
a.
TCC and FSC plates for 24 hours at 37 degrees centigrade.
b. FCC plates sealed with waterproof tape and placed in a weighted
watertight plastic bag, which is then submerged in 44.5 degrees
centigrade water bath for 24 hours.
Observation and results
1.
Remove the filter discs from the petri dishes and allow to dry on absorbent
paper for 1 hour.
2.
Examine all filter discs under a dissecting microscope and perform colony counts on each
set of discs as follows.
a.
TCC: Count colonies on M-endo agar that present a golden
metallic sheen (performed on a disc showing 20 to 80 colonies).
b. FCC: Count colonies on M-FC agar that are blue (performed on a
disc showing 20 to 60 of these colonies).
c.
FSC: Count colonies on K-F agar that are pink to red (performed on
a disc showing 20 to 100 of these colonies).
3.
For each of the three counts, determine the number of fecal organisms present in
100 ml of the water sample, using the following formula.
Colony Count x dilution factor x 100
ml of sample used
Isolation of Escherichia coli
Carry out the coliform test up to fecal coliforms. The EC media is streaked onto the
EMB agar. Check for the typical colonies as explained earlier. Carry out the biochemical
test below:
indole production
methyl red
voges/proskeur
citrate utilization
In addition check for the motility, gram’s characteristics and production of gas from lactose.

136
Howard Mould Count
1. Application
This method shall be used for the determination of mould filaments in canned tomatoes, tomato
juice and vegetable juice, and in tomato puree, tomato paste, tomato pulp and tomato catsup.
2. Procedure
The examination shall be carried out in accordance with the following instructions.
2.1. Apparatus
2.1.1. Compound microscope, either binocular or monocular equipped with:
a. mechanical stage.
b. condenser with iris diaphragm.
c. source of illumination.
d. two objectives - a 10 x (16 mm) for counting and a 20 x (8mm) for confirmation.
e. 8 x - 12.5 x oculars.
f. The 10 x objective must be calibrated with the ocular to give a field diameter of
1.382 mm (Preparation of Microscope, section 2.2.1).
g. The ocular must be equipped with a micrometer disk cross-ruled in sixths of ocular
diaphragm opening (Preparation of Microscope, section 2.2.2).
2.1.2. Howard mould counting chamber or cell of the type with specifications as outlined in
Part 6, Diagram IIa or IIb and cover glass.
2.1.3. Distilled water.
2.1.4. Lint-free clean towel or cloth for drying Howard cell and cover glass.
2.1.5. Bunsen burner.
2.1.6. Spatula with a 5.0 mm flat blade. If the blade is not of this size it may be ground
down to the designated width and to a flat surface. With a glass pencil, mark the blade l0.0
mm from the tip to give a working area of 50 sq. mm. The purpose of recommending this
spatula is to standardize the quantity of product transferred from the sample to the Howard
cell.
2.1.7. Dissecting needle.
2.1.8. U.S. standard sieve no. 2 (for canned tomatoes).
2.1.9. Wide mouth bottles with screw caps or other suitable containers (for canned
tomatoes, puree, pulp, paste and catsup).
2.1.10. Spoon or other suitable utensil (for puree, pulp, paste and catsup).

137
2.1.11. Refractometer (for puree, pulp and paste).
2.1.12. Coarse filter paper or celluwipe (for puree, pulp and paste).
2.2 Preparation of Microscope
2.2.1. Calibrate the 10 x objective with the ocular to give a field of view diameter of 1.382
mm as follows:
a. Using the 10 x objective and ocular(s) in the range of 8 - 12.5 x measure the
diameter of field of view with a stage micrometer or with the two parallel lines or circle
measuring 1.382 mm scribed on a Howard cell.
b. If the field diameter is less than 1.382 mm use lower power ocular(s).
c. If the field diameter is greater, raise the height of the ocular(s) until the diameter
coincides with 1.382 mm or make an accessory drop-in ocular diaphragm with
aperture accurately cut to necessary size.
2.2.2. Equip microscope with a micrometer disk cross-ruled in sixths of ocular diaphragm
opening as follows:
a. Obtain or make a micrometer disk of suitable diameter to fit into ocular
(approximately 21 mm) and 1 mm thick. The disk should be marked with a centre grid
made up of 36 small squares, six to each side of such a size that the length of six
squares is equal to the diameter of the ocular diaphragm which has been adjusted to
give a field diameter of 1.382 mm as in step 2.2.1, (Part 6, Diagram I).
b. To make the grid, calculate the width of grid (10 - 14 mm) that will coincide with
1.382 mm on stage. Mark width on micrometer disk, place disk in ocular and check
that width coincides. If not, remove disk and change lines as necessary. Once the
proper width has been determined, etch grid on micrometer disk with very fine lines
making certain grid is centred on the disk.
2.2.3. Establish adequate light source for examination as follows:
a. Locate and focus a mould filament with the microscope.
b. Focus the light source into the condenser, adjust the height of the condenser, the
diameter of the iris diaphragm and the intensity of the light source to give clear uniform
illumination such that there is sufficient light to see all particles but not so intense as to
mask the characteristics of the mould.
c. Use a coloured filter if necessary to increase contrast of filaments.
2.3. Preparation of Sample Units
2.3.1. Each sample shall consist of six sample units of one container each as outlined in
section 2, Sampling. Each sample unit shall be analyzed separately.
2.3.2. Examine each sample unit immediately after it is prepared. If there is any delay, the
sample unit should be thoroughly shaken again prior to examination.

138
2.3.3.
a. Tomato Juice and Vegetable Juice
(i) Before opening, shake container (sample unit) 60 times in 30 sec through a 30
cm arc.
(ii) Open container. If considerable foam is produced, pass the flame of a Bunsen
burner lightly over the surface to disperse the foam.
(iii) Proceed as in step 2.3.4, Preparation of Howard Mould Count Cell.
(iv) Repeat procedure for remaining five sample units.
b. Canned Tomatoes
(i) Before opening, shake container (sample unit) 60 times in 30 sec through a 30
cm arc.
(ii) Open container. Drain liquid from canned tomatoes through a no. 2 sieve into
a suitable clean receptacle.
(iii) Transfer liquid to a wide mouth bottle and screw lid on securely.
(iv) Continue as in step 2.3.3.a.
c. Tomato Puree, Tomato Pulp and Tomato Paste
(i) Open container (sample unit) and mix tomato product 60 times in 30 sec with a
spoon or other suitable utensil.
(ii) Transfer a small portion onto a coarse filter paper or celluwipe and measure the
refractive index of the filtrate. Removal of the pulp from tomato mixture does not affect
the refractive index as it is based only on the soluble solids. If the pulp is not removed,
a hazy image will be formed which is hard to centre and read.
(iii) Determine amount of distilled water to add to 100 ml of sample unit from Table I
to give a final refractive index of 1.3448 -1.3454 at 20
o
C or 1.3442 -1.3448 at 25
o
C.
(iv) Mix sample unit as in step (i), transfer 100 ml to a wide mouth bottle, add required
amount of distilled water, secure lid and repeat mixing.
(v) Measure refractive index as in step (ii) and correct if necessary.
(vi) Proceed as in step 2.3.4, Preparation of Howard Mould Count Cell.
(vii) Repeat procedure for remaining five sample units.
d. Tomato Catsup
(i) Open container (sample unit) and mix 60 times in 30 sec with a spoon or other
suitable instrument.

139
(ii) Transfer a measured well mixed representative portion to a wide mouth bottle.
(iii) Dilute contents of bottle with an equal volume of distilled water, secure lid and
shake 60 times in 30 sec through a 30 cm arc.
(iv) Proceed as in step 2.3.4, Preparation of Howard Mould Count Cell.
(v) Repeat procedure for remaining five sample units.
2.3.4. Preparation of Howard Mould Count Cell (1)
2.3.4.1. Clean Howard cell and cover glass making certain central area of cell is clean.
Rinse with distilled water, dry with a lint free cloth and pass lightly over a Bunsen
flame.
2.3.4.2. Determine adequate cleanliness of slide by placing cover glass in position and
pressing it firmly against the shoulders. If Newton's rings appear between each
shoulder and the cover glass, and remain after pressure has been released, the slide is
considered sufficiently clean. When the rings are formed they may be observed by
holding the slide at such an angle that the light is reflected from the cover glass. These
rings resemble a rainbow in colour and when properly formed are broken arcs of
concentric circles. If Newton's rings are not formed re-wash slide and cover glass.
Absence of Newton's rings indicates dirt preventing proper seating of cover glass on
shoulders which results in chamber holding an incorrect volume of sample.
2.3.4.3. Clean spatula and dissecting needle, rinse in distilled water, flame and cool.
2.3.4.4. Prepare glass slide using technique (a) or (b) as follows
a. Inclined Cover Glass Technique
(i) Remove cover from Howard cell.
(ii) Dip spatula into well mixed sample up to 10 mm line and transfer a sample
portion to an area on the central disk (or rectangle) halfway between the centre
and far edge, using a dissecting needle to facilitate the transfer. Do not allow the
spatula or needle to touch the central disk, only the sample.
(iii) Rest one edge of the cover glass in a slanting position on the edges of the cell
shoulders nearest the portion of test material.
(iv) Lower the cover glass slightly until it almost touches the test material on the
disk; then, lower it rapidly but gently into place, so that the material spreads
evenly over the entire surface of the disk.
(v) Do not lower the cover glass too rapidly, for in doing so, a portion of the
sample may splash over onto one or both of the shoulders, thus ruining the mount.
On the other hand, do not lower too gently, otherwise the test material will not
spread evenly over the disk.
b. Parallel Cover Glass Technique

140
(i)Remove cover from Howard cell.
(ii)Dip spatula into well mixed sample up to 10 mm line and transfer a sample
portion onto the approximate centre of the disk, using a dissecting needle to
facilitate the transfer. Do no allow the spatula or needle to touch the central disk,
only the sample.
(iii)Hold the cover glass parallel to the surface of the central disk and lower it
slowly until it just touches the sample portion.
(iv)While maintaining contact with the test sample, alternately raise and lower the
cover glass very slightly 2 or 3 times; then, without stopping lower it rapidly but
gently until it just touches the shoulders of the cell, so that the test portion spreads
evenly over the entire surface of the disk.
2.3.4.5. Ensure the slide is characterized by:
a. Sufficient material to fill area used for counting.
b. Newton's rings visible.
c. Even distribution of material on slide. Ensure sample portion is taken from a
thoroughly mixed sample. Otherwise, when cover glass is put in place, insoluble
material, and consequently moulds, may be more abundant at the centre of the mount.
d. Absence of air bubbles.
2.3.4.6. Discard any mount showing:
a. Uneven distribution of material.
b. Absence of Newton's rings.
c. Liquid which has been drawn across the moat and between the cover glass and
shoulder.
d. Numerous air bubbles.
2.3.5. Microscopical Examination
2.3.5.1. Place cell on microscope stage and examine at a magnification of 90 -125 x with
suitable illumination such that the diameter of each field of view is 1.382 mm (1.5 sq. mm) as
outlined in Preparation of the Microscope (section 2.2). Use higher magnification (180 -
250 x) only for confirmation of mould.
2.3.5.2. From each of 2 or more mounts examine at least 25 fields taken in such a
manner as to be representative of all sections of the mount. The recognized procedure
for examining a mount is to examine alternate fields in alternate rows throughout the
entire area of the mount. To accomplish this, examine alternate fields horizontally
across the slide preparation until 5 fields have been examined. Then move the
mechanical stage vertically to the next alternate row and examine 5 more alternate
fields in reverse horizontal direction. Repeat this process until 25 fields have been
examined. If a field with an air bubble is encountered, move to another field unless

141
mould is seen at first glance, because the field will contain insufficient sample.
Otherwise never move the slide purposely to exclude or include mould filaments.
2.3.5.3. Observe each field noting presence or absence of mould filaments as
characterized in Part 6, Diagram III. If not familiar with the diverse forms of mould,
examine known moulds as follows:
(i) Remove mouldy areas from fresh tomatoes infected with various types of
mould, boil in low count tomato juice to simulate actual conditions and examine
microscopically.
(ii) Recognize the difference between various mould filaments and plant remnants
such as tracheal tube thickenings, pieces of cell wall, lint or fabric segments.
(iii) It is not necessary to classify types of mould, only to positively identify mould
filaments as characterized in Part 6, Diagram III.
2.3.5.4. Count field as positive when the aggregate length of < 3 of the longest
filaments present exceeds 1/6 diameter of field. These filaments may be separate or
attached to each other. A clump or mass of mould has the same value as a single
filament (Part 6, Diagram IV).
2.3.6. Calculation and Recording Results
2.3.6.1. Calculate proportion of positive fields from results of examination of all
observed fields for each sample unit.
2.3.6.2. Report results as a percentage of fields containing mould filaments individually
for each sample unit:
Number of positive fields/Number
of fields examined
x 100 = % positive fields per sample unit
and as an average for the whole sample:
% average positive
fields for whole sample
= % sample unit 1 + % 2 + % 3 + % 4 + % 5 + % 6/

142
TABLE I
DILUTION OF PUREE (PULP) FOR MOULD COUNT AT 20
o
C (2)
Actual Refr.
Index
Dilution Factor Amt. of Water to be Added to 100 ml
of Sample Unit
Total Volume of Diluted Sample
Unit
1.3462
1.145
14.5
114.5
1.3478
1.292
29.2
129.2
1.3494
1.440
44.0
144.0
1.3511
1.585
58.5
158.5
1.3527
1.730
73.0
173.0
1.3544
1.876
87.6
187.6
1.3560
2.024
102.4
202.4
1.3577
2.171
117.2
217.2
1.3593
2.322
132.2
232.2
1.3610
2.474
147.4
247.4
3. Interpretation
3.1. The tolerance as specified hereafter and representing the maximum incidence of positive
fields in canned tomatoes, tomato juice or vegetable juice, shall be applied in determining whether
the tested lot of the product complies with the Food and Drug Regulations. The maximum
percentage of positive fields permitted for each lot is that represented by a percentage of positive
fields not exceeding 25% in any sample unit included in the sample taken from a lot.
3.2. The tolerance as specified hereafter and representing the maximum incidence of positive
fields in tomato puree, tomato paste, tomato pulp or tomato catsup, shall be applied in
determining whether the tested lot of the product complies with Section B.11.017 of the Food
and Drug Regulations. The maximum percentage of positive fields permitted for each lot is that
represented by a percentage of positive fields not exceeding 50% in any sample unit included in
the sample taken from a lot.

143
DIAGRAM I
MICROMETER DISK
A: Length of grid that coincides with 1.382 mm on the microscope stage
B: Proper area of field of view
C: Area of micrometer disk not visible through microscope
D: Diameter equal to 1.382 mm and cross ruled in sixths
144
HOWARD MOULD COUNTING CHAMBER
DIAGRAM 11a
A: Calibration circle, 1.382 mm diameter
B: Area of liquid for mould count
C: Cover glass
D: Cover glass
E: Two engraved parallel lines spaced 1.382 mm apart
F: Rectangle, 15 X 20 mm
G: Moat
E
G
F

145
[1.382/2]2 X 3.1416 = 1.5 sq. mm., area of microscopic field1.5 X 0.1 = 0.15 cu. mm., volume
of material in microscopic field
DIAGRAM III
MOULD FILAMENTS
Only filaments which have at least one of the following characteristics shall be classified as mould:
A: Left side (and not right side); parallel walls of even intensity with both ends definitely blunt
B: Parallel walls of even intensity with characteristic branching
C: Parallel walls of even intensity with characteristic granulation
D: Parallel walls of even intensity with definite septation
E: Left side (and not right side); occasionally encountered, parallel walls of even intensity with one
end blunt and the other end rounded

146
F: Occasionally encountered, slowly tapering walls of even intensity with characteristic granulation
or septation
DIAGRAM IV
EXAMPLES OF FIELDS WITH MOULD FILAMENTS
A: This field is considered positive because the sum of the lengths of three separate filaments is
>1/6th the diameter of the field
B: This field is considered negative because the sum of the lengths of any three filaments is <1/6th
the diameter of the field even though more than three separate filaments are present
C: This field is considered positive because the sum of the lengths of three attached filaments is
>1/6th the diameter of the field
D: This field is considered negative because the sum of the lengths of three attached filaments is
<1/6th the diameter of the field
E: This field is considered positive because the length of one filament >1/6th the diameter of the
field

147
F: This field is considered negative because only one filament is present which is <1/6th the
diameter of the field
G: This filed is considered positive because a clump of mould is present. It has the same value as
a single filament
H: This field is considered positive because a clump of mould is present even though the longest
three filaments are <1/6th the diameter of the field

148
Examination of Canned Foods
The incidence of spoilage in canned foods is low, but when it occurs it must be investigated
properly. Swollen cans often indicate a spoiled product. During spoilage, cans may progress from
normal to flipper, to springer, to soft swell, to hard swell. However, spoilage is not the only cause
of abnormal cans. Overfilling, buckling, denting, or closing while cool may also be responsible.
Microbial spoilage and hydrogen, produced by the interaction of acids in the food product with
the metals of the can, are the principal causes of swelling. High summer temperatures and high
altitudes may also increase the degree of swelling. Some microorganisms that grow in canned
foods, however, do not produce gas and therefore cause no abnormal appearance of the can;
nevertheless, they cause spoilage of the product.
Spoilage is usually caused by growth of microorganisms following leakage or underprocessing.
Leakage occurs from can defects, punctures, or rough handling. Contaminated cooling water
sometimes leaks to the interior through pinholes or poor seams and introduces bacteria that cause
spoilage. A viable mixed microflora of bacterial rods and cocci is indicative of leakage, which
may usually be confirmed by can examination. Underprocessing may be caused by undercooking;
retort operations that are faulty because of inaccurate or improperly functioning thermometers,
gauges, or controls; excessive contamination of the product for which normally adequate
processes are insufficient; changes in formulation or handling of the product that result in a more
viscous product or tighter packing in the container, with consequent lengthening of the heat
penetration time; or, sometimes, accidental bypassing of the retort operation altogether. When the
can contains a spoiled product and no viable microorganisms, spoilage may have occurred before
processing or the microorganisms causing the spoilage may have died during storage.
Underprocessed and leaking cans are of major concern and both pose potential health hazards.
However, before a decision can be made regarding the potential health hazard of a low-acid
canned food, certain basic information is necessary. Naturally, if Clostridium botulinum (spores,
toxin, or both) is found, the hazard is obvious. Intact cans that contain only mesophilic, Gram-
positive, sporeforming rods should be considered underprocessed, unless proved otherwise. It
must be determined that the can is intact (commercially acceptable seams and no microleaks) and
that other factors that may lead to underprocessing, such as drained weight and product
formulation, have been evaluated.
The preferred type of tool for can content examination is a bacteriological can opener consisting
of a puncturing device at the end of a metal rod mounted with a sliding triangular blade that is held
in place by a set screw. The advantage over other types of openers is that it does no damage to
the double seam and therefore will not interfere with subsequent seam examination of the can.

149
Table 1. Useful descriptive terms for canned food analysis.
Exterior can condition
leaker
dented
rusted
buckled
paneled
bulge
Internal can condition
normal
peeling
slight, moderate or severe etching
slight, moderate or severe blackening
slight, moderate or severe rusting
mechanical damage
Micro-leak test
packer seam
side panel
side seam
cut code
pinhole
Product odor
putrid
acidic
butyric
metallic
sour
cheesy
fermented
musty
sweet
fecal
sulfur
off-odor
Product liquor
cloudy
clear
foreign
frothy
Solid product
digested
softened
curdled
uncooked
overcooked
Liquid product
cloudy
clear
foreign
frothy
Pigment
darkened
light
changed
Consistency
slimy
fluid
viscous
ropy
Flat - a can with both ends concave; it remains in this condition even when the can is brought
down sharply on its end on a solid, flat surface.
Flipper - a can that normally appears flat; when brought down sharply on its end on a flat
surface, one end flips out. When pressure is applied to this end, it flips in again and the can
appears flat.
Springer - a can with one end permanently bulged. When sufficient pressure is applied to this
end, it will flip in, but the other end will flip out.
Soft swell - a can bulged at both ends, but not so tightly that the ends cannot be pushed in
somewhat with thumb pressure.
Hard swell - a can bulged at both ends, and so tightly that no indentation can be made with
thumb pressure. A hard swell will generally "buckle" before the can bursts. Bursting usually
occurs at the double seam over the side seam lap, or in the middle of the side seam.
The number of cans examined bacteriologically should be large enough to give reliable results.
When the cause of spoilage is clear-cut, culturing 4-6 cans may be adequate, but in some cases it
may be necessary to culture 10-50 cans before the cause of spoilage can be determined. On
special occasions these procedures may not yield all the required information, and additional tests
must be devised to collect the necessary data. Unspoiled cans may be examined bacteriologically
to determine the presence of viable but dormant organisms. The procedure is the same as that

150
used for spoiled foods except that the number of cans examined and the quantity of material
subcultured must be increased.
A. Equipment and materials
1. Incubators, thermostatically controlled at 30, 35, and 55°C
2. pH meter, potentiometer
3. Microscope, slides, and coverslips
4. Can opener, bacteriological can opener, and can punch, all sterile
5. Petri dishes, sterile
6. Test tubes, sterile
7. Serological pipets, cotton-plugged, sterile
8. Nontapered pipets, cotton-plugged (8 mm tubing), sterile
9. Soap, water, brush, and towels, sterile and nonsterile
10. Indelible ink marking pen
11. Diamond point pen for marking cans
12. Examination pans (Pyrex or enamel baking pans)
B. Media and reagents
1. Bromcresol purple (BCP) dextrose broth (M27)
2. Chopped liver broth (M38) or cooked meat medium (CMM) (M42)
3. Malt extract broth (M94)
4. Liver-veal agar (without egg yolk) (LVA) (M83)
5. Acid broth (M4)
6. Nutrient agar (NA) (M112)
7. Methylene blue stain (R45), crystal violet (R16), or Gram stain (R32)
8. Sabouraud's dextrose agar (SAB) (M133)
9. 4% Iodine in 70% ethanol (R18)
C. Can preparation
Remove labels. With marking pen, transfer subnumbers to side of can to aid in correlating
findings with code. Mark labels so that they may be replaced in their original position on
the can to help locate defects indicated by stains on label. Separate all cans by code

151
numbers and record size of container, code, product, condition, evidence of leakage,
pinholes or rusting, dents, buckling or other abnormality, and all identifying marks on
label. Classify each can according to the descriptive terms in Table 1. Before observing
cans for classification, make sure cans are at room temperature.
D. Examination of can and contents
Classification of cans. NOTE: Cans must be at room temperature for classification.
1.Sampling can contents
a. Swollen cans . Immediately analyze springers, swells, and a representative number (at least
6, if available) of flat and flipper cans. Retain examples of each, if available, when reserve
portion must be held. Place remaining flat and flipper cans (excluding those held in reserve)
in incubator at 35°C. Examine at frequent intervals for 14 days. When abnormal can or one
becoming increasingly swollen is found, make note of it. When can becomes a hard swell or
when swelling no longer progresses, culture sampled contents, examine for preformed toxin
of C. botulinum if microscopic examination shows typical C. botulinum organisms or
Gram-positive rods, and perform remaining steps of canned food examination.
b.Flat and flipper cans . Place cans (excluding those held in reserve) in incubator at 35°C.
Observe cans for progressive swelling at frequent intervals for 14 days. When swelling
occurs, follow directions in l-a, above. After 14 days remove flat and flipper cans from
incubator and test at least 6, if available. (It is not necessary to analyze all normal cans.) Do
not incubate cans at temperatures above 35°C. After incubation, bring cans back to room
temperature before classifying them.
2.
Opening the can. Open can in an environment that is as aseptic as possible. Use of
vertical laminar flow hood is recommended.
a.
Hard swells, soft swells, and springers . Chill hard swells in refrigerator before
opening. Scrub entire uncoded end and adjacent sides of can using abrasive cleanser, cold
water, and a brush, steel wool, or abrasive pad. Rinse and dry with clean sterile towel.
Sanitize can end to be opened with 4% iodine in 70% ethanol for 30 min and wipe off with
sterile towel. DO NOT FLAME. Badly swollen cans may spray out a portion of the
contents, which may be toxic. Take some precaution to guard against this hazard, e.g.,
cover can with sterile towel or invert sterile funnel over can. Sterilize can opener by flaming
until it is almost red, or use separate presterilized can openers, one for each can. At the
time a swollen can is punctured, test for headspace gas, using a qualitative test or the gas-
liquid chromatography method described below. For a qualitative test, hold mouth of sterile
test tube at puncture site to capture some escaping gas, or use can-puncturing press to
capture some escaping gas in a syringe. Flip mouth of tube to flame of Bunsen burner. A
slight explosion indicates presence of hydrogen. Immediately turn tube upright and pour in a
small amount of lime water. A white precipitate indicates presence of CO
2
. Make opening
in sterilized end of can large enough to permit removal of sample.
b. Flipper and flat cans . Scrub entire uncoded end and adjacent sides of can using
abrasive cleanser, warm water, and a brush, steel wool, or abrasive pad. Rinse and dry
with clean sterile towel. Gently shake cans to mix contents before sanitizing. Flood end of
can with iodine-ethanol solution and let stand at least 15 min. Wipe off iodine mixture with

152
clean sterile towel. Ensure sterility of can end by flaming with burner in a hood until iodine-
ethanol solution is burned off, end of can becomes discolored from flame, and heat causes
metal to expand. Be careful not to inhale iodine fumes while burning off can end. Sterilize
can opener by flaming until it is almost red, or use separate presterilized can openers for
each can. Make opening in sterilized end of can large enough to permit removal of sample.
3.
Removal of material for testing. Remove large enough portions from center of can
to inoculate required culture media. Use sterile pipets, either regular or wide-mouthed.
Transfer solid pieces with sterile spatulas or other sterile devices. Always use safety devices
for pipetting. After removal of inocula, aseptically transfer at least 30 ml or, if less is
available, all remaining contents of cans to sterile closed containers, and refrigerate at about
4°C. Use this material for repeat examination if needed and for possible toxicity tests. This
is the reserve sample. Unless circumstances dictate otherwise, analyze normal cans
submitted with sample organoleptically and physically (see 5-b, below), including pH
determination and seam teardown and evaluation. Simply and completely describe product
appearance, consistency, and odor on worksheet. If analyst is not familiar with
decomposition odors of canned food, another analyst, preferably one familiar with
decomposition odors, should confirm this organoleptic evaluation. In describing the product
in the can, include such things as low liquid level (state how low), evidence of compaction,
if apparent, and any other characteristics that do not appear normal. Describe internal and
external condition of can, including evidence of leakage, etching, corrosion, etc.
4. Physical examination. Perform net weight determinations on a representative number
of cans examined (normal and abnormal). Determine drained weight, vacuum, and
headspace on a representative number of normal-appearing and abnormal cans (1).
Examine metal container integrity of a representative number of normal cans and all
abnormal cans that are not too badly buckled for this purpose (see Chapter 22).
CAUTION: Always use care when handling the product, even apparently normal cans,
because botulinal toxin may be present.
5. Cultural examination of low-acid food (pH greater than 4.6). If there is any
question as to product pH range, determine pH of a representative number of normal cans
before proceeding. From each container, inoculate 4 tubes of chopped liver broth or
cooked meat medium previously heated to 100°C (boiling) and rapidly cooled to room
temperature; also inoculate 4 tubes of bromcresol purple dextrose broth. Inoculate each
tube with 1-2 ml of product liquid or product-water mixture, or 1-2 g of solid material.
Incubate as in Table 2.
Table 2. Incubation times for various media for examination of low acid foods (pH > 4.6).
Medium
No. of tubes Temp. (°C)
Time of incubation (h)
Chopped liver (cooked meat)
2
35
96-120
Chopped liver (cooked meat)
2
55
24-72
Bromcresol purple dextrose broth
2
55
24-48
Bromcresol purple dextrose broth
2
35
96-120

153
After culturing and removing reserve sample, test material from cans (other than those
classified as flat) for preformed toxins of C. botulinum when appropriate..
a. Microscopic examination. Prepare direct smears from contents of each can after
culturing. Dry, fix, and stain with methylene blue, crystal violet, or Gram stain. If product is
oily, add xylene to a warm, fixed film, using a dropper; rinse and stain. If product washes
off slide during preparation, examine contents as wet mount or hanging drop, or prepare
suspension of test material in drop of chopped liver broth before drying. Check liver broth
before use to be sure no bacteria are present to contribute to the smear. Examine under
microscope; record types of bacteria seen and estimate total number per field.
b. Physical and organoleptic examination of can contents. After removing reserve
sample from can, determine pH of remainder, using pH meter. DO NOT USE pH
PAPER. Pour contents of cans into examination pans. Examine for odor, color,
consistency, texture, and overall quality. DO NOT TASTE THE PRODUCT. Examine
can lining for blackening, detinning, and pitting.
Table 3.Schematic diagram of culture procedure for low-acid canned foods
a
LVA, liver-veal agar; NA, nutrient agar; CMM, cooked meat medium; BCP, bromcresol
purple dextrose broth.
Table 4. Incubation of acid broth and malt extract broth used for acid foods (pH 4.6)
Medium
No. of tubes
Temp. (°C)
Time of incubation (h)
Acid broth
2
55
48
Acid broth
2
30
96
Malt extract broth
2
30
96

154
Table 5. Pure culture scheme for acid foods (pH 4.6).
a
NA, nutrient agar; SAB, Sabouraud's dextrose agar.
E.
Cultural findings in cooked meat medium (CMM) and bromcresol purple dextrose broth
(BCP)
Check incubated medium for growth at frequent intervals up to maximum time of incubation
(Table 2). If there is no growth in either medium, report and discard. At time growth is noted
streak 2 plates of liver-veal agar (without egg yolk) or nutrient agar from each positive tube.
Incubate one plate aerobically and one anaerobically, as in schematic diagram (Table 3).
Reincubate CMM at 35°C for maximum of 5 days for use in future toxin studies. Pick
representatives of all morphologically different types of colonies into CMM and incubate for
appropriate time, i.e., when growth is sufficient for subculture. Dispel oxygen from CMM
broths to be used for anaerobes but not from those to be used for aerobes. After obtaining
pure isolates, store cultures to maintain viability.
1. If mixed microflora is found only in BCP, report morphological types. If rods are
included among mixed microflora in CMM, test CMM for toxin, as described in Chapter 17. If
Gram-positive or Gram-variable rods typical of either Bacillus or Clostridium organisms are
found in the absence of other morphological types, search to determine whether spores are
present. In some cases, old vegetative cells may appear to be Gram-negative and should be
treated as if they are Gram-positive.
Table 6. Classification of food products according to acidity
Low acid--pH greater than 4.6
Acid pH 4.6 and below
Meats
Tomatoes
Seafoods
Pears
Milk
Pineapple
Meat and vegetable Mixtures and "specialties"
Other fruit

155
Spaghetti
Soups
Sauerkraut
Pickles
Berries
Citrus
Vegetables
Asparagus
Beets
Pumpkin
Green beans
Corn
Lima beans
Rhubarb
Table 7. Spoilage microorganisms that cause high and low acidity in various vegetables and
fruits
Spoilage type
pH groups
Examples
Thermophilic
Flat-sour
>5.3
Corn, peas
Thermophilic
(a)
>4.8
Spinach, corn
Sulfide spoilage
(a)
>5.3
Corn, peas
Mesophilic
Putrefactive anaerobes
(a)
>4.8
Corn, asparagus
Butyric anaerobes
>4.0
Tomatoes, peas
Aciduric flat-sour
(a)
>4.2
Tomato juice
Lactobacilli
4.5-3.7
Fruits
Yeasts
<3.7
Fruits
Molds
<3.7
Fruits
a
The responsible organisms are bacterial sporeformers.
Table 8. Spoilage manifestations in low-acid products
Group of
organisms
Classification Manifestations
Can flat
Possible loss of vacuum on storage
Flat-sour
Product
Appearance not usually altered; pH markedly lowered,
sour; may have slightly abnormal odor; sometimes cloudy
liquor
Can swells
May burst
Thermophilic
anaerobe
Product
Fermented, sour, cheesy or butyric odor
Can flat
H
2
S gas absorbed by product
Sulfide spoilage
Product
Usually blackened; rotten egg odor
Putrefactive
Can swells
May burst

156
anaerobe
Product
May be partially digested; pH slightly above normal;
typical putrid odor
Aerobic
sporeformers
Can flat or
swollen
Usually no swelling, except in cured meats when nitrate
and sugar present; coagulated evaporated milk, black
beets
Table 9. Spoilage manifestations in acid products
Type of organism
Classification Manifestation
Can flat
Little change in vacuum
Bacillus thermoacidurans (flat, sour
tomato juice)
Product
Slight pH change; off-odor
Can swells
May burst
Butyric anaerobes (tomatoes and
tomato juice)
Product
Fermented, butyric odor
Can swells
Usually burst, but swelling may be
arrested
Nonsporeformers (mostly lactic
types)
Product
Acid odor
Table 10. Laboratory diagnosis of bacterial spoilage
Underprocessed
Leakage
Can
Flat or swelled; seams generally normal
Swelled; may show normal defects
(a)
Product
appearance
Sloppy or fermented
Frothy fermentation; viscous
Odor
Normal, sour or putrid, but generally
consistent from can to can
Sour, fecal; generally varying from can
to can
PH
Usually fairly constant
Wide variation
Cultures show sporeforming rods only
Mixed cultures, generally rods and
cocci; only at usual temperatures
Microscopic
and cultural
Growth at 35 and/or 55°C. May be
characteristic on special growth media,
e.g., acid agar for tomato juice.
If product misses retort completely, rods,
cocci,yeast or molds, or any combination
of these may be present.
Spoilage usually confined to certain
portions of pack
Spoilage scattered
History
In acid products, diagnosis may be less
clearly defined; similar organisms may be
involved in understerilization and leakage.
a
Leakage may be due not to can defects but to other factors, such as contamination of cooling
water or rough handling, e.g., can unscramblers, rough conveyor system.

157
Table 11. pH range of a few selected commercially canned foods
Food
pH range
Food
pH range
Apples, juice
3.3 - 3.5 Jam, fruit
3.5 - 4.0
Apples, whole
3.4 - 3.5 Jellies, fruit
3.0 - 3.5
Asparagus, green
5.0 - 5.8 Lemon juice
2.2 - 2.6
Beans
Lemons
2.2 - 2.4
Baked
4.8 - 5.5 Lime juice
2.2 - 2.4
Green
4.9 - 5.5 Loganberries
2.7 - 3.5
Lima
5.4 - 6.3 Mackerel
5.9 - 6.2
Soy
6.0 - 6.6 Milk
Beans with pork
5.1 - 5.8 Cow, whole
6.4 - 6.8
Beef, corned, hash
5.5 - 6.0 Evaporated
5.9 - 6.3
Beets, whole
4.9 - 5.8 Molasses
5.0 - 5.4
Blackberries
3.0 - 4.2 Mushroom
6.0 - 6.5
Blueberries
3.2 - 3.6 Olives, ripe
5.9 - 7.3
Boysenberries
3.0 - 3.3 Orange juice
3.0 - 4.0
Bread
Oysters
6.3 - 6.7
White
5.0 - 6.0 Peaches
3.4 - 4.2
Date and nut
5.1 - 5.6 Pears (Bartlett)
3.8 - 4.6
Broccoli
5.2 - 6.0 Peas
5.6 - 6.5
Carrot juice
5.2 - 5.8 Pickles
Carrots, chopped
5.3 - 5.6 Dill
2.6 - 3.8
Cheese
Sour
3.0 - 3.5
Parmesan
5.2 - 5.3 Sweet
2.5 - 3.0
Roquefort
4.7 - 4.8 Pimento
4.3 - 4.9
Cherry juice
3.4 - 3.6 Pineapple
Chicken
6.2 - 6.4 Crushed
3.2 - 4.0
Chicken with noodles
6.2 - 6.7 Juice
3.4 - 3.7
Chop suey
5.4 - 5.6 Sliced
3.5 - 4.1
Cider
2.9 - 3.3 Plums
2.8 - 3.0
Clams
5.9 - 7.1 Potato salad
3.9 - 4.6
Cod fish
6.0 - 6.1 Potatoes
Corn
Mashed
5.1
Cream style
5.9 - 6.5 White, whole
5.4 - 5.9
On-the-cob
6.1 - 6.8 Prune juice
3.7 - 4.3
Whole grain
Pumpkin
5.2 - 5.5
Brine-packed
Raspberries
2.9 - 3.7
Vacuum-packed
6.0 - 6.4 Rhubarb
2.9 - 3.3
Crab apples, spiced
3.3 - 3.7 Salmon
6.1 - 6.5
Cranberry
Sardines
5.7 - 6.6
Juice
2.5 - 2.7 Sauerkraut
3.1 - 3.7

158
Sauce
2.3
Juice
3.3 - 3.4
Currant juice
3.0
Shrimp
6.8 - 7.0
Dates
6.2 - 6.4 Soups
Duck
6.0 - 6.1 Bean
5.7 - 5.8
Figs
4.9 - 5.0 Beef broth
6.0 - 6.2
Frankfurters
6.2 - 6.2 Chicken noodle
5.5 - 6.5
Fruit cocktail
3.6 - 4.0 Clam chowder
5.6 - 5.9
Gooseberries
2.8 - 3.1 Duck
5.0 - 5.7
Grapefruit
Mushroom
6.3 - 6.7
Juice
2.9 - 3.4 Noodle
5.6 - 5.8
Pulp
3.4
Oyster
6.5 - 6.9
Sections
3.0 - 3.5 Pea
5.7 - 6.2
Grapes
3.5 - 4.5 Spinach
4.8 - 5.8
Ham, spiced
6.0 - 6.3 Squash
5.0 - 5.8
Hominy, lye
6.9 - 7.9 Tomato
4.2 - 5.2
Huckleberries
2.8 - 2.9 Turtle
5.2 - 5.3
Vegetable
4.7 - 5.6
Strawberries
3.0 - 3.9 Miscellaneous products
Sweet potatoes
5.3 - 5.6 Beers
4.0 - 5.0
Tomato juice
3.9 - 4.4 Ginger ale
2.0 - 4.0
Tomatoes
4.1 - 4.4 Human
Tuna
5.9 - 6.1 Blood plasma
7.3 - 7.5
Turnip greens
5.4 - 5.6 Duodenal contents
4.8 - 8.2
Vegetable juice
3.9 - 4.3 Feces
4.6 - 8.4
Vegetables, mixed
5.4 - 5.6 Gastric contents
1.0 - 3.0
Vinegar
2.4 - 3.4 Milk
6.6 - 7.6
Youngberries
3.0 - 3.7 Saliva
6.0 - 7.6
Spinal fluid
7.3 - 7.5
Urine
4.8 - 8.4
Magnesia, milk of
10.0 -10.5
Water
Distilled, CO
2
6.8 - 7.0
Mineral
6.2 - 9.4
Sea
8.0 - 8.4
Wine
2.3 - 3.8
2. If no toxin is present, send pure cultures for evaluation of heat resistance to Cincinnati
District Office, FDA, 1141 Central Parkway, Cincinnati, OH 45202, if cultures meet the
following criteria:

159
§
Cultures come from intact cans that are free of leaks and have
commercially acceptable seams. (Can seams of both ends of can must be
measured; visual examination alone is not sufficient.)
§
Two or more tubes are positive and contain similar morphological types.
3. Examination of acid foods (pH 4.6 and below) by cultivation. From each can,
inoculate 4 tubes of acid broth and 2 tubes of malt extract broth with 1-2 ml or 1-2 g of
product, using the same procedures as for low-acid foods, and incubate as in Table 4.
Record presence or absence of growth in each tube, and from those that show evidence
of growth, make smears and stain. Report types of organisms seen. Pure cultures may be
isolated as shown in Table 5.
4.
The presence of only sporeforming bacteria, which grow at 35°C, in cans with
satisfactory seams and no microleaks indicates underprocessing if their heat resistance is
equal to or less than that of C. botulinum. Spoilage by thermophilic anaerobes such as
C. thermobutylicum may be indicated by gas in cooked meat at 55°C and a cheesy
odor. Spoilage by C. botulinum, C. sporogenes, or C. perfringens may be indicated in
cooked meat at 35°C by gas and a putrid odor; rods, spores, and clostridial forms may
be seen on microscopic examination. Always test supernatants of such cultures for
botulinal toxin even if no toxin was found in the product itself, since viable botulinal spores
in canned foods indicate a potential public health hazard, requiring recall of all cans
bearing the same code. Spoilage by mesophilic organisms such as Bacillus
thermoacidurans or B. coagulans and/or thermophilic organisms such as B.
stearothermophilus, which are flat-sour types, may be indicated by acid production in
BCP tubes at 35 and/or 55°C in high-acid or low-acid canned foods. No definitive
conclusions may be drawn from inspection of cultures in broth if the food produced an
initial turbidity on inoculation. Presence or absence of growth in this case must be
determined by subculturing.
5.
Spoilage in acid products is usually caused by nonsporeforming lactobacilli and yeasts.
Cans of spoiled tomatoes and tomato juice remain flat but the products have an off-odor,
with or without lowered pH, due to aerobic, mesophilic, and thermophilic sporeformers.
Spoilage of this type is an exception to the general rule that products below pH 4.6 are
immune to spoilage by sporeformers. Many canned foods contain thermophiles which do
not grow under normal storage conditions, but which grow and cause spoilage when the
product is subjected to elevated temperatures (50-55°C). B. thermoacidurans and B.
stearothermophilus are thermophiles responsible for flat-sour decomposition in acid and
low-acid foods, respectively. Incubation at 55°C will not cause a change in the
appearance of the can, but the product has an off-odor with or without a lowered pH.
Spoilage encountered in products such as tomatoes, pears, figs, and pineapples is
occasionally caused by C. pasteurianum, a sporeforming anaerobe which produces gas
and a butyric acid odor. C. thermosaccolyticum is a thermophilic anaerobe which
causes swelling of the can and a cheesy odor of the product. Cans which bypass the
retort without heat processing usually are contaminated with nonsporeformers as well as
sporeformers, a spoilage characteristic similar to that resulting from leakage.
6.
A mixed microflora of viable bacterial rods and cocci usually indicates leakage. Can
examination may not substantiate the bacteriological findings, but leakage at some time in

160
the past must be presumed. Alternatively, the cans may have missed the retort altogether,
in which case a high rate of swells would also be expected.
7.
A mixed microflora in the product, as shown by direct smear, in which there are large
numbers of bacteria visible but no growth in the cultures, may indicate precanning
spoilage. This results from bacterial growth in the product before canning. The product
may be abnormal in pH, odor, and appearance.
8.
If no evidence of microbial growth can be found in swelled cans, the swelling may be due
to development of hydrogen by chemical action of contents on container interiors. The
proportion of hydrogen varies with the length and condition of storage. Thermophilic
anaerobes produce gas, and since cells disintegrate rapidly after growth, it is possible to
confuse thermophilic spoilage with hydrogen swells. Chemical breakdown of the product
may result in evolution of carbon dioxide. This is particularly true of concentrated
products containing sugar and some acid, such as tomato paste, molasses, mincemeats,
and highly sugared fruits. The reaction is accelerated at elevated temperatures.
9.
Any organisms isolated from normal cans that have obvious vacuum and normal product
but no organisms in the direct smear should be suspected as being a laboratory
contaminant. To confirm, aseptically inoculate growing organism into another normal can,
solder the hole closed, and incubate 14 days at 35°C. If any swelling of container or
product changes occur, the organism was probably not in the original sample. If can
remains flat, open it aseptically and subculture as previously described. If a culture of the
same organism is recovered and the product is normal, consider the product
commercially sterile since the organism does not grow under normal conditions of storage
and distribution.

161
Standard Operating Procedures (SOPs)
Standard procedures should describe
•
procedures for the acceptance or rejection of samples
•
methodology to be followed
•
appropriate control procedures
•
quality assurance procedures
•
procedures for cleaning, sterilizing and calibrating equipment
•
procedures for preparing media and reagents
•
procedures for handling and disposing of contaminated materials
Analytical methods should be based on a standard method such as those published by the
International Commission on Microbiological Specifications for Foods (ICMSF) or the
Association of Official Analytical Chemists (AOAC). Modifications to standard methods should
not be used unless comparative studies have shown that the modified methods are as reliable as
reference methods. Similarly, for pre-prepared kits such as the mini-kits used for biochemical
tests, the manufacturer's instructions must be followed exactly. Mistakes can arise from using an
incorrect viewing angle or the wrong method of inoculation.
SOP’s should include limitations of each test and a list of precautions. Possible interferences
should be described. For example, the potential presence of natural inhibitory substances should
be noted and methods for diluting out or neutralizing these substances must be included. SOP's
should also include the names of personnel to be contacted if out-of-control procedures are
found.
The SOP’s should also indicate how a test should be read and what should be looked for in a
positive and negative test. Colour photographs can be used to assist personnel in reading tests.
Care should be taken to ensure that the photographs do not fade. Instructions on how tests
should be read should also be included on results sheets. SOP's can be constructed from
manufacturer's brochures and manuals, however neither should be used as substitutes for SOP's.
Personnel
Personnel should have the education, experience and motivation necessary to perform their jobs
and the requirements of a quality assurance program. Management of laboratory personnel
through motivation, supervision and workload direction is as important as selection of appropriate
personnel. Training should be ongoing and should aim to ensure that workers know the exact
duties they are to perform so as to obtain results of the highest quality. Employees must be fully
aware of their QA responsibilities and the adverse consequences that will arise from failure to
carry out their duties carefully. Management should ensure that a safe, efficiently designed facility,
sufficient supplies and equipment are available.
Facilities

162
Laboratory facilities should be designed with the safety of workers being of utmost importance. It
should also be designed to provide for the convenience of the workers and operations. It should
be adequately equipped to carry out all objectives of the laboratory. Ventilation, temperature,
laboratory and bench space, storage (including refrigeration) facilities, sinks, electricity outlets
should be considered in the design of the laboratory. Laboratory grade water should be available.
Distilled water is suitable for most microbiological work. Laboratory water should be tested for
its toxicity or stimulatory effects on microorganisms.
Housekeeping
A routine cleaning and disinfection schedule for the laboratory should be established, monitored
and documented. All laboratory benches should be disinfected before and after each use.
Laboratory materials should be stored after use and unneeded and outdated materials should be
discharged according to an appropriate and documented procedure. Where necessary,
hygroscopic chemicals such dry-form media, should be stored in dry cabinets or in appropriately
desiccated containers. Dust should not be allowed to build up and attention should be paid to
hard-to-clean areas.
Quality Assurance
Quality Assurance (QA) is a wide ranging concept covering all matters that individually or
collectively influence the quality of a product. It denotes a system for continuously improving
reliability, efficiency and utilization of products and services. In the context of quality assurance
two important definitions need to be clearly understood:
i.
Internal Quality Control (IQC): which denotes a set of procedures undertaken by the
staff of health facility (medical, paramedical workers as well as laboratorians) for
continuously and concurrently assessing laboratory work so that quality results are
produced by the laboratory.
ii.
External Quality Assessment (EQA): is a system of objectively assessing the
laboratory performance by an outside agency. This assessment is retrospective and
periodic but is aimed at improving the IQC.
IQC and EQA are complementary in ensuring the reliability of the procedures and the results.
What is the objective of QA?
QA programmes are required for the following reasons:
To generate reliable, reproducible results.
To establish inter-laboratory comparability in laboratory testing
To establish the credibility of the laboratory among scientists and the public at large.
Motivating the staff for further improvement.
Prevention of legal complications which may follow poor quality results.
Factors affecting the quality
It is commonly believed that the quality of laboratory results solely depends upon the laboratory
undertaking this analysis. However, there are many pre-analytical and post-analytical factors
which influence the quality of the end results to a very significant extent. Some of the important
factors influencing quality are listed here:

163
i.
Specimen: This is the single most important factor. Selection of the right sample,
collection in a right manner, adequate quantity, proper transportation to the laboratory,
and processing of the sample before testing, are crucial factors. Record the history of the
sample i.e. how it was collected, by whom, when and for what reason.
ii.
Personnel: The quality of the laboratory results generated is directly proportional to the
training, commitment and motivation of the technical staff. The appropriate technician
should handle the analysis he/she is competent in i.e. bacterial, moulds and yeast.
iii.
Environmental factors: Inadequate lighting, workspace or ventilation or unsafe working
conditions may influence the laboratory results. Fans should not be used in the laboratory.
No direct wind from outside should be allowed in the laboratory.
iv.
Analytical factors: The quality of reagents, chemicals, glassware, stains, culture media,
use of standard procedures and reliable equipment all influence laboratory results. Failure
to examine a sufficient number of microscope fields can lead to false negative results.
Proper labeling of reagents and media all the time to avoid mistakes in the mix up.
Post analytical factors: Transcription errors, incomplete reports, and improper interpretation
can adversely influence the laboratory results. Every step in the analysis should be recorded in the
worksheet available for every single analysis.
Requirements of Internal Quality Control (IQC)
Comprehensive: Cover all steps from collection of sample to reporting.
Regular and continuous monitoring.
Economical: Should be cost-effective and within the provided budget.
SOPMs should be periodically reviewed and revised and religiously followed in the laboratories.
Maintenance of equipment
Good quality equipment is absolutely essential to generate quality results. Care of the equipment
purchased is also crucial. The quality control steps for some of the commonly-used equipment at
the intermediate/peripheral laboratory level is depicted in Table 1.
Table 1: Suggested maintenance of commonly-used equipment
Equipment
Maintenance Instructions
Autoclave
Clean and change water monthly
Adjust water level before each run
Record time, temperature and pressure for each run
Inspect gasket in the lid weekly
Technical inspection every six months
Incubator
Clean inside walls once in a month
Record temperature at the start of each working day
Technical maintenance every six months

164
Hot air oven
Clean the inside at least once a month
Record time and temperature with every run
Technical inspection every six months
Microscope
Wipe lenses with lens paper at the end of each day’s work
Protect the microscope from dust, vibrations and moisture
Place a shallow plate containing dry blue silica gel in a box to
absorb moisture
Check alignment of the condenser once a month
Technical inspection once in a year
Balance
Keep the balance and weights clean and dry
Always use a container or weighing paper, do not put material
directly on the pan
Prevent the balance from drafts of air
Refrigerator
Place at least 10 inches away from the wall
Clean and defrost at least every two months
Record temperature daily
Technical service at least once a year
Water Bath
Check water level daily
Check temperature before and during use
Clean monthly
Technical inspection once in six months
Clean Bench (Laminar Flow)
Check the flow of air
Clean with antiseptic solution after every use
Centrifuge
Wipe inner walls with antiseptic solution weekly
Balance well the samples before putting them in the centrifuge.
Check brushes and bearings every six months
Glassware
Discard chipped glassware
Ensure these are free of detergents
Do not store sterile glassware for more than three weeks before it is
used.
Performance tests on culture media
- Culture media may be prepared from the individual ingredients or may be prepared
from dehydrated powders available commercially. The important points in QC of
media are listed below
- Do not over-stock the media. Store the required quantities only which can be used
in 6-12 months.
- Store the media away from moisture by securing the caps of all the containers
tightly.
- Store in a dark, cool and well-ventilated place as per the manufacturer’s
instructions

165
- Keep a record of the receipt, and opening of the media container.
- Discard all dehydrated media that are either darkened or caked. Rotate the stock
of media, following the principle of "first in, first out".
- For preparation of media adhere strictly to the manufacturer’s instructions.
- Prepared media should be protected from sunlight and heat.
- Sterility testing, performance testing and pH test of the prepared media should be
done as listed in Table-2.
Table 2: Performance tests on commonly-used media
Medium
Incubation
Control Organism
Expected Result
S. aureus
Growth and beta-haemolysis
Blood Agar
24h
S. pneumoniae
Growth and alpha-
haemolysis
Chocolate agar
24h
H. influenzae
Growth
E. coli
Red colonies
P. mirabilis
Colourless colonies (no
swarming)
MacConkey agar With
crystal violet
24h
E. faecalis
No growth
E. coli
Positive/negative
Methyl red/Voges-
Proskauer
48h
K .pneumoniae
Negative/positive
E. coli ATCC 25922
Acceptable zone sizes
Mueller-Hinton
24h
P. aeruginosa ATCC 27853 Acceptable zone sizes
E. coli
Positive
Peptone water (indole)
24h
K. pneumoniae
Negative
E. coli
No growth
Simmons citrate
(incubate with loose
screwcap)
48h
K . pneumoniae
Growth, blue colour
Thiosulfate citrate bile
salt (TCBS) agar
24h
Vibrio spp. (non agglutinable Yellow colonies

166
Table 3: QC for commonly-used tests
Procedure/result
Test Control organism
Expected reaction
S. aureus
+
Bubbling reaction
Catalase
Streptococcus spp.
–
No bubbling
Coagulase
S. aureus
+
Clot formation in 4 hours
E. coli
+
Red ring at surface
Indole
E. aerogenes
–
Yellow ring at surface
E. coli
+
Instant red colour
Methyl red
E.. aerogenes
–
No colour change
P.aeruginosa
+
Purple colour in 20 seconds
Oxidase
E. coli
–
No colour in 20 seconds
Voges
E. aerogenes
+
Red colour
Proskauer
E. coli
–
No colour change
Streptococcus group A +
Zone of inhibition
Bacitracin disc
E. faecalis
–
Zone of inhibition
S. pneumoniae
+
Zone of inhibition
Optochin disc
S. viridans
–
No zone of inhibition
P.aeruginosa
+
Purple colour in 30 seconds
Oxidase disc
E. coli
–
No change in colour
The testing should be done each time a new batch of working solution is prepared.

167
Quality control procedures used for the detection of antigen or antibodies by various
test methods : Table 4.
Test
Control procedures required
Expected results
Nonreactive serum control
No clumping
Weakly reactive serum control
Clumping of graded activity
1. Flocculation test (RPR)
Reactive serum control
Clumping of graded activity
Negative control serum
No clumping
2. Latex agglutination test
(ASO)
Positive control serum
Clumping
Antigen control
No clumping
Negative control serum
No clumping
3. Direct agglutination
(Widal test)
Positive control serum
Clumping
Pneumococci
Capsular swelling
Haemolytic streptococci
No reaction
H.influenzae type b
Capsular swelling
4. Capsular Quellung
reaction (Omni serum,
H.influenzae type b)
Acinetobacter anitratum
No reaction
In service training of staff
Periodic updating of the skills and knowledge of the laboratory technicians is essential for
maintaining quality. Course-curriculum of such trainings should focus on the issues highlighted
above (SOPs).
Participation in external quality assessment
Participation in EQAS reassures about the correctness of the results generated by the laboratory
and finds out whether IQC is in place or not. The control or referral laboratories should organise
EQAS in some commonly used tests.
Standard Operating Procedure Record
Prepared By: ________________________________________Date: ___/___/___
Print Name:______________________________
Reviewed By: _______________________________________ Date: ___/___/___
Print Name:______________________________
Technical Staff
_______________________________________ Date: ___/___/___
Print Name:_____________________________
QA Officer
_______________________________________ Date: ___/___/___
Print Name:_____________________________
Laboratory Director
Date Issued: ___/___/___
Withdrawn By: ______________________________________ Date: ___/___/___
Controlled Copy No.: ___________________

168
Quality assurance in microbiology laboratories
The objective of laboratory quality assurance is to verify the accuracy and precision of
information obtained from analyses and to ensure that data obtained from analyses are suitable for
decision making. The application of good laboratory practice ensures accuracy and confidence in
test results. It also prevents cross-contamination of samples and protects personnel against
infection and other laboratory hazards. Standardization of methods will also reduce variation
between results produced by one laboratory and between results produced by associate
laboratories. Good record keeping activities also help manage and encourage staff proficiency.
Although the accuracy required depends on the how the information is to be used, laboratory
staff would be well advised to adopt a TQM approach of continuous improvement to their work.
The elements of the laboratory quality assurance programme
A laboratory quality assurance system consists of the following elements:
•
A Quality Policy
•
Quality planning
•
Appropriate record keeping
•
Control of quality documents
•
Standard operating procedures
•
Designation of responsibility and authority of personnel
•
Training
•
Instrument calibration
•
Equipment maintenance
•
Validation of data including the use of appropriate reagent and culture controls
•
Appropriate sample identification, handling, storage and delivery.
•
Appropriate procedures and controls over procurement of laboratory materials
•
Use of appropriate analytical procedures
•
Statistical quality control
•
Audits of the quality system.
These elements should be encompassed in a quality manual.
N/B
Ideally, both the construction and the implementation of the quality manual should be a
quality effort involving management, designated quality assurance personal and other laboratory
staff.
Management responsibility

169
Management is responsible for establishing the system which will seek initially to ensure that an
appropriate standard of quality is met and then drive the laboratory to improve on that standard.
It should encourage and support staff to carry out the laboratory's quality policy. It is also
responsible for ensuring that the quality system functions as planned. This will involve auditing and
verification of the laboratory practices. It may also involve rewarding groups or individuals or if
necessary disciplining staff who do not meet the laboratory's expectations. Management is
responsible for providing resources and ensuring that these resources are suitable for the
functioning of the laboratory. It is responsible for designating responsibilities and authorities of
persons involved in assuring the quality of output from the laboratory.
Microbiological Sample management
Samples which are normally encountered in the Microbiology laboratory are typically subject to
change; i.e. changes in the microbial content and change in the chemical make-up. Due to
mishandling, target organisms may increase or decrease in number during sample handling.
Analysis of a mishandled sample is a waste of time , man-power and effort and can have a
demoralizing effect on staff. Therefore, before a sample is accepted for analysis, it is important
that the laboratory insist that the original condition of the sample and its container be
maintained. There should also be adequate documentation stating the sample's source, date and
time of collection, analysis requirements and required storage conditions. If possible, the sampling
plan should also be included. Upon receipt of the sample, the samples must be stored to maintain
their original condition and then tested as soon as possible. It may be necessary for a single
technician to have responsibility of the sample.
Instrumental Maintenance, quality control and calibration
Every instrument or piece of equipment used in the performance of diagnostic tests or for reagent
preparation and handling in the microbiology laboratory must function properly and perform
according to established standards to ensure the reliability of diagnostic test results. Equipment
such as balances, thermometers and pH meters should be calibrated to meet national
standards. Temperature sensors and temperature controllers in incubators, water-baths and hot
air sterilizers should similarly be accurate, calibrated and regularly tested. Preventative
maintenance must be carried out on a regular basis. This must be documented and staff should be
trained in how to carry out preventative maintenance. This section presents guidelines for
maintenance and standardization of selected instruments.
Autoclave
Uses of autoclave in microbiology
1. To sterilize clean, wrapped instruments and containers
2. To sterilize media
3. To render microbiologically contaminated materials biologically safe (Sterile) before they
are discarded. Does not affect radioactivity or chemical toxicity of autoclaved materials.
Autoclaves are standard items in all microbiology laboratories, They should be equipped with
accurate and calibrated pressure and temperature gauges. A simple test (although not conclusive)
test of the status of the pressure and temperature gauges is to determine if the correlation between
the two variable holds. For example, with saturated steam 121
o
C is equivalent to 15 PSI.
Preferably a temperature recorder should also be used to keep a record of each sterilization
cycle. Records should include for each cycle, (1) temperature and time settings (2) materials in

170
the chamber (3) pressure and temperature readings once the autoclave has reached the sterilizing
region of the cycle and (4) date and time that the sterilizing cycle has started and finished. The
standard operating procedures used for the operation of an autoclave should take into account
the properties of media being sterilized. Although the standard temperature, pressure and holding
time used for sterilizing is 121
o
C at 15 psi for 15 minutes, this is not suitable for heat-sensitive
sugars such as glucose and sucrose. These sugars should be autoclaved at 110
o
C for 30 minutes.
Because heat transfer through liquids is not instantaneous, large volumes of media will require
longer holding times than small volumes. For sterilization of liquid volumes of greater than 0.5 l,
the following holding times are recommended:
Liquid Volume per container (l) Time required to reach 121
o
C (min) Total holding time (min)
0.5
19
29
1.0
34
44
2.0
37
47
3.0
43
53
4.0
52
62
Thus for a four litre container of medium, a holding time of 62 minutes instead of 15 minutes
must be used. Another factor which will affect the efficiency of sterilization will be the presence of
air in the autoclave. The typical pressure-temperature relationship often used in microbiology
laboratories which states the following:
Pressure (psi) Temperature
o
C
5
109
10
115
15
121
20
126
applies in a system where only water (liquid) and its vapour are present in equillibrium. The
presence of air will result in a temperatures which are less than those above for a given pressure.
The air should thus be removed during when the heating stage of the autoclave cycle. This is best
done by removing the air by vacuum. If this is not possible then an alternative (but less
satisfactory) is to open the exhaust valve while the autoclave is being heated to reach the set
temperature. Modern autoclaves automatically exhaust the air before reaching the sterilization
temperature. The proper functioning of the autoclave should be ascertained using biological
indicators such as spore ampoules or strips of Bacillus stearothermophilus. Physical
measurements of temperature and pressure should also be used. Autoclave tape while a useful
indicator that autoclaving has been undertaken does not show whether the sterilization cycle has
been completed.
A. Calibrate the autoclave with the maximum permissible load. Place biological indicators
into each type of item that maybe autoclaved
1. Drop biological indicator ampoules into flasks of medium (tie ampoule with string
to facilitate removal).
2. Place spore strips into center of wrapped packs.
3. For verification of sterilization of liquid, vary both the total volume of liquid and
the number of containers being autoclaved (i.e., test the same total volume of

171
liquid but distribute it among few containers for one load and among numerous
containers for another load).
B. Observe recording chart for proper time and temperature.
C. Incubate biological indicator to verify sterilization.
Centrifuge
Uses in the microbiology laboratory.
1. Concentrating etiologic agents and cells.
2. Removing particulate matter.
3. Separating components of mixed suspensions on the basis of densities.
The manufacturer prior to shipment should perform initial calibration. Calibration of centrifuge
rotation speed, particularly for today’s solid-state circuit instruments should be done only by
skilled personnel.
Routine use
1. Check each load for proper balance, both for even distribution and for weight to within
0.5g. Well-balanced loads prevent wear on the drive train and motor bearings.
Additionally, a smoother centrifugation will result in better separation.
2. Check that appropriate temperature is maintained during operation.
3. Clean up any spills immediately
Incinerator burner
Uses in the microbiology laboratory.
Electric incinerator burners are particularly useful in laboratories not equipped with gas or flame
sterilizing burners. Incinerators are also useful for working in laminar-flow biosafety cabinets.
Because they require no oxygen, they work well in anaerobic chambers. The absence of an open
flame provides safer alternative to the Bunsen burner.
A. Initial calibration
1. Plug the incinerator into a grounded electrical circuit.
2. Look for a red glow inside the heater element.
3. Be sure that the unit does not generate any smoke or persistent odor suggestive of
burning rubber,
B. Routine quality control
Visually inspect the heater element daily to determine if the heater element core is worn. Inspect
for small cracks in the ceramic casing and residue buildup during both cool and heated conditions.
In the heated condition, cracks can be seen as small, intensely yellow orange fissures. If defects
are notes, replace the heater element. Cracks do not inhibit the sterilization ability if the unit, but
they create an electrical safety hazard.
Incubator
Uses in the microbiology laboratory
The incubator is used to maintain a constant and appropriate temperature for the growth of
microorganisms.
Initial calibration
A. Air Incubators
1. Instrument setup

172
a. Adjust the leveling feet with a wrench if necessary so that the unit is level (bubble
centered in the carpenters level) and steady.
b. Install shelves at the desired levels.
c. Verify that the power source is compatible with the incubator power system before
plugging the system into the electric outlet.
d. Turn OFF-ON switch to ON so that the heating element (an the blower if applicable) will
go on.
2. Setting the safety thermostat (Example: setting for 35
°
C incubator)
a. Close the door of the incubator, and put some tape or a sign near the door handle so that
the door will not be opened during the calibration. If there is no safety thermostat, skip to
step 3 below.
b. Turn both the regulating thermostat control knob and the satiety thermostat knob to the
highest available setting and monitor the temperature.
c. When the temperature reaches the desired safety temperature (usually 2.0
°
C above the
actual desired maximum temperature), turn the safety thermostat down very slowly until
the safety pilot light just goes on.
d. Allow the incubator to equilibrate for 0.5 h, adjusting the safety thermostat knob as
needed to get the temperature to stay at the selected value (usually 37
°
C).
e. When the temperature has stabilized at 37
°
C, tighten the safety thermostat control knob
lock (or place tape over the control) to prevent accidental changes in the setting.
3. Setting the regulating thermostat
a. If there is a safety thermostat, allow the temperature to remain at 37
°
C for 0.5 h, and
then turn the regulating thermostat control knob down until both the safety pilot light and
the regulating pilot light go off.
b. Adjust the regulating thermostat knob until the dial thermometer reaches 35
°
C, and allow
the incubator to equilibrate for 0.5 h. the safety pilot light should go off during normal
operation.
c. After the temperature has stabilized at 35
°
C, tighten the temperature control knob (or put
a tape over the control) to prevent accidental turning of the control knob.
d. If both pilot lights go on at the same time the safety knob is set too low and must be
reset.
4. Calibration of the internal thermometer
a. Lay a NBS thermometer on the back of the shelf nearest the center of the cabinet.
b. After 10 min with the door closed, compare the temperature on the NBS thermometer
with that on the thermometer in the incubator.
c. If there is a discrepancy, it is usually possible to remove the face of the dial thermometer
and adjust the reading. Check the product manual for instructions
d. Check the temperature in four other spots (top front, top back, bottom front and bottom
back corners) with the NBS thermometer so that any hot or cold spots will be known.
Do not use these areas for sensitive cultures.
5. Regulating the humidity
a. Place a hygrometer (humidity measuring device) on the central shelf of the incubator.
b. Read the humidity after 1 h. if the humidity is less than 40%; place a pan of water
(containing antifungal agent) with a large surface area ( 150 cm
2
) on the shelf of the
incubator.
c. Allow the incubator to run overnight and recheck parameters before using.

173
Anaerobic Jars
Uses in the microbiology laboratory.
1. Primary plate incubation (all atmospheres)
a. Microaerophillic atmosphere primarily for Campylobacter species.
b. Anaerobic atmosphere primarily for strict anaerobes.
c. Carbon dioxide enriched atmosphere primarily for Neisseria species,
Haemophilus species, certain microaerophillic streptococci and other
capnophiles
2. Maintenance of specimens (such as tissues) under anaerobic atmosphere.
3. Holding and transporting pure cultures of anaerobic or microaerophilic organisms under
appropriate atmosphere.
4. Incubation of other cultures that require special atmosphere: test strips, tubers, microbroth
dilution plates, etc.
Initial calibration: Anaerobic and Microaerophilic jars
Test the jar with generator system and indicator QC organisms to verify that seal is air tight,
anaerobic atmosphere sufficient to change the indicator is achieved and QC organisms can grow.
Routine quality control
A. Anaerobic jars: each time they are used
Since the lid is the component most likely to fail, record the QC checks in a label attached to
each lid.
1. Check jar and lid for cracks
2. Check the indicator strip has not turned color inside the sealed packet. Discard
all strips that are not white when packet is opened.
3. Before opening an anaerobic jar, observe the indicator strip to be sure that an
anaerobic atmosphere was maintained during incubation. If an anaerobic
atmosphere was not maintained the anaerobic culture result is invalid
4. Rejuvenate catalysts after each use by heating the basket of pellets (rendering
them less inactive), store heated catalyst baskets in a very dry place, such as a
desiccator jar. An extra gallon jar with several inches of calcium carbonate
desiccant in the bottom and the lid tightly screwed on is acceptable
Microscope
Uses in the microbiology laboratory
In microbiology laboratory microscopes are used in observation and description of the
microscopic morphology of bacteria, fungi, parasites and host cells in various stained and
unstained preparations.
Initial aligning procedures
A. Koehler illumination is a precise way of aligning the light pathway onto the specimen plane to
evenly illuminate the field of view. This procedure ensures the highest resolution for the optical
system, enabling visualization of as much detail as possible.
1. Place a cleaned stained specimen (cells or bacteria; subject identity is not critical, but best
to have distinct form for ease of focus) slide right side up in the stage slide holder.
2. Open the field diaphragm all the way.

174
3. Open the condenser diaphragm all the way. If the condenser has an auxiliary lens, swing it
out of the light path. Otherwise, you will not be able to image the diaphragm.
4. Rack the condenser all the way up.
5. Rotate the nosepiece to the 10× objective position (8× to 20× objective is acceptable).
6. Turn on the light source and adjust it to a low, comfortable light intensity.
7. Adjust the binoculars to your inter papillary distance.
8. Use the focusing eyepiece, if available, to compensate for any dioptic discrepancy
(different ability to focus) between each eye. Adjust both eyepieces to equal height.
9. Look through the fixed eyepiece, and focus on the specimen, using he course and fine
adjustment knobs.
10. Use the adjustable eyepiece to focus the image sharply.
11. Gradually close the field diaphragm until you see a multisided polygon (image of
diaphragm) around the field of the specimen.
12. Lower the condenser slightly until the diaphragm edge is as sharp as possible. (A magenta
color may be seen.)
13. Adjust fine focus knob so that the specimen is in sharp focus.
14. If the diaphragm image is not centered, then center it by gently turning the centering
screws located on the condenser.
15. Open the diaphragm until the image of the diaphragm just goes out of the field of view.
Do not open any further.
16. Do not disturb the condenser height.
17. Set the optimal contrast by gradually closing the aperture diaphragm. (Rule of the thumb
is to remove the eyepiece, look down the tube at the back focal plane of the objective,
and adjust the aperture to two-thirds open. Control contrast by adjusting the condenser
diaphragm.
18. Most microscopes will not need further alignment for higher magnification.
B. Calibration of microscope with an ocular micrometer
I. Principle
The identification of molds, bacteria, protozoa and other parasites depend on several factors, one
of which is size. Any laboratory doing diagnostic work in microbiology and parasitology should
have a calibrated microscope available for precise measurements. Measurements are made with a
micrometer disk that is placed in the ocular of the microscope; the disk is usually calibrated as a
line divided into 50 Units. Depending on the objective magnification used the divisions in the disk
represent different measurements. The ocular disk division must be compared with a known
calibrated scale, usually a stage micrometer with a scale of 0.1- and 0.01- mm divisions.
II. Materials
A. Supplies
1. Ocular micrometer disk (line divided into 50U)
2. Stage micrometer with a scale of 0.1- and 0.01-mm divisions
3. Immersion oil.
4. Lens paper
B. Equipment
1. Binocular microscope with 10×, 40×, and 100× objectives. Other objective magnifications
(50× oil or 63 × oil immersion lenses) may also be used.

175
2. Oculars should be 10×. Some may prefer 5×; however smaller magnification may make
final identification more difficult.
3. Single 10× ocular to be used to calibrate all laboratory microscopes (to be used when any
organism is being measured)
III. Quality control
A. Recalibrate the microscope a minimum of once each year. If the scope receives heavy use,
twice a year is recommended.
B. Often the measurement of RBCs (approximately 7.5
µ
m) is used to check the calibrations
of the three magnifications (×100, ×400, ×1,000).
C. Latex or polystyrene beads of a standardized diameter can be used to check the
calculations and measurements beads of 10
µ
m and 90
µ
m are recommended.
D. Record all measurements in QC records.
IV. Procedure
A. Unscrew the eye lens of a 10× ocular, ad place the micrometer disk (engraved side
down) within the ocular. Use lens paper to handle the disk; keep al surfaces free of dust
or lint.
B. Place the calibrate micrometer on the stage, and focus on the scale. You should be able
to distinguish the difference between the 0.1- and 0.01 mm divisions. Makes sure you
understand the divisions on the scale before proceeding.
C. Adjust the stage micrometer so that the “0” line on the ocular micrometer is exactly lined
up on the top of the 0 line on the stage micrometer.
D. When these two 0 lines are lined up, do not move the stage micrometer any further. Look
to the right of the 0 line for another set of lines superimposed on each other. The second
set of lines should be as far to the right of the 0 lines as possible; however the distance
varies with the objectives being used.
E. Count the number of ocular divisions between the 0 lines and the point where the second
set of lines is superimposed. Then, on the stage micrometer, count the number of 0.1- mm
divisions between the 0 lines and the second set of superimposed lines.
F. Calculate the portion of a millimeter that is measured by a single ocular unit.
G. When the high dry and oil immersion objectives are used, the 0 line of the stage
micrometer will increase in size, whereas the ocular line will remain the same size. The thin
ocular 0 line should be lined up in the center or at one edge of the broad stage
micrometer 0 line. Thus when the second set of superimposed line is found, the thin ocular
line should be lined up in the center or at the corresponding edge of the broad stage
micrometer line.
H. Calculate the factors as follows.
Examples:
Stage reading (mm)/ ocular reading × 1000
µ
m/ 1 mm = ocular units (
µ
m)
Low power (10×)
0.8 mm/ 100 U × 1000
µ
m/ 1 mm = 8.0
µ
m (factor)
High dry power (40×)
0.1mm/ 50 U × 1000
µ
m/ 1 mm = 2.0
µ
m (factor)
Oil immersion (100×)
0.05 mm/ 62 U × 1000
µ
m/ 1 mm = 0.8
µ
m (factor)

176
Example: If a helminth egg measures 15 ocular units by 7 ocular units with the high dry
objective, then multiply the measurements by the factor 2.0
µ
m (for that objective). The egg
the measure 30 by 14
µ
m and is probably Clonorchis sinensis.
Example: If a protozoan cyst measures 27 ocular units with the oil immersion objective, then
multiply the measurements by the factor 0.8
µ
m (for that objective). The cyst then measures
21.6
µ
m.
V. Results
A. For each objective magnification, a factor will be generated (1 ocular unit = certain
number of micrometers.
B. If standardized latex or polystyrene beads or an RBC is measured with various
objectives, the size for the object measured should be the same (or very close),
regardless of the objective magnification.
VI. Reporting results
A. Post the multiplication factor for each objective either on the base of the microscope or
on a nearby wall or bulletin board for easy reference.
B. Once the number of ocular lines per width and length of the organism is measured, then,
depending on the objective magnification, the factor (1 ocular unit = certain number of
millimeters) can be applied to the number of lines to obtain the width and length of the
organism.
C. Comparison of these measurements with reference measurements in various books and
manuals should confirm the organism identification.
VII. Procedure noted
A. The final multiplication factors will be on as good as your visual comparison of the ocular
0 and stage micrometer 0 lines.
B. As a rule of thumb, the high dry objective (40×) factor should be approximately 2.5 times
more than the oil immersion objective (100×) factor. The low-power objective (10×)
factor should be approximately 10 times the oil immersion objective (100×) factor.
VIII. Limitations of the procedure
A. After each objective has been calibrated, the oculars containing the disk and/or these can
not be interchanged with corresponding objectives or oculars on another microscope
B. Each microscope used to measure organisms must be calibrated as a unit. The original
oculars and objectives that were used to calibrate the microscope must also be used
when an organism is measured.
C. The objective containing the ocular micrometer can be stored until needed. This single
ocular can be inserted when measurements are taken. However, this particular ocular
containing the ocular micrometer disk must also have been used as the ocular during
microscope calibration.
Hot air oven
In microbiology laboratory the oven is used to dry glassware, sterilize metal and certain high-
temperature stable glass objects and to reactivate palladium-covered alumina catalysts used in
anaerobic chambers and jars.
Initial calibration
A. Connect the power cord to the grounded outlet.

177
B. Place a dial gauge or mercury bulb thermometer that has been previously calibrated with
an NBS thermometer on a shelf in the middle of the oven.
C. Switch the oven on, and adjust it to the desired temperature.
D. Check the thermometer every 15 min until the desired temperature is reached.
E. Readjust the temperature gauge if the temperature increases more than 5
°
C above the
desired set temperature.
F. Allow the temperature to stabilize for at least 2 h before using the oven for the first time.
pH meter
Uses of pH meter in the microbiology laboratory.
1. Precise measurement and adjustment of the pH of solutions.
a. Antibiotic activity and solubility vary with pH of diluents.
b. Bacteria, fungi and viruses often require specific pH ranges of media or transport solution
to remain viable or to multiply.
c. Reagents used for testing metabolic reactions must be prepared to a specific pH fro the
reaction to work correctly and be correctly interpreted
Routine quality control procedure
A. Each time, even if more than one use occurs in the same day.
1. Calibrate the pH meter with the standard calibration buffer at pH 7.00 and the standard
whose pH is nearest to the expected pH of the liquid you plan to test. If your expected
solution us pH 8.2, for example, calibrate with pH 10.00 standard.
2. Read and record the result of pH standard calibration buffer opposite the pH of the
standard that you read in step 1. For example given above, test the pH 4.00 standard
calibration buffer. Results must be within ± 0.10-pH unit of the value of the standard.
3. Read and record the pH of the QC-certified buffer whose pH is closest to that of the
expected pH of the sample. For example given above, use QC- certified buffer pH 8.00.
Value must be within ±0.05 pH unit of the pH of the QC- certified buffer.
Refrigerators and freezers
Uses in the microbiology laboratory
Low temperatures are required for storage and preservation if stock cultures, reagents and
media. Refrigeration or freezing may inhibit the growth of contaminants, slow reactions that would
otherwise inactivate reagents and delay evaporation.
The use of refrigerators and freezer must be carefully controlled. A refrigerator which does not
cool to the correct temperature will cause sample degradation and loss of culture viability. They
should be routinely sanitized. They should be arranged in a tidy manner such that sample or
culture access is not hampered. A record of materials entering and being removed from the
refrigerator should be maintained. All samples must be appropriately identified with the sample's
identity, date of placement in refrigerator, contact person and if possible the use-by date.
Mislabeled and unlabelled samples can lead to many analysis errors. Appropriate containers
should be used to hold samples and cultures. Spillage of cultures in the refrigerator or onto the
floor is very dangerous and can arise from failure to use the proper holding containers, overfilling
containers and from cluttered refrigerator. Cultures should be maintained in the refrigerator on
slopes and not on agar plates. Agar plates, no matter how well sealed will tend come apart,

178
leading to a potential safety hazard. The formation of condensate on the lid of the Petri dish can
also lead to the contamination of the plate.
Initial calibration
A. Preparing thermometers
1.Number each individual thermometer, and calibrate each one against the NBS thermometer
2.Use waterproof colored felt-tip pen or bands of colored tape to mark of the area ±10
°
C of
the working temperature of the unit in which the thermometer will be use
3.Immerse thermometers for refrigerators in 50% glycerol, polyethylene glycol (antifreeze), or
alcohol in an empty blood bank pheresis bag or in a bottle stoppered with a single hole
cork or rubber stopper.
4.Immerse thermometers for freezers in alcohol or polyethylene glycol in plastic bag or bottle.
Be certain to use containers that will withstand sub zero temperatures.
5.If the built in thermometer will be used exclusively, place and NBS-calibrated thermometer
into the unit and verify the accuracy of the internal thermometer. If necessary, adjust the
thermometers to read identically (consult the product manual), or note on the internal
thermometer the correction factor needed to match the NBS measurements. Calibration of
such internal thermometers must be performed at the same intervals as for any thermometer
QC protocol (every 6 months for thermometers with intervals of 1
°
C and every month
for those with smaller divisions).
B. Placing thermometers
1. Place thermometer where it can be viewed easily is not exposed to trauma and will not be
subjected to air drafts that will distort the reading as soon as the door is opened.
2. At least one thermometer should be placed into each interior chamber or a refrigerator or
freezer; very-large-volume units (more than 60 ft
3
[ca. 13 m
3
]) may be better served with
additional thermometers. For a large unit, we recommend that one thermometer be
placed in the top left rear and on be placed in the bottom right front. Before placing a
new unit in service, place several (three or more) thermometers in diverse areas, close to
the door, allow the temperature to equilibrate for 1 h, and check for consistent
temperature readings. If warm spots are found, it is prudent to place the single
thermometer there or to use more than one thermometer.
C. Setting the temperature
1. Set refrigerator temperature to 6
°
C by using regulating dial inside the unit.
2. Set standard freezer temperature to -20
°
C by using external dial or gauge.
3. Set ultra low freezers to appropriate temperatures (common temperatures are –40, -70, -80
and -100
°
C)
4. Allow the temperature to equilibrate for at least 1 h after the compressor stops running for
the first time after startup, and then check the internal thermometers. Adjust the gauges, and
re-equilibrate the temperatures until it is within 0.5
°
C of the desired temperature. If
variation among all internal thermometers are >4
°
C, call your manufacturer for advise (and
service)
5. Monitor the temperature of the unit for stability several times a day for 1 to 2 days before
placing materials inside.
Laminar flow cabinets (Clean bench)
Uses in microbiology laboratories

179
1. To contain infections aerosols generated by processing of samples or cultures. Examples
include the following.
a. Grinding or mincing of tissue
b. Preparing direct smears and wet mounts
c. Plating of specimens.
d. Identification procedures for molds
2. To protect samples or materials from external contamination
a. Performing procedures with sterile fluids
b. Preparation of media or reagents solutions aseptically.
N/B The maintenance of laminar flow hoods should include checking of the ultraviolet light
source, the HEPA filter and the air compressor rate. All will need routine replacement or routine
maintenance. Challenge tests should be used to test for their effectiveness the UV-light and filter.
The hood should not be positioned near doorways, air-conditioning vents or near where there is
heavy human traffic. They should not be used as a storage area and should not be left on when
not in use. Bunsen burners should not be used in the hood as the column of air arising from the
burner can disturb the laminar air-flow patterns. For the similar reasons, media bottles and other
large containers should be removed once they are no longer required.
Installation and certification
A. Every biological safety cabinet must be tested in certified for adequate functioning after it is in
place in the laboratory, since testing that occurs elsewhere will not ensure that the cabinet will
function properly under the conditions actually found in the laboratory
1. Specified airflow velocities must be met but not exceeded.
2. The cabinet and filters must be free of air leaks
3. Intake and exhaust airflow rates must be balanced.
4. Field test should include the following.
a. Determination of the work are velocity profile
b. Measurement of the face velocity (airflow velocity through the front opening)
c. Determination of HEPA filter integrity
d. Determination of air flow patterns (smoke test)
e. Checks on lighting intensity, temperature, vibration and noise levels.
5. Ask that the cabinet function be checked while equipment used in or around the cabinet is
running to ascertain if the cabinet function is impaired.
B. Certification must be done by specially trained personnel.
Previously there have been no standards for certification if personnel who certify biological
cabinets. Cabinet users had to (and still should) know enough about the operation of a
cabinet to ensure that the person certifying the cabinets was adequately trained and familiar
with that particular type of cabinet.
C. Cabinets must be recertified before being operate after the have been moved. For long
distance moves, especially when nonmicrobiology personnel are involved, cabinets should be
decontaminated prior to the move.
1. Ensure that the cabinet was nit damaged during the move
2. Ensure that the placement if the cabinet does not interfere with proper functioning of the
cabinet.
D. Cabinets must be recertified whenever HEPA filters are changed or repaired
E. Cabinets must be recertified at least annually. Institutional or regulatory guideline may call for
more frequent certifications.

180
1. The CAP commission of Laboratory Accreditation mandates annual certification
2. Medicare and Clinical Laboratory Improvement Act regulations call for a minimum air
intake of 50 lfpm through the front opening
3. JCAHO makes no specific recommendations.
Routine Quality control.
A. Each time the safety cabinet is turned on or at least once per day
1. Routine disinfections
While the cabinet is running but before you begin work, wipe down the cabinet surfaces,
including the back and sidewalls, with disinfectant. If bleach is used as the disinfectant rinse all
metal surfaces to prevent corrosion of the metal.
2. Check blower function.
a. Listen for the blower
b. Observe that airflow check strips are drawn in onward the workspace of the
cabinet
3.Record gauge reading (if gauge is provided).
4.Cover working surface with absorbent covering (laboratory diaper pr paper toweling)
(optional). Use of absorbent coverings minimizes splatters and makes clean up easier.
B. Each week
Clean UV lights (if present) by wiping with 70% ethanol.
C. Each month
1. Once each month (or with heavy use, more frequently), remove the vent covers and clean
the gutter with disinfectant. (If this area is provides with a drain valve, disinfectant can be
poured into the area and allowed to stand for 20 min before draining. Flush with several
liters of water)
2. Measure UV light output (if UV light is provided; optional).
D. Each year
Have the cabinet recertified.
E. As needed.
1. Clean up small spills. Replace absorbent covering if contaminated.
2. Remove and replace discard containers
Thermometers
Precise temperature measurements can be made only with instruments whose accuracy has been
verified. This can be accomplished by comparing routine thermometers used in the laboratory
against the SRM thermometers or NBS-calibrated thermometers.
A. Liquid-in-glass thermometers
1. Prepare an ice bath using shaves ice and small amount of water to form a tightly packed
slush. Use only enough water to allow good contact with thermometer. Ice must not float.
Remove excess water. Avoid handling the ice so as not to contaminate it.
2. Rinse the bulb of the standard thermometer with distilled water before inserting it into the
slush bath.
3. Take the ice point reading of the standard thermometer. Gently tap thermometer to
ensure that the mercury does not stick to the capillary wall. Wait at least 5 min before

181
making determination. Liquid-in-glass thermometers do not respond instantaneously; they
needs time to adjust and stabilize.
4. Compare the ice point of the standard with the report of calibration that is received with
the standard, they should agree, Note: if the manufacturer has included a correction factor
with the standard thermometer, then always add or subtract the correction factor from the
reading of the standard to measure the actual temperature in the liquid being measured.
5. Place the standard thermometer and the test thermometers upright in the rack in the
heated liquid bath. Adjust the temperature to 25
°
C and read on the standard
thermometer. Read the temperatures indicated on all test thermometers.
6. Take readings at 25, 30, and 37
°
C (or whichever temperatures the SRM thermometer
has been calibrated for). Thermometers that fall within the tolerance range (as provided
by the manufacturer) are acceptable for routine use.
7. Log all results, serial numbers, ranges and tolerances of test thermometers and standard
thermometers on the QC forms.
Water Baths
Uses in the microbiology laboratory
Water bath are used in the microbiology laboratory for incubating at or maintaining a constant
temperature. They are ideal for application requiring accurate temperature control. One
application specific to microbiology laboratory is equilibrating melted agar to a working
temperature for pouring agar plates. Boiling water baths are used to melt agar.
Initial calibration
A. Fill the bath with demineralized water per manufacturer’s recommendations, making allowance
for displacement by samples to be immersed.
B. Connect the power cord to a grounded outlet.
C. Construct a calibration table for reference dial setting versus temperature. Note: Keep the
water bath covered during use to prevent evaporation and conserve heat.
1. Set the reference dial to a number midway between the highest and the lowest
settings (usual range is 0–9)
2. Place an NBS-calibrated thermometer deep enough into the liquid to obtain
accurate measurements.
3. When the light goes off, indicating heating is complete, record the dial setting and
the corresponding temperature.
4. Continue to raise the dial setting 1 U at a time and record the temperature each
time the light goes off.
5. In this way construct a reference table of dial settings versus water bath
temperature.
Routine Quality control
A. Daily
1. Check the water in the bath for bacterial or algae growth. Visual inspection is
sufficient. If a problem exists empty and clean the tank and add an antimicrobial
agent in the water.
2. Inspect the bath for build up of mineral deposits. Wash the bath and scour with
cleaning supplied if a problem exists.
3. Check for leaks

182
4. Check the temperature with a thermometer that has been calibrated with a NBS
thermometer. Record the temperature on the QC sheet
B. Monthly (for baths filled with water)
1. Drain and clean the bath. Baths used infrequently or those filled with mineral oil maybe cleaned
less frequently.
a. Used a siphon tube to drain
a) Completely immerse siphon in the water
b) Cover one end of the tube, lift that end from the bath, and then lower it below
the water level in the bath before uncovering the closed end.
2. Clean the bath with mild, soapy water and a damp cloth. Do not use bleaches or cleaners
containing abrasives or chlorine on stainless steel baths.
3. Refill the bath with demineralized, distilled, or deionized water or mineral oil.
C. Semiannually
Clean the unit as needed with a scouring compound or tartaric acid to remove scale build up or
corrosion caused by impurities in water.
Pipetters/ calibrated Loops
Uses in the microbiology laboratory
Pipetters are used to dilute sera, set up quantitative cultures, prepare inocula for antimicrobial
tests, add ingredients to media and reagents and add exact amounts of reagents or specimen
during a test procedure. Pipetters are used because of their excellent accuracy and precision and
because they expeditiously dispense small volumes repeatedly.
Quantitative loops are commonly used to setup quantitative cultures and prepare inocula for
antimicrobial tests. Quantitative loops are less accurate than pipetters yet are excellent way to
setup a semi quantitative culture or dilution. Quantitative loops are used when 20% error is
acceptable.
Calibration methods for volume dispensing instruments.
Method
Instrument
Basis of system
Limitation
Gravimetric
Pipetters (recommended
method)
1 ml of water = 1 g
(adjusted for
temperature and
pressure)
Vol dispensed must be
>0.002 ml
Spectrophotometric
Pipetters
Absorbance of
potassium dichromate
used to create
calibration curve
Vol dispensed must be
>0.01 ml
Colorimetric
Quantitative loops
Absorbance of Evans
blue dye used to create
calibration curve
Loop vol between 0.01
and 0.001 ml
Special precautions and Environmental concerns
A. Special precautions for pipetter calibration
1. Changing pipetter tips during calibration procedure
Use the same pipetter tip for all deliveries during the calibration procedure, whether the pipetter is
used for repetitive dispensing of several aliquots of the same liquid (e.g., buffers, reagents) or for

183
transferring single aliquots of different liquids (e.g. serum). Note: during actual pipetting for routine
use, a different tip must be used for each different liquid.
2. Prerinsing pipetter tips
“Prerinsing” is the precoating of the inside of the tip with the liquid being dispensed. Prerinse by
aspirating an aliquot of the liquid into the tip and then dispensing it back into the original container
or discarding it. Prerinsing improves uniformity and precision by providing identical contact
surfaces for all aliquots.
a. If the pipetter is normally used for repetitive dispensing of several aliquots of the same
liquid, prerinse pipetter tip at the beginning, before dispensing the first aliquot.
b. If the pipetter is normally used for transferring single aliquots of different liquids, prerinsing
may not be necessary.
B. Environmental concerns for pipetter calibration
1. Temperature control
b. Temperatures of pipetter to be calibrated, room air, test liquid (water), and other
equipment should be identical (± 0.5
°
C).
c. Temperature should be as close as possible to the temperature at which the pipetter is
used.
d. Keep temperature stable through out the procedure
2. Miscellaneous environmental concerns
a. Maintain relative humidity at 45 to 75%. This reduces evaporation and limits build up of
static electricity
b. Prepare aqueous test liquid from NCCLS type I or II water, which prevents impurities
from affecting water density.
c. Use water with no visible bubbles. Air bubbles alter measured volume.
d. Complete weighing steps quickly. Use a lid on the weighing vessel to decrease
evaporation. These precautions obviate the need for and evaporation factor in the
calculations.
Laboratory glassware and plastic ware
Ideally, the specifications of laboratory glassware and plasticware should be established and
followed. The calibration of pipettes and other volumetric and graduated glassware should be
checked and the calibration verified. The extent to which this is undertaken is dependent on how
the glassware or plasticware is used.
Glassware should be made from high quality borosilicate glass. Glassware made from soft glass
can cause problems due to leaching of components from the surface of the glass. Reusable
glassware and plastic ware should be sterilized and washed using appropriate methods.
Detergents should be completely removed from glassware. Many detergents have a high affinity
for glassware and some are bacteriostatic. A drop of bromothymol blue pH indicator is useful in
determining if the cleaning agent has been completely removed. Bromothymol blue is blue-green
between pH 6.5 to 7.3 and yellow below pH 6.5 and blue above pH 7.3
Periodic toxicity testing should be undertaken with washed glassware and disposable
glassware and plasticware which may be sterilized by ethylene oxide gas. Washing may also leave
toxic residues on glassware. Toxicity testing should be performed annually.

184
The sterility of supplies and equipment must be tested. Sterility tests of petri dishes can be
performed by pouring a non-selective medium onto dish and incubating the solidified plate both
anaerobically and aerobically. The absence of growth indicates that the plates are sterile. Similarly
the sterility of tubes and pipettes can be ascertained with sterile broth medium.
Media and reagents
Microbiological media and test reagents should be tested for their performance. This should be
done for pre-prepared media and media formulated in the laboratory.
Common errors include
•
Incorrect weighing of dried materials
•
Use of dry materials that have deteriorated as a result of exposure to heat, moisture or
oxidation
•
Incorrect measurement of water volumes (eg. using the markings on beakers as volume
guides), use of tap water or using water from a malfunctioning still or water deionizer.
•
Use of contaminated containers and glassware
•
Incomplete mixing or solubilization of ingredients during preparation. Failure to pre-melt
agar before sterilization can lead to uneven gel strength through an agar medium.
•
Overheating of media during preparation and sterilization
•
Improper determination of pH
•
Failure to perform quality control on finished media
•
Failure to perform quality control on dehydrated media
General guidelines for the storage of dehydrated media includes:
•
Store media in tightly capped bottles or tightly closed plastic liners in a cool dry place
protected from light.
•
Keep no more than 6 months' to a years supply on hand. Use older stocks first and do
not exceed supplier's expiration date.
•
Look for changes in flow properties and in colour. If an any item in question, then discard
it.
Sterility testing of prepared media
Sterility testing can be performed by incubating placing selected plates or tubed media prior to
use or along with inoculated media. The temperature should be that normally used for these
media. The plates should be inspected for turbidity or colony formation. Neither of these may
however be present if the medium is designed to inhibit various bacteria. This problem can be
overcome by swabbing the surface of the agar plate and then incubating the swabs in a non-
selective medium. A similar technique can be used with liquid media.
Quality control procedures

185
Quality control should be performed on all materials and equipment which are critical to the
detection, isolation, identification and analysis of microorganisms. This includes media, stains,
biochemical test reagents and equipment such incubators and autoclaves.
As with quality assurance, there should be a procedure manual, control organisms or slides,
defined QC criteria, record sheets and trained personnel. The intervals between QC tests varies
with the critical importance of the material or method and the likelihood that QC will be a
problem. For example, oxidase and catalase tests should be tested weekly, while agglutinating
sera is tested monthly or quarterly. Gram stains should tested on a weekly basis. Each lot or
batch of materials should undergo quality control.
As discussed above equipment and glassware should also undergo quality control tests.
Volumetric dispensers should be tested with each run. Incubators and anaerobic jars should be
tested on a daily basis. Spectrophotometers, biohazard cabinets and microscopes should be
tested yearly.
Control strains should be used to validate procedures and test media and reagents. The strain
used should comply with the standard method being followed. The strains should be well
maintained. The number of subcultures permitted for each strain again should be in accordance
with the standard method. Continual passaging of microbial strains on agar media can lead to a
loss or change in a critical characteristic. Control strains can be purchased from local distributors
or directly from culture collections in the USA, Europe or Australia. The ATCC has one such
collection.
Laboratory Audit
Audit is an essential part of the quality assurance program of a laboratory. A quality assurance
programme covers all aspects of the service provided. It may include policies on the induction
and training of new staff, staff development, laboratory manuals, safety policies, equipment
maintenance etc. Audit is a means of assessing whether one is achieving one's stated objectives.
There are five key questions in the audit process:
- what should we do?
- what do we do?
- Are we doing what we should be doing?
- Can we improve what we do?
- Have we improved?
All technicians are required to participate in laboratory audit which is defined as the systematic
critical analysis of the quality of food microbiological analysis.. Laboratory audit is concerned
primarily with the everyday aspects of the work of the department and is a means of providing
feedback to both the users of the laboratory and its staff. The chief technician will examine the
following areas.
Request forms; are they easy to use? Are all relevant details provided by the user. For
example, date of sampling, time of sampling and temperature of sample at the time of sampling.

186
Sample; is the right sample received at the right time? Are the appropriate tests selected by the
laboratory staff? The laboratory staff should use the laboratory MANUAL. To guide them in the
types of tests to carry out on a sample.
Safety policies and procedures. Every laboratory should have a comprehensive safety policy.
Every single accident in the laboratory should be recorded and improvements made if necessary.
The use of dangerous substances should be audited.
Sufficient use of staff. Do senior staff perform duties that should or could be delegated to
others. Efficient use of staff would be a much more important consideration in a small laboratory
than a larger one.
Functioning of Equipment. The equipment and apparatus should be checked to make sure that
they area functioning as required.

187
Microbial Standards of Foods
Quoting selected sections of the American FDA act may help in understanding and appreciating
this section. Standards and guidelines can be applied only when the appropriate method of
analysis (or equivalent) is used.
Sections of the Food and Drugs Act
1. No person shall sell an article of food that
(a) has in or upon it any poisonous or harmful substance;
(b) is unfit for human consumption;
(c) consists in whole or in part of any filthy, putrid, disgusting, rotten, decomposed or
diseased animal or vegetable substance;
(d) is adulterated; or
(e) was manufactured, prepared, preserved, packaged or stored under unsanitary
conditions.
2. No person shall label, package, treat, process, sell or advertise any food in a manner that is
false, misleading or deceptive or is likely to create an erroneous impression regarding its
character, value, quantity, composition, merit or safety.
3. Where a standard has been prescribed for a food, no person shall label, package, sell or
advertise any article in such a manner that it is likely to be mistaken for such food, unless the
article complies with the prescribed standard.
4. No person shall manufacture, prepare, preserve, package or store for sale any food under
unsanitary conditions.
The Act defines "unsanitary conditions" as "such conditions or circumstances as might
contaminate a food, drug or cosmetic with dirt, filth or render the same injurious to health".
Guidelines
A given guideline may embody the same limiting criteria that would be employed in a standard.
Frequently, however, they are based on fewer data than those used in developing a standard but
they serve as useful indicators of levels achievable using Good Manufacturing Practices (GMPs).
Since guidelines are not part of the Regulations, they can be readily modified, if necessary, as
additional data become available.
There are two distinct groups of guidelines related to health and safety; microbiological guidelines
and injurious extraneous material guidelines. The latter includes foreign matter associated with
objectionable conditions or practices in manufacturing, processing, storing, transporting and
handling of food that could lead to an injury (e.g. glass in jam, splinters, etc).
Sampling plans
The symbols used in the plans and their definitions are as follows:
Lot: A batch or production unit which may be identified by the same code. When there is no
code identification, a lot may be considered as (a) that quantity of product produced under
essentially the same conditions, at the same establishment and representing no more than one

188
day's production; or (b) the quantity of the same variety of product from one and the same
manufacturer available for sampling at a fixed location.
n: The number of sample units usually but not always selected at random from a lot and examined
in order to satisfy the requirements of a particular acceptance plan used. This is the sample.
m: The numerical value of “m” represents acceptable concentrations of microorganisms or
amounts of extraneous material, usually per g or mL. The “m” values listed in the following tables
are based on levels achievable under GMP.
M: the numerical value of “M” represents unacceptable concentrations of microorganisms or
amounts of extraneous material, usually per g or mL, that indicate a (potential) health or injury
hazard, imminent spoilage or gross insanitation; “M” separates sample units of marginally
acceptable quality from those of defective quality. A value determined for any one sample unit of
a sample that is greater than that of “M” renders the pertaining lot unacceptable.
c: The maximum allowable number of marginally acceptable sample units. “c” is the acceptance
number of a plan. When this number is exceeded, the lot becomes unacceptable.
RISK ASSESSMENT
Risk assessment is composed of four elements: hazard identification, exposure assessment,
hazard characterization and risk characterization.
Hazard Identification
The purpose of hazard identification is to identify the microorganisms or the microbial toxins of
concern with food. Hazard identification will predominately be a qualitative process. Hazards can
be identified from relevant data sources. Information on hazards can be obtained from scientific
literature, from databases such as those in the food industry, government agencies, and relevant
international organizations and through solicitation of opinions of experts. Relevant information
includes data in areas such as: clinical studies, epidemiological studies and surveillance, laboratory
animal studies, investigations of the characteristics of microorganisms, the interaction between
microorganisms and their environment through the food chain from primary production up to and
including consumption, and studies on analogous microorganisms and situations.
Exposure Assessment
Exposure assessment includes an assessment of the extent of actual or anticipated human
exposure. It might be based on the potential extent of food contamination by a particular agent or
its toxins, and on dietary information. Exposure assessment estimates the level of microbiological
pathogens or microbiological toxins, and the likelihood of their occurrence in foods at the time of
consumption. The presence, growth, survival, or death of microorganisms, including pathogens in
foods, are influenced by processing and packaging, the storage environment, including the
temperature of storage, pH, moisture content or water activity (a
w
), the presence of antimicrobial
substances, and competing microflora. Predictive microbiology can be a useful tool.
Hazard Characterization
This step provides a qualitative or quantitative description of the severity and duration of adverse
effects that may result from the ingestion of a microorganism or its toxin in food. Several factors

189
need to be considered in hazard characterization. They are related to both the microorganism,
and the human host. In relation to the microorganism the following are important: microorganisms
are capable of replicating; the virulence and infectivity of microorganisms can change depending
on their interaction with the host and the environment; genetic material can be transferred between
microorganisms leading to transfer of characteristics such as antibiotic resistance and virulence
factors; microorganisms can be spread through secondary and tertiary transmission; the onset of
clinical symptoms can be substantially delayed following exposure; microorganisms can persist in
certain individuals leading to continued excretion and continued risk of spread of infection; low
doses of some microorganisms can cause a severe effects; the attributes of a food may alter the
microbial pathogenicity, e.g. high fat content of a food vehicle. In relation to the host the following
may be important: genetic factors; increased susceptibility due to breakdowns of physiological
barriers; status, concurrent infections, immune status and previous exposure history; population
characteristics such as population immunity, access to and use of medical care, and persistence of
the organism in the population.
Risk Characterization
Risk Characterization represent the integration of the hazard identification, hazard
characterization, and exposure assessment determination to obtain a risk estimate. Risk
characterization brings together all of the qualitative or quantitative information of the previous
steps to provide a sound estimate of risk for a given population. Risk characterization depends on
available data and expert judgments.
The following categories have been used to characterize the health risks:
Health 1 The health hazard identified represents a situation that could cause serious adverse
health consequences or death. Appropriate action should be taken against the product to limit or
prevent exposure in the population to the product. Such action should ensure that the product is
no longer sold and the population does not consume what they have at home (e.g. action at the
consumer level if the product has been distributed). Follow-up action should ensure that the cause
has been determined and appropriate corrective action has been taken to correct the problem.
Health 2 The health hazard identified represents a situation that could cause temporary, not
life-threatening, adverse health consequences. The probability of serious adverse consequences is
considered remote. Appropriate action should be taken to limit further distribution of the product.
In some situations, the hazard identified must be present in sufficient numbers to present a risk to
human health. Appropriate action should be taken to limit further distribution if the M value is
exceeded. Repeated violations should be investigated. If c/m values are exceeded, progressive
steps should be taken to bring about compliance, initially review GMP/HACCP.
Sanitation The problem identified is an indication of a breakdown in hygienic practice. A
review of the manufacturer’s GMP/HACCP is appropriate where M or c/m values are exceeded.
A health hazard has not been identified.
Note When products characterized with a Health 2 risk are associated with illness in an
outbreak, consideration should be given to modification of the risk characterization to Health 1
with appropriate action to the consumer level.
It should also be noted that some health risk are typically characterized as Health 2 for the
general population but may cause more severe adverse health consequences, even death, in

190
sensitive populations. Therefore, where products are contaminated with Health 2 risks but are
directed to sensitive populations such as children less than five years of age, the elderly or
immunocompromised individuals (e.g. AIDS patients, transplant recipients, cancer patients, etc.),
consideration should be given to modification of the risk characterization to Health 1 with
appropriate action to the consumer level.
TABLE 1a. Foods for which there is a Microbiological Standard.
SAMPLING PARAMETERS
FOOD
CATEGORY
STANDARD
NATURE
OF
CONCER
N
n
c
m
M
Chocolate
Salmonella
Health 2
10
0
0
-
Cocoa
Salmonella
Health 2
10
0
0
-
Milk Powder Salmonella
Health 2
20
0
0
-
Flavoured
Milks
Aerobic colony
count (ACC)
Sanitation 5
2
5x10
4
10
6
Milk for
Manufacture
ACC
Sanitation 5
0
2x10
6
-
Cheese from
Pasteurized
Milk
Escherichia coli
Staphylococcus
aureus
Health 2
Health 2
5
5
2
2
10
2
10
2
2x10
3
10
4
Cheese from
Unpasteurized
Milk
E. coli
S. aureus
Health 2
Health 2
5
5
2
2
5 X 10
2
10
3
2x10
3
10
4
Cottage
Cheese
Coliforms
Sanitation 5
1
10
1
10
3
Ice Cream
ACC
Coliform
Sanitation
Sanitation
5
5
2
1
10
5
10
1
10
6
10
3
Ice Milk
ACC
Coliforms
Sanitation
Sanitation
5
5
2
1
10
5
10
1
10
6
10
3
TABLE 1b. Foods for which there is a Microbiological Standard
SAMPLING PARAMETERS
FOOD
CATEGORY
STANDARD NATURE
OF
CONCER
N
n c m
M
Mineral or
Spring Water
Coliforms
Sanitation 10 1 0/100 mL
10/100mL
Water in
Sealed
Containers
ACC Coliforms Sanitation
Sanitation
5
10
2
1
10
2
<1.8/100mL
10
4
10/100mL
Pre- packaged
Ice
Coliforms
Sanitation 10 1 <1.8/100mL
10/100mL
Egg Products
Salmonella
Health 2
10 0 0
-

191
TABLE 2. Foods for which there are Standards other than Microbiological
FOOD CATEGORY
STANDARD
NATURE
OF
CONCERN
Dairy products made from pasteurized milk Phosphatase Test.
Health 1
Low Acid Foods in Hermetically Sealed
Containers
A
Commercial Sterility, Refrigeration at <
4/C.
Health 1
Smoked Fish in Hermetically Sealed
Containers
B
Commercial Sterility, Freezing, 9% salt
(NaCl).
Health 1
TABLE 3a. Foods for which Microbiological Guidelines have been established.
SAMPLING
PARAMETERS
FOOD
CATEGORY
GUIDELINE NATURE
OF
CONCERN n c m
M
ACC
includes
aerobic spore
formers
Sanitation 5 2 10
5
10
6
Yeast and
Moulds
Sanitation 5 2 2X10
3
10
4
Cocoa
Coliforms
Sanitation 5 2 <1.8 10
1
ACC
includes
aerobic spore
formers
Sanitation 5 2 3x10
4
10
6
Chocolate
Coliforms
Sanitation 5 2 <1.8 10
2
ACC
Sanitation 5 2 10
3
10
4
E. coli
Health 2
E
10 1 <1.8 10
1
Salmonella
Health 1
20 0 0
0
S. aureus
Health 2
10 1 10
1
10
2
Bacillus cereus Health 2
10 1 10
2
10
4
Instant Infant
Cereal and
Powdered Infant
Formula (if M
exceeded Health
1; if c exceeded
Health 2)
Clostridium
perfringens
Health 2
10 1 10
2
10
3

192
TABLE 3b. Foods for which Microbiological Guidelines have been established
.
SAMPLING
PARAMETERS
FOOD
CATEGORY
GUIDELINE NATURE
OF
CONCERN n c m
M
ACC
Sanitation
5 2 5x10
4
10
6
Yeast and
moulds
Sanitation
5 2 2x10
3
10
4
E. coli
Health 2
C
5 2 <1.8
10
3
S. aureus
Health 2
5 2 5x10
2
10
4
Fresh and Dry
Pasta
Salmonella
Health 2
D
5 0 0
- -
ACC
Sanitation
5 2 5x10
4
10
6
Coliforms
Sanitation
5 2 5x10
1
10
4
E. coli
Health 2
5 1 <1.8
10
3
Yeast and
mould
Sanitation
5 2 5x10
2
10
4
S. aureus
Health 2
5 2 10
2
10
4
Bakery
Products
Salmonella
Health 2
5 0 0
- -
E. coli
Health 2
5 1 10
1
10
3
Heat Treated
Fermented
Sausage
S. aureus
Health 2
5 1 5x10
1
10
4
E. coli
Health 2
5 1 10
2
10
3
Raw
Fermented
Sausage
S. aureus
Health 2
5
1 2.5x10
2
10
4
E. coli
Health 2
5 2 10
2
10
3
Non-
fermented
Ready-to-eat
Sausage
S. aureus
Health 2
5 2 10
2
10
4
TABLE 3c. Foods for which Microbiological Guidelines have been established.
SAMPLING
PARAMETERS
FOOD
CATEGORY
GUIDELINE
NATURE
OF
CONCERN n c m
M
Salmonella
Health 2
5 0 0
- -
Campylobacter
coli or C. jejuni
A
Health 2
5 0 0
- -
Yersinia
enterocolitica A
Health 2
5 0 0
- -
Heat Treated
Sausage, Raw
Fermented
Sausage and Non-
fermented Sausage
E. coli O157
Health 1
5 0 0
- -
ACC
Sanitation 5 3 10
4
10
6
Deboned
Poultry
Products
E. coli
B
Health 2
5 2 10
1
10
3

193
S. aureus
Health 2
5
1 10
2
10
4
Salmonella
Health 2
5 0 0
-
C. jejuni or C.
coli
A
Health 2
5 0 0
-
Products
(Precooked)
Y. enterocolitica
A
Health 2
5 0 0
-
ACC
Sanitation 5 3 10
4
10
6
Coliforms
B
Sanitation 5 3 10
1
10
3
Yeast and Moulds Sanitation 5 3 5x10
2
10
4
E. coli
Health 2
5 2 10
1
10
3
S. aureus
Health 2
5 2 10
2
10
4
C. perfringens
Health 2
5 2 10
2
10
3
Dry Mixes (Gravy,
Sauce, Soup) Heat
and Serve
Salmonella
Health 2
5 0 0
-
TABLE 3d. Foods for which Microbiological Guidelines have been established.
SAMPLING
PARAMETERS
FOOD
CATEGORY
GUIDELINE
NATURE
OF
CONCERN n c m
M
Psychrotrophic
bacteria
Sanitation 5 2 10
5
10
7
E. coli
Health 2
5 2 10
2
10
3
S. aureus
Health 2
5 2 10
2
10
4
Salmonella
Health 2
5 0 0
-
Soybean Products
(Ready-to-eat)
Yersinia
enterocolitica
Health 2
5 0 0
-
C. perfringens
Health 2
5 2 10
4
10
6
B. cereus
Health 2
5 2 10
4
10
6
E. coli
Health 2
5 2 10
2
10
3
S. aureus
Health 2
5 2 10
2
10
4
Salmonella
Health 2
5 0 0
-
Spices (Readyto-
eat only)
Yeast and Mould Sanitation 5 2 10
2
10
4
Pseudomonas
aeruginosa
Health 2
5 0 0/100 mL -
Bottled Water
Aeromonas
hydrophila
Health 2
5 0 0/100 mL -
Fecal Coliforms Sanitation 5 2 10
3
10
5
E.coli
Health 2
5 2 10
2
10
3
Sprouted Seeds
(e.g. Alfalfa and
Bean Sprouts)
Salmonella
Health 2
5 0 0
-

194
TABLE 3e. Foods for which Microbiological Guidelines have been established.
SAMPLING
PARAMETERS
FOOD CATEGORY GUIDELINE NATURE
OF
CONCERN n c m
M
ACC
Sanitation 5 3 10
4
10
5
E. coli
Health 2
5 1 10
1
10
3
Salmonella
Health 1
5 0 0
-
S. aureus
Health 2
5 2 10
2
10
4
B. cereus
Health 2
5 1 10
4
10
5
Health Foods
a) Raw Organ Derived
Products and Herbal
Products (in tablets,
capsules or powders,
consumed at <10
g/day)
C. perfrigens
C
Health 2
5 2 10
4
10
5
ACC
Sanitation 5 2 10
3
10
4
E. coli
Health 2
5 1 <1.8 10
1
Salmonella
Health 1
5 0 0
-
S. aureus
Health 2
5 2 10
1
10
2
B. cereus
Health 2
5 1 10
2
10
4
b) Powdered Protein,
Meal Replacements,
and Dietary
Supplements
C. perfringens Health 2
5 2 10
2
10
3
TABLE 3f. Foods for which Microbiological Guidelines have been established.
SAMPLING
PARAMETERS
FOOD
CATEGORY
GUIDELINE
NATURE
OF
CONCERN n c m M
Vibrio
parahaemolyticus
At harvest
Health 2
30 15 10
1
10
2
Raw Oyster
At consumer level Health 1
5 1 10
2
10
4
E. coli O157:H7 Health 1
5 0 0
Unpasteurized
apple juice
E. coli
Health 2
5 2 100 1000
TABLE 3g. Foods for which Microbiological Guidelines have been established.
FOOD
CATEGORY
GUIDELINE
NATURE OF
CONCERN
If heat process alone is to achieve
commercial sterility F
0
=3 must be achieved
F
0
< 3
Health 1
If a retorted product is not commercially
sterile but heat process is known to be
above F
0
= 3
Health 2
If the product is judged to be
underprocessed F
0
<3
Health 1
Low-acid foods processed
to commercial sterility
If contamination is assessed at
postprocessing
Health 2; if for infant
formula then Health 1

195
TABLE 4 Raw Foods for which there is a proposed guideline
SAMPLING
PARAMETERS
FOOD
CATEGORY
GUIDELINE NATURE OF
CONCERN
n c m M
E. coli
O157:H7
Health 2
Ground beef found
positive for E. coli
O157:H7
Generic E. coli
Becomes Health
1 if generic E.
coli >100 cfu/g
or level not
determined
5 0 0 100
Negative for
E.coli
O157:H7
Raw ground beef
Generic E. coli Sanitation
5 0 0 >100
Positive for
E.coli
O157:H7
Health 2
Raw ground beef
derived from
trimming or
carcasses found
positive for E.coli
O157:H7 at
Processor
Generic E. coli
B
Becomes Health
1 if generic E.
coli >100 cfu/g
or level not
determined
5 0 0 100
TABLE 5 Foods for which there is a Guideline other than Microbiological
FOOD
CATEGORY
METHOD OR
EQUIVALENT
PROPOSED
GUIDELINE
GUIDANCE
NATURE
OF
CONCERN
Commercially
Prepared
Vegetable or
Mushroom
Products in Oil
for pH:
MFHPB-03,
water activity:
MFLP-66,
commercial sterility
and/or thermal
processing:
MFHPB-01
Plant and
Mushroom
Products packed
in Oil
A
I) If pH
C
>4.6, and
water activity
C
> 0.92
OR
ii) If pH
D
is the sole
barrier and <4.6 but
there is no control over
the growth of yeast and
mould OR
iii) If a
w
>0.85
E
but
<0.92 and pH >5.0 or
not controlled OR
iv) If product has not
received
a thermal process
F
sufficient to kill spores
of proteolytic
C.
botulinum and the
Health 1
Health 1
Health 2
Health 1

196
thermal process is the
sole barrier OR
v) If the product relies
on the
thermal process as the
sole barrier and only is
sufficient to kill non-
proteolytic spores of
C.botulinum
G
but is not
stored at refrigeration
temperature.
Health 1
Home Prepared
Garlic- in-oil
Products
It’s Your Health
Garlic-in-oil
B
Product stored at room
temperature or stored
refrigerated but has a
use by date of >10 days
from the date of
manufacturing.
Health 1
For example a thermal process where every container received a minimal heat treatment to
render the product commercially sterile. Documentation could include time-temperature profile
charts and thermal process calculations to verify the F
o
delivered for the worst case situation.
Results from inoculated pack challenge studies or predictive modelling results can also be used as
additional evidence that the concerns over proteolytic strains of C. botulinum has been
addressed.
For example every container has received a pasteurization process sufficient to inactivate the non-
proteolytic spores of C. botulinum (eg 10 minutes at 90/C or equivalent) but is not labelled and
stored refrigerated.
TABLE 6 Raw Foods for which there is a Guideline
FOOD
CATEGORY
GUIDELINE
GUIDANCE
NATURE OF
CONCERN
Visual inspection by lot
or container
Sanitation
Determine % salt as
specified in protocol
Sanitation
Determine the level of
S. aureus
Health 2
Brined Mushrooms for
Further Processing
Imported Brined
Mushroom Protocol
March 1998
Examine for
Enterotoxin
Health 2
There is a sanitation concern for product which is visually defective e.g. low brine, off smell,
musty, cloudy brine etc. and for containers which have a salt concentration <15 % or lots with a
Q value <16% (average salt concentration) as the salt concentration could be low enough to
permit the growth of S. aureus. There is a Health 2 concern if the level of S.aureus in a container
or lots is >10
4
cfu/g and implicated product should be destroyed. Containers with an S. aureus
count is < 10 cfu/g can be used for further processing. If the S.aureus level is >10 cfu/g but <10
4

197
examine for enterotoxin. There is a Health 2 concern if S.aureus enterotoxin is detected in a
container or a lot. The implicated container or lot is not acceptable for further processing and
should be destroyed.

198
Guidelines for Writing Lab reports
Name and Date: Your name and the date should be shown on the top of the first page of the
lab report.
Introduction: The Introduction should tell the reader (i) what is the experimental question the
paper will address, (ii) what is the background biology that makes this an interesting question
(e.g. what are the properties of the organisms used, etc), and (iii) a very brief overview of the
approach used to answer the experimental question
Materials and Methods: The Materials and Methods section should succinctly describe what
was actually done in a narrative format (i.e., not a numerical series of steps as in an experimental
protocol). It should include sufficient description of the techniques used that it is clear to the
reader what experiments were done and how (not what was written in the protocol, but what you
actually did). The details of the protocol do not need to be reproduced in the text but an
appropriate reference should be cited. Any changes from the protocol provided in handouts
should be described. It is not appropriate to indicate volumes of solutions added – instead
indicate the relevant information about the experiment such as final concentrations used, etc
Results: Begin each paragraph with an opening sentence that tells the reader what property is
being tested in the experiments described in that paragraph and why. Write the opening sentence
in bold font for emphasis. (Sometimes a complete sentence is used and sometimes a short phrase
is used – either style is OK but the style should be used consistently throughout the report.) Any
results that include multiple data points that are critical for the reader to evaluate the experiment
should be shown in tables or figures. However, the results should be summarized in
accompanying text
(Note that when referring to a particular table or figure, they should be capitalized: Table 1,
Figure 6, etc.) The text of the Results section should be succinct but should provide the reader
with a summary of the results of each table or figure. Not all results deserve a separate table or
figure. As a rule of thumb, if there are only a few numerical results or a very simple conclusion
describe the results in the text instead of in a table or figure. Your report should focus on what
worked, not things that didn’t work (unless they didn’t work for reasons that are interesting and
provide biological insights).
Tables and Figures: All tables and figures should be put into a contextual framework in the
corresponding text. Tables and figures should present information in a format that is easily
evaluated by the reader. A good rule of thumb is that it should be possible to figure out the
meaning of a Table or Figure without referring to the text. Tables and figures should typically
summarize results, not simply present large amounts of raw data. When possible, the results
should provide some way of evaluating the reproducibility or statistical significance of any
numbers presented. Tables should be sequentially numbered. Each table should have a title
(shown above the table) that describes the point of the table. For example, “Table 1. Bacterial
strains and plasmids used in this study.” If necessary to interpret the table, specific descriptions
about what a result represents or how the results were obtained can be described in a legend
below the table. Figures should be sequentially numbered. Each figure should have a title (shown
below the table) that describes the point of the table. For example, “Figure 1. Isolation of MudJ
insertion mutants.” If necessary to interpret the figure, specific descriptions about what a result

199
represents or how the results were obtained can be described immediately following the title.
Tables and figures may be printed on separate pages that follow the Reference section
Alternatively, the tables and figures may be integrated into the paper if you are using a page layout
program. However, if they are integrated into the paper make sure that there is not a page break
in the middle of a table or figure. Tables and figures should not be directly copied from another
source without credit. Even when credit is given, the table or figure should be redrawn.
Discussion: Do not simply restate the results — explain your interpretations of the results. How
did your results compare with the expected results? Are there other experiments that could be
done to confirm your results (if so, what experiments and what are the predicted results)?
References: Give complete references to the sources for any fact, idea, or opinion not your own
which was cited in the report. List the references alphabetically at the end of your report, using
the format for different sources shown below:
Books:
Maloy, S., V. Stewart, and R. Taylor. 1996. Genetic Analysis of Pathogenic Bacteria. Cold
Spring Harbor Laboratory Press, NY.
Book chapters:
Rice, L., and B. Hemmingsen. 1997. The enumeration of hydrocarbon-degrading bacteria. In D.
Sheehan (ed.) Methods in Molecular Biotechnology: Protocols in Bioremediation, pp. 99-
109. Humana Press, Totowa, NJ.
Published papers:
Rohwer, F., A. Segall, G. Steward, V.Seguritan, F. Wolven, M. Breitbart, and F. Azam, 2000.
The complete genome sequence of the marine Roseophage SIO1 shares homology with
nonmarine phages. Limnol. Oceanography 45: 408-418.
Format and proofreading:
Certain general rules are commonly followed in scientific writing.
Nomenclature
.
Use correct bacterial nomenclature.
Abbreviations. Use standard abbreviations (hr, min, sec, etc) instead of writing complete words.
Some common abbreviations that do not require definition are shown on the attached table.
Define all other abbreviations the first time they are used, then subsequently use the abbreviation
[e.g. Ampicillin resistant (Amp)]. As a general rule, do not use an abbreviation unless a term is
used at least three times in the manuscript. With two exceptions (the degree symbol and percent
symbol), a space should be left between numbers and the accompanying unit. In general,
abbreviations should not be written in the
plural form (e.g. 1 ml or 5 ml, not mls).
Past, present, and future tense. Results described in your paper should be described in past
tense(you’ve done these experiments, but your results are not yet accepted “facts”). Results from
published papers should be described in the present tense (based upon the assumption that
published results are“facts”). Only experiments that you plan to do in the future should be
described in the future tense.

200
Third vs first person. It is OK to use first person in scientific writing, but it should be used
sparingly reserve the use of first person for things that you want to emphasize that “you” uniquely
did (i.e. not things that many others have done as well). Most text should be written in the third
person to avoid sounding like an autobiographical account penned by a narcissistic author.
However, it is better to say“It is possible to ..” than to say “One could ...”. Writing that uses the
impersonal pronoun “one” often seems noncommittal and dry. In addition, inanimate objects (like
genes, proteins, etc) should be described in third person, not with anthropomorphic or possessive
terms (e.g., instead of saying “its att site”, say “the chromosomal att site”).
Empty phrases. Avoid using phrases that do not contribute to understanding. For example, the
following phrases could be shortened (or completely deleted) without altering the meaning of a
sentence: “the fact that ...” (delete); “In order to ...” (shorten to simply “To ...”). Likewise, the
title of a table of results does not benefit from the preface “Results of ...”. In short, don’t use
more words than you need to make your point. Specify. If several expressions modify the same
word, they should be arranged so that it is explicit which word they modify. It is common to use a
pronoun such as “it” or “they” to refer to a concept from the previous sentence. This is OK as
long as there is only one concept that “it” or “they” means. However, if there are more than one
concepts it is easy for the reader to get confused about what the pronoun is meant to specify
(even if you know which one you mean). It is better to error on the side of redundancy by
repeating the concept in subsequent sentences, than to take the chance of confusing the reader.
Don’t make the reader guess what you mean. Parentheses. Avoid double parentheses. For
example, “Three gene products catalyze reactions in the pathway for proline biosynthesis (Figure
1) (3)” could be reworded to say “Figure 1 shows the three reactions of the pathway for proline
biosynthesis (3).”
Proofreading
.
Always spellcheck your paper and carefully proofread your paper before
submission. In addition to checking for errors and typos, read your paper to yourself as if you
were reading it out loud to ensure that the wording and sentence construction is not clumsy.

201
References and selected readings
1. American Public Health Association (APHA). 1992. Compendium of Methods for the
Microbiological Examination of Foods. Third edition. C. Vanderzant and D.F.
Splittstoesser (eds.). American Public Health Association Inc., Washington, D.C.
2. Alley, M. 1996. The craft of scientific writing, 3
rd
edition. Prentice Hall, NJ. [and
accompanying web site: http://filebox.vt.edu/eng/mech/writing/]
3. American Can Company. 1957. The Howard Mold Count Method as Applied to
Tomato Products. American Can Company, Research Division, Maywood, Illinois.
4. American Public Health Association (APHA). 1992. Standard Methods for the
Examination of Dairy Products. Chapter 6. Sixteenth edition, American Public Health
Association, Washington, D.C.
5. American Public Health Association (APHA). 2001. Compendium of Methods for the
Microbiological Examination of Foods Fourth edition. F.P. Downes and K. Ito (editors),
American Public Health Association, Washington, D.C.
6.American Public Health Association. 1985. Laboratory Procedures for the Examination of
Seawater and Shellfish, 5th ed. APHA, Washington, DC.
7. American Public Health Association. 1998. Standard Methods for the Examination of
Water and Waste Water; Twentieth Edition. Lenore.S. Clesceri, A.E. Greenberg and
A.D. Eaton, (eds.). American Public Health Association, Inc., Washington, D.C.
8. Andrews, W.H. 1989. Methods for recovering injured "classical" enteric pathogenic
bacteria (Salmonella, Shigella, and enteropathogenic Escherichia coli) from foods.
Chapter 3. In: B. Ray (ed.) Injured Index and Pathogenic Bacteria, CRC Press, Boca
Raton, FL. pp. 55-113.
9.AOAC INTERNATIONAL. 1995. Official Methods of Analysis, 16th ed. AOAC
INTERNATIONAL, Arlington, VA.
10. AOAC. 2001. Bacteriological Analytical Manual (Online) Chapter 14, Bacillus
cereus. USDA, Center for Food Safety and Applied Nutrition.
11. Association of Official Analytical Chemists (AOAC) International. 1995. FDA
Bacteriological Analytical Manual, Eighth Edition. AOAC International, Arlington, VA.
12. Association of Official Analytical Chemists (AOAC). 1999. Official Methods of Analysis
of AOAC International. 16th. AOAC. Gaithersburg, Md. Vol. I, Chapt. 17. pp:32-34.
13. Association of Official Analytical Chemists. 1990. Official Methods of Analysis, 15th ed.
AOAC, Arlington, VA.
14. Atlas, R.M. 1997. Handbook of Microbiological Media. Second edition. L.C. Parks
(editor). CRC Press Inc.
15. Baird-Parker, A.C. 1962. An improved diagnostic and selective medium for isolating
coagulase positive staphylococci. J. Appl. Bacteriol. 25:12-19.

202
16. Baird-Parker, A.C. and E. Davenport. 1965. The effect of recovery medium on the
isolation of Staphylococcus aureus after heat treatment and after storage of frozen or
dried cells. J. Appl. Bacteriol. 28:390-402.
17. Banks, J.G. and R.G. Board. 1987. Some factors influencing the recovery of yeasts and
moulds from chilled foods. Intl. J. Food Microbiol. 4:197.
18. Beuchat, L.R. and A.D. Hocking. 1990. Some considerations when analysing foods for
the presence of xerophilic fungi. J. Food Prot. 53:984-989.
19. Bhatia Rajesh & lchhpujani R.L.: Quality Assurance in Microbiology CBS Publishers and
Distributors, New Delhi, 1995.
20. Cochran, W. G. 1950. Estimation of bacterial densities by means of the "Most Probable
Number." Biometrics 6:105-116.
21. Collins-Thompson, D.L., A. Hurst and B. Aris. 1974. Comparison of selective media for
the enumeration of sublethally heated food-poisoning strains of Staphylococcus aureus.
Can. J. Microbiol. 20:1072-1075.
22. Continental Can Company. 1968. Mold Counting of Tomato Products. Continental Can
Company Inc., Research and Development, Chicago, Illinois.
23. Crisley, F.D., J.T. Peeler and R. Angelotti. 1965. Comparative evaluation of five
selective and differential media for the detection and enumeration of coagulase-positive
staphylococci in foods. Appl. Microbiol. 13:140-156.
24. D'Aoust, J.-Y. 1977. Effect of storage conditions on the performance of bismuth sulfite
agar. J. Clin. Microbiol. 5: 122-124.
25. D'Aoust, J.-Y. 1984. Effective enrichment-plating conditions for detection of Salmonella
in foods. J. Food Prot. 47:588-590.
26. D'Aoust, J.-Y. 1989. Salmonella. Chapter 9. In: M.P. Doyle (ed.). Foodborne Bacterial
Pathogens, Marcel Dekker Inc., New York, NY. pp. 327-445.
27. D'Aoust, J.-Y., 1981. Update on preenrichment and selective enrichment conditions for
detection of Salmonella in foods. J. Food Prot. 44:369-374.
28. D'Aoust, J.-Y., A.M. Sewell and P. Greco. 1993. Detection of Salmonella in dry foods
using refrigerated preenrichment and enrichment broth cultures: interlaboratory study. J.
of AOAC Int. 76:814-821.
29. D'Aoust, J.-Y., C. Maishment, D.M. Burgener, D.R. Conley, A. Loit, M. Milling and U.
Purvis. 1980. Detection of Salmonella in refrigerated preenrichment and enrichment broth
cultures. J. Food Prot. 43:343-345.
30. D'Aoust, J.-Y., H.J. Beckers, M. Boothroyd, A. Mates, C.R. McKee, A.B. Moran, P.
Sado, G.E. Spain, W.H. Sperber, P. Vassiliadis, D.E. Wagner, and C. Wiberg. 1983.
ICMSF Methods Studies. XIV. Comparative study on recovery of Salmonella from
refrigerated preenrichment and enrichment broth cultures. J. Food Prot. 46:391-399.

203
31. D'Aoust, J.-Y., A.M. Sewell and D.W. Warburton. 1992. A comparison of standard
cultural methods for the detection of foodborne Salmonella. Int. J. Food Microbiol. 16:
41-50.
32. D'Aoust. J.-Y., A.M. Sewell and C. McDonald. 1995. Recovery of Salmonella spp.
from refrigerated preenrichment cultures of dry food composites. J. AOAC Int. 78:
1322-1324.
33. Day, R. 1995. Scientific English: A guide for scientists and other professionals, 2
nd
edition. Orynx Press
34. Day, R. 1998. How to write and publish a scientific paper, 5
th
edition. Orynx Press.
35. de Man, J. C. 1983. MPN tables, corrected. Eur. J. Appl. Biotechnol. 17:301-305.
36. Deak, T., J. Chen, D.A. Golden, M.S. Tapia, J. Tornai-Lehoczki, B.C. Viljoen, M.T.
Wyder and L.R. Beuchat. 2001. Comparison of dichloran 18% (DG18) agar with
general purpose mycological media for enumerating food spoilage yeasts. Int. J. Food
Microbiol. 67:49-53.
37. Eisenhart, C., and P. W. Wilson. 1943. Statistical methods and control in bacteriology.
Bacteriol. Rev. 7:57-137.
38. Flowers, R. S., Gecan, J.S. and Pusch, D.J. 1992. Laboratory Quality Assurance. In
Vanderzant, C. and Splittstoesser, D.F. (ed). Compendium of Methods for the
Microbiological Examination of Foods. American Public Health Association.
39. Food and Agriculture Organization of the United Nations. 1991. Manual of Food Quality
Control 12. Quality Assurance in the Food Control Microbiology Laboratory. Rome.
Italy
40. Food and Drug Administration. 1978. EDRO Data Codes Manual. Product Codes:
Human Foods. FDA, Rockville, MD.
41. Food and Drug Administration. 1989. Laboratory Procedures Manual. FDA, Rockville,
MD.
42. Food and Drug Administration. 1993. Investigations Operations Manual. FDA,
Rockville, MD.
43. Garthright, W. E. 1993. Bias in the logarithm of microbial density estimates from serial
dilutions. Biom. J.35: 3, 299-314.
44. Garthright, W. G. and Blodgett, R.J. 2003, FDA's preferred MPN methods for
Standard, large or unusualtests, with a spreadsheet. Food Microbiology 20:439-445.
45. Goben, G., and J. Swan. 1990. The science of scientific writing. Am. Scientist 78: 550-
558. [Available online at http://www.research.att.com/~andreas/sci.html]
46. Gould, W.A. 1974. Tomato Production, Processing and Quality Evaluation. AVI
Publishing Co., Inc., Westport, Connecticut.
47. Haldane, J.B.S. 1939. Sampling errors in the determination of bacterial or virus density
by the dilution method. J. Hygiene. 39:289-293.

204
48. Halvorson, H. O., and N. R. Ziegler. 1933. Application of statistics to problems in
bacteriology. J. Bacteriol. 25:101-121; 26:331-339; 26:559-567.
49. Harmon, S.M. 1982. New Method for Differentiating Members of the Bacillus cereus
Group: Collaborative Study. J. Assoc. Off. Anal. Chem. 65:1134-1139.
50. Hauschild, A.H.W. 1975. Criteria and procedures for implicating Clostridium perfringens
in food-borne outbreaks. Can. J. Public Health 66:388-392.
51. Hauschild, A.H.W. and R. Hilsheimer. 1974. Enumeration of food-borne Clostridium
perfringens in egg yolk-free tryptose-sulfite-cycloserine agar. Appl. Microbiol. 27:521-
526.
52. Hauschild, A.H.W., R.J. Gilbert, S.M. Harmon, M.F. O'Keeffe and R. Vahlefield. 1977.
ICMSF methods studies. VIII. Comparative study for the enumeration of Clostridium
perfringens in foods. Can. J. Microbiol. 23:884-892.
53. Health Canada. 2003 . Compendium of Analytical Methods . http://www.hc-
sc.gc.ca/food-aliment/mh-dm/mhe-dme/compendium/e_index.html
54. Hitchins, A.D. 1995. Listeria monocytogenes. Chapter 10. Revised 1998.
Bacteriological Analytical Manual (BAM). AOAC International. Gaithersburg, MD.
55. Holbrook, R. and Anderson, J.M., 1980. An improved selective and diagnostic medium
for the isolation and enumeration of Bacillus cereus in foods. Can. J. Microbiol. 26: 753-
759.
56. Horwitz, W. (ed.) 1980. Official Methods of Analysis of the Association of Official
Analytical Chemists. (44.096), Thirteenth edition. AOAC., Washington, D.C.
57. Howaritz PJ, Kowanitz JH: Laboratory quality assurance (McGraw Hill Book
Companry, New York (1987).
58. International Commission on Microbiological Specifications for Foods (ICMSF). 1978.
Microorganisms in foods. Their significance and methods of enumeration. Second
edition. p. 157-159, 318-319. University of Toronto Press, Toronto.
59. International Commission on Microbiological Specifications for Foods. 1986.
Microorganisms in Foods. 2. Sampling for Microbiological Analysis:Principles and
Specific Applications, 2nd ed. University of Toronto Press, Toronto, Ontario, Canada.
60. Jarvis, B. 1973. Comparison of an improved rose bengal-chlortetracycline agar with
other media for the selective isolation and enumeration of moulds and yeasts in foods. J.
Appl. Bacteriol. 36: 723-727.
61. Jarvis, B. and A.P. Williams. 1987. Methods for detecting fungi in foods and
beverages. In: Beuchat, L.R. (ed.), Food and beverage mycology. Second edition. p.
599-636. Avi Publishing Co., Westport, Connecticut.
62. Koskitalo, L.D. and M.E. Milling. 1969. Lack of correlation between egg yolk reaction
in staphylococci medium 110 supplemented with egg yolk and coagulase activity of
staphylococci isolated from cheddar cheese. Can. J. Microbiol. 15:132-133.

205
63. Landry, W.I., J.E. Gilchrist, S. McLaughlin, and J.T. Peeler 1988. Analysis of abnormal
canned foods. AOAC Abstracts
64. Lobban, C. and M. Schefter. 2002. Successful Lab reports: A Manual for Science
Students. Cambridge University Press
65. Lovett, J. 1987. Listeria isolation. Chapter 29. Bacteriological Analytical Manual (BAM).
AOAC. Arlington, Virginia.
66. Lovett, J. and A.D. Hitchins. 1988. Listeria isolation. Chapter 29. Revised October 13,
1988. Bacteriological Analytical Manual (BAM). AOAC. Arlington, Virginia.
67. McClain, D. and W.H. Lee. 1988. Development of USDA-FSIS Method for Isolation
of Listeria Monocytogenes from Raw Meat and Poultry. JAOAC. 71(3):660-664.
68. McClain, D. and W.H. Lee. 1989. FSIS Method for the Isolation and Identification of
Listeria Monocytogenes From Processed Meat and Poultry Products. USDA-FSIS
Laboratory Communication No. 57. Revised May 24, 1989.
69. McCrady, M. H. 1915. The numerical interpretation of fermentation-tube results. J.
Infect. Dis. 17:183-212.
70. McGuire, O.E. 1964. Wood Applicators for the Confirmatory Test in Bacteriological
Analysis of Water. Public Health Reports. 79: 812-814.
71. McMillan, V. 1988. Writing papers in the biological sciences. Bedford Books, NY.
72. Mislivec, P.B., L.R. Beuchat and M.A. Cousin. 1992. Yeasts and Moulds. In:
Compendium of Methods for the Microbiological Examination of Foods, APHA,
Washington, D.C. p. 237-249.
73. Mossel, D.A.A., C.L Vega, and H.M.C. Put. 1975. Further studies on the suitability of
various media containing antibacterial antibiotics for the enumeration of moulds in food
and food environments. J. Appl. Bacteriol. 39: 15-22American Public Health
Association. 1984. Recommended Procedures for the Examination of Sea Water and
Shellfish; Fourth Edition. A.E. Greenberg and D.A. Hunt (eds.). American Public Health
Association Inc., Washington, D.C.
74. National Academy of Sciences. 1969. An Evaluation of the Salmonella Problem.
National Academy of Sciences, Washington, DC.
75. Peeler, J. T., G. A. Houghtby, and A. P. Rainosek. 1992. The most probable number
technique, Compendium of Methods for the Microbiological Examination of Foods, 3rd
Ed., 105-120.
76. Powers, E.M. and T.G. Latt. 1977. Simplified 48-Hour IMViC Test: an Agar Plate
Method. Appl. Environ. Microbiol. 34: 274-279.
77. Rayman, M.K., C.E. Park, J. Philpott and E.C.D. Todd. 1975. Reassessment of the
coagulase and thermostable nuclease tests as means of identifying Staphylococcus aureus.
Appl. Microbiol. 29:451-454.
78. Report of the Forty-Fifth Session of the Executive Committee of the Codex Alimentarius
Commission. Joint FAO/WHO Food Standards Programme. Rome, 3-5 June 1998.

206
79. Report of the Twenty-Second Session of the Codex Alimentarius Commission. Joint
FAO/WHO Food Standards Programme. Geneva, 23-28 June 1997
80. Risk Management and Food Safety. Report of a Joint FAO/WHO Expert
Consultation,Rome, Italy, 1997. FAO Food and Nutrition Paper, N°65
81. Seeliger, H.P.R. and D. Jones.1986. The Genus Listeria. Bergey's Manual of Systematic
Bacteriology. Volume 2. Williams and Wilkins, Baltimore. pp. 1235-1245.
82. Selepak, S.T., and F.G. Witelsky. 1985. Inoculum size and lot-to-lot variation as
significant variables in tube coagulase test for Staphylococcus aureus. J. Clin. Microbiol.
22(5): 835-837.
83. Solberg M. and B.E. Proctor, 1960. A technique utilizing 2,3,5, triphenyltetrazolium
chloride for recognition of bacterial colonies in the presence of large numbers of food
particles. Food Technology, 14 (7): 343-346.
84. Sperber, W.H. and S.R. Tatini. 1975. Interpretation of the tube coagulase test for
identification of Staphylococcus aureus. Appl. Microbiol. 29:502-505.
85. Strunk, W., and E. B. White. 1979. The elements of style, 3
rd
edition. MacMillian
Publishing Co
86. Sudarshan Kumari, Rajesh Bhatia, CC Heuck: Quality Assurance in Bacteriology &
Immunology WHO Regional Publication, South-East Asia Series No. 28, 1998.
87. Szabo, R.A., E. Todd, J. MacKenzie and L. Parrington. 1990. Increased sensitivity of
the Rapid HGMF ELA procedure for E. coli O157 detection in foods and bovine feces.
Appl. Environ. Microbiol. 56:3546- 3549.
88. The Application of Risk Communication to Food Standards and Safety Matters.
Report of a Joint FAO/WHO Expert Consultation, Rome, Italy, 1998. FAO Food and
Nutrition Paper N°70.
89. Thomas, H.A. 1942. Bacterial densities from fermentation tube tests. J. Am. Water
Works Assoc. 34:572-576.
90. U.S. Food & Drug Administration , Center for Food Safety & Applied Nutrition
Bacteriological Analytical Manual Online January 2001
91. Vosti, D.C., H.H. Hernandez, and J.G. Strand. 1961. Analysis of headspace gases in
canned foods by gas chromatography. Food Technol. 15:29-31.
92. Warburton, D.W., J.M. Farber, A. Armstrong, R. Caldeira, N.P. Tiwari, T. Babiuk, P.
LaCasse and S. Read. 1991. A Canadian Comparative Study of Modified Versions of
the "FDA" and "USDA" Methods for the Detection of Listeria monocytogenes. J. Food
Prot. 54(9):669-676.
93. Warburton, D.W., J.M. Farber, A. Armstrong, R. Caldeira, T. Hunt, S. Messier, R.
Plante, N.P. Tiwari and J. Vinet. 1991. A Comparative Study of the "FDA" and "USDA"
Methods for the Detection of Listeria monocytogenes in Foods. Int. J. Food Microbiol.
13(2):105-118.
94. Warburton, D.W., J.M. Farber, C. Powell, N.P. Tiwari, S. Read, R. Plante, T. Babiuk,
P. Laffey T. Kauri, P. Mayers, M.-J. Champagne, T. Hunt, P. LaCasse, K. Viet, R.

207
Smando and F. Coates. 1992. Comparison of Methods for Optimum Detection of
Stressed and Low Levels of Listeria monocytogenes. J. Food Microbiol. 9:127-145.,
95. Warburton, D.W., J.W. Austin, B.H. Harrison and G.Sanders. 1998. Survival and
recovery of Escherichia coli O157:H7 in inoculated bottled water. J. Food Prot.
61(8):948-952.
96. Weagant, S.D., J.L. Bryant and K.G. Jinneman. 1994. An improved rapid technique for
isolation of Escherichia coli O157:H7 from foods. Bulletin # 3900. Laboratory
Information Bulletin (USFDA) 10(9):1- 12.
97. Weagant, S.D., J.L. Bryant and K.G. Jinneman. 1995. An improved rapid technique for
isolation of Escherichia coli O157:H7 from foods. J. Food Prot. 58(1):7-12.
98. Woodward, R. L. 1957. How probable is the most probable number? J. Am. Water
Works Assoc. 49:1060-1068.
99. Word usage in scientific writing [http://www.ag.iastate.edu/aginfo/checklist.html]
Wyszukiwarka
Podobne podstrony:
Forex Online Manual For Successful Trading
Manual for building a c 40 lbs Longbow(1)
Operator's Manual for Advanced Combat Helmet
Operation Manual for Ladder Pro Nieznany
Forex Online Manual For Successful Trading
Service (repair) manual for Pioneer BCT1410
SETOOL3 USER MANUAL FOR ALL NEW CUSTOMERS
GATE Solar Drying Technology for Food Preservation
Manual for BenQ Siemens (firmware) Update tool
IMPRESSIONING MANUAL FOR AMATEUR LOCKSMITHS
The Art of Seeing Your Psychic Intuition, Third Eye, and Clairvoyance A Practical Manual for Learni
Hitman A Technical Manual For Independent Contractors
Manual for building a c 40 lbs Longbow
COMBAT AND OPERATIONAL STRESS CONTROL MANUAL FOR LEADERS AND SOLDIERS
rev walter j schmitz learning the low mass a manual for seminarians and priests
31 Service Manual Installation manual for digital TV tuner
Obama Amends Manual for Courts Martial 2014
Food Sprouting Seeds for Food Sprouting Seeds for Food
więcej podobnych podstron