
Building a Bench for your deck
Bench Plans
You can build this sturdy bench (or a couple
benches) in an afternoon. It makes a good
edge bench to define the ends of a low deck,
or a bench that you can use near a pool's
edge or even against a railing. Its clean
simple lines would make it fit in with most
any decor.
You can build it out of any wood to match
your deck, and depending on lumber sizes,
you may have to modify the sizes slightly,
but I give the dimensions here in typical
pressure treated lumber sizes. The bench is
given as an 8 foot long bench, but it can be
shortened (or lengthened) to any lenght that
suits you.
Below are the cutting dimensions:
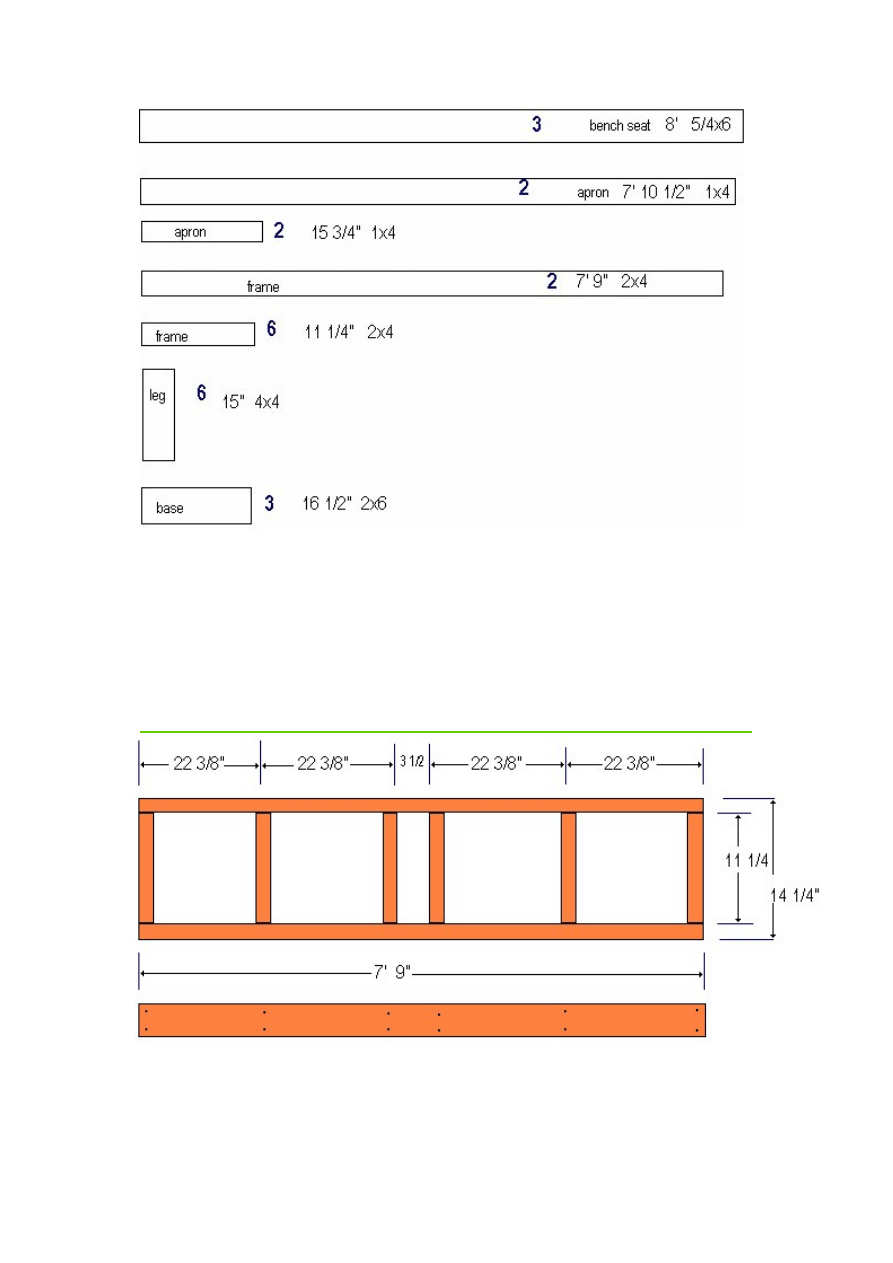
Start by building the 2x4 frame that will support the top and the legs. This is
a simple box made of 2x4s. Cut 2 boards 7'9" each, and cut 6 boards 11 1/4
inches long. Use a 4x4 to gauge the distance between the two center boards
since the center legs will fit between these two. Nail them all together using
16 penny galvanized twist or ring nails.
(see figure below)
Cut 6 legs 15 inches long from the 4x4s. The legs have shoulders cut on
them. Cut the shoulders 3/4" wide and 3 1/2" deep. The 4 corner legs have a
shoulder cut on two sides, the 2 center legs have a shoulder cut only on one
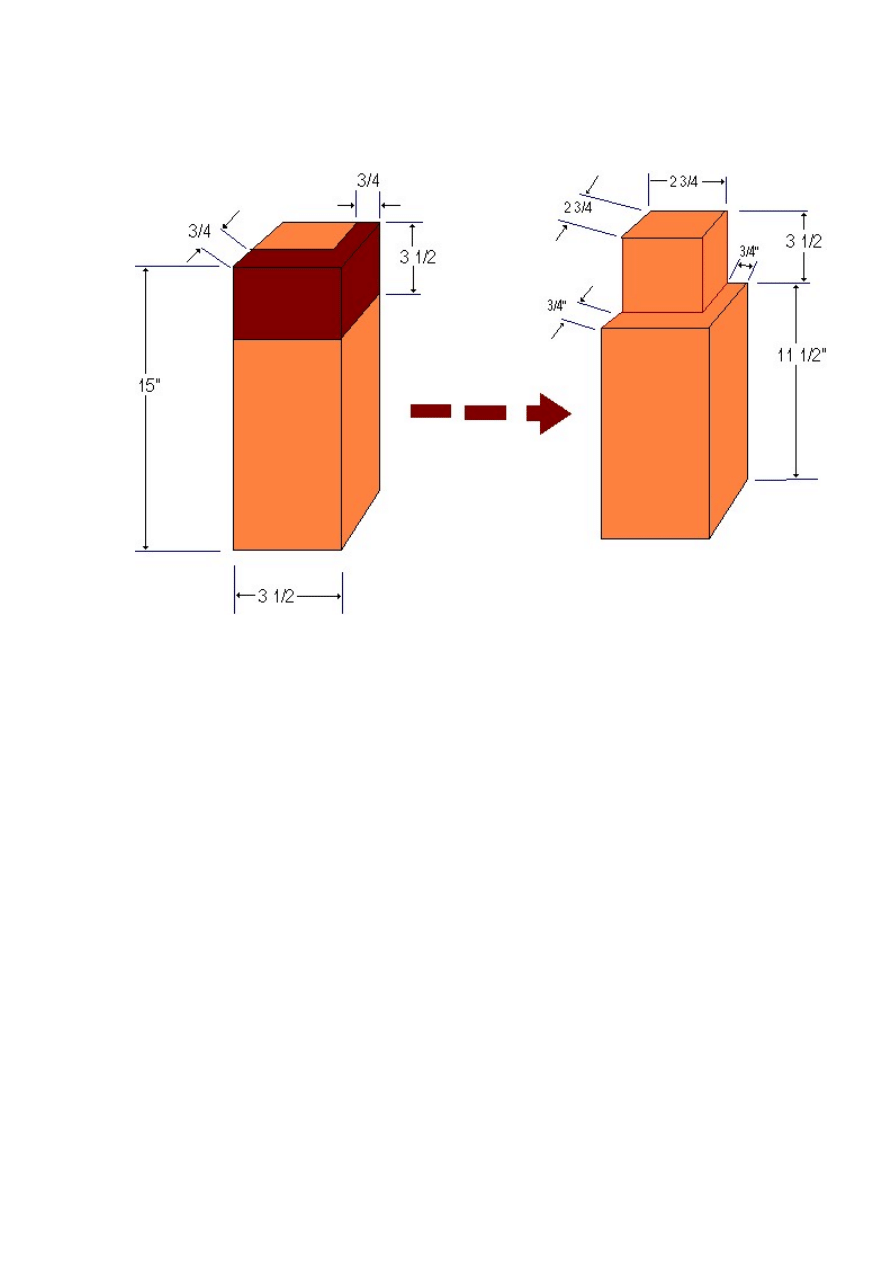
side. (note that I only show the corner legs' shoulders below, for the center
legs, only one shoulder is cut.)
Mount the legs in the frame. Nail these in using 16 penny nails. Nail the
corner legs to the frame from two sides, and nail the 2 center legs in from
three sides.
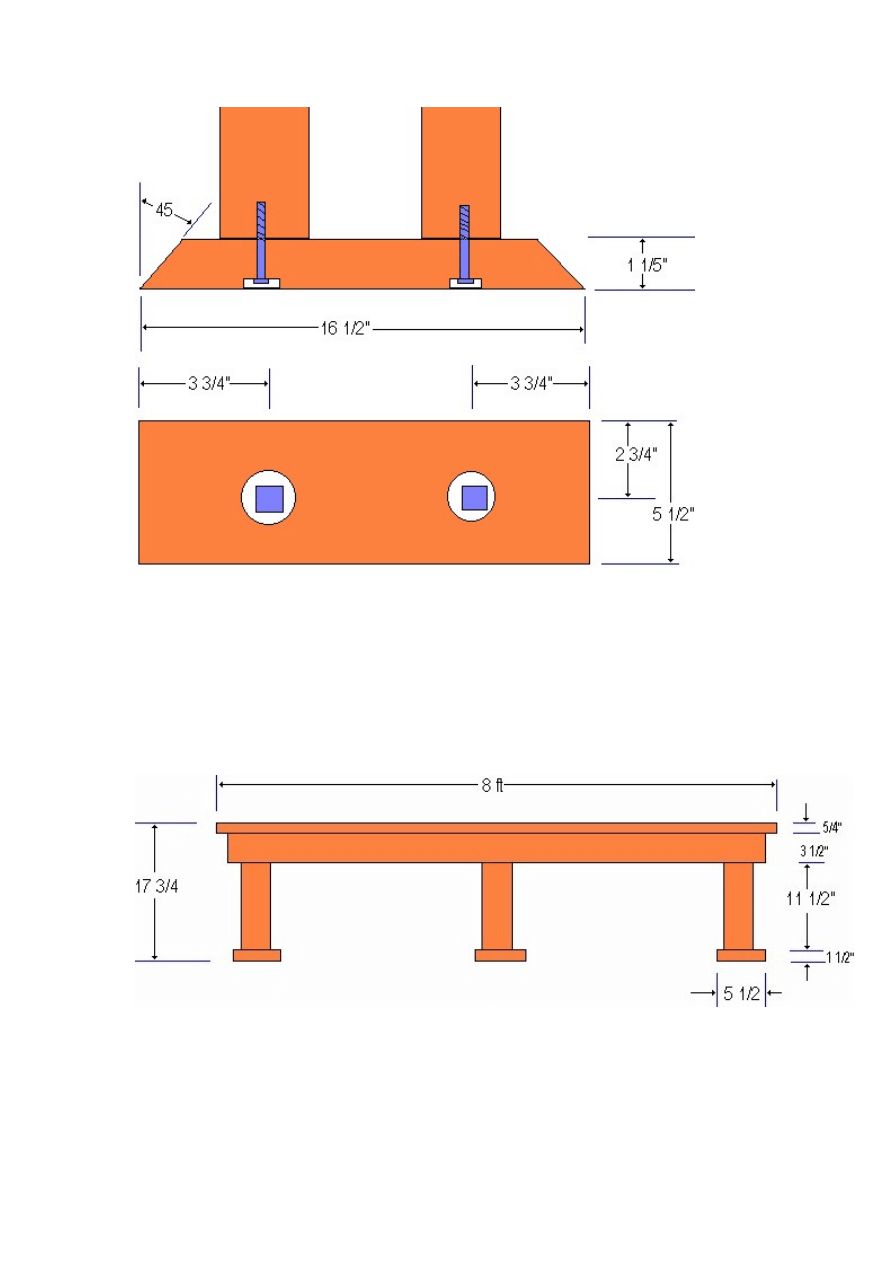
Cut the 3 leg bases from the 2x6. Each base should be 16 1/2 inches long.
Cut the ends at a 45 degree angle.
Mount the bases to the legs. First drill a hole 1 inch in diameter, 1/2 inch
deep. Then drill a 3/8 inch hole through the base in the center of the 1 inch
hole. Set the base on the legs, and center the base on the legs, and mark the
location of the hole in leg. Remove the base and drill a 1/4 inch hole in the leg
for the bolt.
Attach the bases to the legs with 3 inch long, 3/8" lag bolts. One bolt per leg is
sufficient.
Before you mount the seat boards, your bench can have a more finished
appearance if you use a router to route a corner bead all the way around each
board. If you don't have a router, then use a block of wood with sand paper
wrapped around it to round over the edges.
Flip the base over upright, and attach the 3 seat boards of 8' long 5/4 boards.
(You can use 2x6s for the seat top, these should be routed to reduce the
appearance of their thickness). Attach the seat boards to the 2x4 frame
underneath using 2 inch screws or 12 penny galvanized ring nails.
Now, flip the bench over upside down again, and attach the 1x4 apron boards
to the 2x4 frame all the way around. Miter the ends by cutting them at a 45
degree angle. I gave you the sizes, in the cutting list above, but it helps to
make these cuts after measuring the actual dimensions, to assure a nice
clean fit. Attach the apron boards using 8 penny galvanized finish nails.

Finish the benches in the same manner as the deck, with clear wood finish, or
stain, etc.
Attach the bench to your deck by screwing the base sections to the deck
boards through the angled edges of the base. Predrill the holes in the base
sections at a 45 degree angle to the deck (perpindicular to the angle part of
the base).
Enjoy...
Shopping List
All Pressure treated lumber (or your choice)
1. 3 8ft 5/4x6"
2. 3 8ft 1x4
3. 4 8ft 2x4
4. 1 8ft 2x6
5. 1 8ft 4x4
6. 6 3in 3/8" lag bolts, and flat washers (galvanized)
7. 16 penny galvanized ring (PTL) nails
8. 12 penny galvanized ring nails
9. 8 penny galvanized finish nails
Document Outline
Wyszukiwarka
Podobne podstrony:
BRAUN recipes for your baby and toddler
Smart codes for your smart phones
Is it Glorious to Die for your Country
Instructions for your download
A Bench for all Seasons lawka
thank you for your letter HK43ZK5D7T5RJTCAA2R7M62MK66IF76EC63KPVY
Patterson, James Run For Your Life
ModelArt 004 For Your Collection Mig 13
No Man s Land Fight For Your Rights poradnik do gry
Beatles Run for Your Life
211 James Bond For your eyes only
SmokingBad For your Heath
ModelArt 013 For Your Collection Messerschmitt Me109 G
ModelArt 005 For Your Collection Berijev Be 4
Penny For Your Thoughts
the battle for your mind
The Battle For Your Mind by Dick Sutphen
Things you need for your holidays
E Book Psychology Hypnosis The Battle For Your Mind Mass Mind Control Techniques
więcej podobnych podstron