Krylon | Mom's Garden Planter
●
●
●
●
●
●
Find a Krylon
®
Retailer
Near You!
http://www.krylon.com/main/inspiration_template.cfm?leveli...ub_levelid=21&inspirationid=40&content=inspiration_details (1 of 3)12/03/2005 21:09:04

Krylon | Mom's Garden Planter
To find a Krylon
®
Retailer Near You! just select one of the Retailer links and use that dealer's store
locator. Not all retailers stock the complete line of Krylon
®
products. Krylon
®
recommends calling the
retailer for product availability.
To browse through our store locator,
!
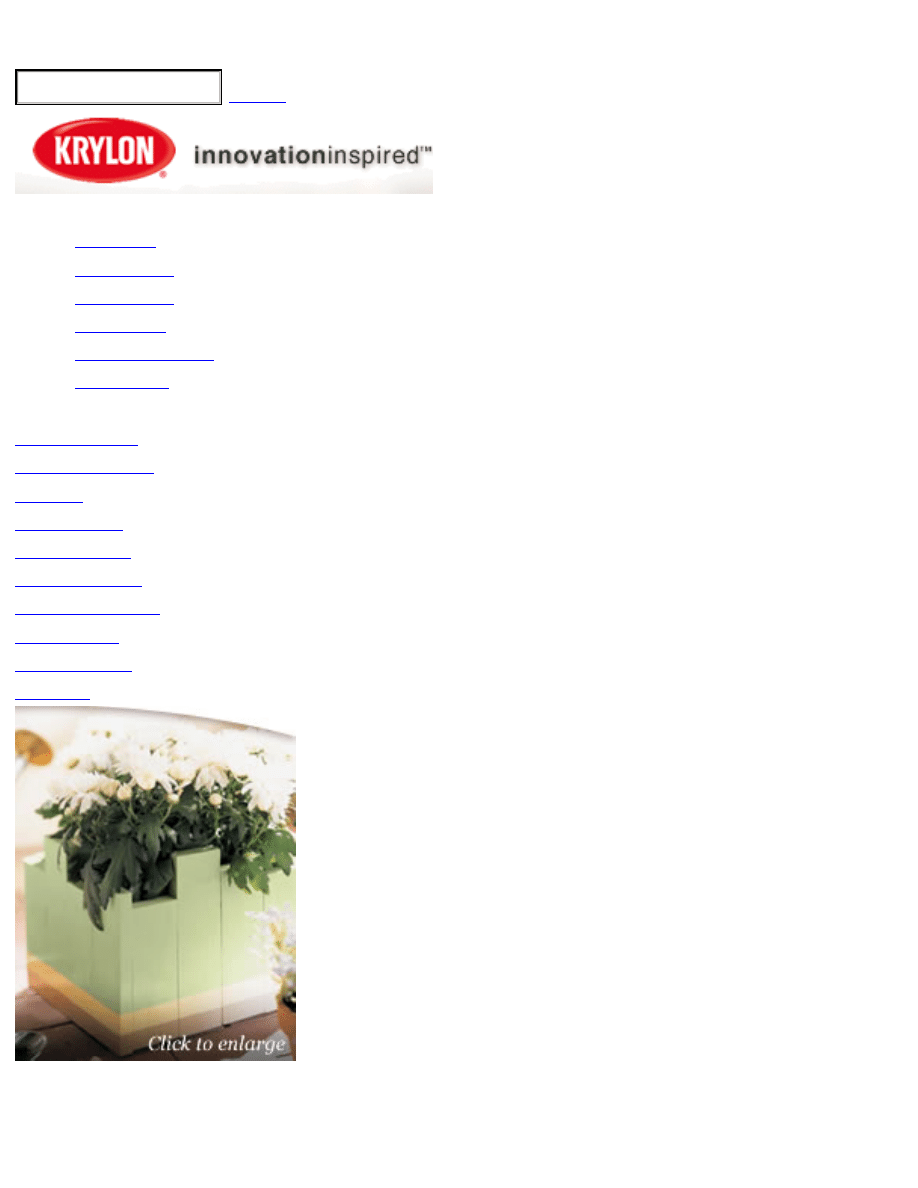
Mom's Garden Planter
by Christine Dejulio
Materials
Krylon
®
Interior-Exterior Spray Paint: Celery (#3543), Almond (#1506), Satin Touch Meringue (#3527)
Wood boards (used 1/2" X 3" pine)
Power saw or hand saw & miter box
Finishing nails
Wood putty
Potted Plant
General Supplies
Drop cloth
Tape measure
Pencil
Hammer
Nail set
Sandpaper
Tackcloth
Safety glasses
Wood glue or all-purpose adhesive (used Loctite Handyman's Choice)
Instructions
1. Measure and cut upright boards to different lengths. We used 16 boards - 4 at each side. These boards
are cut at varying heights, which makes the project easy for a beginner do-it-yourselfer (you don't have
to make perfectly even cuts).
2. Measure and cut inside support pieces for sides, front & back: First, lay out sides, front and back (4
boards each), and measure across them for total width. * Cut 4 support pieces to the exact width of the
boards . * Cut 4 support pieces shorter (2 times the thickness of the board) than the width. This allows
for the inside pieces to fit together like a puzzle.
3. Assemble planter box: Glue and nail the uprights and support boards together. Front & Back - Line up
4 uprights in a row making sure bottoms are flush (tops should be varying heights). Glue support board
across bottoms lining up with the bottom edge and repeat with second support board. Sides - Start gluing
1st support piece up (the distance of the thickness of a board) from the bottoms of the uprights (this
allows space for pieces to fit together).
http://www.krylon.com/main/inspiration_template.cfm?leveli...ub_levelid=21&inspirationid=40&content=inspiration_details (2 of 3)12/03/2005 21:09:04

Krylon | Mom's Garden Planter
4. Fit all 4 sides of planter together. Glue and nail in place.
5. Cut 3 bottom boards to fit inside planter box and nail in place.
6. Set any exposed nails with a nail set and fill with wood putty. After the putty dries, sand the entire
planter box with fine grade sandpaper. Remove any dust with a tackcloth.
7. Put planter on dropcloth and spray paint with any color of your choice (we used celery) and let
thoroughly dry. Mask off bottom stripe with painter's masking tape and spray with almond. Let dry.
Mask off 2nd stripe and spray paint meringue.
8. When dry, set potted plant of your choice inside painted planter.
Ideas to Inspire
•Make planter a rectangular shape instead of square.
•Spray a solid color and use a decorative stencil to embellish with spray paint.
©2004 Krylon
®
|
http://www.krylon.com/main/inspiration_template.cfm?leveli...ub_levelid=21&inspirationid=40&content=inspiration_details (3 of 3)12/03/2005 21:09:04
Document Outline
- krylon.com
Wyszukiwarka
Podobne podstrony:
Garden Planter Square from UK
Plantene opis
(Gardening) Crop Rotationid 1322
Potting and Garden Shed Gazebo
Gardena 02
130821122154 bbc vwitn garden
planter bench
OBLICZANIE POWIERZCHNI PLANTACJI WIERZBY ENERGETYCZNEJPRZY POMOCY PROGRAMU PLANTENE
Build a Garden Bench(1)
Pomiar mom bezw, przy pomocy wahadla fizycznego
6) Market Garden
Akumulator do?LOS Garden tractor Garden tractor?6?7
Barańczak Garden party interpretacja
HaMC Garden of my heart
523, PlanTestowMoj, Punkty funkcyjne
Gardening Bench
Flowered fences flowers garden
więcej podobnych podstron