1
iled Coffee Table
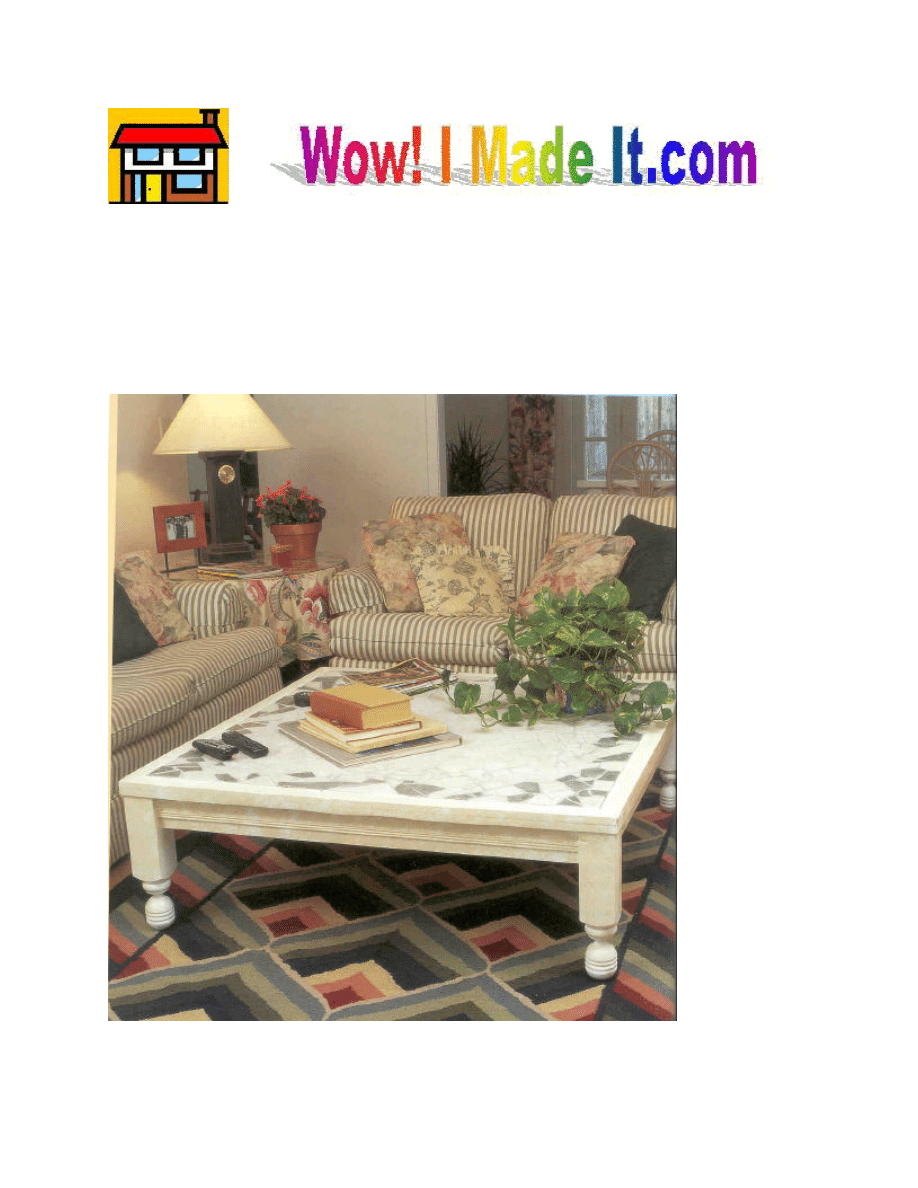
This coffee table is probably the most rugged one ever. Its tile top is almost indestructible
and will withstand spilled drinks, kids’ toys, and just about anything else. And putting it
together is lots of fun, too. Fitting the broken tile pieces together is like completing a giant
jigsaw puzzle—even the kids helped!
T

2
Materials
§ 50 linear feet of 1 x 4 pine
§ 1 linear foot of 2 x 6 pine
§ 1 piece of 1/2-inch plywood, 46 x 46 inches
§ 15 linear feet of 4-inch-wide decorative molding
§ 4 newel posts with 3 1/2" x 3 1/2" square end*
§ Enough ceramic tiles to cover to cover a 46" x 46" area*
§ Tile grout (small container)
§ Tile mastic (small container)
§ Grout sealer (small bottle)
Special Tools and Techniques:
§ 3 or 4 large bar or pipe clamps
§ Large chisel
§ Trowel
§ Rubber-surfaced trowel
§ Tile cutter (if necessary)*
§ Miters
*Notes on Materials
If you don’t own a lathe or don’t want to turn the table legs yourself, just purchase four
newel posts from a building supply store and cut them to length. Turned upside down, they make
extremely good-looking table legs!
When choosing the tile for this table, consider that the tile must fit in a specified area. We
covered the center of the table with broken tile. If you would rather have whole tile covering the
top of the coffee table, you will have some additional figuring to do. If the tile you like will not fit
into the dimensions of the plywood center evenly, you can either alter the dimensions of the table
or trim some of the tiles. We suggest that you read through the section "Constructing the Table
Top," which explains how to make certain that your tiles fit the project. If you opt to trim the tile
to fit the table dimensions, you will need a tile cutter.
To install the tiles, you need a trowel for spreading the mastic and a rubber-surfaced
trowel for applying the grout.
Hardware
§ 8, 3" screws
§ 8, 2-1/2" screws
§ 16, 2" screws
§ 32, 1-1/2" screws
§ 32, 1-1/4" screws
§ 64, 1" screws
3
Cutting List
Code Description
Qty Materials
Dimensions
A
Leg
4
Newel post
14-1/2” long
B
Side Rail
4
1 x 4 pine
45-1/2” long
C
Triangular Support
4
2 x 6 pine
5-1/2” on short sides
D
Top Trim
4
1 x 4 pine
50” long
E
Center
1
½” plywood
46” x46”
F
Top Frame
4
1 x 4 pine, ripped
50” long
G
Side Trim
4
Decorative molding
42” long
Making the Table Base
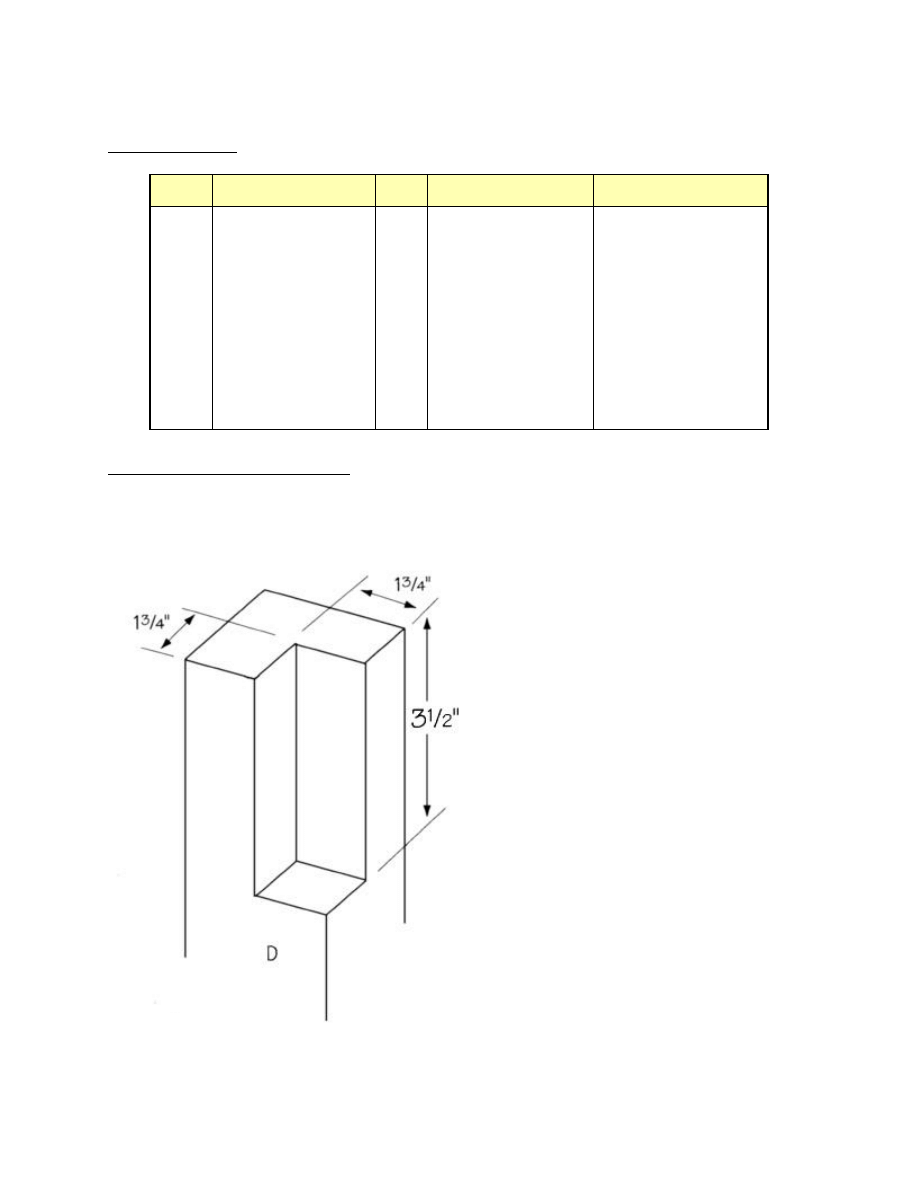
1. To form the legs (A), cut each of the four newel posts to a length of 14-1/2 inches.
2. In order to support the side rails of
the coffee table, we must remove a
corner section of wood from the
square top of each of the four legs
(A) Follow Figure 1 to mark the
area to be removed. Use a depth
stop or simply wrap a piece of tape
around a 1/2-inch or 3/4-inch drill
bit approximately 1 3/4-inch from
the end. Bore away as much waste
as possible. Then use a sharp chisel
to cut an accurate, rectangular
space, as shown in Figure 1.
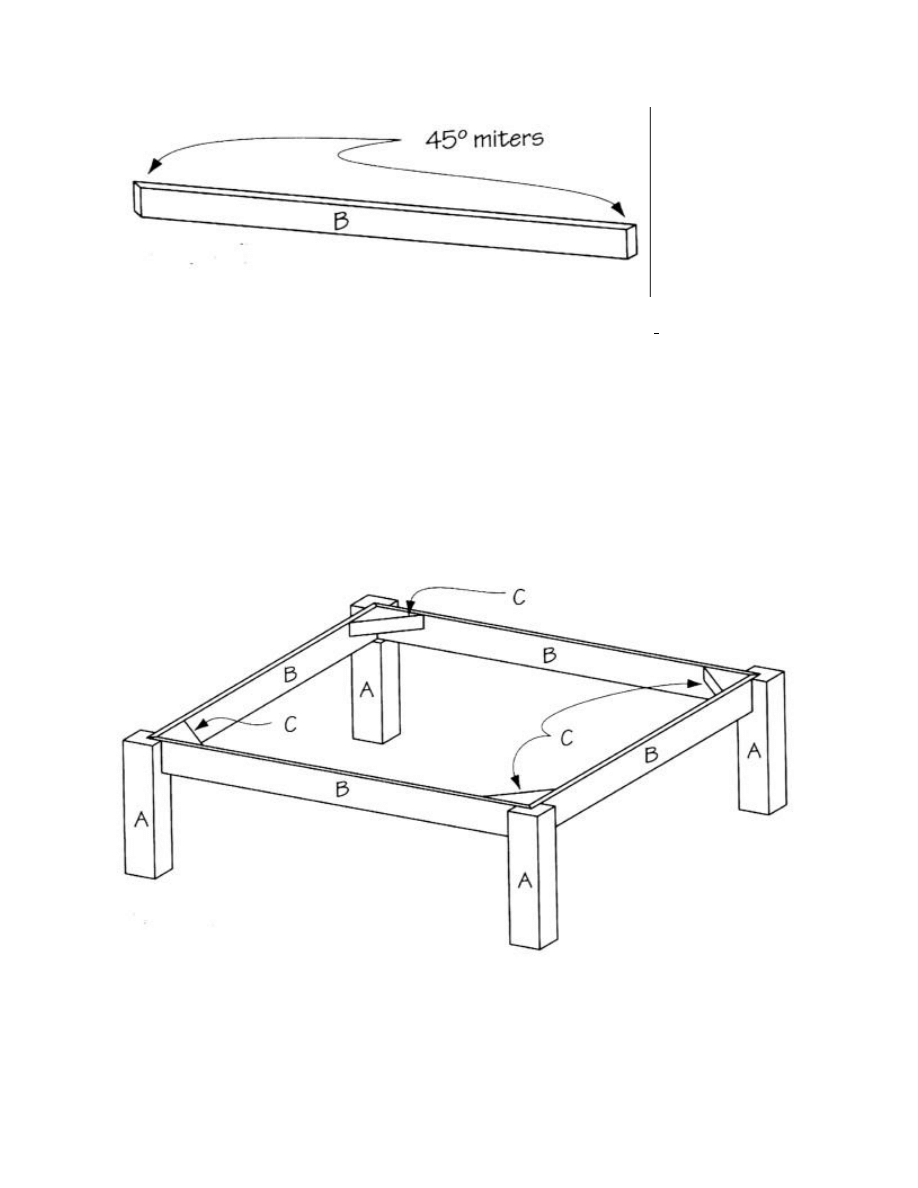
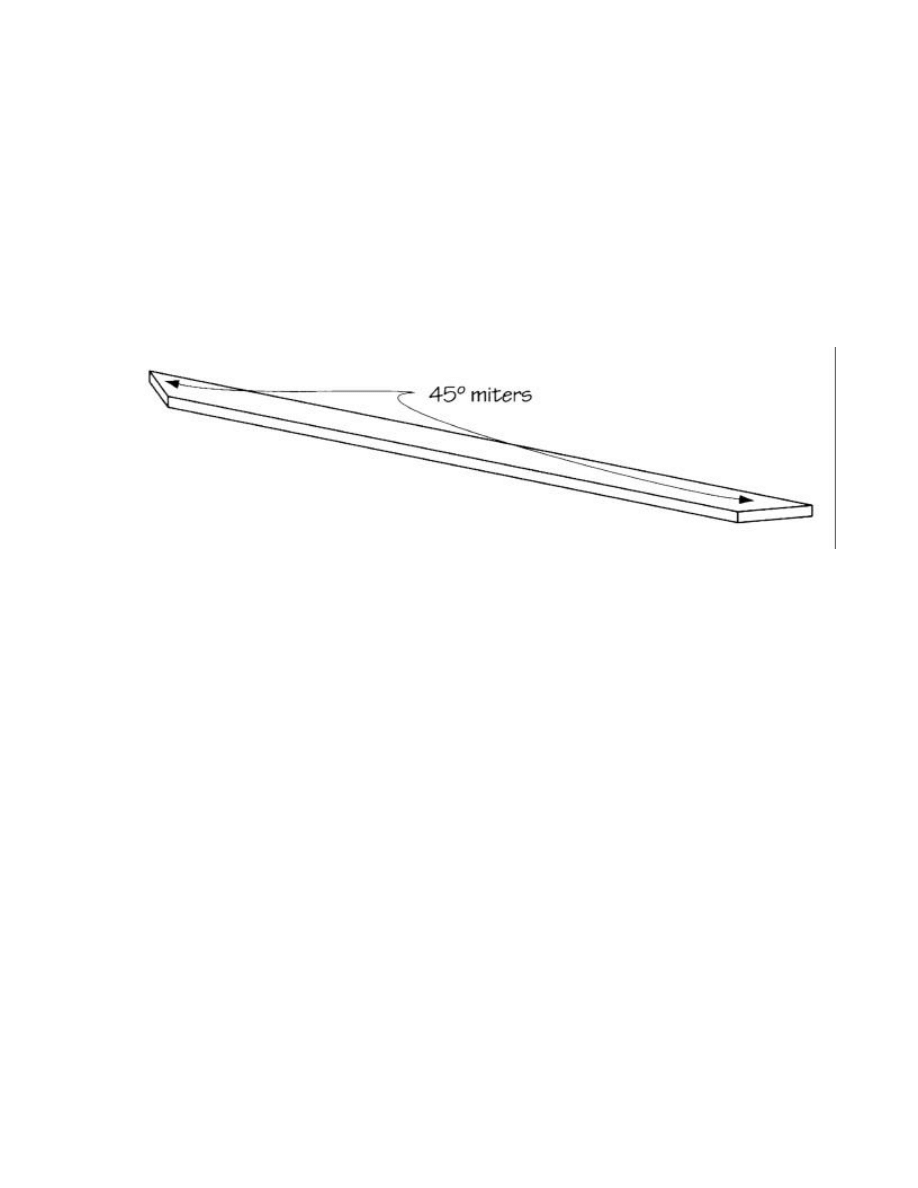
3. Cut four side rails (B) from 1 x 4
pine each measuring 45-1/2 inches
long. Miter both ends of each side
rail (B) at opposing 45-degree
angles, as shown in Figure 2.
Figure 1
4
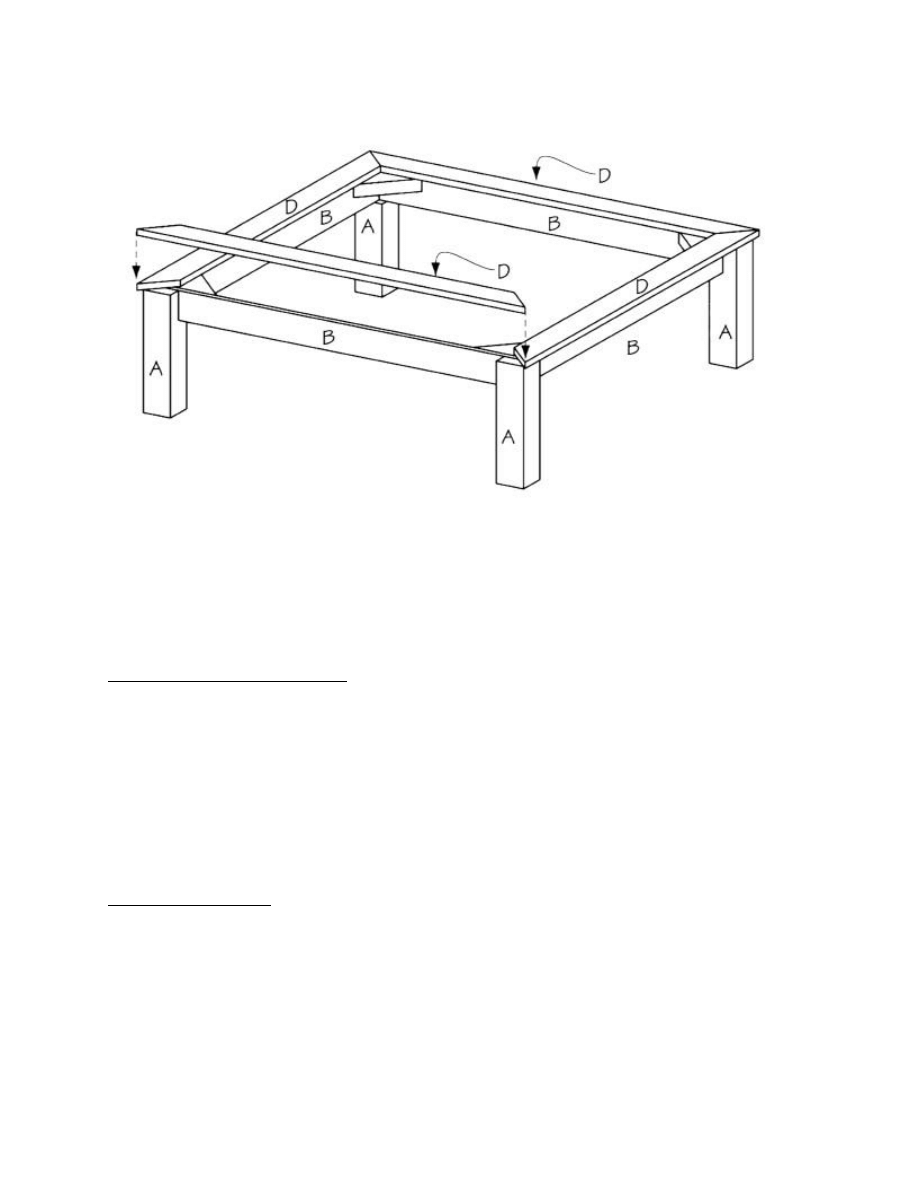
4. The next assembly will probably require the assistance of a willing helper and must be
performed on a level surface. Each of the legs (A) must be connected to the side rails (B) and
the entire assembly must be perfectly level. It is easier to make certain that everything is level
if you perform the assembly with the legs upside-down. Carefully fit two of the side rails (B),
matching miters, inside the opening that you cut in one of the legs (A), as shown (right side
up) in Figure 3. Apply glue to the meeting surfaces and screw through the side rails (B) into
the legs (A), using two 2-inch screws on each of the joints. Make sure that the leg (A) is
square to both of the adjoining side rails (B).
5. Repeat Step 4 three more times to attach the remaining three legs (A) to the remaining side
rails (B), as shown in Figure 3.
6. Cut four triangular supports (C) from 2 x 6 pine, measuring 5-1/2 inches on the two short
sides, as shown in Figure 4. Apply glue to the mitered surfaces and screw through the
triangular supports (C) into the side rails (B) in the four corners of the table base, as shown in
Figure 2
Figure 3
5
Figure 3. The triangular supports (C) should be flush with the tops of the side rails (B). Use
two 3-inch screws on each support.
Constructing the Table Top
The tabletop consists of a center piece of 1/2-inch-thick plywood which is framed on all four sides
with lengths of 2-inch-wide pine. The difference in thickness between the 1/2-inch-thick plywood
and the 3/4-inch-thick pine allows for the addition of ceramic tile in the center of the table.
We circumvented the need to figure exact area for tile placement on our coffee table by
simply using odd-sized broken tiles. In order to ensure a flat table top when you are finished, you
must check that the thickness of the plywood plus the thickness of the tile (and any tile mastic that
you place under the tile) to be sure that it is equal to the thickness of the 1 x 4 pine which borders
the table. You can vary the thickness of the mastic underneath the tile a very small amount, but if
it is not extremely close to the desired thickness, you need to alter the thickness of either the
plywood or the tile.
If you decide to use whole tiles, then you will need to do some additional figuring to make
certain that the tiles you have bought will fit the dimensions we have given. In the event that they
do not, you will need to alter the dimensions of the tabletop pieces to accommodate your own
tiles. To verify your own dimensions, arrange your tiles on your uncut piece of 1/2-inch-thick
plywood. Measure the area your tiles will cover, allowing for a border of grout around the outer
edges the same width as the grout between the tiles.
Draw a line around the tiles (including the outer grout allowance), forming a rectangle.
Compare the dimensions of your rectangle to the size specified in the instructions for the center
(E). If it deviates from those measurements (46 inches square), you must adjust the size of the
center plywood, and also the lengths of all of the additional tabletop pieces (D, E and F).
Actually, if the new size differs by more than ½”, the side rails should be adjusted, too.
Here is a formula for changing all the other dimensions: if your dimensions are over 46 inches
Figure 4
6
square, you must add the difference to all of the pieces except the legs (A). If your dimensions are
less than 46 inches square, you must subtract the difference from all the pieces except the legs
(A).
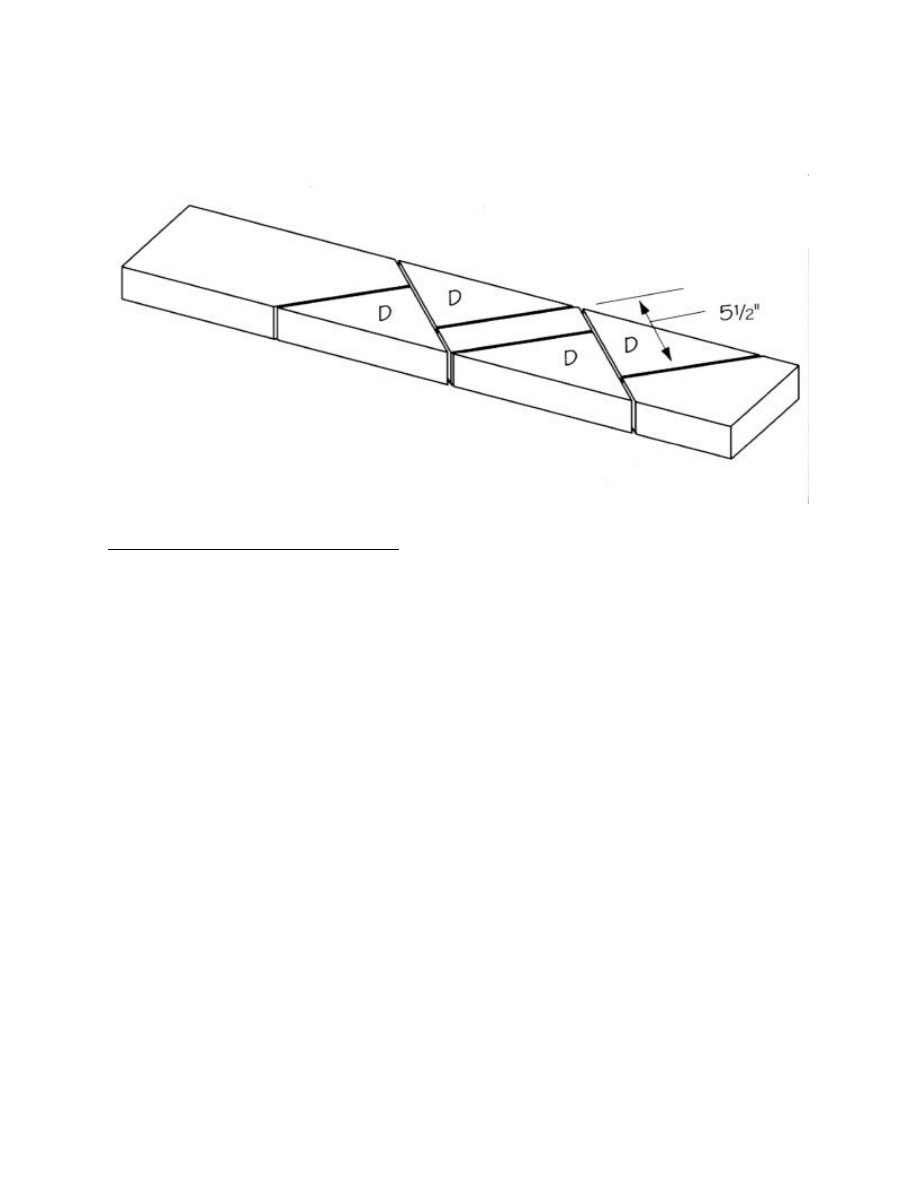
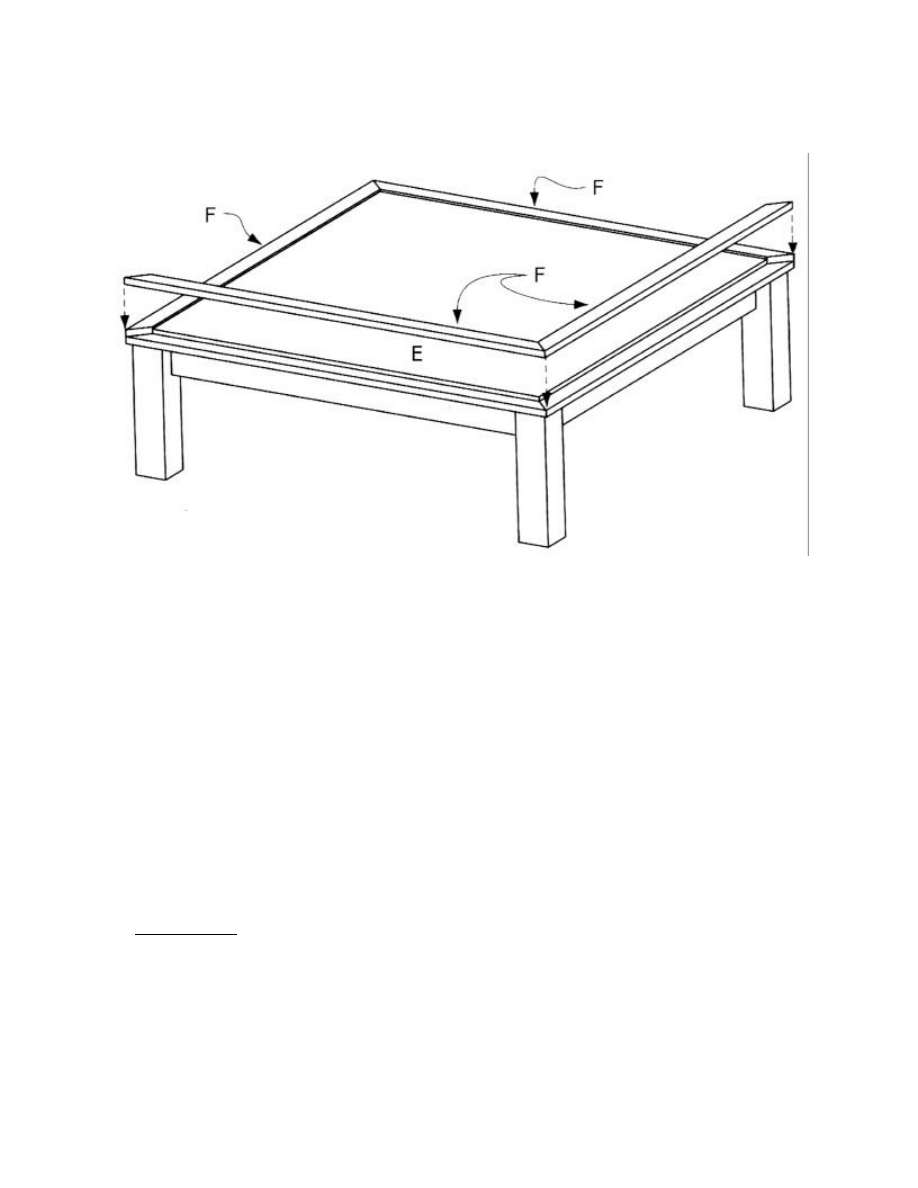
1. The tabletop is composed of a top and bottom layer. The top layer consists of four frame
pieces surrounding the center plywood. The bottom layer is made of wider frame pieces that
support both the center plywood and the top frame]. To form the bottom layer, cut four top
trims (D) from 1 x 4 pine, each measuring 50-inches long.
2. Miter both ends of each top trim (D) at opposing 45-degree angles, as shown in Figure
5.
3. The top trims (D) lay flat on top of the base assembly. Their miters should align with the
miters of the side rails (B), they should extend inward past the sides rails (B) by 1/2 inch, and
they should extend outward past the legs (A) by 1/2 inch, as shown in Figure 6. Apply glue to
the top edge of each side rail (B) and screw through each top trim (D) into a side rail (B). Use
1 1/2-inch screws spaced about every 6 inches. Use a 2 1/2-inch screw to fasten each end of
each top trim (D) to the top of its leg (A), making sure that the top faces of the top trims (D)
are flush.
4. Cut one center (E) from 1/2-inch-thick plywood, 46 x 46 inches square.
5. Apply glue to the meeting surfaces and position the center (E) over the top trims (D), matching
the corners of the center (E) to the mitered joints between the top trims (D), as shown in
Figure 6. Screw through the center (E) into the top trims (D) using 1-inch screws spaced every
6 inches or so.
6. Cut four top frames (F) from 1 x 4 pine, each measuring slightly over 50 inches long. Rip each
top frame (F) to 2 inches in width.
7. Miter the ends of each top frame (F) at opposing 45-degree angles, as shown in Figure 4, so
that the shorter mitered edge matches an edge of the center (E).
Figure 5
7
8. Apply glue to the edges of the center (E), the top surfaces of the top trims (D), and the mitered
surfaces of the top frames (F). Clamp the top frames (F) to the top trims (D) as shown in
Figure 6. The outside of the top frames (F) should be flush with the edges of the top trims (D).
Screw from the bottom through the top trims (D) into the top frames (F), using 1 1/4-inch
screws placed 1 inch from the outside of the top trims (D) and spaced about 6 inches apart.
Adding the Side Trims
1. Cut four, side trims (G) from 3/4-inch wide decorative molding, each measuring 42 inches
long.
2. Apply glue to the back of the side trims (G) and glue and screw them to the outside of the side
rails (B). To avoid holes in the molding, clamp the two pieces together and screw through the
side rails (B) into the side trim pieces (G). Use 1-inch-long screws, spacing them about every
5 inches.
Adding the Tile
1. You may wish to mask the surface of the top frames (F) to protect them from stray mastic or
grout. You could even apply a first coat of your finish at this point. Following the
manufacturer's directions carefully spread an even coat of tile mastic over the surface of the
plywood center (E) with a trowel.
2. Place the tile pieces on the mastic one at a time. Do not slide them or the mastic will be forced
Figure 6
8
up on the sides of the tile. Let the mastic dry overnight.
3. Mix the tile grout according the manufacturers directions (or use pre-mixed grout).
4. Spread the grout over the tile using a rubber-surfaced trowel. Work in an arc, and hold the
trowel at an angle so that the grout is forced evenly into the spaces between the tiles.
5. When the grout begins to set up, use a damp rag to wipe the excess off the tiles and the joints.
If you let it dry, the hardened grout will be very difficult to remove. The idea is to use as little
water as possible when removing the excess so that you don't thin the grout that remains. Let
the grout dry overnight.
6. Rinse the remaining film from the tile and wipe it with an old towel.
7. Apply grout sealer, following the manufacturer's directions. Many grout sealers recommend
that you wait several days before applying it to the project.
8. Finishing
1. Fill any screw holes or imperfections in the wood with wood filler.
2. Thoroughly sand all of the wood parts on the completed coffee table.
Figure 7
9
3. Stain or paint the wood portions of the coffee table the color of your choice. We chose an
off-white paint.
Try more projects from
www.wowimadeit.com
!
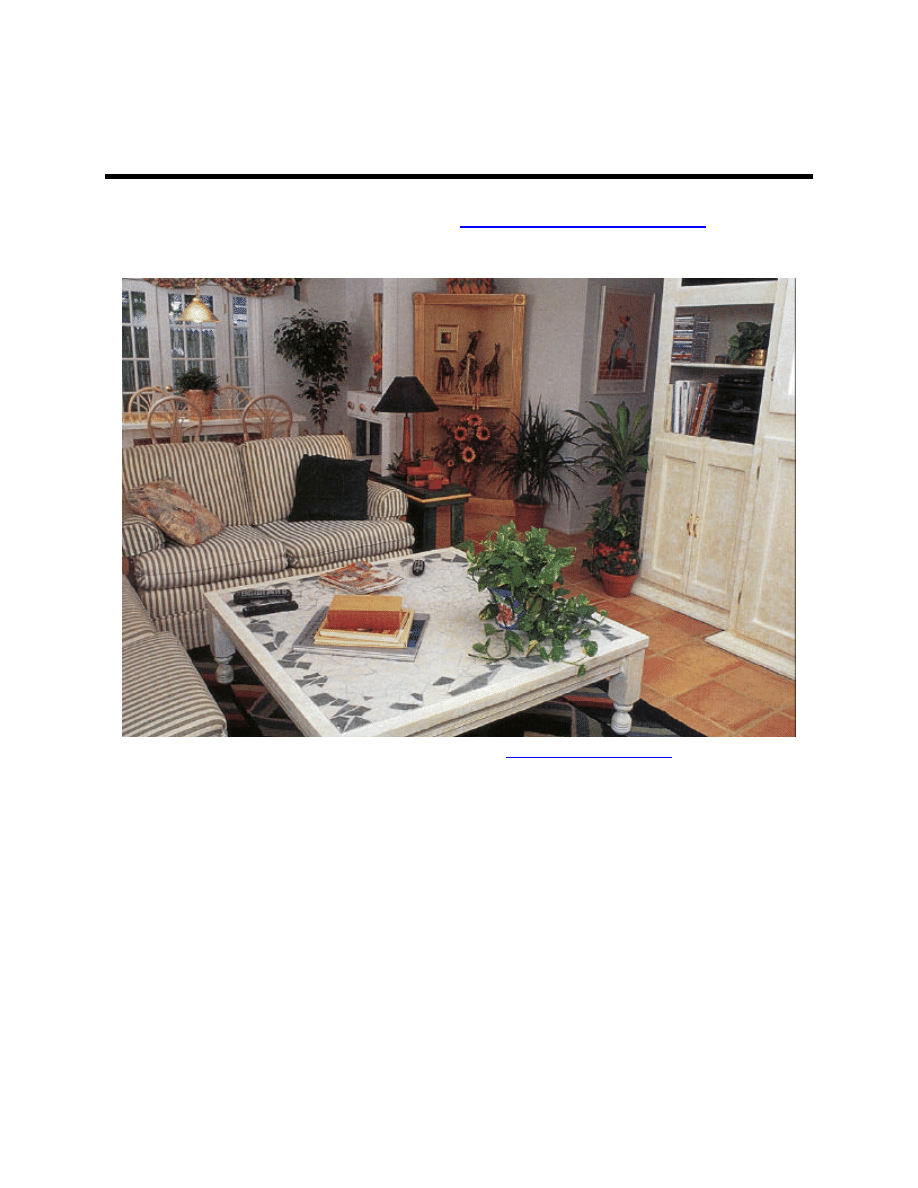
Get Coordinated!
This photograph contains seven projects available from
www.wowimadeit.com
: Kitchen Table,
Entertainment Center, Tiled Coffee Table, Corner Display Cabinet, End Table, Mirror, and
Buffet. Notice how everything is coordinated, and the rooms look unified because all of these
pieces are designed in a similar scale, made of similar materials, and finished with similar
techniques and colors.
Wyszukiwarka
Podobne podstrony:
Coffee Table 1
Coffee Table 2
Coffee Table 1
Games and Coffee Table (2)
Coffee Table
pine coffee table
Table Queen Anne Living Room Tables (Coffee, End)
Table maple coffee table with storage (Hinge Top)
asian coffee table
Klaus J Joehle Roberta s Coffee Table Book of Love
Games and Coffee Table (1)
coffee table
Table Coffee Table
Coffee Table 3
square coffee table
Trestle Coffee Table
Table Spiral Coffee Table (Carved)
Coffee Table 2
więcej podobnych podstron