Micr
E
Qu
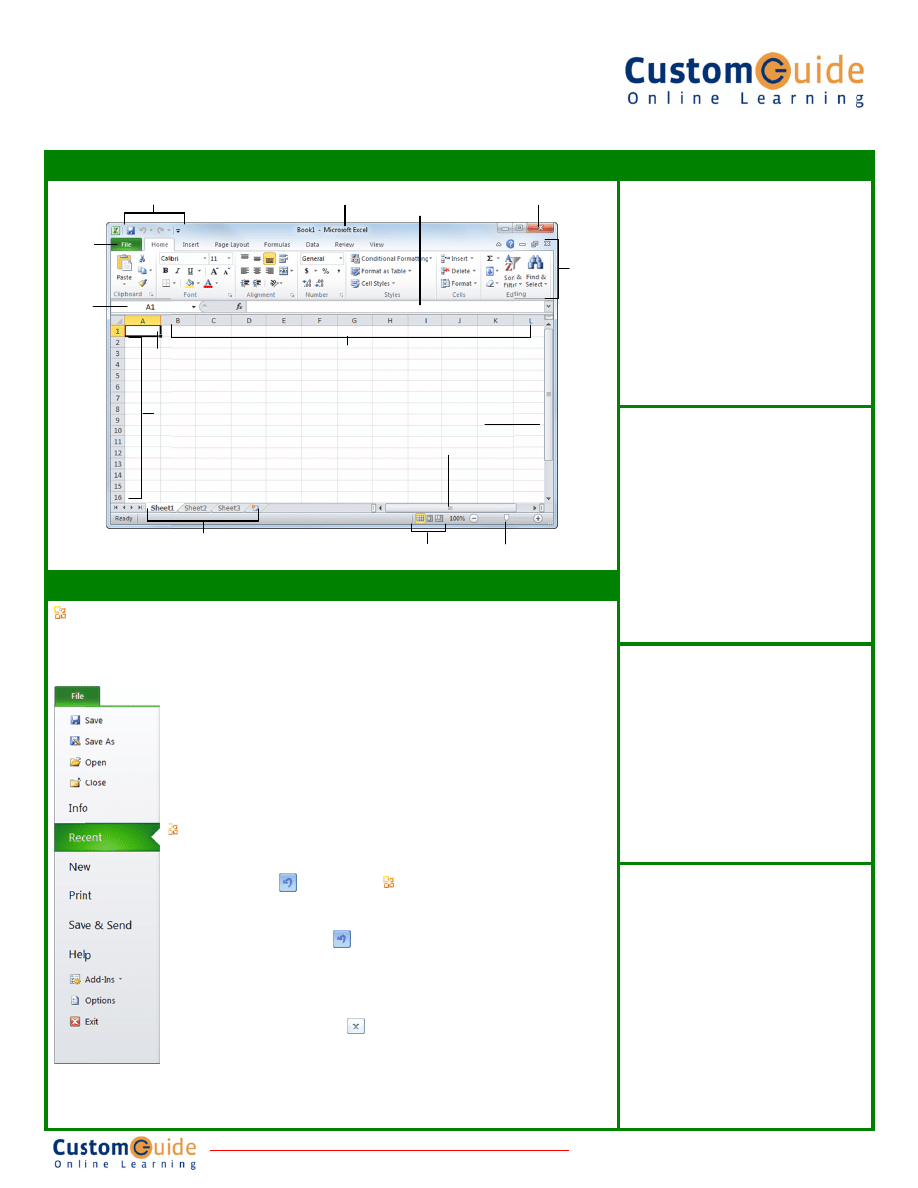
The
The
The
for w
Clos
File ta
Name
box
rosoft
®
Exce
uick Re
e Excel 20
e Fundam
e File tab menu an
working with a pro
se, New, and Prin
ab
Quic
e
Wo
Ro
Act
•
•
•
•
•
•
•
el 2
ference
010 Scree
mentals
nd Backstage view
ogram’s files, such
t.
ck Access Toolba
orksheet tabs
ows
ive cell
• To Create a Ne
the
File
tab and
Create
, or pres
• To Open a Wo
tab and select
O
<Ctrl>
+
<O>
.
• To Save a Wor
Save
button
on
Toolbar, or pres
To Preview an
Click the
File
ta
press
<Ctrl>
+
• To Undo: Click
on the Quick Ac
press
<Ctrl>
+
• To Redo or Re
Redo
button on
Toolbar, or pres
last command is
was not previou
• To Close a Wo
Close
button, o
• To Get Help: P
Help window. T
press
<Enter>
.
Custom
9 Cour
2010
e Card
en
w contain comman
h as Open, Save,
ar
Title
Col
ew Workbook: Cl
d select
New
, and
s
<Ctrl>
+
<N>
.
rkbook: Click the
Open
, or press
rkbook: Click the
the Quick Access
ss
<Ctrl>
+
<S>
.
d Print a Workbo
ab and select
Prin
<P>
.
k the
Undo
bu
ccess Toolbar, or
<Z>
.
epeat: Click the
n the Quick Access
ss
<Ctrl>
+
<Y>
. T
s repeated if Undo
usly used.
orkbook: Click the
or press
<Ctrl>
+
<
Press
<F1>
to open
Type your question
mizable Compute
rseware
9 On
0
ds
•
Cell a
addres
and ro
B2, et
by loo
•
To Se
keybo
•
To Se
select
down
<arro
pointe
•
To Se
Select
headin
To Min
Minim
Or, pre
tab
an
contex
• To Ch
File
ta
• To Us
slider
Zoom
the sli
• To Ch
the sta
select
e bar
View b
Form
lumns
ick
click
File
s
ook:
t
, or
tton
s
The
o
e
<W>
.
n the
n and
er Training
nline Learning
ddresses: Cells a
sses made from th
ow number, such a
c. You can find the
king at the Name
elect a Cell: Click
ard arrow keys to
elect a Cell Range
a range of cells. O
the
<Shift>
key w
ow keys>
to mov
er to the last cell of
elect an Entire Wo
t All
button where
ngs meet. Or, pres
nimize the Ribbo
mize Ribbon
butto
ess
<Ctrl>
+
<F1>
nd select
Minimize
xtual menu.
hange Program S
ab and select
Opti
se Zoom: Click an
to the left or right.
m Out
and
Zoom In
der.
hange Views: Clic
atus bar. Or, click
a view.
Scroll
bars
Zoom s
buttons
C
ula Bar
9 Skills Assessm
are referenced by
heir column letter
as cell A1, A2, B1
e address of a cel
Box.
a cell or use the
select it.
e: Click and drag t
Or, press and hold
while using the
ve the mouse
f the range.
orksheet: Click th
e column and row
ss
<Ctrl>
+
<A>
.
on: Click the
on on the Ribbon.
>
. Or, right-click a
e Ribbon
from the
Settings: Click the
ions
.
nd drag the zoom
. Or, click the
n
buttons on
ck a
View
button in
the
View
tab and
slider
Ribbo
Close button
ments
Keybo
Genera
Open a W
Create Ne
Save
Preview a
Close a W
Help
Run Spelli
Calculate
Create an
normal, or
Navigat
Move Betw
Right One
Left One C
Down One
Up One C
Down One
Up One S
To Cell A1
To Last Ce
Go To Dia
Editing
Cut
Copy
Paste
Undo
Redo
Find
Replace
Select All
Edit active
Clear cell
Format
Bold
Italics
Underline
Open Form
Dialog Box
Select All
Select ent
Select ent
Hide selec
Hide selec
columns
,
ll
to
d
he
e
e
n
on
Excel Quick
www.customg
Custom
Tel. (888) 9
oard Shor
al
Workbook
<
ew
<
<
nd Print
<
Workbook
<
<
ing Check
<
worksheets <
absolute,
<
r mixed referen
tion:
ween Cells <
<
e Cell
<
Cell
<
e Cell
<
Cell
<
e Screen
<
creen
<
1
<
ell
<
alog Box
<
<
<
<
<
<
<
<
<
e cell
<
contents
<
tting
<C
<C
<C
mat Cells <C
x
+ <
<C
tire row
<S
tire column <C
cted rows <C
cted
<C
k Reference © 20
guide.com | Pho
mizable Trainin
903-2432 | www.c
rtcuts
<Ctrl> + <O>
<Ctrl> + <N>
<Ctrl> + <S>
<Ctrl> + <P>
<Ctrl> + <W>
<F1>
<F7>
<F9>
<F4>
nce
<
↑>, <↓>,
<
←>, <→>
<Tab>
<Shift> + <Tab
<Enter>
<Shift> + <Ente
<Page Down>
<Page Up>
<Ctrl> + <Hom
<Ctrl> + <End>
<F5>
<Ctrl> + <X>
<Ctrl> + <C>
<Ctrl> + <V>
<Ctrl> + <Z>
<Ctrl> + <Y>
<Ctrl> + <F>
<Ctrl> + <H>
<Ctrl> + <A>
<F2>
<Delete>
Ctrl> + <B>
Ctrl> + <I>
Ctrl> + <U>
Ctrl> + <Shift>
<F>
Ctrl> + <A>
Shift> + <Space
Ctrl> + <Space>
Ctrl> + <9>
Ctrl> + <0>
011 CustomGuid
one 888.903.243
ng Materials
customguide.com
b>
er>
e>
>
e>
>
de
32
m
Edi
• To E
dou
• To C
• To C
in th
• To P
the
To P
wan
Hom
• To P
arro
Sele
• To C
the
• To C
Clic
• To M
mov
drag
• To I
the
Inse
• To D
click
the
• To I
and
the
For
•
To T
click
cell
•
To E
Typ
func
•
To I
and
•
To R
in th
•
To C
sign
•
To U
you
Cha
•
To C
cha
Cha
To I
char
inse
add
ting
Edit a Cell’s Con
ble-click the cell. E
Clear a Cell’s Co
Cut or Copy Data
he Clipboard group
Paste Data: Place
Paste
button in th
Preview an Item B
t to paste, click th
me tab, and select
Paste Special: Se
ow in the Clipboard
ect an option and
Copy Using Auto
selected cell(s), th
Complete a Serie
ck and drag the fill
Move or Copy Ce
ve or copy, positio
g to the destinatio
Insert a Column o
row you want to in
ert
button in the C
Delete a Column
k and select
Delet
Cells group on the
Insert a Commen
click the
Review
Comments group
rmulas an
Total a Cell Rang
k the
Sum
button
range and click th
Enter a Formula:
e
=
and enter the
ctions. Press
<Ent
Insert a Function
d click the
Inse
Reference a Cell
he formula or click
Create an Absolu
n or press
<F4>
af
Use Several Ope
want to calculate
arts
Create a Chart: S
rt and click the
Ins
arts group and sele
nsert a Sparkline
rt and click the
Ins
ert from the Sparkl
the sparkline and
tents: Select the
Edit the cell conte
ntents: Select the
a: Select cell(s) an
p on the Home tab
e the insertion poin
he Clipboard group
Before Pasting: P
e
Paste
button lis
a preview option
elect the destinatio
d group on the Ho
click
OK
.
o Fill: Point to the
hen drag to the de
es Using AutoFill
handle to comple
ells Using Drag a
on the pointer over
n cells. To copy, h
or Row: Right-clic
nsert. Select
Inser
Cells group on the
or Row: Select th
te
from the contex
e Home tab.
nt: Select the cell w
tab on the Ribbon
. Type a comment
nd Functi
ge: Click the cell w
in the Editing grou
he
Sum
button ag
Select the cell wh
e formula using va
ter>
when you’re f
n: Select the cell w
ert Function
butto
in a Formula: Ty
k the cell you want
ute Cell Referenc
fter selecting cell(s
erators or Cell Ra
first in parenthese
Select the cell rang
sert
tab on the Rib
ect the chart you w
e: Select the cell r
sert
tab on the Rib
ine group. Select
click
OK
.
Custom
9 Cours
cell and click the
F
nts and press
<En
e cell(s) and press
nd click the
Cu
b.
nt where you wan
p on the Home tab
Place the insertion
t arrow in the Clip
to view the item.
on cell(s), click the
ome tab, and selec
fill handle at the b
estination cell(s).
: Select the cells t
te the series.
and Drop: Select t
r any border of the
hold down
<Ctrl>
ck to the right of th
rt
from the contex
Home tab.
he row or column
xtual menu, or click
where you want to
n. Click the
New C
t and click outside
ions
where you want to
up on the Home ta
ain.
here you want to in
alues, cell referenc
finished.
where you want to
on on the Formula
ype the cell referen
t to reference.
ce: Precede the ce
s) to make it abso
anges: Enclose the
es.
ge that contains th
bbon. Click a char
want to use from t
ange that contains
bbon. Select the s
the cell or cell ran
mizable Compute
seware
9 Onl
Formula Bar
, or
nter>
.
s the
<Delete>
key
ut
or
Copy
but
t to paste and clic
b.
n point where you
pboard group on th
e
Paste
button list
ct
Paste
Special
.
bottom-right corne
that define the ser
the cell(s) you wan
e selected cell(s), t
key while dragging
he column, or belo
tual menu, or click
heading(s). Right-
k the
Delete
butto
o insert a commen
Comment
button i
e the comment box
insert the total an
ab. Verify the sele
nsert the formula.
ces, operators, an
enter the function
Bar.
nce (for example,
ell references with
lute.
e part of a formula
he data you want t
rt type button in th
the list.
s the data you wa
parkline you want
ge where you wan
er Training
line Learning 9
Form
y.
tton
k
he
t
r of
ries.
nt to
then
g.
ow
k the
-
on in
nt
n
x.
nd
cted
nd
n
B5)
a $
a
to
e
nt to
to
nt to
• To For
click th
dialog b
• To For
tab, or
Format
• To Cop
formatt
Clipboa
the cop
• To App
Click th
Ribbon
• To For
formatt
Home t
• To App
click th
gallery.
To App
apply co
Styles g
then se
• To Adj
column
border
Work
•
To Inse
sheet ta
•
To Del
button
click th
•
To Ren
the wor
•
To Cha
Color
,
•
To Mov
Hold do
•
To Spl
near th
•
To Fre
window
the Win
•
To Sele
Layout
group,
• To Adj
Layout
or click
Setup d
•
To Pro
use the
To Rec
select
In
Manage
9 Skills Assessm
matting
rmat Text: Use the
e
Dialog Box Lau
box.
rmat Values: Use
click the
Dialog B
t Cells dialog box.
py Formatting wi
ting you want to co
ard group on the H
pied formatting to.
ply a Cell Style:
S
he
Cell Styles
but
n and select a style
rmat a Cell Range
ting to. Click the
F
tab on the Ribbon
ply a Document T
e
Themes
button
.
ply Conditional F
onditional formatti
group of the Home
et the conditions in
ust Column Widt
n header, or the bo
to AutoFit the colu
kbook Ma
ert a New Works
abs at the bottom
ete a Worksheet
in the Cells group
e sheet tab and s
name a Workshee
rksheet, and press
ange a Workshee
and choose the c
ve or Copy a Wo
own the
<Ctrl>
ke
it a Window: Dra
he scroll bars) onto
eeze Panes: Place
w, click the
View
ta
ndow group, and s
ect a Print Area:
t
tab on the Ribbo
and select
Set
Pr
just Page Margin
t
tab on the Ribbo
k the
Dialog Box L
dialog box.
otect or Share a W
e commands in the
cover Autosaved
nfo
. Select an aut
e Versions
button
ments
e commands in th
uncher
in the Fon
the commands in
Box Launcher
in t
th the Format Pa
opy and click the
Home tab. Then, s
Select the cell(s) y
tton in the Styles g
e from the gallery.
e as a Table: Sele
Format as Table
b
n and select a table
Theme: Click the
in the Themes gr
ormatting: Selec
ing. Click the
Con
e tab. Select the fo
n the dialog box.
th or Row Height
ottom border of th
umn or row accord
anageme
heet: Click the
Ins
of the program sc
: Select the sheet
p on the Home tab
elect
Delete
from
et: Double-click th
s
<Enter>
.
et’s Tab Color: R
color you want to a
orksheet: Click an
ey while clicking an
ag either the vertic
o the worksheet.
e the cell pointer w
ab on the Ribbon,
select an option fr
Select the cell ran
on, click the
A
rint
Area
.
ns, Orientation, S
on and use the com
Launcher
in the P
Workbook: Click t
e Changes group.
Versions: Click t
tosaved version fr
n and select
Reco
Excel Quick
www.customg
he Font group on t
nt group to open th
n the Number grou
the Number group
ainter:
Select the
Format Paint
select the cell(s) y
you want to apply
group of the Home
.
ect the cells you w
button in the Styles
e format from the
Page Layout
tab
roup, and select a
t the cells to which
nditional Formatti
ormatting scheme
t: Drag the right bo
e row header. Dou
ding to its content
nt
sert Worksheet
ta
creen. Or, press
<
t want to delete, cl
b, and select
Delet
the contextual me
he sheet tab, ente
Right-click the shee
apply.
d drag a tab to mo
nd dragging to cop
cal or horizontal sp
where you want to
click the
Freeze P
om the list.
nge you want to p
Area
button in the
ize, and Breaks:
mmands in the Pa
Page Setup group
the
Review
tab on
.
the
File
tab on the
rom the Versions l
over Draft Version
Reference © 20
guide.com | Pho
he Home tab, or
he Format Cells
up on the Home
p to open the
cell(s) with the
ter
button in the
ou want to apply
a cell style to.
e tab on the
want to apply table
s group of the
gallery.
on the Ribbon,
theme from the
h you want to
ing
button in the
e you wish to use,
order of the
uble-click the
ts.
ab next to the
<Shift>
+
<F11>
.
lick the
Delete
te Sheet
. Or, right
enu.
r a new name for
et tab, select
Tab
ove a worksheet.
py the worksheet.
plit bar (located
freeze the
Panes
button in
rint, click the
Page
e Page Setup
Click the
Page
age Setup group,
to open the Page
n the Ribbon and
e Ribbon and
ist. Or, click the
ns
.
011 CustomGuid
one 888.903.243
e
t-
e
e
2
Wyszukiwarka
Podobne podstrony:
w cusb20 Microsoft Office 2010 Free Quick Reference Card
w cusb12 Microsoft Visio 2010 Free Quick Reference Card
w cusb25 Microsoft Project 2010 Free Quick Reference Card
w cusb06 Microsoft Word 2010 Free Quick Reference Card
w cusb23 Microsoft Outlook Web App 2010 Free Quick Reference Card
w cusb02 Access 2010 Free Quick Reference Card
w cusb08 Microsoft Internet Explorer 9 Free Quick Reference Card
w cusb32 Microsoft Outlook 2013 Free Quick Reference Card
w cusb04 Share Point Foundation 2010 Free Quick Reference Card
w cusb13 Adobe Acrobat 10 Free Quick Reference Card
w cusb05 Windows 7 Free Quick Reference Card
Microsoft Excel 2010 PL Jezyk VBA i makra Akademia Excela e21vba
Microsoft Excel 2010 PL Formuly i funkcje Akademia Excela e21fae
Microsoft Excel 2010 PL Formuly i funkcje Akademia Excela e21fae
Microsoft Excel 2010 PL Formuly i funkcje Akademia Excela e21fae
Microsoft Excel 2010 PL Formuly i funkcje Akademia Excela
VIM Quick Reference Card
więcej podobnych podstron