T
hank
Y
ou
!
You have successfully downloaded your
Woodsmith project plan.
What really makes a table saw so versatile are the jigs and accessories that
improve your saw's overall performance.
Get More from Your Table Saw
...
at PlansNOW.com
Download Today at PlansNOW.com...$4.95
Build our 10 BEST Table Saw Jigs!
Build stunning furniture that's
both functional and beautiful.
You Can Build It
...
at PlansNOW.com
STRAIGHT,
FLAT &
SQUARE
© 2007 August Home Publishing Co.
Successful stock prepa-
ration actually starts
when you begin pick-
ing out the lumber for
a project. After all, the
boards you choose to
bring home will deter-
mine how easy it will be
for you to end up with flat
and straight workpieces. Here
are a few things to keep in mind.
Thicker is beTTer
. Most boards are
either rough sawn or surfaced two
sides (S2S) or four sides (S4S).
(These terms are defined briefly in
the box on page 2.) Rough sawn is
exactly what it sounds like — rough
stock that hasn’t been “cleaned up.”
S2S and S4S refer to boards that have
been planed so their faces are parallel
(but not necessarily flat).
Whenever possible, I try to buy
rough lumber. It means more work
jointing and planing. But 4/4 (read
“four quarter”) rough stock is close
to 1" thick. On the other hand, 4/4
boards that have been surfaced (S2S
or S4S) are only about
13
/
16
" thick.
So if there is any cupping or bowing
in these boards (either now or as
they acclimate to your shop), you’ve
only got
1
/
16
" to work with before
they’re down to
3
/
4
" thick. Buying
rough stock means I have more
control over the final product.
be picky
. This is also a good time
to be really picky about the boards
you choose. Almost every board will
bow or cup a little, but badly warped
pieces should be passed over. And
if I can see that it’s twisted, I’ll put it
right back into the stack.
buy plenTy
. Finally, I try to buy at
least 20% more wood than a project
calls for. This can feel like money
down the drain, but I remind myself
that there will be knots and other
defects to cut out, mistakes I’ll make,
and test pieces to cut. Plus, if I buy
extra wood, I won’t be tempted to use
pieces that are warped.
It’s tempting to start working as soon
as the boards are hauled into the
shop. But this is a good time to do a
little procrastinating. That’s because
the humidity in your shop is probably
drier than the store, lumberyard, or
mill where you bought the wood. And
as the lumber acclimates to its new
home, you may see some changes.
For instance, the ends of a board can
check, or a board that was flat in the
store may cup or bow.
The thing is, you won’t know for
a week or two, and if you jump right
in, there may be some unwanted sur-
prises in your finished workpieces.
Giving the wood time to move will let
you plan around these changes when
laying out the pieces.
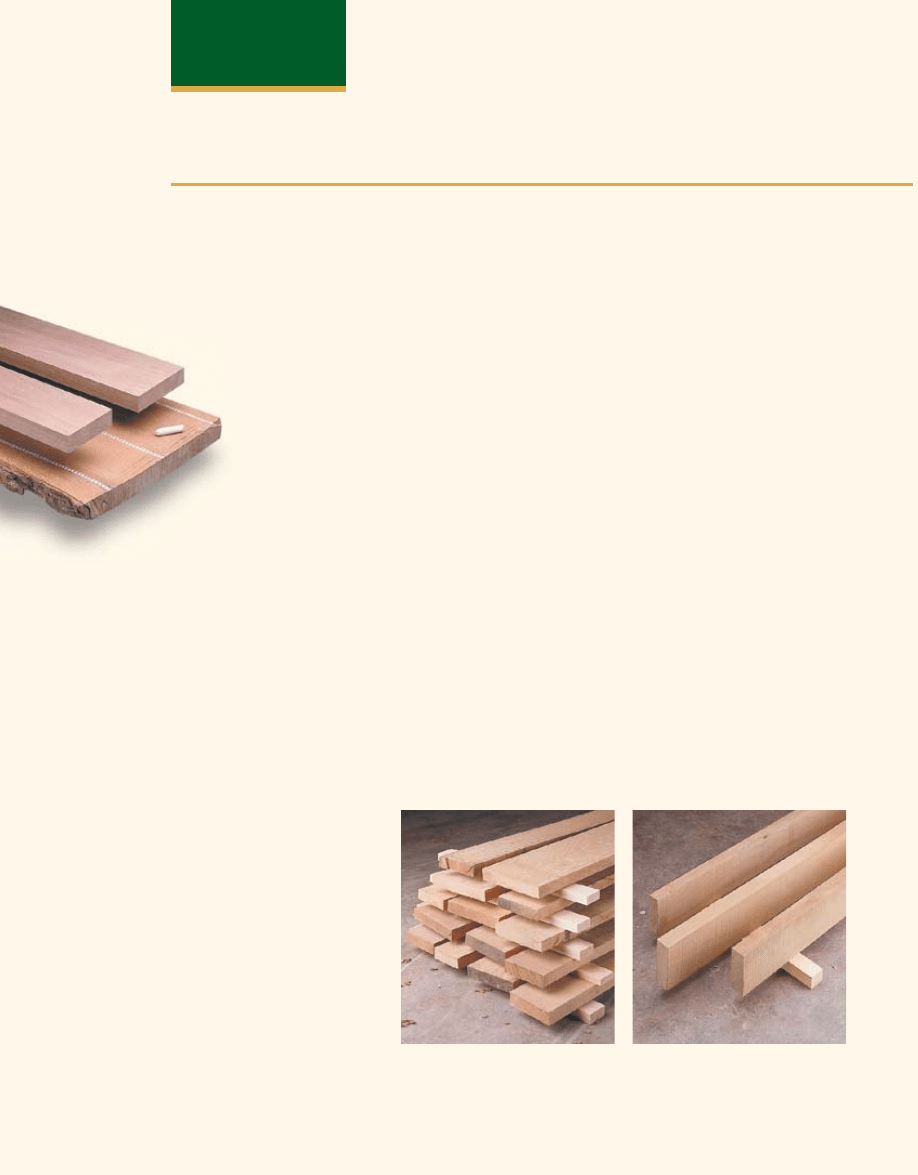
long Term sTorage
. Besides giv-
ing the wood time, you also want to
make sure it acclimates evenly. So I
“sticker” the boards when I first bring
them into the shop. This just means
stacking them with strips of wood in
between to allow air to circulate on all
sides, see left photo below.
sToring projecT pieces
. But that’s
not the end of the wood movement.
Every time a face is planed or an
edge is ripped, the wood may
move a little. So again, to allow
air to circulate, I’ve gotten into
the habit of setting pieces on edge
when I’m not working with them,
see right photo below.
Give the Wood Time to Move
Choose Your Boards Carefully
{
Startingwith
roughstockgives
youmorecontrol
overthefinal
workpieces.
S
traight
, F
lat
& S
quare
Straight,flat,andsquareboardsareeasiertoworkwith,canbeglued
togetherwithfewerproblems,andmakefordoorsanddrawerfrontsthat
stayflat.Here’showwegetourlumberfromroughtoready.
i
n
t
he
W
oodSmith
S
hop
1
www.Woodsmith.com
© 2007 August Home Publishing Co. All Rights Reserved.
{
Let it sit.Toletthewoodadjust
tothemoisturelevelinyourshop,
stackboardswithsmallstripsin
betweenthem.
{
Setting pieces aside.Isetproject
piecesedgedownonsmallstrips
at the end of the day to let air
circulatearoundthem.
LUMBER LINGO
2
www.Woodsmith.com
© 2007 August Home Publishing Co. All Rights Reserved.
After the pieces have been roughed
out, the next thing I do is get one face
of each board flat. My tool of choice
for this is the jointer, though you
could also use a hand plane. (A thick-
ness planer normally won’t flatten the
face of a board unless the opposite
face has already been made flat.)
Though some people just think of
a jointer as an edge-cutting tool, it’s
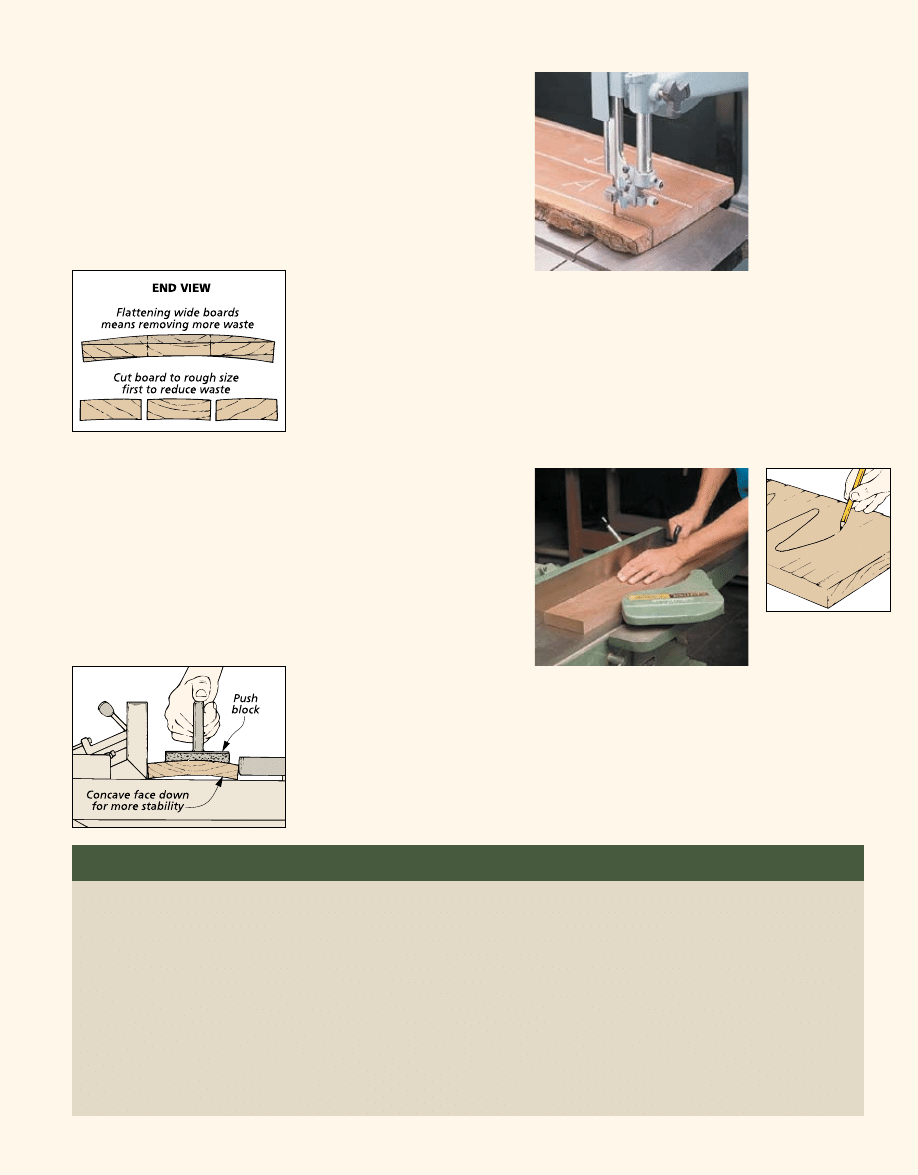
After the lumber has acclimated to
your shop, what’s the next step? Do
you joint and plane the long, rough
boards flat or cut them to rough size?
It might seem to take less time and
effort to work with a few long boards.
But it’s actually more efficient to cut
them to rough size first.
more efficienT
. With a larger board,
Cut to Rough Size First
bow:
A board that is warped along the
length of its faces. (It will rock from end
to end on one face.)
check:
A split that occurs on the end of a
board as it dries out.
crook:
A board that is warped along the
length of its edges. (It will rock from end
to end on one edge.)
cup:
A board that is warped across the
width of its faces. (It will rock from side-
to-side on one face.)
Get One Face Perfectly Flat
{
Totellwhen
thefaceisflat,
scribblealine
acrosstheboard
andcontinue
jointinguntil
allthemarks
disappear.
you have to remove more wood to
get it flat. Take a cupped board for
example. To joint and plane across
its entire width means removing a
lot of material at the center, as shown
in the drawing. But if the board is
ripped into narrow pieces first, there
will be much less waste.
rough cuT pieces
. So after the wood
has acclimated, the next thing I do
is lay out the workpieces of the proj-
ect and cut them to rough size, as
shown in the photo. And I don’t just
lay out the initial pieces. This is the
best time to select boards for highly
visible areas, like drawer fronts, door
frames, and top panels.
allow for snipe
. When roughing out
the pieces, it’s a good idea to leave
them a little long. The problem is
that most thickness planers (mine
included) leave “snipe” at the end of
the board, and the ends of the piece
will need to be trimmed a bit.
also great for flattening a board’s face.
And the procedure is the same.
joinTer basics
. The piece should
be fed into the cutterhead so the
edge grain from left to right “runs
downhill.” This way, the jointer
knives won’t catch the wood and
cause tearout. And if the board is
cupped or bowed, I place the “hollow”
face down on the bed (see drawing)
so there are two points that keep the
board from rocking.
lighT passes
. Jointing the face of a
wide board requires a firm grip and
a good push block. But you don’t
need to “hog out” a lot of material in
one pass. My jointer is usually set to
remove
1
/
32
" or less. And to help me
check my progress (especially with
S2S and S4S boards, since the faces
are already smooth), I scribble lines
across the face, as you can see in the
margin drawing. When the lines are
completely gone, the face is flat.
“four QuarTer” sTock (4/4):
Designation
for hardwood that is rough cut 1" thick. If
the board has been surfaced, the actual
thickness will be closer to
13
/
16
". (5/4,
6/4, and 8/4 are also common.)
rough sawn:
Boards that have been dried
and cut to rough size, but their faces
haven’t been surfaced.
snipe :
A deeper slice that’s planed off the
ends of a board with a thickness planer.
surfaced four sides (s4s):
Hardwood lumber
that has been surfaced (planed) so both
faces and both edges are smooth.
surfaced Two sides (s2s):
Hardwood lumber
that has been surfaced (planed) on both
faces, but the edges have been left rough.
(Faces are parallel but not necessarily flat.)
TwisT:
A warped board that is distorted
on both its faces and edges. One corner
is lifted, and the ends aren’t parallel.
warp:
Any deviation from true or square
in a piece of wood.
{
Roughing it.Cuttingpiecesto
roughsizefirstmeansthere’sless
material to remove to get them
flatandstraight.
{
Joint one face.Flatteningone
facefirstisthekeytoendingup
withpiecesthatareflat,straight,
andsquare.
3
www.Woodsmith.com
© 2007 August Home Publishing Co. All Rights Reserved.
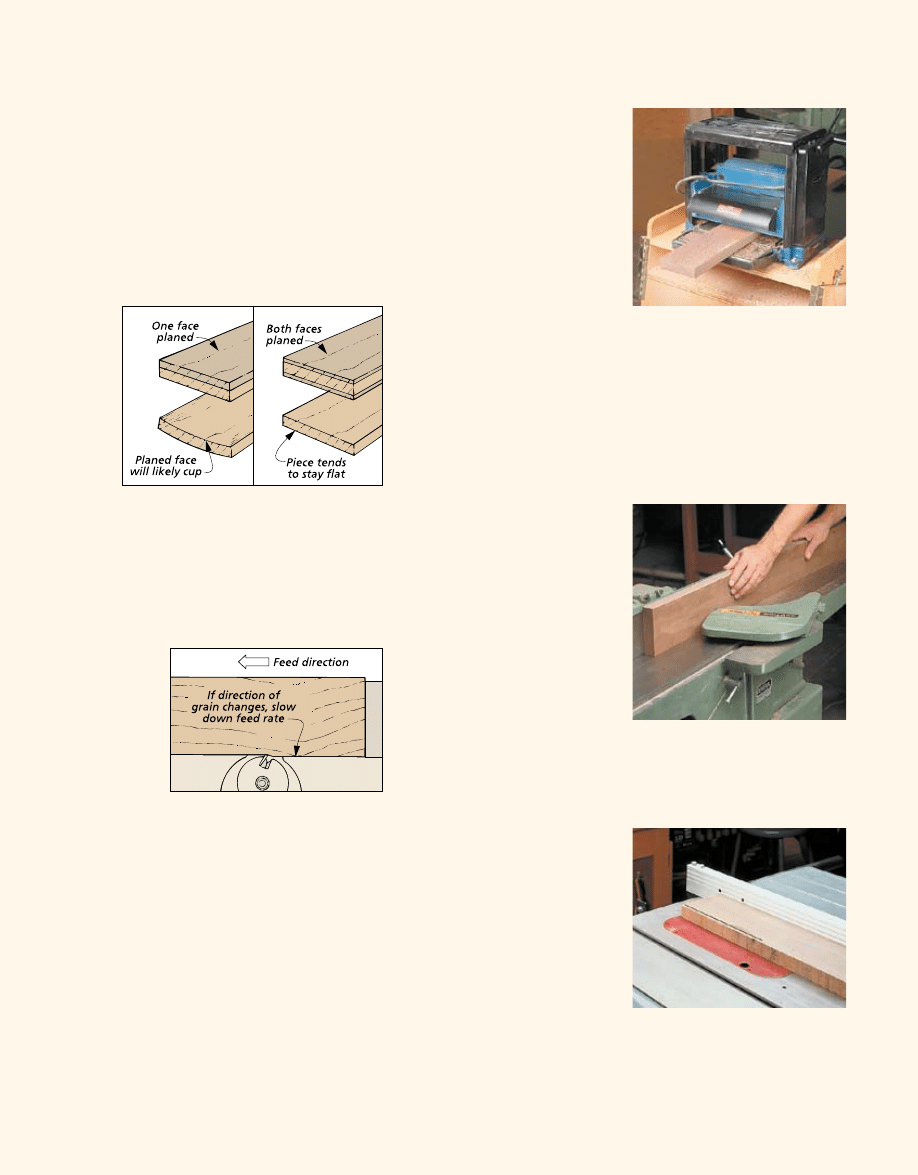
Thickness Stock with Planer
After one face has been jointed (or
hand planed) flat, the board is ready
to be run through a thickness planer.
The planer does two things. It makes
the second face flat and parallel to the
first. And it reduces the thickness of
the stock. Note: It bears repeating that
if you don’t start with one flat face, a
thickness planer will only make the
faces of the board parallel — but they
Now that both faces are flat and
parallel, all that’s left is to make
sure the edges of the workpiece
are straight and square to the faces.
The first edge is straightened on
the jointer. Just make sure the
Joint an Edge
To get the second edge straight and
parallel to the first, I simply walk the
board over to the table saw and rip it
to final width, making sure that the
jointed edge is against the rip fence,
like you see in the photo.
clean edges
. However, sometimes
a saw blade will leave saw marks or
burn the edge of the workpiece. You
could remove these by sanding or
scraping, but a quicker way is to use
the jointer after the piece has been
ripped on the table saw. (Cutting it
on the table saw first ensures that the
edges will be parallel.)
Cut to Final Size
won’t necessarily end up flat.
planer basics
. Feeding a board
through a planer is even easier than
pushing it over a jointer. After all, the
feed rollers do most of the work. I still
like to take light passes (
1
/
32
" or so)
and take care to feed the piece so the
cutterhead is cutting with the grain.
(Remember, a planer shaves off the
top
face of the piece.)
plane boTh faces
. If there’s more
thickness planing to do after both
faces are flat and parallel, I usually flip
the piece between passes. Planing the
same amount from each face like this
“cancels out” (or at least minimizes)
any cupping or bowing that happens
after the fresh wood is exposed to the
air, see drawing.
boards of a feaTher
. When planing,
it’s important that the pieces end up
the same thickness. So I run all the
boards through the planer at each
setting before changing it. Thinner
pieces can be added into the works
as you adjust the depth of cut.
fence is 90° to the table and joint
the concave edge until you can
“hear” the jointer cutting along the
entire length of the piece.
Again, you want to cut with
the grain, but with many boards
(especially longer ones), the grain
direction may change, as it does in
the drawing at left.
This shouldn’t be too big a prob-
lem. As you’re jointing, slow down
when you get to the point where the
grain direction changes. This way,
the knives will be taking smaller
“bites,” and you’ll be less likely to
end up with any chipout.
In this case, I rip the board so it’s
1
/
32
" wider than the final width. Then
make a light pass on the jointer.
sTarT over
. In a perfect world, this
would be the end of the process, and
you could start on the joinery. But
occasionally I’ll discover that a piece
I had milled straight and flat the day
before has warped enough overnight
to prevent me from using it. It wasn’t
that I’d done anything wrong; it’s just
that wood moves. If this happens,
don’t be afraid to start over with a
new piece. In the end, it’ll save you
time (and frustration).
{
Thicknessing the stock.Aplaner
notonlyreducesthethicknessofthe
board,itcreatesafacethat’sflatand
paralleltothejointedface.
{
Joint an edge.Nowthatbothfaces
areflatandparallel,youcanbegin
toworkontheedges.Soit’sbackto
thejointertocleanuponeedge.
{
Final edge.Togetthesecondedge
tobestraightandparallelwiththe
first,itcanberippedonthetable
saw(andcleaneduponthejointer,
ifnecessary).
Wyszukiwarka
Podobne podstrony:
135 As i przezbrajanie zadęcia A flat and retooling Jay Friedman, Mar 6, 2007
Hirneise, Lothar Chemotherapy Helps Cure Cancer, And The Earth Is Flat (Article, Ode 10 2003)(1)
72 Handling straight shots at head – height and midriff
Enviroment Weather and climate (104)
dobble irregular verbs black and white square
104 A Guide to Buying and Selecting Lumber
FIDE Trainers Surveys 2013 04 01, Georg Mohr Bobby Fischer and the square d5
Abramelins Magick Squares Compiled and Corrected for the First Time by Aaron Leitch
WHEAT Everyday I Said a Prayer for Kathy and Made a One Inch Square CD (Empyrean Records) SKY026sky
Flat square stitch
Inoculation strategies for victims of viruses and the sum of squares partition problem
stamitz concerto for clarinet and bassoon in b flat fagot
Londey, Johanson; A correction to Apuleius and the square of opposition
The Square and Compasses In Search of Freemasonry v1 by Donald HB Falconer
Simple Retrofitted Flat Plate Solar Water and Air Heaters
Andrei Codrescu The Posthuman Dada Guide Tzara and Lenin Play Chess (The Public Square Book Series)
Simulation, construction and testing of a two cylinder solar Stirling engine powered by a flat plate
HAESAS 104 Lord and Lady
Postmodernity and Postmodernism ppt May 2014(3)
więcej podobnych podstron