How to make a Coffee Table
STEP BY STEP INSTRUCTIONS - METRIC AND INCHES
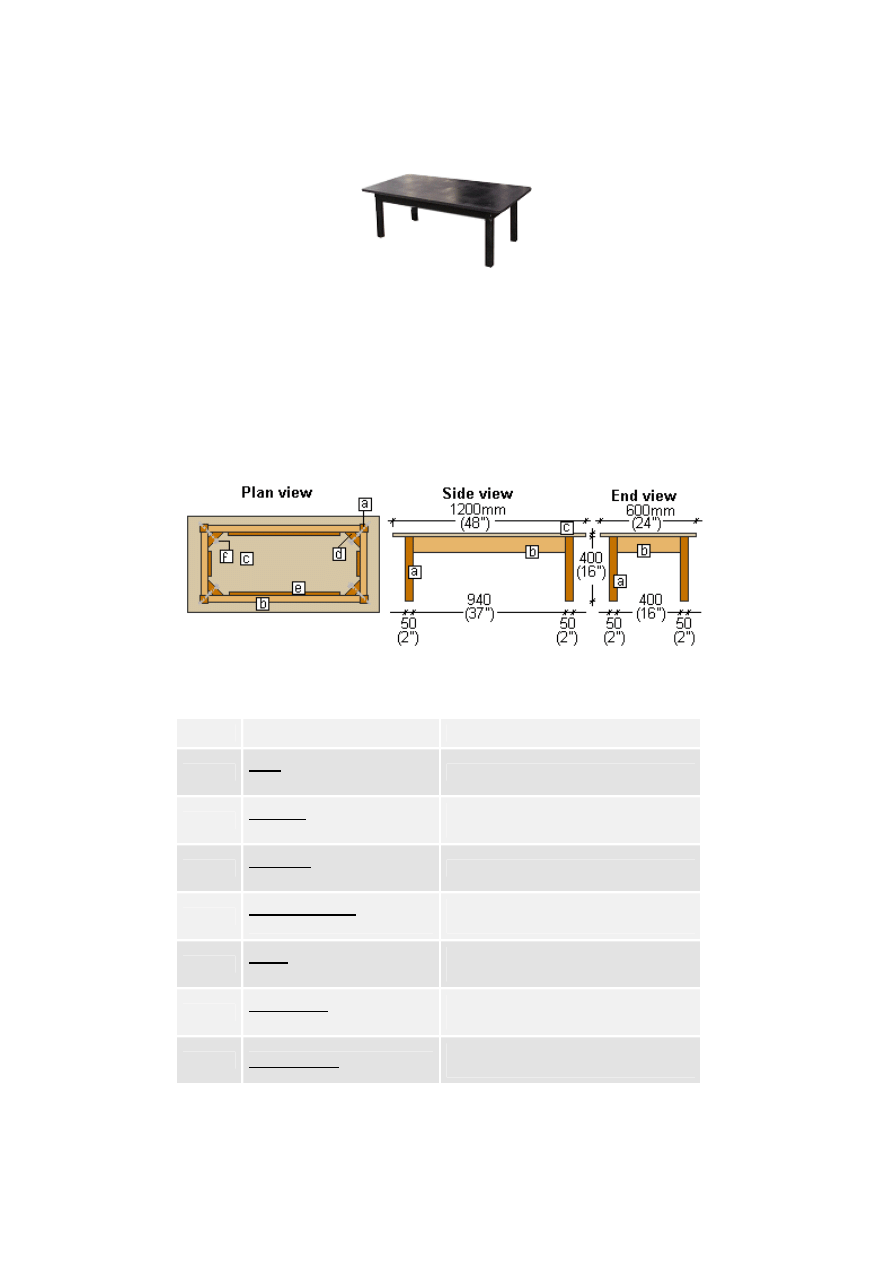
1200mm x 600mm (2ft x 4ft) Lounge-room coffee table.
This project, as with other Buildeazy projects, is designed with the home
handyman or DIYer in mind. Joints that might require the expertise of a more
seasoned woodworker are non-existent. Instead, all joints are secured with
bolts and/or screws and maybe a bit of glue. Because of this, the project only
requires the most basic of tools to undertake a professional job, but does not
lack in strength.
The Plans
The Cutting List
Item
Description
Quantity and Length
a.
Legs: 50mm x 50mm
(2"x2")
4 @ 400mm (16")
b.
Top rails: 100mm x 40mm
(1 1/2" x 4")
2 @ 940mm (37") and 2 @ 400mm
(16")
c.
Table top: 20mm (3/4")
board
1 @ 1200mm x 600mm (2ft x 4ft)
d.
Corner supports: 100mm x
50mm (2"x4")
4 @ 150mm (6") long and angled in
at 45degrees both ends.
e.
Fillets: 25mm x 25mm
(1"x1")
2 @ 150mm (6") and 2 @ 700mm
(28")
f.
Coach bolts: 6mm (1/4")
thick
4 @ 150mm (6") and washers and
wing-nuts to suite.
Screws
Wood screws:
30 @ 40mm (1 1/2") long and 16 @
60mm (2 1/2") long.
The Instructions
1
Cutting the members and a bit about the timber.
Cut all the members (pieces of wood) to the measurements as shown
above. The timber or lumber widths and thicknesses, are common sizes
that can be obtained from most building suppliers or lumber stores.
Also, note that the widths and thickness sizes stated above are the sizes before
the wood is dressed or gauged. For example: a piece of 100mm x 50mm (2x4)
timber might actually be 90mm x 45mm (1 1/2"x3 1/2").
The type of timber or lumber is a personal choice but should be of a good
grade. Are you going to paint the finished table? Maybe stain and varnish it?
Take this into consideration when choosing the type of wood. For the table top,
use a piece of 20mm (3/4") thick MDF (medium density fibre board), custom
wood, plywood or similar type of board.
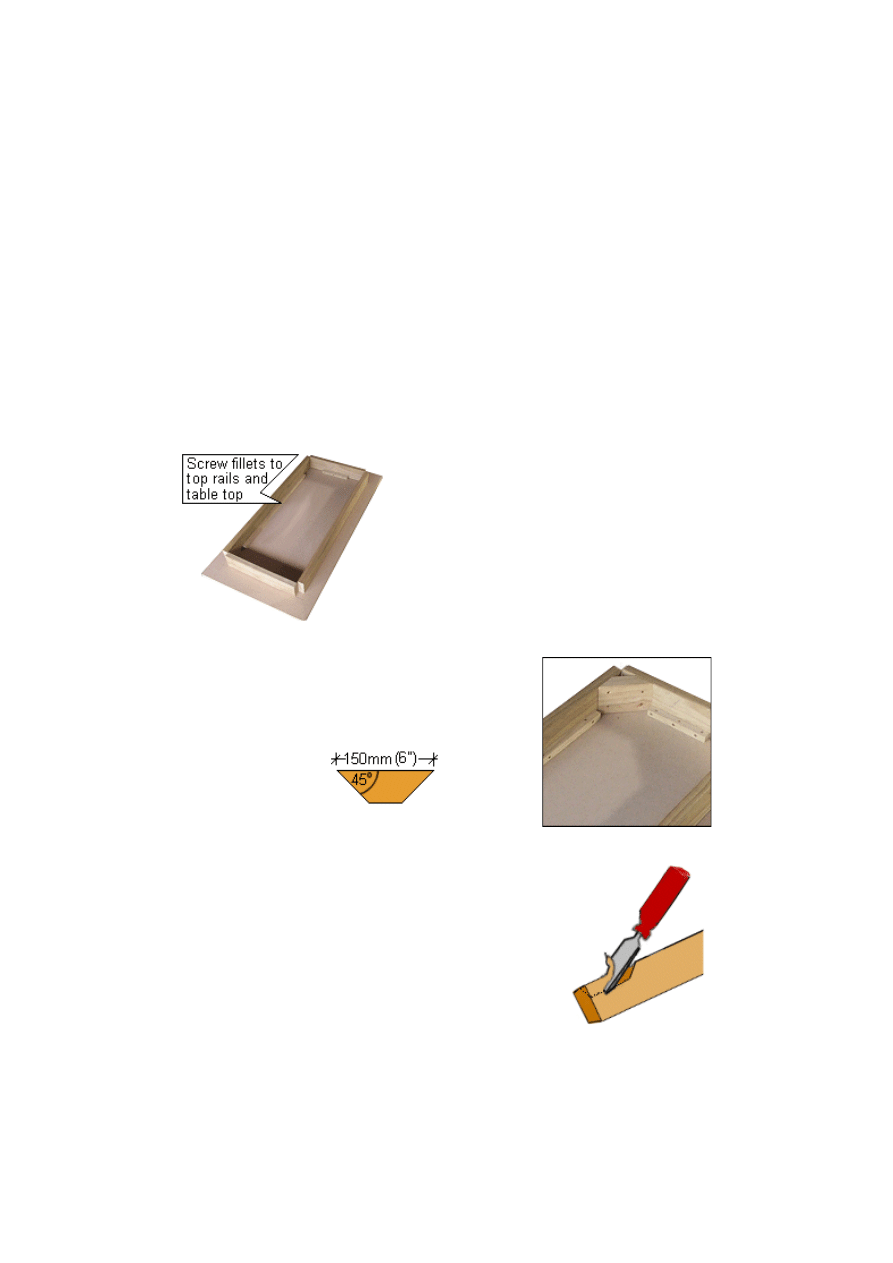
2
Fixing the top rails to the table top.
Place the table top (c) upside down on an even floor, saw stools or
workbench. Position the top rails (b) on the underside of the table top so
that they are touching at each corner and also centred on the table top,
as shown in the diagram.
Next, lay the 4 fillets (e) in place against the top
rails (b) and the underside of the table top (c).
Screw through the fillets (e) into the table top (c)
and then screw through the fillets (e) into the top
rails (b). Sometimes it might be easier to pre-drill
the screw holes through the fillets.
3
Fixing the corner supports to the top rails.
Lay the 4 corner supports (d) in place in the
corners against the top rails (b) and fasten with
screws; four to each corner.
corner support
4
Chisel an edge off the top of each leg.
With a chisel, take the arris (sharp edge) off one
side of each leg (a), beginning about 60mm (2 1/2")
down from the top and continuing up to the top.
Make the depth of the chisel cut about 10mm
(3/8"). This is so the bolt-head will be against a flat
area of wood rather than an arris.
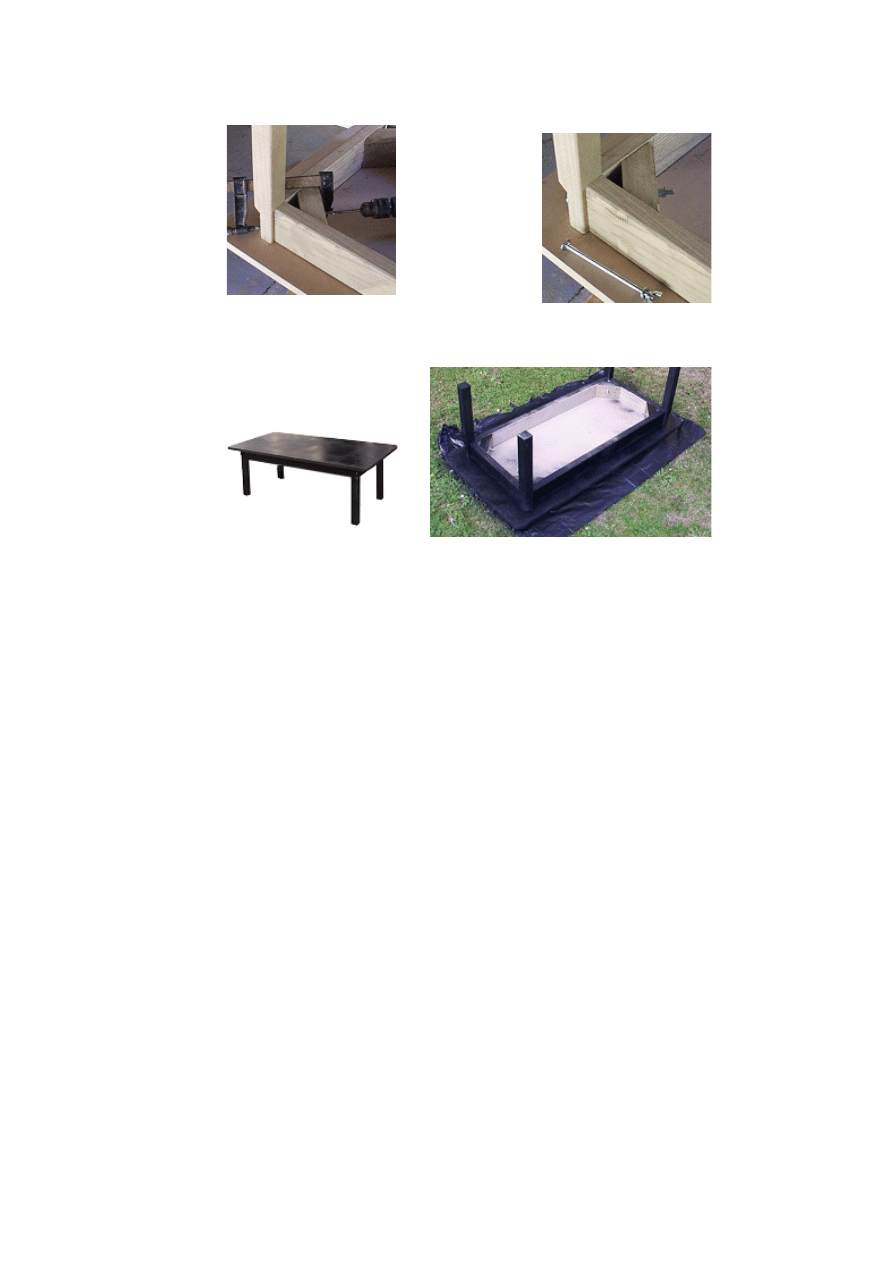
5
Fix the legs to the
top rails.
Clamp the legs to
the top rails (b),and
drill a hole all the
way through each
corner support (d)
and leg (a). Make
the holes slightly
bigger than the
thickness of the
bolts. Insert the
bolts and tighten.
6
Final touches.
Finally paint, stain, varnish or
oil the table.
Wyszukiwarka
Podobne podstrony:
Coffee Table 1
Coffee Table 2
Coffee Table 1
Games and Coffee Table (2)
Coffee Table
pine coffee table
Table Queen Anne Living Room Tables (Coffee, End)
Table maple coffee table with storage (Hinge Top)
asian coffee table
Klaus J Joehle Roberta s Coffee Table Book of Love
Games and Coffee Table (1)
Table Mosaic Tiled coffee table
coffee table
Coffee Table 3
square coffee table
Trestle Coffee Table
Table Spiral Coffee Table (Carved)
Coffee Table 2
więcej podobnych podstron