Swinburne Online Education
Tools of Modern Astronomy
© Swinburne University of Technology
Module HET606:
Tools of Modern Astronomy
Activity 1:
What is a CCD?
CCD imaging in amateur and
professional astronomy.
CCD imaging in amateur and
professional astronomy.

Summary
In this first of two activities we will examine:
1.
What is a CCD
3.
How CCDs work
4.
Problems with CCDs and how to get around
them
2.
Advantages of CCDs (particularly over older
technologies like photography)
In the second activity we will learn how to use
CCDs effectively for astronomy.
There is also an
which lists some of the
many terms used when discussing CCDs.

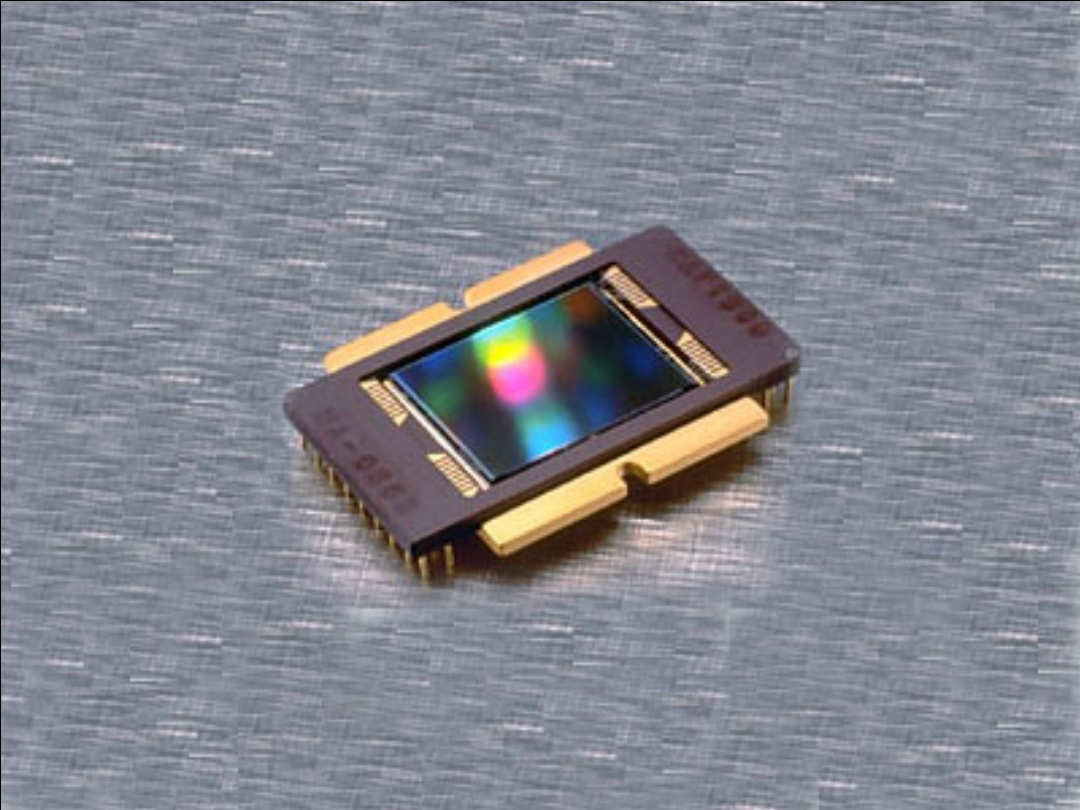
The acronym CCD stands for Charge Coupled
Device. CCDs were invented at Bell Laboratories in
the early 1970’s.
What is a CCD?
It is this application which has revolutionised
astronomy and we will study further in these
lessons.
They were originally designed as computer
memory but it quickly became apparent that
there were other uses for them. Their primary
use today is as a solid-state imaging device.

In this discussion of CCDs we will only discuss
their astronomical use. CCDs are in widespread
use today in all manner of devices (video and still
cameras, scanners etc.) but none of these
applications are as demanding as astronomy.
Astronomical use of CCDs
Most CCDs are used in places where there is
plenty of light available and so concerns of
efficiency are not relevant. Exposures are brief
and so noise sources are unimportant. The
subject matter is forgiving and so cosmetic
blemishes are not noticed. Alas, this is not so
when trying to detect a distant galaxy.
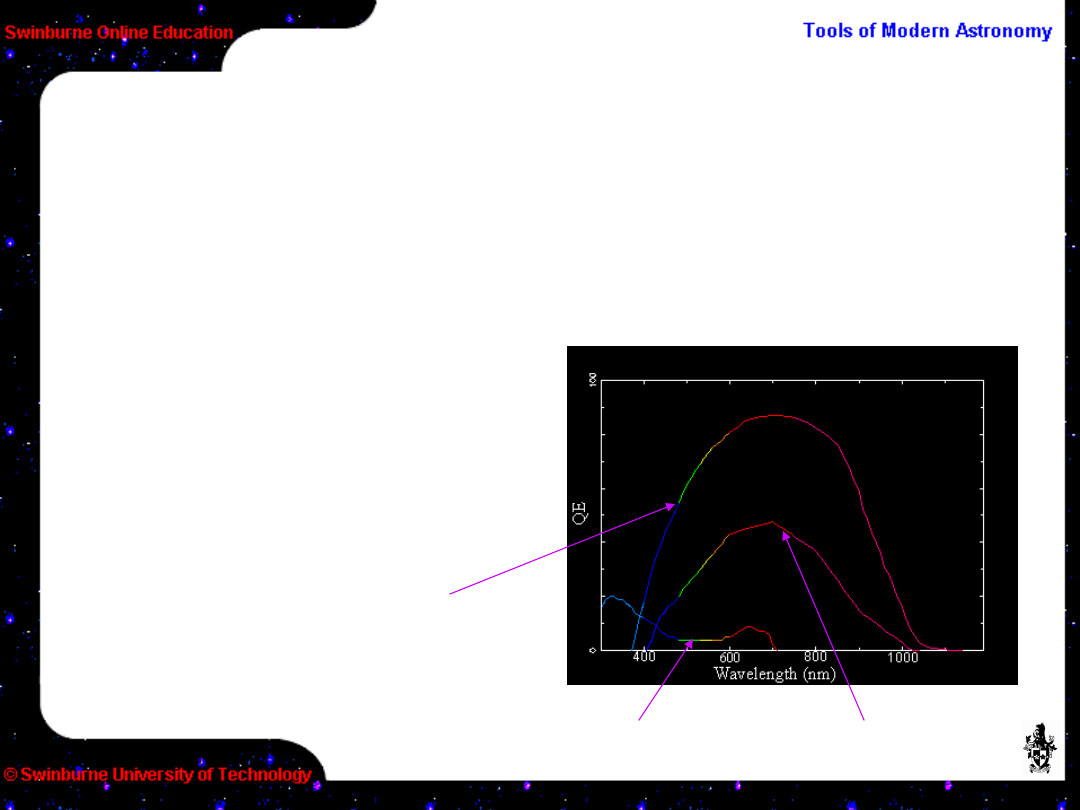
CCDs have a higher quantum efficiency (QE) than
film. QE is a measure of how efficient a device is
in turning input energy (in this case light) into a
measurable signal.
Advantages of CCDs over film
Greater efficiency
means that more data
can be gathered in a
shorter time, or that in
the same time you can
measure a fainter
signal.
Best
film
Amateur CCD
Professional CCD

CCDs have a linear response to light. i.e. the
measured signal is directly proportional to the
amount of light which was received. This is not
true for film.
Advantages of CCDs over film
A linear response
means that if the
exposure is
doubled, then the
measurable signal
will double. Also,
twice the signal
means the source
is twice as bright.
CCD linear
response
Film non-linear
response

• CCDs have a wide dynamic range. Coupled with
their linearity they can measure both very faint
targets and very bright ones.
More advantages of CCDs over film
• CCDs are dimensionally stable. The sensing
elements (pixels – or picture elements) are laid
out in a regular grid formed on the silicon
substrate. This makes them excellent for most
forms of positional measurement.
• CCDs are digital and so modern computers can
be put to use in processing the images. No more
messing about with photographic chemicals or
working in the dark.

This all adds up to a revolution in
astronomy.
Advantages of CCDs
The increase in QE over
film is like making your
telescope into a much
bigger one – effectively
allowing a 1-m
telescope to perform
like a 4-m.
The accuracy of CCDs
in both linearity and
stability means the
measurements made
are of the highest
quality, and a wider
band of the spectrum is
utilised.
The digital nature of CCDs allows new techniques
to be devised, both in taking the data and
extracting the most from it.

• Light (photons) are converted to a charge
(electrons) by the photoelectric effect in a layer
of silicon.
How do CCDs work?
• The charge is accumulated in “wells” during
the exposure.
There are 4 basic stages to CCD operation.
• At the end of the exposure the CCD is “read
out” – the charge is shifted to the readout
register.
• Finally, the charge in each pixel is measured.
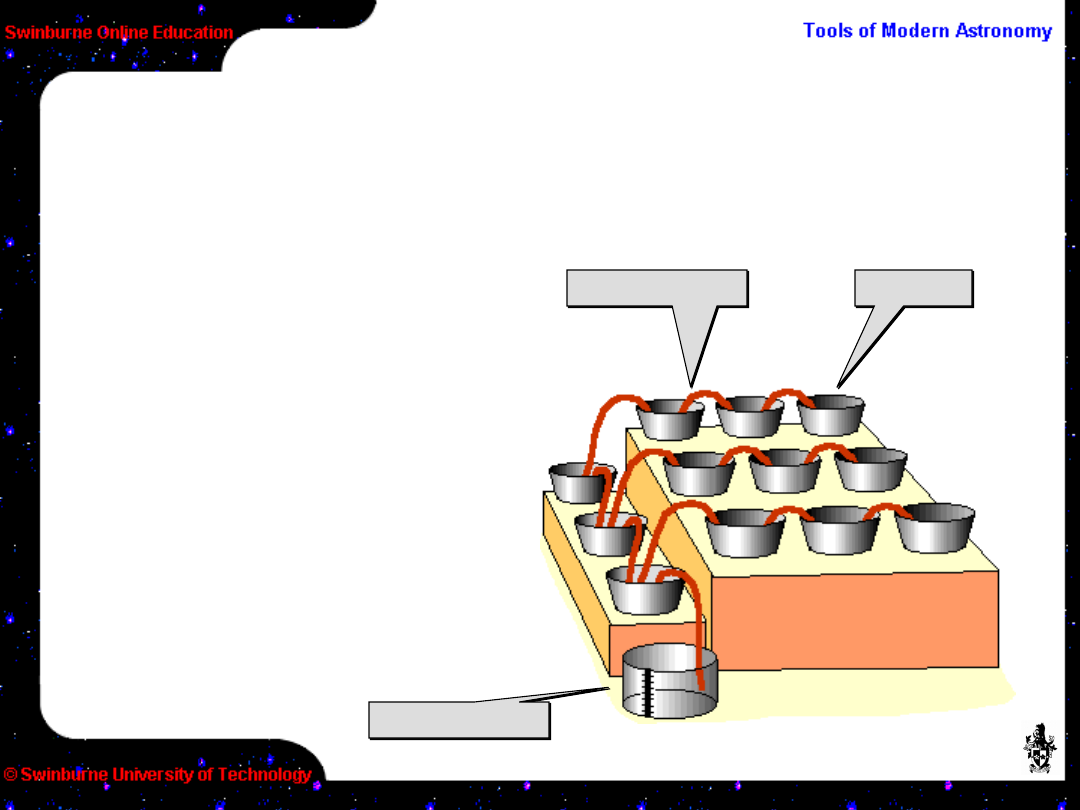
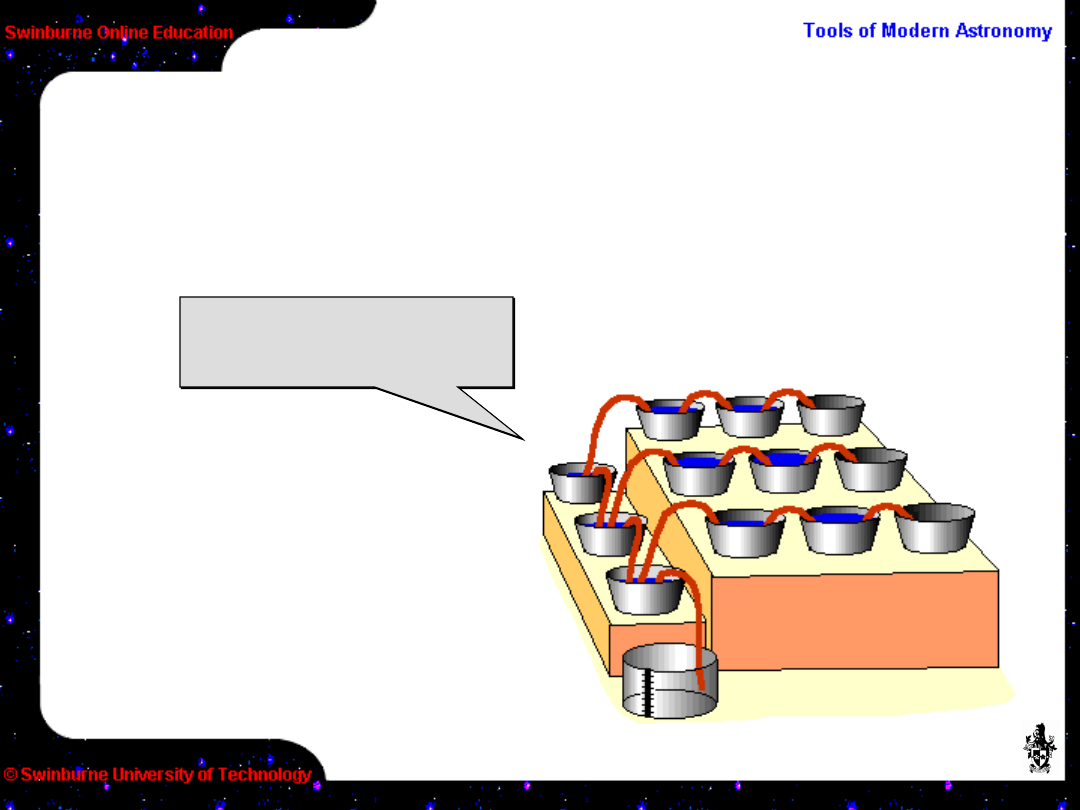
An analogy is useful to picture the mechanisms
involved in how CCDs collect, transfer and count
charge.
How do CCDs work? – charge
collection
Imagine an array of
buckets ready to catch
rain.
Bucket
Bucket
Siphon pump
Siphon pump
Rain gauge
Rain gauge
A single master rain
gauge will be used to
measure the amount of
rain caught in each
bucket.
The buckets are
connected by siphon
pumps.
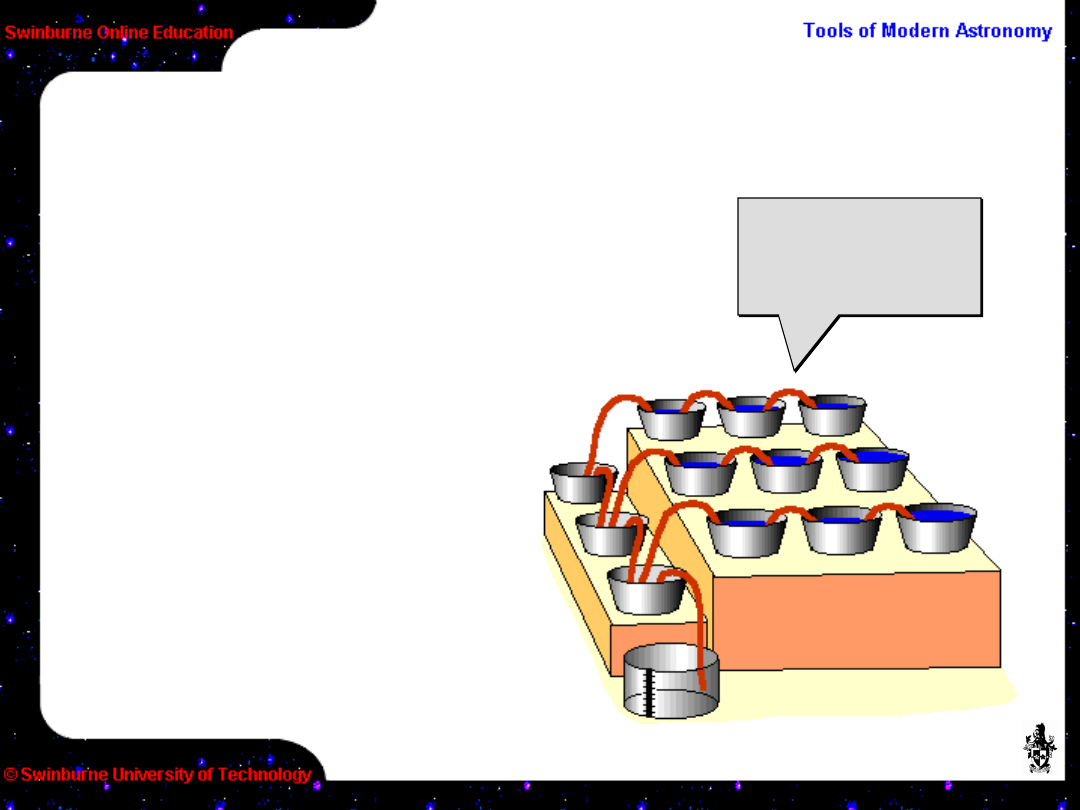
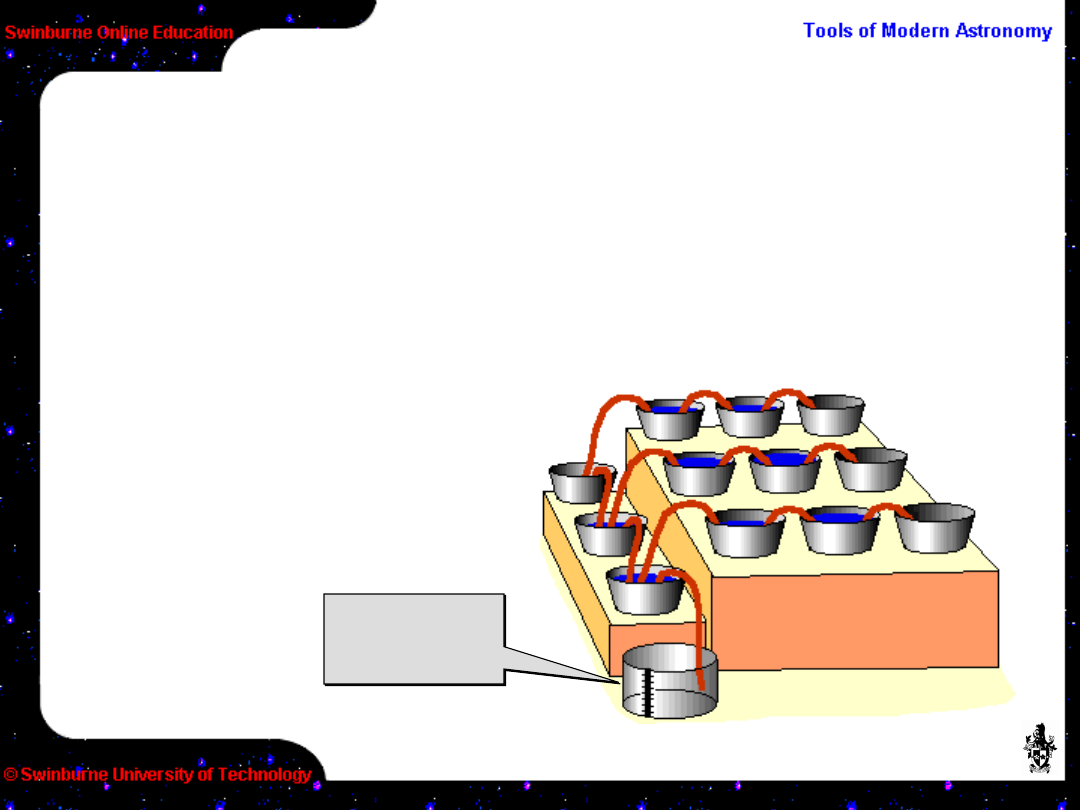
How do CCDs work? – charge transfer
To measure the rain in
each bucket (after the
rain has stopped), the
siphon pumps are used
to move the
accumulated rain
towards the master rain
gauge.
Different buckets
hold different
amounts of rain
Different buckets
hold different
amounts of rain
How do CCDs work? – charge transfer
Contents of all buckets
move to left
Contents of all buckets
move to left
First, the end line of buckets are emptied into the
empty row lined up with the master gauge.
How do CCDs work? – charge
counting
After each
measurement, the
master gauge must be
emptied before a new
measure can be taken.
Rain gauge
is emptied
Rain gauge
is emptied
Then each bucket in turn is siphoned into the
master gauge for measuring.
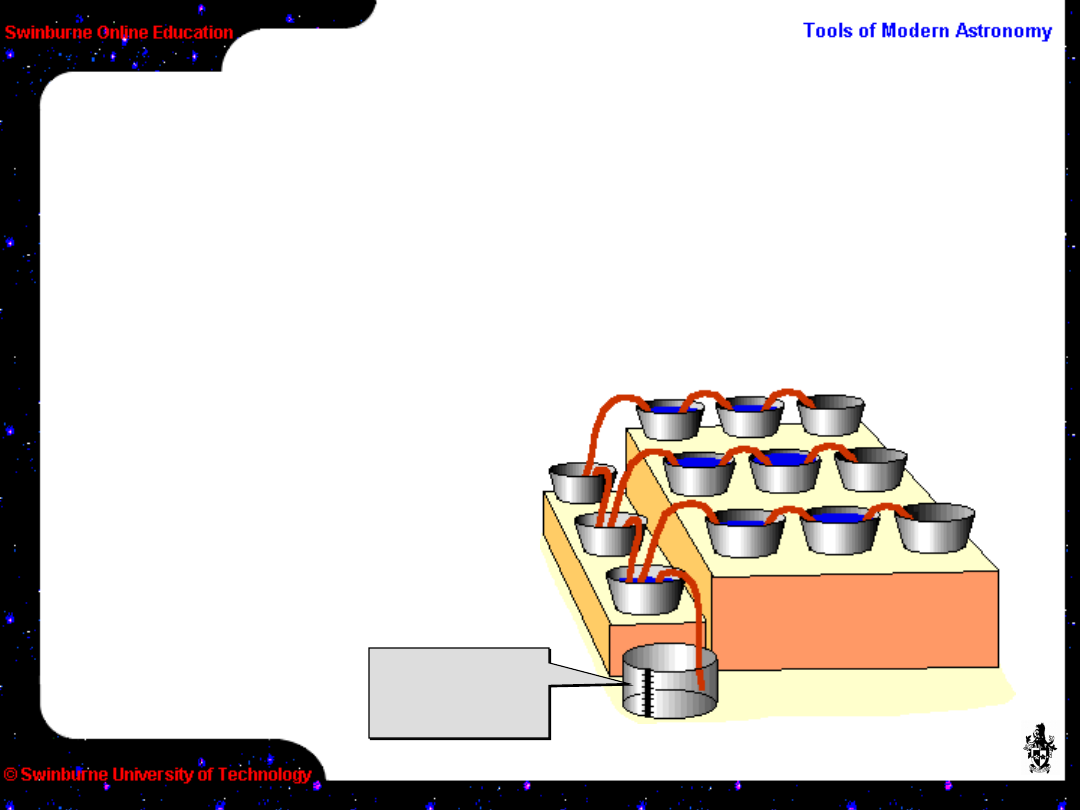
How do CCDs work? – charge
counting
After each
measurement, the
master gauge must be
emptied before a new
measure can be taken.
Then each bucket in turn is siphoned into the
master gauge for measuring.
Rain gauge
is emptied
Rain gauge
is emptied

How do CCDs work? – charge
counting
After each
measurement, the
master gauge must be
emptied before a new
measure can be taken.
Then each bucket in turn is siphoned into the
master gauge for measuring.
Rain gauge
is emptied
Rain gauge
is emptied

How do CCDs work?
This shift-and-measure is carried on until all the
water along the “readout register” has been
measured.
The remaining water
to be measured is
siphoned along into
the now empty
buckets (the readout
register) and the
process of shifting-
and-measuring is
repeated.

In the previous analogy, the raindrops represent
photons.
How do CCDs work?
The accumulated water represents the charge
detected by the CCD.
The buckets represent pixels on the CCD (and their
depth represents the well depth, or how much
charge each pixel can hold).
The siphon pumps represent the CCD shift
registers.
The master gauge is the sense capacitor (and the
fineness of the graduations represents the
measurement accuracy).

Of course CCDs are not
quite so simple, but the
underlying electronics
does a good job at
mimicking the analogy.
CCDs are actually the most
complex electronic circuits
fabricated today, mainly
because of their size and
need for perfection over
large areas of silicon. This
makes them expensive,
too!
How do CCDs work?
Lets start by looking at the individual
pixels.
You should have
been able to spot
from the analogy
some of the
potential problems
associated with
CCDs. By examining
these areas we will
get a better
understanding of
how they work.

The physics of turning photons into electrons is well
understood and causes of efficiency loss can be
controlled – up to a point. The practical problems
associated with the design of CCDs is a limitation,
however.
Problems with CCDs – Pixels
CCDs are 3-dimensional circuitry fabricated on
a base of silicon (which is the light sensitive
layer). It isn’t possible for 100% of the front
surface of a CCD to be free for light to enter as
there is nowhere for the circuitry which
connects the pixels to go. Therefore, the light
has to go through the circuitry which causes
obvious losses. This is called “front-side
illumination” and is what is used for most
commercial CCDs.

An obvious solution is to turn the CCD over and let
the light fall on the back side (“Back-side
illumination”), but this has it’s own problem – there
is then nothing to support the silicon. The thickness
of the silicon also means that the charge can’t be
held in the right position and can drift – this is
called “charge diffusion”. The silicon must be
thinned to a few tens of microns to avoid this, and
supported in a special way.
Problems with CCDs – Pixels
However, thinned and back-illuminated CCDs are
the norm in professional astronomy today as they
offer significant benefits, like 90% or greater QE.
This is the first major difference between
professional and
amateur CCDs.

Another improvement in not loosing light is to
apply an anti-reflection coating to the CCD surface.
Again, normal in professional CCDs.
Problems with CCDs – Pixels
In front-side illuminated devices, the loss of light is
most apparent in the blue end of the spectrum. One
solution found was to coat the chip with “lumigen” –
an organic substance similar to the “glow” in
highlighter markers.
Lumigen works by converting any photons short of
420nm to 520nm, thus keeping the QE constant in
the blue-UV part of the spectrum. Lumigen is cheap
compared to thinning and is available for some
amateur CCDs.

How efficient are the siphons in moving the water
between buckets? Will every drop be moved or will
some be lost? This is called “Charge Transfer
Efficiency” (CTE).
Problems with CCDs – Charge
transfer
The earliest CCDs had a CTE of only ~98%. Today
CTE is typically better than 99·995% in commercial
devices and much higher in scientific devices
(99·9999%).
Poor CTE means that not all of the photons which
arrived on the CCD will be counted, and the further
from the readout register the worse the effect.

What happens when the buckets fill? This is a
problem of both pixels and charge transfer. The
physical size of the pixel determines how much
charge it can hold. Larger pixels can hold more
charge.
Problems with CCDs – saturation
When the pixels are full, they are said to be
saturated. What then happens depends very much
on the electronic design of the CCD. During
readout, not all the charge can be shifted – some is
left behind. This leads to streaks (blooming or
bleeding) forming behind saturated pixels.
This can be minimised somewhat by the inclusion of
electronic “drains” in the CCD, called an Anti-
Blooming Gate (ABG). Unfortunately, this also drains
off wanted charge and so reduces the QE of the
device.

How accurately can we measure the number of
rain drops? How finely graduated is the master
gauge?
Problems with CCDs – Accuracy
A CCD has an analogue output. Photons are
converted to a charge and finally to a voltage for
measurement. An on-chip amplifier boost the
signal to a useful level. Is it possible to measure
exactly how many photons fell on each pixel?
So far, the answer is not exactly. There are many
reasons why it isn’t possible to count electrons (e
–
)
– the closest that can be achieved at the moment
is an RMS error of ~2e
–
. That’s close enough for
most applications, but not all. Amateur CCDs
manage around 20-30 e
–
RMS.

We’ve just seen “readout noise” – how accurately
the number of electrons can be measured.
Unfortunately, there are other sources of noise in
a CCD.
Problems with CCDs – Noise
There’s thermal noise. Astronomical exposures
tend to be long – from a few seconds to many
minutes – and many thermally induced electrons
appear in that time. There is no way to distinguish
these from the photo-electrons which we wish to
measure.
The solution is to cool the CCD enough so that
thermal noise isn’t a problem. This is the next major
difference between amateur and professional CCDs.
Professional CCD systems are in evacuated
chambers and cooled to around 170°K (-100°C);
amateur CCDs barely manage
-30°C. The difference is very
noticeable.

This thermal – or “dark” noise – grows linearly with
time and is a function of the temperature of the
CCD. Fortunately, because it is fairly repeatable
this “dark current” can mostly be removed by
careful calibration.
Problems with CCDs – Noise
“Bias structure” is another source of noise but can
also be calibrated out. The electronics as well as
the physical make-up of a CCD will imprint a
certain background structure to all images.
Finally, there is the problem that each pixel
responds to light slightly differently to its
neighbour. Again this is an effect which we can
calibrate and remove.

It might seem that there is a lot more to using a
CCD than taking a photograph, but some of the
problems discussed also affect film – but aren’t
possible to control. With CCDs there is greater
control and so it is possible to get so much more
from them. The benefits far outweigh the
problems.
Problems with CCDs – Summary
There are other problems which I’ve not mentioned
– such as how the amplifier in some CCDs glows!
Defects in the silicon wafer causing non-fatal
cosmetic problems etc. Even the universe is out to
get you, sending cosmic rays which zap new stars
into existence on your exposure.
How do we turn this raw
image...
CCD Calibrations
into
this...
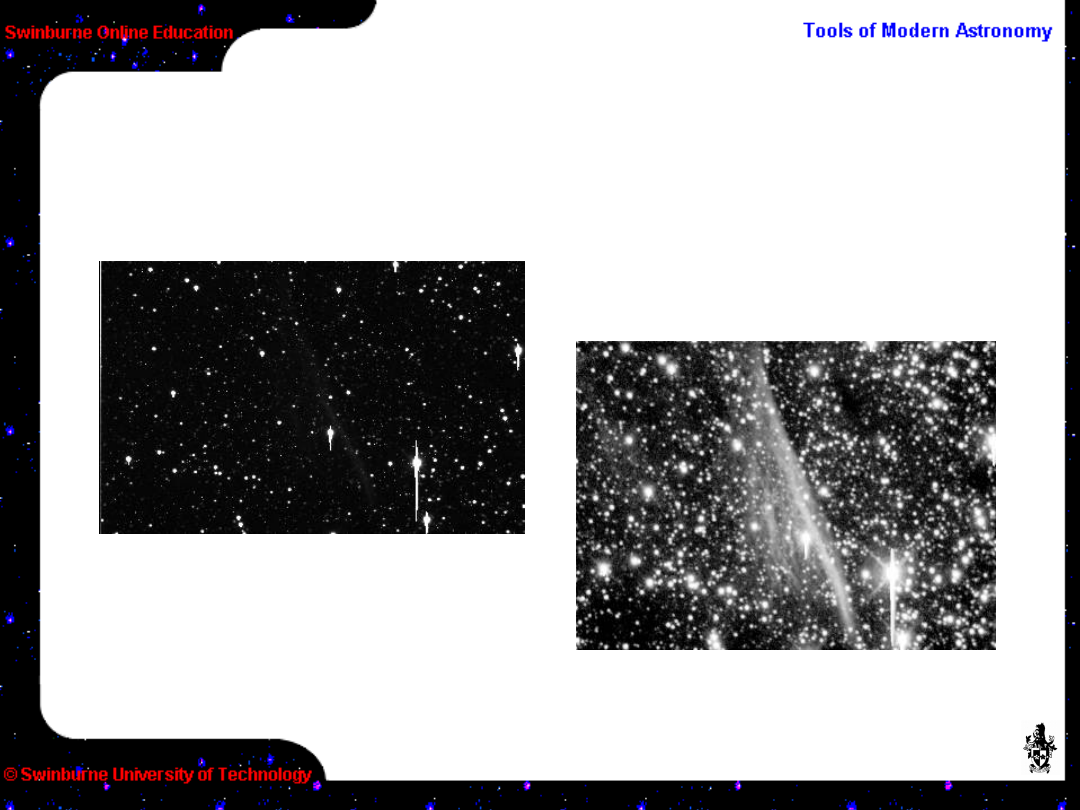
NGC 2736, part of the Vela SN
remnant.
Imaged with 20cm f/4·5 Newtonian
and Cookbook 245 CCD camera.

Engineers characterise their CCDs in a laboratory
before they are put on a telescope. This allows
any problems to be corrected (or bypassed!) and
then allows astronomers to use them to their full
potential.
CCD Characterisation
The parameters which are needed are:
• The amplifier gain – how many electrons per
count.
• The linearity of the amplifier and electronics –
there will always be some slight variation from
perfection.
• QE and CTE – how good is the CCD.
• Any cosmetic or electronic blemishes (“trapping
sites”, etc.) – every CCD is unique!

Amateurs don’t usually bother with such
characterisation tests, nor can they do much
about them if present. What calibrations that can
(and should) be done by everybody are BIAS,
DARK and FLAT FIELD.
CCD Calibrations
Lets start with the BIAS, which is a zero-length
exposure designed to show what, if any, underlying
structure there is on the CCD and electronics.
The bias actually consist of two components; a non-
varying level which is the electronic zero-point, plus
any structure present. Professional systems usually
produce an overscan region to allow the zero-point
for each exposure to be seen.
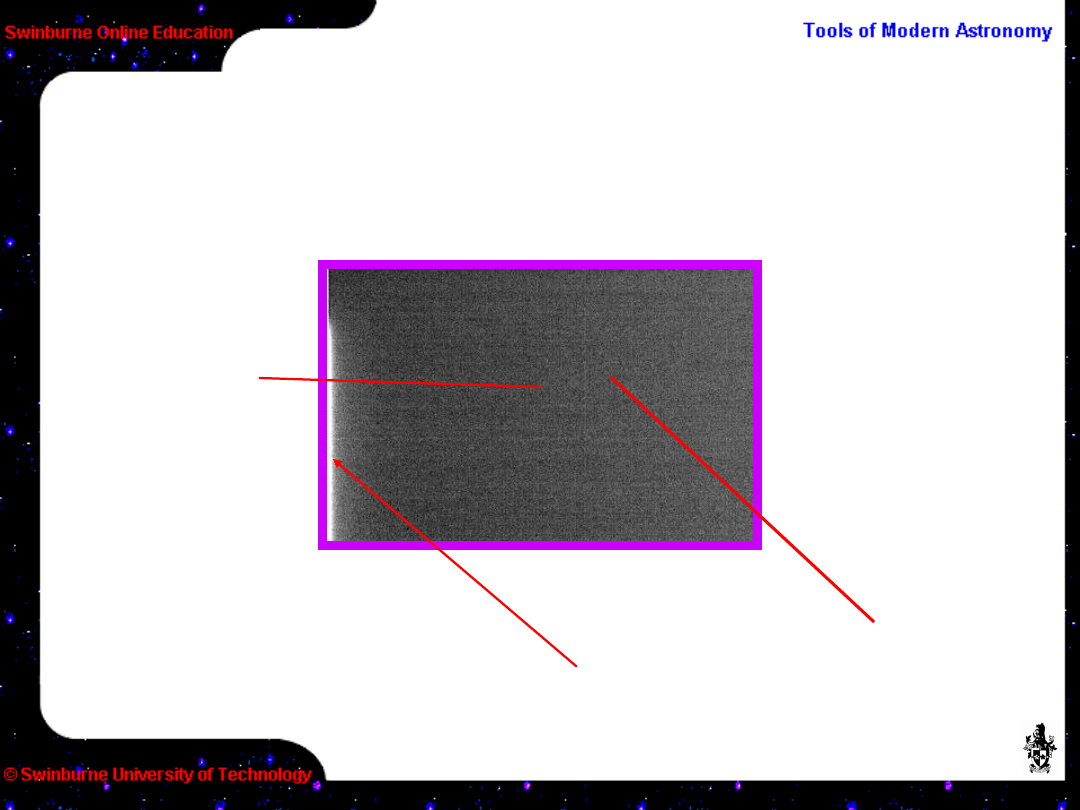
Here is a bias frame from a typical amateur CCD.
CCD Calibrations – bias
The image is
scaled with only 6
ADU from black to
white
The mean level
is 100·8 ADU
The most obvious
structure is this
bright stripe on
the left
Little other
structure is
evident; statistical
variation is only
0·4 ADU so can be
considered quite
a clean bias.

The bias structure is a constant and may simply
be subtracted from each image.
CCD Calibrations – bias
As the readout noise is a significant part of the
variation in each image, it is better to average
several (say 10–20) bias frames and create a
master bias.
The bias should not change in the short term and
so once a master bias has been created it can be
re-used until such time as the electronics are
changed
Removing the bias is the first stage in image
processing.

To remove the thermal content of an exposure,
take a DARK frame. A dark frame is the same
length as a normal exposure but with the shutter
closed so no light falls on the CCD.
CCD Calibrations - dark
It is subtracted from a normal image, provided they
are of the same duration. (After the bias has been
removed, of course.)
All images, including darks, contain the bias. A
shortcut often used is to not separate out the bias
but subtract the dark+bias. This works well
enough.
Again, statistical variations can be minimised if you
average several dark frames together.
Removing the dark is the second step in image
processing.
CCD Calibrations
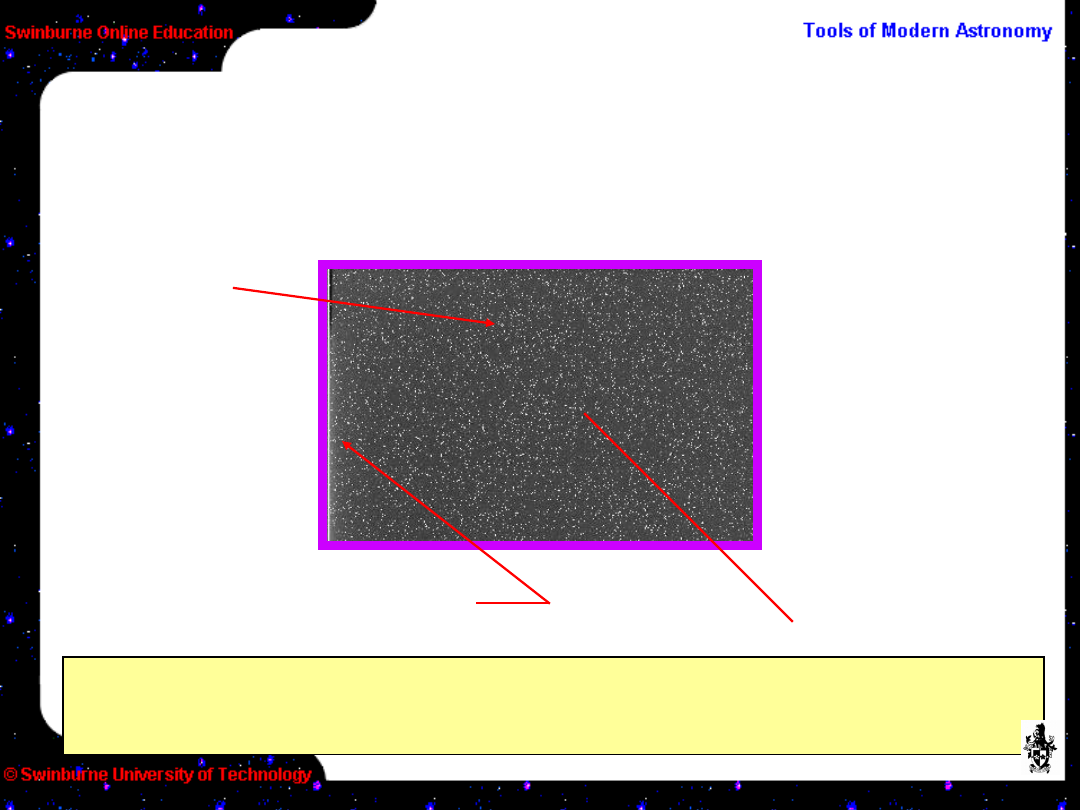
Here is a 4 minute dark frame from a typical
amateur CCD.
The image is
scaled with 20
ADU from black to
white
The bright stripe is now
insignificant
The mean level is
102.9 ADU (little
more than the
bias), but the
maximum is now
709 ADU
The statistical
variation is now
20 ADU and the
whole CCD is
covered in bright
spots

The next stage is to remove the pixel-to-pixel
variations. This is done with a flat field – an image
of a featureless, uniform source (twilight sky is a
good source for this).
CCD Calibrations – flat field
What a flat field shows is not only the minor pixel
variations, but all the defects in the optical train
such as vignetting and dust spots which cause
sensitivity to vary across the frame.
The de-biased, dark subtracted image is divided by
the normalised (image mean reduced to 1) flat field.
This enhances areas of low sensitivity and reduces
areas of higher sensitivity, creating a field with
apparent uniform response.
Dividing by a flat field is the third step in image
processing.
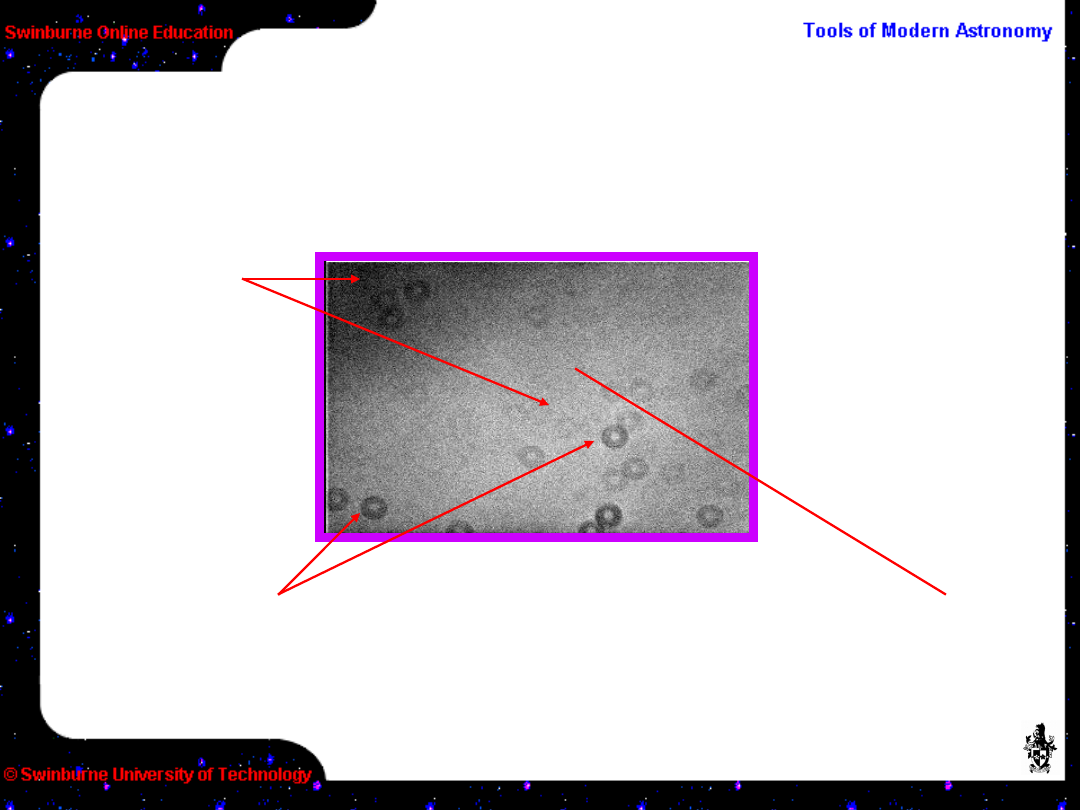
Here is a flat field from a typical amateur CCD.
CCD Calibrations – flat field
The image is
scaled with 50
ADU from black to
white
The mean level is 1800
ADU with only 9 ADU
variation, so is actually
quite uniform
The “dust donuts” here look bad, but
represent a variation of only 1% in the most
extreme case. (Dust donuts are an inverse
“pinhole camera” image of the telescope –
with a central obstruction in this case.)
The variation
in intensity
from centre to
edge
represents a
change of
only 1.7%

Once the quirks of CCDs are understood, the
necessary calibrations become a simple exercise
(which can be carried out automatically under
some software).
Summary
This activity has concentrated on understanding
the basics of CCDs. It has shown both the
advantages and some of the problems of
electronic imaging.
In the next activity we shall see how to put all this
knowledge to use and take some CCD images.

Image Credits
All images © Steven Lee (used with permission)
http://www.aao.gov.au/local/www/sl/
Swinburne Astronomy Online

End of Activity
Press the
ESC
(Escape) key to
return to the home page for this
Module.


Appendices
Some terms used when discussing CCDs:
ABG
Anti-Blooming Gate. An electronic “drain” on
pixels
to try to minimise bleeding due to over-
saturation.
Has unwanted side effects like lowering QE.
ADC
Analogue-to-Digital Converter; it converts an
analogue voltage to a digital count.
ADU
Analogue-to-Digital Unit; one “count” out of
a CCD
Bias
The background level of the CCD
Bias Frame
A zero length exposure to show the
bias
structure of the CCD

Bleed or Bloom
When a pixel is over-filled the
charge
has to go somewhere, usually into ugly
streaks.
Calibration frame
An auxiliary image taken to help
calibrate a science exposure.
CCD
Charge Coupled Device
Channel Stop
An electronic structure on a CCD to
stop the charge in a pixel from migrating.
Clocks, clocking etc.
The charge on a CCD is
moved
around by stepping (or clocking) voltages.
There are various electronic signals which control
this.
CTE
Charge Transfer Efficiency; how good the
electronics
are at shifting the accumulated charge around.

Dark current
The rate of build-up due to thermal
noise
Dark Frame
An exposure to measure the dark
current
Exposure
The time the CCD is exposed to light
Flat Field
An image of a blank target designed to
show imperfections in the CCD and imaging
system
Full-frame Device
A CCD which has its entire area
exposed to light. It needs an external shutter
to
stop it from being exposed to light during read
out.
Frame Transfer Device
A CCD which has only half its
area exposed to light, and the other half
covered.
The exposure is transferred first to the covered
area before being read out.

Gain
The number of e
–
per ADU
Interline Transfer Device
A CCD which has
adjacent
active and readout columns. Not widely used
in
astronomy.
Image processing
The art and science of calibrating
a
digital image (not necessarily CCD) to extract
the
most information from it.
Lumigen
A fluorescent coating which can be
applied
to a CCD to improve its UV/blue
response.
Overscan
By reading out more pixels that actually
exist
on the CCD, you create an overscan strip. This
gives the bias level on an exposure.

Pixel
Picture element; the resolution element of the
CCD
approximately 6 to 30µm in size (not always
square).
QE
Quantum Efficiency; how well the device
responds
to light of different wavelengths
Saturation
When a pixel well is full. If it continues
to
receive light it may bleed (or bloom). See
ABG.
Shift Register
The mechanism by which charge
is
shifted around on the CCD.
Readout Noise
The accuracy to which the charge
in
a pixel can be measured. Usually given as e
–
RMS
Readout Register
The place on a CCD where the
charge is measured

Trapping site
A defect on a CCD which
impedes the flow
of electrons
Well depth
How many electrons a pixel can hold
before
saturating

Document Outline
- Slide 1
- Slide 2
- Slide 3
- Slide 4
- Slide 5
- Slide 6
- Slide 7
- Slide 8
- Slide 9
- Slide 10
- Slide 11
- Slide 12
- Slide 13
- Slide 14
- Slide 15
- Slide 16
- Slide 17
- Slide 18
- Slide 19
- Slide 20
- Slide 21
- Slide 22
- Slide 23
- Slide 24
- Slide 25
- Slide 26
- Slide 27
- Slide 28
- Slide 29
- Slide 30
- Slide 31
- Slide 32
- Slide 33
- Slide 34
- Slide 35
- Slide 36
- Slide 37
- Slide 38
- Slide 39
- Slide 40
- Slide 41
- Slide 42
- Slide 43
- Slide 44
- Slide 45
- Slide 46
- Slide 47
Wyszukiwarka
Podobne podstrony:
Estimation of Dietary Pb and Cd Intake from Pb and Cd in blood and urine
automating with step 7 in lad and fbd simatic (1)
Key Concepts in Language and Linguistics
Guide to the properties and uses of detergents in biology and biochemistry
2008 4 JUL Emerging and Reemerging Viruses in Dogs and Cats
2002 3 MAY Lasers in Medicine and Surgery
In vivo MR spectroscopy in diagnosis and research of
Numerical methods in sci and eng
conceptual storage in bilinguals and its?fects on creativi
20090602 01 ANSF, Coalition Forces further disable IED?lls in Khowst and Zabul
Hamilton W R On quaternions, or on a new system of imaginaries in algebra (1850, reprint, 2000)(92s)
01 [ABSTRACT] Development of poplar coppices in Central and Eastern Europe
Nukariya; Religion Of The Samurai Study Of Zen Philosophy And Discipline In China And Japan
PROF DREWS Infections in pregn and puerp (1)
Human resources in science and technology
86 1225 1236 Machinability of Martensitic Steels in Milling and the Role of Hardness
więcej podobnych podstron