1
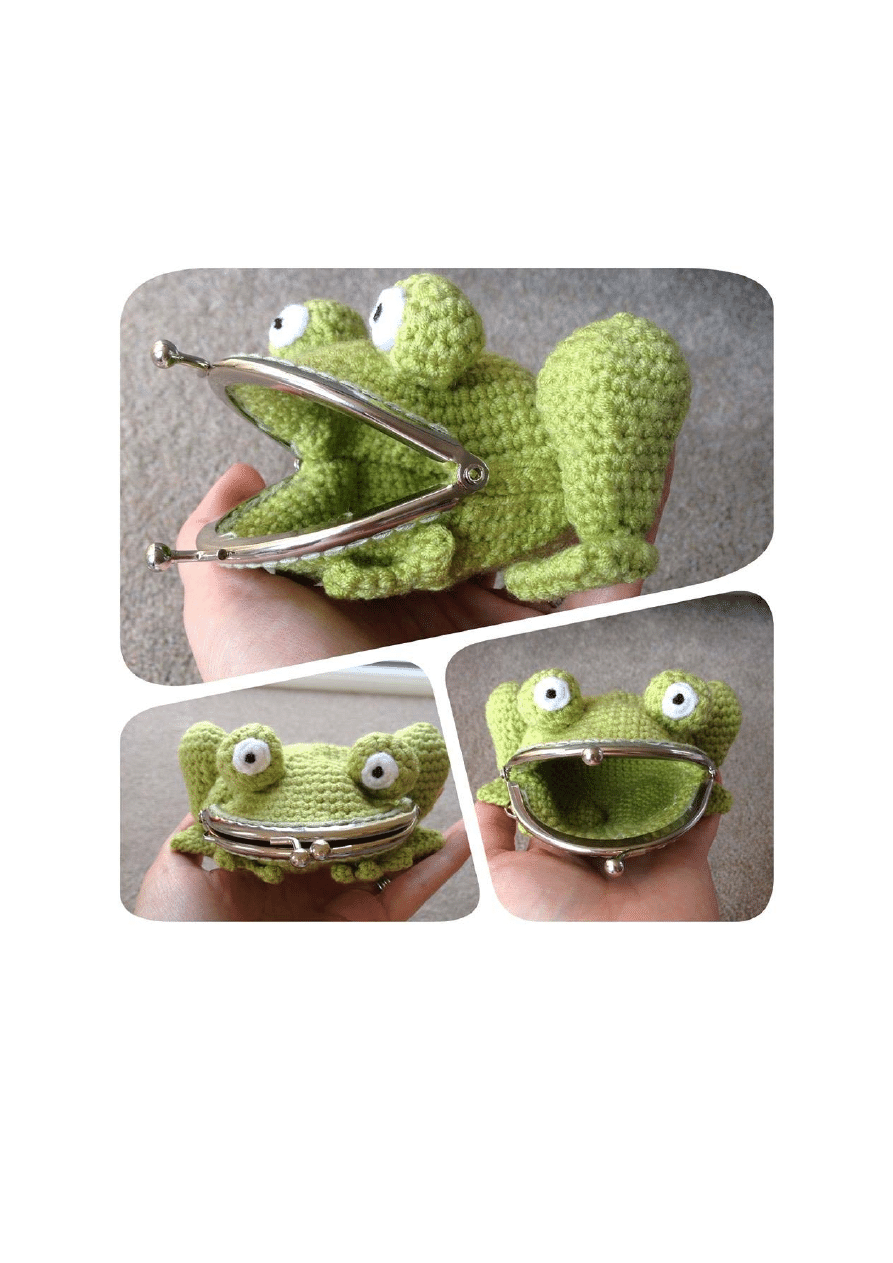
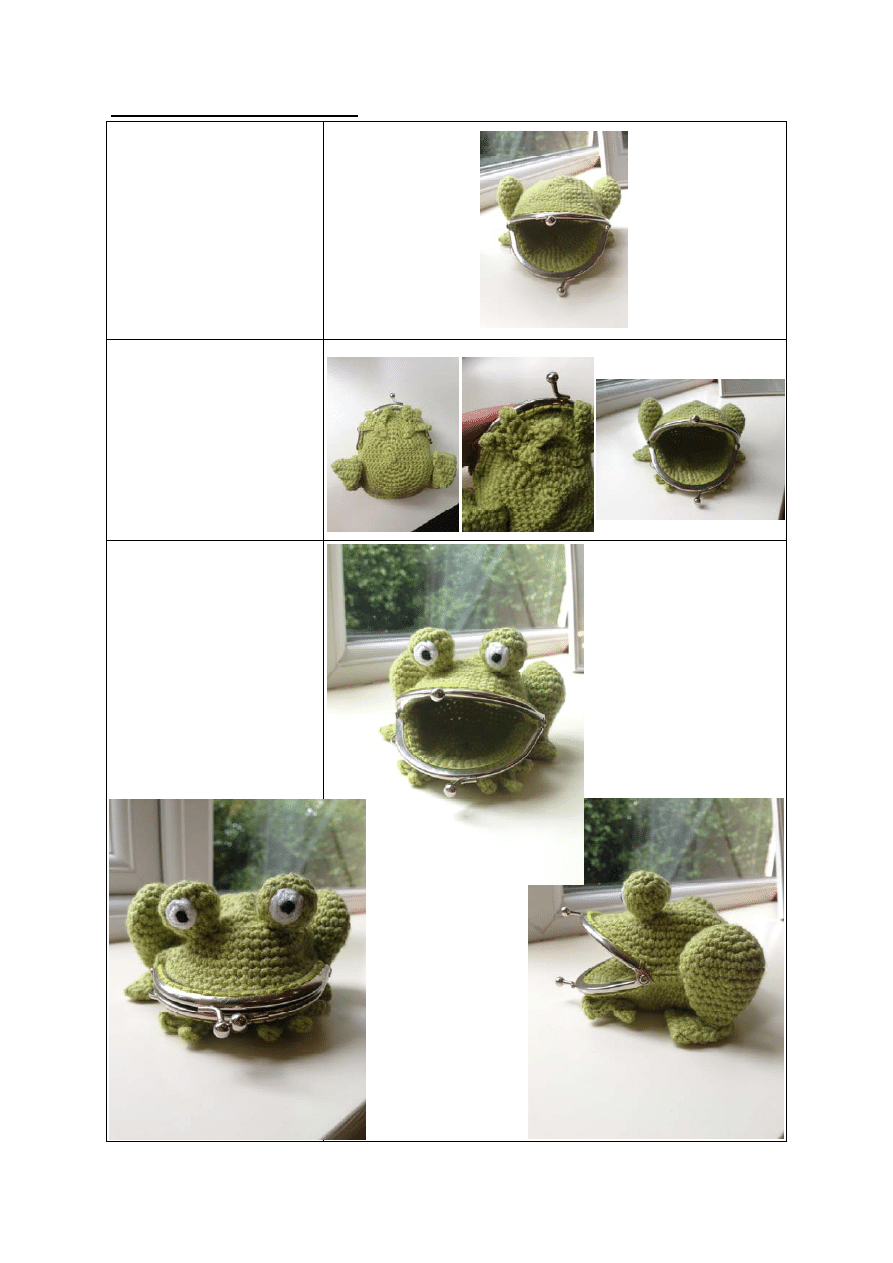
Frog Coin Purse
Www.facebook.com/Lauralovescrochet
Www.etsy.com/uk/shop/LauLovesCrochet
Laura.sutcliffe@hotmail.com
2
Frog Coin Purse
You will need:
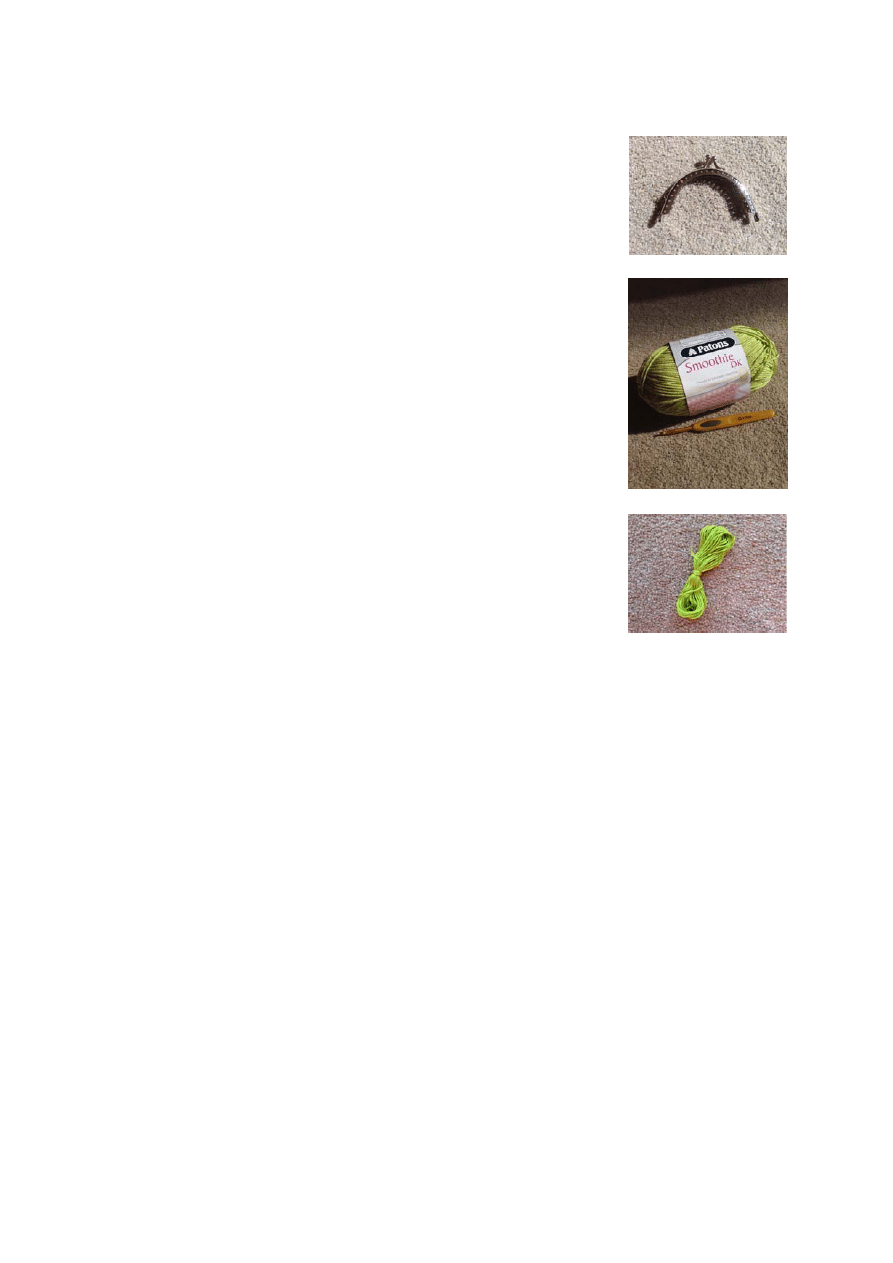
4mm crochet hook
A purse clasp—These are available on eBay—you will need to
search for a 9x6.3cm Arch Frame Kiss Clasp. If you have any
problems in sourcing one, then I am happy to provide one
for you for £1.60 plus 90p postage (UK only). Please email
Laura.sutcliffe@hotmail.com
Green DK weight yarn—I use Patons DK Smoothie 100%
acrylic as it has a lovely shiny finish. A 100g ball of this is
200m long so any yarn of the same weight would be ok.
Small amount of white DK weight yarn—Again I use Patons
DK Smoothie.
Very small amount of black yarn (just for the eyes)
Green thread for attaching the pieces to the purse clasp —
Any thinner yarn or embroidery thread would be suitable,
but DK weight yarn is too thick to go through the holes on
the clasp.
A small amount of polyester toy stuffing for the legs & eyes (you can use off-cuts
of yarn if you don’t have any stuffing)
Other tools you will need are a tapestry needle, a needle fine enough to fit
through the holes in the purse clasp and some scissors.
Stitches & Abbreviations used (United States):
Ch = chain stitch
St = stitch / stitches
Sl st = slip stitch
Sc = single crochet
Inc = increase (2 single crochet stitches made into a single stitch)
Sc2tog = decrease
(sc, inc) around = an sc then an inc, repeat this until the round is complete
[?] = total number of sc stitches you should have in the completed round (not
including any chains)
Pattern Notes:
Most of the pattern is worked in continuous rounds (no joining) unless otherwise
instructed.
I recommend using a stitch marker to mark the start of each round.
If you have any questions regarding this pattern, please email
Laura.sutcliffe@hotmail.com and I will get back to you as soon as possible.
You may sell items that you make from this pattern, but please do not
share or distribute the pattern itself. Thank you.
3
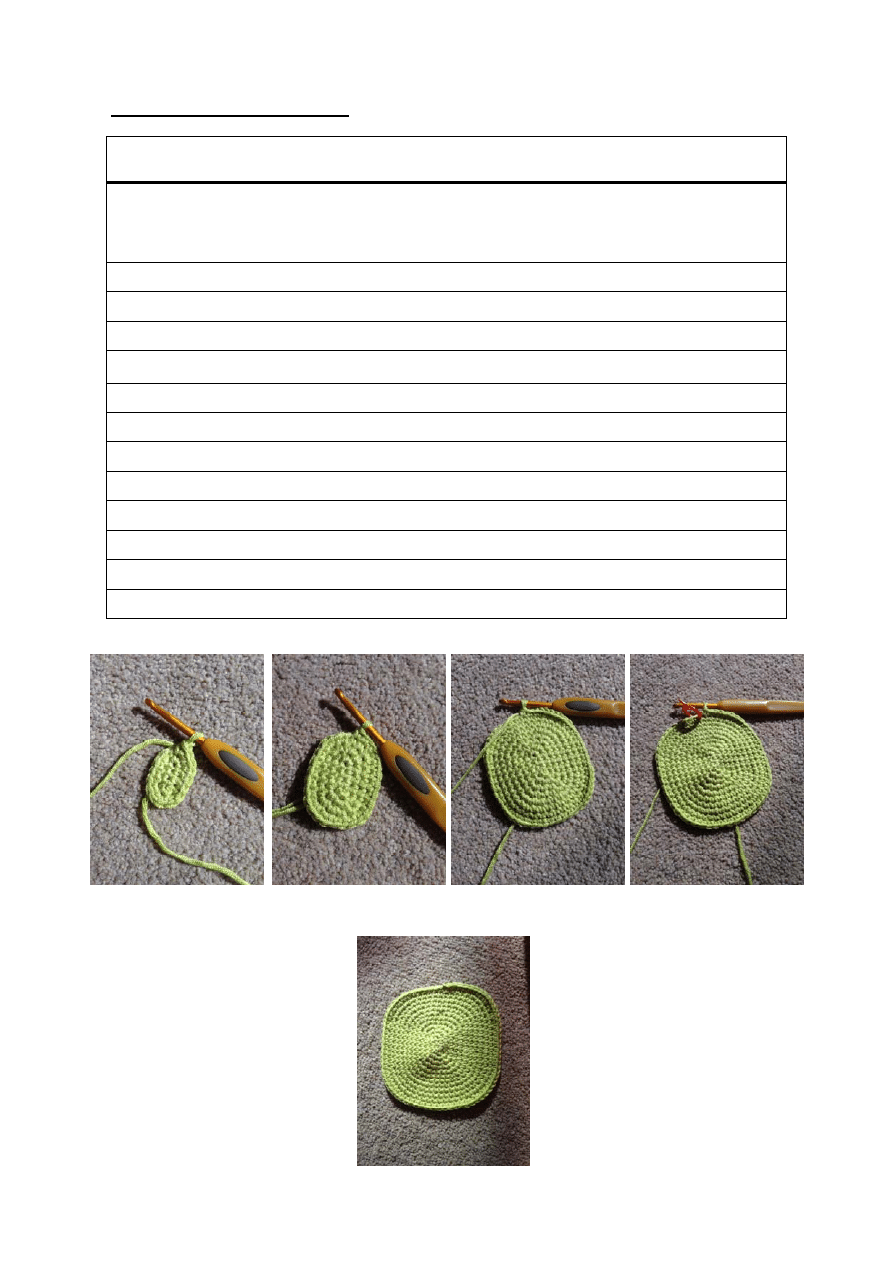
Body (Make 2 pieces)
Round #
Details
Total # of
stitches
Round 1
Ch5, Sc into the 2nd chain from hook. Sc in each of the next 2
stitches. 3 sc in last.
Continue working on the other side of the chain. Sc in each of the
next 2 stitches, inc in last.
[10]
Round 2
Inc, sc 2, (inc x3), sc 2, (inc x2)
[16]
Round 3
*inc, sc 4, inc, sc 2, repeat from *
[20]
Round 4
*(Inc x2), sc 5, (inc x2) sc, repeat from *
[28]
Round 5
*Sc, (inc x 3), sc 5, (inc x3), sc 2 repeat from *
[40]
Round 6
Sc around
[40]
Round 7
Sc around
[40]
Round 8
* Sc 3, (inc x4), sc 7, (inc x4) sc 2 repeat from *
[56]
Round 9
Sc around
[56]
Round 10
Sc around
[56]
Round 11
*Sc 5, (inc x5), sc 8, (inc x5), sc 5 repeat
[76]
Round 12
Sc around
[76]
Sl st into next stitch, FO and weave in ends
Round 2 complete
Round 4 complete
Round 8 complete
Round 10 complete
Round 12 complete
4
Back Legs
In green, make 2 pieces.
Round #
Details
Total # of
stitches
Round 1
Ch2, sc 6 into 2nd chain from hook (do not join)
You can use the magic ring method if you prefer.
[6]
Round 2
Inc around
[12]
Round 3
(sc, inc) around
[18]
Round 4
(sc 2, inc) around
[24]
Round 5
Sc around
[24]
Round 6
Sc around
[24]
Round 7
(Dec, sc 4) around
[20]
Round 8
(Dec, sc 3) around
[16]
Round 9
Sc around
[16]
Round 10
Sc around
[16]
Round 11
(Dec, sc 6) around
[14]
Round 12
(Dec, sc 5) around. Add a small amount of stuffing, just enough so
the leg is lightly puffy (see photo below).
[12]
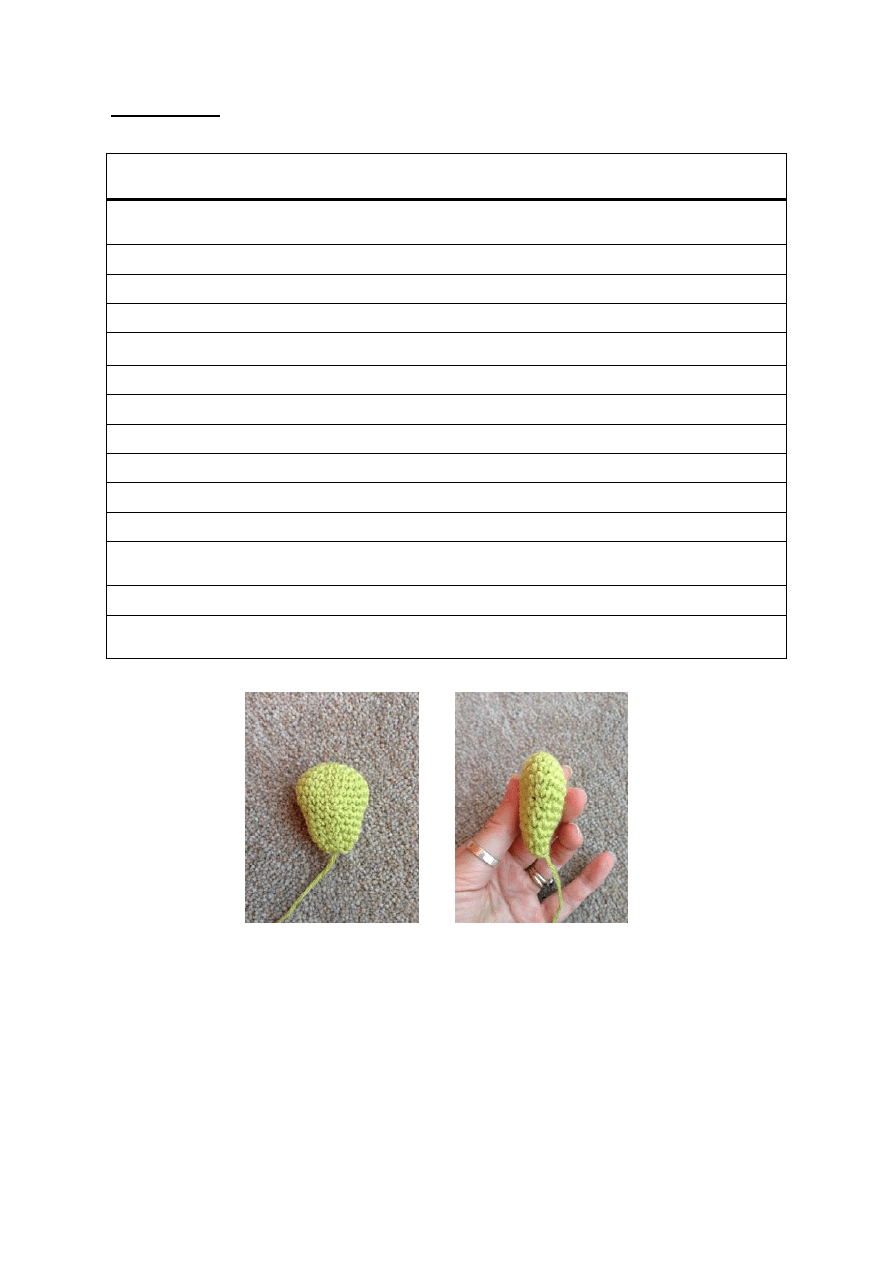
Sl st into next stitch, FO and leave a long tail for assembly.
Round 13
Dec around
[6]
Round 13 complete
Very lightly stuffed
5
Back Feet
In green, make 2 pieces.
These are worked in rows (not rounds)
Row #
Details
Total # of
stitches
Row 1
Ch4, sc into 2nd chain from hook and following 2 stitches, turn ch1
[3]
Row 2
Inc, sc, inc, turn ch1
[5]
Row 3
Inc, sc 3, inc, turn ch1
[7]
Row 4
Inc, sc 5, inc, turn ch1
[9]
Row 5
Inc, sc 7, inc, turn ch1
[11]
Row 6
Inc, sc 9, inc, turn ch1
[13]
Row 7
Inc, sc 11, inc,
[15]
FO and leave a long tail for assembly.
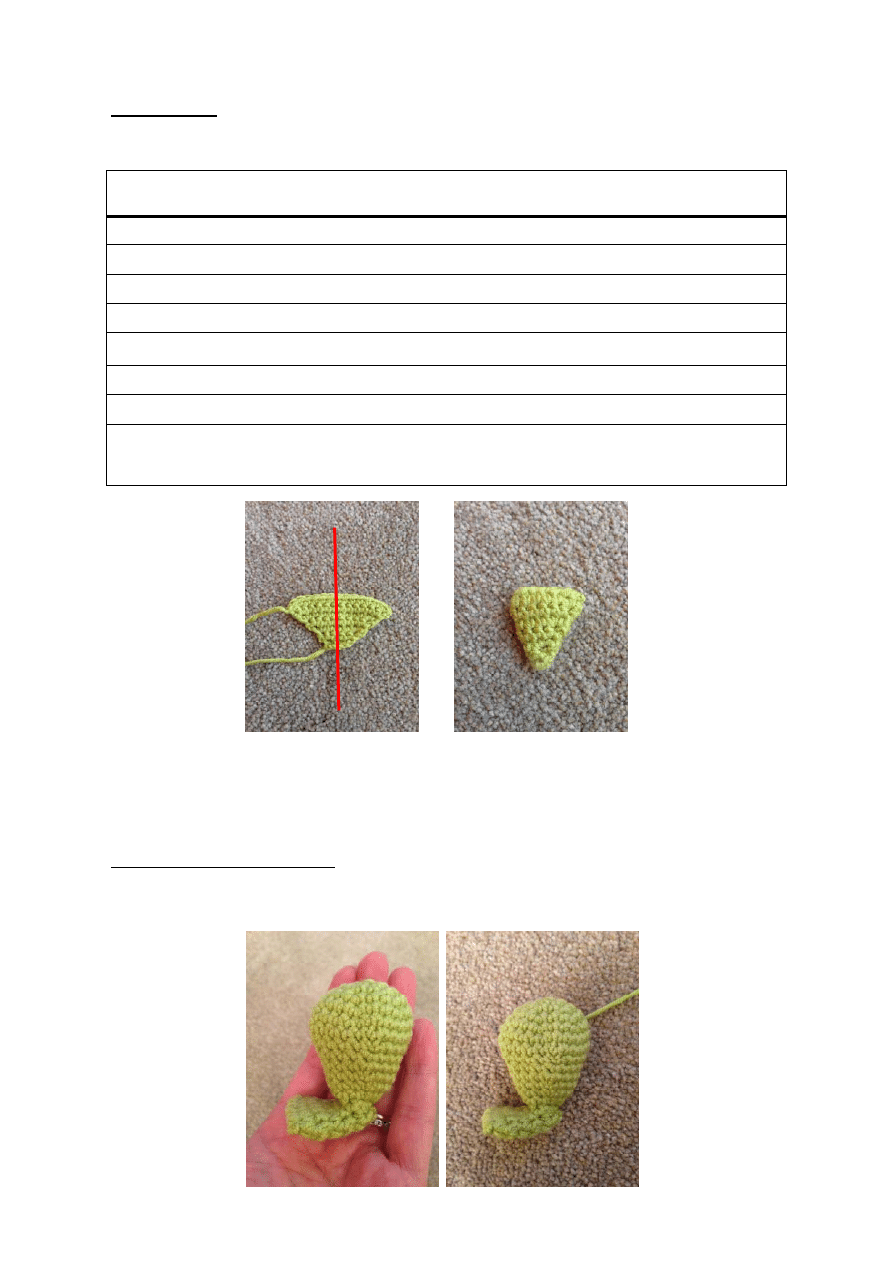
Fold the triangle in half (see photo below) and whip stitch around the
edges. Weave in the ends.
Fold along the line (shown
in red) before sewing the
edges together.
After sewing, your foot
should look something like
this.
Assemble Back Legs
Sew the open end of the back leg piece to the narrow corner of the back foot triangle
as shown below. Leave any remaining tail to use when you sew the leg onto the body.
6
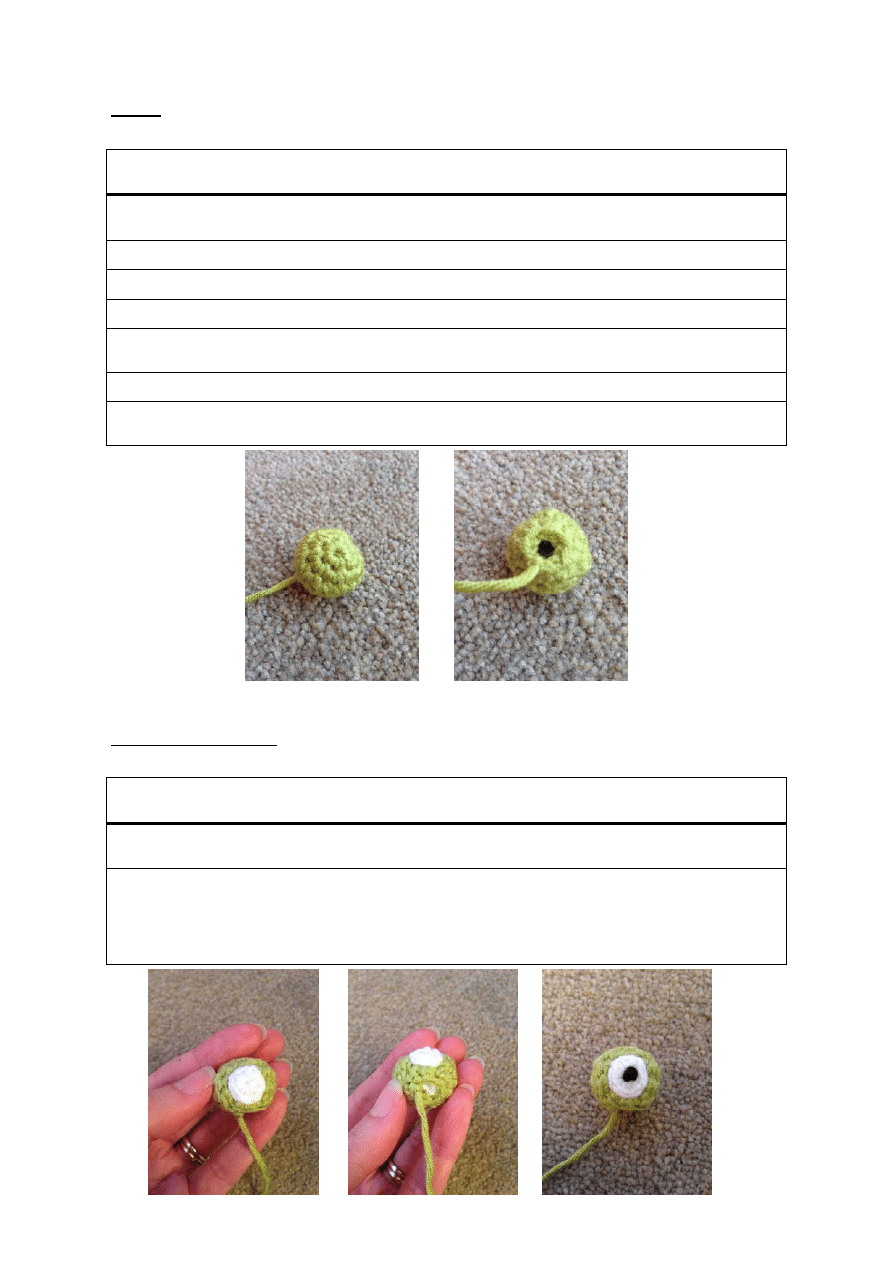
Eyes
In green, make 2 pieces.
Round #
Details
Total # of
stitches
Round 1
Ch2, sc 6 into 2nd chain from hook (do not join)
You can use the magic ring method if you prefer.
[6]
Round 2
Inc around
[12]
Round 3
(sc, inc) around
[18]
Round 4
Sc around
[18]
Round 5
(Sc, dec) around. You may wish to insert some stuffing now before
the opening gets too small to do so.
[12]
Round 6
Dec around
[6]
FO and leave a long tail for assembly.
Finish stuffing.
Eye section when viewed
from the top.
Eye section when viewed
from the bottom.
Whites of Eyes
In white, make 2 pieces.
Round #
Details
Total # of
stitches
Round 1
Ch2, sc 6 into 2nd chain from hook, sl st into 1st sc to join the
round. You can use the magic ring method if you prefer.
[6]
FO and leave a long tail for assembly.
Sew the white eye sections onto the side of the green eye sections as
shown in the photographs below. Using black yarn, make a pupil. To
do this, you can either embroider one or make a French knot in the
centre of the white circle.
7
Front Legs / Feet
In green, make 2 pieces.
Row #
Details
Total # of
stitches
Row 1
Ch5, sc in 2nd ch from hook, sc in each of the next 2 stitches, sl st in
the last
[3]
Row 2
Ch 5 again, (working back down the chain you just made) sc in the
2nd chain from the hook, sc in each of the next 3 stitches
[4]
Row 3
Ch 5 again, (working back down the chain you just made) sc in the
2nd chain from the hook, sc in each of the next 3 stitches
[4]
Row 4
Turn the piece 90 degrees, and work an sc into the end of each of
the 3 rows (see photo below)
[3]
Row 5
Turn, skip the first stitch, sc in the remaining 2 stitches.
[2]
Row 6
Turn, ch1, sc 2
[2]
Row 7
Turn, skip the first stitch, sc in the remaining stitch.
[1]
FO and leave a tail for assembly.
Row 3 complete
Work turned 90 degrees, the
arrows show where the place the 3
sc
Row 4 complete
Front leg complete.
8
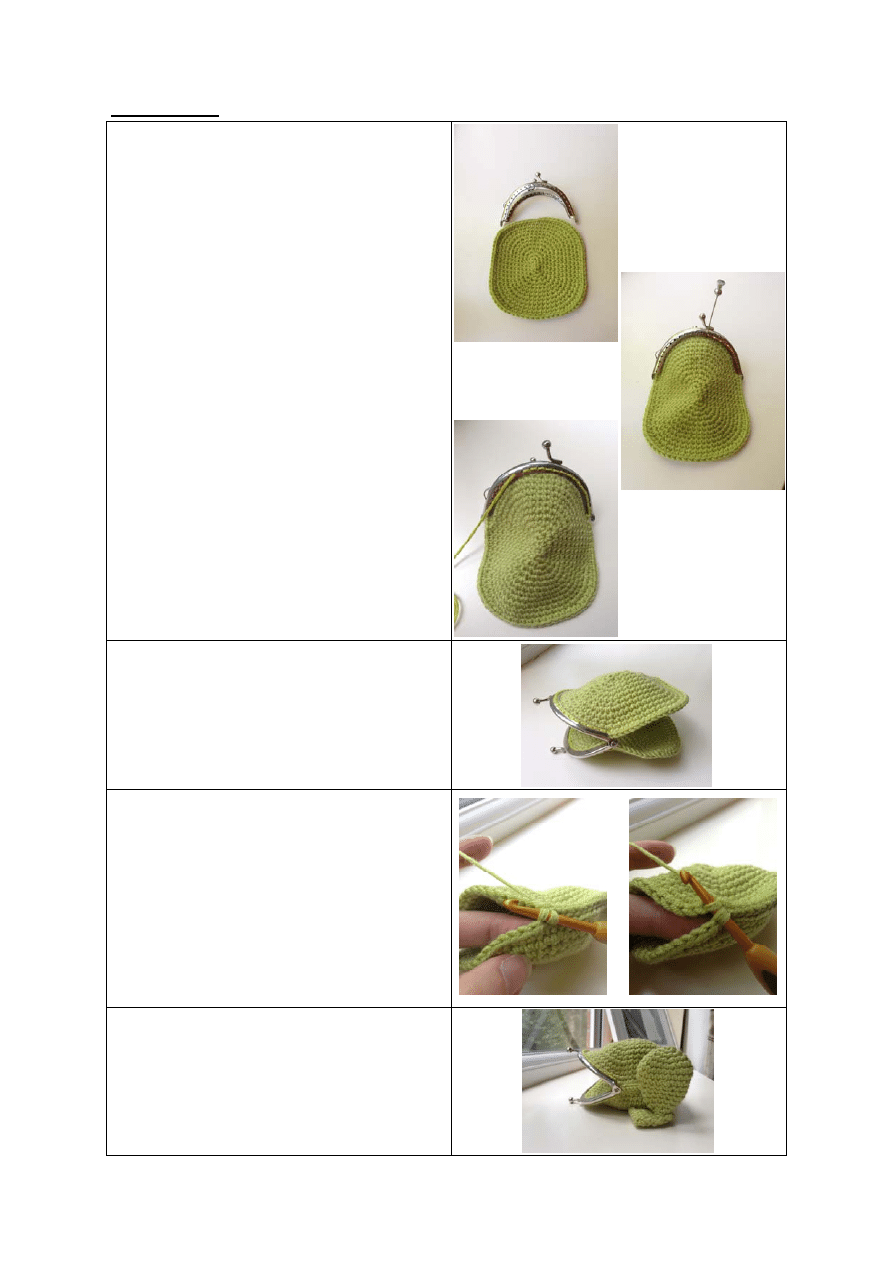
Assembly
The first step is to attach each of the two body
pieces to the purse clasp.
Hold the first piece of your frog’s body, with the
point where you finished off at the top—we are
now going to conceal this point in the frame of the
purse clasp.
Ensure that the right side of the crochet is facing
outwards, and push the piece up into the purse
frame so that the FO point is in the centre
(therefore ensuring that the piece lies straight).
Using some strong green thread or embroidery floss
and a needle (that you have checked is fine enough
to pass through the holes in the purse frame), sew
the first body panel onto the purse frame—I simply
use a back-stitch to do this.
This can be trickier than it looks so some tips
for this would be:
Ensure the crocheted piece is pushed up into
the frame well before every stitch and make
the stitches fairly tight as you don't want the
crocheted piece to sag away from the purse
frame.
Don't place your back-stitches too close to
the edge of the crocheted piece.
Take your time and pull the thread through
gently—the holes in the purse frame can
have sharp edges and can cut the thread if
you pull too hard!
Repeat this process using the 2nd body section on
the opposite side of the purse frame.
Now its time to close the open edges that remain
on the body section. You could just whip stitch
around the edges but I choose to slip stitch as I
think this gives a neater finish.
To do this, hold the two layers together, insert your
hook under the back loop only of the layer closest
to you, and then the front loop only of the layer
furthest away from you. Yarn over the hook, pull it
through the two loops and then pull it through the
final loop to complete the slip stitch. Repeat all the
way around and then weave in the ends.
Now its simply a case of sewing on the back legs,
the front legs and the eyes. I have included a
selection of photos (over the page) to show my
placement of them.
I sew the back legs onto the sl st seam that you
have just created, and then also attach the leg to
the body both a row above this seam and a row
below it, to ensure that they are firmly attached.
9
Assembly continued...
After you have attached the
back legs, your purse should
look something like this.
To attach the front legs, I sew
the leg onto the body section,
but I leave the toes free to move
so that they just stick out at the
front.
Finally attach the eyes.
Congratulations your frog coin
purse is now finished! I hope
you have enjoyed making it but
if you have any questions or
comments then please email me
at Laura.sutcliffe@hotmail.com.
I would love to see a photo of
how you got on :-)
Wyszukiwarka
Podobne podstrony:
canoe purse pattern2 flap1
3 14 canoe purse pattern
concert purse pattern2
3 24 concert purse pattern
canoe purse pattern2 flap1
concert purse pattern2
3 14 canoe purse pattern
3 24 concert purse pattern
canoe purse pattern2 flap1
James Patterson Alex Cross 12 Cross (v1 0)
A E Maxwell Fiddler 02 The Frog and the Scorpion (v1 5)
PO wyk07 v1
s10 v1
s7 4 v1
s9 3a v1
Prezentacja v1
2 BO 2 1 PP Przykłady Segregator [v1]
więcej podobnych podstron