
102
CUTTING BOARD
Materials
Wood Selection
The two basic categories of wood used most often in wood working projects are hardwood and
softwood. Hardwood is more durable and less prone to dents and scratches. It is also more
expensive but will finish to a better advantage. Soft woods, like pine, are more prone to dents and
scratches and do not have the durability of hardwood. Softwoods are much less expensive and
easier to find.
Ask your lumber supplier to show you "Class 1 " or "Select Grade" lumber. Make sure it is properly
dried, straight, and free of knots and defects. (It may be impossible to be completely free of defects
but be sure you understand how to cut around these.)
Ask your Lumber supplier for assistance when purchasing your wood. Similar to laying a pattern out
on a piece of cloth, often you can cut several different pieces of the same thickness of wood out of a
single piece. It is a good idea to add up the total number of board feet, being careful to make sure
you group short pieces in a board with long pieces to minimize waste.
This project could be built out of scrap wood already in your workshop. If you choose to use new
stock from the lumber yard, both hardwoods and softwood are good choices.
Note: Developing a good relationship with Your lumber suppliers is important. They can help guide
you in making material selections as well as making special orders for a type of wood you may
desire for a project.
Now that you have reviewed safety hints, learned the mistakes to avoid, reviewed the basic
components and gathered your tools and materials for your projects - you are ready to BEGIN!
These are the steps to follow for the cutting board:
1.
Cut the stock
2.
Laminate the boards
3.
Finish the board
Cut the Stock
1.
The block thickness is determined by the width you cut the individual pieces. Example: For a block to be 111
thick you will cut the stock 1" wide because of the lamination process which will group the boards together.
Copyright 2004 Martian Auctions
465
2.
Cut the stock a little longer than you wish the length of the cutting board to be. You will cut the board to the
finished side after it has been laminated and sanded.
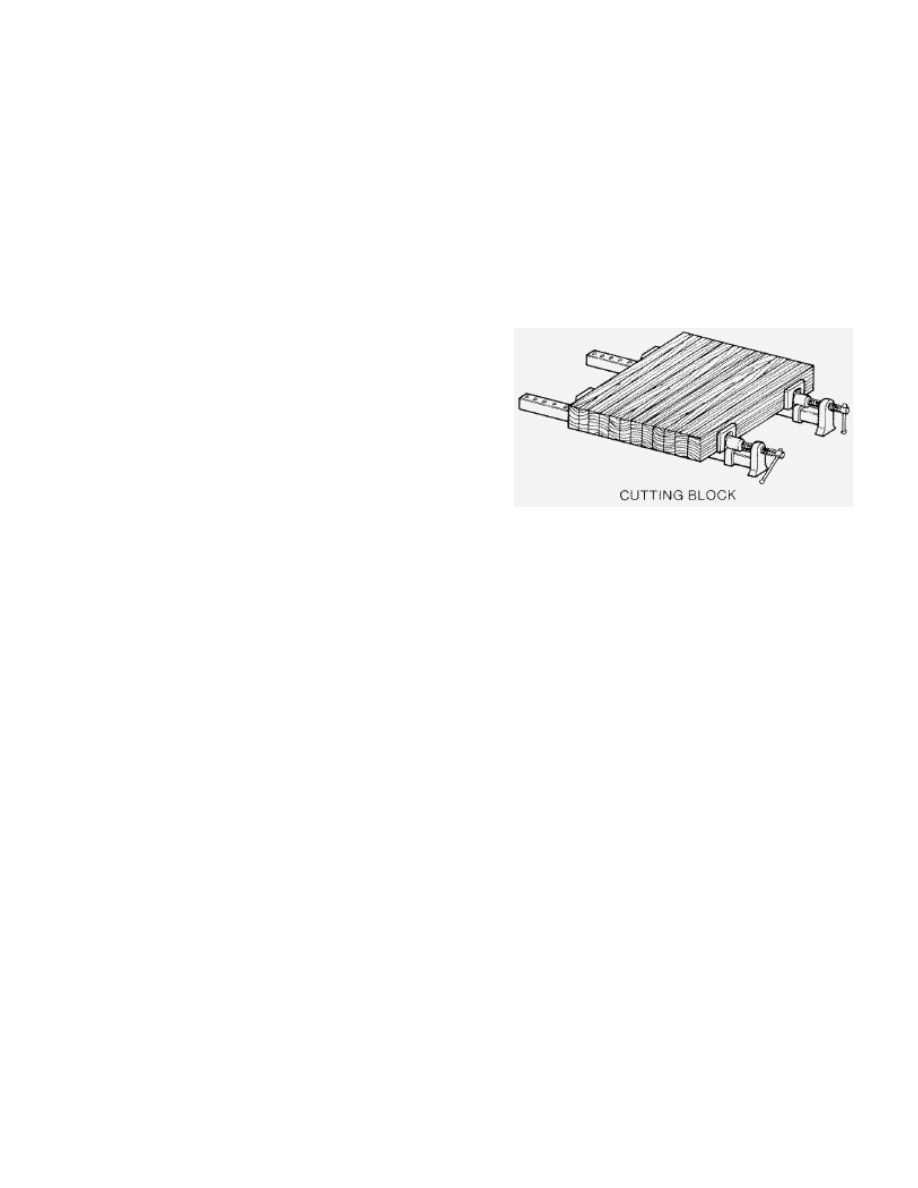
Laminating the Stock
1.
Use resorcinol glue on both sides of the stock to glue them together. Resorcinol glue is water proof and will
provide stability if the board is soaked in water.
2.
After gluing, clamp the boards together and let dry overnight.
3.
Scrub off extra glue before it dries to prevent chipping the cuffing blades when finishing and shaping.
Finishing the Cutting Board
1.
• After the board dries, take out of the clamps and use a
belt sander to smooth the top and bottom surfaces.
2.
Using a table saw or circular saw, cut the board to length. If
using a table saw be sure that the cutting blade does not
exceed 1/4" above the cutting board to prevent drag.
3.
Using a shaper or router put around over edge on the top
surface of the cutting board. Be careful to follow the
guidelines reviewed in the tape.
4.
Use a non-toxic finish such as mineral oil or a salad bowl
finish for this project.
Copyright 2004 Martian Auctions
466
Wyszukiwarka
Podobne podstrony:
cutting board knife
Cutting Board 2
Cutting Board
cutting board knife
Cutting Board French Bread Cutter
HOW TO CLEAN A CUTTING BOARD
cutting board landscape cuttingboard
Cutting Edge Placement Tests
ATM18 Relay Board
Heart Shaped Cheese Board
89SXX Project Board
HD44780 ATTINY13 BOARD TOP MIRROR
Cutting Threaded Rod
Extra Sword Art Online Story pencil board
Basic Board Fence
więcej podobnych podstron