Fitting Instructions /Inbouwinstructie /Manuel de Montage /Manual de Instalar
Fitting Instructions /Inbouwinstructie /Manuel de Montage /Manual de Instalar SGI Type2
682228*0
1/9
www.teleflexgfi.nl
12-07-2005
Kia Sportage 2.0 16v G4GC CVVT Kefico ‘04
Instruction Nr./Instructienr./No. d’instruction/No. de instrucción
:682228*0
Car type/Auto type/Automobile type/Tipo de vehiculo
:Kia Sportage 2.0 16V
CVVT
Year of construction/Bouwjaar/Année de fabrication/Año de construccion :’’04--->
Engine code/Motorcode/Numero du moteur/Número del motor :G4GC
Injectionsystem/Injectiesysteem/Injectionsysteme/Sistema de inyeccion :Kefico
Kitnumbers/Setnummers/Numeros du set/Número del juego :692228
English
These fitting instructions only contain specific information about this type of car. For further information always refer to the “AG Dealer
Information” binder. Always check the system for leakage after filling up the LPG tank.
All electrical connections must be made with the supplied connectors or be soldered and finished with heatshrink.
The given measures and threadcolors in this instruction, should always be checked and measured in case of occurring changes in the cars
wiring and possible changes in type of vehicle. The measures used in this manual are, if not mentioned specificly, given in mm’s.
Always use an anti-corrosion coating where necessary to prevent rust.
Note: This manual is based on Dutch regulations. It is the installer’s responsibility to check the local regulations and to make all neccesary
adaptions !TeleflexGFI recommends to check this instruction through the website WWW.TELEFLEXGFI.NL on eventual updates !
Nederlands
Deze inbouwinstructie vermeldt alleen de specifieke informatie voor dit type auto. Voor verdere informatie moet altijd de “Dealer informatie
map” geraadpleegd worden. Controleer na het tanken de gehele installatie op eventuele lekkage.
Electrische verbindingen moeten gemaakt worden met de daarvoor bijgeleverde connectoren of d.m.v. solderen en afwerken met krimpkous.
De in deze instructie aangegeven maten en draadkleuren dienen zelf opgemeten en gecontroleerd te worden i.v.m. onderlinge verschillen in
de auto’s en mogelijke wijzigingen in de bedrading.
De in deze instructie gebruikte maten worden, indien niet nader vermeld, weergegeven in mm’s.
Behandel na de inbouw de door de inbouw ontstane korrosiegevoelige plaatsen altijd met een korrosiewerend middel.
Opmerking:Deze instructie is gebaseerd op de Nederlandse inbouweisen.Het is de verantwoordelijkheid van de inbouwer om de lokale regels
te controleren en alle nodige aanpassingen uit te voeren! TeleflexGFI adviseert om via de website WWW.TELEFLEXGFI.NL eventuele
updates op deze instructie te controleren !
France
Cette manuel d’instruction signale uniquement les informations spécifiques pour ce type de voiture. Pour dáutres informations, il faudrait sys-
tématiquement consulter le “classeur Dealer-information”.
Après avoir fait le plein, contrôlez toute l'installation en vue d'une fuite éventuelle à l'aide d'une bombe de recherche de fuite ou d'un détecteur
de gaz.
Les connections électriques devraient être réalisées avec les connecteurs fournis ou à l'aide de soudures et terminées avec gaine rétractable.
Les mesures et couleurs des fils indiqués dans cette instruction sont à mesurer ou contrôler par soi-même en raison des variations entre les dif-
férentes voitures et des possibles modifications des câblages. Traitez tous les trous de perçage avec un antirouille.
Toutes les dimensions sont données en milimètres sauf indication contraire.
Attention:Cette manuel d’instruction ets bassé sur normes néerlandais. C’est la responsabilité du mechanicien pour controller les normes locale-
ment !TeleflexGFI conseils à controller des modifications des instructions dans WWW.TELEFLEXGFI.NL !.
Español
Estas instrucciones de montaje solamente indican la información específica para este tipo de vehículo. Con respecto al resto de la información
deberá consultar siempre el libro de las ‘’instrucciones para el concesionario’’.
Controle siempre, después de haber ilenado el tanque, toda la instalación de eventuales goteos.
Las conexiones eléctricas deben ser realizadas con las conexiones suministradas para tal fin o mediante la soldadura y su terminación con una
mazarota ajustada en caliente.
Las dimensiones y los colores de cables indicados en el presente manual deben ser medidos y controlados por Ud. mismo, debido a los posi-
bles cambios en los vehículos y las posibles modificaciones del cableado.
Las dimensiones indicadas en el presente manual son, si no hay otro tipo de indicación, siempre en milímetros.
Después de la instalación, trate los lugares sensibles a la corrosión, debido a la misma instalación, con una sustancia anticorrosión.
Atención : Las instaladores haber las deber para las reglas tópico en comprobar y todas las adaptiones necariamente en hacer !
TeleflexGFI encontrar que la recomendable esta manual para controlar a WWW.TELEFLEXGFI.NL en relación con
modificaciónes !
Fitting Instructions /Inbouwinstructie /Manuel de Montage /Manual de Instalar
Fitting Instructions /Inbouwinstructie /Manuel de Montage /Manual de Instalar SGI Type2
682228*0
2/9
www.teleflexgfi.nl
12-07-2005
Kia Sportage 2.0 16v G4GC CVVT Kefico ‘04
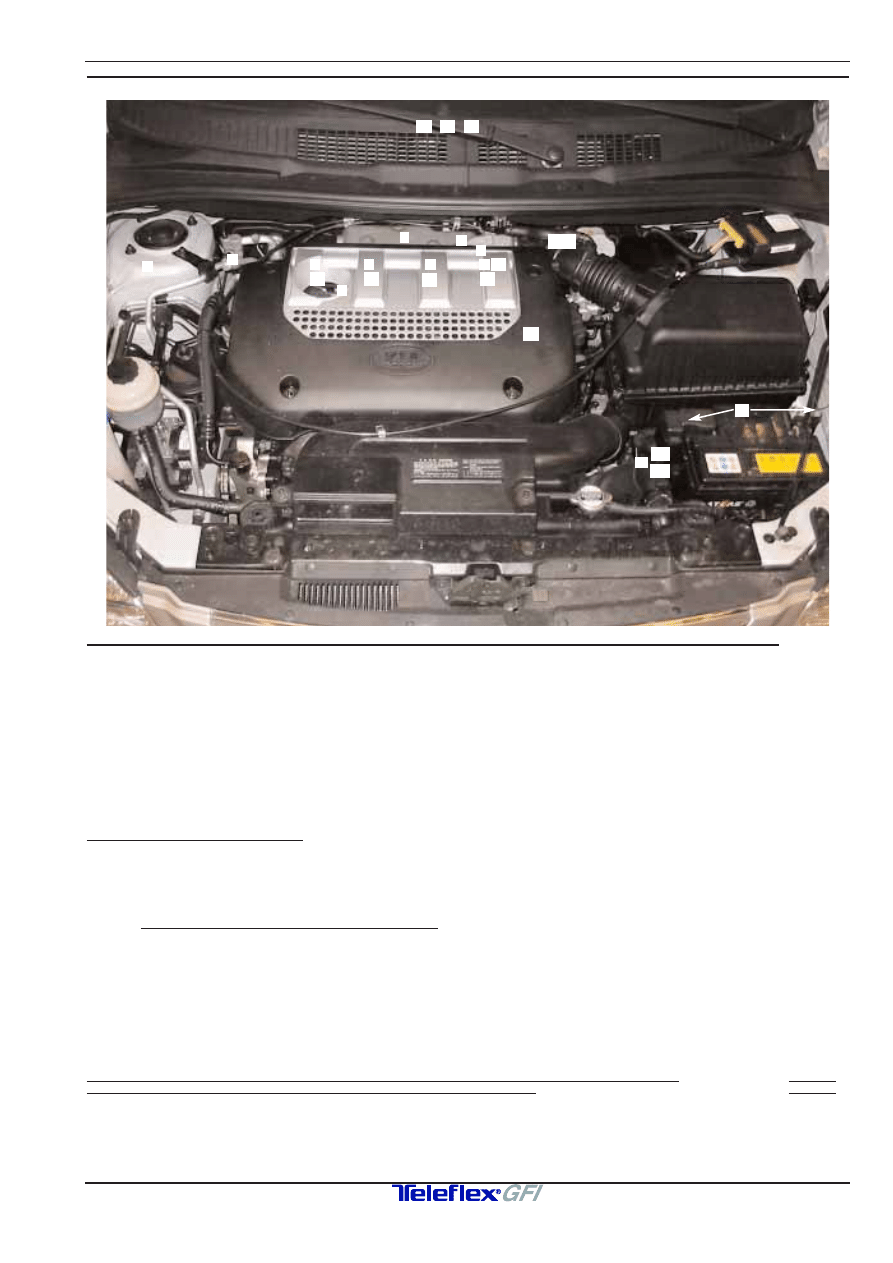
OverviewSystem/SysteemOverzicht/ImplantationGénérale/Resumen del Sistema
Fitting order / Montage volgorde / Ordre de montage / Orden de montaje
1.
Vacuumnipple / Vacuümnippel / Nipple à dépression/ Vacio conexione
2.
Vaporiser / Verdamper / Vaporiseur / Vaporizador
3.
Waterconnections / Wateraansluitingen / Connections d` eau / Connexiones de agua
4.0
Interface unit / Interface unit / Unit d’ interface / Unidad de interfaz
4.1
SGI-computer / SGI-computer / Calculateur SGI / Ordenador SGI
5.(11+12)Mount connector to Interface unit & SGI computer/Monteer connector op Interface unit & SGI computer /
Monter les connecteur Unité d’ interface & Calculateur SGI /Montar connector Unidad de Interfaz & Ordenador SGI
6.(19)
Grummet /Doorvoerrubber /Passe fil caoutchouc /Pasador coucho
7.
SGI-injectors / SGI-injectoren / Injecteurs SGI / Inyectores SGI
8.
Fuel rail LPG / Fuel rail LPG / Common rail GPL/ Rail de combustible de gas
9.
Filter 600344/ Filter 600344/ Filtre 600344/ Filtro 600344
10.
Vacuumhoseconnections/Vacuüm sl.aansluitingen/Connections de tuyau à dépression/Manga de vacío
11(5) , 12(5) , 13 , 14 + 15 :
Mount connectors to the components / Monteer connectoren op de componenten /
Monter les connecteurs aux composants / Montar las connectores en los componentes
16.
Petrol injector interruptions /Benzine injector onderbrekingen /Interruption injecteurs d’ essence /
Interrupción de inyectores de la gasolina
Remark / Opmerking / Remarque / Observación :
Cylinderarrangement according to data carmanufacturer /Cilindernummering gelijk aan data autofabrikant
Numérotage cylindres égal données fabricant de auto / Numeración cilindros igual datos fabricante de coche
17.
Temperature signal / Temperatuur signaal / Signal de temperature /Señal de la temperatura
18.
Power (30+) + Ground / Voeding (30+) + Massa / Alimentation batterie (30+) +Masse/ Alimentación por batería
(30+) + Tierra
19.(6)
Grummet / Doorvoerrubber / Passe fil caoutchouc / Pasador coucho
20.
Switch / Schakelaar / Interrupteur / Interruptor
21.
Connections to LPG switch/Aansluitingen LPG schakelaar /Connections vers l’ interrupteur/Conexiones al interruptor
22.
Beeper( Remove sticker!) /Alarm(Sticker verwijderen!)/Alarme(Enlever autocollant )/Alarma (Quitar pegatina! )
Explanation of symbols / Beschrijving symbolen / Définition symboles/ Explicacíon de los símbolos
Page 10
Legend various / Legenda diversen / Légende divers / Leyenda miscelánea
Page 10
4.0
4.1
17
10
18
1
6(19)
16
16
16
16
2
7
7
7
7
7
5
3
20 21
22
8
9
682228*0
3/9
www.teleflexgfi.nl
12-07-2005
Kia Sportage 2.0 16v G4GC CVVT Kefico ‘04
2b
2d
2c
2a
Fitting Instructions /Inbouwinstructie /Manuel de Montage /Manual de Instalar
Fitting Instructions /Inbouwinstructie /Manuel de Montage /Manual de Instalar SGI Type2
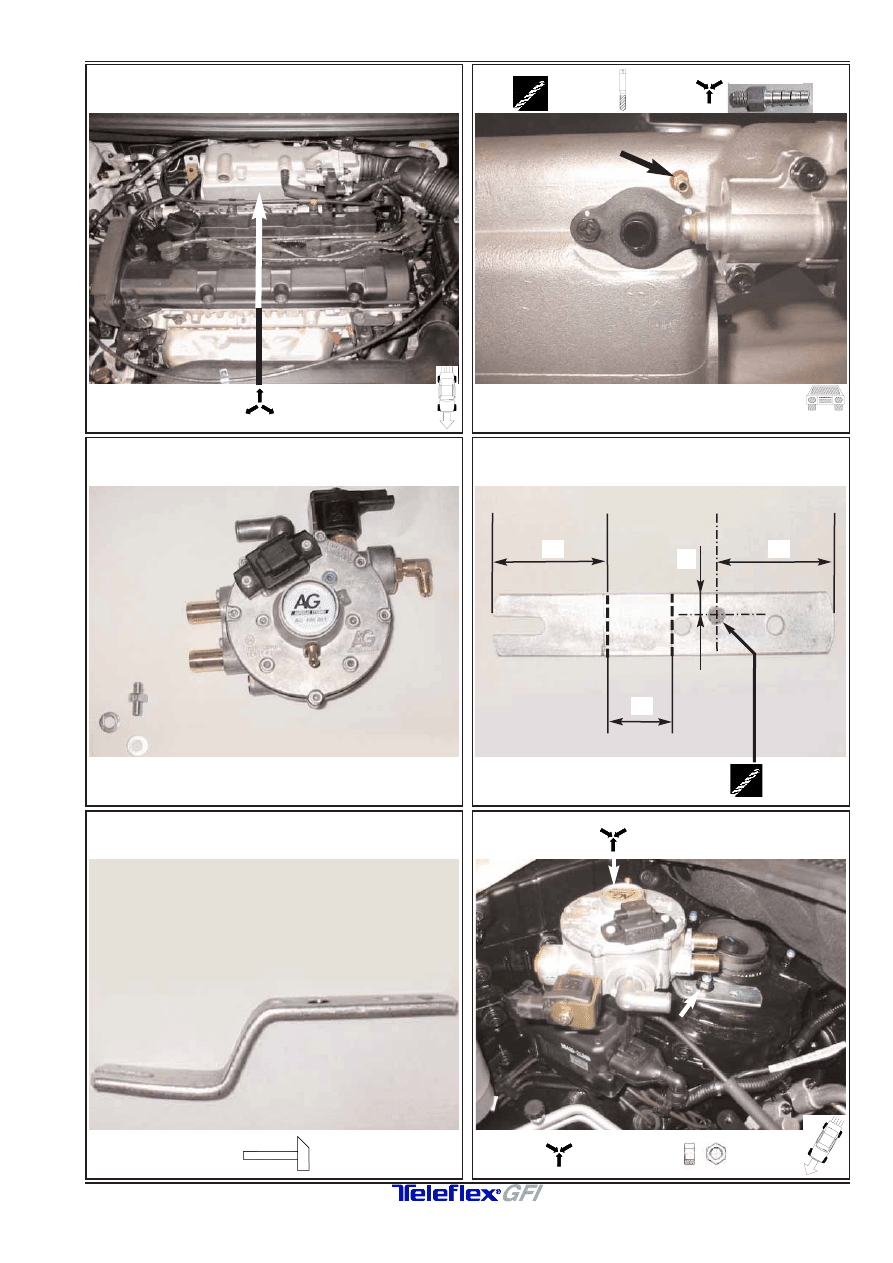
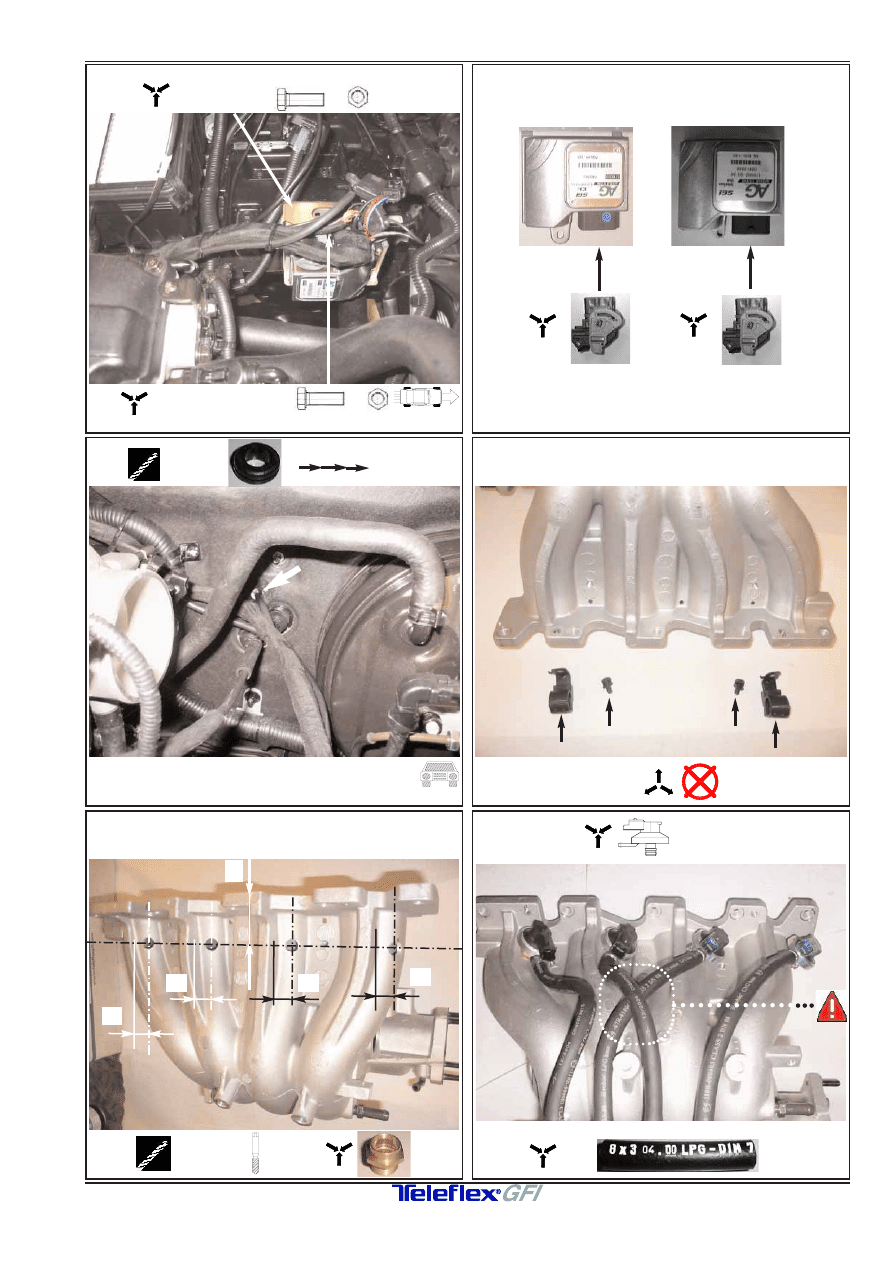
Preparation/Voorbereiding/Préparation/Preparación
AG 600001
Preparation/Voorbereiding/Préparation/Preparación
AG 50151
Preparation/Voorbereiding/Préparation/Preparación
AG 50151
Ø 11 mm
AG 50151 +
M 10
57
35
60
11
1b
M6 x 1
Ø 5mm
AG 35303
1a
Fitting Instructions /Inbouwinstructie /Manuel de Montage /Manual de Instalar
Fitting Instructions /Inbouwinstructie /Manuel de Montage /Manual de Instalar SGI Type2
682228*0
4/9
www.teleflexgfi.nl
12-07-2005
Kia Sportage 2.0 16v G4GC CVVT Kefico ‘04
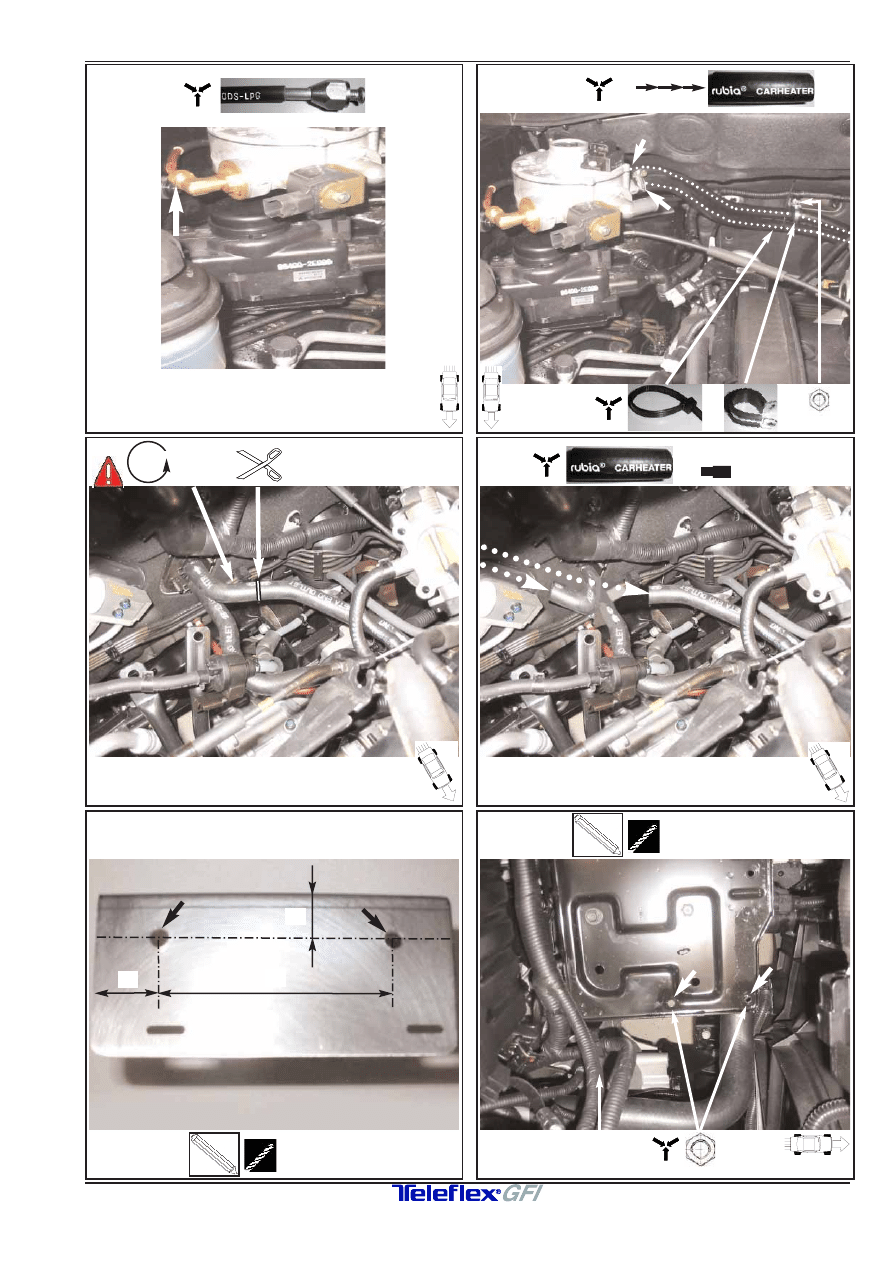
3a
3c
16-16 mm (2x)
(2x)
+
+
+
ORIGINAL
+
3b
180°
4a
Ø 7mm (2x)
22
79
39
Preparation/Voorbereiding/Préparation/Preparación
AG 600161
4b
Ø 7mm (2x)
M10
2e
Fitting Instructions /Inbouwinstructie /Manuel de Montage /Manual de Instalar
Fitting Instructions /Inbouwinstructie /Manuel de Montage /Manual de Instalar SGI Type2
682228*0
5/9
www.teleflexgfi.nl
12-07-2005
Kia Sportage 2.0 16v G4GC CVVT Kefico ‘04
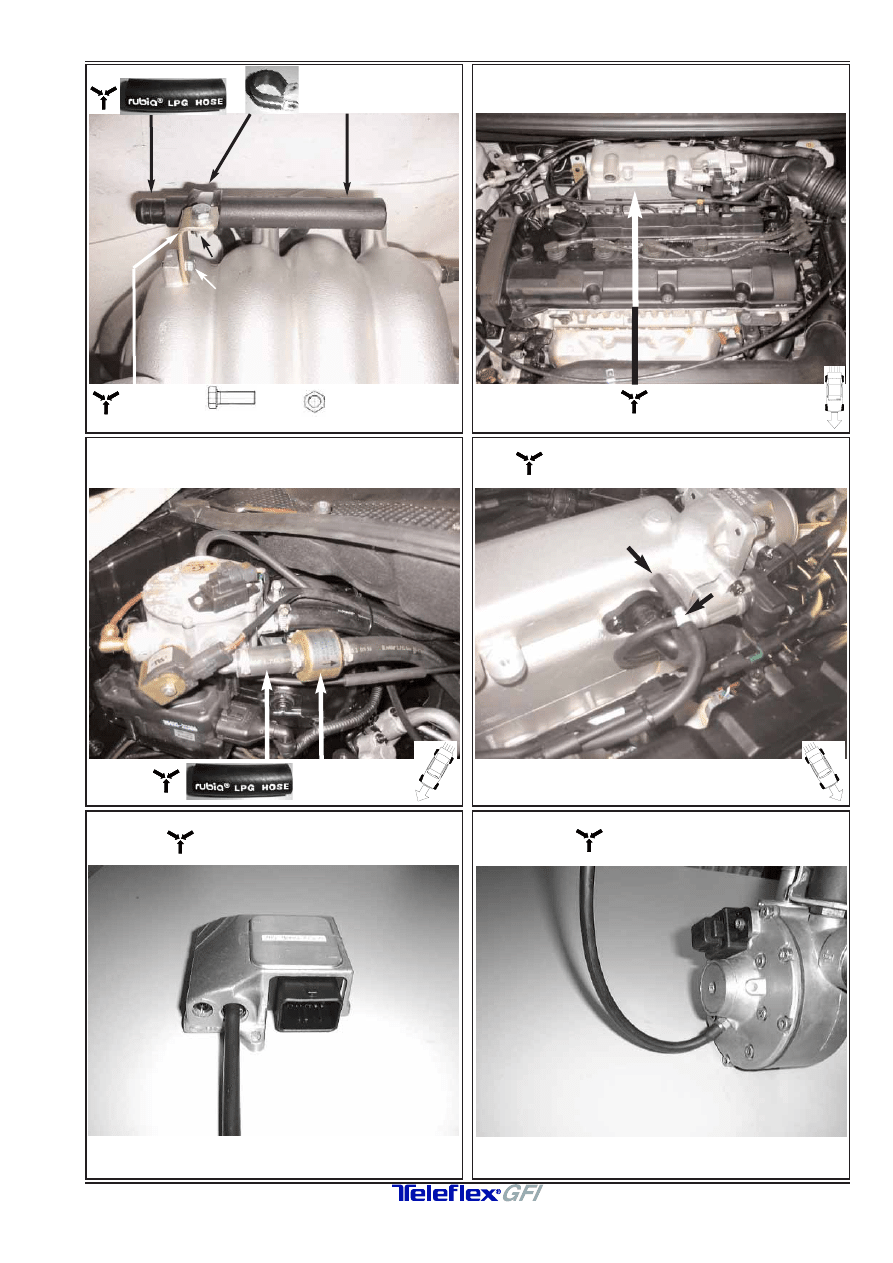
6a(19)
7a
Ø 11mm
AG 600127
5a(11 + 12)
BROWN CONNECTOR
BLACK CONNECTOR
7c
4 x
L=230
4x
7b
Ø 5mm
Ø 9mm
Ø 13mm
M14x1
4X
45
15
15
15
20
4c
600131 + 600107 +
M5
AG 600161 +
+
+
(2x)
682228*0
6/9
www.teleflexgfi.nl
12-07-2005
Kia Sportage 2.0 16v G4GC CVVT Kefico ‘04
Fitting Instructions /Inbouwinstructie /Manuel de Montage /Manual de Instalar
Fitting Instructions /Inbouwinstructie /Manuel de Montage /Manual de Instalar SGI Type2
9a
10a
8b
Vacuümhose / Vacuümslang
Tuyau de depression / Manga de Vacío
Ø 5mm + Ø 3.2mm
+ T
6-4-6
+
600344
10c
Vacuümhose / Vacuümslang
Tuyau de depression / Manga de Vacío
Ø 5 mm
10b
Vacuümhose / Vacuümslang
Tuyau de depression / Manga de Vacío
Ø 3,2 mm
8a
+
AG 600090
AG 945304
+
M6(1x)
M6(2x)
+
Fitting Instructions /Inbouwinstructie /Manuel de Montage /Manual de Instalar
Fitting Instructions /Inbouwinstructie /Manuel de Montage /Manual de Instalar SGI Type2
682228*0
7/9
www.teleflexgfi.nl
12-07-2005
Kia Sportage 2.0 16v G4GC CVVT Kefico ‘04
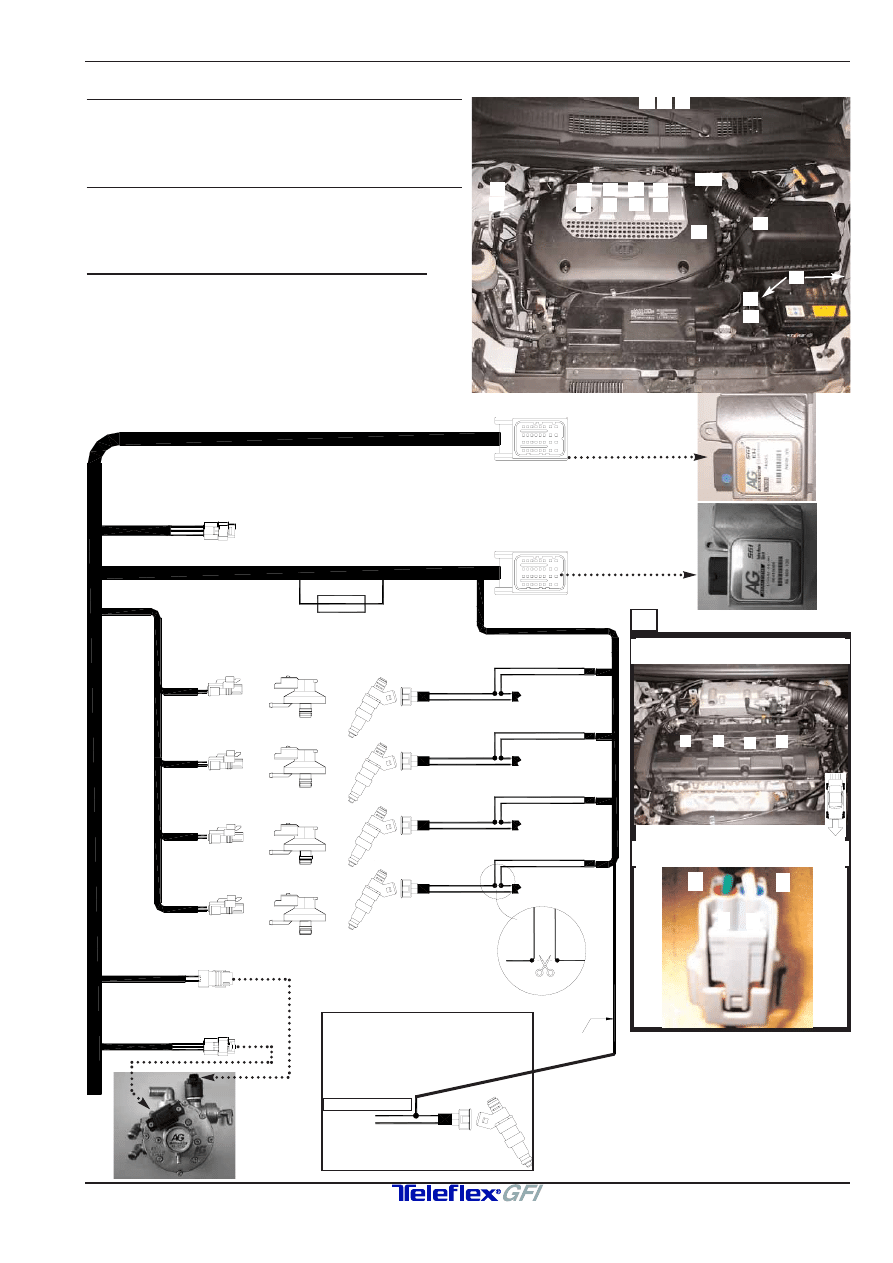
11(5) , 12(5) , 13 , 14 + 15:
Mount the connectors to the components
Monteer de connectors op de componenten
Monter les connecteurs aux composants
Montar las conectores en los componentes
16:
Petrol injector interruptions
Benzine injector onderbrekingen
Interruption injecteurs d’essence
Interrupciones del inyector de las gasolina
Remark / Opmerking / Remarque / Observación :
Cylinderarrangement equal to data carmanufacturer
Cilindernummering gelijk aan data autofabrikant
Numérotage cylindres égal données fabricant de auto
Numeración cilindros igual datos fabricante de coche
17 to 22 See next page
17 t/m 22 Zie volgende pagina
17 à 22 : Page suivante
17 hasta 22 : Véase la pagina siguiente
Electrical connections /Electrische aansluitingen /Raccordement électrique /Conexiones eléctricas
12
15
18
11
13
13
13
13
17
16
14
15
16
16
16
21 22
19(6)
20
Connector 1
(Inj.1)
E
1
A
B
C
D
2
3
4
H
F
G
E
1
A
B
C
D
2
3
4
H
F
G
Brown connector
Black connector
Fuse
Connector 3
(Inj.3)
Connector 2
(Inj.2)
Connector 4
(Inj.4)
Red/White (15+)
DIAGNOSIS
DIAGNOSE
DIAGNOSTIC
DIAGNÓSTICO
11(5)
13
14
15
16
12(5)
11
12
CYLINDER 1
CYLINDER 2
CYLINDER 3
CYLINDER 4
-
+
PinNr. 2 WHITE
CHOICE INJECTOR ARBITRARILY
KEUZE INJECTOR WILLEKEURIG
CHOIX INJECTEUR ARBITRAIRE
ELECCIÓN INYECTOR ARBITRARIO
+
-
-
+
+
-
Interruption 1 (Inj.1)
-
+
Black
Red
Black
Red
Black
Red
Black
Red
Interruption 2 (Inj.2)
Interruption 3 (Inj.3)
Interruption 4 (Inj.4)
-
Pinnr: 1 BLUE
Pinnr: 1 GREEN/ORANGE
Pinnr: 1 YELLOW/RED
Pinnr: 1 GREEN
CYLINDER 1
CYLINDER 2
CYLINDER 3
CYLINDER 4
16
1
2
3
4
Cylinderarrangement / Cilindernummering
Numérotage cylindre/Numeración cilindros
Position of interruption / Plaats onderbr.
Position déconnection / Sitio interrupción
-
1
2
+
Fitting Instructions /Inbouwinstructie /Manuel de Montage /Manual de Instalar
Fitting Instructions /Inbouwinstructie /Manuel de Montage /Manual de Instalar SGI Type2
682228*0
8/9
www.teleflexgfi.nl
12-07-2005
Kia Sportage 2.0 16v G4GC CVVT Kefico ‘04
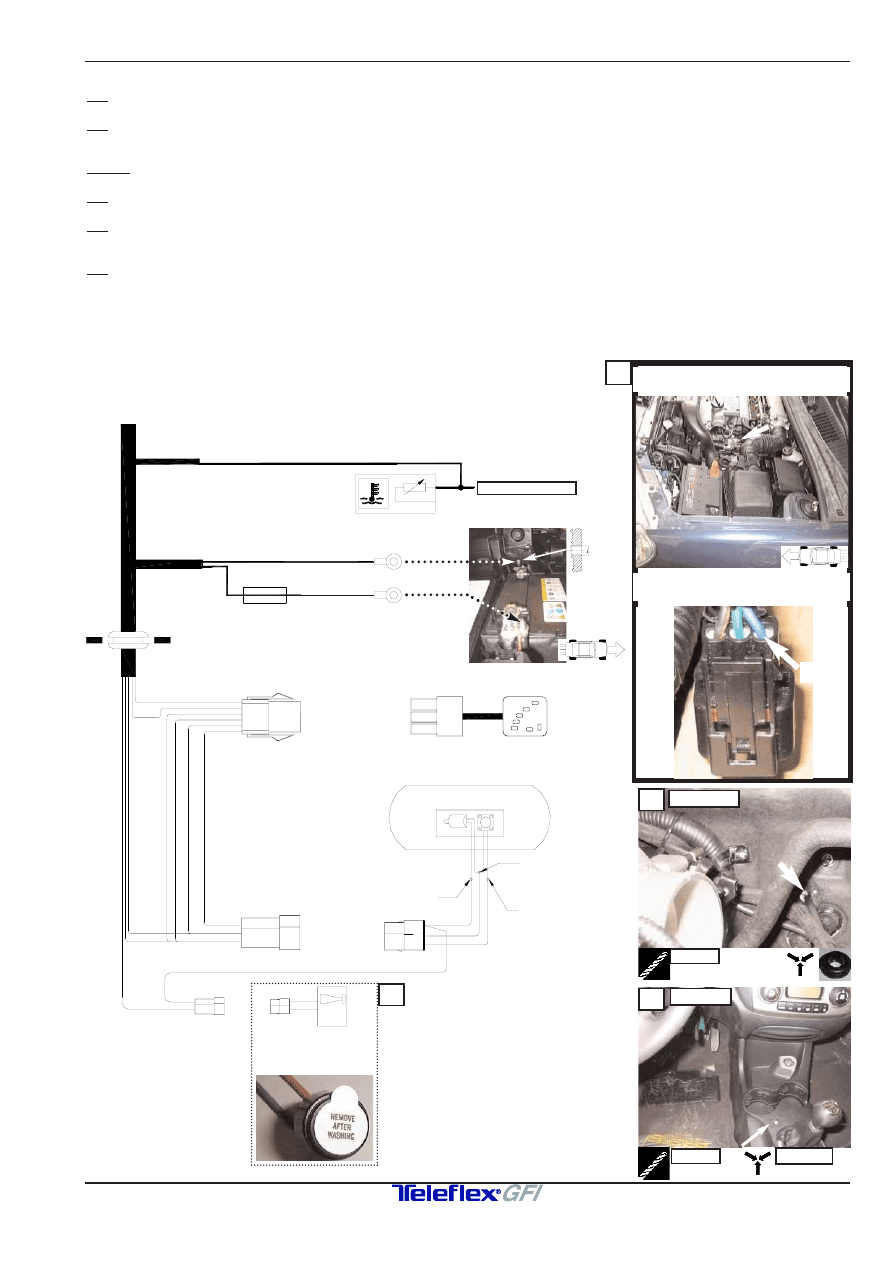
Electrical connections /Electrische aansluitingen /Raccordement électrique /Conexiones eléctricas
Position of connection / Plaats aansluiting
Position connection / Sitio empalme
17
19
20
GRUMMET
SWITCH
SWITCH
Ø 10 MM
Ø 8 MM
Yellow to yellow
5.
4.
6.
3.
2.
1.
Red to purple
3.
5.
Black to black
Temperature sensor
+
-
Fuse
1. Brown
2. Orange
3. Yellow
4. Black
5. Red
6. Purple
Black/White
Black
Ground - (31)
Red
4.
18
19(6)
17
20
21
REMOVE STICKER
STICKER VERWIJDEREN
ENLEVER AUTOCOLLANT
QUITAR PEGATINA
22
Pinnr. 3 BLUE
17:
Temperature sensor / Temperatuursensor / Capteur de température / Sensor de las temperatura
18.
Power (30+) + Ground / Voeding (30+) + Massa / Alimentation batterie (30+) +Masse /
Alimentación por batería (30+) + Tierra
19(6): Grummet /Doorvoerrubber /Passe fils caoutchouc /Pasador de caucho
20:
LPG switch / LPG schakelaar / Interrupteur GPL / Interruptor Gas
21:
Connections to LPG switch + LPG tank/ Aansluitingen schakelaar+ LPG tank /
Connections vers l’interrupteur GPL+ réservoir GPL / Conexiones al interruptor y tanque de gas
22:
Beeper(Remove sticker! )/ Alarm(Sticker verwijderen! )/ Alarme(Enlever autocollant!)/
Alarma(Quitar pegatina!)
Position of sensor / Plaats van sensor
Position d’ détecteur / Sitio de sensor
3
6 mm
6 mm
Fitting Instructions /Inbouwinstructie /Manuel de Montage /Manual de Instalar
Fitting Instructions /Inbouwinstructie /Manuel de Montage /Manual de Instalar SGI Type2
682228*0
9/9
www.teleflexgfi.nl
12-07-2005
Kia Sportage 2.0 16v G4GC CVVT Kefico ‘04
Y
16-16-16mm
T
16-16-16mm
16-20mm
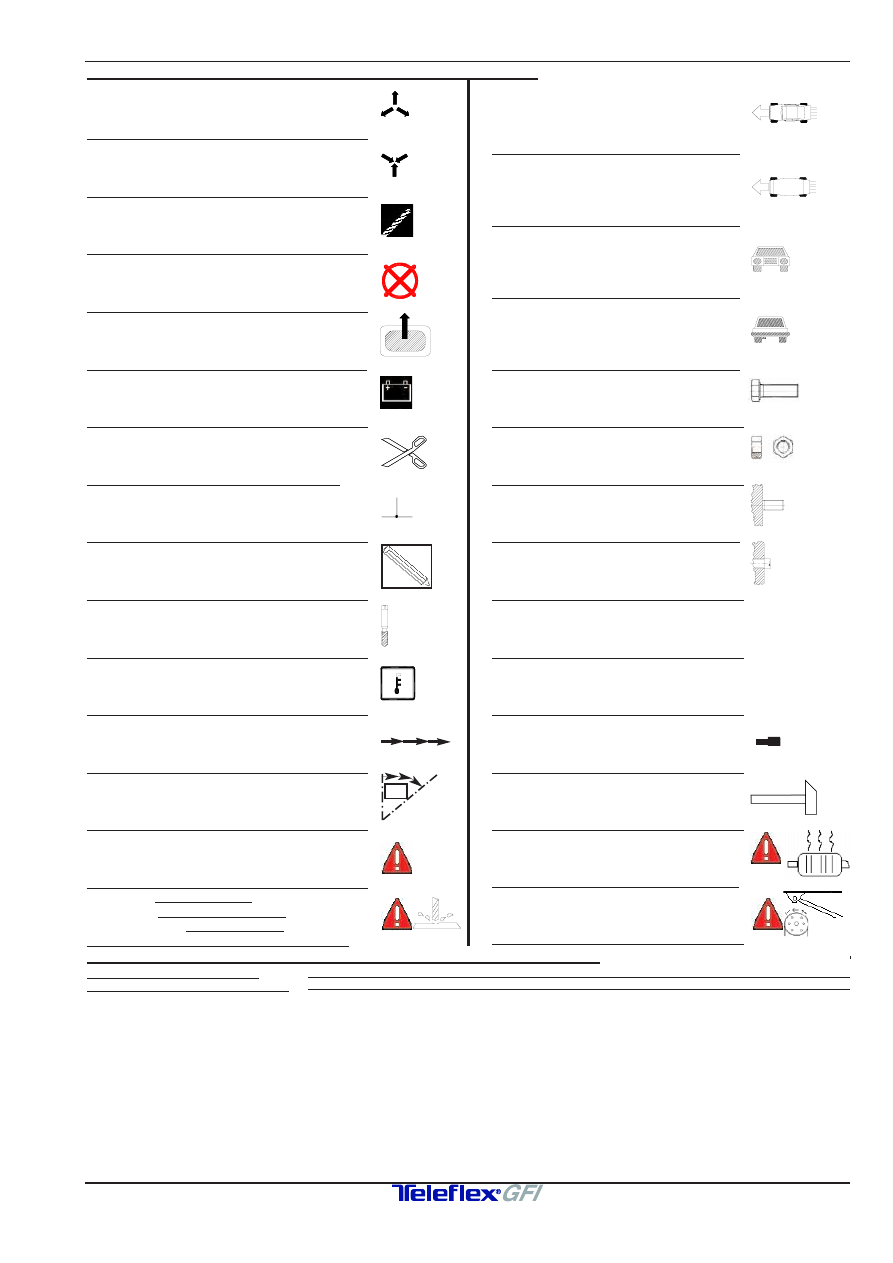
Disassemble part
Demonteer onderdeel
Démonter élément
Desmontar la parte
Mount part
Monteer onderdeel
Monter élément
Montar la parte
Drill
Boren
Perforer
Taladrar
Redundant part
Te vervallen onderdeel
Pièce technique d’origine à supprimer
Parte a suprimir
Piece to be removed from element
Te verwijderen gedeelte van onderdeel
Partie d’origine à supprimer
Parte a quitar del elemento
Battery
Accu
Batterie
Acumulador
Cut
Knippen
Couper
Cortar
Solder connection / Crimp connection
Soldeerverbinding / Krimpverbinding
Connection à souder / Connection à sertir
Conexíon de soldeo / Conexíon de encogimiento
Scriber / Draw
Kraspen / Aftekenen
Pointe à tracer / Dessiner
Puntero de raya / Dibujar
Use screw tap
Gebruik draadtap
Faire usage de taraudeuse
Hacer uso de herramientas de rosca
Temperature sensor / signal
Temperatuur sensor / signaal
Capteur / Signal de temperature
Sensor /Señal de la temperatura
Pierce / Moving direction
Doorvoeren / Bewegingsrichting
Guider / Direction mouvement
Pasar / Dirección movimiento
Bend/Adapt
Buigen/Aanpassen
Courber/Adapter
Torcer/Adaptar
Warning
Let op
Fais attention
Advertencia
Attention for
hoses/tubes/cables
while drilling
Attentie voor
leidingen/slangen/kabels
met boren
Faites attention pour tubes/tuyau/câbles durante perforer
Advertencia
mangas/tubos/cables
durante taladrar
View from top(Indication viewpoint image)
Bovenaanzicht(Indicatie aanzicht foto)
Vue d’ en haut(Indication point de vue photo)
Visto desde arriba(Indicación punto de vista
imagen)
View from bottom(Indication viewpoint image)
Onderaanzicht(Indicatie aanzicht foto)
Vue d’ en bas(Indication point de vue photo)
Visto desde abajo(Indicación punto de vista
imagen)
Frontview(Indication viewpoint image)
Vooraanzicht(Indicatie aanzicht foto)
Aspect frontal(Indication point de vue photo)
Visto frontalmente(Indicación punto de vista
imagen)
Rearview(Indication viewpoint image)
Achteraanzicht(Indicatie aanzicht foto)
Aspect arrière(Indication point de vue photo)
Visto lateralmente(Indicación punto de vista
imagen)
Bolt
Bout
Boulon
Tornillo
Nut
Moer
Écrou
Tuerca
Existing threadend
Bestaand draadeind
Boulon fileté d’origine
Rosca existente externamente
Existing threadhole
Bestaand draadgat
Trou taraudé d’origine
Agujero de rosca existente
Water / Vacuum T-joint
Water / Vacuüm T-stuk
Raccord en T d’ eau / depression
Junta T para agua / vacío
Water / Vacuum Y-joint
Water / Y-stuk
Raccord en Y d’ eau / depression
Junta Y para agua / vacío
Waterpipe
Waterpijpje
Raccord d’ eau
Conducto de agua
Edit part
Bewerk (onder)deel
Adapter élément
Adaptar parte
Heat! Keep at least 100mm away from source
Hitte! Houd minstens100mm afstand van bron
Chaleur!Tenir
au moins
100mm
distance de source
Calor!Tenercomo mínimo 100mm distancia de fuente
Moving /Rotating parts
Bewegende / Draaiende delen
Pièces mobile / Giration
Piezas movible / Dar Vueltas
Symbols / Symbolen / Symboles / Símbolos
Various translations / Vertaling diversen / Traduction divers / Traducción diversos
English Nederlands Francais Español
GRND
Massa
Terre
Tierra
Image
Foto
Photo
Imagen
Page
Bladzijde
Page
Folio
Pin(Terminal)
Stekkerpen
Borne de fiche
Espiga de conectore
Nr.(Number) Nr.(Nummer)
No.(Numéro)
No.(Número)
Wire
Draad
Câble
Cable
Protection
Bescherming
Protection
Protección
Additional
Bijkomend
Accessoire
Adicional
Optional
Optioneel
Optionnel
Opcional
Original(Part,Bolt,e.g.) Origineel(Onderdeel,bout,bijv.) Original(Partie,Boulon p.ex.) Original(Parte,Tornillo p.ej.)
Extension(Extend)
Verleng(en)
Prolonger
Prolangar
Use
Maak gebruik van
Faire usage de
Hacer uso de
Do not use
Niet gebruiken
Non faire usage de
No usar
To (ECU e.g.)
Richting (ECU bijv.)
À (ECU p.ex.)
Para (ECU p.ej.)
Bracket
Steun
Contrefiche
Contrafuerte
Colours/Kleuren/Couleurs/Colores
English Nederlands Francais Español
White
Wit
Blanc
Blanco
Black
Zwart
Noir
Negro
Red
Rood
Rouge
Rojo
Brown
Bruin
Brun
Márron
Purple
Paars
Violet
Violeta
Yellow
Geel
Jaune
Amarillo
Orange
Oranje
Orange
Anaranjado
Blue
Blauw
Bleu
Azul
Green
Groen
Vert
Verde
Beige
Beige
Beige
Beige
Grey
Grijs
Gris Gris
Pink
Roze
Rose
Rosado
Legend various / Legenda diversen / Légende divers / Leyenda miscelánea
xx
º
100mm
(((
Wyszukiwarka
Podobne podstrony:
KIA Sportage 2 0 16V 3
KIA Sportage trudny rozruch silnika zima
kia sportage 99 naprawa ospszetu itp (2)
położenie czujników Kia Sportage 16V dohc
Kia Sportage 94 00LG Carinfo com ua
KIA Sportage 2 0 16V 3
KIA Sportage trudny rozruch silnika zima
Kia Sportage, od 2010
Kia Sportage(1)
akumulator do kia sportage k00 20 i 4wd 20 20 i 16v
położenie czujników Kia Sportage 16V dohc
akumulator do kia sportage kj 20 16v 20 16v 4wd
Kia Sportage 2010
KIA SPORTAGE 2000 schemat elektryki
Kia Sportage, 2004 2010
Kia Sportage 2005
więcej podobnych podstron