Lab 12.4.3 Configure Intrusion Detection
Estimated Time: 30 Minutes
Number of Team Members: Two teams with four students per team
Objective
In this lab exercise, students will complete the following tasks:
• Configure the use of Cisco Intrusion Detection System (IDS) information signatures and
send Cisco IDS Syslog output to a Syslog server.
• Configure the use of IDS attack signatures and send Cisco IDS Syslog output to a Syslog
server.
Scenario
The PIX Security Appliance is interoperable with the Cisco Intrusion Detection System (Cisco IDS).
The PIX Security Appliance traps IDS signatures and sends these as syslog messages to the Syslog
server. This feature supports only single-packet IDS signatures.
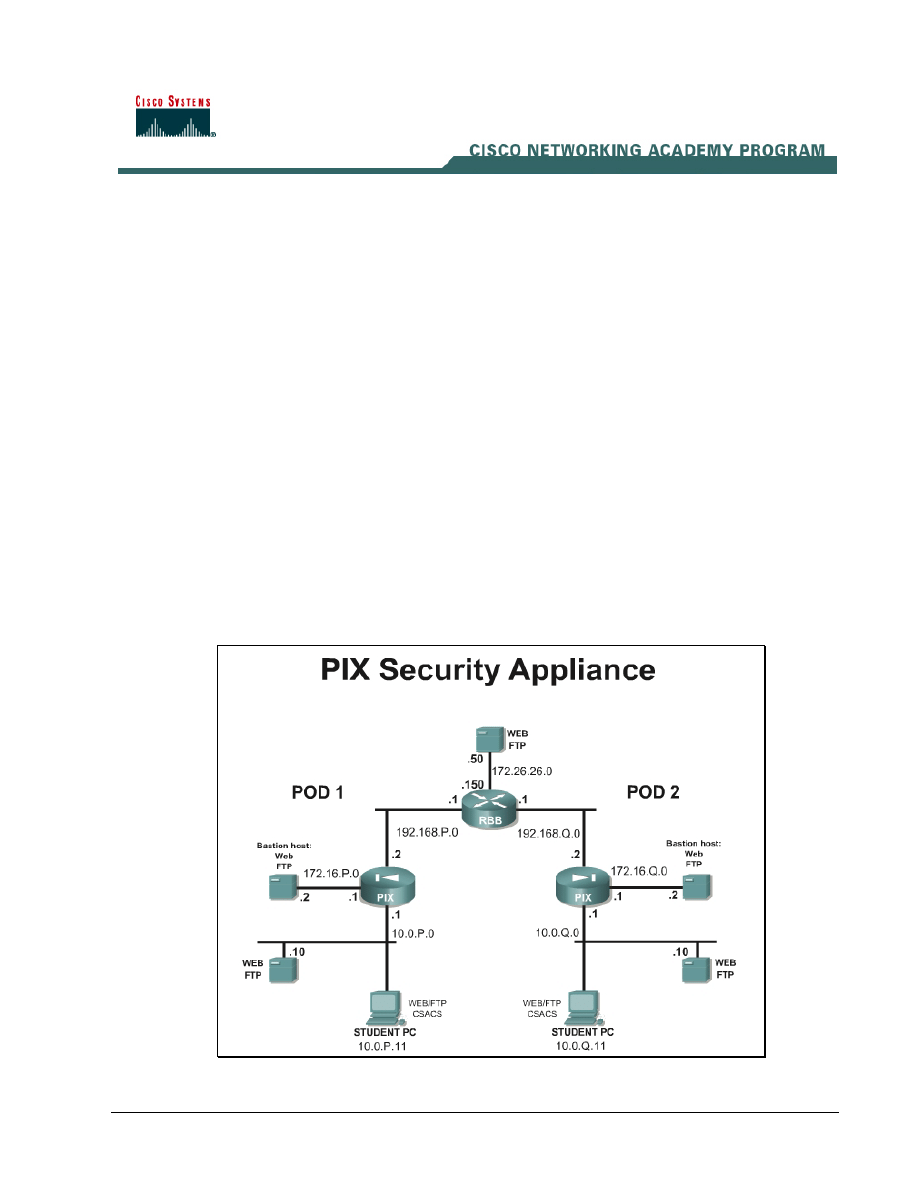
Topology
This figure illustrates the lab network environment.
1 -
6 Fundamentals of Network Security v 1.1 - Lab 12.4.3 Copyright 2003, Cisco Systems, Inc.

Preparation
Begin with the standard lab topology and verify the standard configuration on the pod PIX Security
Appliances. Access the PIX Security Appliance console port using the terminal emulator on the
student PC. If desired, save the PIX Security Appliance configuration to a text file for later analysis.
Tools and Resources
In order to complete the lab, the standard lab topology is required:
• Two pod PIX Security Appliances
• Two student PCs
• One SuperServer
• Backbone switch and one backbone router
• Two console cables
• HyperTerminal
Additional materials:
Refer to Cisco PIX Security Appliance System Log Messages for a list of the supported IDS
signature messages. The documentation can be viewed online at the following website:
http://www.cisco.com/univercd/cc/td/doc/product/iaabu/pix/pix_61/syslog/index.htm
.
Additional information on configuring firewalls can be found in, Cisco Secure PIX Firewalls by David
Chapman and Andy Fox (ISBN 1587050358).
Command list
In this lab exercise, the following commands will be used. Refer to this list if assistance or help is
needed during the lab exercise.
Command
Description
ip audit interface
if_name audit_name
Configures IDS signature use. Configuration mode.
ip audit name audit_name
attack [action [alarm]
[drop] [reset]]
Configures IDS signature use. Configuration mode.
show ip audit info
Displays the default informational actions.
show ip audit interface
Displays the interface configuration.
show ip audit name [name
[info | attack]]
Displays all audit policies or specific policies
referenced by name and possibly type.
2 -
6 Fundamentals of Network Security v 1.1 - Lab 12.4.3 Copyright 2003, Cisco Systems, Inc.

Step 1 Configure the Use of Cisco IDS Signatures and to Send Cisco IDS Syslog Output to a
Syslog Server
Complete the following steps to configure the use of Cisco IDS signatures and to send Cisco IDS
Syslog output to a Syslog server:
a. Turn off console logging:
PixP(config)# no logging console debug
b. Turn on logging and send messages to the syslog server:
PixP(config)# logging on
PixP(config)# logging host inside 10.0.P.11
PixP(config)# logging trap debug
c. Verify connectivity by pinging the peer pod internal host from the Windows command prompt:
C:\>ping 192.168.Q.10
Pinging 192.168.Q.10 with 32 bytes of data:
Reply from 192.168.Q.10: bytes=32 time<10ms TTL=125
Reply from 192.168.Q.10: bytes=32 time<10ms TTL=125
Reply from 192.168.Q.10: bytes=32 time<10ms TTL=125
Reply from 192.168.Q.10: bytes=32 time<10ms TTL=125
(where Q = peer pod number)
d. Specify the information signature policy on the PIX Security Appliance:
PixP(config)# ip audit name INFOPOLICY info action alarm reset
Note: The syntax for the ip audit command is:
ip audit name audit_name info [action [alarm] [drop] [reset]]
The alarm option indicates that when a signature match is detected in a packet, PIX Security
Appliance reports the event to all configured syslog servers. The drop option drops the offending
packet. The reset option drops the offending packet and closes the connection if it is part of an
active connection. The default is alarm.
e. Apply the information signature policy to the outside interface:
PixP(config)# ip audit interface outside INFOPOLICY
f. Verify the information signature policy on the PIX Security Appliance:
PixP(config)# show ip audit interface
ip audit interface outside INFOPOLICY
PixP(config)# show ip audit info
ip audit info action alarm
PixP(config)# show ip audit name
ip audit name INFOPOLICY info action alarm reset
PixP(config)#
g. Open and the Kiwi Syslog Daemon on the desktop.
h. Return to the Windows command line and attempt to ping the peer pod internal host. The ping
should fail.
C:\>ping 192.168.Q.10
Pinging 192.168.Q.10 with 32 bytes of data:
3 -
6 Fundamentals of Network Security v 1.1 - Lab 12.4.3 Copyright 2003, Cisco Systems, Inc.

Request timed out.
Request timed out.
Request timed out.
Request timed out.
(where Q = peer pod number)
i. Observe the messages that appear on the Kiwi Syslog Daemon display. The log should be
similar to the following:
%PIX-4-400010: IDS:2000 ICMP echo reply from 192.168.Q.10 to
192.168.P.10 on interface outside
%PIX-4-400010: IDS:2000 ICMP echo reply from 192.168.Q.10 to
192.168.P.10 on interface outside
%PIX-4-400010: IDS:2000 ICMP echo reply from 192.168.Q.10 to
192.168.P.10 on interface outside
%PIX-4-400010: IDS:2000 ICMP echo reply from 192.168.Q.10 to
192.168.P.10 on interface outside
(where P = pod number, and Q = peer pod number)
j. Remove the information signature policy from the outside interface:
PixP(config)# no ip audit interface outside INFOPOLICY
k. Remove the audit policy audit_name:
PixP(config)# no ip audit name INFOPOLICY
l. Verify that the information signature policy has been removed from the outside interface, the
default informational actions have been restored, and the ip audit name has been removed:
PixP(config)# show ip audit interface
PixP(config)# show ip audit info
ip audit info action alarm
PixP(config)# show ip audit name
Step 2 Configure the Use of IDS Attack Signatures and Send IDS Syslog Output to a Syslog
Server
Complete the following steps to configure the use of IDS attack signatures and send IDS Syslog
output to a Syslog server:
a. Create a global statement for traffic destined to the DMZ server:
PixP(config)# global (dmz) 1 172.16.P.20-172.16.P.254 netmask
255.255.255.0
b. Ping the bastion host with an Internet Control Message Protocol (ICMP) packet size of 10000
from the Windows 2000 command line:
C:\>ping –l 10000 172.16.P.2
Pinging 172.16.P.2 with 10000 bytes of data:
Reply from 172.16.P.2: bytes=10000 time<10ms TTL=128
Reply from 172.16.P.2: bytes=10000 time<10ms TTL=128
Reply from 172.16.P.2: bytes=10000 time<10ms TTL=128
Reply from 172.16.P.2: bytes=10000 time<10ms TTL=128
(where P = pod number)
4 -
6 Fundamentals of Network Security v 1.1 - Lab 12.4.3 Copyright 2003, Cisco Systems, Inc.

c. Specify an attack policy:
PixP(config)# ip audit name ATTACKPOLICY attack action alarm reset
d. Apply the attack policy to the inside interface:
PixP(config)# ip audit interface inside ATTACKPOLICY
e. Ping the bastion host with an ICMP packet size of 10000 from the Windows 2000 command line:
C:\>ping –l 10000 172.16.P.2
Pinging 172.16.P.2 with 10000 bytes of data:
Request timed out.
Request timed out.
Request timed out.
Request timed out.
(where P = pod number)
f. Observe the messages that appear on the Kiwi Syslog Daemon display. The log should be
similar to the following:
%PIX-4-400025: IDS:2154 ICMP ping of death from 10.0.P.11 to 172.16.P.2
on interface inside
%PIX-4-400023: IDS:2150 ICMP fragment from 10.0.P.11 to 172.16.P.2 on
interface inside
%PIX-4-400023: IDS:2150 ICMP fragment from 10.0.P.11 to 172.16.P.2 on
interface inside
%PIX-4-400023: IDS:2150 ICMP fragment from 10.0.P.11 to 172.16.P.2 on
interface inside
%PIX-4-400023: IDS:2150 ICMP fragment from 10.0.P.11 to 172.16.P.2 on
interface inside
%PIX-4-400023: IDS:2150 ICMP fragment from 10.0.P.11 to 172.16.P.2 on
interface inside
%PIX-4-400023: IDS:2150 ICMP fragment from 10.0.P.11 to 172.16.P.2 on
interface inside
(where P = pod number)
5 -
6 Fundamentals of Network Security v 1.1 - Lab 12.4.3 Copyright 2003, Cisco Systems, Inc.

1. Why is the syslog server showing the ICMP fragment in the log?
_____________________________________________________________________________
g. Ping the bastion host with an increased ICMP packet size from the Windows 2000 command
line:
C:\>ping –l 65000 172.16.P.2
Pinging 172.16.P.2 with 65000 bytes of data:
Request timed out.
Request timed out.
Request timed out.
Request timed out.
(where P = pod number)
h. Observe the messages that appear on the Kiwi Syslog Daemon display. The log should be
similar to the following:
%PIX-4-400025: IDS:2154 ICMP ping of death from 10.0.P.11 to 172.16.P.2
on interface inside
%PIX-4-400025: IDS:2154 ICMP ping of death from 10.0.P.11 to 172.16.P.2
on interface inside
%PIX-4-400025: IDS:2154 ICMP ping of death from 10.0.P.11 to 172.16.P.2
on interface inside
%PIX-4-400025: IDS:2154 ICMP ping of death from 10.0.P.11 to 172.16.P.2
on interface inside
(where P = pod number)
i. Remove the attack policy from the inside interface:
PixP(config)# no ip audit interface inside ATTACKPOLICY
j. Remove the audit policy:
PixP(config)# no ip audit name ATTACKPOLICY
k. Verify that the attack policy has been removed from the inside interface, the default attack
actions have been restored, and the ip audit name has been removed:
PixP(config)# show ip audit interface
PixP(config)# show ip audit attack
ip audit attack action alarm
PixP(config)# show ip audit name
l. Save the configuration:
PixP(config)# write memory
6 - 6
Fundamentals of Network Security v 1.1 - Lab 12.4.3
Copyright
2003, Cisco Systems, Inc.
Wyszukiwarka
Podobne podstrony:
Lab12 Applications
lab12 1 7
lab12 5 1
LAB12
LAB12 Regulator cyfrowy
lab12 RapidPrototyping EN
Lab12 4 1
12 (2), Elektrotechnika AGH, Semestr II letni 2012-2013, Fizyka II - Laboratorium, laborki, laborki
Lab12 RapidPrototyping
Lab12
lab12
TECH INT lab12 2014, Studia - Politechnika Opolska, Semestr 6, Techniki Internetowe
LAB12 , Modu˙ sztywno˙ci
lab12 SWBlab12
lab12
lab12 6 3
Lab12 RapidPrototyping
Lab12 13spr, PWr, III semestr, MUD
LAB12, TARASIUK
więcej podobnych podstron