62
EARTH M
OVER
Copyright 2004 Martian Auctions
295

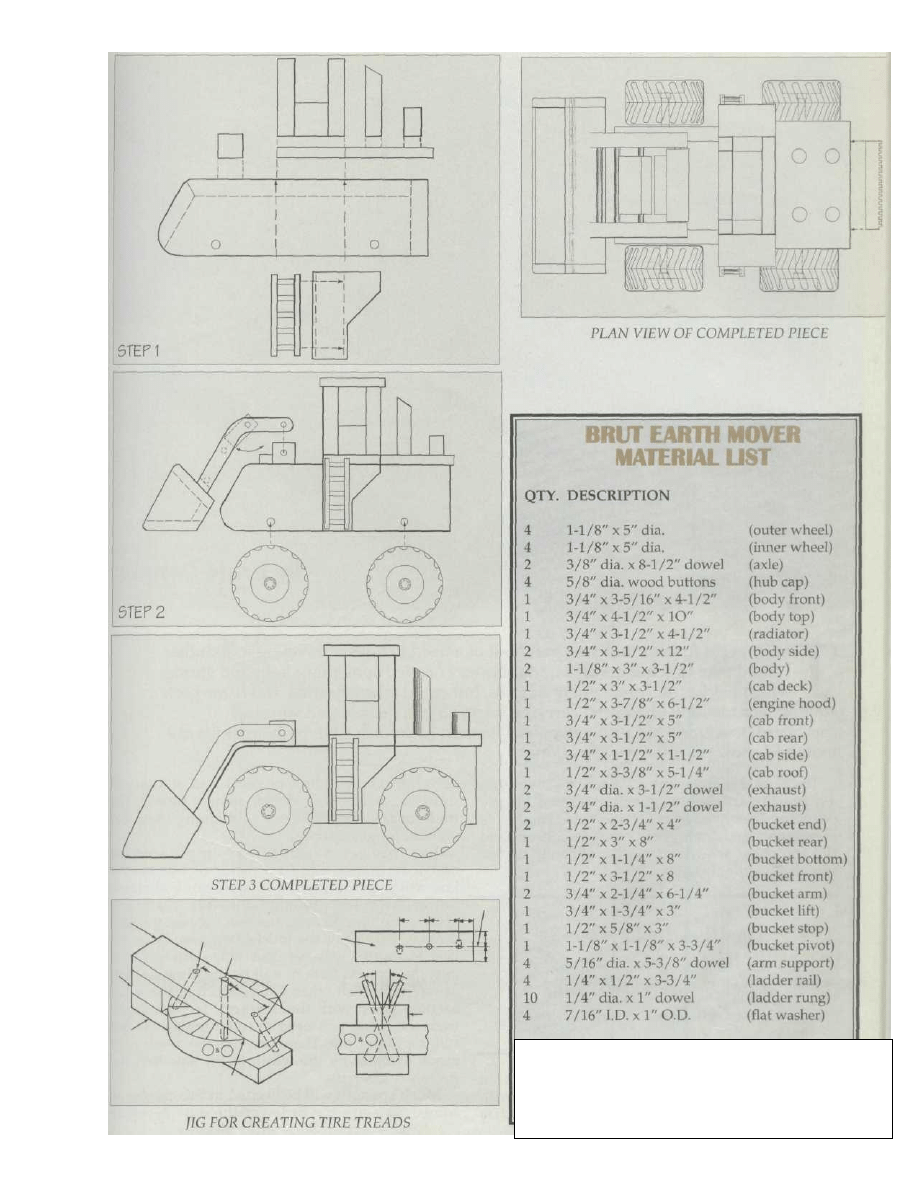
Begin construction with the body. Rip an 18"
length of 3/4" stock 4-1/2" wide then set the saw
for a 30 degree bevel. Make a crosscut to produce
the mitered ends
. Cut
from
the remainder then make a series of 1/8" deep kerf
cuts spaced 1/8" apart to detail the radiator grille.
Cut the side pieces to size then bore the axle
holes before assembly. Use a belt sander or hand
plane (or both to form the front end curves.
Cut the cab and remaining body parts to size
then use the router with a 5/32" corner rounding
bit to ease all sharp corners before completing the
body assembly.
Construct the bucket and bucket arm assembly.
Mark the location of the arm ends and use a chisel
to cut the 1/4" deep mortises to receive them. If
you have a brad point or Forstner bit that bores a
flat bottomed hole, use it first then square the
corners with the chisel. The bucket pivot is nailed
and glued to the body after the entire bucket
assembly has been completed.
The fat wheels are made up by joining two discs
of 1-1/8" stock after angled holes are bored to
form the knobby treads. The simple jig used to
bore the holes features a hardwood guide block
which has two holes drilled at 20 degrees angles in
opposite directions. Note that these holes must
align with the pivot hole so they are bored from
the bottom of the block before the jig is assembled.
The jig may be used with a portable drill or on a
drill press. If using a drill press tilt the table or
prop the jig so the bit enters the angled guide
holes squarely. Bore the holes in discs #1 & #2 as
indicated. To save layout time make photocopies
of the wheel diagram and attach to each disc with
rubber cement.
Use a 2" dia. Forstner bit to bore the recess in
the outer disc, Part 1, then Counterbore for the
plug and axle. Saw the discs to final size after the
angled holes are bored to reveal the treads. Use the
router to round over the corners. Sand then glue
the wheels to the axles in place on the body.
Finish with several thin coats of shellac or two
coats of polyurethane finish.
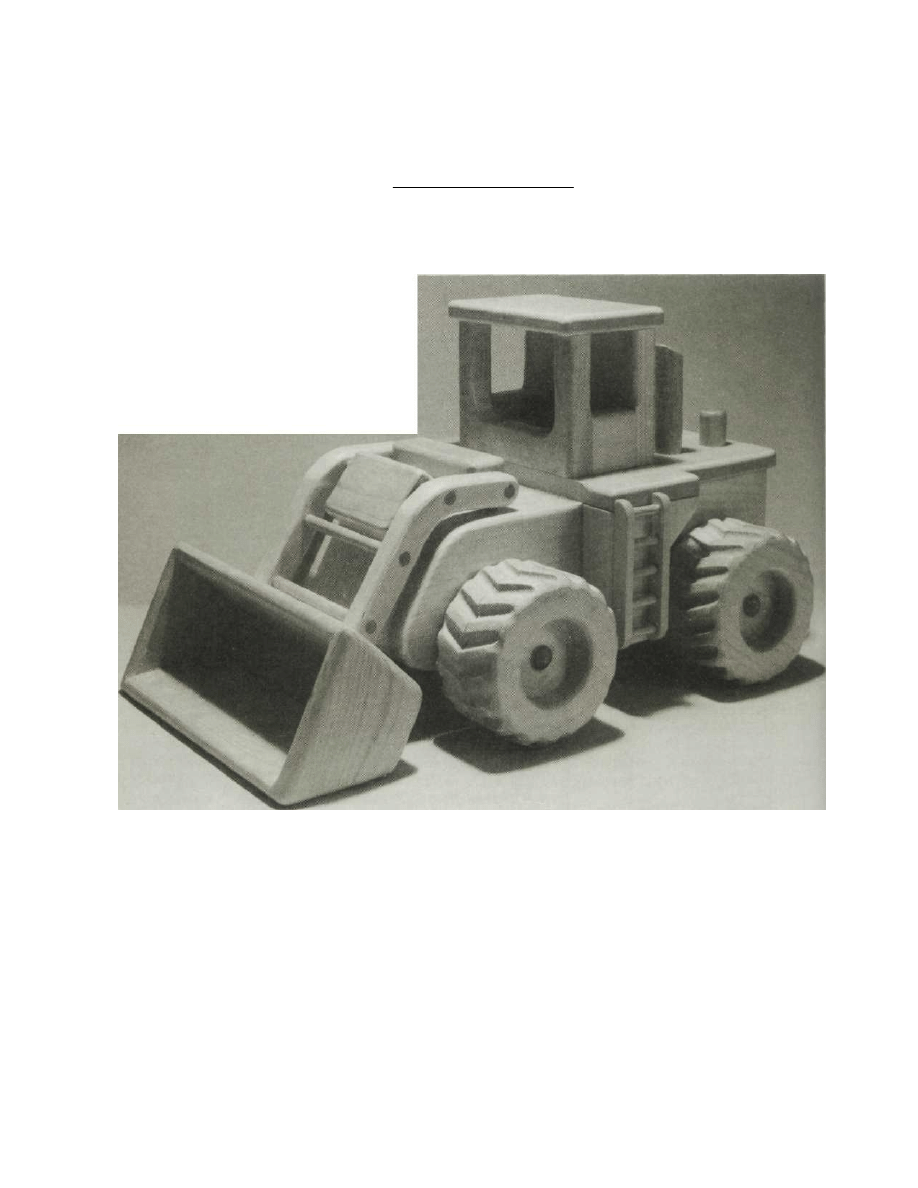
This earth mover features a moveable shovel that stops in different positions. This
project should successfully accommodate most of your child's heavy earth moving
needs for quite sometime. It is pictured here built in clear pine but it can built in a wide
variety of woods. Soft maple would be an excellent alternate choice.
Copyright 2004 Martian Auctions
296
Copyright 2004 Martian Auctions
297
Wyszukiwarka
Podobne podstrony:
Fred Saberhagen Berserker 00 Earth Descended
Hollow Earth Expedition Inside the Drilling Machine
c 14 CONFIRMING THE YOUNG EARTH CREATION FLOOD MODEL
Essentials of Sociology A Down to Earth Approach aZ06 HENS 7052 PC
Fred Saberhagen Earth's End Book of Swords 00 Song of Swords
Hollow Earth Expedition Addendum Characters
checklist earth
DiagnosingThe Earth
Teoretyczny model płaskiej Ziemii, Płaska Ziemia - Flat Earth
EARTH SONG
Hell on Earth Junker Extras
Hirneise, Lothar Chemotherapy Helps Cure Cancer, And The Earth Is Flat (Article, Ode 10 2003)(1)
Earth
Hollow Earth Expedition Character Sheet
Doat Hays Houben Matuk Vitous Building with Earth
How YOU Can Personally Defeat the NWO and Create Peace on Earth
13 Interoperability, data discovery and access The e infrastructures for earth sciences resources
Essentials of Sociology A Down to Earth Approach aZ04 HENS 7052 NI
więcej podobnych podstron