Decks
Decks are a common addition to Auckland houses and come in a variety of shapes and sizes
and construction methods and materials. They can range from a small entry deck to a most
elaborate feature deck, and with a little bit of thought and artistic flair, can be a great asset to
any house. This section concentrates on timber decks.
DO I NEED A PERMIT FOR MY DECK?
All decks 1 metre or more above ground level require a permit (building consent). A deck
less than 1 metre above ground level does not usually require a building consent (permit)
but may require resourse consent, and a deck extending less than two metres from the
face of a building does not require subfloor bracing.
Although a deck may not require building consent, it must still comply with the building
code. In other words, it must be built properly. If in doubt contact your
DECKING MATERIALS EXPLAINED
The three most common used decking materials are:
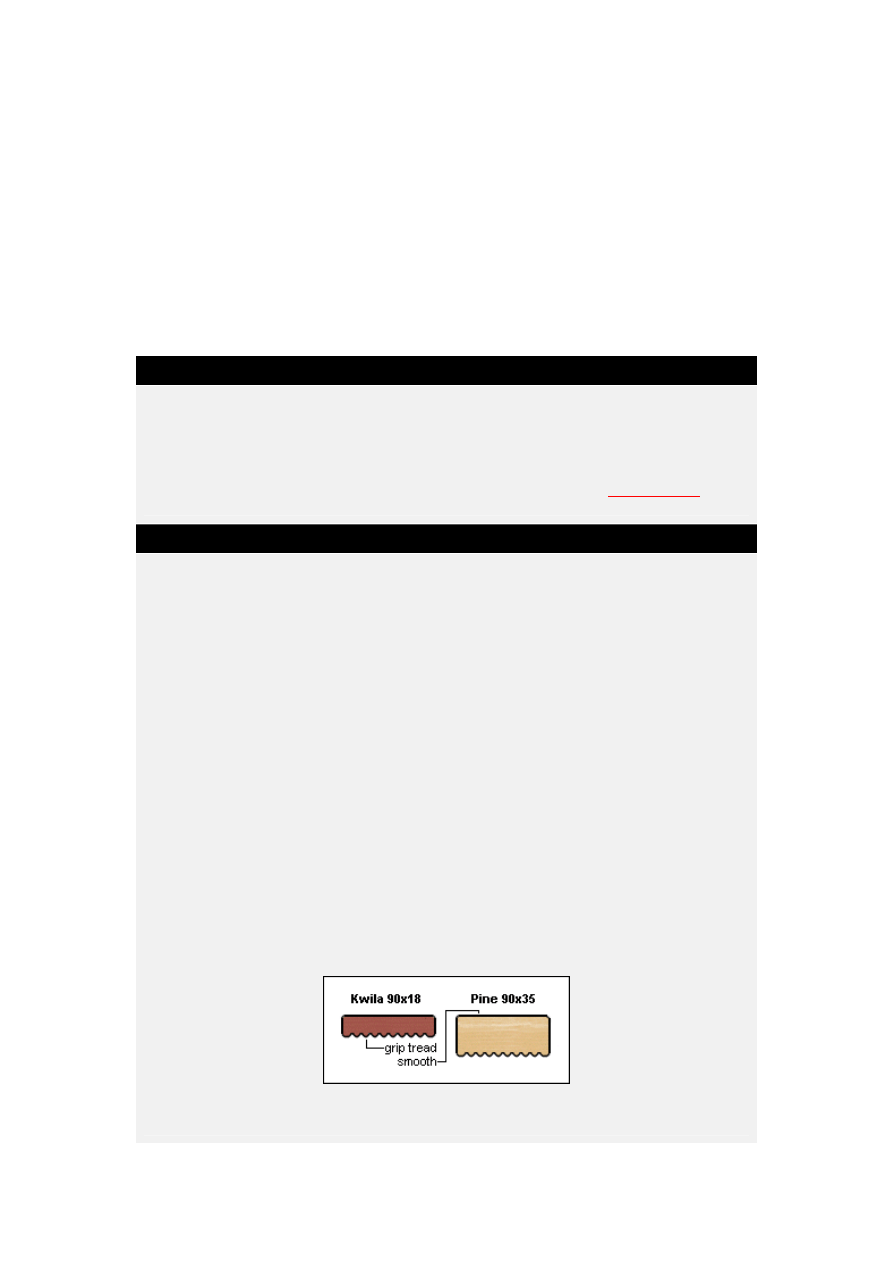
KWILA 90x19
Hardwood - Finished size is usually 90mm x 18mm. Kwila is a redish colour, but once
weathered changes to a silvery-grey colour. It is a very dense and durable timber. Kwila
can span 400mm, which means the joists (the timber the Kwila is nailed to) must not be
more than 450crs or 400mm between each joist.
PINE H3 90x35
Usual finished size is 90mmx35mm. This board, because if its thickness, can span up to
550mm. This means the joists (the timber the decking is nailed to) must not be more that
600crs or 550mm between each joist. Pine decking once weathered has a tendancy to
show little cracks or splits along the grain. This is a natural and accepted trait of pine. This
timber usually comes in two grades. Premium and merchant. Premium is clear with only
small tight knots, merchant is a mixture of grades and containes some big knots.
PINE H3 90x18
Same as above but can only span up to 350mm, which means the Joists (the timber the
decking is nailed to) must not have more than 400mm Crs or 350mm space between each
joist.
All of the above decking examples usually come with one face smooth, and the other face
grooved (grip tread). See Picture below. Other less common profiles are obtainable but not
as readily available.
It is personal preference as to which side of the timber faces up, however if you plan to
spend a lot of time lying or walking barefoot on the deck, grip tread may feel
uncomfortable.
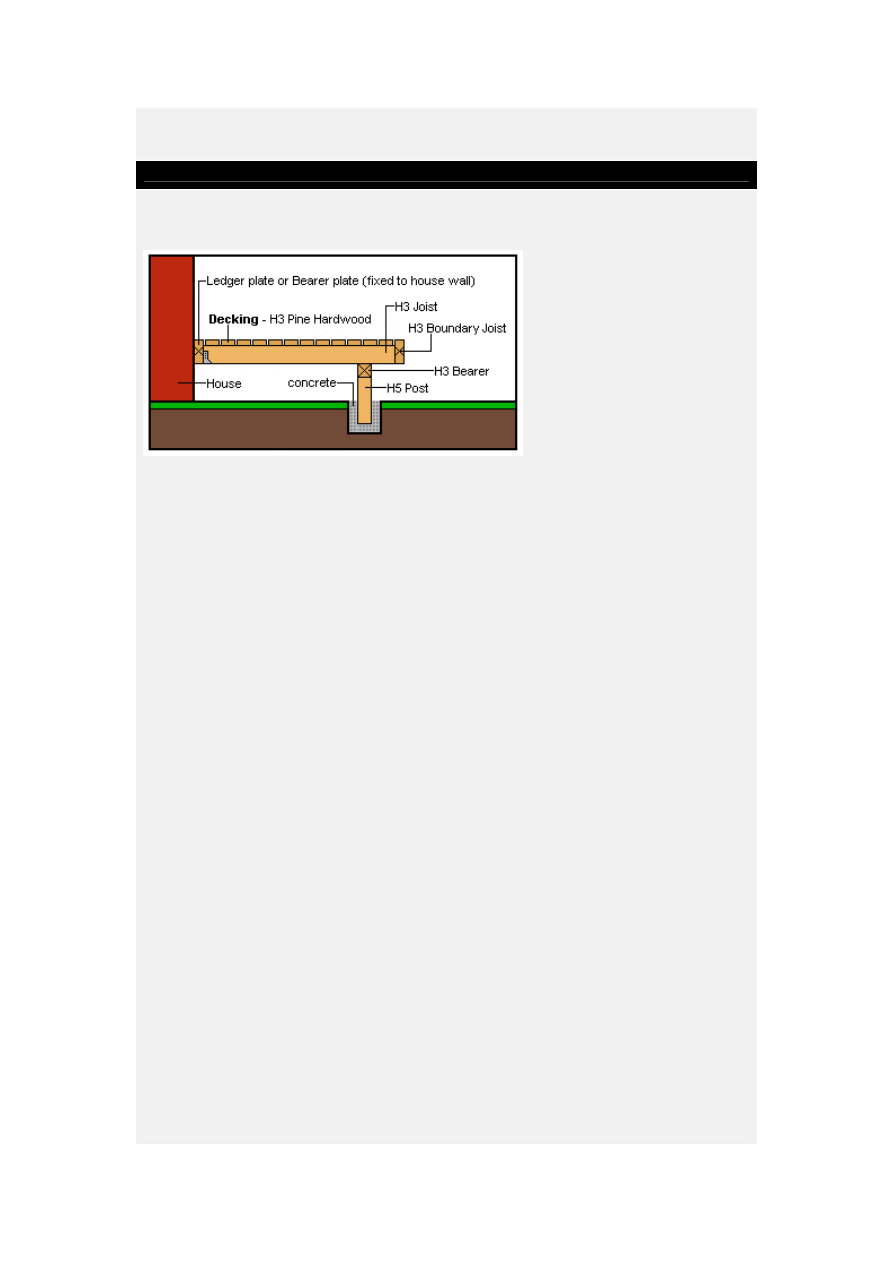
DECK STRUCTURE EXPLAINED
The basic deck consists of
• Posts either embedded in concrete or bolted to appropriate metal post brackets
embedded in concrete.
• Bearers, which either sit on top of, or are bolted to the side of the posts.
• Stringer, ledger plate or bearer plate, bolted or fixed to existing house.
• Joists, fixed to the ledger plate and on top of the bearers.
• Decking, as described in previous chapter.
• Boundary joist. Joist that goes around the perimeter of the deck.
POSTS
Usually 100x100 or 125x125 senton piles. Posts embedded into concrete footings must be
H5 treated, where as posts bolted to appropriate metal (shoe) brackets aand off the ground
need to be H4 treated.
The spacing of posts along the bearer line depends on the structure of the deck, but they
can only span a max of 2000mm without requiring engineers calculations.
A standard footing hole is 300x300 square and 450mm deep. There should be 100mm of
concrete between the bottom of the post and the bottom of the footing hole.
BEARERS
Must be H3 treated, unless very close to the ground in which case they will need to be H4.
The size of the bearer depends on the length of the joists and the span of the bearer, but
they cannot span more than 2000mm without requiring engineers calculations.
example:
Joist span Bearer span Size of Bearer
1.45m 1200mm 100x75
2.40m 1800mm 2/150x50
3.40m 1800mm 2/200x50
Stringer
Also called ledger. The board bolted to the house upon which the joists are fixed to or on.
The stringer must be H3 treated and fixed to the building using M12 bolts OR
Dynobolts/anchor bolts if against concrete or block wall.

Pack the stringer out from the building wall to stop moisture becoming trapped.
The spacing between the bolts depends on the span of the joists which are fixed to or on
the stringer.
example:
If the joists span 2m, the bolts should be 1.25m apart, where as if the joists span 6m, the
bolts should be 0.5m apart.
JOISTS
Must be H3 treated unless very close to the ground, in which case they should be H4
treated. Joists are fixed to the stringer either by butting up to and fixing with joist hangers,
or by sitting on top of the stringer and nailing through both faces of the joist.
The joists sit on top of the bearer and are fixed by way of nailing through each face of the
joist into the bearer.
The size of the joists depend on the joist span and the joist spacing.
example:
Joist spacing Joist span Size of Joist
450mm 1.40m 100x50
450mm 1.80m 125x50
450mm 2.40m 150x50
450mm 3.30m 200x50
450mm 4.25m 250x50
450mm 5.00m 300x50
BOUNDARY JOIST
Must be H3 treated.
The boundary joist is fixed to the perimeter of the deck to give a neat finish.
In most cases the boundary joist is decorative rather than structural, therefore another
preference might be to replace the boundary joists with decking boards.
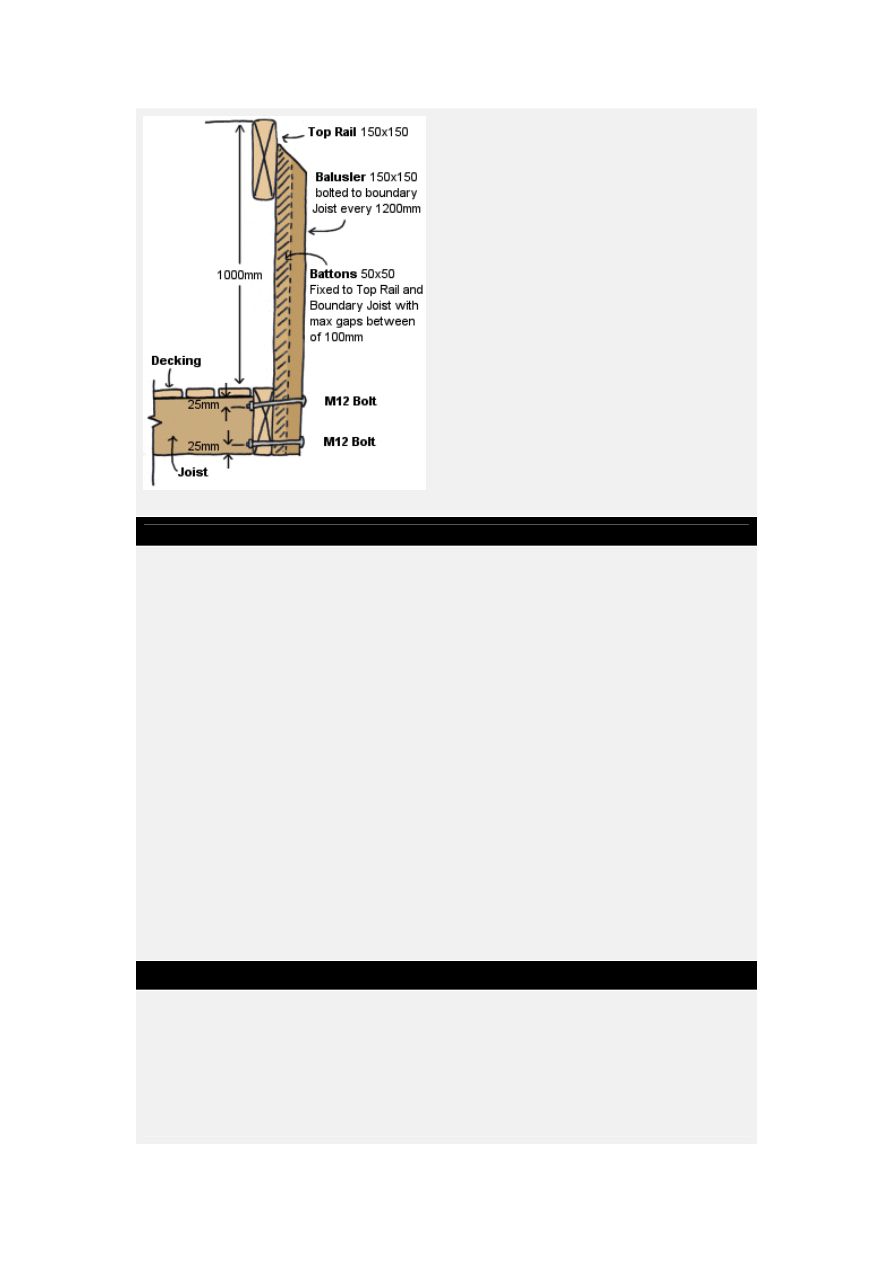
HANDRAIL STRUCTURE EXPLAINED
All decks 1 metre or more above ground level must have a handrail.
A quick overview, a decks handrail must be at least 1000mm in height from the deck.
Any vertical slats cannot have a gap exceeding 100mm, and there must not be anything
horizontal forming a ladder effect. However there are many alternatives, such as solid
handrails lined with harditex and plastered over, solid panelling etc.
Trellis panels can be used, but most 'off the shelf' type trellis that most trellis manufacurers
sell, do not meet the requirements. However, most trellis manufacturers are able to make
trellis to ordered requirements. Depending on the size of the trellis panel, it's relevance to
the thickness of the trellis and the size of the gaps in the hellis which are also governed.
Another alternative is glass, although a very expensive alternative. Glass suppliers will
know the type and thickness of glass required for a handrail, but get ready for a shock
when you find out the price.
diagram and detail of a standard handrail
ABOUT DECKS BUILT CLOSE TO THE GROUND
Often a deck will need to be built close to the ground. This is usually the case when
building a deck on to a house which has a concrete floor. It is usually more costly and
labour intense building a low deck than a deck, say, 1 metre off the ground.
Firstly air needs to be able to circulate around bearers and joists to ensure a long life for
the deck.
If the bearers are near or touching the ground, upgrade them to H4, along with the joists.
(In a normal deck construction, joists and bearers are H3 treated).
Ensure there is a gap between the decking.
Sometimes it will be neccessary to excavate the ground. In doing this, taper the excavation
away from the house to let any water under the deck escape. If this is not possible
because of the contour of the ground and a pool effect is created, then the excavation must
be drained. In this case taper the excavation to a low point and run a drain to a lower point
outside the deck.
The drain can be made by digging a trench, putting scoria in the bottom of the trench,
laying drain coil on top of the scoria and then covering the drain coil with more scoria.
The home handyman should easily be able to do this with a small deck and minimal water
discharge, but a larger area may require a professional drainlay as it may require tapping
the possible water discharge into a stormwater drain.
PRICE VARIATIONS BETWEEN DIFFERENT TIMBERS
At the time of writing (October 2001) decking timber prices including GST are
approxamately: Kwila $4.50 per Metre; 100x40 radiata premium $3.90 per metre;
100x40 radiata merchant grade $2.90 per metre; 100x25 radiata premium $2.55 per
metre;
Most standard decking when dressed is 90mm wide. Allow 12 lineal (running) metres of
decking for every sguare metre of deck area.
The selection of decking boards will also have a bearing on the joist costs. For example,
100x40 radiata decking requires that the joists must be spaced at max 600mm, where as
thinner decking such as 100x25 radiata and kwila require the joists to be closer together
therefore needing more joists hence a higher cost.
The cheapest overall deck structure would be using 100x40 radiata merchant grade
decking, but be prepared to accept a lot of knots.
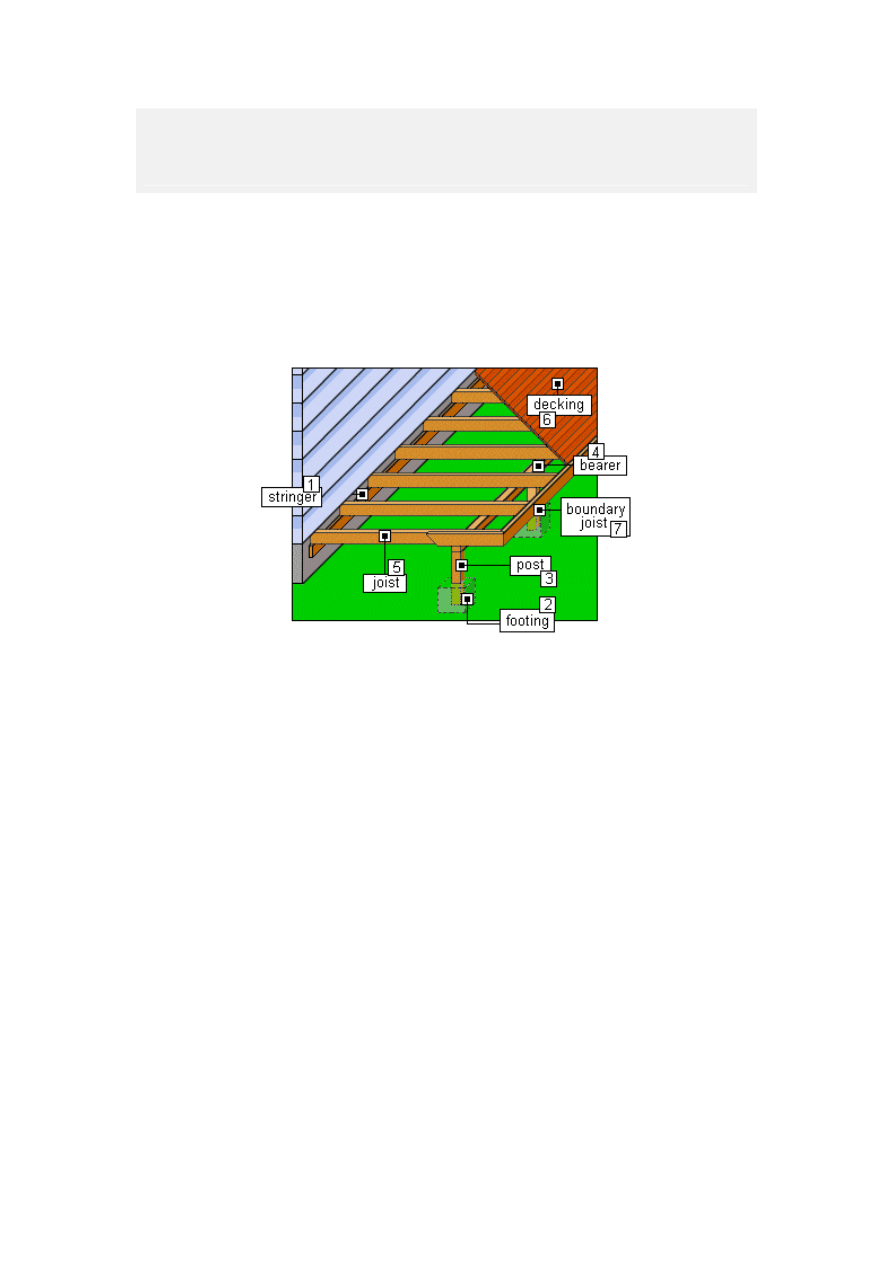
Deck Anatomy
1 stringers
Also called a ledger plate. The stringer is the piece of timber bolted to the house
upon which the joists are fixed on or to. The stringer must be H3 treated and
fixed to the building using M12 bolts OR Dynobolts or similar anchor bolts if the
stringer is to be fixed to concrete or block wall. The stringer needs to be packed
out from the building at every bolt fixing to prevent moisture being trapped
between the stringer and the building. The spacing between the bolts depends
on the span of the joists which are fixed on or to the stringer.
example: If a stringer is 100x50 in size and if the joists fixed to that stringer span
2m, the bolts that attach the stringer to the building should be 1.25m apart,
where as if the joists span 6m, the bolts should be 0.5m apart.
2 footings
A standard footing hole size for 100x100 or 125x125 post is 300mm x 300mm
square and 300mm deep in firm ground. In soft ground the holes will need to be
bigger and deeper. 100mm of concrete is required as a pad beneath the post.
3 posts
POSTS Usually 100x100 or 125x125 senton piles. Posts embedded into
concrete footings must be H5 treated, where as posts bolted to appropriate
metal (shoe) brackets need to be H4 treated. The spacing of posts along the
bearer line depends on the structure of the deck, but they can only span a max
of 2000mm without requiring engineers calculations.
4 bearers
Must be H3 treated, unless very close to the ground in which case will need to
be H4.
The size of the bearer depends on the length of the joists and the span of the
bearer, but they cannot span more than 2000mm without requiring engineers
calculations.
example:
Joist span Bearer span Size of Bearer

1.45m 1200mm 100x75
2.40m 1800mm 2/150x50
3.40m 1800mm 2/200x50
5 joists
Must be H3 treated unless very close to the ground, in which case they must be
H4 treated. The joists are fixed to the stringer either by butting up to and fixing
with joist hangers, or by sitting on top of the ledger plate and nailing through
both faces of the joist.
The joists sit on top of the bearer and are fixed by way of nailing through each
face of the joist into the bearer.
The size of the joists depend on the joist span and the joist spacing.
example:
Joist spacing Joist span Size of Joist
450mm 1.40m 100x50
450mm 1.80m 125x50
450mm 2.40m 150x50
450mm 3.30m 200x50
450mm 4.25m 250x50
450mm 5.00m 300x50
6 decking
Most popular decking is kwila (hardwood) or pine. Both materials usually have
one smooth side and one grooved side (grip tread). It is personal prefernce as to
which side faces up. The thickness and strength of the various deck materials
determines how far apart the joists must be.
7 boundary
joist
Must be H3 treated. The boundary joist is fixed to the perimeter of the deck to
give a neat finish. In most cases the boundary joist is decorative rather than
structural, therefore another preference might be to replace the boundary joists
with decking boards
Building a Deck
In this section we are going to show how to build a simple timber deck, two metres wide x five
metres long and less than one metre above ground level. A deck less than one metre above
ground level does not usually require a building consent (permit) but may require resourse
consent. A deck extending two metres or less from the face of a building does not require
subfloor bracing. Although a deck may not require building consent, it must still comply with
the building code. In other words, it must be built correctly. If in doubt contact the
If necessary use the previous page
for reference throughout these
instructions.
Construction Details
Below is a list of the materials required for the construction of this deck. All timber used in this
deck (with the exception of kwila) is pine. Gauged means dressed (not rough) and finished
size of gauged timber is slightly smaller than that stated below. Tanalised means the
treatment of the timber.
All timbers listed below are common and readily available at any timber merchant.
Scroll down for step by step construction details.
Item
Description
Quantity
Stringers
150x50 guaged tanalised H3 (decay hazard)
1 @ 5.1m
Posts
100x100 guaged tanalised H5 (decay hazard)
5 @ 1.0m
(confirm
height)
Bearers
100x100 sawn tanalised H4 (decay hazard)
2 @ 2.7m
Joists
150x50 guaged tanalised H3 (decay hazard)
10 @ 2.1m
using 35mm
pine decking
OR
12 @ 2.1m
using kwila
decking
Boundary
joists
200x50 guaged tanalised H3 (decay hazard)
2 @ 2.1m
1 @ 5.4m
Decking
100x40 (dressed size 90x35) H3 pine
OR 90x18 kwila hardwood
120m
Concrete
40kg bags concrete mix
3 of
Other
m12 bolts or anchor bolts; 90 or 100mm galvanised jolthead
nails; 75mm jolthead galvanised nails; 60mm jolthead
galvanised nails (if kwila is used)
As required
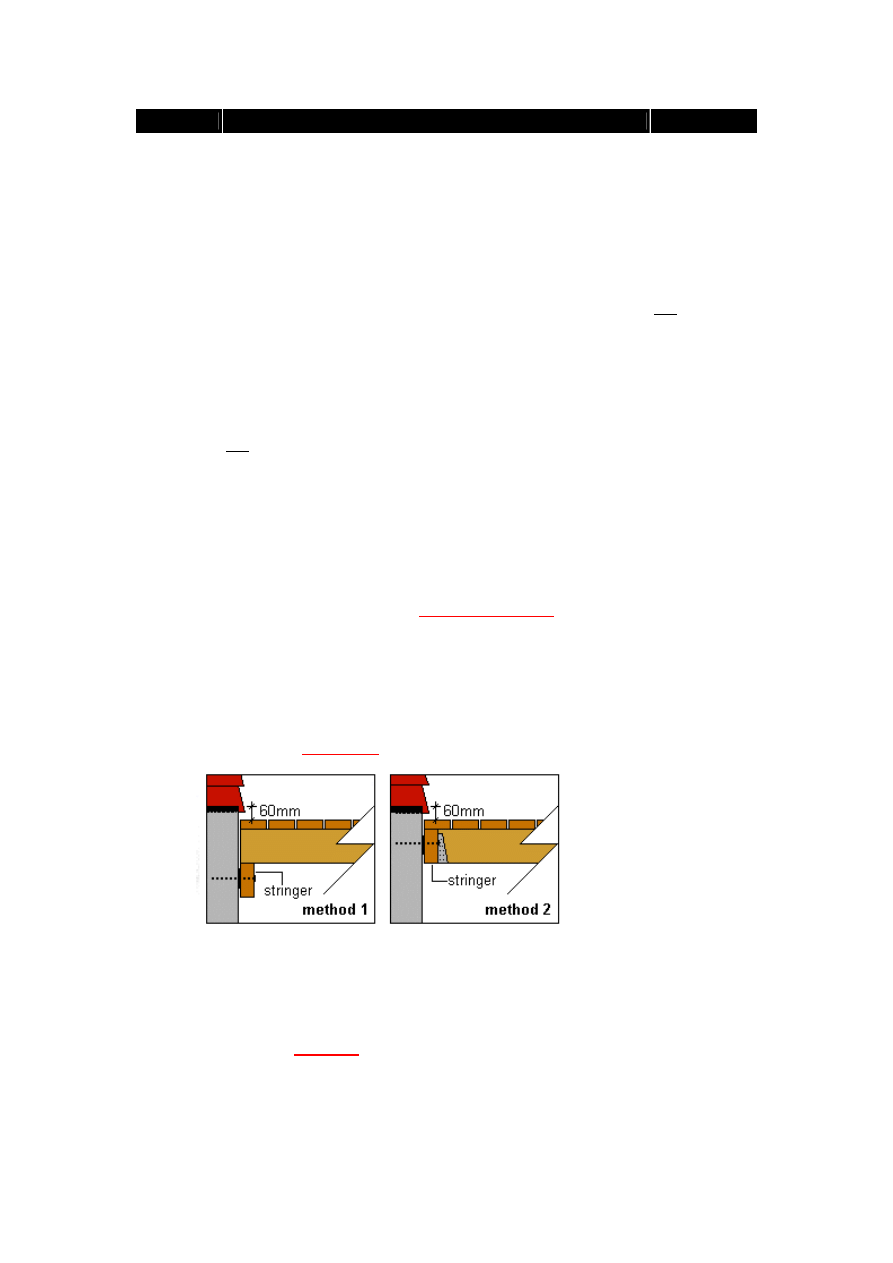
Step (1) Fixing the stringer
The stringer (also called ledger) is the beam that the joists sit on or are attached to
and is bolted to the building. See
Cut the stringer to length (5m) and fix level to the building at the required height
using m12 bolts every 1200mm apart. Pack the stringer out from the wall (5mm -
10mm) at every bolt fixing to prevent moisture being trapped between it and the
building.
The finished height of the deck should be at least 60mm below the building floor, so
the stringer height depends on the thickness of the decking and the method of fixing
the joists to the stringer. See the two options below. Insure the stringer is level by
using a level or
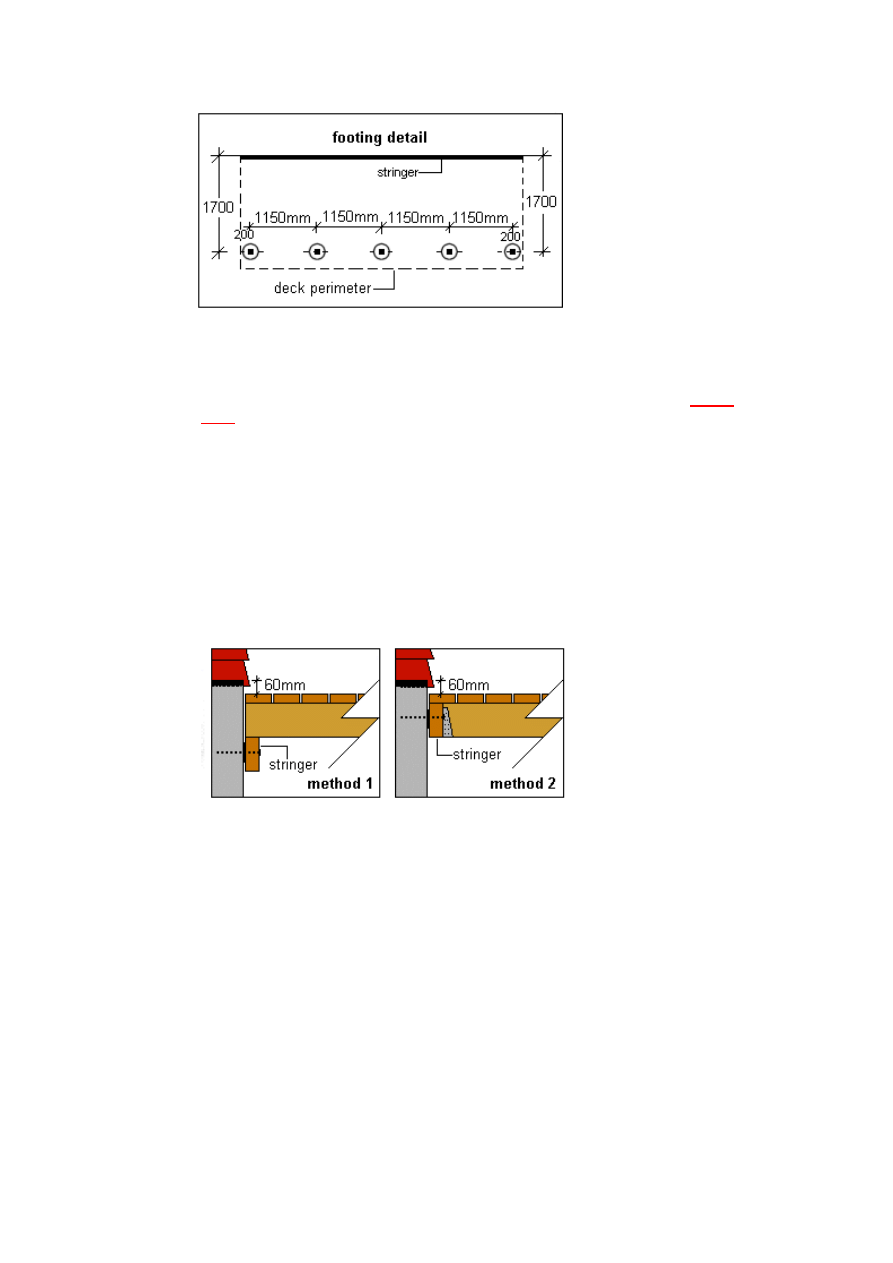
Step (2) The footing holes.
Dig five footing holes 300x300x300 deep to the dimensions as shown in the drawing
below. If the ground is less than firm, then the holes may need to be larger and
deeper.
Make a mix of
and pour a 100mm pad in the bottom of each hole. Place
the posts on top of the concrete pads and pour more concrete around the posts to
hold in place. Ensure the posts are plumb (vertical), parallel, and longer than
required. (The tops will be trimed off later).
Let the concrete cure.
Step (3)
Fixing the bearers to the posts
Trim the top of the posts to the required height which will be 100mm (thickness of
bearer) below the underside of the joists. Mark the underside of the joist height on
the building in relation to the stringer and use a straight edge and level or
to obtain the required height of the posts.
Sit the bearer on top of the posts and make sure any necessary join will be over a
post.
Fix the bearer to each post with two nails angled from each face. Use 100 or 90mm
galvanised jolthead nails.
Let the two ends of the bearer overhang the edge of the deckline at this stage. They
will be cut later.
Step (4)
Fixing the joists
Fix the first joist to or on one end of the stringer depending on your choice of fixing.
See diagram below.
METHOD 1: Sit a joist on one end of the stringer leaving a gap between the end of
the joist and the wall of the building. Fix the joist to the stringer with two nails angled
from each face. Use 100 or 90mm galvanised jolthead nails. It is a good idea to drill
the nail holes first to minimize the risk of splitting the end of the joist.
The other end of the joist will be sitting on the bearer, but do not nail yet until the
joist is sguare (90 degrees) to the house.
METHOD 2: Butt one end of a joist to one end of stringer so the top of the joist is
flush (even) with the top of the stringer. Nail in place. Attach a joist hanger (a metal
bracket with nail holes in it that fits around the end of the joist and against the
stringer) and nail with the appropriate nails to the joist and the stringer.
The other end of the joist will be sitting on the bearer, but do not nail yet until the
joist is sguare (90 degrees) to the house.
Ensure the joist is square (90 degrees) to the building before nailing to the
bearer. This can be done by using the 3,4,5,method.
Measure along the outside of the joist 1500mm (3x500) from the building, mark (A).
Measure along the building 2000mm (4x500), mark (B).
When the measurement from mark (A) to mark (B) is 2500mm (5x500), then the
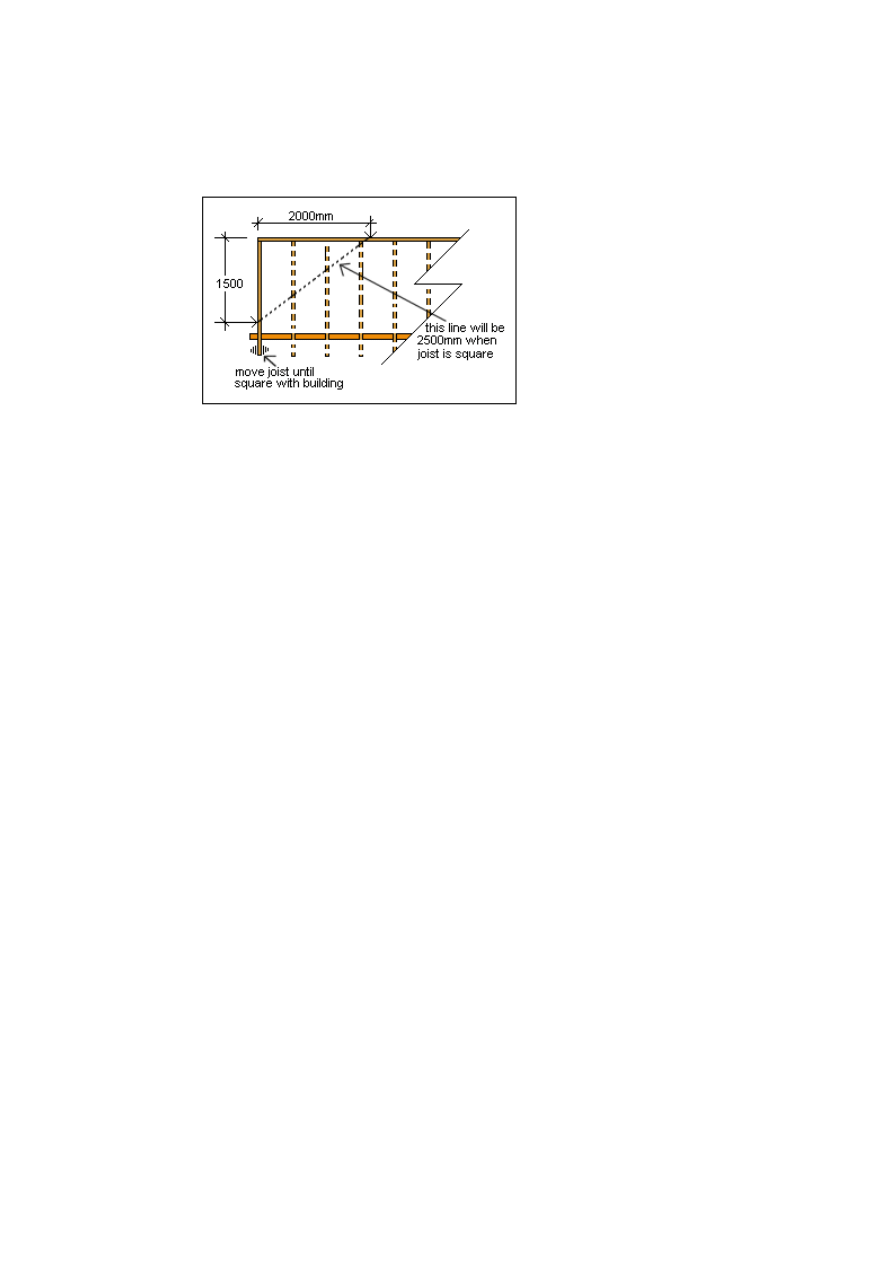
first joist is square to the building. See diagram below.
Make any necessary adjustment to the joist in the way of sliding the end of the joist
either way along the bearer until square and then fix the joist to the bearer with two
nails angled from each face. Use 100 or 90mm galvanised jolthead nails.
Fix the rest of the joists in place parallel to the first.
If 90x35 pine decking is to be used then the joist spacings should be 600mm crs,
and if 90x18 kwila is to be used then the joist spacings should be 450mm crs. (crs
means centres, and is the distance from the centre of one joist to the centre of the
next joist.)
All joists should be slightly longer than required at this stage and will be trimmed off
later.
Step (5)
Laying the deck
Start laying the deck from the building side out, making sure there is a gap between
the first deck board and the building so moisture does not become entrapped. Any
necessary joins should be made on joists and staggered between rows (no two
joins should be next to each other). Continue laying and fixing the deck boards
using a 5mm spacer to obtain an even gap between them. Check deck boards are
straight and parallel to the building.
Let the decking overhang both end joists while laying, and then trim them flush with
the outside of the end joists.
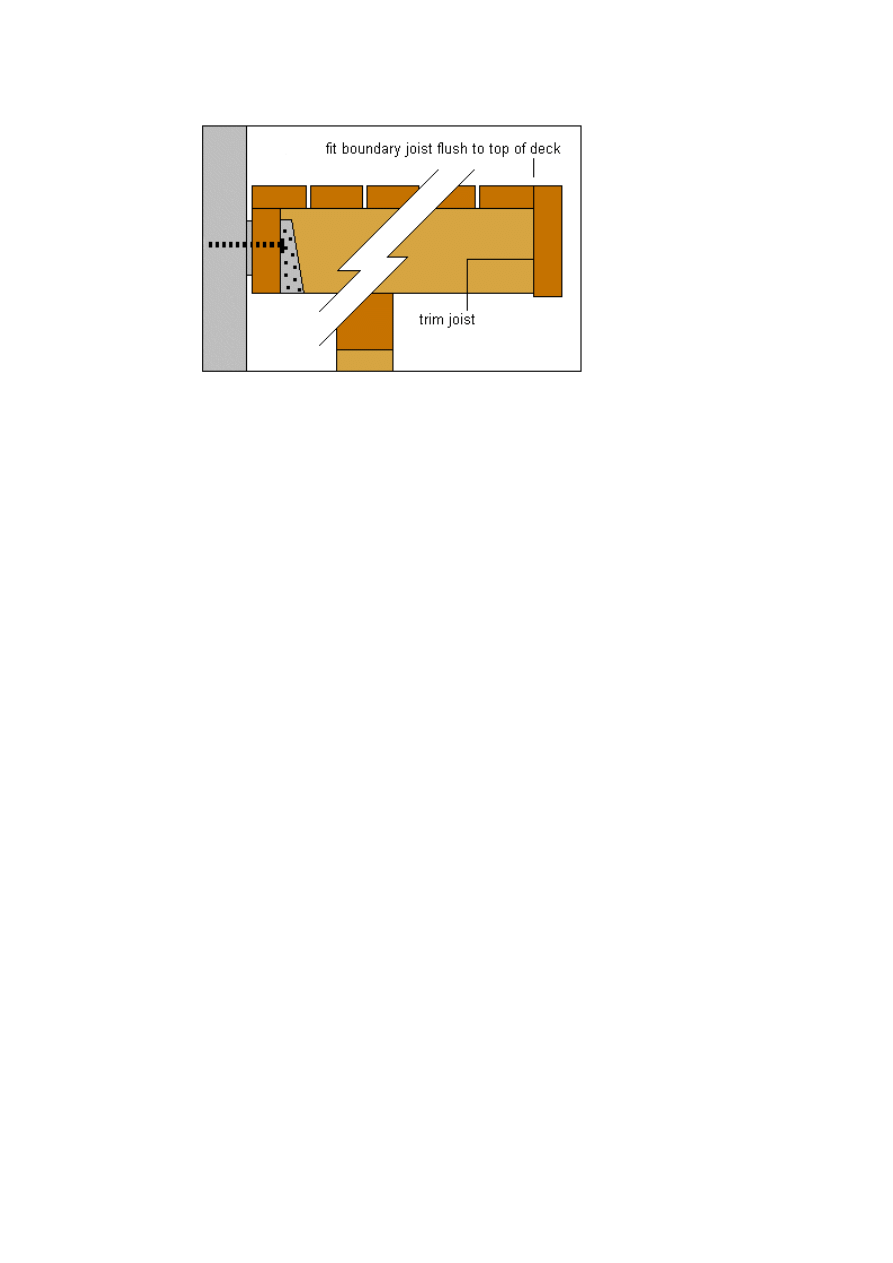
Step (6)
Fixing the boundary joists
Cut the joist ends vertical and flush with the outside edge of the last decking board.
Nail the boundary joist around the perimeter of the deck making sure the top of the
boundary joist is is flush with the top of the decking. See diagram below.
Wyszukiwarka
Podobne podstrony:
Jim Hall at All About Jazz
All about Szmit
All About Depression
All About STP
All About Access Control Lists
Jim Hall at All About Jazz
Timati (Feat Timbaland, Grooya, La La Land & Max C) Not All About The Money
Meghan Trainor All about that Bass
islcollective worksheets beginner prea1 elementary school writing all about me 239354e8031ecbf8af4 8
all about responsibility2
All About Eve
All About My School(1)
ALL IN ONE2 wszystko
All about the USA
więcej podobnych podstron